warm fuzzy pattern-1 - home - camp koreycampkorey.org/.../uploads/2017/09/warm-fuzzy-pattern.pdf ·...
TRANSCRIPT

Warm Fuzzy Pattern Supplies Needed:
1. sewing machine 2. sharp scissors 3. needle
(For hand sewing.) 4. quilt pins
(I liked quilt pins vs. standard pins as they were easier to see amongst the fur.)
5. pattern (Included; six pattern pieces traced and cut out make one warm fuzzy.)
6. permanent marker (I suggest contrasting ink to your fur to see your pattern.)
Materials Needed:
1. 30mm sew on wiggle eyes (Two eyes per fuzzy.)
2. all colors of fabric fur (I found longer fur a little harder to sew and create a fuzzy body. Something to keep in mind when picking your fabric fur.)
3. thread (I found contrasting thread is helpful when sewing with fur as it was easy to lose my sewing seam otherwise.)
4. stuffing Find out which way your fur lays. There is definitely a wrong and right way!
Wrong Way
Right Way
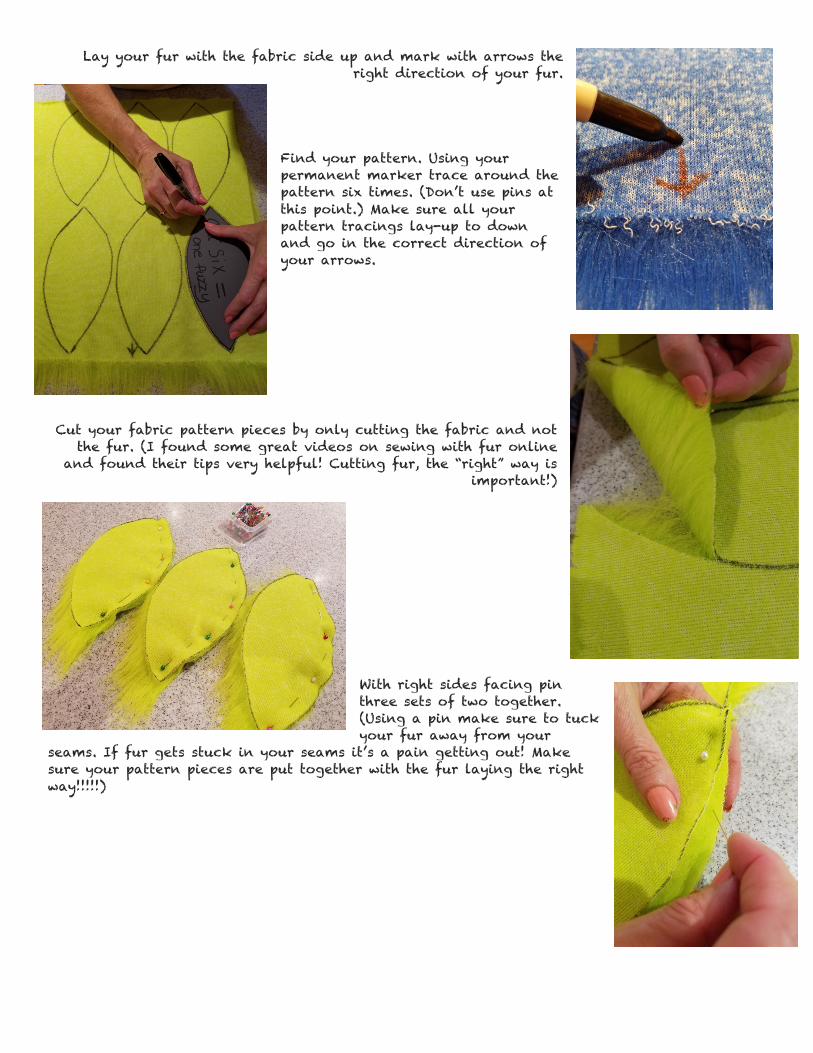
Lay your fur with the fabric side up and mark with arrows the right direction of your fur.
Find your pattern. Using your permanent marker trace around the pattern six times. (Don’t use pins at this point.) Make sure all your pattern tracings lay-up to down and go in the correct direction of your arrows.
Cut your fabric pattern pieces by only cutting the fabric and not
the fur. (I found some great videos on sewing with fur online and found their tips very helpful! Cutting fur, the “right” way is
important!)
With right sides facing pin three sets of two together. (Using a pin make sure to tuck your fur away from your
seams. If fur gets stuck in your seams it’s a pain getting out! Make sure your pattern pieces are put together with the fur laying the right way!!!!!)

Sew as close to the edge of your twosomes using a zig zag stich. (I liked the zig zag stich as it gave the seams a little give.)
Now pin your three pairs of twosomes together furry sides facing to make a fuzzy. (Make sure your pattern pieces are put together with the fur laying the right way!!!!!) Make sure you leave a three inch or so gap to turn your fuzzy inside out.
Stuff firmly but make sure your fuzzy still feels huggable. Hand sew your gap closed using a whip stich. I needed to hand sew a little gap at the end of my fuzzy in some cases. Sew your eyes on your fuzzy. (Find a flatter spot to do this and not a seam. I placed my eyes around a 1½” from the fuzzy top.) Fluff up your fur! (I used a little plastic comb.) For me I found tracing, cutting, pinning, sewing and stuffing all work best done assembly line fashion. You kind of get in the mode and just chug along. It was fun seeing how different fur gave everyone a little different look!