walk-through guide for teknion panels - home - … · walk-through guide for teknion panels ......
TRANSCRIPT

Walk-through guide for Teknion Panels -using the Leverage Panel Builder

Prerequisites…
A licensed version of ProjectSpec (4.6.0) or newer and/or ProjectSymbols
for AutoCAD installed on your PC.
The latest Teknion Toolpak (version 3.0) or newer.
Before You Begin
Important Update
Teknion has changed the procedure for Panel Orders. The new format is
explained below. Please be aware to make sure you are on the newest
version of the software otherwise these options will not be available.
1. Flattened
As of September 1st, 2012 all panel orders must use this format.
Panel orders using Matrix after 9/1/2012 will be returned.
These must be “exploded” in ProjectSpec for order.
2. Panel Matrix
Former Teknion Order Entry style.
Orders accepted up to August 31st, 2012
These show up in ProjectSpec as panel frames with option codes
reflecting the appropriate panel type.

Panel Builder Basics
1. Open your drawing into AutoCAD.
2. Launch the Teknion Toolpak. In this example we will use ProjectPanel
for Leverage as an example.
Starting a Project
(AutoCAD 2010 shown)

Panel Builder Basics
3. Begin a “New Project”.
4. Save the project to the location of your choice.
Starting a Project(Continued)
NOTE: To open an existing project, click “Open Project” and browse for
the project folder which would end with a .prj extension.

Panel Builder Basics
1. Click the “Plan” Button on the
dialog.
2. This opens a dialog to place
“generic” panel widths for this
system.
3. These can be used for space
planning without needing the
knowledge of what height, style, or
type for that location.
4. These plan symbols can later be
“Assigned” as a panel type once
they have been created in the
Design screen.
Plan

Panel Builder Basics
1. Click the “Design” Button on the dialog.
Design

Panel Builder Basics
2. This opens the Design dialog
The Design is broken out into basically 5 Sections. For this example we
have highlighted the sections for easy reference:
• Toolbar
• Design screen for current panel (yellow)
• Frames & Stacks (pink)
• Tiles & Elements (blue)
• Saved panels (green)
Design (Continued)

Panel Builder Basics
5. Once the selections have been chosen, the catalog viewer will pop
up and ask the user to select the finishes for the top trim and panel
frame.
6. If selecting the options at this point you will want to select “~Bare
Frame” when selecting the finishes for the panel frame. Not doing
this will show “Incomplete” during the specification inside of
ProjectSpec.
Design (Continued)
NOTE: If the catalog reader does not appear, please ensure the catalog
reader button on the
toolbar is toggled “ON”.

Panel Builder Basics
7. To add tiles or elements to the frame, select one of the available
buttons at the top.
8. Click and Drag a tile from the right window to the left to drop the tile
into place.
9. The tile will be RED until you have moved it into an “allowed”
position where it will turn GREEN and you then may release the
mouse button.
Design (Continued)
NOTE: As you release each element into place, the catalog viewer will
appear and prompt the user to select the trims and finishes for each
tile. After Sept 1st, 2012 finishes can be selected once the panel has
been “Siffed” into ProjectSpec.

Panel Builder Basics
10. After completing the OUTSIDE of the panel, you can right-click
above the panel and choose to “Match Inside to Outside” to
complete the INSIDE of the panel if they are the same.
Design (Continued)
NOTE: To “Match Inside to Outside” you must work left to right.

Panel Builder Basics
11. Once the panel has been designed, give the panel a name and
description before saving. Teknion allows no more that 10
characters for the panel type and only allows alpha and numeric
characters as well as a “-” and “_”.
Design (Continued)
NOTE: The Green highlighting shows the save area.

Panel Builder Basics
12. To create additional panel types similar to the first, you can remove
tiles from the existing panel and replace with other elements.
Design (Continued)
13. Once the tiles have been switched out, just give the panel a new
name and description before pressing the save button.

Panel Builder Basics
14. After completing your designs, press the BACK button or the red
close button in the upper right to exit back to the previous panel
screen.
Design (Continued)

Panel Builder Basics
Once panels have been Designed and Saved, you will see the available
types on the left and the corresponding available widths on the right.
Build
Select a panel type (or more by holding the CTRL key and selecting
multiple types) and then press the BUILD button. This process will
build all the 2D and 3D variations of the widths and heights.

Panel Builder Basics
Once a panel has been placed in the drawing (either with the PLAN or
with PLACE), a panel type can be swapped or “Assigned” a new
type.
1. Select the Type (It is not necessary to pick the width. The width will be
selected automatically by the size in the drawing.)
2. Click ASSIGN
3. Select the panel(s) in the drawing to be reassigned with the new
type.
Assign

Panel Builder Basics
Only after a panel has been designed and built, can it be placed in a
drawing. To place a panel:
1. Select the Type
2. Select the Width
3. Click Place
4. Select the insertion point in the drawing
5. Specify the rotation
6. Continue placing that size/type until you press Escape (or Right-
Click)
Place

Panel Builder Basics
Once the drawing has been SIF’d out into ProjectSpec, you will notice
the panels types showing as merged sifs.
1. Select a panel with the merged icon
2. Press the Expand Merge icon
3. The panel has now been expanded to individual parts and pieces
and will reflect the tags chosen in the Design screen. (See
Appendix)
ProjectSpec
Panel Builder Basics
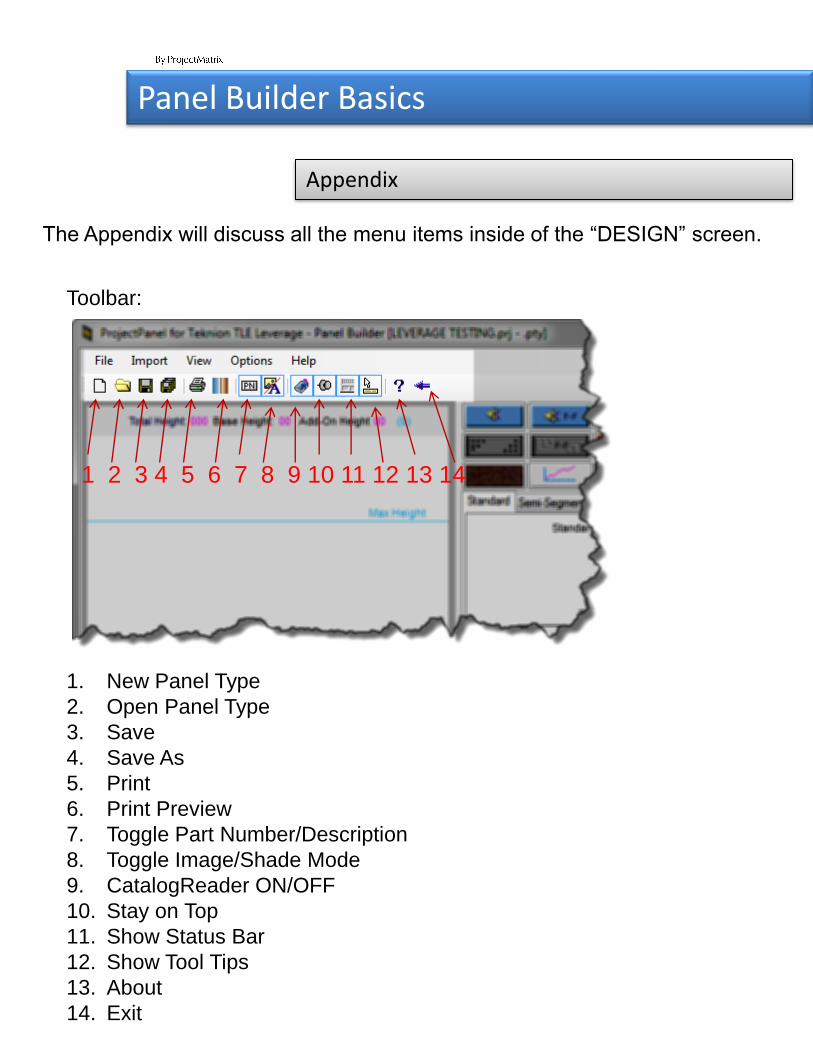
The Appendix will discuss all the menu items inside of the “DESIGN” screen.
Appendix
Toolbar:
1. New Panel Type
2. Open Panel Type
3. Save
4. Save As
5. Print
6. Print Preview
7. Toggle Part Number/Description
8. Toggle Image/Shade Mode
9. CatalogReader ON/OFF
10. Stay on Top
11. Show Status Bar
12. Show Tool Tips
13. About
14. Exit
1 2 3 4 5 6 7 8 9 10 11 12 13 14

Panel Builder Basics
The Appendix will discuss all the menu items inside of the “DESIGN” screen.
Appendix
Import Menu:
1. Xpress DB
Used to import DesignExpress (DataOne) panel types.
Import the xpress.mdb file from the DesignExpress project.
2. Order Entry SIF
Used to import CAP panel types.
Import a Teknion SIF exported from CAP
3. Project PTY
Used to import other ProjectMatrix panel types
Import .pty files from other projects.

Panel Builder Basics
Appendix
Importing Panel from Design Express
To begin the import from an existing Design Express Project, start by creating or
opening a ProjectPanel for Teknion project. Navigate to the design Screen by
pressing the “Design” button.
1. Select Import form the Design’s screen pull down menu.
2. Then select “Xpress DB”.
3. Browse to the existing Design Express Project that contains the panels you wish
to import.
4. Select the file named “Xpress.mdb” from within the project folder.
5. In the “Importing Panel type” dialog please select the panel types that you want
to import into your project.
6. The panel types should be seen being built in your project now. When complete
you can edit or build using these panel as if created in ProjectPanel for Teknion.

Panel Builder Basics
Appendix
Importing Panel from Teknion Order Enter SIF with Panel Matrix
To begin the import from an existing Teknion Order SIF, start by creating or opening a
ProjectPanel for Teknion project. Navigate to the design Screen by pressing the
“Design” button.
1. Select Import form the Design’s screen pull down menu.
2. Then select “Order Entry SIF”.
3. Browse to the existing SIF file that contains the panels you wish to import.
4. Select the SIF file.
5. In the “Importing Panel type” dialog please select the panel types that you want
to import into your project.
6. The panel types should be seen being built in your project now. When complete
you can edit or build using these panel as if created in ProjectPanel for Teknion.

Panel Builder Basics
Appendix
Importing Panel from existing ProjectPanel for Teknion project.
Import an existing ProjectPanel project, start by creating or opening a ProjectPanel
for Teknion project. Navigate to the design Screen by pressing the “Design” button.
1. Select Import form the Design’s screen pull down menu.
2. Then select “Project PTY”.
3. Browse to the existing ProjectPanel for Teknion project contains the panels you
wish to import.
4. Select the Folder named with the ending in “PRJ”.
5. In the “Importing Panel type” dialog please select the panel types that you want
to import into your project.
6. The panel types should be seen being built in your project now. When complete
you can edit or build using these panel as if created in ProjectPanel for Teknion.

Panel Builder Basics
Appendix
Options Menu:
SIF Options
1. SIF Tag 4
Places the panel type in Tag 4 for each component.
Example from above (Tag 4= 66A)
2. SIF Tag 5
Type+Side+Level
Example from above (Tag 5= 66AO1)
Equals Type 66A / OUTSIDE/ LEVEL 1
Color
Example from above (FB1)
Equals Fabric style FB1 vs. Inside which would show FB4

Panel Builder Basics
Appendix
Help Menu:
Help Options:
1. Flattened
As of September 1st, 2012 all panel orders must use this
format.
Panel orders using Matrix after 9/1/2012 will be returned.
These must be “exploded” in ProjectSpec for order.
2. Panel Matrix
Former Teknion Order Entry style.
Orders accepted up to August 31st, 2012
These show up in ProjectSpec as panel frames with option
codes reflecting the appropriate panel type.