w626 eng book - philips · pdf fileyour phone 1 home screen on the home screen, you can check...
TRANSCRIPT

Your phone
Philips continuously strives to improve its products. Due to software upgrading, some contents in this user guidemay be different from your product. Philips reserves the rights to revise this user guide or withdraw it at anytime without prior notice. Please take your product as standard.
Touch screen
Search
Charger/Micro USBport connector
Side volume key
Home Menu
Headphone jack
Back
Power keyFront camera lens

Your phone 1
Home screen
On the home screen, you can check the status ofyour phone and use the applications.
There are 4 extended home screen, slide yourfinger horizontally to the left and right to check eachone. Tap 2tto return to the center home screen.
You can add your favorite applications, shortcuts,folders and widgets so they’re always just a tapaway.Your phone’s home screen consists of the followingareas:
Status Bar
Shortcut icons
Widgets
Application icons

2 Your phone
Keys
Learn about the main keys.m
Shortcuts
Learn about the shortcuts.m
Key Definition Function
P Power -Press and hold to power on/off.-Press to turn on/off the screendisplay.
-Hold to access the Phoneoptions, choose Silent orAirplane mode.
1 Menu key -Open a list of options availableon the current screen.-Hold to open or hide theonscreen keyboard while usingsome applications.
2 Home key -Return to the home screen.
-Hold to open the list of recentapplications.
3 Back key -Return to the previous screenor exit.
-Hide the onscreen keyboardwhen it is opened.
4 Search key
-Open the Google Searchapplication.-Open the search input windowwhile using some applications.
Volume key
-Volume up/down.-Press to turn to silent modewhen there is a call.
Key Definition FunctionMessages Quick access to messaging.
Dial Quick access to dial pad.
Contacts Quick access to phonebook.
Menu -Tap to enter into menu screen.
-In idle screen, press and hold itfor more than 2 seconds toopen the pop-up screenoptions.
Home Return to the home screen.

Your phone 3
Notifications panelWhen you get a new notification, you can open theNotifications panel to see what event notification ornew information you have received. TheNotifications panel lets you quickly switch betweenrecently-opened apps, and also lets you easily turnon settings such as Wi-Fi and Bluetooth.
To open the Notifications panel, press and hold thestatus bar, then slide your finger downward.
If you have several notifications, you can scrolldown the screen to see them all.
You can slso open the Notifications panel on theHome screen by tapping 1>Notifications.
Using Quick Settings
The Quick Settings tab lets you easily turn on Wi-Fi, Bluetooth, GPS, and more, and also provides aquick shortcut to change the mode and set thebrightness, timeout, auto rotation if slide the tab.
Status icon
Processingprogram
Notifications
Drag to hide the list.
Quick settingtab
4 Your phone
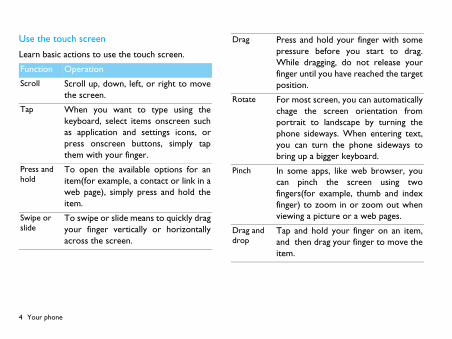
Use the touch screen
Learn basic actions to use the touch screen.
Function Operation
Scroll Scroll up, down, left, or right to movethe screen.
Tap When you want to type using thekeyboard, select items onscreen suchas application and settings icons, orpress onscreen buttons, simply tapthem with your finger.
Press and hold
To open the available options for anitem(for example, a contact or link in aweb page), simply press and hold theitem.
Swipe or slide
To swipe or slide means to quickly dragyour finger vertically or horizontallyacross the screen.
Drag Press and hold your finger with somepressure before you start to drag.While dragging, do not release yourfinger until you have reached the targetposition.
Rotate For most screen, you can automaticallychage the screen orientation fromportrait to landscape by turning thephone sideways. When entering text,you can turn the phone sideways tobring up a bigger keyboard.
Pinch In some apps, like web browser, youcan pinch the screen using twofingers(for example, thumb and indexfinger) to zoom in or zoom out whenviewing a picture or a web pages.
Drag and drop
Tap and hold your finger on an item,and then drag your finger to move theitem.

Your phone 5
Icons and symbols
Learn about the icons and symbols on the screen.
Icons Function
Your phone will not ring when receiving acall.
Your phone will vibrate when receiving acall.
Flight mode activated.
Your phone is connected to a GSMnetwork.The more bars are shown thebetter the reception is.
The SIM is without signal.
Call in progress.
Call on hold.
Speakerphone activated.
You have a missed call.
Synchronised with the web.
New SMS or MMS.
The bars indicate the battery level.
WLAN activated.
Your phone is connected to network.
Downloading data.
Uploading data.
Connected to PC.
Bluetooth is activated.
The headset is plugged into the phone.
The alarm clock is activated.
Indicates the memory card is in use.
Error occurred or caution required.
6 Table of contents
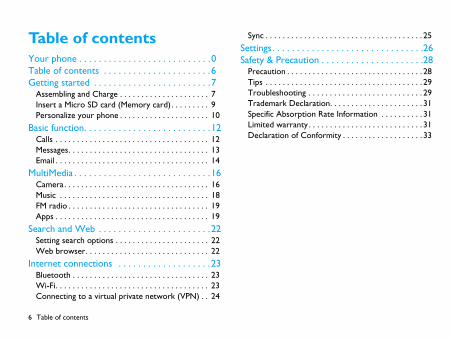
Table of contents Your phone . . . . . . . . . . . . . . . . . . . . . . . . . . .0Table of contents . . . . . . . . . . . . . . . . . . . . . .6Getting started . . . . . . . . . . . . . . . . . . . . . . . .7
Assembling and Charge . . . . . . . . . . . . . . . . . . . . . 7Insert a Micro SD card (Memory card) . . . . . . . . . 9Personalize your phone . . . . . . . . . . . . . . . . . . . . . 10
Basic function. . . . . . . . . . . . . . . . . . . . . . . . . .12Calls . . . . . . . . . . . . . . . . . . . . . . . . . . . . . . . . . . . . 12Messages. . . . . . . . . . . . . . . . . . . . . . . . . . . . . . . . . 13Email . . . . . . . . . . . . . . . . . . . . . . . . . . . . . . . . . . . . 14
MultiMedia . . . . . . . . . . . . . . . . . . . . . . . . . . . .16Camera . . . . . . . . . . . . . . . . . . . . . . . . . . . . . . . . . . 16Music . . . . . . . . . . . . . . . . . . . . . . . . . . . . . . . . . . . 18FM radio . . . . . . . . . . . . . . . . . . . . . . . . . . . . . . . . . 19Apps . . . . . . . . . . . . . . . . . . . . . . . . . . . . . . . . . . . . 19
Search and Web . . . . . . . . . . . . . . . . . . . . . . .22Setting search options . . . . . . . . . . . . . . . . . . . . . . 22Web browser. . . . . . . . . . . . . . . . . . . . . . . . . . . . . 22
Internet connections . . . . . . . . . . . . . . . . . . .23Bluetooth . . . . . . . . . . . . . . . . . . . . . . . . . . . . . . . . 23Wi-Fi. . . . . . . . . . . . . . . . . . . . . . . . . . . . . . . . . . . . 23Connecting to a virtual private network (VPN) . . 24
Sync . . . . . . . . . . . . . . . . . . . . . . . . . . . . . . . . . . . . . 25
Settings. . . . . . . . . . . . . . . . . . . . . . . . . . . . . . .26Safety & Precaution . . . . . . . . . . . . . . . . . . . . .28
Precaution . . . . . . . . . . . . . . . . . . . . . . . . . . . . . . . . 28Tips . . . . . . . . . . . . . . . . . . . . . . . . . . . . . . . . . . . . . 29Troubleshooting . . . . . . . . . . . . . . . . . . . . . . . . . . . 29Trademark Declaration. . . . . . . . . . . . . . . . . . . . . . 31Specific Absorption Rate Information . . . . . . . . . . 31Limited warranty . . . . . . . . . . . . . . . . . . . . . . . . . . . 31Declaration of Conformity . . . . . . . . . . . . . . . . . . . 33

Getting started 7
Getting startedCongratulations on your purchase and welcome toPhilips!
To get the most of your product and enjoy allPhilips has to offer, register your product at:www. philips. com/mobilephones
More details about your product, please access:www.philips.com/support
Note: • Please read the safety instructions in the "Safety & Precaution"
section before use.
Assembling and ChargeLearn about installing USIM or SIMcard and chargingthe battery for the first use.
Insert SIM cardFollow the steps below to insert your USIM or SIMcard. Remember to turn off your mobile phonebefore removing the back cover.
1 Remove the back cover.
2 Take out the battery.

8 Getting started
3 Insert the USIM or SIM card.
4 Install the battery.
5 Replace the back cover.
Charge the batteryA new battery is partially charged. The battery iconin the upper-right corner shows the battery level ofcharging status.

Getting started 9
Tips: • You can use the phone while it is charging. • Keeping the charger plugged to the mobile phone when the
battery is fully charged will not damage the battery. The onlyway to turn off the charger is to unplug it, so it is advisable touse an easily accessible power socket.
• If you do not intend to use your phone for several days, werecommend that you remove the battery.
• If a fully charged battery left unused, it will lost its charge overtime.
• If a battery is being used for the first time or the battery hasnot been used for a prolonged period, it may take longer timeto recharge.
Insert a Micro SD card (Memory card)Insert a memory cardYou can expand the memory of your phone andstore more additional multimedia files by adding amicro-SD card.
1 Align your micro-SD card with the slot. Put it inplace.
2 Press down the card holder and pull it until it islocked.
Remove the memory cardPlease press down the card holder before removingthe memory card and SIM card in the WCDMA slot.

10 Getting started
Before removing a memory card, first unmount itfor safe removal.
1 In Idle screen, select 1>Settings>Storage>Unmount SD card.
2 Press down the card holder and push out thememory card.
Note: • Do not remove a memory card while the device is transferring
or accessing information to prevent corrupting or damagingthe files in the memory card.
Format the memory cardFormatting your memory card on a PC may causeincompatibilities with your device. Format thememory card only on the device.
In Idle screen, select 1>Settings>Storage >EraseSD card.
Note: • Before formatting the memory card, remember to make
backup copies of all important data stored on your device. Themanufacturer’s warranty does not cover loss of data resultingfrom user actions.
Use as mass storageMemory card can be used as mass storage whenconnected with PC. You can synchronize datasbetween your computer and memory card.
1 Connect the phone and PC with USB cable.2 Drag down the Notification panel, and tap
>Turn on USB storage>OK.3 On your computer, then you can check/edit the
content of memory card.
Note: • Before turning off USB storage, make sure you have
unmounted your memory card from your computer.
Personalize your phoneMake the phone look and sound just the way youwant it. Personalize it with a different wallpaper,skin, ringtone, and notification sound for eventssuch as incoming text, email, and calendarreminders.
1 Change the wallpaper: Tap 1>Wallpaper tochoose the one you want.
2 Add widgets/shortcuts/folders to the homescreen: Tap 1>Add, or press and hold theblank area of the home screen to add.

Getting started 11
3 Rearrange or remove widgets and icons: Pressand hold the widget or icon you want to move,drag it to a new location.
4 Delete the widgets and icons: Press and hold thewidger or icon, drag it to the trash can on thebottom of the screen.
5 Change ringtones and alarms: Tap1>Settings>Audio profiles>General tochange.

12 Basic function
Basic functionCallsLearn to use calling functions, such as making andanswering calls, using options available during a callor customising and using call-related features.
Make a call on the phone dialer screen1 Tap to open the dial pad, dial the number
directly.2 Or enter the first few digits of a phone number,
then choose one number from the filtered listthat have matching digits.
3 After entering a complete number, tap Call.
Tips: • The phone dialer’s Smart dial features makes it quick and easy
for you to make a call. Simply enter the phone number or firstfew letters of the person’s name you want to call. Smart dialautomatically searches and filters your stored contacts and thephone numbers from the call history.
Use Speed dial1 Tap to open the dial pad, tap 1to open the
speed dial.2 Tap the numbers to add the contact you want to
use speed dial.
3 Then press and hold the corresponding number,you can dial out. For example, if you assign acontact’s number to the number 2 key, you canjust press and hold 2 to dial the number.
Tips: • The number 1 key is generally reserved for your voicemail.
Press and hold this key to call voicemail and retrieve yourvoivemail messages.
Call a phone number in a text message or email1 Tap the phone number within the message or
email.2 Edit the phone number if needed, and then tap
Call.
Make an emergency call1 Tap to open the dial pad, dial the emergency
number for your locale, and then tap Call.Tips:
• If you’ve enableed but forgotten your lock password or lockpattern, you can still make emergency calls by tappingEmergency call on the screen.

Basic function 13
Internet callsWhen you’re connected to a WI-FI network, youcan make and receive calls through an Internetcalling account.
1 Before you add an internt calling account, makesure that you’ve registered with an Internetcalling service that supports voice calls overSession Initiation Protocal(SIP).
2 Tap 1>Settings>Call settings>Internetcall>Accounts, mark Use Internet calling, thentap Add account, enter your account details.Tap 3to save your account. Mark the Receiveincoming calls Check box.
Tips: • When a call is in progress, use the buttons onscreen to mute
or unmute the microphone or to turn the speakerphone onor off. You can also tap 1and choose other options.
• When a call is in progress, you can tap Hold and then tap Addcall to add a new call, the first call will be hold automatically.
Answer/Reject a call1 When a call comes in, slide the screen down to
answer, slide up to reject.2 The phone can send a message when you reject
incoming calls: Tap 1> Settings>Call
settings>Other settings>Reject and replymessage to set the reject message.
MessagesSend a SMS/MMS message1 On the home screen, tap >Compose new
message.2 Fill in one or more recipients:
- Enter the complete number, or first fewletters of a contact name or starting digits ofa mobile number, then choose one from thematching list.
- Tap to select numbers from yourcontacts.
3 Enter the text message in the text box.4 Tap 1>Attach to add picture/video/audio/
slideshow if you want to sent an MMS message.5 Tap Send, or tap 3to save the message as a
draft.
Note: • There is a limit on the number of characters for a single text
message. If you exceed the limit, your text message will bedelivered as one but will be billed as more than one message.
• Your text message automatically becomes a multimediamessage if you enter an email address as the recipient, add a
14 Basic function
message subject, attach an item, or compose a very longmessage.
Message setting options1 Notification
- Receive a notification in the status bar andset your phone to vibrate or play a soundwhen a message arrives or when a message isnot sent successfully, and choose anotification sound.
- Allow your phone to show pop-upnotifications on the screen when messagesare sent successfully or not, or disable thisoption.
2 SMS- Set the message priority.- Enable support for special accent characters
for text messages.3 MMS
- Receive a report on the delivery status ofyour message.
- Automatically download complete MMSmessages including themessage body andattachments in your service area and whenroaming.
- Set the message priority and maximum filesize of MMS messages. If the MMS messagefile size is exceeded, the message won't besent.
EmailGmailMake sure you sign into your Google Accountbefore using Gmail. If you didn’t do so, go to theAccounts & sync setting to sign in.
You can also set up more than one Google Accounton the phone, and then switch between accounts inGmail.
1 Send an email message:- In the Gmail inbox, press 1and then tap
Compose.- If you’ve set up multiple Google Accounts,
choose which Gmail address you want to usefor sending your email.
- Enter the message recipient’s email addressin the To field. If you are sendingthe email toseveral recipients, separate the emailaddresses with a comma.
Basic function 15
- Enter the detailed information, tap1>Attach if you want to add anattachement.
- Tap to send the mail or save it as a draft, orpress 3to discard the message.
EmailLearn to send or view email messages via yourpersonal or company email account.
Set up an email account1 On the home screen, tap
- If this is your first time to add an emailaccount in Mail, tap Other (POP3/IMAP) onthe Choose a mail provider screen.
- If you’ve already added an email account inMail, then tap 1>More > New account. Ifthe Choose a mail provider screen isdisplayed, tap Other (POP3/IMAP).
2 Enter the email address and password for youremail account and then tap Next.
3 If the account type you want to set up is not inthe phone database, you’ll be asked to entermore details.
4 Enter the account name and your name andthen tap Finish setup.
Note: • When you are finished setting up the email account, the email
messages are downloaded to your device. • Consult your mail service provider for the mail server
configuration.
CalendarUse the Calendar app to schedule your events,meetings, and appointments.
1 Sign in to your Google Account so you’ll be ableto sync the Calendar app with your GoogleCalendar online. You can add multiple GoogleAccounts.
2 In Idle mode, open the application list and tapCalendar, tap 1>New event to schedule yourevent/meeting/appointment.
3 Enter the details and tap Save.

16 MultiMedia
MultiMediaCameraLearn about camera function. Let you take photosas desired by using your phone.
Take a photo/Record a video1 Tap to turn on the camera.
2 Press the side volume key to zoom in or out, oruse the setting bar to do the necessaryadjustment.
3 Tap or press the side camera key to starttaking/recording.
4 Tap 1>Switch camera/switch to video toswitch to the front camera lens, you can takeyourself portrait.
5 After taking photos/recording videos, select theimage viewer to view.
6 Scroll left/right to view more photos, pinch tozoom in/out the photos/videos.
Tips: • All the photos taken are saved to SDcard>DCIM>Camera.
Camera settingsBefore taking photos/recording videos, customiseyour camera settings:
Icon Option FunctionZoom in/out zoom in/out.
Settingbar
Imageviewer
Capture a photoSwitching button
Numberof photoyou can take

MultiMedia 17
Flash mode Turn on/off flash modedepending on your lightingconditions.
White balance
White balance enables thecamera to capture colorsmoreaccurately by adjustingto your current lightingenvironment.
Store location
Set the camera to includelocation information foryour photos. To use thisfeature, you must activatelocation services.
Capture mode
Choose normal/smileshot(the camera can detectpeople’s smile and takephotos automatically whenthey smile)/panoramamode(take the first photo,then slowing move thedevice in any direction andalign the green frame withthe viewfinder, When youhave aligned the greenframe and viewfinder, thecamera will automaticallytake the next photo, Repeatto complete the panoramicphoto .
Burst shot Set to capture shots of amoving subject and thencombine them into a singlephoto that shows theaction.

18 MultiMedia
MusicLearn to listen to your favourite music with themusic player. Tap tto open the music screen.
Using the following keys to control playback:
Music settingsTap 1>Add to playlist, you can place the song incurrent playlist, or create a new playlist.
Self timer Select the length of thedelay before the cameratakes a photo.
Face detection
Set the camera to focus onhuman faces automatically.
Anti-flicker Reduce blur caused by thedevice's vibration ormovement.
Select camera
Select front/back camera.
EV Adjust the exposure value.
Scene mode Change the scene mode.
Picture size Select the size of picture.
Picture quality
Set the quality level for yourphotos.
Color effect Apply a special effect, suchas sepia or black and whitetones.
Function DefinitionPaly and resume playback.Pause the playback.Select previous track.Select next track.Select the play mode:• Repeat once (play current file
repeatedly)• Repeat all (play all the files in
the folder repeatedly)Activate Shuffle mode, play currentfile randomly.Select to enter into playlist.

MultiMedia 19
Tap 1>use as ringtong, you can set the currentmusic as ringtone.
FM radioLearn to listen to music and news on the FM radio.To listen to the FM radio, you must connect aheadset, which serves as the radio antenna.
The first time you open FM Radio, it automaticallyscans for available FM stations, saves them aspresets, and plays the first FM station found.
FM radio settingsTap 1>search, the phone will search available FMstations.
Tap 1>RDS settings>Alternative frequency,Set whether or not the FM radio attempts to retunea radio station when the signal is weak.
Tap 1>RDS settings>Channel information,Set whether or not to show the station informationon the FM radio screen.
AppsYou can download a wide variety of free and paidapps ranging from productivity apps, entertainment,to games from the Android Market.
Download applications from Android MarketBased on the Android platform, your device’sfunctionality can be extended by installing additionalapplications. Android Market provides you an easyand quick way to shop for games and mobileapplications.
1 Install an application- In Idle mode, open the application list and
select Market.- Select Accept when the terms and
conditions appear.
Function Definition/ Go to previous/next available FM
station.</> Fine tune the radio frequency by +/
-0.1 MHz.Pause/start playing.View the All presets list.
20 MultiMedia
- Search for a file or application and downloadit.
Note: • Download and install only apps that you trust.
2 Uninstall an application- From the Android Market home screen,
select My apps.- Select the item you want to delete.- Select Uninstall > OK.
Download files from the webWhen you download files or web applications fromthe web, your device saves them in a memory card.
Note: • Files you download from the web can include viruses that will
damage your device. To lessen your risk, only download filesfrom sources you trust.
• Some media files include Digital Rights Management to protectcopyrights. This protection may prevent you fromdownloading, copying, modifying, or transferring some files.
1 Download files from the web- In Idle mode, open the application list and
select Internet.
- Search for a file or application and downloadit.
Note: • To install applications downloaded from websites other than
Android Market, you must select Settings >Applications>Unknown sources >OK.
2 Synchronise dataYou can synchronise data with various web serversand back up or restore your data. Once thesynchronisation is completed, your device staysconnected to the web. If any change is made on theweb, the updated information will appear on yourdevice and will automatically begin synchronisation,and vice versa.
Tips: • This feature may be unavailable depending on your region or
service provider.
3 Set up a server account- In Idle mode, open the application list and
select Settings>Accounts and sync.- Select Add account >an account type.- Follow the on-screen instructions to
complete the account setup. For online
MultiMedia 21
community services, such as Facebook orMySpace, enter your user name andpassword and select Log in.
4 Activate automatic sync- In Idle mode, open the application list and
select Settings>Accounts and sync.- Select Auto-sync.- Select an account.- Select the applications you want to
synchronise.
Note: • To exclude applications from automatic synchronisation, clear
the check boxes next to the applications you want.
5 Synchronise data manually- In Idle mode, open the application list and
select Settings > Accounts and sync.- Select an account.- Select Sync now. Your device will start
synchronising the data you set forsynchronisation.
22 Search and Web
Search and WebYou can search for information on the phone andon the Web by using Google Search.
Setting search options1 Tap 4>1>Search settings.
Web browserOpen the web browser and start surfing the Web.
Going to a webpage1 Tap to enter the web, then tap the URL
field on top of the screen to enter the webaddress.
2 The phone will go to that webpage directly.
3 Tap 1>Windows to open multiple browserwindows or switch among them.
4 Tap 1> Bookmarks to add bookmarks forquickly view.
5 Tap 1> More to view the previously visitedhistory, check page info or downloards, sharepage and others.
Tips: • Tap 1>Settings > Display, and then select the Auto-rotate
screen check box, you can turn on automatic screenorientation.,
• You can swipe your finger on the screen to navigate and viewother areas of thewebpage, or pinch to zoom in/out.
Function Definition .Searchengine
Apply search engine change tobrowser.
Web searchsuggestions
Display suggestions for Google websearches below thesearch box as youtype.
Searchable items
Select the items you want includedwhen doing a search.

Internet connections 23
Internet connections BluetoothYour phone can connect to a compatible Bluetoothdevice for exchanging data.
Turn on/off Bluetooth1 From the Home screen, tap 1 >Settings >
Wireless & networks.2 Select or clear the Bluetooth check box.
Note: • Turn off Bluetooth when not in use to save battery power, or
in places where using a wireless device is prohibited, such ason board an aircraft and in hospitals.
Receive data via Bluetooth1 Turn on the Bluetooth firstly, then tap 1
>Settings > Wireless &networks>Bluetoothsettings>Discoverable to make device can befound.
2 Then select Scan for devices.3 Select a device, Enter a pair password and select
Accept to pair with the other device.
4 On the receiving device, accept the file.
Note: • Some devices, especially headsets or hands-free car kits, may
have a fixed Bluetooth PIN, such as 0000. If the other devicehas a PIN, you must enter it.
• Received data is saved to the bluetooth folder. If you receivea contact, it is automatically saved to the phonebook..
Send data via Bluetooth1 Select a file or item, such as a contact, calendar
event, 1 memo, or media file, from anappropriate application or My files.
2 Select an option for sending data via Bluetooth.3 Search for and pair with a Bluetooth-enabled
device.
Wi-FiLearn to use your device’s wireless networking. Theavailability and strength of the Wi-Fi signal will varydepending on objects, such as buildings or simply awall between rooms, the Wi-Fi signal has to passthrough.

24 Internet connections
Turn on Wi-Fi and connect to a WLAN 1 From the Home screen, tap 1 >Settings
>Wireless & networks> Wi-Fi.2 Select the Wi-Fi check box to turn Wi-Fi on.3 Tap Wi-Fi settings. Detected Wi-Fi networks
will be listed in the Wi-Fi networks section.
Tips: • If the wireless network that you want is not listed, tap Add
Wi-Fi network to manually add it.4 Choose the Wi-Fi network you want to connect
to, tap Connect.5 If you selected a secured network, you'll be
asked to enter the network key or password.6 Using Wi-Fi Protected Setup (WPS), you can
connect to a secured network.7 Using the WLAN Direct feature to connect
two devices via a WLAN without requiring anaccess point.
Connecting to a virtual private network (VPN)you can connect and access resources inside asecured local network, such as your corporatenetwork.
Depending on the type of VPN you’re using atwork, you may be asked to enter your logincredentials and install security certificates beforeyou can connect to yourcompany’s local network.You can get this information from your networkadministrator.
You must first establish a Wi-Fi or data connectionbefore you can start a VPN connection.
Set up secure credential storageIf your network administrator tells you to downloadand install security certificates,you must first set upsecure credential storage on the phone.
1 From the Home screen, tap 1 >Settings>Security>Set password.
2 Enter a new password and confirm.3 Select the Use secure credentials check box
then you can download and install thecertificates needed to access your localnetwork.
Connect to a VPN1 Add a VPN connection: tap Settings >
Wireless & networks>VPN settings > Add

Internet connections 25
VPN, choose the VPN type and tap the VPNsettings and set them up according to thesecurity details yournetwork administrator gaveyou, then tap 1>Save.
2 When VPN is added, tap VPN settings, selectthe VPN that you want to connect to in theVPNs section,
3 When asked, enter your log in credentials, andthen tap Connect, you can then open the webbrowser to access resources such as yourcorporate network intranet.
SyncTap 1>Settings>Accounts&sync to finishsetting online account before sync.
Synchronizing with a Google Account1 Tap 1> Settings>Accounts&sync> Add
account.2 Follow the onscreen instructions to sign in to an
account or create a new account.3 If select Background data, apps can send and
receive online account information even if youare not currently using them.
4 If select Auto-sync, apps can use the syncschedule defined inthe account settings. If this iscleared, you will need to sync accounts manually.
26 Settings
SettingsControl and customize phone settings on theSettings screen. On the Home screen, tap1>Settings.
Function Definition .SIMmanagement
Set the dual SIM card information/setthe SIM card for data connection,call, message.
Wireless &networks
Set up wireless connections, such asWi-Fi, data connection,andBluetooth, enable Airplanemode, and more.
Call settings Set up call services such as voicemailand change other phone settings.
Audio profiles
•Select the profiles of the phone.•Set the volume and type for ringtong, alarm and notification.
Display Set up display settings such asautomatic screenorientation,brightness, screentimeout, and more.
Location Select the sources to use whendetermining your location.
Security Set a screen lock or manage thecredential storage.
Applications Manage running applications, moveapplications to or from the storagecard, and install or uninstallprograms.
Accounts & •Log in or out of your social network accounts, Google Account,and Exchange ActiveSync account.
•You can also manage synchronization and other settings for youraccounts.
Privacy •Erase all data on the phone.•Update the current system via the update package.
Settings 27
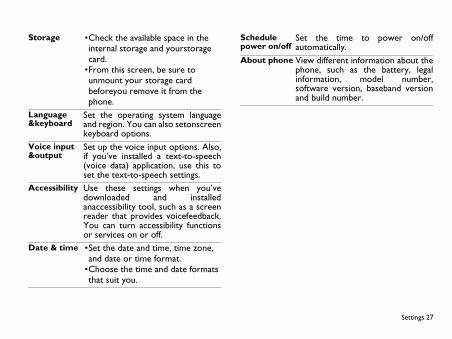
Storage •Check the available space in the internal storage and yourstorage card.
•From this screen, be sure to unmount your storage card beforeyou remove it from the phone.
Language &keyboard
Set the operating system languageand region. You can also setonscreenkeyboard options.
Voice input &output
Set up the voice input options. Also,if you’ve installed a text-to-speech(voice data) application, use this toset the text-to-speech settings.
Accessibility Use these settings when you’vedownloaded and installedanaccessibility tool, such as a screenreader that provides voicefeedback.You can turn accessibility functionsor services on or off.
Date & time •Set the date and time, time zone, and date or time format.
•Choose the time and date formats that suit you.
Schedule power on/off
Set the time to power on/offautomatically.
About phone View different information about thephone, such as the battery, legalinformation, model number,software version, baseband versionand build number.

28 Safety & Precaution
Safety & PrecautionPrecautionKeep your phone away from small children
Keep your phone and all accessories out of the reach of smallchildren. Small parts may cause choking or serious injury ifswallowed.
Radio WavesYour phone transmits/receives radio waves in the EDGE/GPRSfrequency(900/1800/1900MHz) and WCDMA Band1.Check with the vehicle manufacturer that electronic equipmentused in your vehicle will not be affected by radio energy.
Switch off your phone...Turn off the phone when in an aircraft. The use of mobile phones inan aircraft may be dangerous for the operation of the aircraft,
disrupt the mobile phones network and may be illegal.In hospitals, clinics, other health care centers and anywhere elsewhere you may be in the close vicinity of medical equipment.In areas with a potentially explosive atmosphere (e.g. petrol stationsand also areas where the air contains dust particles, such as metal
powders).In a vehicle transporting flammable products or a vehiclepowered by liquefied petroleum gas (LPG).In quarries or other areaswhere blasting operations are in progress.
Your mobile phone and your carAvoid using your phone while driving and obey all regulations thatrestrict the use of mobile phones while driving. Use hands free
accessories to increase your safety when possible. Ensure that yourphone and car kit do not block any air bags or other security devicesfitted in your car.
Handle your phone carefully and sensiblyFor the optimal and satisfactory operation of the phone you arerecommended to use the phone in the normal operating position.
• Do not expose your phone to extreme temperatures.
• Do not immerse the phone in any liquid; if your phone is damp,switch it off, remove the battery and let them dry for 24hrs beforeusing them again.
• To clean the phone, wipe it with a soft cloth.• In hot weather or after prolonged exposure to the sun (e.g., behind a
window or a windscreen), the temperature of your phone's casingmight increase. Be very careful in this case when picking up yourphone and also avoid using it with an ambient temperature over 40°C.
Protect batteries from damageYou should only use Philips Authentic Accessories, as the use ofany other accessories may damage your phone and may be
dangerous, and will make all guarantees for your Philips phone null andvoid. The use of an unspecified type of battery may also cause anexplosion.Make sure damaged parts are replaced immediately by a qualifiedtechnician and that they are replaced with genuine Philips replacementparts.• Your phone is powered by a rechargeable battery.• Use specified charger only.• Do not incinerate.• Do not deform or open the battery.• Do not allow metal objects (such as keys in your pocket) to short
circuit the battery contacts.• Avoid exposure to excessive heat (>60° C or 140° F), moisture or
caustic environments.Environmental care
Remember to observe the local regulations regarding the disposalof the packaging materials, exhausted batteries and old phone and
please promote their recycling.Philips has marked the battery andpackaging with standard symbols designed to promote the recycling andappropriate disposal of your eventual waste.
:The labeled packaging material is recyclable.:A financial contribution has been made to the associated national
packaging recovery and recycling system.:The plastic material is recyclable (also identifies the type of plastic).

Safety & Precaution 29
WEEE Marking in the DFU: “Information to the Consumer”
Disposal of your old productYour product is designed and manufactured with high quality materialsand components, which can be recycled and reused.
When this crossed-out wheeled bin symbol is attached to aproduct it means the product is covered by the EuropeanDirective 2002/96/ECPlease inform yourself about the local separate collection systemfor electrical and electronic products.
Please act according to your local rules and do not dispose of your oldproducts with your normal household waste. The correct disposal ofyour old product will help prevent potential negative consequences forthe environment and human health.This device may contain commodities, technology or software subject toexport laws and regulations from the US and other countries. Diversioncontrary to law is prohibited.
TipsPacemakersIf you have a pacemaker:
• Always keep the phone more than 15 cm from your pacemakerwhen the phone is switched on, in order to avoid potentialinterference.
• Do not carry the phone in a breast pocket.• Use the ear opposite to the pacemaker to minimize the potential
interference.• Switch off your phone if you suspect that interference is taking place.Hearing aidsIf you are a user of a hearing aid, consult your physician and hearing aidmanufacturer to learn whether your particular device is susceptible tocellular phone interference.
How to prolong the battery life of your phone To have your mobile phone function properly, sufficient battery poweris important. For the power-saving purpose, do the following, ifapplicable:• Turn off the Bluetooth function of your phone.
• Set the backlight level and duration of your phone to a low value. • Turn on the auto keypad lock, turn off the key sounds, tap vibration,
or vibration alerts. • Establish GPRS connection when needed. Otherwise, your phone
will keep searching for GPRS connection, and drain your batterypower.
• Turn off your phone if there is no coverage. Otherwise, the phonewill keep searching for network, and drain your battery power.
TroubleshootingThe phone does not switch onRemove/reinstall the battery. Then charge the phone until the batteryicon stops scrolling. Unplug the charger and try to switch the mobile on.
The display shows BLOCKED when you switch on the phoneSomebody tried to use your phone but didn’t know the PIN code northe unblocking code (PUK). Contact your service provider.
The display shows IMSI failureThis problem is related to your subscription. Contact your operator.
Your phone doesn’t return to idle screenLong press the hang-up key or switch off the phone, check that the SIMcard and the battery are installed correctly and switch it on again.
The network symbol is not displayedThe network connection is lost. Either you are in a radio shadow (in atunnel or between tall buildings) or you are outside the networkcoverage area. Try from another place, try to reconnect to the network(especially when abroad), check that the antenna is in place if your mobilehas an external antenna, or contact your network operator forassistance/information.
The display doesn’t respond (or the display responds slowly) to key pressesThe display responds more slowly at very low temperatures. This isnormal and does not affect the operation of the phone. Take the phoneto a warmer place and try again. In other cases please contact yourphone supplier.

30 Safety & Precaution
Your battery seems to over heatYou might be using a charger that was not intended for use with yourphone. Make sure you always use the Philips authentic accessory shippedwith your phone.
Your phone doesn’t display the phone numbers of incoming callsThis feature is network and subscription dependent. If the networkdoesn’t send the caller’s number, the phone will display Call 1 orWithheld instead. Contact your operator for detailed information onthis subject.
You can’t send text messagesSome networks don’t allow message exchanges with other networks.First check that you have entered the number of your SMS centre, orcontact your operator for detailed information on this subject.
You can’t receive and/or store JPEG picturesA picture may not be accepted by your mobile phone if it is too large, ifits name is too long, or if it doesn’t have the correct file format.
You feel that you have missed some callsCheck your call divert options.
When charging, the battery icon shows no bar and the outline is flashingOnly charge the battery in an environment where the temperature doesnot go below 0°C (32°F) or above 50°C (113°F).In other cases please contact your phone supplier.
The display shows SIM failureCheck that the SIM card has been inserted correctly. If the problempersists, your SIM card may be damaged. Contact your operator.
When attempting to use a feature in the menu, the display shows NOT ALLOWEDSome features are network dependent. They are only available,therefore, if the network or your subscription supports them. Contactyour operator for detailed information on this subject.
The display shows INSERT YOUR SIM CARDCheck that the SIM card has been inserted correctly. If the problempersists, your SIM card may be damaged. Contact your operator.
The autonomy of your phone seems lower than indicated on the user guideThe autonomy is linked to your settings (e.g., ringer volume, backlightduration) and the features you use. To increase the autonomy, andwhenever possible, you must deactivate features you do not use.
Your phone doesn’t work well in your carA car contains many metallic parts that absorb electromagnetic waveswhich can affect the phone’s performance. A car kit is available toprovide you with an external antenna and enables you to make andreceive phone calls without handling the handset.
Note: • Check with the local authorities whether or not you are allowed to
use the phone while driving.
Your phone is not chargingIf the battery is completely flat, it might take several minutes of pre-charge (up to 5 minutes in some cases) before the charging icon isdisplayed on the screen.
The picture captured with the phone camera is not clearMake sure that the camera lens on both sides is clean.
Safety & Precaution 31
Trademark Declaration
Specific Absorption Rate InformationInternational standardsTHIS MOBILE PHONE MEETS THE INTERNATIONALRECOMMENDATIONS FOR EXPOSURE TO RADIO WAVESYour mobile phone is a radio transmitter and receiver. It is designed andmanufactured not to exceed the limits for exposure to radio frequency(RF) energy defined by the international standards. Theserecommendations have been established by the InternationalCommission on Non-Ionizing Radiation Protection (ICNIRP) and, theInstitute of Electrical and Electronics Engineers (IEEE) that forecast asubstantial safety margin for assuring the protection of all persons,regardless of age and health.The exposure recommendations for mobile phones use a measurementunit known as the Specific Absorption Rate (SAR). The SAR limitrecommended by the ICNIRP for the mobile phones used by the generalpublic is 2.0W/kg averaged over ten grams of tissue and, is 1.6W/kgaveraged over one gram of tissue by IEEE Std 1528 for the head.Tests for SAR have been conducted using recommended operatingpositions with the mobile phone transmitting at its highest certifiedpower level in all tested frequency bands. Although the SAR isdetermined at the highest certified power level, the actual SAR levels ofthe mobile phone while operating are generally below the maximum SARvalue. This is because the phone is designed to operate at multiple power
levels so as to use only the power required to reach the network. Ingeneral, the closer you are to a base station antenna, the lower thepower output. While there may be differences between the SAR levels of variousphones and at various positions, they all meet the internationalprotection standards for exposure to radio waves. The highest SAR value for this W626 model phone when testedfor compliance against the standard was 0.772 W/kg forICNIRP recommendation. For limiting the radio waves exposure, it is recommended to reduce themobile phone call duration or to use a headset. The purpose of thoseprecautions is to take the mobile phone away from the head and thebody.
Limited warranty1 What Does This Limited Warranty Cover?Philips warrants to the original retail purchaser (“Consumer” or “You”)that this Philips cellular product and all accessories originally provided byPhilips in the sales package (“Product”) are free from defects in materials,design and workmanship under normal use in accordance with theoperating instructions and pursuant to the following terms andconditions. This limited warranty extends only to the Consumer forProducts purchased and used in the original country of purchase. Thelimited warranty is valid only in Philips’ intended country of sales of theproduct.2. How Long is The Limited Warranty Period?The limited warranty period for the Product extends for ONE (1) YEARfrom the date of purchase of the Product, documented by valid proof ofpurchase. The limited warranty for original Philips rechargeable batteryextends for six (6) months from the date of purchase.3. What Will Philips Do if The Product is Not Free From Material
Defects in Materials and Workmanship During The LimitedWarranty Period?
During the limited warranty period, Philips or its authorized servicerepresentative will, at its option either repair or replace, without chargefor parts or labour, a materially defective Product with new orrefurbished parts or Product and return such repaired or replaced
Android Android is a trademark of Google, Inc.
Bluetooth™ Bluetooth™ is a trade-mark owned bytelefonaktiebolaget L M Ericsson, Sweden and licensedto Philips.
Philips PHILIPS and PHILIPS’ Shield Emblem are registeredtrademarks of Koninklijke Philips Electronics N.V.manufactured by Shenzhen Sang Fei ConsumerCommunications Co., Ltd. Under license fromKoninklijke Philips Electronics N.V..

32 Safety & Precaution
Product to the Consumer in working condition. Philips will retaindefective parts, modules or equipment.Repaired or replaced Product will be covered by this limited warrantyfor the balance of the original limited warranty period or ninety (90) daysfrom the date of repair or replacement whichever is longer. Repair orreplacement of Product, at Philips’ option is your exclusive remedy.4. What is Not Covered By This Limited Warranty?This limited warranty does not cover:a) Product that has been subjected to misuse, accident, shipping or otherphysical damage, improper installation, abnormal operation handling,neglect, inundation, fire, water or other liquid intrusion; orb) Product that has been damaged due to repair, alteration, ormodification by anyone not authorized by Philips; orc) Product that has reception or operation problems caused by signalconditions, network reliability or cable or antenna systems; ord) Product defects or problems caused by uses with non-Philips productsor accessories; or e) Product which warranty/quality stickers, product serial number orelectronic serial number has been removed, altered or rendered illegible;or f) Product purchased, used, serviced, or shipped for repair from outsidethe original country of purchase, or used for commercial or institutionalpurposes (including but not limited to Products used for rentalpurposes); or g) Product returned without valid proof of purchase or which proof ofpurchase has been altered or is illegible.h)Normal wear and tear or Force Majeure.5. How Do You Get Warranty Service?a) Return the Product to an authorized service center of Philips. You maycontact the local Philips office for the location of the nearest authorizedservice center.b)The SIM card must be removed from the Product before it is given toPhilips. Philips assumes no liability for damaged or loss of the SIM card orthe data contained therein.c)If the Product failure is not covered by this limited warranty, or thislimited warranty is inapplicable, void or invalid due to any terms and
conditions stated herein, the Consumer will be charged for the cost ofrepair or replacement of the Product and all other related cost incurredin repairing or replacing the Product.d) IMPORTANT - you are required to return the Product together witha valid proof of purchase which must identify the point of purchase, dateof purchase, Product model and Product serial number clearly.6. Other Limitation: This Warranty is The Entire Agreement.
EXCEPT FOR THE EXPRESS WARRANTIES SET FORTH ABOVE ANDTHOSE IMPLIED BY LAW AND WHICH CANNOT BE EXCLUDEDOR MODIFIED BY AGREEMENT, PHILIPS PROVIDES NO OTHERWARRANTY WHETHER EXPRESS OR IMPLIED (WHETHER BYSTATUTE, UNDER THE OPERATION OF LAW OR OTHERWISE)AND SPECIALLY DISCLAIMS ANY WARRANTY OF SATISFACTORYQUALITY MERCHANTABILITY OR FITNESS FOR A PARTICULARPURPOSE.PHILIPS’ TOTAL LIABILITY FOR DAMAGES RELATING TO ORARISING OUT OF THE PURCHASE OR USE OF THE PRODUCT,REGARDLESS OF THE TYPE OR CAUSE OF SUCH DAMAGE OR THEFORM OR CHARACTERISATION OF THE CLAIM ASSERTED (E.G.CONTRACT OR TOPIT), SHALL NOT EXCEED THE ORIGINALPURCHASE PRICE PAID FOR THE PRODUCT.
HOWEVER IN NO EVENT SHALL PHILIPS BE LIABLE FOR ANYPUNITIVE, SPECIAL, INCIDENTAL, INDIRECT ORCONSEQUENTIAL DAMAGES (INCLUDING BUT NOT LIMITED TOTHE LOSS OF USE, LOSS OF TIME, INCONVENIENCE, COMMERIALLOSS, LOST PROFITS, LOST BUSINESS OPPORTUNITIES, COST OFSUBSTITUTION OF GOODS OR SERVICES, INVESTMENTS,DAMAGE TO GOODWILL OR REPUTATION, OR LOSS OF DATAAND CLAIMS BY THIRD PARTIES) RESULTING FROM PURCHASEOR USE OF THE PRODUCT, TO THE FULLEST EXTENT ALLOWEDBY LAW, WHETHER OR NOT PHILIPS HAS BEEN ADVISED OF THEPOSSIBILTY OF SUCH DAMAGES. THESE LIMITATIONS SHALLAPPLY NOTWITHSTANDING THE FAILURE OF THE ESSENTIALPURPOSE OF ANY LIMITED REMEDY.

Safety & Precaution 33
This limited warranty represents the complete and exclusive agreementbetween the Consumer and Philips with respect to this cellular Productand it supercedes all prior agreements between the parties, oral orwritten, and all other communications between the parties relating tothe subject matter of this limited warranty. No carrier, retailer, agent,dealer, employee, thereof, or employee of Philips is authorized to makemodifications to this limited warranty and you should not rely on anysuch representation.This limited warranty does not affect the Consumer’s statutory rightsunder applicable national laws in force.
Declaration of ConformityWe, Shenzhen Sang Fei ConsumerCommunications Co., Ltd.11 Science and Technology Road,Shenzhen Hi-tech Industrial Park,Nanshan District, Shenzhen 518057China
declare under our sole responsibility that the productPhilips W626Philips GSM/GPRS/EDGE/WCDMA/HSDPA/HSUPA 900/1800/1900/Band1TAC number: 8609 5001
to which this declaration relates, is in conformity with the followingStandards:
SAFETY: EN 60950-1:2006/A11:2009 HEALTH: EN 50360:2001 EN 62209-1:2006 EN 62209-2:2010EMC: EN 301 489-1 v1.8.1 EN 301 489-7 v1.3.1 EN 301 489-17 v2.1.1 EN 301 489-19 v1.2.1 EN 301 489-24 v1.5.1 EN 55013:2001+A2:2006 EN 55020:2007
Radio: EN 301 511 v9.0.2 ETSI TS 151 010-1 v9.5.0
EN 301 908-1 EN 301 908-2 v4.2.1 EN 300 328 v1.7.1 ETS 300 487 A1:1997
We hereby declare that (all essential radio test suites have been carriedout and that) the above named product is in conformity to all theessential requirements of Directive 1999/5/EC.The Conformity assessment procedure referred to in Article 10 and de-tailed in Annex III or IV of Directive 1999/5/EC has been followed withthe involvement of the following Notified Body(ies):849 N.W. State Road 45 P.O. Box 370 Newberry, Florida 32669 USA..
Identification mark: CE1177Februaty 15th, 2012
Quality Manager