w 1. setting the network function on the radio rs-ba1 q · setting the network function on the...
TRANSCRIPT

IP REMOTE CONTROL SOFTWARE
Installation guide w
This guide contains instructions on how to config-ure the remote control system, and how to remotely control a radio.Before reading this guide, please finish the installa-tion using the RS-BA1 Preparations and Installation guide q.See the RS-BA1 Instruction Manual included in the CD, for detailed instructions.
Example of the remote control system
Before configuration
This guide explains the minimum required settings to configure a remote control system, taking the following illustration as an example. In this example, a Remote station remotely controls a Base station radio through the Internet.
• We recommend that you place the Remote station’s PC near the Base station to check that the settings are correct, and that you can correctly control the radio.
• Only users whose ID and password are registered on the Base station can access the Base station radio. BE CAREFUL in managing IDs and passwords.
• See the Instruction Manual included in the CD for detailed instructions on the RS-BA1. You can also refer to each software’s help file for assistance with the functions and settings. While the software is open, push the [F1] key of the PC’s keyboard to open the help file.
IP address: 192.168.0.10IP addressWAN: ���.���.���.���
LAN: 192.168.0.1
Domain name: Icom-rsba1.com
RC-28 (Optional)
InternetInternet
Remote station
User ID:Password:
USER1USER0001
Base station
IC-7800(Icom1)6AhAuto
Model:CI-V address:Baud rate:
Connect to the LAN port
Router Router
These instructions are based on using the IC-7800.
IC-7800
A radio with the server functionPC
To configure the remote control system, the following settings are required.
• To let the Remote Utility work properly, it must be added as an exception in the Firewall. See the RS-BA1 Instruction Manual included in the CD, for details.
• If you configure the remote control system through the Internet, you need to configure the Base station and Remote station routers to allow Internet access.
Configure the port forwarding settings and IP filter settings on your router for port numbers 50001, 50002, and 50003. See your router’s manual for details of how to configure the settings.• Before you start communicating using the RS-BA1, the PC’s audio volume must be set to a proper level. Adjust the audio level of the device that your microphone, speaker, or headset is connected to. If you connect the microphone, speaker, or headset after setting the audio level, confirm the level has not changed.
See the RS-BA1 Instruction Manual included in the CD, for details.
In this guide, explains how to set the radio for operating the remote control system through the internet as illustrated on the left page.
When using the remote control system in a local network, read “RS-BA1 Instruction Manual” on the supplied CD.
This section describes how to setup the Base station.Before configuring the settings, turn ON the radio.
q Hold down [EXIT/SET] for 1 second to select the Set mode menu screen.
w Push [F-5•OTHERS] to enter the Others set mode.e Push [F-1•▲ ] or [F-2•▼ ] to select the desired item. • See the list as shown to the right for the setting items.r Adjust/select or enter the needed contents. • See the list as shown to the right for the setting contents. • Hold down [F-4•DEF] for 1 second to return them to their de-
faults. • See the RS-BA1 Instruction Manual included in the CD, for de-
tails.t Push [EXIT/SET] to exit the Set mode.
NOTE: When you change the setting that shows “(Val-id after Reboot),” you have to reboot the radio after set-ting, so they will take effect.• After the reboot, keep the radio’s power ON, or re-
main in the remote standby mode.
[Setting items and contents]• Network setting
Items Contents
Network Control OFF (Default) ON
IP Address IP address that is not assigned to any other device.Example: 192.168.0.10
(Default)
Default Gateway IP address of the LAN side on the routerExample: 192.168.0.1
Control Port (UDP) 50001 (Default)
Serial Port (UDP) 50002 (Default)
Audio Port (UDP) 50003 (Default)
Internet Access Line Your internet access line typeExample: FTTH (Default)
DHCP ON (Default) OFF(For only the IC-7851 and IC-7850)
• Radio registration
Items Contents
Network Radio Name Desired Network Radio Name• Up to 16 charactersExample: IC-7800(Icom1)
CI-V Address Desired CI-V AddressExample: the radios’ default setting.IC-7851/IC-7850: 8EhIC-7800: 6AhIC-7700: 74h
CI-V Baud Rate Desired Baud RateExample: Auto (Default)
• User registration
Items Contents
Network User1/2/3ID
Desired User ID• Up to 16 charactersExample: USER1
Network User1/2/3Password
Desired Password• 8 to 16 characters• At least two different characters
must be used.Example: USER0001
Network User1/2/3Administrator
NO (Default) YES• In case the user is set as an ad-
ministrator.
• Transmitting audio setting
Items Contents
Network MOD Use ON (Default)(For only the IC-7800 and IC-7700)
Step 2: Installation guide q Step 1: Preparations Step 3: Installation guide w
1. Configure the remote control sysytem
NOTE:The user ID, password, and other settings in this illustra-tion are only an example. Please configure the system using your own settings.
1. Setting the Network function on the radio
To prevent unauthorized access:Set a long and strong password so that no one can pos-sibly guess it.Mix upper and lower case letters, numbers or characters.
For your convenience:If you use an RC-28 remote encoder at the Remote station, you can use the RS-BA1 and feel like you are operating the actual radio’s main dial, transmit key and so on.
RS-BA1For radios with the Network function
1-1-32 Kamiminami, Hirano-ku, Osaka 547-0003, Japan A-6894W-7EX-e Printed in Japan© 2013–2015 Icom Inc.
This section describes how to setup the Remote station (Client) PC.Before configuring the settings, connect a speaker and microphone, or a headset to the Remote station’s PC.Before configuring the settings, turn ON the radio.
This section describes how to connect and remotely control a radio from a Remote station using the Remote Controller.• The description in this section is based on the assumption that the connection to the radio using the Remote Utility has suc-
ceeded (“<<CONNECT>>” is displayed under the radio name).
1. Configure the remote control sysytem (Continued) 2. Remote control operation
2. Settings on the Remote station’s PC
1
1Network setting
q Double-click the “Remote Utility” icon on your desk-top to open the Remote Utility.
w “Please set your own PC information” appears, then click [OK].
e The Network Setting screen appears. Configure the network settings as described below.
q Enter a name for your PC in the “PC Name” field. (Example: JG3YMK)
w Select your internet access line type in the “Inter-net Access Line” menu. (Example: FTTH)
e Click [Apply] to save the network settings.
qEnter
wSelecteClick
r After clicking, “Take effect after restarting the appli-cation” appears, then click [OK], and restart the Re-mote Utility.
Connecting to the Base station (Server)
q Select the Radio Operation mode from the drop-down list located at the top of the screen, and then click the [Server List] tab.
w The Server List screen appears, then click [Add].e The Server Registration screen appears. Register a
Base station as described below. q Enter a name for the Base station in the “Server
Description” field. (Example: IC-7800) w Enter the WAN’s IP address or the domain name
of the Base station in the “Server Address or Net-work Name” field. (Example: icom-rsba1.com)
e Enter your user ID (Example: USER1) and pass-word (Example: USER0001) which are registered in the Base station, in the “User ID” and “Pass-word” fields.
r Click [OK] to save the settings and close the screen.
qEnter
wEnter
eEnter
rClick
r In the Server List screen, select the registered Base station name (Example: IC-7800), and then click [Connect].
• “CONNECTING” appears under the Base station name when the connection has succeeded.
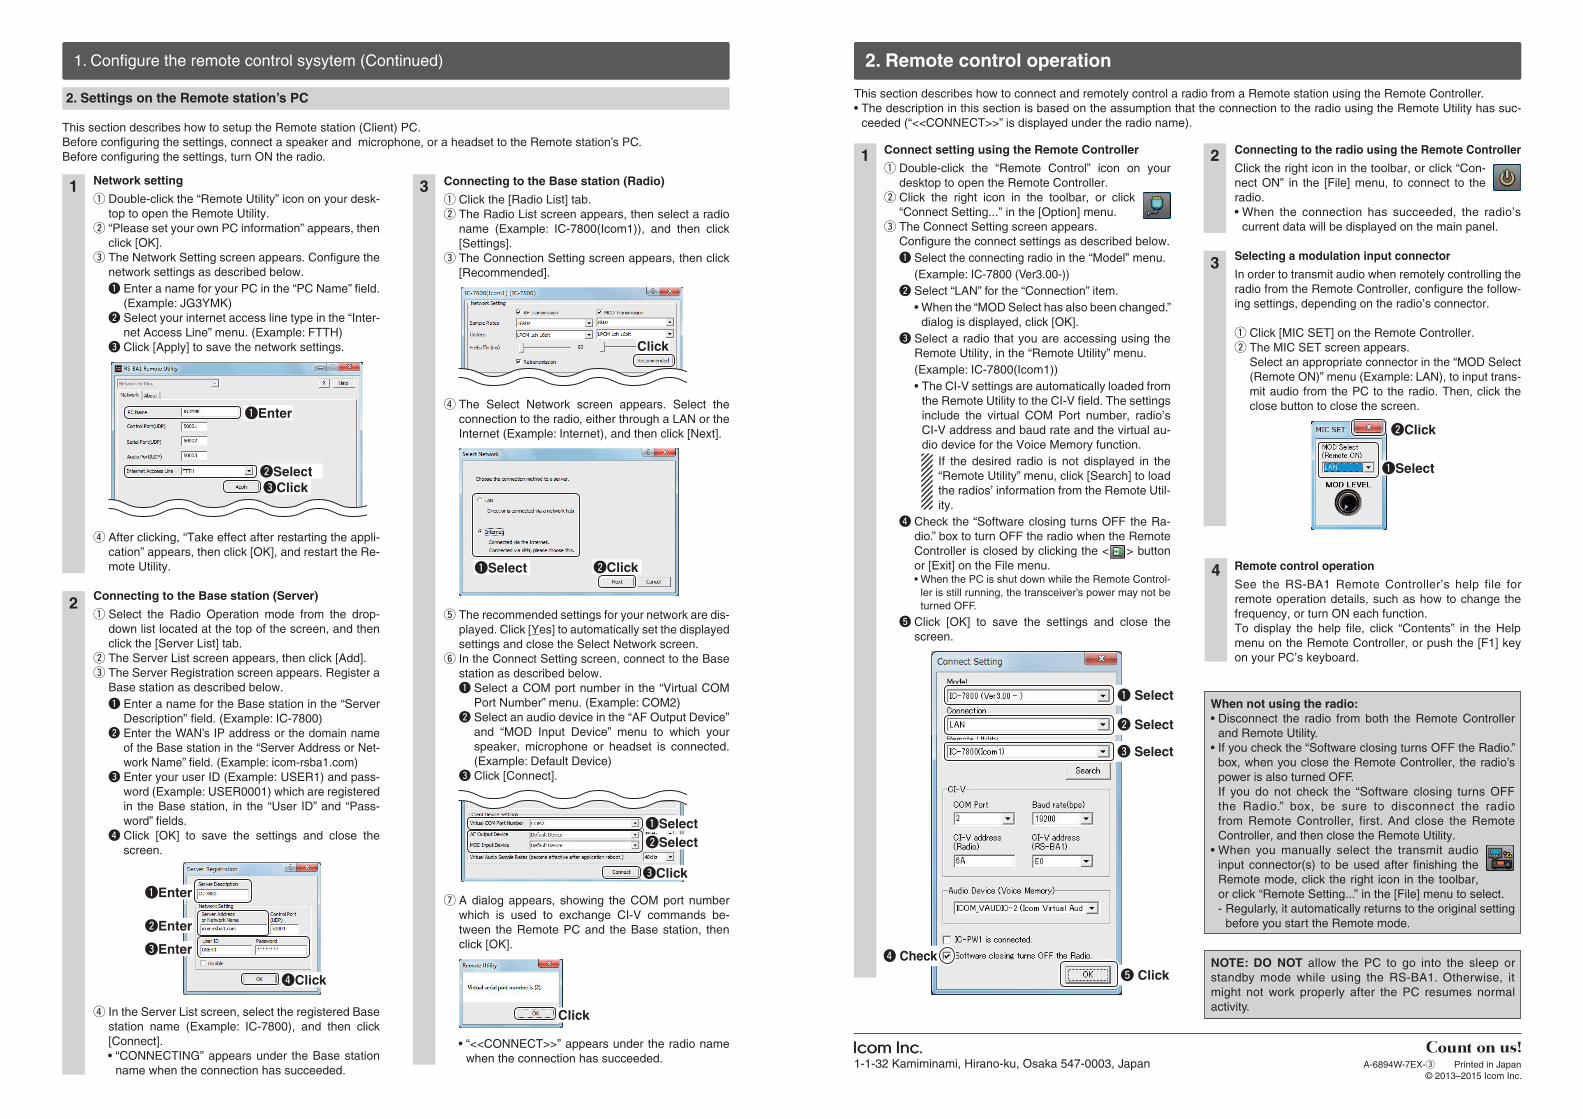
Connect setting using the Remote Controller
q Double-click the “Remote Control” icon on your desktop to open the Remote Controller.
w Click the right icon in the toolbar, or click “Connect Setting...” in the [Option] menu.
e The Connect Setting screen appears. Configure the connect settings as described below. q Select the connecting radio in the “Model” menu. (Example: IC-7800 (Ver3.00-)) w Select “LAN” for the “Connection” item. • When the “MOD Select has also been changed.”
dialog is displayed, click [OK]. e Select a radio that you are accessing using the
Remote Utility, in the “Remote Utility” menu. (Example: IC-7800(Icom1)) • The CI-V settings are automatically loaded from
the Remote Utility to the CI-V field. The settings include the virtual COM Port number, radio’s CI-V address and baud rate and the virtual au-dio device for the Voice Memory function.
If the desired radio is not displayed in the “Remote Utility” menu, click [Search] to load the radios’ information from the Remote Util-ity.
r Check the “Software closing turns OFF the Ra-dio.” box to turn OFF the radio when the Remote Controller is closed by clicking the < > button or [Exit] on the File menu.
• When the PC is shut down while the Remote Control-ler is still running, the transceiver’s power may not be turned OFF.
t Click [OK] to save the settings and close the screen.
2
3
2
3
Connecting to the Base station (Radio)
q Click the [Radio List] tab.w The Radio List screen appears, then select a radio
name (Example: IC-7800(Icom1)), and then click [Settings].
e The Connection Setting screen appears, then click [Recommended].
Click
r The Select Network screen appears. Select the connection to the radio, either through a LAN or the Internet (Example: Internet), and then click [Next].
qSelect wClick
t The recommended settings for your network are dis-played. Click [Yes] to automatically set the displayed settings and close the Select Network screen.
y In the Connect Setting screen, connect to the Base station as described below.
q Select a COM port number in the “Virtual COM Port Number” menu. (Example: COM2)
w Select an audio device in the “AF Output Device” and “MOD Input Device” menu to which your speaker, microphone or headset is connected. (Example: Default Device)
e Click [Connect].
qSelectwSelect
eClick
u A dialog appears, showing the COM port number which is used to exchange CI-V commands be-tween the Remote PC and the Base station, then click [OK].
Click
• “<<CONNECT>>” appears under the radio name when the connection has succeeded.
Connecting to the radio using the Remote Controller
Click the right icon in the toolbar, or click “Con-nect ON” in the [File] menu, to connect to the radio.• When the connection has succeeded, the radio’s
current data will be displayed on the main panel.
Selecting a modulation input connector
In order to transmit audio when remotely controlling the radio from the Remote Controller, configure the follow-ing settings, depending on the radio’s connector.
q Click [MIC SET] on the Remote Controller. w The MIC SET screen appears. Select an appropriate connector in the “MOD Select
(Remote ON)” menu (Example: LAN), to input trans-mit audio from the PC to the radio. Then, click the close button to close the screen.
wClick
qSelect
Remote control operation
See the RS-BA1 Remote Controller’s help file for remote operation details, such as how to change the frequency, or turn ON each function.To display the help file, click “Contents” in the Help menu on the Remote Controller, or push the [F1] key on your PC’s keyboard.
4
NOTE: DO NOT allow the PC to go into the sleep or standby mode while using the RS-BA1. Otherwise, it might not work properly after the PC resumes normal activity.
When not using the radio:• Disconnect the radio from both the Remote Controller
and Remote Utility. • If you check the “Software closing turns OFF the Radio.”
box, when you close the Remote Controller, the radio’s power is also turned OFF.
If you do not check the “Software closing turns OFF the Radio.” box, be sure to disconnect the radio from Remote Controller, first. And close the Remote Controller, and then close the Remote Utility.
• When you manually select the transmit audio input connector(s) to be used after finishing the Remote mode, click the right icon in the toolbar, or click “Remote Setting...” in the [File] menu to select.
- Regularly, it automatically returns to the original setting before you start the Remote mode.
e Select
q Select
r Checkt Click
w Select