vonage companion™ user guide for the mac
TRANSCRIPT

Issue 1 Mar. 05, 2009
View the Terms of Service by visiting the Vonage website at www.vonage.com/tos. 1
Vonage Companion™ User Guide for the Mac

Issue 1 Mar. 05, 2009
View the Terms of Service by visiting the Vonage website at www.vonage.com/tos. 2
Table of Contents 1 Introduction .........................................................................................................................3
1.1 What is Vonage Companion™?......................................................................................................... 3 Standard Features....................................................................................................................................................................... 3 Enhanced Features and Functions ............................................................................................................................................. 4
2 Installation and Setup.........................................................................................................4 2.1 Getting Ready .................................................................................................................................... 4
System Requirements ................................................................................................................................................................. 4 Audio Device Requirements........................................................................................................................................................ 4
2.2 Installing Vonage Companion ............................................................................................................ 5 2.3 Configuring Vonage Companion........................................................................................................ 6
Setting up for Voicemail .............................................................................................................................................................. 6 Setting up a Contact List ............................................................................................................................................................. 6
3 Using Vonage Companion .................................................................................................7 3.1 Starting and Logging in to Your Vonage Companion ........................................................................ 7 3.2 Shutting Down.................................................................................................................................. 11 3.3 The Onscreen Vonage Companion ................................................................................................. 12
The Vonage Companion Menu ................................................................................................................................................. 13 Showing and Hiding Parts of Vonage Companion .................................................................................................................... 15
3.4 Placing a Call ................................................................................................................................... 16 3.5 Handling an Incoming Call ............................................................................................................... 18 3.6 Call Waiting ...................................................................................................................................... 19 3.7 Blocking Incoming Calls ................................................................................................................... 19 3.8 Handling an Established Call ........................................................................................................... 21 3.9 Transferring a Call............................................................................................................................ 22
Quick Transfer........................................................................................................................................................................... 22 Transfer this Call ....................................................................................................................................................................... 23
3.10 Recording a Call............................................................................................................................. 24 3.11 Voicemail........................................................................................................................................ 24 3.12 Conference Calls............................................................................................................................ 25
Starting a Conference Call ........................................................................................................................................................ 25 Managing the Conference ......................................................................................................................................................... 28
4 Vonage Companion Contacts & History........................................................................30 4.1 My Contacts ..................................................................................................................................... 30
Setting up Contacts ................................................................................................................................................................... 31 Managing Contacts ................................................................................................................................................................... 35 Using Contacts .......................................................................................................................................................................... 36
4.2 My History ........................................................................................................................................ 37 Managing the Lists of Calls ....................................................................................................................................................... 37 Calling from a List...................................................................................................................................................................... 38
5 Configuring Vonage Companion.....................................................................................39 5.1 Configuring Preferences .................................................................................................................. 39
Preferences – Application ......................................................................................................................................................... 39 Preferences – Alerts and Sounds ............................................................................................................................................. 40 Preferences – Quick Transfer ................................................................................................................................................... 41 Preferences – Audio Devices.................................................................................................................................................... 42 Preferences – Bandwidth Saver................................................................................................................................................ 44 Preferences – Diagnostics ........................................................................................................................................................ 45
Issue 1 Mar. 05, 2009
View the Terms of Service by visiting the Vonage website at www.vonage.com/tos. 3
1 Introduction 1.1 What is Vonage Companion™? With your busy lifestyle, Vonage offers you more ways to stay in touch using your Vonage service. Vonage Companion lets you stay connected at home or on the go!
Your Vonage Companion has the same phone number as your main Vonage phone line, so using the Companion is like taking a portable extension of your home phone with you wherever you go. Simply download and install the Vonage Companion application onto any Mac, log in using your familiar Vonage web account username and password, and use the Mac’s built-in microphone and speakers or plug in a headset with microphone to make and receive calls.
You can even install your Vonage Companion on multiple computers. There are two versions of Vonage Companion, one for Macs and one for Windows. You can download, install and use either or both versions of Companion with your login credentials. When you log in, Vonage will automatically log you out of another Companion session that you left running!
Your Vonage Companion does not replace your home phone, it expands it. Incoming calls ring both your home phone and, if you’re logged in, your Vonage Companion - pick up your calls either at home or on the go. Once a call is answered it can’t be picked up from the other phone. For instance, if you answer a call using Vonage Companion it can no longer be answered from your home phone. However, if you decline to answer a call on the Vonage Companion it will continue to ring your home phone.
Make simultaneous outgoing calls from your home phone and from your Companion. Even if your Vonage Companion is in use, your home phone is always functional.
Standard Features Vonage Companion has all the standard features, including:
• Call display and Voicemail indicator. • Speakerphone and Mute. • Redial and Hold. • Call history – list of received, missed, and dialed calls. • Call transfer. • Audio conferencing. In addition to the standard telephone features, Vonage Companion offers the following enhanced features: • Selective call block. • Call recording.

Issue 1 Mar. 05, 2009
View the Terms of Service by visiting the Vonage website at www.vonage.com/tos. 4
Enhanced Features and Functions The Vonage Companion also supports the following features and functions:
• Managed contact list – synchronized with your Vonage online Contact Center. • Personalize your contacts by adding a ring tone or a photo. • Automatic detection and configuration of audio devices. • Acoustic echo cancellation, automatic gain control. • Slightly change the sound quality of your call in order to save valuable bandwidth.
2 Installation and Setup 2.1 Getting Ready Make sure you have your Vonage web account username and password handy. You’ll need both to log into your Vonage Companion.
System Requirements Processor Minimum: Intel or PPC G5 1.5 GHz
Optimal: Intel
Memory Minimum: 128 MB RAM Optimal: 256 MB RAM
Hard Disk Space 60 MB
Operating system Minimum: MAC OS 10.4.11 (Tiger) or MAC OS 10.5.3 (Leopard*) *We recommend running the latest security updates of the OS, although the Vonage Companion will run on all 10.5 (Leopard) flavors Optimal: Leopard
Connection High speed broadband Internet connection (LAN, wireless)
Audio Device Requirements Vonage Companion requires both speakers and a microphone to make calls. Based on the capabilities of your Mac any of the following configurations are acceptable:
• Built-in speakers and microphone • External speakers and microphone • USB headset with microphone (preferred for optimal call quality) • Bluetooth® headset with microphone • USB phone

Issue 1 Mar. 05, 2009
2.2 Installing Vonage Companion Download and install Vonage Companion. The download link is located in the Online Help.
View the Terms of Service by visiting the Vonage website at www.vonage.com/tos. 5
After clicking on the download link, it will automatically begin the download in a few seconds.
Click Agree to accept the terms in the license agreement and the download will continue.
When prompted, drag the Vonage Companion icon into the Applications folder icon. The Vonage Companion icon will appear in your Applications folder.
If you’d like Vonage Companion to be available from your dock, drag the Vonage Companion icon from your Applications folder into your dock. Click the Vonage Companion icon whenever you want to call with Vonage Companion!

Issue 1 Mar. 05, 2009
2.3 Configuring Vonage Companion If Vonage Companion is not already running, start it as you would any other program: Double-click on the Vonage Companion icon in the Applications folder. Vonage Companion appears.
You can create a shortcut on the dock to start Vonage Companion by dragging the icon from the Applications Folder to the dock. A shortcut will appear on your dock.
Setting up for Voicemail Your Vonage Companion is an extension of your main Vonage phone line, so it shares the same voicemail box. Just dial *123 from your main Vonage line, or click on the voicemail button on your Vonage Companion. Enter your voicemail password and follow the easy instructions you will hear during setup!
Your Vonage Companion also has a convenient Voicemail button that you can use to access your Vonage voicemail. In addition, your Vonage Companion lets you know when you have voice messages waiting.
You can also access your voicemail from any other phone by dialing your local access number. Refer to Voicemail Plus Basics for more information.
Setting up a Contact List Typically, you will want to create contacts in order to easily make phone calls. You can set up contacts in several ways:
• During a call that you place or receive, you can add the other party to your contact list. • You can add contacts to the Contact list one by one. • You can import a contact list from a file or from another application. With Vonage, managing your contacts is easy with a unified Contact Center! Your Vonage Companion contacts will automatically synchronize with the contacts in your Vonage online Contact Center. If you add, delete, or edit a contact in your Vonage Companion’s My Contacts, the changes will automatically be applied to your Vonage online Contact Center, and vice versa.
For more information about managing contacts, please see “Vonage Companion Contacts & History.”
View the Terms of Service by visiting the Vonage website at www.vonage.com/tos. 6

Issue 1 Mar. 05, 2009
3 Using Vonage Companion 3.1 Starting and Logging in to Your Vonage Companion If Vonage Companion is not already running, start it as you would any other program: Double-click on the Vonage Companion icon in the Applications folder or on your dock. The Login windows for Vonage Companion will appear.
Log into Vonage Companion using your familiar Vonage web account username and password.
Messages during Login
There are several messages provided in the bottom of the login window during the login process, to let you know when login is successful and to help you determine what’s wrong if your Vonage Companion has trouble with the login process.
Message Description
Logging in … Your username and password are in the process of being verified.
Login successful. Your Vonage Companion has successfully logged in with the username and password that you entered.
Invalid username or password. There is a problem with either your username or your password. Please try again. If you have forgotten your password, please click on the “Forgot your Vonage password?” link for assistance.
View the Terms of Service by visiting the Vonage website at www.vonage.com/tos. 7

Issue 1 Mar. 05, 2009
View the Terms of Service by visiting the Vonage website at www.vonage.com/tos. 8
Vonage Companion is not supported with this account.
Your account has not been set up with Vonage Pro. Log into your Vonage online web account to sign up for Vonage Pro. Vonage Companion is only available to customers with a Vonage Pro residential calling plan.
If you are already a Vonage customer, log on to your Vonage Online Account and click Add-ons > Upgrade to Vonage ProSM. Sign up for Vonage Pro and you’ll immediately be able to use Vonage Companion.
If you are not yet a customer, start your Vonage service by choosing the Vonage ProSM calling plan. Sign up for Vonage Pro and you can immediately start placing local and long distance calls with your Vonage Companion, even if you haven’t received your Vonage adapter. Once you’ve received and installed your Vonage adapter you’ll also be able to place International calls.
Login failed. No network connection available on this computer.
Your Vonage Companion was not able to successfully log in due to a problem with your computer or local area network. Make sure the network cable on your computer is plugged in. If your computer connects wirelessly to your local area network, make sure your wireless connection is working.
Login failed. Cannot reach the Vonage network.
Your Vonage Companion was not able to successfully log in due to a problem reaching the Vonage network. This problem typically happens when your Vonage Companion is not able to connect to the Internet. Make sure the computer on which your Vonage Companion is installed can access the Internet by checking various web sites. If you are having trouble accessing the Internet, try rebooting (power off and then on) your Broadband modem (such as your DSL or Cable modem). If you are running a firewall or other security software on your Mac, you may see one or more security alerts when you launch Vonage Companion. There is no need to be concerned if you see alerts, they simply mean that Vonage Companion has been detected as a new application and your firewall needs to be told that it is an accepted application. However, if your firewall or other security software requires you to unblock/approve/accept Vonage Companion, follow the necessary directions for allowing access.
By default, the Mac firewall is configured to Allow all incoming connections. If you have changed this setting, you may need to change the firewall settings to allow Vonage Companion to function properly.
To change your firewall settings to allow Vonage Companion to access the Internet, open System Preferences (click the icon on the dock), and click the Security icon. Click on the Firewall tab. If your firewall is set to “Set access for specific services or applications”, be sure Vonage Companion appears in the list of applications.
If you are using Vonage Companion in a corporate environment, contact your Network Administrator to determine how to use Vonage Companion with the corporate firewall.

Issue 1 Mar. 05, 2009
Messages due to Multiple Login Attempts You can install your Vonage Companion on multiple computers (both Macs and PCs) but only one at a time can be logged in. For each instance of your Vonage Companion, you will use the same username and password to log in. When you log in, Vonage will automatically log you out of another Companion session that you left running, or give you further information or options. Refer to the following table:
Message Login Scenario
Ready to call. Another instance of your Vonage Companion was automatically logged out.
Successful login. When you logged in, another instance of your Vonage Companion (which wasn’t on a phone call) was automatically logged out.
Another instance of your Vonage Companion is on a phone call. Would you like to log out that other instance and terminate the call?
Another instance of your Vonage Companion is on a phone call, so you have the choice of logging it off or not.
Cannot log in at this time. Another instance of your Vonage Companion is on an emergency phone call.
Unsuccessful login. Another instance of your Vonage Companion is on an emergency (911) phone call so you must wait until the emergency call is completed.
You have been logged out by another instance of your Vonage Companion.
You are the Vonage Companion instance that was automatically logged off due to another instance of your Vonage Companion logging in.
You’ll know your login and connection to Vonage were successful and you can place and receive phone calls when your Vonage Companion launches and you see the message “Ready to Call” in the Call Panel. You should also see your phone number displayed at the top of your Vonage Companion – remember, it will be the same number as your Vonage Home phone!
View the Terms of Service by visiting the Vonage website at www.vonage.com/tos. 9

Issue 1 Mar. 05, 2009
View the Terms of Service by visiting the Vonage website at www.vonage.com/tos. 10
Messages after Login
There are several messages provided in the Call Panel of your Vonage Companion after login, either to let you know when your Vonage Companion is ready for you to make and receive phone calls and to help you determine what’s wrong if there’s a problem.
Message Description
Ready to Call Your Vonage Companion was able to successfully connect to the Vonage network. Congratulations - you can now make and receive calls!
No network connection available on this computer. This message will typically be displayed after you successfully logged in but then a problem arises with your Computer’s local area network connection. Make sure the network cable on your computer is plugged in. If your computer connects wirelessly to your local area network, make sure your wireless connection is working.
Cannot reach the Vonage network. This message will typically be displayed after you successfully logged in but then a problem arises with your Vonage Companion’s connection to the Vonage network.
This problem typically happens when your Vonage Companion is not able to connect to the Internet. Make sure the computer on which your Vonage Companion is installed can access the Internet by checking various web sites. If you are having trouble accessing the Internet, try rebooting (power off and then on) your Broadband modem (such as your DSL or Cable modem).
If you are running a firewall or other security software on your Mac, you may see one or more security alerts when you launch Vonage Companion. There is no need to be concerned if you see alerts, they simply mean that Vonage Companion has been detected as a new application and your firewall needs to be told that it is an accepted application. However, if your firewall or other security software requires you to unblock/approve/accept Vonage Companion, follow the necessary directions for allowing access. By default, the Mac firewall is configured to Allow all incoming connections. If you have changed this setting, you may need to change the firewall settings to allow Vonage Companion to function properly. To change your firewall settings to allow Vonage Companion to access the Internet, open System Preferences (click the icon on the dock), and click the Security icon. Click on the Firewall tab. If your firewall is set to “Set access for specific services or applications”, be sure Vonage Companion appears in the list of applications. If you are using Vonage Companion in a corporate environment, contact your Network Administrator to determine how to use Vonage Companion with the corporate firewall.

Issue 1 Mar. 05, 2009
3.2 Shutting Down To shut down Vonage Companion, choose Vonage Companion > Quit Vonage Companion. Or press Q.
Clicking on the red button on Vonage Companion will hide the application window. It does not shut down Vonage Companion.
View the Terms of Service by visiting the Vonage website at www.vonage.com/tos. 11

Issue 1 Mar. 05, 2009
3.3 The Onscreen Vonage Companion
Call Panel
Contacts & History Panel
View the Terms of Service by visiting the Vonage website at www.vonage.com/tos. 12

Issue 1 Mar. 05, 2009
The Vonage Companion Menu When your Vonage Companion is the active application on your Mac, the following Vonage Companion menu will appear in your Mac’s menu bar:
Vonage Companion • About Vonage Companion. Displays the current version of Vonage Companion you are running. • Preferences. These settings control the way that you work with Vonage Companion. Note that
settings apply locally, which means that if you install Vonage Companion on another computer you'll be able to configure the settings differently.
• Logout. To log off Vonage Companion, without shutting down. If you log out, you'll be presented with the log in screen and prompted to enter your username and password.
• Services. Displays common services (not related to Vonage Companion) that are related to the Mac.
• Hide Vonage Companion. Temporarily hides the Vonage Companion application window. This may be useful if you have several windows open on your desktop at once.
• Hide Others. Temporarily hides every application window other than the Vonage Companion. This may be useful if you have several windows open on your desktop at once.
• Show All. Shows all the applications windows that were previously hidden using the Hide Others option.
• Quit Vonage Companion. To shut down Vonage Companion. You can also exit by pressing -Q.
Edit Allows you to perform standard editing functions like copying and pasting text. For example, let’s say you are entering multiple contacts that work for the same company. They may each have a unique phone number, but all work at the same location. If you highlight the address in one contact profile, choose copy, you can paste the address into the profiles of the other contacts with only having typed it once.
Contacts
Lets you work with contacts. Everything in this menu except for import and export can also be performed directly in the Contacts & History panel. For information on these actions, including import and export, please see “Vonage Companion Contacts & History.”
Actions Lists the actions that you can perform, depending on the current "state" of Vonage Companion. Selected items on the Vonage Companion, as on other Mac applications, are outlined in blue. For example, if a contact is selected, it is highlighted in blue and the Actions menu lists all the actions that can be performed on that contact. Similarly, if you Ctrl-click, you will be presented with the same items that are in the Actions menu.
View the Terms of Service by visiting the Vonage website at www.vonage.com/tos. 13

Issue 1 Mar. 05, 2009
View the Terms of Service by visiting the Vonage website at www.vonage.com/tos. 14
Help
Provides access to Quick Help and Online Help. The Quick Help is hosted locally, which may be useful for occasions when you’re not connected to the internet.

Issue 1 Mar. 05, 2009
Showing and Hiding Parts of Vonage Companion
Restore to Large View
Minimize to Dock Hide Vonage Companion
Show/Hide Dialpad
Show/Hide Contacts & History
Drag to Resize
Dialpad
You can still receive calls when Vonage Companion is hidden or minimized.
If you exit when the Contacts & History panel is hidden, Vonage Companion will start next time with the Contacts & History panel hidden.
View the Terms of Service by visiting the Vonage website at www.vonage.com/tos. 15

Issue 1 Mar. 05, 2009
3.4 Placing a Call Making a phone call is fast, easy and versatile with Vonage Companion. Dial a number, call from your contacts or call history, or redial. You can place a call when another call is already in progress, make calls from both your Vonage Companion and your home phone at the same time, and even call your home phone from your Vonage Companion (or vice versa)!
Since your Vonage Companion will have the same phone number as your home phone, think of it as your home phone on the move. Incoming calls ring both your home phone and, if you’re logged in, your Vonage Companion - pick up your calls either at home or on the go. Make simultaneous outgoing calls from your home phone and from your Companion. Even if your Vonage Companion is in use, your home phone is always functional.
Note: When you call your home phone from Vonage Companion, your Companion will also ring, Please do not answer the call on your Companion so it can be picked up on your home phone.
View the Terms of Service by visiting the Vonage website at www.vonage.com/tos. 16
Redial Drop Down List
Call Button
Call Entry Field
My Contacts View Selected
Groups Contacts
Note: Clicking on the Call entry field will highlight it in blue. Enter the phone number you are calling via the Vonage Companion dialpad or your computer keyboard.

Issue 1 Mar. 05, 2009
To Place a Call From the ... Description
Call Panel
1. Enter the phone number in the Call entry field using the dialpad or the computer keyboard.
2. Click the green Call button or press Enter on the computer keyboard.
Note: If another call is currently in progress, place a new call just as you did the initial call. A new call will appear and the current call will be put on hold.
Drag an entry from My Contacts or My History and drop it into the Call entry field. The call will be placed immediately.
Note: If the view contains lots of contacts, locate the contact by typing the first or last name into the field to filter the list.
Ctrl-click an entry in My Contacts or My History and click Call. The call will be placed immediately.
Note: If the view contains lots of contacts, locate the contact by typing the first or last name into the field to filter the list.
My Contacts View or
My History View in the
Contacts & History panel
Double-click an entry from My Contacts or My History. The call will be placed immediately.
Vonage Companion Menu Click Actions then choose Redial and the number to call. The call will be placed immediately.
Call Entry field Click the down arrow on the right side of the Call entry field and choose the number to call. The call will be placed immediately. Optionally, you may click the green Call button to pre-populate the Call entry field with the last phone number you dialed. Click the Call button again to call that number.
Placing another Call
To place a new call (without hanging up on the current call), place a call in any one of the methods previously described. An active Call Panel appears for each separate call.
Your Phone #
First Call Placed On Hold Second Call Initiated
Active Call Panels
Hiding your Identity
You can hide your identity on a call, so that the other person will not see your Caller ID on their phone.
On the Vonage Companion menu choose Actions > Hide my Number for this Call.
Your identity is hidden only for this call.
View the Terms of Service by visiting the Vonage website at www.vonage.com/tos. 17

Issue 1 Mar. 05, 2009
Calling Phone Numbers with Letters
Vonage Companion’s Turn Letters to Numbers feature allows you to easily call numbers like Vonage’s 1-700-WEATHER. Simply type the letters into the Call panel and Vonage Companion will automatically convert them to the appropriate numbers.
This feature is enabled by default. If you don’t want to use it for a call, click Actions > Turn Letters to Numbers in the Vonage Companion Menu. The feature will be disabled for this call.
Entering Digits in Response to Automated Voice Prompts While you are on a call, it is easy to enter responses to automated voice prompts such as your voicemail password, conference participant codes or responses to automated questions. When prompted, simply enter the digits using your computer’s keyboard or the Vonage Companion dialpad. You will hear beeps as the digits are entered but will not see them displayed on Vonage Companion. When prompted to enter digits, do not click on the Call entry field, highlighting it in blue, because Vonage Companion interprets that action as the first step in starting a new call.
Ending a Call
Click End on the Call panel. Details of the call remain on the Call Panel for a moment after the call ends. It will clear automatically.
3.5 Handling an Incoming Call Incoming calls ring both your Vonage Companion and your Vonage home phone. Whoever answers first will connect to the caller. If your Vonage Companion is not logged in and ready for calls, incoming calls will only ring your Vonage home phone.
Caller ID information about the incoming call will appear in the Incoming Call Panel. By default, if Vonage Companion is not in focus (i.e. the currently active application), it will pop up when an incoming call is received. (For information on configuring call notifications, see “Alerts and Sounds.”). If you decline to answer the call on your Vonage Companion, your home phone will continue to ring until either the call is answered or is directed to voicemail.
If your broadband service at home is temporarily interrupted or if your device is not connected, incoming calls ring both your Vonage Companion and your Network Availability Number if you’ve set one up.
View the Terms of Service by visiting the Vonage website at www.vonage.com/tos. 18
Issue 1 Mar. 05, 2009
Action From the ... Description
Answer Call Panel Click Answer.
If you are on another call, that first call is automatically put on hold. You are now talking to the new caller.
Or press Enter (on the keyboard), if Vonage Companion is the active application.
Decline Call Panel Click Decline. The call will end on your Vonage Companion, but it will continue to ring your home phone.
Ending a Call
Click End on the Call Panel. Details of the call remain on the Call Panel for a moment. They will clear automatically.
3.6 Call Waiting Call Waiting is always on for Vonage Companion. Although your Vonage Online Account settings apply to your Vonage phone number and typically apply for your home phone and Vonage Companion, disabling Call Waiting applies only to your home phone.
If you are on a call with your Vonage Companion, incoming calls will ring your home phone and Call Waiting will be functional on Vonage Companion.
3.7 Blocking Incoming Calls You can control how contacts can contact you on your Vonage Companion. You can set up controls in advance or “on the fly” (as phone calls come in).
Note: This only affects calls on your Vonage Companion, the call will not be blocked for your home phone.
On an Incoming Call
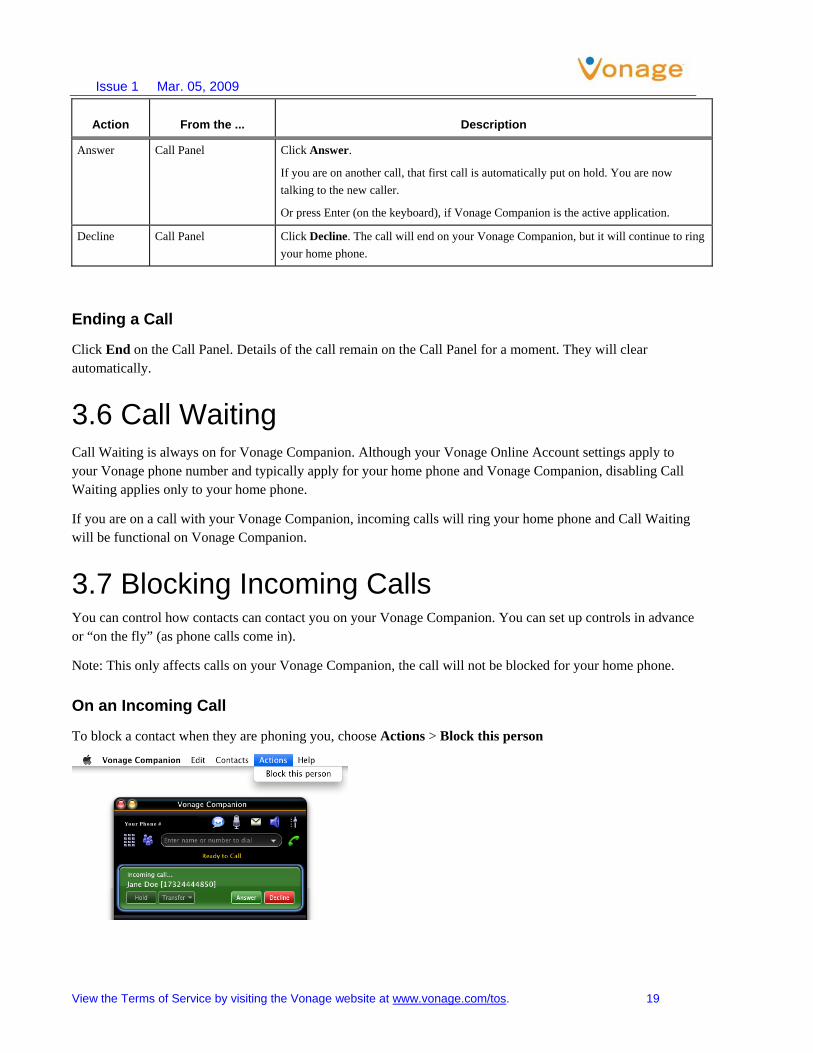
To block a contact when they are phoning you, choose Actions > Block this person
Your Phone #
View the Terms of Service by visiting the Vonage website at www.vonage.com/tos. 19

Issue 1 Mar. 05, 2009
The call is declined on your Vonage Companion and will continue to ring your home phone. In addition, “blocked” appears beside their name in the contact list.
You will no longer see incoming calls from this person on your Vonage Companion; they will automatically be declined. Remember, these calls will not be blocked from your home phone.
To later unblock this person, Ctrl-click their name on the contact list and choose Unblock Contact.
From the Contact List or History List
You can also selectively block callers in your Contacts or in your Call History.
Ctrl-click on the name and choose Block Contact. A call from that person will not ring on your Vonage Companion. Remember, these calls will not be blocked from your home phone. So if you block a contact in your Vonage Companion your Companion will not ring if that contact calls your phone number but your home phone will still ring. If the call goes unanswered, it will go to voicemail.
To later unblock this person, Ctrl-click on the name and choose Unblock Contact.
View the Terms of Service by visiting the Vonage website at www.vonage.com/tos. 20

Issue 1 Mar. 05, 2009
3.8 Handling an Established Call While the call is in progress you can:
• Control the audio: use the speakerphone, mute the call, adjust volume. • Record the call. • Put the call on hold. • Add the caller as a contact. • Transfer the call.
View the Terms of Service by visiting the Vonage website at www.vonage.com/tos. 21
Conference Mode On/OffRecord On/Off
Mute On/Off
Speaker Volume (What you hear)
Speakerphone Mode On/Off
Hold
Transfer Add to My Contacts
You can also transfer the call or start a conference call from the Actions menu (located in your Mac’s menu bar) with the call in progress.

Issue 1 Mar. 05, 2009
3.9 Transferring a Call
Quick Transfer You can set up a list of phone numbers to which calls can be transferred. Then during a call, you can easily transfer to any of these numbers by selecting from the Quick Transfer list.
To set up the numbers:
1. Choose Vonage Companion > Preferences from the menu. Display the Quick Transfer panel.
2. Enter as many numbers as you want. To enter a new number, click the Add button. To remove an entry, highlight the entry in the table and click the Remove button.
View the Terms of Service by visiting the Vonage website at www.vonage.com/tos. 22

Issue 1 Mar. 05, 2009
To transfer a call, click the Transfer button, select Quick Transfer, and click the number to transfer to. As soon as the transfer is made (the other phone starts ringing), the call is disconnected at your end. Note that the person you are transferring will hear the other phone ringing.
Transfer Button
Transfer this Call
1. Click Transfer > Transfer this Call. The Vonage Companion prompts for the number to transfer to.
2. Call the target (the person you are transferring the call to) by keying the number (or you can drag and drop a contact from My Contacts).
3. Click Transfer Now; a message will appear that lets you know the call is being transferred.
Enter number of target
Click Transfer Now after entering the target’s number
Or click Cancel to continue the current call
View the Terms of Service by visiting the Vonage website at www.vonage.com/tos. 23

Issue 1 Mar. 05, 2009
3.10 Recording a Call Vonage Companion allows you to record any call in progress and save it as a WAV (Waveform audio file format) file on your computer.
To record a call in progress:
1. Click on the Call Panel to start recording (the Record button only appears in the Call Panel while a call is in progress).
2. Click on the Call Panel to stop recording or click on End to end the call and stop recording.
3. You’ll be prompted to provide a filename for the saved recording. Click OK or Cancel to save with the default filename or type a new filename then click OK to save or click Delete to quit without saving. (See Note below)
Note: To choose the location on your computer where you’d like to store your recorded calls, open the Application panel of the Preferences window (click Vonage Companion > Preferences > Application from the Vonage Companion Menu) then click Browse Folder to select the “Recorded calls location” and OK to save it. Please be sure to define this location before starting to record as calls will automatically be saved to the defined location.
3.11 Voicemail Your Vonage Companion is an extension of your Vonage home phone, so it shares the same voicemail box.
When you receive voicemail messages while logged in to Vonage Companion, an indicator with the number of messages you have will show next to the Voicemail button. Click the Voicemail button to automatically call your voicemail. Refer to Voicemail Plus Basics for more information.
View the Terms of Service by visiting the Vonage website at www.vonage.com/tos. 24

Issue 1 Mar. 05, 2009
3.12 Conference Calls The Conference button turns “conference mode” On/Off. When conference mode is “On” new calls are automatically “merged” with existing calls into a conference call. You can also create a conference call with conference mode “Off” by manually merging calls using the Merge button on the Call Panel. Read further for more detailed information about conference calling. Conference Button (“Off”) Conference Button (“On”)
Starting a Conference Call You can create a conference call in one of the following two ways:
• Using the Conference button
• Merging separate calls
Using the Conference Button To start a conference call using the Conference button:
1. Click the Conference button. Vonage Companion enters “conference mode” and “Enter conference participant” appears in the Call entry field.
2. Place a call in one of the following ways (or place another call, if you are already on a call):
• Ctrl-click on a contact and choose Call (or Add to Call).
• Type a name or number in the Call entry field.
• Drag and drop a contact from My Contacts.
(Or to cancel the call, click the Cancel button.)
If you were not already on a call, the first call would be handled like any other call. Additional calls (dialed or received) automatically merge into conference.
View the Terms of Service by visiting the Vonage website at www.vonage.com/tos. 25

Issue 1 Mar. 05, 2009
First call established
Second call initiated
As soon as the second call is answered the conference call is established.
Merging Separate Calls To start a conference call using existing, separate calls (conference mode is off):
1. Establish the calls. The calls can be incoming or outgoing.
2. Click Merge.
View the Terms of Service by visiting the Vonage website at www.vonage.com/tos. 26

Issue 1 Mar. 05, 2009
Your Phone #
Each current call appears in a separate panel. Selecting “Merge” will merge
all the separate calls into a single conference call.
Conference is now established
View the Terms of Service by visiting the Vonage website at www.vonage.com/tos. 27

Issue 1 Mar. 05, 2009
Managing the Conference
Adding More Participants
You can add more participants to an existing conference in any of these ways:
• Ctrl-click on a contact and choose Add to Conference Call. • Place a separate outgoing call in the normal way (by entering a name or number in the Call entry field,
drag and drop a contact into the Call entry field or Ctrl-click on the contact in the contact list and select Call). When the call is established, click Merge. All existing separate calls will be brought into the existing conference.
• Answer one or more incoming calls. A separate call will be established for each call. Click Merge. All existing separate calls will be brought into the existing conference. Whenever you click Merge, all current established calls are conferenced together; you cannot keep any one call out of the conference.
• From the Call Panel, click the Conference button to turn on. Place a call by typing a name or number. When the person answers, the call will automatically be added to the conference.
Removing a Participant
To remove one call from the conference, click on the drop down arrow next to that participant and choose Separate from Conference. The call becomes a separate call.
Remove one call from the Conference.
Disbanding the Conference
To break the conference into separate calls, click Actions > Disband Conference from the Vonage Companion menu.
To hang up on everyone, click the End button.
End Conference Call for all participants.
View the Terms of Service by visiting the Vonage website at www.vonage.com/tos. 28

Issue 1 Mar. 05, 2009
Suspending the Conference
To suspend the conference, click the Hold button. Click the Resume button to continue the conference.
Audio Controls Adjusting Volume
Use the speaker adjustment to adjust volume of the sound you are hearing.
Mute
Click on the Mute button to prevent the other parties from hearing you. The button appears on the Call Panel during a call.
If your headset has a mute button, make sure it is also not muted. Vonage recommends always using the Vonage Companion mute button so you can tell at a glance whether your call is muted. Your headset mute status is normally not reflected by the Vonage Companion mute button. Speakerphone
The Speakerphone button turns “speakerphone mode” On/Off. In speakerphone mode, the audio for your calls will be directed through the speaker device and microphone device defined in the “Speakerphone Mode” settings under Vonage Companion > Preferences > Audio Devices. In an example configuration, the Mac’s integrated speakers and microphone would be selected for speakerphone mode while a USB or Bluetooth headset would be selected for headset mode. When speakerphone mode is off, audio is directed through the headset defined in the “Headset Mode” settings.
View the Terms of Service by visiting the Vonage website at www.vonage.com/tos. 29

Issue 1 Mar. 05, 2009
4 Vonage Companion Contacts & History
The Contacts & History panel, which is divided into two views, provides access to the following:
• Contacts. • Call history.
4.1 My Contacts
My Contacts View
Drop Down Menu
Search Field
Groups
The My Contacts view displays your contacts and lets you specify multiple contact methods for them, including:
• Home phone number, work phone number, mobile phone number • Fax number (this is provided for convenience; Vonage Companion does not have any fax capability). • Email
There is a “Primary” button for you to identify the phone number that you typically call for that contact. When you double click on that contact in your contacts list or drag and drop it into the Call entry field, Vonage Companion automatically calls the phone number selected as the primary (default).
Contacts are typically organized into groups. Vonage Companion includes built-in groups: “Friends”, “Home” and “Work”. You can add more groups, as desired.
View the Terms of Service by visiting the Vonage website at www.vonage.com/tos. 30

Issue 1 Mar. 05, 2009
Setting up Contacts
Adding a Contact
To add a contact, on the menu bar, click on Contacts > Add a Contact. Or Ctrl-click a group and choose Add Contact to the Group. Or click on a group to select it, then click on the drop down menu arrow to the left of the Search field, and select Add Contact to the Group. The Contact Profile dialog box appears.
Field Description
Name Enter a First Name and/or Last Name. This is the name that will appear in the Call Panel when this person phones you, as well as the Call History.
View the Terms of Service by visiting the Vonage website at www.vonage.com/tos. 31

Issue 1 Mar. 05, 2009
View the Terms of Service by visiting the Vonage website at www.vonage.com/tos. 32
Nickname This is the Contact’s “Nickname.” If you enter a Nickname, this name will appear in the Call Panel and Call History instead of the First and Last Name when this person phones you.
Group Either:
Choose one group.
Click Select More and select several groups. The new contact will be added to each group.
If you do not specify a group, the contact will be added to the “Other” group.
Ring tone Choose a ring tone for this contact from the drop down list. Select either the default (preferred sound) or any WAV file you’ve imported from your computer. Click the arrow to play the currently selected ring tone.
Note: To import new WAV files from any location on your computer, choose Import from the Ring tone drop down list and navigate to the desired WAV file.
Avatar Choose a personalized photo for this contact and it will display when Vonage Companion rings.
To choose a photo, click Change on the Contact Profile screen then navigate to an image stored on your computer. Vonage Companion supports PNG, JPG and JPEG file formats.
Click Reset to remove your personalized photo.
Contact Methods
Enter as many contact methods as you want. Email entries must have the format <name>@<domain>
Primary Select the number you typically call for this contact as the “Primary.” The primary number will be used when you double-click this contact.
For example, if you choose the contact’s Mobile phone number, then double-clicking this contact calls their Mobile phone.
Adding a Contact using Existing Information
You can add a contact by capturing existing information:
• If you are on a phone call with a person who is not a contact, click the Add button in the Call Panel. • On the call history list, select an entry that is not a contact. Ctrl-click and choose Add as Contact. Or with
the entry selected, click Actions on the Vonage Companion menu.
The Contact Profile dialog appears. The phone number field is pre-populated with the entry you selected.
Importing Contacts
You can populate the Vonage Companion contact list by using the Import Contacts feature. The new contacts will be added to the existing contacts.
You can import a contact list from:
• Mac Address Book. • A comma-separated values file. (*.csv). • An Extensible Markup Language file (*.xml file).

Issue 1 Mar. 05, 2009
Importing Contacts from Address Book
1. Click Contacts > Import Contacts from the Vonage Companion Menu.
2. The Import Contacts dialog appears. Choose Mac Address Book from the drop down list.
3. As soon as you click Import Now on the dialog, all the contacts in Address Book will import into My Contacts.
Import Contacts from a CSV file
1. Click Contacts > Import Contacts from the Vonage Companion Menu.
2. The Import Contacts dialog appears. Choose Comma Separated Values (.csv File) from the dropdown list. Use the Browse button to locate the file you want to import from.
3. As soon as you click Import Now on the dialog, the My Contacts view in Vonage Companion is updated to show the imported entries.
Note: Prior to importing, create a CSV file of your contacts by exporting them from the program you used to define them. Refer to the program’s Help information for details on how to export to a CSV file.
View the Terms of Service by visiting the Vonage website at www.vonage.com/tos. 33

Issue 1 Mar. 05, 2009
Import Contacts from an XML file
1. Click Contacts > Import Contacts from the Vonage Companion Menu.
2. The Import Contacts dialog appears. Choose XML (.xml File) from the dropdown list. Click on the Browse button to locate the file you want to import from.
3. As soon as you click Import Now on the dialog, the My Contacts view in Vonage Companion is updated to show the imported entries.
Note: Prior to importing, create a XML file of your contacts by exporting them from the program you used to define them. Refer to the program’s Help information for details on how to export to a XML file.
Vonage Contact Center Synchronization
With Vonage, managing your contacts is easy with a unified Contact Center! Your Vonage Companion contacts will automatically synchronize with the contacts in your Vonage online Contact Center whenever you login to Vonage Companion and every 10 minutes while you’re logged in. If you add, delete, or edit a contact in your Vonage Companion’s My Contacts, the changes will automatically be applied to your Vonage online Contact Center, and vice versa.
You can even install your Vonage Companion on multiple computers, and your contacts will automatically be available.
Note: In order for Vonage Companion and Contact Center to synchronize contacts you must log into Contact Center at least once. If there are contacts in your online Contact Center that do not have a group assigned to them, they will automatically be assigned to the “Other” group in your Vonage Companion.
Exporting Contacts
You can export a contact list to a comma-separated values file or an xml file.
1. From the main menu, click the Contacts menu and choose Export Contacts. The Export Contacts dialog appears. Click the Choose File button to select the file you want to export to. You may specify a new file name or an existing file.
2. When you click Export Now, the export starts. The result is:
• For new files, a new file of the specified type is created with current contact information. • For an existing, file, the file is replaced with the current contact information.
View the Terms of Service by visiting the Vonage website at www.vonage.com/tos. 34

Issue 1 Mar. 05, 2009
Managing Contacts
Changing Contact Information
To change the information for a contact, Ctrl-click the contact and choose Edit Contact Profile. The Contact Profile dialog box appears. Some of the changes you can make are:
• Change any contact details. • Add, delete or change a contact method. • Move a contact to another group by selecting a different group. • Add an existing contact to more groups by selecting one or more extra groups. • Personalize your contacts by adding a ring tone or a photo.
Moving or Deleting a Contact • To drag a contact to a different group, select it and drag to the new group. • To delete a contact, select it, Ctrl-click, and choose Delete Contact. You will be prompted to confirm the
deletion of the contact.
Adding, Deleting or Renaming Groups
Select any group, Ctrl-click, and choose the appropriate menu item.
If you try to delete a group that is not empty, you will be prompted to confirm the deletion of the group.
If the “Other” group does not exist, it will be created.
View the Terms of Service by visiting the Vonage website at www.vonage.com/tos. 35

Issue 1 Mar. 05, 2009
Using Contacts
Phone the person
• Double-click the contact to start a phone call to the person.
• Drag the contact to the Call entry field to start a phone call.
• Ctrl-click and choose Call, then click the desired number.
Email a contact who has an email address
Ctrl-click and choose Send Email.
Contact Flyout
Mouse over a contact to show the Contact flyout. This flyout shows all the contact methods set up for the contact.
Finding a Contact
If the contact list is long, use the Search ( ) field to filter the contacts that are displayed. To clear the Search field and redisplay all contacts, click on the in the Search field.
View the Terms of Service by visiting the Vonage website at www.vonage.com/tos. 36

Issue 1 Mar. 05, 2009
4.2 My History
The My History view in the Contacts & History panel provides call details for dialed, received and missed calls. The call details are specific to the computer you are logged in on, and the history covers only the time periods that you are successfully logged in to Vonage Companion. Call details include time and date of call, Caller ID information and duration of call.
My History View
Drop Down Menu Search Field
Managing the Lists of Calls You can Ctrl-click on an entry in a list to:
• Delete the call. • Delete all entries in this list. • Block a Number. • Add to contacts. The Add a Contact dialog box appears. Complete the dialog box and press OK.
View the Terms of Service by visiting the Vonage website at www.vonage.com/tos. 37

Issue 1 Mar. 05, 2009
You can mouse over an entry in a list to:
• Display a flyout with the number, date, time, and, if applicable, duration of each call.
Calling from a List You can Ctrl-click on an entry in a list to:
• Place a call to this person, using the contact method that was used for this call. You can also double-click to place a call.
• Place a call to this person and add them to a conference call that is in progress. For more information on conference calls, see “Conference Calls.”
View the Terms of Service by visiting the Vonage website at www.vonage.com/tos. 38

Issue 1 Mar. 05, 2009
5 Configuring Vonage Companion You can control the way you work with your Vonage Companion by setting up your Preferences.
IMPORTANT NOTE: These Preferences are settings that apply locally for each instance of your Vonage Companion, which means that if you install Vonage Companion on another computer you’ll be able to configure your Preferences differently.
5.1 Configuring Preferences Choose Vonage Companion > Preferences. The Preferences window appears.
The Preferences panels let you control the way that you work with each instance of your Vonage Companion.
Preferences – Application
The Application panel lets you set your preferences for general Vonage Companion behavior - with your Vonage Companion we provide choices, so you can communicate on your own terms! These preferences include:
1. “Open at login” Choice of whether your Vonage Companion launches automatically when you login to your Mac.
2. “Recorded calls location” Choice of location on your computer where you’d like to store your recorded calls. (See “Recording a Call” for more details)
View the Terms of Service by visiting the Vonage website at www.vonage.com/tos. 39

Issue 1 Mar. 05, 2009
Preferences – Alerts and Sounds
The Alerts and Sounds panel lets you control whether Vonage Companion pops up for call notification and lets you manage your ringtones.
Managing Your Ringtones
You can import ringtones; these will be added to the list of ringtones you can choose from when assigning an active ringtone. Imported ringtones must be in wav file format. Use the Import… button to add .wav files to your ringtone list.
Use the Play and Stop buttons to listen to a ringtone, and Delete to delete a ringtone from the list.
You can assign a specific ringtone to be played when an incoming call is received.
1. Highlight the ringtone in your list. Click the Set as Active Ringtone button. This ringtone will now be played whenever an incoming call is received.
2. If you want to stop using your imported ringtone and use the default ringtone again, click the Clear Active Ringtone button.
Making Vonage Companion the Active Window
With the “Pop up Vonage Companion if it is not in focus” setting, you can control whether the Vonage Companion application becomes the active window when an incoming call is received.
View the Terms of Service by visiting the Vonage website at www.vonage.com/tos. 40

Issue 1 Mar. 05, 2009
Preferences – Quick Transfer
This panel lets you set up a list of phone numbers that calls can be transferred to. Then during a call, you can transfer to any of these numbers by selecting from a list.
Enter as many numbers as you want. To enter a new number, click the Add button. To remove an entry, select the entry and click the Remove button.
See “Quick Transfer” for information on using this feature.
View the Terms of Service by visiting the Vonage website at www.vonage.com/tos. 41

Issue 1 Mar. 05, 2009
Preferences – Audio Devices
Vonage Companion automatically detects devices at each startup, and selects the most appropriate device for each purpose. If you do not like this selection, you can override it on this panel.
If you override a selection, it will be honored the next time you start Vonage Companion, unless the device is no longer available, in which case Vonage Companion will again automatically detect audio devices available.
Field Description
Headset Mode
Speaker Device
Microphone Device
Change these fields only if you want to override the devices that Vonage Companion automatically selected.
In both these fields, select the headset you are using.
The headset is the device that is usually used for audio out (the sound you hear) and audio in (recording your voice). The only situation in which the headset is not used is when the Speakerphone button is pressed.
Therefore, unless you will always be using Vonage Companion in speakerphone mode, you must make a selection here.
Select the headset in both the “Speaker Device” field and “Microphone Device” field.
Speakerphone Mode
Speaker Device Change this field only if you want to override the device that Vonage Companion automatically selected.
Make the appropriate choice:
• Select the device that you want to use for audio out (the sound you hear) when the Speakerphone button is pressed. Make sure you select a speaker device (not the headset).
• Select None if you do not intend to use speakerphone mode. The Speakerphone button will be disabled if you select None.
View the Terms of Service by visiting the Vonage website at www.vonage.com/tos. 42

Issue 1 Mar. 05, 2009
View the Terms of Service by visiting the Vonage website at www.vonage.com/tos. 43
Field Description
Microphone Device Change this field only if you want to override the device that Vonage Companion automatically selected.
Make the appropriate choice:
• Select the device that you want to use for audio in (recording your voice) when the Speakerphone button is pressed.
It can be any microphone: it does not have to be the microphone on the device you specified as the speaker device.
• Select None if you do not intend to use speakerphone mode. The Speakerphone button will be disabled if you select None.
Reduce background noise Automatically attempts to remove background noise.
You should typically leave this turned on for the speakerphone.
Phone Ring Device
Speaker Device Change this field only if you want to override the device that Vonage Companion automatically selected.
The speaker device where you want to hear the phone ringing.
Ring volume The volume of the ringer.

Issue 1 Mar. 05, 2009
Preferences – Bandwidth Saver Bandwidth Saver allows you to slightly change the sound quality of your call in order to save valuable bandwidth. If bandwidth is not an issue for you, we suggest you use “Highest Sound Quality” which is the default setting.
Depending on your ISP (Internet Service Provider), you may experience problems or poor quality while using your Vonage Companion due to limited bandwidth of your Internet connection. In this case, you may want to adjust your Vonage Companion sound quality to use a lower bandwidth.
Bandwidth Saver provides three bandwidth settings for your Vonage Companion digital voice calls: Highest, Higher, and Normal Sound Quality. Many people can barely tell the difference between the settings. By adjusting your Vonage Companion sound quality to the lower bandwidth “Higher” setting or the lowest bandwidth "Normal" setting, you can still maintain excellent sound quality while saving bandwidth.
Note: Although you can adjust bandwidth via your Online Account, the setting only applies to your home phone. Bandwidth settings affecting Vonage Companion must be adjusted from Preferences and must be set locally for each computer where you download and install Vonage Companion.
View the Terms of Service by visiting the Vonage website at www.vonage.com/tos. 44

Issue 1 Mar. 05, 2009
Preferences – Diagnostics
This panel lets you enable logging to files. Logging uses computer resources, so you should only enable it when instructed by a Vonage customer support representative.
To set up logging:
1. Click Enable Diagnostic Logging.
2. Specify the folder where logs will be saved.
3. Click OK.
Activity on Vonage Companion will be logged to text files in the specified folder. A new set of files is started each time you log on. In order not to create large files when logging (which may create computer problems), you must not remain logged on indefinitely when logging. You should occasionally exit and restart Vonage Companion.
If requested by a customer support representative, you can:
• Open the logging folder and then open a log file using a text editor. • Email the logs in the specified folder to Vonage customer support.
You can delete log files from the specified folder as you would delete any file on your computer.
View the Terms of Service by visiting the Vonage website at www.vonage.com/tos. 45