virtual paint for android za ra cunalni stvo in informatiko ... virtual paint for android ......
TRANSCRIPT

University of Ljubljana
Faculty of Computer and Information Science
Aleksandar Miloeski
Virtual Paint for Android
BACHELOR’S THESIS
PROFESSIONAL STUDY PROGRAMME COMPUTER AND
INFORMATION SCIENCE
Mentor: Borut Batagelj, Phd
Ljubljana 2017


Univerza v Ljubljani
Fakulteta za racunalnistvo in informatiko
Aleksandar Miloeski
Navidezni slikar za Android
DIPLOMSKO DELO
VISOKOSOLSKI STROKOVNI STUDIJSKI PROGRAM PRVE
STOPNJE RACUNALNISTVO IN INFORMATIKA
Mentor: vis. pred. dr. Borut Batagelj
Ljubljana 2017


COPYRIGHT. The results of this Bachelor’s Thesis are the intellectual
property of the author and the Faculty of Computer and Information Science,
University of Ljubljana. Publication or usage of the results of this Bachelor’s
Thesis requires written consent of the author, the Faculty of Computer and
Information Science, and the supervisor.


Declaration of Authorship
I, Aleksandar Miloeski, hereby declare that I am the author of the bachelor’s
thesis entitled:
Virtual Paint for Android
I confirm that:
• the bachelor’s thesis was made on my own, mentored by Borut Batagelj,
Phd,
• the electronic copy of this bachelor’s thesis, its title, the abstract, and
the keywords are identical to the printed copy,
• I agree with the publishing of the electronic copy of this bachelor’s
thesis on the World Wide Web through the university web archive.
Ljubljana, February 1, 2017 Author’s signature:


Faculty of Computer and Information Science issues the following thesis:
Virtual Paint for Android
Subject area of the thesis:
Nowadays, traditional input devices for controlling computer programs
are replaced by touchless appliances. Develop a system that can detect and
track a human hand on an Android mobile device by using computer vision
techniques, as well as understand hand gestures and take appropriate actions
based on individual motions. The developed application must allow simple
drawings on the phone’s screen and performance of standard program oper-
ations (erase, undo, change color, etc.) by using only hand movements in
front of the phone’s camera without touching the screen.


Fakulteta za racunalnistvo in informatiko izdaja naslednjo nalogo:
Navidezni slikar za Android
Tematika naloge:
Dandanes tradicionalne vhodne naprave za kontrolo racunalniskih pro-
gramov zamenjujejo brezdoticne naprave. Razvite sistem, ki omogoca sle-
denje cloveski roki na Android napravah s pomocjo metod racunalniskega
vida. Sistem naj omogoca tudi prepoznavo gest in izvedbo ustrezne akcije na
osnovi geste. Razviti program mora omogociti preprosto risanje po zaslonu
telefona in izvajati preprostih akcij programa kot so brisanje, razveljavitev,
sprememba barv, itd s preprostimi kretnjami pred kamero telefona brez do-
tika zaslona.


Najlepsa hvala mentorju, vis. pred. dr. Borutu Batagelju za vso pomoc,
potrpezljivost in usmerjanje pri izdelavi diplomske naloge.
Iskreno se zahvaljujem tudi vsem ostalim profesorjem in asistentom na
Fakulteti za racunalnistvo in informatiko, s katerimi sem kadarkoli sode-
loval, za znanje, pomoc, vljudnost ter clovecnost, ki so presegli vsa moja
pricakovanja.
Seveda se zahvaljujem tudi svojim starsem, predvsem za potrpezljivost med
vsem tem casom.
Thank you, Joana. I couldn’t have done it without you.


Contents
Abstract
Povzetek
Razsirjeni povzetek
1 Introduction 1
2 Available equipment 3
2.1 Software . . . . . . . . . . . . . . . . . . . . . . . . . . . . . . 3
2.2 Hardware . . . . . . . . . . . . . . . . . . . . . . . . . . . . . 6
3 Approaches 13
3.1 Convexity defects . . . . . . . . . . . . . . . . . . . . . . . . . 15
3.2 K-curvature . . . . . . . . . . . . . . . . . . . . . . . . . . . . 18
3.3 Contour matching . . . . . . . . . . . . . . . . . . . . . . . . . 20
3.4 Colored bands method . . . . . . . . . . . . . . . . . . . . . . 21
4 Detection process and implementation 23
4.1 Hand detection . . . . . . . . . . . . . . . . . . . . . . . . . . 28
4.2 Feature extraction . . . . . . . . . . . . . . . . . . . . . . . . 31
4.3 Pseudocode . . . . . . . . . . . . . . . . . . . . . . . . . . . . 38
5 User interface 41
5.1 Virtual interface . . . . . . . . . . . . . . . . . . . . . . . . . . 42

CONTENTS
5.2 Physical interface . . . . . . . . . . . . . . . . . . . . . . . . . 46
6 Application usage 51
6.1 Instructions . . . . . . . . . . . . . . . . . . . . . . . . . . . . 51
6.2 User test observations . . . . . . . . . . . . . . . . . . . . . . 53
7 Conclusion 57
Bibliography 61

List of Abbreviations
Abbreviation Meaning
fps frames per second
VR virtual reality
IR infrared
RGB red green blue
HSV hue saturation value
ROI region of interest
SDK software development kit
IDE integrated development environment
JNI java native interface


Abstract
The aim of this thesis is to create a functional application for the Android
environment that allows the user to do simple virtual drawings without the
use of the touch screen, but rather through hand motions caught by the
camera.
There is a variety of approaches to this end, which vary by complexity and
performance. This piece of work attempts to find a middle ground among
the existing algorithms, as well as to build on and improve them specifically
for this particular task. The idea is based in sci-fi books and movies, as
well as the current global trend and human desire to simplify their work
with the help of virtual reality. This type of technology, in conjunction with
augmented reality, could be used in a variety of fields, such as architecture,
for easier real life model sketching, internal design, for virtual showcasing of
furniture inside a room, etc. A similar technology could be used in the future
for hologram manipulation.
The application was entirely created in the Eclipse IDE with the An-
droid SDK and the OpenCV library. It can be run on smartphones running
Android version 4.2.2 or newer.
Keywords: virtual, drawing, paint, augmented reality, hand detection, An-
droid, OpenCV.


Povzetek
Cilj diplomske naloge je narediti funkcionalno aplikacijo za okolje Android,
ki omogoca uporabniku enostavno virtualno risanje na zaslon brez dotikov,
temvec s premikanjem roke pred kamero.
Obstaja vrsta pristopov kako ta problem resiti, ki se razlikujejo po zah-
tevnosti in zmogljivosti. To delo poskusa najti kompromisno resitev med ob-
stojecimi metodami ter jih nadgraditi in izboljsati, da se priblizamo nasemu
cilju. Ideja temelji na stevilnih znanstvenofantasticnih knjigah in filmih ter
trenutni teznji in zelji cloveka za poenostavitev svojega dela s pomocjo vir-
tualne resnicnosti. Taksna tehnologija, skupaj z obogateno resnicnostjo, bi
se lahko uporabljala na stevilnih podrocjih, kot so na primer: arhitektura, za
lazje skiciranje modelov v realnem svetu; notranje oblikovanje, za virtualno
prikazovanje pohistva znotraj prostora ipd. Z uporabo taksne tehnologije se
bo lahko v prihodnosti tudi manipuriralo s hologrami.
Aplikacija je v celoti izdelana v programskem okolju Eclipse, z uporabo
paketa programske opreme Android in knjiznice OpenCV. Izvaja se lahko na
pametnih telefonih s sistemom Android razlicice 4.2.2 ali novejse.
Kljucne besede: navidezni, slikar, risanje, obogatena resnicnost, zaznava-
nje roke, Android, OpenCV.


Razsirjeni povzetek
V tem delu smo uspesno zgradili delujoco aplikacijo za virtualno risanje z
roko v obogateni resnicnosti. Sistem prepozna roko, ali pa pripomocke za
risanje, in izvaja ukrepe, ki popolnoma temeljijo na rocnih gestah, brez no-
bene potrebe po dotikih na zaslonu. Veliko omejitev preprecuje nemoteno
risanje v poljubnem okolju, vendar je ogrodje aplikacije dobro definirano in
ponuja jasno predstavitev tehnologije in moznosti uporabe.
Pregledali smo moznosti, kaj ze obstaja, kaksne tehnologije so ze na vo-
ljo ter uporabnost resitve. V koncnem izdelku predstavimo vecino opisanih
metod. Implementirani sta dve glavni metodi za zaznavanje roke in demon-
stracija dveh dodatnih metod, ki smo ju tudi podrobno pregledali. Mozne
so razne prilagoditve parametrov, ki vplivajo na zaznavanje. Mozno je tudi
omogocanje in onemogocanje drugih moznosti, ki bi lahko spremenile upo-
rabnost aplikacije v razlicnih okoljih, ali pa nacin uporabe v odvisnosti od
uporabnikovih zelja. Eden od namenov aplikacije je demonstracija moznosti
in dostopnih tehnologij, zato je mozen tudi izris zaznanih delov roke in prikaz
vmesnih korakov zaznavanja.
Ceprav je uporabljena tehnologija ze dobro znana in odprte narave, nismo
nasli projektov, ki temeljijo na podobnih principih. V casu izdelave tega dela,
Google Play Store ni ponujal nobene aplikacije, ki omogoca zaznavanje roke
in virtualno interakcijo z graficnim vmesnikom. Obstajajo podobne aplikacije
za druge platforme, ki uporabljajo dodatno, bolj napredno in drazjo strojno
opremo, vendar je cilj tega dela bil zgraditi aplikacijo za povprecni pametni
telefon s sistemom Android brez uporabe dodatne strojne opreme.

Razvoj je v celoti potekal v razvojnem okolju Eclipse z uporabo paketa
programske opreme Android (angl. Android SDK) in odprte knjiznice za
racunalniski vid OpenCV. Glavne graficne operacije se izvajajo s pomocjo
funkcij iz OpenCV. Napisali smo tudi funkcije, ki temeljijo na znanih algo-
ritmih za iskanje znacilnosti roke, stabiliziranje kazalca ipd. in popolnoma
nove algoritme za potrebe virtualnega uporabniskega vmesnika in boljsega
prepoznavanja rocnih gest.
Aplikacija deluje na pametnih telefonih z operacijskim sistemom Android
4.2.2 ali novejsim. Testirana je bila na vec napravah od nizjega do srednjega
cenovnega razreda, stare od leta 2012 do leta 2015. V splosnem je bila hitrost
prikaza dokaj nizka, med 8 in 18 slicic na sekundo (angl. frames per seconds,
fps), kar v vecini primerov ni zadostno za prijetno risanje, vseeno pa je dovolj
za demonstracijo uspesnega risanja.
Aplikacija temelji na glavni nalogi, to je zaznavanje roke uporabnika. Vse
ostalo je odvisno od uspesnosti te zaznave. Proces zaznavanja je sestavljen
iz dveh glavnih delov: graficno zaznavanje roke in izracun znacilnosti roke.
Prvi del se zacne z zajemom slike s pomocjo sprednje kamere telefona.
Preden se ta proces zacne, uporabnik z dotikom na zaslonu izbere barvo,
ki ji sistem sledi. Na podlagi izbrane barve se izracuna obmocje dopustnih
barvnih vrednosti. Vhodni sliki se najprej dvakrat zmanjsa velikost in se za-
megli, kar poenostavi proces zaznavanja posamezne barve. Barvni prostor se
pretvori iz RGB v HSV, ker ta predstavlja barve bolj intuitivno. HSV slika
se nato binarno segmentira na podlagi izbrane barve: vse tocke, ki zadoscajo
barvnemu pogoju, postanejo bele, ostale pa crne. Na binarni sliki se tipicno
izvede neka vrsta morfologije. V vecini primerov smo dobili najboljse re-
zultate z dilatacijo. S tem se koncajo graficne operacije na vhodni sliki.
Na podlagi dilatirane binarne slike sistem najde konture, ki naj bi ustrezale
obliki roke. Te konture so podlaga za vse nadaljnje izracune.
Drugi del zajema izracun znacilnosti roke, oziroma njenih delov, iz doblje-
nih kontur. Poskusili smo s stirimi metodami, vsaka s svojimi prednostmi in
slabostmi: metoda z napakami konveksnosti (angl. convexity defects), me-

toda k-curvature, metoda z ujemanjem kontur (angl. contour matching) in
metoda z barvnimi trakovi (angl. colored bands method).
Zadnja metoda ne potrebuje nobenih izracunov, temvec uporabo vizual-
nih pripomockov. Namesto, da bi iskali znacilnosti iz kontur, uporabljamo
dva ali tri trakove razlicne barve, ki jih namestimo na konice prstov in
enostavno sledimo tem barvam. Potrebno je samo izbrati vse barve pred
zacetkom zaznavanja. Ta nacin deluje veliko bolje od ostalih in se je iz-
kazal lazji za uporabo v vecini primerov, vendar zahteva uporabo posebnih
pripomockov, ki niso vedno na voljo.
Ostale tri metode omogocajo zaznavanje roke brez dodatkov, vendar so
zelo odvisne od okolice, osvetlitve in postavitve roke.
Metoda z napakami konveksnosti izkorisca dejstvo, da prsti tvorijo spe-
cificne kote, ko so iztegnjeni. Napaka konveksnosti (angl. convexity defect) je
vdolbina v konveksni ovojnici. Vsaka vdolbina v konveksni ovojnici konture
roke je potencialno prostor med dvema prstoma. Metoda isce taksne napake,
ki izpolnjujejo nastavljene kriterije, in jih doda v seznam zanimivih napak.
Lastnosti teh napak se nato uporabljajo za dolocanje stevila iztegnjenih pr-
stov. Metoda deluje dobro v primerih z dobro osvetlitvijo in enostavnim
enobarvnim ozadjem, vendar zahteva upostevanje vseh omejitev (npr. roka
mora vedno biti pokonci, prsti morajo biti jasno iztegnjeni in narazen ipd.),
ki jih uporabnik ponavadi ne pozna.
Ostali dve metodi, ki smo ju tudi implementirali, sluzita samo kot pre-
gled moznih alternativ. Metoda k-curvature isce tocke v konturi, ki tvorijo
dolocene kote s svojimi sosednimi tockami, pod predpostavko, da so te tocke
deli neke krivine. Ce krivina izpolnjuje kriterije za smer, velikost in oddalje-
nost od dlani roke, lahko predpostavimo tudi, da ustreza konici nekega prsta.
Metoda z ujemanjem kontur preprosto primerja trenutno konturo z vnaprej
definiranimi konturami. Najprej je treba definirati N kontur, ki ustrezajo N
gestam. Ce se kontura dovolj ujema s katerokoli od gest domnevamo, da z
roko kazemo to gesto.
Nobena od teh metod ne deluje v poljubnem okolju, saj so vse odvisne

od kontrasta med izbrano barvo in barvami v ozadju. Dodali smo se nekaj
ukrepov v poskusu, da cim bolj zmanjsamo napake in olajsamo uporabo apli-
kacije. Na primer, v primeru metode z napakami konveksnosti se izracuna
tudi centroid, ki se uporablja za preprecevanje, oziroma zmanjsevanje laznih
pozitivov. Implementirali smo tudi nizkoprepustni filter z neskoncnim im-
pulznim odzivom, ki odpravlja odvecno tresenje kazalca.
Ker je nacin uporabe aplikacije netipicen, smo morali razviti tudi poseb-
nen graficni uporabniski vmesnik. Vsi ukazi, ki vplivajo na risanje, se izvedejo
izkljucno virtualno, brez dotikov po zaslonu. Zato je namesto fizicnih gum-
bov vmesnik sestavljen iz virtualnih gumbov, ki se aktivirajo s premikanjem
roke pred kamero. Na voljo je brisanje in razveljavljanje potez, spreminja-
nje barve in debeline crt, risanje pravokotnikov in krogov ter predogled in
shranjevanje risbe v pomnilnik kot datoteko tipa PNG s prozornim ozadjem.
Aplikacija vsebuje tudi fizicne gumbe, ki sluzijo za spreminjanje nacina upo-
rabe in izbiranje barve roke ter omogocajo spreminjanje drugih parametrov,
ki vplivajo na zaznavanje roke in obnasanje aplikacije.
Na koncu razvoja je koncno aplikacijo testiralo tudi nekaj uporabnikov.
Kot pricakovano, se je uporaba izkazala za prevec tezavno. Ceprav so med
razvojem testi pokazali, da je sistem zmozen natancnega risanja in interakcije
z uporabniskim vmesnikom s strani naucenega uporabnika in v nadzorovanih
okoliscinah, je krivulja ucenja za nove uporabnike izjemno strma. Poleg
tega so dodatni problemi, ki nastanejo zaradi omejitev razvitega sistema,
pogosto odvracali testerje od nadaljnih poskusov. Nacin z barvnimi trakovi,
v primerjavi z ostalimi metodami z zaznavanjem roke, se je izkazal za nekoliko
lazjega, vendar tudi ta ne bi bil dovolj enostaven za uporabo brez jasnega
belega ozadja in podrobnih navodil od pomocnika.
Kljub temu menimo, da ima razvit vmesnik veliko moznosti za nadaljnjo
uporabo in razsiritev. Med najboljsimi kandidati za razsirjanje razvitega
sistema so Haarove znacilke, ki odpravljajo odvisnost od barve ter filtri delcev
(angl. particle filters), ki omogocajo sledenje objektom, tudi takrat, ko niso
popolnoma vidni. Ce se bi odstranili omejitev iskanja dolocene barve bi

aplikacija lahko delovala v poljubnem okolju, kar bi omogocilo uporabo v
prakticne namene, kot so umetnost, arhitektura, notranje oblikovanje ipd.
Poleg tega bi bil vmesnik uporaben tudi v drugih aplikacijah za pametne
telefone, ki uporabljajo obogateno resnicnost, kot so razne igre, poucne in
izobrazevalne aplikacije, komunikacijske aplikacije itn.


Chapter 1
Introduction
In recent times, the use of virtual and augmented reality is becoming increas-
ingly more commonplace in all areas of life and science. More importantly,
the possibilities are virtually boundless, and the potential uses are becoming
clearer. Even though the general population is reluctant to these changes,
especially when it requires getting used to entirely new technologies and ways
of using them, it seems inevitable that the user interfaces will change for the
better. Just as man used to draw on cave rocks and later moved on to using
parchments for writing, as the typewriter became obsolete in favor of the
keyboard, and as keyboards and mice finally transformed into touchscreens,
so there must be a next step in the evolution of input and user interfaces.
The main inspiration for this work are the classic computer graphics pro-
grams, such as MS Paint, which often represent the first contact a child has
with a digital form of drawing. In today’s world, there is a vast number of
similar drawing applications available for portable devices, but they are all
based on the same principle and use the same technology. Augmented reality
has had some commercial success on handheld devices, for example, with the
2016 iOS and Android game Pokemon Go. Hand tracking apps, however, are
very hard to be found.
A very important distinction that needs to be made between theorizing
and revolutionizing is the practicality of novel inventions. In order for society
1

2 CHAPTER 1. INTRODUCTION
to adopt a new technology for everyday use, it must be perfected to the point
where the use of such technology is no longer tedious, awkward, and outright
difficult. Unfortunately, virtual reality and augmented reality today are far
from commonplace. One of the main drawbacks is that the hardware present
in the average smartphone, that is readily accessible to the average consumer
in 2016, which can be several years old, often lacks the computing power
required for the smooth execution of the current algorithms used for making
sense of what the camera sees, resulting in a tedious experience.
Specifically, the function of this application is to track the user’s hand in
front of the camera, and, depending on the gesture that the hand is making,
either draw on the screen by moving one of the fingers, or erase or undo
drawings, change drawing color, line width, etc. The first thing it utilizes
is the phone’s camera to give an image of what is in front of the user. A
hand detection algorithm is then run on that image to find the user’s hand
in front of the camera, and a specialized algorithm that discerns the five
different fingers. The position of each finger or visibility thereof is mapped
to predefined hand gestures, so that the appropriate action can be carried
out when a gesture is detected. The principal action is, of course, drawing
on the screen by moving the index finger in front of the camera.
One of the aims of this thesis is to examine possible approaches that
could simplify the use of virtual hand drawing and improve the accuracy of
hand detection and tracking so that it could be run on contemporary low-
end to middle-end mobile devices with an acceptably high frame rate. A few
approaches have been taken into account, and four of them have been tested.
Naturally, no single one is flawless, and there is a costly tradeoff for each one
of them.
Chapter 2
Available equipment
2.1 Software
Since the intended platform for the application was Android, the entire devel-
opment was done in the Eclipse IDE using the Java programming language.
The graphical user interface is typically defined in .xml files. The other
option was the newer and more specialized Android Studio, but the devel-
opment environment would not have much impact on this work, so the more
traditional option was just as useful.
Android was chosen because it is one of the two most used mobile oper-
ating systems [1], the other one being iOS. In our opinion, iOS would be less
suitable for this type of work because it is much more closed, and there are
not as many tools for iOS that are freely accessible and well documented.
Consequently, there are not as many student projects and theses done for
iOS, which may well serve as a starting point or reference. The two fore-
most reasons, however, are popularity and availability. Android holds the
highest market share among smartphones [1]. In this context, availability
means that Android is offered on a wider range of smartphones, including
some cheaper models, as opposed to iOS, which is only available on Apple’s
iPhone and iPad, which are both in the highest price categories. As far as
development goes, a very similar hand detection system could be built for
3

4 CHAPTER 2. AVAILABLE EQUIPMENT
iOS using Objective-C, since they are also supported by OpenCV. In sum-
mation, the choice of operating system was partly based on the availability
of devices running Android, and partly on its higher market share.
2.1.1 OpenCV
Most of the operations carried out on the captured images were graphics func-
tions from the open source library OpenCV (OpenCV for Android, version
2.4.4). OpenCV has its own useful implementations of data structures used
in image processing, like Mat, Point, MatOfPoint, Scalar, Rect, etc. Almost
all operations and calculations were done using these data structures, like
representing images as matrices of 3-channel pixels, RGB and HSV colors as
3x1 scalars, color segmentation, finding relevant points within shapes, etc.
The image processing functions of OpenCV are naturally merely imple-
mentations of well-known public domain algorithms. The official OpenCV
documentation website does not list the Java wrapper versions of its func-
tions as of 2016 (only C, C++, and Python) [2], but the same details in the
current documentation apply to the Java versions as well.
Among the most frequently-used functions are its methods for image fil-
tering (blurring, downsampling, dilation, erosion), image segmentation based
on color, finding contours of shapes, finding convex hull, convexity defects,
etc. Here is a non-exhaustive list of the most used functions and a short
explanation of what they do (the official documentation offers explanations
in more detail [2]):
• Imgproc.pyrDown – applies the Gaussian pyramid to an image: first con-
volves it with a Gaussian function (equivalent to Imgproc.GaussianBlur),
and then scales it down by rejecting even rows and columns;
• Imgproc.cvtColor – converts an image from one color space to another.
It is used here to convert the input RGB image into an HSV image,
because the HSV color space is more appropriate for color detection
based on the hue components of an image;
2.1. SOFTWARE 5
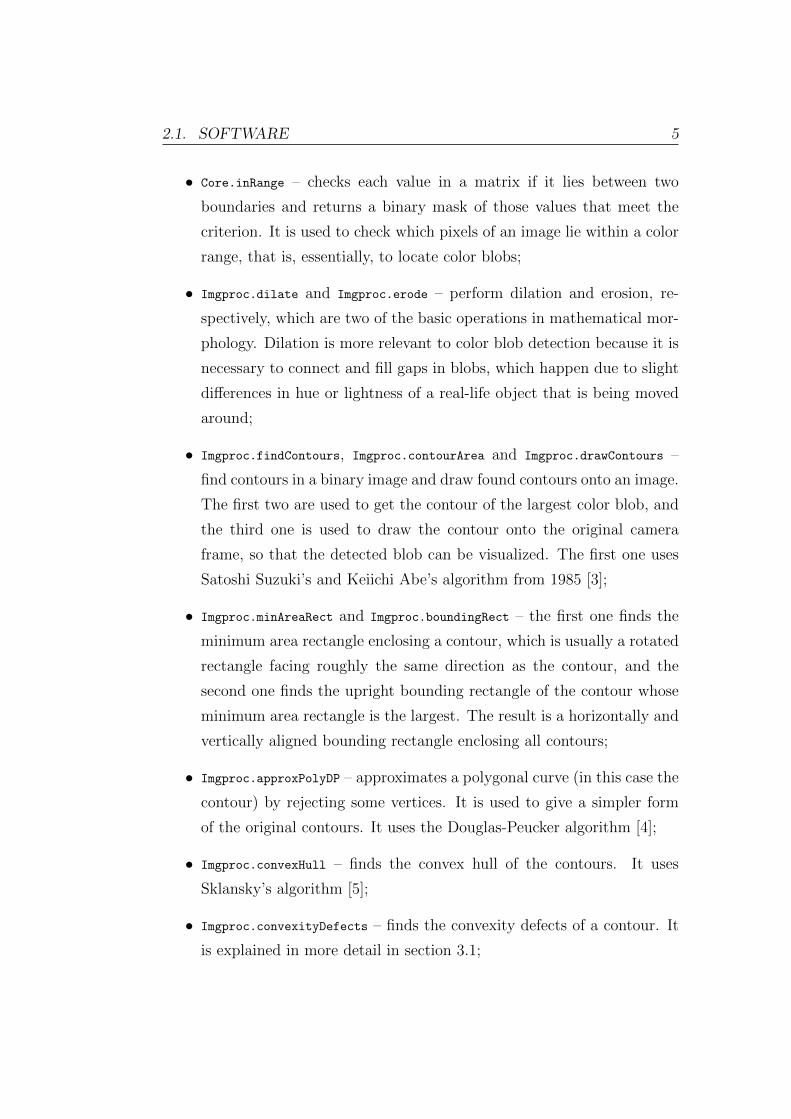
• Core.inRange – checks each value in a matrix if it lies between two
boundaries and returns a binary mask of those values that meet the
criterion. It is used to check which pixels of an image lie within a color
range, that is, essentially, to locate color blobs;
• Imgproc.dilate and Imgproc.erode – perform dilation and erosion, re-
spectively, which are two of the basic operations in mathematical mor-
phology. Dilation is more relevant to color blob detection because it is
necessary to connect and fill gaps in blobs, which happen due to slight
differences in hue or lightness of a real-life object that is being moved
around;
• Imgproc.findContours, Imgproc.contourArea and Imgproc.drawContours –
find contours in a binary image and draw found contours onto an image.
The first two are used to get the contour of the largest color blob, and
the third one is used to draw the contour onto the original camera
frame, so that the detected blob can be visualized. The first one uses
Satoshi Suzuki’s and Keiichi Abe’s algorithm from 1985 [3];
• Imgproc.minAreaRect and Imgproc.boundingRect – the first one finds the
minimum area rectangle enclosing a contour, which is usually a rotated
rectangle facing roughly the same direction as the contour, and the
second one finds the upright bounding rectangle of the contour whose
minimum area rectangle is the largest. The result is a horizontally and
vertically aligned bounding rectangle enclosing all contours;
• Imgproc.approxPolyDP – approximates a polygonal curve (in this case the
contour) by rejecting some vertices. It is used to give a simpler form
of the original contours. It uses the Douglas-Peucker algorithm [4];
• Imgproc.convexHull – finds the convex hull of the contours. It uses
Sklansky’s algorithm [5];
• Imgproc.convexityDefects – finds the convexity defects of a contour. It
is explained in more detail in section 3.1;

6 CHAPTER 2. AVAILABLE EQUIPMENT
• Imgproc.pointPolygonTest – calculates the distance of each point that
lies inside the contour to the nearest contour edge. It is used to find
the maximum inscribed circle within the hand. A function calculates
each point’s shortest distance, and returns the one that is the farthest
away from each wall of the contour, i.e. the most ”inside” point, as
well as its distance;
• Imgproc.matchShapes – compares two contours and returns a decimal
number from 0 upwards: 0 meaning identical, and higher values mean-
ing higher dissimilarity.
The color blob detection code was written partly on top of an open-source
sample from OpenCV [2] demonstrating the technique. It was extended to
allow detection of multiple colors at once, without reiterating the entire pro-
cess for each color, and it was modified to support additional functionalities
for the need of this application, as well as to speed up the process by removing
irrelevant operations. The morphology done on the input image (blurring,
downsampling, dilation, erosion) was also altered and experimented with,
since there isn’t any single best way to modify an image in order to extract
the most relevant features possible.
2.2 Hardware
The targeted hardware was any of the middle-end Android devices specifi-
cally, since the whole point of this work is for the application to be runnable
on the average consumer smartphone without too much latency.
Several Android phones have been used for testing, but most of the work
was done on a 2013 Sony Xperia L C2105 running Android 4.2.2 with a
Dual-core 1.0 GHz Krait CPU and an Adreno 305 GPU, 1 GB of RAM, and
an 8 MP primary camera able to record at 30 fps at a 720p resolution [6].
This phone’s hardware specifications are well below those of contemporary
smartphones of 2016, when this work was done. The device used for video
capture was, of course, the phone’s primary camera.

2.2. HARDWARE 7
Mode Options on Visible parts Average fps*
1 Whole hand none/drawing features hand 15
2 Whole hand none hand 15
3 Whole hand all hand 15
4 Whole hand none nothing 25
5 Whole hand none hand 19
6 Two colors / 1, 2 bands 20
7 Three colors / 1, 2, 3 bands 18
*measured over 1 minute
Table 2.1: Measured frame rates on Sony Xperia L [6].
The application has also been tested on the following models: Sony Xpe-
ria E (2013, Android 4.1), Sony Xperia E4g E2003 (2015, Android 4.4.4),
Samsung Galaxy A3 A300FU (2014, Android 6.0.1), Samsung Galaxy S5
G900F (2014, Android 6.0.1), Huawei Ascend G7-L01 (2014, Android 6.0),
and Huawei Ascend G620s (2014, Android 4.4.4).
However, the Xperia L, along with the newer Sony Xperia E4g, performed
noticeably better in terms of frame rate in comparison with the other phones.
The two Xperia phones’ frame rates would vary between 10 and 18 fps,
whereas none of the other phones could get an average of above 10 fps. For
reference, anything below approximately 12 fps is arguably too low for a
pleasant, or at least somewhat practical, user experience. Table 2.1 shows
frame rate measurements for the Xperia L in all modes with different options
enabled. The general trend of these observations is as expected: the larger
the area of detected shapes, the slower the execution.
It should be noted that the oldest phone in the list, the Sony Xperia
E, which also sports the least advanced hardware, was able to run the ap-
plication at approximately 8 fps on average. Even though it would not be
regarded as a satisfactory frame rate, being able to successfully draw some
shapes and save a drawing essentially demonstrates that the application can

8 CHAPTER 2. AVAILABLE EQUIPMENT
Figure 2.1: Tilt Brush snapshots.
be run successfully on older devices, too.
2.2.1 Advanced hardware used in hand recognition
Hand tracking is increasingly being implemented through advanced tech-
nologies, and used by many of the games running on their complementary
platforms. It is already standard in contemporary VR games, and there are
too many to be listed here. There are a number of excellent solutions – at
least in terms of precision and speed – but each one of them is fundamentally
different from our concept in that it uses hardware that is not standard for
smartphones and tablets, and, in the majority of cases, is significantly more
expensive.
Tilt Brush is currently one of the most popular and critically acclaimed
games for the HTC Vive. It uses the VR set’s sensors to create a virtual
environment in which the user can paint 3D shapes around them by using
the two hand-held controllers [7] (Figure 2.1).
Another example, more similar in the end result, is Virtual Notepad [8].
This project uses a spatially tracked tablet and pen for taking notes in the
virtual environment, tracked by the sensors on a head-mounted display of a
VR set (Figure 2.2).
However, neither of them do any visual hand recognition and similar com-

2.2. HARDWARE 9
Figure 2.2: Virtual Notepad. Snapshot taken from [8].
putations, as they both use more advanced and exotic hardware that sends
tracking data to the system. The hardware that can be used to facilitate,
or eliminate, the need for visual hand recognition, can be divided into a few
non-exclusive categories: infrared projectors and cameras, haptic devices,
high-tech gloves and hand-held devices, and powerful processing units.
Infrared projectors and cameras
Infrared projectors and infrared cameras are capable easily and accurately
measuring the distances to various objects in front of them, i.e. their depths.
Infrared cameras are already being made use of in various modern devices
that are becoming steadily more and more accessible to the general public.
Some more popular examples include VR sets like Oculus Rift, PlayStation
VR, HTC Vive, etc., and home gaming systems such as Microsoft’s Xbox
One that uses Kinect, or general purpose PCs connected with the Asus’s
Xtion PRO LIVE camera. Oculus Rift has its own IR LEDs integrated
into the head-mounted display that emit light that is being picked up by a
USB stationary infrared sensor [9]. In addition to it, the Oculus, as well as
other VR sets, can be coupled with a third party peripheral device, like Leap
Motion, to get a better sense of depth. Leap Motion uses two monochromatic
infrared cameras and three infrared LEDs [10] to generate almost 200 frames

10 CHAPTER 2. AVAILABLE EQUIPMENT
per second of reflected data [11] about the space in front of it and feed
it back to the PC, which analyzes the data and efficiently determines the
exact position, direction, shape, and separate parts of the hands. Kinect and
Xtion PRO LIVE work in a similar way, utilizing an infrared projector and
an infrared sensor that captures the light and feeds the light data back to
the Xbox One or PC [12].
An infrared thermal camera could also be used to provide temperature
data about visible objects, so that the system could rule out any objects that
are outside the human temperature range.
Haptic devices
Haptic devices use a tangible physical medium, like bursts of air (Aireal) [13],
vibrations, and even soundless ultrasonic waves (UltraHaptics) [14]. Haptic
technology differs from the other items on this list in that it provides feedback
in the opposite direction: from the system to the user. It is mainly used to
complement the user experience in the virtual world. As such, it has little
value in hand recognition itself, but it is worth mentioning as a possible
means of improving the accuracy of hand movements in future applications
of similar nature, through giving the user a sense of where their hand is going,
especially in terms of depth. For example, Aireal would send directed bursts
of air in the direction of a virtual moving ball, so that the user would feel
when they have made tactile contact with the ball. UltraHaptics would send
small vibrations through the air (in the form of ultrasound) which would
simulate, for example, a touch of a button on a user’s hand. Without it, the
user would only be able to see their hand visually touching the button in the
virtual environment, but they would not have any other form of confirmation
that they have indeed pressed the button.
Haptic feedback could also be used in an application like this one to let
the user know when they are drawing by simulating a touch on the tip of the
index finger.

2.2. HARDWARE 11
High-tech gloves and hand-held devices
High-tech gloves and similar hand-held devices incorporate various sensors
sending data about position, orientation, and bearing back to the system at
all times. Visual cues, like markers, do not belong in this category, since
they are not technically hardware and do not contain any digital technology
whatsoever, but we are trying to limit the use of anything that is not an
integral part of the smartphone.
The Nintendo Power Glove from 1989 is an early example of hardware
used to replace the traditional controller, but its success was limited due to
a number of factors, including not being technologically advanced enough
to be practical in gaming. The Nintendo Wii Remote released in 2006 was
much more successful, as the technology was much more advanced at that
time. As of 2016, there are a number of VR controllers available (Oculus
Touch, HTC Vive controllers) that allow the user to interact with the virtual
environment very accurately and with great freedom of motion.
The Computer Vision Laboratory at the Faculty of Computer and Infor-
mation Science at the University of Ljubljana has developed Digital Airbrush,
a device that acts much like a real airbrush, but uses infrared light caught
by an infrared camera for position tracking [15].
The Manus VR glove [16], however, is much closer to the subject matter
of this work, as it facilitates intuitive use of hands in a virtual environment,
allowing the user to grab, drag, pull, and push objects around. It is essentially
a regular glove fitted with high-tech sensors that track hand position and
movements, as well as precise finger movements, and a vibration motor that
gives haptic feedback to the user. Devices like these gloves give all the data
necessary for hand interaction, which is exactly what this work is trying
to achieve only through computer vision, without any sensors other than a
simple 2D camera.

12 CHAPTER 2. AVAILABLE EQUIPMENT
Powerful processors
High-end CPU’s and GPU’s are able to run an exponentially larger number
of operations than the average smartphone. Since we are limited to less
powerful and non-specialized hardware, there must be a compromise between
the practicality of what can be achieved and the complexity of the necessary
operations. For example, Oculus Rift and similar devices actually use the
PC’s computing power for all graphical and other processing, and only use
their infrared cameras, gyroscopes, etc. as additional input and, finally,
to display the images that are produces by the PC. More specifically, the
recommended PC specs listed on the Oculus website as of 2016 far exceed
the capabilities of the hardware present in the average smartphone. GPU:
Intel i5-4590 equivalent or greater; CPU: Intel i5-4590 equivalent or greater;
Memory: 8GB+ RAM; etc [17].
Chapter 3
Approaches
There are three main aspects that need to be factored: performance, com-
puting complexity, and simplicity of use.
• Performance: successfulness of the hand detection algorithm and the
accuracy of its tracking are paramount to the usability of this app. If it
cannot always find the hand, if it often mistakes another object for the
hand, and if the detected contour wobbles as if the hand were unsteady,
then it doesn’t matter how simple, effective and resource-friendly the
algorithm is.
• Computing complexity: conversely, no matter how accurately the hand
is detected, the application becomes unusable if the number of opera-
tions carried out is just too large for the device to be able to seamlessly
render the augmented reality graphics.
• Simplicity of use: for lack of a better term, simplicity of use in this
context implies the necessary environmental conditions, physical req-
uisites, background, and other visual aids for the algorithm to work
properly or to simplify its job. A trivial example would be the con-
trast between the hand and the background: a pitch-black hand on an
all-white background would always make it tremendously easier to de-
tect the hand without any interference. In addition, depending on the
13

14 CHAPTER 3. APPROACHES
inherent algorithms, by decreasing the number of background objects
which could be mistaken for a hand, it could also decrease the amount
of operations being executed, thus improving the frame rate and con-
serving working memory. However, this implies that the user must
confine themself to using the application only in certain, very limited
conditions. Such an application is useless to an interior designer trying
to sketch a colorful living room.
In order for the application to work accurately, smoothly, and without the
need for physical limitations, there needs to be an acceptable balance between
the three aforementioned factors, and that is exactly what this work is trying
to narrow down.
The final application offers a demonstration of four different approaches
that have been taken into account, each with its own advantages and disad-
vantages:
1. Convexity defects: The first method looks for convexity defects within
the convex hull of the detected hand, and assumes each defect repre-
sents one finger. This method has been implemented in the application
as Mode 1 (Whole hand).
2. K-curvature: The second one is a slight variation of the first one, but
instead of defects, it looks for curvatures of a certain angle in the hand
contour, presumably representing fingers. A demonstration of how this
method works is available in the application by enabling ’Display k-
curvature’ under ’Preferences’, while Mode 1 (Whole hand) is active.
3. Contour matching: The third one simply compares the current hand
contour to previously defined hand contours, and determines the cur-
rent gesture based on the result of the comparisons. This method can
be turned on in the application by choosing Mode 1 (Whole hand), and
enabling ’Use contour matching’ under ’Preferences’.

3.1. CONVEXITY DEFECTS 15
4. Colored bands: Finally, the last one is different from the first three in
that it does not look for any hand features, but instead just focuses on
predefined colors, each representing a separate finger. This method is
available in the application by choosing Mode 2 (Two fingers or Three
fingers).
Following is a more detailed description of each approach.
3.1 Convexity defects
The first method that was taken into consideration looks for convexity defects
in the convex hull of the detected hand contour. A region of the hand is first
sampled so that we can get an approximate average color of the hand. That
color is then used to set thresholds for segmenting the image into a binary
one, setting the hand apart from the background, allowing us to extract its
contour. This initial process is the basis for this work and is used in all
subsequent approaches. It is explained in more detail in Section 4.1.
It is fairly easy to track the hand using blob detection once we have
the color, but the number of fingers held up is calculated by computing the
number of convexity defects on the hand outline. The most obvious and
sharpest convexity defects in a hand polygon are the points that correspond
to the crevices between the fingers (Figure 3.1). However, depending on
the threshold set for what should be considered a defect (this is a different
threshold), there can be too many, or too few defects found, meaning an
incorrect number of fingers detected. Additional problems arise when only
one finger, especially the index finger, is extended. Namely, if the rest of the
fist is smooth and the finger is tilted in a way that flattens the angle between
it and each side of the fist, then there are no obvious convexity defects in
the hull. This presents a crippling problem, since that is the most important
gesture, meaning ”drawing,” but the system does not detect any fingers. This
is demonstrated in Figure 4.5b, where the index finger is extended, but it

16 CHAPTER 3. APPROACHES
doesn’t form a significant convexity defect in the convex hull; Compare to
Figure 3.1, where four defects have been detected.
The process of determining the number of fingers is as follows:
The contour representing the hand that is segmented from the background
is simplified by approximating a simpler polygon by reducing the number of
points in the original polygon using the Ramer-Douglas-Peucker algorithm
[4], which can be thought of as the opposite of smoothing a shape. The al-
gorithm works by recursively removing certain points of the original polygon
that it deems the least necessary. How many points are kept depends on the
precision that is user-defined as a parameter when calling the function, but
the worst-case complexity of the algorithm is O(n2).
The convex hull of the simplified contours (red polygon in Figure 3.1) is
calculated using Sklansky’s algorithm [5], of O(n log n) complexity, which is
then used for finding the convexity defects of the polygon.
Once there is a simplified contour and its convex hull, the set of points not
contained in the hull constitute all convexity defects in the polygon. Each
defect is comprised of four components that describe it: a start point, an
end point, a far point (the point within the defect that is the farthest from
the convex hull), and the distance between the far point and the hull. The
greater the distance, the likelier it is that that point is located between two
fingers (or at the root of one, in the case when only one finger is extended).
Figure 3.1 shows four such defects and their components.
If the contour was, indeed, a hand, and N fingers were discernibly ex-
tended, among the numerous defects found, exactly N depth points should
have distances clearly greater than the rest and technically greater than the
chosen threshold (mentioned above). The number of points above the thresh-
old is assumed to be the number of fingers, which makes choosing the right
threshold essential to the whole task. However, if one threshold works fine
with five fingers, it may be too high when only the index finger is visible.
And vice versa, if the threshold is low enough to recognize the crevice be-
tween the sole index finger and the knuckle next to it, things quickly get out

3.1. CONVEXITY DEFECTS 17
Figure 3.1: Convexity defects: each defect is composed of four parts: a start
point (yellow circle), a far point (purple circle), an end point (cyan circle),
and a depth (distance between the far point and the convex hull); the lines
help visualize the whole defect.
of hand as various other insignificant defects are erroneously recognized as
valid spaces between fingers.
In summation, both parts of this method are severely limited when it
comes to tracking a hand and its separate fingers, rendering it useless in real
world situations, and at best unreliable in a high contrast environment:
1. The background must not contain any color similar to the color of the
hand, or another object can be mistaken for a hand;
2. The crevices between the fingers must form the perfect angles required
by the set threshold in order to be recognized as convexity defects and
add towards the finger count.
Obviously, using color blob detection is not the best way to track a hand
on a screen, and finding convexity defects is far from reliable when we need
the exact number of fingers (or a gesture can be mistaken for a completely

18 CHAPTER3. APPROACHES
α
β
1
3
1
3
1
1
22
2
2
p1
p2
k = 2θ = 60º
Figure3.2: K-curvature:theangleαthatp1formswithits2ndneighbors
ineachdirection(greencircles)is57o,andtheangleβthatp2formswith
its2ndneighborsis160o;αisbelowthethresholdθ,sop1ispotentiallya
fingertip.
differentgesture),butitissimplerandfasterthanother,moreadvanced
approaches.
3.2 K-curvature
TheK-curvaturealgorithmconsiderseachpointthatdefinesthehandcon-
tour.Foreachpointpi,ittakesthepointthatiskpointsbeforeit(pi−k),and
theonethatiskpointsafterit(pi+k),anditcalculatestheangle pi−kppi+k.
Ifthatangleislowerthanapredefinedthresholdθ(typicallyaround60o),
pointpiisaddedtothelistofinterestingpointsthatcouldbelocatedneara
fingertiporacrevice[18].Thesepointscanbefurtherfiltered,forexample,
bycheckingiftheangleisfacingdownwards(finger)orupwards(crevice),or
limitingthemaximumdistancebetweenpointpanditsk-thneighbors.
Forexample,Figure3.2showstwopoints,p1andp2,andothercontour
pointsaroundthem.kisdefinedas2,andθis60o. Theangleαthatp1

3.2. K-CURVATURE 19
Figure 3.3: K-curvature: the contour’s distortion prevents the algorithm from
finding curves properly. Red circles are points of interest, and green circles
are their k-th neighbors.
forms with its two 2nd neighbors is 57o, and the angle β that p2 forms with
its two 2nd neighbors is 160o. Since α is less than θ, and β is greater than
θ, p1 is considered a potential fingertip point, and p2 is disregarded.
We have implemented a crude form of the algorithm in the application
as function kCurvature(MatOfPoint contour, int k, int theta) as an optional
alternative to the Convexity defects method, but the observed results, as far
as counting fingers goes, were not satisfactory. This method relies on the
smoothness of the contour, which in turn relies on the successfulness of the
color blob detection and the subsequent morphology, as well as chance. If the
part of the contour that goes along a certain finger is distorted and it does
not form an angle of less than 60 degrees, it will not be detected as a finger.
This irregularity of the hand contour, especially around the fingertips due to
the different color of the nails, causes curves to be detected in unexpected
places, and overlooked at the very tip of the finger (Figure 3.3). The problem
is not in the algorithm, but in the distorted contour itself.
A demonstration of how this method works is available in the applica-
tion in Mode 1 (Whole hand) by enabling the option ’K-curvature’ in the

20 CHAPTER 3. APPROACHES
’Preferences’ menu.
3.3 Contour matching
Contour matching is a much simpler method that relies solely on
comparing contours. The current largest detected contour is com-
pared to three contours captured beforehand by the user, each cor-
responding to a certain hand gesture. The comparison is done by
the OpenCV function Imgproc.matchShapes(Mat contourA, Mat contourB, int
method, double parameter) [2], which compares the two shapes and returns
a decimal number from 0 upwards: 0 meaning identical, and higher values
meaning higher dissimilarity. The function uses one of three possible meth-
ods (specified by the method variable), all of which use the Hu invariants [19]
to calculate the result. The Hu invariants are in turn calculated by the func-
tion Imgproc.HuMoments(Moments m, Mat huInvariants), which returns a matrix
of seven Hu invariants. The method used in the application is described in
Equation 3.1, where A denotes contourA, B denotes contourB, and mXi is
the i-th Hu moment of contourX.
I(A,B) = maxi=1...7
|mAi −mB
i ||mA
i |(3.1)
This method is only available in Mode 1 (Whole hand), and requires
that the user first capture three sample contours: closed fist, index finger
extended, and open hand. This is done by enabling the option ’Contour
matching’ in ’Preferences’, and making the three gestures one by one, tapping
the screen once after each gesture. The contours are automatically saved on
each tap. Once the three samples are captured, the program constantly
makes comparisons between the current contour and the other three, and
then compares the returned numbers; the one with the lowest number is
taken as the current gesture. If the number is above a certain threshold
(no contour was similar enough to the current one), the program skips to
the Convexity defects method as a failsafe. While it is a simple method that

3.4. COLORED BANDS METHOD 21
provides a fast and easy way to guess the hand gesture in a white background
setting, it fails when there is moderate background noise because the other
detected contours prevent the matching to be done properly.
3.4 Colored bands method
There are a few more possibilities that could be explored in a later implemen-
tation, but they are all techniques that are not widely used when it comes
to hand detection on mobile devices. Prominent examples include ”Haar-
like features” and ”particle filtering.” It should be noted here that the field
of hand detection solely by the use of a 2D camera, especially without the
use of infrared cameras or other hardware, is far from widely explored, and
thus scarcely used. The current publicly available methods do not provide
a definitive robust way of hand detection in an arbitrary environment that
might contain a lot of noise, variable lightness, and occlusion of the hand, or
in an arbitrary hand pose, such as horizontal or facing the camera with the
fingertips, much less identifying the separate fingers or other anatomic parts
of the hand.
To that effect, we have facilitated the work of the previously described
method, by using paper bands taped to each finger, each in a different color.
Instead of tracking a hand, things could be simplified greatly by just tracking
different color blobs. That way there would be no need for finger or hand
recognition at all. We could simply tape a band in a unique color to each
fingertip and track those bands using color blob detection. Hiding a finger
behind the fist effectively moves that band out of sight, which the program
would see as not holding that finger up. That way it can count the number
of fingers that are up. With that, we have a program that can track a hand,
count fingers, and recognize gestures (since it can tell each finger apart), with-
out the need for complex graphical processing, which would greatly improve
performance.
Those approaches are always much less computationally demanding, but

22 CHAPTER 3. APPROACHES
require additional objects to be used as visual aids in the physical world.
Several different objects were tried during the course of this work, the
simplest one being a piece of colored paper wrapped around a fingertip. In
the end it really makes no difference what is used, as long as it is brightly
colored and distinctly to the background (usually colors that are rarely seen
in most natural environments), clearly visible at the end of each finger, and
the algorithm is set to look for those specific colors. However, in the spirit of
this work’s ultimate goals, whatever is used needs to be as simple and easy
to acquire as possible, so that it does not present a problem to the end-user.
To that end, if such an object must be used, we propose a simple black or
white glove with colored fingertips. Such a glove differs essentially from the
above-mentioned high-tech gloves and hand-held devices in that it contains
no electronic hardware whatsoever and is therefore very inexpensive. Here
we face the same trade-off between convenience and performance again.
Chapter 4
Detection process and
implementation
The very first thing that needs to be done once the application is started is
selecting the mode of operation: Mode 1 (Whole hand) or Mode 2 (Colored
bands). Next, the application asks for one or more colors to be selected (one
for Mode 1, and two or three for Mode 2). The modes of operation and
ways of selecting and changing colors are described in more detail in Section
6.1. Once that is done, the system begins tracking the selected colors and
attempts to understand what it sees. Below is an overview of the general
process.
A CustomCameraView object is initialized, which extends JavaCameraView, a
bridge view that connects OpenCV and Android’s Java Camera so that each
camera frame can be processed and converted to an RGB OpenCV matrix
[2]. Once the camera is started, a ColorBlobDetector object is also initialized,
and awaits between one and three colors to be assigned to it. The colors can
be defined (picked) in a few ways, but once the specified number of colors
is selected, the ColorBlobDetector starts continuously looking for those colors
on the input matrix. The detector receives the HSV colors, calculates certain
lower and upper bounds (within the HSV color space) based on these colors,
and stores them for later use.
23

24 CHAPTER 4. DETECTION PROCESS AND IMPLEMENTATION
Regardless of the mode, at least one color must be selected before any
detection can be done. In the case of Mode 1 (Whole hand), the user selects
the skin color on the back of their hand, and that is the only color being
tracked. In the case of Mode 2 (Colored bands), the user selects the color of
each band separately, so that they may be tracked separately.
Provided that the colors have been selected and assigned to the detector,
it calls its main processing function on each camera frame. It looks for any
blobs in the current camera frame that satisfy certain color criteria defined
by the aforementioned bounds (by range checking and producing a mask of
the pixels that have passed the criterion), and returns any found blobs in the
form of a list of contours (OpenCV object MatOfPoint) mapped to the input
image.
From this point on, everything is done exactly once for each camera frame,
while the program is running and the camera is still active. If the list of con-
tours for the current frame is not empty, more calculations follow. However,
depending on the active mode, different actions are taken:
1. Mode 1 (Whole hand) (Figures 4.1a and 4.1b):
The position of the cursor is defined by default as the top-left corner of
the bounding box of the entire contour. This is done because it is the
closest point to the index finger’s tip of the right hand that is easily
calculable.
However, if the thumb’s tip is too far left from the index finger’s tip,
the bounding box’s top-left corner floats somewhere between the two
fingers. In order to address this problem, there is an option available
in the application that attempts to approximate the index fingertip’s
position more accurately (’Use fingertip as cursor’ in ’Preferences’).
The method behind it tries to guess which convexity defect corresponds
to the space between the thumb and the index finger, and takes its
start point, which is roughly near the index finger’s tip, as the cursor’s
position. There is, however, a downside when using this method: the

25
(a) Whole hand — drawing (b) Whole hand — interface interaction
(c) Colored bands — drawing (d) Colored bands — interface interaction
Figure 4.1: Modes of operation: Whole hand and Colored bands

26 CHAPTER 4. DETECTION PROCESS AND IMPLEMENTATION
detected contours shift constantly, up to 30 times per second, which
means the convexity defects move with them. That causes the cursor
to wobble, resulting in jagged lines (akin to the first line in Figure
4.6, and sometimes worse). For that reason, this functionality is only
optional. It is also worth noting that we have implemented a cursor
stabilization algorithm (Section 4.2.5).
When interacting with the user interface, due to physical limitations,
the cursor does not always correspond to the top-left corner, but moves
down when the hand is in the bottom half of the image, and right when
it is in the right half of the image. In other words, the cursor does not
follow the index finger’s tip; instead, it follows the relative position of
the hand in relation to the entire screen. This is done because, when
the index finger is near the bottom of the screen, it cannot be tracked
if the rest of the hand is not visible to the camera.
Next, in order to differentiate between fingers, the convex hull of the
hand is calculated, and its convexity defects are extracted, which should
serve as an approximation of the number of fingers that are being held
up. This is explained in more detail in section 3.1. For ease of use,
one or two fingers up is translated to ”one finger up,” i.e. drawing
mode, and three or more fingers means ”two fingers up,” i.e. interface
interaction mode.
2. Mode 2 (Colored bands) (Figures 4.1c and 4.1d):
In this case, the exact blob corresponding to the index finger is known,
so its bounding rectangle’s top-left corner is taken as the cursor, which
is far more precise than the entire hand’s bounding rectangle.
No further calculation is needed here because the exact number of fin-
gers is known, since each color corresponds to a separate finger. The
number of detected colors is the number of fingers held up.
From this point on, the process is the same regardless of the current
mode. Depending on the current hand gesture, three different interaction

27
modes apply. However, due to differences in detection techniques in the two
modes, we have settled on assigning different gestures for interaction in the
two modes.
1. No action — If the number of visible fingers was determined to be
zero in Mode 1, or zero or more than two in Mode 2, the entire cycle
is skipped and no action is taken, thus allowing the user to move their
hand freely across the screen.
2. Drawing — If the number of visible fingers was determined to be
one in Mode 2 (Figure 4.1c), or one or two in Mode 1 (Figure 4.1a),
that is the default mode of ”drawing”, where each new frame adds
an additional point and an additional line to the drawing. The point
is added to the current position of the cursor, and the line is drawn
from the previous position of the cursor to the current one, thereby
approximating the effect of continuous drawing. These points and lines
are stored in ArrayList’s whose entire contents are drawn on top of
the input RGB image on each frame before displaying that frame on
the screen.
3. Interface interaction — Finally, if the number of visible fingers was
determined to be two in Mode 2 (Figure 4.1d), or 3 or more in Mode
1 (Figure 4.1b), this enters the ”user interface mode,” in which the
position of the cursor is constantly being checked whether or not it
lies within a virtual button’s coordinates. If it does, that button is
”pressed” and its corresponding action is taken.
Following is a more technical and detailed description of the entire process
(which is only applicable to Mode 1), divided into two parts: hand detection
and feature extraction. Hand detection concerns with producing a binary
image of the hand as clearly as possible, with the minimal possible amount
of noise. Feature extraction is the more intelligent part of the process that
performs contour analysis, i.e. tries to make sense of the detected contours.
This entire process is also summed up in the diagram in Figure 4.2.

28 CHAPTER 4. DETECTION PROCESS AND IMPLEMENTATION
Figure 4.2: Diagram of the entire process.
Note that feature extraction is not needed in Mode 2 (Colored bands),
since the system knows the exact position of each colored band, and what
finger it corresponds to.
4.1 Hand detection
On each camera frame, which means up to 30 times per second, the input
frame is converted to an OpenCV.Mat object (1st image of Figure 4.3), and
it is passed to the color blob detector. It is then twice blurred and scaled
down by applying the Gaussian pyramid, which consists of convoluting it was
a Gaussian function (blurring), and rejecting even rows and columns, thus
halving the width and height of the 2-dimensional matrix. Since this process
is done twice for the rows and the columns, the resulting matrix is four times
smaller than the original matrix. The OpenCV function used to achieve this
effect is Imgproc.pyrDown(Mat srcMat, Mat dstMat).

4.1. HAND DETECTION 29
This matrix is then converted to HSV color space (2nd image of Figure
4.3), using the OpenCV function Imgproc.cvtColor(Mat srcMat, Mat dstMat,
int code), code being the type of conversion, or in this case, RGB2HSV
(RGB to HSV). The HSV color space is more appropriate for range checking
because it represents colors in terms of hue, saturation, and value, as opposed
to a cryptic mixture of various hues.
The color blob detector has two attributes that determine the range check-
ing: lowerBounds and upperBounds. They represent the range (anything be-
tween lowerBounds and upperBounds) for the range checking, and contain three
variables for each channel. The range checking is done on each channel sepa-
rately, so a certain pixel has to be within the set range on each channel in or-
der to be positive. The OpenCV function Core.inRange(Mat srcHSVMat, Scalar
lowerBounds, Scalar upperbounds, Mat dstMask) performs the range checking
and produces a binary mask of the same size as the source matrix, where
all source points that were inside the color range are now set to 1 (shown
as white), and all the remaining ones are set to 0 (shown as black) (3rd
image of Figure 4.3). This is similar to thresholding, where all pixels of a
grayscale image above or below a certain value are admissible, but range
checking works on multiple channels and allows multiple values within a cer-
tain range. While the most important channel in this case is H (the actual
hue of the color), we still need to limit the range of the other two channels,
because a very wide spectrum of colors can have the same H value. However,
the user is given the option to change the range of each channel. Setting the
ranges of S and V to their maximum values, for example, is essentially the
same as using only the H channel, because the algorithm admits all values
on those two channels.
Once there is a binary mask, the results could be further filtered in order
to reduce any potential noise. The most useful thing to do here is mor-
phological transformation: dilation and erosion, or any combination thereof
(opening and closing). As there is no single universal and most successful
sequence of morphological operations, the results will always vary depending
30 CHAPTER 4. DETECTION PROCESS AND IMPLEMENTATION
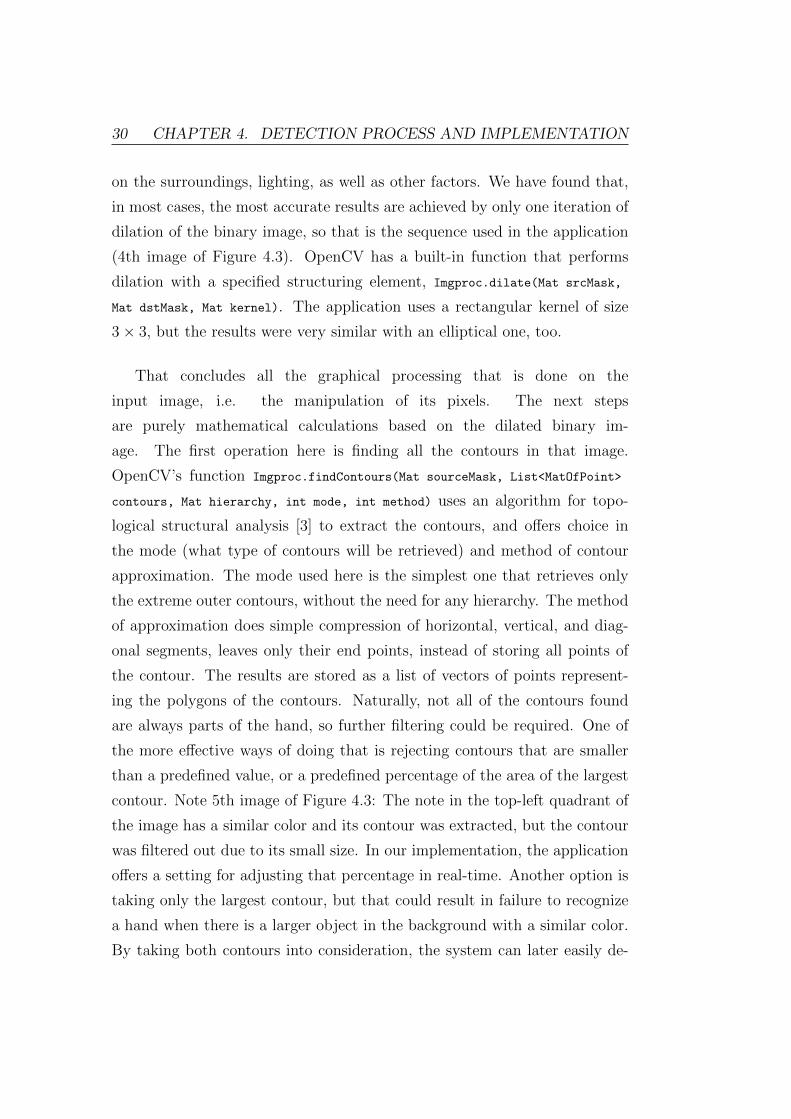
on the surroundings, lighting, as well as other factors. We have found that,
in most cases, the most accurate results are achieved by only one iteration of
dilation of the binary image, so that is the sequence used in the application
(4th image of Figure 4.3). OpenCV has a built-in function that performs
dilation with a specified structuring element, Imgproc.dilate(Mat srcMask,
Mat dstMask, Mat kernel). The application uses a rectangular kernel of size
3× 3, but the results were very similar with an elliptical one, too.
That concludes all the graphical processing that is done on the
input image, i.e. the manipulation of its pixels. The next steps
are purely mathematical calculations based on the dilated binary im-
age. The first operation here is finding all the contours in that image.
OpenCV’s function Imgproc.findContours(Mat sourceMask, List<MatOfPoint>
contours, Mat hierarchy, int mode, int method) uses an algorithm for topo-
logical structural analysis [3] to extract the contours, and offers choice in
the mode (what type of contours will be retrieved) and method of contour
approximation. The mode used here is the simplest one that retrieves only
the extreme outer contours, without the need for any hierarchy. The method
of approximation does simple compression of horizontal, vertical, and diag-
onal segments, leaves only their end points, instead of storing all points of
the contour. The results are stored as a list of vectors of points represent-
ing the polygons of the contours. Naturally, not all of the contours found
are always parts of the hand, so further filtering could be required. One of
the more effective ways of doing that is rejecting contours that are smaller
than a predefined value, or a predefined percentage of the area of the largest
contour. Note 5th image of Figure 4.3: The note in the top-left quadrant of
the image has a similar color and its contour was extracted, but the contour
was filtered out due to its small size. In our implementation, the application
offers a setting for adjusting that percentage in real-time. Another option is
taking only the largest contour, but that could result in failure to recognize
a hand when there is a larger object in the background with a similar color.
By taking both contours into consideration, the system can later easily de-

4.2. FEATURE EXTRACTION 31
Figure 4.3: Various stages of the process: 1. Getting the input image; 2.
Converting to HSV color space; 3. Color segmentation; 4. Dilation; 5.
Contours; 6. Feature extraction.
termine which one is the hand, by examining its other features, and not only
its size.
4.2 Feature extraction
The contour itself holds vital information about the hand, its posture, and its
separate parts, or whether it is a hand at all, but it needs to be unlocked by
conducting more thorough contour analyses. Among the more useful features
of a contour are its rotated (purple rectangle in 6th image of Figure 4.3) and
upright bounding boxes, its convex hull (red polygon in 6th image of Figure
4.3), its maximum inscribed circle (red circle in 6th image of Figure 4.3), and
its center of gravity.
There are many possible approaches as to how the hand features can be
extracted from the contour. While we achieved the best functionality by
using the Convexity defects method (Section 3.1), we have also implemented
two others: K-curvature (Section 3.2) and Contour matching (Section 3.3).

32 CHAPTER 4. DETECTION PROCESS AND IMPLEMENTATION
4.2.1 Convex hull
The default method is calculating convexity defects in the convex hull. The
convex hull is essential in hand recognition, since it can be used together with
the contour to find any convexity defects, which may or may not represent the
spaces between extended fingers. The hull is calculated by using OpenCV’s
function Imgproc.convexHull(MatOfPoint contour, MatOfInt hull). The output
MatOfInt is just a list of indices of contour, corresponding to the points that
are also vertices of the convex hull. In order to get the hull’s actual vertices,
we need to copy the values from contour that are mapped in hull, and store
them in a separate list of points.
4.2.2 Convexity defects
Using the two variables holding the contour and the hull, we use
OpenCV’s function Imgproc.convexityDefects(MatOfPoint contour, MatOfInt
hull, MatOfInt4 defects) to get all the convexity defects between the contour
and its convex hull. A convexity defect is composed of three points and one
descriptive value: start point, end point, far point, and depth. MatOfInt4
holds four integers, which means the points are not stored as OpenCV.Point
objects, but as numbers representing indices mapped to the variable contour.
These three points are obtained by getting the Point objects at the specified
indices in the contour.
Extended fingers form prominent convexity defects in the contour. How-
ever, many other defects need to be filtered out first, and even then, there is
still plenty of room for error. The most common filtering steps are rejecting
defects that are facing downwards (since the space between fingers is usually
facing upwards), defects forming angles wider than approximately 100o (as
the fingers don’t usually bend that far), defects that are too small, defects
that are too close to the convex hull (i.e. too shallow), etc.

4.2. FEATURE EXTRACTION 33
4.2.3 Maximum inscribed circle
The convexity defects can be further filtered once the maximum inscribed
circle has been found, since it ideally represents the palm of the hand, and
the defects are the spaces between fingers. For example, if a defect cannot be
a finger if it is too far away from the maximum inscribed circle (fingers are
attached to the palm), if it is twice the size of the circle’s diameter (fingers
are usually about as long as the palm), etc. Finding the maximum inscribed
circle in a contour is relatively simple, but very time consuming, because the
algorithm has a high time complexity. It is typically found by performing
a point-in-polygon test on each point inside or near the contour, which also
calculates its distance to the nearest contour edge. The point that has the
maximum distance, and is inside the contour, is the center of the maximum
inscribed circle, and the distance to the nearest edge is its radius. This is
done by calling the OpenCV function Imgproc.pointPolygonTest(MatOfPoint2f
contour, Point point, boolean measureDistance) once for each point of the en-
tire matrix. The complexity of one run of a typical point-in-polygon test for
one point is O(n) [20]. Running it on the entire matrix takes width×heighttimes that. Doing so once per each frame, several frames per second, can
slow down the entire application and render it useless. The complexity can
be reduced for special polygons, such as convex polygons, but that is not
the case with these contours. There are several ways to accelerate the basic
algorithm, mainly by limiting the search area, but the algorithm is always
of O(n) complexity for arbitrary polygons, hence ”acceleration” refers to re-
ducing a constant time factor [20]. The most obvious way to limit the search
area is to create a Region of Interest (ROI) and ignore the rest of the image.
The ROI is first defined as the bounding box of the contour. If there are more
than two convexity defects found, the top edge of the ROI can be limited
to the highest far point (we need more than two defects to make sure the
highest one is not the thumb), because the palm is located below the fingers,
excluding the thumb. The bottom edge of the ROI can be defined as twice
the length of any of the defects (fingers) from its far point (root) downwards,

34 CHAPTER 4. DETECTION PROCESS AND IMPLEMENTATION
because the palm’s height is a little more than the middle finger’s length
(Figure 4.4).
In addition to the ROI, the point-in-polygon test is only performed on
every N -th point within the ROI (where N is greater than 3, but less than
15). That way, the maximum inscribed circle is found roughly 6 times faster,
and the accuracy suffers very little, as it is not very important to find the
exact center of the palm, but merely an approximation. Native C code
using JNI was also used for the same purpose in an attempt to decrease the
computation time, but the Java method that skips a few pixels in the search
was found to be a little faster.
Constricting the centroid
Additionally, if the ’Constrict centroid’ option is enabled, the ROI is defined
simply as the maximum inscribed circle’s area from the previous frame, if it
exists. This prevents the tracking system from jumping to a different region
outside of the hand in cases when there are other large objects of a similar
color. The constriction is usually loose enough to allow relatively quick, but
natural hand moves across the screen. If the centroid is lost, the original
method for finding it takes over, and then the constriction takes effect again
[21].
Ignoring false positives
Having found the maximum inscribed circle and filtered the obvious false
positive convexity defects is usually enough to get a sense of where the hand is
and how many fingers are held up. There is an optional function implemented
in the application that attempts to further filter out obvious false positives by
doing various other tests (based on the shapes in Figure 4.4), but its success
rate is not always high, and in some cases, it can even impede drawing in
clear situations. Nevertheless, it is worth noting the additional tests that are
performed. The contour is disregarded as not a valid hand if:

4.2. FEATURE EXTRACTION 35
Figure 4.4: ROI of the hand: purple circles: far points; green line: length of
a defect; blue line: twice the length of the defect; yellow rectangle: ROI for
the point-in-polygon tests; red circle: maximum inscribed circle.
• the farthest fingertip (convexity defect start or end point) is too far
away from the palm (center of maximum inscribed circle)
• the farthest far point (root point between two fingers) is too far away
from the palm (center of maximum inscribed circle)
• the minimum enclosing circle of the convexity defects (circle
formed by the roots of the fingers) does not intersect the max-
imum inscribed circle; minimum enclosing circle is found by us-
ing the OpenCV function Imgproc.minEnclosingCircle(MatOfPoint2f
points, Point center, float radius)
• the center of gravity of the entire contour is too far away from the
maximum inscribed circle; the center of gravity is found by using
the contour’s moments, which are calculated by the OpenCV function
Imgproc.moments(Mat contour, boolean binaryImage)

36 CHAPTER 4. DETECTION PROCESS AND IMPLEMENTATION
(a) no protrusion or discernible features (b) the index finger ”protrudes” the hull
Figure 4.5: Hull protrusion. Even though no convexity defects have been
detected in image (b), we try to find a point in the top-left part of the hull
that is far enough from the maximum inscribed circle.
4.2.4 Hull protrusion
There is, however, one problem with this entire approach when the user is
attempting to draw by using only the index finger. Namely, when the index
finger is the only one extended and the rest of the fist is closed, the convexity
defect formed by the index finger and the hull is too close to the hull, too small
to be detected, or too wide to pass the angle criterion (Figure 4.5). Due to
the nature of a closed human fist, the lack of discernible features (such as the
ones on a human face) presents a significant difficulty in recognizing it from
its backside (Figure 4.5a). For this reason, there is a limitation on drawing:
drawing must be done with both the index finger and the thumb extended.
We have found one possible solution that works in a limited number of cases,
but it can also be a source of many false positives. We try to find a protrusion
from the hull in the top-left part of the contour in relation to the palm (i.e.
the minimum inscribed circle), by looking for a point that is far enough from
the palm.

4.2. FEATUREEXTRACTION 37
Figure4.6:Fourlinesdrawnwithdifferentstabilizationvalues:0(none),4,
6,and10(max).
4.2.5 Cursorstabilization
Inordertosmoothoutthecursormovements,itspositionisconstantlybeing
stabilizedbypassingthroughalow-passIIR(infiniteimpulseresponse)filter.
Ittakesthecursorpositionsfromthecurrentandthepreviousframeand
shrinksthedifferencebetweenthem(byasetamountthatisalsoadjustable).
SinceitisanIIRfilter,thepreviousfilteredvaluesaffectnewvalues.That
meansthatoverthecourseafewframes,theeffectofthefilterisacursor
thatdoesnotmakeanyunwantedsuddenmoves(Figure4.6).Asideeffect
ofsettingahighvalueissignificantlagofthecursoratlowerframerates.
Forthatreason,thefilter’salgorithmtakesintoaccounttwootherfactors:
thecurrentframerate,andthedistancethecursorhastraveledsincethelast
frame(Equation4.1).Thestrengthofthefilterisloweratlowerframerates
andhigherathigherframerates.Itisalsodecreasedproportionatelytothe
speedofthecursor.
newPos=prevPos+curPos−prevPos
smoothing×frameRate−speed(4.1)

38 CHAPTER 4. DETECTION PROCESS AND IMPLEMENTATION
4.3 Pseudocode
This entire process is summed up in the following pseudocode (Listing 4.1),
divided into two parts in the same way as in the text.
Listing 4.1: Pseudocode of the detection process.
// HAND DETECTION -----
Mat mRgba = inputFrame.rgba() // get input image
((ColorBlobDetector) mDetector).processEach(mRgba) {
Mat mPyrDownMat = Imgproc.pyrDown(mRgba) x2 // pyrDown twice
Mat mHsvMat = Imgproc.cvtColor(mPyrDownMat, RGB2HSV) // convertpyrDown rgba image to hsv image
for (each color in hsvColors) {
Mat mMask = Core.inRange(mHsvMat, mLowerBounds<color>,mUpperBounds<color>) // do a range-check for each pixel of hsvimage
// mMask is a bit mask of pixels that are either inside the colorrange (1, white) and pixels that are not (0, black)
Mat mDilatedMask = Imgproc.dilate(mMask, 3x3 kernel) // dilate the1-regions of the binary image
List<MatOfPoint> contours = Imgproc.findContours(mDilatedMask) //find contours of the 1-regions and store them as a matrix ofpoints
maxArea = find area of largest contour
disregard all contours that are smaller than a certain percentageof maxArea
scale up all contours by 4 // because the input images was halvedtwice
}}
// FEATURE EXTRACTION -----
for (each color in hsvColors) : Imgproc.drawContours(mRgba, contours) //draw the contours onto the input image
RotatedRect minAreaRect = Imgproc.minAreaRect(contours) // find theminimum area (rotated) rectangle enclosing the contour
Rect boundRect = Imgproc.boundingRect(contours) // find the uprightbounding rectangle enclosing all contours
if (whole hand mode) {
contour = Imgproc.approxPolyDP(contour) // simplify the contour byapproximating it
Imgproc.convexHull(contour, hull) // find the convex hull of thecontour
MatOfInt4 convexityDefects = Imgproc.convexityDefects(contour, hull)// find the convexity defects in the contour in relation to thehull
// filter the convexity defectsList validDefects
for (each defect in convexityDefects) {

4.3. PSEUDOCODE 39
if (defect.angle < 100 && defect.depth > depthThreshold &&defect.farPoint < yThreshold)
validDefects.add(defect) // add this defect to the list ofvalid defects
}
// find the maximum inscribed circleMat ROI = mRgba.submat(limitingCriteria) // limit the search to a
region of interest
for (each point in ROI) { // additionally skips a some pixels to savetime
dist = Imgproc.pointPolygonTest(contour, point) // calculate thedistance from point to closest edge of contour
// if dist is max, this point and dist define the max inscribedcircle
}
List fingertips = validDefects.endPoints // take the end points ofthe defect as fingertips
optionally: ignoreFalsePositives() // if the farthest fingertip orfar point is too far away from the palm, don’t draw
// if no defects found, try to find a protrusion near the palm, inthe upper-left corner; it may be the index finger
optionally: findHullProtrusion()
} // else if (colored bands mode) proceed

40 CHAPTER 4. DETECTION PROCESS AND IMPLEMENTATION

Chapter 5
User interface
The user interface was created specially to fit the purposes of this applica-
tion. A traditional graphical user interface with pressable buttons would be
useless here since the whole idea is to approximate modern virtual reality ap-
plications. Admittedly, peripheral devices like mice and keyboards are often
used for walking around and choosing menu options in virtual reality, but in
some cases there is also the possibility to press buttons and make decisions by
doing actions in the virtual world. Ideally, this application would be used in
conjunction with a VR set, like Google Cardboard, meaning the user would
not hold the device and also wouldn’t be able to press any buttons, hence
the need for a virtual user interface.
The final interface is mostly composed of virtual ”buttons,” that are not
actual buttons, but mere text views (Android element TextView) having a
certain position and text. These text views cannot be pressed or tapped
physically; they are activated when the cursor (otherwise used for drawing)
is positioned over them. That enables button pressing in the virtual world
of the application, without the need to ever touch the phone’s screen. The
current gesture decides whether a ”button” will be pressed or not: there
have to be three fingers detected in Mode 1 (see Section 6.1.1) or two fingers
detected in Mode 2 for a virtual button to be activated. The reason for this
difference in gestures is the difference in the detection techniques used for
41
42 CHAPTER 5. USER INTERFACE
Mode 1 and Mode 2. For example, the problem of not being table to detect
a sole extended finger in Mode 1 by using the Convexity defects method (see
Figure 4.5b) prevented us from assigning the ”one finger gesture” to the same
action in all cases. A potential solution has been proposed in Section 4.2.4,
but since it isn’t a complete solution, we have decided to assign different
gestures for the different modes.
The actual drawing is done by using one core OpenCV function on every
camera frame: Core.line(Mat image, Point start, Point end, Scalar color,
int thickness). Every new bit of drawing is saved in the ArrayList object
listOfLines. When the cursor moves between the duration of two consec-
utive frames, a new line is added to listOfLines, defined by the point that
corresponds to the current cursor position, and that cursor position from
the previous frame. Since the ArrayList holds an array of Point objects,
it actually stores the line’s two ending points. On each frame, the contents
of that ArrayList are drawn on the screen. The precision of the drawing
again depends on the successfulness of the hand detection, as well as the
frame rate. Lower frame rates result in much more discrete and choppier
lines, instead of seamless curves akin to those made by a paintbrush. That
roughness could also be masked by simply increasing the width of the lines
that are being drawn.
5.1 Virtual interface
The virtual interface is divided into three main groups: Erasing buttons,
Controls, and Preview.
1. Erasing buttons — contains buttons for undoing and clearing the
entire drawing (Figure 5.1a):
• Clear: instantly clears any drawings by emptying the ArrayList
holding the points that constitute the drawing;
• Undo: continuously erases the previous line while the button is

5.1. VIRTUAL INTERFACE 43
pressed until there are no more lines by removing the last element
of the ArrayList holding the points that constitute the drawing.
2. Controls — contains buttons that then show drawing controls and the
Preview button (Figure 5.1b):
• Preview: displays the Preview layout, which shows the drawing
in its current state.
• Shapes: displays three additional buttons for drawing shapes by
dragging: Rectangle, Circle, and Line;
– Rectangle: since a rectangle can be represented by two op-
posite corner points (top-left and bottom-right), those two
points can be stored in the same ArrayList used for lines. An
additional empty point is appended after the second point to
let the drawing method know that it should draw a rectangle;
– Circle: a circle is represented by one point corresponding to
its center, and one integer value as its radius. The center is
stored in the same ArrayList as the first point, and the radius
is stored as the x value of the second point. The y value of
the second point is set to −1 to let the drawing method know
that it should draw a circle;
– Line: a straight line is drawn in the same way as a rectangle
(start point and end point), but it is stored in the ArrayList
just like the regular lines drawn with one finger.
• Thickness: displays a seek bar (Android element SeekBar), which
allows the user to change the line thickness of any subsequent
drawing (as in Figures 4.1b and 4.1d). Changing the value of that
seek bar simply changes the variable holding the line thickness of
any subsequent lines (and points), so that when a line is added to
the ArrayList holding the lines, a number representing its thick-
ness is also added to an ArrayList holding the thickness of each
line inside the first ArrayList;

44 CHAPTER 5. USER INTERFACE
• Color: displays a palette of four drawing colors to choose from
(a small number of colors was chosen for simplicity); the user
can then move the cursor (their hand) to the desired color, which
changes the line color of any subsequent drawing. In a similar way
to changing the line thickness, selecting a new color adds a new
value to the ArrayList holding the color of each line inside the
ArrayList holding the lines;
3. Preview — shows two pictures of the drawing one above the other
(Figure 5.1c). The first one shows only the drawing on a white back-
ground, by creating a new all-white matrix and adding the drawings
on top of it. Since all elements of a drawing are stored in the two
ArrayList’s mentioned above, it is easy enough to make a copy of a
drawing without showing the camera input or the user interface (im-
plemented in copyRawDrawings()). All points and lines are simply drawn
onto a new blank matrix with their original colors and line thicknesses,
which is then converted from an OpenCV Mat to a Java Bitmap ob-
ject and shown in an ImageView in the Preview layout (implemented
in showPreviewLayout()). The user is then left with the possibility to
either discard or save the drawing to the phone’s external memory.
The second image shows the drawing on top of the last input camera
frame when the ’Preview’ button was pressed. There are two buttons
to choose from here:
• Save: saves the picture to phone storage by compressing the bitmap
of the drawing on a transparent background into a small PNG im-
age file, and saves it to the phone’s external memory, in a subfolder
of the phone’s Android Gallery titled ’Drawings’ (implemented in
saveToExternalStorage());
• Dismiss: dismisses the Preview layout.

5.1. VIRTUAL INTERFACE 45
(a) Erasing buttons (b) Control buttons, with Color controls
(c) Preview layout (d) Physical controls, with Menu open
Figure 5.1: User interface

46 CHAPTER 5. USER INTERFACE
5.2 Physical interface
The other part of the user interface is completely physical and intended to
be used by actual screen touches. These are options that are not necessary
for the actual drawing; they set and adjust the way in which the system
recognizes the hand and facilitates virtual interaction. The physical menu is
activated by pressing the built-in Menu button on an Android device (which
can be a separate physical button on older devices, or substituted by long
pressing the App Switch button). Here, there are four options to choose
from, visible in Figure 5.1d.
1. Mode — switches between the two modes (see below):
• Whole hand;
• Two/Three colors.
2. Pick colors — allows the user to select the color(s) that will be tracked:
• All at once: shows a grid of 2 or 3 points where the fingers should
be placed;
• One by one: the user needs to tap each finger separately;
• Only one: allows the user to change only one color, after all colors
have been set.
3. Camera filter — changes the white balance (each phone has its own
list of supported white balance settings, like Normal, Incandescent,
Fluorescent, Cloudy, Daytime, etc.), which can be advantageous in
certain conditions because it can emphasize some colors and minimize
the accent of others;
4. Show/Hide physical controls — displays three buttons which in
turn display their own seek bars, which can directly affect how the
hand is detected, and adjust the brightness and range of the colors
that are being tracked:

5.2. PHYSICAL INTERFACE 47
• Stabilization: seek bar that adjusts the strength of the low-pass
filter for cursor stabilization (Section 4.2.5). At the lowest value,
the filter will not have any effect on frame rates lower than 60
(virtually never). At the highest value, the filter first takes effect
at 4 fps, and it halves the distance between the cursor positions in
each two consecutive frames at 6 fps. For example, if the average
frame rate is around 15 fps, then this seek bar should be set to
the middle value for best results;
• Lightness: a seek bar that changes the lightness of the already set
colors. Since the colors are defined in the HSV color space, it is
easy enough to change the last value of HSV (V = V alue ∼Lightness). This could be useful in situations where the back-
ground light has changed since the colors have been selected, thus
not changing the actual color (hue), but only how light or dark it
is;
• Color radius (Figure 5.2): three seek bars for adjusting the range
of each color channel for range-checking. The radius is the al-
lowed difference from the selected color values on each channel
separately. For example, increasing the radius of the S channel
will cause the detector to detect colors that have much different
saturation levels from the original color, from grayish to very vivid
(Figure 5.2c);
• Min. area: seek bar that adjusts the minimum area for detected
contours as a percentage of the largest contour found. All contours
smaller than that will be ignored;
• Threshold: seek bar that changes the threshold which determines
what is considered a convexity defect, available only in Mode 1
(Whole hand). A lower threshold value means higher sensitivity,
which results in more false positives (edges between fingers that
are not there), and a higher value tends to overlook edges if they
are not too sharp.

48 CHAPTER 5. USER INTERFACE
(a) Initial setting — only dark blue is de-
tected.
(b) Increased hue range — green, cyan, and
purple are also detected.
(c) Increased saturation range — less satu-
rated blueish colors are also detected.
(d) Decreased value range - lighter colors are
not detected.
Figure 5.2: Color radius. The original color that is being tracked is a dark
blue, as in image (a). The blue contour in each subsequent image covers all
the colors that are being detected with the modified radius values.
5. Preferences — displays a scrollable list of preferences and options:
• Option to use only one finger for drawing (Mode 1): due to the
problem of detecting a convexity defect when only one finger is
extended (see Figure 4.5b), there is an option to use another al-
gorithm, mentioned in subsection 4.2.4, for detecting a finger that
protrudes from the convex hull in the top-left part in relation to

5.2. PHYSICAL INTERFACE 49
the maximum inscribed circle (corresponding to the palm). This
method does not always work perfectly and sometimes causes more
problems and is therefore optional;
• Option to use the index fingertip as the cursor (Mode 1): the
default way for determining the position of the cursor is taking
the top-left corner of the bounding box of the entire hand. In
some cases, it is possible to determine the exact position of the
index fingertip, but it is not always reliable and it is therefore
optional;
• Option to use the Contour matching method for detecting hand
gestures (in Mode 1) described in Section 3.3;
• Option to display the result of using the K-curvature algorithm
(Section 3.2), along with options to set the k-number and the
maximum angle theta (Mode 1). It shows points of interest as red
circles, and their k-neighbors as smaller green circles (Figure 3.3);
• Options to draw contours, rotated bounding rectangle, convex
hull, convexity defects, finger projections, maximum inscribed cir-
cle, center of gravity, and minimum enclosing circle;
• Option ’Constrain centroid’ (Mode 1): constrains the search area
for the maximum inscribed circle’s center to its area from the
previous few frames, which prevents the centroid from jumping
to a different region outside of the hand contour (described in
”Constricting the centroid” in Section 4.2.3);
• Option to enable additional methods that attempt to detect and
ignore false positives (in Mode 1), as described in ”Ignoring false
positives” in Section 4.2.3. The false positives are marked with
red lines and text to provide a sense of how effective the methods
are;
• Options for displaying one of the meta-images of the underlying
process: the HSV image, the binary image after range checking,

50 CHAPTER 5. USER INTERFACE
or the dilated binary image. The image appears in a separate
smaller window inside the input camera frame;
• Option for displaying the current frame rate.
Action feedback
The feel and responsiveness of the interface is, naturally, only as good as
the precision of the cursor, which is directly proportional to how well the
colors are being traced. However, for additional feedback, every ”press” of
each button is accompanied by a short vibration, a clicking sound, and a
temporary change of the text’s color as confirmation that the button has
been clicked.
Additionally, each button has an invalidation time of roughly one second
after it has been clicked, so that the same action will not be carried out again
immediately after the first ”click.” The user then has one second to move the
cursor out of that button’s position.

Chapter 6
Application usage
6.1 Instructions
Firstly, the mode (Whole hand or Colored bands) needs to be selected by
choosing Menu>Mode, and picking one of the modes. The available modes
are ’Whole hand’, ’Two fingers’, and ’Three fingers’. The latter two are very
similar and are here referred to as ’Colored bands’ mode. Once the mode
has been selected, the hand’s color or the colored bands’ colors need to be
sampled. That is done by choosing Menu>Pick colors, and choosing one of
the ways to pick colors. The touch screen must be tapped where the hand
or the colored bands are positioned on the display. Each colored band must
be tapped separately.
Since the user interface is almost completely virtual, drawing and inter-
acting with the interface rely on hand gestures. The two main modes (Whole
hand and Colored bands) differ significantly, so the way interaction works is
somewhat different too.
6.1.1 Whole hand mode
There are three possible gestures that can be made with the hand: closed
fist, one finger extended, and open hand. Due to the way detection works,
the number of visible fingers does not always correspond to the number of
51

52 CHAPTER 6. APPLICATION USAGE
detected fingers. For example, the ’one finger’ gesture can be made with
one or two fingers, depending on the enabled options, and the ’open hand’
gesture can be made with three, four, or five fingers.
1. One finger: this gesture means drawing. The user can move their
hand freely and draw just as they would do with a paintbrush.
However, in order for a convexity defect to be detected, there must be
another visible finger next to it, so the gesture is actually ”two fingers
extended”. The program can detect a sole extended index finger only
when the option ’1-finger drawing’ is enabled, but that entails other
limitations as a consequence.
2. Open hand: this gesture allows interaction with the user interface,
i.e. clicking buttons. It can be made with three, four, or all five fingers
visible. The best results are achieved when the entire hand is open. In
this mode, the cursor is not positioned in the top-left corner; it moves
around the hand depending on which part of the screen the hand is in.
3. Closed fist: when no fingers are detected, the hand can move freely
without having any impact, just as if the hand were not visible.
However, there is an exception to these rules. Drawing shapes (rectan-
gles, circles, and straight lines) requires different gesture meanings. Once the
button has been clicked (with an open hand), the cursor needs to be posi-
tioned where the top-left corner of the rectangle, or the center of the circle,
or the start point of the line, should be. Switching to the one finger gesture
starts dragging (just like in any other drawing program). Once the cursor
is where the bottom-right corner of the rectangle, or the rim of the circle,
or the end point of the line, should be, switching to the closed fist gesture
completes the drawing. If the user switches to the open hand gesture before
completing the drawing, the starting position of the shape is reset and they
can start over. Removing the hand from view cancels the drawing of the
shape.

6.2. USER TEST OBSERVATIONS 53
6.1.2 Colored bands mode
The gestures are very similar, with the exception that the hand does not
matter, since only the bands are being tracked. The number of bands is the
number of fingers, with the first band being marked as the ’index finger’.
1. One finger: drawing, but only the ’index finger’ band needs to be
visible. If only one of the other bands is visible, no drawing is done.
2. Two fingers: user interface interaction, the same as in the first mode.
3. Three fingers: when all three bands are visible, the hand can move
freely without having any impact, the same as in the first mode.
Drawing shapes is done differently from the first mode. Once the button
has been clicked (with two fingers), the cursor needs to be positioned at the
start of the drawing, then the shape is dragged with one finger, and once two
fingers are visible again, the drawing is complete. Hiding all fingers before
the drawing has been completed cancels the drawing of the shape.
All other actions are carried out intuitively, just as in any other drawing
program. For example, to change the drawing color, the user selects ’Color’,
and then moves the cursor to the desired color. To adjust a seek bar, the
user positions the cursor over the seek bar and moves the cursor left or right.
6.2 User test observations
During development, the application was shown to work well even in a messy
room with colored clothes lying around, provided that all its limitations are
observed. However, user testing was strictly carried out in a well-lit room,
against a clear white wall. Another environment was not attempted because
it seemed clear it would prove unproductive.
Several people have been asked to attempt to perform basic operations
using the application. A few recurring observations have been noted.

54 CHAPTER 6. APPLICATION USAGE
A total of eight people participated in the user tests. Two of them were
above the age of 55 and had significantly more problems in all areas than the
rest, who were all below 30. One of the younger testers had some experience
in computer vision and grasped the concepts expectedly more easily, probably
due to being acquainted with the technology’s limitations.
In either case, it is clear that there is a tremendously steep learning curve
to using the application. At the very beginning, most of the testers found
the way of setting the color unintuitive, mostly because some actions require
screen touches, and others are performed using the virtual interface.
Due to the limitations of the technology, and in turn the application,
there are many quirks that need to be observed in order to successfully use
the application. However, an end user would have no way of knowing them,
which leads to a much more difficult and less successful drawing experience.
For example, testers generally forget to spread out their fingers, to form the
expected angles with their fingers (which obscures some fingers), to refrain
from slanting their hand (which occludes some of its fingers, and often times
changes the tone of the color due to shadows), to keep it at a sufficient
distance from the camera, etc.
In addition, it takes a long time to learn and to get used to the different
gestures, especially since there are three different modes of use (Mode 1 uses
the whole hand, and Mode 2 has two submodes: Two colors and Three
colors).
The single biggest problem was testers forgetting to keep the entire hand
in the camera’s view. Instead, they would sometimes pull it back towards the
camera, or move parts of the hand outside of the screen, resulting in partial
detection, which practically translates to no hand recognition. It can also be
concluded that it is generally easier to operate the user interface, as it was
reported multiple times to feel more natural than actual drawing.
All of these observations were made while ignoring problems arising from
bad lighting, unfocused camera, and other visual interference. When such
problems did occur, everything needed to be stopped and reset, because the

6.2. USER TEST OBSERVATIONS 55
Figure 6.1: Demonstration of a drawing entirely made and saved with the
application, using two colored bands (Mode 2).
testers would quickly become frustrated and give up trying.
A demonstration of a drawing made during development can be seen in
Figure 6.1, but none of the testers could get anywhere near that level of
precision.

56 CHAPTER 6. APPLICATION USAGE

Chapter 7
Conclusion
We have successfully built a working smartphone application that enables
users to draw simple shapes in the spirit of augmented reality. We have also
integrated a completely virtual graphical user interface, eliminating the need
for a touchscreen, except for setting the system up. The user interface allows
control of drawing options, undoing, clearing, and saving the drawing, much
like in the classic paint programs, such as MS Paint, which was one of the
primary inspirations for this work.
Its biggest flaw is that it relies on color segmentation and requires a
good contrast between the foreground and the background to minimize the
amount of noise. It is perfectly practical when the background is a solid
plain color different from the skin’s color, but it is not very useful in real-
world situations where there could be objects of a very similar color as the
hand, or the colored blobs. However, this program’s usefulness could be
greatly improved by substituting detection solely based on color with a more
advanced and robust object detector, or using it alongside color detection.
That way any noise in the background could be safely ruled out, and the
application would allow practical drawing in any environment that provides
at least enough light for the hand to be seen. The two most prominent
candidates for that substitution are Haar-like features and particle filtering.
It would be feasible to build a Haar cascade for detecting hands and
57

58 CHAPTER 7. CONCLUSION
integrate it into this same program. In face detection, the color of background
objects does not matter, as long as the face to be detected sports the regular
features that the Haar cascade is trained to detect. The same is true for hand
detection, even though the hand does not have such prominent features such
as eyes, a nose, and a mouth.
Particle filtering could be even more useful, because it allows tracking of
objects whose position is not always clear, and it can predict the position of
the object in subsequent frames after partial or even complete occlusion [22].
There are also a few other tweaks that can be done to the currently used
algorithms, and they could be complemented by other methods, like the
Meanshift and Camshift algorithms [23] (that track trained shapes and col-
ors regardless of size or rotation), adaptive hand segmentation (that adapts
skin color models to illumination change using accumulated histograms for
consecutive frames), fitting an ellipse to the contour around a fingertip using
least-squares fitting (to get a better approximation of the position and pose
of a finger), and many others [21].
However, the skeleton of the application, even without the addition of
more advanced hand detection algorithms, could also be used for creating
other augmented reality smartphone applications that rely on virtual hand
interaction. Examples include various games (tile games, maze games, ball
games, etc.), instruction apps (3D model viewers of the Earth, anatomical
parts), training apps in medical or handicraft fields (such as suturing or
sewing), non-verbal communication apps (such as sign language), design apps
(CADs), and others.

Bibliography
[1] IDC Research, Inc., “Smartphone OS Market Share, 2016 Q3.” http:
//www.idc.com/prodserv/smartphone-os-market-share.jsp. Ac-
cessed: 2017-02-01.
[2] “OpenCV 2.4.4 documentation.” http://docs.opencv.org/2.4.4,
2013. Accessed: 2017-02-01.
[3] S. Suzuki and K. Abe, “Topological structural analysis of digitized bi-
nary images by border following,” Computer vision, graphics, and image
processing, vol. 30, no. 1, pp. 32–46, 1985.
[4] D. H. Douglas and T. K. Peucker, “Algorithms for the reduction of the
number of points required to represent a digitized line or its caricature,”
Cartographica: The International Journal for Geographic Information
and Geovisualization, vol. 10, no. 2, pp. 112–122, 1973.
[5] J. Sklansky, “Finding the convex hull of a simple polygon,” Pattern
Recognition Letters, vol. 1, no. 2, pp. 79–83, 1982.
[6] Sony Mobile Communications AB, Lund, Sweden, Xperia L White Pa-
per, 1274-5880.1. March 2013. http://www.sonymobile.com.
[7] Google Inc., “Tilt Brush.” https://www.tiltbrush.com, April 2016.
Accessed: 2017-02-01.
59

60 BIBLIOGRAPHY
[8] I. Poupyrev, N. Tomokazu, and S. Weghorst, “Virtual Notepad: hand-
writing in immersive VR,” Proceedings of the Virtual Reality Annual
International Symposium, pp. 126–132, 1998.
[9] Oculus VR, LLC., “The Oculus Rift, Oculus Touch, and
VR Games at E3.” https://www3.oculus.com/en-us/blog/
the-oculus-rift-oculus-touch-and-vr-games-at-e3, June 11
2015. Accessed: 2017-02-01.
[10] F. Weichert, D. Bachmann, B. Rudak, and D. Fisseler., “Analysis of
the accuracy and robustness of the leap motion controller,” Sensors,
p. 6380–6393, 2013.
[11] Leap Motion, Inc., “Controller — Leap Motion JavaScript SDK
v2.3 documentation.” https://developer.leapmotion.com/
documentation/javascript/api/Leap.Controller.html. Accessed:
2017-02-01.
[12] A. Kipman, M. Finocchio, R. M. Geiss, J. C. Lee, C. C. Marais, and
Z. Mathe, “Visual target tracking using model fitting and exemplar,”
July 5 2011. US Patent 7,974,443.
[13] R. Sodhi, I. Poupyrev, M. Glisson, and A. Israr, “AIREAL: Interactive
tactile experiences in free air,” in Proceedings of the 40th Annual SIG-
GRAPH Conference on Computer Graphics and Interactive Techniques,
p. 134, ACM, 2013.
[14] T. Carter, S. A. Seah, B. Long, B. Drinkwater, and S. Subramanian,
“UltraHaptics: Multi-point mid-air haptic feedback for touch surfaces,”
in Proceedings of the 26th annual ACM symposium on User interface
software and technology, pp. 505–514, ACM, 2013.
[15] B. Batagelj, J. Marovt, M. Troha, and D. Mahnic, “Digital airbrush,”
Proceedings ELMAR-2009, pp. 305–308, 2009.
[16] “Manus VR.” https://manus-vr.com, 2015. Accessed: 2017-02-01.

BIBLIOGRAPHY 61
[17] Oculus VR, LLC, “Oculus Rift.” https://www3.oculus.com/en-us/
rift. Accessed: 2017-02-01.
[18] A. A. Argyros and M. I. Lourakis, “Vision-based interpretation of hand
gestures for remote control of a computer mouse,” in European Confer-
ence on Computer Vision, pp. 40–51, Springer, 2006.
[19] M.-K. Hu, “Visual pattern recognition by moment invariants,” IRE
transactions on information theory, vol. 8, no. 2, pp. 179–187, 1962.
[20] K. Hormann and A. Agathos, “The point in polygon problem for arbi-
trary polygons,” Computational Geometry, vol. 20, no. 3, pp. 131–144,
2001.
[21] T. Lee and T. Hollerer, “Handy ar: Markerless inspection of augmented
reality objects using fingertip tracking,” in 2007 11th IEEE Interna-
tional Symposium on Wearable Computers, pp. 83–90, IEEE, 2007.
[22] K. Nummiaro, E. Koller-Meier, and L. Van Gool, “A color-based parti-
cle filter,” in First International Workshop on Generative-Model-Based
Vision, vol. 1, pp. 53–60, Denmark, Kopenhagen: Datalogistik Institut,
Kobenhavns Universitet, 2002.
[23] G. R. Bradski, “Real time face and object tracking as a component of
a perceptual user interface,” in Fourth IEEE Workshop on Applications
of Computer Vision, 1998. WACV’98. Proceedings., pp. 214–219, IEEE,
1998.