· web view part 2 – before lab day: read your lab experiment background and procedure below,...
TRANSCRIPT

Part 1 - Get a Lab Appointment and Install Software:
Set up an Account on the Scheduler (FIRST TIME USING NANSLO):Find the email from your instructor with the URL (link) to sign up at the scheduler.Set up your scheduling system account and schedule your lab appointment. NOTE: You cannot make an appointment until two weeks prior to the start date of this lab assignment. You can get your username and password from your email to schedule within this time frame.
Install the Citrix software: – go to http://receiver.citrix.com and click download > accept > run > install (FIRST TIME USING NANSLO).You only have to do this ONCE. Do NOT open it after installing. It will work automatically when you go to your lab. (more info at http://www.wiche.edu/info/nanslo/creative_science/Installing_Citrix_Receiver_Program.pdf)
Scheduling Additional Lab Appointments: Get your scheduler account username and password from your email.Go to the URL (link) given to you by your instructor and set up your appointment.(more info at http://www.wiche.edu/nanslo/creative-science-solutions/students-scheduling-labs)
Changing Your Scheduled Lab Appointment: Get your scheduler account username and password from your email. Go to http://scheduler.nanslo.org and select the “I am a student” button. Log in to go to the student dashboard and modify your appointment time. (more info at http://www.wiche.edu/nanslo/creative-science-solutions/students-scheduling-labs)
Part 2 – Before Lab Day:
Read your lab experiment background and procedure below, pages 1-21.
Submit your completed Pre-Lab Questions (pages 3-4) per your faculty’s instructions.
Watch the Spectrophotometer Control Panel Video Tutorial http://www.wiche.edu/nanslo/lab-tutorials#emissionspec
Part 3 – Lab Day
Log in to your lab session – 2 options:1)Retrieve your email from the scheduler with your appointment info or 2) Log in to the student dashboard and join your session by going to http://scheduler.nanslo.org
NOTE: You cannot log in to your session before the date and start time of your appointment. Use Internet Explorer or Firefox.
Click on the yellow button on the bottom of the screen and follow the instructions to talk to your lab

partners and the lab tech.

Remote Lab ActivitySUBJECT SEMESTER: ____________
TITLE OF LAB: Emission Spectroscopy
Lab format: This lab is a remote lab activity.
Relationship to theory (if appropriate): This activity covers the relationship between colors and absorbed/emitted light, as well as the relationship between absorption of electromagnetic radiation and global warming.
Instructions for Instructors: This protocol is written under an open source CC BY license. You may use the procedure as is or modify as necessary for your class. Be sure to let your students know if they should complete optional exercises in this lab procedure as lab technicians will not know if you want your students to complete optional exercise.
Instructions for Students: Read the complete laboratory procedure before coming to lab. Under the experimental sections, complete all pre-lab materials before logging on to the remote lab, complete data collection sections during your on-line period, and answer questions in analysis sections after your on-line period. Your instructor will let you know if you are required to complete any optional exercises in this lab.
Remote Resources: UV/Vis Spectrometer; Secondary - Emission Tubes.
CONTENTS FOR THIS NANSLO LAB ACTIVITY:
Learning Objectives...................................................................................... 2Background Information .............................................................................. 2-3Equipment ................................................................................................... 3Pre-lab Assignment ...................................................................................... 3-4Preparing for this NANSLO lab activity ........................................................ 5Experimental Procedure .............................................................................. 5-6Analysis (Can Be Done Offline If Necessary) ................................................ 6-9Exporting a Graph of the Spectrum ............................................................. 9Spectrometer NANSLO Control Panel Instructions ...................................... 10-20Creative Commons Licensing ....................................................................... 21
1 | P a g e L a s t U p d a t e d M a y 2 7 , 2 0 1 5

U.S. Department of Labor Information ........................................................ 21
LEARNING OBJECTIVES:
1. Identify the most intense peaks in the emission spectra for several molecular and atomic gases.
2. Use the visible emission spectrum for hydrogen gas to determine the electronic transitions taking place and compare these with the theoretical predictions using the Rydberg equation.
3. Relate wavelength and color of light.4. Calculate frequency and energy of electromagnetic radiation from its known
wavelength.5. Predict absorption of light by a gas from its emission spectrum.6. Identify an unknown gas by its emission spectrum.
BACKGROUND INFORMATION:
Spectroscopy is the study of the interaction between light and matter, in particular how atoms or molecules absorb or emit electromagnetic (EM) radiation. Electromagnetic radiation is characterized by its wavelength or its frequency, which are related by the equation c = λν, where λ is wavelength (typically units are nanometers for visible light), ν is frequency (units are s-1, known as Hertz or Hz) and c is the speed of light (299,792,458 m/s). Note that for any wave, its wavelength times its frequency equals its speed; for electromagnetic radiation that speed is the speed of light. Also note that as wavelength increases, frequency decreases, and vice versa.
Electromagnetic radiation may be understood as having both wave-like and particle-like properties, depending on the experimental setup and the type of detector used (in this experiment, we are measuring wavelengths using a spectrometer that emphasizes the wave-like properties of light). From a particle-like point of view, the smallest amount of EM radiation (of a particular wavelength) that can be emitted or observed is called a photon. As Albert Einstein showed more than a century ago, the energy of a photon is proportional to the frequency of the EM radiation involved (and thus inversely proportional to the wavelength): Ephoton = hν, where h is called Planck’s constant (h = 6.62607 x 10⁻³⁴ J•s). Since energy is conserved and since atoms and molecules almost always emit or absorb one photon at a time, the change in energy of an atom or molecule will determine the frequency (and wavelength) of the EM radiation absorbed or emitted: ΔEatom = Ephoton = hν = hc / λ.
Atoms (or molecules) emit photons of very distinctive wavelength (as determined by the previous equation) when the energy of the atom decreases. Atoms can absorb energy when
2 | P a g e L a s t U p d a t e d M a y 2 7 , 2 0 1 5

they absorb a photon with an appropriate wavelength (a photon whose energy matches the difference in energy between the initial and final energy states of the atom, ΔEatom). Since atoms have quantized energy levels (only certain energy levels are possible,) there are only certain values possible for ΔEatom. Thus, only certain frequencies and wavelengths of EM radiation will be emitted by the atoms (and molecules) in this experiment.
For most atoms, determining the energy levels possible involves very complex quantum mechanical calculations. The H atom (hydrogen) is a notable exception since it is the simplest of atom with only a single electron. Even before quantum mechanics was discovered and understood, physicists and chemists were able to write a very simple equation to predict the wavelengths for the EM radiation absorbed or emitted by H atoms known as the Rydberg equation: 1 / λ = RH {(1/n12) – (1/ n22)} where RH is called the Rydberg constant (0.010967760 nm-1), and n1 and n2 are positive (non-zero) integers called quantum numbers such that n1 < n2. See your text for more details about the Rydberg equation and to see an example of using this equation in a calculation.
You may notice that we are using hydrogen molecules (H2) in this experiment whereas the Rydberg equation only applies to hydrogen atoms (H). Hydrogen atoms are not chemically stable, but H2 molecules are stable and can be used to fill the glass tube in the hydrogen lamp. The high-voltage electrical discharge used to power the lamp will temporarily break up H2 molecule into individual H atoms which then gain additional energy from the discharge. This additional energy is then emitted in the form of visible light as the H atoms return to lower energy states.
The energy of a photon of electromagnetic radiation is given by the relationship: E = hν where E = energy in joules, ν = frequency in cycles per second, and h = Planck’s constant = 6.62607 x 10⁻³⁴ J•s
The relationship between wavelength and frequency of electromagnetic radiation is: λν= c where λ = wavelength in meter and c = 2.996 x 10⁸ m/s, the speed of radiant energy in a vacuum
EQUIPMENT:
Paper Pencil/Pen Computer with Internet access
PRE-LAB ASSIGNMENT:
3 | P a g e L a s t U p d a t e d M a y 2 7 , 2 0 1 5

1. Use the Rydberg equation to predict the wavelength of the electromagnetic radiation emitted for following electron transitions for the hydrogen atom (rounded-off to the nearest 0.1 nm).
Electron Transition Predicted Wavelength (nm)n = 3 → 2n = 4 → 2n = 5 → 2n = 4 → 3n = 2 → 1
2. Using Figure 1 and your predicted wavelengths above, determine what type of electromagnetic radiation is produced by these electron transitions in the hydrogen atom. In other words, does the transition of n = 3 → 2 produce ultraviolet (UV), visible or infrared (IR) radiation? What about the other transitions above?
Figure 1: By Jonathan S. Urie [CC-BY-SA-3.0 (http://creativecommons.org/licenses/by-sa/3.0)] via Wikimedia Commons
Electron Transition Type of Radiationn = 3 → 2n = 4 → 2
4 | P a g e L a s t U p d a t e d M a y 2 7 , 2 0 1 5

n = 5 → 2n = 4 → 3n = 2 → 1
3. Review the Experimental Procedure below and let your instructor know if you have any questions.
PREPARING FOR THIS NANSLO LAB ACTIVITY:
Read and understand the information below before you proceed with the lab!
Scheduling an Appointment Using the NANSLO Scheduling System
Your instructor has reserved a block of time through the NANSLO Scheduling System for you to complete this activity. For more information on how to set up a time to access this NANSLO lab activity, see www.wiche.edu/nanslo/scheduling-software.
Students Accessing a NANSLO Lab Activity for the First Time
For those accessing a NANSLO laboratory for the first time, you may need to install software on your computer to access the NANSLO lab activity. Use this link for detailed instructions on steps to complete prior to accessing your assigned NANSLO lab activity – www.wiche.edu/nanslo/lab-tutorials.
Video Tutorial for RWSL: A short video demonstrating how to use the Remote Web-based Science Lab (RWSL) control panel for the air track can be viewed at http://www.wiche.edu/nanslo/lab-tutorials#emissionspec.
NOTE: Disregard the conference number in this video tutorial.
AS SOON AS YOU CONNECT TO THE RWSL CONTROL PANEL: Click on the yellow button at the bottom of the screen (you may need to scroll down to see it). Follow the directions on the pop up window to join the voice conference and talk to your group and the Lab Technician.
EXPERIMENTAL PROCEDURE:
Read and understand these instructions BEFORE starting the actual lab procedure and collecting data. Feel free to “play around” a little bit and explore the capabilities of the equipment before you start the actual procedure.
5 | P a g e L a s t U p d a t e d M a y 2 7 , 2 0 1 5

Once you have logged on to the Remote Lab, you will perform the following Laboratory procedures:
1. Use the control panel to gather data from the emission lamps.
a. Be sure to start the spectrometer so you can view the spectra when the lamps are energized.
b. Use the camera to zoom in on each emission lamp to read the labels and determine what gas is in each one.
c. Use the screw-drive robot to position the fiber optic cable for the spectrometer and record the spectrum of each of the emission lamps.
d. While viewing each spectrum, use the cursor to find the wavelength of five or six most intense peaks for each of the gases. Record these in a table.
e. Also, while each lamp is glowing, zoom in close with the camera and see what color it appears to be.
ANALYSIS (CAN BE DONE OFFLINE IF NECESSARY):
2. How closely do the first three transitions listed in the table you prepared in the pre-lab assignment correspond to the observed wavelength of the three largest peaks in the hydrogen atom emission spectrum?
3. Note that all the most intense peaks for neon gas have wavelengths greater than 580 nm. Based on Figure 2, what colors of visible light are emitted by the neon tube? Does this explain the apparent color of neon lamps to the ‘naked’ eye?
Figure 2: Visible Portion of EM Spectrum
4. Shown below is a portion of the emission spectrum produced by a mixture of two of the gases involved in this experiment. Based on your experimental results, does this gas mixture include helium gas? Explain your reasoning. Can you determine which two gases are in this gas mixture?
6 | P a g e L a s t U p d a t e d M a y 2 7 , 2 0 1 5

Figure 3: Spectrum of Gas Mixture
5. Iron vapor produces an emission spectrum that includes an intense peak at 527.0 nm. Determine the frequency (in Hz) for this type of electromagnetic radiation. What color of visible light corresponds to this wavelength? What is the energy (in J) per photon emitted at this wavelength? What is this photon energy in units of kJ per mole? (In other words, one mole of these photons with wavelength of 527.0 nm consists of how many kilojoules of electromagnetic energy?)
6. The peaks that you observe in the emission spectrum of each gas are also wavelengths of light that the gas will absorb better than others. So, if a gas shows an emission peak at 550 nm, the gas will also absorb light with a wavelength of 550 nm. The more intense the emission peak, the more that light will be absorbed by the gas. Based on this information, rank the four gases you observed in this experiment in order of how well they will absorb infrared light. Write the strongest infrared absorber on the left and the weakest on the right:
Best absorber > next best > next best > worst absorber
7. Based on these results, and the reference listed below, why do you think carbon dioxide is considered a “greenhouse gas” that we need to be concerned about when compared to the other gases you observed in this experiment?
Reference: http://www.ecoearth.org/article/Atmospheric_composition
(Bear in mind that these results only take a small portion of the infrared portion of the
7 | P a g e L a s t U p d a t e d M a y 2 7 , 2 0 1 5

spectrum into account.)
8. Figure 4 below shows the absorption spectra of several common gases that are prevalent in the atmosphere. Peaks in this spectrum indicate the wavelengths that these gases absorb the best. The horizontal axis is the wavelength in microns which is another name for micrometers. Note that this horizontal axis is a logarithmic axis. So this single figure covers a large portion of the electromagnetic spectrum, namely the ultraviolet, visible and infrared regions of the spectrum. The vertical axis is the percent absorptivity of each gas (in other words, what percent of EM radiation at a given wavelength is absorbed by each gas). A percent absorptivity of zero means a gas is completely transparent at that wavelength. A value of 100 means complete absorbance at that wavelength so the gas is opaque. The spectrum labeled "Total" corresponds to the spectrum of the total atmosphere.
a. The visible spectrum is typically defined as wavelengths between 400 and 700 nm. Convert these wavelength values to microns and locate the visible region in the figure below. Also locate the ultraviolet and infrared regions of the figure (hint: does infrared radiation have longer or shorter wavelengths than visible light?).
b. Does the spectrum labeled "Total" indicate whether the atmosphere is mostly transparent or mostly opaque in the visible region? Briefly explain your answer.
c. The figure also shows that the Earth emits large amounts of “thermal radiation” at wavelengths between about 5 and 50 microns. Is this in the ultraviolet, visible, or infrared region of the spectrum? Greenhouse gases can cause global warming by absorbing this emitted “thermal radiation”, trapping heat in the Earth’s atmosphere. Are carbon dioxide, water or oxygen (plus a little ozone, O3) greenhouse gases according to this figure? Briefly explain your answer.
d. Why are scientists and governments much more concerned about carbon dioxide acting as a greenhouse gas than water or oxygen? What effect do human activities have on the levels of these gases in the atmosphere?
8 | P a g e L a s t U p d a t e d M a y 2 7 , 2 0 1 5

Figure 4: Solar Radiation
9. Identify the “unknown” gas in the emission lamp labeled “E”. Explain why you think you are correct.
EXPORTING A GRAPH OF THE SPECTRUM:
Locate the" Export to Clipboard" button. Go to the pull-down box to the right of it and set it to "Graph Image." Now click the Export to Clipboard button which will place a copy of the spectrum in your clipboard.
Start a program like Paint or Word or PowerPoint and paste in the spectrum. Save the file with an appropriate name so you can find it later.
9 | P a g e L a s t U p d a t e d M a y 2 7 , 2 0 1 5

SPECTROMETER NANSLO CONTROL PANEL INSTRUCTIONS
The Remote Web-based Science Lab (RWSL) spectrometer is controlled remotely by using a web interface as shown below. This NANSLO control panel allows you to control every function of the spectrometer just as if you were sitting in front of it.
Figure 5: Spectrometer lab interface for emission spectroscopy lab
Communicating with your Lab Partners
As soon as you have accessed this lab interface, click on the “Voice Conference” yellow button (you may need to scroll down to see it) to view instructions for communicating with your lab partners and with the Lab Technicians. Only one person can be in control of the equipment at
10 | P a g e L a s t U p d a t e d M a y 2 7 , 2 0 1 5

any one time so talking together on a conference line helps to coordinate control of the equipment and creates a more collaborative environment for you and your lab partners.
Gaining Control of the Helmholtz Coil Apparatus
Right click anywhere in the grey area of the lab interface and choose “Request Control of VI” from the dialogue box that appears when multiple students are using the spectrometer at the same time. After you request control, you may have to wait a short time before you actually receive control and are able to use the features on this lab interface.
Figure 6: Take control of the lab interface by right clicking and selecting "Request Control of VI."
Releasing Control of the Emission Spectroscopy Apparatus
To release control of the spectrometer so that another student can use it, right click anywhere in the grey area of the lab interface and choose "Release Control of VI" from the dialogue box that appears.
11 | P a g e L a s t U p d a t e d M a y 2 7 , 2 0 1 5
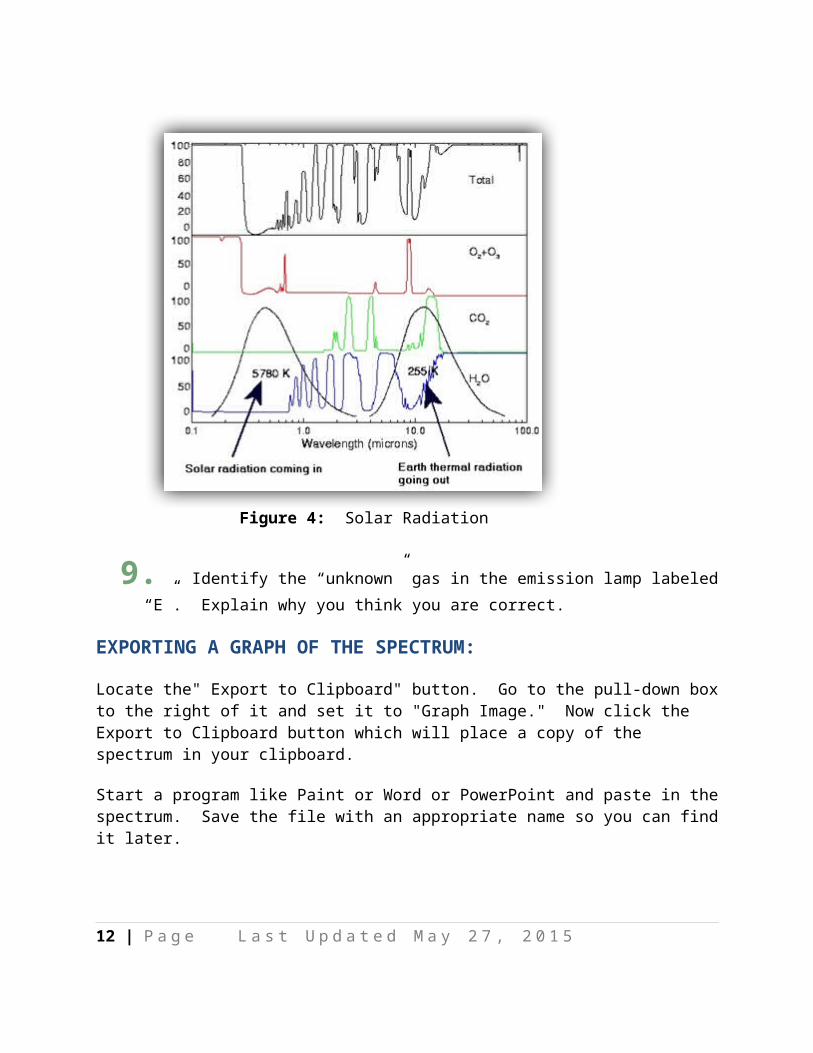
Figure 7: Release control of the lab interface byright clicking and selecting "Release Control of VI."
Activating the Spectrometer
To activate the spectrometer, click the "Start" button on the far left portion of the lab interface. The button will now turn yellow and say “Pause”.
Figure 8: After clicking on the "Start" button, it turns to a "Pause" button.
12 | P a g e L a s t U p d a t e d M a y 2 7 , 2 0 1 5

Spectrometer View Window
The Image view Window displays the real-time video feed from a digital camera focused on the spectrometer, the emission lamps, and a horizontal screw-drive robot with mounted fiber optic cable located in front of the emission lamps. The four black boxes, labeled A through E and also labeled from left to right H2, He, Ne, CO2 and ?, are the emission lamps that generate different colors of visible light depending on the gas that is in them. The optic cable transmits the detected light to the spectrometer where the spectrum is digitally acquired. The spectrometer is the small box located near one end of the track.
Figure 9: Spectrometer View Window showing spectrometer, emission lamps, and robot with mounted optic fiber.
Camera Presets and PAN-TILT-ZOOM Controls
Several camera preset positions have been programmed for use with this lab interface. Hovering over the grey area where the buttons are will give you a pop-up menu that describes where each preset is assigned to as shown in Figure 10. Camera presets 1 through 5 allow you to zoom in quickly to one of the 5 lamps. Preset Camera 6 allows you to see a full view of the spectrometer, the emission lamps, and a horizontal screw-drive robot with mounted fiber optic cable located in front of the emission lamps.
13 | P a g e L a s t U p d a t e d M a y 2 7 , 2 0 1 5

Figure 10: Six camera presets.
The four arrows used to pan and tilt allow you to move the camera right to left and up and down. The two zoom buttons allow you to zoom in to see a closer look at the equipment such as shown in Figure 11 or zoom out to view more of the room.
Figure 11: Pan, tilt and zoom capabilities.
14 | P a g e L a s t U p d a t e d M a y 2 7 , 2 0 1 5

Setting Up the Spectrometer
To acquire the spectrum of one of the emission lamps, first select Camera Present 6 - Full View so that you can see the sensor move along the track. Click on the green-colored A button on the left side of the screen. This will position the sensor in front of this tube and turn on the H2 emission lamp.
Figure 12: Select Camera Present 6 and the "A" button.
Next click on Camera Preset 1 to view a closeup of the H2 emission lamp once it is turned on.
Use the “Nudge Left” and “Nudge Right” buttons to move the fiber optic and make sure you are getting the maximum signal from the lamp. If the lamp turns off before you are finished, just click the same letter again, and it will re-energize. By default, the TimeTubeOn is set to 60 seconds. You can adjust this setting; however, because of the high voltage involved in these lamps, DO NOT set the TimeTubeON field to more than 120 seconds. The lamp status and the number of seconds it has been energized are shown in the Lamp Status portion of the interface screen (to the right of the green lamp buttons A – E).
Once you have the signal maximized, click the “Pause” button to hold the image so the light doesn’t have to be energized while you locate the maximum peaks (Figure 13).
15 | P a g e L a s t U p d a t e d M a y 2 7 , 2 0 1 5

Figure 13: Press the Pause button to "freeze" the spectrum
You will now need to “zoom out” on the spectrum window to view the entire spectrum properly. Here’s how to zoom in and out on the spectrum:
16 | P a g e L a s t U p d a t e d M a y 2 7 , 2 0 1 5

1. Click on the center button at the lower right of the graph, shown below in Figure 14.
Figure 14: Click button to access other options.
2. This brings up a small sub-menu of other buttons. The only two that are useful to you are the left-most buttons in the top and bottom rows. Select the left-most button in the bottom row to view the entire spectrum.
17 | P a g e L a s t U p d a t e d M a y 2 7 , 2 0 1 5

Figure 15: Spectrum Zoom Out Button
3. Select the left-most button in the top row to select specific parts of the spectrum to “zoom in” on and view more closely (see Figure 16). After clicking this button, you use the mouse to draw a box around the area that you want to zoom in to. Be sure you draw the box so that it includes some area past the top of the peak you are interested in or else it will chop off the top of it in the viewing window. If you accidentally zoom in too far or on the wrong part of the spectrum, just zoom out and start over again.
18 | P a g e L a s t U p d a t e d M a y 2 7 , 2 0 1 5

Figure 16: Spectrum Zoom In Button
Identifying the Peak to Export
To export a graph, you will first locate the most intense peaks. Make sure you are zoomed out to view the entire spectrum (Figure 15 above.) Click the button labeled "Enable Cursor" under the left side of the graph. The green light will come on, and a vertical green cursor line will appear on the screen. Click the cursor control button. Use the mouse to "grab" the cursor line by clicking on it and dragging it to the peak that you want to identify. You must have control of the lab interface to be able to do this activity.
19 | P a g e L a s t U p d a t e d M a y 2 7 , 2 0 1 5

Figure 17: Click the “Enable Cursor” button and then the “Cursor Control” icon to identify the peak.
There are now two fields under the graph: “Wavelength (nm)” and “Intensity”. The Wavelength field shows the current position of the cursor, and Intensity shows a relative intensity reading of wherever the cursor is located (Figure 17).
Use the cursor to find the wavelength of each major peak in the spectrum.
Once you have the cursor on top of a peak, you can zoom in on it to make sure you are really on the highest part of the peak. (Sometimes they are double peaks!) If you zoom in or out, you will need to click the cursor control button again in order to move the cursor.
If you want to zoom in on a peak for a closer look, make sure you place the cursor approximately on that peak before you click the "Spectrum Zoom In" button and draw a bar around it.
If you lose the cursor while zooming in on peaks, just zoom out again to find it.
20 | P a g e L a s t U p d a t e d M a y 2 7 , 2 0 1 5

21 | P a g e L a s t U p d a t e d M a y 2 7 , 2 0 1 5

For more information about NANSLO, visit www.wiche.edu/nanslo.
All material produced subject to:
Creative Commons Attribution 3.0 United States License 3
This product was funded by a grant awarded by the U.S. Department of Labor’s Employment and Training Administration. The product was created by the grantee and does not necessarily reflect the official position of the U.S. Department of Labor. The Department of Labor makes no guarantees, warranties, or assurances of any kind, express or implied, with respect to such information, including any information on linked sites and including, but not limited to, accuracy of the information or its completeness, timeliness, usefulness, adequacy, continued availability, or ownership.
22 | P a g e L a s t U p d a t e d M a y 2 7 , 2 0 1 5