vertical rotisserie asador vertical rôtisserie verticale - · pdf filevertical...
TRANSCRIPT

�
Copies of the I/B. Please reproduce them without any changes except under special instruction from Team International BELGIUM. The pages must be reproduced and folded in order to obtain a booklet A5 (+/- 148.5 mm width x 210 mm height). When folding, make sure you keep the good numbering when you turn the pages of the I/B. Don’t change the page numbering. Keep the language integrity. Print only what is inside the frame.
�
Front cover page (first page)
Assembly page 1/48
Fax +32 2 359 95 50
Vertical Rotisserie
Asador vertical
Rôtisserie verticale
DGR 31031 120V~ 60Hz 1420 W www.KALORIK.com

�
Copies of the I/B. Please reproduce them without any changes except under special instruction from Team International BELGIUM. The pages must be reproduced and folded in order to obtain a booklet A5 (+/- 148.5 mm width x 210 mm height). When folding, make sure you keep the good numbering when you turn the pages of the I/B. Don’t change the page numbering. Keep the language integrity. Print only what is inside the frame.
2 DGR 31031- 140506
Assembly page 2/48
Fax +32 2 359 95 50
IMPORTANT SAFEGUARDS When using electrical appliances, basic safety precautions should always be followed, including the following: 1. READ ALL INSTRUCTIONS. 2. Check that your mains voltage corresponds to that stated on the
appliance. 3. Do not touch hot surfaces. Use handles or knobs. 4. To protect against electrical shock do not immerse cord, plugs, or
the appliance in water or other liquid. 5. Close supervision is necessary when any appliance is used by or
near children. 6. Unplug from outlet when not in use and before cleaning. Allow to
cool before putting on or taking off parts. 7. Do not operate any appliance with a damaged cord or plug or
after the appliance malfunctions or has been damaged in any manner. Return the appliance to the nearest authorized service facility for examination, repair, or adjustment.
8. The use of accessory attachments not recommended by the appliance manufacturer may cause fire, electric shock, or injuries.
9. Do not use outdoors, for household use only. 10. Do not let the cord hang over the edge of a table or counter, or
touch hot surfaces. 11. Do not place on or near a hot gas or electric burner, or in a
heated oven. 12. Extreme caution must be used when moving an appliance
containing hot oil or other hot liquids. Use only on a dry, level surface.
13. Always attach the plug to the appliance first, then the plug cord into the wall outlet. To disconnect, turn any control to “off” (or 0), then remove the plug from wall outlet.
14. Do not use the appliance for other than intended use. 15. Oversize foods or metal utensils other than the one supplied must
not be inserted in a rotisserie as they may create a fire or risk of electric shock.
16. A fire may occur if the rotisserie is covered or touching flammable material, including curtains, draperies, walls, and the like, when in
�
Copies of the I/B. Please reproduce them without any changes except under special instruction from Team International BELGIUM. The pages must be reproduced and folded in order to obtain a booklet A5 (+/- 148.5 mm width x 210 mm height). When folding, make sure you keep the good numbering when you turn the pages of the I/B. Don’t change the page numbering. Keep the language integrity. Print only what is inside the frame.
3 DGR 31031- 140506
Assembly page 3/48
Fax +32 2 359 95 50
operation. Do not store any item on top of the appliance when in operation.
17. Do not clean with metal scouring pads. Pieces can break off the pad and touch electrical parts involving a risk of electric shock.
18. Do not place any of the following materials in the oven: paper, cardboard, plastic, and the like.
19. To disconnect the appliance, put all knobs in off (or 0) position and remove the plug from the wall outlet.
20. Never attempt to use the rotisserie without the lid or grease tray in place.
21. The lid of this appliance gets very hot. Always wear oven gloves / mitts when handling the lid or accessories.
22. Warning: this appliance generates heat and can let steam escape during use; proper precautions must be taken to prevent the risks of burns, injury to persons or damage to property.
23. If the appliance accidentally falls or becomes immersed in water, unplug it immediately and do not reach into the water.
24. Extreme caution must be used when removing the drip tray or disposing of hot grease.
25. Do not operate in presence of explosive and/or flammable fumes.
26. To reduce risk of injury, unplug the appliance before inserting food, and keep unplugged when not in use.
27. Be sure to provide adequate space for air circulation above and on the sides during use.
SAVE THESE INSTRUCTIONS HOUSEHOLD USE ONLY
POLARIZED PLUG INSTRUCTIONS
This appliance is equipped with a polarized plug (one blade is wider than the other). To reduce the risk of electric shock, this plug will fit into the polarized outlet only one way. If the plug does not properly fit into the outlet at first, reverse it. If it still does not fit, contact a competent qualified electrician. Do not attempt to modify the plug in any way.

�
Copies of the I/B. Please reproduce them without any changes except under special instruction from Team International BELGIUM. The pages must be reproduced and folded in order to obtain a booklet A5 (+/- 148.5 mm width x 210 mm height). When folding, make sure you keep the good numbering when you turn the pages of the I/B. Don’t change the page numbering. Keep the language integrity. Print only what is inside the frame.
4 DGR 31031- 140506
Assembly page 4/48
Fax +32 2 359 95 50
SHORT CORD INSTRUCTIONS
A short power supply cord is provided to reduce the hazards resulting from becoming entangled in, or tripping over a longer cord. Extension cords may be used if care is exercised in their use.
• The electrical rating of the extension cord should be at least that of the appliance. If the electrical rating of the extension cord is too low, it could overheat and burn.
• The resulting extended cord should be arranged so that it will not drape over the counter top or tabletop where it can be pulled on by children or tripped over.
CONTROL PANEL
Time adjustment Digital display Heat selection (Low or High)
Outer Heating elements function indicator
Center Heating element function indicator
Power On/Off
Center Heating element selection (On / Off)
Cooking cycle (Start / Pause)
Power On indicator
Meat/Poultry auto-program selection

�
Copies of the I/B. Please reproduce them without any changes except under special instruction from Team International BELGIUM. The pages must be reproduced and folded in order to obtain a booklet A5 (+/- 148.5 mm width x 210 mm height). When folding, make sure you keep the good numbering when you turn the pages of the I/B. Don’t change the page numbering. Keep the language integrity. Print only what is inside the frame.
5 DGR 31031- 140506
Assembly page 5/48
Fax +32 2 359 95 50
PART DESCRIPTION KNOW YOUR APPLIANCE
• Temperature control range is 390°F (Low setting) – 515°F (High
setting) • Timer range is 0 to 99 minutes. • Your oven’s cavity has been coated with a non-stick material to
enable an easier cleaning of the cavity walls. • Your oven is also equipped with center heating element that
enables the food to be cooked from the inside out, while the outer heating elements cook from the outside in. This special feature enables the food to cook much quicker. It is not recommended to switch on the center heating element if you want the food to be cooked “rare” of “medium-rare”, especially for roast beef.
Glass Lid
Housing in stainless steel
Control panel
Skewers
Hook handle Center heating element cover
Tower
Drip pan

�
Copies of the I/B. Please reproduce them without any changes except under special instruction from Team International BELGIUM. The pages must be reproduced and folded in order to obtain a booklet A5 (+/- 148.5 mm width x 210 mm height). When folding, make sure you keep the good numbering when you turn the pages of the I/B. Don’t change the page numbering. Keep the language integrity. Print only what is inside the frame.
6 DGR 31031- 140506
Assembly page 6/48
Fax +32 2 359 95 50
• Removable parts are dishwasher safe (except main housing), making cleaning up easy
• Contrary to traditional rotisserie systems, this appliance has no moving parts (pit or fan) which make it very silent. Hot air will circulate around the roast, by the alternate function of each outer heating element, to enable even cooking results.
IMPORTANT GUIDELINES FOR COOKING MEAT AND POULTRY – TIPS FOR OPTIMAL RESULTS NOTE: Please read this entire Use / Care Guide thoroughly before
using.
• All meat and poultry should be thoroughly defrosted before
cooking. Have foods at room temperature before placing them in the rotisserie.
• We recommend the use of a meat thermometer to ensure the food is cooked thoroughly.
• Cooking times will vary according to shape, thickness and composition of food. It is recommended that food be checked after the minimum time stated to avoid over cooking.
• The maximum recommended size for poultry is 10 lb. • Cooking times for beef will vary depending if you want it “rare” or
“well done.” Recommended internal temperatures for beef are: rare 140oF; medium rare 145oF; medium 160oF; well done 170oF.
• For adding flavor, do marinate or apply rubs, seasonings and spices to foods, but this prior loading into the rotisserie.
• For easier cleanup, spray the rotisserie parts and accessories with a spray-on cooking oil before cooking. DO NOT spray the part with an aerosol during the cooking or while the rotisserie is in function.
• Remember small poultries (6 or 8 lb.) cook much quicker than larger ones (10lb.) Use a meat thermometer to control the cooking at regular intervals.
• Select roasts that have and even shape as they will cook in a more uniform way.
• It is important to position the center heating element cover as centered as possible into the roast, especially at the large end if
Caution: Always make sure that meat and poultry are thoroughly cooked before eating. The juices from poultry should run clear when cooking process is
complete.

�
Copies of the I/B. Please reproduce them without any changes except under special instruction from Team International BELGIUM. The pages must be reproduced and folded in order to obtain a booklet A5 (+/- 148.5 mm width x 210 mm height). When folding, make sure you keep the good numbering when you turn the pages of the I/B. Don’t change the page numbering. Keep the language integrity. Print only what is inside the frame.
7 DGR 31031- 140506
Assembly page 7/48
Fax +32 2 359 95 50
the roast is not evenly shaped. Position the larger end of the roast at the top, not at the bottom.
• If the roast is short, please leave it positioned near the top instead of near the bottom end of the center heating element.
• Do not serve immediately after cooking is finished. Let the food rest for 10 minutes after removing from the rotisserie, before serving, to allow a more juicy poultry or roast.
• For meat cut in pieces, like pork chops or sausages or chicken breast, it is advised to use the skewers.
BEFORE THE FIRST USE
• Unpack the appliance and accessories, then wash and wipe these accessories. Wipe the inside and outside of the rotisserie with a sponge or damp cloth and dry thoroughly.
• NEVER IMMERSE IN WATER • It is normal if some smoke or smell emanates from the appliance
when using it for the first time. This is not harmful. In order to eliminate any packing oil that may remain after production, we recommend to operate the appliance for 15 minutes, using the rotisserie on its maximum temperature setting (HIGH).
OPERATING INSTRUCTIONS
CAUTION: NEVER LEAVE UNATTENDED WHILE IN USE! WARNING: THE LID OF THE ROTISSERIE GETS VERY HOT DURING USE; ALWAYS WEAR GLOVES AND HANDLE WITH CARE
• To make the rotisserie easier to clean, hold the drip tray and the inside of the lid and spray with a non-stick cooking spray. Do the same for the Center heating element cover and the tower accessory when they will be used
• Position the drip tray around the heating element and slide it in position
• Follow step A, B or C below before powering on the rotisserie

�
Copies of the I/B. Please reproduce them without any changes except under special instruction from Team International BELGIUM. The pages must be reproduced and folded in order to obtain a booklet A5 (+/- 148.5 mm width x 210 mm height). When folding, make sure you keep the good numbering when you turn the pages of the I/B. Don’t change the page numbering. Keep the language integrity. Print only what is inside the frame.
8 DGR 31031- 140506
Assembly page 8/48
Fax +32 2 359 95 50
A - PREPARE MEAT
• Place meat (roast) on a plate or cutting board. With a knife, cut an X-shaped slit through the center of the roast, large enough for the center heating element cover to fit in.
• NOTE : if using smaller roasts or meat cut in pieces, you can use the tower of the skewers instead
• Position the cover with the mounted roast over the center heating element.
B- PREPARE POULTRY
• The giblets should be removed from the poultry • Feed the center heating element cover through the bottom of
the tower • Pull the chicken open and mount it over the top of the tower, so
that the drumsticks hang downwards on the side of the tower. • Make sure the center heating element cover’s end comes
through the neck of the chicken, or extends through the front of the body cavity as much as possible, if the poultry is large.
• Lift the poultry, using the metal loop at the end of the center cover, with the hook handle, and position the center cover over the heating element, with the poultry mounted. The bottom of the tower shall rest on the drip pan.
C- USING SKEWERS
• To make kebabs or roasts smaller pieces of meat, the skewers will come handy.
• Cut the meat in small pieces, marinate if desired, and then add the cubed meat / small pieces / sausages onto the skewers.
• When skewers are loaded with food, insert the short end of the skewer’s shaft into the holes of the tower so that they fit into vertical position
• Slide the tower into position around the central heating element, so that it stands on the drip tray.

�
Copies of the I/B. Please reproduce them without any changes except under special instruction from Team International BELGIUM. The pages must be reproduced and folded in order to obtain a booklet A5 (+/- 148.5 mm width x 210 mm height). When folding, make sure you keep the good numbering when you turn the pages of the I/B. Don’t change the page numbering. Keep the language integrity. Print only what is inside the frame.
9 DGR 31031- 140506
Assembly page 9/48
Fax +32 2 359 95 50
USING THE ROTISSERIE
• Place the lid, plug the unit on and press “ON/OFF” once. The unit will beep twice and the digital display will start flashing “00”. The “HIGH” and “POULTRY” indicator turn on, and the 4 light indicators for the heating elements will flash on.
• These 4 lights indicate which heating elements will turn on when the rotisserie starts cooking. The 3 outer lights indicate the outer heating elements; the center light indicates the center heating element.
• The “center heater” button will switch the center heating element on and off, also during the cooking cycle.
• Press “SELECT” button to choose “POULTRY” or “MEAT” type, indicated by the “MEAT” and “POULTRY” lights.
• Press the “+” or “-” keypad to increase or decrease the cooking time desired. The maximum cooking time is 99 minutes.
• Press the “HEAT” button to select “HIGH” or “LOW” (see recommendations in the table hereafter). The indicator light indicates the program selected; most of the time you will use the “HIGH” setting, but the “LOW” setting is interesting to experiment with.
• Press “START/PAUSE” button, the “On” light will illuminate and the digital display will start to count down. When the heating elements turn on, two of the lights will flash in a circular array, alternating in a circular pattern. It is normal for the 3 outer heating elements not to work at the same time.
CAUTION: the lid will become very hot during cooking. Handle with care and with oven mitts or pads. The roasting process generates steam that can cause burns. Tilt the glass lid when opening so that the steam is directed away from the face and hands.
• Check the internal temperature of the food periodically with a food thermometer until the food is done.
• When the cooking cycle is finished, the rotisserie will beep twice, the digital display will show “00” and the heating elements will turn off automatically. Using a hot pad or oven mitt, carefully remove the glass lid
• Insert the hook handle into the loop at the end of the heating element cover or at the top of the drip tray to lift the food, using 2
�
Copies of the I/B. Please reproduce them without any changes except under special instruction from Team International BELGIUM. The pages must be reproduced and folded in order to obtain a booklet A5 (+/- 148.5 mm width x 210 mm height). When folding, make sure you keep the good numbering when you turn the pages of the I/B. Don’t change the page numbering. Keep the language integrity. Print only what is inside the frame.
10 DGR 31031- 140506
Assembly page 10/48
Fax +32 2 359 95 50
hands for large birds or roasts. Place on a large tray or shallow pan.
• Allow food to rest for 10 to 15 minutes for best results. • For skewers, carefully remove them from the tower, and slide the
food onto a plate.
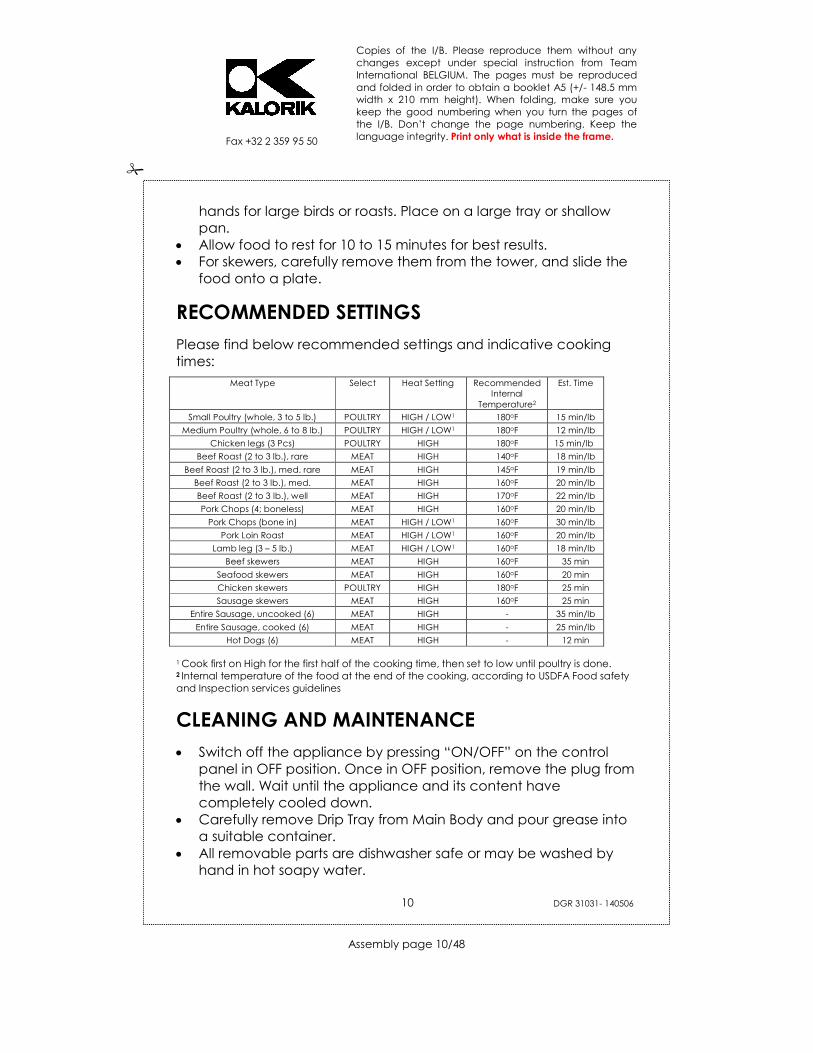
RECOMMENDED SETTINGS
Please find below recommended settings and indicative cooking times:
Meat Type
Select Heat Setting Recommended Internal
Temperature2
Est. Time
Small Poultry (whole, 3 to 5 lb.) POULTRY HIGH / LOW1 180oF 15 min/lb
Medium Poultry (whole, 6 to 8 lb.) POULTRY HIGH / LOW1 180oF 12 min/lb
Chicken legs (3 Pcs) POULTRY HIGH 180oF 15 min/lb
Beef Roast (2 to 3 lb.), rare MEAT HIGH 140oF 18 min/lb
Beef Roast (2 to 3 lb.), med. rare MEAT HIGH 145oF 19 min/lb
Beef Roast (2 to 3 lb.), med. MEAT HIGH 160oF 20 min/lb
Beef Roast (2 to 3 lb.), well MEAT HIGH 170oF 22 min/lb
Pork Chops (4; boneless) MEAT HIGH 160oF 20 min/lb
Pork Chops (bone in) MEAT HIGH / LOW1 160oF 30 min/lb
Pork Loin Roast MEAT HIGH / LOW1 160oF 20 min/lb
Lamb leg (3 – 5 lb.) MEAT HIGH / LOW1 160oF 18 min/lb
Beef skewers MEAT HIGH 160oF 35 min
Seafood skewers MEAT HIGH 160oF 20 min
Chicken skewers POULTRY HIGH 180oF 25 min
Sausage skewers MEAT HIGH 160oF 25 min
Entire Sausage, uncooked (6) MEAT HIGH - 35 min/lb
Entire Sausage, cooked (6) MEAT HIGH - 25 min/lb
Hot Dogs (6) MEAT HIGH - 12 min
1 Cook first on High for the first half of the cooking time, then set to low until poultry is done. 2 Internal temperature of the food at the end of the cooking, according to USDFA Food safety and Inspection services guidelines
CLEANING AND MAINTENANCE
• Switch off the appliance by pressing “ON/OFF” on the control panel in OFF position. Once in OFF position, remove the plug from the wall. Wait until the appliance and its content have completely cooled down.
• Carefully remove Drip Tray from Main Body and pour grease into a suitable container.
• All removable parts are dishwasher safe or may be washed by hand in hot soapy water.

�
Copies of the I/B. Please reproduce them without any changes except under special instruction from Team International BELGIUM. The pages must be reproduced and folded in order to obtain a booklet A5 (+/- 148.5 mm width x 210 mm height). When folding, make sure you keep the good numbering when you turn the pages of the I/B. Don’t change the page numbering. Keep the language integrity. Print only what is inside the frame.
11 DGR 31031- 140506
Assembly page 11/48
Fax +32 2 359 95 50
• Over time, the tower, center cover and skewers will discolor - this is normal.
• The glass lid may have to be cleaned with a 3M scouring pad or similar, along with a non-abrasive cleanser, to remove burnt-on grease. Rinse and set aside to air-dry.
• To remove baked-on food residue easily, place parts in hot soapy water and let stand for 20 - 30 minutes before hand washing.
• Wipe interior of main body and heating elements with a damp cloth or sponge, with added dishwashing detergent, to remove grease. To clean grease spatters behind the heating elements, carefully slide a paper towel or sponge dampened with water and dishwashing detergent. Slide behind the element and dry with a paper towel or soft cloth. Do not use abrasive cleansers on exterior or interior surfaces.
• To clean cooked-on foods from interior surfaces or glass window, use a plastic bristle brush, or a polyester or nylon mesh pad, dampened with a dishwashing detergent and water. NEVER spray cleaners directly into the interior surfaces of the Main Body.
• Clean spills from exterior of Main Body with a damp cloth after each use. Dry thoroughly with soft cloth.
DO NOT IMMERSE THE MAIN BODY OF THE APPLIANCE IN WATER OR ANY OTHER LIQUID.
TROUBLESHOOTING
Meat roasts stick to center heating element cover. • Did you remember to grease this part before loading the roast? • Is the roast very lean? Remember to let the roast stand about 10
minutes before trying to remove it from the shaft. • Try loosening the meat from around the top and bottom of the
shaft, then push the top of the shaft down through the meat. If it’s still stuck, cut the roast lengthwise down one entire side, and then slip the shaft out. Cut the roast on the other side so that you have 2 long pieces. Slice the roast thinly to serve.
Turkey will not fit in unit. • Some turkey breasts are hard to position. Try to centre them as
much as possible, using the tower.

�
Copies of the I/B. Please reproduce them without any changes except under special instruction from Team International BELGIUM. The pages must be reproduced and folded in order to obtain a booklet A5 (+/- 148.5 mm width x 210 mm height). When folding, make sure you keep the good numbering when you turn the pages of the I/B. Don’t change the page numbering. Keep the language integrity. Print only what is inside the frame.
12 DGR 31031- 140506
Assembly page 12/48
Fax +32 2 359 95 50
• Use string and skewers to help keep the turkey breast in place if necessary.
• Large birds may simply not fit in. We do not recommend using for birds over 10 lb.
• Try placing the bird in the rotisserie without the tower. The roasts and poultry are not thoroughly done. • The times in the user guide are approximate. Increase the
cooking times • Timer is not set up correctly. Recommended times shall be used
as a reference starting point. Meat is done inside but overdone outside • Meat is thick and requires more cooking time at reduced speed. • Try cooking on High for half of the cooking time, and switch to
LOW mid-cycle until the end of the cooking time. Unit does not turn on or will not get hot • Did you plug the unit in? • You MUST set the timer before pushing the Start/Pause button. Cannot change countdown minutes on display • Timer buttons must be pushed firmly. You may not have pushed
hard enough or long enough. • To advance time quickly, push and hold the timer button for 1 full
second. Some smoke is visible during use • During first use, it is normal to have some smoke coming from the
unit. Smoke from food splatters on subsequent use is also normal. • Did you wipe out the interior of the unit after the last use? • Is roast or poultry touching the heating elements? Did you tie
chicken wings in so they won’t touch the heating elements? • Is fat and dripping spattering onto the heating elements during
cooking? Grease/drippings may ooze out onto counter. • Make sure the drip tray is properly in place. • During use, some dripping may spatter onto interior walls and run
down into the bottom of the unit, bypassing the drip tray.

�
Copies of the I/B. Please reproduce them without any changes except under special instruction from Team International BELGIUM. The pages must be reproduced and folded in order to obtain a booklet A5 (+/- 148.5 mm width x 210 mm height). When folding, make sure you keep the good numbering when you turn the pages of the I/B. Don’t change the page numbering. Keep the language integrity. Print only what is inside the frame.
13 DGR 31031- 140506
Assembly page 13/48
Fax +32 2 359 95 50
Drippings may also run down the centre are, collecting in the bottom.
• Does the food being cooked have a high quantity of fat? You may have to pause halfway through cooking, remove the roast/bird, and then carefully empty the drip tray.
• If cooked food is allowed to stand in the unit to cool, condensation will collect and run down the interior walls to the bottom of the unit.
• Be sure the rotisserie is completely cooled down before attempting to clean the inside.
Meat roasts cook unevenly. • Did you thread the roast onto the shaft evenly? Roasts need to
be centered on the Shaft toward the top of the unit to cook evenly.
• Was the roast oddly shaped, with a small pointed end and a large wide end? Then try cooking a roast without the centre element on for more typical cooked results.
There’s a hole in the middle of the roast. • This is typical of any roast that is cooked on a rotisserie-type
appliance. Since the centre heating element helps cook the roast, the hole in the meat may be a little more noticeable than from other rotisseries. However, the roasts also cook much more quickly.
• To try to minimize the shaft hole, turn off the centre element. It will take longer to cook, but the hole will be much less noticeable.

�
Copies of the I/B. Please reproduce them without any changes except under special instruction from Team International BELGIUM. The pages must be reproduced and folded in order to obtain a booklet A5 (+/- 148.5 mm width x 210 mm height). When folding, make sure you keep the good numbering when you turn the pages of the I/B. Don’t change the page numbering. Keep the language integrity. Print only what is inside the frame.
14 DGR 31031- 140506
Assembly page 14/48
Fax +32 2 359 95 50
WARRANTY We suggest that you complete and return the enclosed Product Registration Card promptly to facilitate verification of the date of original purchase. However, return of the Product Registration Card is not a condition of these warranties. You can also fill out this warranty card online, at the following address: www.KALORIK.com This KALORIK product is warranted in the U.S.A. for 1 year from the date of purchase against defects in material and workmanship. This warranty is not transferable. Keep the original sales receipt. Proof of purchase is required to obtain warranty performance. During this period, if the KALORIK product, upon inspection by KALORIK, is proven defective, it will be repaired or replaced, at Kalorik’s option, without charge to the customer. If a replacement product is sent, it will carry the remaining warranty of the original product. This warranty does not apply to any defect arising from a buyer's or user's misuse of the product, negligence, failure to follow KALORIK instructions noted in the user’s manual, use on current or voltage other than that stamped on the product, wear and tear, alteration or repair not authorized by KALORIK, or use for commercial purposes. There is no warranty for glass parts, glass containers, filter basket, blades and agitators, and accessories in general. There is also no warranty for parts lost by the user. ANY WARRANTY OF MERCHANTABILITY OR FITNESS WITH RESPECT TO THIS PRODUCT IS ALSO LIMITED TO THE ONE YEAR LIMITED WARRANTY PERIOD. Some states do not allow limitation on how long an implied warranty lasts or do not allow the exclusion of incidental or consequential damages, so the above limitations may not apply to you. This warranty gives you specific legal rights, and you may also have other rights which vary from state to state. If the appliance should become defective within the warranty period and more than 30 days after date of purchase, do not return

�
Copies of the I/B. Please reproduce them without any changes except under special instruction from Team International BELGIUM. The pages must be reproduced and folded in order to obtain a booklet A5 (+/- 148.5 mm width x 210 mm height). When folding, make sure you keep the good numbering when you turn the pages of the I/B. Don’t change the page numbering. Keep the language integrity. Print only what is inside the frame.
15 DGR 31031- 140506
Assembly page 15/48
Fax +32 2 359 95 50
the appliance to the store: often, our Customer Service Representatives can help solve the problem without having the product serviced. If servicing is needed, a Representative can confirm whether the product is under warranty and direct you to the nearest service location. If this is the case, bring the product, or send it, postage prepaid by the user (all Kalorik customers are responsible for the initial shipment back to the warranty center), along with proof of purchase and a return authorization number indicated on the outer package, given by our Customer Service Representatives. Send to the authorized KALORIK Service Center (please visit our website at www.KALORIK.com or call our Customer Service Department for the address of our authorized KALORIK Service Center). When sending the product, please include a letter explaining the nature of the claimed defect. If you have additional questions, please call our Customer Service Department (please see below for complete contact information), Monday through Thursday from 9:00am - 5:00pm (EST) and Friday from 9:00am - 4:00pm (EST). Please note hours are subject to change. If you would like to write, please send your letter to: KALORIK Customer Service Department Team International Group of America Inc. 1400 N.W 159th Street, Suite 102 Miami Gardens, FL 33169 USA Or call: Toll Free: +1 888-521-TEAM / +1 888-KALORIK Only letters can be accepted at this address above. Shipments and packages that do not have a return authorization number will be refused.

�
Copies of the I/B. Please reproduce them without any changes except under special instruction from Team International BELGIUM. The pages must be reproduced and folded in order to obtain a booklet A5 (+/- 148.5 mm width x 210 mm height). When folding, make sure you keep the good numbering when you turn the pages of the I/B. Don’t change the page numbering. Keep the language integrity. Print only what is inside the frame.
16 DGR 31031- 140506
Assembly page 16/48
Fax +32 2 359 95 50
PRECAUCIONES IMPORTANTES Al utilizar artefactos eléctricos usted siempre debe tener en cuenta todas las precauciones básicas de seguridad, incluyendo las siguientes: 1. LEA TODAS LAS INSTRUCCIONES. 2. Asegúrese de que su voltaje principal corresponda al que figura
en el artefacto. 3. No toque las superficies calientes. Utilice las asas/manijas o
perillas. 4. A los efectos de protegerse contra las descargas eléctricas no
sumerja los cables, los enchufes o el artefacto en al agua o en cualquier otro líquido.
5. Es necesario prestar debida atención cuando los artefactos estén siendo utilizados por niños o cerca de ellos.
6. Desconecte el artefacto del tomacorriente cuando esté fuera de uso y antes de proceder a limpiarlo. Deje que el artefacto se enfríe antes de colocar sus partes o quitarlas.
7. No ponga en funcionamiento ningún artefacto cuando el cable o el enchufe estén dañados, o luego de un mal funcionamiento del artefacto, o si éste tiene cualquier desperfecto. Devuelva el artefacto la agencia de servicio autorizada más cercana a usted para su revisación, y si es necesario, su reparación y/o ajuste.
8. El uso de accesorios adicionales no recomendados por el fabricante del artefacto puede causar incendios, descargas eléctricas o daños físicos.
9. No lo utilice en el exterior; es para uso doméstico exclusivamente.
10. No deje que el cable cuelgue fuera del borde la mesa o de la mesada, o que quede en contacto con superficies calientes.
11. No coloque el artefacto sobre o cerca de cocinas a gas u hornallas eléctricas, o dentro de un horno caliente.
12. Se debe tener extremo cuidado al mover el artefacto cuando éste contenga aceite caliente u otros líquidos calientes. Utilícelo solamente sobre una superficie seca y plana.
13. Recuerde que siempre debe colocar primero el enchufe en el artefacto, y luego conectar el artefacto al tomacorriente. Para

�
Copies of the I/B. Please reproduce them without any changes except under special instruction from Team International BELGIUM. The pages must be reproduced and folded in order to obtain a booklet A5 (+/- 148.5 mm width x 210 mm height). When folding, make sure you keep the good numbering when you turn the pages of the I/B. Don’t change the page numbering. Keep the language integrity. Print only what is inside the frame.
17 DGR 31031- 140506
Assembly page 17/48
Fax +32 2 359 95 50
desconectar, mueva cualquiera de los controles a la posición “off” [o cero (0)], y luego retire el enchufe del tomacorriente.
14. Debe darle al artefacto solamente el uso para el que ha sido fabricado.
15. No deben introducirse en un asador espiedo trozos de comida excesivamente grandes o utensilios de metal que no sean los que están incluidos con el artefacto, ya que esto podría causar incendios o el riesgo de descarga eléctrica.
16. El contacto del artefacto con material inflamable, o si es cubierto con dicho material, incluyendo cortinas, tapicería, paredes y otros elementos similares, mientras está en funcionamiento, puede causar incendios. No coloque ningún objeto sobre la parte superior del artefacto cuando éste se encuentre en funcionamiento.
17. No limpie el artefacto con esponjas de metal raspantes (estropajos). Dichas esponjas podrían desintegrarse y sus pedazos podrían entrar en contacto con partes eléctricas, causando descargas eléctricas.
18. No coloque dentro del horno ninguno de los materiales que se enumeran a continuación: papel, cartón, plástico, u otros materiales similares.
19. Para desconectar el artefacto, coloque todos los botones en la posición “off” (o Cero (0) y desconéctelo del tomacorriente.
20. Nunca trate de utilizar el espiedo sin su tapa correspondiente o sin que la bandeja para el jugo esté debidamente colocada.
21. La tapa de este artefacto se calienta mucho. Siempre se deben utilizar guantes/agarraderas para horno al manejar la tapa o los accesorios.
22. Atención: este artefacto genera calor y puede haber un escape de vapor durante su uso; se deben tomar las precauciones necesarias para prevenir riesgos de quemaduras, daños personales o de la propiedad.
23. En caso accidental de que el artefacto se caiga o se sumerja en el agua, desconéctelo inmediatamente y no trate de sacarlo del agua..
24. Se debe tener extremo cuidado al quitar la bandeja de goteo o quitar el jugo caliente de la misma.
25. No haga funcionar el artefacto cerca de explosivos y/o vapores inflamables.

�
Copies of the I/B. Please reproduce them without any changes except under special instruction from Team International BELGIUM. The pages must be reproduced and folded in order to obtain a booklet A5 (+/- 148.5 mm width x 210 mm height). When folding, make sure you keep the good numbering when you turn the pages of the I/B. Don’t change the page numbering. Keep the language integrity. Print only what is inside the frame.
18 DGR 31031- 140506
Assembly page 18/48
Fax +32 2 359 95 50
26. Para reducir el riesgo de daños físicos, desconecte el artefacto antes de introducir comida en el mismo y manténgalo desconectado mientras no esté en funcionamiento.
27. Asegúrese de colocar el artefacto en un lugar con suficiente circulación de aire por encima del mismo y a sus costados durante su funcionamiento.
GUARDE ESTAS INSTRUCCIONES EXCLUSIVAMENTE PARA USO DOMÉSTICO
INSTRUCCIONES PARA ENCHUFE POLARIZADO Este artefacto está equipado con un enchufe polarizado (una hoja es más ancha que la otra). Para reducir el riesgo de descarga eléctrica, este enchufe se podrá utilizar solamente en el tomacorriente polarizado y de una sola manera. Si en un principio el enchufe no se ajusta adecuadamente en el tomacorriente, inviértalo. Si en esta forma tampoco se ajusta, comuníquese con un electricista competente calificado. NUNCA, por ninguna razón, intente modificar el enchufe.
INSTRUCCIONES PARA CABLE CORTO
Se incluye un cable eléctrico corto para reducir la posibilidad de enredarse o de tropezar, como ocurriría en el caso de que el cable fuera excesivamente largo. Se pueden acoplar extensiones de cables si se lo utiliza con la precaución necesaria.
• La capacidad de corriente eléctrica de la extensión de cable debe ser como mínimo la misma del artefacto. Si la capacidad eléctrica de la extensión de cable es demasiado baja, éste podría re-calentarse y quemarse.
• El cable unido a la extensión deberá ser arreglado de modo tal que no cuelgue de la mesada o de la mesa, dado que podría causar accidentes si los niños tiraran del cable o tropezaran con él.

�
Copies of the I/B. Please reproduce them without any changes except under special instruction from Team International BELGIUM. The pages must be reproduced and folded in order to obtain a booklet A5 (+/- 148.5 mm width x 210 mm height). When folding, make sure you keep the good numbering when you turn the pages of the I/B. Don’t change the page numbering. Keep the language integrity. Print only what is inside the frame.
19 DGR 31031- 140506
Assembly page 19/48
Fax +32 2 359 95 50
PANEL DE CONTROL
DESCRIPCIÓN DE PARTES
KNOW YOUR APPLIANCE
Ajuste de hora Visor digital Selector (Calor Alto o Bajo)
Indic. funciones elementos Calor externos
Indic. funciones elementos Calor internos
Posic. On/Off
Elemento Central calor selección (On / Off)
Ciclo cocción (Inicio/ Pausa)
Indicador posic. ON
Carne/Aves selector de programa autom.
Panel de Control
Brocheta
Agarradera de gancho Cobertura Elemento Calor Central
Torre
Fuente para jugo
Tapa de vidrio
Carcasa Acero Inoxidable

�
Copies of the I/B. Please reproduce them without any changes except under special instruction from Team International BELGIUM. The pages must be reproduced and folded in order to obtain a booklet A5 (+/- 148.5 mm width x 210 mm height). When folding, make sure you keep the good numbering when you turn the pages of the I/B. Don’t change the page numbering. Keep the language integrity. Print only what is inside the frame.
20 DGR 31031- 140506
Assembly page 20/48
Fax +32 2 359 95 50
• El Control de rango de temperatura es 390°F (Baja) – 515°F (Alta) • El Rango medidor de Tiempo es 0 a 99 minutos. • La cavidad de su horno ha sido cubierta con una capa de un
material anti-adhesivo para facilitar la limpieza de las paredes de la cavidad.
• Su horno también está equipado con un elemento de calor central que permite que la comida se cocine de adentro hacia afuera, mientras que los elementos de calor externos efectúan la cocción de afuera hacia adentro. Ésta es una opción especial que hace que la comida se cocine más rápidamente. No se recomienda. No se recomienda encender el elemento de calor central si usted desea que su comida esté “poco cocida” o “medianamente cocida”, especialmente si se trata de carne asada.
• Las partes desmontables pueden ser lavadas en el lavaplatos (excepto la carcasa), lo que hace su limpieza aún más fácil.
• Contrariamente a los sistemas de espiedo tradicionales, este artefacto no tiene partes de que funcionan en movimiento (como ventilador o pit) lo cual hace que el artefacto tenga un funcionamiento silencioso. El aire caliente circula alrededor del asador, por la función alterna de cada elemento de calor externo, para obtener una cocción uniforme.
PAUTAS IMPORTANTES PARA COCINAR CARNES Y AVES – CONSEJOS ÚTILES PARA OBETENER LOS MEJORES RESULTADOS
NOTA: Por favor, lea atentamente esta Guía de Uso/Cuidado antes de utilizar el artefacto.
• Todas las carnes y aves deberán estar completamente
descongeladas antes de su cocción. Tenga las comidas a temperatura ambiente antes de colocarlas en el espiedo.
• Recomendamos el uso de un termómetro para carnes para asegurarse de que la carne está completamente cocida.
Atención: Asegúrese siempre de que la carne y las aves estén completamente cocidas antes de comerlas. Los
jugos de las aves deben aclararse una vez que el proceso de cocción haya llegado a su compleción.
�
Copies of the I/B. Please reproduce them without any changes except under special instruction from Team International BELGIUM. The pages must be reproduced and folded in order to obtain a booklet A5 (+/- 148.5 mm width x 210 mm height). When folding, make sure you keep the good numbering when you turn the pages of the I/B. Don’t change the page numbering. Keep the language integrity. Print only what is inside the frame.
21 DGR 31031- 140506
Assembly page 21/48
Fax +32 2 359 95 50
• Los tiempos de cocción varían según la forma, grosor y composición de la comida. Se recomienda chequear la comida luego del mínimo tiempo estipulado, a fin de evitar que la misma se cocine excesivamente.
• El peso máximo recomendado para aves es 10 libras (aproximadamente 4.535 kg).
• Los tiempos de cocción para carne de res varían, según si su preferencia es “poco cocida”, o “bien cocida”. Las temperaturas internas recomendadas para carne de res son: medio cocida, 140oF; jugosa, 145oF; término medio, 160oF; bien cocida, 170oF.
• Para darle más sabor a las comidas, marine o aplique untes, especias y condimentos, pero esto debe ser hecho antes de colocarlas en el espiedo.
• Para una limpieza más fácil, vaporice las partes del espiedo y los accesorios con aceite de cocina antes de comenzar a cocinar. No vaporice las partes con un aerosol durante la cocción o cuando el espiedo esté en funcionamiento.
• Recuerde que los pollos (u otras aves) pequeños (6 a 8 libras = 2½ a 3½ kg) se cocinan mucho más rápido que los grandes (10 libras= 4.50 kg). Utilice un termómetro para carne para controlar la cocción, a intervalos regulares.
• Seleccione carnes que tengan una forma pareja, ya que así se cocinarán de un modo uniforme.
• Es importante colocar la cobertura del elemento central de calor lo más centrado posible dentro del espiedo, especialmente en el extremo ancho, en el caso en que la carne no tenga un formato parejo. Colocar el extremo más ancho de la carne en la parte superior, no en la inferior.
• Si el trozo de carne es corto, por favor déjelo colocado cerca de la parte superior y no cerca de la parte inferior del elemento de central de calor.
• No sirva inmediatamente después de finalizada la cocción. Deje reposar la comida durante 10 minutos luego de sacarla del espiedo, antes de servirla, para permitir que la carne de res o el pollo (u otro ave) esté más jugosa.
• Para la carne cortada en trozos, como costillas de cerdo, salchichas, o pechuga de pollo, recomendamos que se utilicen las brochetas.
�
Copies of the I/B. Please reproduce them without any changes except under special instruction from Team International BELGIUM. The pages must be reproduced and folded in order to obtain a booklet A5 (+/- 148.5 mm width x 210 mm height). When folding, make sure you keep the good numbering when you turn the pages of the I/B. Don’t change the page numbering. Keep the language integrity. Print only what is inside the frame.
22 DGR 31031- 140506
Assembly page 22/48
Fax +32 2 359 95 50
ANTES DE UTILIZAR POR PRIMERA VEZ
• Retire el artefacto y los accesorios de la caja, luego lave y seque los accesorios. Limpie el interior y el exterior del espiedo con una esponja o trapo húmedo y seque bien.
• NUNCA LO SUMERJA EN EL AGUA • Es normal que haya algún escape de vapor u olor del artefacto
durante su funcionamiento cuando se lo utiliza por primera vez. Esto no es dañino. A fin de eliminar cualquier aceite de empaque que puede haber quedado luego de su fabricación, recomendamos hacer funcionar el artefacto durante 15 minutos, en la posición de temperatura más alta [HIGH=MÁXIMO].
INSTRUCCIONES OPERATIVAS
PRECAUCIÓN: PRESTE SIEMPRE ATENCIÓN AL ARTEFACTO CUANDO ESTÉ EN FUNCIONAMIENTO. ADEVRTENCIA: LA TAPA DEL ESPIEDO SE CALIENTA DUTANTE SU USO; SIEMPRE UTILICE GUANTES Y MANÉJELA CON SUMO CUIDADO.
• Para que la limpieza del espiedo sea más fácil, sostenga la bandeja para grasa y el interior de la tapa y rocíelos con aceite de cocina anti-adhesivo. Haga lo mismo con la cobertura del y con el accesorio de torre antes de utilizarlos.
• Colocar la bandeja para grasa alrededor del elemento de calor y deslícelo hasta que esté en su posición correcta.
• Siga los pasos A, B o C antes de conectar el espiedo. A - PREPARACIÓN DE CARNE • Coloque la carne (para asar) en un plato o en una tabla de
cortar. Utilizando un cuchillo, haga un corte en forma de X en el centro de la carne, lo suficientemente largo como para que el elemento central de calor encaje en el mismo.
• NOTA: en el caso de carnes para asar más pequeñas, o si la carne está cortada en trozos, puede utilizar la torre de las brochetas.
• Coloque la cobertura con la carne de asar ubicada sobre el elemento de calor central.

�
Copies of the I/B. Please reproduce them without any changes except under special instruction from Team International BELGIUM. The pages must be reproduced and folded in order to obtain a booklet A5 (+/- 148.5 mm width x 210 mm height). When folding, make sure you keep the good numbering when you turn the pages of the I/B. Don’t change the page numbering. Keep the language integrity. Print only what is inside the frame.
23 DGR 31031- 140506
Assembly page 23/48
Fax +32 2 359 95 50
B- PREPARACIÓN DE AVES • Deben quitarse los menudos de las aves. • Colocar el elemento central de calor en la parte interior de la
torre. • Tenga el pollo abierto y móntelo sobre la parte superior de la
torre, de modo que las patas del mismo queden colgando hacia abajo a los costados de la torre.
• Asegúrese que el extremo de la cobertura del elemento de calor central esté atravesando el cogote del pollo, o se extiende a través del frente de la cavidad del cuerpo lo más posible, en el caso de que el pollo sea grande.
• Levante el pollo (o pavo, etc.), utilizando el aro de metal que está al final de la cobertura central, con la agarradera de gancho, y colocar la cobertura central por encima del elemento de calor, con el pollo (o pavo, etc.) montado. La parte inferior de la torre debe estar apoyada en la bandeja para jugo.
C- USO DE LAS BROCHETAS • Para hacer kebabs o pequeños trozos de carne asada, las
brochetas estarán al alcance de la mano. • Corte la carne en trozos pequeños, si lo desea puede marinarlos,
y luego inserte la carne en cubos/pequeños trozos/salchichas en las brochetas.
• Una vez que las brochetas estén completas con la comida insertada, coloque el extremo corto de la brochetas en los agujeros de la torre, de modo que las brochetas encajen en posición vertical.
• Deslice la torre para que su posición sea alrededor del elemento de calor central, de modo que quede encima de la fuente para jugo.
USO DEL ESPIEDO • Coloque la tapa, conecte la unidad y oprima el botón “ON/OFF”
una vez. La unidad hará bip dos veces, y la pantalla digital comenzará a mostrar "00" intermitente. El indicador “HIGH” (=ALTO) y “AVES” estarán en posición ON, y los 4 indicadores luminosos para los elementos de calor aparecerán intermitentes.

�
Copies of the I/B. Please reproduce them without any changes except under special instruction from Team International BELGIUM. The pages must be reproduced and folded in order to obtain a booklet A5 (+/- 148.5 mm width x 210 mm height). When folding, make sure you keep the good numbering when you turn the pages of the I/B. Don’t change the page numbering. Keep the language integrity. Print only what is inside the frame.
24 DGR 31031- 140506
Assembly page 24/48
Fax +32 2 359 95 50
• Estas 4 luces indican cuál de los elementos de calor se encenderá cuando el espiedo comience a cocinar. Las 3 luces externas indican los elementos de calor externos; la luz central indica el elemento central de calor.
• El botón de "calentador central" encenderá y apagar el elemento de calor central, también durante el ciclo de cocción.
• Oprima el botón “SELECCIONAR” para elegir la opción “AVES” [POULTRY] o “CARNE” [MEAT], indicadas por las luces “AVES” y “CARNE”.
• Oprima el teclado “+” o “-” para aumentar o disminuir el tiempo de cocción que usted desee. El tiempo máximo de cocción es 99 minutos.
• Oprima el botón "CALENTAR" [HEAT] para seleccionar "ALTO" [HIGH] o "BAJO" [LOW] (lea las recomendaciones en la tabla presentada más adelante en estas instrucciones). La luz indicadora muestra el programa seleccionado; la mayoría de las veces usted utilizará la opción "ALTO" [HIGH], pero es interesante también experimentar la opción "BAJO" [LOW].
• Oprima el botón "INICIO/PAUSA" [START/PAUSE], la luz “On” se encenderá y la pantalla digital comenzará una cuenta regresiva. Cuando los elementos de calor se encienden, dos de las luces trabajarán en forma intermitente en círculo, describiendo alternativamente un patrón circular. Es normal que los 3 elementos de calor externos no trabajen al mismo tiempo.
CUIDADO: la tapa se calentará mucho durante la cocción. Manéjela con cuidado y con guantes para horno o agarraderas. El proceso de asado genera humo, y éste puede causar quemaduras. Incline ligeramente la tapa de vidrio al abrirla, de modo que el humo nunca sea despedido en dirección a la cara y a las manos.
• Verifique periódicamente la temperatura interna de la comida con un termómetro para comida hasta que la misma esté hecha.
• Cuando el ciclo de cocción haya finalizado, el espiedo hará bip dos veces, la pantalla digital indicará "00", y los elementos de calor se apagarán automáticamente. Con la ayuda de una agarradera o de un guante para horno, quite la tapa de vidrio.
• Inserte el asa [agarradera] de gancho dentro del aro ubicado en el extremo de la cobertura del elemento de calor, o en la parte superior de la bandeja para jugo para levantar la comida, utilizando las 2 manos cuando se trate de aves o carnes grandes. Colóquela en una fuente grande o en una olla poco profunda.

�
Copies of the I/B. Please reproduce them without any changes except under special instruction from Team International BELGIUM. The pages must be reproduced and folded in order to obtain a booklet A5 (+/- 148.5 mm width x 210 mm height). When folding, make sure you keep the good numbering when you turn the pages of the I/B. Don’t change the page numbering. Keep the language integrity. Print only what is inside the frame.
25 DGR 31031- 140506
Assembly page 25/48
Fax +32 2 359 95 50
• Deje reposar la comida entre 10 y 15 minutos para obtener mejores resultados.
• Para las brochetas, retírelas de la torre con sumo cuidado, y deslice la comida sobre un plato.
AJUSTES RECOMENDADOS
Por favor, vea los siguientes ajustes recomendados y los tiempos de cocción:
Tipo de Carne
Seleccionar Ajustes Temperatura
Temperatura Interna
Recomendada2
Tiempo Aproximado
Ave Pequeña (entera, 3 a 5
lb.)
AVES ALTA / BAJA1 180oF/ 82oC 15 min/lb
Ave Mediana (entera, 6 a 8
lb.)
AVES ALTA / BAJA1 180oF/ 82oC 12 min/lb
Patas de pollo (3 patas) AVES ALTA 180oF/ 82oC 15 min/lb
Carne Asada (2 a 3 lb.), poco
cocida
CARNE ALTA 140oF/ 60oC 18 min/lb
C. Asada (2 a 3 lb.), jugosa CARNE ALTA 145oF/ 62oC 19 min/lb
C. Asada (2 a 3 lb.), medio
hecha.
CARNE ALTA 160oF/ 71oC 20 min/lb
C. Asada (2 a 3 lb) bien hecha CARNE ALTA 170oF/ 76oC 22 min/lb
Costillas Cerdo (4; sin hueso) CARNE ALTA 160oF 20 min/lb
Costillas Cerdo (con hueso) CARNE ALTA / BAJA1 160oF/ 71oC 30 min/lb
Cerdo para Asar CARNE ALTA / BAJA1 160oF/ 71oC 20 min/lb
Pata de Cordero (3 – 5 lb.) CARNE ALTA / BAJA1 160oF/ 71oC 18 min/lb
Brochetas carne de res CARNE ALTA 160oF/ 71oC 35 min
Brochetas mariscos CARNE ALTA 160oF/ 71oC 20 min
Brochetas de pollo AVES ALTA 180oF/82oC 25 min
Brochetas de salchichas CARNE ALTA 160oF/ 71oC 25 min
Salchicha entera, sin cocinar
(6)
CARNE ALTA - 35 min/lb
Salchicha entera (cocida) (6) CARNE ALTA - 25 min/lb
Hot dogs (6) CARNE ALTA - 12 min
1 Cocine primero en ALTA (HIGH] durante la primera mitad del tiempo de cocción, luego cámbielo a BAJA [LOW] hasta que el pollo (pavo, etc.) esté listo. 2 La temperatura interna de la comida al final de la cocción, de acuerdo a las pautas de seguridad de la Comida USDFA y a la guía de inspección de.

�
Copies of the I/B. Please reproduce them without any changes except under special instruction from Team International BELGIUM. The pages must be reproduced and folded in order to obtain a booklet A5 (+/- 148.5 mm width x 210 mm height). When folding, make sure you keep the good numbering when you turn the pages of the I/B. Don’t change the page numbering. Keep the language integrity. Print only what is inside the frame.
26 DGR 31031- 140506
Assembly page 26/48
Fax +32 2 359 95 50
LIMPIEZA Y MANTENIMIENTO
• Apague el artefacto apretando el botón ON/OFF que se encuentra en el panel de control, poniéndolo en posición OFF. [Apagado]. Una vez que esté en posición OFF, desconecte el enchufe de la pared. Espere hasta que el artefacto y su contenido se hayan enfriado completamente.
• Con mucho cuidado quite la bandeja para jugo del Cuerpo Principal y vierta la grasa dentro de un recipiente adecuado.
• Todas las partes desmontables pueden ser lavadas sin riesgo de daño en el lavaplatos, o también pueden ser lavadas a mano con agua y jabón.
• Con el tiempo, la torre, la cobertura central y las brochetas se decolorarán. Esto es normal.
• Es posible que la tapa de vidrio deba ser lavada con una esponja/estropajo 3M u otra similar, junto con un limpiador no abrasivo, para quitar la grasa adherida quemada. Enjuague y déjela secar.
• Para quitar fácilmente todo residuo de comida, coloque las partes en agua tibia y jabón y déjelas en remojo durante 20-30 minutos antes de lavarlas a mano.
• Lave el interior del cuerpo principal y los elementos de calor con un trapo húmedo o una esponja con detergente para platos, para quitar la grasa. Para limpiar las salpicaduras detrás de los elementos de calor, haga deslizar con mucho cuidado una toalla de papel o una esponja con agua y detergente; hágalo deslizar por detrás del elemento y seque con una toalla de papel o un trapo suave. No utilice limpiadores abrasivos en las superficies internas ni en las externas.
• Para limpiar restos de comida de las superficies internas o de la ventana de vidrio, utilice un cepillo de cerda de plástico, o un trapo de nylon o polyester embebido en agua con detergente. NUNCA utilice limpiadores en aerosol directamente sobre las superficies internas del Cuerpo Principal.
• Limpiar la superficie exterior del Cuerpo Principal con un trapo húmedo después de cada uso. Seque con un trapo suave.
NO SUMERJA EL CUERPO PRINCIPAL DEL ARTEFACTO DENTRO DE AGUA O DE CUALQUIER OTRO LÍQUIDO

�
Copies of the I/B. Please reproduce them without any changes except under special instruction from Team International BELGIUM. The pages must be reproduced and folded in order to obtain a booklet A5 (+/- 148.5 mm width x 210 mm height). When folding, make sure you keep the good numbering when you turn the pages of the I/B. Don’t change the page numbering. Keep the language integrity. Print only what is inside the frame.
27 DGR 31031- 140506
Assembly page 27/48
Fax +32 2 359 95 50
LOCALIZACIÓN Y SOLUCIÓN DE PROBLEMAS
Las carnes asadas se pegan a la cobertura del elemento central de calor. • ¿Se acordó de engrasar esta parte antes de colocar la carne? • ¿Es una carne demasiado magra? Recuerde que usted debe
dejar la carne reposar durante unos 10 minutos antes de tratar de sacarlo de la barra.
• Trate de aflojar la carne de alrededor del extreme superior e inferior de la barra, luego empuje la parte superior de la barra hacia abajo a través de la carne. Si aún permanece pegada, corte la carne a lo largo hacia abajo en la totalidad del costado, y luego quite la barra. Corte la corte en el otro costado, de modo que le queden dos trozos largos. Corte la carne en rebanadas para servir.
El pavo no cabe en la unidad. • Algunas pechugas de pavo son difíciles de colocar. Trate de
centrarlas lo más posible, utilizando la torre. • Use cuerdas y brochetas para ayudar a que el pavo se
mantenga en su lugar, si es necesario. • Puede ocurrir que aves muy grandes no quepan en el artefacto.
No recomendamos aves que pesen más de 10 libras (4.535. kg). • Trate de ubicar el pavo (pollo, etc.) en el espiedo sin la torre. La carne de asar y las aves no están completamente cocidas. • Los tiempos de cocción en la guía para el usuario son
aproximados. Extienda los tiempos de cocción. • El medidor de tiempo no está programado correctamente. Los
tiempos de cocción recomendados deben ser utilizados como punto inicial de referencia.
La carne está bien cocida adentro pero excesivamente cocida afuera. • La carne es gruesa y requiere un mayor tiempo de cocción a
una menor velocidad. • Trate de cocinarla en ALTA [HIGH] durante la mitad del tiempo
de cocción, y luego cambie a BAJA [LOW] medio-ciclo hasta el final del tiempo de cocción.
�
Copies of the I/B. Please reproduce them without any changes except under special instruction from Team International BELGIUM. The pages must be reproduced and folded in order to obtain a booklet A5 (+/- 148.5 mm width x 210 mm height). When folding, make sure you keep the good numbering when you turn the pages of the I/B. Don’t change the page numbering. Keep the language integrity. Print only what is inside the frame.
28 DGR 31031- 140506
Assembly page 28/48
Fax +32 2 359 95 50
La unidad no se enciende o no calienta • ¿Conectó el artefacto? • Usted DEBE hacer el ajuste/programar el medidor de tiempo
antes de apretar el botón Inicio/Pausa. No puede cambiar los minutos de cuenta regresiva en la pantalla • Los botones del medidor de tiempo deben ser oprimidos con
firmeza. Tal vez usted no los oprimió lo suficiente y durante suficiente tiempo.
• Para avanzar los minutos con rapidez, oprima y sostenga el botón del medidor de tiempo por 1 segundo completo.
Puede aparecer humo durante el uso • Es normal que haya salga humo del artefacto la primera vez que
se lo usa. El humo proveniente de las salpicaduras de las comidas en usos consecutivos es normal también.
• ¿Limpió el interior de la unidad luego de cada uso? • ¿Tal vez la carne o aves están tocando los elementos de calor?
¿Ató las alas del pollo de modo que no toquen los elementos de calor?
• ¿Hay salpicaduras/goteo de grasa cayendo sobre los elementos de calor durante la cocción?
La grasa y/o goteo pueden caer sobre el cuenta-minutos. • Asegúrese de que la bandeja para grasa esté correctamente
colocada. • Puede ocurrir que haya salpicaduras durante el uso- debido al
goteo de grasa en las paredes interiores y que ese goteo se desparrame hacia la parte inferior de la unidad, cayendo afuera de la fuente para grasa. El goteo puede también caer sobre el centro y acumularse en la parte inferior.
• ¿Hay alto contenido de grasa en la comida que está cocinando? Usted debe hacer una pausa en la mitad de la cocción, quitar la carne/ave, y vaciar la bandeja para grasa.
• Si usted deja la comida ya cocinada reposando en la unidad hasta que se enfríe, habrá condensación en las paredes interiores, y hasta la parte inferior de la unidad.
• Asegúrese que la unidad se haya enfriado completamente antes de limpiar su interior.

�
Copies of the I/B. Please reproduce them without any changes except under special instruction from Team International BELGIUM. The pages must be reproduced and folded in order to obtain a booklet A5 (+/- 148.5 mm width x 210 mm height). When folding, make sure you keep the good numbering when you turn the pages of the I/B. Don’t change the page numbering. Keep the language integrity. Print only what is inside the frame.
29 DGR 31031- 140506
Assembly page 29/48
Fax +32 2 359 95 50
Las carnes asadas no se han cocinado uniformemente. • ¿Colocó la carne en la barra de un modo uniforme? La carne
asada tiene que ser centrada en la Barra hacia la parte superior de la unidad para la cocción sea uniforme.
• ¿La carne tenía una forma irregular, con un pequeño extreme en punta y el otro extremo muy ancho? En este caso trate de cocinar una carne sin el elemento central, para obtener una mejor cocción.
Hay un agujero en el medio de la carne asada. • Esto es típico en las carnes asadas en un artefacto tipo espiedo.
Dado que el centro del elemento de calor ayuda a que la carne se cocine, el agujero en el medio de la carne puede ser un poco más visible que en otro tipo de artefactos similares. Sin embargo, las carnes también se cocinan más rápidamente.
• Para tratar de que el agujero en la carne sea lo más pequeño posible, apague el elemento central. La cocción llevará más tiempo, pero el agujero será mucho menos visible.

�
Copies of the I/B. Please reproduce them without any changes except under special instruction from Team International BELGIUM. The pages must be reproduced and folded in order to obtain a booklet A5 (+/- 148.5 mm width x 210 mm height). When folding, make sure you keep the good numbering when you turn the pages of the I/B. Don’t change the page numbering. Keep the language integrity. Print only what is inside the frame.
30 DGR 31031- 140506
Assembly page 30/48
Fax +32 2 359 95 50
GARANTÍA Le sugerimos rellenen y nos envíen rápidamente la Tarjeta de Registro de Producto adjunta para facilitar la verificación de la fecha de compra. Por lo tanto, la devolución de esa Tarjeta de Registro de Producto no es una condición imprescindible para la aplicación de esa garantía. Puede también rellenar dicha tarjeta de garantía en línea en la dirección siguiente: www.KALORIK.com A partir de la fecha de compra, este producto KALORIK está garantizado un año contra los defectos materiales y de fabricación, en los Estados Unidos. Esta garantía no es transferible. Conserve la prueba de compra original. Se exige una prueba de compra para obtener la aplicación de la garantía. Durante este período, si el producto KALORIK después de una inspección por parte de KALORIK, se manifiesta defectuoso, será reparado o remplazado, según lo que decida KALORIK, sin gastos para el consumidor. Si se envía un producto de remplazo, se aplicará la garantía que queda del producto original. Esta garantía no se aplica a los defectos causados por una mala utilización por parte del comprador o del usuario, o una negligencia al no respeto del manual de instrucciones KALORIK, o una utilización en un circuito eléctrico cuyo voltaje es diferente al que figura en el producto, o un desgaste normal, o modificaciones o reparaciones no autorizadas por KALORIK, o por un uso con fines comerciales. No existe garantía por las partes de cristal, jarras de cristal, filtros, cestos, cuchillas y accesorios en general. No existe tampoco garantía por las piezas perdidas por el usuario. Toda garantía de valor comercial o de adaptabilidad a este producto está limitada a un año también. Algunos estados no ponen límites a la duración de la garantía tácita o no autorizan la exclusión de daños y perjuicios accesorios o indirectos, por lo que puede que las restricciones anteriormente mencionadas no le sean aplicables a Usted. Esta garantía le otorga derechos legales particulares, pero usted puede tener también otros
�
Copies of the I/B. Please reproduce them without any changes except under special instruction from Team International BELGIUM. The pages must be reproduced and folded in order to obtain a booklet A5 (+/- 148.5 mm width x 210 mm height). When folding, make sure you keep the good numbering when you turn the pages of the I/B. Don’t change the page numbering. Keep the language integrity. Print only what is inside the frame.
31 DGR 31031- 140506
Assembly page 31/48
Fax +32 2 359 95 50
derechos que varían de un estado a otro y algunos derechos pueden variar de un estado a otro. Si el aparato tuviera un defecto durante el periodo de garantía y / o más de 30 días después de que se compró, no devuelva el aparato en la tienda donde le compró: a menudo, nuestro Servicio al Consumidor puede ayudar a resolver el problema sin que el producto tenga que ser reparado. Si hace falta una reparación, uno de nuestros representantes puede confirmar si el producto está bajo garantía y dirigirle al servicio post-venta más próximo. Si fuera el caso, traiga el producto (o envíelo, correctamente franqueado) con la prueba de compra que mencione el número de autorización de devolución indicado por nuestro Servicio al Consumidor, al servicio post-venta KALORIK más próximo. (Visite nuestra web www.KALORIK.com o llame al Servicio al Consumidor para obtener la dirección del Servicio post-venta KALORIK exclusivo más próximo). Si envía el producto, le rogamos añadan una carta explicando la naturaleza del defecto. Si tiene preguntas adicionales, por favor llame al Servicio al Consumidor (véase abajo para los datos completos), de lunes a jueves, de las 9:00 a las 17:00 (EST), y el viernes de las 9:00 a las 16:00 (EST). Note que las horas pueden ser modificadas. Si quiere escribirnos, puede hacerlo a la dirección siguiente: KALORIK Servicio al Consumidor Team International Group of America Inc. 1400 N.W 159th Street, Suite 102 Miami Gardens, FL 33169 USA O llame gratuitamente (U.S.A.) al +1 888-521-TEAM / +1 888-KALORIK Las cartas se aceptan solamente en la dirección anteriormente mencionada. Los envíos y paquetes que no tengan número de autorización de devolución serán rechazados.

�
Copies of the I/B. Please reproduce them without any changes except under special instruction from Team International BELGIUM. The pages must be reproduced and folded in order to obtain a booklet A5 (+/- 148.5 mm width x 210 mm height). When folding, make sure you keep the good numbering when you turn the pages of the I/B. Don’t change the page numbering. Keep the language integrity. Print only what is inside the frame.
32 DGR 31031- 140506
Assembly page 32/48
Fax +32 2 359 95 50
CONSIGNES DE SECURITE Pour utiliser un appareil électrique, des précautions élémentaires sont à respecter, telles que celles énumérées ci-dessous : 1. LISEZ L’ENSEMBLE DES INSTRUCTIONS. 2. Avant d'utiliser l'appareil, vérifiez que la tension du réseau
correspond bien à celle notée sur la plaque signalétique de votre appareil.
3. Ne touchez pas les surfaces chaudes. Manipulez les poignées et les boutons.
4. Pour écarter les risques d’électrocution, n'immergez pas le cordon ou la fiche ou l’appareil dans l'eau ou dans tout autre liquide.
5. Faites particulièrement attention lorsque l’appareil est utilisé par ou en présence d’enfants.
6. Débranchez l'appareil de la prise murale lorsqu’il n’est pas utilisé ou avant de le nettoyer. Laissez l'appareil refroidir avant de nettoyer l'appareil.
7. Ne faites pas fonctionner l'appareil si son cordon ou sa fiche est endommagé ou si l'appareil a présenté un dysfonctionnement ou est endommagé. Retournez l’appareil au centre de service autorisé pour le faire vérifier ou réparer.
8. L'utilisation d’accessoires non recommandés par le fabricant présente des risques d’incendie, d’électrocution ou de blessure.
9. Ne laissez pas le cordon pendre de la table ou d'un comptoir et évitez qu’il touche une surface chaude.
10. Ne pas utiliser en extérieur ; usage domestique uniquement 11. Ne placez pas l'appareil sur ou près d'un brûleur à gaz ou électrique ou
dans un four chaud. 12. Soyez extrêmement prudent lorsque vous déplacez un appareil
contenant de l'huile chaude ou d'autres liquides chauds. N’utilisez que sur une surface plane et stable.
13. Insérez toujours le cordon d'abord dans l'appareil et ensuite dans la prise murale. Pour déconnecter l'appareil, placez tous les boutons sur la position arrêt et débranchez l'appareil de la prise murale.
14. N'utilisez pas cet appareil à des fins autres que celles pour lesquelles il est conçu.
15. Des aliments de trop grande taille pour l’appareil ou des ustensiles en métal autres que ceux fournis ne doivent pas être insérés dans le corps de l’appareil car ils créent un risque d’incendie ou de choc électrique.
16. Un incendie pourrait se déclarer si l’appareil est recouvert ou entre en contact avec des matériaux inflammables tels que des rideaux,
�
Copies of the I/B. Please reproduce them without any changes except under special instruction from Team International BELGIUM. The pages must be reproduced and folded in order to obtain a booklet A5 (+/- 148.5 mm width x 210 mm height). When folding, make sure you keep the good numbering when you turn the pages of the I/B. Don’t change the page numbering. Keep the language integrity. Print only what is inside the frame.
33 DGR 31031- 140506
Assembly page 33/48
Fax +32 2 359 95 50
tentures, cloisons etc. pendant l’utilisation. Ne posez rien sur l’appareil pendant son utilisation.
17. N'utilisez pas d'ustensiles en métal ou des tampons a récurera métalliques car ils pourraient se morceler et touchez des parties électrifiées pour créer des risques de chocs électriques
18. Ne mettez jamais aucun des matériaux suivant dans l’appareil pendant son utilisation : papier, carton, plastiques, etc.
19. Pour déconnecter l’appareil, placer tous les boutons en position éteinte (« OFF ») et ensuite retirez la fiche de la prise murale.
20. N'utilisez pas l'appareil sans son couvercle ou le réceptacle de graisse en place.
21. Le couvercle de l’appareil devient extrêmement chaud. Portez toujours des gants de cuisine ou des maniques pour manipuler le couvercle ou les accessoires.
22. Attention : cet appareil génère de la chaleur et de la vapeur peut s’échapper pendant l’utilisation. Prenez toutes les précautions nécessaires pour éviter toute brulure, blessures ou dommages divers.
23. Si l’appareil tombe ou se retrouve immergé, débranchez-le immédiatement avant d’essayer de saisir l’appareil.
24. Faites extrêmement attention en manipulant le réservoir de graisse ou en vous débarrassant de la graisse accumulée.
25. Ne pas utiliser en présence d’explosifs ou de fumée inflammable. 26. Pour réduire les risques de blessure, débranchez l’appareil avant d’y
insérer de la nourriture, et laissez débranché si l’appareil n’est pas utilisé. 27. Laissez suffisamment d’espace libre autour et au-dessus de l’appareil
pour permettre une ventilation adéquate.
CONSERVEZ CES INSTRUCTIONS USAGE DOMESTIQUE UNIQUEMENT CONSIGNES CONCERNANT LA FICHE POLARISEE Ce produit est muni d'une fiche polarisée (une lame plus large que l'autre). Ce genre de fiche n'entre que d'une façon dans une prise polarisée, afin de minimiser les risques de chocs électriques. Si vous n'arrivez pas à enfoncer la fiche à fond dans la prise, retournez la fiche et réessayez. Si cela ne fonctionne toujours pas, faites appel à un service qualifié. N'essayez jamais de modifier la fiche!
CONSIGNES CONCERNANT LE CORDON

�
Copies of the I/B. Please reproduce them without any changes except under special instruction from Team International BELGIUM. The pages must be reproduced and folded in order to obtain a booklet A5 (+/- 148.5 mm width x 210 mm height). When folding, make sure you keep the good numbering when you turn the pages of the I/B. Don’t change the page numbering. Keep the language integrity. Print only what is inside the frame.
34 DGR 31031- 140506
Assembly page 34/48
Fax +32 2 359 95 50
Le cordon d’alimentation de l’appareil est un cordon détachable de type court, et ce afin de diminuer les risques d’accidents (chute si vous marchez sur le cordon...). Vous pouvez toutefois utiliser le cordon détachable avec une rallonge si nécessaire mais:
• Assurez-vous que l'ampérage de la rallonge soit égal ou supérieur à celui de l'appareil. Un cordon plus long avec un ampérage inférieur à celui de l'appareil risquerait de surchauffer et de brûler.
• La rallonge ne doit pas pendre du plan de travail ou de la table afin d'éviter que les enfants ne le tirent ou trébuchent.
PANNEAU DE CONTROLE
Marche/Arrêt
Réglage du temps de cuisson
Afficheur digital
Sélecteur de température : Low
(Basse) or High (Haute)
Indicateur lumineux de fonctionnement des éléments chauffants extérieurs
Indicateur lumineux de fonctionnement
Cycle de cuisson (Start / Pause)
Marche / Arrêt pour l’élément chauffant central
Sélection du programme Viande (Meat) ou Volaille (Poultry)
Indicateur lumineux de fonctionnement de l’élément chauffant central

�
Copies of the I/B. Please reproduce them without any changes except under special instruction from Team International BELGIUM. The pages must be reproduced and folded in order to obtain a booklet A5 (+/- 148.5 mm width x 210 mm height). When folding, make sure you keep the good numbering when you turn the pages of the I/B. Don’t change the page numbering. Keep the language integrity. Print only what is inside the frame.
35 DGR 31031- 140506
Assembly page 35/48
Fax +32 2 359 95 50
DESCRIPTION DES ELEMENTS KNOW YOUR APPLIANCE • Le contrôle de la température est le suivant : 390°F / 200°C en
position « LOW » (Basse) et 515°F / 270°C en position « HIGH » (Haute)
• Temps de cuisson réglable de 0 à 99 minutes par minuterie. • La cavité de la rôtisserie est dispose d’un revêtement anti-
adhérent pour faciliter le nettoyage. • Votre rôtisserie est aussi équipée d’un élément chauffant central
qui permet de cuire la nourriture aussi de l’intérieur vers l’extérieur, pendant que les éléments chauffants extérieurs cuisent de l’extérieur vers l’intérieur. Cette fonction spéciale permet une cuisson beaucoup plus rapide. Il n’est pas conseillé d’activer l’élément chauffant central si vous aimez la nourriture cuite « saignante », particulièrement pout le rosbif.
Brochettes
Poignée crochet Etui pour élément chauffant central
Tour
Collecteur de graisses
Couvercle en verre
Corps en acier inoxydable
Panneau de contrôle
�
Copies of the I/B. Please reproduce them without any changes except under special instruction from Team International BELGIUM. The pages must be reproduced and folded in order to obtain a booklet A5 (+/- 148.5 mm width x 210 mm height). When folding, make sure you keep the good numbering when you turn the pages of the I/B. Don’t change the page numbering. Keep the language integrity. Print only what is inside the frame.
36 DGR 31031- 140506
Assembly page 36/48
Fax +32 2 359 95 50
• Les parties amovibles peuvent être nettoyées au lave-vaisselle (pas le corps principal) pour un nettoyage facile.
• Contrairement aux rôtisseries traditionnelles, cet appareil n’a pas de parties mobiles (broche ou ventilateur) ce qui le rend particulièrement silencieux. L’air chaud circule autour de la partie à rôtir, de par la fonction alternée de chaque élément chauffant extérieur, pour des résultats de cuisson homogènes.
RECOMMANDATIONS IMPORTANTES POUR LA CUISSON DE LA VIANDE ET DES VOLAILLES – CONSEILS POUR DES RESULTATS OPTIMAUX NOTE: Lisez cette notice entièrement avant l’utilisation.
• Les viandes et volailles doivent être décongelées avant la cuisson.
Portez la nourriture à la température ambiante avant de la placer dans la rôtisserie.
• Nous conseillons l’utilisation d’un thermomètre à viande pour vous assurer que la nourriture est parfaitement cuite.
• Les temps de cuisson varient selon la forme, l’épaisseur et le type de nourriture. Il est conseillé de vérifier la cuisson après le temps minimum recommandé pour éviter tout risque de sur-cuisson.
• Le poids maximum recommandé pour la volaille est de 10 livres (4.5 kg)
• Les temps de cuisson du bœuf varient selon si vous désirez un résultat saignant, à point ou bien cuit. Les températures internes conseillées pour le bœuf sont : 60oC/140oF pour « saignant », 70oC/160oF pour « à point » et 75oC/170oF pour « bien cuit ».
• Pour ajouter du gout, marinez la viande ou enrobez la dans des épices ou assaisonnements, mais cela avant d’introduite dans l’appareil.
• Pour un nettoyage plus facile, vaporisez un spray d’huile de cuisson sur les parois et sur les accessoires avant la cuisson. Ne le vaporisez JAMAIS un aérosol pendant la cuisson ou quand l’appareil est en fonctionnement.
Attention: Prenez soin à ce que les viandes et volailles soient toujours bien cuites avant de les manger. Vérifiez toujours
que les jus de caisson des viandes et volailles coulent clairs

�
Copies of the I/B. Please reproduce them without any changes except under special instruction from Team International BELGIUM. The pages must be reproduced and folded in order to obtain a booklet A5 (+/- 148.5 mm width x 210 mm height). When folding, make sure you keep the good numbering when you turn the pages of the I/B. Don’t change the page numbering. Keep the language integrity. Print only what is inside the frame.
37 DGR 31031- 140506
Assembly page 37/48
Fax +32 2 359 95 50
• Rappelez-vous que des petites volailles (6 à 8 livres – 2.5 à 3.5kg-) cuisent beaucoup plus rapidement que des grosses volailles (10 livres – 4.5 kg-). Utilisez un thermomètre à viande pour contrôler la cuisson à intervalles réguliers.
• Choisissez des rôtis de forme régulière, car le résultat de cuisson sera plus homogène.
• Il est important de positionner l’étui couvrant l’élément chauffant central de façon la plus centrée possible dans la pièce de viande, et ce particulièrement dans la partie la plus large de la pièce à rôtir, si le rôti n’est pas formé de façon uniforme. Placez la partie la plus large en haut, pas vers la bas.
• Si la pièce à rôtir est courte, laissez-la placée en position haute plutôt que vers le bas de l’élément chauffant central.
• Ne servez pas immédiatement à la fin de la cuisson. Laissez la nourriture reposer pendant 10 minutes après l’avoir retirée de l’appareil, vous obtiendrez des résultats plus juteux.
• Pour rôtir des pièces en morceaux, comme des côtelettes, des saucisses ou des blancs de poulet, il est préférable d’utiliser les brochettes.
BEFORE THE FIRST USE
• Déballez l’appareil et les accessoires, puis lavez et essuyez ceux-ci. Passez une éponge ou un linge humide à l’intérieur de la cavité, et séchez consciencieusement.
• NE JAMAIS IMMERGER LE CORPS DE L’APPAREIL. • Il est normal que de la fumée et une certaine odeur soient
générées pendant la première utilisation. Ceci est sans danger. Pour éliminer toute trace de graisse due à la production, il est recommandé de faire fonctionner l’appareil à vide pendant 15 minutes, en utilisant la température la plus haute (HIGH)

�
Copies of the I/B. Please reproduce them without any changes except under special instruction from Team International BELGIUM. The pages must be reproduced and folded in order to obtain a booklet A5 (+/- 148.5 mm width x 210 mm height). When folding, make sure you keep the good numbering when you turn the pages of the I/B. Don’t change the page numbering. Keep the language integrity. Print only what is inside the frame.
38 DGR 31031- 140506
Assembly page 38/48
Fax +32 2 359 95 50
MODE D’EMPLOI ATTENTION : NE PAS LAISSER SANS SURVEILLANCE PENDANT L’EMPLOI ATTENTION : LE COUVERCLE DEVIENT TRES CHAUD PENDANT L’UTILISATION ; PORTEZ DES GANTS DE PROTECTION ET MANIPULEZ AVEC SOIN
• Pour que la rôtisserie soit plus facile à nettoyer, avant la mise en marche, saisissez le réceptacle à graisse et l’intérieur du couvercle et vaporisez-les avec un aérosol d’huile de cuisson. Procédez de même avec l’étui de l’élément central et la tour, s’ils sont utilisés.
• Mettez le réceptacle à graisse en position autour de l’élément chauffant central et glissez-le en place.
• Suivez les instructions A, B ou C avant la mise en marche de l’appareil.
A – PREPARER LA VIANDE • Placez la viande (le rôti) sur une assiette ou sur une planche à
découper. Avec un couteau, incisez le milieu de la pièce de viande en forme de X, au centre du rôti, suffisamment large pour que l’étui de l’élément chauffent central puisse pénétrer facilement.
• NOTE : si vous cuisez un petit rôti ou des morceaux prédécoupés, vous pouvez utiliser la tour ou les brochettes à la place.
• Mettez en place l’étui autour de l’élément chauffant, avec le rôti monté dessus.
B- PREPARER UNE VOLAILLE • Les abats doivent être retirés préalablement à la cuisson (la
volaille doit être vidée) • Insérer l’étui de l’élément central à travers la base de la tour. • Maintenez le poulet ouvert et montez le sur la tour, de façon à ce
que les pilons pendent vers le bas sur les côtés de la tour. • Assurez-vous que l’étui de l’élément central passe par le cou du
poulet, ou passe autant que possible par l’avant du corps de la volaille, si celle-ci est de grande taille.

�
Copies of the I/B. Please reproduce them without any changes except under special instruction from Team International BELGIUM. The pages must be reproduced and folded in order to obtain a booklet A5 (+/- 148.5 mm width x 210 mm height). When folding, make sure you keep the good numbering when you turn the pages of the I/B. Don’t change the page numbering. Keep the language integrity. Print only what is inside the frame.
39 DGR 31031- 140506
Assembly page 39/48
Fax +32 2 359 95 50
• Soulevez la volaille, en utilisant la poignée en forme de crochet, passée dans l’anneau de l’étui pour élément central, et placez l’étui autour de l’élément chauffant central, avec la volaille montée dessus. La base de la tour doit reposer sur le réceptacle à graisse.
C- UTILISER LES BROCHETTES • Pour faire des brochettes ou cuire des petites pièces de viande,
les piques à brochettes sont très pratiques. • Coupez la viande en petites pièces, marinées si désiré, et insérez
les morceaux de viande en cube / saucisses, etc. sur les piques à brochettes.
• Quand les piques sont montées avec la viande, insérez le côté court de la pique dans les trous pratiqués dans la tour, de façon à ce que les piques tiennent en position verticale.
• Mettez la tour en place autour de l’élément chauffant central, et de façon à ce qu’elle repose sur le collecteur de graisse.
UTILISATION DE LA ROTISSERIE • Mettez le couvercle en place, branchez sur la prise de courant et
appuyez sur le bouton « ON/OFF » (une seule fois). L’appareil va émettre deux bips sonores et l’écran digital clignote « 00 ». Les témoins lumineux « HIGH » (Haute) et « POULTRY » (Volaille) s’illuminent et les 4 témoins lumineux représentant les éléments chauffants s’allument également.
• Ces 4 voyants indiquent quels éléments chauffants vont fonctionner quand la rôtisserie sera en marche. Les 3 voyants extérieurs indiquent les éléments chauffants en périphérie, et le voyant au milieu indique l’élément chauffant central.
• Le bouton “Center Heater” permet de sélectionner la mise en marche ou l’arrêt de l’élément chauffant central (aussi sélectionnable quand le cycle de cuisson est déjà commencé).
• Appuyez sur le bouton “SELECT” pour choisir le type d’aliment à cuire “POULTRY” (Volaille) or “MEAT” (Viande), indiqués par les voyant lumineux correspondant “MEAT” and “POULTRY”.
• Appuyez sur les touches « + » ou « - » pour augmenter ou diminuer le temps de cuisson souhaité (le temps maximum est de 99 minutes).

�
Copies of the I/B. Please reproduce them without any changes except under special instruction from Team International BELGIUM. The pages must be reproduced and folded in order to obtain a booklet A5 (+/- 148.5 mm width x 210 mm height). When folding, make sure you keep the good numbering when you turn the pages of the I/B. Don’t change the page numbering. Keep the language integrity. Print only what is inside the frame.
40 DGR 31031- 140506
Assembly page 40/48
Fax +32 2 359 95 50
• Appuyez sur le bouton “HEAT” (Température) pour sélectionner “HIGH” (Haute) or “LOW” (basse) – voir les recommandations dans la table ci-après -. Un témoin lumineux indique le programme sélectionné. La plupart du temps, vous allez utiliser le réglage « HIGH », mais le réglage « LOW » offre des possibilités intéressantes qu’il est utile d’essayer.
• Appuyez sur « START/PAUSE », le témoin lumineux « ON » s’illumine et l’écran digital va commencer à décompter les minutes.
• Quand les éléments chauffants sont en marche, deux témoins lumineux s’illuminent tour à tour, dans un mouvement circulaire. Il est normal que les éléments chauffants à la périphérie ne fonctionnent pas tous les trois en même temps.
ATTENTION: le couvercle devient très chaud pendant la cuisson. Manipulez avec soin, et utilisez des gants ou des maniques. La rôtisserie génère de la vapeur d’eau qui peut occasionner des brulures. Penchez le couvercle en le soulevant de façon à ce que la vapeur soit dirigée loin de vous, de votre visage et de vos mains. • Vérifiez la température interne de la nourriture de façon régulière,
avec un thermomètre a viande, et ce jusqu'à la fin de la cuisson. • Lorsque le cycle de cuisson est terminé, la rôtisserie émettra deux
bips sonores, l’écran va afficher « 00 » et les éléments chauffants vont s’éteindre automatiquement. En utilisant des gants de cuisson ou des maniques, retirer soigneusement le couvercle.
• Insérez le crochet de la poignée dans l’anneau au bout de l’étui de l’élément central ou en haut du collecteur de graisse, pour soulever la nourriture (utilisez vos deux mains pour soulever de grosses volailles ou un gros rôti)
• Placez l’ensemble dans un grand plat creux. • Laissez la préparation reposer pendant 10 à 15 minutes pour des
résultats optimums. • Pour des brochettes, retirer les soigneusement de la tour, et faite
glisser la nourriture dans une assiette.

�
Copies of the I/B. Please reproduce them without any changes except under special instruction from Team International BELGIUM. The pages must be reproduced and folded in order to obtain a booklet A5 (+/- 148.5 mm width x 210 mm height). When folding, make sure you keep the good numbering when you turn the pages of the I/B. Don’t change the page numbering. Keep the language integrity. Print only what is inside the frame.
41 DGR 31031- 140506
Assembly page 41/48
Fax +32 2 359 95 50
REGLAGES RECOMMANDES Vous trouverez ci-après les réglages recommandés et des temps de cuisson indicatifs pour quelques types d’aliments:
Type de viande
Sélection Réglage de la température
Température interne
recommandée2
Temps estimé 3
Petite volaille (Entière, 1.5 à 2.5 kg) POULTRY HIGH / LOW1 82oC/180oF 15 min/livre
Volaille moyenne (Entière, 2.5 à 3.5 kg) POULTRY HIGH / LOW1 82oC/180oF 12 min/livre
Cuisses de poulet (3 pièces) POULTRY HIGH 82oC/180oF 15 min/livre
Roti de bœuf (1 à 1.5kg), saignant MEAT HIGH 60oC/140oF 18 min/livre
Roti de bœuf (1 à 1.5kg), med. rare MEAT HIGH 63oC/145oF 19 min/livre
Roti de bœuf (1 à 1.5kg), a point MEAT HIGH 70oC/160oF 20 min/livre
Roti de bœuf (1 à 1.5kg), Bien cuit MEAT HIGH 76oC/170oF 22 min/livre
Côtes de porc (4; sans os) MEAT HIGH 70oC/160oF 20 min/livre
Côtes de porc (avec os) MEAT HIGH / LOW1 70oC/160oF 30 min/livre
Roti de porc MEAT HIGH / LOW1 70oC/160oF 20 min/livre
Gigot d’agneau (1.5 – 2.5 kg) MEAT HIGH / LOW1 70oC/160oF 18 min/livre
Brochettes de bœuf MEAT HIGH 70oC/160oF 35 min
Brochettes de Fruits de mer MEAT HIGH 70oC/160oF 20 min
Brochettes de poulet POULTRY HIGH 82oC/180oF 25 min
Brochettes de saucisses MEAT HIGH 70oC/160oF 25 min
Saucisse entière, non-précuite (6) MEAT HIGH - 35 min/livre
Saucisse entière, précuite (6) MEAT HIGH - 25 min/livre
Saucisse Hot Dog (6) MEAT HIGH - 12 min
1 Cuisez d’abord sur HIGH pendant la première moitié du temps de cuisson recommandé, puis sur LOW jusqu'à ce que la volaille soit cuite. 2 Température interne de la nourriture à la fin de la cuisson, selon les directives USDFA (Services d’inspection et pour la sécurité alimentaire américains) 3 1 livre = 0.45 kg (1 kg = 2.2 livres)
NETTOYAGE ET MAINTENANCE
• Eteignez l’appareil en appuyant sur “ON/OFF” sur le panneau de contrôle. Une fois l’appareil éteint, en position OFF, débranchez de la prise murale. Laissez refroidir complètement.
• Retirez soigneusement le collecteur de graisse de l’appareil, et versez le contenu précautionneusement dans un réceptacle adapté.
• Toutes les parties amovibles sont nettoyables au lave-vaisselle ou peuvent être nettoyées à la main dans de l’eau chaude savonneuse.
• Avec le temps il est possible que l’étui de l’élément chauffant central, les brochettes, … décolorent – ceci est normal.

�
Copies of the I/B. Please reproduce them without any changes except under special instruction from Team International BELGIUM. The pages must be reproduced and folded in order to obtain a booklet A5 (+/- 148.5 mm width x 210 mm height). When folding, make sure you keep the good numbering when you turn the pages of the I/B. Don’t change the page numbering. Keep the language integrity. Print only what is inside the frame.
42 DGR 31031- 140506
Assembly page 42/48
Fax +32 2 359 95 50
• Le couvercle en verre peut être nettoyé avec un tampon/grattoir, avec un nettoyant non abrasif, pour retirer toute trace de graisse brulée. Rincez et laissez sécher.
• Pour retirer facilement des traces de nourriture cuite sur les parties nettoyables, mettez les accessoires à tremper dans de l’eau savonneuse pendant 20 à 30 minutes avant de les laver à la main.
• Passez une éponge ou un chiffon humide sur les parois intérieures de l’appareil et les éléments chauffants, en ajoutant éventuellement un peu de détergent pour la vaisselle pour retirer la graisse. Pour nettoyer des projections de graisse derrière les éléments chauffants, glissez derrière soigneusement un chiffon humide ou une éponge avec un peu de détergent. Essuyez ensuite avec un essuie-tout en papier ou un chiffon doux. N’utilisez pas de nettoyants abrasifs, sur les surfaces intérieures ni extérieures.
• Pour nettoyer des traces de nourritures cuites sur la fenêtre ou sur les surfaces intérieures, utilisez une brosse en plastique, polyester ou nylon, avec le l’eau additionnée d’un peu de détergent doux. Ne vaporisez jamais de produits nettoyants directement sur les surfaces intérieures à traiter.
• Nettoyez les traces à l’extérieur du corps de l’appareil avec un chiffon humide après chaque usage. Séchez ensuite avec un chiffon doux.
NE JAMAIS IMMERGER LE CORPS DE L’APPAREIL DANS DE L’EAU OU TOUT AUTRE LIQUIDE.

�
Copies of the I/B. Please reproduce them without any changes except under special instruction from Team International BELGIUM. The pages must be reproduced and folded in order to obtain a booklet A5 (+/- 148.5 mm width x 210 mm height). When folding, make sure you keep the good numbering when you turn the pages of the I/B. Don’t change the page numbering. Keep the language integrity. Print only what is inside the frame.
43 DGR 31031- 140506
Assembly page 43/48
Fax +32 2 359 95 50
PROBLEMES ET SOLUTIONS
La viande attache à l’étui de l’élément chauffant central. • Avez-vous pensé à huiler cette pièce avant de monter le rôti ? • Le rôti est-il très maigre ? Pensez à le laisser reposer 10 minutes
après la fin de la cuisson avant de tenter de le retirer. • Essayez de détacher la viande de la partie haute et basse de
l’étui, puis poussez l’étui par le haut hors de la pièce de viande. • S’il est toujours coincé, coupez le rôti dans le sens de la longueur
le long d’un côté entier, puis retirez l’étui. Coupez le rôti de l’autre côté de façon à obtenir 2 morceaux dans le sens de la longueur. Coupez en tranches fines pour servir.
La dinde ne rentre pas. • Quelques filets de dinde sont difficiles à mettre en place. Essayez
de les centrer autant que possible, en utilisant la tour. • Utilisez des liens et les brochettes pour maintenir les filets de dinde
en place si nécessaire. • Une volaille trop grosse peut ne pas tenir du tout Nous conseillons
de n’utiliser l’appareil qu’avec des volailles de moins de 10 lb. (4.5 kg)
• Essayez de mettre la volaille en place sans utiliser la tour.
Les rôtis et volailles ne sont pas complètement cuits • Les temps indiques dans ce manuel sont indicatifs. Augmentez le
temps de cuisson. • La minuterie n’est pas réglée convenablement. Les temps
recommandes ne doivent être suivi que comme un point de référence.
La viande est cuite à l’intérieur mais trop cuite à l’extérieur. • La viande est épaisse et demande à être cuite plus longtemps a
température plus basse. • Essayez de cuire la première moitié du temps de cuisson
recommandé à haute température (HIGH) et finissez la cuisson a basse température (LOW)

�
Copies of the I/B. Please reproduce them without any changes except under special instruction from Team International BELGIUM. The pages must be reproduced and folded in order to obtain a booklet A5 (+/- 148.5 mm width x 210 mm height). When folding, make sure you keep the good numbering when you turn the pages of the I/B. Don’t change the page numbering. Keep the language integrity. Print only what is inside the frame.
44 DGR 31031- 140506
Assembly page 44/48
Fax +32 2 359 95 50
L’appareil ne s’allume pas ou ne chauffe pas • L’appareil est-il branché ? • Vous devez régler la minuterie avant d’appuyer sur le bouton
« Start/Pause ».
Impossible de changer la minuterie / le temps affiché • Les boutons de la minuterie doivent être pressés fermement. Vous
n’avez peut-être pas appuyé assez fort ou assez longtemps. • Pour avancer la minuterie plus rapidement, pressez le bouton
d’ajustement de la minuterie pendant plus d’une seconde.
Il y a de la fumée pendant l’utilisation • Pendant la première utilisation, il est normal de voir un peu de
fumée produite par l’appareil. De la fumée résultant des projections de nourriture ou grasses est aussi parfaitement normal.
• Avez-vous essuyé l’intérieure de l’appareil après la dernière utilisation ?
• Le rôti ou la volaille touchent-ils les éléments chauffants ? Avez-vous attaché les ailes de la volaille de façon à ce qu’elles ne touchent pas les éléments chauffants ?
• Des projections grasses entrent-elles en contact avec les éléments chauffants pendant la cuisson ?
On retrouve des traces de graisse sur le plan de travail • Assurez-vous que le collecteur de graisse est bien en place.. • Pendant la cuisson, des projections peuvent couler le long des
parois et/ou hors du collecteur de graisse, vers le fond de l’appareil. De même pour des projections coulant le long de l’élément central.
• La préparation à cuire est-elle très grasse ? Il est possible que vous deviez arrêter la cuisson en cours, retirer la volaille/le rôti, et ensuite vider précautionneusement le collecteur de graisse.
• Si la préparation est laissée à refroidir dans l’appareil, de la condensation va apparaitre sur les parois et coulera le long vers le fond de l’appareil.
• Prenez soin de laisser l’appareil refroidir complètement avant de le nettoyer.

�
Copies of the I/B. Please reproduce them without any changes except under special instruction from Team International BELGIUM. The pages must be reproduced and folded in order to obtain a booklet A5 (+/- 148.5 mm width x 210 mm height). When folding, make sure you keep the good numbering when you turn the pages of the I/B. Don’t change the page numbering. Keep the language integrity. Print only what is inside the frame.
45 DGR 31031- 140506
Assembly page 45/48
Fax +32 2 359 95 50
Le rôti ne cuit pas de façon uniforme. • Avez-vous positionne le rôti de façon uniforme autour de l’étui
couvrant l’élément chauffant central ? Le rôti doit être centré vers la partie la plus haute pour cuire uniformément.
• La rôti a-t-il une forme non-conventionnelle, avec un côté plus étroit et un plus large ? Essayez de cuire le rôti sans utiliser l’élément central.
Il y a un trou au milieu du rôti • Cela est typique pour tout rôti cuit dans une rôtisserie. Dans le cas
de cet appareil, puisque l’élément central aide à cuire le rôti, le trou central va être peut être plus important et visible que dans d’autres rôtisseries. Cependant, le rôti va aussi cuire de façon beaucoup plus rapide.
• Pour minimiser le trou central, ne mettez pas l’élément chauffant central en fonction pour la cuisson. Le rôti mettra plus longtemps à cuire, mais le trou sera moins visible.

�
Copies of the I/B. Please reproduce them without any changes except under special instruction from Team International BELGIUM. The pages must be reproduced and folded in order to obtain a booklet A5 (+/- 148.5 mm width x 210 mm height). When folding, make sure you keep the good numbering when you turn the pages of the I/B. Don’t change the page numbering. Keep the language integrity. Print only what is inside the frame.
46 DGR 31031- 140506
Assembly page 46/48
Fax +32 2 359 95 50
GARANTIE
Nous vous suggérons de remplir et de nous renvoyer rapidement la Carte d’Enregistrement Produit ci-jointe afin de faciliter la vérification de la date d’achat. Cependant, le renvoi de la Carte d’Enregistrement Produit n’est pas une condition indispensable à l’application de la présente garantie. Vous pouvez aussi remplir cette carte de garantie en ligne à l’adresse suivante : www.KALORIK.com.
A compter de la date d’achat, ce produit KALORIK est garanti un an, sur le territoire des Etats-Unis, contre les défauts matériels et de fabrication. Cette garantie n’est pas transférable. Conservez la preuve d’achat originelle. Une preuve d’achat est exigée pour obtenir l’application de la garantie.
Durant cette période, le produit KALORIK qui, après inspection par KALORIK, s’avère défectueux, sera réparé ou remplacé, au choix de KALORIK, sans frais pour le consommateur. Si un produit de remplacement est envoyé, c’est la garantie restante du produit originel qui s’appliquera.
La présente garantie ne s’applique pas aux défauts dus à une mauvaise utilisation de la part de l’acheteur ou de l’utilisateur, à une négligence, au non-respect des consignes du manuel d’utilisation KALORIK, à une utilisation sur un circuit électrique au voltage différent de celui renseigné sur le produit, à une usure normale, à des modifications ou réparations non autorisées par KALORIK, ou par un usage à des fins commerciales. Il n’existe pas de garantie pour les parties en verre, récipients en verre, filtres, paniers, lames et accessoires en général. Il n’existe également pas de garantie pour les pièces perdues par l’utilisateur.
Toute garantie de valeur commerciale ou d’adaptabilité à ce produit est également limitée à la garantie d’un an.
Certains états ne limitent pas la longueur de la garantie tacite ou n’autorisent pas l’exclusion de dommages-intérêts accessoires ou indirects, les restrictions ci-dessus peuvent donc ne pas s’appliquer à vous. Cette garantie vous donne des droits légaux particuliers, et certains droits peuvent varier d’un état à l’autre.

�
Copies of the I/B. Please reproduce them without any changes except under special instruction from Team International BELGIUM. The pages must be reproduced and folded in order to obtain a booklet A5 (+/- 148.5 mm width x 210 mm height). When folding, make sure you keep the good numbering when you turn the pages of the I/B. Don’t change the page numbering. Keep the language integrity. Print only what is inside the frame.
47 DGR 31031- 140506
Assembly page 47/48
Fax +32 2 359 95 50
Si l’appareil devait présenter un défaut durant la période de garantie et plus de 30 jours après l’achat, ne ramenez pas l’appareil au magasin : souvent, notre Service Clientèle peut aider à résoudre le problème sans que le produit ne doive être réparé. Si une réparation est nécessaire, un représentant peut confirmer si le produit est sous garantie et vous rediriger vers notre centre de réparation. Le cas échéant, ramenez le produit (ou envoyez-le, dûment affranchi), ainsi qu’une preuve d’achat, en mentionnant le numéro d’autorisation de retour, indiqué par notre service clientèle, au service après-vente KALORIK agrée (visitez notre site internet www.KALORIK.com ou appelez notre département Service Clientèle pour obtenir l’adresse du service après-vente KALORIK agréé). Si vous envoyez le produit, veuillez y joindre une lettre expliquant la nature du défaut. Si vous avez des questions complémentaires, veuillez appeler notre département Service Clientèle (voyez plus bas pour les coordonnées complètes), du Lundi au Jeudi de 9h à 17h (EST) et le Vendredi de 9h à 16h (EST). Veuillez noter que les heures sont sujettes à modification. Si vous souhaitez nous écrire, adressez votre courrier à: KALORIK Consumer Service Department Team International Group of America Inc. 1400 N.W 159th Street, Suite 102 Miami Gardens, FL 33169 USA Ou appelez (Gratuitement des Etats-Unis): +1 888-521-TEAM ou +1 888-KALORIK. Seules les lettres seront acceptées à l’adresse ci-dessus. Les envois et colis n’ayant pas de numéro d’autorisation de retour seront refusés.

�
Copies of the I/B. Please reproduce them without any changes except under special instruction from Team International BELGIUM. The pages must be reproduced and folded in order to obtain a booklet A5 (+/- 148.5 mm width x 210 mm height). When folding, make sure you keep the good numbering when you turn the pages of the I/B. Don’t change the page numbering. Keep the language integrity. Print only what is inside the frame.
� Back cover page (last page)
Assembly page 48/48
Fax +32 2 359 95 50
www.KALORIK.com I/B Version 140506