version 1 - icar
TRANSCRIPT

Version 1.0

Page | 2
INDEX
Sr.No List of Content Page No. 1 ARMS Introduction 4
2 Projects 6
2.1 New Project Addition 6
2.2 Project Approval by Nodal Officer 7
2.3 Basic Information Updation 8 2.4 Co-PI Updation 9
2.5 Collaborating Institutes Updation 10
2.6 Project Monthly Progress report 11
3 Technology Developed 12
3.1 New Technology Addition 12 3.2 Patent (technology) 14
3.3 Add Commercialization (technology) 15
3.4 Add Popularization (technology) 16
3.5 Update Technology 17 4 Publication 18
4.1 New Publication Addition 18
4.2 Update Publication Entry 23
5 Capacity Building 24
5.1 Capacity Building Activities 25
5.2 Institute Building Activities 26 5.3 Teaching And FOCARS 27
5.3.1 Course designed 28
5.3.2 Course Organized 29
5.3.3 Methodology Developed 30 5.4 Teaching Activities 31
5.4.1 Course Taught 32
5.4.2 Teaching Aid Developed 33
5.4.3 Student Guided 34 5.5 Training Conducted 35
6 Peer Recognition 38
7 Final Submission 40

Page | 3
8 Reporting 42
8.1 Head Level Approval 42 9 Reviewing 44
9.1 Director Level Approval 45
9.2 ARR Score 45
9.3 Report of Priority area 46 10 Nodal officer 47
10.1 Assign Role 48
10.2 Assign Reporting Officer 49
10.3 Assign Reviewing Officer 51
10.4 Add Priority Area 53 10.5 Project Approval 54
10.6 Approved Project List 55
11 SMD Level 56
11.1 Priority Area Addition 56 11.2 Priority Assignment 57
12 Council Level 59
12.1 Assignment of National Level Priority Area 59
12.2 SMD wise Priority Area list 60

Page | 4
1. Introduction
Agricultural Research Management System (ARMS) is developed for
agricultural research management based on priority areas of research. This
will also help in mapping various scientific outputs to different schemes of
the Council. This will also help the Council of real time research assessment
and its prioritization at different levels i.e. institute, SMD and Council. Also,
this system will be used for information management and evaluation of
scientific achievements of individual scientists by the Council. Achievements
are to be uploaded in the system on monthly basis along with its
documentary evidence, if needed. The information submitted by scientists
will be duly verified either by Reporting Officer or PME In-charge or
Reviewing Officer as per type of information at various stages in a
prescribed time period. Scientists would be able to map their research
undertaking to different priorities of the Council. System has inbuilt
mechanism to calculate overall score of individual scientists after
achievements are uploaded on monthly/yearly basis as per the case may be.
The present scoring system is as per ASRB score card of a scientist (as per
present designation) without any restriction on type of activities and its
upper limit. Further, this system will be integrated to the Annual
Performance Appraisal Report (APAR) of a scientist to calculate his/her
overall score. In this system 70% weightage given for Scientific Achievement
and 30% for APAR. The scores obtained will be normalized within ARS
discipline and then rank of a scientist will be obtained at different levels.
This may be used for providing possible incentives to high performing
scientists in the Council.
All scientists will be required to enter any particular information into the
system only once, which would save the scientists’ time to provide
information many times for different requirements. System is having
provision to provide various information in report formats (Monthly
progress report Annual report material etc. of Division/ Institute/ SMD). In

Page | 5
future, information generated from this system can also be linked with
different dashboards of Government of India. So, this System would be able
to help in monitoring and management of agricultural research on real time
basis.
User has to login into the ARMS (http://arms.icar.gov.in) system using with
their ICAR email Id and password (Fig1.1). After successful login into the
system, User can enter achievements.
In the following section, detailed help has been provided for making entries
in different modules available in the developed system for benefit of the
various users. These modules can be accessed only after logging in to the
system. It may also be noted that there are various user levels available in
the system – Scientist Level, Reporting Officer Level, Reviewing Officer Level,
SMD Level and DG Level.
For any query, user can write a mail to [email protected].
Fig 1.1: Home page with user Login

Page | 6
2 - Projects
Go to the project sections by choosing Achievements → Research →
Projects to enter details related to projects (Fig 2.1).
Fig 2.1: Making entries in Project achievements Section
Following steps for Project in ARMS mentioned one by one.
2.1 New Project Addition
Users are requested to follow for making entries in the project section of the
ARMS software.
Go to the project sections by choosing Achievements → Research →
Projects → Project Addition to enter work done related to projects.
New project has to be added by Principal Investigator of that particular
project into the system. In that ‘Project Addition’ page user have to entered
some basic project details (Fig 2.2) and submit. Submitted and non-
approved project will be listed Below.
Note: System will automatically consider Principal Investigator who ever
added the project. So, PI must enter the Project Details. Submitted projects
will go for Nodal officer approval of the Institute.

Page | 7
Fig 2.2: Adding new project (by PI Only)
2.2 Project Approval by Nodal Officer
The following Fig 2.3 shows the list of projects list waiting for the nodal
officer approval.
Fig 2.3: List of Project for Approval
Click on any Project title then the page redirects to project details page with
detailed information of that project. Nodal officer can approve/reject the

Page | 8
project (Fig 2.4). Approved project started reflecting in PI account ‘project
details’ page list (Fig 2.5). Rejected projects permanently deleted from the
system.
Fig 2.4: Project Approval Page
2.3 Basic Information Updation.
Note: Only PI of the project is able to add project basic information details,
add/update Co-PI and collaborating institutes (Fig 2.5).
Fig 2.5: Project Details Page
In Project details page Click on the project title to redirect to ‘project basic
information page. Click edit button to update project basic information
details like start date, end date, project completion details, extension of the
project details etc... (Fig 2.6)

Page | 9
Fig 2.6: Add additional project basic information
2.4 Co-PI Updation.
In Project details page click on the Add Co-PI to add/delete/update Co-PIs of
the projects one by one in ‘Co-PI Updation’ page (Fig 2.7).

Page | 10
Fig 2.7: Add Co-PI page
User can update or delete the Co-PI from here and can also change expert
status of a Co-PI.
2.5 Collaborating Institute Updation
In project details page under collaborating institute column link (assign) will
available at PI of the project. Click the assign, then page will redirect to
collaborative institute page (Fig 2.8).
Fig 2.8: Assign Institute Page

Page | 11
Select the institute name from the left list box and click on the right arrow
button to add that institute and vice versa for deleting the institute from
right list box
2.6 Project Monthly Progress Report
Add monthly project achievement by clicking on the achievements link
(refer to the Fig 2.9). Only PI of the project can add monthly
achievement.
Fig 2.9: Adding Achievements

Page | 12
3- Technology
Go to the Technology sections by choosing Achievements → Research →
Technology to enter work done related to Technology.
This form is divided into following steps based upon user’s selection on the
initial form.
• Basic Information about the technology developed
• Add Contributors
• Patents
• Commercialized
• Popularized
3.1 New Entry in Technology
Fig 3.1: Select Technology
• Click on the New Entry Menu shown in the Fig 3.1 to add new
technology developed.
• After clicking on that link, a form will be loaded as shown in the Fig 3.2
where basic information about the technology can be enter.

Page | 13
Fig 3.2: Add Basic Technology information
• User need to fill basic information about the technology developed
along with proof in pdf format.
• There are three radio buttons in the form 1) Patent 2) Commercialized
3) Popularized and their respective page will be loaded depending on
the selection. For example, if user select No in Patent then there will
be no provision for filling up the patent’s details and this is same for
other two options. After filling up the form, click the save & next
button.
• After added basic information clicking on the save & next button then
redirect to add contributor’s page.

Page | 14
• Contributors can be added through their ICAR email Id and then user
can select the type -Principal Investigator or Co- Principal Investigator.
Fig 3.3: Add Contributors
• After adding the contributors, click on the Save & Next button to
continue. Save & Next button will appear in case technology has
patent/commercialized/popularized. Else submit button will appear.
3.1.1 Patent Form (Technology)
• Fill the basic details about the patent and provide proof in pdf format
or patent URL. One of them is compulsory either user provide pdf or
URL
• After filling up the form click on the Save & Next/Submit button to
continue.

Page | 15
Fig 3.4: Add Patent Information
3.1.2 Commercialized Form (Technology)
Fig 3.5: Technology commercialized
• If technology’s revenue to the organization is in the range of 5 to 10
lakhs, select first radio button and if revenue is greater than 10 lakhs
then select second radio button and then select year of
commercialized as showed in Fig 3.5.
• After filling up all the details, click on Save & Next button to proceed.

Page | 16
3.1.3 Popularized Form (Technology)
Fig 3.6: Technology Popularized
• After completing the Popularized Form click on the Submit button to
submit data.
• Uploaded information can be updated by clicking on the update entry
link which is in the technology dropdown.

Page | 17
3.2 Update Technology entry
• After clicking on the update entry link, user will be redirected to the
page shown below. On this page user will be able to see all the
entered information.
• Click on the heading to see detailed information.
Fig 3.7: Update Technology
• Click on Update to update the information.

Page | 18
4- Publication
Go to the publication module by choosing Achievements → Publication to
enter work done related to publication. Publication part is synchronized
with KRISHI Portal.
Fig 4.1: Publications Menu
4.1 - Enter New Publication
Step 1
• Select the type of publication form Publication Type dropdown field.
Please upload entire publication in pdf format or specify the DOI.
• Use keyword in coma separated format like (dbms, datatable).
• In date field year is required field, user can select only year and click
next to proceed.
• Next forms will be based on the selection of publication type
dropdown in this page. For example, if research paper is selected, next
form will have provision to add more details about research paper and
this will be same for all publication types.

Page | 19
Fig 4.2: Publication page

Page | 20
Step 2
In Research Paper there are three journal options -
o NAAS Rated
o Thomson Reuters and
o Others
If NAAS Rated is selected then NAAS rating and ISSN will be filled
automatically on selection of journal name.
For Thomson Reuters, Impact factor of the journal needs to be entered.
Note: Please enter only Impact factor of the journal. System will be
converting it with NAAS rating conversion formula that is 6+Impact Factor.
Fig 4.3: Add research paper information

Page | 21
Step 3
• First author and corresponding author types can be added by selecting
the author type from the dropdown. Multiple corresponding authors can
be added. Order can be re-arranged by clicking up/down arrow in the list.
• ICAR authors added by entering ICAR email. For others authors, name
and Institute information has to be entered.
Fig 4.4: Add Authors
Step 4
• This is last step and on this page all the entries made will be shown. Fields
not filled or not relevant to the selected publication type will have a value
“Not Available”.
• There are two fields in this form Access Rights and Embargo. In Access
rights fields user can select who can access their publication. In embargo
there are two radio buttons “Allow access Rated” and “Embargo with
specific date”. In first option “Allow access Rated” user’s publication will
be available to public immediately after the submission and if user want
their publication available to public after some specific date select
“Embargo with specific date” option and enter that date.

Page | 22
NOTE - There are two option on this page
1- Submit
In this option data will be saved in the ARMS database and it will not go
to the Krishi Repository and later user can modify and delete the entry.
2- Submit and send to Krishi Repository
To enable that option, User have to grant Krishi Distribution License. By
default, its checked. After clicking on that button data will be saved in the
ARMS database and the publication entered will be send to the Krishi
Repository and user cannot delete or modify that entry later.

Page | 23
4.2- Update Publication Entry
• User can update the details filled earlier. Click on ‘Update entry’ link
redirect to publication details updates page (Fig 4.5).
• Entries made can also be deleted by clicking on the delete button.
• If the publication data has been sent to the Krishi Repository then that
entry can neither be deleted nor modified.
Fig 4.5: Update Publications

Page | 24
5- Capacity Building
Go to the Capacity Building sections by choosing Achievements → Capacity
Building to enter work done related to Capacity Building.
Fig 5.1: Menu
Capacity building is further divided into the following parts
1- Capacity building
2- Institute Building
3- Teaching and Focars
4- Teaching
5- Training

Page | 25
5.1- Capacity Building
Fig 5.2: Capacity Building
• Select Capacity building type from the drop down, activity name, start
date and end date. Start date should be less than the end date.
• In Description user can add only 250 words for each activity.
• Entries entered will be displayed in the table underneath the form.

Page | 26
5.2- Institute Building
Fig 5.3: Institute Building
• Select Role in Organization from the drop down, activity name, start
date and end date. Start date should be less than the end date.
• End Date is not compulsory.
• In Description user can add only 250 words for each Institute building
activity.
• Entries entered will be displayed in the table underneath the form.

Page | 27
5.3- Teaching and Focars
Fig 5.4: Teaching and FOCARS Menu
This is further divided into 3 parts.
1- Course Designed
2- Course Organized
3- Methodology Developed

Page | 28
5.3.1 Course Designed
Fig 5.5: Course Designed
• To enter the course designed, fill up the complete form (Course Title,
Abstract, Year, Batch no.).
• After filling up all the details click on Submit button to save the data.
• All the entries made will be shown in the table underneath the form.
• All the entries made can be edited or Deleted.

Page | 29
5.3.2 Course Organized
Fig 5.6: Course Organized
• To enter the course Organized, fill up the complete form (Course Title,
Abstract, start date, end date, Batch no.).
• Start date should be less then End date.
• After filling up all the details click on Submit button to save the data.
• All the entries made will be shown in the table underneath the form.
• All the entries made can be edited or Deleted.

Page | 30
5.3.3 Methodology Developed Addition
Fig 5.7: Methodology Developed
• To enter the Methodology Developed, fill up the complete form
(Method Type, Year, Batch no., Method Name).
• Start date should be less then End date.
• After filling up all the details click on Submit button to save the data.
• All the entries made will be shown in the table underneath the form.
• All the entries made can be edited or Deleted.

Page | 31
5.4- Teaching Activities
Fig 5.8: Teaching Menu
This is further divided into 3 parts.
1- Course Taught
2- Teaching Aid Developed
3- Student Guided

Page | 32
5.4.1 Course Taught
Fig 5.9: Teaching Activity
• To enter the Course Taught, fill up the complete form.
• Both fields in Credit Hour should be in Number.
• After filling up all the details click on Submit button to save the data.
• All the entries made will be shown in the table underneath the form.
• All the entries made can be edited or Deleted.

Page | 33
5.4.2 Teaching Aid Developed
Fig 5.10: Teaching Aid Developed
• To enter the Teaching Aid Developed, fill up the complete form.
• Document uploaded should be pdf format.
• After filling up all the details click on Submit button to save the data.
• All the entries made will be shown in the table underneath the form.
• All the entries made can be edited or Deleted.

Page | 34
5.4.3 Student Guided
Fig 5.11: Student Guided
• To enter the Student Guided, fill up the complete form.
• Document uploaded should be pdf format.
• After filling up all the details click on Submit button to save the data.
• All the entries made will be shown in the table underneath the form.
• All the entries made can be edited or Deleted.

Page | 35
5.5 Training Conducted
Fig 5.12: Training Menu
• To enter the training organized, fill up the complete form as shown in
Fig 5.13.
• Document uploaded should be pdf format.
• The Start date should be less than the end date.
• All the entries made will be shown in the table underneath the form.
• All the entries made can be edited or deleted.

Page | 36
Fig 5.13: Training form
• After filling up the entire details click on Next button to save the data
and proceed to the next screen to add contributors as shown in Fig
5.14.
• Enter ICAR email of contributor and type and then add.

Page | 37
Fig 5.14: Add Training (Organizer)

Page | 38
6- Peer Recognition Addition
Go to the Peer Recognition sections by choosing Achievements → Peer
Recognition to enter work done related to Peer Recognition.
Fig 6.1: Peer Recognition Menu
• To enter peer recognition, fill up the complete form as shown in Fig
6.2.
• After filling up all the details click on Submit button to save the data.
• All the entries made will be shown in the table underneath the form.
• All the entries made can be edited or Deleted.

Page | 39
Fig 6.2: Add Peer Recognition

Page | 40
7- Final Submission
Go to the Final Submission sections by choosing Achievements → Final
Submission to submit work done on monthly basis.
Fig 7.1: Final Submission Menu
• User can click on the plus icon shown in Fig 7.2. to see the detailed
information of that module.
• Select the year and month name from the drop down and click on the
submit button.
• After that user’s monthly data will be submitted to Reporting Officer
for approval.

Page | 41
Fig 7.2: Final Submission

Page | 42
8- Reporting
Go to the Reporting Menu → Head Level Approval as shown in the Fig: 8.1.
Reporting Officer Level Report will come under this menu.
Fig 8.1: Menu for reporting officer
8.1 Head Level Approval
o First Reporting officer have to select the period and then select
scientist name from the dropdown as shown in the Fig: 8.2.
o After selecting both the valid options, click on search button to view
that scientist’s data. All the data submitted by the scientist will be
shown below.

Page | 43
Fig 8.2: Approval Page
Note-If the Scientist have not submitted his/her name will appear in red
color and else it will be in green color.
• Reporting officers can approve or disapprove the submission made
by the scientist. On Rejecting the submission, reporting officer have
to write the rejection reason in comment section. On
rejection/approval, an e-mail will be sent to the scientist.

Page | 44
9- Reviewing
Go to the Reviewing Menu → Director Level Approval as shown in the Fig:
9.1.
Fig 9.1: Reviewing officer’s Menu
Fig 9.2: Reviewing Officer Approval

Page | 45
9.1 Director Level Approvals
• First Reviewing officer have to select the period and then the
scientist name from the dropdown as shown in the Fig: 9.2.
Note-If the Scientist have not submitted data, his/her name will appear
in red color and else it will be in green color.
• After selecting both the valid options click on search button to view
that scientist data. All the data submitted by the scientist will be
shown below.
• Reviewing officers can approve or disapprove the submission made
the scientist. On Rejecting the submission Reviewing officer have to
write the rejection reason in comment section. On rejection, an e-
mail will be sent to the scientist with the reason attached.
9.2 AAR Score
Go to the Reviewing Menu for approving after logging in as shown in the Fig:
9.1.
Reviewing officer able to add AAR for each and every scientist of the
institute as shown in Fig 9.3.
AAR Score will be given for each scientist on yearly basis. In the month of
May or June.

Page | 46
Fig 9.3: Assign AAR
Note-If the Director/reviewing officer has not given AAR Score then
scientist name will appear in red color and else in green color.
9.3 Priority Area List
National Priority area assigned to the particular institute and Nodal
officer added institute/Regional priority area will listed to Director of
institute

Page | 47
10- Nodal Officer
Fig 10.1: Menu for Nodal Officer
There are following options in Nodal officer Menu:
• Assign Role
• Assign Reporting Officer
• Assign Reviewing Officer
• Add Priority Area
• Project Approval
• Approved Project List

Page | 48
10.1 Assign Role
For Assigning role go to Nodal Officers → Assign Role as shown in the Fig
10.1.
Nodal officer can change the role individual by the user level from
dropdown as show in the Fig 10.2.
Fig 10.2: Assign Role
Click on the edit button and the select the level from the dropdown and
then update.

Page | 49
10.2 Assign Reporting Officer
For Assigning reporting officer go to Nodal Officers → Assign Reporting
Officer as shown in the Fig 10.1.
Fig 10.3: Assign Reporting officer

Page | 50
• Select the Reporting officers from the drop down and then click on
show button as shown in the Fig 10.3.
• After clicking on the show button all the scientist available will be
available in the left list box and already selected scientist in the right
list box.
• For assigning reporting officer select the scientist from the scientist
available list box and then click on the right arrow.
• For removing scientist select the scientist from the selected scientist
and the click right arrow.
• After performing all the operation click on the submit button.
Note: Incase reporting officer from different institute then change
institute and assign accordingly.

Page | 51
10.3 Assign Reviewing Officers
For Assigning reviewing officer go to Nodal Officers → Assign Reviewing
Officer as shown in the Fig 10.1.
Figure 10.4: Assign reviewing officer

Page | 52
• Select the Reviewing officers from the drop down and then click on
show button as shown in the Fig 10.4.
• After clicking on the show button all the scientist available will be
available in the left list box and already selected scientist in the right
list box.
• For assigning Reviewing officer select the scientist from the scientist
available list box and then click on the right arrow.
• For removing scientist select the scientist from the selected scientist
and the click right arrow.
• After performing all the operation click on the submit button.
Note: Incase Reviewing officer from different institute then change institute
and assign accordingly.

Page | 53
10.4 Add Priority Area
• For adding priority area go to Nodal Officers → Add Priority Area as
shown in the Fig 10.1.
• Priority Area can be added by selecting priority type from the
dropdown and then write priority area in the textbox and then click on
the submit button (Fig 10.5).
• Submitted priority area go for SMD approval.
• Earlier added priority will be shown in the table below and they can be
updated clicking on update button.
Fig 10.5: Priority area addition

Page | 54
10.4 Project Approval
• For Project Approval go to Nodal Officers → Project Approval as
shown in the Fig below. Here all the projects waiting for approval are
listed here.
• Click on any Project title then the page redirects to project details
page with detailed information of that project. Nodal officer can
approve/reject the project (Fig 10.7). Approved project started
reflecting in PI account ‘project details’ page list (Fig 2.5). Rejected
projects permanently deleted from the system.
Fig 10.6: List of Projects waiting for Approval
Fig 10.7: Accept or Reject Project

Page | 55
10.5 Approved Project List
For Approved Project List go to Nodal Officers → Approved Project List as
shown in the Fig 10.1. List of all the approved ongoing projects shown in Fig
10.8
Fig 10.8: List of approved projects

Page | 56
11- SMD level
After login user will be redirected to this page. And in the menu navigation
bar there are two options available.
1- Priority Area Addition for Research
2- Priority Assignment
11.1 Priority Area Addition SMDs can add Priority area here. Select DDG → Priority Area Addition.
Fig 11.1: Priority area addition
Select priority type and enter priority area then click submit. National priority
adde at SMD level as shown in Fig 11.1.

Page | 57
11.2 Priority Assignment
Assignment of National level priority area to Institutes. Approve institute
level priority area added by Nodal officers of the institutes.
National
In this tab user can see the priority type and priority area assigned by the
Council.
Fig 11.2: Priority Area
Priority area column in the table is hyperlink and user can click on that to
assign and remove the institute name as shown in Fig 11.2.
After clicking on that hyperlink, user will be redirected to this page which
contains the list of institutes which can be assigned to that priority area.
User can add and remove institute by clicking on the arrow buttons and
finally clicking on the Submit button to save the data.

Page | 58
Fig 11.3: Assign Research area to institute
Regional/Institute
o In this tab SMD see all the reginal and institute priorities added by the
institutes along with the institute name. List is sorted in such way that
the priority with pending status will always come the top.
o SMD can approve and decline the priority area and same will be
reflected in the institute’s nodal officer dashboard.
o SMD can see the all the projects under that priority area.
Fig 11.4: Priority Area
Page | 59
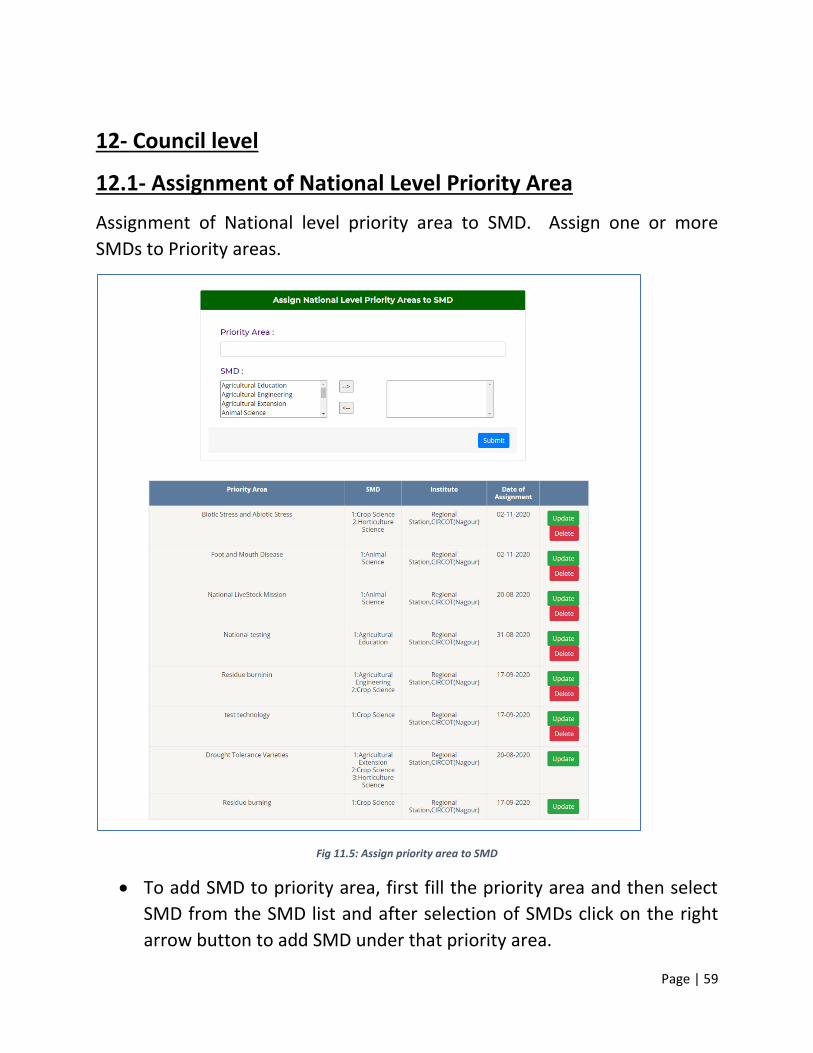
12- Council level
12.1- Assignment of National Level Priority Area
Assignment of National level priority area to SMD. Assign one or more
SMDs to Priority areas.
Fig 11.5: Assign priority area to SMD
• To add SMD to priority area, first fill the priority area and then select
SMD from the SMD list and after selection of SMDs click on the right
arrow button to add SMD under that priority area.

Page | 60
• And if user want to delete SMD from priority area, click on the left
arrow button.
• All the entries can be Updated or deleted.
• In the table underneath the form, Institute name, SMDs can be seen
under that priority area.
12.2- SMD wise Priority Area list
Fig 11.6: SMD
• On this page Council can see all the priority areas assigned to different
SMDs as shown in the Fig 11.6.
• User can see SMD priority area by selecting SMD from the dropdown.
For any query, user can write a mail to [email protected].