vendor customer creation and maintenance - … creation document the vendor/customer creation (vcc)...
TRANSCRIPT
Vendor Customer
Creation and Maintenance
Training Guide Version 4.0
AFIS | Vendor Customer
1
Table of Contents
About This Training Guide ..................................................................................................... 3
Training Guide Description .................................................................................................................... 3
Training Guide Objectives ..................................................................................................................... 3
1. Vendors and Customers Overview .................................................................................. 4
1.1. Vendor/Customer Structure Overview ....................................................................................... 4
1.2. Vendor Customer Table .............................................................................................................. 5
1.3. Customer Account Structure ...................................................................................................... 8
2. Create a New Vendor/Customer Record ........................................................................ 11
2.1. Vendor/Customer Creation Document .................................................................................... 11
2.2. Vendor Customer Creation Document Components ............................................................... 12
2.3. Vendor Customer Creation Document Data Entry ................................................................... 17
2.4. Create a New Vendor/Customer Record .................................................................................. 22
2.5. Create a Miscellaneous Vendor/Customer Record .................................................................. 32
2.6. Addition of Vendors from ProcureAZ ....................................................................................... 32
2.7. Research Updates ..................................................................................................................... 33
3. Modify an Existing Vendor/Customer Record ................................................................ 35
3.1. Vendor/Customer Modification Document.............................................................................. 35
3.2. Vendor Customer Modification Document Components ......................................................... 37
3.3. Vendor Customer Modification Document Data Entry ............................................................ 44
3.4. Modify a Vendor/Customer Record ......................................................................................... 50
3.5. Modification of Vendors from ProcureAZ ................................................................................ 53
3.6. Research a Vendor/Customer Record ...................................................................................... 53
4. Vendor Hold and Customer Dispute Tracking ................................................................ 56
4.1. Vendor Hold Process................................................................................................................. 56
4.2. Customer Dispute Tracking ....................................................................................................... 57
5. Vendor ACH Data .......................................................................................................... 58
5.1. Identify Vendor ACH/EFT Data ................................................................................................. 58
5.2. Verify ACH/EFT Information ..................................................................................................... 59
Appendix ............................................................................................................................. 61
Terminology ........................................................................................................................................ 61
AFIS | Vendor Customer
2
List of Acronyms .................................................................................................................................. 62
AFIS | Vendor Customer
3
About This Training Guide
TRAINING GUIDE DESCRIPTION
This training guide examines how AFIS users create and maintain Vendor/Customer records and use the
various tables in AFIS to store these records. Users will use documents to create and modify
Vendor/Customer records as well as review the tables that are updated by these documents.
TRAINING GUIDE OBJECTIVES
In this training guide, you will:
Create and modify Vendor/Customer records
Look up vendor information in tables and documents

AFIS | Vendor Customer
4
1. Vendors and Customers Overview
Learning Objectives
In this lesson, you will:
Examine the structure of vendor and customer accounts in AFIS
Examine the tables used to maintain vendor and customer accounts in AFIS
Lesson Overview
In order for the State of Arizona to conduct business with a specific vendor or customer, the vendor or
customer must be active and approved in the AFIS Vendor/Customer (VCUST) table. One person or
business entity may serve as both a vendor and a customer to the State of Arizona, and the
management of both types of records is done using Vendor/Customer Creation and Modification based
documents.
1.1. Vendor/Customer Structure Overview
In AFIS, the same tables and documents are used to manage both vendors and customers. AFIS supports
both centralized and decentralized maintenance of vendor and customer records. The key types of
information captured in the AFIS Vendor/Customer data model are:
Legal name/DBA
1099 tax information
Address information (Payment, Ordering, Billing, etc.)
Default disbursement options
ACH information (vendor and address level)
Prevent new spending control by Department
Business Type information
The creation of Vendor/Customer records on the Vendor/Customer table is done using the
Vendor/Customer Creation (VCC) based document codes listed below:
VCCD1 – Vendor/Customer Creation – Departments
VCCPZ1 – Vendor/Customer Creation – ProcureAZ
VCCG1 – Vendor/Customer Creation – GAO
VCCE1 – Vendor/Customer Creation – EFT
The modification of Vendor/Customer records on the Vendor/Customer table is done using the
Vendor/Customer Modification (VCM) based document codes listed below:
AFIS | Vendor Customer
5
VCMD1 – Vendor/Customer Modification – Departments
VCMPZ1 – Vendor/Customer Modification – ProcureAZ
VCMG1 – Vendor/Customer Modification – GAO
VCME1 – Vendor/Customer Modification – EFT
For customer records, both the VCC and VCM based documents may be used to relate the record to a
one Billing Profile, to create a customer account. Billing Profiles are established by Departments on the
Billing Profile (BPRO) table. Departments may require multiple Billing Profiles, and a single customer
record may have multiple Billing Profiles associated with it either within a single Department and/or
across multiple Departments. If more than one billing profile needs to be associated with a customer
record, or the customer account information was not provided on the VCC or VCM documents, it is
possible to establish the customer account directly on the Customer Account (CACT) table, by inserting a
new record.
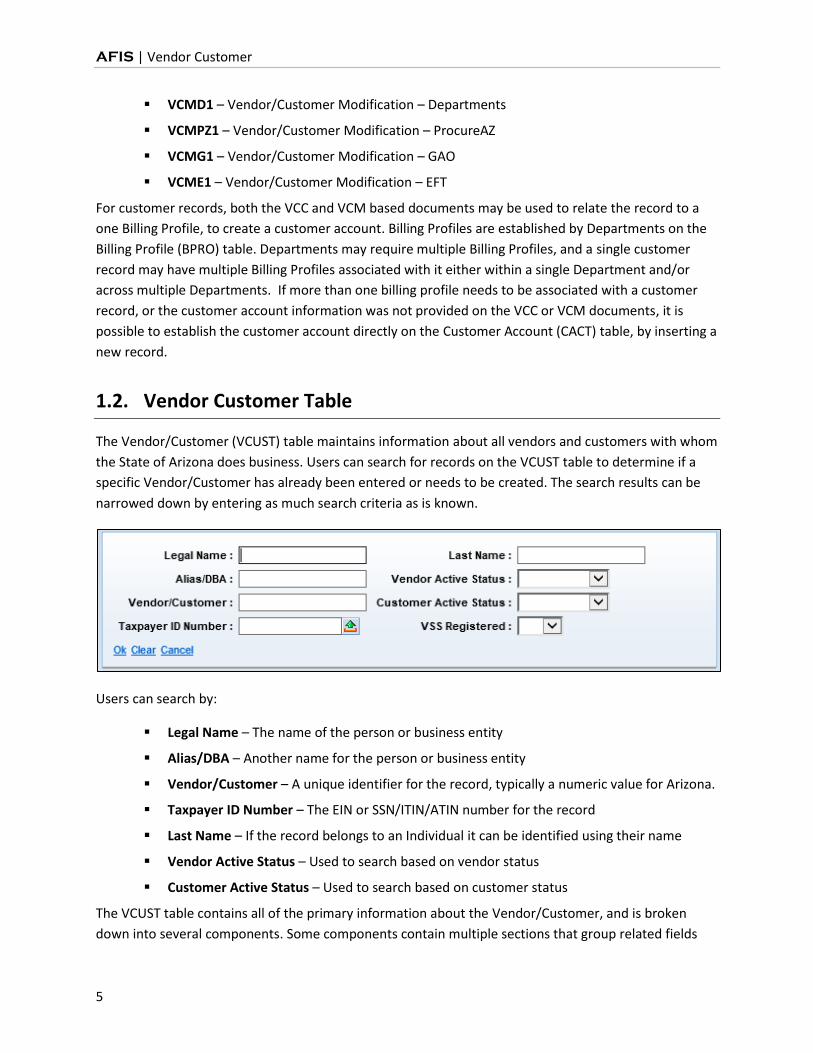
1.2. Vendor Customer Table
The Vendor/Customer (VCUST) table maintains information about all vendors and customers with whom
the State of Arizona does business. Users can search for records on the VCUST table to determine if a
specific Vendor/Customer has already been entered or needs to be created. The search results can be
narrowed down by entering as much search criteria as is known.
Users can search by:
Legal Name – The name of the person or business entity
Alias/DBA – Another name for the person or business entity
Vendor/Customer – A unique identifier for the record, typically a numeric value for Arizona.
Taxpayer ID Number – The EIN or SSN/ITIN/ATIN number for the record
Last Name – If the record belongs to an Individual it can be identified using their name
Vendor Active Status – Used to search based on vendor status
Customer Active Status – Used to search based on customer status
The VCUST table contains all of the primary information about the Vendor/Customer, and is broken
down into several components. Some components contain multiple sections that group related fields
AFIS | Vendor Customer
6
into an organized structure. Each component and section can be accessed using the Secondary
Navigation Panel for the VCUST table. Within the table’s components and sections, certain fields are
only active based on the information contained in other fields in the table. All of the information
contained for a record on the VCUST can be added to or modified by using the VCC and VCM based
documents by authorized users. (Most information can be added de-centrally; some information is only
maintained centrally.)
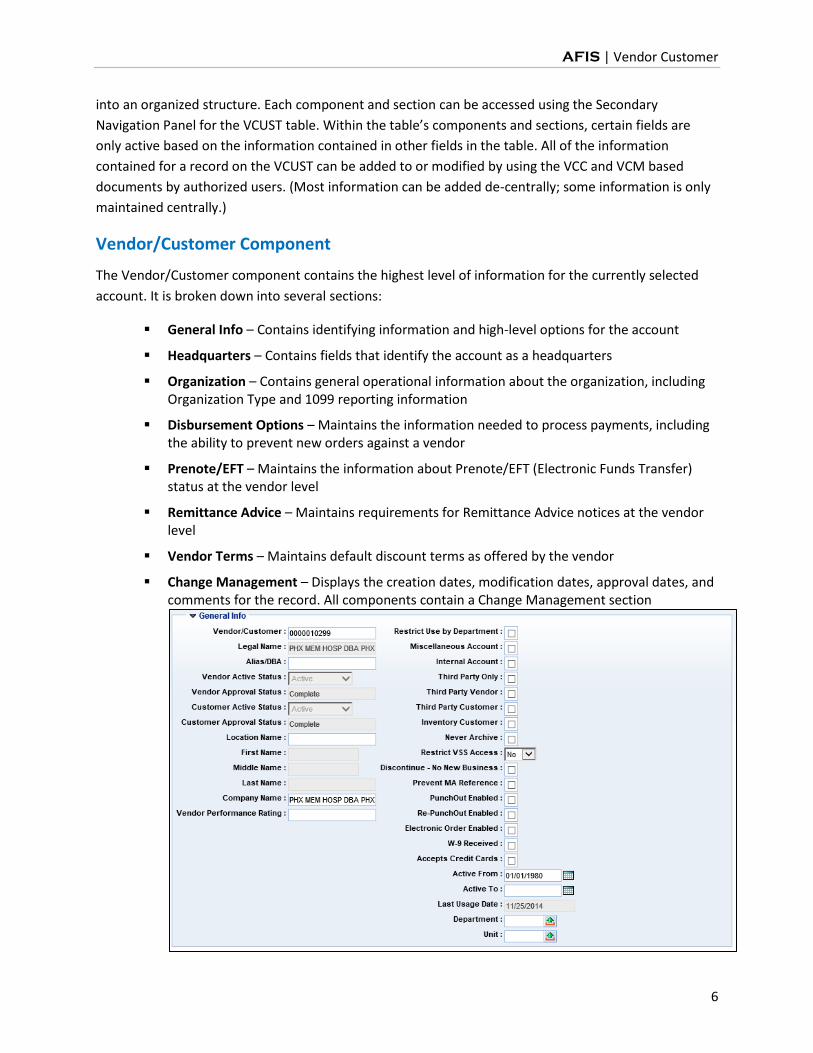
Vendor/Customer Component
The Vendor/Customer component contains the highest level of information for the currently selected
account. It is broken down into several sections:
General Info – Contains identifying information and high-level options for the account
Headquarters – Contains fields that identify the account as a headquarters
Organization – Contains general operational information about the organization, including Organization Type and 1099 reporting information
Disbursement Options – Maintains the information needed to process payments, including the ability to prevent new orders against a vendor
Prenote/EFT – Maintains the information about Prenote/EFT (Electronic Funds Transfer) status at the vendor level
Remittance Advice – Maintains requirements for Remittance Advice notices at the vendor level
Vendor Terms – Maintains default discount terms as offered by the vendor
Change Management – Displays the creation dates, modification dates, approval dates, and comments for the record. All components contain a Change Management section
AFIS | Vendor Customer
7
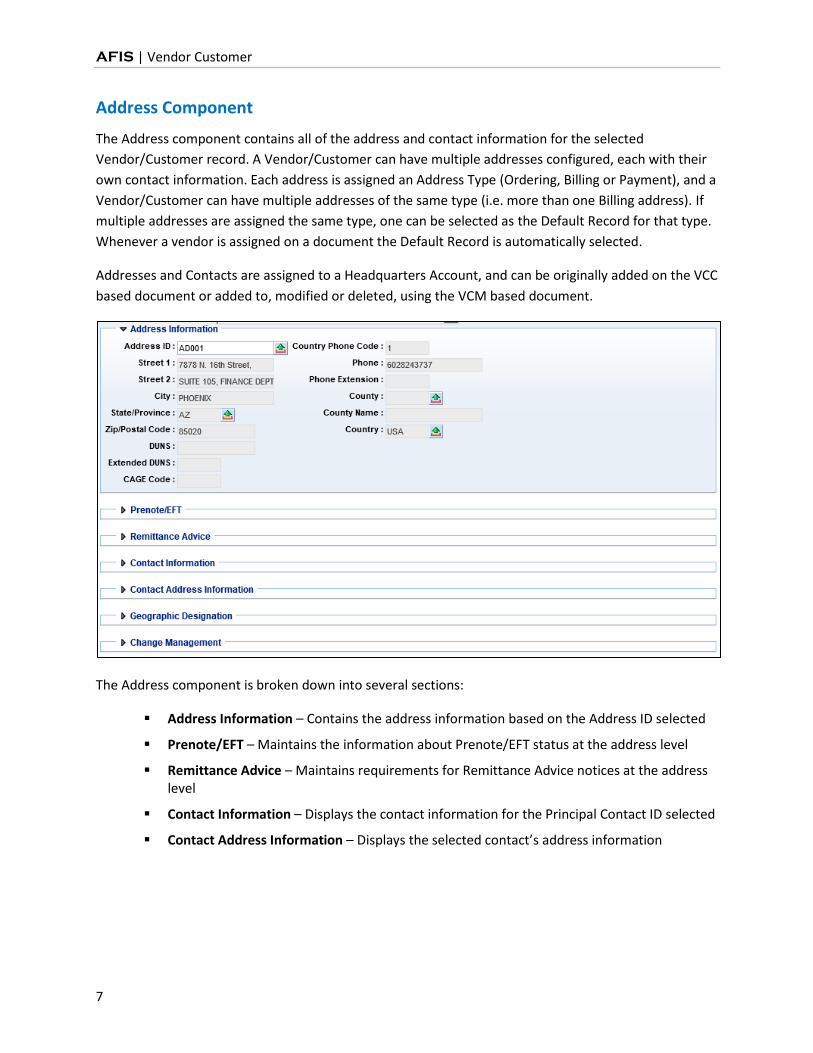
Address Component
The Address component contains all of the address and contact information for the selected
Vendor/Customer record. A Vendor/Customer can have multiple addresses configured, each with their
own contact information. Each address is assigned an Address Type (Ordering, Billing or Payment), and a
Vendor/Customer can have multiple addresses of the same type (i.e. more than one Billing address). If
multiple addresses are assigned the same type, one can be selected as the Default Record for that type.
Whenever a vendor is assigned on a document the Default Record is automatically selected.
Addresses and Contacts are assigned to a Headquarters Account, and can be originally added on the VCC
based document or added to, modified or deleted, using the VCM based document.
The Address component is broken down into several sections:
Address Information – Contains the address information based on the Address ID selected
Prenote/EFT – Maintains the information about Prenote/EFT status at the address level
Remittance Advice – Maintains requirements for Remittance Advice notices at the address level
Contact Information – Displays the contact information for the Principal Contact ID selected
Contact Address Information – Displays the selected contact’s address information

AFIS | Vendor Customer
8
Other Components
The other components in the VCUST table contain additional information for the currently selected
record.
Business Type – Maintains a list of the Business Types that apply to a vendor, including their Small and Minority-Owned status
Service Area – Maintains a list of the service areas or territories that apply to a vendor
Commodity – Maintains a list of the commodities supplied by the vendor
Authorized Department – Establishes a list of Departments that are authorized to use the Vendor/Customer
Prevent Spending – Establishes a list of Departments that are prohibited from ordering from the vendor
Certification – Displays the Active and Approved status for the Vendor/Customer
1.3. Customer Account Structure
Customers are individuals or business entities that purchase goods or services from the State of Arizona.
Customer Accounts are determined by the combination of a Customer (Vendor/Customer) code and a
Billing Profile code. Customer records are created and added to the VCUST table by using the VCC based
documents. If a Customer record has already been created, a Customer Account can either created by
using a VCM based document or through a direct update to the Customer Account Options (CACT) table.
AFIS | Vendor Customer
9
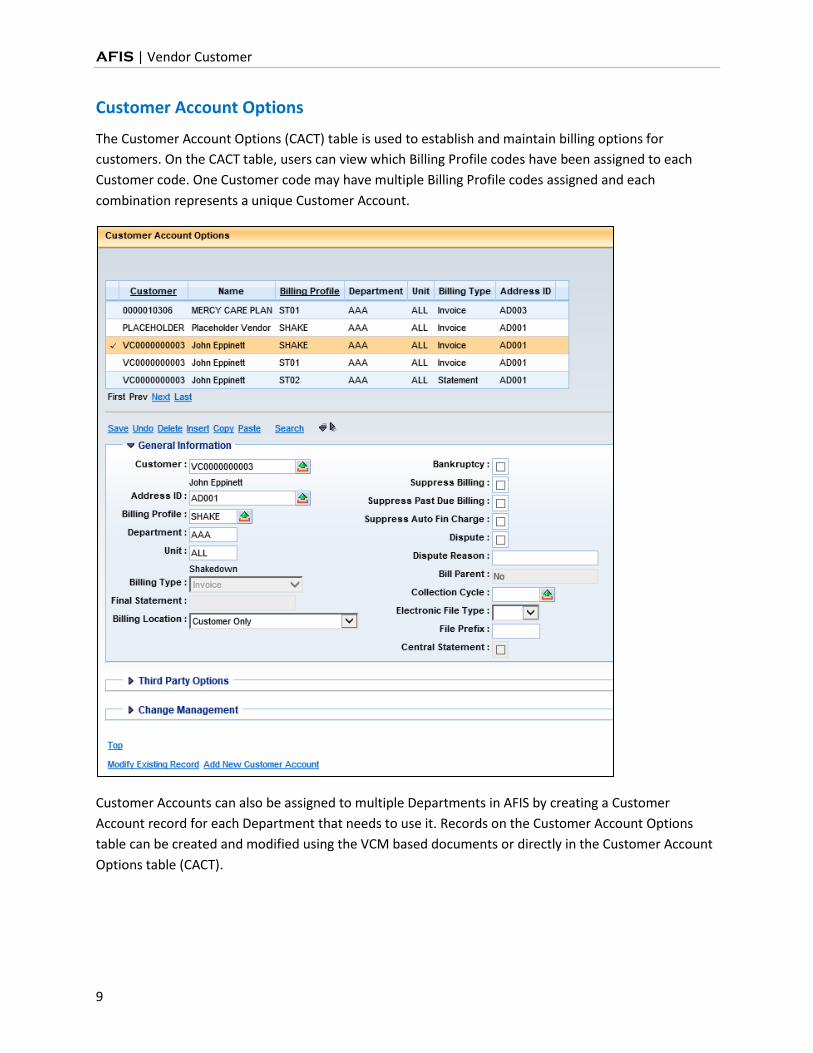
Customer Account Options
The Customer Account Options (CACT) table is used to establish and maintain billing options for
customers. On the CACT table, users can view which Billing Profile codes have been assigned to each
Customer code. One Customer code may have multiple Billing Profile codes assigned and each
combination represents a unique Customer Account.
Customer Accounts can also be assigned to multiple Departments in AFIS by creating a Customer
Account record for each Department that needs to use it. Records on the Customer Account Options
table can be created and modified using the VCM based documents or directly in the Customer Account
Options table (CACT).

AFIS | Vendor Customer
10
Customer Account Information
The Customer Account Information (CUSTA) query page is used to view balance information for
Customer Accounts. Documents that reference a Customer Account by using a combination of the
Customer code and Billing Profile update the balance information for that account on the CUSTA page.
AFIS | Vendor Customer
11
2. Create a New Vendor/Customer Record
Learning Objectives
In this lesson, you will:
Examine the components of the Vendor/Customer Creation document
Review the data entry requirements for the Vendor/Customer Creation document
Create a Vendor/Customer Creation document
Examine the process of using a Miscellaneous Vendor/Customer account
Research the updates made to the Vendor/Customer table by the Vendor/Customer Creation document
Lesson Overview
A Vendor Customer Creation (VCC) based document is used to create both new vendors and new
customers. In AFIS, a vendor can also be a customer. The Vendor Customer (VCUST) table stores all of
the information for both vendors and customers. This lesson examines the VCC based document
components and data entry process.
2.1. Vendor/Customer Creation Document
The Vendor/Customer Creation (VCC) based documents allow users to add new records to the
Vendor/Customer (VCUST) table, the 1099 Reporting Information (1099I) table, and the Customer
Account Options (CACT) table. Only one Vendor/Customer record can be entered per document.
Vendor/Customer Creation documents cannot reference any other document in AFIS, nor can they be
referenced by any other document in AFIS.
Vendor/Customer Creation (VCCD1) documents that are created by Departments are routed to
workflow for approval at the department level and at the GAO level before being submitted to Final.
Once a VCC based document has been submitted to Final it cannot be modified or cancelled. Changes at
that point require the creation and submission of a Vendor/Customer Modification (VCM) based
document.
New records can be created for individuals or business entities that are only a Customer, only a Vendor,
or both a Customer and Vendor. Depending on the entity’s relationship to the State, the data entry
requirements on the VCC based document vary in several important ways. For example, Ordering and
Payment address types are used for Vendor records, while Billing address types are used for Customer
records.
AFIS | Vendor Customer
12
Miscellaneous and Internal Vendor/Customer Accounts
A Miscellaneous Account does not represent a specific vendor or customer. The Miscellaneous Account
can be used to create a document to record a one-time transaction. Selecting an existing
Vendor/Customer code will infer the name and address information to a document. When a
Miscellaneous Account is referenced, the name and address information has to be manually entered.
Both the Miscellaneous Account and Internal Account check boxes are located on the Vendor/Customer
Creation (VCC) based document, in the Vendor/Customer component, on the Account Indicators tab.
2.2. Vendor Customer Creation Document Components
The Vendor Customer Creation (VCC) based document has many components, or sections, that relay
detailed information to the Vendor Customer (VCUST) table. Some components are only used when
creating a vendor, and other components are only used when creating a customer.
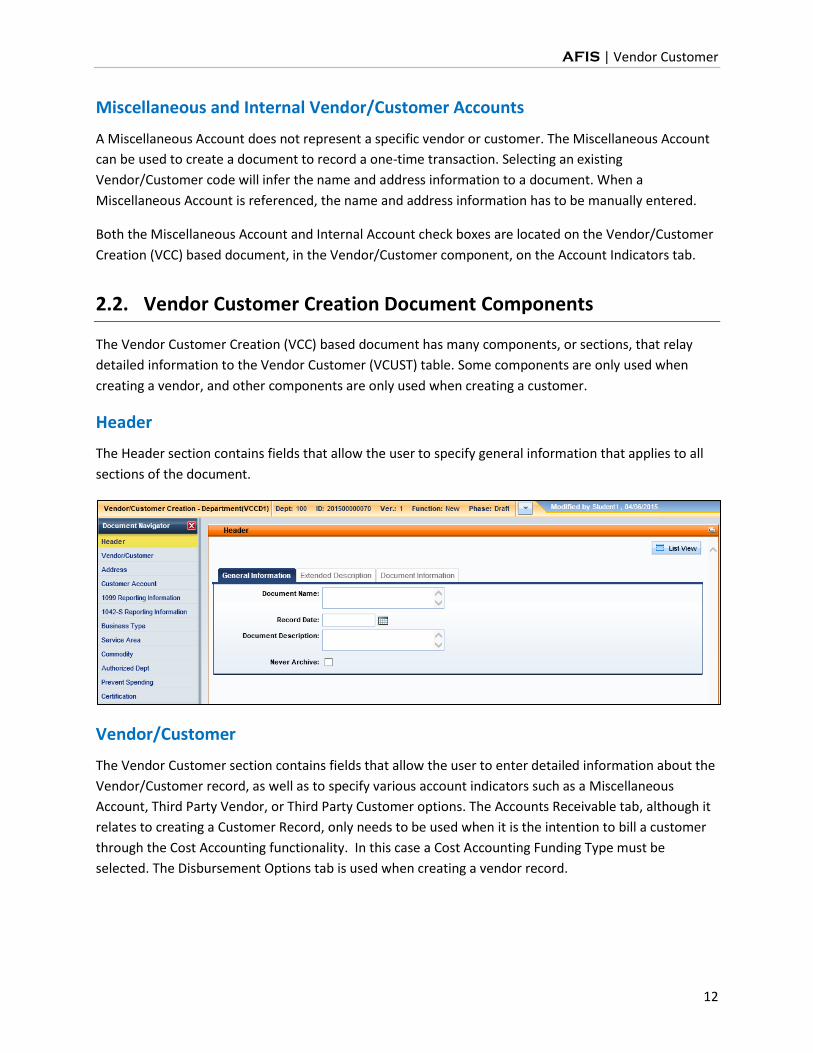
Header
The Header section contains fields that allow the user to specify general information that applies to all
sections of the document.
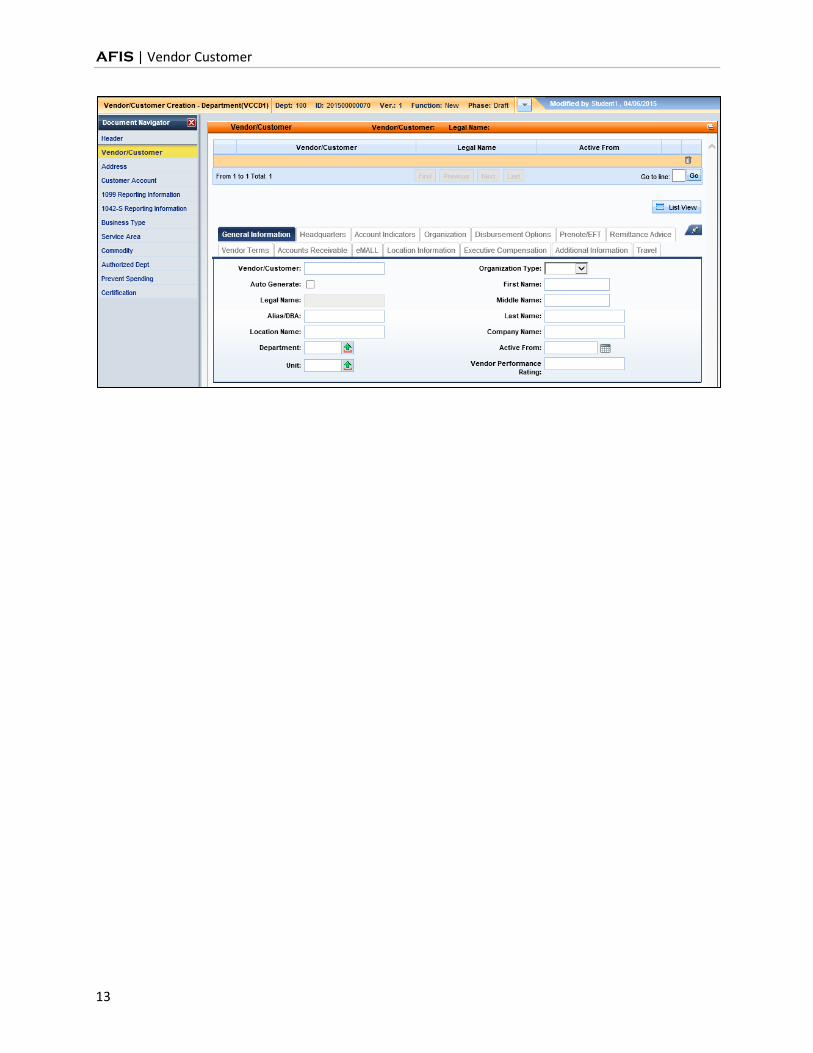
Vendor/Customer
The Vendor Customer section contains fields that allow the user to enter detailed information about the
Vendor/Customer record, as well as to specify various account indicators such as a Miscellaneous
Account, Third Party Vendor, or Third Party Customer options. The Accounts Receivable tab, although it
relates to creating a Customer Record, only needs to be used when it is the intention to bill a customer
through the Cost Accounting functionality. In this case a Cost Accounting Funding Type must be
selected. The Disbursement Options tab is used when creating a vendor record.
AFIS | Vendor Customer
13
AFIS | Vendor Customer
14
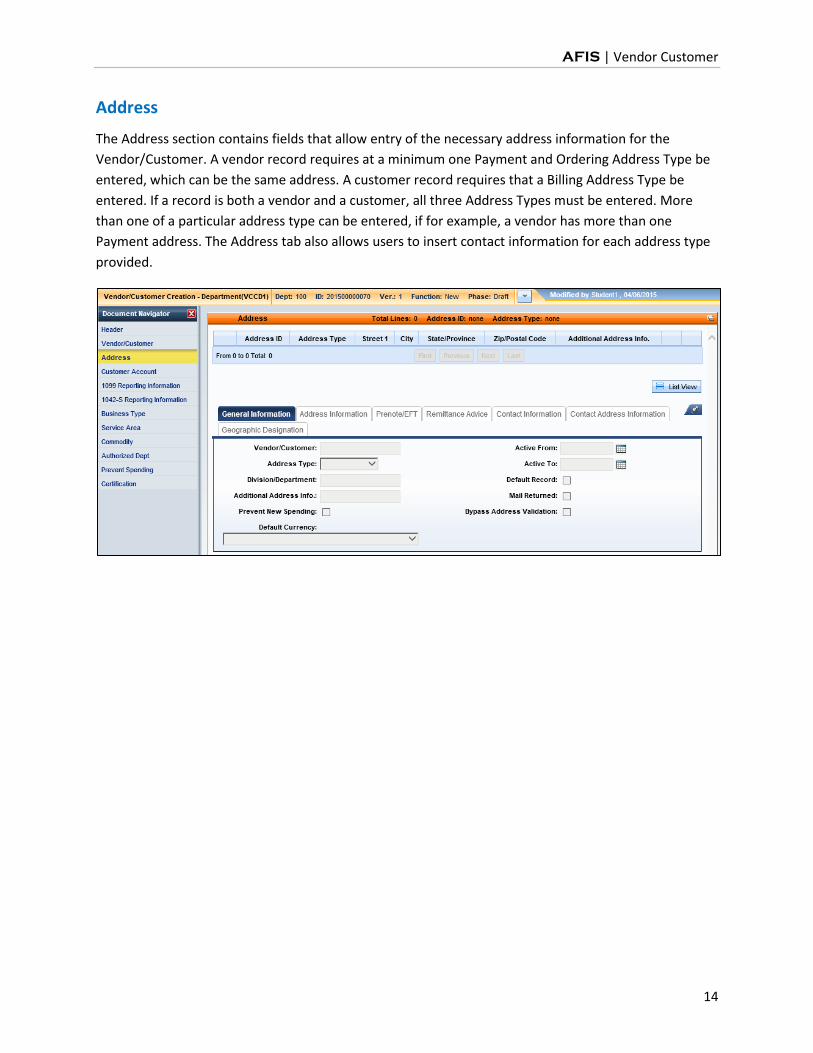
Address
The Address section contains fields that allow entry of the necessary address information for the
Vendor/Customer. A vendor record requires at a minimum one Payment and Ordering Address Type be
entered, which can be the same address. A customer record requires that a Billing Address Type be
entered. If a record is both a vendor and a customer, all three Address Types must be entered. More
than one of a particular address type can be entered, if for example, a vendor has more than one
Payment address. The Address tab also allows users to insert contact information for each address type
provided.
AFIS | Vendor Customer
15
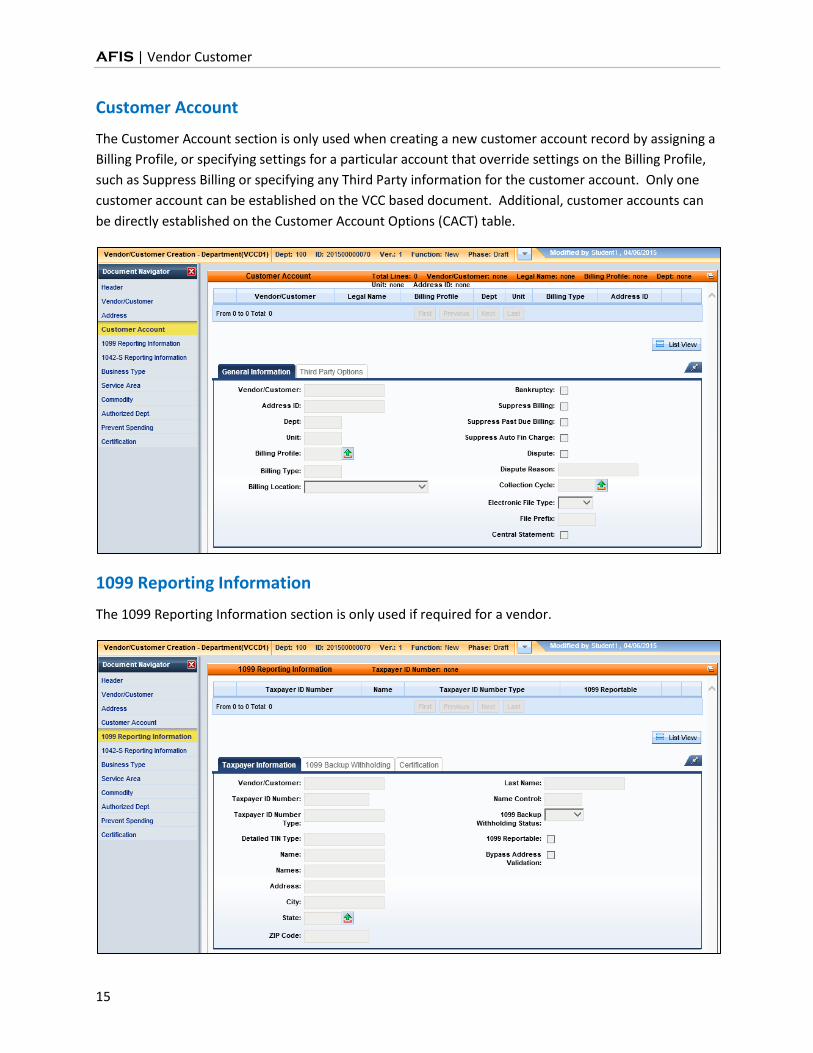
Customer Account
The Customer Account section is only used when creating a new customer account record by assigning a
Billing Profile, or specifying settings for a particular account that override settings on the Billing Profile,
such as Suppress Billing or specifying any Third Party information for the customer account. Only one
customer account can be established on the VCC based document. Additional, customer accounts can
be directly established on the Customer Account Options (CACT) table.
1099 Reporting Information
The 1099 Reporting Information section is only used if required for a vendor.
AFIS | Vendor Customer
16
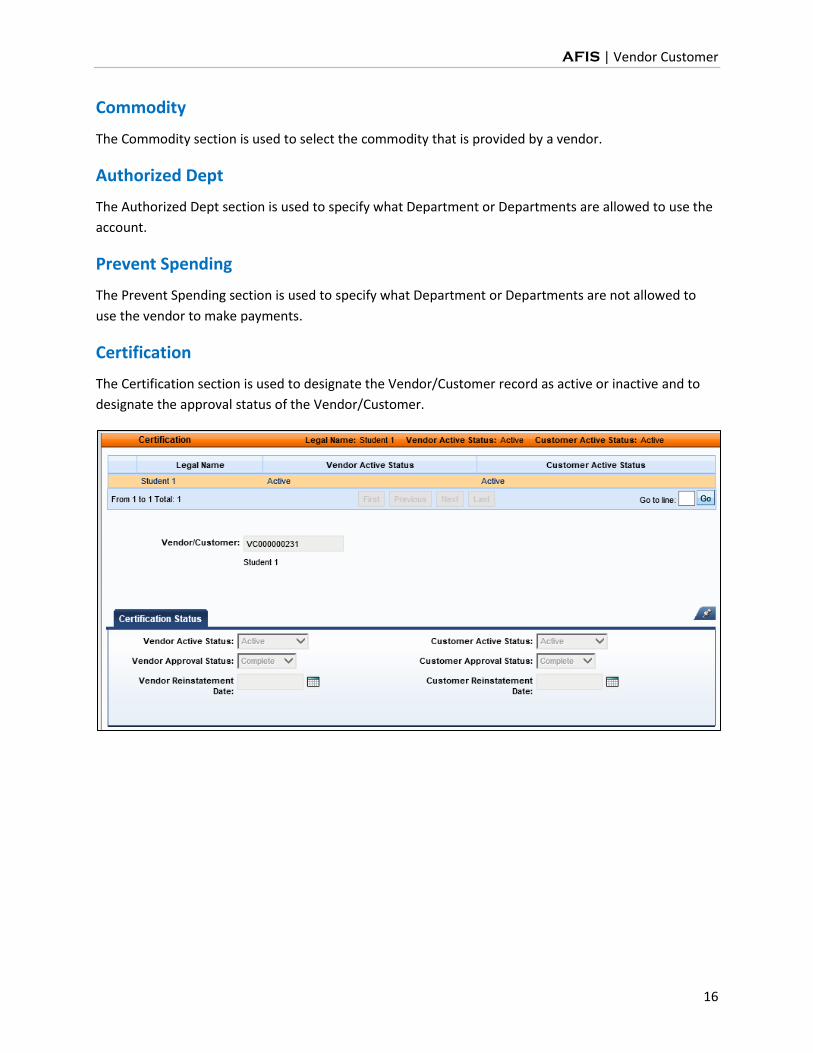
Commodity
The Commodity section is used to select the commodity that is provided by a vendor.
Authorized Dept
The Authorized Dept section is used to specify what Department or Departments are allowed to use the
account.
Prevent Spending
The Prevent Spending section is used to specify what Department or Departments are not allowed to
use the vendor to make payments.
Certification
The Certification section is used to designate the Vendor/Customer record as active or inactive and to
designate the approval status of the Vendor/Customer.
AFIS | Vendor Customer
17
2.3. Vendor Customer Creation Document Data Entry
Vendor Customer Creation (VCC) based documents can be created by navigating to the Document
Catalog and entering in the required information for the document. Depending on whether the record is
for a vendor or a customer, different information will be required.
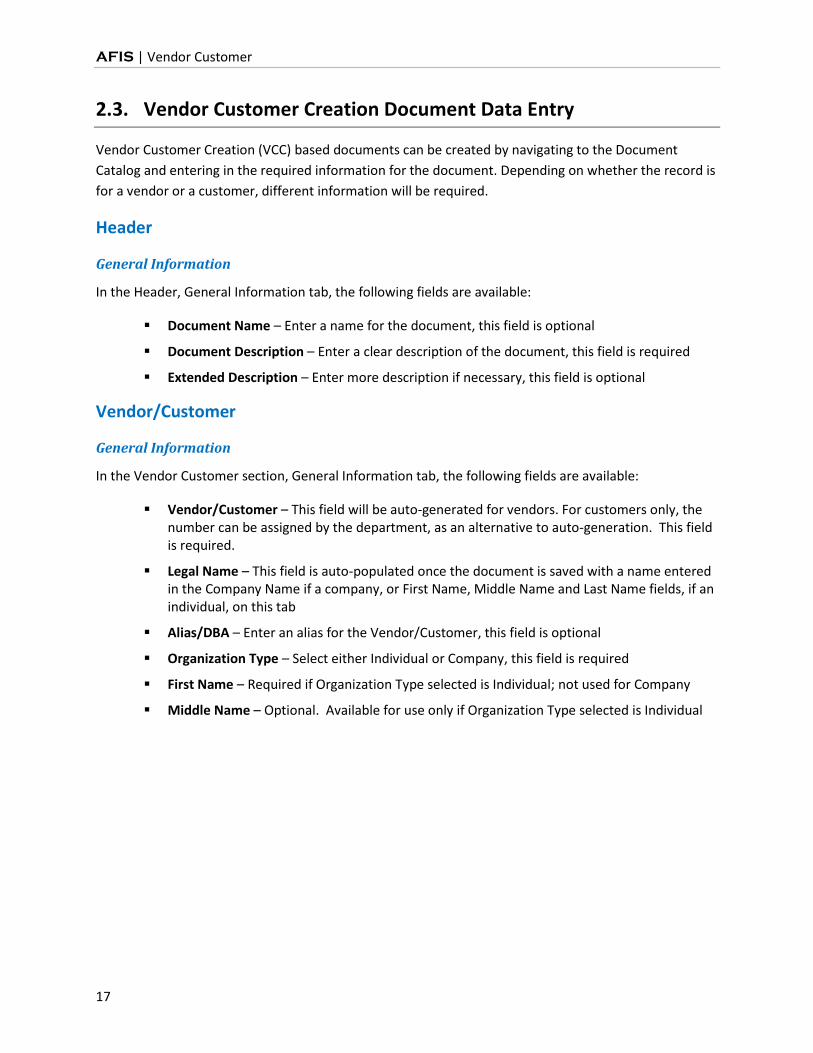
Header
General Information
In the Header, General Information tab, the following fields are available:
Document Name – Enter a name for the document, this field is optional
Document Description – Enter a clear description of the document, this field is required
Extended Description – Enter more description if necessary, this field is optional
Vendor/Customer
General Information
In the Vendor Customer section, General Information tab, the following fields are available:
Vendor/Customer – This field will be auto-generated for vendors. For customers only, the number can be assigned by the department, as an alternative to auto-generation. This field is required.
Legal Name – This field is auto-populated once the document is saved with a name entered in the Company Name if a company, or First Name, Middle Name and Last Name fields, if an individual, on this tab
Alias/DBA – Enter an alias for the Vendor/Customer, this field is optional
Organization Type – Select either Individual or Company, this field is required
First Name – Required if Organization Type selected is Individual; not used for Company
Middle Name – Optional. Available for use only if Organization Type selected is Individual
AFIS | Vendor Customer
18
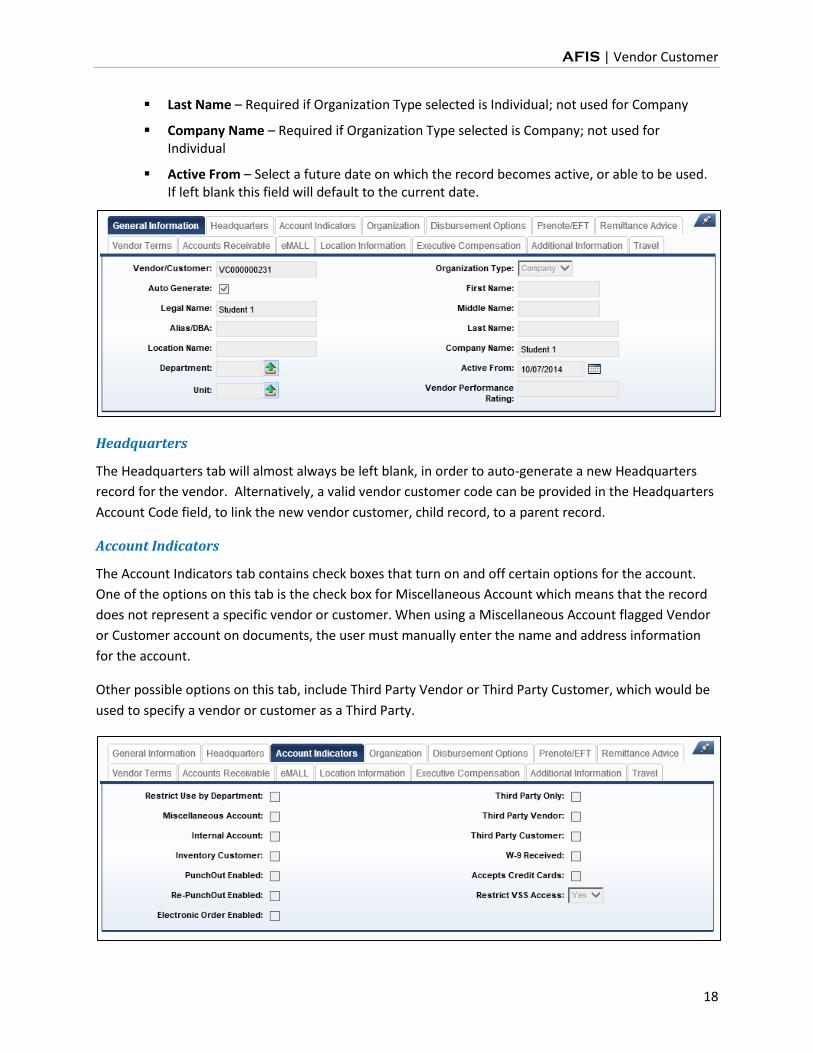
Last Name – Required if Organization Type selected is Individual; not used for Company
Company Name – Required if Organization Type selected is Company; not used for Individual
Active From – Select a future date on which the record becomes active, or able to be used. If left blank this field will default to the current date.
Headquarters
The Headquarters tab will almost always be left blank, in order to auto-generate a new Headquarters
record for the vendor. Alternatively, a valid vendor customer code can be provided in the Headquarters
Account Code field, to link the new vendor customer, child record, to a parent record.
Account Indicators
The Account Indicators tab contains check boxes that turn on and off certain options for the account.
One of the options on this tab is the check box for Miscellaneous Account which means that the record
does not represent a specific vendor or customer. When using a Miscellaneous Account flagged Vendor
or Customer account on documents, the user must manually enter the name and address information
for the account.
Other possible options on this tab, include Third Party Vendor or Third Party Customer, which would be
used to specify a vendor or customer as a Third Party.
AFIS | Vendor Customer
19
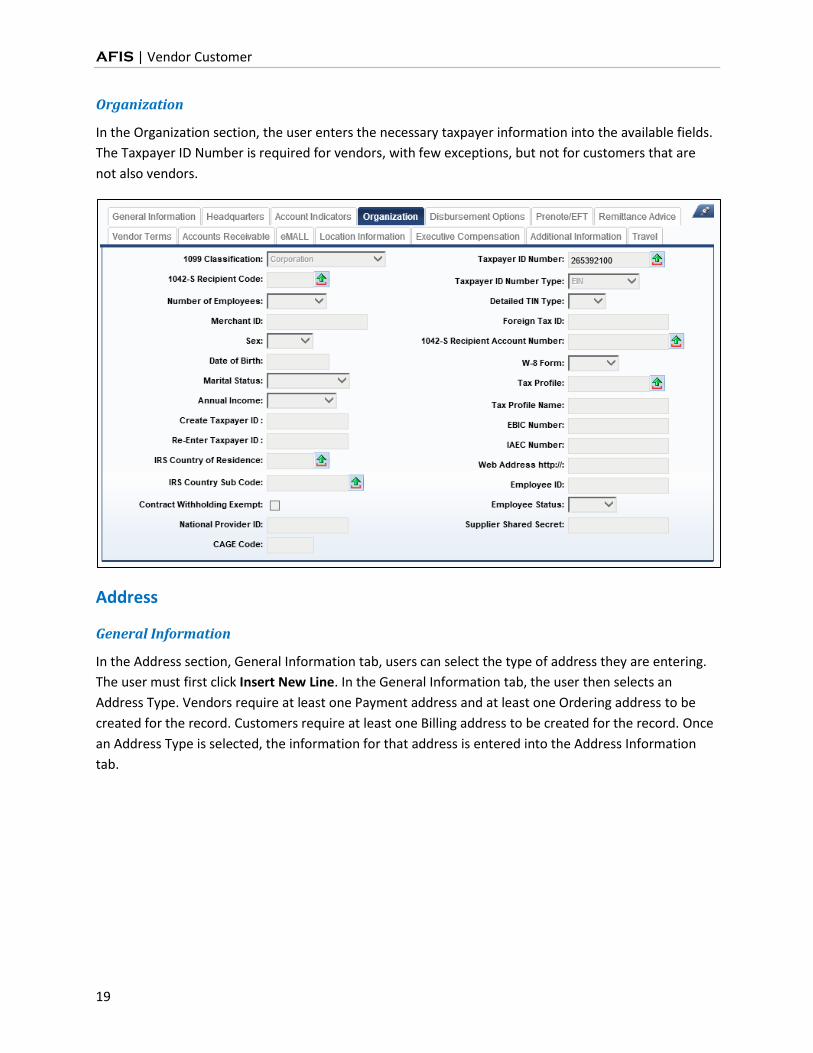
Organization
In the Organization section, the user enters the necessary taxpayer information into the available fields.
The Taxpayer ID Number is required for vendors, with few exceptions, but not for customers that are
not also vendors.
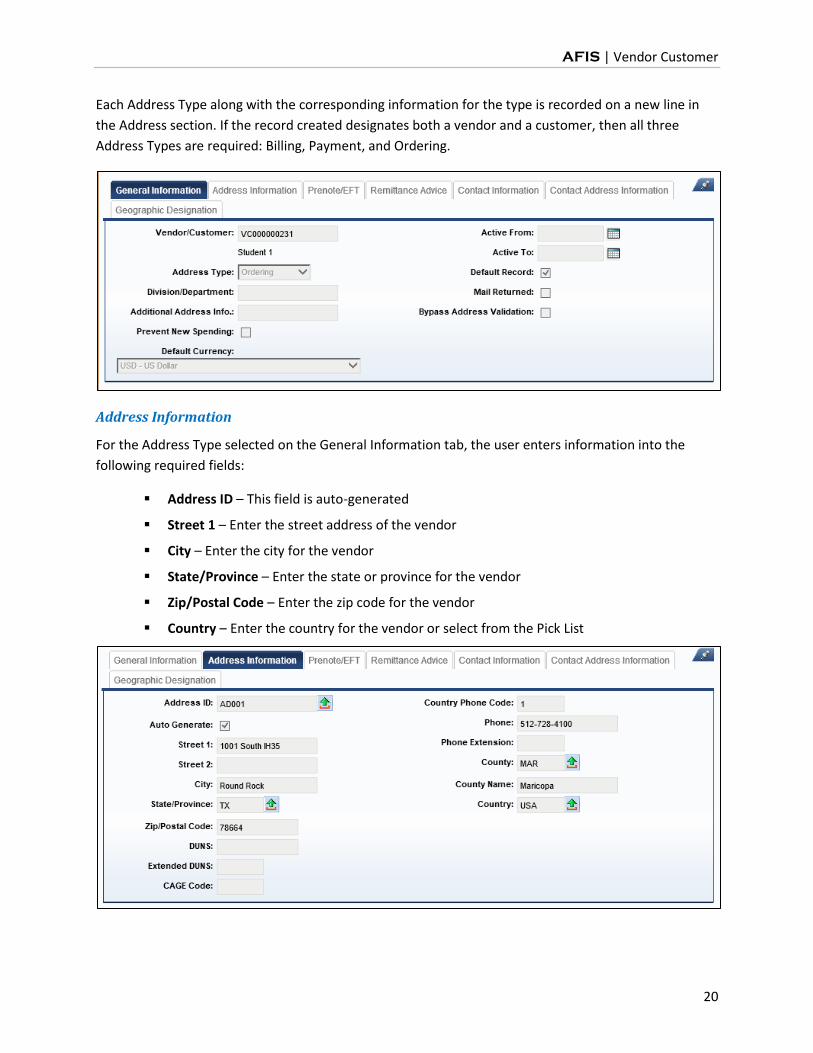
Address
General Information
In the Address section, General Information tab, users can select the type of address they are entering.
The user must first click Insert New Line. In the General Information tab, the user then selects an
Address Type. Vendors require at least one Payment address and at least one Ordering address to be
created for the record. Customers require at least one Billing address to be created for the record. Once
an Address Type is selected, the information for that address is entered into the Address Information
tab.
AFIS | Vendor Customer
20
Each Address Type along with the corresponding information for the type is recorded on a new line in
the Address section. If the record created designates both a vendor and a customer, then all three
Address Types are required: Billing, Payment, and Ordering.
Address Information
For the Address Type selected on the General Information tab, the user enters information into the
following required fields:
Address ID – This field is auto-generated
Street 1 – Enter the street address of the vendor
City – Enter the city for the vendor
State/Province – Enter the state or province for the vendor
Zip/Postal Code – Enter the zip code for the vendor
Country – Enter the country for the vendor or select from the Pick List
AFIS | Vendor Customer
21
Prenote/EFT
The Prenote/EFT tab contains fields that are optional and specify EFT payment information for the
vendor. The information on this tab will not be viewable.
Contact Information
The Contact Information tab contains fields for specifying the contact information for a Principle Contact
with the vendor or customer. For a customer record, the Principal Contact ID is auto-generated and the
Principle Contact field is required. Additional information for the contact can also be entered if known.
Contact Address Information
The Contact Address Information tab contains fields that will default based on the information in the
Address Information section when the document is saved or validated, or if desired, different address
information can be provided for the contact. A contact has to be added in order for the address
information to default.
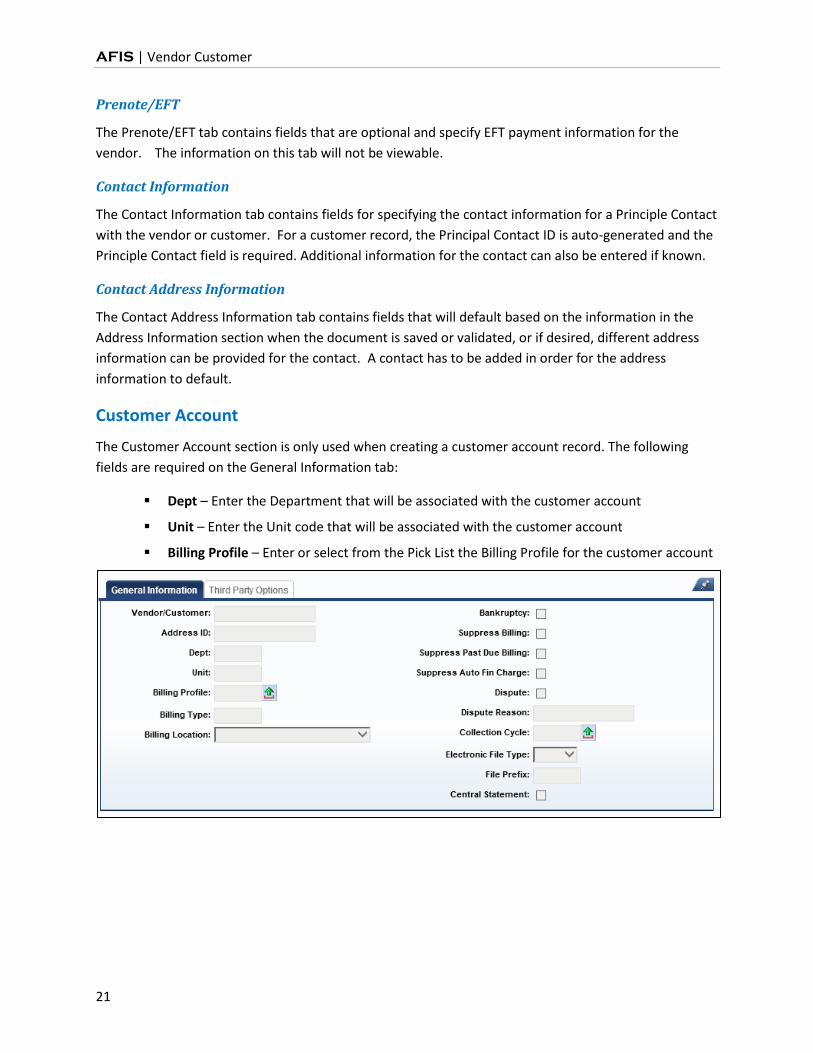
Customer Account
The Customer Account section is only used when creating a customer account record. The following
fields are required on the General Information tab:
Dept – Enter the Department that will be associated with the customer account
Unit – Enter the Unit code that will be associated with the customer account
Billing Profile – Enter or select from the Pick List the Billing Profile for the customer account
AFIS | Vendor Customer
22
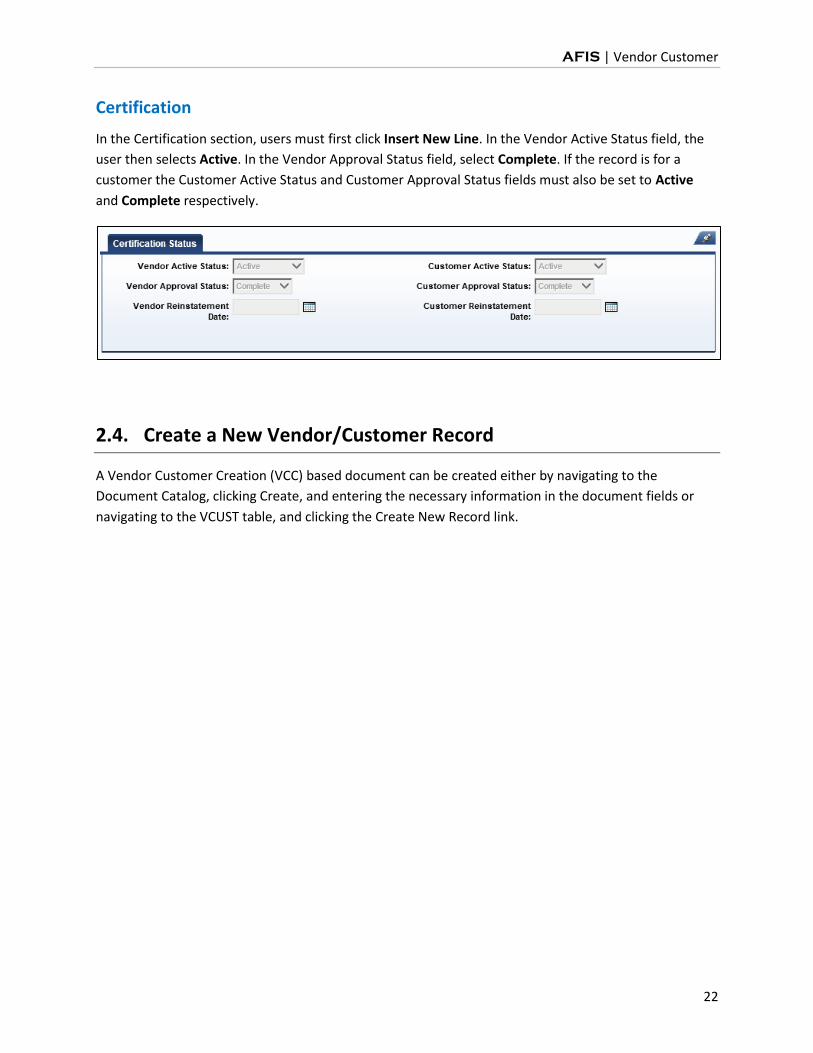
Certification
In the Certification section, users must first click Insert New Line. In the Vendor Active Status field, the
user then selects Active. In the Vendor Approval Status field, select Complete. If the record is for a
customer the Customer Active Status and Customer Approval Status fields must also be set to Active
and Complete respectively.
2.4. Create a New Vendor/Customer Record
A Vendor Customer Creation (VCC) based document can be created either by navigating to the
Document Catalog, clicking Create, and entering the necessary information in the document fields or
navigating to the VCUST table, and clicking the Create New Record link.
AFIS | Vendor Customer
23
ACTIVITY 2.4
Create a New Vendor/Customer Record
Scenario
The State of Arizona wants to purchase 1000 new laptop computers from a new computer
manufacturer, Dell. In addition, the State will be providing consultant services to Dell. Prior to creating a
subsequent delivery order, Dell must be added to the VCUST table as a vendor. Furthermore, prior to
receiving services from the State, Dell must be added to the VCUST table as a customer. The user must
also determine that an entry does not already exist on the VCUST table prior to adding the entry.
Setup
User is logged into the AFIS Home Page.
Steps
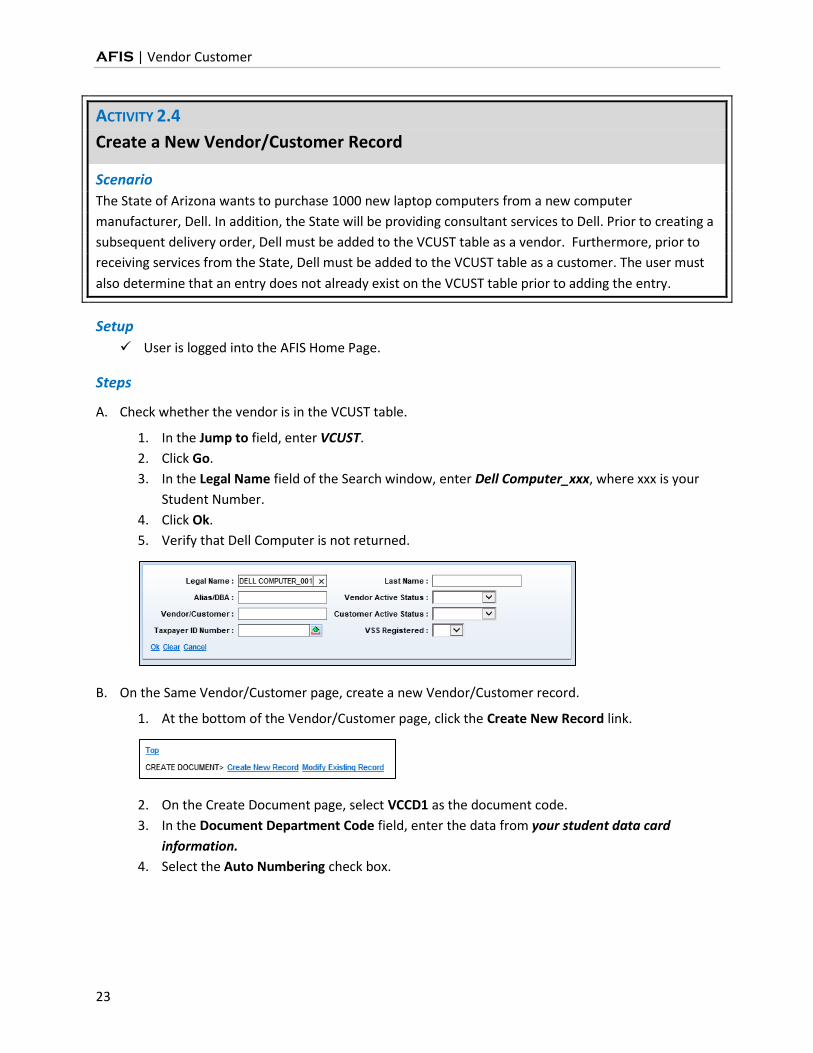
A. Check whether the vendor is in the VCUST table.
1. In the Jump to field, enter VCUST.
2. Click Go.
3. In the Legal Name field of the Search window, enter Dell Computer_xxx, where xxx is your
Student Number.
4. Click Ok.
5. Verify that Dell Computer is not returned.
B. On the Same Vendor/Customer page, create a new Vendor/Customer record.
1. At the bottom of the Vendor/Customer page, click the Create New Record link.
2. On the Create Document page, select VCCD1 as the document code.
3. In the Document Department Code field, enter the data from your student data card
information.
4. Select the Auto Numbering check box.
AFIS | Vendor Customer
24
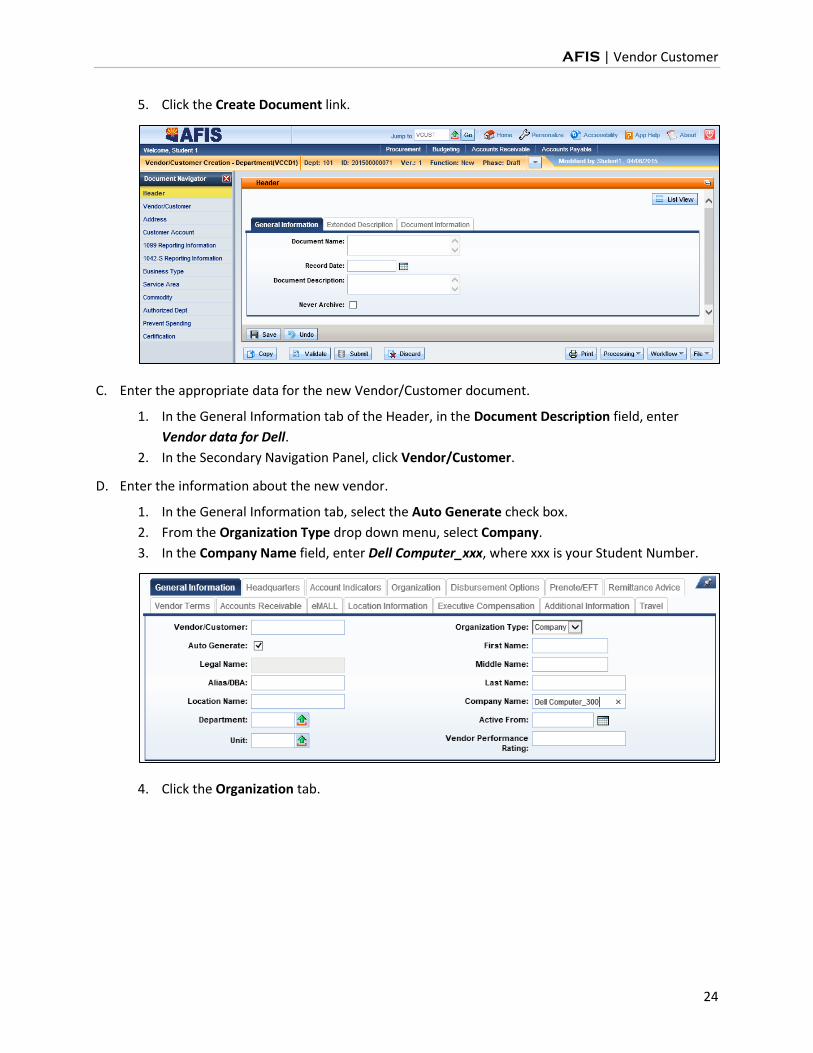
5. Click the Create Document link.
C. Enter the appropriate data for the new Vendor/Customer document.
1. In the General Information tab of the Header, in the Document Description field, enter
Vendor data for Dell.
2. In the Secondary Navigation Panel, click Vendor/Customer.
D. Enter the information about the new vendor.
1. In the General Information tab, select the Auto Generate check box.
2. From the Organization Type drop down menu, select Company.
3. In the Company Name field, enter Dell Computer_xxx, where xxx is your Student Number.
4. Click the Organization tab.
AFIS | Vendor Customer
25
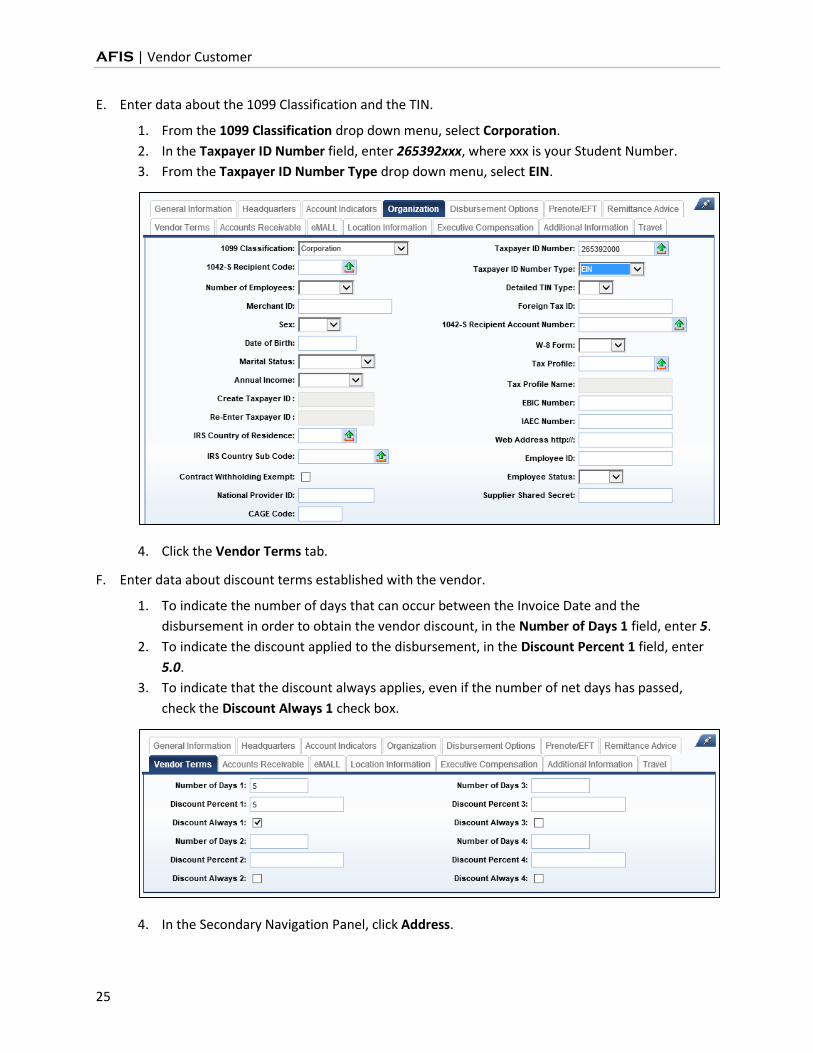
E. Enter data about the 1099 Classification and the TIN.
1. From the 1099 Classification drop down menu, select Corporation.
2. In the Taxpayer ID Number field, enter 265392xxx, where xxx is your Student Number.
3. From the Taxpayer ID Number Type drop down menu, select EIN.
4. Click the Vendor Terms tab.
F. Enter data about discount terms established with the vendor.
1. To indicate the number of days that can occur between the Invoice Date and the
disbursement in order to obtain the vendor discount, in the Number of Days 1 field, enter 5.
2. To indicate the discount applied to the disbursement, in the Discount Percent 1 field, enter
5.0.
3. To indicate that the discount always applies, even if the number of net days has passed,
check the Discount Always 1 check box.
4. In the Secondary Navigation Panel, click Address.
AFIS | Vendor Customer
26
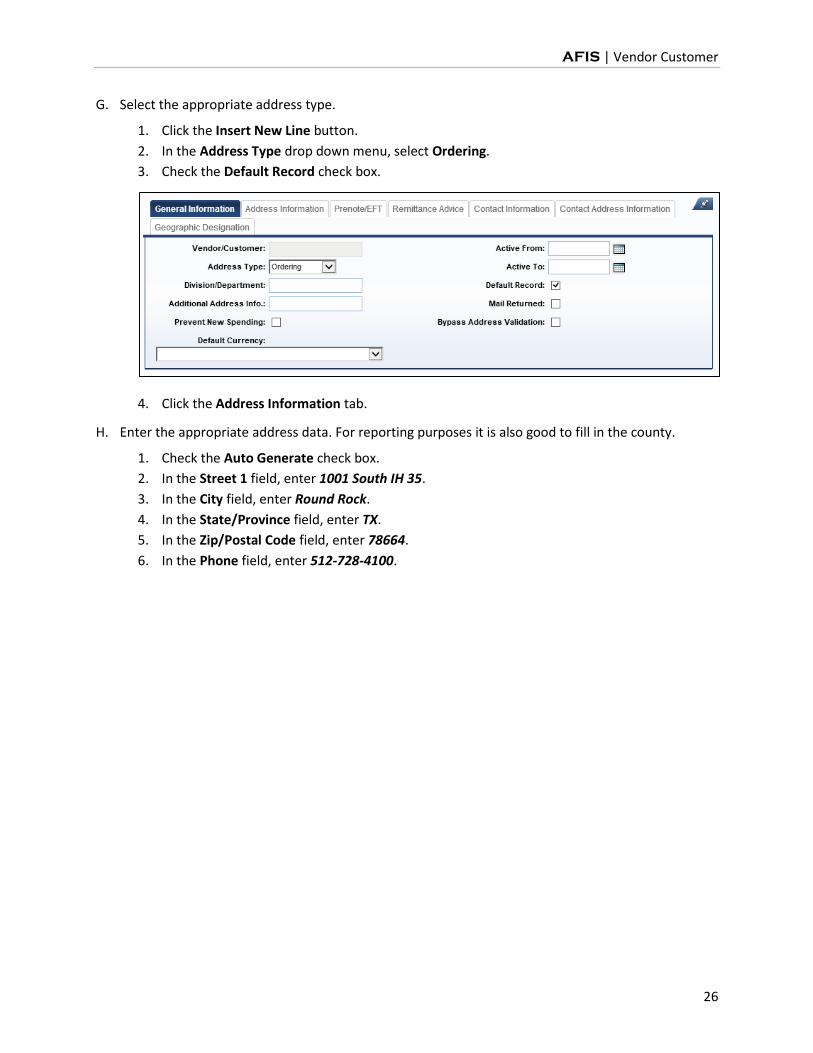
G. Select the appropriate address type.
1. Click the Insert New Line button.
2. In the Address Type drop down menu, select Ordering.
3. Check the Default Record check box.
4. Click the Address Information tab.
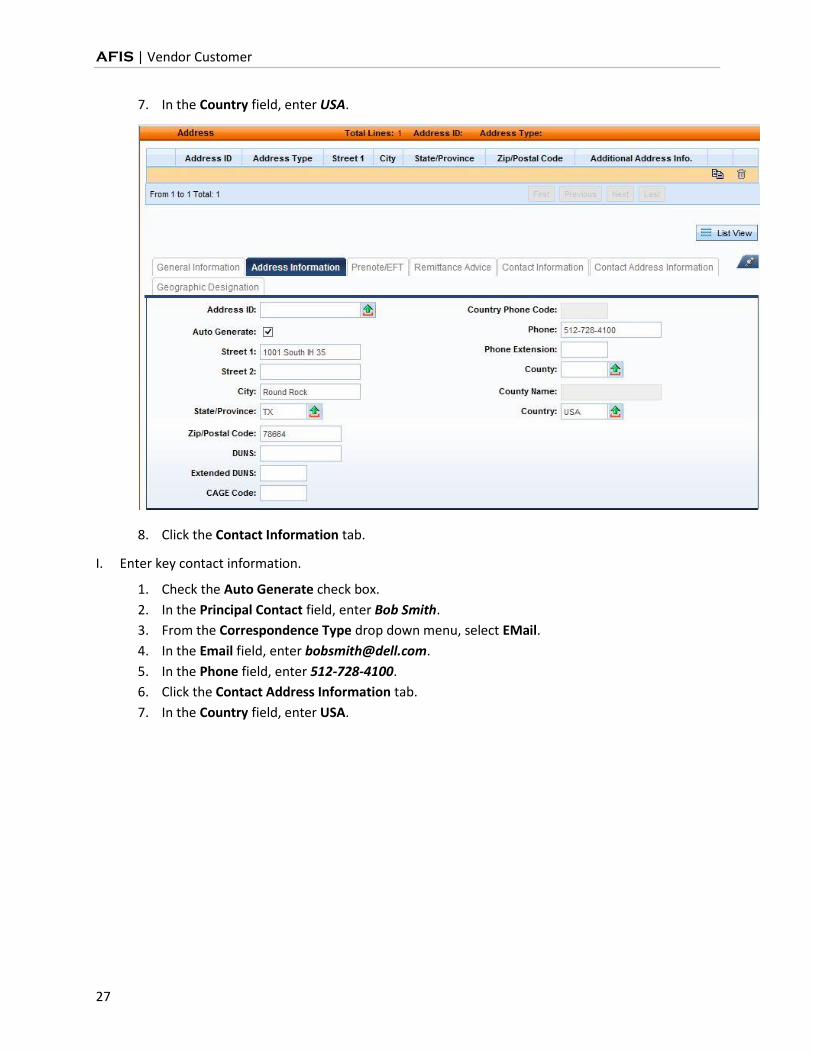
H. Enter the appropriate address data. For reporting purposes it is also good to fill in the county.
1. Check the Auto Generate check box.
2. In the Street 1 field, enter 1001 South IH 35.
3. In the City field, enter Round Rock.
4. In the State/Province field, enter TX.
5. In the Zip/Postal Code field, enter 78664.
6. In the Phone field, enter 512-728-4100.
AFIS | Vendor Customer
27
7. In the Country field, enter USA.
8. Click the Contact Information tab.
I. Enter key contact information.
1. Check the Auto Generate check box.
2. In the Principal Contact field, enter Bob Smith.
3. From the Correspondence Type drop down menu, select EMail.
4. In the Email field, enter [email protected].
5. In the Phone field, enter 512-728-4100.
6. Click the Contact Address Information tab.
7. In the Country field, enter USA.
AFIS | Vendor Customer
28
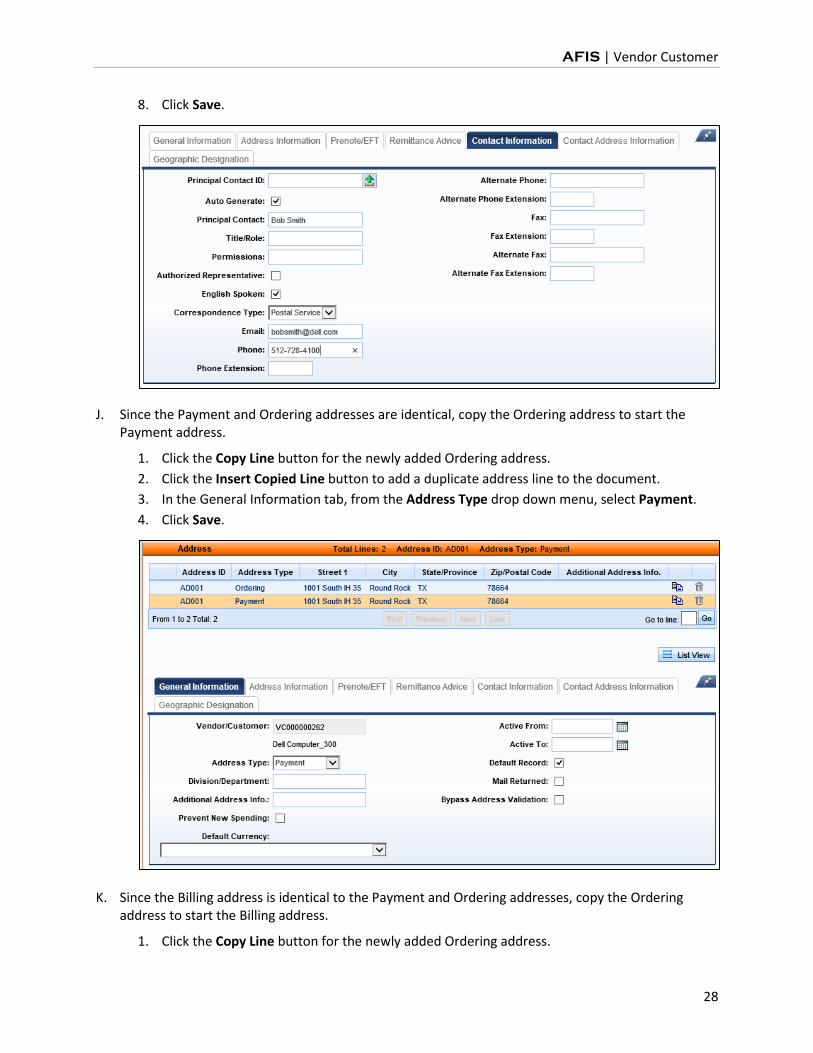
8. Click Save.
J. Since the Payment and Ordering addresses are identical, copy the Ordering address to start the Payment address.
1. Click the Copy Line button for the newly added Ordering address.
2. Click the Insert Copied Line button to add a duplicate address line to the document.
3. In the General Information tab, from the Address Type drop down menu, select Payment.
4. Click Save.
K. Since the Billing address is identical to the Payment and Ordering addresses, copy the Ordering address to start the Billing address.
1. Click the Copy Line button for the newly added Ordering address.
AFIS | Vendor Customer
29
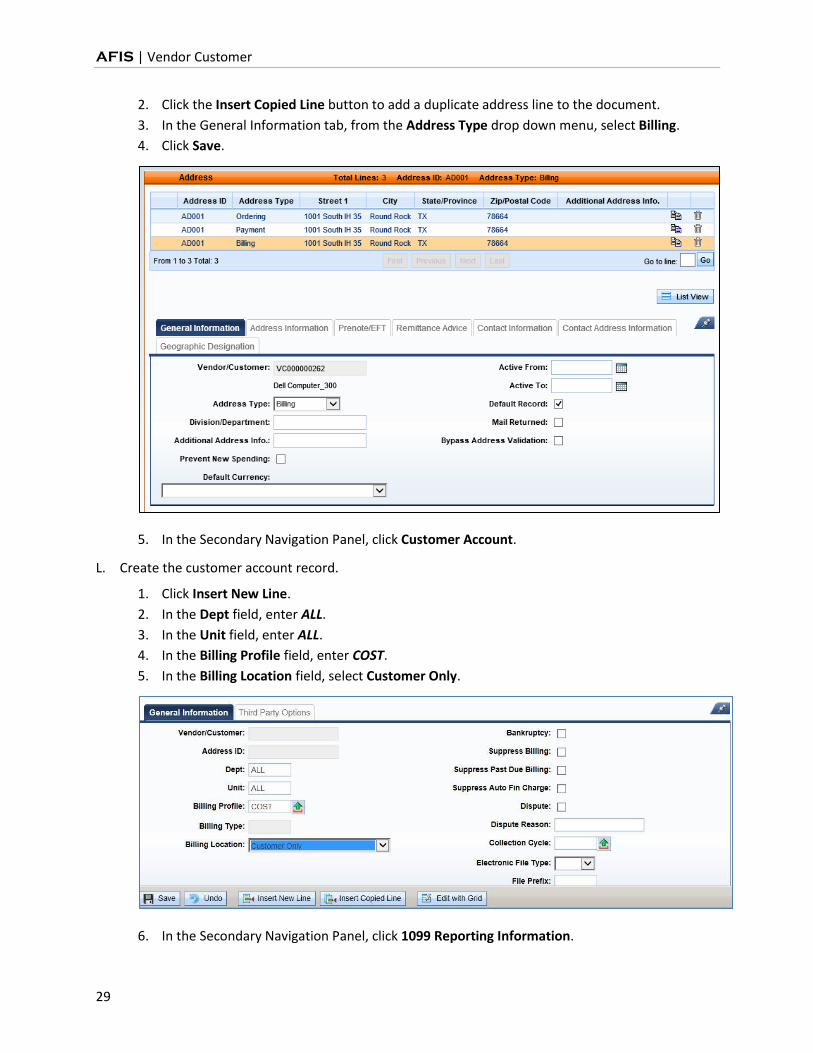
2. Click the Insert Copied Line button to add a duplicate address line to the document.
3. In the General Information tab, from the Address Type drop down menu, select Billing.
4. Click Save.
5. In the Secondary Navigation Panel, click Customer Account.
L. Create the customer account record.
1. Click Insert New Line.
2. In the Dept field, enter ALL.
3. In the Unit field, enter ALL.
4. In the Billing Profile field, enter COST.
5. In the Billing Location field, select Customer Only.
6. In the Secondary Navigation Panel, click 1099 Reporting Information.
AFIS | Vendor Customer
30
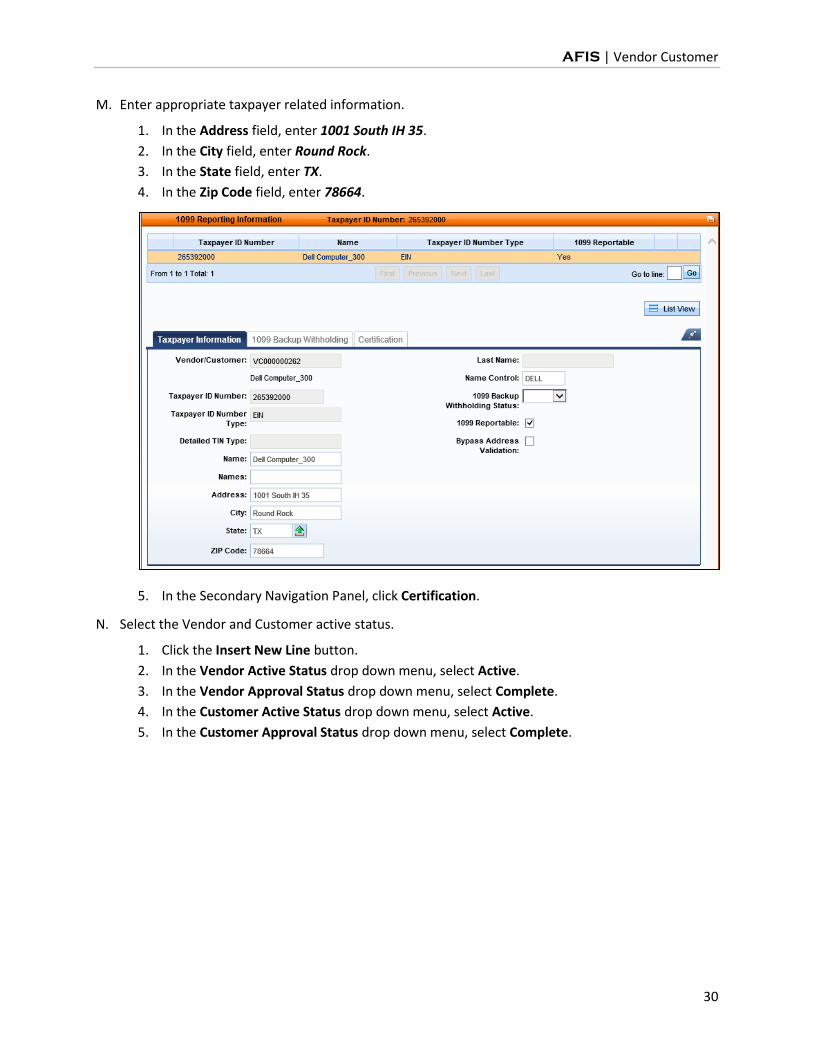
M. Enter appropriate taxpayer related information.
1. In the Address field, enter 1001 South IH 35.
2. In the City field, enter Round Rock.
3. In the State field, enter TX.
4. In the Zip Code field, enter 78664.
5. In the Secondary Navigation Panel, click Certification.
N. Select the Vendor and Customer active status.
1. Click the Insert New Line button.
2. In the Vendor Active Status drop down menu, select Active.
3. In the Vendor Approval Status drop down menu, select Complete.
4. In the Customer Active Status drop down menu, select Active.
5. In the Customer Approval Status drop down menu, select Complete.

AFIS | Vendor Customer
31
6. Click Save.
O. Validate and Submit the document.
1. Click the Validate button to check for errors. If any errors exist, correct the errors then click
the Validate button again. If the validation is successful, the following message is displayed in
the upper left corner of the screen: “Document validated successfully.”
2. Click the Submit button to submit the document to workflow for approval. The following
message is displayed in the upper left corner of the screen: “Document submitted
successfully.”
3. Click Home in the Primary Navigation Panel to return to the Home Page.
AFIS | Vendor Customer
32
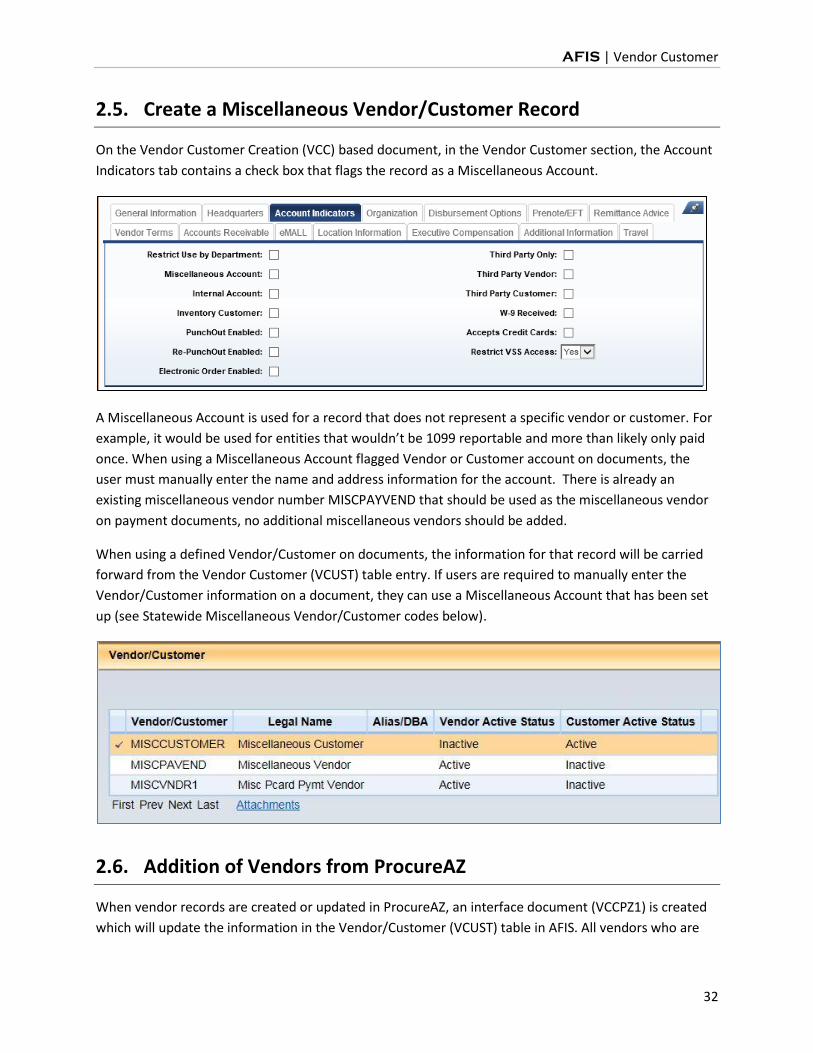
2.5. Create a Miscellaneous Vendor/Customer Record
On the Vendor Customer Creation (VCC) based document, in the Vendor Customer section, the Account
Indicators tab contains a check box that flags the record as a Miscellaneous Account.
A Miscellaneous Account is used for a record that does not represent a specific vendor or customer. For
example, it would be used for entities that wouldn’t be 1099 reportable and more than likely only paid
once. When using a Miscellaneous Account flagged Vendor or Customer account on documents, the
user must manually enter the name and address information for the account. There is already an
existing miscellaneous vendor number MISCPAYVEND that should be used as the miscellaneous vendor
on payment documents, no additional miscellaneous vendors should be added.
When using a defined Vendor/Customer on documents, the information for that record will be carried
forward from the Vendor Customer (VCUST) table entry. If users are required to manually enter the
Vendor/Customer information on a document, they can use a Miscellaneous Account that has been set
up (see Statewide Miscellaneous Vendor/Customer codes below).
2.6. Addition of Vendors from ProcureAZ
When vendor records are created or updated in ProcureAZ, an interface document (VCCPZ1) is created
which will update the information in the Vendor/Customer (VCUST) table in AFIS. All vendors who are
AFIS | Vendor Customer
33
registered in ProcureAZ should make all of their changes in ProcureAZ and not directly in AFIS. The
Vendor/Customer code assigned in AFIS will display in ProcureAZ as the “Alternate ID” for the vendor.
2.7. Research Updates
The Vendor Customer (VCUST) table stores all of the records for both vendors and customers used in
AFIS. The information entered on any of the Vendor Customer Creation (VCC) based documents can be
seen in the sections and fields on the VCUST table.
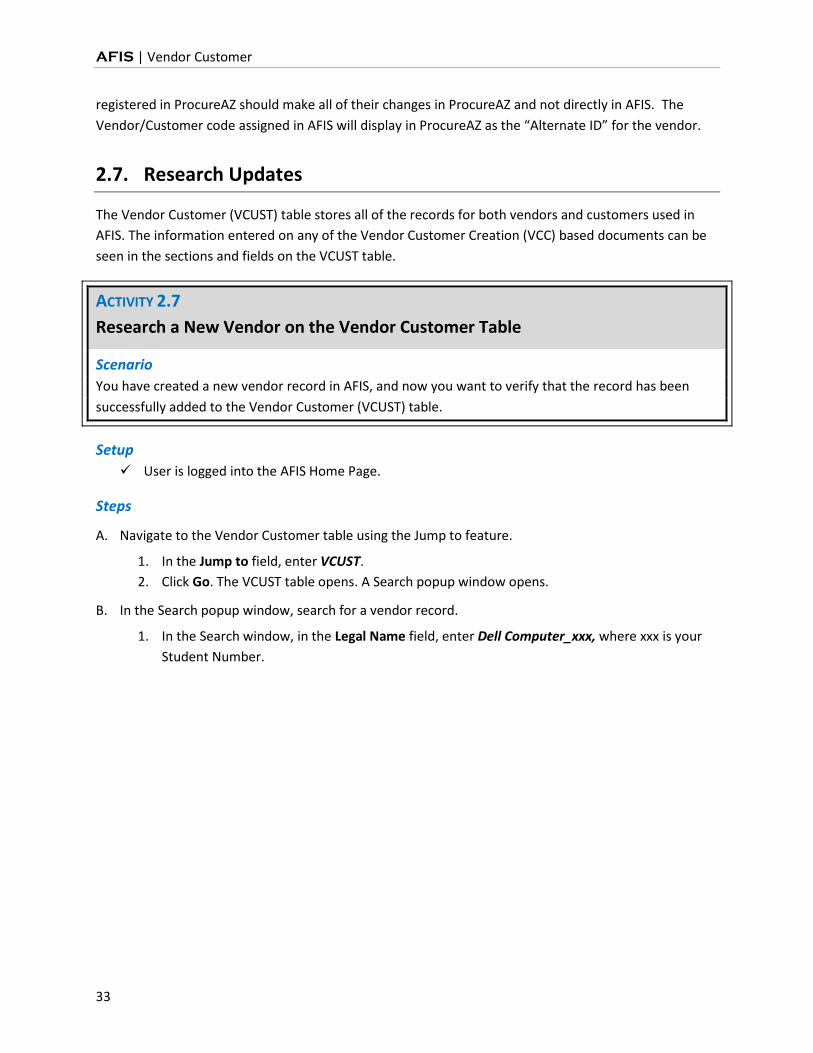
ACTIVITY 2.7
Research a New Vendor on the Vendor Customer Table
Scenario
You have created a new vendor record in AFIS, and now you want to verify that the record has been
successfully added to the Vendor Customer (VCUST) table.
Setup
User is logged into the AFIS Home Page.
Steps
A. Navigate to the Vendor Customer table using the Jump to feature.
1. In the Jump to field, enter VCUST.
2. Click Go. The VCUST table opens. A Search popup window opens.
B. In the Search popup window, search for a vendor record.
1. In the Search window, in the Legal Name field, enter Dell Computer_xxx, where xxx is your
Student Number.
AFIS | Vendor Customer
34
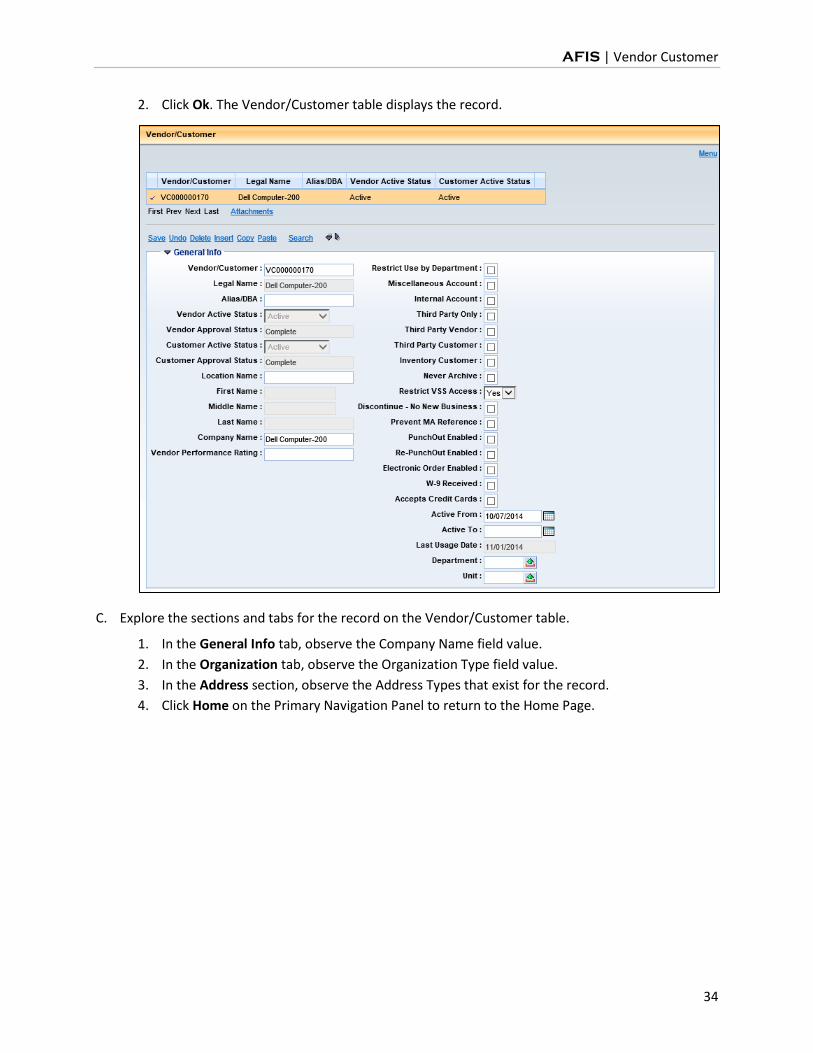
2. Click Ok. The Vendor/Customer table displays the record.
C. Explore the sections and tabs for the record on the Vendor/Customer table.
1. In the General Info tab, observe the Company Name field value.
2. In the Organization tab, observe the Organization Type field value.
3. In the Address section, observe the Address Types that exist for the record.
4. Click Home on the Primary Navigation Panel to return to the Home Page.
AFIS | Vendor Customer
35
3. Modify an Existing Vendor/Customer Record
Learning Objectives
In this lesson, you will:
Examine the components of the Vendor/Customer Modification document
Review the data entry requirements for the Vendor/Customer Modification document
Create a Vendor/Customer Modification document
Examine the ProcureAZ interface process for vendor modification
Research the updates made to the Vendor/Customer and Customer Account Options tables by the Vendor/Customer Modification document
Lesson Overview
The Vendor Customer Modification (VCM) based document is used to add to, change, or delete existing
vendor and customer information stored in AFIS. Only one Vendor/Customer can be updated by the
VCM document. This lesson examines the VCM document components and data entry process.
3.1. Vendor/Customer Modification Document
Vendor/Customer Modification (VCM) based documents allow users to modify or add to an existing
vendor or customer record. Changes submitted through a VCM based document only apply to a single
record. Some examples of when a VCM based document should be used include the following:
Modifying Organization or Prenote/EFT information
Adding a new address for an existing Vendor/Customer record
Modifying an existing address
Modifying a vendor’s Legal Address or other 1099 information
Adding 1099 Reporting Information for a new Taxpayer ID number
Modifying an existing record’s Legal Name
Creating an Active vendor when an Active customer already exists, or vice versa
To create or change a Customer Account record, make changes directly in the Customer Account
Options (CACT) page. In the CACT you can:
Add a new Customer Account record
Modify an existing Customer Account record
Like the VCC based documents, the VCM based documents, with the exception of the VCMPZ1, are
routed to workflow for approval by the department and by GAO, and they cannot reference or be
AFIS | Vendor Customer
36
referenced by any other document in AFIS. The VCM based documents cannot be copied, nor can they
be modified once the Phase is Final.
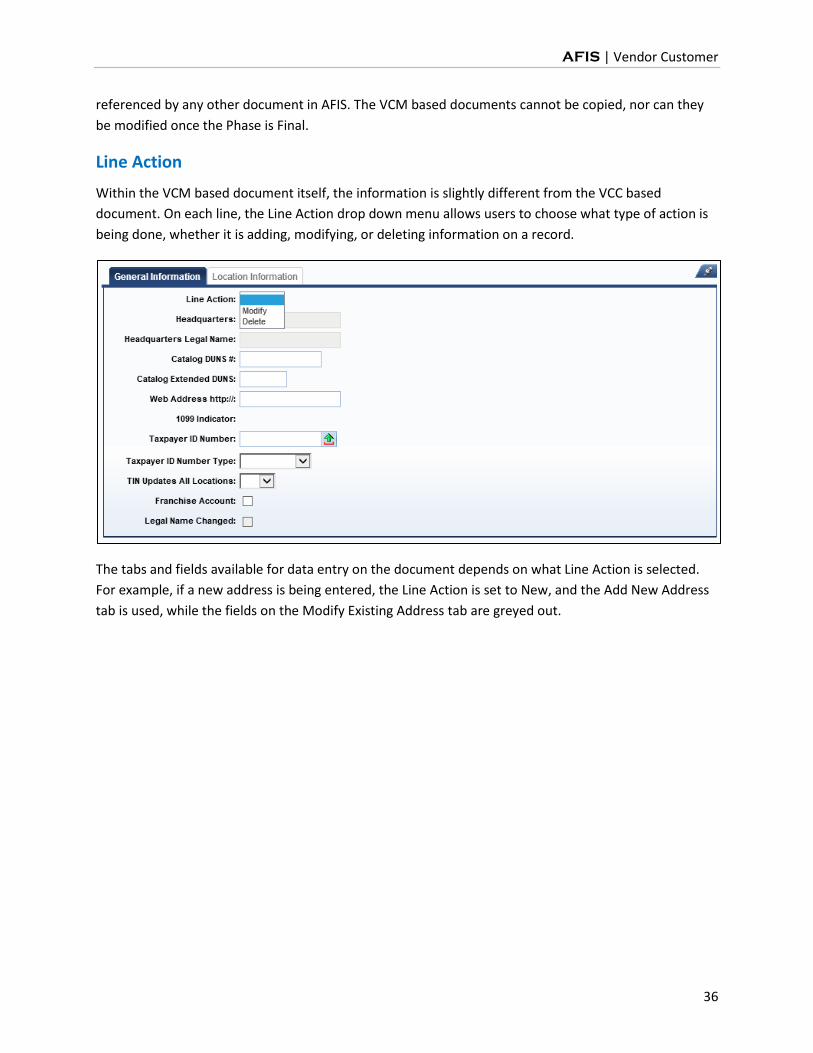
Line Action
Within the VCM based document itself, the information is slightly different from the VCC based
document. On each line, the Line Action drop down menu allows users to choose what type of action is
being done, whether it is adding, modifying, or deleting information on a record.
The tabs and fields available for data entry on the document depends on what Line Action is selected.
For example, if a new address is being entered, the Line Action is set to New, and the Add New Address
tab is used, while the fields on the Modify Existing Address tab are greyed out.
AFIS | Vendor Customer
37
3.2. Vendor Customer Modification Document Components
The Vendor Customer Modification (VCM) based document has many components, or sections, that
relay detailed information to the Vendor Customer (VCUST) table. Depending on the type of information
that requires modification, only certain sections may be used. For each section except the Header, users
must click Insert New Line, and select a Line Action that determines how the Vendor/Customer record is
being modified.
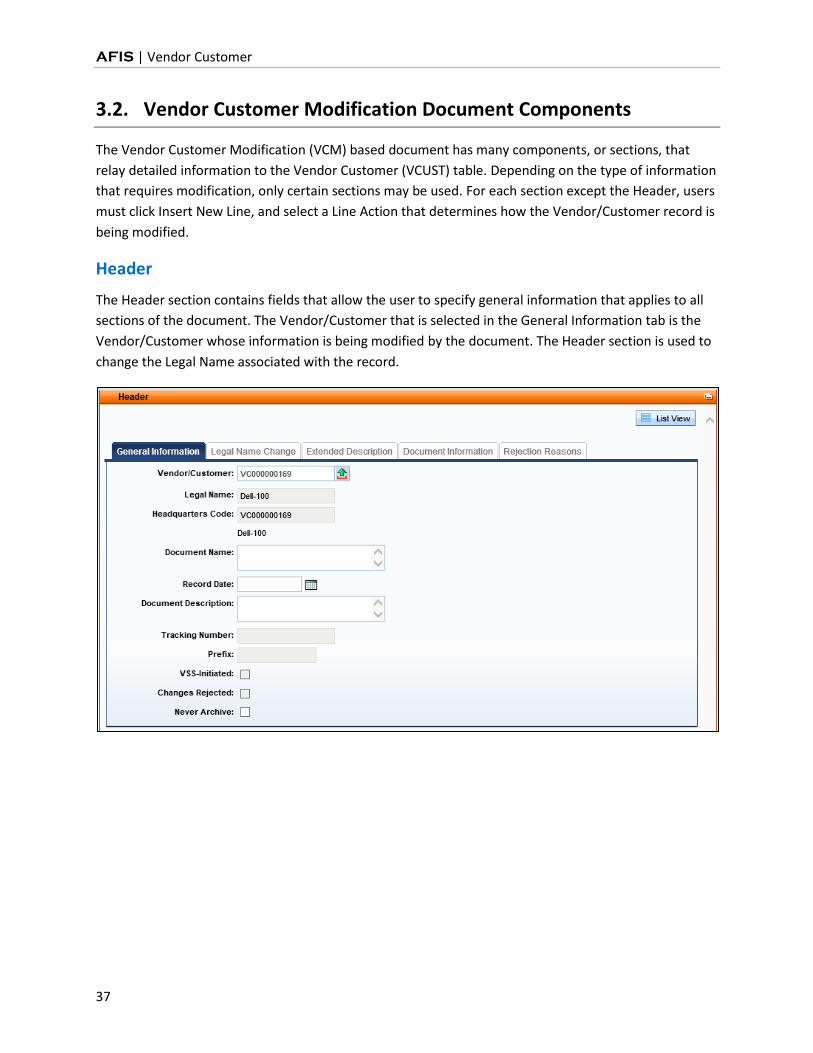
Header
The Header section contains fields that allow the user to specify general information that applies to all
sections of the document. The Vendor/Customer that is selected in the General Information tab is the
Vendor/Customer whose information is being modified by the document. The Header section is used to
change the Legal Name associated with the record.
AFIS | Vendor Customer
38
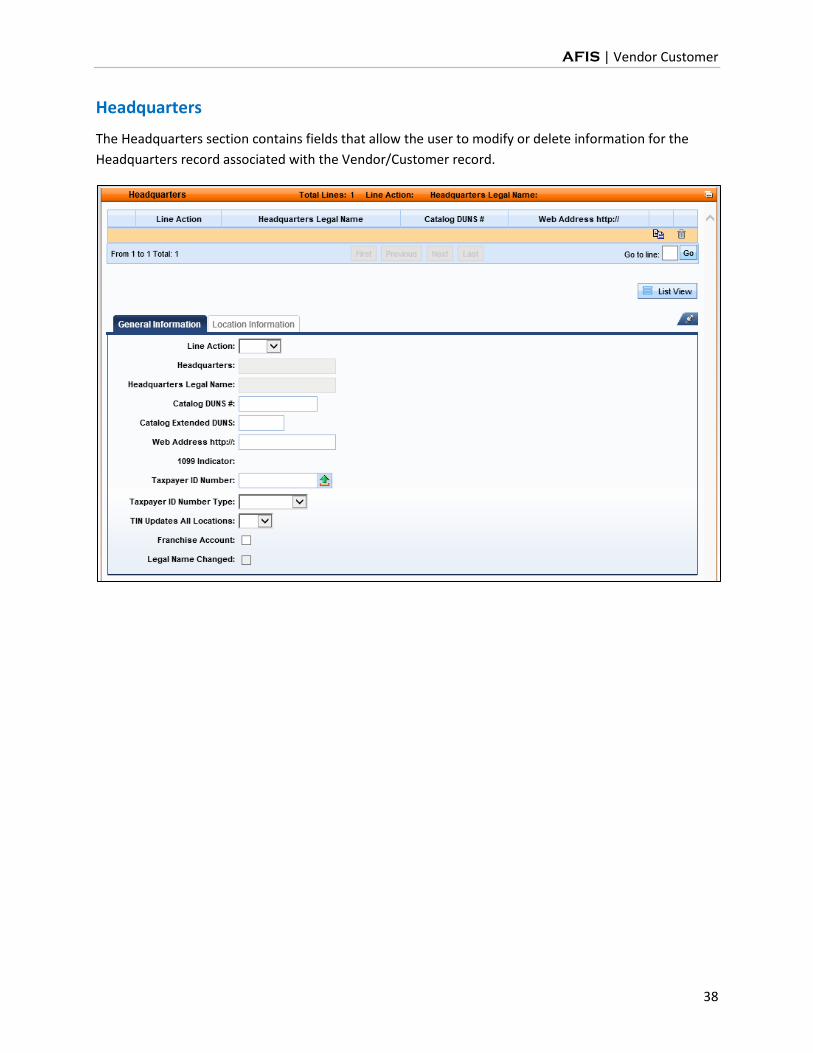
Headquarters
The Headquarters section contains fields that allow the user to modify or delete information for the
Headquarters record associated with the Vendor/Customer record.
AFIS | Vendor Customer
39
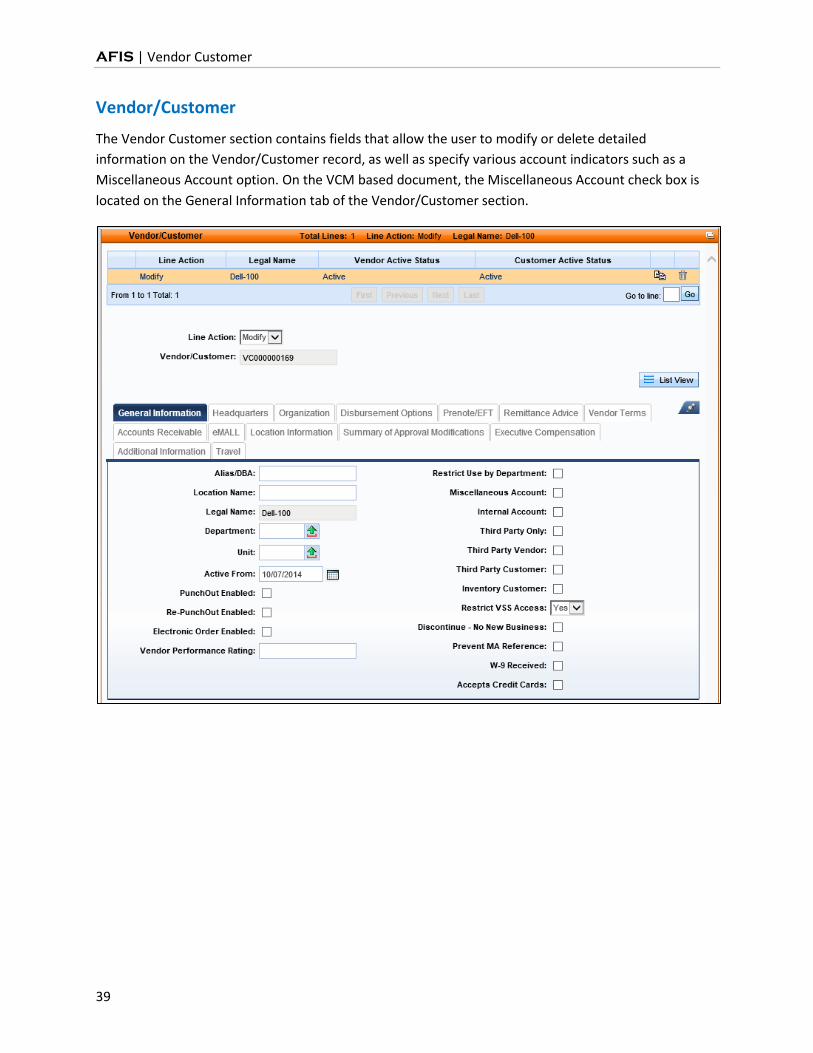
Vendor/Customer
The Vendor Customer section contains fields that allow the user to modify or delete detailed
information on the Vendor/Customer record, as well as specify various account indicators such as a
Miscellaneous Account option. On the VCM based document, the Miscellaneous Account check box is
located on the General Information tab of the Vendor/Customer section.
AFIS | Vendor Customer
40
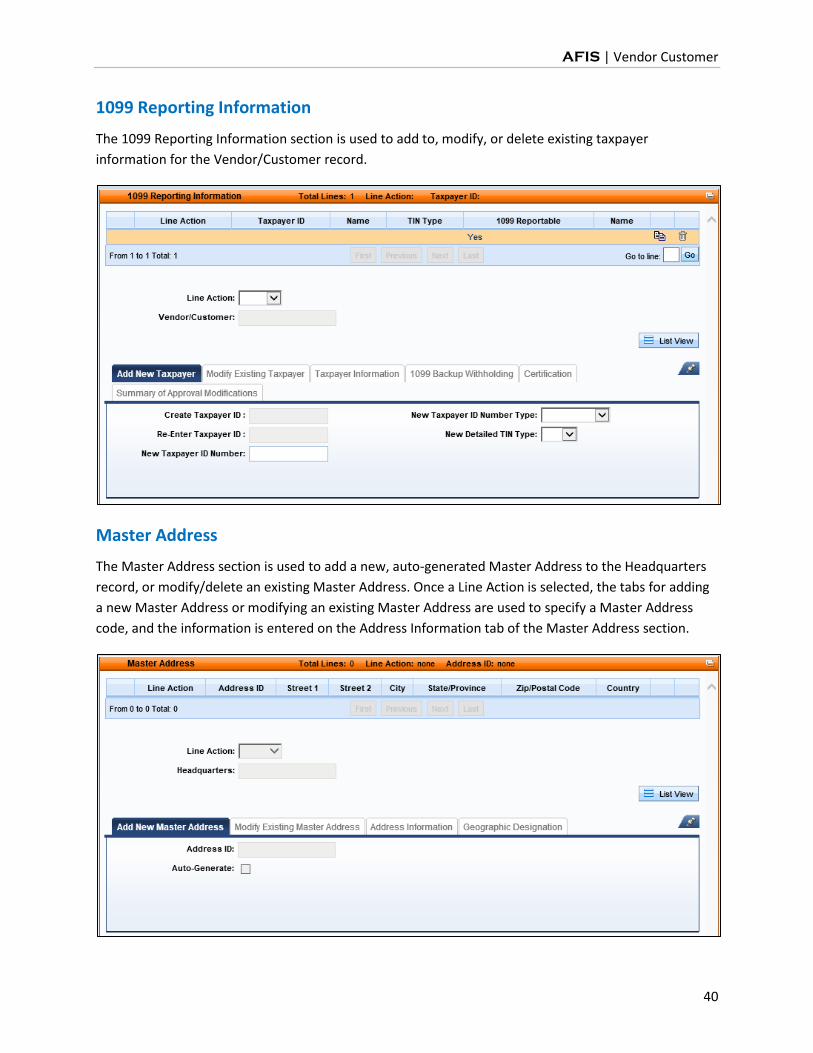
1099 Reporting Information
The 1099 Reporting Information section is used to add to, modify, or delete existing taxpayer
information for the Vendor/Customer record.
Master Address
The Master Address section is used to add a new, auto-generated Master Address to the Headquarters
record, or modify/delete an existing Master Address. Once a Line Action is selected, the tabs for adding
a new Master Address or modifying an existing Master Address are used to specify a Master Address
code, and the information is entered on the Address Information tab of the Master Address section.
AFIS | Vendor Customer
41
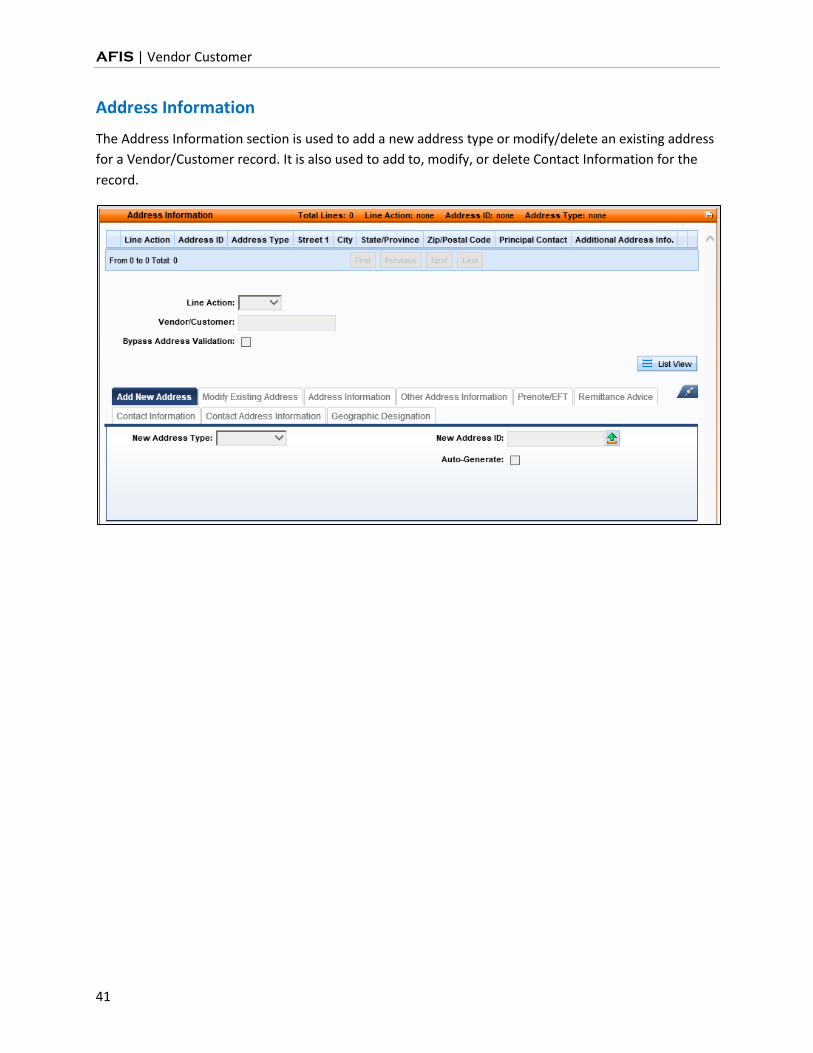
Address Information
The Address Information section is used to add a new address type or modify/delete an existing address
for a Vendor/Customer record. It is also used to add to, modify, or delete Contact Information for the
record.
AFIS | Vendor Customer
42
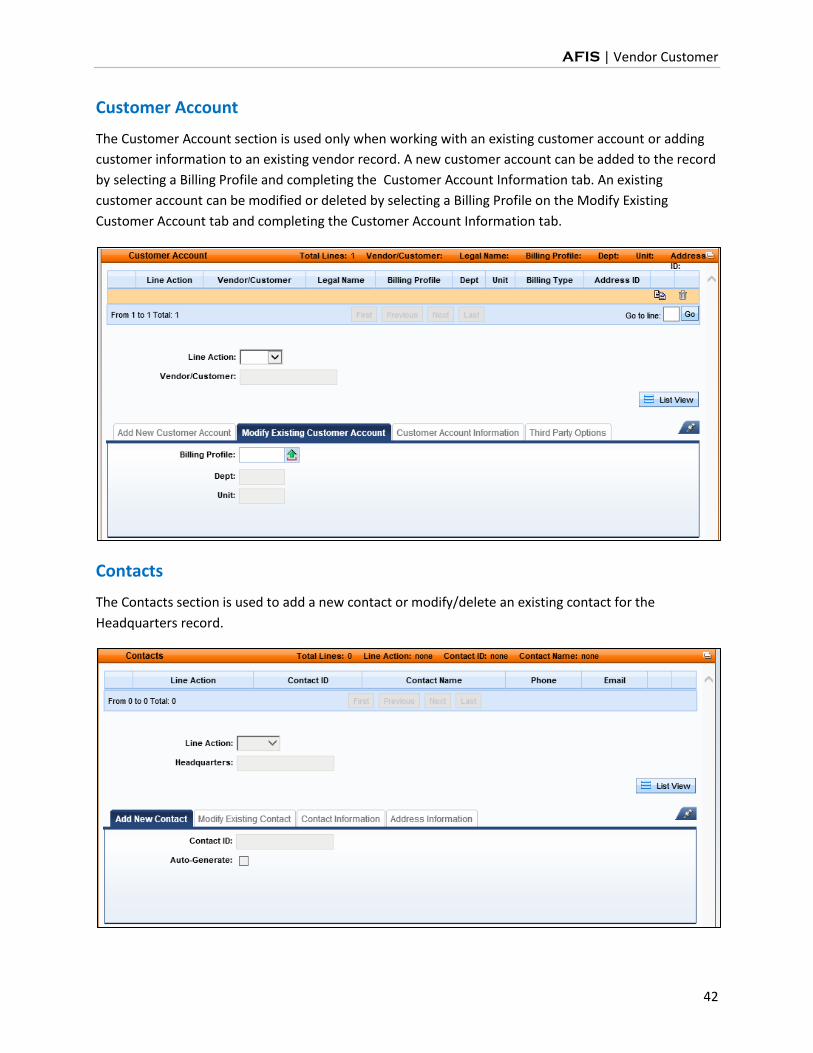
Customer Account
The Customer Account section is used only when working with an existing customer account or adding
customer information to an existing vendor record. A new customer account can be added to the record
by selecting a Billing Profile and completing the Customer Account Information tab. An existing
customer account can be modified or deleted by selecting a Billing Profile on the Modify Existing
Customer Account tab and completing the Customer Account Information tab.
Contacts
The Contacts section is used to add a new contact or modify/delete an existing contact for the
Headquarters record.
AFIS | Vendor Customer
43
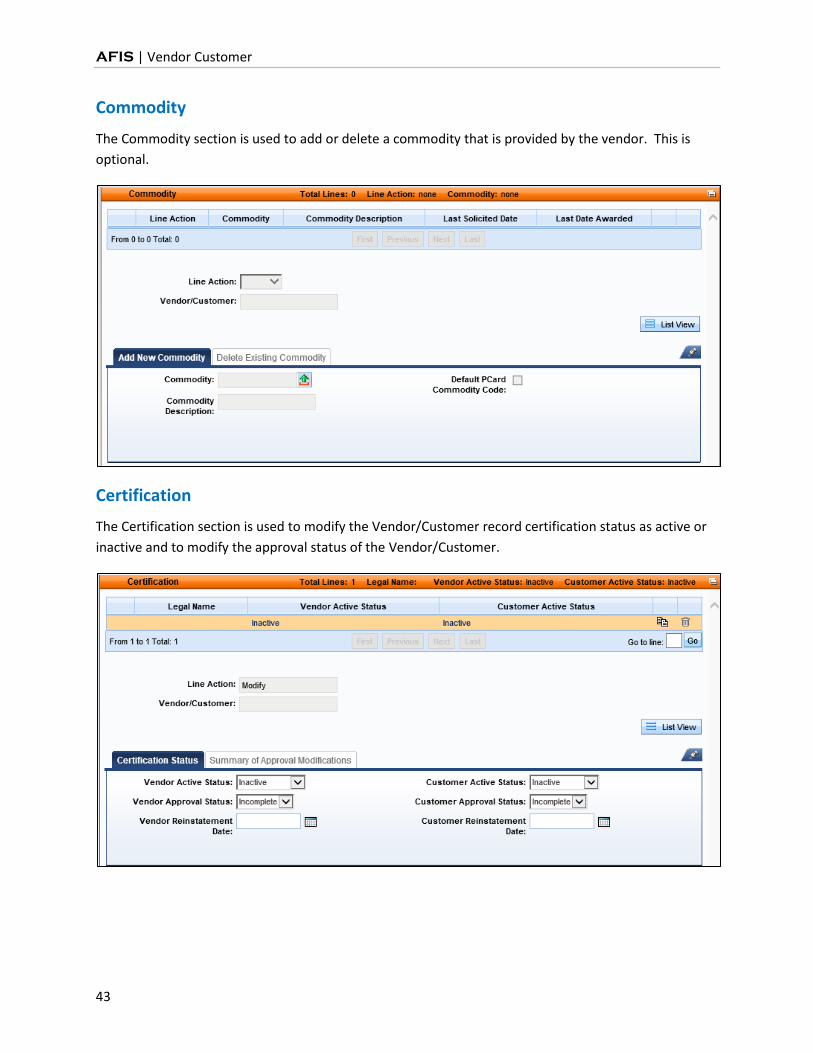
Commodity
The Commodity section is used to add or delete a commodity that is provided by the vendor. This is
optional.
Certification
The Certification section is used to modify the Vendor/Customer record certification status as active or
inactive and to modify the approval status of the Vendor/Customer.
AFIS | Vendor Customer
44
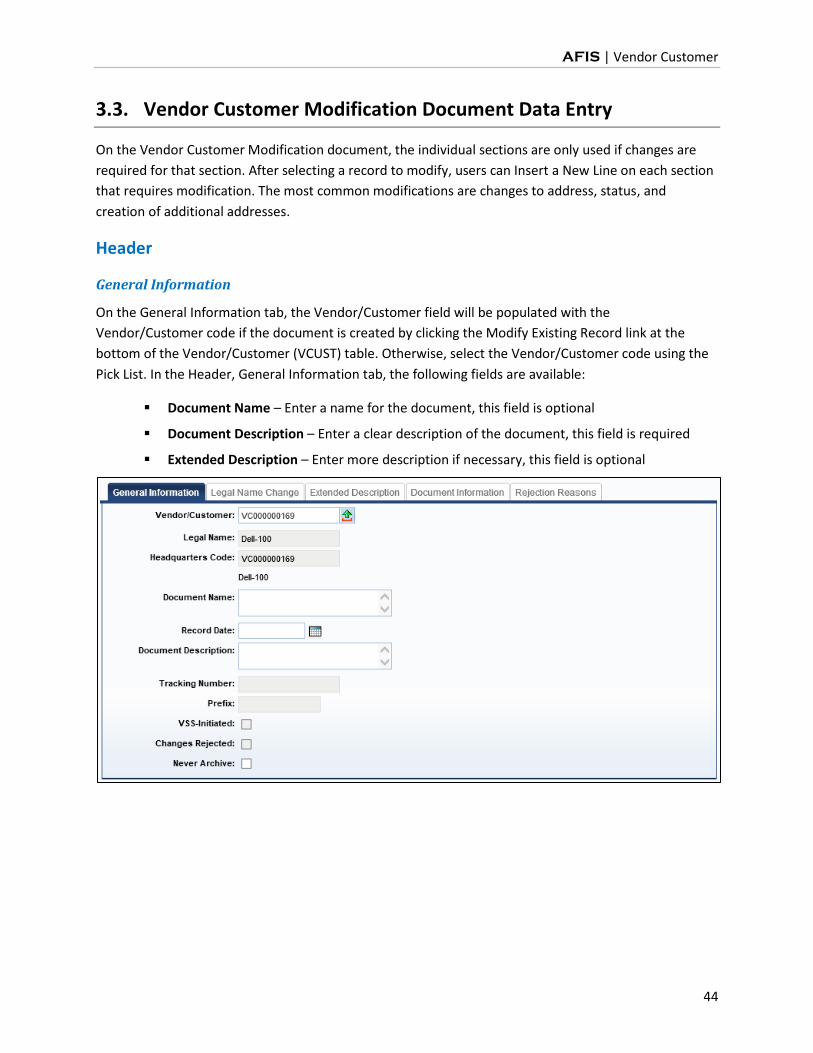
3.3. Vendor Customer Modification Document Data Entry
On the Vendor Customer Modification document, the individual sections are only used if changes are
required for that section. After selecting a record to modify, users can Insert a New Line on each section
that requires modification. The most common modifications are changes to address, status, and
creation of additional addresses.
Header
General Information
On the General Information tab, the Vendor/Customer field will be populated with the
Vendor/Customer code if the document is created by clicking the Modify Existing Record link at the
bottom of the Vendor/Customer (VCUST) table. Otherwise, select the Vendor/Customer code using the
Pick List. In the Header, General Information tab, the following fields are available:
Document Name – Enter a name for the document, this field is optional
Document Description – Enter a clear description of the document, this field is required
Extended Description – Enter more description if necessary, this field is optional
AFIS | Vendor Customer
45
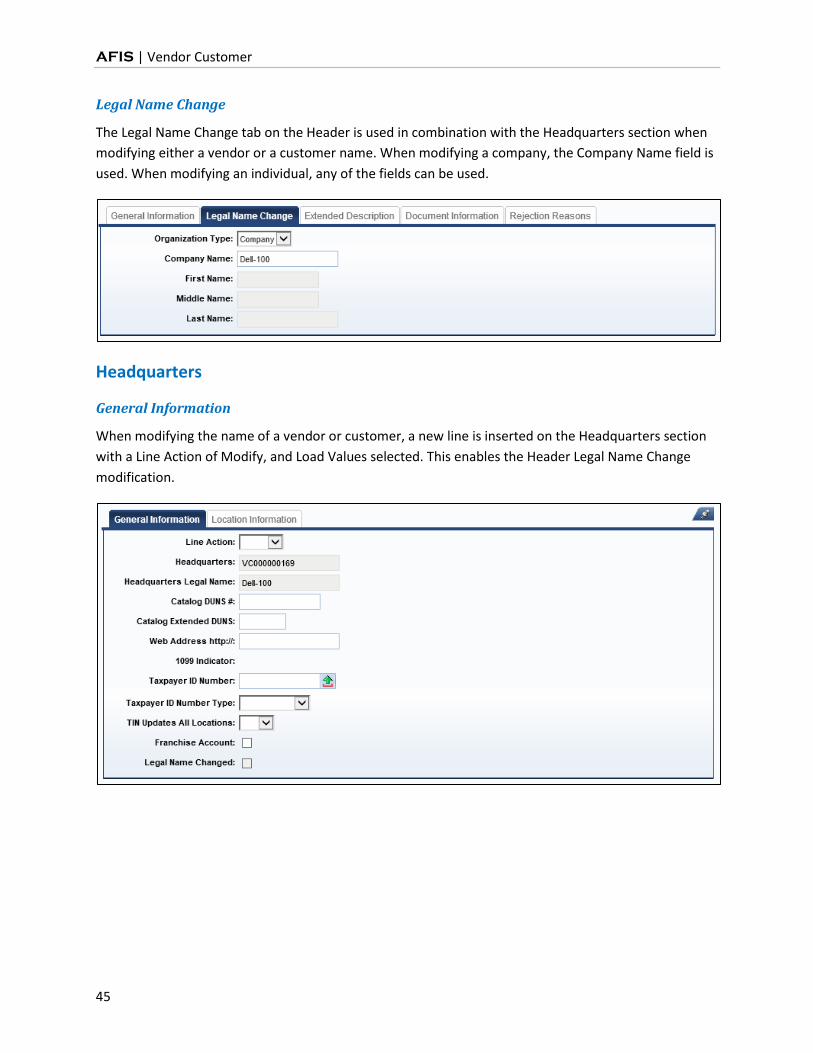
Legal Name Change
The Legal Name Change tab on the Header is used in combination with the Headquarters section when
modifying either a vendor or a customer name. When modifying a company, the Company Name field is
used. When modifying an individual, any of the fields can be used.
Headquarters
General Information
When modifying the name of a vendor or customer, a new line is inserted on the Headquarters section
with a Line Action of Modify, and Load Values selected. This enables the Header Legal Name Change
modification.
AFIS | Vendor Customer
46
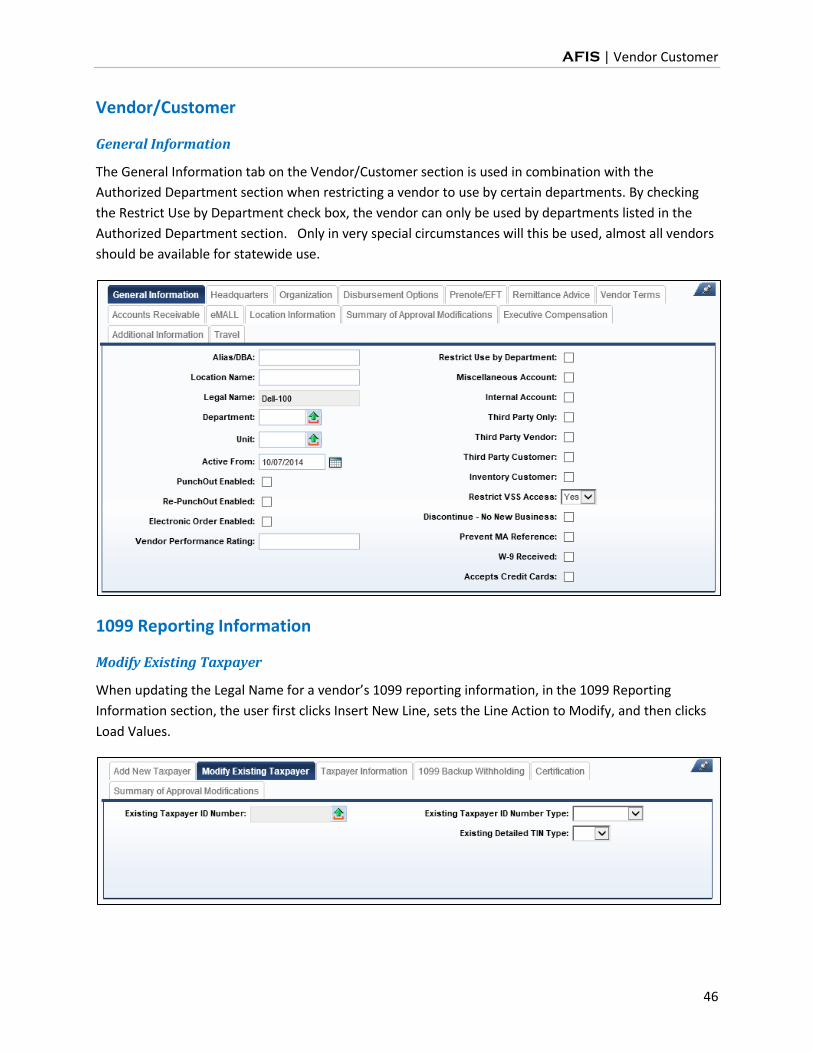
Vendor/Customer
General Information
The General Information tab on the Vendor/Customer section is used in combination with the
Authorized Department section when restricting a vendor to use by certain departments. By checking
the Restrict Use by Department check box, the vendor can only be used by departments listed in the
Authorized Department section. Only in very special circumstances will this be used, almost all vendors
should be available for statewide use.
1099 Reporting Information
Modify Existing Taxpayer
When updating the Legal Name for a vendor’s 1099 reporting information, in the 1099 Reporting
Information section, the user first clicks Insert New Line, sets the Line Action to Modify, and then clicks
Load Values.
AFIS | Vendor Customer
47
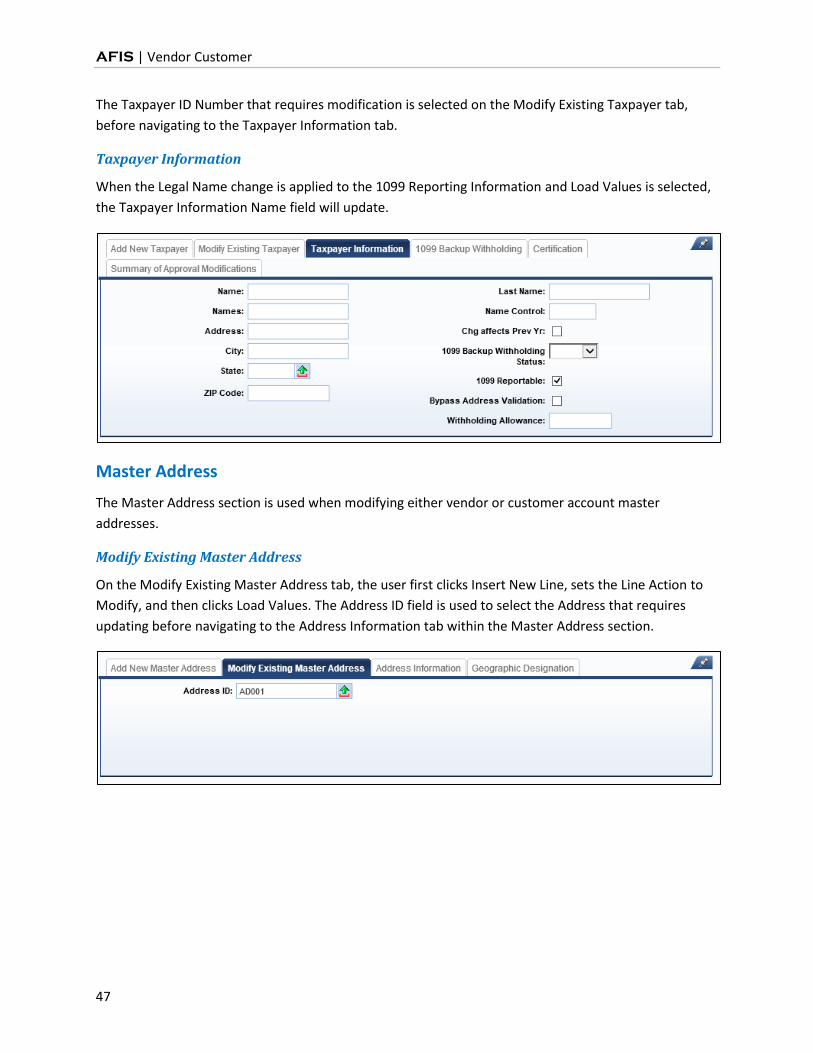
The Taxpayer ID Number that requires modification is selected on the Modify Existing Taxpayer tab,
before navigating to the Taxpayer Information tab.
Taxpayer Information
When the Legal Name change is applied to the 1099 Reporting Information and Load Values is selected,
the Taxpayer Information Name field will update.
Master Address
The Master Address section is used when modifying either vendor or customer account master
addresses.
Modify Existing Master Address
On the Modify Existing Master Address tab, the user first clicks Insert New Line, sets the Line Action to
Modify, and then clicks Load Values. The Address ID field is used to select the Address that requires
updating before navigating to the Address Information tab within the Master Address section.
AFIS | Vendor Customer
48
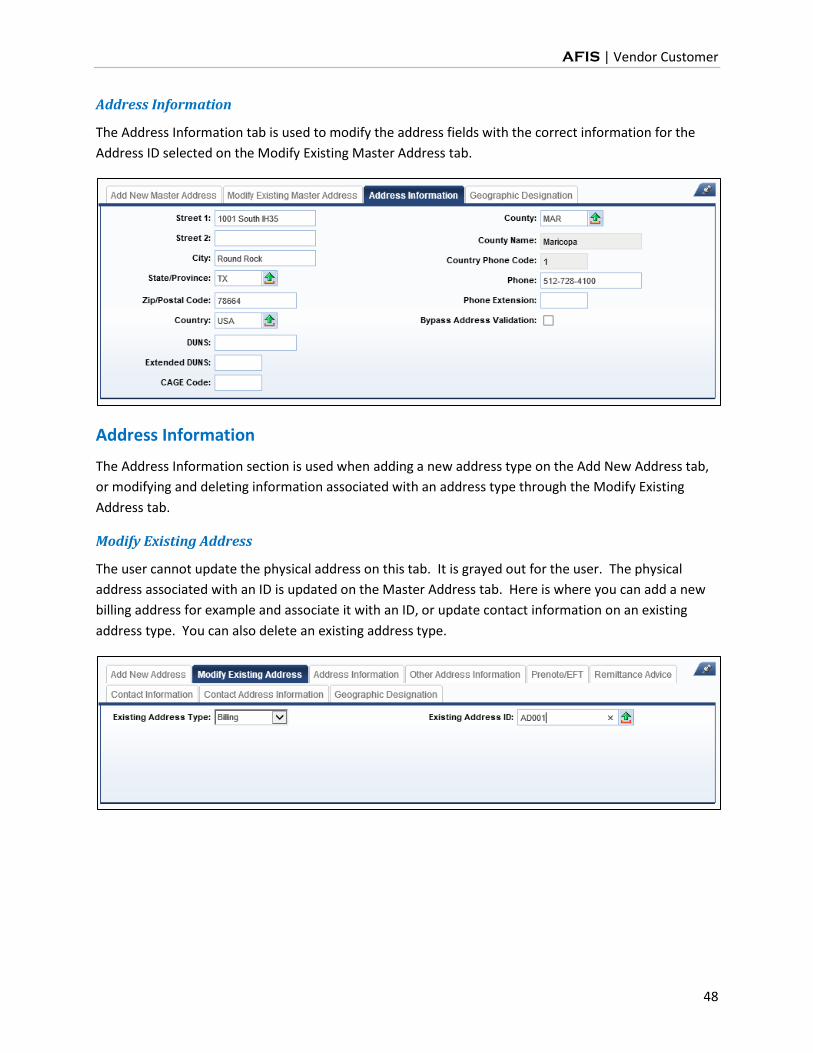
Address Information
The Address Information tab is used to modify the address fields with the correct information for the
Address ID selected on the Modify Existing Master Address tab.
Address Information
The Address Information section is used when adding a new address type on the Add New Address tab,
or modifying and deleting information associated with an address type through the Modify Existing
Address tab.
Modify Existing Address
The user cannot update the physical address on this tab. It is grayed out for the user. The physical
address associated with an ID is updated on the Master Address tab. Here is where you can add a new
billing address for example and associate it with an ID, or update contact information on an existing
address type. You can also delete an existing address type.
AFIS | Vendor Customer
49
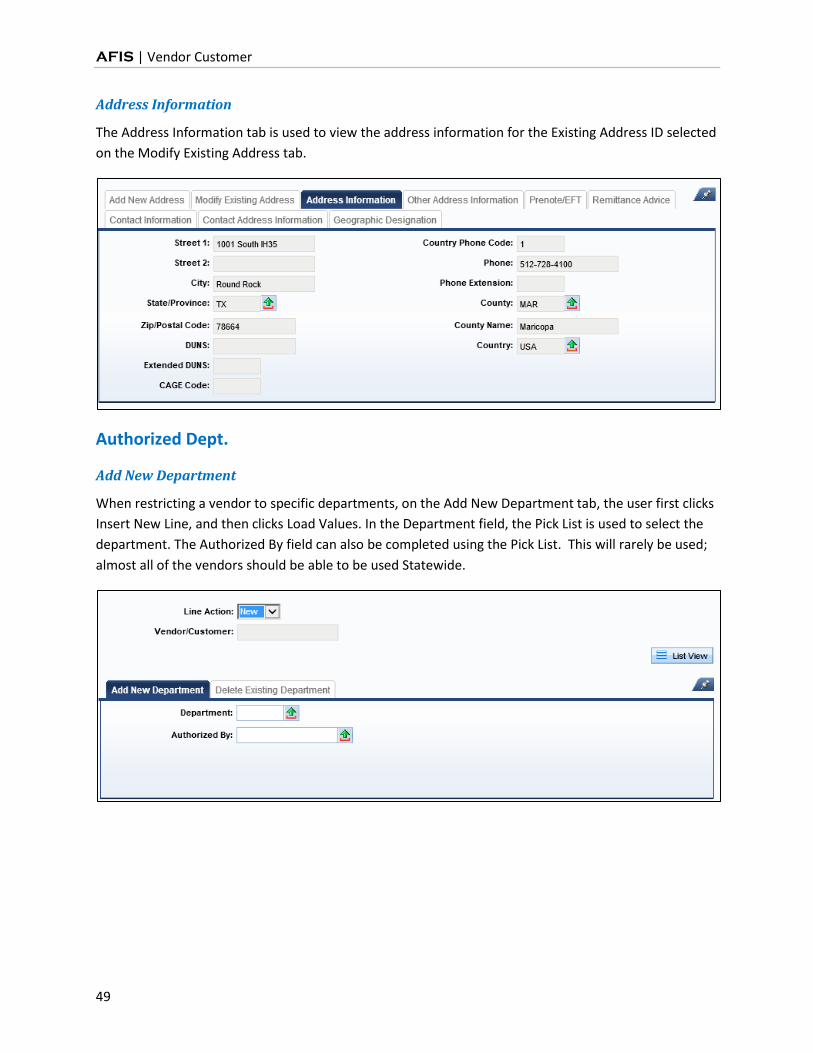
Address Information
The Address Information tab is used to view the address information for the Existing Address ID selected
on the Modify Existing Address tab.
Authorized Dept.
Add New Department
When restricting a vendor to specific departments, on the Add New Department tab, the user first clicks
Insert New Line, and then clicks Load Values. In the Department field, the Pick List is used to select the
department. The Authorized By field can also be completed using the Pick List. This will rarely be used;
almost all of the vendors should be able to be used Statewide.
AFIS | Vendor Customer
50
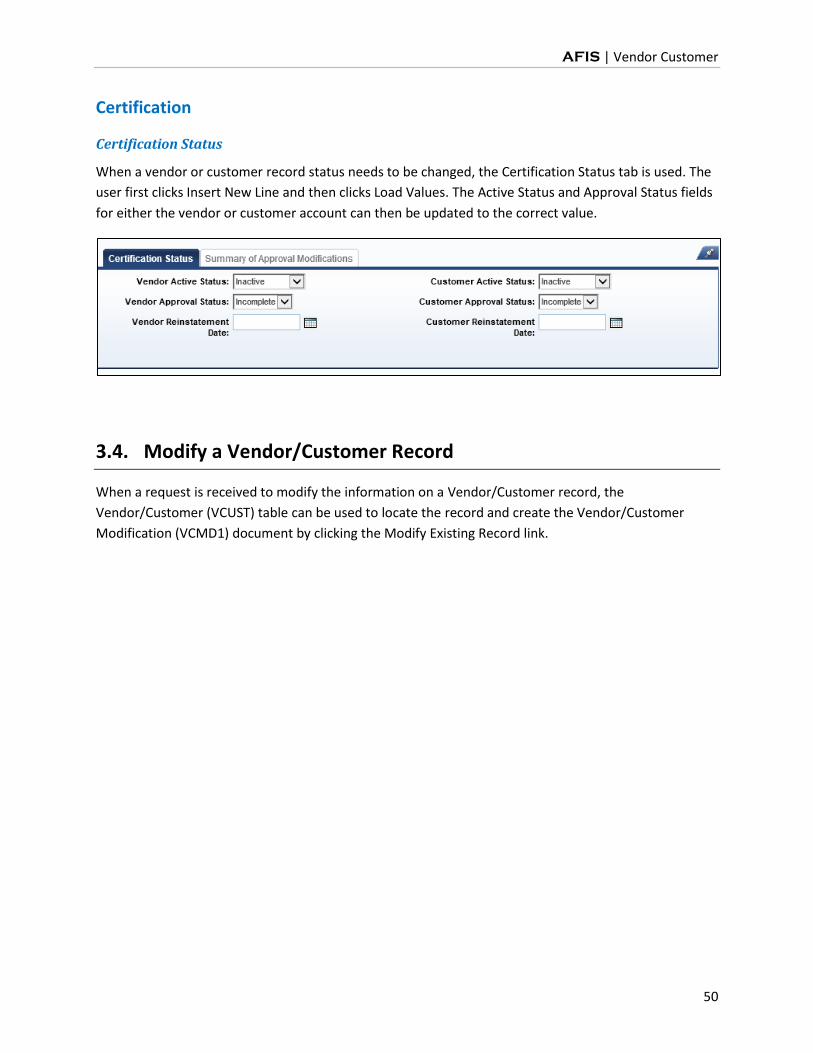
Certification
Certification Status
When a vendor or customer record status needs to be changed, the Certification Status tab is used. The
user first clicks Insert New Line and then clicks Load Values. The Active Status and Approval Status fields
for either the vendor or customer account can then be updated to the correct value.
3.4. Modify a Vendor/Customer Record
When a request is received to modify the information on a Vendor/Customer record, the
Vendor/Customer (VCUST) table can be used to locate the record and create the Vendor/Customer
Modification (VCMD1) document by clicking the Modify Existing Record link.

AFIS | Vendor Customer
51
ACTIVITY 3.4
Modify a Vendor/Customer Record
Scenario
The State of Arizona wants to purchase 1000 new laptop computers from the computer manufacturer,
Dell. You know that Dell is already an established vendor in AFIS and requires updates for new address
details. Before creating a delivery order, the vendor’s new address needs to be added. You will use the
VCUST table to locate the record and create a Vendor/Customer Modification (VCMD1) document to
make the necessary updates to the account.
Setup
User is logged into the AFIS Home Page.
Steps
A. Navigate to the Vendor/Customer table.
1. In the Jump to field, enter VCUST.
2. Click Go. The VCUST table opens. A search popup window opens.
B. Search for the record that requires updating.
1. In the Search window, in the Legal Name field, enter Dell Computer_xxx, where xxx is your
Student Number.
2. Click Ok. The Vendor/Customer table opens with the record displayed.
AFIS | Vendor Customer
52
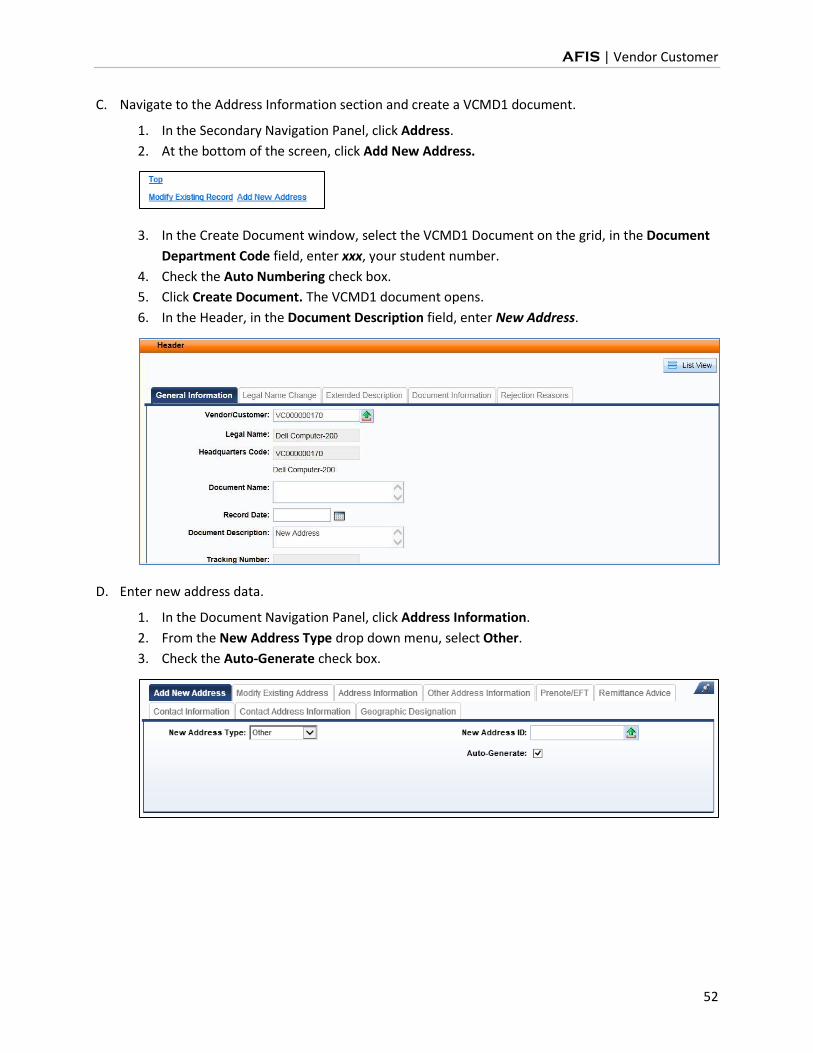
C. Navigate to the Address Information section and create a VCMD1 document.
1. In the Secondary Navigation Panel, click Address.
2. At the bottom of the screen, click Add New Address.
3. In the Create Document window, select the VCMD1 Document on the grid, in the Document
Department Code field, enter xxx, your student number.
4. Check the Auto Numbering check box.
5. Click Create Document. The VCMD1 document opens.
6. In the Header, in the Document Description field, enter New Address.
D. Enter new address data.
1. In the Document Navigation Panel, click Address Information.
2. From the New Address Type drop down menu, select Other.
3. Check the Auto-Generate check box.
AFIS | Vendor Customer
53
4. Click the Address Information tab.
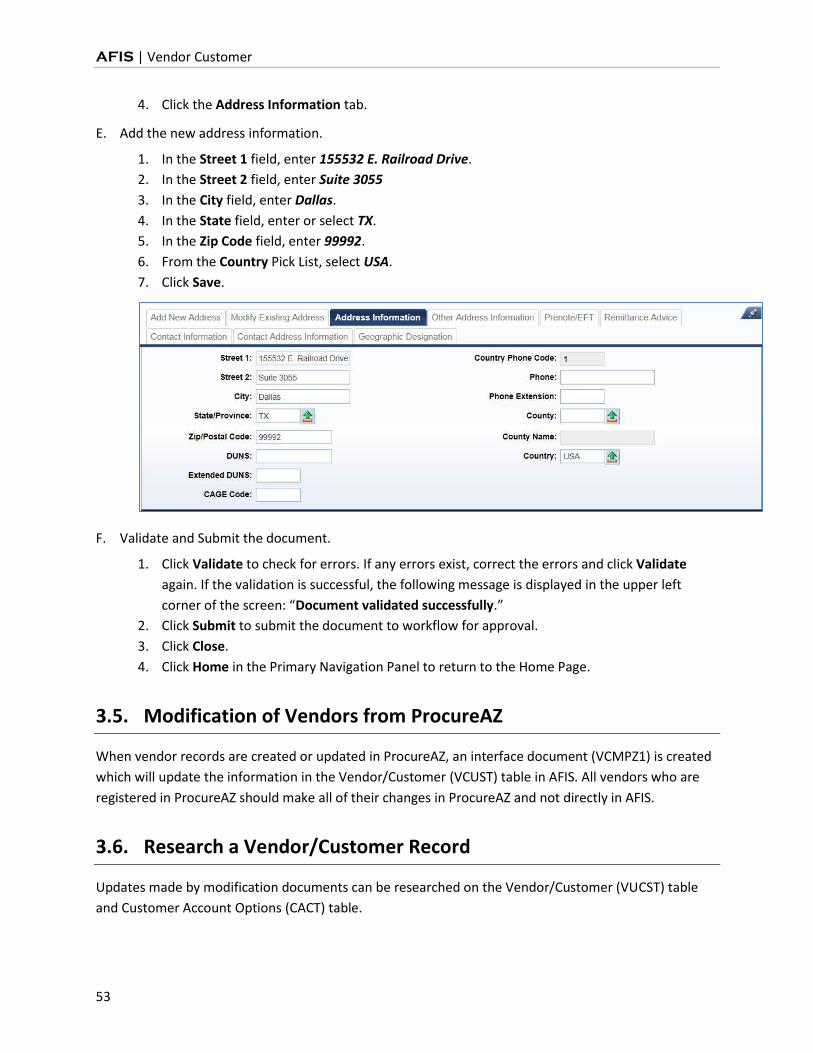
E. Add the new address information.
1. In the Street 1 field, enter 155532 E. Railroad Drive.
2. In the Street 2 field, enter Suite 3055
3. In the City field, enter Dallas.
4. In the State field, enter or select TX.
5. In the Zip Code field, enter 99992.
6. From the Country Pick List, select USA.
7. Click Save.
F. Validate and Submit the document.
1. Click Validate to check for errors. If any errors exist, correct the errors and click Validate
again. If the validation is successful, the following message is displayed in the upper left
corner of the screen: “Document validated successfully.”
2. Click Submit to submit the document to workflow for approval.
3. Click Close.
4. Click Home in the Primary Navigation Panel to return to the Home Page.
3.5. Modification of Vendors from ProcureAZ
When vendor records are created or updated in ProcureAZ, an interface document (VCMPZ1) is created
which will update the information in the Vendor/Customer (VCUST) table in AFIS. All vendors who are
registered in ProcureAZ should make all of their changes in ProcureAZ and not directly in AFIS.
3.6. Research a Vendor/Customer Record
Updates made by modification documents can be researched on the Vendor/Customer (VUCST) table
and Customer Account Options (CACT) table.
AFIS | Vendor Customer
54
ACTIVITY 3.1
Research a Vendor/Customer Record
Scenario
After processing the updates on a customer account record, you want to verify the changes have been
made on the VCUST and CACT tables in AFIS.
Setup
User is logged into the AFIS Home Page.
Steps
A. Navigate to the Vendor Customer table using the Jump to feature.
1. In the Jump to field, enter VCUST.
2. Click Go. The VCUST table opens. A Search popup window opens.
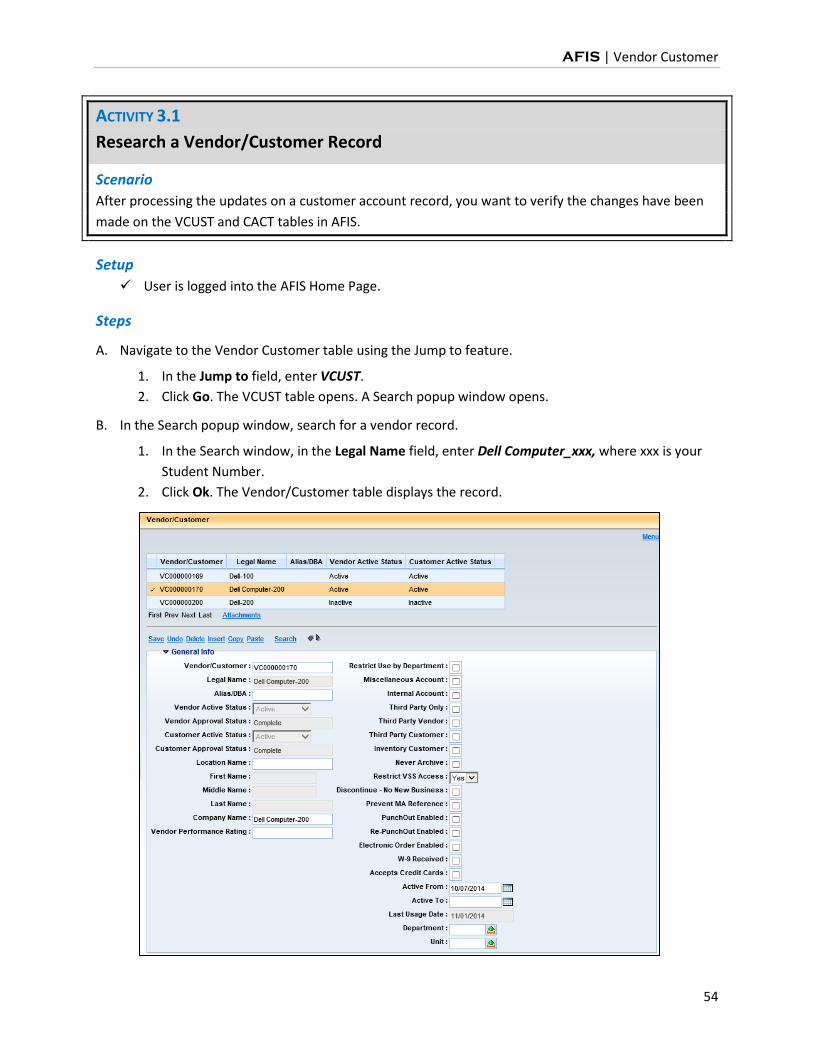
B. In the Search popup window, search for a vendor record.
1. In the Search window, in the Legal Name field, enter Dell Computer_xxx, where xxx is your
Student Number.
2. Click Ok. The Vendor/Customer table displays the record.
AFIS | Vendor Customer
55
C. Explore the sections and tabs for the record on the Vendor/Customer table.
1. In the General Info tab, observe the Legal Name and Company Name field values.
2. In the Address section, observe the Address Types that exist for the record.
3. Select the line for the Billing Address Type.
4. Observe the Address Information for the record.
5. When you are finished, click Home to return to the Home Page.
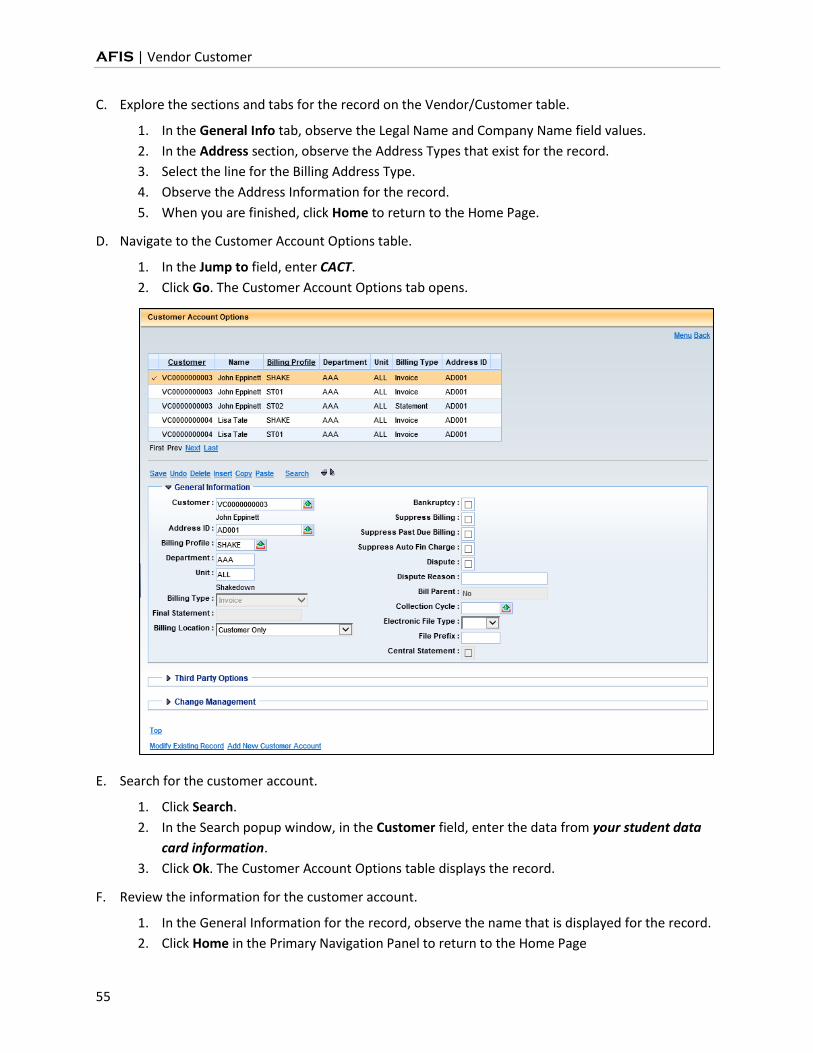
D. Navigate to the Customer Account Options table.
1. In the Jump to field, enter CACT.
2. Click Go. The Customer Account Options tab opens.
E. Search for the customer account.
1. Click Search.
2. In the Search popup window, in the Customer field, enter the data from your student data
card information.
3. Click Ok. The Customer Account Options table displays the record.
F. Review the information for the customer account.
1. In the General Information for the record, observe the name that is displayed for the record.
2. Click Home in the Primary Navigation Panel to return to the Home Page
AFIS | Vendor Customer
56
4. Vendor Hold and Customer Dispute Tracking
Learning Objectives
In this lesson, you will:
Review the vendor hold process
Review the customer account dispute process
Lesson Overview
In AFIS, vendor accounts may need to be placed into a hold status for specific departments. Customers
may need to be marked as being in dispute. These designations can be temporary in nature. This lesson
reviews these processes and the document options that are used to update the necessary accounts.
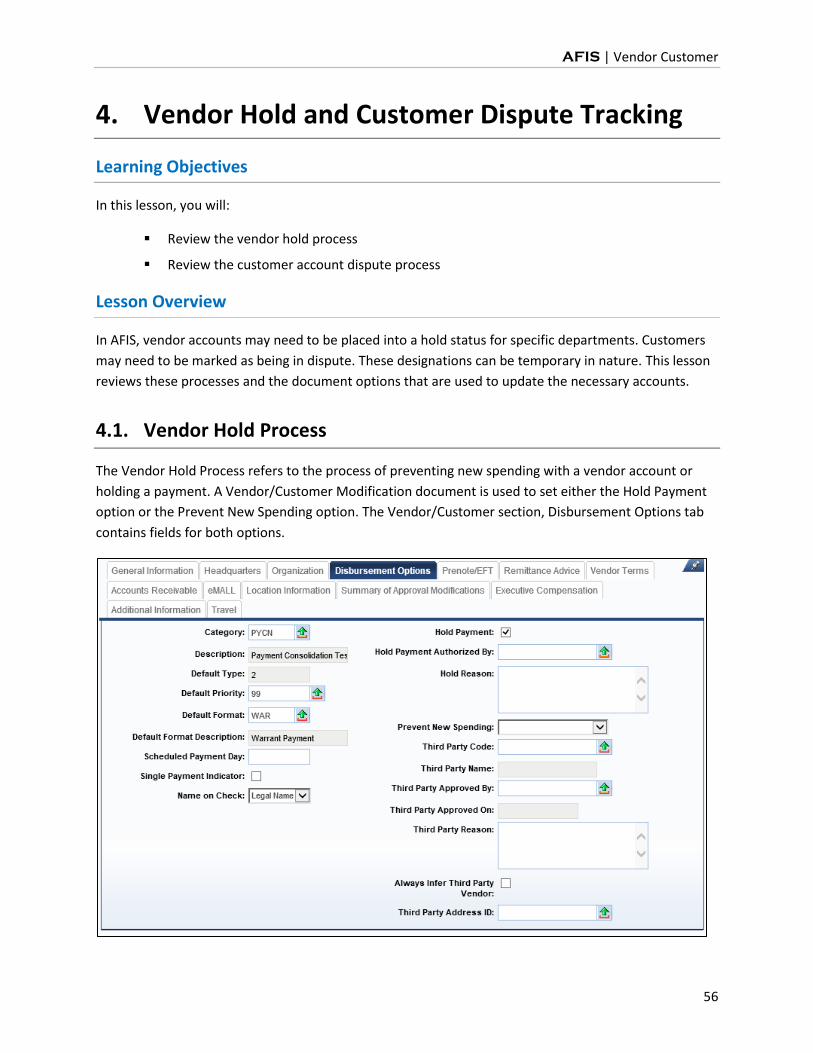
4.1. Vendor Hold Process
The Vendor Hold Process refers to the process of preventing new spending with a vendor account or
holding a payment. A Vendor/Customer Modification document is used to set either the Hold Payment
option or the Prevent New Spending option. The Vendor/Customer section, Disbursement Options tab
contains fields for both options.
AFIS | Vendor Customer
57
Prevent New Spending can be activated for specific departments or all departments. When specific
departments are required, the Prevent Spending section of the Vendor/Customer Modification
document is used to add or remove departments from the list of departments that cannot spend with
the vendor.
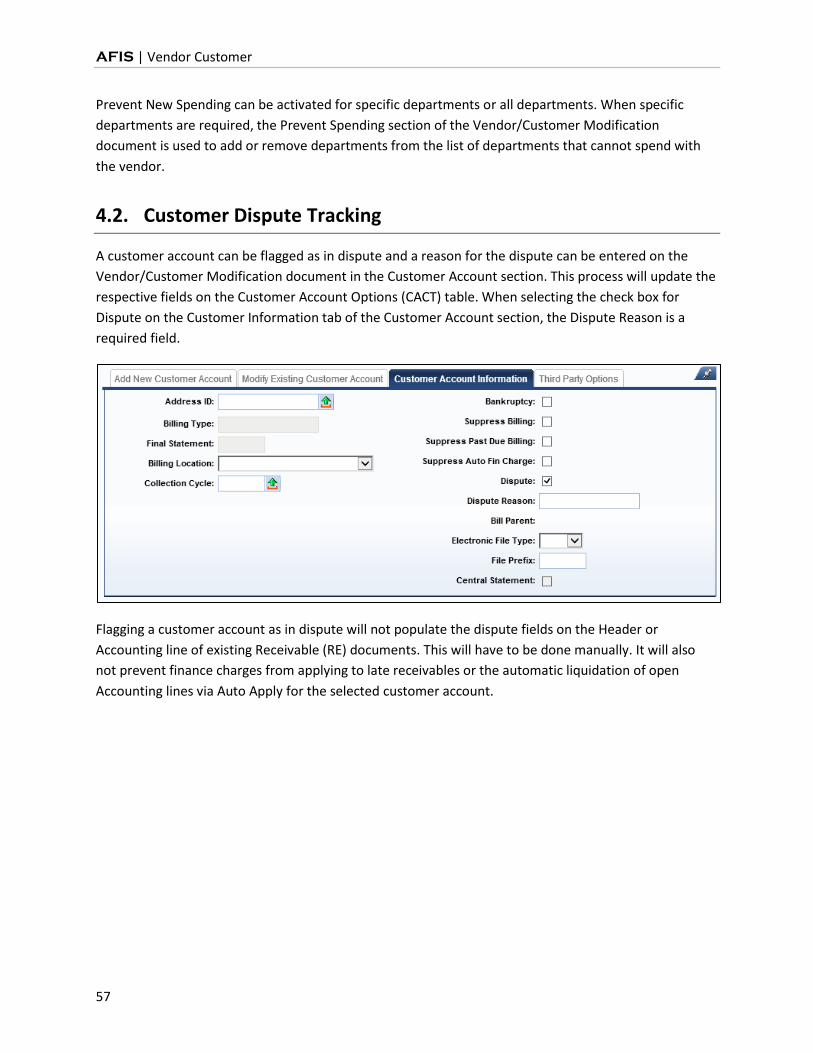
4.2. Customer Dispute Tracking
A customer account can be flagged as in dispute and a reason for the dispute can be entered on the
Vendor/Customer Modification document in the Customer Account section. This process will update the
respective fields on the Customer Account Options (CACT) table. When selecting the check box for
Dispute on the Customer Information tab of the Customer Account section, the Dispute Reason is a
required field.
Flagging a customer account as in dispute will not populate the dispute fields on the Header or
Accounting line of existing Receivable (RE) documents. This will have to be done manually. It will also
not prevent finance charges from applying to late receivables or the automatic liquidation of open
Accounting lines via Auto Apply for the selected customer account.
AFIS | Vendor Customer
58
5. Vendor ACH Data
Learning Objectives
In this lesson, you will:
Identify the vendor ACH/EFT data in the Vendor/Customer table
Lesson Overview
Vendors can provide originally or update GAO with their ACH/EFT data by submitting a paper form to
GAO for data entry on a Vendor/Customer Creation – ACH (VCCE1) document or Vendor/Customer
Modification - EFT (VCME1) document. Only authorized users will be able to use the VCCE1 or VCME1
documents or see the fields that these documents update on the Vendor/Customer (VCUST) table.
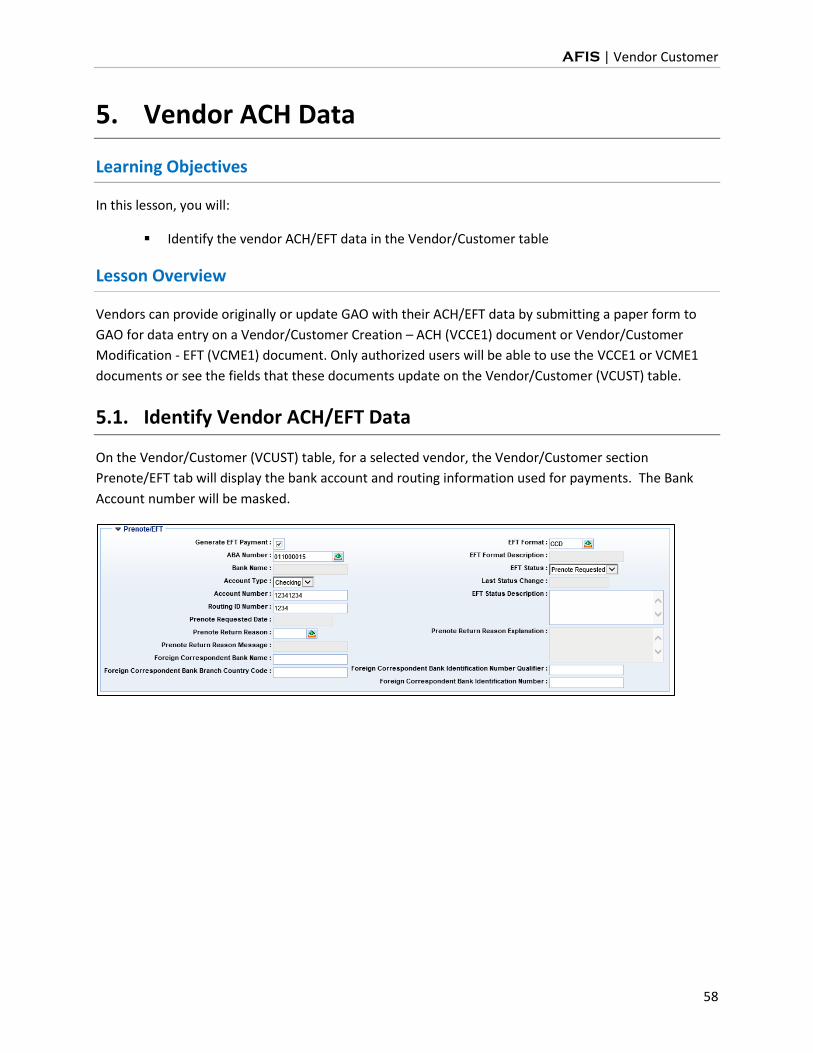
5.1. Identify Vendor ACH/EFT Data
On the Vendor/Customer (VCUST) table, for a selected vendor, the Vendor/Customer section
Prenote/EFT tab will display the bank account and routing information used for payments. The Bank
Account number will be masked.
AFIS | Vendor Customer
59
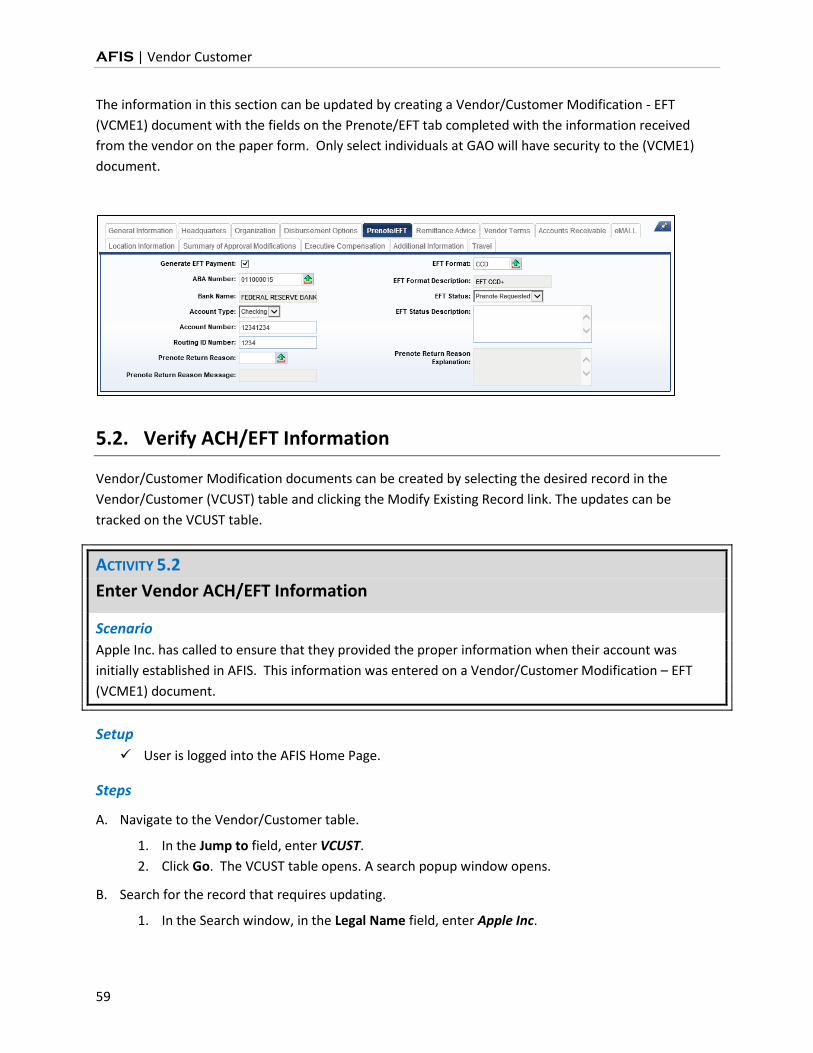
The information in this section can be updated by creating a Vendor/Customer Modification - EFT
(VCME1) document with the fields on the Prenote/EFT tab completed with the information received
from the vendor on the paper form. Only select individuals at GAO will have security to the (VCME1)
document.
5.2. Verify ACH/EFT Information
Vendor/Customer Modification documents can be created by selecting the desired record in the
Vendor/Customer (VCUST) table and clicking the Modify Existing Record link. The updates can be
tracked on the VCUST table.
ACTIVITY 5.2
Enter Vendor ACH/EFT Information
Scenario
Apple Inc. has called to ensure that they provided the proper information when their account was
initially established in AFIS. This information was entered on a Vendor/Customer Modification – EFT
(VCME1) document.
Setup
User is logged into the AFIS Home Page.
Steps
A. Navigate to the Vendor/Customer table.
1. In the Jump to field, enter VCUST.
2. Click Go. The VCUST table opens. A search popup window opens.
B. Search for the record that requires updating.
1. In the Search window, in the Legal Name field, enter Apple Inc.
AFIS | Vendor Customer
60
2. Click Ok. The Vendor/Customer table opens with the record displayed.
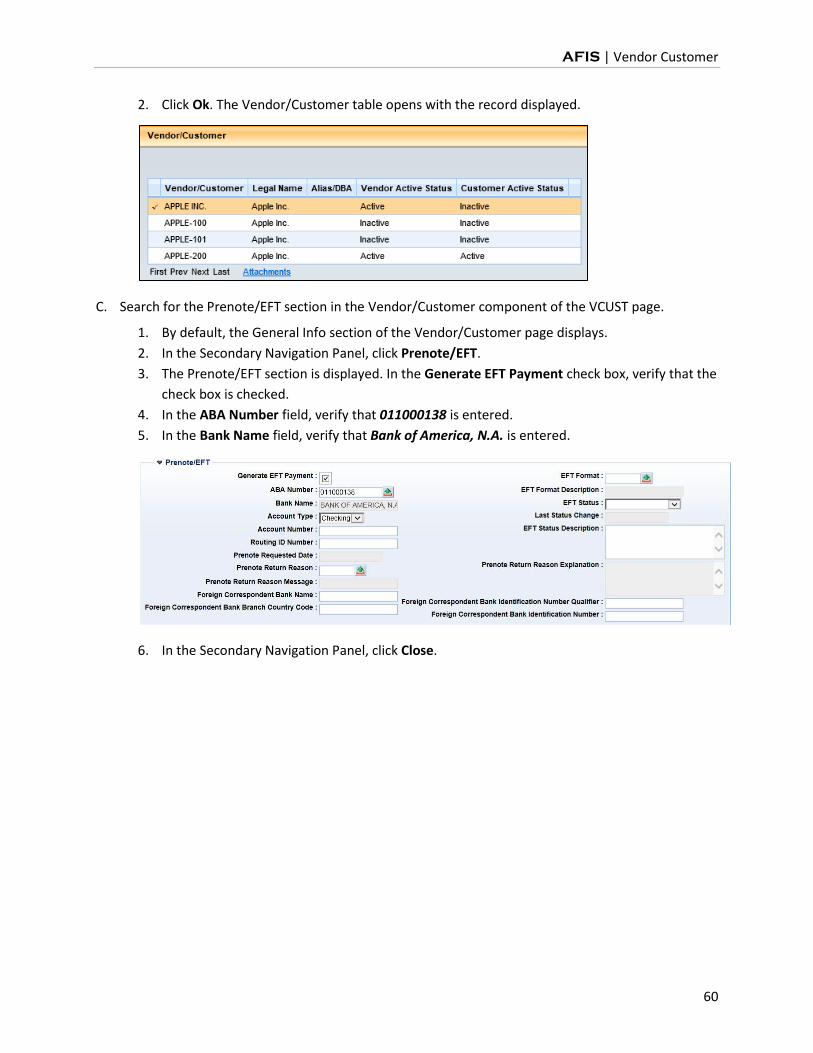
C. Search for the Prenote/EFT section in the Vendor/Customer component of the VCUST page.
1. By default, the General Info section of the Vendor/Customer page displays.
2. In the Secondary Navigation Panel, click Prenote/EFT.
3. The Prenote/EFT section is displayed. In the Generate EFT Payment check box, verify that the
check box is checked.
4. In the ABA Number field, verify that 011000138 is entered.
5. In the Bank Name field, verify that Bank of America, N.A. is entered.
6. In the Secondary Navigation Panel, click Close.
AFIS | Vendor Customer
61
Appendix
TERMINOLOGY
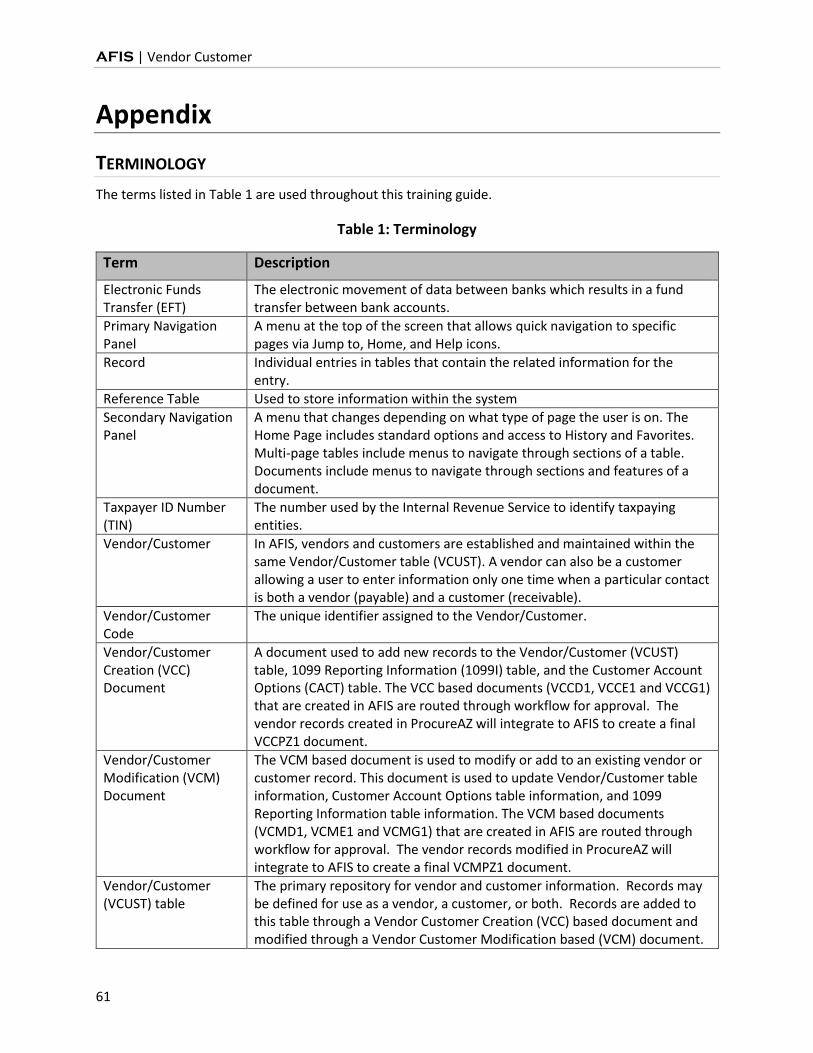
The terms listed in Table 1 are used throughout this training guide.
Table 1: Terminology
Term Description
Electronic Funds Transfer (EFT)
The electronic movement of data between banks which results in a fund transfer between bank accounts.
Primary Navigation Panel
A menu at the top of the screen that allows quick navigation to specific pages via Jump to, Home, and Help icons.
Record Individual entries in tables that contain the related information for the entry.
Reference Table Used to store information within the system
Secondary Navigation Panel
A menu that changes depending on what type of page the user is on. The Home Page includes standard options and access to History and Favorites. Multi-page tables include menus to navigate through sections of a table. Documents include menus to navigate through sections and features of a document.
Taxpayer ID Number (TIN)
The number used by the Internal Revenue Service to identify taxpaying entities.
Vendor/Customer In AFIS, vendors and customers are established and maintained within the same Vendor/Customer table (VCUST). A vendor can also be a customer allowing a user to enter information only one time when a particular contact is both a vendor (payable) and a customer (receivable).
Vendor/Customer Code
The unique identifier assigned to the Vendor/Customer.
Vendor/Customer Creation (VCC) Document
A document used to add new records to the Vendor/Customer (VCUST) table, 1099 Reporting Information (1099I) table, and the Customer Account Options (CACT) table. The VCC based documents (VCCD1, VCCE1 and VCCG1) that are created in AFIS are routed through workflow for approval. The vendor records created in ProcureAZ will integrate to AFIS to create a final VCCPZ1 document.
Vendor/Customer Modification (VCM) Document
The VCM based document is used to modify or add to an existing vendor or customer record. This document is used to update Vendor/Customer table information, Customer Account Options table information, and 1099 Reporting Information table information. The VCM based documents (VCMD1, VCME1 and VCMG1) that are created in AFIS are routed through workflow for approval. The vendor records modified in ProcureAZ will integrate to AFIS to create a final VCMPZ1 document.
Vendor/Customer (VCUST) table
The primary repository for vendor and customer information. Records may be defined for use as a vendor, a customer, or both. Records are added to this table through a Vendor Customer Creation (VCC) based document and modified through a Vendor Customer Modification based (VCM) document.
AFIS | Vendor Customer
62
Multiple VCC & VCM documents are available depending on the user establishing the vendor or customer.
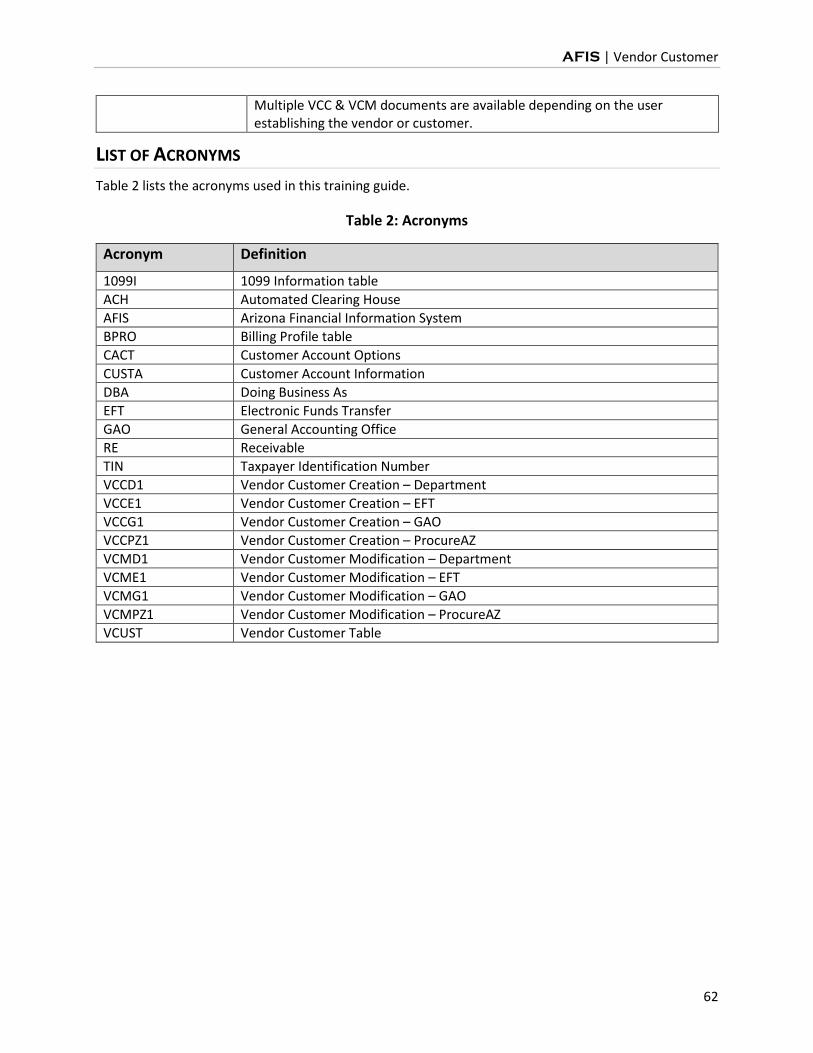
LIST OF ACRONYMS
Table 2 lists the acronyms used in this training guide.
Table 2: Acronyms
Acronym Definition
1099I 1099 Information table
ACH Automated Clearing House
AFIS Arizona Financial Information System
BPRO Billing Profile table
CACT Customer Account Options
CUSTA Customer Account Information
DBA Doing Business As
EFT Electronic Funds Transfer
GAO General Accounting Office
RE Receivable
TIN Taxpayer Identification Number
VCCD1 Vendor Customer Creation – Department
VCCE1 Vendor Customer Creation – EFT
VCCG1 Vendor Customer Creation – GAO
VCCPZ1 Vendor Customer Creation – ProcureAZ
VCMD1 Vendor Customer Modification – Department
VCME1 Vendor Customer Modification – EFT
VCMG1 Vendor Customer Modification – GAO
VCMPZ1 Vendor Customer Modification – ProcureAZ
VCUST Vendor Customer Table