vcs sketch - vanguard appraisals, inc.vanguard appraisals, inc. fall 2009 6 now to draw a line going...
TRANSCRIPT

VCS SKETCH
2009 User Group Meeting
From Field… To Finished in CAMAvision…

____________________________ Vanguard Appraisals, Inc. Fall 2009
2
Accessing Sketch in Parcel Maintenance To get started with Sketch open CAMAvision® enter Parcel Maintenance and load the parcel you’re going to sketch. Now click on the Sketch button to enter the sketch program. If there is a number in the text of the button (e.g., “Sketch [2]”) this indicates the number of sketches on the parcel.
Adding a New Sketch Screen If you’re dealing with a new parcel or a parcel without a current sketch the canvas will be blank. To start sketching we have to open a new sketch canvas, to do that click on the icon that looks like a blank sheet of paper.
Adding a Sketch Object
To start sketching an object, choose the “add a general object” icon from the tool sketching tool bar as shown to the left. The keyboard shortcut is <Ctrl>+<O>. After clicking on the new object icon the “Define New Sketch Item” window opens. From here we can Name and place the new object on the canvas.

____________________________ Vanguard Appraisals, Inc. Fall 2009
3
After naming the object, for this example we’re using 1S B FR (MAIN), click OK at the bottom left of the window. TIP: The “Instant Object” tab has many predefined shapes. Simply select the shape, enter a couple of dimension length, and let sketch do the rest. It is ideal if all you are drawing is a box, or rectangle, and makes short work of drawing gazebos.
Basic Drawing After clicking OK the drawing toolbar becomes active. Choose which style of line you’re going to draw. We’re going to start with a “Horz/Vert Line.”

____________________________ Vanguard Appraisals, Inc. Fall 2009
4
Press the button indicated on the toolbar or use the keyboard short-cut <Ctrl>+<L>.
*Also notice at the bottom of the screen step by step directions are prompting you.
At this point we’re being prompted to enter a Length of the line we wish to draw. Type the desired Length. I’m using 24 in this example.
TIP: Lengths and diameters are always measured in feet. Fractions of a foot are entered as a decimal. Here is a conversion chart of decimal to inches.
Decimal to Inches 0.0833 = 1 inch 0.1667 = 2 inches 0.2500 = 3 inches 0.3333 = 4 inches 0.4167 = 5 inches 0.5000 = 6 inches 0.5833 = 7 inches 0.6667 = 8 inches 0.7500 = 9 inches 0.8333 = 10 inches 0.9167 = 11 inches
Example: To enter 24’ 6” you would type: 24.5

____________________________ Vanguard Appraisals, Inc. Fall 2009
5
On the canvas you’ll notice a + symbol. This is the starting point of your sketch.
To draw horizontal and vertical lines, press one of the four arrow keys on your keyboard after typing in the length. So, I’ll enter 24 in the Length field then immediately press the up arrow key to insert a 24 foot vertical line on my canvas.

____________________________ Vanguard Appraisals, Inc. Fall 2009
6
Now to draw a line going to the right enter a number in the Length field (I’ll use 8) then press the right arrow key. This will make the line as shown below.
At this point I’m going to draw an angle. There are a few ways to do this. I’ll start with the “Free Ended Line” key on the drawing tool bar. This icon is located just to the right of the Horz/Vert key. The keyboard shortcut is <Ctrl>+<F>.
A free-ended line will draw in all directions: up, down, left, right and will only be anchored when you press <Enter>. Until the line is anchored, you can repeatedly type in a length and press a direction key and the line will change. Free-ended drawing combines the capabilities of the simple horizontal/vertical drawing mode and diagonal drawing. It can even be used in place of these two other drawing modes.

____________________________ Vanguard Appraisals, Inc. Fall 2009
7
In the above example I entered a 2 in my Length field then used the up arrow, I then entered a 2 in the Length field again but used the right arrow to make a 2’10” diagonal line. The line is anchored by pressing <Enter>. The other way to draw a diagonal line is to use the “Radial Line” tool on the toolbar. This is located just to the right of the Free Ended Line icon. The keyboard shortcut is <Ctrl>+<R>.
You’ll notice now we’re being prompted to enter Degrees. In order to use this tool you must know what degree the angle is and how long the line is. This degree diagram can be used to determine how an angled line will be drawn in Sketch.
In order to draw a diagonal line going back towards the house I find that the angle is 135° and type that into the toolbar and press the <Enter> key.
At this point you’re prompted to enter the Length. In this case it’s 2’10”. In order to draw the line 2’10” long you must convert the 10” to a percentage. 10 inches divided by 12 inches is 83% so the number I’ll be entering into the tool bar is 2.83 for the length. Refer to the tip on decimal inches (above).
Now I have a diagonal line 2’10” long going back towards the base of my dwelling.

____________________________ Vanguard Appraisals, Inc. Fall 2009
8
As you can see the sketch can become crowded with dimension labels as we draw our object. In order to remove these unneeded or unwanted labels press the <Delete> key on your computer’s keyboard. Once will turn the label off, pressing it again will turn the dimension label back on.
One more way to draw a diagonal line is to use the “Diagonal Line” tool on the tool bar, located to the right of the Radial Line tool. The keyboard shortcut is <Ctrl>+<D>.
This tool behaves similar to the Free Ended line tool. First you must enter the Length then press an arrow key to move to the first pivot point. For example, enter 2 and use the up arrow then enter 2 and use the right arrow making a 2’10” diagonal line. As you can see, it behaves just like the Free Ended line tool. But unlike the Free Ended line, you can only enter two lines for the Diagonal Line tool.

____________________________ Vanguard Appraisals, Inc. Fall 2009
9
The next tool is the “Three Point Arc” which is located to the right of the Diagonal Line tool on the toolbar. Arcs are among the most challenging lines to draw, but the Three Point Arc makes it a breeze. The keyboard shortcut is <Ctrl>+<A>.
The first step is to use the arrow keys to move to the ending point of the arc. At this point you position the cursor point similar to the Free Ended line: typing in Lengths and pressing the arrow keys to move the cursor. You can move the cursor in any direction at one-inch intervals or type in a Length and then press an arrow key to draw a straight line. The end point is committed when <Enter> is pressed. Note: This imaginary line you are drawing is the cord length of the arc. In this instance the length from one side of the arc to the other happens to also be the 8 foot diameter of an imaginary full circle. I’m going to type 8 into the Length field and press the right arrow key, then press <Enter> to begin sizing the arc.
This gives me a line that is 8’ long on my sketch.

____________________________ Vanguard Appraisals, Inc. Fall 2009
10
The second step is to use the arrow keys adjust the diameter of the arc (if you image it as a piece of full circle) by pressing the arrow keys. Typing a small number (typically 1-10) and then pressing an arrow key will adjust the arc faster. <Spacebar> inverts the arc.
Press <Enter> to commit to the end of this Three Point Arc. TIP: If your sketch has only one arc, try to plan so your arc is the last line to be drawn. This saves you time since you can forgo all of step one (above) by simply pressing the <Home> key. This will simultaneously close the sketch and get to the end-point of the arc. The next tool on the toolbar is the “Simple Radius Arc” located to the right of the Three Point Arc button. The keyboard shortcut is <Ctrl>+<S>.
This tool allows the user to make quick quarter arcs. First type the radius length, then press a key <A>.<D> for clockwise quarter-arcs, <E>.<H> for counter-clockwise quarter arcs (see the sketch cheat sheet), the <Spacebar> inverts the arc and <Insert> toggles on/off the radius line.

____________________________ Vanguard Appraisals, Inc. Fall 2009
11
In this example the radius is 4’ and I want the quarter arc to arc to the bottom and to the left of my object. Therefore I’m going to type 4 in the tool bar and then press the “B” key on my keyboard to make the following arc.
The last drawing tool on my tool bar is the “Half Circle”. It is located to the right of the Simple Arc tool. The keyboard shortcut is <Ctrl>+<C>.
First type the diameter length, then press an arrow key to draw the half-circle. <Spacebar> inverts the arc. For the example below I entered 16’ in for the Diameter, pressed my left arrow key and pressed the space bar once.
Another handy tool in the sketch program is the ability to close an object without knowing a dimension. In order to do this you can press the <Home> key on your keyboard. This will take you immediately from the point you are at back to the home (starting) point of the object.

____________________________ Vanguard Appraisals, Inc. Fall 2009
12
If you are drawing rectangles or square objects, you can save even more time and press <Ctrl>+<Home> and have sketch draw two of the four sides for you.
After getting back to the home position, press <Enter> once to position the dimension of the last line, then Click <OK> to confirm the position of the caption/text and <Enter> again to position the caption of the object and finally <Enter> one last time to confirm the position of the entire object. Adding a New Note Object
To add Text to a sketch, press the icon of an “A”. Text labels can be up to 255 characters in length and even word-wrap. The keyboard shortcut is <Ctrl>+<N>.
After clicking on that icon the “Define New Sketch Item” window appears.
Home

____________________________ Vanguard Appraisals, Inc. Fall 2009
13
From here you can type the text of the note you wish to appear on the sketch then click OK. Once the note appears, use the arrow keys to position it on the sketch. Don’t worry if you need to edit the text of note after the fact. You can do it later with the “Edit Name Object” dialog.

____________________________ Vanguard Appraisals, Inc. Fall 2009
14
Moving an Object The behavior of the mouse while you are not drawing can be divided into three modes: Selection, Object Moving, and Label Moving. Which mode the mouse is in can be easily determined by seeing which of the following buttons is pressed on the toolbar. Here the mouse cursor mode is for moving objects. Clicking the label of an object while pressing and holding the left-mouse button will let you move the object as you move your mouse.
You can quickly toggle between the three modes by pressing <Ctrl>+<Space>.
Moving a Label Similar to the Object Moving, is the Label Moving mode. When in this mode, clicking an object’s label and holding the left-mouse button will let you move just the label of the object. Note objects are special in that they are both an object and just a note. You can move these types of objects around using either the Move Object or Move Label mode.
Tip: It’s possible to multi-select objects for moving all at once. While holding the <Shift> key down while clicking each object label, it’s possible to select several objects to move together as a group. Line Styles, Line Colors and Fill Patterns To emphasize an object, or perhaps indicate special walls the user may want to change the color of an object’s lines or even the line style. To make the “Line Colors” toolbar appear click on “Edit” in the Main Menu and choose Line Colors at the bottom of the list. The keyboard shortcut is <F9>.

____________________________ Vanguard Appraisals, Inc. Fall 2009
15
The following toolbar will appear:
To change the line colors choose an object then change the color. To change a lines appearance choose the object then change from Solid to Dot, Dash and so on.
To change the width of a line choose the object and adjust the Width by clicking on the up or down arrow to the right of the Width field.
The user can also fill the object by choosing a type of fill and the color.

____________________________ Vanguard Appraisals, Inc. Fall 2009
16
To create the following look…

____________________________ Vanguard Appraisals, Inc. Fall 2009
17
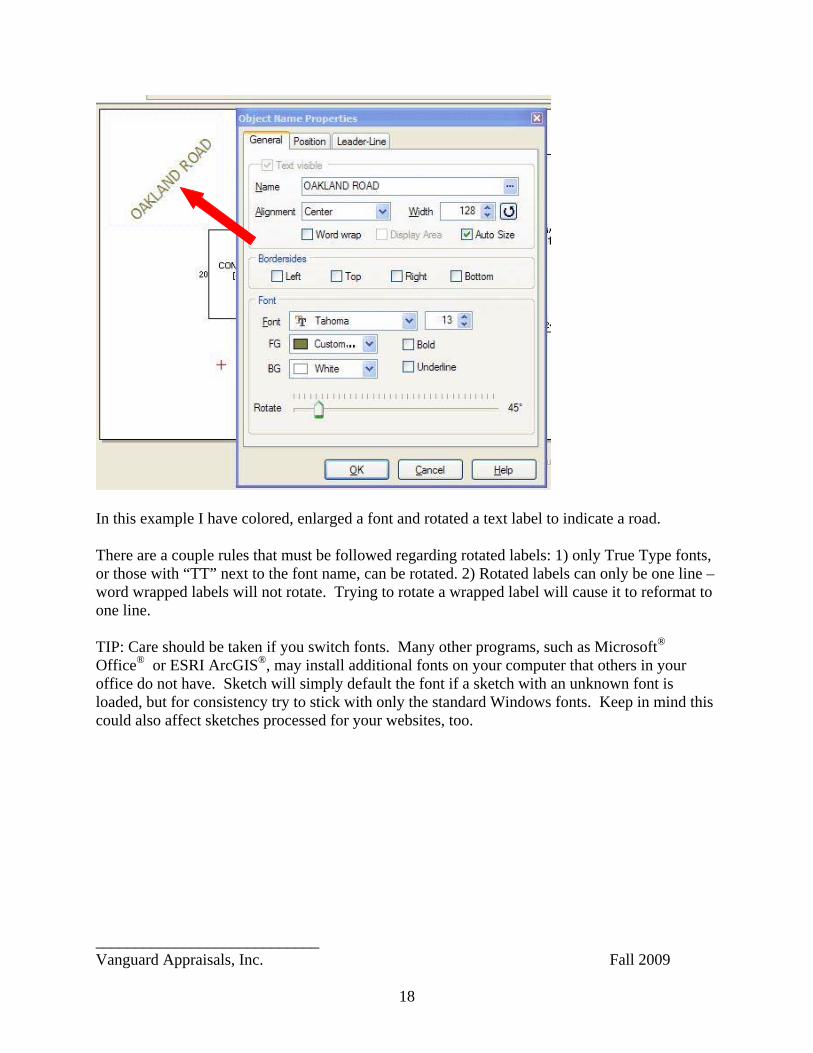
Editing Object Labels and Notes You can also edit the labels of object. Enlarge or change the font, or even add some color to an object’s label or to a Note. To access the label properties screen press the pencil icon next to the current object or press the keyboard shortcut <F5>.
On the Main toolbar. This will open the “Edit Name Object” dialog:
Edit the label text. Add border sides around the label. Adjust the font, size and color.
____________________________ Vanguard Appraisals, Inc. Fall 2009
18
In this example I have colored, enlarged a font and rotated a text label to indicate a road. There are a couple rules that must be followed regarding rotated labels: 1) only True Type fonts, or those with “TT” next to the font name, can be rotated. 2) Rotated labels can only be one line – word wrapped labels will not rotate. Trying to rotate a wrapped label will cause it to reformat to one line. TIP: Care should be taken if you switch fonts. Many other programs, such as Microsoft® Office® or ESRI ArcGIS®, may install additional fonts on your computer that others in your office do not have. Sketch will simply default the font if a sketch with an unknown font is loaded, but for consistency try to stick with only the standard Windows fonts. Keep in mind this could also affect sketches processed for your websites, too.

____________________________ Vanguard Appraisals, Inc. Fall 2009
19
Leader-Lines for Labels Sometimes the description label of an object cannot fit within the object so you have to position it outside. Adding a Leader-Line to the label pointing it back to the object its referring can ensure your sketches are clear. Leader-Lines can be activated and from within the “Edit Name Object” dialog.
Tip: Adding a leader-line to a simple label can be used to indicate a roadway.

____________________________ Vanguard Appraisals, Inc. Fall 2009
20
Centering and Rotation Sketch has the tools to let you quickly center or rotate an entire sketch. To center an entire
sketch, simply press the Center button located on the toolbar. The rotate feature has you first selecting one or more objects to rotate. You can select any number of objects on screen to rotate – even the entire sketch if you want.
Select the object whose origin point (the point you started drawing the object) you want to rotate around, and then either use the mouse or arrow keys to move the rotation slider bar. TIP: If you need to add a rotated patio, deck, garage or some other object, it’s easier to first draw it using straight lines and then rotate it into place. This saves you time. TIP: Description labels do not rotate with the Rotation dialog. Instead rotate labels from within the “Edit Name Object” dialog. Dimension labels never rotate.

____________________________ Vanguard Appraisals, Inc. Fall 2009
21
Dimension Lines and Vertical Markers Dimension Lines are simple measurement objects that can be used to indicate distance between objects, height or length – whatever you need. In this example, I added a horizontal measurement line and then rotated it 45°.
Vertical Markers are objects that you can add to a sketch to clarify and indicate the number of floors of an object. The Verticals editor has several options that let you tailor the look of the object. A typical use for the Vertical Marker would be when drawing a multi-level commercial structure and you want to indicate the height.

____________________________ Vanguard Appraisals, Inc. Fall 2009
22
Linking an Object to Pricing Linking is the action of associating the calculated area of a sketch object to a partition of the structure pricing. Any sketch object with an area can be linked to the pricing portion of parcel. Currently you are able to link a sketch to the Residential main area, basement finish, porch areas, deck areas, veneer perimeter, addition areas, and garage areas. For commercial structures you can link the description label itself, as well as the main area, basement area and perimeter. So why link? One reason is because it makes it easier on you and your staff if areas change and you need to update both sketch and pricing. For example, if the Main area on a sketch changes – and its area is linked to the pricing – you can update the sketch and be assured the new area will be updated in the pricing. In other words it saves you time since you only have to edit the area by changing the sketch. It also improves the accuracy of your data because the SF your are pricing matches exactly what your sketch says.

____________________________ Vanguard Appraisals, Inc. Fall 2009
23
On the pricing side, you can tell an area is linked by the dark border around the area field. On the sketch, a little link indicator (a † in the example above) can be displayed next to each object that is linked to pricing.

____________________________ Vanguard Appraisals, Inc. Fall 2009
24
Linking By Example The typical way to begin linking is to start on the sketch. In this example we will be linking the main area of the sketch to the pricing.
First select the object to be linked then press the Link button on the toolbar. Alternatively you could select the object and press <Ctrl>+<L>. The sketch screen will immediately minimize1 allowing you to look access the pricing screens.
1 If you a multiple monitors you can have both the parcel maintenance and sketch screens up at the same time on the different monitors. Sketch will not minimize if its on the other screen.

____________________________ Vanguard Appraisals, Inc. Fall 2009
25
The cursor will change to a figure pointer. Click on the Main Area SF field and you will get a linking confirmation message.
Press “Yes” to confirm the link. And then the outline around the data entry field will change.

____________________________ Vanguard Appraisals, Inc. Fall 2009
26
Object Naming Guide The following is a suggested guide for naming your sketch objects. These are the same procedures used by Vanguard Appraisals, Inc. for reappraisal and data entry projects. Main Areas: 1S__________(Main) 1 1/2S______(Main) 1S B________(Main) 1 1/2S B____(Main) 1S A________(Main) 1 1/2S A____(Main) 1S B A______(Main) 1 1/2S B A__(Main) 1S B_____S/F(Main) 1S B_____S/L(Main) 1S "A"______(Main) 1S B "A"____(Main) 2S__________(Main) MFD HOME (i.e., Mobile Home) 2S B________(Main) 2S A________(Main) 2S B A______(Main) Addition Areas: 1S__________ 2S________ 1S B________ 2S B______ 1S A________ 2S A______ 1S B A______ 2S B A____ 1 1/2 S_____ 1S ______ GREAT RM 1 1/2S B____ 1S B ____ GREAT RM 1S STL/GLASS SOLAR RM All of the above blanks (______) may be filled in with one of the following types of construction: FR CONC EARTH BRK STUCCO LOG STN PERMASTN C BLK BERMED Porches: 1S______OP 2S______OP 1S______3 S PORCH 1S______EP 2S______EP 2S______3 S PORCH 1S______SCRNP 2S______SCRNP 1S______E BRZY 1S______O BRZY All of the above blanks (______) may be filled in with one of the following types of construction: FR C BLK LOG PERMASTN BRK STUCCO STN

____________________________ Vanguard Appraisals, Inc. Fall 2009
27
Veneer: 1/2S______ 1 1/2S______ 1S________ 2S__________ All of the above blanks (______) may be filled in with one of the following types of construction: BRK PERMASTN STN SIM STN Patio: VINYL DK FLAGSTN PATIO WD DK ROOF CONC PATIO RF OH C BLK PATIO CONC STP BRK PATIO WD STP STN PATIO CONC STP/R Garages: 1S______GAR All of the above blanks (______) may be filled in with one of the following types of construction: FR CONC BRK STUCCO STN PERMASTN C BLK LOG Miscellaneous: BSMT ENTRY BSMT EXT