v2 - milesight · 1 chapteriintroduction 1.1milesightsmarttoolsintroduction...
TRANSCRIPT

Smart Tools User ManualV2.05
Contents
Chapter I Introduction.......................................................................................................................... 11.1 Milesight Smart Tools Introduction......................................................................................... 11.2 Key Features............................................................................................................................ 1
Chapter II Installation........................................................................................................................... 22.1 System Operating Environment...............................................................................................22.2 Installation Guide.....................................................................................................................2
Chapter III Operations and settings......................................................................................................43.1 IPC Tools...................................................................................................................................4
3.1.1 Network.........................................................................................................................63.1.2 Setting............................................................................................................................73.1.3 Preview........................................................................................................................ 113.1.4 Upgrade....................................................................................................................... 12
3.2 NVR Tools...............................................................................................................................143.2.1 Network.......................................................................................................................163.2.2 Setting..........................................................................................................................173.2.3 Upgrade....................................................................................................................... 183.2.4 Status...........................................................................................................................20
3.3 Calculators............................................................................................................................. 203.3.1 Calculator For Camera................................................................................................. 213.3.2 Calculator For NVR.......................................................................................................223.3.3 Calculator For Disk.......................................................................................................22
Chapter IV Service.............................................................................................................................. 25
1
Chapter I Introduction
1.1 Milesight Smart Tools Introduction
Milesight Smart Tools is a powerful assisting software which is capable of learning the networkenvironments and automatically finding Milesight network cameras and network video recordersconnected in the LAN. It provides you a quick way to modify devices settings and do firmwareupgrade. It is highly recommended for multiple Milesight devices configuration. It also can be usedfor calculating the matching number of camera, network video recorder and disk space.
1.2 Key Features
Innovative UI design Integrated IPC Tools, NVR Tools and Calculators, easy to install and use Smart devices discovery and filter Simple batch firmware upgrade and online firmware upgrade for both Milesight cameras
and network video recorders Efficient video and image parameters configuration to cameras in a group Convenient network setup for cameras, like IP address, DDNS and so on Useful network modification and connection status display for network video recorders Quick calculation for the matching number of camera, network video recorder and disk
space

2
Chapter II Installation
2.1 System Operating Environment
OS: Windows 7/8/10/Vista/Server 2000/Server 2008CPU: 1.66GHZ or fasterMemory: 1GB or moreGraphic memory: 128MB or moreInternet protocol: TCP/IP
2.2 Installation Guide
Run the Installation file and install the programs on your computer by following the on-screeninstructions. After finishing installation, you will find the program on the start menu or on thedesk.
Step1: Check the box ‘I accept the terms in the <License Agreement>’;
Figure 2-1 Accept the termsStep2: Choose ‘Custom installation’ to select the destination folder where Milesight Smart Tools
will be installed, or choose ‘Default installation’ to install it in the default destination folder;

3
Figure 2-2 InstallationStep3: Click ‘Quick installation’ button to complete the installation.
Figure 2-3 Finished installationNote:
The language of Smart Tools is based on the language of computer systems.

4
Chapter III Operations and settings
The home page of the software is as follows:
Figure 3-1 Home pageClick the buttons to enter the three parts. You can make settings for each part.Note:1) Smart Tools currently supports 5 languages: Simplified Chinese, Traditional Chinese, English, Japanese, Korean,
Russian;2) Smart Tools currently supports 5 resolution: 1024*768, 1280*1024, 1440*900, 1920*1080.
3.1 IPC Tools
IPC Tools can automatically detect multiple online Milesight Network Cameras connected in theLAN, set IP addresses, and manage firmware upgrades. It is recommended when assigning IPaddresses for multiple Milesight Network Cameras.
Key Features
Support single and batch network settings Support batch firmware upgrades and online firmware upgrade Support configuration of Fisheye Camera Support batch modification of the device name Support batch primary/second/third stream parameter settings Support batch audio settings Support batch modification of the username and password Support batch time settings Support batch OSD settings Support batch HTTP/RTSP port settings Support batch DDNS parameters settings
5
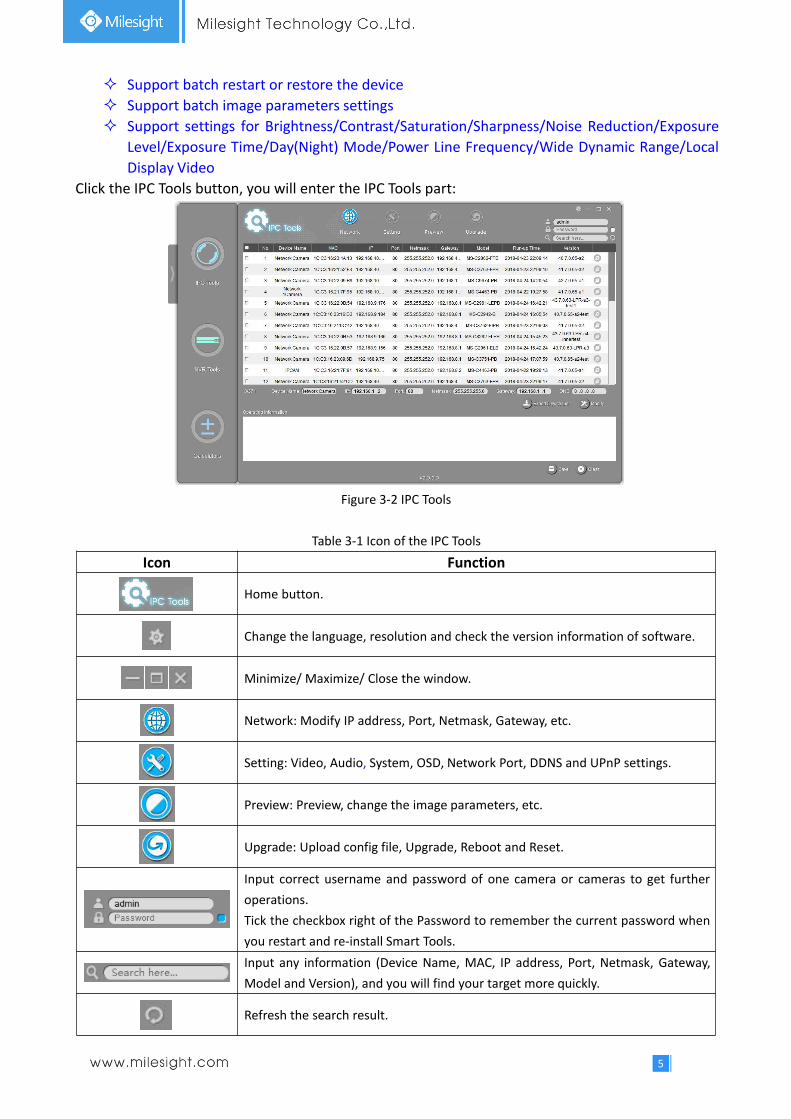
Support batch restart or restore the device Support batch image parameters settings Support settings for Brightness/Contrast/Saturation/Sharpness/Noise Reduction/Exposure
Level/Exposure Time/Day(Night) Mode/Power Line Frequency/Wide Dynamic Range/LocalDisplay Video
Click the IPC Tools button, you will enter the IPC Tools part:
Figure 3-2 IPC Tools
Table 3-1 Icon of the IPC Tools
Icon Function
Home button.
Change the language, resolution and check the version information of software.
Minimize/ Maximize/ Close the window.
Network: Modify IP address, Port, Netmask, Gateway, etc.
Setting: Video, Audio, System, OSD, Network Port, DDNS and UPnP settings.
Preview: Preview, change the image parameters, etc.
Upgrade: Upload config file, Upgrade, Reboot and Reset.
Input correct username and password of one camera or cameras to get furtheroperations.Tick the checkbox right of the Password to remember the current password whenyou restart and re-install Smart Tools.Input any information (Device Name, MAC, IP address, Port, Netmask, Gateway,Model and Version), and you will find your target more quickly.
Refresh the search result.
6
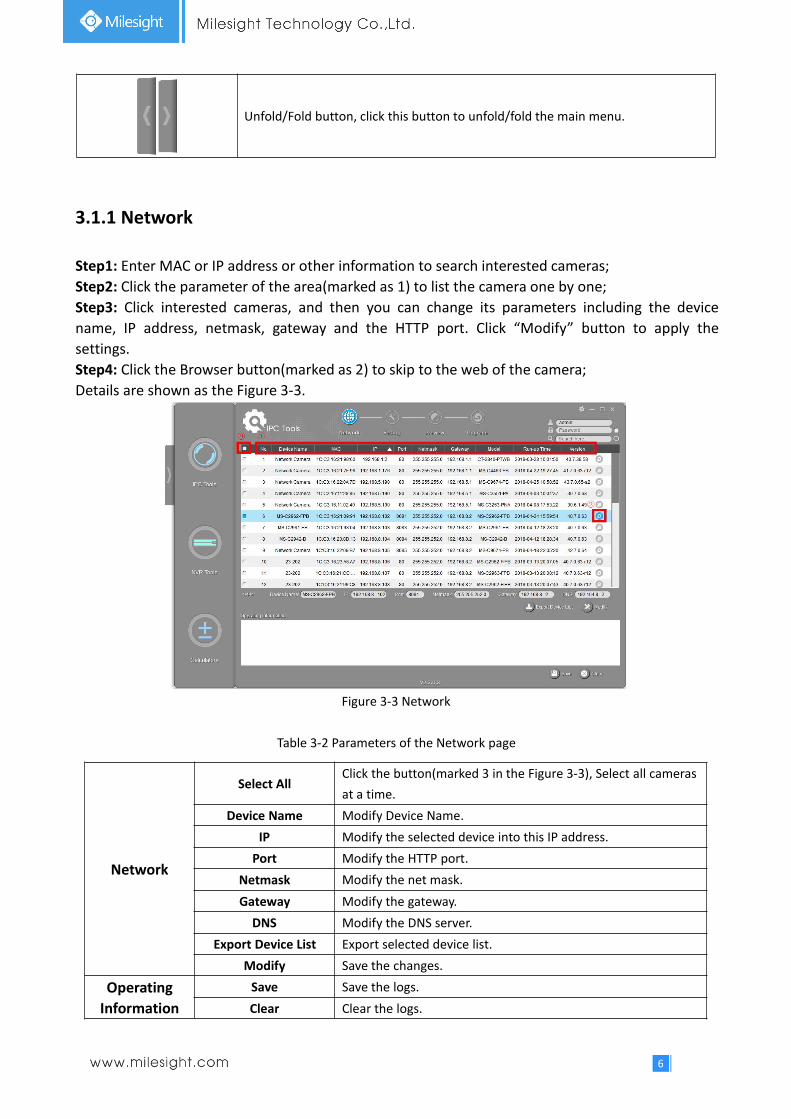
Unfold/Fold button, click this button to unfold/fold the main menu.
3.1.1 Network
Step1: Enter MAC or IP address or other information to search interested cameras;Step2: Click the parameter of the area(marked as 1) to list the camera one by one;Step3: Click interested cameras, and then you can change its parameters including the devicename, IP address, netmask, gateway and the HTTP port. Click “Modify” button to apply thesettings.Step4: Click the Browser button(marked as 2) to skip to the web of the camera;Details are shown as the Figure 3-3.
Figure 3-3 Network
Table 3-2 Parameters of the Network page
Network
Select AllClick the button(marked 3 in the Figure 3-3), Select all camerasat a time.
Device Name Modify Device Name.IP Modify the selected device into this IP address.Port Modify the HTTP port.
Netmask Modify the net mask.Gateway Modify the gateway.DNS Modify the DNS server.
Export Device List Export selected device list.Modify Save the changes.
OperatingInformation
Save Save the logs.Clear Clear the logs.

7
3.1.2 Setting
When click the ‘Setting’ button, you can set the related parameters of the Video, Audio, System,User, OSD, Network and Fisheye. Details are shown as follows.
Figure 3-4 Setting
Table 3-3 Sub interfaces of the Setting Page
Video/ImageSettings
Video Setup:
Here you can setup the parameters of the Primary Stream, the Secondary Stream andTertiary Stream:Video Codec: H.265(if camera supports)/H.264/MJPEG/MPEG4 (if camera supports)
available.
Frame Size: the resolution.Bit Rate: transmitting bits of data per second.
Profile: Base/ Main/ High(only H.264 supports).
Smart Stream: It is optional to turn On/Off Smart Stream mode.Smart Stream mode remarkably reduces the bandwidth and the datastorage requirements for network cameras while ensuring the high quality

8
of images.
Level: Level 1~10 are available to meet your need if you turn on Smart Stream.Bit Rate Control: CBR/ VBR.I-frame Interval: Set the I-frame interval to 1~120.Maximum Frame Rate: maximum refresh frame rate per second.
Audio Settings
Audio Setup:
Here you can setup the parameters of Audio:Enable Audio: Enable or Disable the Audio.Audio Mode: Only Mic, Only Speaker and Both Mic&Speaker are available.Audio Input:Denoise: Enable or Disable the Denoise.Encoding: G711-ULaw, G711-ALaw, AAC LC are available.Sample Rate: 8KHz and 16KHz are available.Adjust Input Gain and Alarm Level.Audio Output:Adjust Output Volume.
System Settings
System Setup:
Here you can setup the parameters of the System:

9
System Setup:Device Name: Modify the device name.Date/Time Setup:Keep current date and time: Keep current date and time of the system.Synchronize with computer time: Synchronize the time with your computer.Set date and time manually: Set the system time manually.Synchronize to SNTP server: Synchronize the time with configured network server and
selected time zone.
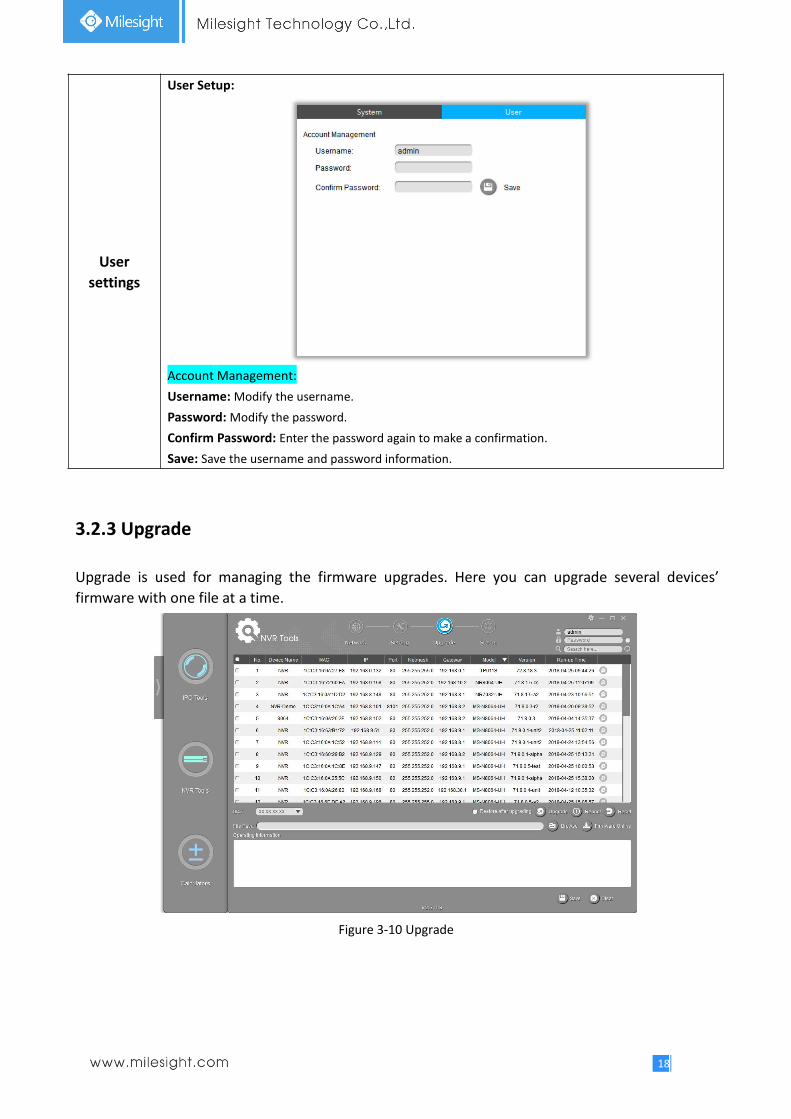
User settings
User Setup:
Account Management:Username:Modify the username.Password:Modify the password.Confirm Password: Enter the password again to make a confirmation.Save: Save the username and password information.
OSD settings
OSD Setup:
Video Stream: Here you can choose the stream of OSD.
Font Size: Smallest, Small, Medium, Large, Largest and Auto are available.
Video Title: Input the video title.

10
Text Position: Top-Left, Top-Right, Bottom-Left and Bottom-right are available.Show Timestamp: Enable/Disable the timestamp.Date Position: Top-Left, Top-Right, Bottom-Left and Bottom-Right are available.Date Format: YYYY-MM-DD, MM/DD/YYYY, DD/MM/YYYY are available.Copy to other stream: Copy the OSD information to other stream.
Network Settings
Network Setup:
Port: Here you can set up the HTTP Port and RTSP Port.DDNS Setup: DDNS allows you to access the device via domain name instead of IP
address. It manages to change IP address and update your domaininformation dynamically.
UPnP: UPnP allows you skip the steps to router port mapping.DHCP: Check the checkbox to enable the DHCP function.
Fisheye settings
Fisheye Setup:
Compatible Mode: Bundle-Stream Mode and Multi-Channel Mode are available.Bundle-Stream Mode: the Bundle-Stream Mode combines all thechannels into one, and then sending to NVR or VMS, which is easyfor compatibility.Multi-Channel Mode: the Multi-Channel Mode sends all the originalchannels to NVR or VMS, so the channels can be modified separately.Note: We recommend Bundle-Stream mode with Milesight NVR.

11
Zoom Status: Support to set display time of Zoom Status OSD.2 seconds/5 seconds/10 seconds/Always Open/Always Close are available.
Preset Status: Support to set display time of Preset Status OSD.2 seconds/5 seconds/10 seconds/Always Open/Always Close are available.
Patrol Status: Support to set display time of Patrol Status OSD.Always Open/Always Close are available.
Auto Scan Status: Support to set display time of Auto Scan Status OSD.Always Open/Always Close are available.
3.1.3 Preview
The Video Previews is used for setting the related parameters of the video with live view to displaythe differences. Live view will be full screen if you double click it.
Figure 3-5 Preview
Table 3-4 Parameter of the Previews Page
DisplaySettings
Power LineFrequency
60HZ flicker for NTSC mode and 50HZ flicker for PAL mode.
Day/Night Mode Night Mode, Day Mode, Auto Mode and Customize are available.
Day To Night ValueThis is the sensitivity for switching Day Mode to Night Mode. When IRLight Sensor Current Value is lower than this value, it will switch DayMode to Night Mode.
Night To Day ValueThis is the sensitivity for switching Night Mode to Day Mode. When IRLight Sensor Current Value is higher than this value, it will switch NightMode to Day Mode.
Corridor Mode Off, Clockwise 90° and Anticlockwise 90° are available.
Image Rotation Off, Rotating 180°, Flip Horizontal and Flip Vertical are available.

12
3.1.4 Upgrade
Upgrade is used for managing the firmware upgrades. Here you can upgrade several devices’firmware with one file at a time.
Enhancement
IR Balance Mode
There is an option to turn On/Off the IR LED.IR Balance Mode would avoid the problem of overexposure anddarkness, and the IR LED will change according to the actualillumination.
White Balance
To restore white objects, remove the color distortion caused by theenvironment light.Auto White Balance, Manual White Balance, Incandescent Lamp,Warm Light Lamp, Natural Light and Fluorescent Lamp are available.
Digital Anti-fogMode
This function is only for H.265 series. Better image effect in foggyweather.
Digital ImageStabilisation
This function is only for H.265 series. Decrease the blur and shakinessof the image.
BLC Region Back Light Compensation. Off and Centre are available.
Wide DynamicRange
This function can capture and display both bright and dark areas in thesame frame, which enables details of objects in both bright and darkareas to be visible.Off, On and Customize are available.
Wide DynamicLevel
Set WDR with Low/High/Auto level.
High LightCompensation
This function is only for H.265 series to adjust the brightness to anormal range when the light is strong.Off, General Mode, Enhanced Mode are available.
HLC Level Select a level for HLC.
ImageConfiguration
BrightnessAdjust the brightness of image. The higher the brightness is, thebrighter the image is.
ContrastAdjust the contrast of image. The higher the contrast is, the moredifferent in brightness between objects are.
SaturationAdjust the Saturation of the image. Higher Saturation makes colorsappear more "pure" while lower one appears more “wash-out”.
SharpnessAdjust the Sharpness of image. Higher Sharpness sharps the pixelboundary and makes the image looks more clear.
Noise Reduction Reduce the noise to get a better image.

13
Figure 3-6 Upgrade
Table 3-5 Parameter of the Upgrade Page
Option Function Introduction
Click “Reboot” button to restart the selected cameras.
Click “Reset” button to reset the selected cameras to factory default settings.Enable the “Keep the IP Config” option to keep the IP configuration whenresetting the selected cameras.
Click the “Browse” button to choose a config file or a firmware file.
Select the camera, enter the correct username and password, click the “Browse”button to choose a config file, and then click “Upload config file” button to uploada configuration file.
Click the “Firmware Online” button to check firmware online, and Click “ ” to
directly download the latest firmware on the website for different models.
Check the downloaded firmware in “Downloads”.

14
Click “ ” to select the firmware to upgrade camera, click “ ” to open
containing folder.
Select the camera, enter the correct username and password.Click the “Browse” button to choose a firmware file, and then click the “upgrade”Button to upgrade the camera, or you can click the “Firmware Online” button todirectly download the latest firmware on the website to upgrade differentmodels.The upgrade will be completed after the progress bar disappeared.
Enable the “Restore after upgrading” option to restore the selected cameras tofactory default after upgrading.
10.XX.XX.XX is for MS-C2XXX-XX20. XX.XX.XX is for MS-C3XXX-XX30.XX.XX.XX is for MS-CXXXX-XXA40.XX.XX.XX is for MS-CXXXX-XXB42.XX.XX.XX is for MS-C8262-XXB/ MS-C9674-PB(V100)43.XX.XX.XX is for MS-C9674-PB(V101)Note:When you need to upgrade firmware of your network cameras, the firmware fileshould match with the devices, otherwise the upgrade will fail.
3.2 NVR Tools
NVR Tools can automatically detect multiple online Milesight Network NVRs connected in the LAN,set IP addresses, and manage firmware upgrades. It is recommended when assigning IP addressesfor multiple Milesight Network NVRs.

15
Key Features
Support single and batch network settings Support batch firmware upgrades and online firmware upgrade Support batch modification of the device name Support batch modification of the username and password Support batch restart or restore the device Support batch get status of the NVR
Click the NVR Tools button, you will enter the NVR Tools part:
Figure 3-7 NVR Tools
Table 3-6 Icons of the NVR Tools Page
Icon Function
Home button.
Change the language, resolution and check the version information of software.
Minimize/ Maximize/ Close the software.
Network: modify IP address, Port, Netmask, Gateway, etc.
Setting: System.
Upgrade: Upgrade, Reboot and Reset.
Status: Connected cameras and their MAC/IP/Status.
Input correct username and password of one camera or cameras to get furtheroperations.Tick the checkbox right of the Password to remember the current password whenyou restart and re-install Smart Tools.

16
Input any information (Device Name, MAC, IP address, Port, Netmask, Gateway,Model and Version), and you will find your target more quickly.
Refresh the search result.
Unfold/Fold button, click this button to unfold/fold the main menu.
3.2.1 Network
Step1: Enter the SN or IP address other information to search interested NVR;Step2: Click the parameter of the area(marked as 1) to list the camera one by one;Step3: Click interested cameras of the list, and then you can change the parameters including theIP address, Port, Netmask, Gateway and DNS. Click “Modify” button to apply the settings.Step4: Click the Browser button(marked as 2) to skip to the web of the NVR;Details are shown as the Figure 3-8.
Figure 3-8 Network
Table 3-7 Parameter of the Network page
Optional
Select AllClick the button(marked 3 in the picture), Select all cameras ata time.
Start IP Address Modify all the selected cameras’ IP addresses from this one.
Device Name Modify Device Name.
IP Modify the selected device into this IP address.
Port Modify the HTTP port.
Netmask Modify the net mask.
Gateway Modify the gateway.
DNS Modify the DNS server.

17
3.2.2 Setting
Here you can setup date/time of system and upload configuration file to NVR.
Figure 3-9 Setting
Table 3-8 Parameter of the Previews Page
Modify Save the changes.
Export Device List Export selected device list.
OperatingInformation
Save Save the logs.Clear Clear the logs.
Systemsetting
System Setup:
Here you can setup the parameters of the System:Timezone: Enable to select different Timezone.Daylight saving time: Disable and Automatic are available.Synchronize with computer time: Synchronize the time with your computer.Set date and time manually: Set the system time manually.Synchronize to SNTP server: Synchronize the time with configured network server and selectedtime zone.
18
3.2.3 Upgrade
Upgrade is used for managing the firmware upgrades. Here you can upgrade several devices’firmware with one file at a time.
Figure 3-10 Upgrade
Usersettings
User Setup:
Account Management:Username:Modify the username.Password:Modify the password.Confirm Password: Enter the password again to make a confirmation.Save: Save the username and password information.

19
Table 3-9 Parameter of the Upgrade Page
Option Function Introduction
Click “Reboot” button to restart the selected NVRs.
Click “Reset” button to reset the selected NVRs to factory default settings.
Click the “Browse” button to choose a config file or a firmware file.
Click the “Firmware Online” button to check firmware online, and Click “ ” to
directly download the latest firmware on the website for different models.
Check the downloaded firmware in “Downloads”.
Click “ ” to select the firmware to upgrade NVR, click “ ” to open
containing folder.
Select the NVR, enter the correct username and password.Click the “Browse” button to choose a firmware file, and then click the “upgrade”Button to upgrade the NVR, or you can click the “Firmware Online” button todirectly download the latest firmware on the website to upgrade differentmodels.The upgrade will be completed after the progress bar disappeared.Enable the “Restore after upgrading” option to restore the selected NVRs tofactory default after upgrading.
20
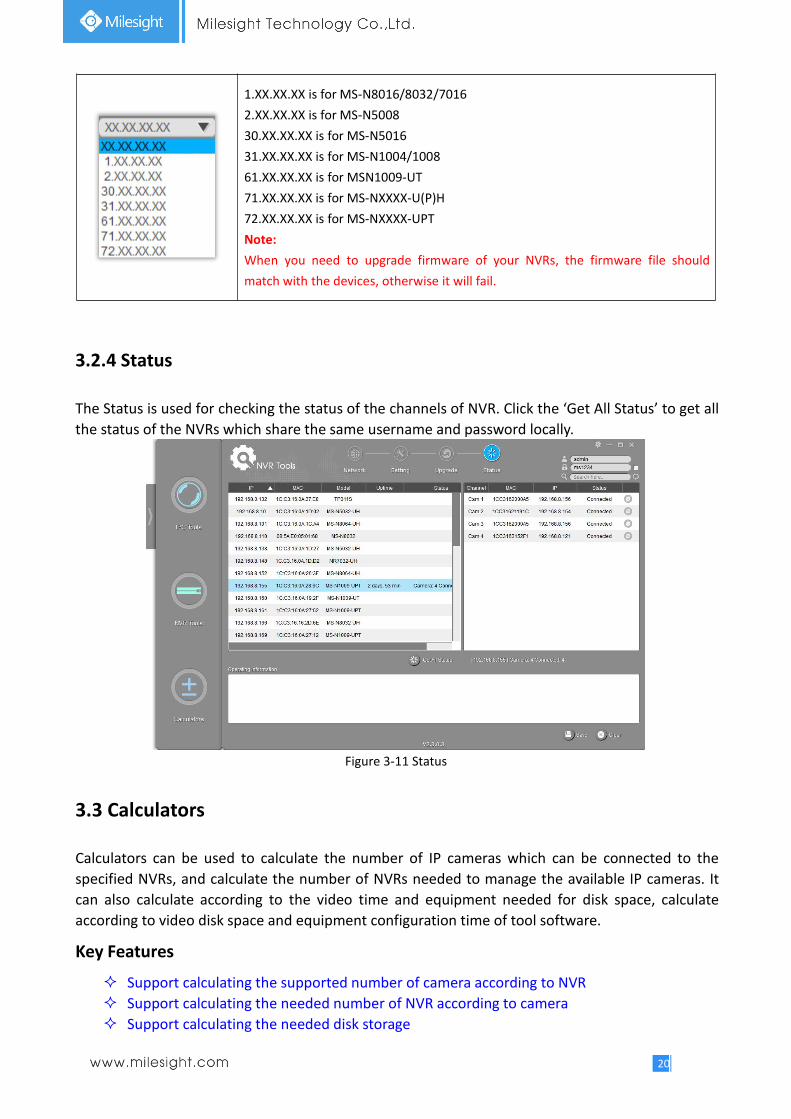
1.XX.XX.XX is for MS-N8016/8032/70162.XX.XX.XX is for MS-N500830.XX.XX.XX is for MS-N501631.XX.XX.XX is for MS-N1004/100861.XX.XX.XX is for MSN1009-UT71.XX.XX.XX is for MS-NXXXX-U(P)H72.XX.XX.XX is for MS-NXXXX-UPTNote:When you need to upgrade firmware of your NVRs, the firmware file shouldmatch with the devices, otherwise it will fail.
3.2.4 Status
The Status is used for checking the status of the channels of NVR. Click the ‘Get All Status’ to get allthe status of the NVRs which share the same username and password locally.
Figure 3-11 Status
3.3 Calculators
Calculators can be used to calculate the number of IP cameras which can be connected to thespecified NVRs, and calculate the number of NVRs needed to manage the available IP cameras. Itcan also calculate according to the video time and equipment needed for disk space, calculateaccording to video disk space and equipment configuration time of tool software.
Key Features
Support calculating the supported number of camera according to NVR Support calculating the needed number of NVR according to camera Support calculating the needed disk storage

21
Support calculating the recording time according the disk storage Innovative UI interface and easy use
Click the Calculators button, the page is as following:
Figure 3-12 Calculators
Table 3-10 Icons of the Calculators page
Icon Function
Home button.
Change the language, resolution and check the version information of software.
Minimize/ Maximize/ Close the software.
Calculator For Camera.
Calculator For NVR.
Calculator For Disk.
Unfold/Fold button, click this button to unfold/fold the main menu.
3.3.1 Calculator For Camera
Choose your NVR model and numbers, set the cameras’ rates for primary and secondary stream,then click the ‘Calculate’ button to get the total number of NVR channels as well as the number ofthe cameras you can add to your NVRs.

22
Figure 3-13 Calculator For Camera
3.3.2 Calculator For NVR
Choose your cameras’ bit rate for primary and secondary streams and the cameras’ numbers,select the NVRs’ models, then click the ‘Calculate’ button to get the number of the needed NVRs’numbers and the suggested adding way.
Figure 3-14 Calculator For NVR
3.3.3 Calculator For Disk
Edit the channels information, the software will calculate the record time depending on the givendisk space, or the needed disk storage depending on the given time.

23
Figure 3-15-1 Calculator For Disk(Time)
Figure 3-15-2 Calculator For Disk(Storage)

24
Table 3-11 Sub interfaces of the Calculators
Add Channel(s)
Add Channel(s):
Channel:Channel Number: The number you want to add.Channel Prefix: You can edit the channel prefix by yourself.Configuration:Device Type: The device type.Image Quality: Image quality.Resolution: Choose the wanted resolution of the device.Frame Rate: The Frame Rate of the device.Bitrate: The bit rate of the device.
Modify Channel
Modify Channel:
Configuration:Device Type: The device type.Image Quality: Image quality.Resolution: Choose the wanted resolution of the device.Frame Rate: The Frame Rate of the device.Bitrate: The bit rate of the device.Copy: Copy the settings to other channels.OK: Save the settings.Cancel: Cancel the settings.
Delete Channel Delete the selected channel.
25
Chapter IV Service
Milesight Technology Co., Ltd provides customers with timely and comprehensive technicalsupport services. End-users can contact your local dealer to obtain technical support. Distributorsand resellers can contact directly with Milesight for technical support.
Technical Support Mailbox: [email protected]: http://www.milesight.comOnline Problem Submission System: http://www.milesight.com/service/feedback.asp
MILESIGHT USATEL: +1-800-561-0485Add: 7509 N.W. 36th Street, Miami, Florida 33166, USA
MILESIGHT KOREATEL: +82-2-839-3335Add: 9F/901, Star Valley B/D Digital-ro 9gil 99, Geumcheon-gu, Seoul, Korea
MILESIGHT CHINATEL: +86-592-5922772Add: No.23 Wanghai Road,2nd Software Park, Xiamen, China
MilesightBetter Inside, More in Sight