v 1.1 gettin g star ted guide - isotonik studios
TRANSCRIPT
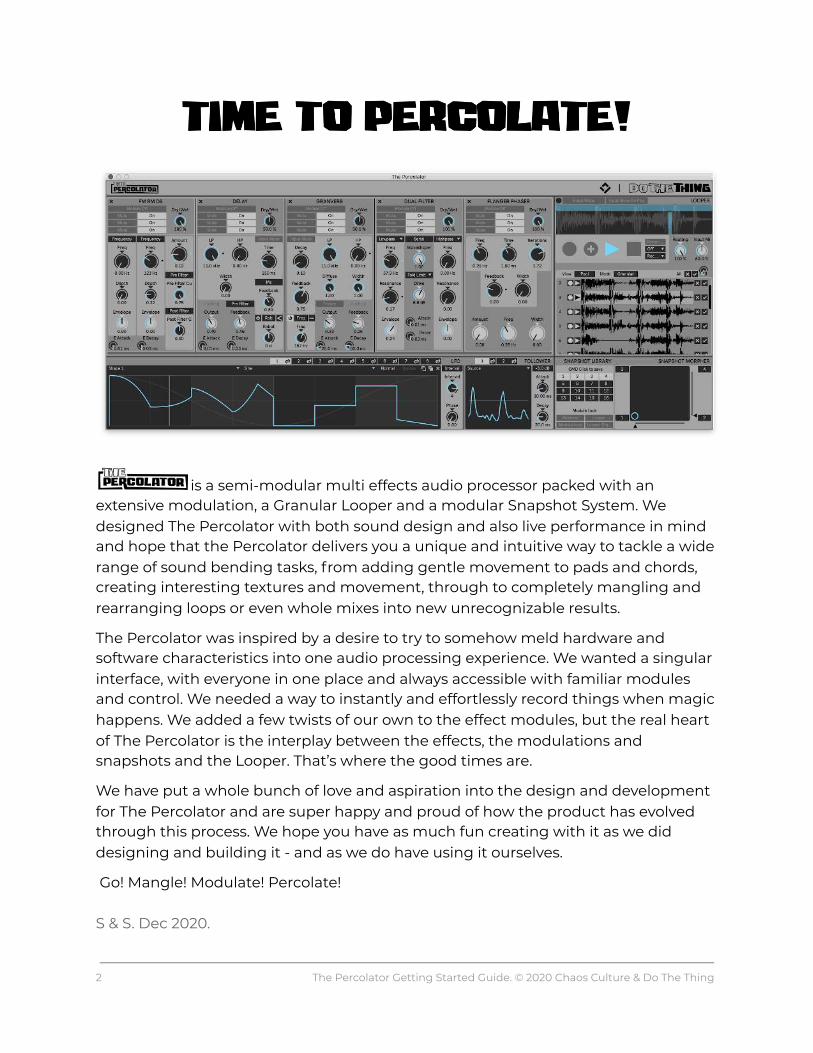
is a semi-modular multi effects audio processor packed with an extensive modulation, a Granular Looper and a modular Snapshot System. We designed The Percolator with both sound design and also live performance in mind and hope that the Percolator delivers you a unique and intuitive way to tackle a wide range of sound bending tasks, from adding gentle movement to pads and chords, creating interesting textures and movement, through to completely mangling and rearranging loops or even whole mixes into new unrecognizable results.
The Percolator was inspired by a desire to try to somehow meld hardware and software characteristics into one audio processing experience. We wanted a singular interface, with everyone in one place and always accessible with familiar modules and control. We needed a way to instantly and effortlessly record things when magic happens. We added a few twists of our own to the effect modules, but the real heart of The Percolator is the interplay between the effects, the modulations and snapshots and the Looper. That’s where the good times are.
We have put a whole bunch of love and aspiration into the design and development for The Percolator and are super happy and proud of how the product has evolved through this process. We hope you have as much fun creating with it as we did designing and building it - and as we do have using it ourselves.
Go! Mangle! Modulate! Percolate!
S & S. Dec 2020.
2 The Percolator Getting Started Guide. © 2020 Chaos Culture & Do The Thing
V 1.1 Getting Started Guide
Getting Started Guide 3
1. Overview 5
2. Effect Rack & Modules 7
3. Effect Module Mixer Section 8
4. FM RM DS 9
5. Flanger Phaser 11
6. Delay 13
7. Dual Filter 15
8. Granverb 17
9. Mixer 19
10. Modulation 20
11. LFO Module 20
12. Envelope Follower Module 21
13. Mapping Modulation Sources to Targets 22
14. Internal Modulation and Live’s Automation 23
15. Snapshot Module 24 15.1. SnapShot Library 24 15.2. XY Pad 4 way morpher 24
16. Looper Module 26
17. Looper: The Loop Pool 27 17.1. How to Record Loops 28 17.2. How to Record several consecutive takes into the Loop Pool. 28 17.3. How to Overdub the currently playing Loop through the effect modules to a new Pool Slot. 28 17.4 Loop Pool Playback Modulation 28 17.5 Loop Pool and Snapshots 28
3 The Percolator Getting Started Guide. © 2020 Chaos Culture & Do The Thing
18. Looper: Granular Player 29 18.1. Modulation and the Granular player 30 18.2. Snapshots and the Granular player 30
4 The Percolator Getting Started Guide. © 2020 Chaos Culture & Do The Thing
1. Overview
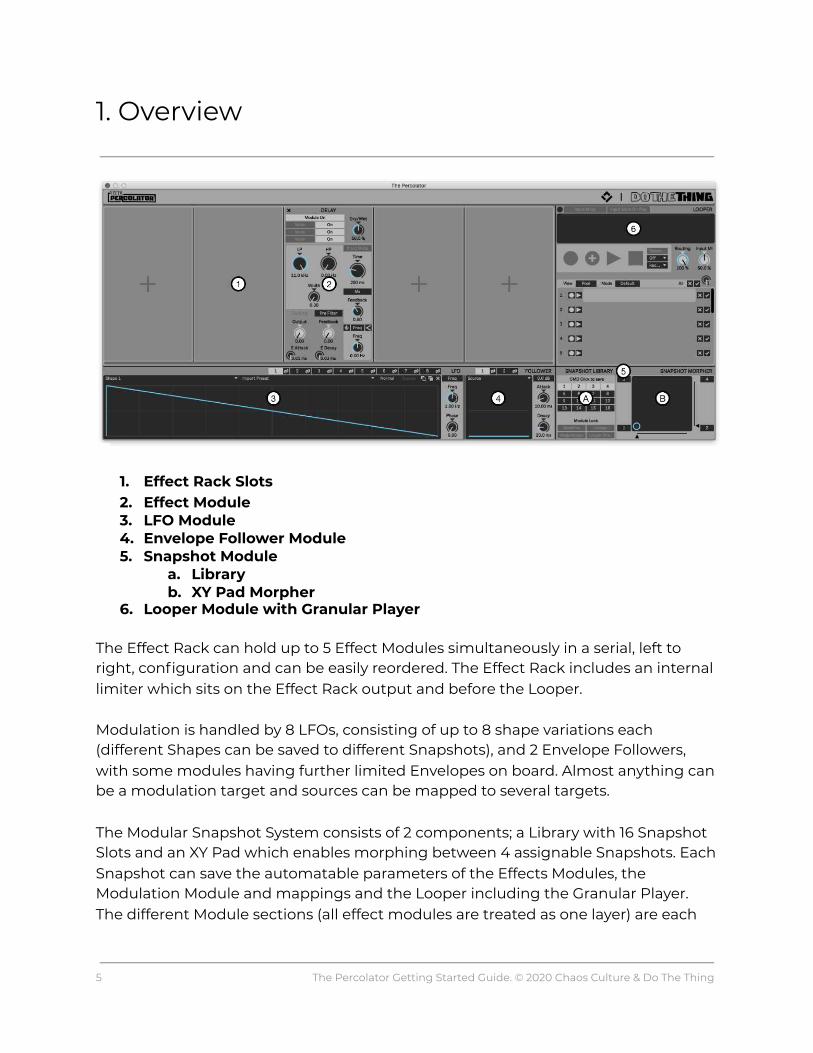
1. Effect Rack Slots 2. Effect Module 3. LFO Module 4. Envelope Follower Module 5. Snapshot Module
a. Library b. XY Pad Morpher
6. Looper Module with Granular Player
The Effect Rack can hold up to 5 Effect Modules simultaneously in a serial, left to right, configuration and can be easily reordered. The Effect Rack includes an internal limiter which sits on the Effect Rack output and before the Looper.
Modulation is handled by 8 LFOs, consisting of up to 8 shape variations each (different Shapes can be saved to different Snapshots), and 2 Envelope Followers, with some modules having further limited Envelopes on board. Almost anything can be a modulation target and sources can be mapped to several targets.
The Modular Snapshot System consists of 2 components; a Library with 16 Snapshot Slots and an XY Pad which enables morphing between 4 assignable Snapshots. Each Snapshot can save the automatable parameters of the Effects Modules, the Modulation Module and mappings and the Looper including the Granular Player. The different Module sections (all effect modules are treated as one layer) are each
5 The Percolator Getting Started Guide. © 2020 Chaos Culture & Do The Thing
assigned their own Snapshot layer and layers from different Snapshots can be recombined and even saved to new Snapshots.
The Looper enables recording of the output signal of the Effects Modules. The output of the Looper can be routed back through the effect modules for endless resampling and mixed with incoming audio. Up to 16 Loops can be temporarily saved to the Loop Pool and recalled to the player. Playback of Loops stored in the Loop Pool can be modulated.
The Looper also features a Granular Player with up to 8 Grains simultaneously available for getting all weird, grainy and stretched out.
6 The Percolator Getting Started Guide. © 2020 Chaos Culture & Do The Thing
2. Launcher Device & Options
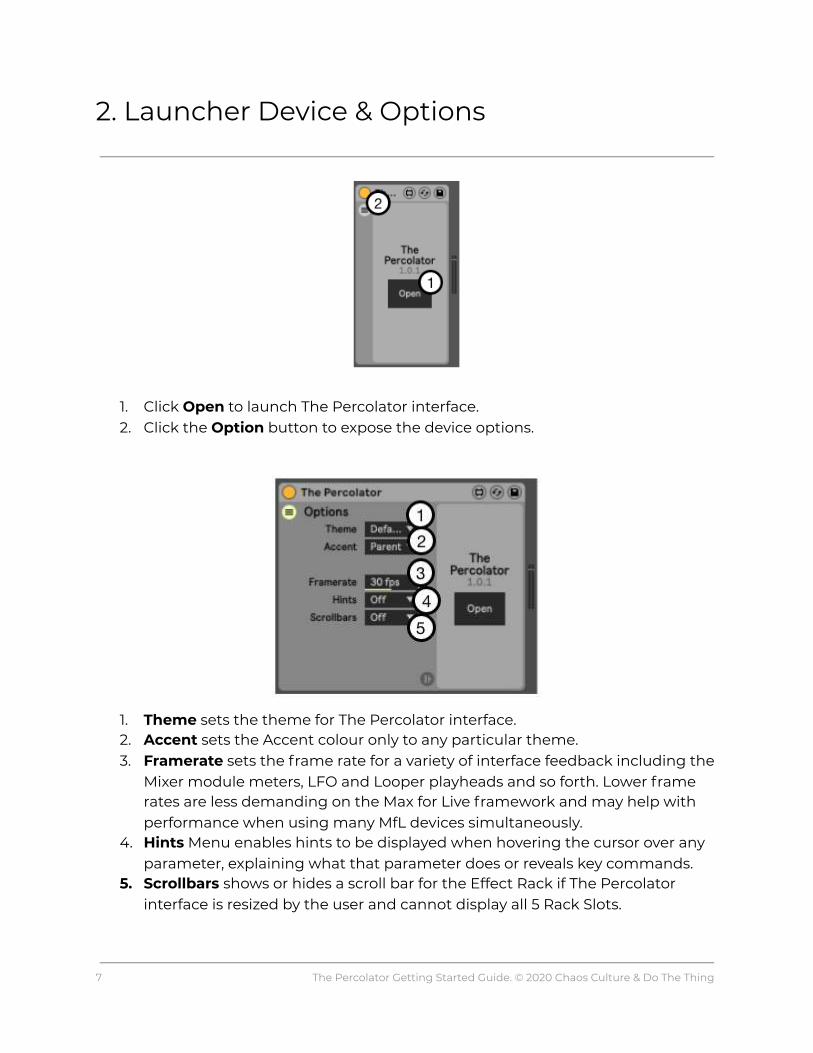
1. Click Open to launch The Percolator interface. 2. Click the Option button to expose the device options.
1. Theme sets the theme for The Percolator interface. 2. Accent sets the Accent colour only to any particular theme. 3. Framerate sets the frame rate for a variety of interface feedback including the
Mixer module meters, LFO and Looper playheads and so forth. Lower frame rates are less demanding on the Max for Live framework and may help with performance when using many MfL devices simultaneously.
4. Hints Menu enables hints to be displayed when hovering the cursor over any parameter, explaining what that parameter does or reveals key commands.
5. Scrollbars shows or hides a scroll bar for the Effect Rack if The Percolator interface is resized by the user and cannot display all 5 Rack Slots.
7 The Percolator Getting Started Guide. © 2020 Chaos Culture & Do The Thing
3. Effect Rack & Modules
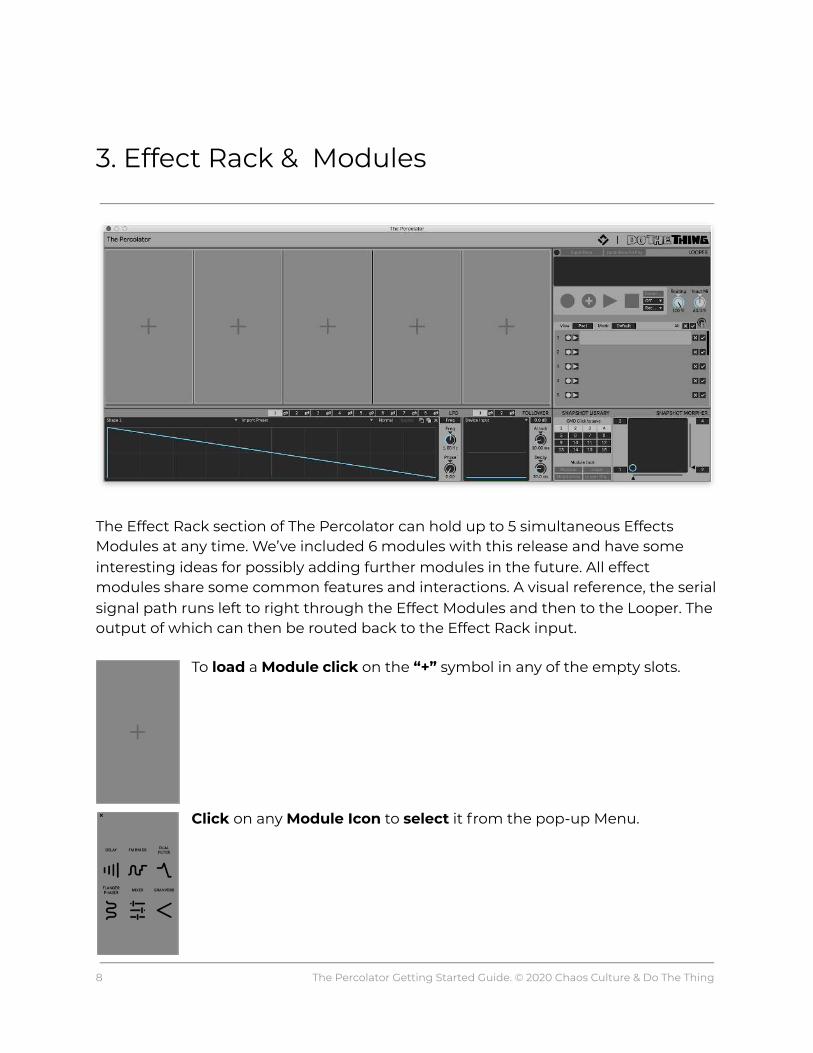
The Effect Rack section of The Percolator can hold up to 5 simultaneous Effects Modules at any time. We’ve included 6 modules with this release and have some interesting ideas for possibly adding further modules in the future. All effect modules share some common features and interactions. A visual reference, the serial signal path runs left to right through the Effect Modules and then to the Looper. The output of which can then be routed back to the Effect Rack input.
To load a Module click on the “+” symbol in any of the empty slots.
Click on any Module Icon to select it from the pop-up Menu.
8 The Percolator Getting Started Guide. © 2020 Chaos Culture & Do The Thing
4. Effect Module Mixer Section
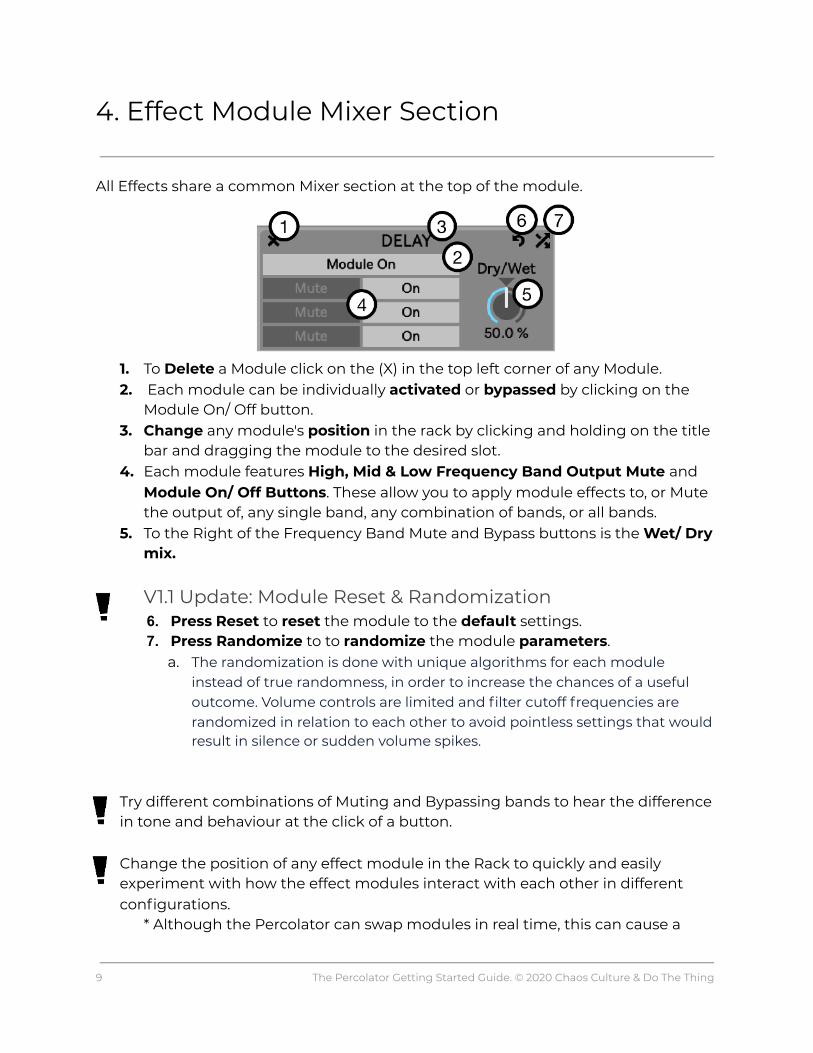
All Effects share a common Mixer section at the top of the module.
1. To Delete a Module click on the (X) in the top left corner of any Module. 2. Each module can be individually activated or bypassed by clicking on the
Module On/ Off button. 3. Change any module's position in the rack by clicking and holding on the title
bar and dragging the module to the desired slot. 4. Each module features High, Mid & Low Frequency Band Output Mute and
Module On/ Off Buttons . These allow you to apply module effects to, or Mute the output of, any single band, any combination of bands, or all bands.
5. To the Right of the Frequency Band Mute and Bypass buttons is the Wet/ Dry mix.
V1.1 Update: Module Reset & Randomization 6. Press Reset to reset the module to the default settings. 7. Press Randomize to to randomize the module parameters .
a. The randomization is done with unique algorithms for each module instead of true randomness, in order to increase the chances of a useful outcome. Volume controls are limited and filter cutoff frequencies are randomized in relation to each other to avoid pointless settings that would result in silence or sudden volume spikes.
Try different combinations of Muting and Bypassing bands to hear the difference in tone and behaviour at the click of a button.
Change the position of any effect module in the Rack to quickly and easily experiment with how the effect modules interact with each other in different configurations.
* Although the Percolator can swap modules in real time, this can cause a
9 The Percolator Getting Started Guide. © 2020 Chaos Culture & Do The Thing
momentary audio drop out and is not intended as a performance feature.
The effect modules can generate frequencies that cross the band crossover settings, even when those bands are bypassed or muted.
5. FM RM DS
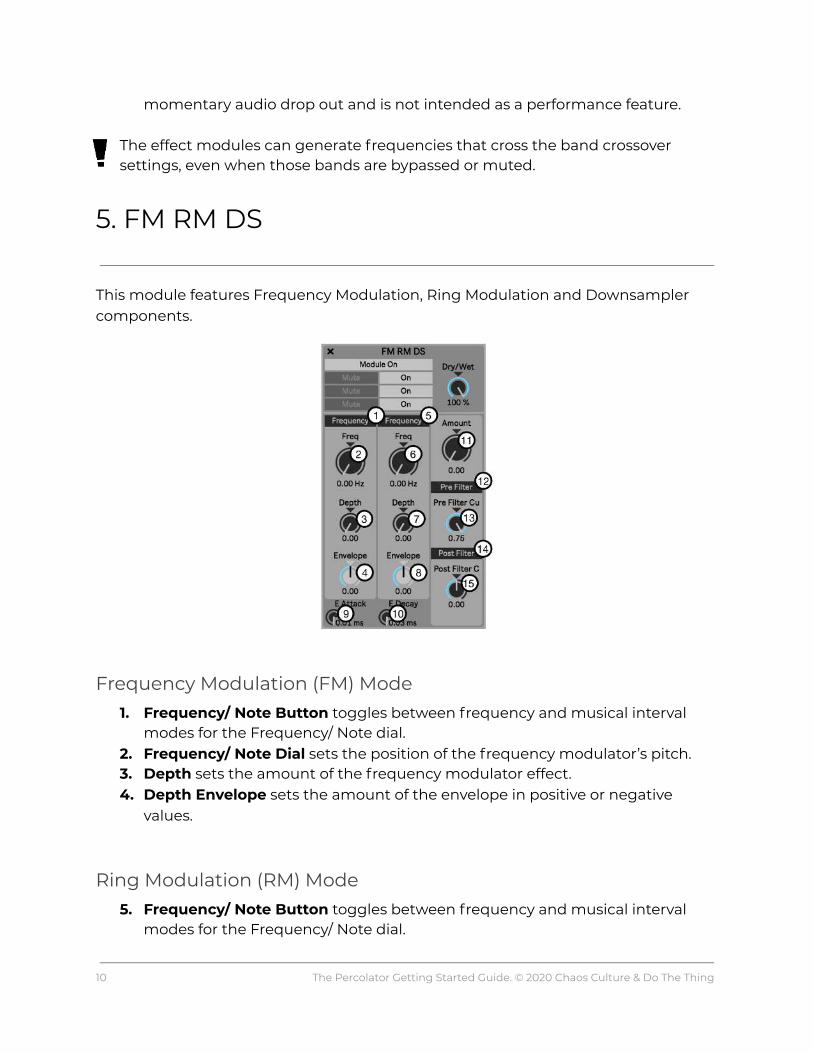
This module features Frequency Modulation, Ring Modulation and Downsampler components.
Frequency Modulation (FM) Mode 1. Frequency/ Note Button toggles between frequency and musical interval
modes for the Frequency/ Note dial. 2. Frequency/ Note Dial sets the position of the frequency modulator’s pitch. 3. Depth sets the amount of the frequency modulator effect. 4. Depth Envelope sets the amount of the envelope in positive or negative
values.
Ring Modulation (RM) Mode 5. Frequency/ Note Button toggles between frequency and musical interval
modes for the Frequency/ Note dial.
10 The Percolator Getting Started Guide. © 2020 Chaos Culture & Do The Thing

6. Frequency/ Note Dial sets the position of the Ring Modulator’s pitch. 7. Depth sets the amount of the Ring Modulator effect. 8. Depth Envelope sets the amount of the envelope in positive or negative
values. 9. Envelope Attack 10. Envelope Decay
- Attack and Decay control the attack and release time for the FM and RM Depth Envelope.
Downsampler (Sample Rate Reduction) 11. Amount sets the amount of rate reduction being applied. 12. Pre Filter On/ Off Button activates the Low Pass filter placed before the
Downsampler. This combination can be used to create the typical "YAYA" effect that you can often hear in old Daft Punk records.
13. Amount controls the filter cutoff frequency. 14. Post Filter Fader On/ Off 15. Amount activates the low pass filter placed after the Downsampler. Here, the
more you downsample, the lower the filter goes. You can use this to hide the very nasty aliasing created by the downsampling which can help to produce a less digital, more lofi style sound.
11 The Percolator Getting Started Guide. © 2020 Chaos Culture & Do The Thing
6. Flanger Phaser
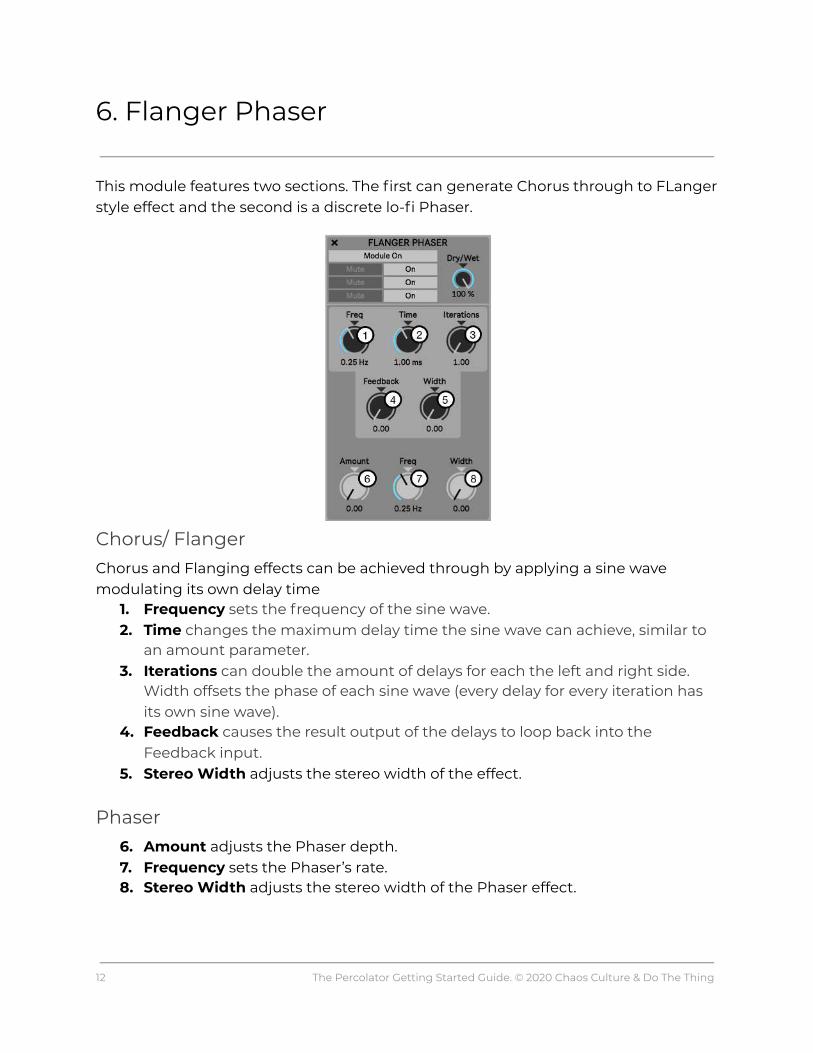
This module features two sections. The first can generate Chorus through to FLanger style effect and the second is a discrete lo-fi Phaser.
Chorus/ Flanger Chorus and Flanging effects can be achieved through by applying a sine wave modulating its own delay time
1. Frequency sets the frequency of the sine wave. 2. Time changes the maximum delay time the sine wave can achieve, similar to
an amount parameter. 3. Iterations can double the amount of delays for each the left and right side.
Width offsets the phase of each sine wave (every delay for every iteration has its own sine wave).
4. Feedback causes the result output of the delays to loop back into the Feedback input.
5. Stereo Width adjusts the stereo width of the effect.
Phaser 6. Amount adjusts the Phaser depth. 7. Frequency sets the Phaser’s rate. 8. Stereo Width adjusts the stereo width of the Phaser effect.
12 The Percolator Getting Started Guide. © 2020 Chaos Culture & Do The Thing
How to make a Chorus-like effect - Apply higher settings to the Iteration parameter and lower settings to the Time and Feedback parameters to achieve a stronger Chorus character.
How to make a Flanger-like effect - Apply higher settings to the Feedback parameter and reduce the Width parameter to achieve a stronger Flanger character.
13 The Percolator Getting Started Guide. © 2020 Chaos Culture & Do The Thing
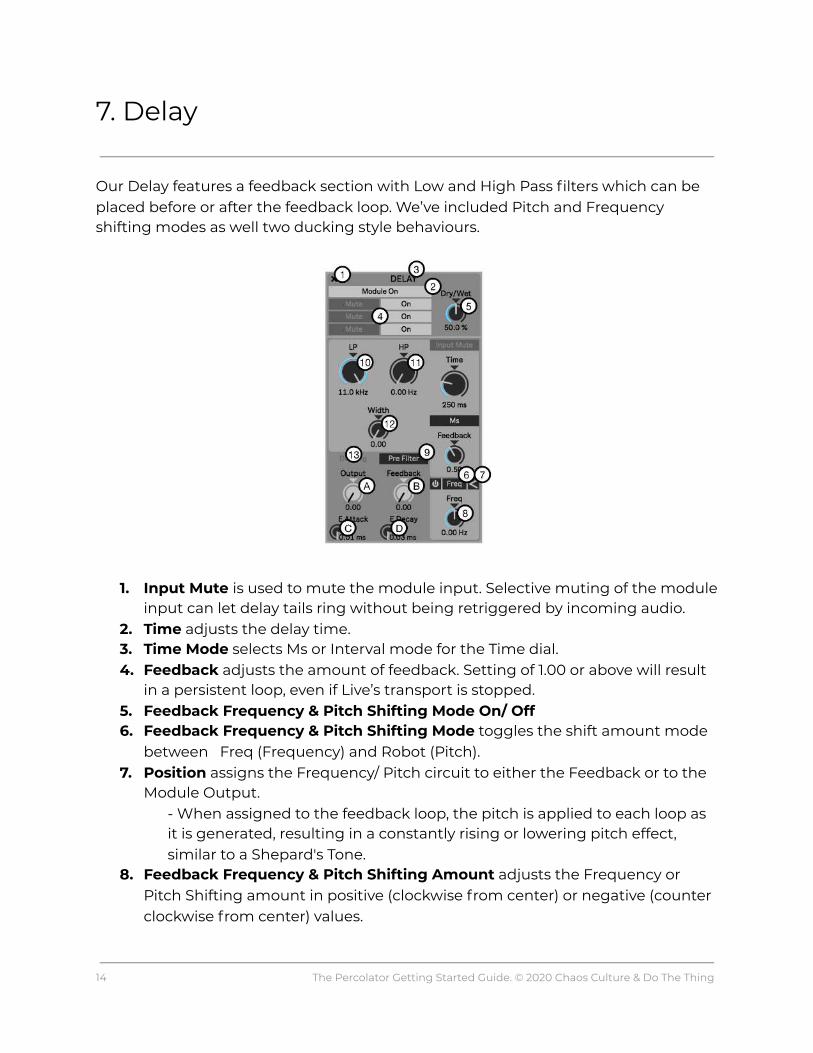
7. Delay
Our Delay features a feedback section with Low and High Pass filters which can be placed before or after the feedback loop. We’ve included Pitch and Frequency shifting modes as well two ducking style behaviours.
1. Input Mute is used to mute the module input. Selective muting of the module
input can let delay tails ring without being retriggered by incoming audio. 2. Time adjusts the delay time. 3. Time Mode selects Ms or Interval mode for the Time dial. 4. Feedback adjusts the amount of feedback. Setting of 1.00 or above will result
in a persistent loop, even if Live’s transport is stopped. 5. Feedback Frequency & Pitch Shifting Mode On/ Off 6. Feedback Frequency & Pitch Shifting Mode toggles the shift amount mode
between Freq (Frequency) and Robot (Pitch). 7. Position assigns the Frequency/ Pitch circuit to either the Feedback or to the
Module Output. - When assigned to the feedback loop, the pitch is applied to each loop as it is generated, resulting in a constantly rising or lowering pitch effect, similar to a Shepard's Tone.
8. Feedback Frequency & Pitch Shifting Amount adjusts the Frequency or Pitch Shifting amount in positive (clockwise from center) or negative (counter clockwise from center) values.
14 The Percolator Getting Started Guide. © 2020 Chaos Culture & Do The Thing
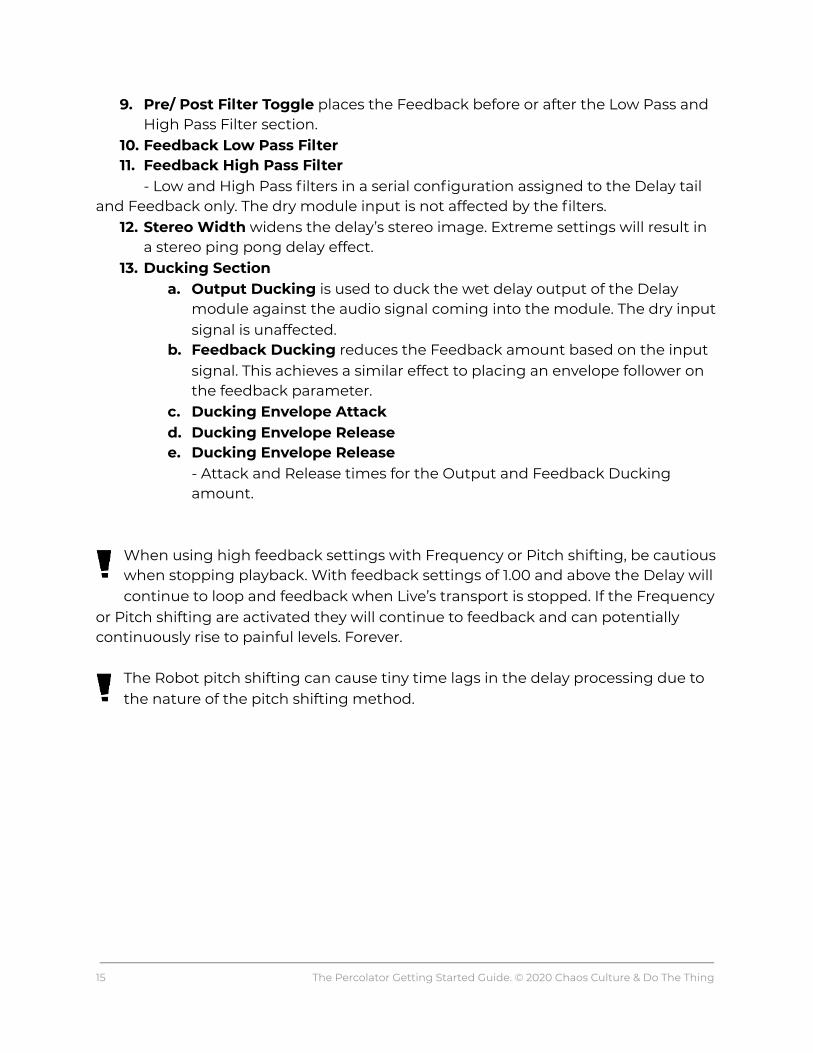
9. Pre/ Post Filter Toggle places the Feedback before or after the Low Pass and High Pass Filter section.
10. Feedback Low Pass Filter 11. Feedback High Pass Filter
- Low and High Pass filters in a serial configuration assigned to the Delay tail and Feedback only. The dry module input is not affected by the filters.
12. Stereo Width widens the delay’s stereo image. Extreme settings will result in a stereo ping pong delay effect.
13. Ducking Section a. Output Ducking is used to duck the wet delay output of the Delay
module against the audio signal coming into the module. The dry input signal is unaffected.
b. Feedback Ducking reduces the Feedback amount based on the input signal. This achieves a similar effect to placing an envelope follower on the feedback parameter.
c. Ducking Envelope Attack d. Ducking Envelope Release e. Ducking Envelope Release
- Attack and Release times for the Output and Feedback Ducking amount.
When using high feedback settings with Frequency or Pitch shifting, be cautious when stopping playback. With feedback settings of 1.00 and above the Delay will continue to loop and feedback when Live’s transport is stopped. If the Frequency
or Pitch shifting are activated they will continue to feedback and can potentially continuously rise to painful levels. Forever.
The Robot pitch shifting can cause tiny time lags in the delay processing due to the nature of the pitch shifting method.
15 The Percolator Getting Started Guide. © 2020 Chaos Culture & Do The Thing
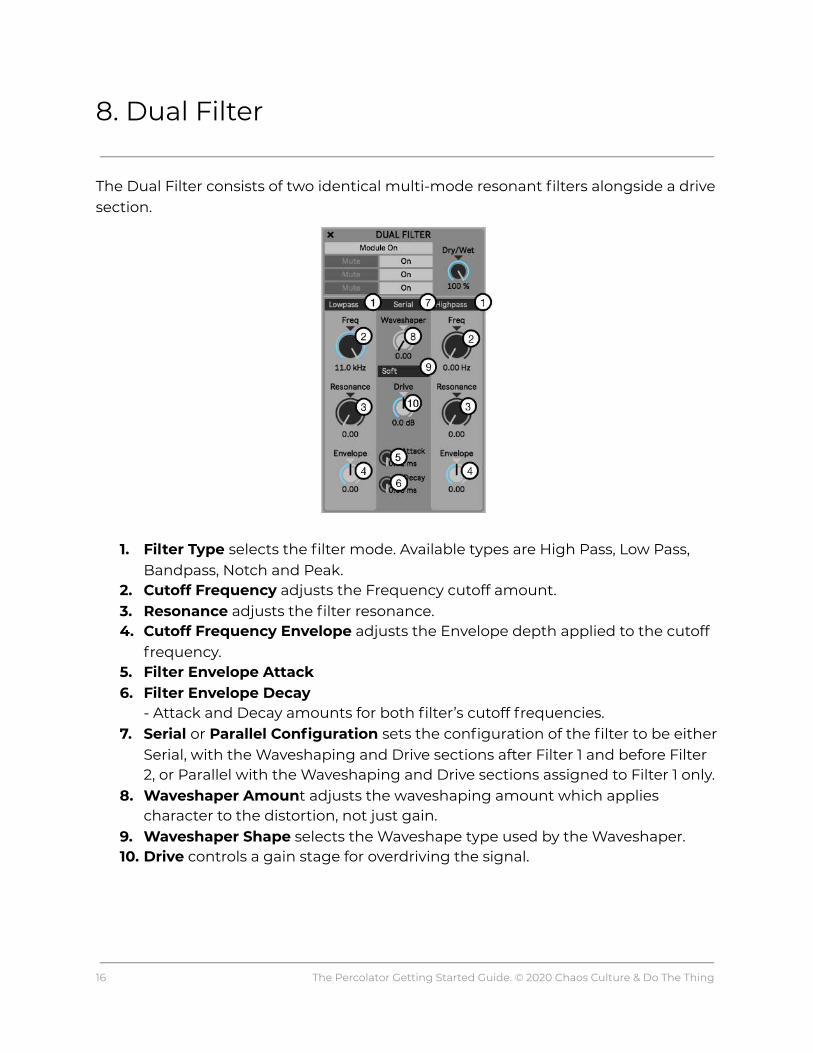
8. Dual Filter
The Dual Filter consists of two identical multi-mode resonant filters alongside a drive section.
1. Filter Type selects the filter mode. Available types are High Pass, Low Pass,
Bandpass, Notch and Peak. 2. Cutoff Frequency adjusts the Frequency cutoff amount. 3. Resonance adjusts the filter resonance. 4. Cutoff Frequency Envelope adjusts the Envelope depth applied to the cutoff
frequency. 5. Filter Envelope Attack 6. Filter Envelope Decay
- Attack and Decay amounts for both filter’s cutoff frequencies. 7. Serial or Parallel Configuration sets the configuration of the filter to be either
Serial, with the Waveshaping and Drive sections after Filter 1 and before Filter 2, or Parallel with the Waveshaping and Drive sections assigned to Filter 1 only.
8. Waveshaper Amoun t adjusts the waveshaping amount which applies character to the distortion, not just gain.
9. Waveshaper Shape selects the Waveshape type used by the Waveshaper. 10. Drive controls a gain stage for overdriving the signal.
16 The Percolator Getting Started Guide. © 2020 Chaos Culture & Do The Thing
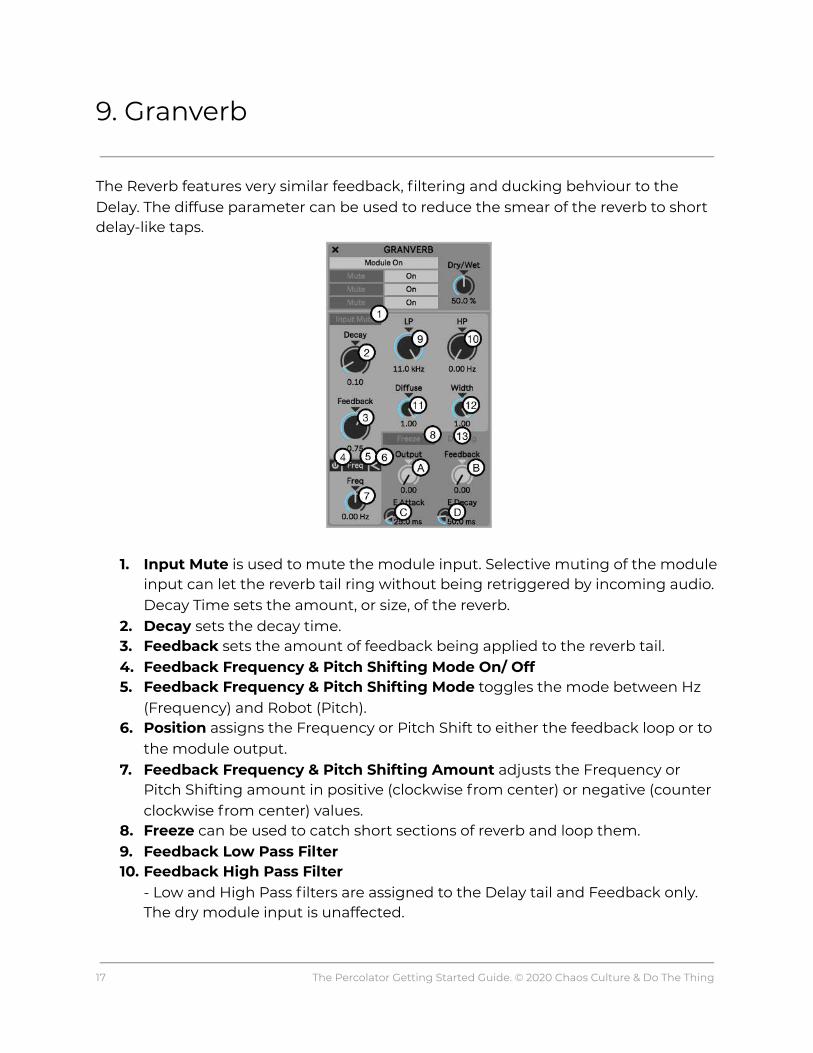
9. Granverb
The Reverb features very similar feedback, filtering and ducking behviour to the Delay. The diffuse parameter can be used to reduce the smear of the reverb to short delay-like taps.
1. Input Mute is used to mute the module input. Selective muting of the module input can let the reverb tail ring without being retriggered by incoming audio. Decay Time sets the amount, or size, of the reverb.
2. Decay sets the decay time. 3. Feedback sets the amount of feedback being applied to the reverb tail. 4. Feedback Frequency & Pitch Shifting Mode On/ Off 5. Feedback Frequency & Pitch Shifting Mode toggles the mode between Hz
(Frequency) and Robot (Pitch). 6. Position assigns the Frequency or Pitch Shift to either the feedback loop or to
the module output. 7. Feedback Frequency & Pitch Shifting Amount adjusts the Frequency or
Pitch Shifting amount in positive (clockwise from center) or negative (counter clockwise from center) values.
8. Freeze can be used to catch short sections of reverb and loop them. 9. Feedback Low Pass Filter 10. Feedback High Pass Filter
- Low and High Pass filters are assigned to the Delay tail and Feedback only. The dry module input is unaffected.
17 The Percolator Getting Started Guide. © 2020 Chaos Culture & Do The Thing

11. Diffuse changes the nature of the reverb effect. At low settings the Reverb will generate delay like taps and at high settings the reverb’s decay will wash out in a more typical reverb manner.
12. Stereo Width widens the reverb’s stereo image. 13. Ducking Section
a. Output Ducking is used to duck the wet delay output of the Delay module against the audio signal coming into the module. The dry input signal is unaffected.
b. Feedback Ducking reduces the Feedback amount based on the input signal. This achieves a similar effect to placing an envelope follower on the feedback parameter.
c. Ducking Envelope Attack d. Ducking Envelope Release
- Attack and Release times for the Output and Feedback Ducking amount.
18 The Percolator Getting Started Guide. © 2020 Chaos Culture & Do The Thing

10. Mixer
The Mixer module features 3 bands set at the same frequency crossover points as the per-module Mute & Bypass functions as well as Master volume control.
High, Mid & Low Bands 1. Stereo Width adjusts the stereo width of the band. 2. Pan Position sets the pan position of the band. 3. Volume sets the band volume.
Mix Volume 4. Mix sets the overall module output volume.
The Mixer is a fun place to play with pushing different bands into the inbuilt Limiter to create different emphasis with your mix.
Adding more stereo width can increase the relative volume for the band.
19 The Percolator Getting Started Guide. © 2020 Chaos Culture & Do The Thing

11. Modulation
Modulators. We has ‘em.
12. LFO Module
1. LFO 1-8 Selection Tabs are used to assign the selected LFO to the front panel editor and controls.
2. LFO 1-8 Mapping Mode On/ Off Tabs are used to activate the mapping mode which enables linking the LFO to modulation target parameters.
3. Shape is a menu which is used to select the LFO shape for use. The Shape menu can hold 8 Shapes per LFO. Different LFO shapes can be saved to, and recalled by, Snapshots.
4. The Preset Library is a library of LFO shapes which can be loaded into the Shape menu.
5. Playback Direction sets the playback direction of the LFO. 6. Bypass is used to activate and deactivate the LFO’s mapping assignments. 7. Copy LFO Shape copies the current LFO shape. 8. Paste LFO Shape pastes the copied LFO shape to the currently selected LFO. 9. X is used to delete breakpoints. If some breakpoints are currently selected, it
only deletes those selected points. If no breakpoints are selected, it deletes the whole shape and replaces it with the default shape
10. LFO Rate Mode is used to select either Hz or Interval modes for the LFO Rate. - When the LFO is setting to Frequency timing, the LFO playhead will continue to cycle when Live’s playhead is stopped. In Interval mode, the playhead will only cycle when Live’s playback is active.
11. LFO Rate sets the rate for the LFO. 12. Phase is used to offset the LFO start position. Moving the Start position will
cause the LFO to begin playback from the selected position.
20 The Percolator Getting Started Guide. © 2020 Chaos Culture & Do The Thing

13. The Waveform Editor is used to display the currently selected shape and can be edited. - Double click on the shape to create a breakpoint. - Click and Drag to reposition the breakpoint. - Hold Shift to constrain the horizontal position of the breakpoint to the
nearest breakpoint. IE; If there is a breakpoint to the left of the breakpoint being edited, then the
edited breakpoint cannot be dragged past the position of the left breakpoint. - Click in the Editor and drag to select multiple breakpoints. - Hold Option and Drag to copy those breakpoints to a new position. - Hold CMD while moving or creating breakpoints to snap them to the grid. - Hold Shift + Option while dragging to ‘draw’ quantised steps into the editor. - Hold Option when clicking close to a line between breakpoints and drag to apply curves.
13. Envelope Follower Module
1. Envelope 1 & 2 Selection Tabs are used to assign the selected Envelope to the
front panel controls. 2. Envelope 1 & 2 Mapping Mode On/ Off Tabs are used to activate the mapping
mode which enables linking the Envelope Followers to modulation target parameters.
3. Source selects the output of the module that you wish to use to trigger the envelope. The source input is assigned to Modules, not to Effect Rack Slots
4. Input Gain can be used to scale the input signal in order to compensate for too quiet or loud sources.
5. Attack adjusts the speed of the Envelope attack. 6. Decay adjusts the speed of the Envelope decay.
21 The Percolator Getting Started Guide. © 2020 Chaos Culture & Do The Thing

14. Mapping Modulation Sources to Targets
1. Click any of the Mapping On/ Off buttons on the LFOs or Envelope Followers to activate the mapping for that modulation source. Modulation targets will now be highlighted.
2. Click the “ + ” icon on any target to assign the LFO or Envelope Follower to the target.
22 The Percolator Getting Started Guide. © 2020 Chaos Culture & Do The Thing

3. Adjust the Modulation amount from the Target Mapping Depth Slider. 4. Click anywhere outside the target “+” icon to exit the mode. 5. Reset Everything is used to clear all modulation mappings. 6. Reset Source will only clear the currently selected modulation source.
When in the mapping mode, press and hold CMD to momentarily toggle the Mapping mode and be able to adjust the centre point of the target parameter.
Effect Modules will retain their modulation mappings if moved to new positions in the Effect Rack.
15. Internal Modulation and Live’s Automation
The Percolator’s internal modulation is separate to Live’s automation system and both can be applied to Modulation targets simultaneously.
23 The Percolator Getting Started Guide. © 2020 Chaos Culture & Do The Thing

16. Snapshot Module
Snapshots are used to store and recall all automatable parameters of The Percolator..
16.1. SnapShot Library 1. Click on any Snapshot to recall it. Selecting new Snapshots will cause the
device to jump to the new settings. - CMD + Click on any Snapshot to save the current state of the device to that Snapshot. - SHIFT + Click on any Snapshot to clear it.
2. Module Lock is used to Lock any of the Module Types to the currently recalled Snapshot, so the state of that module is retained when recalling, saving or clearing any Snapshots.
- IE; I have Snapshots 1 & 2 saved with 2 different Effect Modules settings. I create some Modulation Settings in Snapshot 1 and wish to hear this modulation setting applied to the Effect Module settings saved in Snapshot 2.
- Click on Snapshot 2 and Lock the Effect Modules Layer. - Click on Snapshot 1 to recall it. You will now hear the ‘locked’ Effect Modules setting from Snapshot 2 and the LFO settings from Snapshot 1. - These combined settings can be saved to a new Snapshot by CMD + Click on a new Snapshot Slot. - Deactivate the Effect Module Layer Lock (from Snapshot 2) to hear and edit the new Snapshot.
16.2. XY Pad 4 way morpher The four corner Snapshot Slots are used to assign Snapshots to the XY Pad.
3. Click on the desired Slot and enter the desired Snapshot Number to assign
24 The Percolator Getting Started Guide. © 2020 Chaos Culture & Do The Thing
Snapshots. 4 . Drag the Target Dot in the XY Pad to morph between the selected Snapshots, or alternatively adjust the X or Y axis sliders positioned alongside the XY Pad.
Clicking in the either Snapshot Library or the XY Pad will switch functionality instantly to that component.
If an Effect Module is deleted at any time, it is deleted from all snapshots. Snapshots cannot morph between different configurations of Modules in the Effect Rack.
V1.1 Update: Quantize Snapshot Recall Added the ability to quantize snapshot recalling . This quantization works exactly how the quantization of the Looper does. If you recall a snapshot right on the beat or slightly after, it still counts as being "in time". This helps with performative use of snapshot recall without having to focus on triggering it perfectly before the beat.
V1.1 Update: MIDI Trigger Snapshot Recall
(Live 11 only) Snapshots can now also be recalled via MIDI input for live performance use . Route any of Live’s MIDI track outputs to the MIDI input of the MIDI track hosting The Percolator device. MIDI note C3 will recall the first snapshot and consecutive notes above will trigger higher snapshot numbers. It's suggested to not quantize snapshot recalling if the incoming MIDI data is already quantized.
25 The Percolator Getting Started Guide. © 2020 Chaos Culture & Do The Thing
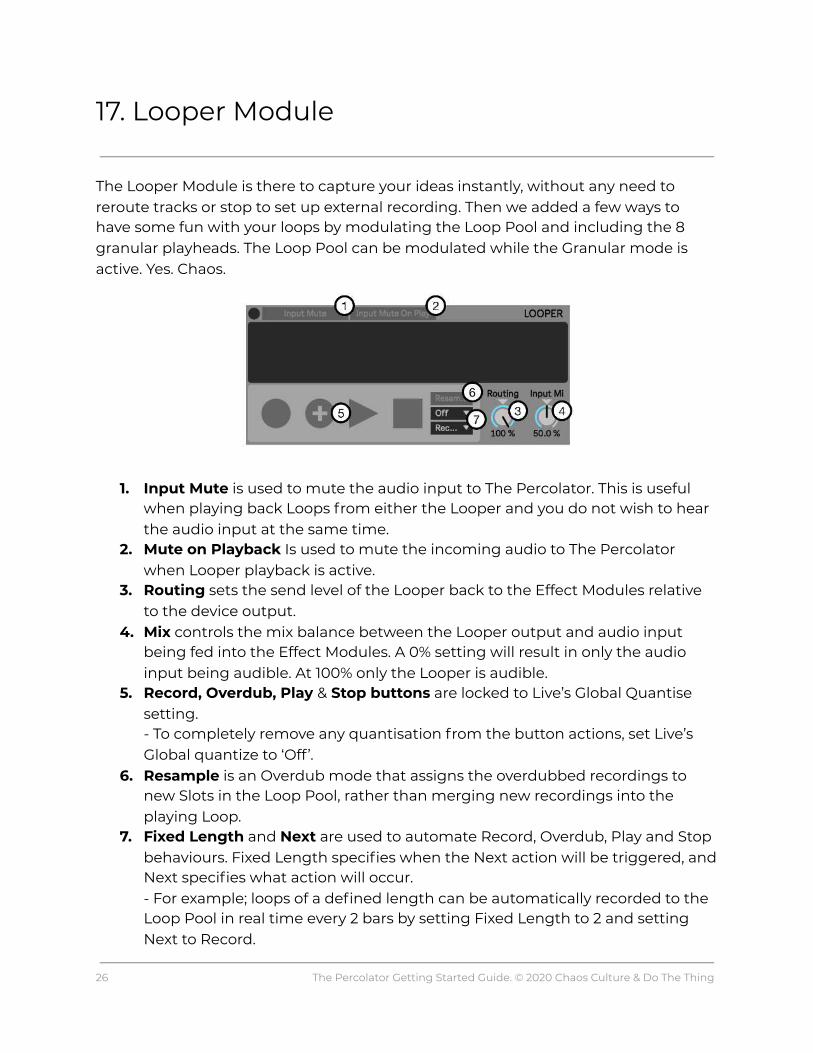
17. Looper Module
The Looper Module is there to capture your ideas instantly, without any need to reroute tracks or stop to set up external recording. Then we added a few ways to have some fun with your loops by modulating the Loop Pool and including the 8 granular playheads. The Loop Pool can be modulated while the Granular mode is active. Yes. Chaos.
1. Input Mute is used to mute the audio input to The Percolator. This is useful
when playing back Loops from either the Looper and you do not wish to hear the audio input at the same time.
2. Mute on Playback Is used to mute the incoming audio to The Percolator when Looper playback is active.
3. Routing sets the send level of the Looper back to the Effect Modules relative to the device output.
4. Mix controls the mix balance between the Looper output and audio input being fed into the Effect Modules. A 0% setting will result in only the audio input being audible. At 100% only the Looper is audible.
5. Record, Overdub, Play & Stop buttons are locked to Live’s Global Quantise setting. - To completely remove any quantisation from the button actions, set Live’s Global quantize to ‘Off’.
6. Resample is an Overdub mode that assigns the overdubbed recordings to new Slots in the Loop Pool, rather than merging new recordings into the playing Loop.
7. Fixed Length and Next are used to automate Record, Overdub, Play and Stop behaviours. Fixed Length specifies when the Next action will be triggered, and Next specifies what action will occur. - For example; loops of a defined length can be automatically recorded to the Loop Pool in real time every 2 bars by setting Fixed Length to 2 and setting Next to Record.
26 The Percolator Getting Started Guide. © 2020 Chaos Culture & Do The Thing

18. Looper: The Loop Pool
The Loop Pool displays recording Slots used for temporarily storing recordings to, and playing back recordings from, the Looper buffer.
Please remember → Recordings saved in the Loop Pool cannot be saved with Live Project saves! This an MFL limitation which we can’t overcome.
1. View toggles the lower view between the Loop Pool and the Grain
parameters. 2. Mode toggles between the Default Looper playback and the Granular modes.
3. Clear All is used to clear all recordings from the Loop Pool. 4. Export All is used to Export all recordings in the Loop pool. 5. Loop Pool Slot Dial can be used to select the target slot for recording or
playback. 16 Slots are available. 6. Record is used to select the target Slot to be used for recording. 7. Playback is used to select the currently playing Loop. 8. Clear will clear the recording from the current Slot. 9. Export will export the Slot recording. 10. Slot Display displays the waveform of the current stored recording or empty
Slot.. - Clicking a stored waveform will select it for playback and display the waveform in the main player. - When no recording is currently stored in the slot, the blank slot can be clicked to select it as the recording destination.
27 The Percolator Getting Started Guide. © 2020 Chaos Culture & Do The Thing
18.1. How to Record Loops - Click Record to begin Recording immediately or as defined by Live’s Global Quantize. - Then Click:
- Stop to stop recording - Record to continue recording a new loop into a new Loop Pool Slot. - Overdub to overdub the incoming signal into the playing recording.
- If Fixed Length is set to an interval length, then the selected Next action will trigger at the specified interval.
18.2. How to Record several consecutive takes into the Loop Pool. - Set the Next action to Record and the Looper will continue to record new loops to the Loop Pool Slots until manually stopped. Up to 16 slots are available.
18.3. How to Overdub the currently playing Loop through the effect modules to a new Pool Slot. The Looper can play from one take while recording to another, also through the effect modules.
- Click the Resample button. - Set the Next action to Overdub and set the desired Loop length. The Looper will playback the selected Loop and then record new Loops to the Loop Pool Slots until manually stopped.
18.4 Loop Pool Playback Modulation Modulating playback of loops in the Loop Pool (by assigning an LFO or Envelope Follower to the Loop Slot Dial) will result in activating legato playback of each loop within the range defined by the modulation depth of the Loop Dial. This can be used to remix different sections of each Loop stored in the Loop Pool together.
18.5 Loop Pool and Snapshots The currently selected Loop Pool Slot can be saved to Snapshots, enabling different active Loops to be saved to different Snapshots.
28 The Percolator Getting Started Guide. © 2020 Chaos Culture & Do The Thing

19. Looper: Granular Player
The Looper features a Granular player with 8 Grain playheads, each with their own set of parameters. Using the Next Behaviour in the main Looper section, it is possible to record loops of audio which can then playback with the Granular player instantly once recording is complete.
1. Click Loop Pool/ Grains to select the Granular player interface. 2. Click the Looper/ Granular Button to activate the Granular player. 3. Reset will reset all 8 Grains parameters to default. 4. 1-8 Grain Editor Tabs are used to display the desired Grains parameters. 5. 1-8 Grain On/ Off Buttons are used to activate or deactivate the 8 Granular
Playheads. 6. Position defines the loop start position.. 7. Loop Size defines the Loop length in relation to the Position. 8. Length sets the length of the playhead. 9. Fade adds a short fade to the end of the playhead to smooth looped playback. 10. Direction sets the playhead playback direction. This can be set to forward
backward or Ping Pong. 11. Pitch sets the pitch of the selected grain. 12. Speed sets the playback speed for the Grain. This can be set to negative
values also, causing the playhead to travel backwards through the defined Loop size.
13. Volume sets the volume of the currently selected Grain. 14. Pan sets the pan position of the current selected Grain.
29 The Percolator Getting Started Guide. © 2020 Chaos Culture & Do The Thing
V 1.1 Update: Pitch Range Grain Pitch shifting range has been doubled to 4 octaves.
19.1. Modulation and the Granular player All Grain parameters are available as modulation targets.
19.2. Snapshots and the Granular player Grain On/ off and all grain parameters are available to be saved to Snapshots.
20. V1.1 Update: Miscellaneous Improvements
● Updated The Percolator UI background colors slightly. ● The title of the floating window now displays the device and track name, which
updates automatically after renaming. ● Minor bugfixes for all GUI elements and the overall device from updating the
underlying framework to the latest version.
30 The Percolator Getting Started Guide. © 2020 Chaos Culture & Do The Thing
The Percolator is an ongoing collaboration between Chaos Culture and Do the Thing, distributed by Isotonik Studios.
Sebastian was introduced to music early on and grew up reverse engineering and producing songs. While being professionally trained to become a jazz pianist, he learned the ins and outs of many applications and electronic devices. The most important one was the lite version of Ableton Live 4,
which enabled him to dive deeper into sound design and other aspects of music production. By studying audio engineering and working with many studios, Sebastian was introduced to the music industry as he started his work as a mixing engineer and sound designer. Chaos Culture is a project, an artist name he uses to publish some of his music and other creations such as Max for Live devices that extend the functionality of Live.
Sammy grew up playing guitar in Melbourne high school bands which fostered his early love for guitar pedals and
audio effects in general. Discovering MPCs in his late teens, a new passion for electronic music quickly fostered and then - acid techno. The late 1990s found Sammy practising DJ sets at his local 2nd hand synth store (who could afford turntables?) which established the foundation for a long career in the MI industry, eventually landing him in Berlin working for Ableton first as International Sales Manager and later as Business Development Manager. With 20 odd years experience playing records and relentlessly buying and selling studio gear, alongside his passion for design, clean workflows and beautiful solutions, Do The Thing is the working alias for his current creative projects and freelance work.
Isotonik Studios is a collective of developers that are focused on extending the use of Ableton Live via MaxforLive devices, Control Surface Scripts and Live Packs.
Established for over ten years, Isotonik Studios is the home of Ned Rush, nativeKONTROL and many others.
31 The Percolator Getting Started Guide. © 2020 Chaos Culture & Do The Thing