usssssb: talking usb from python - newaenewae.com/files/hackaday_usssssbtalkingusbfrompython......
TRANSCRIPT

USSSSSB:Talking USB From Python
Colin O’Flynn – NewAE Technology Inc.
Live Links Available at http://oflynn.com/?p=669And
https://hackaday.io/project/8251-usssssb-talking-usb-from-python-supercon-2015

Welcome to the Jungle!
There will be no fun or games. There will be:
• Introduction to USB (2.0 and 3.0)
• Learning about Interface Options
• Figuring out how to use USB Microcontrollers
• Python interfaces to USB Devices
• Examples of GUIs (Bonus!)
• Debugging USB Protocols
• Driver Signing, Distribution, and getting a VID

About this Presentation
There will be many things done roughly/quickly, meaning:
• “Bad” Python code
• Skipping over details of proper use of USB classes
• Misusing said USB classes for our own purpose

About Me
• EE from Halifax, Canada
• Worked on some fun projects – IPv6 Stacks for sensor networks, USB-Based sniffers, various wireless protocols, analog capture hardware
• Write for Circuit Cellar every two months on FPGAs
• Closing up a PhD on embedded security– Find me at Blackhat/DEFCON/etc.

About NewAE Technology Inc.
• Canadian company started in 2013
• Prime product: embedded security analysis tools, training, and consulting– Do you have an AES256 bootloader?
It’s probably trivial to break it, even with no errors in your implementation
see proof:
https://hackaday.io/project/956-chipwhisperer-security-research/log/10108-aes-256-is-not-enough-breaking-a-bootloader
https://eprint.iacr.org/2014/899.pdf

AWESOME: Live Workshop• Atmel has donated a number of SAM D21 Xplained Pro Boards
– I’m going to use them to give you the hands-on experience.
– Note I don’t have a connection to Atmel. Am just familiar with their products and have used them previously.
– 90% of what I’ll take you through is portable across other devices and families or USB stacks.

Software Setup While I Talk
• Download and install Atmel Studio (6.2 latest as of these slides, use 7.x if possible)
• Download and install WinPython-2.7 (latest version)
• Download and install libusb-win32-devel-filter from http://sourceforge.net/projects/libusb-win32/files/libusb-win32-releases/1.2.6.0/libusb-win32-devel-filter-1.2.6.0.exe/download
http://oflynn.com/?p=669
All links available from here

Part #1: USB Overview
WARNING: I assume you have some experience with USB already, but provide this very brief summary anyway. This summary will provide you with just enough information, but you’ll be on the wrong side of the Dunning-Kruger curve.

Dunning-Kruger

What the heck is USB?
htt
p:/
/xkc
d.c
om
/92
7/

Finding USB Resources
Get the original docs at http://www.usb.org/developers/docs/ - the USB specs are very well written for “regular users”• Be sure to get the USB 2.0 docs, not latest 3.x!• Original spec is updated with ECN
Example page from the USB Spec
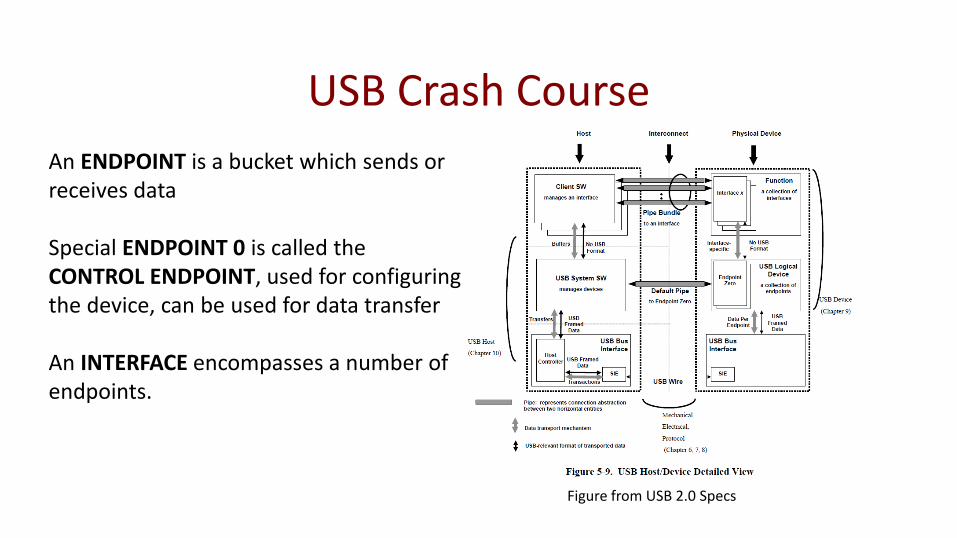
USB Crash Course
Figure from USB 2.0 Specs
An ENDPOINT is a bucket which sends or receives data
Special ENDPOINT 0 is called the CONTROL ENDPOINT, used for configuring the device, can be used for data transfer
An INTERFACE encompasses a number of endpoints.

USB Descriptors• Descriptors… describe things
– Device Descriptor describes entire device (general class, Vendor ID, if has serial number)
– Configuration Descriptor describes specific configuration of device (possible to have multiple), such as:
• Interfaces, endpoints within Interfaces
– String Descriptors for device name, manufacture, etc.

USB Classes• Classes define how certain devices interact, provide standard
to the Operating System– Human Interface Device (HID) defines keyboards, mice, joysticks
– Mass Storage Controller (MSC) allows USB-key to work without needing special drivers

IAD DeviceIAD allows you to mash together multiple devices such they appear as separate to the user, i.e.:
• Mass Storage to provide drivers and application software
• CDC (Serial Port) for debug logging
• Proprietary interface for high-speed data transfer to your application

USB 2.0 Important Speed Notes
• Low Speed = 1.5 Mbit/s
• Full Speed = 12 Mbit/s
• High Speed = 480 Mbit/s
Almost only used by keyboard/mice or similar.
Common for many simple USB peripherals.
USB 2.0 high speed is fairly common as well now.

What Speed is that?• Various methods to determine USB speed a peripheral
supports– Specific resistors on data lines
– Special signalling sequence
– Most of this can be opaque to you however (but if a design has a resistor on the lines that is why)

More ResourcesUSB Complete book is probably best known resource!

More ResourcesAlso useful:
USB in a Nutshell: http://www.beyondlogic.org/usbnutshell

What about USB 3.0????
USB 3.0 effectively adds a separate channel for 3.x traffic… the cable still has the 2.0 signals. But honestly let’s start with slower 2.0 for now…

Part #2: USB Solutions

USB-Serial
• Easy solution: ignore everything, just pretend we still have our serial port
• Legacy Equipment being upgraded…. Ok makes sense.
• Debug serial port… yes I guess too.
• As your main connection for your product? That’s getting a little sloppy!

Faster USB Interface Chips
• Allows more complex protocols Still some “stream-oriented” protocol needed
• Doesn’t take full use of USB capabilities

USB Custom Interfaces
• Can do much more than just sling data:– Enumerate a mass storage interface to allow user to copy stored data
off without any application
– Enumerate an Ethernet adapter to allow used to get internet connectivity
– Enumerate as proprietary interface for fast data-slinging

USB – VID/PID• How does computer know what was plugged in?
• VID = Vendor ID (who made this)
• PID = Product ID (what product of theirs is it)

USB Vendor ID• USB requires devices to provide 16-bit Vendor ID (VID), and
16-bit Product ID (PID)– VID assigned globally by USB-IF to a company
– PID assigned by company who owns that VID
• VID technically needs to be purchased from USB-IF (or by joining USB-IF) at cost of ~$4000 USD.

USB Vendor IDh
ttp://xkcd
.com
/14
94
/

USB Vendor ID
• If you later want to have drivers appear as part of Windows Update you will need a VID.
• If you want to use trademarked USB logo you will need to join USB-IF (and thus be assigned a VID).
• If using a device such as FTDI you can re-use their VID & PID.
• Microcontroller manufactures might allow you to use their VID with permission, do not just re-use and select random PID.

USB Vendor ID• A few well-known “pirate VIDs”:
– Either have been revoked, OR a large group just started using them
– Users of those VIDs do not (and cannot) use trademarked logo anywhere since under no agreement with USB-IF… but no law against setting some bits somewhere (i.e. the VID)

Custom vs. Off-The-ShelfOff-the-Shelf (i.e. USB-Serial):
• Limited functions, but certified drivers available (easy for users to install)
• Do not need a VID
• Little development effort (possibly just a soldering iron)
Custom:
• Flexible functionality, allows excellent user experience
• More development effort
• Require a VID
• Possibly require driver development + certification

Part #3: USB Microcontrollers

Selecting a Microcontroller• Features to consider:
– Full or High Speed?
– Ability to operate without crystal (uses USB signals for timing) ONLY possible for Full Speed, NOT for High Speed
– Additional interfaces you might require (external memory?)
– Useful references for your intended application

Selecting a Microcontroller• Options from almost every major vendor!
• Atmel, NXP, Microchip, etc.

SAMD21

Typical Features• Integrated resistors (avoids external parts)
• Ping-Pong buffers (i.e., one buffer is being processed while another is being filled)
• For high-speed common to have > 2 buffers…
• Possible to watch number of endpoints you might need for

Endpoint Exhaustion
i.e… RNDIS + CDC-Serial + Mass Storage = 8 endpoints + 1 control endpoint

Example of USB Product
Atmel SAM3S USB Microcontroller• Provides serial port,
programming interface for FPGA, and high-speed data transfer for analog samples
NewAE Technology Inc. ChipWhisperer-Lite

USB to FPGA Communication
External Memory Interface
Registers inside FPGA
• Can use DMA to dump data from USB to memory-mapped FPGA registers

Part #4: Python Intro
WARNING: I assume you have some experience with Python already, but provide this very brief summary anyway. This summary will provide you with just enough information…

Basics of Python
htt
p:/
/xkc
d.c
om
/35
3/ • Python makes you feel dirty
because it’s so easy– Very easy to write bad code
– Example: Despite not needing semicolons, Python will ignore them if added at the end of lines. This looks terrible but Python knows what you want so just ignores it…

Basics of Python (The Shortcut)
• Python is whitespace-sensitive:
if a < 4:print("That is wrong you jerk")b++
d++

Basics of Python (The Shortcut)
• Python normally uses implicit types… can cast/control if needed:
#Here is some integerstheyear = 2015theyear = int(2015)
#Stringsmyname = "Colin"

Basics of Python (The Shortcut)
• Can use Python console for executing instructions
>>> test = 123>>> type(123)<type 'int'>>>>

Basics of Python (The Shortcut)
• Python has lists…
>>> something = [1,4,5,6]>>> something[1, 4, 5, 6]>>> something[2]5>>> something[2] = 8>>> something[1, 4, 8, 6]>>>

Basics of Python (The Shortcut)
• Also supports other similar data types:– Dictionaries (dicts)
– Tuples

Part #5: Python To USB

About LibUSB/PyUSB• C library for accessing USB devices.. Available for many
systems (Linux, Win, Mac)
• We will use wrapper for C functions (PyUSB)
• Easiest way to see how it works is with an example…

Lab #1: HID Based USB Communication

Introduction to Hardware
Debugger USB (debug device on underside)
SAMD11 USB (For our application to use)
User Button Reset Button

Software Setup• Assuming you had installed Atmel Studio 6 or 7 successfully
• Also installed WinPython-2.7 (it’s slow)
• Start Atmel Studio now!

Making HID Demo Project
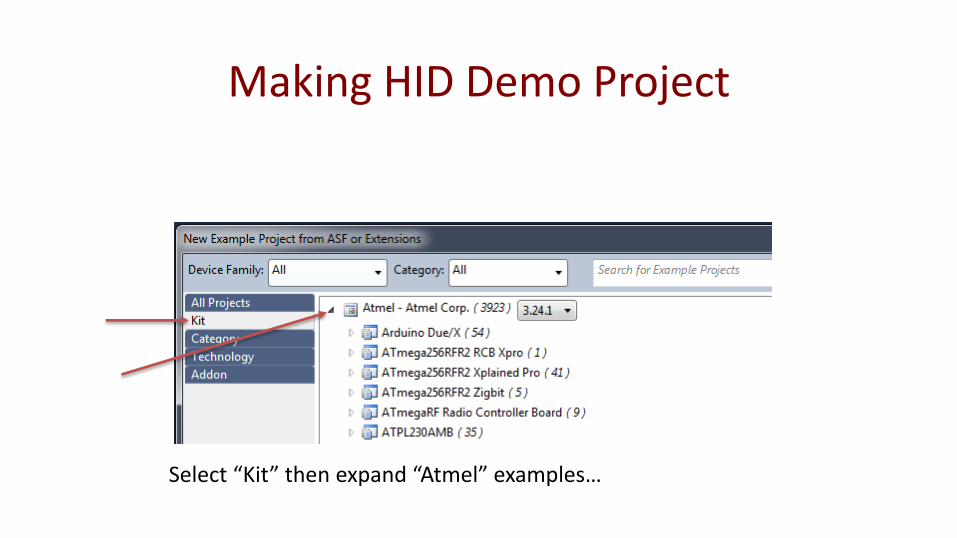
Making HID Demo Project
Select “Kit” then expand “Atmel” examples…

Making HID Demo Project
Expand SAM D21 Xplained Pro board…

Making HID Demo Project
Select “USB Device HID Generic Example”, give appropriate path/name for where you wish to save.

Build the Project…

Programming/Debugging• SAMD21 Xplained Pro has integrated debugger for full source-
level debugging
• Can also just use as programmer
• Choice of how to program (via debug or programmer dialog)

Option #1: Debug Programming

Option #2: Programmer Interface
1. Select Tools Device Programming
2. Select interface, Hit Apply3. Switch to Memories tab4. Hit Program

Debug Firmware Upgrade
…This might happen to you the first time, just upgrade.

Checking it Works• If using one USB cable, move cable to “TARGET USB” section
– If you have a second cable, just plug second in now
– If already second cable plugged in, hit “RESET” button
• Hopefully Windows detects device…

Checking With Device Manager
Before Plugging in Target After Plugging In

Checking with USBView• USBView provided by Microsoft as part of Windows Driver
Development Kit
• Download just the tool at http://www.ftdichip.com/Support/Utilities/usbview.zip

Working System

Not Working System

Work-Around for SAMD11 (NOT D21 I think)
• Appears to be incorrect calibration bytes for 48 MHz oscillator loaded on certain devices
• If you want to test this, output clock on PA08 using this:ui_init();
ui_powerdown();
//Output GCLK on PA08
struct system_pinmux_config pin_config;
system_pinmux_get_config_defaults(&pin_config);
pin_config.mux_position = PINMUX_PA08H_GCLK_IO0;
system_pinmux_pin_set_config(PIN_PA08H_GCLK_IO0, &pin_config);
// Start USB stack to authorize VBus monitoring
udc_start();

Work-Around for SAMD11
• Select “Find in Files”
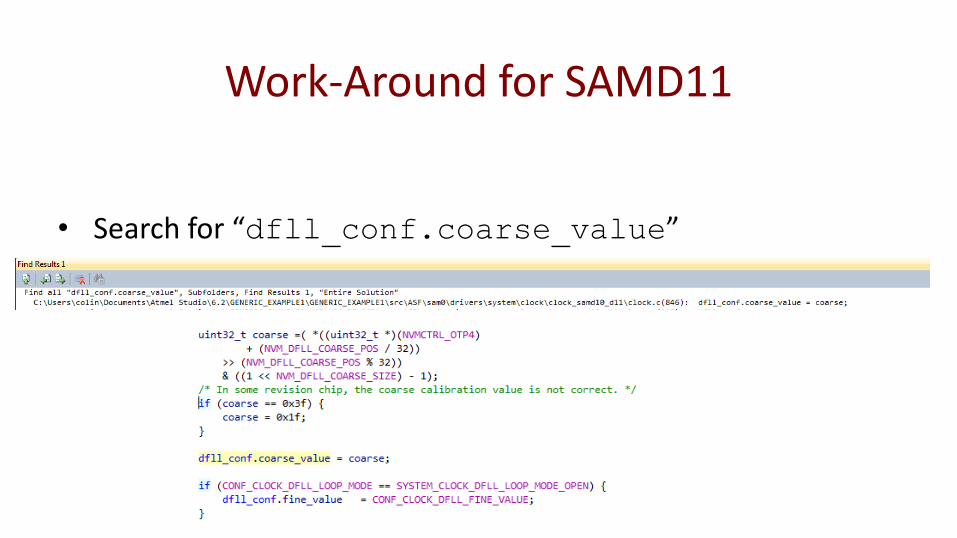
Work-Around for SAMD11
• Search for “dfll_conf.coarse_value”

Work-Around for SAMD11
1. Switch back USB to Debug port (if not using two USB cables)2. Select Device Programming
3. Select “Apply” to open programmer

Work-Around for SAMD11
4. Read value of “DFLL48M_COARSE_CAL” from Fuses tab:

Work-Around for SAMD11
Overwrite the coarse variable at this point… start with HEX value read from fuses (so don’t forget 0x), and go up a few numbers… here 0x26 works for me

Work-Around for SAMD11• Re-build and re-program
• Switch USB cable from DEBUG to TARGET (or if have two USB cables, just hit RESET button)
• If still a USB error, try larger number (or smaller maybe)

Assuming everyone has working USB…• Pause a moment for people to fix all these issues, and get a
USB device detected by Windows
• Next step is to do basic communications from Python

Python Setup
Navigate to WinPython install directory (NB: by default wherever installer was located, can change to something convenient like c:\WinPyton-xxxx\):
Run WinPythonCommand Prompt

Python Setup #1
pip install pyusb
Run this command:

Python Setup #2
pip install pyside
Run this command:

Running Spyder…
Run Spyder

Checking for Python Console

Example – NOT a Python Console

Open a Python Console (if not running)

Testing Basic USB Connectivityhttps://github.com/walac/pyusb/blob/master/docs/tutorial.rst

Need to Insert Filter Driver!
NOTE: Provided by libusb-win32-devel-filter which you should have installed…

Installing Filter Driver
VID = 03EBPID = 2402

Install Successful

NOTE: Remove to restore• If other driver/program needed this device, be sure to remove
the filter driver to restore original operation once you are done tinkering!
• In our case just leave it in…

Re-Trying Test from Python

Simple Test File
import usb.core
dev = usb.core.find(idVendor=0x03eb, idProduct=0x2402)
print dev
Press this button to GO

Control Transfer Example

Getting Report…
http://www.usb.org/developers/hidpage/HID1_11.pdf (~page 61)

Getting Report…
http://www.usb.org/developers/hidpage/HID1_11.pdf (~page 61)

Getting Report… (cont’d)
http://www.usb.org/developers/hidpage/HID1_11.pdf (~page 61)

Getting Report via Python
data = dev.ctrl_transfer(0b10100001, 0x01, 3<<8, 0, 4)
bmRequestType bRequest ReportType = 3 wIndex = 0 4 Bytes

Checking Source code….

Let’s Try It!import usb.core
dev = usb.core.find(idVendor=0x03eb, idProduct=0x2402)
dev.set_configuration()
data = dev.ctrl_transfer(0b10100001, 0x01, 3<<8, 0, 4)
print data

Problems with Control Endpoint• Limited endpoint size
• Should try to avoid using for real data transfer!

Input and Output Reports• INPUT reports are sent TO the computer
• OUTPUT reports are sent FROM the computer
• HID by default only sends reports when things change… i.e. when you move your mouse or type on keyboard

Input and Output Reports• We can misuse reports for generic data transfer if we want
– Send input reports as just a chunk of data
– Send output reports also as a chunk of data
• More convenient than serial port, since no issue with start/stop of packet! Always know when a new block is there.

Getting Endpoint Addresses
Input Report Here
Output Report Here

Output Report Processingvoid ui_led_change(uint8_t *report)
{
if (report[0]=='1') {
// A led must be on
switch(report[1]) {
case '1':
ui_b_led_blink = false;
LED_On(LED_0_PIN);
break;
}
} else {
// A led can blink
switch(report[1]) {
case '1':
ui_b_led_blink = true;
break;
}
}
}
C code is expecting this array:
[‘1’, ‘1’, 0, 0, 0, 0, 0, 0]
To turn on the LED. Anything else allows it to blink (NB: Check current ASF release as they might have changed this).
src\ASF\common\services\usb\class\hid\device\generic\example\samd11d14a_samd11_xplained_pro\ui.c

Sending Output Reportdata = [ord('1'), ord('1'), 0, 0, 0, 0, 0, 0]
dev.write(0x02, data)
LED should turn on solid.

Brief Note: Debugging USB Flow
src\ASF\common\services\usb\class\hid\device\generic\udi_hid_generic.c

Input Report
Pressing SW0 causes an INPUT REPORT to be sent

Getting Input Report
dev.read(0x81, 8, timeout=500)

Getting Input Report
for i in range(0, 10):
while True:
try:
test = dev.read(0x81, 8, timeout=50)
break
except usb.core.USBError, e:
if str(e).find("timeout") >= 0:
pass
else:
raise IOError("USB Error: %s"%str(e))
print test

Running This Demo
Just hit reset button to reconnect USB

Running This Demo
Prints 10 state changes… press button to generate state changes.
Want the full source code for copy/paste? See http://oflynn.com/?p=669

Making a Simple GUI• No longer doing this inside Spyder… instead open actual
editor
• Use IDLE that ships with Python

Making a Simple GUI
1. Make a new file2. Save it somewhere with .py name… i.e.:
lab1testgui.py

GUI: Step #1
from PySide.QtCore import *
from PySide.QtGui import *
import usb.core
import sys
class USBForm(QDialog):
def __init__(self, parent=None):
super(USBForm, self).__init__(parent)
self.setWindowTitle(“Hackaday 2015 Demo")
if __name__ == "__main__":
app = QApplication(sys.argv)
form = USBForm()
form.show()
sys.exit(app.exec_())
Want the full source code for copy/paste? See http://oflynn.com/?p=669

GUI: Step #1
Want the full source code for copy/paste? See http://oflynn.com/?p=669

GUI: Step #2A
Want the full source code for copy/paste? See http://oflynn.com/?p=669
def __init__(self, parent=None):
super(USBForm, self).__init__(parent)
self.setWindowTitle("ESC 2015 Demo")
layout = QVBoxLayout()
self.setLayout(layout)
self.pbConnect = QPushButton("Connect")
self.pbConnect.clicked.connect(self.con)
self.isConnected = False
self.pbLED = QPushButton("LED Blinking")
self.pbLED.setCheckable(True)
self.pbLED.clicked.connect(self.changeLED)
self.pbLED.setEnabled(False)
layout.addWidget(self.pbConnect)
layout.addWidget(self.pbLED)

GUI: Step #2B
Want the full source code for copy/paste? See http://oflynn.com/?p=669
def con(self):
if self.isConnected == False:
#Do USB Connect Here
self.isConnected = True
self.pbConnect.setText("Disconnect")
self.pbLED.setEnabled(True)
else:
self.isConnected = False
self.pbConnect.setText("Connect")
self.pbLED.setEnabled(False)

GUI: Step #2C
Want the full source code for copy/paste? See http://oflynn.com/?p=669
def changeLED(self):
if self.pbLED.isChecked():
#Send command to make LED on
self.pbLED.setText("LED On")
else:
#Send command to make LED blink
self.pbLED.setText("LED Blinking")
Buttons do nothing yet…

GUI: Step #3A
Want the full source code for copy/paste? See http://oflynn.com/?p=669
def con(self):
if self.isConnected == False:
self.dev = usb.core.find(idVendor=0x03eb, idProduct=0x2402)
self.dev.set_configuration()
#Sync changeLED
self.changeLED()
self.isConnected = True
…rest of code from before…

GUI: Step #3B
Want the full source code for copy/paste? See http://oflynn.com/?p=669
def changeLED(self):
if self.pbLED.isChecked():
#Send command to make LED on
self.dev.write(0x02, [ord('1'), ord('1'), 0, 0, 0, 0, 0, 0])
self.pbLED.setText("LED On")
else:
#Send command to make LED blink
self.dev.write(0x02, [0, ord('1'), 0, 0, 0, 0, 0, 0])
self.pbLED.setText("LED Blinking")
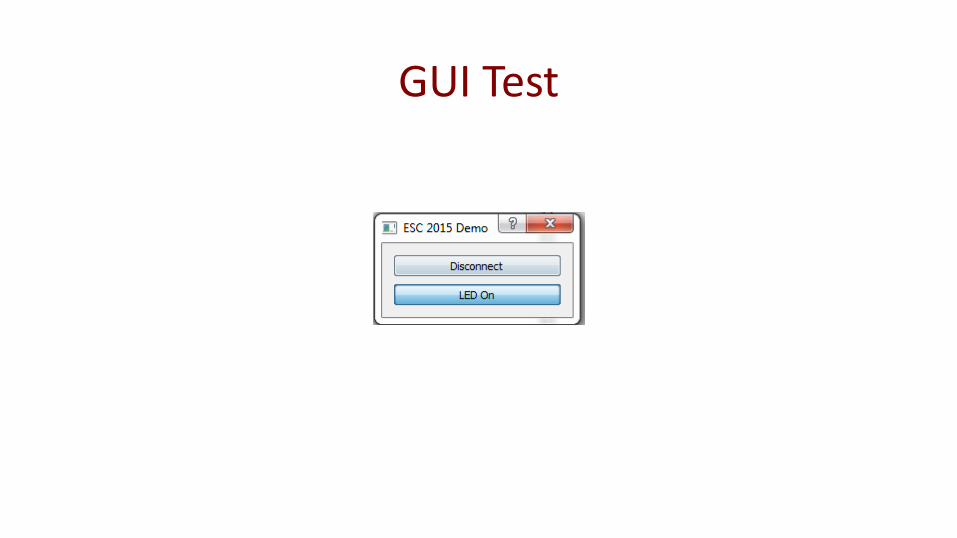
GUI Test

Adding Button Reading…def __init__(self, parent=None):
… original stuff still here…
layout.addWidget(self.pbConnect)
layout.addWidget(self.pbLED)
self.swStatus = QLineEdit()
self.swStatus.setReadOnly(True)
layout.addWidget(self.swStatus)
self.butTimer = QTimer(self)
self.butTimer.timeout.connect(self.pollButton)

Adding Button Reading…def con(self):
if self.isConnected == False:
… original stuff still here…
#Sync changeLED
self.changeLED()
self.butTimer.start(100)
self.isConnected = True
self.pbConnect.setText("Disconnect")
self.pbLED.setEnabled(True)
else:
self.butTimer.stop()
self.isConnected = False
…again rest of code stil here…

Adding Button Reading…def pollButton(self):
try:
data = self.dev.read(0x81, 8, timeout=50)
if data[0]:
self.swStatus.setText("Button Pressed")
else:
self.swStatus.setText("Button Released")
except usb.core.USBError, e:
if str(e).find("timeout") >= 0:
pass
else:
raise IOError("USB Error: %s"%str(e))

Testing

Congratulations!You did it! USB Communication and a Windows GUI all without any terribly bad hacks!

Part #6: Vendor-Specific Bulk Transfer

From HID to Bulk Transfer• You probably just want to shovel bytes across interface
• Possible with HID, but limited speed
• Instead let’s use vendor-specific Bulk Transfer– Just send a packet to the IN or OUT bulk endpoint
– Will require a simple driver

ASF Demos• ASF has vendor-specific demo as example project
– Same idea of using dev.write() and dev.read()
• Also what is used in my ChipWhisperer-Lite project– Lots of examples there, also uses USB high-speed mode (not
supported in SAMD21 chips)
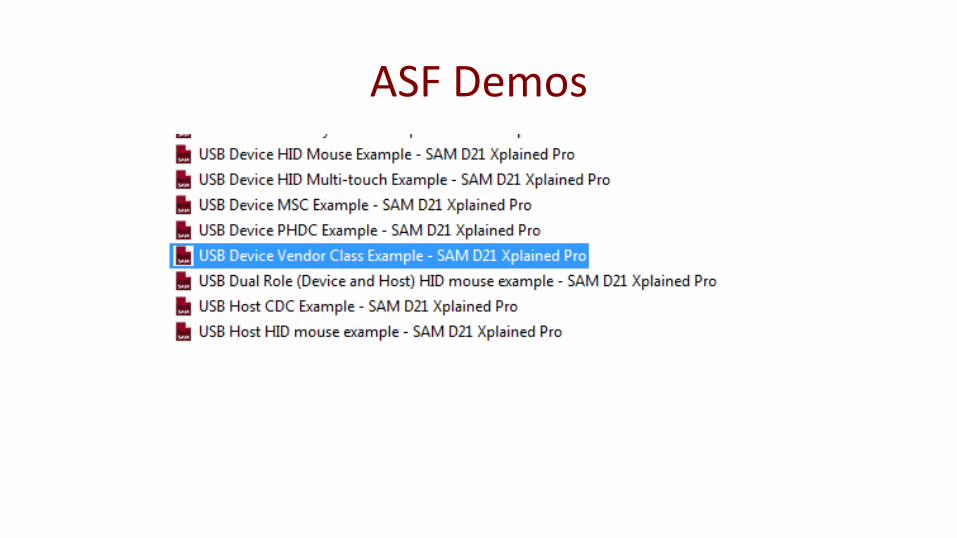
ASF Demos

Making a Driver
• Run Inf Wizard to generate a .inf file• Windows will load libusb driver for
this device• You can then access it inside of
Python• NB: For development can use
same “Filter Wizard” to install driver

Making a Driver
Specify device name etc as you want to appear in Windows.

Distribution to Users
Just need to sign driver! We’ll talk about that later…

Part #7: Debugging USB & Micros

Basics of Protocol Analyzers

Software Protocol Analyzers• Cheap/Free
• Useful for higher-level problems… more difficult for testing problems with enumeration where OS might not “see” device!

Software Protocol Analyzers
• Wireshark!

Your PC
VM
Using a Virtual Machine
http://vusb-analyzer.sourceforge.net/tutorial.html
USB Driver/App
USB Device

Hardware Protocol Analyzers
• If doing USB where your time has value, these will pay for themselves VERY quickly– Example from these slides: Finding that bug in my SAMD11 dev-kit,
using USB Hardware Analyzer I could easily see corrupt packets going across the wire
• Suggests something very wrong at lower layers
• First thing to check: clock reliability Problem Solved in ~30 mins.
• w/o Hardware analyzer might have wasted time thinking it was SW issue causing device to not enter correct mode

Hardware Protocol Analyzer
Several companies offer these, for example:• Teledyne Mercury T2• Ellisys USB Explorer• Total Phase (the Beagle 480 at left)
Most of them in $1000-$4000 price range

Debugging Firmware• Serious Issue:
– Setting a breakpoint will cause USB to disconnect (since device is no longer responding to requests) unless very careful
– Makes debugging tricky!
Breakpoint Here

Debugging Firmware• If just checking a single packet is OK, since don’t care about
lost connection
• But harder when checking more complex protocols…

Debugging Firmware• Use hardware I/O lines in protocol analyzer (Beagle USB 480
supports this feature, others probably do too)– #1: Toggle lines when certain areas of software are run
– #2: Trigger interrupts when specific errors occur

Debugging Firmware Example #1

Debugging Firmware Example #1
6.770.979
Setup Packet (6.770.952)

Debugging Firmware Example #1• Use IO Pins to get real time ability to link USB packets to
Events
• This is a very useful ability – highly recommend purchasing a USB analyzer with trigger(s) input

Debugging Firmware Example #2
Requires hardware packet matching logic:
• Again Total Phase Beagle 480 / 5000 support this, and probably other tools (but I don’t know offhand )
• Can match on specific packet, OR a corrupt packet

Debugging Firmware Example #2• Connect output from analyzer to either:
– Break pin (if available on device / emulator)
– Interrupt pin, and set breakpoint inside ISR… step out of ISR to see what the firmware was doing

Debugging Firmware Example #2

Part #8: Distributing Drivers
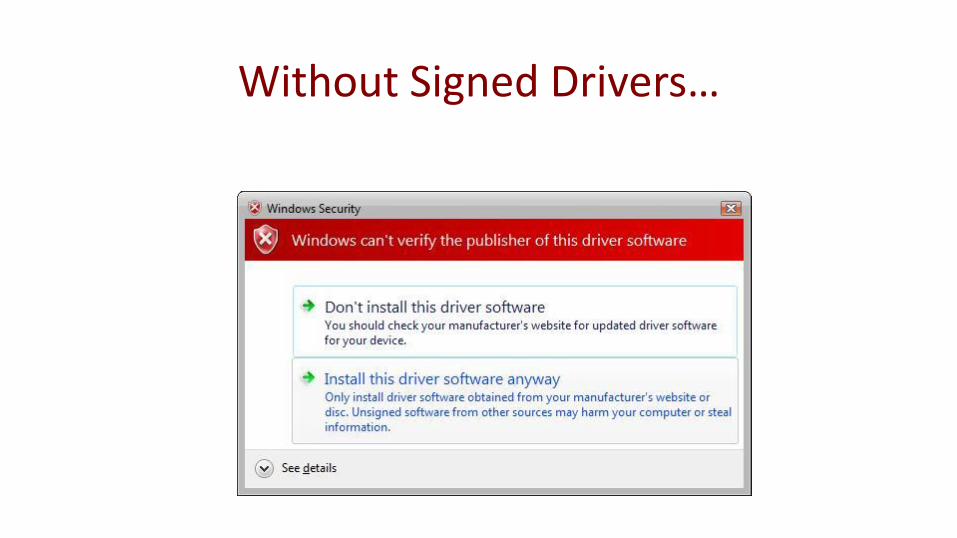
Without Signed Drivers…

With Signed Drivers…

How to Sign Windows Drivers• There is cheaper/free ways, but I’m showing you the “least
painful / most useful”
• This is the greatest resource I’ve found: http://www.davidegrayson.com/signing/
• Supplement my notes by reading the above!

Step 1: Give Someone $$$• Require code signing certificate… several options, i.e.:
– https://www.globalsign.com/en/code-signing-certificate/
– Will require verification as part of this process
• Following steps assume you’ve installed certificate on system– NB: If doing that, don’t install on laptop you could easily lose…

Step 2: Install 10GB of Crap• You require ‘signtool’ and ‘inf2cat’ programs
– Need to install Windows SDK + WDK (which also uses Visual Studio 2013)
– Then you can just copy those files out…

Step 3: Fancy Batch File
"C:\Program Files (x86)\Windows Kits\8.1\bin\x86\inf2cat" /v /driver:%~dp0
/os:XP_X86,Vista_X86,Vista_X64,7_X86,7_X64,8_X86,8_X64,6_3_X86,6_3_X64
"C:\Program Files (x86)\Windows Kits\8.1\bin\x86\signtool" sign /v /n "Your Company
Name Inc." /tr http://timestamp.globalsign.com/scripts/timestamp.dll /fd SHA256 /as
*.cat pause
NOTE: Have choice of SHA1 or SHA2… SHA1 will be obsolete in 2016 so now just use SHA2
NOTE2: Possible to sign with both, as older systems didn’t always work with SHA2

Step 4: Signing a Driver
• Copy .bat file to location of .inf
• Run .bat file, check for errors– Might need to update date to be > 2013!
– Looks for company name in batch file for matching, if certificate not installed see signtool switches to use file instead

Step 5: Distribution• Be sure to remove .bat file!
• Distribute .inf with .cat file to customers/users

Step 6: Windows Hardware Quality Labs• Another step forward… getting drivers automatically from
Windows Update
• Costs additional $$$ to pay Microsoft for testing for WHQL Testing

Part #9: This and That

USB Suspend Current• When in “USB Suspend” max current = 2.5 mA
Sadface.

USB Suspend Current
Put processor to sleep here (if not already), possibly turn off parts of your system using MOSFET / Voltage Regulator


Soft Start

USB Inrush Current

USB Inrush Current Testing
Uses differential probe from NewAE Technology Inc. (NB: requires mode for DC-accurate levels, see http://newae.com/sidechannel/cwdocs/naecw501_hwdiffprobe.html

USB Inrush Testing
Free tool from USB-IF Compliance Program website to analyzer captures

Serial Numbers• If your device DOES NOT have a serial number, drivers are
reinstalled when device is plugged into a different port
• Easy solution: many micros have unique ID nowadays, just use that to generate a serial number– Doesn’t require you to manage anything
– Better for user, since Windows doesn’t keep reinstalling drivers

USB Inrush Testing• USB Specs require minimum of ~1uF for device detection
• Upper limit is ~10uF
• Official testing done with current probe (somewhat expensive for one-off test)

That’s All Folks!• USB Interfaces aren’t too difficult! Need to get your feet wet.
• Having a hardware debugger is a useful investment.
• Can communicate from something like Python even.

Thanks for Sticking Around!My Contact:
Email: [email protected]
Twitter: @colinoflynn
Personal website: http://www.oflynn.com
Company website: http://www.newae.com