using the zip bind system & stitch in the ditch binding ... using the zip bind system &...
TRANSCRIPT

1
Using the Zip Bind System & Stitch in the Ditch Binding Foot – Updated Feb. 2017 Congratulations on purchasing the Zip Bind System and Stitch in the Ditch Binding Foot (SND)! These directions are provided to help you use these tools to bind quilts, table runners, jackets, placemats, etc. We hope that you will be inspired to use the tools for a wide variety of quilting, sewing and crafting projects as well.
I hope you find these directions and videos useful and have many successful experiences with your new tools! Contact us with any suggestions or comments at 850-433-1414 or [email protected].
Linda Winner, Martelli’s Education Director
The written directions are divided into the following parts:
Part 1: Directions, Videos, an Intro Part 2: Three Ways* to Bind Projects Part 3: The Tools Part 4: Getting Started Part 5: Step-by-Step Directions - written in order of the process Part 6: General Q & A Part 7: What Do Judges Look For?
Part 1: Directions, Videos, & an Intro
In the past, we offered DVDs but YouTube makes watching and updating videos on cell phones, iPads, etc. so easy! Plus, if we offered a DVD, every time we filmed a video, your DVD would be out of date!
Here’s How to Find Written Directions and Videos Online:
1. I recommend going to my website – http://winnerdesigns.com/directions/ - and downloading the latest version of written directions. You’ll find them under Martelli. From your computer, you can click on any link that is underlined in blue. It will take you directly to the related videos.
2. Or you can go to www.youtube.com/lindavideos then click on Playlists. a. To learn how to use the binding tools, click the Playlist titled “Zip Bind Stitch in Ditch Binding”. You’ll
see on the right side all of the videos that I’ve filmed. b. To learn about attaching the Seam Guide Foot to your machine, click on the Playlist entitled,
“Attaching Martelli Feet to your Machine”.
Here’s a list of the videos that are available as of February 6, 2017. Zip Bind/Stitch in Ditch Binding: Overview on Attaching the Foot - https://www.youtube.com/watch?v=76jd2S5d3Pc&index=6&list=PLIzgfFmf8SoXVEd8NvkO_qBV89wmpmlnx Overview of the Process - https://www.youtube.com/watch?v=Ia5SPMdEYvA Pt 1 - https://www.youFolding & Cutting Bindingtube.com/watch?v=tXemL_88vFY Pt 2 - https://www.youtube.com/watch?v=0PUZw-UNM5g Pt 3 - https://www.youtube.com/watch?v=dBfbSFbAr7Y Pt 4 - https://www.youtube.com/watch?v=dBfbSFbAr7Y Practice Piece - https://www.youtube.com/watch?v=zfi14vPvv5Q&list=PLIzgfFmf8SoXVEd8NvkO_qBV89wmpmlnx&index=13 Folding and Cutting Binding - https://www.youtube.com/watch?v=HiA3d7ebTfY&list=PLIzgfFmf8SoXVEd8NvkO_qBV89wmpmlnx&index=10

2
Zip Bind General Mitered Corners - https://www.youtube.com/watch?v=DVuQ0eiRS8U&list=PLIzgfFmf8SoXVEd8NvkO_qBV89wmpmlnx&index=14 Everyday All the Time Tools – Zip Guns, Sew Mate, Seam Guide Foot - https://www.youtube.com/watch?v=Vvq7H0PO31Y Zip Guns - https://www.youtube.com/watch?v=c-lzGMVFppY&index=8&list=PLIzgfFmf8SoXVEd8NvkO_qBV89wmpmlnx
Seam Guide/Stitch in Ditch Foot: Basics - www.youtube.com/watch?v=76jd2S5d3Pc&index=6&list=PLIzgfFmf8SoXVEd8NvkO_qBV89wmpmlnx As a ¼” Piecing Foot - https://www.youtube.com/watch?v=YwglE3P2WJQ&list=PLIzgfFmf8SoXVEd8NvkO_qBV89wmpmlnx&index=7 As a Double Needle Top Stitching Foot - https://www.youtube.com/watch?v=vE384cvizn0&list=PLIzgfFmf8SoXVEd8NvkO_qBV89wmpmlnx&index=11 Attaching Martelli Feet Overview of the Seam Guide Foot - https://www.youtube.com/watch?v=2E-_mxwHxnQ&list=PLIzgfFmf8SoVhS-H0PL6HN9TpMCSfJwGt Attaching to Bernina - https://www.youtube.com/watch?v=Y5a1uvaf4DU Attaching to Janome - https://www.youtube.com/watch?v=0kE5wHagtm4 Attaching to Viking/Husqvarna - https://www.youtube.com/watch?v=bnT450HTXL8 Attaching to Pfaff - https://www.youtube.com/watch?v=_4TgLUBS7wU Attaching to Older Machines and Industrials - https://www.youtube.com/watch?v=wiredTHRw0c&index=6&list=PLIzgfFmf8SoVhS-H0PL6HN9TpMCSfJwGt
Martelli’s Zip Bind System and Stitch in the Ditch Binding Foot Directions
With all of the new tools and techniques available today, the stakes have been raised. Gone are the days of ‘quaint, charming and homemade’ as the only goal. Even if you’re not planning to enter your projects into quilt shows, most of us want a professional finish that we won’t be embarrassed to share with friends and family. Bindings are the last step and one that most of us dread. It’s a shame that something so little can draw so much attention, but because they do, you want the best and most consistent results possible with the least amount of effort.
Martelli’s Zip Bind System and Stitch in the Ditch Binding Foot are the tools that you’ll use to bind your projects. Once you master these tools, you’ll be amazed at the results you’ll get in a shorter amount of time. Plus, the Stitch in the Ditch Binding Foot is a great foot for top stitching (Top Stitching), straight stitching and as a ¼” piecing foot (YouTube ¼” Piecing). You’ll be so impressed with your new skills that you’ll start looking beyond quilts for things to bind or sew using these tools! What else can I do with the tools? Aside from binding, several of the tools can be used for many other projects. There are 3 sets of tools that I call ‘everyday –all the time tools’ (There’s a video with this as the title!):
1. Zip Guns & Clips – in place of straight pins, quilting clips (hair clips), staples, paper clips & potato chip clips! 2. Sew Mate – seam ripper, stiletto, embellisher, appliqué, paper piecing, finger pressing, machine ribbon
embroidery, with your embroidery machine, etc. 3. The Seam Guide/ SND Foot- as a ¼” piecing foot, seam guide foot, teach someone to sew foot, a ‘sew
straight’ foot, for rag quilts, purses, pillows, hemming, alterations, etc. The #1 Fence should get lots of use as a regular seam guide foot!
Keep these tools out so you’ll remember to use them! Here are some ideas:
Baby Bathroom Kitchen/House Clothing Travel Gifts
Bibs Curling Iron Holder Home Dec Items Sweatshirt Jackets Curling Iron Holder Sewing Organizers
Blankets Towel Wraps Upholstery Dress Jackets Make up Bags Cutting Mat Bag
Diaper Bags Hair Wraps Rugs, Table Skirts Vests Organizers Pillows
Baby Organizers Organizers Throws, Pillows Necklines & Sleeves Book Organizers Eye Glasses Holder
Clothing Items Sleep Masks Curtains, Valances Jeans Skirt Clothing Bag Gift Cards
Gift Basket Towels Table Runners Wallets Shoe Bag Purses
Baskets Placemats Fanny Pack Scrapbook Pages
Potholders, Aprons Drink Holders Calendar Holder
Microwave Mitts Travel Bags Lunch Bags
The products are so good that they were voted #1 in Quilting Notions and Accessories! But like anything worthwhile, there’s a learning curve. For success, watch my videos and use the “Getting Started’ section further down to practice on a practice piece – or better yet, make 4 practice placemats. After 16 mitered corners, you’ll never forget how! With some practice, you’ll soon be finishing all those UFO’s and starting new projects in no time!

3
Part 2: Three Ways to Bind your Projects and Basic Questions
There are three options for finishing bindings: 1. Hand Binding – I hand bind those “beautiful, nice, don’t touch” projects. Many people hand bind when they
have more time, for relaxation or because they haven’t mastered stitch in the ditch binding! 2. Stitch–n-Ditch Binding – Great for those ‘pretty yet practical’ projects or when you’re short on time. (For me,
that’s all of my projects!) Ask yourself, “If I could stitch in the ditch well, would I?!” 3. Machine Binding – There are other binding feet (Martelli used to sell the Kwik Bind) that attach to your
machine that sew front & back at the same time. They are harder to master but can be done. Or you can purchase the Seam Binding Tape and use the Zip Guns/Clips, the Minute Miters and the Seam Guide Foot provided in this package.
Why should I use these tools if I already Hand Bind my projects? We all want the best results to our projects, whether they are going to be judged in a quilt show or by a ‘quilt police friend’ or just for myself. These tools will give you “better results than you’ve gotten before” and in half the time. Do I need all of the tools? Yes. The Seam Guide/Stitch in Ditch Binding Foot keeps you sewing straight consistently when attaching the binding to the front of your project. That’s critical whether you hand bind or stitch in the ditch. The Zip Bind Tool allows you to catch the binding consistently from the front to back, side to side and edge to edge. And if you choose to stitch in the ditch, you can adjust the tool to hold the binding consistently wider on the back. The Minute Miters make consistent mitered corners quicker, easier and better than ever. The other tools make the whole process easier as well. Why is Stitching in the Ditch Binding so hard?! If you’ve 'stitched in the ditch' you probably have encountered these 3 problems: 1. We don't always ‘stitch in the ditch’. Most of us start out stitching in the ditch, then we have a few stitches on the binding, then we get back in the ditch, then a few stitches show on the quilt, then back in the ditch, then on the binding and so on… this is really ‘Stitching Along the Ditch’! 2. We don't always catch the binding on the back. We catch the binding on the back of our project then miss the binding then get back on track and catch the binding only to get off track and miss it again… 3. We don’t get a professional look. Because the stitching on the front isn’t exactly straight, it won’t be straight on the back. Our binding is wider in some places and narrower in others causing us to catch and miss the bindings. Our corners aren’t consistent so we get a sloppy look overall. All of this leads to ripping the binding off and starting over – this time sewing by hand. The time that we thought we’d save by ‘stitching in the ditch’ has just doubled!
When would you Stitch in the Ditch? 1. You want the look of hand binding on front (no stitches) but the practicality and speed of machine stitching. 2. You need your project to be able to stand up to many washings in the washer and/or dryer. 3. You need to save time. 4. You are making many of the same thing.
When would you not Stitch in the Ditch? 1. You’ve spent a great amount of time on your project and want a traditional binding (use the same tools and almost all of the same techniques for hand binding instead). 2. You do not want to see any machine stitching on either side of your binding. 3. You’ve finished a project that is heirloom quality or will be entered into a quilt show, etc. Anything that isn’t appropriate for stitching in the ditch is perfect for using the same tools and completing them by hand. Our hand binding method gives ‘results that are good enough to impress any quilt show judge’. You’ll get great results that are consistent and beautiful in half the time that it would traditionally take.
Part 3: The Tools Here’s what’s included in Martelli’s Zip Bind System & the Seam Guide Foot. It now comes in a nice zipper bag, too!
Zip Bind System includes:
3 Minute Miters 3 Zip Guns w/ 20 extra clips Zip Bind Tool Sew Mate (Now comes in a nice bag now - sorry - old picture!)
Seam Guide Foot includes: 1 Foot 4 Fence for lofts
6 adapters

4
Zip Bind System The Zip Bind System contains the Zip Bind Tool, 3 sizes of Minute Miters, 3 sizes of Zip Guns and Zip Clips, and a Sew Mate. These tools combine to create the Zip Bind System and can be purchased at a special bundled price but they are sold separately as well. 1. The Zip Bind Tool The Zip Bind Tool ensures even and consistent bindings from 1) front binding to back binding, 2) side to side and 3) one end to the other. The tool is adjustable so that you can finish a binding from ¼” to a scant 1” wide. Because the tool provides independent screws on each side, the tool can be used for both hand binding and stitching in the ditch binding. Adjusting the tool correctly for the width of your binding will ensure success! If ever you have a problem, check the Zip Bind Tool… 2. Minute Miters The 3 sizes of Minute Miters provide precise, consistent and perfect mitered corners in less than a minute. Two Minute Miters are always used on a project; the larger of the two is used on the front side, the smaller on the back. To determine which of the three you would use is based on the measurement of your folded binding. Use the measurements provided:
Small = ¼” – ½” Medium = ½ - 1” Large = 1” – 1 ½”
Or… Use the ‘eyeball’ method. After sewing your folded binding to the first side, place a Minute Miter on the binding. Choose the Minute Miter that covers the binding from edge to edge the best.
Small, Medium & Large Zip Guns with 20 extra Clips for each Gun –
Use in place of straight pins & quilting clips
‘Stitching in the Ditch’ with the
Seam Guide Foot and the
Zip Bind Tool
Sew Mate – Seam ripper, stiletto, embellishment, ironing, etc. – ‘The 101 uses tool’!
Zip Bind Tool – Adjustable for ¼” to 1” binding – keeps binding width consistent as you sew by machine or hand
Seam Guide Foot
4 Fences –
1-no loft, 2-low loft, 3-medium loft & 4-high loft
6 Adapters
Minute Miters – 1 Large, 1 Medium, 1 Small - “Perfect mitered corners in under a minute!”

5
3. Zip Guns and Zip Clips Zip Guns and clips are like a stapler and staples for fabric without the worry of any damage to your fabric. Use them in place of straight pins to hold your fabric together. Zip Guns hold eight reusable clips and come in three sizes - small, medium and large. All three sizes can be used for binding light-weight battings and fabric. The large clips are good for heavier battings and fabrics like polar fleece and flannel. The small clips are good for single layers of fabric in the case of an apron or jacket. To reload the guns, simply place the clip open side down into the top of the gun and push with your nail. (The fabric goes in the ‘mouth’ of the zip gun & clips are loaded on the other end of the Zip Gun.) The video provides detailed information on using the Zip Guns. Tip: Place Zip Guns at your sewing machine, ironing board or cutting table – wherever you might normally use pins 4. The SewMate This multi-function tool can be used for sewing, quilting, crafting. The curved part is a seam ripper and great for picking out stitches. The flat section is similar to a stiletto but without the sharp point to damage the fabric. It can be used under the sewing machine needle or for appliqué, machine ribbon embroidery, finger pressing, turning, flipping, manipulating, holding, etc. Place the tool flat to hold fabric in place under the iron.
Seam Guide/Stitch in the Ditch Binding Foot The Seam Guide/Stitch in the Ditch Binding Foot was designed to sew the bindings consistently on the front of your project and to stitch in the ditch but there are several other uses as well. When you have some time, try using the foot for the following:
a. As a Seam Guide for Straight Sewing & Consistent Seams b. For Top Stitching – with a single or double needle, see how professional your results can be c. ¼” Piecing Foot – for sewing all those blocks together with a ¼” seam – be sure to use the #1 Fence
Getting Started with the SND Foot 1. Use the ‘Marking your Foot’ directions so that seam allowances and fence numbers are easy to read 2. Use the ‘Fences’ chart to determine which fence will work best for your project 3. Use the Adapters chart to determine whether you will need an adapter for your machine 4. Read the Needle Position information to see if you need to move your needle
Marking your Foot – Video Part 1 at 3:00 The foot is engraved but I recommend using a Sharpie permanent marker (& hair spray) to mark your foot. Watch the video Martelli Zip Bind System & Stitch in the Ditch Binding Part 1. At 3:00 minutes into the video, you’ll see me mark the foot. 1. Unscrew the Fence so that you only have the Foot in your hand. Using the
black Sharpie, draw on the seam allowance lines and scribble on the numbers. Spritz with hair spray to remove excess ink on top of the foot. The ink should settle down in the engraved markings. Repeat the process until all numbers are easily read.
2. Color in the numbers on each of the 4 Fences. 3. If you always use the same width of binding & seam allowance, you can draw a line on the foot to mark your
seam allowance. When you are getting close to an edge, this line will let you know to stop sewing. Place the Foot with no Fence on your machine and lower the presser foot and the needle. Use a hem marking ruler and measure out ¼”, 3/8” or ½” from the needle and make a mark on the foot. Take foot off the machine. Draw a horizontal line across foot where your mark will designate the seam allowance.
Fences - Video Part 1 at 4:20 The Stitch in the Ditch Binding Foot comes with 4 fences. When removing from the package, you’ll notice the foot is attached to Fence #2 – most of the time the batting that you’ll use in your quilting projects will be low loft – so you’ll probably use Fence #2 the most. If you’re a sewer more than a quilter, you’ll probably use Fence #1 more often.
Fence Loft
1 No Loft fabric with no batting (Packaging states ‘Garment’ but garment could be a sweatshirt with a chenille top and flannel backing – that would require Fence #4)
2 Low Loft Batting 2 pieces of fabric with low loft batting
3 Medium Loft Batting 2 pieces of fabric with medium loft batting
4 High Loft Batting 2 pieces of fabric with high loft batting or chenille, minky, fun furs, etc.

6
Attaching the Foot If your machine has a Universal or Snap On Foot, more than likely you’ll be able to just remove your foot and ‘snap on’ the Seam Guide/Stitch in the Ditch Binding Foot. Use this chart to determine if you need an adapter for your machine:
Shank Adapter Type of Machine No adapter needed Viking, Husqvarna, New Home, Elna, Janome***, Babylock****, some
Singers, some Brothers****, most other snap-on feet, most EuroPros
Adapter 1***** Pfaff*, Singer Featherweight, Low shank Machines, Bernina**
Adapter 2 New Singers, Quantum, some Brothers
Adapter 3 Singer Slant Needle
Adapter 4 Brother High Shank & other High Shank Machines
Adapter 5 Kenmore Super High Shank Machines
Adapter 6 Brother 1300 & 1500, Juki
Also fits some Necchi, White & others.
* Pfaff – Disengage Dual Feed, remove metal ankle and replace with the #1 shank adapter or optional metal adapter. (For a more updated but shorter video on the Pfaff, watch this video at 6 minutes and 24 seconds.) **Bernina requires an adapter from Bernina. In my 2 videos I talk about 2 options. In this video, go to 9 minutes and 26 seconds. I like the 2nd option listed below because it makes your Bernina a ‘snap-on’, allowing you to add other feet to your machine.
1. Low Shank Adapter to be used with Martelli #1 adapter a. #75 for newer 3 digit machines b. #77 for older 4 digit machines & a few older 3 digit machines
2. Snap On Foot - no other adapter required a. #125 for newer 3 digit machines (part #006082.73.00) b. #1008 for 4 digit machines & older 3 digit machines (part #006261.70.00) This can be purchased from www.justcurves.biz
***Janome needle sits to the right of center so move your needle to center position. Use the indentation on the Stitch in the Ditch Foot as a guide to line up your needle. Note: The Janome Gem Gold & Silver machines do not allow you to move your needle position so stitching will not be in the ditch. ****Brothers & Babylocks Some have a long ‘needle’ screw that might hit the gold screw in the Foot. (Watch the video at 4 minutes and 10 seconds to see what I mean.). If your bar hits the screw, your dealer might be able to swap it out with a shorter needle screw. Or contact us to send you a silver replacement screw. Babylock Ellagio 1, 2, 3 machine needles sit to the left of center so you’ll need to move your needle to center position. --------------------------------- If your machine is not listed, most likely there will be an adapter that will fit. Simply look at your foot attached to your machine from the side and find the adapter that is closest in height. Once you determine which adapter you need or whether you need an adapter at all, put the other adapters away in a safe spot as you might need one of them if you ever buy another machine. If your machine requires an adapter, first watch my video on attaching Martelli Feet to your machine. Remove the current foot on your machine by unscrewing it. If there is an ‘ankle’ attached, remove it. Place the screw back in enough so that you can slip the ‘U’ part of the adapter in between the screw and the shank. Be sure that the adapter is up all the way so that the bottom of the ‘U’ is touching the screw. (If it is too low, it will lengthen the foot and exert too much pressure and not allow fabric underneath.) Tighten the screw tight enough so that it won’t come off when sewing but not tight enough that it will break the adapter. Place the SND Binding Foot under the adapter clamp, making sure that the metal bar is lined up with the clamp, and lower the presser foot. You should be able to hear when the foot attaches successfully. Press down on the shank screw if needed to lock it in place. Needle Position – watch this video Most machines’ needles are already in the center position. This is where the needle needs to be to be able to successfully ‘stitch in the ditch’. On the underside of the foot, you’ll feel a ledge that goes the length of the foot where the hole is. That ledge creates a ‘shadow’ or ‘line’ on the top of the foot. The needle should be lined up with this ‘line’. If it is not, you won’t stitch an accurate seam allowance or stitch in the ditch.
1. On Janome machines, you will need to move your needle from to the left to line up with the ‘line’ created from the ledge underneath the foot. On most Janomes, you will move it from 3.5 to 2.5.
2. A few Babylock machines - the Ellagio 1, 2, & 3 – have the needle in the left position so you will need to move the needle to the right.

7
Zip Bind Tool Basics - Part 2 Video 3:40
The great thing about the zip bind tool? It’s adjustable! The bad thing about the zip bind tool? – It’s adjustable!
The Zip Bind Tool is the key to your success…There’s a bit of a learning curve but once you master this you’ll be amazed at how it works! When adjusted properly, the space between the acrylic edges and the metal edges will equal the width of your binding. This allows you to control the consistency of the width of your bindings from: 1. Front binding to back binding 2. One side to another side 3. One end of the binding to the other For Hand Binding, the bindings on the front and back side of your project should be exactly the same width. Using the video and the information below, you’ll adjust each screw so that the acrylic edges are smooth and even and the length fits the width of your binding. For Stitching in the Ditch Binding, the binding on the back should be just a bit wider than the binding on the front side. After adjusting the tool evenly & checking for the 3 clues listed below, you’ll adjust the Groove side just a bit longer (a hair, a smidge, a scant, a skosh, a wee bit) than the L side.
Zip Bind Terms – Screws and Sides –
Adjusting the Tool
Because the Zip Bind Tool can be used for bindings as narrow as ¼” and as wide as 1”, adjusting the tool correctly for the width of your binding is critical! Each screw lengthens or narrows the acrylic side. For a wider binding,
you’ll adjust the tool wider; for a narrower binding, you’ll adjust narrower. For hand binding, the sides should be adjusted to the same length. For machine binding, you’ll adjust the sides evenly, and once the length is correct
you’ll adjust the Groove Side just a bit longer than the L Side.
‘Into the
Belly’, the Slide area
Into the belly is the term used to remind you that you always adjust the tool by placing the black handles into your
belly so that it works as a 3rd hand, helping you control each side so that they are even and straight.. The Slide area is where the screws move up or down to lengthen or shorten the acrylic pieces. With 3” of binding,
you’ll adjust the Groove side screw so that it’s about 5/8 of the way up the slide area (closer to the black than the acrylic). The L side should be adjusted so that the acrylic edge is even with the Groove side.
Groove Side This is the side where the acrylic is slanted or angled rather than flat. If you look closely from each side, you
should be able to see a groove. This is to hold your binding in place as you sew.
The Lock Line This is the side where the acrylic is flat. If you look from the side, you should see what looks like a block style letter L. From the other side, it should look like a backwards L.
When looking at the tool straight on, the L creates a ‘lock line’ that runs the length of the tool. You’ll place the tool on with the L Side on the front of your project. When adjusted correctly for the width of your binding, the Lock
Line will sit ‘in the ditch’ to ensure that your stitching stays in the ditch.
Even Edges For hand binding, the screws should be adjusted so that the lengths of each side are straight and even and fit the width of your binding (3 Clues).
Uneven Edges –
a hair, a smidge, a
scant…
For stitch in the ditch binding, you’ll do the same as for hand binding – adjusting the screws so that the lengths of each side are straight and even and fit the width of your binding (3 Clues). Once this is correct, you’ll adjust the
Groove side a bit longer than the L Side. - “a hair, a smidge, a skosh, a wee bit” so that your binding on the back side will be just a bit wider on the back than on the front
Black
Handles
The black handles are used only to open the Zip Bind Tool to place on and take off of your project.
Holding &
Moving the Tool
When stitching in the ditch, the Zip Bind Tool will sit in your right hand about an inch or two in front of the Stitch
in the Ditch Foot on your sewing machine. You won’t pull with your right hand; your left hand and feed dogs will do the work. Your left hand will pull consistently the top corner repositioning as needed. From time to time as
you’re stitching in the ditch, you’ll need to check to see that the Lock Line isn’t showing, that it is staying exactly in the ditch.
Zip Bind Tool showing adjustments for different widths of bindings – approximately ¼”, ½”, scant 1” bindings

8
Getting Started with the Zip Bind Tool –watch this video at 4:14 or this video at For your practice piece, your binding should be cut at 3”, straight of grain, out of a stiff fabric and sewn on the
front of your project with the Stitch in the Ditch Foot set at a scant 3/8” seam allowance. Unscrew the screws a bit and place the black handles into your belly with the Groove side facing up. Use your thumbs and pointer fingers to push the Groove side acrylic out so that it is about 5/8 of the way up the
slide area (closer to the black than the acrylic). Tighten the screw, making sure the acrylic edge is straight. Turn the tool over so that the L side is facing up. Use your belly, thumbs and pointer fingers to adjust the length
so that the 2 edges of acrylic are even. Turning the tool from L side to Groove side, adjust the sides with the screws so that they are even and straight. With the back side of your project facing up, squeeze the Zip Bind Tool black handles and place the tool Groove
side up onto the back side of your project. With your pointer fingers and thumbs, grasp the binding immediately to the left and right of the Zip Bind Tool and
‘pop’ back the binding towards you (the fabric should make a ‘popping’ noise) and pull forward so that the binding goes into the Groove.
Look to see if the tool has been adjusted correctly for the binding fabric width by using the 3 Clues.
The 3 Clues – Video Part 2 3:40 The goal is to adjust the tool so that the space between the acrylic edges and the metal edges equal the width of your binding. I’ve created these 3 clues to help you determine if you’ve adjusted the tool correctly. Clue 1 – The binding should sit tightly in the groove but not so tight there’s a pucker.” On the back side of your project, look to see if the fabric is sitting tightly in the Groove but not so tight that there is a pucker in the fabric.
Too Tight - If you’ve adjusted the tool too little, it will be hard to ‘pop’ the binding back so you’ll need to go back to your belly and adjust each side a bit longer.
Too Loose - If you’ve adjusted too much, the binding won’t sit tightly into the Groove and will be too big to hold the binding in place as you sew. Take the tool back to your belly and adjust each side a bit shorter.
Clue 2 – The Lock Line should never show. When looking at the front side of your project, the ‘line’ made from the edge of the ‘L’ that runs the width of the tool should sit directly in the ditch so that you don’t see the ‘line’.
Too Tight - If you’ve adjusted the tool too little, the ‘line’ will appear on the binding. Too Loose - If you’ve adjusted too much, the ‘line’ will appear on your project.
Clue 3 – If the Lock Line is locked in the ditch, you should not be able to see a gap between the fabric binding edge and the metal edges of the tool.
Part 4: Getting Started
Stitch in Ditch Binding Practice Piece Overview Video
Note: To ensure success learning to use the tools, the following pages walk you through the process using a 3”, straight of grain, cheap/stiff fabric attached to a low loft placemat size project. When you have had success and want to make changes to the type or width of binding or the type of batting or quilt top fabric, do a practice piece with similar materials to ensure success.
You can do a practice piece like above or 4 placemats. If you do 4 placemats, then you’ll do 16 mitered corners – no forgetting!
Your Practice Piece & Binding Fabric
As most of us would assume, a baby quilt that has to be in the mail tomorrow is NOT the best way to become familiar with new tools! It cannot be said enough that your practice piece is invaluable. This will ensure a quicker and easier learning curve. When starting, choose a quilted practice piece about the size of a placemat. It should be a typical cotton top and bottom and have a low loft batting. If using a placemat, cut off the seams first. Square off your piece so that sides are straight. Stitch around the edges so that your ‘sandwich’ is stitched together so that no batting is ‘poofing’ out. As for the binding fabric, the goal is to learn how the tools feel in your hands and help give precise, consistent results.
1. Sew binding to front side of
project.
2. Miter 1st corner; sew binding.
3. Miter 2nd corner; sew binding.
4. Stitch in the Ditch. Rip & stitch this side 3 times
for practice.

9
The best type of binding fabric to use your first few times is stiff, cheap cotton fabric cut straight of grain exactly 3”. This goes against what you’ave done or heard but stiff fabric has lots of sizing in it and you’ll be able to feel ‘how the tools feel’ rather than ‘how the fabric feels’. Once you feel how the binding ‘pops’ into the Zip Bind Tool groove and slides as you sew and how the fabric looks when folding with the Minute Miters then you can move to better fabrics at different widths. Because of the design of the tools, I rarely cut bindings on the bias (more time; more fabric!) except when sewing curves or stripes. With nicer fabrics or fabrics that have been washed, I add starch. Part 2 Video 3:40
For your first few times, choose a placemat-size quilted project and cut your binding 3” straight of grain out of a stiff, cheap cotton fabric. For the 3” binding, use a scant 3/8” for stitch-n-ditch or 3/8” seam allowance for hand binding. If stitching in the ditch you should see that the binding folds over to the back side with a bit more binding than the front; if hand binding, it should be the same.
Practice attaching your bindings, by hand binding or stitching in the ditch and after a few times you should be comfortable enough to complete a real project and move to different types of fabrics. The wider the binding width, the wider your seam allowance needs to be. Once you have mastered the use of these tools, the following will help when you want to vary the width of your binding. YouTube – “Different widths”, “Narrow binding”, “Wider binding”
Part 5: Step by Step Instructions for Practice Piece
NOTE: I’m left-handed so pictures might seem ‘backwards’. I thought about ‘flipping’ the pictures but decided that would be more
confusing! When doing it yourself, use your right hand when you see my left hand.
Gather Tools & Materials Video Part 1 7:44
You’ll need: Large Minute Miter, Small Minute Miter SND Foot w/ Fence #1 & Fence #2 – with markings Video Part 1 at 3:00 Large or Medium Zip Gun with extra clips Sew Mate Zip Bind Tool
Attach the Foot with Fence #1 Video Overview of the Seam Guide Foot Attach Foot to machine. Use Shank Adapters chart to see if you need an Adapter. *Janome &
Babylock owners - Check to see that needle is centered (needle should line up with indentation from back side of the foot). Move needle if necessary.
Adjust seam allowance to scant 3/8” for 3” binding strip. (¼” for 2 ½” strip, just under ½” for
3 ¼” strip)
Later projects: Adjust seam allowance based on binding width & whether you’ll SND or hand
bind. If you’re not working with low loft, choose appropriate Fence (see chart). Fence should not ‘bob’ when project is under Foot.
Select binding fabric - Straight of grain, stiff fabric is best Video Folding & Cutting Binding When learning to use the tools, it’s easiest to learn on stiff, straight of grain fabric cut at 3”. Later on when you know how to use the
tools, then you can use most any type and any width of fabric. For the first few projects select a stiff, straight of grain fabric for binding. Do not pre-wash binding fabric for practice piece.
For later projects, add starch if binding fabric has been pre-washed, is bias, cross-grain or soft.
Cut binding 3” straight of grain - ErgoCutter, No Slip Strip Ruler, Martelli Mat Video Folding & Cutting Binding Cut 3” strip of straight of grain fabric.
Bias binding has too much ‘give’ and is more difficult when you’re first beginning. So For your projects, binding does not need to be cut on bias unless you are sewing curves or matching a pattern or sewing diagonals.
Later, when you are comfortable with the tools and want to change the width, you can use the formula provided to determine what width of binding will give what finished look. Watch the 3 videos on binding widths.
(2 ½” strip = finished ¼”; 3 ¼” = finished ½”).
Preparing the Binding Strip Video Part 1 8:32
Instead of folding & pressing binding strips, we’re going to stitch them together with the Seam Guide Foot. Use Fence #1 on Foot and set seam at ¼”.
Make one long strip by sewing ends right side together with diagonal seam. Trim seam and press strips. Fold binding in half wrong sides together making sure edges are even. Finger press.
Stitch raw edges together. This keeps the two edges of binding together as you attach it to your project. Finger press.
Preparing your Practice Piece- Attach Fence #2 Video Part 1 at 6:04 and 9:57
For the 1st time, use a practice piece at least the size of a placemat but not much larger. This shouldn’t be a quilt or a real project. We’re still learning! This should be low-loft batting with a cotton top and backing that is quilted.
Square off as shown in the video, making sure that edges are straight and even.

10
Stitching the Edge of your Practice Piece Use the Stitch in the Ditch Binding Foot set at 1/4” w/ Fence #2 Video Part 1 9:57
You’ll avoid puckers and batting ‘bumps’ if you first stitch along all the edges of your practice piece. The Seam Guide Foot works fine for this. Put Fence #2 on the Foot and set the Foot at ¼” seam allowance. Even though I’ve set the foot, I’ll only use it as a guide
to stitch as close to the edge as possible.
Front of Project
Attach binding with Zip Gun – Zip gun Part 1 Video Video Part 1 10:52 Match your thread color to the quilt top and bobbin thread color to binding.
For your practice piece, lengthen stitch length so that it will be easy to rip out for practice. Leaving a 6” binding ‘tail’ that will be used to join your bindings later, use the Zip Gun to
attach the binding to your project in the same way that you would use straight pins. I like to start 2/3 of the way down the 1st side for ease of joining. On a real project, lay out your
binding to be sure that there are no joinings of binding strips anywhere near the corners. If there are, make adjustments as needed.
Attach binding to 1st side - Stitch in Ditch Foot scant 3/8”, Zip Gun Video Part 1 11:30 Use Fence #2 and set seam at scant 3/8”.
Lower presser foot and wiggle fabric so that project and binding edges are pressed next to and not under the fence.
Begin stitching; removing Zip Clips about ½” from foot.
Video Part 1 12:32, 17:28
Stop stitching at 3/8” from edge. (For later projects, whatever your seam allowance plus a scant will be how far you’ll stop from edge.)
To check seam allowance, fold binding over to back so there’s no gap between batting & edge of binding. Check to see that there’s just a bit more binding on back than on front. If not, remove binding, adjust
seam allowance, and try again. Note: Binding cut at 3” should give a bit more binding on back so you’ll be able to catch the binding on the
back. (For later projects using a different width of binding, adjust seam allowance to provide a bit more binding on back than on front. The wider the binding, the wider the seam allowance. You don’t need to
back stitch on your practice piece. On a real project, lock stitches in when you begin and end each seam.
Miter 1st Corner – Minute Miter, Zip Gun Mitered Corners Video Video Part 1 13:20
For your practice piece, you’ll use the large Minute Miter. For later projects, use the ‘eye-ball method’ to determine which Minute Miter is best.
Place Minute Miter on Fabric & Slide to Edge 1. Hold Minute Miter in your hand so that the straight edge of triangle is in the same direction
up with edge of project. Squeeze Minute Miter and slide it onto the side of your project. 2. Scoot it to the edge and align it so that it is even with the fabric edge.
3. Be sure the triangle tip is past the edge of your binding.
Video Part 1 14:17
With your other hand, take the tail of the binding fabric and fold it over the Minute Miter. Hold the fabric tight and with your 1st hand pull the handle of the Minute Miter away from the
project. You’ll feel the fabric catch in triangle. Stop pulling when the fabric and the Minute Miter
are lined up with the binding that is already sewn down. Take the fabric and fold it over and line it up with next side of your project.
Zip Gun
Video Part 1 14:33 With the Zip Gun, place a clip about an inch away from the Minute Miter to attach the binding to
the project. Be sure that your fabric is lined up and that you’ve got a sharp corner on the inside fabric.
Video Part 1 14:45
“Three Sided Square”
With one hand squeezing the Minute Miter, make a three sided square to remove the Minute Miter – squeeze and move it forward towards the Zip Clip, squeeze and move it straight towards
the middle of your project so that it releases from the triangle, and then pull it out towards the edge and off of your project.

11
Video Part 1 15:05
“Pop Grab Turn” Take your pointer finger inside the folded binding and pop the binding up
so that it is standing straight up. Grab the two edges of the bindings evenly together and turn them back towards the side that you’ve just
sewn down. Be sure that the two binding edges line up evenly with the top and sides
edge. If they are not even, remove the Zip Clip and try again! This will take a bit of practice but I promise you’ll get it – we call them
Minute Miters for a reason!
Front Attach binding to 2nd side Part 1 Video SND Foot, Zip Gun Video Part 1 15:34, 19:35 Place fabric so that it’s next to foot. Start at top & sew this side down just like previous side,
stopping at 3/8” from edge. Check 1st corner that you’ve completed to see how you did. If you didn’t get a nice mitered
corner, rip it out and try again – that’s why it’s called a practice piece! NITE: Now is a good time to check your seam allowance. Fold binding over to the back to see
how it looks. You should feel no gap between the batting and the binding edge and have a bit more binding on the back. If you don’t think it’s enough or you’ve got too much, rip it out.
5. Miter additional corners and attach bindings Part 1 Video 18:21 Minute Miter, Zip Gun Mitered Corners Video On your practice piece, skip the other corners & sides. For your projects, repeat the process detailed above.
6. Attaching the last side Part 1 Video Minute Miter, Zip Gun The last side of your project is also the 1st side. When sewing near the end of binding, leave a tail so binding strips can be joined.
7. Join the 2 ends of your bindings SND Foot, Zip Gun Part 3 Video 9:45 Join bindings using whatever technique you like.
For nicer projects, I now use The Binding Tool (not a Martelli product) For ‘cheater projects’, I use this method presented in video - Fold end of beginning strip at 45°
angle; fold ¼”, press & use Stitch Witchery, Steam-a-Seam, 007, etc. Cut off excess fabric. Take other piece of binding, tuck inside to see how much excess fabric can be trimmed away
and use Stitch Witchery, etc. to bond this piece inside beginning piece.
Front Attach binding to 2nd side Stitch in Ditch Foot, Zip Gun
Adjusting the Zip Bind Tool Part 2 Video
1. Prepare your Project Zip Bind Tool
Video Part 1 Before you join your binding pieces, turn your bindings to the back and finger press a bit. Check the
bindings and your corners. There’s no point in going further if you don’t have enough binding on the back to catch.
The picture shows all sides have been completed but remember when you’re learning you only need
to do 2 corners.
2. Adjust the Tool for the Width of your Binding Zip Bind Tool
Part 2 Video 3:40 Use the Zip Bind Tool Basics and the videos online as guides to learn how to adjust the Zip
Bind Tool. Remember that you’ll always adjust the tool evenly first to see that it fits the width
of the binding before you adjust “a hair, a smidge, a scant, a skosh, a wee bit”. “The great thing about the Zip Bind Tool is that is adjustable. The bad thing about the tool is
that it is adjustable…” Because your binding & quilt fabric and your batting are all variables you will need to learn to
adjust the Zip Bind Tool by using the screws on each side so that it is correct for the width of your binding.
“Into the Belly” For your practice piece, you’ll test the screws so that they are about ¾ or 5/8 of the way up
towards the black handles. The edges should be even. Place the black handles into your belly. Loosen one screw and using your pointer fingers and
thumbs, slide that side out to about 2/3 or ¾ and tighten the screw. Turn the tool over with the black handles in your belly and adjust that side. Run your fingers along the edge to make
the edges even. Be sure that both sides are straight as it’s easy to adjust them slanted.
12
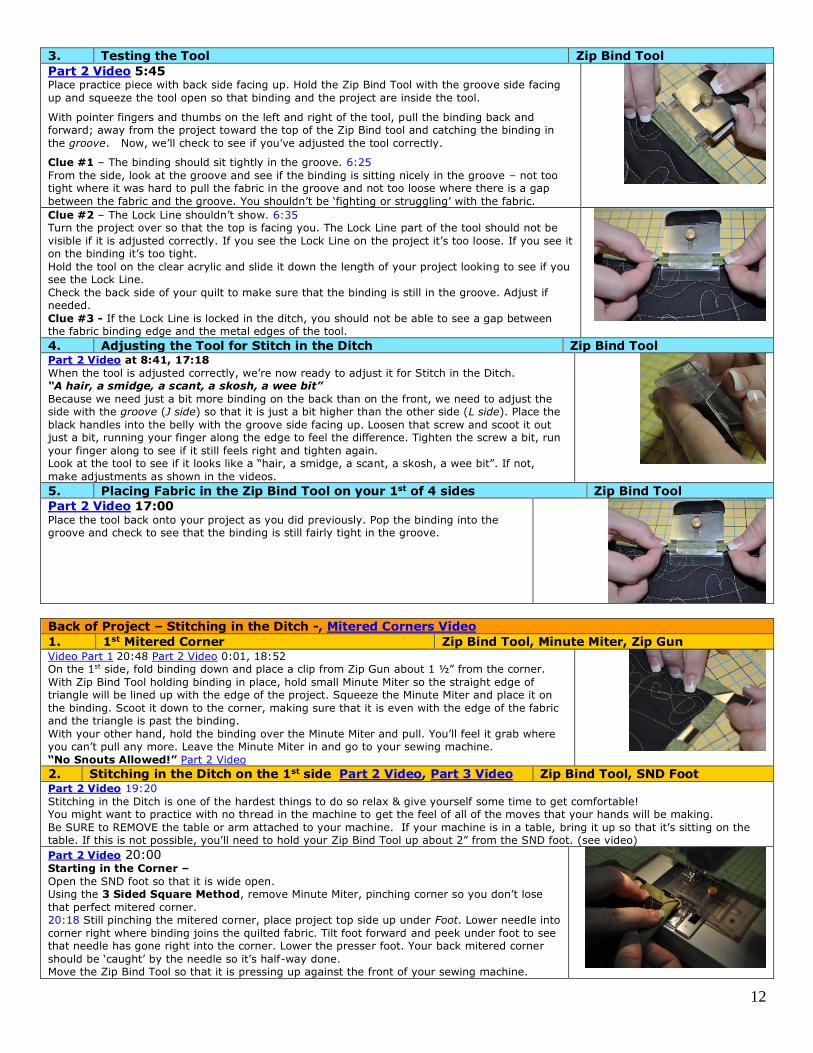
3. Testing the Tool Zip Bind Tool
Part 2 Video 5:45 Place practice piece with back side facing up. Hold the Zip Bind Tool with the groove side facing
up and squeeze the tool open so that binding and the project are inside the tool.
With pointer fingers and thumbs on the left and right of the tool, pull the binding back and forward; away from the project toward the top of the Zip Bind tool and catching the binding in
the groove. Now, we’ll check to see if you’ve adjusted the tool correctly.
Clue #1 – The binding should sit tightly in the groove. 6:25
From the side, look at the groove and see if the binding is sitting nicely in the groove – not too tight where it was hard to pull the fabric in the groove and not too loose where there is a gap
between the fabric and the groove. You shouldn’t be ‘fighting or struggling’ with the fabric.
Clue #2 – The Lock Line shouldn’t show. 6:35 Turn the project over so that the top is facing you. The Lock Line part of the tool should not be
visible if it is adjusted correctly. If you see the Lock Line on the project it’s too loose. If you see it on the binding it’s too tight.
Hold the tool on the clear acrylic and slide it down the length of your project looking to see if you see the Lock Line.
Check the back side of your quilt to make sure that the binding is still in the groove. Adjust if needed.
Clue #3 - If the Lock Line is locked in the ditch, you should not be able to see a gap between the fabric binding edge and the metal edges of the tool.
4. Adjusting the Tool for Stitch in the Ditch Zip Bind Tool Part 2 Video at 8:41, 17:18
When the tool is adjusted correctly, we’re now ready to adjust it for Stitch in the Ditch. “A hair, a smidge, a scant, a skosh, a wee bit”
Because we need just a bit more binding on the back than on the front, we need to adjust the side with the groove (J side) so that it is just a bit higher than the other side (L side). Place the
black handles into the belly with the groove side facing up. Loosen that screw and scoot it out just a bit, running your finger along the edge to feel the difference. Tighten the screw a bit, run
your finger along to see if it still feels right and tighten again. Look at the tool to see if it looks like a “hair, a smidge, a scant, a skosh, a wee bit”. If not,
make adjustments as shown in the videos.
5. Placing Fabric in the Zip Bind Tool on your 1st of 4 sides Zip Bind Tool
Part 2 Video 17:00 Place the tool back onto your project as you did previously. Pop the binding into the groove and check to see that the binding is still fairly tight in the groove.
Back of Project – Stitching in the Ditch -, Mitered Corners Video
1. 1st Mitered Corner Zip Bind Tool, Minute Miter, Zip Gun Video Part 1 20:48 Part 2 Video 0:01, 18:52 On the 1st side, fold binding down and place a clip from Zip Gun about 1 ½” from the corner.
With Zip Bind Tool holding binding in place, hold small Minute Miter so the straight edge of triangle will be lined up with the edge of the project. Squeeze the Minute Miter and place it on
the binding. Scoot it down to the corner, making sure that it is even with the edge of the fabric and the triangle is past the binding.
With your other hand, hold the binding over the Minute Miter and pull. You’ll feel it grab where you can’t pull any more. Leave the Minute Miter in and go to your sewing machine.
“No Snouts Allowed!” Part 2 Video
2. Stitching in the Ditch on the 1st side Part 2 Video, Part 3 Video Zip Bind Tool, SND Foot Part 2 Video 19:20
Stitching in the Ditch is one of the hardest things to do so relax & give yourself some time to get comfortable! You might want to practice with no thread in the machine to get the feel of all of the moves that your hands will be making.
Be SURE to REMOVE the table or arm attached to your machine. If your machine is in a table, bring it up so that it’s sitting on the table. If this is not possible, you’ll need to hold your Zip Bind Tool up about 2” from the SND foot. (see video)
Part 2 Video 20:00
Starting in the Corner –
Open the SND foot so that it is wide open. Using the 3 Sided Square Method, remove Minute Miter, pinching corner so you don’t lose
that perfect mitered corner. 20:18 Still pinching the mitered corner, place project top side up under Foot. Lower needle into
corner right where binding joins the quilted fabric. Tilt foot forward and peek under foot to see that needle has gone right into the corner. Lower the presser foot. Your back mitered corner
should be ‘caught’ by the needle so it’s half-way done. Move the Zip Bind Tool so that it is pressing up against the front of your sewing machine.
13
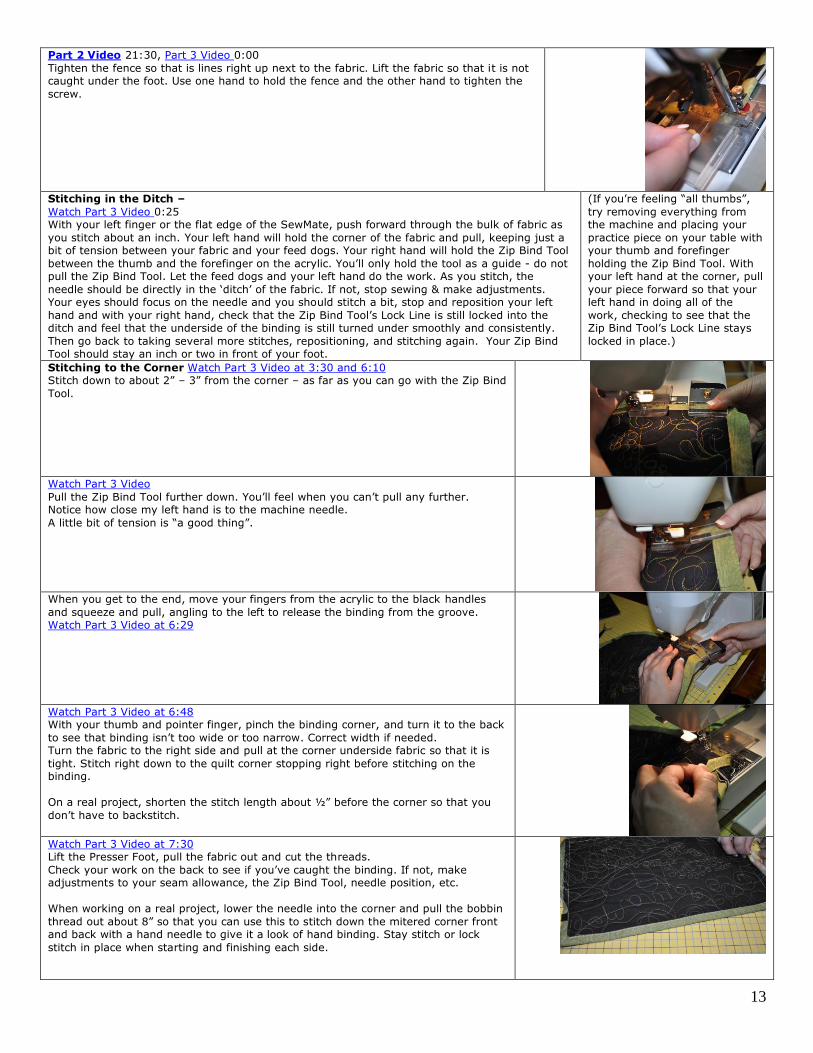
Part 2 Video 21:30, Part 3 Video 0:00
Tighten the fence so that is lines right up next to the fabric. Lift the fabric so that it is not caught under the foot. Use one hand to hold the fence and the other hand to tighten the
screw.
Stitching in the Ditch –
Watch Part 3 Video 0:25 With your left finger or the flat edge of the SewMate, push forward through the bulk of fabric as
you stitch about an inch. Your left hand will hold the corner of the fabric and pull, keeping just a bit of tension between your fabric and your feed dogs. Your right hand will hold the Zip Bind Tool
between the thumb and the forefinger on the acrylic. You’ll only hold the tool as a guide - do not pull the Zip Bind Tool. Let the feed dogs and your left hand do the work. As you stitch, the
needle should be directly in the ‘ditch’ of the fabric. If not, stop sewing & make adjustments. Your eyes should focus on the needle and you should stitch a bit, stop and reposition your left
hand and with your right hand, check that the Zip Bind Tool’s Lock Line is still locked into the ditch and feel that the underside of the binding is still turned under smoothly and consistently.
Then go back to taking several more stitches, repositioning, and stitching again. Your Zip Bind
Tool should stay an inch or two in front of your foot.
(If you’re feeling “all thumbs”,
try removing everything from the machine and placing your
practice piece on your table with your thumb and forefinger
holding the Zip Bind Tool. With your left hand at the corner, pull
your piece forward so that your left hand in doing all of the
work, checking to see that the Zip Bind Tool’s Lock Line stays
locked in place.)
Stitching to the Corner Watch Part 3 Video at 3:30 and 6:10 Stitch down to about 2” – 3” from the corner – as far as you can go with the Zip Bind
Tool.
Watch Part 3 Video
Pull the Zip Bind Tool further down. You’ll feel when you can’t pull any further. Notice how close my left hand is to the machine needle.
A little bit of tension is “a good thing”.
When you get to the end, move your fingers from the acrylic to the black handles
and squeeze and pull, angling to the left to release the binding from the groove. Watch Part 3 Video at 6:29
Watch Part 3 Video at 6:48 With your thumb and pointer finger, pinch the binding corner, and turn it to the back
to see that binding isn’t too wide or too narrow. Correct width if needed. Turn the fabric to the right side and pull at the corner underside fabric so that it is
tight. Stitch right down to the quilt corner stopping right before stitching on the binding.
On a real project, shorten the stitch length about ½” before the corner so that you
don’t have to backstitch.
Watch Part 3 Video at 7:30
Lift the Presser Foot, pull the fabric out and cut the threads.
Check your work on the back to see if you’ve caught the binding. If not, make adjustments to your seam allowance, the Zip Bind Tool, needle position, etc.
When working on a real project, lower the needle into the corner and pull the bobbin
thread out about 8” so that you can use this to stitch down the mitered corner front and back with a hand needle to give it a look of hand binding. Stay stitch or lock
stitch in place when starting and finishing each side.

14
3. Miter other Corners Mitered Corners Video, Part 3 Video Minute Miter, Zip Gun Watch Part 3 Video at 7:54
Note: I like to stitch in the Ditch ‘corner to corner’ so that there are no beginning and ending stitches showing. Each time you finish a corner, you’ll start the process
all over again, repeating every step with the possible exception of the need for the Minute Miter.
At the sewing machine, open foot all the way open. Attach Zip Bind Tool to next
side. Complete next mitered corner by using Minute Miter or simply folding the corner
over and holding it in place as you place it under the needle.
4. Attach binding to other Sides Part 3 Video Zip Bind Tool, SND Foot Pinch the mitered corner and lower the needle in, tightening the foot as before. Repeat the process, making any changes needed.
5. Sewing over the Joined bindings Part 3 Video Zip Bind Tool, SND Foot The binding ends were joined previously when working on the front, so you’ll simply stitch in the ditch following the directions above. This should give you a nice angled
binding on the front and back.
Part 6: Q & A – Answers to Common Questions Q: When stitching in the ditch, I’m not catching the back of my bindings. What am I doing wrong?
A: There are a bunch of things it could be but most likely it was something at the beginning (isn’t that always the
case!). Your binding might not have been cut straight or consistently. Your seam allowance might be too wide. Your Zip Bind Tool might not have been adjusted correctly. When attaching the binding to the front, you might have stopped too close to the edge. When learning, all of these things can seem overwhelming. But with practice, you’ll know these things without even thinking about them! For now, grab some popcorn & a drink & watch the Overview video. Then grab another placemat sized practice piece & try again. If it doesn’t work give me a call!
Q: I feel a ‘gap’ between my binding edge and where my batting ends. How can I fix this?
A: Your seam allowance when sewing down the front side of your binding is too narrow. Increase the width a bit
then fold the binding to the back so that you feel a ‘full binding’. To be able to stitch in the ditch, you will need a bit more binding on the back than on the front.
Q: When stitching in the ditch, sometimes I catch my binding and sometimes I don’t. What do I do?
A: There are 3 main problems that might cause this. 1) Instead of the above problem with too small of a seam
allowance, you may have sewn your binding on the front with too wide of a seam allowance. When sewing the binding on the front, fold it to the back to see that you have just a bit more than on the front side. You need to be able to catch this binding in the Zip Bind Tool. If not, remove the binding and decrease your seam allowance and attach it just on one side then test it out. 2) When the Zip Bind Tool isn’t adjusted correctly, the binding slips or moves as you sew. Watch the 3 Clues section of the video. 3) The Stitch in the Ditch Binding Foot wasn’t adjusted correctly. The foot needs to be adjusted each time you start a new side. Remember that on the underside of the foot, we’re creating a ‘channel’ that keeps you stitching in the ditch but it also helps hold the binding on the back side. Watch the video to see how we begin each side, remembering to adjust with 2 hands.
Q: My SND stitches show just to left of the ditch. What causes this and how can I make them less visible?
A: First, check to see that your needle is in the center position. (Ex: Janome needles sit to the right of center.) It
should line up with the ‘line’ that is created from the wall on the underside of the foot. Also, when starting, be sure that your foot seam guide is wide open and place your needle down into the corner ditch first. Then lower the presser foot and tighten the foot with one hand holding the guide tight and the other hand tightening the screw. If this doesn’t help, try moving the needle one position to the right. When testing, increase your stitch length so that it’s easy to rip out the stitches. Of course, a matching thread or a mono-poly thread is best but if your stitches are still showing, check to see that your needle is in the center position.

15
Q: My mitered corners aren’t sharp. What can I do?
A: There are a number of things that could cause this but one culprit is the amount of space left unstitched at the
ends of each side. Whatever your seam allowance is, stop sewing that width from the end. Use the Minute Miter making sure that you have a crisp ‘inside corner’ to your fabric when you fold it towards the next side. When sewing the next side, start right at the top or a stitch or two in. Be sure that you’ve got your fabric lined directly next to (and not under) the stitch in the ditch foot so that your seam allowances are consistent from side to side. Watch this video on using the Minute Miters.
Q: My Zip Bind Tool doesn’t seem to be ‘locking’ down or holding in place.
A: Your Zip Bind Tool might need to be adjusted. Watch this video starting at 9:15.
Q: What guarantees success?
A: Practice, practice, practice! Make 4 practical placemats following my videos exactly. These are just every day,
‘junky’ ones that won’t be shown off. You’ll never have to go back & watch any of my videos ever again because you’ll never forget the steps!
Q: What’s the best way to get started?
A: Start with just a few tools. The Zip Guns, Zip Clips, Sew Mate and the Seam Guide Foot are great sewing/
quilting tools. Watch my “Everyday, All the Time Tools”, “¼” Piecing” & “Top Stitching” Videos for ideas.
Q: Can I do curved bindings?
A: Yes and no. It’s simple to see by looking at the Zip Bind Tool and the SND Foot that they are meant to sew
straight. But, when doing large projects with curves (a Christmas tree skirt) the tools work fine. When looking at a curve, you’ve got to ask yourself, can this tool make that curve? On baby bibs, the answer is no! But you can combine the use of these tools and that magic material (fabric glue!) to help with the curves.
Q: What if these tools are just not for me?
A: If you decide you’re just not into this, they might make a great gift for a friend or as a Secret Santa gift. Or, go
to www.WinnerDesigns.com/Directions and click on Yahoo Groups. You’ll read about joining a group called “Sew It’s For Sale” – a place where sewers, quilters, embroiderers come together to buy & sell to each other.
Part 7: What Do Judges Look For?
Aside from the number of things on your quilt itself, judges spend quite a bit of time on mitered corners and bindings. They’re a dead give-away for someone who is new to quilting or not as experienced! 1. When looking at your corner from the front or back, it should have a square rather than rounded appearance.
Looking from the side, you should see the folds in the opposite direction. (See my Mitered Corners video on where I talk about ‘no snouts allowed’!)
2. When squeezing your mitered corner, you want to be able to say, ‘flat & full; sharp & crisp’. They shouldn’t feel mushy, gushy, lumpy or bumpy.
3. Typically, corners should be sewn down with small hidden stitches on both the front and back but read the rules for the particular show.
4. When looking at your bindings, they should be straight and consistent from edge to edge rather than a bit wavy or angled or wider or fuller. If hand binding, the stitches should be small and hidden as much as possible.
5. When feeling your bindings, you want to have a ‘full’ binding where there is no gap between the batting and the edge of the binding. The binding should feel consistently full not lumpy or bumpy.
6. Most judges prefer hand binding (I think it’s because so many people don’t stitch in the ditch well!) but I’ve been told by several that they’ll accept stitching in the ditch when done well. Categories like Machine Quilting allow for more flexibility. If you are going to stitch in the ditch, they’ll be looking for the following:
a. the stitches on the front disappear into the ditch b. the binding on the back is caught consistently c. the stitching is straight d. the width of the binding is consistent e. and the ‘lip’ of the binding (the extra binding on the back is just a bit wider than on the front and is
consistent from side to side, edge to edge and front to back.
Good luck!!!
Questions? Contact us at [email protected] or 850-433-1414 so we can help you get great bindings!