user’s manual information and reports ... 126 customer reports ... please refer to the unit’s...
TRANSCRIPT

User’s Manual
VERSION 5.0 Extreme Point of Sale, Inc 1001 Pemberton Hill Road
Suite 204 Apex, NC 27523
(919) 387-7597 - [email protected]

Resources:
The latest version of this manual is available at http://www.extremepos.com
Our video tutorials are available at http://www.youtube.com/extremepos
Requirements:
Thunder Point of Sale is a Windows-based point of sale product. You will need Windows 7 or later; for
multiple station setups, a single station will be your server and manage the database and this should be
your most powerful machine. For these setups, a hardwired network will be much faster and more
reliable than wireless.
ThunderPOS uses Microsoft SQL Server as a backend; it’s been tested with Microsoft SQL Server 2008 R2
Express Edition and with Microsoft SQL Server 2014 SP1 Express Edition. We recommend using one of
these editions if possible.
For a typical store, you will additionally want the following hardware:
An Epson or Star compatible receipt printer
A cash drawer, with a cable intended for the receipt printer you’re using
A USB barcode scanner
You are likely to also want a compatible label printer. The requirements on these are manufacturer-
specific, and so we recommend contacting sales at [email protected] or at (919) 387-7597
extension 100 for a listing of compatible printers.
Support is offered on hardware purchased from Extreme Point of Sale, Inc, and you can contact sales for
information on preconfigured hardware bundles. To ensure the best experience, we recommend a full
turn-key bundle, which will include the hardware above, the computer, and a monitor, as well as
support from Extreme Point of Sale. Please bear in mind that we will not be able to support hardware
purchased elsewhere.

Installation
Installation procedures will be different from an additional station than from the primary station. You
should begin by installing on the primary station.
Install the application from your download by running the setup.exe and proceeding through the
prompts. Once installed, a shortcut labeled “ThunderPOS” will be placed on your desktop.
Run this, and it is going to ask you if you need to install the server or need to connect to another station.
For the primary server, you’ll want to select to install the server. This will automatically download and
configure SQL Server for you; there need to be no pending updates for Windows for this to work.
If you are on a secondary station, it is important that the option is selected to connect to another
station. If you set servers up on both stations, they will run independently of each other and maintain
separate sales information and inventory levels.
You will be prompted to register. If you are a demo user, you’ll want to select demo and fill in your
information; for full customers, simply enter your customer ID and serial number.
Once the login screen has appeared, the installation is finished.

Initial Setup Wizard
The first time that you attempt to log in, the system will detect if you have not used the software before
and bring up the setup wizard. This minimal version of the settings screen will allow you to set the most
important settings in the software, including an initial password, your printer settings, your company
name and addressed, and backup settings.
You’ll need to go through this before proceeding into the software.

Dashboard
The dashboard is the first thing you will see after completing the setup wizard, or after logging in on
subsequently running the software.
This features several quick reports that give you information on what is going on in the system. You can
configure which of these show based on the employee by going to the tools menu, then selecting the
dashboard layout option.
The available reports will change based on your employee reporting permissions.

Categories, Departments, and Vendors
These similar features are all methods of classifying items. All can be managed under the store menu,
via Categories, Departments, and Vendors.
Categories and Departments are set on all items. They are not interlinked – categories aren’t specifically
sub-departments or anything of that nature – but rather are ways to make it easier to search and report
sales. You’ll want to decide how you want to set up your categories and departments before doing
anything else, as setting these up before items will make your life far easier.
You may merge a category or department into another. Doing so will delete one category or
department and move all items in it into another.
Vendors are required for doing a purchase order. You do not need to set vendors on every item, but
doing so can make purchase ordering and vendor returning far more streamlined. If you intend to set
up vendors, you’ll want to set them prior to setting up Items.

Items
Item Management, alongside the register, is one of the hearts of the software.
The screen shown above is the item grid. This screen can be reached from the store menu by going to
items, or from the register it can be launched by clicking an items button or by hitting the F2 key.
Under default settings, you can make edits to item directly on the grid by clicking the cell you want to
change and typing in the new value that you want. If you want to revert this change before hitting
enter, you can press escape to cancel the edit.
Other functions are available along the bottom of the screen. Quick searching is available by typing into
the text box and hitting enter. This will search the item id fields, title, and description.

You can add items by clicking add and putting in the information that you need. The Item ID is required
and must be unique. You also are required to put an item name in; this does not need to be unique.
You’ll want to fill in pricing information, but it will default to zeroes if you do not fill out any of the fields.
You can add new departments, categories, and vendors to set on items through their respective sections
of the program.
A few of these options and settings deserve additional attention:
On Amazon and On Website both are related to the ecommerce addon functionality. For further
information on this functionality, ask your sales representative.
Use Serial Numbers will cause the system to prompt for the serial number of an item if you sell it or buy
it in trade
Service Item will cause the system to not deduct the item from inventory when you sell it.
Preorder Item will make the item sell as a preorder.
Enforce Minimum Age will provide a prompt when you sell the item to a walkin customer or one who
has not had a birthdate set to ensure that the minimum age is met, or enforce based off the customer’s
birthdate if available.

Editing of items or duplicating items also uses this screen; it’ll simply be filled in when you head in to
begin with.
The above screen is for searching items in more specific ways than the quick search allows. Item ID,
Item ID 2, and Item ID 3 will search those specific fields, rather than all 3.
Name, Manufacturer, and Descriptions 1 and 2 will all search as contains. Most of the other fields are
self-explanatory.
Hit “Save Default Search” if you want to make this the default search for items going forward. Clear
search will reset all fields back to blank; if doing a new search you’ll usually want to use this.

When you print labels, you will get a screen where you can modify the design you’re using as above.
This will allow for you to select from a variety of templates for your printer, and then select the fields
that you want to print out.
The EPL labels are for a variety of printers, but most Zebra printers use these designs.
For further information on which label designs work for which printers, please contact support.

You can see the history of an item by highlighting it on the grid and then clicking more -> view history or
by hitting control+H.
This will bring up this screen, where you can view all your new, used, transfer and ecommerce history
for the item, including a summary of recent purchases and sales over the last month, quarter, year, and
all-time.

Each employee can have a different layout for the item grid. This allows you to customize what’s seen
to suit the employee’s needs, and to what your store needs. You can access this by clicking on ‘more’
and then Change Grid Layout.
Most fields can be edited directly on the grid by default once you put them there, allowing you to easily
avoid going into the full edit screen if you don’t need to.
You can control both the fields that are on the screen and the order in which they appear here, before
saving it.

Under the more button, you’ll find a variety of other functions besides the grid layout. As an example,
the screen show directly above is the New Item Defaults screen. These station specific settings will
autofill the fields on that station when adding a new item, or importing from a database that does not
have that field available.
If you uncheck the ‘use station defaults’ box, then these settings will not be used on this station.

Bundles
Another feature within the system relating to items is the concept of a ‘Bundle’. A bundle is a set of
items that you can sell together by scanning a single code at the register, potentially with a discount for
being purchased together.
You can reach this screen by going to the store menu and then to bundles. This will show a list of all
your current bundles, and you can do a variety of things from here, including creating new bundles,
editing existing ones to modify the items they contain, deleting them, showing the history for them, or
printing barcodes for them.
When creating a bundle, you’ll scan in or search for the items you’re wanting to put into the bundle and
then you’ll have the option to set an override price on it.
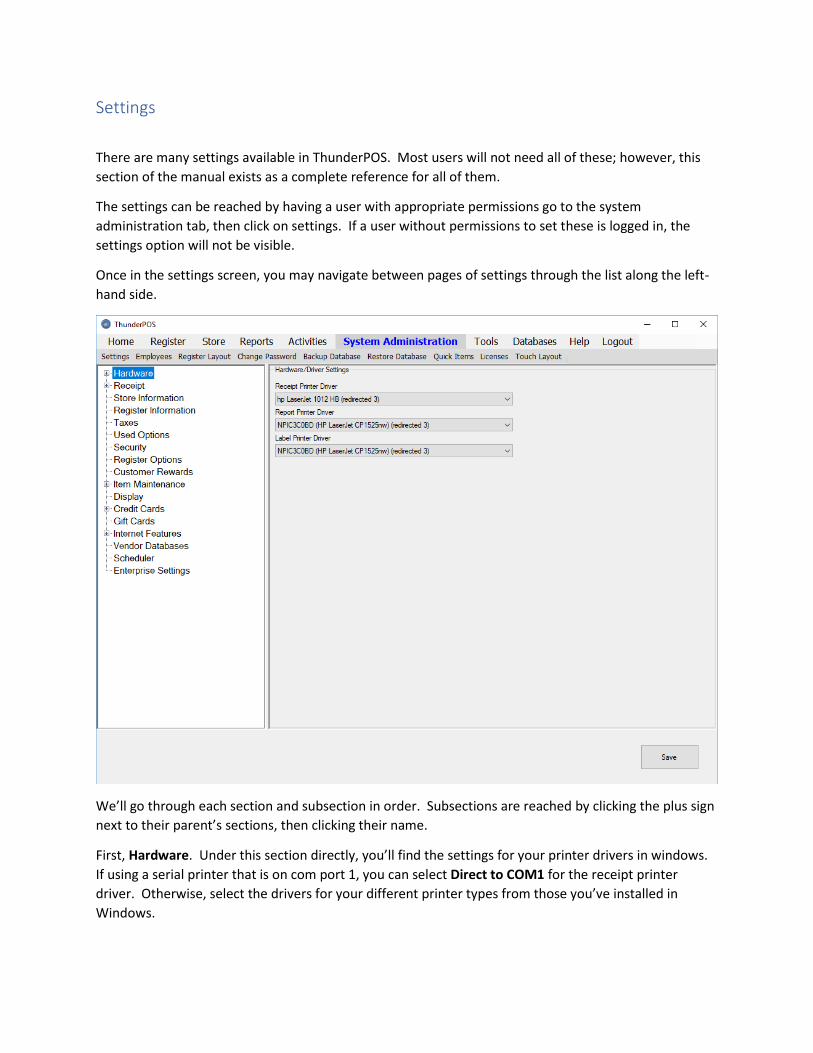
Settings
There are many settings available in ThunderPOS. Most users will not need all of these; however, this
section of the manual exists as a complete reference for all of them.
The settings can be reached by having a user with appropriate permissions go to the system
administration tab, then click on settings. If a user without permissions to set these is logged in, the
settings option will not be visible.
Once in the settings screen, you may navigate between pages of settings through the list along the left-
hand side.
We’ll go through each section and subsection in order. Subsections are reached by clicking the plus sign
next to their parent’s sections, then clicking their name.
First, Hardware. Under this section directly, you’ll find the settings for your printer drivers in windows.
If using a serial printer that is on com port 1, you can select Direct to COM1 for the receipt printer
driver. Otherwise, select the drivers for your different printer types from those you’ve installed in
Windows.

The first subsection of Hardware is Serial Printers. This section covers commands that can be directly
sent to either a Direct to COM1 receipt printer, or one using System fonts.
The Cash Drawer Port allows you to point the cash drawer to a different hookup than the receipt printer
than necessary, or at the point of the printer otherwise.
The Cash Drawer Command is the system command sent to the receipt printer to pop the cash drawer.
The prefilled options are the most commonly used ones; if your receipt printer requires something else,
you may freely type it into this box.
If using a printer with a cutter, checking the receipt cutter box and filling in the command will allow its
operation. Again, the most common are prefilled; some printers may need other commands, which you
will be able to find in that printer’s documentation.
If you’ve loaded a store logo into the printer’s memory, you can check logo and then select the logo
command to have this print. Logo commands that are prefilled in refer to the first logo in memory; if
using multiple images in the receipt printer memory, consult your printer documentation.

The final subsection of Hardware is for miscellaneous other hardware.
The Cipherlab 8000 Port and Port Speed will need to be set if you are using a Cipherlab 8000-series
batch scanner. These settings will need to match the speed and port on both windows and the device
itself.
Under Display Pole, you’ll find options relating to the display pole type and port that you will want to
use. If you’re using one, check the box for Display Pole, and select the type. If using a serial display
pole, you’ll also need to fill in the port number.
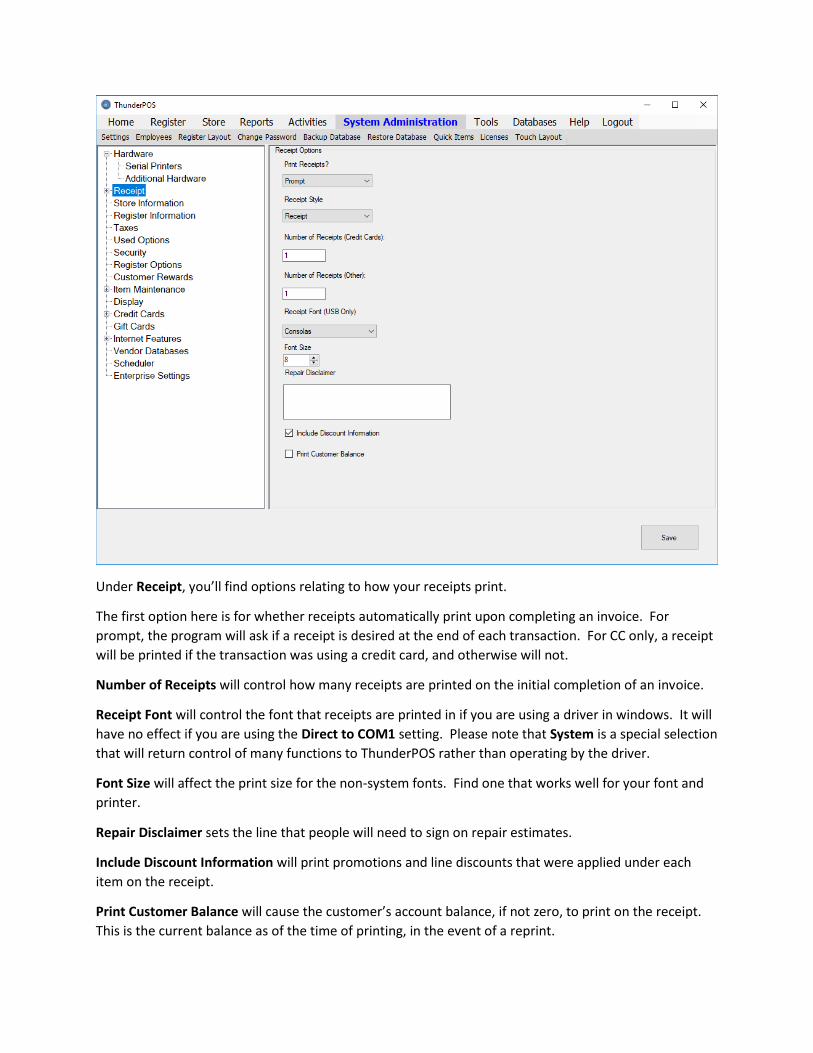
Under Receipt, you’ll find options relating to how your receipts print.
The first option here is for whether receipts automatically print upon completing an invoice. For
prompt, the program will ask if a receipt is desired at the end of each transaction. For CC only, a receipt
will be printed if the transaction was using a credit card, and otherwise will not.
Number of Receipts will control how many receipts are printed on the initial completion of an invoice.
Receipt Font will control the font that receipts are printed in if you are using a driver in windows. It will
have no effect if you are using the Direct to COM1 setting. Please note that System is a special selection
that will return control of many functions to ThunderPOS rather than operating by the driver.
Font Size will affect the print size for the non-system fonts. Find one that works well for your font and
printer.
Repair Disclaimer sets the line that people will need to sign on repair estimates.
Include Discount Information will print promotions and line discounts that were applied under each
item on the receipt.
Print Customer Balance will cause the customer’s account balance, if not zero, to print on the receipt.
This is the current balance as of the time of printing, in the event of a reprint.

The first subsection under Receipt is for Notes. This will allow you to set up to ten lines that appear at
the bottom of every receipt that is printed. The Coupons subsection is there for driver printers.

Under Store Information, you’ll find a place where you can set your top of receipt company information.
The first line will also appear on label designs that have the company name property.
Hours of Operation will affect the labor scheduler and customer appointment scheduler.
Remind Me To Make A Backup will prompt backups to be made in the event enough time has passed
since your last backup upon logging in.

Register Information contains settings related to the operation of the station that settings were opened
from. Register ID is information only, telling you the internal id of the computer you are on.
Enable Popup Keyboard and Numpad Where Available will cause the touch-compatible dialogues to
pop when on a screen where they are supported.
Open Register On Login will cause the register screen to automatically pop up without clicking register
after logging in.
Picture Directory is a shared folder where your pictures and other necessary files will get saved to.

Under Taxes, you’ll find the place to set your tax rates and descriptions of them.
Additionally, there are a few other settings that affect how taxes are collected.
Always Round Tax Up to Next Penny will cause all rounding to go up. This setting should be determined
by consulting local tax law.
For Do Not Charge Tax 1/2/3 on Used Items, checking these will disable the tax on used items. This
setting should only be on if you are certain this is how it is supposed to be done in your area.
For “Sales Tax Is On Full Sales” or “Deduct Tradeins from Sales for Determining Tax” you can ask a local
accountant which of these is appropriate for you.

Used Options will allow you to set the ways that used product and tradeins are priced. Extended Pricing
is for using Used Price 1 & 2 and Tradein Price 1 & 2 for credit and cash – a six price array. Condition
Discounts will allow for just Tradein Price 1 and Used Price 1 to be set, and then percentages getting set.
Additionally, there are a couple of miscellaneous settings related to used and trades on this section.
Do Not Accept Tradeins from Cash Customer will block trade items from being selected if the default
customer is selected. If enabled, you will need to select a specific account to trade from.
Suggest Used When Available if New Copy Sold will remind the cashier a used copy is available if they
attempt to sell a new one; this will hopefully encourage selling used copies first, which tend to be
higher-margin.

Under Security, you’ll find a few settings related to maintaining the security of your store and your data.
Audit Quantity Changes will require any direct changes to your stock quantity in inventory to be
justified, recording who, when, and why any changes were made.
Prompt Cashier ID will require a login at any transaction’s completion.
Require Password for Clock In/Out will force the entry of the password for any employee to use the
time clock, guarding against employees clocking each other in.
Allow Only Current Date for Reports for Non-Administrators will force non-administrators to not run
any sales or transaction reports reaching back into the past.

The Register Options section of settings has settings that will impact how checking customers out is
done.
Prompt when selling Out of Stock Item and Do Not Sell Out of Stock Item are heavily related. If neither
is on, if you attempt to sell an item that is out of stock it will simply allow it, taking the quantity into
negative numbers. If Prompt is checked, but Do Not Sell is not, a prompt will allow you to cancel, sell
anyway into negative, or create a special order. If Do Not Sell is checked, but Prompt is not, you will
simply receive an error and the item will not be added to the invoice. Finally, if both are checked, you’ll
get a similar prompt but without the option to sell anyway.
Combine Lines will allow for quantities to auto-combine if you are selling multiple of the same item at
the same condition. If this is off, scanning the same item multiple times will result in multiple lines on
the invoice and receipt.
Promotion Prices sets whether promotions are applied or not. Automatic will have them always be on;
off will always have them disabled. Manual and Manual (Default On) will allow the cashier to toggle
them; manual defaults off and Manual (Default On) sets them on at the start of each transaction.
Search Alternate Item ID When Scanning and Search ISBN/Third Item Number When Scanning will
allow Item ID 2 and 3 to be scanned whenever you scan a barcode at the register. If multiple matches
are found as a result, you’ll need to select between them for the item you wanted.

% Added to Max Deposits allows for you to take in money above the selling price when taking down a
deposit. This typically is done to cover the amount that will be charged for sales tax on pickup.
Rewards Points accumulated by will allow for you to set whether customer rewards points are gathered
by dollar count or by item.
Once Street Date Reached, Continue To Create Preorders For Items will determine if items that are
checked as preorders in inventory are sold as preorders after the street date, or placed on the invoice as
normal items.
Print Labels For Trade-ins will, if checked, cause stickers to print for all items on the invoice that have
been traded in. By default, these will print at the price of the condition they were traded in at; if you
check Print Price 1/A For Trades of Any Condition then the stickers will be for condition 1 or A as set
elsewhere.
Show Used Add-On Items will allow you to sell addon items as either new or used.
Print Signature Line For Trades will place a line for customers who are trading in items to sign
acknowledging that the items they are trading are now the store’s property.
Apply Customer Account Payments To Invoices will, if checked, track on an invoice by invoice level what
account transactions are paid for. If not checked, only an overall balance is maintained.
Autogenerate Customer IDs: If checked, when a new customer is created a random customer number
will be filled in for it. Until the customer is saved, this can be changed.

Customer Rewards allows you to set the rewards that customers get, and the points threshold they
need to meet. Note that a negative price here will allow you to give away coupons.
Make certain you check tax rates that need to be applied here.

Item Maintenance has options for setting up items and handling items.
Use Price Tables will enable the price table screen, allowing you to bulk set prices off retail price or cost
ranges for departments.
Serial Numbers on POs will require when receiving items on a purchase order that are serial numbered
that you enter the serial numbers.
Prefixes for New Item Barcodes and Used Item Barcodes both allow the labels that are printed to add
whatever you set as the prefix to the front of barcodes, letting them be identified as new or used
regardless of the checkbox state. Our recommendations are to set prefixes such as N or U.
Automatically Generate Item IDs will allow for the random generation of item numbers when items are
created. You can change from these random digits until the item is saved.
Do Not Perform Initial Search When Loading Items Screen will prevent the default search from
triggering when going into the items screen. This can be useful to speed the system up.
Disable Editing Items On Grid will keep items from being edited, even by those with permission, from
the grid search view.
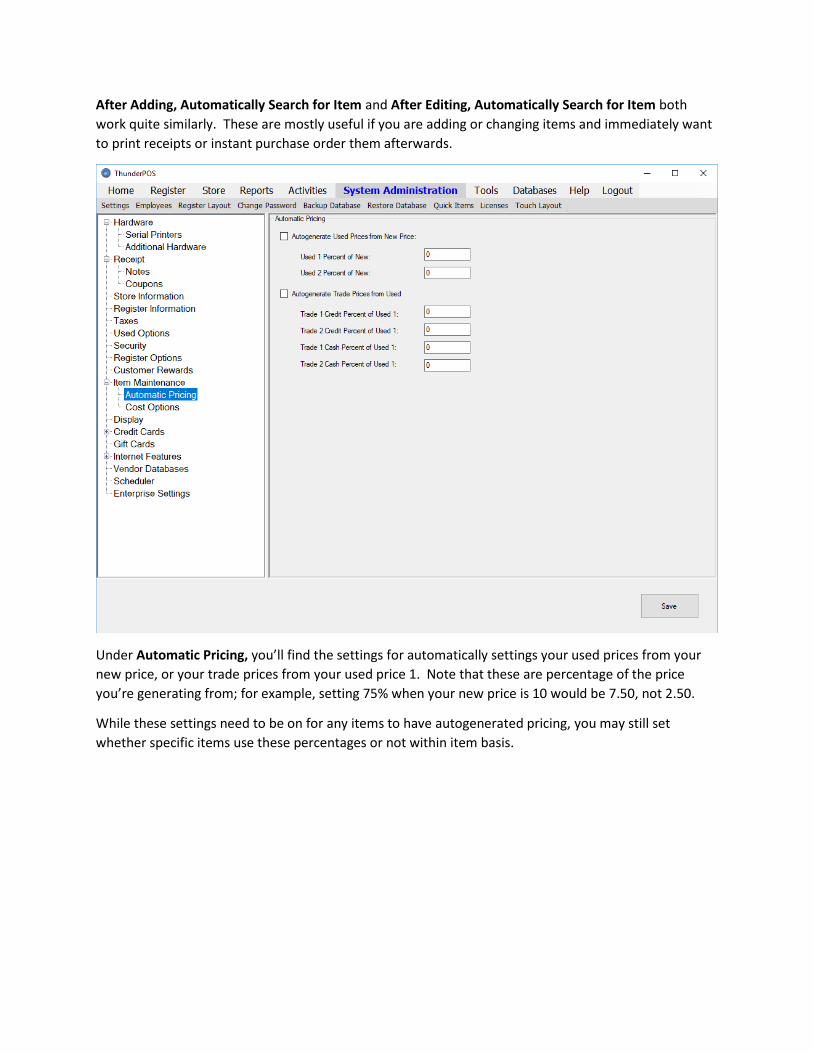
After Adding, Automatically Search for Item and After Editing, Automatically Search for Item both
work quite similarly. These are mostly useful if you are adding or changing items and immediately want
to print receipts or instant purchase order them afterwards.
Under Automatic Pricing, you’ll find the settings for automatically settings your used prices from your
new price, or your trade prices from your used price 1. Note that these are percentage of the price
you’re generating from; for example, setting 75% when your new price is 10 would be 7.50, not 2.50.
While these settings need to be on for any items to have autogenerated pricing, you may still set
whether specific items use these percentages or not within item basis.

Under Cost Options you can set a few options for your New Cost and Used Cost fields in items. Average
Cost for New and Average Cost for Used determine whether, as operations such as purchase orders and
trade ins happen to bring items into inventory, the cost will be adjusted to be an average. For example,
with Average Cost for Used on, if you have two of an item in stock used at $5.00, and take a third in
trade for $2.00, then the weighted average will cause the used cost for that item to become $4.00.
Automatically Generate Cost from Retail Price will allow you when initially creating an item to create
the cost from the retail price and the vendor’s discount percentage.

Display has station specific options for how things are shown on screen.
Show Notes When Selecting a Customer and Show Notes When Scanning Item are very similar; when
an item is selected or a customer is selected for the invoice, if the option is on and the item or customer
has notes will pop up.
Show Category and Department by name or number will determine in the various dropdown selection
screens whether the shorter number or the description is what’s displayed.
Show Vendor by does the same, for Vendors.

Reports
Reporting is one of the more important functions within the software. You can access the list of primary
reports through the “Reports” menu from the back-register screen.
Below is a list of reports and their function:
Sales Reports
Totals Sales figures for the period selected. Optionally, an itemized breakdown of all items sold in that period as well.
By Category Sales breakdown by category
By Department Sales breakdown by department
By Employee Sales breakdown by the completing cashier
By Hour Sales breakdown by the hour of the day
By Day of Week Sales breakdown by the day of the week
By Customer Sales breakdown by the customer
By Primary Vendor Sales breakdown by primary vendor
Daily Payment Types Daily tender type totals (i.e. cash, check, etc.)
Items Reports
List A list of all items in inventory, with options for grouping or filtering
Audit Quantity A list of quantity changes made and reasons why, if the Audit Quantity Changes option is enabled.
Reorder Report Shows items that are below the reorder level.
Top Sellers A list of top selling items in the period selected.
Total Value A display of the total quantity and cost-based value of your inventory.
Street Date A list of items filtered by street date; useful for showing upcoming or recent releases.
By Category A list of items within a specific category
By Department A list of items within a specific department
By Vendor A list of items with a specific vendor set
PO Serial Numbers A report of your serial numbers used for purchase order items, if the option to collect them is enabled.
Idle Items A list of items with no activity since a specified date that are presently in stock. Separated for new and used on the same items.
Transactions
Invoice Totals A list of transactions in the period specified, the amount tendered, and the total price and cost
Serial Numbers A list of serial numbered items returned, traded, and sold
Audit Activity Shows discounts and price changes at register, as well as post-transaction voids, and who performed them

Account Transactions Shows transactions done through the customer accounts for the period specified
Suspended Transactions Lists suspended transactions that are currently waiting for completion, as well as the suspend ids.
Customers
Account Balances Shows all customers and their account balances. Can filter out inactive customers
Account Statement Show a statement for the specified customer
Sales History Show the items purchased by customers during a
Address List Lists customers, their addresses and phone numbers
Discount Cards Lists discount cards. Can filter out expired cards.
Wish Lists Shows items on customer wish lists
Rewards Points Shows customer rewards points balances
Store Information
Department List Shows the department names and numbers
Category List Shows the category names and numbers
Vendor List Shows the vendors and their information
Gift Card Balances Shows gift cards and their balances
Rentals
Current Lists currently outstanding rentals
Past Due Lists past due rentals
Items In Store Lists rental items that are not currently rented
History Shows transaction history for rental items
Others
Hours Scheduled Shows the hours employees have been scheduled to work, if using the labor scheduler
Hours Worked Shows the hours and shifts employees have worked, if using time clock
Repairs Lists repairs in progress or completed
Repair Notes Lists the notes on repairs
Special Orders Shows special orders in progress or completed
Employee Metrics Shows employee metrics, based on time they have spent clocked in, for all employees
Employee Activity Shows employee activity for a specific employee. This includes shifts worked, sales as a cashier, sales while clocked in, quantity audit changes they have performed, and register audit activity they are responsible for.

Physical Inventory
The Physical Inventory process allows you to scan all items in your store, either in specific categories and
departments or in the entire store, and generate a discrepancy report for marking down shrunken
inventory, then set your stock quantities to what you have scanned.
As such, it’s a very powerful tool, and should be restricted to trusted employees or administrators.
The first step, as seen above, is to select which items you are performing an inventory of. Note that only
items that are within both departments and categories selected will be inventoried.
Once you have started, you have a few ways you can proceed: You can scan at the register using your
normal barcode scanner, you can export a spreadsheet from the system and change quantities there
with a program such as excel, or you can utilize a supported batch scanner such as the Cipherlab 8000
series to upload batches of scanned items. You can also use a combination of these, though you will
want to take care to not double-count items.
To scan using the normal scanner, you’ll click continue counting, and be taken to a screen where you can
perform scans or searches. Be careful to correctly select new or used for these items.

To export to a spreadsheet, click the export button. Importing back will need you to click the import
button and browse to your saved spreadsheet file.
For the Cipherlab batch scanner, you’ll want to have the items scanned in that you are uploading and
the device set in the cradle before clicking import. See the documentation included with the scanner for
further details on configuration. We recommend uploading batches somewhat frequently, and if not
using barcode prefixes make certain you separate new and used items into different batches.
Once you’ve finished counting, you should run a discrepancy report to make certain there are no
obvious errors, such as missed or double-counted shelves.
Once that is done, hitting finalize and update inventory will make a final discrepancy report and then
adjust all items in the selected departments and categories based on scans. Please note that any items
you do not scan will go to 0 quantity in stock.
If you want to abandon the inventory in progress, click “Cancel Inventory Process”.
You may leave the inventory screen and come back later to resume if you do not click either Finalize and
Update nor Cancel Inventory Process.

Customers
While optional, many stores will find maintaining their customer data critical. There are tools in
ThunderPOS that will allow you to do reporting on and maintain contact with your customer base, but to
use that, you’ll need to make certain you’re selecting and configuring them for invoices.
To get to customer management, you can go through the store menu and then click on customers, you
can click the customers button on most registers, or you can hit the F3 key at the register.
Once there, you can search customers either quickly using the search box under the grid or with an
advanced search in the lower left-left side in the screen.
You can add a new customer by clicking the add button, or edit an existing one by highlighting them and
hitting view/edit.

When adding or editing a customer, there are only a few fields that are required: A customer ID, a first
name, and a last name. The other fields are optional, though the more you fill out, the more that you
will have to work with later.
One highlight to point out is the Scan License button. When using a compatible barcode scanner with
driver’s license parsing, this will allow you to scan the customer’s driver’s license to automatically fill in
many of the fields, including the name, address, date of birth, id number, and potentially height, weight,
hair color and eye color depending on the state the ID was issued from. This can save quite a bit of
typing; if interested, be certain to ask Sales about compatible scanners.
If you want to allow a customer to carry a balance, even if it’s just negative for trades, make certain you
check the ‘account active’ box.
Once you’ve set up the customer to your liking, hit save to save them or the changes made.
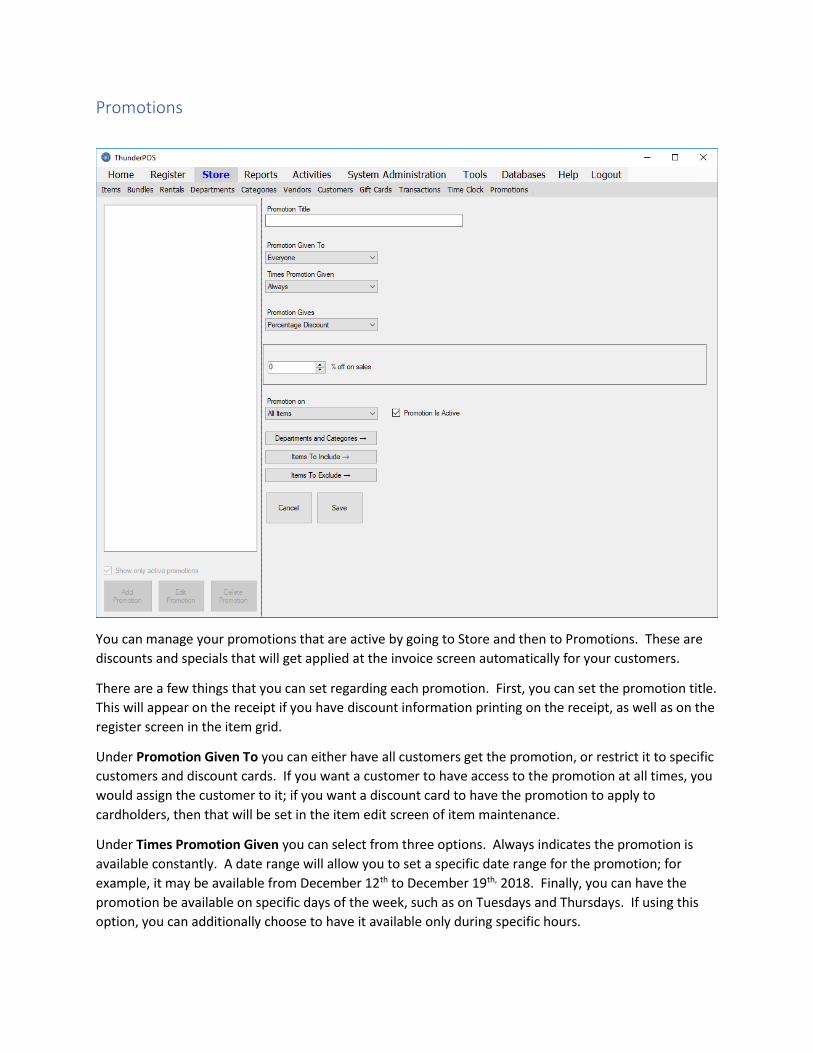
Promotions
You can manage your promotions that are active by going to Store and then to Promotions. These are
discounts and specials that will get applied at the invoice screen automatically for your customers.
There are a few things that you can set regarding each promotion. First, you can set the promotion title.
This will appear on the receipt if you have discount information printing on the receipt, as well as on the
register screen in the item grid.
Under Promotion Given To you can either have all customers get the promotion, or restrict it to specific
customers and discount cards. If you want a customer to have access to the promotion at all times, you
would assign the customer to it; if you want a discount card to have the promotion to apply to
cardholders, then that will be set in the item edit screen of item maintenance.
Under Times Promotion Given you can select from three options. Always indicates the promotion is
available constantly. A date range will allow you to set a specific date range for the promotion; for
example, it may be available from December 12th to December 19th, 2018. Finally, you can have the
promotion be available on specific days of the week, such as on Tuesdays and Thursdays. If using this
option, you can additionally choose to have it available only during specific hours.

Next, you’ll want to select what the promotion gives. There are currently five types of promotions; four
are for use when selling items, and one is for taking in trades.
For trades, the option available is an additional percentage boost on those trade items. This can apply
on cash trades, credit trades, or both; if you want to do different percentages for cash and credit this
would be accomplished through setting up two promotions for different amounts.
For sales, you can have any of the following apply to new, used, or both. First, there is a flat percentage
off the normal price. Second, you can have a dollar amount discount from the normal price. Third, you
can do a buy x get y % off type promotion. These are very flexible and can range from things like simple
buy 1 get 1 free to more complex promotions like buy 2 get 3 25% off. Finally, you can do a promotion
where items are set to a specific price.
Last, you’ll need to set what items the promotions are applied to. You can do this in two ways – through
adding departments and categories to include items for, or through adding specific items that should be
included. You can also specifically exclude items, so if you’re wanting to do all but one item in a
category, you would include the category but exclude the item you don’t want discounted.
Note that only one promotion will get applied to any item. In the event multiple promotions would get
applied, the system will select which promotions apply, attempting to do so in a favorable method for
the customer. Also note that promotions only get applied if they are turned on – see the register
options section of settings for further details.

Employees
For the security-minded user, proper configuration of employee permissions is the place to start. It does
very little good to set up auditing and other controls if you give everyone access to logging in as an
administrator, after all.
To reach employees, you’ll need to go under system administration and then go to Employees. Note
that this will only be visible if you are logged in as an administrator.
To create new employees, you’ll hit the add button in the lower left. To edit an existing employee, you’ll
hit edit there.
When creating a new employee, you’ll need to fill in a cashier id and the password, as well as confirming
the password. Passwords are case sensitive and must be at least seven characters long. When editing
an employee, if not changing the password just leave those boxes blank.
Other fields in the top half of the screen are largely informational, and are simply there for your
convenience for tracking employees. Many reports will show the first and last name if available.
In the bottom half of the screen, you’ll find the settings for permissions for employees. By far the most
important of these is the Administrator checkbox. A user who is an administrator automatically has all

other permissions, and additionally certain top-level functions, such as restoring a backup of the
database or editing employees, can only be done by an administrator. In the event that you ever have
set all employees to not be administrator, the 01 ID will automatically be granted administrator once
again.
Going down each column in order, under Store Management the settings primarily relate to setup
options for the store. Store Settings will grant access to your options set under system administration
and then settings. Departments / Categories will allow the user to create new departments and
categories; Vendors will do the same for vendors. Physical Inventory will grant access to the physical
inventory function of the software, described in its chapter in this manual. Purchase Orders, Instant
Purchase Orders, and Vendor Returns grant access to those forms of inventory management.
Under Reports, an employee can either have access to all reports or you can set their access on a report
by report basis. If doing the latter, by default they will not have access to any of the reports. You’ll need
to click the button next to this option to bring up a screen where you may set the reports you want this
employee to be able to run.
Under Sales Transactions, the permissions primarily relate to activity at the register itself. Change
Prices will allow the user to set a discount percentage or change the price directly. Price Change Limit
will prevent this from being by more than a certain amount. Delete Items allows them to remove items
that have been placed on the invoice from the invoice. Open Cash Drawer will allow them to use the
open cash drawer button to pop it outside of transactions. Please note that even without open cash
drawer, the cash drawer will still pop at the end of a transaction when it otherwise would.
Under Items, there are settings related to the Item Maintenance section of the program. All employees
can access the search and select functions of the grid, as this is necessary for register operation. View
grants them permission to see further details on the individual items. Add allows them to create new
items. Update allows them to edit items and make changes to most fields. If updating, Change
Quantities sets whether they can change the stock level fields and Change Costs sets whether they can
change the Cost fields.
Under Customers, there are settings related to customer maintenance. All employees can access the
search and select functions of customers. Add allows them to create new customers. Edit allows them
to modify customers. Transactions allows them to perform account transactions with the customers,
such as making a payment against the amount due or doing a balance adjustment. Adjust rewards
points allows them to change the customer’s number of bonus points.
Finally, under Miscellaneous, there are options that don’t really fit elsewhere. Print Barcodes allows the
employee to print item and customer labels. Void Past Invoices allows the employee to use the voiding
function, though even with this permission it is limited to the current day’s transactions only. Adjust Gift
Card Balance allows the employee to adjust the balance of store gift cards.

Purchase Orders
Purchase orders are one of the most useful tools for tracking your incoming inventory. These can be
accessed by an employee with appropriate permissions through the Activities menu, then the Purchase
Orders option.
Once there, you’ll be presented with a list of your previous purchase orders. You can filter this list using
the dropdown boxes in the lower right for Status and From Vendor. If you’re wanting to edit an open
purchase order, highlight it and click Edit. If you’re wanting a new purchase order, click New.
In either case, you’ll be taken to the following screen:

The above is a purchase order with a few items filled in already. You’ll need to select what vendor
you’re ordering from using the Vendor ID dropdown box. Other fields are optional, but recommended
for your own information.
To add items to the purchase order, you can either search (using Lookup) or scan the item into the Add
Item box. If scanning, you should check “Used” or not, as appropriate.
Once an item is on the purchase order, it will appear in the grid. If a search grid is on screen at the same
time, it will be in the bottom half of the screen, as pictured above. Fields that are in blue text – the #
ordered and the cost per – can be directly edited on the grid. If you need to remove an item from the
order entirely, click the delete button in the second column on that line. If you need to make edits to
the item in inventory, such as to update the title or pricing, click Edit.
Please note that simply placing an item on an order will not modify your quantity in stock in inventory.
To do that, you must receive the item. You can do this in one of three ways.
First, you can receive line by line, by clicking the receive button on that line. This will prompt for the
quantity that you are receiving.
Second, you can utilize a batch scanner, similarly to physical inventory, to scan the quantities of items
you are receiving. If an item is scanned through this that is not already on the order, it will attempt to

add it to your purchase order at the default cost, then receive it. To get to this function, go through
the more menu, then ‘receive from device’.
Finally, you can Receive All through the more menu. This will automatically set ALL ITEMS on the
purchase order to have the received quantity be equal to the quantity ordered.
When leaving a purchase order, there are three ways to do so. The cancel button will discard all
changes to the order. The save button will save the changes and update inventory if items were
received, but leave the purchase order open. Finally, the finalize button will save the changes, update
inventory, and close out the purchase order, preventing any further changes.
Instant purchase orders are a similar function for a single item. You can reach this through the Items
screen’s more button, and all you need to fill out is a cost per, a quantity, optionally a vendor, and check
used if doing a used purchase order. This can be much quicker for small numbers of items, but is less
efficient for large orders.

Vendor Returns
Vendor returns are very similar to purchase orders. These are used to remove item quantities from your
stock levels, rather than add them. The primary difference is that the quantity does not need to be
received; instead, whenever you Finalize the return, all quantities on the return will be removed from
your inventory.

Transaction List
The transaction list allows you to view and search past transactions, as well as access functionality to do
returns or voids off those transactions.
To access the transaction list, go through store and then transactions, or click the transactions button on
the register. This will bring up the transactions that were most recently done in reverse chronological
order.
Searching in the bottom left will offer a screen through which you can set different filters to find
transactions you need to view.
Other than simply viewing the totals of the transactions, you can perform two main actions here once
you’ve found the transaction you want.
First, if you want to void the transaction, that is done using the void button in the bottom right of this
screen. Only transactions which were done on the current date can be voided, and only if the employee
who is logged in has permission to do so. Voiding transactions is logged to the audit activity log.
Second, and more commonly, you can view the details of the transaction, which will bring up the below
screen:

This screen will give a line by line breakdown of the transaction that you want to see, and there are a
few things you can do here. First, you can reprint the receipt. Second, you could reprint the receipt
without prices.
Finally, you can do a return on the item, which will automatically place it on the current transaction at a
negative quantity, at the same price that it was sold at on the transaction that you are taking it from.

Backing Up and Restoring the Database
These critical functions will allow you to make a backup of the database, and to restore a backup of a
database.
The backup function can be accessed by all employees. We recommend making backups frequently.
This is visible under system administration and then backup database. You can browse to a file location
to create the backup in by clicking browse. Please note that regardless of the station you trigger the
backup from, the location that the backup is made to will be on the server station. Clicking execute
will attempt to make the backup.
Restoring a database is done very similarly, but can only be performed by an administrator on the
system. For administrators, the function is found under System Administration, then Restore Database.
You will want to browse to the file, then execute.

Label Utility
The label utility is used to mass print labels, either from a purchase order or from labels queued either
through the vendor databases or through the Enterprise system.
If you want to mass print labels based on a search, that can be done through the items screen; perform
the search you want and then go through more and then mass print labels.
Select the circle next to purchase orders or queued labels. If doing a purchase order, select the
purchase order you want to print, and then select either received quantities or ordered quantities.
Click print in the bottom right to print the labels based on your selections.
Gift Cards
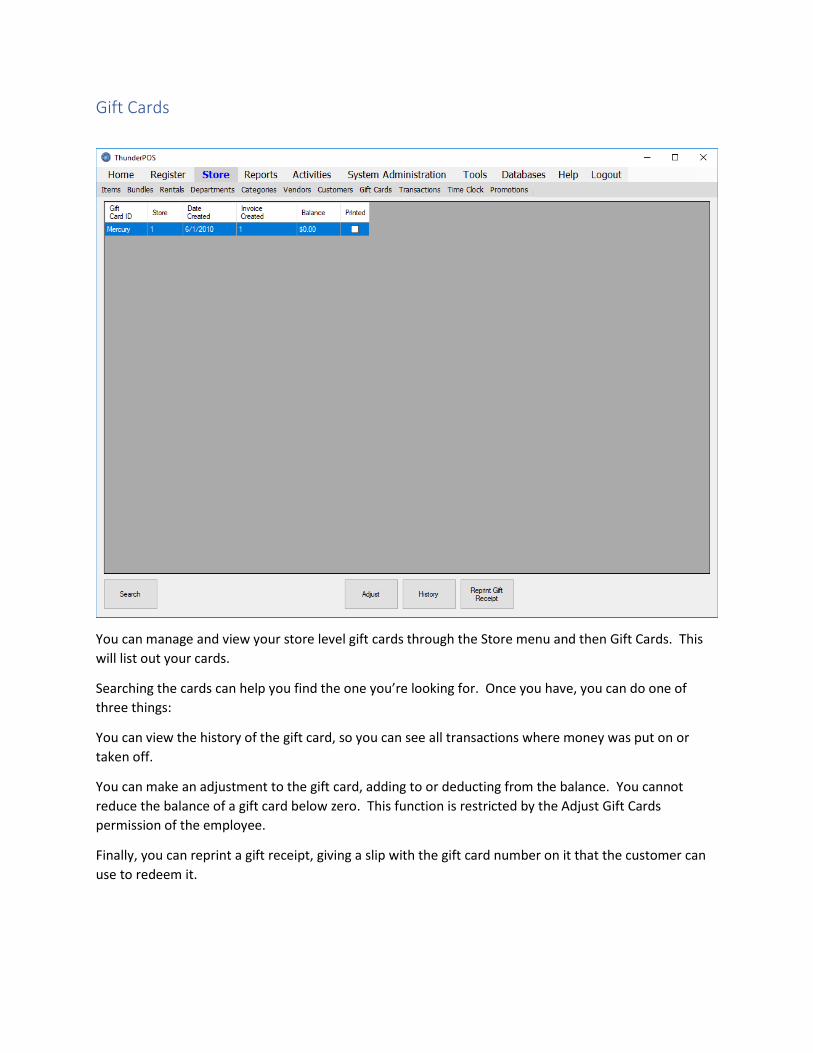
You can manage and view your store level gift cards through the Store menu and then Gift Cards. This
will list out your cards.
Searching the cards can help you find the one you’re looking for. Once you have, you can do one of
three things:
You can view the history of the gift card, so you can see all transactions where money was put on or
taken off.
You can make an adjustment to the gift card, adding to or deducting from the balance. You cannot
reduce the balance of a gift card below zero. This function is restricted by the Adjust Gift Cards
permission of the employee.
Finally, you can reprint a gift receipt, giving a slip with the gift card number on it that the customer can
use to redeem it.

Register
The register screen is where your employees will spend most of their time. The version pictured above
is our Standard template, modeled after previous versions of the software. There are several different
template options available, which will change the look and layout of the register. These can be selected
from under System Administration and then Register Layout.
Items
Items can be added to the invoice in one of several ways. First, for designs with the “Enter Item ID” box,
you can scan items into that box and they will if found be added. Second, you can go through the Items
screen by hitting the Items box here or pressing the F2 key. On this screen, if you highlight an item and
hit select, it will be added to the register.
If you have set up Quick Items, you can go through the quick items button to add one of your quick
items to the invoice.
Changing Items If you are using a Touch layout, you will see your touch screen menus, configured through the system
administration menu. These will allow you to add items to the invoice as well.
Please note that the used checkbox, the condition, the trade-in checkbox, and the trade-in type
dropdown are for items about to be scanned. If you want to change an item that is already on the
invoice, you’ll need to hit the Change More button.
You can also modify pricing for items on the invoice. To do this, you’ll want to highlight the item on the
grid for changing, and then you can either hit Change Price to set a specific price, Change Discount to do
the change by a percentage, or Change Quantity to change the number that you are selling.
You can remove an item from the invoice by highlighting it and either hitting the delete button, or
pressing the delete key on the keyboard.
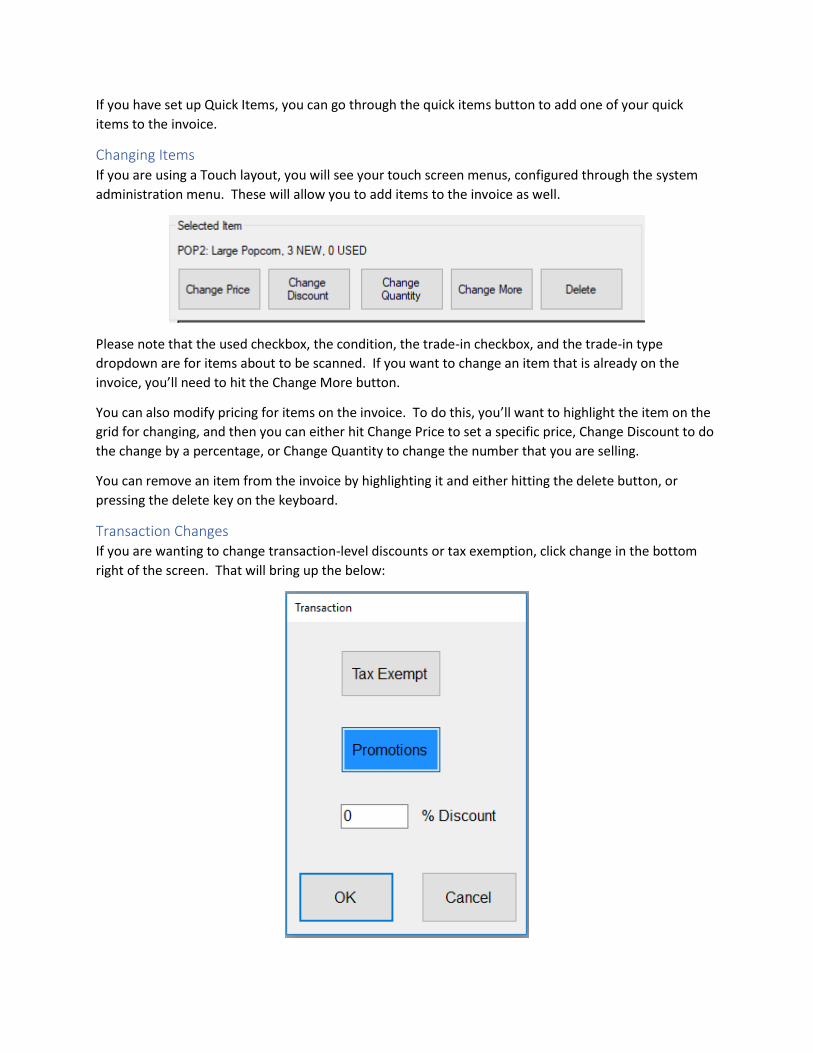
Transaction Changes If you are wanting to change transaction-level discounts or tax exemption, click change in the bottom
right of the screen. That will bring up the below:

If the box is filled in, that means it is enabled. For example, in the above screenshot, tax exempt is off
and promotions are on. If an invoice is tax exempt, it will be recorded in total as tax exempt and the
sales tax will be 0%.
If promotions are set to manual, they can be toggled here. If they are disabled, all promotions will not
be applied; if they are enabled, all promotions will be applied.
The discount will be applied to each line. This is multiplicative with all other discounts; if a line has a
price of $10, a 10% line discount, and then another 10% is applied at the invoice level, it will be
discounted to $9.00 and then to $8.10.
Customers
Similar to the items, there are multiple ways to select a customer for the invoice. The default customer
will be the Walk-In Customer, as shown above. If you know the ID of the customer you want to select,
you can hit Lookup By ID, then type in or scan the barcode for the customer.
Lookup discount card can do the same, and then find the customer who holds that discount card.
Finally, you can hit F3 or the customers button on the left to bring up the grid; search for the customer
you want, then hit select.
Gift Cards To sell a Gift Card on the receipt, you can click the Gift Card button, or enter a item ID of GC. This will
bring up the following screen:

You’ll want to scan the gift card into the Gift Card ID button, then in Amount fill in the amount you want
to sell the gift card for. This will place it onto the invoice.
Special Orders You can also place items on order by hitting Special Order and selecting the item you want to place on
the invoice. The special order deposit screen is shown below:
The maximum deposit is affected by the setting to take a percentage above the price. See settings for
more details.
A non-Walk In customer must be selected for the invoice to place a special order.
Completing Transactions Once you are ready to complete the transaction, you have a few options for how to do so.
First, hitting “Cancel Transaction” will reset the screen and discard the transaction in process. This does
get recorded as a canceled transaction.
Hitting “Complete Transaction” will bring up the payments screen, pictured below.
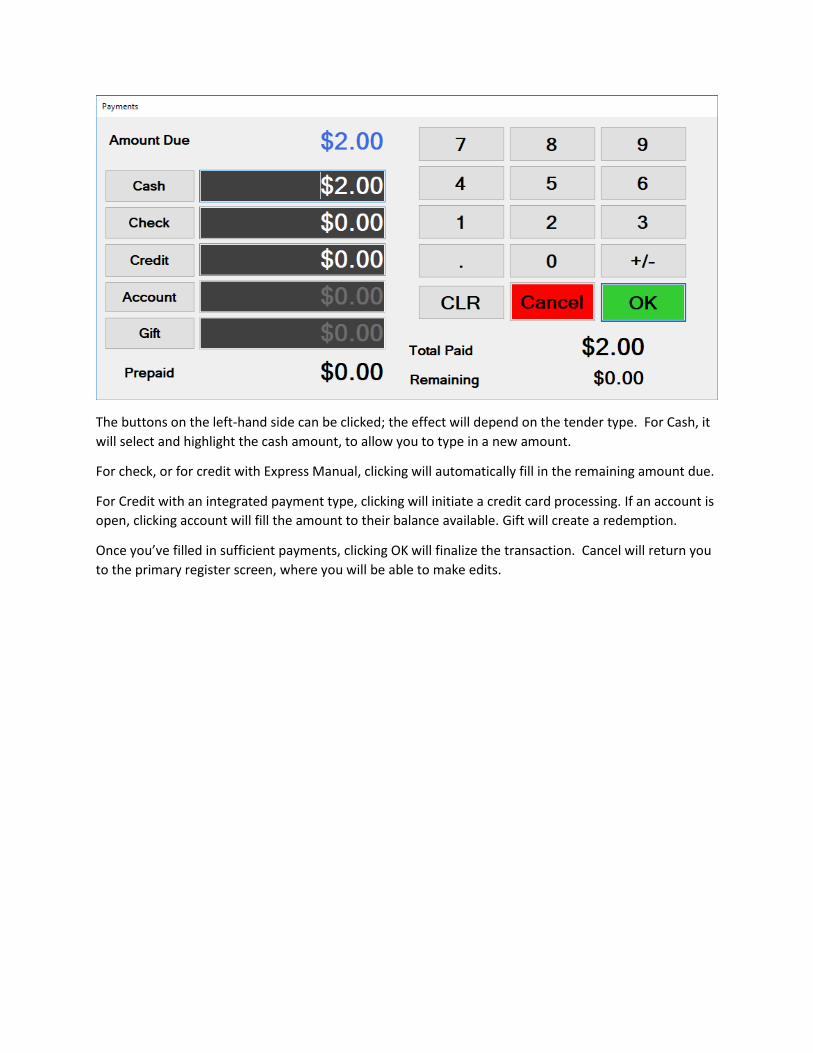
The buttons on the left-hand side can be clicked; the effect will depend on the tender type. For Cash, it
will select and highlight the cash amount, to allow you to type in a new amount.
For check, or for credit with Express Manual, clicking will automatically fill in the remaining amount due.
For Credit with an integrated payment type, clicking will initiate a credit card processing. If an account is
open, clicking account will fill the amount to their balance available. Gift will create a redemption.
Once you’ve filled in sufficient payments, clicking OK will finalize the transaction. Cancel will return you
to the primary register screen, where you will be able to make edits.