user's guide v2.1 for abc 2005 11 03s guide_v2.1.pdf · (windows ce5.0 version) version 2.1 -...
TRANSCRIPT

User’s Guide
(Windows CE5.0 Version)
Version 2.1

- 2 -
1.0 End User License Agreement
EULA for Microsoft Windows CE Operating System for Windows-based Terminal Devices
IMPORTANT—READ CAREFULLY
This End User License Agreement (EULA) is a legal agreement between you (either an individual or a single entity) and the manufacturer (MANUFACTURER) of the special purpose computing device (SYSTEM) you acquired which includes certain Microsoft software product(s) installed on the SYSTEM and/or included in the SYSTEM package (SOFTWARE). The SOFTWARE includes computer software, the associated media, any printed materials, and any online or electronic documentation. By installing, copying or otherwise using the SOFTWARE, you agree to be bound by the terms of this EULA. If you do not agree to the terms of this EULA, MANUFACTURER and Microsoft Licensing, Inc. (MS) are unwilling to license the SOFTWARE to you. In such event, you may not use or copy the SOFTWARE, and you should promptly contact MANUFACTURER for instructions on return of the unused product(s) for a refund.
SOFTWARE LICENSE
The SOFTWARE is protected by copyright laws and international copyright treaties, as well as other intellectual property laws and treaties. The SOFTWARE is licensed, not sold.
1. GRANT OF LICENSE
SOFTWARE includes software already installed on the SYSTEM (SYSTEM SOFTWARE) and, if included in the SYSTEM package, software contained on the CD-ROM disk and/or floppy disk(s) labeled "Desktop Software for Microsoft Windows CE" (DESKTOP SOFTWARE). This EULA grants you the following rights to the SOFTWARE:
• System Software.
You may use the SYSTEM SOFTWARE only as installed in the SYSTEM.
• Desktop Software.
DESKTOP SOFTWARE might not be included with your SYSTEM. If DESKTOP SOFTWARE is included with your SYSTEM, you may install and use the component(s) of the DESKTOP SOFTWARE in accordance with the terms of the end user license agreement provided with such component(s). In the absence of a separate end user license agreement for particular component(s) of the DESKTOP SOFTWARE, you may install and use only one (1) copy of such component(s) on a single computer with which you use the SYSTEM.
• Use of Windows CE Operating System for Windows-Based Terminal Devices with Microsoft Windows NT Server, Terminal Server Edition.

- 3 -
If the SOFTWARE is Windows CE operating system for Windows-Based Terminal devices, the following special provisions apply. In order to use the SYSTEM in connection with Windows NT Server, Terminal Server Edition, you must possess (1) a Client Access License for Windows NT Server, Terminal Server Edition and (2) an end user license for Windows NT Workstation or an end user license agreement for Windows NT Workstation for Windows-Based Terminal Devices (please refer to the end user license agreement for Windows NT Server, Terminal Server Edition for additional information). MANUFACTURER may have included a Certificate of Authenticity for Windows NT Workstation for Windows-Based Terminal Devices with the SYSTEM. In that case, this EULA constitutes an end user license for the version of Windows NT Workstation for Windows-Based Terminal Devices indicated on such Certificate of Authenticity.
• Back-up Copy.
If MANUFACTURER has not included a back-up copy of the SYSTEM SOFTWARE with the SYSTEM, you may make a single back-up copy of the SYSTEM SOFTWARE. You may use the back-up copy solely for archival purposes.
2. Description of Other Rights and Limitations.
• Speech/Handwriting Recognition
If the SYSTEM SOFTWARE includes speech and/or handwriting recognition component(s), you should understand that speech and handwriting recognition are inherently statistical processes; that recognition errors are inherent in the processes; that it is your responsibility to provide for handling such errors and to monitor the recognition processes and correct any errors. Neither MANUFACTURER nor its suppliers shall be liable for any damages arising out of errors in the speech and handwriting recognition processes.
• Limitations on Reverse Engineering, Recompilation and Disassembly
You may not reverse engineer, decompile, or disassemble the SYSTEM SOFTWARE, except and only to the extent that such activity is expressly permitted by applicable law notwithstanding this limitation.
• Single SYSTEM
The SYSTEM SOFTWARE is licensed with the SYSTEM as a single integrated product. The SYSTEM SOFTWARE installed in Read Only Memory (ROM) of the SYSTEM may only be used as part of the SYSTEM.
• Single EULA
The package for the SYSTEM SOFTWARE may contain multiple versions of this EULA, such as multiple translations and/or multiple media versions (e.g., in the user documentation and in the software). Even if you receive multiple versions of the EULA, you are licensed to use only one (1) copy of the SYSTEM SOFTWARE.

- 4 -
• Rental
You may not rent or lease the SOFTWARE.
• Software Transfer
You may permanently transfer all of your rights under this EULA only as part of a sale or transfer of the SYSTEM, provided you retain no copies, you transfer all of the SOFTWARE (including all component parts, the media, any upgrades or backup copies, this EULA and, if applicable, the Certificate(s) of Authenticity), and the recipient agrees to the terms of this EULA. If the SOFTWARE is an upgrade, any transfer must include all prior versions of the SOFTWARE.
• Termination
Without prejudice to any other rights, MANUFACTURER or MS may terminate this EULA if you fail to comply with the terms and conditions of this EULA. In such event, you must destroy all copies of the SOFTWARE and all of its component parts.
3. Upgrades.
If the SYSTEM SOFTWARE and this EULA are provided separate from the SYSTEM by MANUFACTURER and the SYSTEM SOFTWARE is on a ROM chip, CD ROM disk(s) or floppy disk(s), and labeled "For ROM Upgrade Purposes Only" ("ROM Upgrade"), you may install one copy of the ROM Upgrade onto the SYSTEM as a replacement copy for the SYSTEM SOFTWARE originally installed on the SYSTEM and use it in accordance with Section 1 of this EULA.
4. Copyright.
All title and copyrights in and to the SOFTWARE (including but not limited to any images, photographs, animations, video, audio, music, text and "applets," incorporated into the SOFTWARE), the accompanying printed materials, and any copies of the SOFTWARE, are owned by MS or its suppliers (including Microsoft Corporation). You may not copy the printed materials accompanying the SOFTWARE. All rights not specifically granted under this EULA are reserved by MS and its suppliers (including Microsoft Corporation).
5. Product Support.
Product support for the SOFTWARE is not provided by MS, its parent corporation, Microsoft Corporation, or their affiliates or subsidiaries. For product support, please refer to MANUFACTURER’s support number provided in the documentation for the SYSTEM. Should you have any questions concerning this EULA, or if you desire to contact MANUFACTURER for any other reason, please refer to the address provided in the documentation for the SYSTEM.
6. Export Restrictions.
You agree that you will not export or re-export the SOFTWARE to any country, person, or entity subject to U.S. export restrictions. You specifically agree not to export or re-export the
- 5 -
SOFTWARE: (i) to any country to which the U.S. has embargoed or restricted the export of goods or services, which as of March 1998 include, but are not necessarily limited to Cuba, Iran, Iraq, Libya, North Korea, Sudan and Syria, or to any national of any such country, wherever located, who intends to transmit or transport the products back to such country; (ii) to any person or entity who you know or have reason to know will utilize the SOFTWARE or portion thereof in the design, development or production of nuclear, chemical or biological weapons; or (iii) to any person or entity who has been prohibited from participating in U.S. export transactions by any federal agency of the U.S. government.
If the SOFTWARE is labeled "North America Only Version" above, on the Product Identification Card, or on the SOFTWARE packaging or other written materials, then the following applies: The SOFTWARE is intended for distribution only in the United States, its territories and possessions (including Puerto Rico, Guam, and U.S. Virgin Islands) and Canada. Export of the SOFTWARE from the United States is regulated under "EI controls" of the Export Administration Regulations (EAR, 15 CFR 730-744) of the U.S. Commerce Department, Bureau of Export Administration (BXA). A license is required to export the SOFTWARE outside the United States or Canada. You agree that you will not directly or indirectly, export or re-export the SOFTWARE (or portions thereof) to any country, other than Canada, or to any person or entity subject to U.S. export restrictions without first obtaining a Commerce Department export license. You warrant and represent that neither the BXA nor any other U.S. federal agency has suspended, revoked or denied your export privileges.
7. Note on Java Support.
The SYSTEM SOFTWARE may contain support for programs written in Java. Java technology is not fault tolerant and is not designed, manufactured, or intended for use or resale as on-line control equipment in hazardous environments requiring fail-safe performance, such as in the operation of nuclear facilities, aircraft navigation or communication systems, air traffic control, direct life support machines, or weapons systems, in which the failure of Java technology could lead directly to death, personal injury, or severe physical or environmental damage.
8. Limited Warranty.
• Limited Warranty
MANUFACTURER warrants that the SOFTWARE will perform substantially in accordance with the accompanying written materials for a period of ninety (90) days from the date of receipt. Any implied warranties on the SOFTWARE are limited to ninety (90) days. Some states/jurisdictions do not allow limitations on duration of an implied warranty, so the above limitation may not apply to you.
• Customer Remedies
MANUFACTURER’S and its suppliers’ entire liability and your exclusive remedy shall be, at MANUFACTURER’S option, either (a) return of the price paid, or (b) repair or replacement of the SOFTWARE that does not meet the above Limited Warranty and which is returned to MANUFACTURER with a copy of your receipt. This Limited Warranty is void if failure of the SOFTWARE has resulted from accident, abuse, or misapplication. Any replacement SOFTWARE will be warranted for the remainder of the original warranty period or thirty (30) days, whichever is longer.

- 6 -
• No Other Warranties
EXCEPT AS EXPRESSLY PROVIDED IN THE LIMITED WARRANTY SECTION ABOVE, THE SOFTWARE IS PROVIDED TO THE END USER "AS IS" WITHOUT WARRANTY OF ANY KIND, EITHER EXPRESSED OR IMPLIED, INCLUDING, BUT NOT LIMITED TO, WARRANTIES OF NON- INFRINGEMENT, MERCHANTABILITY, AND/OR FITNESS FOR A PARTICULAR PURPOSE. THE ENTIRE RISK OF THE QUALITY AND PERFORMANCE OF THE SOFTWARE IS WITH YOU.
• No Liability for Consequential Damages
MANUFACTURER OR MANUFACTURER’S SUPPLIERS, INCLUDING MS AND ITS SUPPLIERS, SHALL NOT BE HELD TO ANY LIABILITY FOR ANY DAMAGES SUFFERED OR INCURRED BY THE END USER (INCLUDING, BUT NOT LIMITED TO, GENERAL, SPECIAL, CONSEQUENTIAL OR INCIDENTAL DAMAGES INCLUDING DAMAGES FOR LOSS OF BUSINESS PROFITS, BUSINESS INTERRUPTION, LOSS OF BUSINESS INFORMATION AND THE LIKE), ARISING FROM OR IN CONNECTION WITH THE DELIVERY, USE OR PERFORMANCE OF THE SOFTWARE.
If you acquired this EULA in the United States, this EULA is governed by the laws of the State of Washington.
If you acquired this EULA in Canada, this EULA is governed by the laws of the Province of Ontario, Canada. Each of the parties hereto irrevocably attorneys to the jurisdiction of the courts of the Province of Ontario and further agrees to commence any litigation which may arise hereunder in the courts located in the Judicial District of York, Province of Ontario.
If this EULA was acquired outside the United States, then local law may apply.
Should you have any questions concerning this EULA, please contact the MANUFACTURER of your SYSTEM.
U.S. GOVERNMENT RESTRICTED RIGHTS
The SOFTWARE and documentation are provided with RESTRICTED RIGHTS. Use, duplication, or disclosure by the Government is subject to restrictions as set forth in subparagraph (c)(1)(ii) of the Rights in Technical Data and Computer Software clause at DFARS 252.227-7013 or subparagraphs (c)(1) and (2) of the Commercial Computer Software—Restricted Rights at 48 CFR 52.227- 19, as applicable. MANUFACTURER is Microsoft Corporation/One Microsoft Way/Redmond, WA 98052-6399.

- 7 -

- 8 -
2.0 Setup Wizard
The Setup Wizard is used for the terminal's initial setup. The wizard runs when:
• In "Terminal Properties" dialog box select "Reset the terminal to factory-default property settings" to restart the terminal.
You can use the Setup Wizard to set the basic terminal network configuration and display parameters. Any changes on the basic setup you made can be changed later by using the “Terminal Properties" dialog box. You can launch this dialog box by pressing the [F2] key at anytime when you switch to "Connection Manager" window. Please refer to "Configure Terminal Properties".
There are seven dialog boxes, as below, for the Setup Wizard process.
• Click “Next” or “Accept” buttons to display the next dialog box in sequence.
• Click “Back” button to return to the previous dialog box.
• Click “Cancel” button to quit and display the Terminal's Connections Manager.
Welcome
This dialog box shows product information.

- 9 -
EULA (End User License Agreement)
Please read the license agreement carefully.
Setup Display, Printers and Network
Display Settings: Refer to the section 3.7
Network Settings: Refer to the section 3.11
Printer Settings: Refer to the section 3.12
Terminal Name: Enter the terminal name which can be recognized by your server. The maximum length of the terminal name is 15 characters due to server limitation.

- 10 -
Finish
This dialog box is informational.
• Click Finish, to apply your selections and quit the Setup Wizard. • Click Back, to return to the previous dialog box.

- 11 -
3.0 Terminal Properties (Control Panel)
Same as the PC, the terminal provides powerful control panel. Using the Terminal Properties Dialog Box, you can setup all of the terminal properties according to your application requirement.
In the WBT Shell Mode, pressing the [F2] key in "Connection Manager" window to invoke “Terminal Properties” dialog box.
In the Desktop Shell Mode, moving the mouse to "Start Settings Control Panel" and click it, to invoke “Control Panel” dialog box.

- 12 -
3.1 System
The System Information sheet provides the terminal basic hardware configuration, such as product ID, memory configuration, Ethernet Mac address and software version numbers.
• OEM Software Version
This is the terminal firmware version. It is an important information while you contact to your supplier for after service, such as technical support and free software upgrade.
• Microsoft Windows CE
This is the version number of Microsoft Windows CE.
• Terminal Name
Enter the terminal name which can be recognized by your server. The maximum length of the terminal name is 15 characters due to server limitation.
• Reset the terminal to factory-default property settings
Click on this check box to reset the terminal to its factory default setting.
• Ok and Close
Click on “Ok” or "☒" button to quit the dialog box.

- 13 -
3.2 Desktop Style The terminal provides three different operation styles which cater to user’s personal favor and application requirement.
• WBT Shell Mode
The WBT Shell Mode keeps the traditional Windows Based Terminal operation style. With the WBT standard hot key, user can easily switch connections. And it has higher efficiency due to simple and smaller shell size.
• Desktop Shell Mode
The Desktop Shell Mode has more fancy operation style same as normal PC. Most of PC user may be used to this mode. In this mode, user can download personal wallpaper.
• Kiosk Mode
This mode is designed for intranet application. User can preset a default home page and then browse internet application. Press “Ctrl + Alt + End” to quit the Kiosk Mode.
3.3 Options
3.3.1 Desktop
• Enable Shutdown
The terminal provides software shutdown feature and set this feature enable as factory default. But if your application does not allow user to shutdown the terminal, then please disable the check box. (Factory default: Enable)
• Enable IE
The terminal provides Internet Explorer and set this feature enable as factory default. But if your application limits the user to use the Internet Explorer, then please disable the check box. (Factory default: Enable)
- 14 -
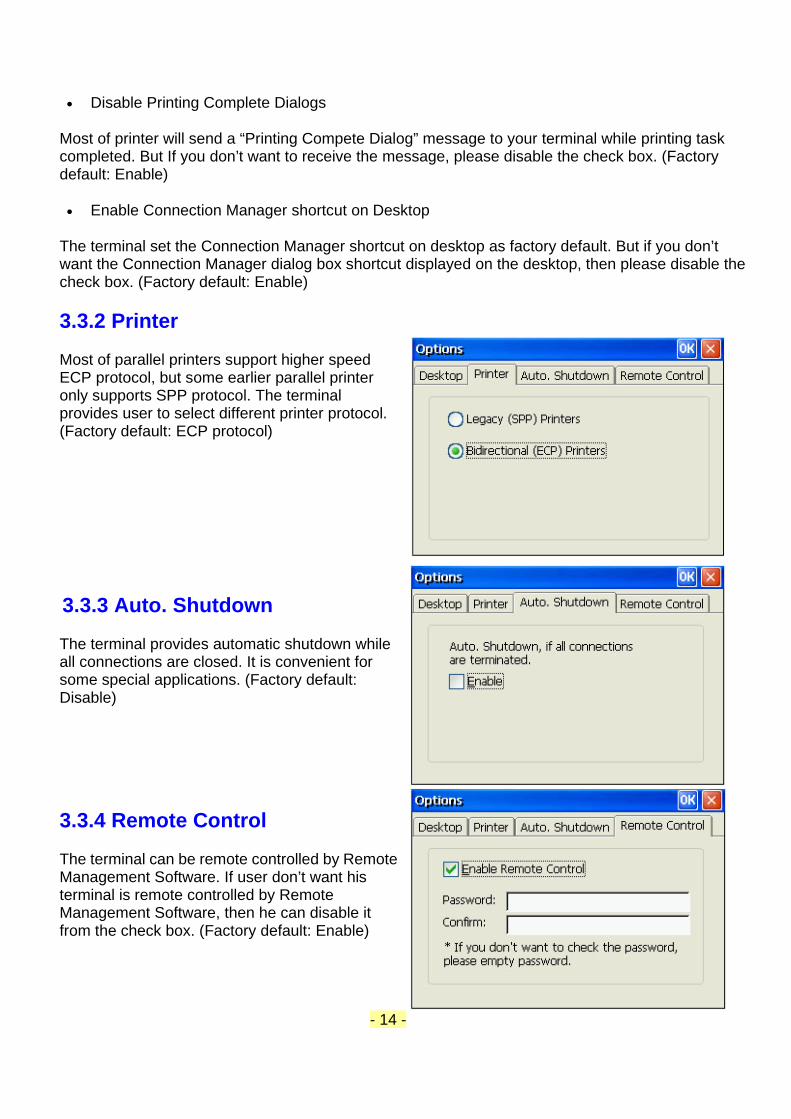
• Disable Printing Complete Dialogs
Most of printer will send a “Printing Compete Dialog” message to your terminal while printing task completed. But If you don’t want to receive the message, please disable the check box. (Factory default: Enable)
• Enable Connection Manager shortcut on Desktop
The terminal set the Connection Manager shortcut on desktop as factory default. But if you don’t want the Connection Manager dialog box shortcut displayed on the desktop, then please disable the check box. (Factory default: Enable)
3.3.2 Printer
Most of parallel printers support higher speed ECP protocol, but some earlier parallel printer only supports SPP protocol. The terminal provides user to select different printer protocol. (Factory default: ECP protocol)
3.3.3 Auto. Shutdown
The terminal provides automatic shutdown while all connections are closed. It is convenient for some special applications. (Factory default: Disable)
3.3.4 Remote Control
The terminal can be remote controlled by Remote Management Software. If user don’t want his terminal is remote controlled by Remote Management Software, then he can disable it from the check box. (Factory default: Enable)

- 15 -
3.4 RDP Settings
3.4.1 RDP Local Resources
Using the RDP Local Resources tab, you can configure terminal's remote computer sound, local devices and RDP colors.
• Remote computer sound
Bring to this computer -- Mapping the audio (sound) from the server to the terminal.
Do not play – Do not pay audio (sound) on both client and server. It can reduce the network traffic and server loading.
Leave at remote computer -- Leave the audio at remote server, does not mapping the audio (sound) from the server to the terminal.
• RDP Colors Setting
There is two RDP sessions color setting, 256 colors and High Color(16 bit). Select 256 colors, you may get higher connection speed, and select high color, you can get higher image quality. By default High Color(16 bit) is activated.
• Local devices
Disk drivers -- Enable local USB port mapping. It supports USB Disk drivers, such as USB FDD, HDD, Flash Disk and CDROM.
Printers -- Enable local parallel port mapping. It supports both parallel printers from LPT1 and USB printers from USB port.
Serial ports -- Enable local serial ports mapping.
Smart cards -- Enable local smart card mapping, if any.
• Keyboard
Remote Computer – The “ALT+TAB” function apply to remote RDP server, it doesn’t work on local thin client.
Local Device -- The “ALT+TAB” function apply to local thin client only, it doesn’t map to remote RDP server..

- 16 -
3.4.2 RDP Experience
Using the RDP Experience tab, you can choose your connection speed to optimize performance.
• Modem (56 Kbps)
If you are using an external modem, you can select this option as default.
• BroadBand (128 Kbps ~ 1.5 Mbps)
If you are using a broad band connection, you can select this option as default.
• LAN (10 Mbps or higher)
If you are using the high speed LAN, you can select this option as default.
• Custom
You can select all options by yourself. By default Custom is selected.
• Reconnect if connection is dropped
Enable this check box, the terminal will automatic make its RDP connections while the RDP connections are dropped. The terminal enables this feature as factory default.

- 17 -
3.5 ICA Settings
The Global ICA Client Settings dialog box contains the following tabs:
The Default Hotkeys tab, where you can define alternative key combinations for system hotkeys, See "Configuring Hotkeys" for more information.
The Preferences tab, where you can control the default window and settings used for new connection entries, See "Configuring Global Preferences" for more information.
The Server Location tab, where you can configure Business Recovery options, See "Configuring Server Location and Business Recovery" earlier in this chapter for more information.
The Firewall Settings tab, where you can configure the client to use a SOCKS proxy and alternate address remapping, See "Configuring Firewall Settings" earlier in this section for more information.
3.5.1 Configuring Hotkeys
The ICA Windows CE Client provides users with hotkeys that can be used during ICA sessions to control various functions. Some hotkeys control the behavior of the ICA Windows CE Client itself while others emulate standard Windows hotkeys. When you want to use a Microsoft Windows key combination during a session, use the mapped hotkey instead. The following table lists the default ICA Windows CE Client hotkeys.
Name Value Description
Status Dialog CTRL+6 Displays ICA Client connection status. Close Session CTRL+2 Disconnects the ICA Client from the MetaFrame server
and closes the client window on the local desktop. Using this hotkey leaves the ICA session running in a disconnected state on the MetaFrame server. If you do not want to leave your session running in a disconnected state, log off instead.
ESC CTRL+3 Gives you the functionality of an ESC key on your device. CTRL-ALT-DEL CTRL+4 Displays the Windows NT or Windows 2000 Security
dialog box on the MetaFrame XP server. CTRL-ESC CTRL+5 On MetaFrame XP servers, the Windows Start menu is
displayed. ALT-ESC CTRL+7 This hotkey cycles the focus through the minimized
icons and open windows of applications running in your ICA session.
ALT-TAB CTRL+8 This hotkey cycles through all applications in the ICA session. A popup box appears and displays the programs as you cycle through them. The selected application receives keyboard and mouse focus.
ALT-BACKTAB CTRL+9 Like the ALT+TAB hotkey, this key sequence cycles through applications that are open in the ICA session, but in the opposite direction. The chosen application receives keyboard and mouse focus.

- 18 -
To change the default hotkeys
1. From your Windows-based terminal device, double click the ICA Settings of Control Panel to open the Global ICA Client Settings dialog box.
2. On the Hotkeys page, use the lists of keys to customize the default hotkey key sequences. 3. Click OK to save your changes.
3.5.2 Configuring Global ICA Preferences
The following settings are configured in the global Preferences tab:
Default Window Colors. Select 16, 256, Thousands by clicking the appropriate radio button. When using a low-bandwidth connection, 16 color may provide better performance.
Serial Number. This is the serial number of your ICA Client software. This number is only necessary when you are using the ICA Windows CE Client with a product such as WINFRAME Host/Terminal, which requires each ICA Client to have a Citrix PC Client Pack serial number. If a serial number is required, you must enter it exactly as it appears on the Serial Number card. The serial number is not used when connecting to MetaFrame servers.
Program Neighborhood Agent. The Program Neighborhood Agent allows users to connect without using a Web browser to a server running the Web Interface and access all published applications in the server farm. Users do not have to manually configure a connection to each application as they do with Connection Manager. The Program Neighborhood Agent also provides single sign-on: when users log on at the start of a session, they do not have to supply their logon credentials again during that session, even if they connect to several different applications. You can update server URLs and configure ICA session settings using the Program Neighborhood Agent, and you can also choose which, if any, of these settings your users can access and modify. To use the Program Neighborhood Agent: 1. You must ensure that the configuration file on the server has suitable settings for your users.
Use the Program Neighborhood Agent Administration tool to check the default settings and change them if necessary.
2. Users who wish to connect using Program Neighborhood Agent then need to enable it on their client device and customize the settings if they wish.
3. Once users have the settings they require, they connect to the relevant server URL, and are

- 19 -
presented with a list of the available applications.
To change global preferences
1. From your Windows-based terminal device, double click the ICA Settings of Control Panel to open the Global ICA Client Settings dialog box.
2. Click the Preferences tab.
3. Make the desired changes. 4. Click OK to save your changes.
3.5.2.1 Configuring Settings on the Server The Program Neighborhood Agent configuration settings are stored on the server in a file called Config.xml. You edit this file using the Program Neighborhood Administration tool (Admin tool), which provides an easy-to-use graphical interface to the files parameters. You can modify default settings for all users. You can allow or deny your users the ability to: 1. Connect to a different server URL 2. Determine their own screen color depth and audio quality When a user enables the Program Neighborhood Agent on the client device and connects to the server URL, the client reads the configuration data from the server. The settings you configure using the Admin tool affect all users of this configuration file. The options and their settings are displayed in the client devices Properties dialog box, which users access through the Control Panel. Users need to disable then re-enable the Program Neighborhood Agent before the client recognizes any change to the configuration file. CAUTION The settings in the configuration file are global; the settings and any changes you make to them affect all users connecting to the file. To access the Program Neighborhood Agent Admin tool, connect to http://servername/Citrix/PNAgentAdmin/ on your server running the Web Interface.

- 20 -
The Program Neighborhood Agent Admin tool enables you to specify:
• Which tabs users see in their Properties dialog box.
Users can see a maximum of two tabs in the Properties dialog box: Server and ICA Options. The Server tab allows users to select the server URL to which they want to connect. The ICA Options tab allows users to select the screen color depth, and audio quality for a session. To hide or display a tab, use the Client Tab Control option in the Program Neighborhood Agent Admin tool. Note that to hide or display the ICA Options tab, you select Session Options within the Client Tab Control option.
• Server connections.
To specify the URL to which users can connect, use the Server Settings option in the Program Neighborhood Admin tool.
• Whether or not users can save their passwords.
By default, users who are prompted for credentials can save their password. To disable this function, select the Logon Methods option and clear the Allow user to save password check box.
• Whether or not users can modify their screen color depth and sound quality.
To define which settings are available to users, use the Session Options option in the Program Neighborhood Agent Admin tool. The preferences users set for color depth and sound quality affect the amount of bandwidth the ICA session consumes. To limit bandwidth consumption, you can force the server default for some or all of the options on this tab. This removes all settings for the corresponding option, other than Default, from the interface. Note If the server specified in the URL is configured to use the Secure Gateway for MetaFrame, client devices need an SSL root certificate for the server.
3.5.2.1 Configuring Settings on the Client Device This section describes how to modify Program Neighborhood Agent settings on the client device. These tasks can be carried out by the user.
• Enabling the Program Neighborhood Agent
1. Open the Global ICA Client Settings dialog box according to the instructions for your Windows-based terminal, then select the Preferences tab.
2. Select the Enable PNAgent check box. 3. Enter your logon credentials. Depending on how the Program Neighborhood Agent has been
configured on the server, you may be given the option to save your password. If you select this option, you are not prompted for your password again until the next time you change it. If you do not select this option, you are prompted for your password each time you connect or reboot your terminal.

- 21 -
Note The only logon mode available is Prompt User, which appears as a selected and dimmed out option on the Server tab. This means that users are prompted to enter their logon credentials at the start of each session.
• To modify screen color depth and sound quality
1. Enable the Program Neighborhood Agent as described in .Enabling the Program Neighborhood Agent.
2. Click PNAgent Settings. 3. Select the ICA Options tab. 4. Make the desired configuration changes. Depending on how Program Neighborhood has
been configured on the server, you may be able to set preferences for the screen color depth and sound quality of ICA sessions.
• To change the server URL
The Program Neighborhood Agent requires the URL to a configuration file on the server running the Web Interface. This file contains the information the Program Neighborhood Agent needs for users to access remote applications on a local device. 1. Enable the Program Neighborhood Agent as described in .Enabling the Program
Neighborhood Agent. 2. Click PNAgent Settings. 3. Select the Server tab. 4. The Server tab displays the currently selected URL. Click Change, then enter the new
server URL. 5. To apply the update and return to the Server tab, click Update. To cancel the operation, click
Cancel.
3.5.2.1 Accessing Applications Using the Program Neighborhood Agent 1. Enable the Program Neighborhood Agent as described in .Enabling the Program
Neighborhood Agent. 2. Click PNAgent Settings. 3. On the Server tab, select the server URL to which you want to connect, then click Update. 4. Enter your logon credentials.The list of available applications appears in the Connection
Manager dialog box. 5. To open an application, select it on the list, then click Connect.

- 22 -
3.5.3 Configuring Global ICA Server Location
Server location (also called server browsing) provides a method for a user at a network-connected Citrix ICA client to view a list of all Citrix servers on the network, and a list of all published applications.
Tip Set a specific server address for the Citrix server that functions as the master ICA Browser when your network configuration uses routers or gateways, or to eliminate broadcasts on your network. Business recovery provides consistent connections to published applications in the event of a master ICA Browser server disruption. You can define up to three groups of Citrix servers to which you want to connect: a primary and two backups. Each group can contain from one to five servers. When you specify a server group for your client, the client attempts to contact all the servers within that group simultaneously, and the first server to respond is the one to which you connect.
On the ICA Windows CE Client, business recovery settings apply to all connection entries.
To set Business Recovery options for all connection entries:
1. Open the Global ICA Client Settings dialog box. 2. Click the Server Location tab. 3. Select Use HTTP server location if your firewall restricts UDP broadcasts. This setting
enables the client to retrieve a list of all Citrix servers on the network directly from this server using TCP. If you do not select Use HTTP server location, the client obtains the list using UDP. If your Citrix server is behind a firewall, you can use this setting to avoid the UDP broadcast.
4. In the Server Group field, select the group that you want to configure. The Server Group field lets you create lists of specific servers that you want to designate as primary and backup servers for connecting to published applications. Use this field to designate whether the servers entered in the Address List field belong to your Primary, first backup (Backup 1), or second backup (Backup 2) group.
5. Click Add to add a server to the selected group. The Add Server Address dialog box appears.
6. Enter the name or address of a Citrix server. If you selected Use HTTP server location in Step 3, you need to enter the server address and the port to use. Click OK.
7. Add more servers as necessary. Click OK to save your changes.

- 23 -
3.5.4 Configuring Global ICA Firewall Settings
Configuring the ICA Client to Use a SOCKS Proxy
If you are using a SOCKS proxy server to limit access to your Citrix servers, you must configure a SOCKS proxy server to handle connections between clients and the server. You can place the proxy server on either side of the firewall, or in some situations, on both sides of the firewall.
If your network is using a SOCKS proxy server, you must configure the ICA Client to connect to Citrix servers through it. You can configure a default SOCKS proxy for all connections or a SOCKS proxy with a specific connection entry.
To configure a default SOCKS proxy server
1. Open the Global ICA Client Settings dialog box. 2. Click the Firewall Settings tab.
3. Click Connect via SOCKS proxy. 4. In the Address of proxy to use box, enter the SOCKS proxy server’s IP address or DNS
name. 5. In the Port box, enter the proxy server’s port number (if different than 1080). 6. Click OK to save your changes.
Note: If you configure a default SOCKS proxy, you must specify at least one server in the Server Location tab for server and published application browsing to work. See "Configuring Server Location and Business Recovery" earlier in this chapter for more information.
To configure a SOCKS proxy for a specific connection entry
1. In the Connection Manager dialog box, click the Connections. 2. Click the connection entry that you want to change and click Edit. The Edit Connection
Details dialog appears. 3. Click the Firewall Settings tab. 4. Click Connect via SOCKS proxy. 5. In the Address of proxy to use box, enter the SOCKS proxy server’s IP address or DNS
name. 6. In the Port box, enter the proxy server’s port number (if different than 1080). 7. Click OK to save your changes.

- 24 -
• Configuring Alternate Address Translation
If the ICA Client is outside a firewall that uses address remapping, you must configure the ICA Client to use the alternate address returned by the master ICA Browser. This is necessary even if you are not using a SOCKS proxy server.
Note: You must also use the ALTADDR utility to manually set the alternate address for each Citrix server. See the Command Reference appendix of either the MetaFrame Administrator’s Guide or the WINFRAME System Guide for more information.
To use alternate address translation for all connection entries
1. Open the Global ICA Client Settings dialog box. 2. Click the Firewall Settings tab. 3. Click Use alternate address for firewall connection. 4. Click OK to save your changes.
Note: If you set alternate address translation for all connection entries, it cannot be disabled for specific connection entries.
To use alternate address translation for a specific connection entry
1. Click the name of the connection entry that you want to change. 2. Click Edit to display the Edit Connection Details dialog box. 3. Click the Firewall Settings tab. 4. Click Use alternate address for firewall connection. Click OK to save your changes.

- 25 -
3.6 ICA Options Settings
• Local Disk driver mapping
Enable local USB disk drivers mapping. It supports USB FDD, HDD, Flash Disk and CDROM.
• Enable Mouse Timer Settings
Enable and select the mouse even timer.
• Scroll Speed
Select the scroll even speed.

- 26 -
3.7 Display Settings
Using the Display Properties sheet, you can configure the terminal's display screen, screen saver and wallpaper settings.
3.7.1 Display
The following table discusses the functions of the Display tab.
• Desktop Area and Refresh Frequency :
Using the scroll list, you can select the terminal display resolution.
Using the "Test resolution" button, you can preview the image selected on the scroll list.
• Enable Power Saving
Click on the check box to enable the power saving features. By default this function is activated.
• Screen Saver
Click on this ratio button to enable the screen saver. By default this function is activated.
There is two screen saver pattern, Windows CE logo and blank screen. You can select one of them. By default the Windows CE logo pattern is activated. Then you can adjust the amount of time the screen saver will active.
Using the "Test" button, you can preview the "Screen Saver" image for 3 seconds.
• Turn Off Monitor
Click on this ration button to enable turn-off monitor by disabling synchronization signal. By default this function is inactivated.
- 27 -
You can adjust the time period which the feature will be actived.
Using the "Test" button, you can preview the "Turn Off Monitor" image for 3 seconds.
• Display Driver Colors
It list how many colors the hardware platform can support. For different hardware platform, may have different display capability. In general, the terminal supports, 256 colors(8 bits), High Color(16 bits), True Color(24 bits) and Full Color(32 bits). By default, the High Color(16 bits) is activated.
• Password Protection
Using the screen saver password, you can avoid someone to use your terminal while you leave your office. To change password, just enable this check box and press “Modify Password” button.
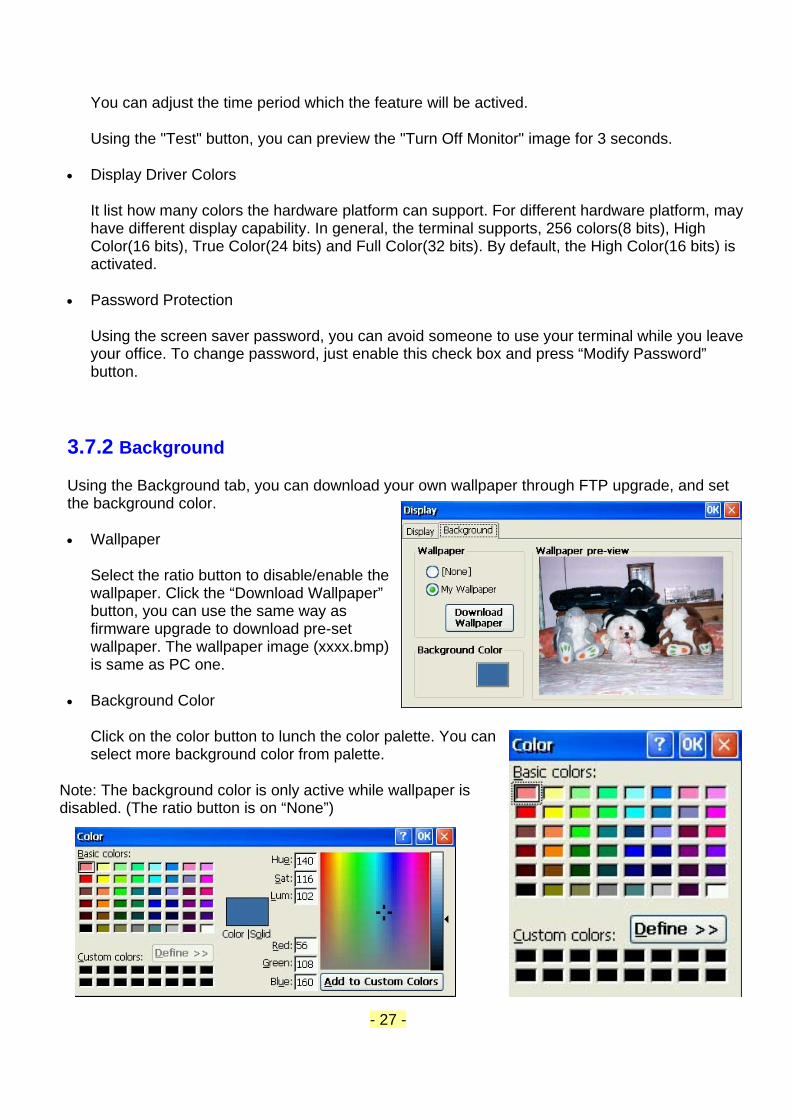
3.7.2 Background
Using the Background tab, you can download your own wallpaper through FTP upgrade, and set the background color.
• Wallpaper
Select the ratio button to disable/enable the wallpaper. Click the “Download Wallpaper” button, you can use the same way as firmware upgrade to download pre-set wallpaper. The wallpaper image (xxxx.bmp) is same as PC one.
• Background Color
Click on the color button to lunch the color palette. You can select more background color from palette.
Note: The background color is only active while wallpaper is disabled. (The ratio button is on “None”)

- 28 -
3.8 FTP Update Properties Settings
Using the Update Properties Sheet, you can update your terminal's firmware (i.e. software in ROM). For more information, please refer to "Firmware Upgrade Utilities" section.
• Server Name
It is the name or IP address of the server which has the new version firmware.
• Path Name
It is the path directory of new version firmware which you want to upgrade.
• File Name
It is the file name of new version firmware which you want to upgrade.
• User Name
It is the user name which can be recognized by the server.
• Password
It is the preset password which can be recognized by the server.
- 29 -
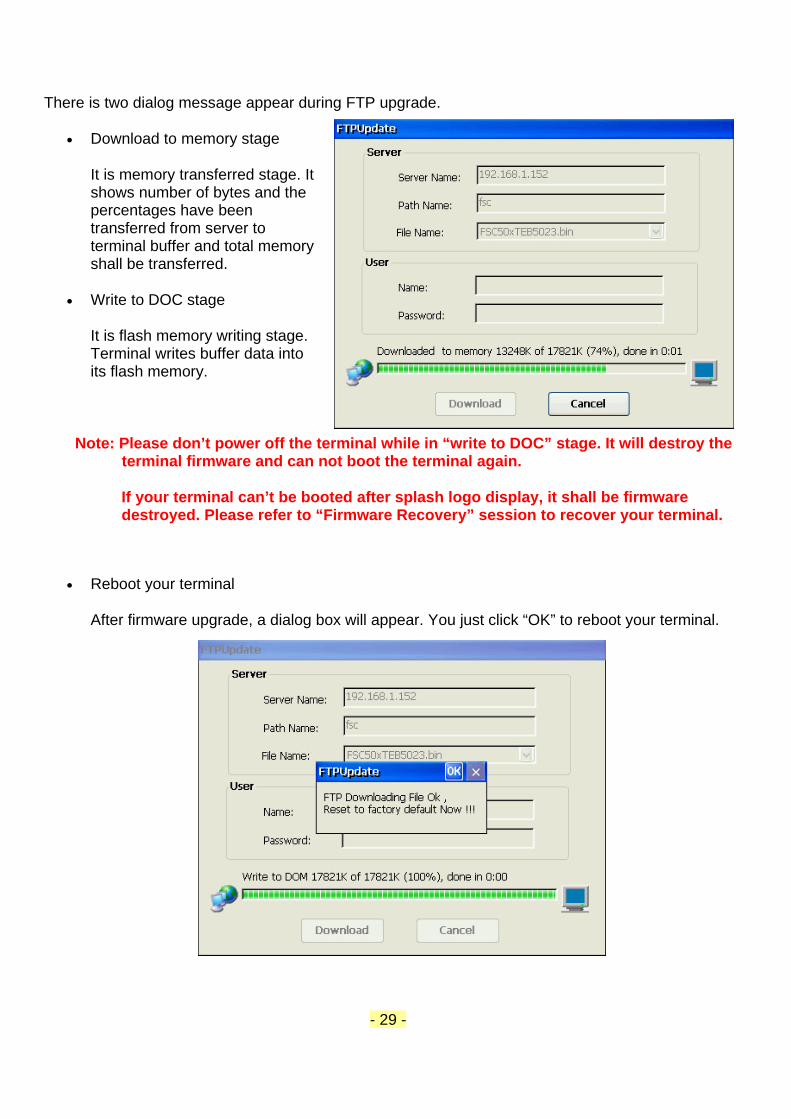
There is two dialog message appear during FTP upgrade.
• Download to memory stage
It is memory transferred stage. It shows number of bytes and the percentages have been transferred from server to terminal buffer and total memory shall be transferred.
• Write to DOC stage
It is flash memory writing stage. Terminal writes buffer data into its flash memory.
Note: Please don’t power off the terminal while in “write to DOC” stage. It will destroy the terminal firmware and can not boot the terminal again.
If your terminal can’t be booted after splash logo display, it shall be firmware destroyed. Please refer to “Firmware Recovery” session to recover your terminal.
• Reboot your terminal
After firmware upgrade, a dialog box will appear. You just click “OK” to reboot your terminal.

- 30 -
3.9 Internet settings
The Internet Explorer 6.0 feature for Microsoft Windows CE5.0 provides an HTML/DHTML parsing and rendering engine, a browser control host, a simple browser UI, television-style navigation, and multiple-language support. The browser control host and HTML engine are comparable in functionality to that of Microsoft Internet Explorer 6.0.
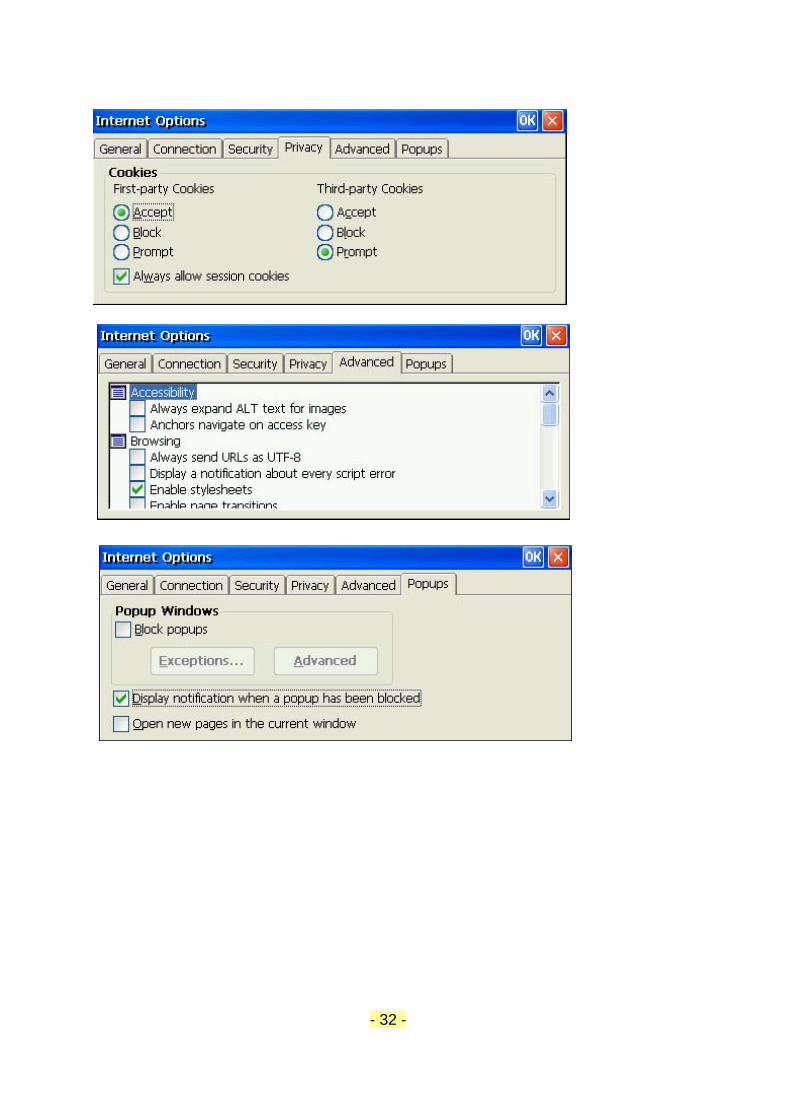
Using the Web properties sheet, you can configure Internet explorer settings. This property sheet includes General, Connection, Security, Privacy, Advanced and Popups tabs.
• Start Page -- Set the Home page • Search Page -- Set the Search page • Cache Size – Set the Cache memory size of Internet explorer • Clear Cache & History – Clear Internet explorer cache and history information
• Use LAN (no autodial) & Autodial name
If you do not have dial-up connection for the Internet explorer, please enable this check box. If you have it as default or option, please set the default dial name on the “autodial name” field.
• Access the Internet using a proxy server
If your terminal connects to the Internet through a proxy server, you have to enable the "Access the Internet using a proxy server" check box, and then type the proxy server name (or proxy server IP address) and port number. Otherwise, you have to disable the check box.

- 31 -
Setting below ActiveX controls and plug-ins to be “Disable”, “Enable” or “Prompt”.
1. ActiveX controls and plug-ins
• Script ActiveX controls marked safe for scripting. • Initialize and script ActiveX controls not marked as safe. • Run ActiveX controls and plug-ins
2. ActiveX controls and plug-ins
• Allow paste operations via script • Active scripting
3. Miscellaneous
• Display mixed content • Allow META Refresh • Navigate sub-frames across different domains • Submit non-encrypted form data • Access data sources across domains
- 32 -

- 33 -
3.10 Touch Panel Setup
The terminal provides both Comport and USB touch screen.
You can select one from the list. Before you use the touch panel, please do the Calibration first.
3.10.1 ELO Touch setup
• Connection Port and Baud rate setting
Select the COM port which your touch panel is connected to. Select the connection speed of the COM port.
You have to calibrate your touch panel when it is installed at first time or it is out of scale for some reason.
Touching the screen is equivalent pressing and releasing the mouse button.
3.10.2 USB Touch Screens setup
The “Calibrate” button will active while the USB touch screen is connected and the “Enable Comport TouchScreen” isn’t checked.
Touching the screen is equivalent to pressing and releasing the mouse button.
Touching the screen is equivalent pressing and releasing the mouse button.
Note: The terminal supports ELO and eTurbo USB Touch Screens so far.

- 34 -
3.11 Network Settings
The Network Setting Dialog Box lets you ether to enable a DHCP addressing or to specify an IP address.
• Obtain an Address from a DHCP Server:
Click on the radio button to enable DHCP addressing.
• Specify an IP Address:
Click on the radio button to enable the following three fields for a specific IP address setting.
• IP Address
Enter a static IP address in this field.
• Subnet Mask
Enter the subnet mask of the IP address.
• Gateway
Enter the gateway of the IP address.

- 35 -
• Keep current IP address, if DHCP fails
Enable this check box, the terminal can keep the previous IP address when DHCP server fails.
• TCP Keep Alive Time
If your terminal is connecting to a remote server through routers, you may need more TCP alive time to wait information. This feature allows you to setup different alive time according to your application.
• Client IP Address
Click on the "Client IP Address" check button to know the Client information, including Client name, IP address, subnet mask, gateway, DHCP server, DNS and WINS.
• Ping IP Address
Click on the "Ping IP Address" to display the Network State dialog box. You can ping the name or IP of a host connected on the network. You even can ping an web site through the gateway.
You can setup how many times you want to ping for a ping task. Default is 6 times. And you can setup the timeout value of host response for different network configuration. The default is 2 seconds.

- 36 -
• Network Speed
The terminal provides several connection speed for different network application. You can refer to your HUB and Router specification to select proper one.
3.11.1 Advanced Network Settings
The Advanced Network Settings dialog box displays when click on the "Advanced Network" button.
• Enable DNS
Click on the check box to enable the following three fields for the DNS setting.
• Default Domain
Enter the default domain name in this field.
• Primary Server IP Address
Enter the primary DNS server IP address in this field.
• Secondary Server IP Address

- 37 -
Enter the secondary DNS server IP address in this field.
• Enable WINS
Click on the check box to enable the following two fields for the WINS setting.
• Primary Server IP Address
Enter the primary WINS server IP address in this field.
• Secondary Server IP Address
Enter the secondary WINS server IP address in this field
• Click on "OK" button to save the changes and restart the terminal.
• Click on "Cancel" button to quit the dialog box without saving changes.
3.11.2 Global ICA Client Settings
The global settings are accessed from the Global ICA Client Settings dialog box. This is usually accessed with other Terminal property settings on your terminal. The key combination used to display the properties will be in the documentation supplied by your Windows CE terminal manufacturer. It is usually a function key such as F2.
To change the global settings
1. Open the Global ICA Client Settings dialog box according to the instructions for your Windows-based terminal device.
2. Make the desired changes. 3. Click OK to save your changes.
The Global ICA Client Settings dialog box contains the following tabs:
The Default Hotkeys tab, where you can define alternative key combinations for system hotkeys, See "Configuring Hotkeys" for more information.
The Preferences tab, where you can control the default window and settings used for new connection entries, See "Configuring Global Preferences" for more information.
The Server Location tab, where you can configure Business Recovery options, See "Configuring Server Location and Business Recovery" earlier in this chapter for more information.

- 38 -
The Firewall Settings tab, where you can configure the client to use a SOCKS proxy and alternate address remapping, See "Configuring Firewall Settings" earlier in this section for more information.
The PNLite tab, where you can enable and configure PNLite mode. In PNLite mode, a list of available published applications on the network is "pushed" to the ICA client and displayed in the Connection Manager dialog box. This means the user need not configure each connection entry manually. See "PNLite Mode" earlier in this chapter for more information.
• Configuring Hotkeys
The ICA Windows CE Client provides users with hotkeys that can be used during ICA sessions to control various functions. Some hotkeys control the behavior of the ICA Windows CE Client itself while others emulate standard Windows hotkeys. When you want to use a Microsoft Windows key combination during a session, use the mapped hotkey instead. The following table lists the default ICA Windows CE Client hotkeys.
Name Default Value Description Status Dialog CTRL+6 Displays ICA Client connection status.
Close Session CTRL+2
Disconnects the ICA Windows CE Client from the Citrix server and closes the client window on the local desktop. Using this hotkey leaves the ICA session running in a disconnected state on the Citrix server. If you do not want to leave your session running in a disconnected state, log off instead.
Esc CTRL+3 Provides the functionality of an ESC key on your terminal.
CTRL-ALT-DEL CTRL+4 Displays the Windows NT Security dialog box on a MetaFrame for Windows server.
CTRL-ESC CTRL+5 On MetaFrame for Windows servers, the Windows Start menu is displayed. On WINFRAME servers, this hotkey displays the Task List.
ALT-ESC CTRL+7 This hotkey cycles the focus through the minimized icons and open windows of applications run in your ICA session
ALT-TAB CTRL+8 This hotkey cycles through all applications in the ICA session. A pop-up box appears and displays the programs as you cycle through them. The selected application receives keyboard and mouse focus.
ALT-BACKTAB CTRL+9 Like the ALT+TAB hotkey, this key sequence cycles through applications that have been opened in the ICA session, but in the opposite direction. The chosen application receives keyboard and mouse focus.

- 39 -
To change the default hotkeys
1. Display the Global ICA Client Settings dialog box according to the instructions for your Windows-based terminal device.
2. On the Hotkeys page, use the lists of keys to customize the default hotkey key sequences.
3. Click OK to save your changes.
• Configuring Global Preferences
The following settings are configured in the global Preferences tab:
Default Window Colors. In the Window Colors box, select the color depth you require. When using a PPP connection, 16 color mode may provide better performance. If the window options specified exceed the capabilities of the client hardware, the maximum color depth supported by the Windows CE device are used instead.
Note: The options to select Thousands or Millions of colors are not available if your device is not capable of high color display.
Serial Number. This is the serial number of your ICA Client software. This number is only necessary when you are using the ICA Windows CE Client with a product such as WINFRAME Host/Terminal, which requires each ICA Client to have a Citrix PC Client Pack serial number. If a serial number is required, you must enter it exactly as it appears on the Serial Number card. The serial number is not used when connecting to MetaFrame servers.
Client Name. This box allows you to set the name of your client device. Citrix servers use the client name to uniquely identify resources (such as mapped printers) associated with a given client device. The client name should be unique for each computer running a Citrix ICA Client.
Note: If you do not use unique client names, device mapping and application publishing may not operate correctly.

- 40 -
To change global preferences
1. Display the Global ICA Client Settings dialog box according to the instructions for your Windows-based terminal device.
2. Click the Preferences tab.
3. Make the desired changes.
4. Click OK to save your changes.
• Configuring Server Location and Business Recovery
Server location (also called server browsing) provides a method for a user at a network-connected Citrix ICA client to view a list of all Citrix servers on the network, and a list of all published applications.
Tip Set a specific server address for the Citrix server that functions as the master ICA Browser when your network configuration uses routers or gateways, or to eliminate broadcasts on your network. Business recovery provides consistent connections to published applications in the event of a master ICA Browser server disruption. You can define up to three groups of Citrix servers to which you want to connect: a primary and two backups. Each group can contain from one to five servers. When you specify a server group for your client, the client attempts to contact all the servers within that group simultaneously, and the first server to respond is the one to which you connect.
On the ICA Windows CE Client, business recovery settings apply to all connection entries.
To set Business Recovery options for all connection entries:
4. Open the Global ICA Client Settings dialog box. 5. Click the Server Location tab. 6. Select Use HTTP server location if your firewall restricts UDP broadcasts. This setting
enables the client to retrieve a list of all Citrix servers on the network directly from this server using TCP. If you do not select Use HTTP server location, the client obtains the list

- 41 -
using UDP. If your Citrix server is behind a firewall, you can use this setting to avoid the UDP broadcast.
8. In the Server Group field, select the group that you want to configure. The Server Group field lets you create lists of specific servers that you want to designate as primary and backup servers for connecting to published applications. Use this field to designate whether the servers entered in the Address List field belong to your Primary, first backup (Backup 1), or second backup (Backup 2) group.
9. Click Add to add a server to the selected group. The Add Server Address dialog box appears.
10. Enter the name or address of a Citrix server. If you selected Use HTTP server location in Step 3, you need to enter the server address and the port to use. Click OK.
11. Add more servers as necessary. Click OK to save your changes.
• Configuring Firewall Settings
Configuring the ICA Client to Use a SOCKS Proxy
If you are using a SOCKS proxy server to limit access to your Citrix servers, you must configure a SOCKS proxy server to handle connections between clients and the server. You can place the proxy server on either side of the firewall, or in some situations, on both sides of the firewall.
If your network is using a SOCKS proxy server, you must configure the ICA Client to connect to Citrix servers through it. You can configure a default SOCKS proxy for all connections or a SOCKS proxy with a specific connection entry.
To configure a default SOCKS proxy server
3. Open the Global ICA Client Settings dialog box. 4. Click the Firewall Settings tab.

- 42 -
3. Click Connect via SOCKS proxy. 4. In the Address of proxy to use box, enter the SOCKS proxy server’s IP address or DNS
name. 5. In the Port box, enter the proxy server’s port number (if different than 1080). 6. Click OK to save your changes.
Note: If you configure a default SOCKS proxy, you must specify at least one server in the Server Location tab for server and published application browsing to work. See "Configuring Server Location and Business Recovery" earlier in this chapter for more information.
To configure a SOCKS proxy for a specific connection entry
4. In the Connection Manager dialog box, click the Connections. 5. Click the connection entry that you want to change and click Edit.TheEdit Connection
Details dialog appears. 6. Click the Firewall Settings tab.
4. Follow the instructions for the procedure above beginning with Step 3.

- 43 -
• Configuring Alternate Address Translation
If the ICA Client is outside a firewall that uses address remapping, you must configure the ICA Client to use the alternate address returned by the master ICA Browser. This is necessary even if you are not using a SOCKS proxy server.
Note: You must also use the ALTADDR utility to manually set the alternate address for each Citrix server. See the Command Reference appendix of either the MetaFrame Administrator’s Guide or the WINFRAME System Guide for more information.
To use alternate address translation for all connection entries
5. Open the Global ICA Client Settings dialog box. 6. Click the Firewall Settings tab. 7. Click Use alternate address for firewall connection. 8. Click OK to save your changes.
Note: If you set alternate address translation for all connection entries, it cannot be disabled for specific connection entries.
To use alternate address translation for a specific connection entry
5. Click the name of the connection entry that you want to change. 6. Click Edit to display the Edit Connection Details dialog box. 7. Click the Firewall Settings tab. 8. Click Use alternate address for firewall connection. Click OK to save your changes.

- 44 -
3.12 Printer Settings
From the control panel properties sheet, double click the Printers icon to reach the "add printer" dialog box.
Double click on the "Add Printer" icon to reach the WBT Printer Wizard. This setup wizard provides five major steps to setup the printer.
Step1: Select the Printer Port
There are five different printing ports, COM1, COM2, LPT1, LPT2(USB) and network, for your selection.
Note: You can not see the LPT2:(USB) port on the list, if you do not connect an USB printer on the terminal.

- 45 -
Step2: Select the Printer Model
Select the printer from Manufacturers & Printers list.
Note: If your printer isn’t in the list, Please enable “User Defined” check box.
Step3: Select the Manufacture and Model
1. Your printer is on the list.
The printer you select will display on the “Printer name” field.

- 46 -
2. Your printer is not on the list.
If the printer is not in the list, please type the printer name which is exactly same as name display on the server.
3. You select a network printer
If you select a network printer, you shall type the exact printer name and network path.

- 47 -
Step4: Set Default Printer
Step5: Configure another printer

- 48 -
Step6: Completed the Printer Setup

- 49 -
3.13 ThinPrint Settings The ThinPrint enables direct printing program from the terminal to network printers. Together with Citrix MetaFrame application server software, this new feature gives a powerful solution for remote offices and wireless LAN hotspots. With this new ThinPrint Client, a print job can be delivered over the Citrix ICA protocol & Microsoft RDP protocol to the device and from there direct to the network printer through TCP/IP protocol; there is no longer a need for a print server in addition to a network printer.
To enable the ThinPrinterClient and click the setup button to reach the ThinPrint setup dialog box. You just select and fill the items you want, then you can use the ThinPrint after the terminal re-boot.
Print jobs are produced over the current printer if the printer ID can't be determined (e.g., no ID is given in the printer name).

- 50 -
• Add local port…
Click on “Add local port…” button, a local port dialog box appears. You can enter the printer name and printer port.
• Add network printer…
Click (shared) printers Double clicking one of these printers opens a panel containing two input boxes. The top one is for printer name, the bottom one for the printer's network path. OK confirms input and CANCEL cancels them. A new network printer is installed by double clicking the NET0 printer symbol in the list of printers (Illus. 3). After path, share name, and possibly user name and password have been entered and confirmed by clicking OK (Illus. 7), a printer object is created with the new name.
• Advanced settings
Click on “Ad

- 51 -
• Bandwidth:
Enter a bandwidth value which is the same or smaller than that set in .print Engine. If the value is larger or if Client Control is disabled at the server, server settings are applied. Enter 0 to retain server settings.
• Port number:
Enter here the port number where .print Client should receive incoming connections. Be sure that the TCP/IP port number is the same on both .print Client and server-side .print Engine. Otherwise, communication between the two .print components is impossible.
Note: TCP/IP Port number is of course only relevant for printing over TCP/IP. The default port number is 4000.
• Quit:
QUIT CLIENT Quits .print Client. (.print Client must be restarted before ThinPrint .print printing resumes).
• OK
Click on "OK button, all changes are applied without quitting .print Client. Some changes could first be effective after restarting print Clients.
• Cancel
Click on " x " button to quit the dialog box without saving changes.

- 52 -
3.14 Input & Volume Settings
Using the Input & Volume dialog boxes to configure your terminal's keyboard, mouse and audio volume.
• NumLock on Boot:
Using the check box, you can enable NumLock while the terminal starts up.
• Locale:
Using the scroll list, you can select a language for the keyboard.
• Volume Control:
Using this slider control, you can adjust the volume of the audio.
Using the "Mute" check box, you can disable the audio of the terminal.
• Repeat Delay:
Using the slider control, you can adjust the repeat delay of keyboard characters. Repeat Delay defines how long the same character will appear again when typed more than once.
• Repeat Rate:
Using this slider control, you can adjust the repeat rate of a keyboard character. Repeat Rate defines how quickly the same character will appear again when a key is held down.
• OK
Click on "OK button to save changes and quit the dialog box.
• Cancel

- 53 -
Click on " x " button to quit the dialog box without saving changes.
• Speed
Using the slider control, you can adjust the mouse speed. Speed defines how much distance will be changed for each mouse event.
• Mouse Settings:
Using the ratio button, you can select "Right Handed" and "Left Handed" for your convenience.
• OK
Click on "OK button to save changes and quit the dialog box.
• Cancel
Click on " ☒ " button to quit the dialog box without saving changes.

- 54 -
3.15 Date/Time Setting
To change your terminal’s time zone, Click TimeZone icon to display TimeZone dialog box.
In the timezone list, select the time zone you are currently in. If you want your terminal’s clock to adjust automatically In the timezone list, select the time zone you are currently in. If you want your computer’s clock to adjust automatically when daylight saving time changes, make sure Automatically Adjust Clock For Daylight Saving Changes check box is selected.

- 55 -
3.16 LPD Settings
The Berkeley versions of the Unix™ operating system provide line printer spooling with a collection of programs: lpr (assign to queue), lpq (display the queue), lprm (remove from queue), and lpc (control the queue). These programs interact with an autonomous process called the line printer daemon.
LPR is a a TCP-based protocol. The port on which a line printer daemon listens is 515. The terminal includes a LPD module which allows a LPR device printing data from the local printer of the terminal.
To set the LPD printer, click “LPD Setting” button. Then type the queue name and select printer port.

- 56 -
3.17 SNMP Settings Simple Network Management Protocol (SNMP) is the Internet Standard protocol for network management and part of the TCP/IP protocol suite. SNMP was developed by the Internet community to monitor and manage networks. It uses a distributed architecture that consists of managers and agents.
The SNMP agent is an SNMP application that monitors network traffic and responds to queries from SNMP manager applications. The agent also notifies the manager when significant events occur by sending a trap. An SNMP manager is an SNMP application that generates queries to SNMP-agent applications and receives traps from SNMP-agent applications.

- 57 -
3.18 Screen Keyboard Settings
The screen keyboard allows platforms that do not have a keyboard to simulate keyboard input by using an input method. It implements a software-based input panel (SIP) architecture that functions through a touch screen. For this purpose, the terminal implements a software-based input panel architecture that functions through a touch screen.
• Current input
There is two keyboards on the list. According your application, you can select either one.
• Enable Screen KB Control Panel
Enable this check box to active screen keyboard Enable/Disable button while power on. It is necessary for a touch screen & no keyboard application system. The Enable/Disable button shall be actived automatically while power on the terminal.

- 58 -
3.19 Security Settings
Using the security dialog box, you can avoid someone to change your terminal's properties.
• Password Enable
Enable this check box to active terminal's security. You shall set and confirm your password. The factory default password is "guest".
Note: The password is designed to avoid any unreasonable change to the Terminal Properties Settings. Please do NOT change the password unless you are the administrator. If you forget the password, the terminal will can not recall by itself. Please save your password carefully.
There are two methods to recall your terminal, if you forget the password.
• Contact your distributor for help. (to get a super password.) • Use the Remote Management software to recall your terminal.
• Enable Browser Terminal Properties Information

- 59 -
Enable this check box to allow user view the terminal properties, even if the password is incorrect.
• Disable Terminal Connection Configure Tab
Enable this check box to disable the configure tab of terminal connection manager.

- 60 -

- 61 -
3.20 VNC Viewer Settings
• Auto Start at startup
Auto start the VNC viewer while the terminal startup.
• VNC server
Type the server address which the VNC viewer connects to.
• Password
Type the VNC server log in password.
3.21 VNC Server Settings
• Password
Type the VNC server log in password.

- 62 -
• Start/Stop Server
Click the “Start/Stop Server” bottom to “Active/In-active” the VNC Server.
• Lunch on Startup
Auto start the VNC server feature while the terminal startup.
• Enable Remote Input
Enable/Disable the VNC server remote access.
3.22 USB Storage Management
• USB Storage Device
Allow user to Enable/Disable the USB storage device.

- 63 -
3.23 Certificates
Import certificate
View certificate

- 64 -
3.24 Taskbar and Start Menu

- 65 -
4.0 Connection Manager
On the Connection Manager dialog box, you can select either "Connections" or "Configure" dialog box to manage your terminal's network connections.
4.1 Using the Configure Dialog Box
The functions of the Configure Dialog Box are used to add, modify, delete, and configure connections.
Configure Dialog Box
The Configure properties sheet contains five basic functions. The following table identifies and describes each of them.
• Add
Click on the "Add" button to create a new connection. A new connection dialog box displays, when this button is pressed. There is four connection type at least on the list. For the different firmware version, you may have more connection types, such as text terminal emulations.

- 66 -
Please refer to "Creating A New Connection" section for more information about adding a different type connection.
• Edit
Click on the "Edit" button to edit the properties of a selected connection. Please refer to "Editing A Connection" section for more information about editing a connection.
• Delete
Click on the "Delete" button to delete a connection. When you click this button, a "Confirmation" dialog box displays. Click on "Yes" button to complete the deletion. Click on "No" to cancel the deletion.

- 67 -
• Startup:
Click on the "Startup" button to specify the connection option while the terminal startup. The "Connection Startup Dialog Box" displays after the "Startup" button is pressed. Using the "Connection Startup Dialog Box" , you can pre-set sessions automatically connect to the servers when terminal is turned on.
Connection Startup Dialog Box
• Make the selected connection your default connection.
Enable this function to use the connection you selected in the "Connection Manager" as the default connection.
• Automatically start the selected connection at startup.
Enable this function to automatically start the connection you selected in the "Connection Manager" when the terminal is turned on.
• Default connection auto-start delay time.
If you want a connection to be always the active session from a multiple auto-connection application, you must set this connection to be default connection. Pre-setting the auto-start

- 68 -
delay time allows you to make the default connection to be the active session for different application environment. The default delay time is 6 seconds.
• FailOver:
Failover provides backup connections and will auto-start while any Auto-start session is fail. For example on the below FailOver dialog box, If the auto-start connection is fail for some reason, then the terminal will automatically search and connect to the Denny (an ICA server) server. If the Denny server is fail too, then the terminal will automatically search and connect to the Neil Hsu (a RDP server), and so on. If all FailOver connections are fail, then the terminal will display error message. It is very useful for some special applications, such as banking system and POS application system.
Click on the "FailOver" button to display the "FailOver Dialog Box" .
• FialOver time out You can preset the time out (by seconds) for each failover session • => Button Add the selected connection to FailOver list • <= Button Move out the selected connection from FailOver list • Up Button Increase the selected connection FailOver priority • Down Button Decrease the selected connections FailOver priority • OK Button To quit the dialog box and save the changes • Cancel Button To quit the dialog box without any change
Failover operates as follows:
1. Failover operation is active, if the auto-start session is fail. 2. Failover pings the first connection from the FailOver list. If the ping is successful, then the
terminal automatically connect to the first backup connection. 3. If ping is not successful, then Failover pings next connection on the FailOver list, and so
on.

- 69 -
4. If no connection is made, the Failover stops and displays error message.
• OK
Click on "OK" to quit the dialog box and save the changes.
• Cancel
Click on "Cancel" to quit the dialog box without any change.
4.2 Using the Connection Dialog Box
Terminal Connection Manager / Connections Dialog Box
The functions of the connection dialog box are used to make a network connection with server.
• Connect
Click on the "Connect" button to make a network connection. You can also double-click on a selected connection in the Connection Name to make a network connection with server.

- 70 -
• End
The "End" button will be enabled when you press "[Ctrl] + [Alt] + [End]" at the same time from a working section. You can click on "End" button to end any active connection process listed in status field. The "End" button is disabled in the default.
• Enable/Disable Screen KB
Click on the "Enable Screen KB" to display screen keyboard. Click on the "Disable Screen KB" to disable screen keyboard.

- 71 -
5.0 Multiple Sessions
5.1 In the WBT Shell Mode
To start multiple sessions:
From a working session or the Terminal Properties dialog box, Press [Ctrl] + [Alt] + [End] to invoke the Terminal Connection Manager. Then click on another connection to start a new session from the Terminal Connection Manager.
To toggle between sessions:
• Press [Ctrl] + [Alt] + [down ] to proceed to the next session. • Press [Ctrl] + [Alt] + [up ] to proceed to the previous session.
5.2 In the Desktop Shell Mode
To start multiple sessions:
From a working session or the Terminal Properties dialog box, Press [Ctrl] + [Alt] + [End] to invoke the Terminal Connection Manager. Then click on another connection to start a new session from the Terminal Connection Manager.
To toggle between sessions:
• Press [Ctrl] + [Alt] + [down ] to proceed to the next session. • Press [Ctrl] + [Alt] + [up ] to proceed to the previous session.
5.1 In the Kiosk Mode
To start multiple sessions:
From a working session or the Terminal Properties dialog box, Press [Ctrl] + [Alt] + [End] to invoke the Terminal Connection Manager. Then click on another connection to start a new session from the Terminal Connection Manager.
To toggle between sessions:
• Press [Ctrl] + [Alt] + [down ] to proceed to the next session. • Press [Ctrl] + [Alt] + [up ] to proceed to the previous session.

- 72 -
6.0 Creating New Connections
The New Connection dialog box, as follows, allow user to create new network connections.
New Connection Dialog Box
From the pull down list bar in the dialog box, you can select the type of connection protocol you want to use to connect to a server. There are four or five selections available on the list. Click on "OK" button, when you have made your selection.
• Microsoft Remote Desktop Client
RDP (Remote Desktop Protocol) protocol, which connects to a TSE (Windows NT Terminal Server Edition) server. If you selected the RDP client, the Connection Wizard displays. Using the wizard, you can create a RDP connection. Please refer to "Create RDP Connections" for more information.
• Citrix ICA Client for Windows CE
ICA (Independent Computing Architecture) protocol, which connects to a Citrix ICA Winframe or Metaframe server. If you selected the Citrix ICA Client for Windows CE, the "Specify Connection

- 73 -
Type" dialog box displays. Using the sequence of dialog boxes, you can create an ICA connection. Please refer to "Create ICA Connections" for more information.
• Terminal Emulation
Connects to multiple terminal emulation applications. If you selected the Terminal Emulation, the "Connection Properties" dialog box displays. Using the dialog box, you can create a specific terminal emulator. Please refer to the "PowerTerm user’s guide" for more information.
Note: Terminal Emulation is an option feature, not default build-in.
• Dial-Up Client
The Dial-up Networking feature is implemented with Remote Access Service (RAS) and the Point-to-Point Protocol (PPP). Dial-up Networking allows the terminal to access network resources from a remote server. The terminal can connect to a remote access server using direct serial and infrared as well as dial-up. Please refer to the "Create Dial-UP Connections" for more information.
• Virtual Private Network
The Virtual Private Networking feature is implemented through the Point-to-Point Tunneling Protocol (PPTP). The PPTP is a network protocol that enables the secure transfer of data from a remote client to a private enterprise server, thus creating a virtual private network (VPN) by using TCP/IP-based data networks. PPTP supports multiple network protocols and can be used for virtual private networking over public and private networks. PPTP can be used to provide secure, on-demand, virtual networks by using dial-up lines, local area networks (LANs), wide area networks (WANs), or the Internet and other public TCP/IP-based networks. Please refer to the "Create VPN Connections" for more information.
• Mini-browser
The Internet Explorer is IE 5.5. It works like PC Internet Explorer, but it does not support JVM & Flash.
• Viewer
The viewer provides user through network to view files, such as Word, Excel, PowerPoint, PDF etc.
• PMail
The PMail provides user to send and receive e-mail by connecting to a POP3 or IMAP4 server. Please refer to the "Create Inbox Connection" for more information.

- 74 -
6.1 Create RDP Connections
You can use the WTS Connection Wizard to create a new RDP connection. Click the "Next" button to display the next dialog box in the sequence. Click the "Back" button to return to the previous dialog box. Click the "Cancel" button to quit this dialog box at any time. When you are finished, a new connection will be added to the Connection Name list in the Terminal Connection Manager.
There are four dialog boxes, as below, for the WTS Connection Wizard process.

- 75 -

- 76 -
6.2 Create ICA Connections
You can configure and run two types of ICA sessions: Citrix server connections and published applications.
• Citrix server connections allow you to connect to the Windows desktop of a specific Citrix server; you can run any applications available on the desktop, in any order.
• Published applications are specific applications set up by an administrator for remote users to run. When connected, you are presented with the application itself.
Note This procedure describes the simplest way to create a connection entry. When you follow these steps, you set the essential items you need to connect to a Citrix server from the Windows CE device, See "Changing a Connection Entry" for more information about how to change the other properties for a connection entry.
Note This section provides basic introduction regarding how to create an ICA connection for both network and dial-in. If you want to know more detail information about ICA operation and features, please refer to the "Citrix ICA Client Administrator's Guide", the other section of this CD User's Guide.
To create a new connection entry
1. In the Connection Manager dialog box, click the Configure tab. 2. Click Add. 3. In the New Connection dialog box, click Citrix ICA Client in the type of connection list. Click OK. 4. The Specify Connection Type dialog box appears:
Click Network Connection to make a network connection. Make sure your client device is connected to the network through the Ethernet connector. Click Next to continue. Skip to Step 6.
—or—
Click Dial-In Connection to make a dial-in connection. Make sure your modem is installed and properly configured. Click Next to continue.

- 77 -
Note The ICA Windows CE Client does not support modem callback. When using modem callback, the server hangs up on dial-in connections at logon and then dials a specified number to reconnect to the user attempting to log on. Because Windows CE contains no mechanism to answer the return call, the ICA Windows CE Client does not support modem callback for dial-in connections.
5. The Dial-In Devices page appears:
From the pull-down list, select your modem. In the Phone Number box, type the phone number of the Citrix server including the area code and country code if required. Click Next to continue. Skip to Step 9.
6. The Select a Citrix Server or Published Application page appears:
7. Click Citrix Server to connect to a server or Published Application to connect to a published application. You can click "Refresh" button to refresh the Citrix server on the network, then select the server which you want to connect to.
If your CE device is not on the same network as the Citrix server which you would like to connect to, the server name will not appear in the list (this would occur if you are on the other side of a router, across the Internet, or using RAS to connect to a remote network containing Citrix servers). In this case, click Server Location and go to the next step. Otherwise, scroll through the list and select the Citrix server or published application or type the name of the Citrix server or published application in the edit field. Click Next.

- 78 -
8. The Server Location dialog box appears:
Remote Application Manager uses the information entered in the Server Location screen to help locate available Citrix servers and published applications.
If:
• you are on another network (for example, if you are on the other side of a router, across the Internet, or connected by RAS), click Add to enter the IP address or DNS name of a Citrix server on the network that contains the Citrix server you would like to connect to. The Windows CE client uses this server to locate the list of available Citrix servers on the network.
• your network configuration cannot propagate UDP traffic (for example, if your firewall restricts UDP broadcasts), please select TCP + HTTP browser or SSL/TLS + HTTPS browser. Make sure that the list contains the IP address or name of a Citrix server on the network that contains the Citrix server you would like to connect to. The Windows CE client uses this server to locate the list of available Citrix servers on the network.
Note When you first select TCP + HTTP browser, the convention used for the default server name is ica.domainname where domainname is your TCP/IP domain name. You can change this to a specific server name/IP address or leave the default setting and map the name of a server to ica.domainname. Note that TCP/IP+HTTP server location uses a TCP connection so does not support the (Auto-Locate) function.
Click OK, then click Next.
9. The Select a Title for the ICA Connection page appears:

- 79 -
Enter a name for the connection entry. The name you choose is the name of the entry in the list of connections in Connection Manager. Click Next to continue.
10. The Specify an Application screen appears (this screen does not appear when configuring a published application connection):
In the Command Line field, enter the path and name of an application to run on the server once the logon to the Citrix server is successful. Leave this field blank to run a Windows NT desktop on the Citrix server. Working Directory lets you associate a directory with the application specified in the Command Line field. Enter the drive and path of the working directory in the Working Directory field.
For example, if the application Notepad.exe is in the C:\WTSRV directory on the Citrix server, type C:\WTSRV\Notepad.exe in the Command Line field. If you use Notepad to work on documents in the C:\My Documents directory, type C:\My Documents in the Working Directory field. When you log on to the Citrix server, Notepad begins. In Notepad, if you click the File menu, the directory C:\My Documents is displayed. Click Next to continue.
11. The Specify Logon Information screen appears

- 80 -
Type a valid username, domain, and password. If you leave these fields blank, you are prompted for your username, domain, and password when the ICA Windows CE Client connects to the Citrix server. Click Next to continue.
12. The Select Window Options screen appears
In the Window Colors field, you can set the number of colors used for the ICA Client window. There is three ratio buttons, 16, 256 and Thousands. You can select one of them and Click Next to continue.
13. The Compression, Encription, and Sound screen appears

- 81 -
Click Use Printer Configuration Utility to enable printer autoconfiguration.
Click Compress Data Stream to reduce the amount of data transferred between the ICA Windows CE Client and the Citrix server hosting the session. (If your connection is bandwidth-limited, enabling compression may increase performance. If your client device is on a high-speed LAN, you may not need compression.)
Click Enable Sound to enable sound support. Remote applications will be able to play sounds on your client. From the pull-down list, select a sound presentation quality level. High provides the greatest audio quality but should only be used when bandwidth consumption is not a concern. Medium results in less bandwidth consumption than when using High. Compression of sound data provides greater bandwidth efficiency but reduces sound quality somewhat. This value is recommended for most LAN-based connections. Low offers the most efficient use of bandwidth but also decreases sound quality severely. This value is recommended for low-bandwidth connections, including most modem connections.
Speed Screen SpeedScreen latency reduction improves responsiveness over high latency connections by providing feedback to the user in response to typed data or mouse clicks.
Note SpeedScreen will only work if the server-side SpeedScreen feature is availablhas been enabled on the Citrix server to which you are connecting.
To change SpeedScreen latency reduction settings
1. In Connection Manager dialog box, select the connection entry that you want to change. 2. Click the Options tab. 3. In the SpeedScreen field, select the setting (On, Off or Auto) you need.
• For slower connections (for example, if you are connecting over a WAN or a dial-in connection), set mode to On to decrease the delay between user input and screen display.
• For faster connections (for example, if you are connecting over a LAN), set mode to Off. • If you are not certain of the connection speed, set the mode to Auto to turn SpeedScreen
latency reduction on or off automatically depending on the latency of the connection.
Encription Level Encryption increases the security of your ICA connection. By default, basic encryption is enabled on all connections. If the Citrix server you are connecting to

- 82 -
supports advanced encryption (e.g., SecureICA services), you can use it to improve security.
To change the encryption settings for an ICA connection
1. In Connection Manager dialog box, select the connection entry you want to configure. 2. In the Properties tab, click Options. 3. Click Encryption and select the level of encryption you want to use. The default level is
Basic. Select RC5 128-bit Login Only to use encryption only during authentication.
The Citrix server must be configured to allow the selected encryption level or greater. For example, if the Citrix server is configured to allow RC5 56-bit connections, the ICA client can connect with RC5 56 or 128-bit encryption.
Note To use advanced encryption, you need to install SecureICA on your Citrix server. The Citrix server must also be configured to allow the selected encryption level or greater.
Click Next to continue.
14. The Firewall Setting screen appears
In the Firewall Setting, you can configure the client to use a SOCKS proxy and alternate address remapping.
15. Click Finish to save the entry or Cancel to exit the new connection entry dialog box without saving the entry.
Once you have created a connection entry, the name appears in the list of connections in Connection Manager.
6.3 Create Dial-Up Connections
You can use the Dial-Up Remote Connection Wizard to create a new Dial-Up connection. Click the "Next" button to display the next dialog box in the sequence. Click the "Back" button to return to the

- 83 -
previous dialog box. When you are finished, a new connection will be added to the Connection Name list in the Terminal Connection Manager.
There are four major steps, as below, for the Dial-Up Remote Connection Wizard process.
• Name: It is the connection name will be listed in the Terminal Connection Manager.
• Telephone Number: It is the phone number where you want to dial for this connection. • Device Setting for RAS Connection: You shall select correct modem type and COM port. • Dial Properties: Click on the "Dialing Properties" button to reach the "Dialing Properties"
dialog box displays.

- 84 -
• Dialing from: There is three default setting, direct line, prefix dial(0) and prefix dial(9). If you want to add location, just press "New..." button to create new one.
• Dialing Patterns: Here below is the preset dialing pattern. If you want to change the dialing pattern for each type of call, just press "Dialing Patterns..." button and edit the fields.
• Configure: Press "Configure..." button to reach device properties which allow you to change modem setting.

- 85 -
• TCP/IP Setting
• Use Server-assigned IP address: If you want to get an IP address, DNS and WINS settings from remote server, you shall enable this check box. Otherwise, you shall key in all of information on the fields.
• The TCP/IP allows user to use Slip, software & IP header compressions for different connection requirement.

- 86 -
• Automatic Logon: Using the pre-set user name and password, it allows user automatic logon the remote server without password access.
• Automatic Connection: All of the connections on the connection manager will be listed while this check box is enabled. You can select the connection which you would like automatic connection after the dial-up connection is done.
• Check "Finish" to complete the Dial-Up connection setup.

- 87 -
6.4 Create VPN Connections
You can use the VPN Remote Connection Wizard to create a new VPN connection. Click the "Next" button to display the next dialog box in the sequence. Click the "Back" button to return to the previous dialog box. When you are finished, a new connection will be added to the Connection Name list in the Terminal Connection Manager.
There are three major steps, as below, for the VPN Remote Connection Wizard process.
• Name: It is the connection name will be listed in the Terminal Connection Manager.

- 88 -
• Key in the VPN host name or IP address.
• TCP/IP Setting
• Use Server-assigned IP address: If you want to get an IP address, DNS and WINS settings from remote server, you shall enable this check box. Otherwise, you shall key in all of information on the fields.
• The TCP/IP allows user to use Slip, software & IP header compressions for different connection requirement.
• Check "Finish" to complete the VPN connection setup.

- 89 -
6.5 Create web Connections
To create a new web connection, just type the web site name and start page.
6.6 Create Inbox Connections
You can send and receive e-mail by connecting to a POP3 or IMAP4 server. Inbox contains an e-mail service for each method you use. For example, if you receive e-mail through a connection to a POP3 server and through a connection to an IMAP4 server, Inbox will contain two services: POP3 Mail and IMAP4 Mail. Each e-mail service has its own folder hierarchy with four default folders: Inbox, Outbox, Deleted (local), and Sent. The messages you receive and send through the mail service are stored in these folders. You can also create additional folders within each hierarchy. For more information on folders, see About Folders.
When connecting to a POP3 or IMAP4 server, you use a modem to connect to your Internet service provider (ISP), or use a modem or Ethernet card to connect to the local area network that your mail server is connected to. In addition to creating a connection to your ISP or network, you must create an e-mail service in Inbox. For more information, see Connecting to a Mail Server.
6.6.1 Connecting to a Mail Server
Set up a mail service
To connect to your POP3 or IMAP4 mail server, you need to set up an Inbox mail service and a remote connection to the Internet or network the mail server is connected to. For more information on setting up a remote connection.
1. Get the following information from your ISP or network administrator: POP3 or IMAP4 server name, SMTP host name, user name, password, and domain name (for network connections only).
2. Open Inbox, and select Services > Options > Services tab. 3. Select Add. 4. From the Service type list, select POP3 Mail or IMAP4 Mail. (POP3 is the most
common mail protocol for ISPs.)

- 90 -
5. Enter a unique name for the service. This name cannot be changed later. 6. Select OK. 7. Follow the steps in the Setup wizard. For more information, see the following topics:
Notes • Other mail protocols, such as the protocol used by AOL, are not supported. In
addition, services that use special authentication, such as MSN, are not supported. However, you can gain access to the Internet through these services. There may be third-party programs available that would enable you to send and receive mail through proprietary protocols. Try searching the Web on the keyword "Windows CE" to find third-party programs for your device.
• If you use the same service to connect to different mailboxes, set up and name a different service for each connection.
Set service definitions
The Mail Service Setup wizard appears after you add a service. If you are adjusting the settings of an existing service, select Services > Options, select the service you are using, and then Properties. In the Service Definition dialog box, complete the following entries as needed:
• Connection: Select the name of the connection you created to connect to the mail server. If you are receiving e-mail through a network (Ethernet) connection, Select Network Connection. If you want Inbox to use your current connection, select (none). If you have not created a connection, select Create new connection, double-tap or double-click the Make New Connection icon, and follow the instructions in the wizard. When finished, select Inbox in the Taskbar and continue setting up Inbox.
• POP3 Host (POP3 only): Enter the name of the mail server you use to receive and send messages.
• Server (IMAP4 only): Enter the name of the mail server you use to receive and send messages.
• User ID: Enter the user name or mailbox ID assigned to you. • Password: Enter the password you use to access this mail account. If you do not want
to be prompted to enter the password each time you connect, select Save password. • Domain (Windows NT): Enter your Windows NT domain name. This name is required
only when connecting to networks, such as a corporate network, that use Windows NT domain security. This is not required for most ISP accounts. If you have trouble connecting, try clearing this box.
• SMTP Host: If your mail service uses a separate server for SMTP, enter the name in the box. If you're setting up a POP3 Mail service with an ISP, the ISP must use an SMTP mail gateway.
• Return Address: By default, the return address is set to username@POP3host or username@Servername, depending on the service you are using. If this is not your e-mail address, enter the correct address in the box.
Set general preferences
If you are adjusting the settings of an existing service, select Services > Options, select the service you are using, select Properties, and then select Next. In the General Preferences dialog box, choose any of the following settings, all of which are optional:

- 91 -
• Disconnect service after actions are performed: Select to automatically disconnect from the server upon completion of all pending actions. This option minimizes connect time and cost.
• Check for new messages every: Select the time interval (in minutes) at which you want the device to check for new mail. If this option is turned off, you must check for new mail manually by selecting Services > Send/Receive Mail.
• Display a message box when new mail arrives (POP3 only): Select to be informed that new mail has arrived.
• Play a sound (IMAP4 only): Select to be informed that new mail has arrived. • Send using MIME format (POP3 only): Select to send messages with extended
characters. • Only display messages from the last 3 days: Select how many day's messages you
want downloaded.
Set Inbox preferences
If you are adjusting the settings of an existing service, select Services > Options, select the service you are using, select Properties, and then select Next twice. In the Inbox Preferences dialog box, choose any of the following options:
• Get message headers only: Select to save storage space and time by downloading only headers. You can download a full copy of the message later by selecting the message and then Services > Get Full Copy.
• Include <number> lines: Select to set the message length (approximate number of lines) that you want to download.
• Get full copy of messages: Select to receive a full copy of all messages. In addition to the message body, any options you select in When getting full copy will be downloaded. Selecting this option increases the amount of time needed to download messages.
• Only synchronize folder hierarchy under Inbox (IMAP4 only): Select to speed download time by preventing the complete download of the folder list every time you connect.
• Get meeting requests (POP3 only): Select to download and store copies of meeting requests when getting full copies of messages. This setting applies whether you have chosen to download full copies of messages by default, or if you selectively download full copies of messages by opening the message and selecting Services > Get Full Copy. Limitations apply.
• Get file attachments (POP3 only): Select to download and save message attachments when getting full copies of messages. This option may use significant RAM and slow download time. This setting applies whether you have chosen to download full copies of messages by default, or if you selectively download full copies of messages by opening the message and selecting Services > Get Full Copy.
• Get file attachments and meeting requests (IMAP4 only): Select to download and store meeting requests and message attachments when getting full copies of messages. This setting applies whether you have chosen to download full copies of messages by default, or if you selectively download full copies of messages by opening the message and selecting Services > Get Full Copy. Limitations apply.
• Only if smaller than (IMAP4 only) Select to restrict the size of the attachments you download. Set to 10K if you want to receive meeting requests only.

- 92 -
Download messages from the server
When you download messages, you need to create two connections: a remote connection and a mail server connection. The remote connection connects you to your ISP or network. The mail server connection downloads messages from your mail server to Inbox on your device. When you select Services > Connect in Inbox, Inbox starts a remote connection using the connection you specified when setting up the current mail service. If you are already connected through a remote connection other than the one you specified in the mail service, you will be asked if you want to use the current connection. If you choose not to, you will need to disconnect from the current connection before you can check for new messages.
1. Select the Services menu and make sure that the service you want to use is selected (the selected service has a bullet next to it.)
2. Select Services > Connect. The messages on your device and mail server are synchronized: new messages are downloaded to the device Inbox folder, messages in the device Outbox folder are sent, and messages that have been deleted on the server are removed from the device Inbox. Double-tap or double-click a message in the message list to open it.
3. If you read a message and decide that you need the full copy, select File > Get Full Copy while in the message window or Services > Get Full Copy while in list view. This will also download message attachments and meeting requests if you have those options selected in the Inbox Preferences dialog box. You can also choose to download full copies of messages by default.
4. When finished, select Services > Connect to disconnect. You also need to disconnect your dial-up connection by double-tapping or double-clicking the icon in the status bar and selecting Disconnect.
Notes • Receiving entire messages consumes storage memory. • The size column in the Inbox list view displays the local size and server size of a message.
Even when a message has been downloaded fully, these numbers may differ because the size of a message can vary between the server and the device.
• When using IMAP4 to get Outlook or Schedule+ data, you will see the contents of your Journal folder. File editing transactions and documents (such as Task items, e-mail messages, and Word documents) attached using drag and drop will appear as shortcuts on the device. A copy of the document will not be moved to your device, and the shortcut on the device cannot be used to access the document. To move documents associated with a journal entry to the device, attach the document to the entry rather than dragging and dropping it. Also, be sure to set your IMAP4 service to receive full copies of messages, attachments, and meeting requests. For more information on using Journal, see the Help for the desktop version of Outlook.
6.6.2 Reading and Responding to Messages
Download messages
The way you download copies of messages depends on how you are receiving messages:
If you receive messages through a remote mail server, see Download messages from the server.

- 93 -
Reply to or forward a message
1. Open the message, and then select Compose > Reply to Sender, Reply to All, or Forward.
2. Enter your response. 3. Select File > Send.
• Selections in the Options dialog box determine whether the original text is included. • To see more header information, select the inverted triangle in the lower-right corner of the
header area. Select the triangle again to collapse the header area.
Add the sender to Address Book
1. Open the message, and then select Compose > Add Sender to Address Book. A new contact card will open with the sender's name and e-mail address already entered.
2. Enter other desired information.
Select Go > Address Book.
• To add a new entry, select New. Enter the name you want to type in the To and CC fields of messages in the Name field. For more information, see Compose and send a message.
• To delete an entry, select it, and then select Delete. • To edit an entry, select it, and then select Edit.
Check Inbox status
In list view, select Compose > Status. You can view details such as the number of messages to be sent, deleted, and copied, and the number of attachments to be downloaded.
Include the original message in a reply
1. Select Services > Options > Compose tab. 2. Under Reply, select Include Body.
This setting will place a copy of the original message beneath your response text. 3. To indent the original message, select Indent. 4. To add leading characters (such as >) to the original message lines, select Add leading
character, and enter the character you want.
Enlarge the message font
1. Open the message you want to read. 2. Select File > Large Font. 3. To return the font to its original size, select File > Large Font again.

- 94 -
6.6.3 Composing and Editing Messages
Compose and send a message
1. In list view, select Compose > New Message. 2. Enter the address of one or more recipients, separating them with a semicolon. If the
recipient is listed in the Address Book, enter a few letters of the recipient's name and select Compose > Check Names. If there is only one match, the e-mail address is inserted. If there is more than one match, select the correct address from the Choose E-mail Recipients dialog box. If there is no match then add a new e-mail address through Choose E-mail Recipients.
3. To attach a file, select File > Attachments > Add Attachment. 4. Select File > Send. If you are working offline, the message is moved to the Outbox folder
and will be sent the next time you connect.
To see more header information, select the triangle in the lower-right corner of the header area. Select the triangle again to collapse the header area.
Save a message
• Select File > Save to save the message you are composing or editing. The message is not sent and is saved in the Inbox folder of the active service.
Save copies of sent messages
By default, sent messages are not saved on your device.
1. Select Services > Options > Compose tab. 2. Select Keep copy of sent mail in Sent folder.
6.6.4 Working with Folders
About folders
Inbox contains folders from mail services you have set up. You can set up services to connect directly to a remote mail server. When you set up a service, it appears in the Inbox list view. Each service contains four default folders: Inbox, Deleted (local), Outbox, and Sent. The Deleted (local) folder contains messages that have been deleted on the device. If you are using IMAP4, you may see a Deleted Items folder. This folder is for messages deleted on the server. The behavior of the Deleted (local) and Sent folders depends on the Inbox options you have chosen.
You can also create your own folders. The behavior of the folders you create depends on whether you are using POP3 or IMAP4.
If you are using POP3 and you drag messages to a folder you created, the link is broken between the messages and their copies on the mail server. The next time you connect, the mail server will see that the messages are missing from the device Inbox and delete them from the server. This prevents you from having duplicate copies of a message, but it also

- 95 -
means that you will no longer have access to messages you move to folders you create from anywhere except the device.
If you are using IMAP4, the folders you create and the messages you move are mirrored on the server. For example, if you move two messages from the Inbox folder to a folder called Family, the server will create a copy of the Family folder and copy the messages into that folder. Therefore, messages are available to you anytime you connect to your mail server, whether it is from your device or PC. This synchronization of folders occurs when you create a new folder, move messages into a folder, exit the Inbox program, or select Services > Synchronize Folders. If you want to view the messages in a folder while disconnected from your mail server, select the folder and then Services > Offline Folder.
Create a folder
1. Select File > Folder > New Folder. 2. Type a name for the folder.
Rename a folder
1. Select the folder you want to rename. 2. Select File > Folder > Rename Folder. 3. Type the new name for the folder.
Notes
• Default folders, such as Inbox, can't be renamed. • Folders you create for IMAP4 mail servers can't be renamed.
Delete a folder
1. Select the folder you want to delete. 2. Select File > Delete.
Note: Default folders, such as Inbox, can't be deleted.
Designate a folder as offline
Only IMAP4 folders can be designated as offline. All IMAP4 default folders, such as Inbox, are automatically designated as offline. Messages in offline folders can be viewed when you are disconnected from your mail server. If a folder is not designated as offline, you will be able to read and respond to messages in that folder only when connected to the server.
To designate a folder as offline, select the folder, and then select Services > Offline Folder.
Synchronize folders while connected
When you synchronize folders, the contents of your device folders and mail server folders are compared and updated. New mail messages are downloaded, and messages in your device Outbox folder are sent. The synchronization behavior depends on how you connect to your mail server.
- 96 -
When you connect to a POP3 server, the Inbox and Outbox folders on your device are synchronized with the corresponding folders on the mail server. To synchronize after the initial connection, select Services > Send/Receive Mail.
When you connect to an IMAP4 server, Inbox, Outbox, and all folders marked as offline are synchronized. To synchronize all folders after the initial connection, select Services > Synchronize Folders. To synchronize just the selected folder and the Outbox folder, select Services > Send/Receive Mail
6.6.5 Organizing Messages
Move or copy a message
Caution When you move a message that you have received through POP3 or synchronization to a folder you created on your device, the copy of the message on the server is deleted. This prevents duplicate copies of messages. Although the complete message is moved, message attachments will be deleted if you have not selected the option to download attachments. Once the message is moved, you will be able to access the message only from your device.
1. Select the message. 2. Select File > Move To or File > Copy To. 3. Select the destination folder.
If you are working offline, the message will be moved or copied from the server the next time you connect.
Delete a message
• Select the message and select File > Delete. Messages are moved to the Deleted (local) folder and deleted according to the option you have selected in Services > Options > Delete tab: 1. On connect/disconnect: Deletes messages when you connect or disconnect from
your mail service or exit Inbox. 2. Immediately: Deletes messages as soon as you select File > Delete. 3. Manual: Deletes messages when you select File > Empty Deleted (local).
Note If you are working offline, messages that have been deleted from the server will be deleted from the device the next time you connect.
Empty the Deleted (local) folder
• Select File > Empty Deleted (local). This permanently deletes messages in the Deleted (local) folder.
• To check or adjust the current settings for deleting messages, select Services > Options > Delete tab.
Clear messages and folders
When receiving mail from a POP3 or IMAP4 server, select the service that contains the folders and messages you want to clear, and then select Service > Clear All. All messages

- 97 -
and folders that are linked to the selected service are cleared and memory space is expanded on the device without deleting messages on the server. The next time you connect, the messages and folders are downloaded again.
Unmark a message
To unmark a message that is marked for download, double-tap or double-click the marked message.
Set the action to follow deleting, moving, or responding to a message
1. Select Services > Options > Read tab. 2. Select desired options.
6.6.6 Working with Message Attachments
Receive attachments
• If you receive messages through a remote mail server, in Inbox on the device, select the Get file attachments and meeting requests (IMAP4) or Get meeting requests (POP3) setting in the Inbox Preferences dialog box. For more information, see Set Inbox preferences.
Notes
• Embedded images and OLE objects cannot be received as attachments. • Embedded messages can be viewed as an attachment when using IMAP4 to receive
e-mail. However, this features does not work if TNEF is enabled so that you can receive meeting requests.
Check attachment status
• An attachment sent with an e-mail message, whether it has been downloaded or not, will appear as an icon at the bottom of the message in its own window pane. If you don't see this pane, select File > Attachments > Show Attachments. If TNEF is turned on so you can receive meeting requests, you will not see attachments until they are fully downloaded.
• To mark an attachment for downloading in a POP3 or IMAP4 service, double-tap or double-click it. The attachment will be downloaded the next time you connect. You can also set Inbox to download attachments automatically when you get a full copy of a message. For more information, see Receive attachments.
Open an attachment
• With the message open, double-tap or double-click the attachment's icon at the bottom of the message. If you don't see this pane, select File > Attachments > Show Attachments.
Store an attachment
1. Select Services > Options > Storage tab.

- 98 -
2. Select to store attachments on internal RAM or a storage card. 3. If you use more than one storage card, select it from the list.
Note Once you make the above selection, all attachments will be moved to the selected card.
Delete an attachment
• To delete an attachment from a message you are sending, select the attachment, and then select Edit > Clear or press the DEL key on the keyboard.
• To delete an attachment you have received, delete the message.
Attach a file to a message
1. With the message open, select File > Attachments > Add Attachment. 2. Select the file you want to attach.
Note OLE objects cannot be attached to Inbox messages.
Adding, removing, and viewing mail services
• All installed mail services are listed in the Installed services box. • To add a mail service, select Add. • To remove a mail service, select the service from the Installed services box and then
select Remove. • To view a mail service's properties, select the service from the Installed services box and
then select Properties.

- 99 -
7.0 Editing a Connection
The "Edit" button on Configure Dialog Box allows the user to edit or modify the properties of selected connection.
7.1 Edit a RDP Connection
There are two properties sheets on the Properties dialog box. Depending on your connection configuration, you can use these two properties sheets to edit connection parameters.
7.1.1 Net Connections Properties Sheet
• Name
This filed displays a connection name listed in the Terminal Connection Manager. Enter the name in this field and click "OK" button, you can change and save the connection name of the selected server.
• Server
This field displays the IP address or server name of the selected server.
• Automatic Logon:

- 100 -
Click this toggle button to enable/disable automatic logon. The Username, Password and Domain fields will be enabled when the Automatic Logon is tick.
• Username
Enter your user name for Automatic Logon check.
• Password
Enter your password for Automatic Logon check.
• Domain
Enter your domain for Automatic Logon check.
• Low Speed Connection
Click on this button to enable low-speed connections.
• OK
Click on "OK" button to save your changes and quit the dialog box
• Cancel
Click on "Cancel" button to quit the dialog box without any change.
• Apply
Click on "Apply" button to use the changes.
7.1.2 Application Properties Sheet
Using the Application Properties Sheet, you can designate an application program on the server to run automatically when the connection is made.

- 101 -
• Desktop
Click on "Desktop" button to select a desktop application to run.
• File Name
Click on "File name" button to select a file to run. Enter the file name of the application in the field provided.
• Working Directory
Enter the directory path of the application file provided in File Name.
• OK
Click on "OK" button to save your changes and quit the dialog box
• Cancel
Click on "Cancel" button to quit the dialog box without any change.
• Apply
Click on "Apply" button to use the changes.

- 102 -
7.2 Edit an ICA Connection There are seven dialog boxes that display in succession during the editing process. Please follow the instructions on the screen to complete all fields editing step by step. (Note: For more detail introduction, please refer to the "Citrix ICA User's Guide.pdf"
To change the properties of a connection entry
1. In the Connection Manager dialog box, click the Configure tab. 2. Click the name of the connection entry that you want to change. 3. Click Edit to display the Edit Connection Details dialog box.
4. Make the desired changes. 5. Click OK to save your changes.
The Edit Connection Details dialog box contains the following tabs:
• The Server tab (network connection entries only), where you can set the server or published application name to which to connect. There is also a button to display the Server Location dialog box where you can set Business Recovery options.
• The Dial-in tab (dial-in connection entries only), where you can set the area code, country code, and telephone number to dial. You can use the settings on this page in the same way as when you first set up the connection entry.

- 103 -
• The Application tab, where you can specify an application to run after connecting to a Citrix server.
• The Logon tab, where you can set the user name, password, and domain to use to log in to the Citrix server automatically.
• The Window tab, where you can set the number of colors used for the ICA Client window.
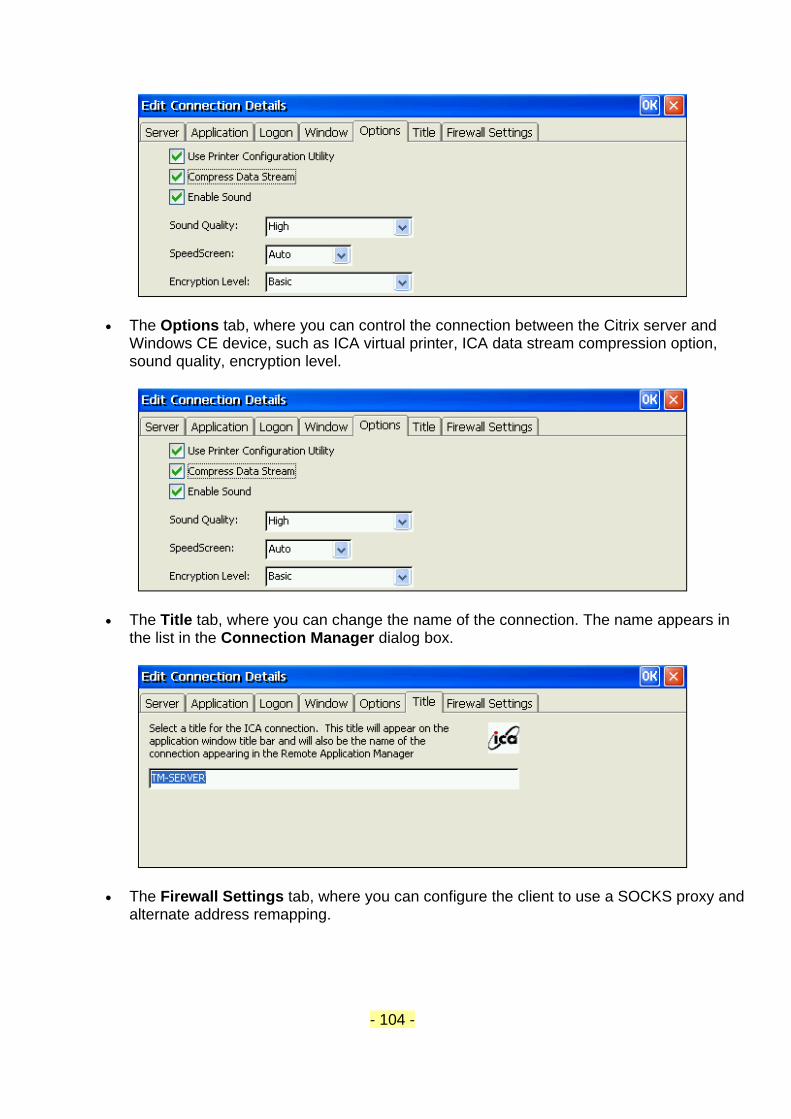
- 104 -
• The Options tab, where you can control the connection between the Citrix server and Windows CE device, such as ICA virtual printer, ICA data stream compression option, sound quality, encryption level.
• The Title tab, where you can change the name of the connection. The name appears in the list in the Connection Manager dialog box.
• The Firewall Settings tab, where you can configure the client to use a SOCKS proxy and alternate address remapping.

- 105 -
7.3 Edit a Dial-up Connection
The following dialog boxes allow user to change the Remote Dial-Up Connection settings. Please refer to the description below the dialog boxes to change all items which you need.
• Name: It is the connection name will be listed in the Terminal Connection Manager.

- 106 -
• Telephone Number: It is the phone number where you want to dial for this connection. • Device Setting for RAS Connection: You shall select correct modem type and COM port. • Dial Properties: Click on the "Dialing Properties" button to reach the "Dialing Properties"
dialog box displays.
• Dialing from: There is three default setting, direct line, prefix dial(0) and prefix dial(9). If you want to add location, just press "New..." button to create new one.
• Dialing Patterns: Here below is the preset dialing pattern. If you want to change the dialing pattern for each type of call, just press "Dialing Patterns..." button and edit the fields.

- 107 -
• Configure: Press "Configure..." button to reach device properties which allow you to change modem setting.
• TCP/IP Setting

- 108 -
• Use Server-assigned IP address: If you want to get an IP address, DNS and WINS settings from remote server, you shall enable this check box. Otherwise, you shall key in all of information on the fields.
• The TCP/IP allows user to use Slip, software & IP header compressions for different connection requirement.
• Automatic Logon: Using the pre-set user name and password, it allows user automatic logon the remote server without password access.
• Automatic Connection: All of the connections on the connection manager will be listed while this check box is enabled. You can select the connection which you would like automatic connection after the dial-up connection is done.

- 109 -
• Check "Finish" to complete the Dial-Up connection setup.
7.4 Edit an VPN Connection
The following dialog boxes allow user to change the VPN Remote Connection settings. Please refer to the description below the dialog boxes to change all items which you need.
• Name: It is the connection name will be listed in the Terminal Connection Manager.

- 110 -
• Key in the VPN host name or IP address.
• TCP/IP Setting
• Use Server-assigned IP address: If you want to get an IP address, DNS and WINS settings from remote server, you shall enable this check box. Otherwise, you shall key in all of information on the fields.
• The TCP/IP allows user to use Slip, software & IP header compressions for different connection requirement.

- 111 -
• Check "Finish" to complete the VPN connection setup.
7.5 Edit an web Connection
To edit an web connection, just edit the web site name and/or start page, then click "OK".