user's guide - honeywell productivity and workflow...
TRANSCRIPT

XMLLabel™ v6.10
User's Guide

ii XMLLabel v6.10 User’s Guide
Intermec Technologies Corporation
Corporate Headquarters 6001 36th Ave. W. Everett, WA 98203 U.S.A.
www.intermec.com
The information contained herein is proprietary and is provided solely for the purpose of allowing customers to operate and service Intermec-manufactured equipment and is not to be released, reproduced, or used for any other purpose without written permission of Intermec.
Information and specifications contained in this document are subject to change without prior notice and do not represent a commitment on the part of Intermec Technologies Corporation.
© 2005 by Intermec Technologies Corporation. All rights reserved.
The word Intermec, the Intermec logo, Norand, ArciTech, Beverage Routebook, CrossBar, dcBrowser, Duratherm, EasyADC, EasyCoder, EasySet, Fingerprint, INCA (under license), i-gistics, Intellitag, Intellitag Gen2, JANUS, LabelShop, MobileLAN, Picolink, Ready-to-Work, RoutePower, Sabre, ScanPlus, ShopScan, Smart Mobile Computing, SmartSystems, TE 2000, Trakker Antares, and Vista Powered are either trademarks or registered trademarks of Intermec Technologies Corporation.
Throughout this manual, trademarked names may be used. Rather than put a trademark (™ or ®) symbol in every occurrence of a trademarked name, we state that we are using the names only in an editorial fashion, and to the benefit of the trademark owner, with no intention of infringement.
There are U.S. and foreign patents pending.
Microsoft, Windows, and the Windows logo are registered trademarks of Microsoft Corporation in the United States and/or other countries.

XMLLabel v6.10 User’s Guide iii
Document Change Record This page records changes to this document. The document was originally released as version 001.
Version Date Description of Change
002 11/2005 Added new information to support RFID, SAP Auto-ID Infrastructure, and changes to the Label Loader application.

iv XMLLabel v6.10 User’s Guide

Contents
XMLLabel v6.10 User’s Guide v
Contents
Before You Begin......................................................................................................vii Safety Icons ................................................................................................vii Global Services and Support .......................................................................vii Who Should Read This Document? ..........................................................viii Related Documents ...................................................................................viii
Getting Started ..................................................................................................... 1
What Is XMLLabel?................................................................................................... 2 Understanding How XMLLabel Works....................................................... 2 Requirements .............................................................................................. 3
System Requirements .................................................................... 3 Supported Printers ........................................................................ 4
What’s New? ............................................................................................................. 4
Installing XMLLabel.................................................................................................. 4
Installing Printers to Work With XMLLabel.............................................................. 6 Setting Up Printers in LabelShop PRO........................................................ 6 Setting Up Printers in Oracle Version 11i10................................................ 8
Creating an Intermec Printer in Oracle ......................................... 8 Assigning Printers to Label Types................................................ 10 Defining Label Formats............................................................... 12
Setting Up Printers in SAP Auto-ID Infrastructure.................................... 13
Designing Labels ............................................................................................... 15
Understanding How the Printer Supports Label Elements ....................................... 16
Defining Variable Data............................................................................................ 16
Using Variable Data in a Label ................................................................................ 18
Using Non-Latin Character Sets in a Label .............................................................. 20 Using Non-Latin Characters With Variable Data ...................................... 20 Using Non-Latin Characters With Fixed Data........................................... 20
1
2

Contents
vi XMLLabel v6.10 User’s Guide
Defining RFID Tags in a Label................................................................................ 21
Using Variables for Advanced Features .................................................................... 23
Optimizing Label Printing Speed............................................................................. 30 Using Printer Resident Fonts..................................................................... 30 Using Scaleable Fonts ................................................................................ 31
Printing Labels .................................................................................................... 33
Converting a .lab File Format to an .lbx File Format................................................ 34
Downloading the .lbx File to Your Printer ............................................................... 36 Creating Printer Groups ............................................................................ 40 Removing Printers and Groups.................................................................. 42
Printing a Test Label................................................................................................ 42
Troubleshooting................................................................................................ 47
Troubleshooting Problems and Possible Solutions ................................................... 48
Understanding Error Messages................................................................................. 50
Using Sample Labels................................................................................................ 50
3
4

Before You Begin
XMLLabel v6.10 User’s Guide vii
Before You Begin This section provides you with safety information, technical support information, and sources for additional product information.
Safety Icons This section explains how to identify and understand cautions and notes that you see in this document.
A caution alerts you to an operating procedure, practice, condition, or statement that must be strictly observed to prevent equipment damage or destruction, or corruption or loss of data.
Attention: Une précaution vous avertit d’une procédure de fonctionnement, d’une méthode, d’un état ou d’un rapport qui doit être strictement respecté pour empêcher l’endommagement ou la destruction de l’équipement, ou l’altération ou la perte de données.
Note: Notes either provide extra information about a topic or contain special instructions for handling a particular condition or set of circumstances.
Global Services and Support
Warranty Information To understand the warranty for your Intermec product, visit the Intermec web site at www.intermec.com and click Service & Support > Service & Support. The Intermec Global Sales & Service page appears. From the Service & Support menu, move your pointer over Support, and then click Warranty.
Disclaimer of warranties: The sample code included in this document is presented for reference only. The code does not necessarily represent complete, tested programs. The code is provided “as is with all faults.” All warranties are expressly disclaimed, including the implied warranties of merchantability and fitness for a particular purpose.

Before You Begin
viii XMLLabel v6.10 User’s Guide
Web Support Visit the Intermec web site at www.intermec.com to download our current manuals in PDF format. To order printed versions of the Intermec manuals, contact your local Intermec representative or distributor.
Visit the Intermec technical knowledge base (Knowledge Central) at intermec.custhelp.com to review technical information or to request technical support for your Intermec product.
Telephone Support In the U.S.A. and Canada call 1-800-755-5505 and select the appropriate option.
Outside the U.S.A. and Canada, contact your local Intermec representative. To search for your local representative, from the Intermec web site, click Contact.
Who Should Read This Document? The XMLLabel v6.10 User’s Guide provides you with information about the features of XMLLabel application. It also explains how to install, use, and troubleshoot XMLLabel. Before you install XMLLabel, you should be familiar with your network and general networking terms, such as IP address.
Related Documents The Intermec web site at www.intermec.com contains our documents that you can download in PDF format.
To order printed versions of the Intermec manuals, contact your local Intermec representative or distributor.

XMLLabel v6.10 User’s Guide 1
Getting Started
Use this chapter to familiarize yourself with Intermec XMLLabel™. In this chapter you will find these sections:
• What Is XMLLabel?
• What’s New?
• Installing XMLLabel
• Installing Printers to Work With XMLLabel
1

Chapter 1 — Getting Started
2 XMLLabel v6.10 User’s Guide
What Is XMLLabel? XMLLabel is a powerful suite of applications that enables you to easily convert LabelShop PRO label formats into files that you can download to Intermec XMLReady™ printers. XMLLabel helps you convert, download, and test the label formats. The Intermec XMLReady printers store these converted label formats and then accept XML data files directly from your ERP or WMS system to print labels on demand.
The unique architecture of XMLLabel eliminates the need for print server middleware.
Understanding How XMLLabel Works Intermec XMLLabel consists of three applications:
• XMLLabel Wizard: The XMLLabel Wizard guides you through the process of selecting your LabelShop PRO label format (.lab) file and converting it into an XMLLabel format (.lbx) file that you can download to an XMLReady printer. XMLLabel Wizard also lets you create a sample .xml file and a variable list file (.var) at the same time that you create the .lbx file. You can use the .xml file to print a test label and you can use the .var file for debugging purposes.
• Label Loader: Use Label Loader to download the .lbx file to your Intermec XMLReady printer so that when an XML print job arrives from your ERP or WMS system, that data is formatted and printed using the .lbx file.
• XMLLabel Print: Use XMLLabel Print to send a test .xml file to your printer. The .xml file contains test data. The XMLReady printer uses the .lbx file to print the test data, allowing you to troubleshoot any problems with the format file.
• XMLLabel Preferences: Use the XMLLabel Preferences dialog box if you need to change the target system, keep .pof files for troubleshooting, and remove or include setup values when sending labels to the printer.
After you convert, download, and test your format files, you are ready for an XML print job from an ERP or WMS system.
Chapter 1 — Getting Started
XMLLabel v6.10 User’s Guide 3
XML print jobs
(optional)
XMLReadyprinter
XMLReady printer
.lbxlabel
format
.lablabel
format
.xmltestfile
LabelLoader
LabelShopPRO
XMLLabelWizard
XMLLabelPrint
ERP/WMS system
XMLLabel Overview: This diagram shows how XMLLabel works with your ERP or WMS system to print labels on an Intermec XMLReady printer.
Requirements
System Requirements • LabelShop PRO v6.12
• PC running Microsoft Windows 2000 or Windows XP
• Hardware requirements–standard for operating system
• Host system with compatible XML output such as Oracle 11i10, SAP Auto-ID Infrastructure (AII) v.2.1 SP03 or v.4.0
• Microsoft Internet Explorer 5.01 or later
• Microsoft .NET Framework version 1.1

Chapter 1 — Getting Started
4 XMLLabel v6.10 User’s Guide
Supported Printers • EasyCoder® PF2i, PF4i, PF4ci, PM4i, PX4i, PX6i with
Fingerprint v8.70 or later and EasyLAN/EasyLAN Wireless interface.
What’s New? This revision of the user’s guide includes this new information:
• Support for RFID labels. For help, see “Defining RFID Tags in a Label” on page 21.
• Support for printing in SAP Auto-ID Infrastructure (AII). For help, see “Setting Up Printers in SAP Auto-ID Infrastructure” on page 13.
• Changes to the Label Loader application. For help, see “Downloading the .lbx File to Your Printer” on page 36.
Installing XMLLabel If LabelShop is not installed, you can install it from the XMLLabel CD.
Note: You must have the Microsoft Framework version 1.1 installed on your PC to install XMLLabel. If necessary, download Framework v1.1 from the Microsoft web site and then install XMLLabel.
To install XMLLabel
1 Insert the XMLLabel CD in your CD drive. The CD will automatically start and display the introduction window.

Chapter 1 — Getting Started
XMLLabel v6.10 User’s Guide 5
If the CD does not start automatically, go to Start > Run and browse to the autorun.exe file on your CD drive. Click OK to start the installation.
2 Click Install Software.
3 If you do not have LabelShop PRO already installed, select Install LabelShop PRO and follow the directions for installation.
4 Select Install XMLLabel and follow the directions for installation.
To install XMLLabel on the LabelShop PRO Net
1 From the LabelShop CD provided with the LabelShop PRO Net package, install LabelShop PRO Net on the server.
2 At the Network installation type window, choose Local installation.

Chapter 1 — Getting Started
6 XMLLabel v6.10 User’s Guide
3 Finish installing LabelShop PRO Net on the server, and then install the clients from the server as described in the Installation Guide of LabelShop PRO Net.
4 Install XMLLabel locally on each of the clients that will use XMLLabel.
After you have LabelShop PRO and XMLLabel installed, you can run XMLLabel from these two places:
• Start > Programs > Intermec XMLLabel
• Tools menu in LabelShop PRO
Installing Printers to Work With XMLLabel You need to make sure that you have the XMLReady printers you plan to use in your network installed in LabelShop PRO, Oracle®, or SAP Auto-ID Infrastructure (AII). Use this section to install and set up printers in:
• LabelShop PRO.
• Oracle.
• SAP Auto-ID Infrastructure.
Setting Up Printers in LabelShop PRO LabelShop PRO supports all Intermec XMLReady printers.
To install your printer
1 Open LabelShop PRO.
2 Go to File > Select printer or click the Select printer button
from the main menu. The Printer dialog box appears.

Chapter 1 — Getting Started
XMLLabel v6.10 User’s Guide 7
3 Click Add. The Add printer dialog box appears.
4 Expand the Intermec Default folder.
5 From the Model list, select your printer model.
6 From the Port list, select the port to which the printer is connected.
7 Click OK.
8 Make sure the printer you added is selected in the Printer
dialog box and click OK. Printers supported by LabelShop PRO have a printer icon in front of the printer name. XMLLabel does not support printers that appear without the printer icon. Supported printers include EasyCoder PF2i, PF4i, PF4ci, PM4i, PX4i, and PX6i in DP mode.

Chapter 1 — Getting Started
8 XMLLabel v6.10 User’s Guide
The name and port of the selected printer appears in the lower left corner of the LabelShop PRO window.
Setting Up Printers in Oracle Version 11i10 Use this section to understand how to set up OWM to print with the Intermec XMLReady printers. There are three processes you need to complete to configure the Oracle printer:
• Creating an Intermec printer in Oracle
• Assigning printers to label types
• Defining label formats
Creating an Intermec Printer in Oracle The printer needs to be set up within Oracle Applications solely for the purpose of choosing the correct printer for a particular print request and then identifying the selected printer by its name in the XML produced by the system.
Use the System Administrator Responsibility Role to create printers. To create a printer, you need to:
• select the label printer mode.
• define the printer.
• enter the IP address.
To select the label printer mode
1 From the System Administrator Responsibility Role, go to Profile > System.
2 Query for the profile option named “WMS: Label Print Mode.”
3 From the WMS: Label Print Mode option dialog box, select Synchronous – TCP/IP.
4 Save your settings.
Chapter 1 — Getting Started
XMLLabel v6.10 User’s Guide 9
To define printers
1 From the System Administrator Responsibility Role, go to Install > Printer > Register.
The Printers dialog box appears.
2 In the Printer field, type a unique name to reference your printer throughout the application.
3 From the Type list box, select Label.
4 In the Description field, type a meaningful description of the printer.
5 Repeat Steps 2 through 4 for each label printer.
To enter an IP address
1 From the Warehouse Manager role, go to Setup > Warehouse Configuration > Printers and Devices > Define Printer IP.

Chapter 1 — Getting Started
10 XMLLabel v6.10 User’s Guide
The Define Printer IP dialog box appears.
2 From the Printer Name list box, select the printer name.
3 In the IP Address field, enter the IP address.
4 In the Port field, enter the port (9200).
5 Click Test to ping the printer. You should receive a message telling you that the connection is successful.
If your connection is not successful, make sure there is connectivity between the database and the printer.
Assigning Printers to Label Types When a particular label request is made, Oracle looks for printer assignments for the label type being printed and uses the printer assigned to the label type at the most specific level.
To assign printers to label types
1 From the Warehouse Manager Responsibility Role, go to Setup > Warehouse Configuration > Printing > Assign Printers to Documents.

Chapter 1 — Getting Started
XMLLabel v6.10 User’s Guide 11
The Choose Document and Label Printers dialog box appears.
The tree view in the left panel shows the list of document Label Types to which you can assign printers.
2 If a label type does not appear, right-click the Documents node and select New from the context-sensitive menu.
3 From the List of Values, select the appropriate label type. The label type is added to the tree view.
4 From the tree view in the left panel, select a document label type (for example, Lpn or Lpn Summary).
5 From the Printer drop-down list, select a printer name to associate with the label type.
6 From the Level drop-down list, assign a level to the label type.
7 In the Value field, enter the value for that level.
Note: You cannot delete printer or label type assignments from this form; you can only disable them.

Chapter 1 — Getting Started
12 XMLLabel v6.10 User’s Guide
Defining Label Formats After you design your labels in LabelShop PRO, you need to define the label formats within Oracle. The label format contains fields that need to be populated with data from Oracle.
To define a Label Format
1 From the Warehouse Manager Responsibility Role, go to Setup > Warehouse Configuration > Printers and Devices > Define Label Formats.
2 To find existing label formats, select the Label Type associated with the label format and click Find.
3 In the Name field, enter a label format name or make sure the label format name matches the name given to the label format in LabelShop PRO.
Note: There are no restrictions on the naming conventions for the label format, but the extension is always .lbx (lowercase).
4 In the Description field, enter a description for the label format.
After you define the format name and description, you can view the label content by clicking the Label Fields and Variables button.
Chapter 1 — Getting Started
XMLLabel v6.10 User’s Guide 13
Setting Up Printers in SAP Auto-ID Infrastructure XMLLabel supports Auto-ID Infrastructure (AII) version 2.1. To use Intermec XMLReady printers with SAP AII, you need to configure the parameters in the following procedure.
To find all of these settings, go to Basic Settings in the SAP AII interface.
To set up printers in SAP AII
1 Set EPC Settings to EPC_1.27.
2 Define RFC connections for the RFID printers:
a For TCP/IP printing, set these parameters:
Parameter Value
Type T (TCP/IP)
Gateway Host IP address of the printer
Gateway Service Port 9200
b For HTTP printing, set these parameters:
Parameter Value
Type G (HTTP)
Target Host IP address of the printer
Service 80
Prefix /xml/pv
Activate HTTP Services Enable
3 Make sure the name of the LabelShop variable (EPC) is the same as the AII variable (EPC), which contains the 96 or 64 bit data as a hexadecimal string.
These RFID parameters are just the basic settings you need to configure to use XMLLabel with AII. Please see your AII documentation for other required settings and additional information.

Chapter 1 — Getting Started
14 XMLLabel v6.10 User’s Guide

XMLLabel v6.10 User’s Guide 15
Designing Labels
Use this chapter to understand how to design labels to use with your Intermec XMLReady printer. This chapter contains these sections:
• Understanding How the Printer Supports Label Elements
• Defining Variable Data
• Using Variable Data in a Label
• Using Non-Latin Character Sets in a Label
• Defining RFID Tags in a Label
• Using Variables for Advanced Features
• Optimizing Label Printing Speed
2

Chapter 2 — Designing Labels
16 XMLLabel v6.10 User’s Guide
Understanding How the Printer Supports Label Elements Designing labels for WMS or ERP is just like designing any other labels, but here are some printing issues you need to know about to make the design process easier.
Understanding Label Printing Issues
Label Element How Does the Printer Support It?
Fixed text The printers support printer resident fonts or TrueType fonts. Since TrueType fonts are sent as graphical bitmaps, the print speed is slower.
Variable text The printers support only printer resident fonts.
Lines/Boxes The printers support both.
Bar codes The printers support fixed and variable. Use printer bar codes only.
Graphics The printers support fixed graphics only.
Polygons, circles, rounded rectangles
The printers print these elements as graphics.
Oblique lines The printers print these elements as graphics.
OLE objects The printers print these elements as graphics.
RFID tags The printers support fixed and variable data.
Defining Variable Data The variable text fields in your label should use the same variable field names used in the database. Variable field names can contain spaces such as “Part No.”
To define variable data
1 Open LabelShop PRO.
2 From the LabelShop PRO toolbar, click the Display
Document Browser button.
3 On the Data Sources tab, right-click Form and select Add. Var0 appears underneath Form.
Chapter 2 — Designing Labels
XMLLabel v6.10 User’s Guide 17
4 Click Var0 to select it and click again or press F2.
5 Enter the name of the variable field that is used in the database and press Enter.
Variable Field: In this example, “Part No” is the name of the variable in the database.

Chapter 2 — Designing Labels
18 XMLLabel v6.10 User’s Guide
6 Double-click the variable. The variable dialog box appears.
7 Select the Input tab and enter a sample value in the text field of the Variable value box.
Variable Value: In this example, the Variable value is “1234567890.”
8 Click OK.
Using Variable Data in a Label Use the following procedure to add variable data to your label. You can display the variable data as text or a bar code.
To use variable data in a label
1 From the Data Sources tab, click and drag the variable you want to add to the label into the label frame. A dialog box appears.

Chapter 2 — Designing Labels
XMLLabel v6.10 User’s Guide 19
2 Select whether you want the variable to appear on the label as text or a bar code. The variable data appears on the label.
This example shows what the label looks like if you display the variable as a bar code.

Chapter 2 — Designing Labels
20 XMLLabel v6.10 User’s Guide
3 To move the variable data, click the Select Objects button
from the Creations toolbar and then click and drag the variable to your desired location.
4 To change the parameters for the variable data, such as font type or bar code symbology, double-click the variable data. A Text, Bar Code, or Image dialog box appears.
5 Make any necessary changes in the dialog box and then click OK.
Using Non-Latin Character Sets in a Label You can use non-Latin character sets in both fixed and variable data fields. You must use the printer font Swis721 BT if you want to print a non-Latin character. The Swis721 font offers a wide range or character sets including Greek, Cyrillic, Baltic, and Turkish.
Using Non-Latin Characters With Variable Data For variable data, the printer reads the font encoding from the XML file header. The printer supports these encodings of the XML file: 850, 851, 852, 855, 857, 1250, 1251, 1252, 1253, 1254, 1257, ISO 8859-1, and UTF-8.
Using Non-Latin Characters With Fixed Data For fixed data, you need to make some changes in LabelShop PRO and Windows. Use the following procedure to add non-Latin based characters to a fixed data field.
Note: Intermec does not recommend using standard Windows fonts. You can use standard Windows fonts for non-Latin characters, but these characters are sent as graphic data and may lead to lower throughput.
To use non-Latin characters in a fixed data field
1 From the Creation toolbar, click the Text button and create
a fixed text field on the label.
2 Type some placeholder text in the fixed text field.

Chapter 2 — Designing Labels
XMLLabel v6.10 User’s Guide 21
3 Double-click the fixed text field. The Text dialog box opens.
4 Make sure the Swis721 BT font is highlighted and select a Subset from the list.
5 From the language bar in Windows, change the keyboard settings to the required keyboard. Windows must have multiple keyboard support installed.
6 In LabelShop PRO, replace the placeholder text with your non-Latin character text.
Defining RFID Tags in a Label You can design labels that contain RFID tags with LabelShop PRO and print them on XMLReady printers using XMLLabel. Creating an RFID variable is the same as defining any other variable with these two exceptions:
• In the Input tab, make sure the name of the variable is the same as the variable containing the RFID data.
• In the Output tab, set the Maximum length to 24 for 96-bit data and 16 for 64-bit data.

Chapter 2 — Designing Labels
22 XMLLabel v6.10 User’s Guide
Before you can save a .lab format and convert it to an .lbx file supported by XMLLabel, you need to set up the RFID Tag properties for printing.
To set up RFID tag properties for printing
1 From the LabelShop PRO main menu, choose File > Page Setup.
2 Select the RFTag tab.
3 From the Model list, select EPC or UCode - ISO.
Note: You can use standard ISO tags as well, but we do not describe the interface in this procedure.
4 In the Class field, select EPC 1.19, C1V1 tags, or Gen 2 tags.
5 In the Width and Height fields, enter the dimensions of the RFID insert.
6 In the Top and Left fields, enter the location of the insert from the top left of the label.
7 (Optional) If you are using non-standard RFID tags, you can select a custom tag image by selecting Image name and searching for a graphic file.
Chapter 2 — Designing Labels
XMLLabel v6.10 User’s Guide 23
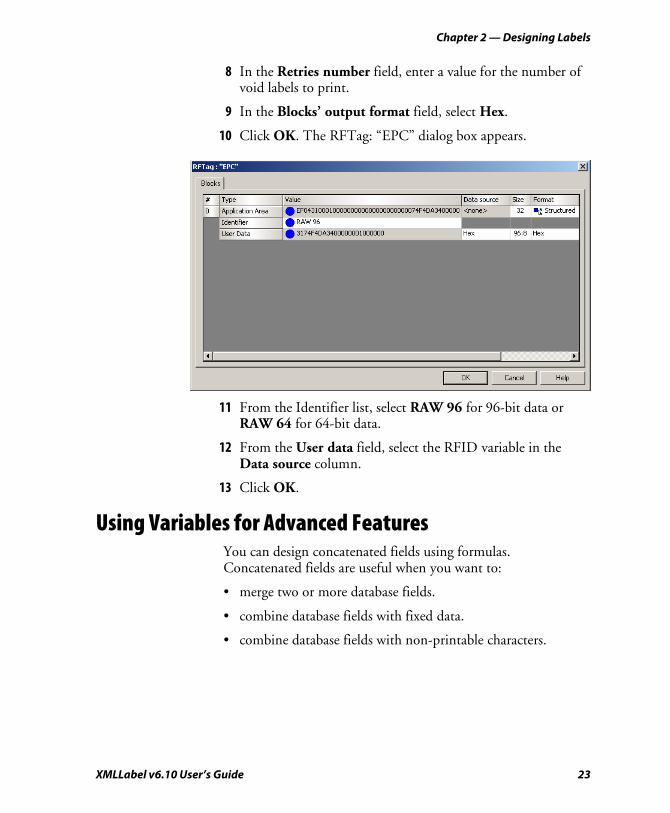
8 In the Retries number field, enter a value for the number of void labels to print.
9 In the Blocks’ output format field, select Hex.
10 Click OK. The RFTag: “EPC” dialog box appears.
11 From the Identifier list, select RAW 96 for 96-bit data or RAW 64 for 64-bit data.
12 From the User data field, select the RFID variable in the Data source column.
13 Click OK.
Using Variables for Advanced Features You can design concatenated fields using formulas. Concatenated fields are useful when you want to:
• merge two or more database fields.
• combine database fields with fixed data.
• combine database fields with non-printable characters.

Chapter 2 — Designing Labels
24 XMLLabel v6.10 User’s Guide
Formulas can include control characters such as EOT (ASCII 4), GS (ASCII 29), and RS (ASCII 30). Including control characters is useful when printing bar codes with embedded control characters, for example in EDI messages in two dimensional (2D) bar code symbologies.
Variable formula names cannot contain curly brackets ({}) or ampersands (&). You must enclose the variable in curly brackets if a variable in the formula has a name containing one of these characters: + - * / < > = ^ % ! ".
When building formulas for UCC/EAN 128 bar codes, you may need FNC1(Function Code 1). You use the control character (FNC1) for such cases. You enter the Function Code 1 character as {FNC1}.
Note: Printer fonts normally do not print control characters.
To design a concatenated field
1 Declare the individual fields, even if they are not used separately.
2 Create the concatenated field using a formula.
The following example explains how to create specific concatenated fields.
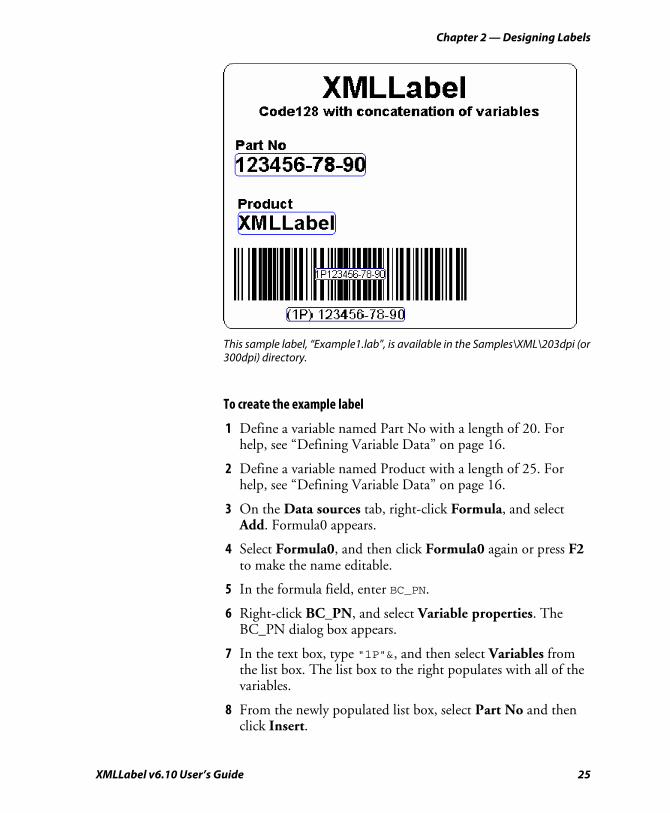
Example 1: Code 128 With Manufacturer’s Part Number Example 1 explains how to create the following label including a Code 128 bar code with the manufacturer’s part number, using a FACT Data Identifier (DI). The DI for part number is 1P.
Chapter 2 — Designing Labels
XMLLabel v6.10 User’s Guide 25
This sample label, “Example1.lab”, is available in the Samples\XML\203dpi (or 300dpi) directory.
To create the example label
1 Define a variable named Part No with a length of 20. For help, see “Defining Variable Data” on page 16.
2 Define a variable named Product with a length of 25. For help, see “Defining Variable Data” on page 16.
3 On the Data sources tab, right-click Formula, and select Add. Formula0 appears.
4 Select Formula0, and then click Formula0 again or press F2 to make the name editable.
5 In the formula field, enter BC_PN.
6 Right-click BC_PN, and select Variable properties. The BC_PN dialog box appears.
7 In the text box, type "1P"&, and then select Variables from the list box. The list box to the right populates with all of the variables.
8 From the newly populated list box, select Part No and then click Insert.

Chapter 2 — Designing Labels
26 XMLLabel v6.10 User’s Guide
9 Select the Output tab.
10 In the Maximum length field, enter 22 and click OK.
11 On the Data sources tab, right-click Formula (1) and select Add. Formula1 appears under BC_PN.

Chapter 2 — Designing Labels
XMLLabel v6.10 User’s Guide 27
12 Select Formula1, and then click Formula1 again or press F2 to make the name editable.
13 In the formula field, enter HR_PN.
14 Right-click formula HR_PN, and select Variable properties. The HR_PN dialog box appears.
15 In the text box, type "(1P) "& (there is a space after the close parenthesis), and then select Variables from the list box. The list box to the right populates with all of the variables.
16 From the newly populated list box, select Part No and click Insert.
17 Select the Output tab, and set the length to 25 and click OK.
18 Drag the formulas and variables to the label, and select Text or Barcode as appropriate.
Example 2: EAN128 With Two Merged Data Fields Example 2 explains how to create a label including an EAN128 bar code with two merged data fields.
This sample label, “Example2.lab,” is available in the Samples\XML\203dpi (or 300dpi) directory.

Chapter 2 — Designing Labels
28 XMLLabel v6.10 User’s Guide
The bar code should include these two internal data fields:
• AI for Location is 90 (internal use only)
• AI for Product Group is 91 (internal use only)
Since the lengths of the fields are not fixed, you need to put a separator character (FNC1) between the Location Field and the AI for the product group.
To create the Example 2 label
1 Define a variable named Location with a length of 10. For help, see “Defining Variable Data” on page 16.
2 Define a variable named Product Group with a length of 10. For help, see “Defining Variable Data” on page 16.
3 On the Data sources tab, right-click Formula and select Add. Formula0 appears.
4 Select Formula0, and then click Formula0 again or press F2 to make the name editable.
5 In the formula field, enter BC_LOC_PG and press Enter.
6 Right-click formula BC_LOC_PG and select Variable properties. The BC_LOC_PG dialog box appears.
7 In the text box, type “90”&, select Variables from the list box, and then select Location from the newly populated list box.
8 Click Insert.
9 In the text box, type & “{FNC1}”&”91”&, select Variables from the list box, and then select Product Group from the newly populated list box.

Chapter 2 — Designing Labels
XMLLabel v6.10 User’s Guide 29
10 Click Insert.
11 Select the Output tab.
12 In the Maximum length field, enter 25 and click OK.
13 On the Data sources tab, right-click Formula and select Add. Formula1 appears.
14 Select Formula1, and then click Formula1 again or press F2 to make the name editable.
15 In the formula field, enter HR_LOC_PG and press Enter.
16 Right-click formula HR_LOC_PG and select Variable properties. The HR_LOC_PG dialog box appears.
17 In the text box, type “(90) “&, select Variables from the list box, and then select Location from the newly populated list box.
18 Click Insert.
19 In the text box, type & “(91) “&, select Variables from the list box, and then select Location from the newly populated list box.
20 Click Insert.
21 Select the Output tab.

Chapter 2 — Designing Labels
30 XMLLabel v6.10 User’s Guide
22 In the Maximum length field, enter 31 and click OK.
23 Drag the formulas and variables to the label, and select Text or Barcode as appropriate.
Optimizing Label Printing Speed If you are not satisfied with your label throughput, you can increase your print speed by choosing the correct font.
To change the font
1 Double-click the text in the label. The Text dialog box appears.
2 Select the correct font from the Font list.
Using Printer Resident Fonts You should use printer resident fonts for fixed text. If you use Windows fonts, these fonts are sent as graphics causing the label to print slower.

Chapter 2 — Designing Labels
XMLLabel v6.10 User’s Guide 31
Note: You must use printer resident fonts for variable text.
Using Scaleable Fonts You can scale these fonts into any size. You can enter width in a percent of the nominal width, which makes it very flexible. If you want to alter the nominal size, select the point size (mm or inch) and then the width and height in percent.
Example:
Set the height to 16 points and then decrease the width to 67%.

Chapter 2 — Designing Labels
32 XMLLabel v6.10 User’s Guide

XMLLabel v6.10 User’s Guide 33
Printing Labels
The unique architecture of XMLLabel makes it easy for you to convert existing .lab files to .lbx files and send them down to the XMLReady printers. Use the suite of XMLLabel applications to convert your file, download it to the printer, and perform a test print to validate your label format.
This chapter contains these sections:
• Converting a .lab File Format to an .lbx File Format
• Downloading the .lbx File to Your Printer
• Printing a Test Label
3

Chapter 3 — Printing Labels
34 XMLLabel v6.10 User’s Guide
Converting a .lab File Format to an .lbx File Format Before you can start using the XMLLabel Wizard, make sure that:
• the target printer is installed in LabelShop PRO.
• you have a .lab file designed for the target printer model that you can convert.
To convert a .lab file to an .lbx file
1 Start the XMLLabel Wizard. There are two ways to start the XMLLabel Wizard:
• From within LabelShop PRO, choose Tools > XMLLabel Wizard.
• Choose Start > Programs > Intermec XMLLabel > XMLLabel Wizard.
The XMLLabel start window appears.
2 From the XMLLabel start window, click Next.
3 From the Step 1 – Input File window, click Browse. The Choose a LabelShop label format dialog box appears.

Chapter 3 — Printing Labels
XMLLabel v6.10 User’s Guide 35
4 Select the .lab file you want to convert and click Open. The destination directory and the label format file name appear in the text field on the Step 1 – Input File window.
5 Click Next.
6 From the Step 2 – Output Files window, select the check boxes to generate a test file or a variable file list file. Creating these files is optional, but it helps you test and debug problems with your label format.
7 Click Next.
8 From the Step 3 – Confirm File Names and Directories. window, make sure the file names and directories are correct and click Next.
XMLLabel creates your new format and optional test files and then displays the Finished! window.

Chapter 3 — Printing Labels
36 XMLLabel v6.10 User’s Guide
9 Select the check box to Run Label Loader Utility when you close the wizard.
10 Click Finish.
Downloading the .lbx File to Your Printer After you have converted your .lab file to an .lbx file, you need to download it to your printer. Use the Label Loader application to download the .lbx file to your Intermec XMLReady printer.
To download the .lbx file to your printer
1 Start the Label Loader application. There are three ways to start the Label Loader application:
• Label Loader automatically launches after you finish the XMLLabel Wizard if you have selected the check box to run Label Loader when you close the wizard.
• From within LabelShop PRO, choose Tools > Label Loader.
• Choose Start > Programs > Intermec XMLLabel > Label Loader.

Chapter 3 — Printing Labels
XMLLabel v6.10 User’s Guide 37
The Label Loader start window appears.
2 Click Next. The Add Printers window appears.
3 In the Broadcast Address / IPAddress text box, enter the broadcast address of the subnet (network segment) you want to search or the IP address of a specific printer.
Note: 255.255.255.255 scans your local network segment. If you want to scan another network segment, you must specify a broadcast address, such as 192.168.214.255. If you have problems with these settings, please contact your network administrator.
4 Click Add. Your broadcast address or IP address now appears in the Addresses to be scanned list. You can add multiple broadcast addresses and multiple IP addresses.

Chapter 3 — Printing Labels
38 XMLLabel v6.10 User’s Guide
5 Click Next. Label Loader scans the network for printers and displays them in the Add Groups window.
Note: If you have problems scanning for printers, see “Troubleshooting Problems and Possible Solutions” on page 48 for help.
6 Select the printers you want to use and click the right arrow ( - >) to move them into the Selected Printer(s) to send file(s) to list. Your printers now appear under My Printer Groups.
Chapter 3 — Printing Labels
XMLLabel v6.10 User’s Guide 39
You can create printer groups and remove printers you do not want to use. For help, see the next sections, “Creating Printer Groups” and “Removing Printers and Groups.”
7 Click Next.
8 Select the check boxes of the printers where you want to send the .lbx files and click Next.
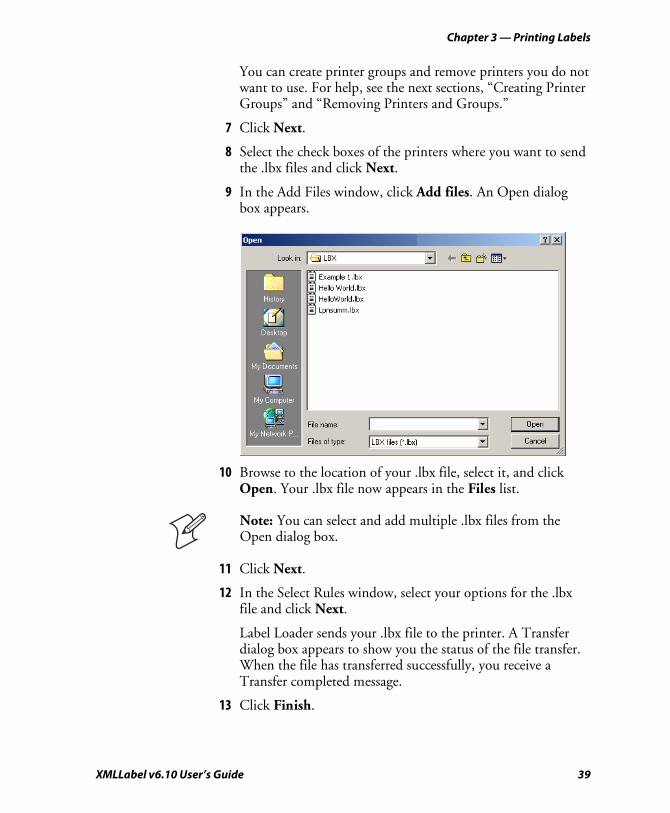
9 In the Add Files window, click Add files. An Open dialog box appears.
10 Browse to the location of your .lbx file, select it, and click Open. Your .lbx file now appears in the Files list.
Note: You can select and add multiple .lbx files from the Open dialog box.
11 Click Next.
12 In the Select Rules window, select your options for the .lbx file and click Next.
Label Loader sends your .lbx file to the printer. A Transfer dialog box appears to show you the status of the file transfer. When the file has transferred successfully, you receive a Transfer completed message.
13 Click Finish.

Chapter 3 — Printing Labels
40 XMLLabel v6.10 User’s Guide
Creating Printer Groups You can create printer groups and give them meaningful names to make setting up printing easier in your network. You can create multiple groups and add the network printers to several different groups. Label Loader automatically saves the printer groups you create so that you can use them at any time.
To create a printer group
1 There are two ways to create a group:
• From the Add Groups window, click Add Group.
• Place your mouse pointer in the Selected Printer(s) to send file(s) to box, right-click, and select Add Group.
NewGroup1 is added underneath My Printer Groups in the Selected Printer(s) to send file(s) to list box.
2 Type a name for your new printer group and then press Enter.
3 Select the new printer group you just created.
4 From the Printers on the network list, select the printers you want to add to the new group and click the right arrow ( - > ). The printers now appear underneath your new group.

Chapter 3 — Printing Labels
XMLLabel v6.10 User’s Guide 41
If an IP address is not found during scanning or your network does not support SNMP broadcasts, you can manually add a printer’s IP address.
To manually add a printer’s IP address
1 Place your mouse pointer in the Selected Printer(s) to send file(s) to box, right-click, and select Add IP Address. The IPAddress dialog box appears.
2 Add IP addresses in either of these ways:
• To add a single printer, enter the IP address and click OK.
• To add all printers in an IP range, select IP Range, enter a number in the to box, and then click OK.
Your IP address or range now appears in the Selected Printer(s) to send file(s) to box.
Chapter 3 — Printing Labels
42 XMLLabel v6.10 User’s Guide
Removing Printers and Groups Removing printers and groups is as easy as adding them. There are two ways to remove printers and groups.
To remove a printer or a printer group
• From the Selected Printer(s) to send file(s) to list, select the printer or printer group you want to remove and click the left arrow ( < - ). The printer or printer group disappears from the window.
• From the Selected Printer(s) to send file(s) to list, select the printer or printer group you want to remove, right-click with your mouse, and select to remove the printer or printer group.
Printing a Test Label If you chose to generate a test file when you were converting your .lab file to an .lbx file, you can use the test (.xml) file to make sure your label format converted correctly. The test file depends on which system you set in XMLLabel Preferences.
The test .xml file will look something like this example:
<?xml version="1.0" standalone="no" ?> <labels _FORMAT="Example 1.lbx" _QUANTITY="1"> <label> <variable name="Part No">123456-78-90</variable> <variable name="Product Name">XMLLabel</variable> </label> </labels>
The test label variables are populated with the values that you defined when creating your label format in LabelShop PRO.

Chapter 3 — Printing Labels
XMLLabel v6.10 User’s Guide 43
To print a test label
1 Start XMLLabel Print. Go to Start > Programs > Intermec XMLLabel > XMLLabel Print. The XMLLabel Print window appears.
2 Click Next.
3 From the Step 1 – Choose Printer window, click Scan for printers. The Advanced dialog box appears.
4 You can enter broadcast address or IP address information in two ways:
• Use the Scan for printers button:
a In the Broadcast Address / IPAddress text box, enter a broadcast address you want to search or the IP address of a specific printer.
b Click Add. Your broadcast address or IP address now appears in the Addresses to be scanned list. You can add multiple broadcast addresses and multiple IP addresses.
c Click OK. XMLLabel Print scans the network for printers and displays them in the Selected Printer to send file to list on the Step 1 – Choose Printer window.

Chapter 3 — Printing Labels
44 XMLLabel v6.10 User’s Guide
d Select the printer you want to send the .xml file to and click Next.
• Manually enter an IP address:
a Select the Use manual IP address check box.
b Type the IP address in the text box.
c Click Next.

Chapter 3 — Printing Labels
XMLLabel v6.10 User’s Guide 45
5 From the Step 2 – Choose File window, click Browse. An Open dialog box appears.
Note: The .xml files created by the XMLLabel wizard are always stored in the Program Files\Intermec\LabelShop PRO 6 \XML directory.
6 Browse to the location of your .xml file, select it, and click Open. The path to your .xml file now appears in the File box.
7 Click Next. A Send message box appears to show the status of downloading your .xml file to the printer and then the Finish window appears.

Chapter 3 — Printing Labels
46 XMLLabel v6.10 User’s Guide
You can click the link on the Finish window to see an example of the label you just printed with your XML data.
8 Click Finish.

XMLLabel v6.10 User’s Guide 47
Troubleshooting
Use this chapter to understand and fix problems, understand error messages, and understand how to use the sample labels provided with LabelShop PRO and XMLLabel.
4

Chapter 4 — Troubleshooting
48 XMLLabel v6.10 User’s Guide
Troubleshooting Problems and Possible Solutions Use the following table to find problems you may see while using XMLLabel along with possible solutions to fix them. Please contact Intermec technical support if you need more information.
Troubleshooting Problems and Possible Solutions
Problem Possible Solution
You send a label to the printer and nothing happens. (Oracle)
There may be a problem with the setup. Check the following items:
• Verify that the printing mode profile option is set to Synchronous-TCP/IP.
• Assign and enable the printer at the user level or higher level for each Label Type you want to print.
• Assign Label Type(s) to the business flows at the user level or at a higher level, and make sure they are enabled.
• Verify each Label Type has a label format defined and each label format has a variable defined.
Information is not available to print. Verify the appropriate information is available. For example, if an item is not serial controlled, the serial label is not available.
You send a label to the printer and nothing happens. (SAP AII)
There may be a problem with the setup. Check the following items:
• Make sure all of your TCP/IP or HTTP settings are correct.
• Make sure your port for TCP/IP printing is set to 9200.

Chapter 4 — Troubleshooting
XMLLabel v6.10 User’s Guide 49
Troubleshooting Problems and Possible Solutions (continued)
Problem Possible Solution
You send a label to the printer and nothing happens. (General)
Hardware printing or printing service problem. Check the printer’s network connection.
The printer power switch is turned off. Make sure the printer power switch is turned on.
The .lbx file is not available in the printer. Use Label Loader to send the .lbx file to the printer.
A label prints, but there are problems with the data or a field does not print.
There may be a problem with the setup. If you see a variable on the label that is not replaced by any data, check Define Label Format setup.
Make sure the variables in LabelShop PRO and the host system are identical. Check for capitalization and space characters.
If the variable text does not print correctly, check that the printer font supports the character set of the database or the encoding used in the host application.
The printer does not appear as expected when you scan the network.
There may be a problem with the network setup. Check the following items:
• Make sure your PC does not have an active firewall and that it allows SNMP traffic on the network.
• You may be using the wrong community setting. Check the community setting in the Scan for printers dialog box. For help, see your network administrator.
• The router may drop broadcast packages if you are scanning for printers outside your local network segment. Try specifying your IP addresses manually instead of using broadcast. See page 41 for help on how to enter an IP address manually.
• Your printer model or firmware version are not supported by XMLLabel.

Chapter 4 — Troubleshooting
50 XMLLabel v6.10 User’s Guide
Understanding Error Messages You may see one of these error messages if you encounter a problem in XMLLabel.
Understanding Error Messages
Error Message Definition
Error 516 The printer object file, which is a temporary file, has been corrupted or damaged. Retry and check that a file was generated. If the problem occurs again, please contact your supplier.
Error 520 The printer object file, which is a temporary file, was never created. Please retry. If the problem continues, please check your LabelShop and XMLLabel installation.
Error 521 You have used expressions in a formula that XMLLabel does not support. This may be, for example, a check digit calculation or a logical expression. Change the formula so that it contains only concatenated constants, variables and special characters.
Error 522 You have tried to use an ASCII character using char (nnn) statement in a formula. Change the formula to use printable syntax, for example {RS} for ASCII 30.
Error 523 You cannot use a formula inside another formula. Make the variable as a formula in a single step.
Using Sample Labels If you are having problems creating or printing labels, you can use the sample labels that contain correct printer settings to troubleshoot your label.
The sample LabelShop PRO label (.lab) files are located in this directory:
Program Files\Intermec\LabelShop PRO 6\Samples\Labels \XML\203dpi or 300dpi

Chapter 4 — Troubleshooting
XMLLabel v6.10 User’s Guide 51
Each directory contains the following labels:
• Shipping.lab
• Wipcont.lab
• Flowcontrol.lab
• Location.lab
• Lpn.lab
• Lpncont.lab
• Lpnsumm.lab
• Material.lab
• Serial.lab
• SGTIN-96_Hex.lab (requires an RFID-enabled printer)
• Shipcont.lab
• SSCC-96_Hex.lab (requires an RFID-enabled printer)
You can use these labels as templates for all supported Intermec XMLReady printers. The sample labels were created for the EasyCoder PM4i printer. You can use these files to create .lbx files for another printer model.
To create .lbx files for another printer model
1 Open the .lab file in LabelShop PRO.
2 Select the printer model you want to use.
3 Save the .lab file.
4 Run the XMLLabel wizard to create the .lbx file.
If you do not need to make any changes to the sample labels for testing, the .lbx file for each .lab file is available in this directory:
Program Files\Intermec\LabelShop PRO 6\Samples\LBX \203dpi or 300dpi
Chapter 4 — Troubleshooting
52 XMLLabel v6.10 User’s Guide


Corporate Headquarters6001 36th Avenue WestEverett, Washington 98203U.S.A.
tel 425.348.2600
fax 425.355.9551
www.intermec.com
XMLLabel v6.10 User's Guide
*075224-002*P/N 075224-002