6820 series 80-column printer terminal holder...
TRANSCRIPT
80-Column Printer Terminal Holder6820, 6821, 6822
6820 Series
Installation Instructions

ii 6820 Series 80-Column Printer Terminal Holder Installation Instructions
Intermec Technologies Corporation
Worldwide Headquarters6001 36th Ave.W.Everett, WA 98203U.S.A.
www.intermec.com
The information contained herein is provided solely for the purpose of allowing customers to operate and service Intermec-manufactured equipment and is not to be released, reproduced, or used for any other purpose without written permission of Intermec Technologies Corporation.
Information and specifications contained in this document are subject to change without prior notice and do not represent a commitment on the part of Intermec Technologies Corporation.
© 2008-2012 by Intermec Technologies Corporation. All rights reserved.
The word Intermec, the Intermec logo, Norand, ArciTech, Beverage Routebook, CrossBar, dcBrowser, Duratherm, EasyADC, EasyCoder, EasySet, Fingerprint, INCA (under license), i-gistics, Intellitag, Intellitag Gen2, JANUS, LabelShop, MobileLAN, Picolink, Ready-to-Work, RoutePower, Sabre, ScanPlus, ShopScan, Smart Mobile Computing, SmartSystems, TE 2000, Trakker Antares, and Vista Powered are either trademarks or registered trademarks of Intermec Technologies Corporation.
There are U.S. and foreign patents as well as U.S. and foreign patents pending.

ContentsSafety Information . . . . . . . . . . . . . . . . . . . . . . . . . . . . . . . . . . . 5
About These Instructions . . . . . . . . . . . . . . . . . . . . . . . . . . . . . 5Holder Installation Kit Contents . . . . . . . . . . . . . . . . . 6Tools Required . . . . . . . . . . . . . . . . . . . . . . . . . . . . . . . . . 7
Installing the Holder . . . . . . . . . . . . . . . . . . . . . . . . . . . . . . . . . 7Removing the Existing Holder . . . . . . . . . . . . . . . . . . . 7Installing Cables for the New Holder . . . . . . . . . . . . 14Installing the New Holder . . . . . . . . . . . . . . . . . . . . . . 18Inserting the Computer in the Holder . . . . . . . . . . . 18Configuring the Printer to Communicate
with Your Computer. . . . . . . . . . . . . . . . . . . . . . . . . 20
More Information . . . . . . . . . . . . . . . . . . . . . . . . . . . . . . . . . . . 22
6820 Series 80-Column Printer Terminal Holder Installation Instructions iii

iv 6820 Series 80-Column Printer Terminal Holder Installation Instructions

Safety InformationYour safety is extremely important. Read and follow all warnings and cautions in this document before handling and operating Intermec equipment. You can be seriously injured, and equipment and data can be damaged if you do not follow the safety warnings and cautions.
This section explains how to identify and understand cautions and notes that are in this document. You may also see icons that tell you when to follow ESD procedures and when to take special precautions for handling optical parts.
About These InstructionsA terminal holder connects Intermec computers to the 6820, 6821, or 6822 printers. These instructions explain how to install the holder in the printer.
For simplicity, these instructions refer to all compatible printers as the 6820. Differences between installing the holder in a fixed printer or in a portable printer are called out where appropriate.
A caution alerts you to an operating procedure, practice, condition, or statement that must be strictly observed to prevent equipment damage or destruction, or corruption or loss of data.
This icon appears at the beginning of any procedure in this manual that could cause you to touch components (such as printed circuit boards) that are susceptible to damage from electrostatic discharge (ESD). When you see this icon, you must follow standard ESD guidelines to avoid damaging the equipment you are servicing.
Note: Notes either provide extra information about a topic or contain special instructions for handling a particular condition or set of circumstances.
6820 Series 80-Column Printer Terminal Holder Installation Instructions 5

Holder Installation Kit Contents
If you are installing a Bluetooth-enabled holder, you also need:
• the 6820 Printer Configuration Utility.
• a programming cable (P/N 226-270-001) to connect the printer to your PC.
Note: Your installation kit may come with cables. These are not necessary for installing the terminal holder and should be discarded.
Item Computer Part Number
Holder assembly (1 ea.)
700/700C 203-645-101203-693-102 (Bluetooth)
CK61 203-739-101203-739-102 (Bluetooth)
CN3 203-842-001 (Bluetooth, fixed printers only)203-881-001 (Bluetooth, portable printers only)
CN3e 203-872-001 (Bluetooth, fixed printers only)203-882-001 (Bluetooth, portable printers only)
CN4 203-908-001 (Bluetooth, portable printers only)203-910-001 (Bluetooth, fixed printers only)
CN4e 203-909-001 (Bluetooth, portable printers only)203-911-001 (Bluetooth, fixed printers only)
CN70 203-967-001
CN70e 203-966-001 (Bluetooth)
Flathead screws, 8-32 x 1.25 in (4 ea.)
All 801-115-000 (portable printer)800-562-001 (fixed printer)
Spacers (4 ea.) CN3/CN3e,CN4/CN4e
642-874-001 (portable printers only)
Adapter (1 ea.) CN3/CN3e,CN4/CN4e
642-850-001 (fixed printers only)
ESD cover (1ea.)
CN70/CN70e
655-441-001 (fixed printers only)
6 6820 Series 80-Column Printer Terminal Holder Installation Instructions

Tools RequiredYou need these tools to install the holder in the printer:
• #1 Phillips screwdriver
• #0 Phillips screwdriver
Installing the HolderTo install the holder, you need to follow the steps below. These steps are explained in the next sections.
1 Remove the existing holder.
2 Install the cables for the new holder.
3 Install the new holder.
4 Insert the computer in the holder.
5 Configure the printer to communicate with your computer.
Removing the Existing HolderThe steps for removing the holder are different depending on whether the 6820 printer is fixed or portable:
• For a portable printer, see the next procedure.
• For a fixed printer, see “To remove the existing holder from a fixed printer” on page 10.
The Bluetooth-enabled holder in this kit must be installed by a qualified technician. The hardware in this kit is warranted for 1 year. If the hardware is installed by non-Intermec-authorized service personnel and there is a hardware failure, at Intermec’s sole discretion, if the cause of this failure is determined to be related to improper installation of the Bluetooth-enabled holder, any warranty periods remaining for any components of the kit will be voided. Any costs associated with the remediation of such failures will be the responsibility of the user.
To remove the existing holder from a portable printer1 Disconnect external power and remove the internal battery
(if installed) from the printer.
2 Open the printer lid.
6820 Series 80-Column Printer Terminal Holder Installation Instructions 7
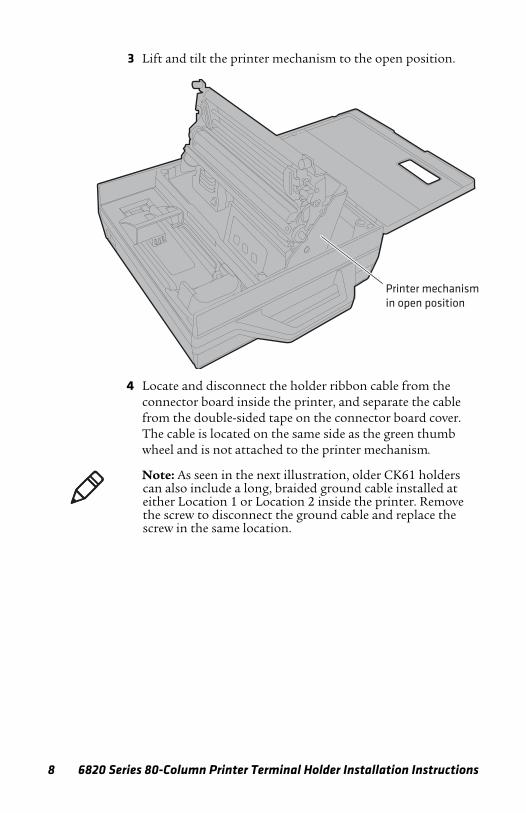
3 Lift and tilt the printer mechanism to the open position.
4 Locate and disconnect the holder ribbon cable from the connector board inside the printer, and separate the cable from the double-sided tape on the connector board cover. The cable is located on the same side as the green thumb wheel and is not attached to the printer mechanism.
Printer mechanismin open position
Note: As seen in the next illustration, older CK61 holders can also include a long, braided ground cable installed at either Location 1 or Location 2 inside the printer. Remove the screw to disconnect the ground cable and replace the screw in the same location.
8 6820 Series 80-Column Printer Terminal Holder Installation Instructions

2
Disconnecting the CK61 Holder Cables: In addition to the ribbon cable, the CK61 holder (shown above) may also have a ground cable attached at Location 1 or Location 2.
5 Tilt the printer mechanism back into place.
6 Remove the four flathead screws that secure the existing holder to the printer.
7 Lift the holder from the printer. The holder is still connected to the printer by a ground cable.
8 Disconnect the ground cable and carefully pull the ribbon cable out from under the printer mechanism. You may need to lift the mechanism out of the way.
To printer mechanism
Printer mechanismremoved for clarity
Screw(4 places)
CK61 holder only
Location
Location 1
Holder ribbon cable
6820 Series 80-Column Printer Terminal Holder Installation Instructions 9

Removing the Holder: Disconnect the ground cable under the holder to remove the holder from the printer. Older CK61 holders may have two ground cables (shown above).
To remove the existing holder from a fixed printer1 Remove the four screws that secure the access cover and
remove the cover from the printer. Be careful not to lose the standoff under each screw.
2 Disconnect the ribbon cable from the extender cable in the printer.
10 6820 Series 80-Column Printer Terminal Holder Installation Instructions

Disconnecting Cables For a Left-Side Holder
Printer mechanismremoved for clarity
Screw(4 places)
Access cover
Holder Standoff(4 places)
Extendercable
6820 Series 80-Column Printer Terminal Holder Installation Instructions 11

Disconnecting Cables For a Right-Side Holder
3 Remove the four flathead screws that secure the holder to the printer.
4 Lift the holder from the printer, disconnect the ground cable from the extender cable, and remove the holder.
Printer mechanismremoved for clarity
Holder
Screw(4 places) Access cover
Standoff(4 places)
Extendercable
Note: Older CK61 holders may have two ground cables that must be disconnected before removing the holder from the printer as seen in the next illustrations.
12 6820 Series 80-Column Printer Terminal Holder Installation Instructions

Removing the Existing Holder (Left-Side): Older CK61 holder with two ground cables (shown here).
Screw(4 places)
Printer mechanismremoved for clarity
6820 Series 80-Column Printer Terminal Holder Installation Instructions 13

ces)
14 6820 Series 80-Column Printer Terminal Holder Installation Instructions
Removing the Existing Holder (Right-Side): Older CK61 holder with two ground cables (shown here).
Installing Cables for the New HolderThe steps for installing cables for the new holder are different depending on whether the 6820 printer is fixed or portable.
• For a portable printer, see the next procedure.
• For a fixed printer, see “To install cables in a fixed printer” on page 16.
Screw(4 pla
To install cables in a portable printer1 Lift and tilt the printer mechanism to the open position.
2 For the 700, CK61, and CN70/CN70e holders, continue with the next step.
For the CN3/CN3e and CN4/CN4e holders, place four spacers (P/N 642-874-001) on the feet of the holder.

3 Position the holder over the printer with the connector end of the holder towards the printer handle.
4 Route the ribbon cable into the bay, under the printer mechanism, and out the other side.
5 Insert the ribbon cable connector into the connector in the printer. The connector is keyed and can only be inserted one way.
6 Tilt the printer mechanism back into place.
Spacer(4 places)
Screw(4 places)
Connector endof holder
6820 Series 80-Column Printer Terminal Holder Installation Instructions 15

7 Insert the metal connector on the end of the printer ground cable into the connector on the holder ground wire. Make sure the connectors are fully seated.
8 If you are replacing an older CK61 holder, connect the new holder ground cable to either of the printer ground cables.
9 If you are installing a Bluetooth-enabled holder, place the new FCC label over the existing FCC label inside of the printer case. The new label indicates that related parameters have changed.
For the CN3/CN3e or CN4/CN4e holder, route the cables through the bottom of the adapter (P/N 642-850-001) and place the holder in the adapter.
To install cables in a fixed printer1 Position the holder near the mounting bay. The connector
end of the holder should be closer to the 6820 front panel buttons.
2 For the 700, CK61, and CN70/CN70e holders, continue with the next step.
Adapter(CN3/CN4 only)
Screw(4 places)
Connector endof holder
16 6820 Series 80-Column Printer Terminal Holder Installation Instructions

3 Route the ribbon cable into the printer through the slot in the side of the case.
4 Connect the cable to the ribbon cable extender and lock the connectors.
5 Connect the holder ground cable to the printer ground cable. Make sure the connector is fully seated.
6 If you are replacing an older CK61 holder, connect the new holder ground cable to either one of the existing extender cables. Route the extra cable back into the printer and place it into the empty area outside the paper tray.
7 Inside the printer cable area, place the access cover standoffs over the screw holes and replace the printer access cover.
8 For the CN70/CN70e holders, install the ESD cover.
a Turn the printer over.
b Remove the protective film from the ESD cover to expose the adhesive.
c Angle the ESD cover onto the holder and press firmly.
6820 Series 80-Column Printer Terminal Holder Installation Instructions 17
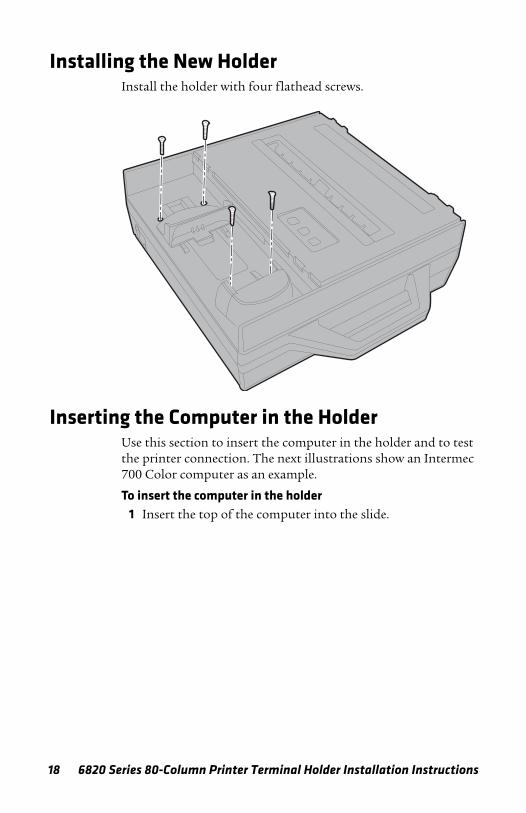
Installing the New HolderInstall the holder with four flathead screws.
Inserting the Computer in the HolderUse this section to insert the computer in the holder and to test the printer connection. The next illustrations show an Intermec 700 Color computer as an example.
To insert the computer in the holder1 Insert the top of the computer into the slide.
18 6820 Series 80-Column Printer Terminal Holder Installation Instructions

2 Use the computer to push the slide to the end of its track.
3 Lower the bottom of the computer into the holder, and slide the computer into the docking connector until it is fully seated.
Slide
Holder
6820 Series 80-Column Printer Terminal Holder Installation Instructions 19

4 Turn on the printer and check for the appropriate charge indicator on the installed computer. The charge indicator shows that you have a good connection to the new holder.
5 Use your application to generate a printout to test the holder connection. You must have a printer test application or use another application to produce a printout to test the holder connection.
Configuring the Printer to Communicate with Your Computer
Use the 6820 Printer Configuration Utility to configure your printer to communicate with your computer, change printer configuration options, and download fonts. The Printer Configuration Utility is available in the 6820 Tool Kit.
To configure the printer1 Lift and tilt the printer mechanism to the open position.
2 If you are installing a Bluetooth holder, disconnect the holder ribbon cable, or the utility cannot communicate with the printer.
Disconnect terminal holderribbon cable for Bluetooth terminal holders
20 6820 Series 80-Column Printer Terminal Holder Installation Instructions

3 Plug the 6820 programming cable (P/N 226-270-001) into the side of the printer mechanism.
4 Connect the cable to your desktop PC.
5 Start the Printer Configuration Utility.
6820 Series 80-Column Printer Terminal Holder Installation Instructions 21

6 Click Get 6820 Configuration. Follow the prompts to communicate with the printer.
7 When you are connected to the printer, note the displayed settings, make any necessary adjustments, and click Set 6820 Configuration. The configuration is sent to the printer.
8 If you are installing a Bluetooth-enabled holder, connect the holder ribbon cable.
More InformationVisit the Intermec technical knowledge base (Knowledge Central) at www.intermec.com and click Support > Knowledge Central to review technical information or to request technical support for your Intermec product.
Note: Select the DTR protocol when you use a Bluetooth holder.
22 6820 Series 80-Column Printer Terminal Holder Installation Instructions


Worldwide Headquarters6001 36th Avenue WestEverett, Washington 98203U.S.A.tel 425.348.2600fax 425.355.9551www.intermec.com
© 2012 Intermec Technologies Corporation. All rights reserved.
6820 Series 80-Column Printer Terminal Holder Installation Instructions
*942-007-006*P/N 942-007-006