user’s guide guÍa del usuario · 2008-10-20 · never climb onto the piano or stand. never climb...
TRANSCRIPT

USER’S GUIDEGUÍA DEL USUARIO
AP31/33-ES-1
ES
AP31/33_ES_cover.p65 03.10.7, 11:00 AMPage 1 Adobe PageMaker 6.5J/PPC

427B-E-002A
AP31/33_ES_cover.p65 03.10.8, 11:35 AMPage 2 Adobe PageMaker 6.5J/PPC

11. Do not defeat the safety purpose of thepolarized plug. A polarized plug has twoblades with one wider than the other. Thewide blade is provided for your safety. Ifthe provided plug does not fit into youroutlet, consult an electrician for replace-ment of the obsolete outlet.
12. Unplug this product during lightning stormsor when unused for long periods of time.
13. Care should be taken so that objects donot fall and liquids are not spilled into theenclosure through openings.
14. The product should be serviced by quali-fied service personnel when:
A. The power-supply cord or the plug hasbeen damaged; or
B Objects have fallen, or liquid has beenspilled into the product; or
C.The product has been exposed to rain ormoisture; or
D.The product does not appear to operatenormally or exhibits a marked change inperformance; or
E. The product has been dropped, or theenclosure damaged.
15. Do not attempt to service the product be-yond that described in the user - mainte-nance instructions. All other servicingshould be referred to qualified service per-sonnel.
16. Clean only with dry cloth.
17. Protect the power cord from being walkedon or pinched particularly at plugs, con-venience receptacles, and the point wherethey exit from the product.
18. Only use attachments/accessories speci-fied by the manufacturer.
* 10 : applies to the AP-31V/AP-33V* 11 : applies to the AP-31/AP-33
WARNING – When using electric products,basic precautions should always be followed,including the following:
1. Read all the instructions before using theproduct.
2. Heed all warnings.
3. Follow all instructions.
4. To reduce the risk of injury, close supervi-sion is necessary when a product is usednear children.
5. Do not use this product near water – forexample, near a bathtub, washbowl,kitchen sink, in a wet basement, or near aswimming pool, or the like.
6. This product should be used only with astand that is specified by the manufac-turer.
7. This product, either alone or in combina-tion with an amplifier and headphones orspeakers, may be capable of producingsound levels that could cause permanenthearing loss. Do not operate for a longperiod of time at a high volume level or ata level that is uncomfortable. If you expe-rience any hearing loss or ringing in theears, you should consult an audiologist.
8. The product should be located so that itslocation or position does not interfere withits proper ventilation.
9. The product should be located away fromheat sources such as radiators, heat reg-isters, or other products that produce heat.
10. The product should be connected to apower supply only of the type described inthe operating instructions or as marked onthe product.
KEEP THESE INSTRUCTIONS
IMPORTANT SAFETY INSTRUCTIONS“INSTRUCTIONS PERTAINING TO A RISK OF FIRE, ELECTRIC SHOCK,
OR INJURY TO PERSONS”
427B-E-003B
AP31/33_ES_cover.p65 03.10.7, 11:00 AMPage 3 Adobe PageMaker 6.5J/PPC

NOTICEThis equipment has been tested and found to comply with the limits for a Class B digitaldevice, pursuant to Part 15 of the FCC Rules. These limits are designed to providereasonable protection against harmful interference in a residential installation. Thisequipment generates, uses and can radiate radio frequency energy and, if not installedand used in accordance with the instructions, may cause harmful interference to radiocommunications. However, there is no guarantee that interference will not occur in a particularinstallation. If this equipment does cause harmful interference to radio or television reception,which can be determined by turning the equipment off and on, the user is encouraged totry to correct the interference by one or more of the following measures:
• Reorient or relocate the receiving antenna.• Increase the separation between the equipment and receiver.• Connect the equipment into an outlet on a circuit different from that to which the re-
ceiver is connected.• Consult the dealer or an experienced radio/TV technician for help.
FCC WARNINGChanges or modifications not expressly approved by the party responsible for compliancecould void the user’s authority to operate the equipment.
TO REDUCE THE RISK OF FIRE OR ELECTRIC SHOCK, REFER SERVICING TO QUALIFIEDSERVICE PERSONNEL.
427B-E-004A
AP31/33_ES_cover.p65 03.10.7, 11:00 AMPage 4 Adobe PageMaker 6.5J/PPC

E-1
Introduction
Congratulations on your selection of the CASIO Digital Piano. This piano is a sophisticated musicalinstrument that blends the very best of traditional piano feel and sound quality with the latest thatmodern electronics technology has to offer.Before using the instrument, be sure to carefully read through the instructions contained in this manual.
Please keep all information for future reference.
CAUTIONRISK OF ELECTRIC SHOCK
DO NOT OPEN
CAUTION: TO REDUCE THE RISK OF ELECTRICSHOCK, DO NOT REMOVE COVER (OR BACK). NO USER-SERVICEABLE PARTS INSIDE. REFER SERVICING TOQUALIFIED SERVICE PERSONNEL.
The lightning flash with arrowhead symbol, within an equilateraltriangle, is intended to alert the user to the presence ofuninsulated “dangerous voltage” within the product’s enclosurethat may be of sufficient magnitude to constitute a risk of electricshock to persons.
The exclamation point within an equilateral triangle is intended toalert the user to the presence of important operating and mainte-nance (servicing) instructions in the literature accompanying theproduct.
427B-E-005B
CASIO ELECTRONICS CO., LTD.Unit 6, 1000North Circular RoadLondon NW2 7JD, U.K.
This mark applies to the AP-31V/AP-33V only.Please keep all information for future reference.
AP31/33_E_01_09.p65 03.10.7, 11:00 AMPage 1 Adobe PageMaker 6.5J/PPC

E-2
Safety Precautions
427B-E-006A
SymbolsVarious symbols are used in this user’s guideand on the product itself to ensure that theproduct is used safely and correctly, and toprevent injury to the user and other personsas well as damage to property. Those sym-bols along with their meanings are shownbelow.
WARNING
This indication stipulates matters that havethe risk of causing death or serious injuryif the product is operated incorrectly whileignoring this indication.
CAUTION
This indication stipulates matters that havethe risk of causing injury as well as mat-ters for which there is the likelihood ofoccurrence of physical damage only if theproduct is operated incorrectly while ig-noring this indication.
Symbol Examples
This triangle symbol ( ) meansthat the user should be careful.(The example at left indicateselectrical shock caution.)
This circle with a line through it( ) means that the indicated ac-tion must not be performed. In-dications within or nearby thissymbol are specifically prohib-ited. (The example at left indi-cates that disassembly is prohib-ited.)
The black dot ( ) means that theindicated action must be per-formed. Indications within thissymbol are actions that are spe-cifically instructed to be per-formed. (The example at left indi-cates that the power plug must beunplugged from the electricalsocket.)
AP31/33_E_01_09.p65 03.10.7, 11:00 AMPage 2 Adobe PageMaker 6.5J/PPC

E-3427B-E-007A
WARNING
Power CordImproper use of the power cord cancreate the risk of fire and electricshock. Always be sure to observethe following precautions.• Use only the power cord speci-
fied for this piano.• Make sure that the power source
you are using matches the ratingmarked on the instrument itself.
• Do not use an extension cord toplug multiple devices into thesame power outlet.
Power CordImproper use of the power cord cancreate the risk of personal injury,material damage, fire and electricshock. Always be sure to observethe following precautions.• Do not place heavy objects on the
power cord or subject it to heat.• Never try to modify the power
cord or subject it to excessivebending.
• Never twist or pull on the powercord.
• Should the power cord or plugbecome damaged, contact youroriginal retailer or an authorizedCASIO service provider.
Power CordDo not touch the plug with wethands when it is plugged in. Thismay cause electrical shock.
Do not locate the piano on an unstable sur-face.Never locate the piano on a surfacethat is wobbly, tilted, or otherwiseunstable*. An unstable surface cancause the piano to fall over, creat-ing the risk of personal injury.
* Avoid areas where there are mul-tiple layers of carpeting, andwhere cables are running underthe piano.
Always make sure you se-cure the piano to the standwith the screws that are pro-vided. An unsecured pianocan fall from the stand, cre-ating the risk of personal in-jury.
Never climb onto the piano or stand.Never climb onto the pianoor hang from its edges. Doingso can cause the piano to fallover, creating the risk of per-sonal injury. Special care con-cerning this point is requiredin households where there aresmall children.
Never dispose of the piano by burning it.Never dispose of the piano by burn-ing it. Doing so creates the risk offire and personal injury due to ex-plosion.
Do not place containers containing wateror other liquids on the instrument.Do not place the following objectson the instrument. Placing such ob-jects on the instrument may causefire or electrical shock if they spilland get inside the instrument.• Containers filled with water or
other liquids (including vases,potted plants, cups, cosmetics andmedicines)
• Small metal objects (includinghairpins, sewing needles andcoins)
• Flammable objects• Naked flame sources, such as
lighted candles
AP31/33_E_01_09.p65 03.10.7, 11:00 AMPage 3 Adobe PageMaker 6.5J/PPC

E-4
Avoid dropping the piano and other strongimpact.Continued use of the piano after ithas been damaged by dropping orby other external impact creates therisk of fire and electric shock. Im-mediately perform the followingsteps whenever the piano is dam-aged by impact.1. Turn off piano power.2. Unplug the piano from its power
outlet.3. Contact your original retailer or
an authorized CASIO service pro-vider.
Do not put plastic bags over your head orin your mouth.Never allow the plastic bags thatthe piano and its accessories comein to be placed over the head orswallowed. Doing so creates the riskof suffocation. Special care concern-ing this point is required in house-holds where there are small chil-dren.
Opening and closing the keyboard coverMake sure that the keyboard coveris completely opened as far as it willgo. When closing the keyboardcover, hold the front of the coverand close it slowly. Pinching yourfingers between the piano and key-board cover creates the risk of per-sonal injury.
427B-E-008A
In the event a foreign object shouldhappen to get inside the instrument,please take the following actions:1. Turn off power.2. Unplug the power cord from the
wall outlet.3. Consult with the dealer where
you purchased the instrument orwith an authorized CASIO ser-vice provider.
Do not expose this piano to rain or mois-ture.To reduce the risk of fire or electricshock, do not expose this piano torain or moisture.
Never try to take the piano apart or modifyit.Never try to take the piano apart ormodify it in any way. Doing so cre-ates the risk of electric shock, burninjury, or other personal injury.Leave all internal inspection, adjust-ment, and repair up to your origi-nal retailer or an authorized CASIOservice provider.
Precautions concerning smoke, abnormalodor, and other abnormalitiesContinued use of the piano while itis emitting smoke or abnormal odor,or while it is displaying other ab-normalities creates the risk of fireand electric shock. Immediately per-form the following steps wheneveryou notice any abnormality.1. Turn off piano power.2. Unplug the piano from its power
outlet.3. Contact your original retailer or
an authorized CASIO service pro-vider.
AP31/33_E_01_09.p65 03.10.7, 11:00 AMPage 4 Adobe PageMaker 6.5J/PPC

E-5
CAUTION
Power CordImproper use of the power cord cancreate the risk of fire and electricshock. Always be sure to observethe following precautions.• Never locate the power cord near
a stove or other source of heat.• When unplugging from an out-
let, never pull on the cord.(Always grasp the plug whenpulling.)
• After use turn off the powerswitch of the instrument and un-plug the power cord from theelectrical outlet.
Power PlugImproper use of the power plug cancreate the risk of fire and electricshock. Always be sure to observethe following precautions.• Push the plug fully into the power
outlet as far as it will go.• Unplug from the power outlet
during lightening storms, andwhen you do not plan to use thepiano for a long time (such as be-fore a long trip).
• Unplug from the power outlet atleast once a year and clean anydust build up between the prongsof the plug.
Moving the pianoBe sure to perform the followingsteps before moving the piano. Fail-ure to do so can damage the powercord, creating the risk of fire andelectric shock.1. Unplug the piano from its power
outlet.2. Unplug the pedal connecting
cord, and all cords and otheritems connected to the back of thepiano.
CleaningBefore cleaning the piano, unplug itfrom the power outlet. Failure to doso can damage the power cord, cre-ating the risk of fire and electricshock. It can also cause the piano tofall over, creating the risk of per-sonal injury.
Never climb onto the piano or stand.Doing so can cause the piano to fallover, creating the risk of personalinjury. Special care concerning thisitem is required in householdswhere there are small children.
ConnectorConnect only the specified devicesto the piano's connectors. Connect-ing non-specified items creates therisk of fire and electric shock.
LocationAvoid locating the piano in the fol-lowing types of areas. Subjecting thepiano to the conditions describedbelow creates the risk of fire andelectric shock.
• Areas expose to high humidity orlarge amounts of dust
• Near food preparation areas andother areas where it is exposed tooil smoke
• Near a heater, on a heated carpet,in direct sunlight, inside a closedautomobile parked in the sun, andany other area subjected to veryhigh temperature
Never place the piano directly ontofurniture or other item that has afinished surface. The rubber feet onthe bottom of the piano can reactwith the paint or other coatings, re-sulting in soiling of or damage tothe finished surface. Be sure to layfelt or some other material on thefinished surface before placing thepiano on it.
427B-E-009A
AP31/33_E_01_09.p65 03.10.7, 11:00 AMPage 5 Adobe PageMaker 6.5J/PPC

E-6 427B-E-010A
Do not place heave objects on the piano.Never place heavy objects on top ofthe piano. Doing so can cause thestand to tip over and the object tofall, creating the risk of personal in-jury.
Volume settingDo not play at very loud volumesfor a long time. This precaution isespecially important when using theheadphones. Long-term exposure tovery loud sound can damage yourhearing.
Assemble the stand properly.Failure to do so can cause the standto fall over and the piano to fallfrom the stand, creating the risk ofpersonal injury.Make sure your assemble the standin accordance with the instructionsthat come with it, and ensure thatall connections are secure. Alsomake sure that you choose an ap-propriate location for the stand.• When placing the piano onto the
stand, take care that you do notpinch your fingers between thepiano and the stand.
• At least two people shouldlift the piano when plac-ing it onto the stand ormoving it. Trying to movethe piano alone can causethe stand to fall over, cre-ating the risk of personalinjury.
• Do not drag the stand ortilt it forward or backwhen placing the pianoonto the stand or movingit. Doing so can cause thepiano to fall over, creatingthe risk of personal injury.
• Periodically check the screws thatsecure the piano to the stand forlooseness. If a screw is loose, re-tighten it. Loose screws can causethe stand to tip over and the pi-ano to fall, creating the risk ofpersonal injury.
AP31/33_E_01_09.p65 03.10.7, 11:00 AMPage 6 Adobe PageMaker 6.5J/PPC

E-7
Operational Precautions
Locating the Unit
Avoid the following locations.• Areas exposed to direct sunlight and high humidity.• Areas subjected to very low temperatures.• Near a radio, TV, video deck, or tuner (unit can cause interference with audio or video signals)
Care of the Unit
• Never use benzene, alcohol, thinner or other such chemicals to clean the exterior of the unit.• To clean the keyboard, use a soft cloth dampened with a weak solution of a mild neutral detergent and water. Wring
out all excess moisture from the cloth before wiping.• Severe impact can cause problems.
When transporting the piano, use soft cloth to pack around the keyboard and buttons to protect them against damage.• Never try to repair or modify any part of the piano.
Any attempt to repair or modify the piano can cause problems with operation.• Avoid using this piano near televisions, radios, etc.
Because this piano uses digital circuitry, it may cause interference with other electronic devices such as televisions,radios, etc.
• In case of a problem, check that buttons and connections are correct, as indicated in this manual. If the piano stilldoes not work properly, contact your retailer or a nearby dealer. Never try to repair the piano yourself.
Lithium Battery
This unit is equipped with a lithium battery to provide power needed to retain memory contents while unit power isturned off. Should the lithium battery go dead, all memory contents will be lost whenever you turn unit power off. Thenormal life of the lithium battery is five years from the time that the battery was installed. Be sure to periodicallycontact your retailer or authorized service provider to have the lithium battery replaced. Note that you will be chargedseparately for lithium battery replacement.
• Note that CASIO COMPUTER CO., LTD. shall not be held liable for any damages or losses or any claims by thirdparties arising from corruption or loss of data caused by malfunction or repair of the unit, or from battery replace-ment.
You may notice lines in the finish of the case of this piano. These lines are the result of the molding process used toshape the plastic of the case. They are not cracks or breaks in the plastic, and are no cause for concern.
NOTE • Unauthorized reproduction of this manual in its entirety or in part is expressly forbidden. All rights reserved.• CASIO COMPUTER CO., LTD. shall not be held liable for any damages or losses or any claims by third parties arising from use of this
product or this manual.• The contents of this manual are subject to change without notice.
427B-E-011A
AP31/33_E_01_09.p65 03.10.7, 11:00 AMPage 7 Adobe PageMaker 6.5J/PPC

E-8
8 versatile tones• Eight instrument tones including piano and pipe organ provide plenty of performance versatility.• Other features include digital effects that control the acoustical characteristic of tones, as well as three pedal effects for all the
nuances of an acoustic piano.
Metronome• A simple operation lets you set the tempo and the beat of the metronome to suit the tune you want to play. It’s the perfect
practice tool for players of all levels.
8 demo tunes• Eight demo tunes demonstrate how to use each of the built-in tones.
Memory• Built-in memory lets you store a performance for later playback.
You can play along with playback on the keyboard, and even create an ensemble effect by using a keyboard tone that is differentfrom the recorded tone.
Powerful keyboard setting functions• A selection of powerful keyboard setting functions help you get create exactly the musical mood you want.
Transpose adjusts the key of the keyboard in semitone steps.Tuning provides a means to tune with another musical instrument.Touch Select adjusts the intensity of the output sound in accordance with the amount of pressure you apply to the keyboard.
MIDI terminal• Connecting to another MIDI musical instrument lets you play two instruments from the keyboard of your CELVIANO. You can
also connect to a commercially available MIDI sequencer to increase the number of parts you can play.
Main Features
427B-E-012B
AP31/33_E_01_09.p65 03.10.7, 11:00 AMPage 8 Adobe PageMaker 6.5J/PPC
E-9
Contents
427B-E-013B
IMPORTANT SAFETYINSTRUCTIONS
Introduction ............................... E-1
Safety Precautions .................... E-2
Operational Precautions ........... E-7
Main Features ............................ E-8
Contents ..................................... E-9
General Guide .......................... E-10Connecting Headphones .........................E-10
Attachment of the Score Stand................E-11
Basic Operation ....................... E-12Using Tones .............................................E-12
Using the Pedals ......................................E-14
Using the Metronome ..............................E-15
Using the Memory ................... E-16About the Memory ...................................E-16
Recording.................................................E-16
Playback...................................................E-17
Deleting Memory Contents ......................E-17
Using Demo Tunes .................. E-18
Keyboard Settings................... E-19Using Touch Select ..................................E-19
Using Transpose ......................................E-19
Adjusting the Tuning of the Piano ............E-20
MIDI ........................................... E-21What is MIDI? ..........................................E-21
What you can do with MIDI ......................E-21
MIDI Connections ....................................E-21
MIDI Channels .........................................E-21
Simultaneous Receive OverMultiple Channels (Multi-Timbre).............E-21
Setting the Keyboard Channel .................E-22
Sending Memory Playback Data .............E-22
Program Change Number Settings .........E-23
Turning Local Control On and Off ............E-24
MIDI Data Notes ......................................E-25
Troubleshooting ...................... E-26
Assembly Instructions ............ E-27Attachment of the Score Stand................E-29
Specifications .......................... E-30
Appendix/Apéndice ...................A-1Initial Power On Settings............................A-1
MIDI Data Format .......................A-2Channel Messages ....................................A-2
System Messages .....................................A-7
MIDI Implementation Chart
AP31/33_E_01_09.p65 03.10.7, 11:00 AMPage 9 Adobe PageMaker 6.5J/PPC

E-10
GRAND PIANO 2 PIANO 2 ELEC PIANO 2PIANO 1 ELEC PIANO 1
HARPSICHORDVIBRAPHONE
REVERBOFF ROOM STAGE HALL 1
POEWR
CONTROL
START/STOP
METRONOME
GRAND PIANO
MIN MAX
VOLUME
DEMO
RECORD
ON / OFF
POWER
CONTROL
START/STOP
METRONOME
GRAND PIANO
MIN MAX
VOLUME
DEMO
RECORD
ON / OFF
427B-E-014A
General Guide
• Key, button, and other names are indicated in the text of this manual using bold type.• See page E-27 for details on the stand.
METRONOME button
RECORD button
START/STOP button
Front
Headphone Jack
Power IndicatorGRAND PIANO button
VOLUME knob
CONTROL button
POWER button
Connecting HeadphonesConnect commercially available headphones to the CELVIANO’s headphones jack. This cuts off the built-in speakers, which means you can practice even late at night without disturbing others. To protect yourhearing, make sure that you do not set the volume level too high when using headphones.
HeadphonesIMPORTANT!
Whenever connecting headphone, first setthe VOLUME knob of the CELVIANO andthe volume controller of the externalequipment to relatively low volumesettings. You can later adjust volume tothe level you want after connections arecomplete.
AP31/33_E_10_15.p65 03.10.7, 11:00 AMPage 10 Adobe PageMaker 6.5J/PPC

E-11
GRAND PIANO 2 PIANO 2 ELEC PIANO 2PIANO 1 ELEC PIANO 1
HARPSICHORDVIBRAPHONE
REVERB CHORUS METRONOME BEAT METRONOME VOL TEMPOOFF ROOM STAGE HALL 1 HALL 2 OFF ON 0 2 3 21 210 5 64 8 9733 1204 5 6
POEWR
CONTROL
START/STOP
METRONOME
GRAND PIANO
MIN MAX
VOLUME
DEMO
RECORD
ON / OFF
MIDI
OUT IN
427B-E-015B
Make sure that the cover of the piano is fully open whenever you are playing on the keyboard.A partially open cover can suddenly close unexpectedly and pinch your fingers. CAUTION
Note Names A value next to a note name indicates the relative position of the noteon the keyboard as shown below.
C D E F G A B(H)
C C1
C2
C3
C4
C5
C6
C7
C8
* With the AP-31 and AP-33, the power cord is hard-wired to the bottom of the instrument.
Back PanelBottom
MIDI TerminalsAC Power Jack *
Bottom
Pedal Connector
AP31/33_E_10_15.p65 03.10.7, 11:00 AMPage 11 Adobe PageMaker 6.5J/PPC

E-12 427B-E-016B
Basic Operation
Using TonesThe following procedures describe everything you need toknow about selecting and using tones.
Selecting a ToneYour CELVIANO has a selection of 8 built-in tones.
• The names of the tones are marked above the keyboardkeys to which they are assigned.
• The GRAND PIANO tone was recorded with stereo sam-pling.
To select a tone
1. Press the POWER button to turn on CELVIANOpower.
2. Select the tone you want.• To select GRAND PIANO
Press the GRAND PIANO button. Note that GRANDPIANO is the initial default tone setting wheneveryou turn on power.
• To select one of the other tonesWhile holding down the CONTROL button, press thekeyboard key that corresponds to the tone you wantto select.* A note does not sound when you press a keyboard
key while holding down CONTROL.
3. Use the VOLUME knob to adjust the volume.• It is a good idea to set the volume to a relatively low
level at first.• Moving the knob towards MIN decreases volume,
while moving it towards MAX increases volume.
Using Digital EffectsYour CELVIANO provides you with a selection of digital ef-fects that you can apply to tones. The following providesgeneral descriptions of each effect, but the best way to findout how they affect tones is to experiment for yourself.
Digital Effect Types• REVERB
The REVERB effect gives you a choice of the four varia-tions listed below. Each one simulates the acoustics of dif-ferent environments.
ROOM ...... Small, intimate live houseSTAGE ..... Small stageHALL 1 .... Stage area of a large hallHALL 2 .... Audience area of a large hall
• CHORUSThe CHORUS effect is most effective for the E.PIANO tone.
• The names of the settings are marked above the keyboardkeys to which they are assigned.
4. Play something on the keyboard.• Adjust volume to the level you want as you play.
5. After you are finished playing, press the POWERbutton to turn off power.
Tone Keys
A0 B0 C1 D1
B0 C1 E1
MELLOW PIANO
ELEC PIANO 1
GRAND PIANO 2
HARPSICHORD
PIPE ORGAN
STRINGS
ELEC PIANO 2
Digital Effect Keys
E1 F1 G1 A1
B1F1 A1
REVERB OFF
ROOM
STAGE HALL 2
CHORUS OFF
CHORUS ON
HALL 1
GRAND PIANO
GRAND PIANO button
AP31/33_E_10_15.p65 03.10.7, 11:00 AMPage 12 Adobe PageMaker 6.5J/PPC

E-13427B-E-017B
• The above digital effect settings can be changed after youturn on power.
NOTE • Selecting a tone automatically selects the digital effects cur-
rently assigned to it.• Changes you make to digital effect settings are assigned to
the currently selected tone only.• Digital effect settings remain in effect until you turn off CELVI-
ANO power.• Demo tunes have their own digital effect settings, which are
automatically selected whenever you select a demo tune.
To select a digital effect
While holding down the CONTROL button, press thekeyboard key that corresponds to the digital effectyou want to select.• A note does not sound when you press a keyboard key
while holding down CONTROL.
Power on effect settingsThe table below shows the effect settings that are assigned toeach tone whenever you turn on CELVIANO power.
More about tones
PolyphonyThis piano can play up to 64 notes at the same time.Also note that some of the tones offer only 32-note polypho-ny (GRAND PIANO, MELLOW PIANO, ELEC PIANO 1,HARPSICHORD, STRINGS).
Touch ResponseThe touch response feature of this piano causes the volumeof the tones and the sound of the tones themselves to changeslightly in accordance with how much pressure you apply tothe keyboard, just like with an acoustic piano. Touch responseaffects the HARPSICHORD tone only slightly, because theoriginal musical instrument normally produces the samesound, no matter how much pressure is applied.
Digitally Sampled TonesThe tones of this piano are produced using digitally record-ed samples of actual musical instruments. Not all of the in-struments, however, can produce tones across the entire rangeplayed by this piano (A0 through C8). In such a case, digitalrecordings are used for the range that actually can be pro-duced by the original instrument, and synthesized tones areused for notes that cannot be produced naturally. Because ofthis, you may notice very slight differences between naturalnotes and synthesized notes in sound quality and in resultsproduced when using effects. These differences are normaland do not indicate malfunction.
Tone NameDigital Effect Setting
REVERB CHORUS
GRAND PIANO HALL 1 OFFMELLOW PIANO HALL 1 OFFGRAND PIANO 2 HALL 1 OFFELEC PIANO 1 HALL 1 ONELEC PIANO 2 HALL 1 ONHARPSICHORD HALL 1 OFFPIPE ORGAN HALL 1 OFFSTRINGS HALL 1 ON
AP31/33_E_10_15.p65 03.10.7, 11:00 AMPage 13 Adobe PageMaker 6.5J/PPC

E-14 427B-E-018B
The AP-33 comes equipped with the three pedalsshown in the illustration below.
Damper pedal
Soft/Sostenuto pedal
The AP-31 is equipped with the two pedals shown inthe illustration below. The left pedal normally func-tions as a soft pedal.
Soft pedal Damper pedalSostenuto pedal
Using the Pedals
Pedal functions• Damper pedal
Pressing this pedal causes notes to reverberate and to sus-tain longer.
• Soft pedalPressing this pedal dampens notes and slightly reducestheir volume. Only notes played after the pedal is depressedare affected, and any notes played before the pedal ispressed sound at their normal volume.
• Sostenuto pedalLike the damper pedal, this pedal causes notes to reverber-ate and to sustain longer. The difference between the twopedals is the timing when they are pressed. With the soste-nuto pedal, you press the pedal after depressing the notesyou want to sustain. Only the notes whose keyboard keysare depressed when the sostenuto pedal is pressed are af-fected.
To assign the sostenuto to the left pedal(AP-31 only)While holding down the left pedal, turn on CELVIANO pow-er. To return left pedal to soft pedal, turn power off and thenback on again.
NOTE • The following shows how pedal effects are applied during dif-
ferent types of operations.
Memory playback, demo tune play................... Pedal effects applied to notes played on the key-
board only.
AP31/33_E_10_15.p65 03.10.7, 11:00 AMPage 14 Adobe PageMaker 6.5J/PPC

E-15
Using the MetronomeThe metronome provides a reference beat that you can useduring your performances or practice sessions. You canchange the beat and the tempo of the metronome.
• The names of the settings are marked above the keyboardkeys to which they are assigned.
Using the Metronome
PREPARATION • Check to make sure that the indicator above the RECORD but-
ton is off. If the indicator is on, press the RECORD button toturn it off.
• See the section of this User’s Guide covering the memory fordetails on using the metronome in combination with the func-tion.
To use the metronome
1. Press METRONOME to start the metronome.• This starts the metronome sound.
2. Set the beat of the metronome.While holding down the CONTROL button, press thekeyboard key that corresponds to the beat setting youwant to select.• A note does not sound when you press a keyboard
key while holding down CONTROL.• The first value of the beat can be set to a value of 2
through 6, or 0 (unaccented beat).
3. Change the tempo setting as described below.• A note does not sound when you press a keyboard
key while holding down CONTROL.• While holding down the CONTROL button, press
keyboard key A2 (–) to decrease tempo or B2 (+) toincrease it. Holding down either keyboard key chang-es the setting at high speed. Pressing keyboard keyA2 (120) changes the tempo setting to 120.
• You can also change the tempo setting(beats perminute) by holding down the CONTROL button andusing keyboard keys B2 through A3 to input valuesfrom 0 to 9. You can input a two-digit or three-digittempo value. Note that the tempo value you input isapplied when you release the CONTROL button. Thetempo setting does not change if you input a one-digitvalue or a value that is outside of the allowable set-ting range.
• The tempo can be set within the range of 30 to 255(beats per minute).
4. When you want to stop the metronome, pressMETRONOME again.• Pressing METRONOME again restarts the metronome
sound using the current beat and tempo setting.• If you want to change both the tempo and the beat
before restarting the metronome, perform the aboveprocedure here.
NOTE • You can change metronome beat and tempo settings at any
time, even while the metronome is sounding.• You can also use the metronome in combination with memory
play. See the section of this User’s Guide covering the functionfor details.
Adjusting the Metronome VolumeUse the following procedure to increase and decrease the vol-ume of the metronome beat.
To adjust the metronome volume
While holding down the CONTROL button, press thekeyboard key that corresponds to the metronomevolume setting you want to select.• A note does not sound when you press a keyboard key
while holding down CONTROL.• You can set a value from 1 to 3.
NOTE The metronome volume is automatically set to 2 whenever youturn on piano power.
427B-E-019B
B1 B2C2 D2 E2 F2 G2 C3 D3 E3 F3 G3A2
B2F2 A2 F3 A3C2 E2 C3 E3
Beat Keys Tempo Keys
Number Input Keys
Metronome Volume Keys
AP31/33_E_10_15.p65 03.10.7, 11:00 AMPage 15 Adobe PageMaker 6.5J/PPC

E-16 427B-E-020A
Using the Memory
This section describes how to record keyboard play to mem-ory and playback data from memory.
About the Memory
Memory CapacityMemory can hold up to 2,500 notes (one song).
• Recording stops automatically and the indicator above theRECORD button goes out whenever memory becomes full.
Recorded DataThe following is a list of the data that can be recorded in mem-ory once recording starts.
• Anything you played on the keyboard (Received MIDI datais not recorded.)
• Tone settings and any tone setting changes• Beat setting used during recording• Pedal operations
Recorded Data StorageThis piano has a lithium battery to supply power to retainmemory contents even while power is off.* The life of thelithium battery is five years after the date of manufacture ofthe piano. Be sure to contact your CASIO dealer about hav-ing the lithium battery replaced every five years.
* Never turn off CELVIANO power while a record opera-tion is in progress.
IMPORTANT!• Recording new data to a song memory area automatically
deletes any data previously stored in that song memoryarea.
• Turning off power while a record operation is in progressdeletes anything recorded up to that point.
• CASIO shall not be held responsible for any losses by youor any third party due to loss of data caused by malfunctionor repair of this piano, or by battery replacement.
Recording
To record notes from the keyboard
PREPARATION • Select the tone and effects you want to start with.• If you want to use the metronome during recording, start the
metronome. Use the procedure under “Using the Metronome”on page E-15 to set the beat and the tempo.
1. Press the RECORD button to put the piano intorecord standby.• The indicator above the RECORD button flashes.• You can also change the metronome’s beat setting at
this time.• If you want the metronome to sound while you are
recording, press the METRONOME button here tostart the metronome.
2. Play something on the keyboard to start record-ing.• When you start recording, the indicator above the
RECORD button stops flashing and remains lit.• What you play sounds from the speakers and is re-
corded into memory.• You can also start recording by pressing the START/
STOP button. In this case, blank space is inserted inmemory from the point that you press the START/STOP button up to the point you start to play on thekeyboard.
3. After you are finished recording, press the START/STOP button to stop the record operation.• At this time the indicator above the RECORD button
goes out.• To stop the metronome, press the METRONOME but-
ton.• Here you can press the START/STOP button and play-
back the data you just recorded.
AP31/33_E_16_20.p65 03.10.7, 11:00 AMPage 16 Adobe PageMaker 6.5J/PPC

E-17
PlaybackUse the following procedure to play back from memory.
To playback from memory
1. If you want the metronome to sound during play-back of your recording, hold down the CON-TROL button and press keyboard key B3 to turnon the metronome.
• Using the metronome comes in handy, for example,when you want to record the left-hand part and thenpractice the right hand-part while playing back.
2. Press the START/STOP button to start playback.• If you turned on the metronome in step 1, the metro-
nome sounds during playback.• You can toggle the playback metronome sound on and
off by pressing the METRONOME button.• Playback stop automatically when the end of the tune
is reached.• To stop part way through, press the START/STOP
button.• To stop the metronome, press the METRONOME but-
ton.
NOTE • You can change the playback tempo while playing back from
memory.• You cannot change the tone when playing back from memory.
Deleting Memory Contents
IMPORTANT!The delete operation cannot be undone. Make sure you playback memory contents and confirm that you no longer needit before performing the following procedure.
To delete memory contents
1. Press the RECORD button to put the piano intorecord standby.
2. Press the START/STOP button twice to delete thecontents of the selected song area.
C4
Setting Range
B3 (black key): Metronome OFFB3: Metronome ON
427B-E-021A
AP31/33_E_16_20.p65 03.10.7, 11:00 AMPage 17 Adobe PageMaker 6.5J/PPC

E-18 427B-E-022B
Using Demo Tunes
Your CELVIANO comes with eight built-in demo tunes, eachof which features one of the eight built-in tones.
To play the demo tunes in sequence
While holding down the CONTROL button, press theSTART/STOP button.• All the demo tunes play in sequence, starting from the Tune
1.
To play a specific demo tune• To play the first of the demo tunes, start sequential demo
tune play and then press the GRAND PIANO button.• To play another of the demo tunes, start sequential demo
tune play and then hold down the CONTROL button andpress the keyboard key that corresponds to the tune youwant to play.
• The tune you select continues to repeat until you stop it.
To stop demo tune play
Press the START/STOP button to stop demo tune play.
NOTE • You cannot change the tempo or tone, or turn on the metro-
nome while a demo tune is playing.• Playing on the keyboard during demo tune play plays notes
using the demo tune’s tone.• You can adjust volume while demo playback is in progress.• Tone, digital effect, transpose, and tuning settings are changed
automatically when a demo tune is played. These changes aretemporary, and remain in effect only while the demo tune is play-ing.
• Pedal operations performed during demo tune play are appliedto notes played on the keyboard only. They are not applied todemo tune playback.
• Demo tune notes cannot be sent as MIDI data.
Demo Tune List
A0 B0 C1 D1
B0 C1 E1
MELLOW PIANO
ELEC PIANO 1
GRAND PIANO 2
HARPSICHORD
PIPE ORGAN
STRINGS
ELEC PIANO 2
Tone Keys
Tone (Keyboard Key) Title Composer Time
GRAND PIANO Etude Op.10-5 “Black Keys” F.F.Chopin 1’44”
MELLOW PIANO Träumerei R.Schumann 2’04”
GRAND PIANO 2 Variatio 30 [Goldberg-Variationen] J.S.Bach 1’05”
ELEC PIANO 1 Original — 1’59”
ELEC PIANO 2 Original — 1’01”
HARPSICHORD Praeludium [Partita 1] J.S.Bach 1’51”
PIPE ORGAN Jesus Bleibet Meine Freude J.S.Bach 1’18”
STRINGS Original — 1’35”
AP31/33_E_16_20.p65 03.10.7, 11:00 AMPage 18 Adobe PageMaker 6.5J/PPC

E-19
To change the transpose setting
While holding down the CONTROL button, select akey by pressing one of the keyboard illustrated below.
• A note does not sound when you press a keyboard keywhile holding down CONTROL.
NOTE The transpose value is automatically set to 0 (C) whenever youturn on CELVIANO power.
Touch Select SettingsC4 .................. <OFF>
C4 ................. <LIGHT>This setting produces strong output, even whenlight pressure is applied to the keyboard.
D4 .................. <MIDDLE>This is the standard setting.
E4 .................. <HEAVY>This setting requires relatively strong keyboardpressure to produce normal output.
To change the Touch Select setting
While still holding down the CONTROL button, se-lect the key touch by pressing one of the keyboardkeys illustrated below.
• A note does not sound when you press a keyboard keywhile holding down CONTROL.
NOTE Touch select is automatically set to MIDDLE whenever you turnon CELVIANO power.
Keyboard Settings
C4 (black key): LIGHT
Using TransposeTranspose lets you adjust the pitch of your CELVIANO insemitone steps. This means you can change the key of thepiano to suit the voice of a vocalist or the key of anothermusical instrument, without having to learn to play a piecein another key.Use the keys shown below to change the transpose setting.
Using Touch SelectThis setting lets you adjust the touch of the keyboard to suityour own playing style. This means you can select a strongertouch for those with powerful hands, and a lighter touch forbeginners and anyone else with less strength.Use the keys shown below to change the Touch Select set-ting.
Setting Range
E4 (black key)(black key) C
4
E4 (black key): HEAVYC4 : OFFD4 : MIDDLE
C4
D4C4
Setting Range
F5
F4 (black key)
C5
C5: Standard key
(black key) F4 F5
HigherLower
427B-E-023B
AP31/33_E_16_20.p65 03.10.7, 11:00 AMPage 19 Adobe PageMaker 6.5J/PPC

E-20
Adjusting the Tuning of the PianoYou can adjust the overall tuning of the piano for play alongwith another instrument. You can adjust tuning within a rangeof ±50 cents from A4 = 440.0Hz.
Use the keyboard keys noted below to adjust the tuning ofthe piano.
To adjust the tuning of the pianoAdjust the tuning as described below.
While holding down the CONTROL button, presskeyboard key E4 (–) to lower the tuning or F4 (+) toraise it. Each press of a key changes the tuning byabout 0.8 cents (1/128 semitone).• A note does not sound when you press a keyboard key
while holding down CONTROL.
NOTE Holding down the CONTROL button and pressing keyboard keysE4 (–) and F4 (+) at the same time returns tuning to the standardA4 = 440.0Hz.* 100 cents is equivalent to one semitone.
427B-E-024A
C4
Setting Range
E4: – (lowers the pitch)F4: + (raises the pitch)
AP31/33_E_16_20.p65 03.10.7, 11:00 AMPage 20 Adobe PageMaker 6.5J/PPC

E-21
What is MIDI?The letters MIDI stand for Musical Instrument Digital Inter-face, which is the name of a worldwide standard for digitalsignals and connectors that makes it possible to exchangemusical data between musical instruments and computers(machines) produced by different manufacturers. MIDI com-patible equipment can exchange keyboard key press, key re-lease, tone change, and other data as messages.Though you do not need any special knowledge about MIDIto use your CELVIANO as a stand-alone unit, MIDI opera-tions require a bit of specialized knowledge. This section pro-vides you with an overview of MIDI that will help to get yougoing.
What you can do with MIDISend
• What you play on the CELVIANO can be sent to the con-nected device as MIDI messages*1. The connected devicesounds notes in accordance with the messages it receives.
• MIDI messages*1 can be sent from the CELVIANO to acommercially available MIDI sequencer*2 for recording.
Receive
• The CELVIANO can be used to sound notes sent as MIDImessages from a connected device.
• Commercially available MIDI piano data can be sent froma MIDI sequencer*2 or MIDI-capable personal computerfor playback on the CELVIANO. Up to 16 parts can beplayed simultaneously by the CELVIANO.
427B-E-025A
MIDI
*1 Keyboard play and memory playback data can be sent asMIDI data. Demo tunes cannot be sent as MIDI data.
*2 A device that contains memory storage for MIDI data.Some MIDI sequencers feature external storage capabili-ties, which let you record a virtually unlimited number oftunes.
MIDI ConnectionsTwo MIDI cables, one for sending and one for receiving, arerequired for two-way recording and playback capabilitieswith a connected MIDI sequencer or other device.
MIDI ChannelsMIDI allows you to send the data for multiple parts at thesame time, with each part being sent over a separate MIDIchannel. There are 16 MIDI channels, numbered 1 through16, and MIDI channel data is always included whenever youexchange data (key press, pedal operation, etc.).Both the sending machine and the receiving machine mustbe set to the same channel for the receiving unit to correctlyreceive and play data. If the receiving machine is set to Chan-nel 2, for example, it receives only MIDI Channel 2 data, andall other channels are ignored.Your CELVIANO is equipped with multi-timbre capabilities,which means it can receive messages over all 16 MIDI chan-nels and play up to 16 parts at the same time.Keyboard and pedal operations performed on your CELVI-ANO are sent out by selecting a MIDI channel (1 to 16) andthen sending the appropriate message.
Simultaneous Receive Over MultipleChannels (Multi-Timbre)The Multi-Timbre mode makes it possible to assign theCELVIANO’s built-in tones to MIDI channels 1 through 16.Then you can simultaneously sound multiple channels to playfrom a commercially available multi-track sequencer.
NOTE • See “Assigning Tones to Individual Channels” on page E-22 for
details on assigning tones to each channel.• Up to 16 channels can be received simultaneously (Channel 1
through channel 16).• The number of channels to be received simultaneously must
be predetermined. If it becomes necessary to cancel a chan-nel, the cancel operation must be performed on the sendingside.
OUT IN
OUT INMIDI
GRAND PIANO 2 PIANO 2 ELEC PIANO 2PIANO 1 ELEC PIANO 1
HARPSICHORDVIBRAPHONE
REVERB CHORUS METRONOME BEAT METRONOME VOL TEMPOOFF ROOM STAGE HALL 1 HALL 2 OFF ON 0 2 3 21 210 5 64 8 9733 1204 5 6
POEWR
CONTROL
START/STOP
METRONOME
GRAND PIANO
MIN MAX
VOLUME
RECORD
ON / OFF
DEMO
MIDI cable: MK-5
Sender Receiver
MIDI musical instrumentMIDI sound moduleMIDI sequencerOther MIDI device
IN OUT
OUT INMIDI
GRAND PIANO 2 PIANO 2 ELEC PIANO 2PIANO 1 ELEC PIANO 1
HARPSICHORDVIBRAPHONE
REVERB CHORUS METRONOME BEAT METRONOME VOL TEMPOOFF ROOM STAGE HALL 1 HALL 2 OFF ON 0 2 3 21 210 5 64 8 9733 1204 5 6
POEWR
CONTROL
START/STOP
METRONOME
GRAND PIANO
MIN MAX
VOLUME
RECORD
ON / OFF
DEMO
MIDI cable: MK-5
SenderReceiver
MIDI musical instrumentMIDI sequencerOther MIDI device
AP31/33_E_21_25.p65 03.10.7, 11:00 AMPage 21 Adobe PageMaker 6.5J/PPC

E-22 427B-E-026A
Setting the Keyboard ChannelThis parameter sets the channel for MIDI messages to an ex-ternal device. You can set any MIDI channel in the range of 1to 16 as the keyboard channel.
To set the Keyboard Channel
While still holding down the CONTROL button, se-lect the Keyboard channel by pressing one of the key-board keys illustrated below.
Example: Channel 8
• A note does not sound when you press a keyboard keywhile holding down CONTROL.
NOTE The Keyboard Channel is automatically set to 1 whenever youturn on CELVIANO power.
Assigning Tones to Individual ChannelsYou can assign tones to channels using a Program Change mes-sage sent from a connected MIDI device. You cannot change thetone assigned to each channel from the CELVIANO.
NOTE The tone GRAND PIANO is automatically assigned to all chan-nels whenever you turn on CELVIANO power.
Sending Memory Playback DataYou can send memory playback as MIDI data. The send chan-nel used depends on the Keyboard Channel setting, as shownin the table below.
* When you have Channel 16 set as the keyboard channel,memory playback is send over Channel 1.
• Pedal effect data recorded to the memory is applied to play-back from the memory, and does not affect your perfor-mance on the keyboard. Likewise, pedal operations on theCELVIANO are applied to the keyboard only, and not toplayback from the memory.
Keyboard Play Keyboard ChannelMemory Keyboard Channel + 1*
C4 C7 (black key)
B5 (black key)
AP31/33_E_21_25.p65 03.10.7, 11:00 AMPage 22 Adobe PageMaker 6.5J/PPC

E-23427B-E-027B
Program Change Number SettingsThe tones of your CELVIANO have two different sets of program numbers: Type 1 sequential numbers and Type 2 numbers thatcorrespond to the General MIDI System (see “General MIDI” on page E-24). The tables below show the program numbers that areassigned, depending on whether you select Type 1 or Type 2 using the procedure under “To change the program change numbertype” on page E-24.
GRAND PIANO 0 0 0 0 0 0
MELLOW PIANO 0 0 1 0 0 1
GRAND PIANO 2 0 0 2 0 0 2
ELEC PIANO 1 0 0 3 0 0 3
ELEC PIANO 2 0 0 4 0 0 4
HARPSICHORD 0 0 5 0 0 5
PIPE ORGAN 0 0 6 0 0 6
STRINGS 0 0 7 0 0 7
Tone Name
Type 1
Send Receive
Bank Select
MSB LSB
Programnumbers
Bank Select
MSB LSB
Programnumbers
GRAND PIANO 2 0 0 2 0 0 —
MELLOW PIANO 3 0 0 3 0 0 —
GRAND PIANO 2 0 0 0 0 0 0 Acoustic Grand Piano
ELEC PIANO 1 16 0 4 16 0 4 —
ELEC PIANO 2 0 0 4 0 0 4 Electric Piano 1
HARPSICHORD 0 0 6 0 0 6 Harpsichord
PIPE ORGAN 24 0 19 24 0 19 —
STRINGS 0 0 48 0 0 48 Strings Ensemble 1
Tone Name
Type 2
Send Receive
Bank Select
MSB LSB
Programnumbers
Bank Select
MSB LSB
Programnumbers
CorrespondingGeneral MIDI Sound
AP31/33_E_21_25.p65 03.10.7, 11:00 AMPage 23 Adobe PageMaker 6.5J/PPC

E-24 427B-E-028A
Turning Local Control On and OffThis setting effectively determines whether or not the key-board and pedals of the CELVIANO are connected to theCELVIANO’s sound source, as illustrated below.
When Local Control is on (the normal setting), anythingplayed on the keyboard is sounded by the internal soundsource and simultaneously output from the MIDI OUT ter-minal. When off, anything played on the keyboard is outputfrom the MIDI OUT terminal only, without being soundedby the sound source.Local Control can be turned off when you are using theCELVIANO as the sound source of a connected sequencer orother device, and you want to guard against sound beingproduced should the CELVIANO keyboard be pressed acci-dentally.
To turn Local Control on and off
While still holding down the CONTROL button,switch Local Control on and off by pressing one ofthe keyboard keys illustrated below.
• A note does not sound when you press a keyboard keywhile holding down CONTROL.
NOTE • Note that no sound will be produced from the CELVIANO’s
speakers if you press the keyboard while Local Control is turnedoff.
• Local Control is turned on automatically whenever you turn onCELVIANO power or play a demo tune.
OUT INMIDI
Local Control
Keyboard
Pedals
Sound sourceON
OFF
General MIDIThe General MIDI System is a set of specifications for soundgenerating devices agreed upon by world MIDI manufactur-ers. These specifications were developed to allow the creationof music data that is not limited to specific equipment mak-ers and models. Among other things, General MIDI definesthe tone number sequence and the number of MIDI channelsthat can be used. Any device equipped with a sound sourcethat supports General MIDI is able to produce sounds of sim-ilar nuances, regardless of the manufacturer or model.
The Type 2 program change numbers of your CELVIANO as-sign program numbers to tones so they comply with the Gen-eral MIDI System.Type 2 program change numbers make it possible to receiveGeneral MIDI System data from a connected sequencer orother device, and play it using the CELVIANO’s tones. Toneswitching is performed only when a program number thatcorresponds to any of the CELVIANO’s non-bass tones is re-ceived. No tone switching is performed when any other pro-gram number is received.The table on page E-23 shows the program number assign-ments for Type 1 and Type 2.
To change the program change number type
While still holding down the CONTROL button, se-lect the Program Change Mode by pressing one ofthe keyboard keys illustrated below.
• A note does not sound when you press a keyboard keywhile holding down CONTROL.
• See the table on page E-23 for detailed information aboutType 1 and Type 2.
C4A5: TYPE 2
A5 (black key): TYPE 1
C4G5: ON
F5 (black key): OFF
AP31/33_E_21_25.p65 03.10.7, 11:00 AMPage 24 Adobe PageMaker 6.5J/PPC

E-25
MIDI Data NotesThis section provides details about the MIDI data your CELVI-ANO sends and receives. You can also find further technicalinformation in the “MIDI Data Format” and “MIDI Imple-mentation Chart”* at the end of this User ’s Guide.
* The MIDI Implementation Chart is a standard format sum-mary of how data is transferred between your CELVIANOand a connected MIDI device.
Keyboard Data (Note On, Note Off, Note
Number, Velocity)The following four types of keyboard data can be sent andreceived.
Data Meaning
Note On Keyboard key is pressed.Note Off Keyboard key is released.Note Number Which key is pressed.Velocity Pressure applied
Tone Change Data (Program Change)Whenever you change the tone on the CELVIANO, tonechange data (Program Change) is also sent out as MIDI data.Conversely, receipt of a Program Change from a connectedMIDI device causes the CELVIANO to change to the applica-ble tone. See “Program Change Number Settings” on pageE-23 for details.
Pedal and Effect Operation Data (Control
Change and Universal System Exclusive
Message)Control Change is used to send and receive data about damp-er, soft, and sostenuto pedal* depress and release, as well asdata about digital effects.
* AP-31 UsersThe AP-31 is equipped with only two pedals. The left-handpedal can be switched between soft and sostenuto. Thepedal effect applied by MIDI data depends on whether datais being sent or received.Send: Pressing the left pedal sends data that corresponds
to the current pedal effect setting (soft or sostenu-to).
Receive: Pedal effect is applied in accordance with the datareceived.
427B-E-029B
AP31/33_E_21_25.p65 03.10.7, 11:00 AMPage 25 Adobe PageMaker 6.5J/PPC
E-26 427B-E-030A
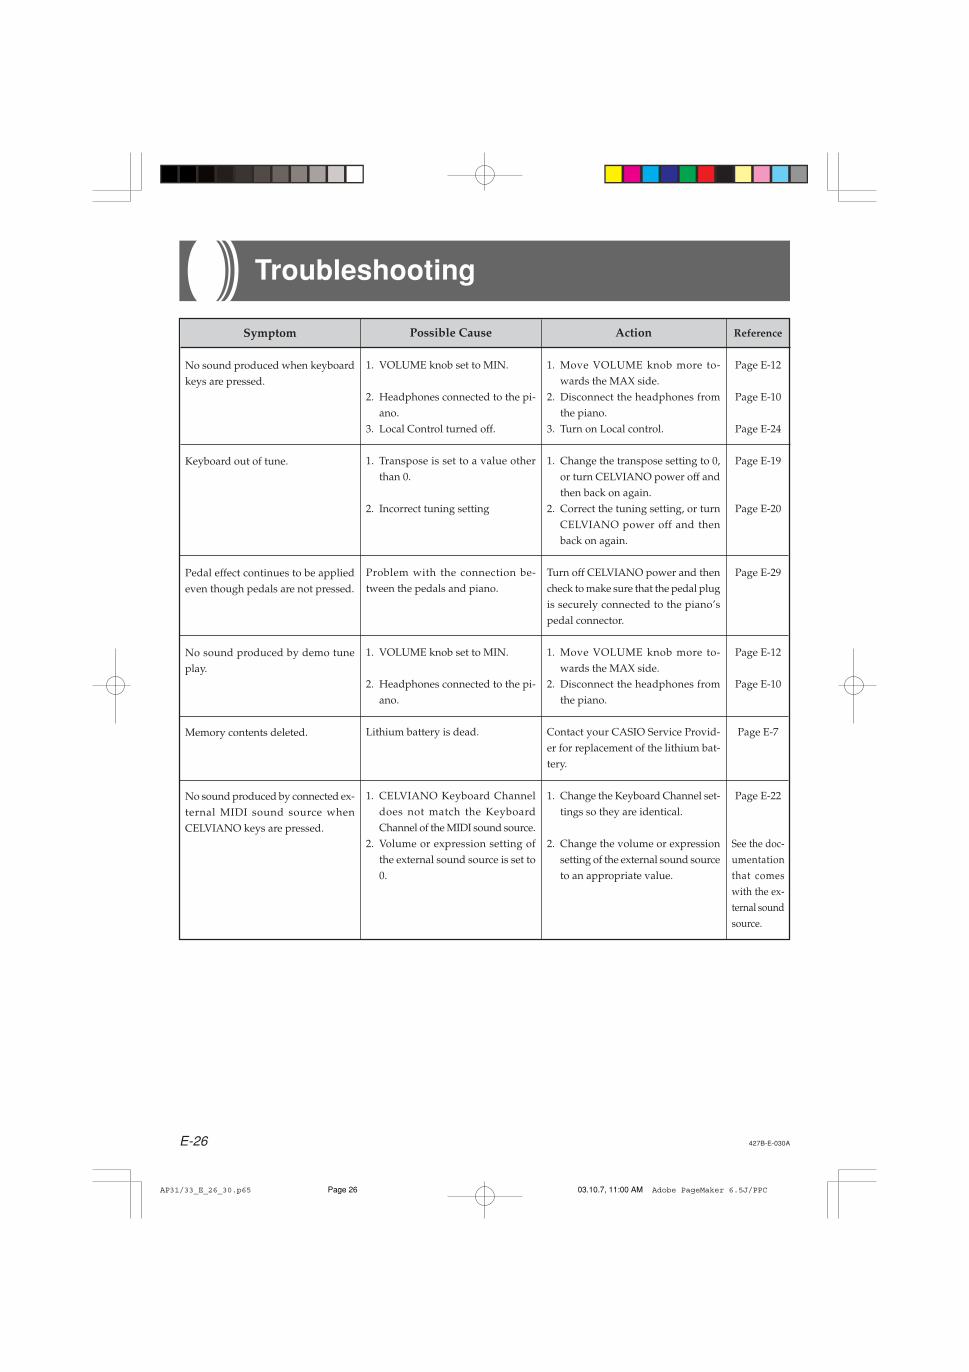
Troubleshooting
Symptom
No sound produced when keyboardkeys are pressed.
Keyboard out of tune.
Pedal effect continues to be appliedeven though pedals are not pressed.
No sound produced by demo tuneplay.
Memory contents deleted.
No sound produced by connected ex-ternal MIDI sound source whenCELVIANO keys are pressed.
Possible Cause
1. VOLUME knob set to MIN.
2. Headphones connected to the pi-ano.
3. Local Control turned off.
1. Transpose is set to a value otherthan 0.
2. Incorrect tuning setting
Problem with the connection be-tween the pedals and piano.
1. VOLUME knob set to MIN.
2. Headphones connected to the pi-ano.
Lithium battery is dead.
1. CELVIANO Keyboard Channeldoes not match the KeyboardChannel of the MIDI sound source.
2. Volume or expression setting ofthe external sound source is set to0.
Action
1. Move VOLUME knob more to-wards the MAX side.
2. Disconnect the headphones fromthe piano.
3. Turn on Local control.
1. Change the transpose setting to 0,or turn CELVIANO power off andthen back on again.
2. Correct the tuning setting, or turnCELVIANO power off and thenback on again.
Turn off CELVIANO power and thencheck to make sure that the pedal plugis securely connected to the piano’spedal connector.
1. Move VOLUME knob more to-wards the MAX side.
2. Disconnect the headphones fromthe piano.
Contact your CASIO Service Provid-er for replacement of the lithium bat-tery.
1. Change the Keyboard Channel set-tings so they are identical.
2. Change the volume or expressionsetting of the external sound sourceto an appropriate value.
Reference
Page E-12
Page E-10
Page E-24
Page E-19
Page E-20
Page E-29
Page E-12
Page E-10
Page E-7
Page E-22
See the doc-umentationthat comeswith the ex-ternal soundsource.
AP31/33_E_26_30.p65 03.10.7, 11:00 AMPage 26 Adobe PageMaker 6.5J/PPC

E-27
Assembly Instructions
IMPORTANT!• Be sure to assemble the stand on a flat surface.• This stand does not include any of the tools required to
assemble it. You should have a large Phillips head (+)screwdriver on hand for assembly.
Figure 1
• Check the items that come with the unit to make sure thateverything shown in Figure 1 (A through L) is included.All screws are in a plastic bag inside of the packing card-board.
Figure 3
1.Attach E brackets to side uprights A and B using the Iscrews (Figure 3).• When attaching the E bracket to the side upright B, slip
a J clip onto the I screw before screwing the I screwinto the upright at point 3.
2.Attach angle brackets F to side uprights A and B usingthe four I screws (Figure 3).
3. Install height adjustment screw H into hole 4 located inthe center of the back of crosspiece D (Figure 3).
4.Attach side uprights A and B to crosspiece D using thefour G screws (Figure 3).• Make sure that crosspiece D is correctly positioned as
indicated by 5 in the inset of Figure 3. It should be per-pendicular (at a 90-degree angle) to the two side uprights.Also make sure that uprights A and B are parallel witheach other. If the pieces are not positioned correctly, thenuts built into crosspiece D will not seat properly withthe G screws. This can result in stripping of the threadsand free turning of nuts.
Figure 2
• Before starting actual assembly of the stand, undo the clipat location 1 (Figure 2) where the pedal cable comes outthe back of crosspiece D. Pull out the coiled cable and re-fasten two clips at points 1 and 2 as shown in the illus-tration.
1 Assembling the stand
Refer to Figures 3, 4 and 5 as you assemble the stand accord-ing to the following procedure.
x4
x2
x1
x14x2
x2
G
F
H
IJ
K
A BC
D Lx2
x2 E
21
G
A
H
D
B
G
FI
CF
I
**
EI
J
I
3
L
L E
5
Side upright
Crosspiece
Bottom
4
Caution
• Take particular care to avoid injury when installinglegs and pedals, and when mounting the keyboardonto the stand.
• When assembling, make sure that the sliding keyboardcover of the piano body is completely closed. If thecover is left open during assembly, it may close sud-denly causing the fingers to be pinched between thepiano body and cover.
• Illustrations in this User’s Guide shows the AP-31.
427B-E-031A
AP31/33_E_26_30.p65 03.10.22, 5:05 PMPage 27 Adobe PageMaker 6.5J/PPC

E-28 427B-E-032A
L
EFigure 6
K
K
FF
Caution
Take care that you do not pinch your fingers betweenthe keyboard and stand!
Figure 4 2 Installing the Keyboardonto the Stand
Be sure that you securely anchor the keyboard to the standusing the K butterfly bolts (Figure 6).• Slide the screws on the bottom of the keyboard into the
slots in the two angle brackets F. Next, secure the keyboardto the stand with two butterfly bolts K (Figure 7).
Figure 7
Front
Back
• The butterfly bolts keep the keyboard from falling from thestand. Be sure that you always secure the keyboard withthe butterfly bolts.
6.Rotate height adjustment screw H until it supports cross-piece D, preventing the crosspiece from bending when youpress the pedals (Figure 5).
IMPORTANT!Be sure to install adjustment screw H and perform the ad-justment procedure described above before depressing thepedals. Failure to do so can result in damage to crosspieceD.
5.Attach back panel C to the E brackets and crosspiece D.Note that the back panel C should be installed so it is infront of the E brackets (Figure 4). Use the two L screws,six I screws to secure the back panel in place (Figures 3and 4). Note that you must also install the second J clip atthis time as shown in the illustration.• First, install the topmost L screws on the left and right
sides of the back panel C. Note that you should slip theother J clip onto the I screw at point 6 before youscrew the I screw in.
• The back panel C should rest on the feet of side uprightsA and B as indicated by 7 in the illustration. Press theback panel C against crosspiece D while installing theL screws.
Figure 5
H
(Back)
A
CB
I
6
J
J
7
L
AP31/33_E_26_30.p65 03.10.22, 5:05 PMPage 28 Adobe PageMaker 6.5J/PPC

E-29
Figure 9
1.Check to make sure that the piano’s POWER button is inthe OFF position. If it is ON, press the button to switch itOFF.
2.Attach the power cord that comes with the piano to thebottom of the piano.*
3.Plug the piano’s power cord into a wall outlet (Figure 9).
* 2: applies to the AP-31V and AP-33V
IMPORTANT!• The shapes of the piano’s power cord and wall outlet
should be different according to countries or regions. Theillustrations are examples.
• With the AP-31 and AP-33, the power cord is hard-wired tothe bottom of the instrument.
Caution
The screws that you use to assemble the stand may be-come loose after a long period due to changes in tem-perature and humidity, or vibration caused by normaluse, etc. Periodically check the screws used to fasten thestand and the butterfly bolts used to fasten the standand the piano, and tighten them whenever necessary.
4 Connecting to a Power Supply
Figure 8
Position the pedal plug as shown in Figure 8 and insert itinto the pedal connector on the bottom of the piano. Securethe pedal cable to the upright of the stand using the J clipsthat you installed when assembling the stand (Figure 8).
3 Connecting the Pedal3 Connecting the Pedal
Clip J
Pedal plug
Householdwall outletPower cord
427B-E-033B
Attachment of the Score StandInstall the music stand by inserting its pegs into the holes inthe top of the piano.
AP31/33_E_26_30.p65 03.10.22, 5:05 PMPage 29 Adobe PageMaker 6.5J/PPC

E-30 427B-E-034B
Specifications
Models: AP-31/AP-31V/AP-33/AP-33V
Keyboard: 88 piano keys (with touch response)
Polyphony: 64 notes, maximum
Tones: 8
Digital Effects: Reverb (4 types), Chorus
Demo Tunes: • Number of Tunes: 8
• Playback: Repeat (all tunes, one tune)
Memory: • Operations: Real-time recording, playback
• Capacity: Approximately 2,500 notes (one song)
• Memory Backup: Built-in lithium battery (Battery Life: 5 years)
Pedals: AP-31/AP-31V: Damper, Soft/Sostenuto (Selectable)
AP-33/AP-33V: Damper, Soft, Sostenuto
Other Functions: • Metronome: Beat (6 types), Tempo ( = 30 to 255)
• Touch Select: 3 types, off
• Transpose: 1 octave (F to C to F)
• Tuning: A4 = 440Hz ±50 cents (adjustable)
MIDI: 16 multi-timbre receive
Input/Output: • Headphones: Stereo standard jacks × 2
Output Impedance: 470ΩOutput Voltage: 18V (RMS) MAX
• MIDI (OUT) (IN)
Speakers: 12cm × 2 (Output: 20 W + 20 W)
Power Supply: AP-31/AP-33: 120V
AP-31V/AP-33V: 220-240V
Power Consumption: AP-31/AP-33: 60W
AP-31V/AP-33V: 60W
Dimensions: • CELVIANO (without stand): 137.0 × 42.5 × 19.0 cm (53 15/16 × 16 3/4 × 7 1/2 inch)
• CELVIANO: 139.0 × 47.0 × 81.0 cm (54 3/4 × 18 1/2 × 31 7/8 inch)
Weight: • CELVIANO (without stand): approximately 34 kg (74.8 lbs)
• CELVIANO: approximately 44 kg (96.8 lbs) (AP-31/AP-31V)
approximately 44 kg (96.8 lbs) (AP-33/AP-33V)
• Design and specifications are subject to change without notice.• AP-31 and AP-33 have hardwired power cords.• AP-31V and AP-33V have detachable power cords.
All of the items in these specifications apply to the AP-31, AP-31V, AP-33, and AP-33V, unless specifically noted otherwise.
AP31/33_E_26_30.p65 03.10.7, 11:00 AMPage 30 Adobe PageMaker 6.5J/PPC

A-1
Appendix/Apéndice
Initial Power On SettingsThe table below shows the initial settings of the CELVIANO whenever power is turned on.
Ajustes iniciales al activarse la alimentaciónLa tabla siguiente muestra los ajustes iniciales del CELVIANO siempre que se activa la alimentación.
Item Setting
Tone GRAND PIANO
Reverb HALL 1 (GRAND PIANO)
Chorus Off (GRAND PIANO)
Touch Select MIDDLE
Transpose C
Item Setting
Tuning A4 = 440.0Hz
Keyboard Channel Channel 1
Local Control On
Program Change Mode Type 1
Item Ajuste
Afinación A4 = 440,0Hz
Canal de teclado Canal 1
Control local Activado
Modo de cambio de programa Tipo 1
Item Ajuste
Sonido GRAND PIANO
Reverberación HALL 1 (GRAND PIANO)
Coro Desactivado (GRAND PIANO)
Selección de toque MIDDLE
Transposición C
427B-E-065A
AP-25/28_ES_Appendix.p65 03.10.7, 11:00 AMPage 1 Adobe PageMaker 6.5J/PPC

A-2 427B-E-066B
MIDI Data Format
n ....... Voice Channel Number = 0H to FH (Ch1 to Ch16)mm .. Data entry MSB value for the parameter that is se-
lected by RPN and NRPNll ....... Data entry LSB value for the parameter that is se-
lected by RPN and NRPN
Data EntryFormat
Byte 1 Byte 2 Byte 3
BnH 06H mmH (Data Entry MSB)BnH 26H llH (Data Entry LSB)
Items marked “” are receive only.
Channel MessagesNote MessagesNote Off
RecognitionFormat
n ....... Voice Channel Number = 0H to FH (Ch1 to Ch16)kk .... Note Number = 00H to 7FHvv .... Note Off Velocity = 00H to 7FH
RemarksNote Off Velocity value is ignored.
SendFormat
n ....... Voice Channel Number = 0H to FH (Ch1 to Ch16)kk .... Note Number = 15H to 6CHvv .... Note Off Velocity = 40H
Note On
RecognitionFormat
n ....... Voice Channel Number = 0H to FH (Ch1 to Ch16)kk .... Note Number = 00H to 7FHvv .... Note Off Velocity = 00H to 7FH
SendFormat
n ....... Voice Channel Number = 0H to FH (Ch1 to Ch16)kk .... Note Number = 15H to 6CHvv .... Note Off Velocity = 01 to 7FH
n ....... Voice Channel Number = 0H to FH (Ch1 to Ch16)mm .. Bank Number MSB = 00H, 02H, 03H, 10H, 18Hll ....... Bank Number LSB = 00H
SendA Bank Select message is sent at the same time when youselect a tone on the instrument.
Modulation Wheel
Format
n ....... Voice Channel Number = 0H to FH (Ch1 to Ch16)vv .... Modulation Depth = 00H to 7FH
Portamento Time
Format
Control ChangeBank SelectFormat
n ....... Voice Channel Number = 0H to FH (Ch1 to Ch16)vv .... Portamento Time = 00H to 7FH
Byte 1 Byte 2 Byte 3
8nH kkH vvH9nH kkH 00H
Byte 1 Byte 2 Byte 3
8nH kkH vvH
Byte 1 Byte 2 Byte 3
9nH kkH vvH
Byte 1 Byte 2 Byte 3
9nH kkH vvH
Byte 1 Byte 2 Byte 3
BnH 05H vvH
Byte 1 Byte 2 Byte 3
BnH 01H vvH
Byte 1 Byte 2 Byte 3
BnH 00H mmH (Bank Select MSB)BnH 20H llH (Bank Select LSB)
AP31/33_E_MIDI Data.p65 03.10.7, 11:00 AMPage 2 Adobe PageMaker 6.5J/PPC

A-3
Byte 1 Byte 2 Byte 3
BnH 0AH vvH
n ....... Voice Channel Number = 0H to FH (Ch1 to Ch16)vv .... Pan = 00H (left) to 40H (center) to 7FH (right)
Expression Controller
Format
n ....... Voice Channel Number = 0H to FH (Ch1 to Ch16)vv .... Expression = 00H to 7FH
Hold 1 (Damper Pedal)Format
Byte 1 Byte 2 Byte 3
BnH 0BH vvH
Recognitionn ....... Voice Channel Number = 0H to FH (Ch1 to Ch16)vv .... Hold 1 = 00H to 7FH (00H to 3FH:OFF, 40H to
7FH:ON)
Sendn ....... Voice Channel Number = 0H to FH (Ch1 to Ch16)vv .... Hold 1 = 00H,7FH(00H:OFF, 7FH:ON)
Byte 1 Byte 2 Byte 3
BnH 40H vvH
Byte 1 Byte 2 Byte 3
BnH 41H vvH
Recognitionn ....... Voice Channel Number = 0H to FH (Ch1 to Ch16)vv .... Portamento = 00H to 7FH (00H to 3FH:OFF, 40H
to 7FH:ON)
n ....... Voice Channel Number = 0H to FH (Ch1 to Ch16)vv .... Volume = 00H to 7FH
Pan
Format
Portamento
Format
Byte 1 Byte 2 Byte 3
BnH 07H vvH
Recognitionn ....... Voice Channel Number = 0H to FH (Ch1 to Ch16)vv .... Sostenuto = 00H to 7FH (00H to 3FH:OFF, 40H to
7FH:ON)
Sendn ....... Voice Channel Number = 0H to FH (Ch1 to Ch16)vv .... Sostenuto = 00H, 7FH (00H:OFF, 7FH:ON)
SoftFormat
Recognitionn ....... Voice Channel Number = 0H to FH (Ch1 to Ch16)vv .... Soft = 00H to 7FH (00H to 3FH:OFF, 40H to
7FH:ON)
Sendn ....... Voice Channel Number = 0H to FH (Ch1 to Ch16)vv .... Soft = 00H, 7FH(00H:OFF, 7FH:ON)
Resonance
Format
n ....... Voice Channel Number = 0H to FH (Ch1 to Ch16)vv .... Filter Resonance = 00H to 7FH
Byte 1 Byte 2 Byte 3
BnH 42H vvH
Byte 1 Byte 2 Byte 3
BnH 43H vvH
Byte 1 Byte 2 Byte 3
BnH 47H vvH
427B-E-067B
Channel Volume
Format
SostenutoFormat
Byte 1 Byte 2 Byte 3
BnH 48H vvH
n ....... Voice Channel Number = 0H to FH (Ch1 to Ch16)vv .... AMP Release Time = 00H to 7FH
Attack Time
Format
Release Time
Format
Byte 1 Byte 2 Byte 3
BnH 49H vvH
n ....... Voice Channel Number = 0H to FH (Ch1 to Ch16)vv .... AMP Attack Time = 00H to 7FH
AP31/33_E_MIDI Data.p65 03.10.7, 11:00 AMPage 3 Adobe PageMaker 6.5J/PPC

A-4
Vibrato RateNRPN MSB = 01HNRPN LSB = 08HData Entry MSB = mmH
mm .. Vibrato Rate = 00H to 40H to 7FH (-64 to 0 to +63)
RecognitionWhen the instrument receives this message, the presetVibrato Rate value for the tone is changed to the VibratoRate value that corresponds to the data entry MSB of thereceived message. There is no change when the value ofthe data entry MSB is 40H(0).
Vibrato DepthNRPN MSB = 01HNRPN LSB = 09HData Entry MSB = mmH
mm .. Vibrato Depth = 00H to 40H to 7FH (-64 to 0 to+63)
RecognitionWhen the instrument receives this message, the presetVibrato Depth value for the tone is changed to the valuethat corresponds to the data entry MSB of the receivedmessage. There is no change when the value of the dataentry MSB is 40H(0).
Vibrato DelayNRPN MSB = 01HNRPN LSB = 0AHData Entry MSB = mmH
mm .. Vibrato Delay = 00H to 40H to 7FH (-64 to 0 to +63)
RecognitionWhen the instrument receives this message, the presetVibrato Delay value for the tone is changed to the valuethat corresponds to the data entry MSB of the receivedmessage. There is no change when the value of the dataentry MSB is 40H(0).
Byte 1 Byte 2 Byte 3
BnH 5BH vvH
n ....... Voice Channel Number = 0H to FH (Ch1 to Ch16)vv .... Reverb Send Level = 00H to 7FH
Effect 3 Depth (Chorus Send Level)Format
Byte 1 Byte 2 Byte 3
BnH 5DH vvH
Byte 1 Byte 2 Byte 3
BnH 63H pmH (MSB)BnH 62H plH (LSB)
Byte 1 Byte 2 Byte 3
BnH 54H kkH
n ....... Voice Channel Number = 0H to FH (Ch1 to Ch16)kk .... Source Note Number = 00H to 7FH
Effect 1 Depth (Reverb Send Level)Format
NRPN MSB NRPN LSB Parameter
01H 08H Vibrato Rate01H 09H Vibrato Depth01H 0AH Vibrato Delay01H 20H TVF Cut Off Frequency01H 21H TVF Resonance01H 63H TVF/TVA Envelope Attack Time01H 64H TVF/TVA Envelope Decay Time01H 66H TVF/TVA Envelope Release Time
See “Vibrato Rate” through “TVF/TVA Envelope ReleaseTime” for the data entry MSB value range and other details.
NRPN (Non-Registered Parameter Numbers)
With the instrument, NRPN are defined as tone editing pa-rameters and drawbar parameters. The MSB and LSB of anNRPN specify the parameter being controlled, while the spec-ified parameter ’s value is set in accordance with the subse-quent data entry.The following table shows the relationship between parame-ters and NRPN as defined by the instrument.
n ....... Voice Channel Number = 0H to FH (Ch1 to Ch16)vv .... Chorus Send Level = 00H to 7FH
n ....... Voice Channel Number = 0H to FH (Ch1 to Ch16)pm ... MSB of NRPNpl ..... LSB of NRPN
Recognition• NRPN messages not defined by the instrument can also
be received, but subsequent data entry values afterundefined NRPN messages are ignored.
• After the NRPN MSB and LSB are received and theapplicable control parameters settings are made, thevalue is set by receipt of the MSB of the subsequentdata entry. The data entry LSB is ignored.
427B-E-068B
Byte 1 Byte 2 Byte 3
BnH 4AH vvH
n ....... Voice Channel Number = 0H to FH (Ch1 to Ch16)vv .... Filter Cutoff Frequency = 00H to 7FH
Portamento Control
Format
Brightness
Format
Format
AP31/33_E_MIDI Data.p65 03.10.7, 11:00 AMPage 4 Adobe PageMaker 6.5J/PPC

A-5
Filter/AMP Envelope Release TimeNRPN MSB = 01HNRPN LSB = 66HData Entry MSB = mmH
mm .. Filter/AMP Envelope Release Time = 00H to 40Hto 7FH (-64 to 0 to +63)
RecognitionWhen the instrument receives this message, the presetFilter/AMP Envelope Release Time value for the tone ischanged to the value that corresponds to the data entryMSB of the received message. There is no change whenthe value of the data entry MSB is 40H(0).
427B-E-069B
Filter Cut Off FrequencyNRPN MSB = 01HNRPN LSB = 20HData Entry MSB = mmH
mm .. Cut Off Frequency = 00H to 40H to 7FH (-64 to 0 to+63)
RecognitionWhen the instrument receives this message, the presetFilter Cut off Frequency value for the tone is changed tothe value that corresponds to the data entry MSB of thereceived message. There is no change when the value ofthe data entry MSB is 40H(0).
Filter ResonanceNRPN MSB = 01HNRPN LSB = 21HData Entry MSB = mmH
mm .. Filter Resonance= 00H to 40H to 7FH (-64 to 0 to+63)
RecognitionWhen the instrument receives this message, the presetFilter Resonance value for the tone is changed to the val-ue that corresponds to the data entry MSB of the receivedmessage. There is no change when the value of the dataentry MSB is 40H(0).
Filter/AMP Envelope Attack TimeNRPN MSB = 01HNRPN LSB = 63HData Entry MSB = mmH
mm .. Filter/AMP Envelope Attack Time = 00H to 40Hto 7FH (-64 to 0 to +63)
RecognitionWhen the instrument receives this message, the presetFilter/AMP Envelope Attack Time value for the tone ischanged to the value that corresponds to the data entryMSB of the received message. There is no change whenthe value of the data entry MSB is 40H(0).
Filter/AMP Envelope Decay TimeNRPN MSB = 01HNRPN LSB = 64HData Entry MSB = mmH
mm .. Filter/AMP Envelope Decay Time = 00H to 40Hto 7FH (-64 to 0 to +63)
RecognitionWhen the instrument receives this message, the presetFilter/AMP Envelope Decay Time value for the tone ischanged to the value that corresponds to the data entryMSB of the received message. There is no change whenthe value of the data entry MSB is 40H(0).
Byte 1 Byte 2 Byte 3BnH 65H qmH (MSB)BnH 64H qlH (LSB)
The MSB and LSB of an RPN specify the parameter be-ing controlled, while the specified parameter ’s value isset in accordance with the MSB of the subsequent dataentry.See “Pitch Bend Sensitivity” through “RPN Null” for thedata entry MSB value range and other details.
Format
RPN (Registered Parameter Numbers)On the instrument, RPNs are defined as settings for the fol-lowing parameters.
NRPN MSB NRPN LSB Parameter
00H 00H Pitch Bend Sensitivity00H 01H Master Fine Tuning00H 02H Master Coarse Tuning7FH 7FH RPN Null
n ....... Voice Channel Number = 0H to FH (Ch1 to Ch16)qm ... MSB of RPNql ..... LSB of RPN
Recognition• RPN messages not defined by the instrument can also
be received, but subsequent data entry values after un-defined RPN messages are ignored.
• After the MSB and LSB of an RPN are received and theapplicable control parameters settings are made, thevalue is set by receipt of the MSB of the subsequentdata entry. The data entry LSB is ignored.
SendAn RPN is sent whenever an operation that changes theparameter assigned to the RPN is performed.
AP31/33_E_MIDI Data.p65 03.10.7, 11:00 AMPage 5 Adobe PageMaker 6.5J/PPC

A-6
Byte 1 Byte 2 Byte 3
BnH 78H 00H
n ....... Voice Channel Number = 0H to FH (Ch1 to Ch16)
RecognitionReceipt of this message immediately mutes all tones play-ing over the MIDI channels.
Reset All Controller
Format
Byte 1 Byte 2 Byte 3
BnH 79H 00H
n ....... Voice Channel Number = 0H to FH (Ch1 to Ch16)
RecognitionReceipt of the Reset All Controller message causes thefollowing controllers to be reset.
Controller Name Reset Value
Modulation Wheel vvH = 00HExpression Controller vvH = 7FHHold 1 vvH = 00HPortamento vvH = 00HSostenuto vvH = 00HSoft vvH = 00HNRPN msb = 7FH, lsb = 7FHRPN msb = 7FH, lsb = 7FHPitch Bend Change llH mmH = 00H 40H
Byte 1 Byte 2
CnH ppH
pp .... Program Number = 00H to 7FH
SendProgram Change messages are sent when you select atone on the instrument.
Byte 1 Byte 2 Byte 3
EnH llH mmH
n ....... Voice Channel Number = 0H to FH (Ch1 to Ch16)ll ....... Pitch Bend Change LSB = 00H to 7FHmm .. Pitch Bend Change MSB = 00H to 7FH
Recognition• The value llH mmH is 00H 00H at the lowest pitch,
00H 40H at mid-pitch, and 7FH 7FH at the highest pitch.• You have to set both the LSB and MSB together to form
a 14-bit value and make a Pitch Bend Change messagerecognized by the instrument.
Channel Mode MessageAll Sound Off
Format
427B-E-070B
Pitch Bend Sensitivity
RPN MSB = 00HRPN LSB = 00HData Entry MSB = mmH
mm .. Pitch Bend Sensitivity = 00H to 18H (0 to 24 semi-tones)
RecognitionThe data entry LSB is always ignored.
Master Fine TuningRPN MSB = 00HRPN LSB = 01HData Entry MSB = mmHData Entry LSB = llH
mm ll .... Master Fine Tuning = 00 00H to 40H 00H to 7FH7FH (-100 to 0 to +99.99 cents)
Master Coarse TuningRPN MSB = 00HRPN LSB = 02HData Entry MSB = mmH
mm .. Master Coarse Tuning = 28H to 40H to 58H (-24 to0 to +24 semitones)
RecognitionThe data entry LSB is always ignored.
RPN NullRPN MSB = 7FHRPN LSB = 7FH
RecognitionOnce an RPN Null is sent, all received data entry MSBsand LSBs are ignored until another RPN message otherthan RPN Null or an NRPN message is received.
Program ChangeFormat
Pitch Bend Change Format
AP31/33_E_MIDI Data.p65 03.10.7, 11:00 AMPage 6 Adobe PageMaker 6.5J/PPC

A-7
All Note OffFormat
Byte 1 Byte 2 Byte 3
BnH 7BH 00H
n ....... Voice Channel Number = 0H to FH (Ch1 to Ch16)
RecognitionReceipt of the All Note Off message mutes all tones be-ing played by data received over the MIDI channels (noteoff).If Hold 1 or Sostenuto is turned on when the All NoteOff message is received, notes are sustained in accordancewith the corresponding pedal operation.
SendThis message is sent when the CONTROL button ispressed and when memory playback is stopped.
Omni Mode Off
Format
Byte 1 Byte 2 Byte 3
BnH 7CH 00H
n ....... Voice Channel Number = 0H to FH (Ch1 to Ch16)
RecognitionReceipt of an Omni Mode On message does not turn onthe instrument Omni Mode. Receipt of an Omni ModeOn message is treated as an All Note Off message.
Omni Mode On
Format
Byte 1 Byte 2 Byte 3
BnH 7DH 00H
n ....... Voice Channel Number = 0H to FH (Ch1 to Ch16)
RecognitionReceipt of an Omni Mode On message does not turn onthe instrument Omni Mode. Receipt of an Omni ModeOn message is treated as an All Note Off message.
Mono Mode On
Format
427B-E-071A
Byte 1 Byte 2 Byte 3
BnH 7EH vvH
n ....... Voice Channel Number = 0H to FH (Ch1 to Ch16)vv .... Number of Mono Mode Channels = 00H to 10H
RecognitionReceipt of a Mono Mode On message does not turn onthe instrument Mono Mode. Receipt of a Mono Mode Onmessage is treated as an All Sound Off message.
Byte 1 Byte 2 Byte 3
BnH 7FH 00H
n ....... Voice Channel Number = 0H to FH (Ch1 to Ch16)
ReceiveReceipt of a Poly Mode On message by the instrumentsets Channel n to Mode 3 and is processed as if an AllSound Off message and All Note Off message were re-ceived.
System Messages
Universal System Exclusive MessageGM System On
Format
F0H 7EH 7FH 09H 01H F7H
SendThis message cannot be sent.
Reverb TypeFormat
F0 7F 7F 04 05 01 01 01 01 01 00 vv F7
Parameter (vv) Setting GM Level 2 Equivalent
00H ROOM Small Room02H STAGE Large Room03H HALL 1 Medium Hall04H HALL 2 Large Hall
Chorus TypeFormat
F0 7F 7F 04 05 01 01 01 01 02 00 vv F7
Parameter (vv) Setting GM Level 2 Equivalent
02H CHORUS Chorus 3
Poly Mode On
Format
AP31/33_E_MIDI Data.p65 03.10.7, 11:00 AMPage 7 Adobe PageMaker 6.5J/PPC

A-8 427B-E-072B
Formato de datos MIDI
Solamente se reciben los ítemes marcados con “” .
Mensajes de canalesMensajes de notaDesactivación de nota
ReconocimientoFormato
n ....... Número de canal de voz = 0H a FH (canal 1 al 16).kk .... Número de nota = 00H a 7FH.vv .... Velocidad de presión = 00H a 7FH.
ObservacionesEl valor de la velocidad de desactivación de nota esignorado.
EnvíoFormato
n ....... Número de canal de voz = 0H a FH (canal 1 al 16).kk .... Número de nota = 15H a 6CH.vv .... Velocidad de desactivación de nota = 40H.
1er. byte 2do. byte 3r. byte
8nH kkH vvH9nH kkH 00H
1er. byte 2do. byte 3r. byte
8nH kkH vvH
Nota activadaReconocimientoFormato
n ....... Número de canal de voz = 0H a FH (canal 1 al 16).kk .... Número de nota = 00H a 7FH.vv .... Velocidad de desactivación de nota = 00H a 7FH.
EnvíoFormato
1er. byte 2do. byte 3r. byte9nH kkH vvH
1er. byte 2do. byte 3r. byte9nH kkH vvH
n ....... Número de canal de voz = 0H a FH (canal 1 al 16).kk .... Número de nota = 15H a 6CH.vv .... Velocidad de desactivación de nota = 01 a 7FH.
n ....... Número de canal de voz = 0H a FH (canal 1 al 16).mm .. MSB de número de banco = 00H, 02H, 03H, 10H,
18H.ll ....... LSB de número de banco = 00H.
EnvíoUn mensaje de selección de banco es enviado al mismotiempo cuando selecciona un sonido en el instrumento.
Perilla de modulación
Formato
1er. byte 2do. byte 3r. byte
BnH 01H vvH
n ....... Número de canal de voz = 0H a FH (canal 1 al 16).vv .... Profundidad de modulación = 00H a 7FH.
1er. byte 2do. byte 3r. byte
BnH 00H mmH (MSB de selección de banco)BnH 20H llH (LSB de selección de banco)
Cambio de controlSelección de bancoFormato
1er. byte 2do. byte 3r. byte
BnH 05H vvH
Tiempo de portamento
Formato
n ....... Número de canal de voz = 0H a FH (canal 1 al ca-nal 16).
vv .... Tiempo de portamento = 00H a 7FH.
Ingreso de datosFormato
n ....... Número de canal de voz = 0H a FH (canal 1 al 16).mm .. Valor MSB de ingreso de datos para el parámetro
que se selecciona mediante RPN y NRPN.ll ....... Valor LSB de ingreso de datos para el parámetro
que se selecciona mediante RPN y NRPN.
1er. byte 2do. byte 3r. byte
BnH 06H mmH (MSB de ingreso de datos)BnH 26H llH (LSB de ingreso de datos)
AP31/33_S_MIDI Data.p65 03.10.22, 4:12 PMPage 8 Adobe PageMaker 6.5J/PPC

A-9427B-E-073B
1er. byte 2do. byte 3r. byte
BnH 07H vvH
n ....... Número de canal de voz = 0H a FH (canal 1 al ca-nal 16).
vv .... Volumen = 00H a 7FH
1er. byte 2do. byte 3r. byte
BnH 0AH vvH
n ....... Número de canal de voz = 0H a FH (canal 1 al ca-nal 16).
vv .... Efecto panorámico = 00H (izquierdo) a 40H (cen-tro) a 7FH (derecho).
Controlador de expresión
Formato
n ....... Número de canal de voz = 0H a FH (canal 1 al ca-nal 16).
vv .... Expresión = 00H a 7FH.
1er. byte 2do. byte 3r. byte
BnH 0BH vvH
Retención 1 (Pedal amortiguador)Formato
Efecto panorámico
Formato
Reconocimienton ....... Número de canal de voz = 0H a FH (canal 1 al ca-
nal 16).vv .... Retención 1 = 00H a 7FH (00H a 3FH:OFF, 40H a
7FH:ON).
Envíon ....... Número de canal de voz = 0H a FH (canal 1 al ca-
nal 16).vv .... Retención 1 = 00H,7FH (00H:OFF, 7FH:ON).
Portamento
Formato
1er. byte 2do. byte 3r. byte
BnH 40H vvH
1er. byte 2do. byte 3r. byte
BnH 42H vvH
Reconocimienton ....... Número de canal de voz = 0H a FH (canal 1 al ca-
nal 16).vv .... Sostenuto = 00H a 7FH (00H a 3FH:OFF, 40H a
7FH:ON).
Envíon ....... Número de canal de voz = 0H a FH (canal 1 al ca-
nal 16).vv .... Sostenuto = 00H,7FH (00H:OFF, 7FH:ON).
SuaveFormato
Reconocimienton ....... Número de canal de voz = 0H a FH (canal 1 al ca-
nal 16).vv .... Suave = 00H a 7FH (00H a 3FH:OFF, 40H a
7FH:ON).
Envíon ....... Número de canal de voz = 0H a FH (canal 1 al ca-
nal 16).vv .... Suave = 00H,7FH (00H:OFF, 7FH:ON).
Resonancia
Formato
1er. byte 2do. byte 3r. byte
BnH 43H vvH
1er. byte 2do. byte 3r. byte
BnH 47H vvH
n ....... Número de canal de voz = 0H a FH (canal 1 al ca-nal 16).
vv .... Filtro de resonancia TVF = 00H a 7FH.
Tiempo de liberación
Formato
1er. byte 2do. byte 3r. byte
BnH 48H vvH
n ....... Número de canal de voz = 0H a FH (canal 1 al ca-nal 16).
vv .... Tiempo de liberación AMP = 00H a 7FH.
Tiempo de ataque
Formato
SostenutoFormato
1er. byte 2do. byte 3r. byte
BnH 49H vvH
n ....... Número de canal de voz = 0H a FH (canal 1 al ca-nal 16).
vv .... Tiempo de ataque de AMP = 00H a 7FH.
Volumen de canal
Formato
1er. byte 2do. byte 3r. byte
BnH 41H vvH
Reconocimienton ....... Número de canal de voz = 0H a FH (canal 1 al ca-
nal 16).vv .... Portamento = 00H a 7FH (00H a 3FH:OFF, 40H a
7FH:ON).
AP31/33_S_MIDI Data.p65 03.10.22, 4:12 PMPage 9 Adobe PageMaker 6.5J/PPC

A-10
1er. byte 2do. byte 3r. byte
BnH 4AH vvH
n ....... Número de canal de voz = 0H a FH (canal 1 al ca-nal 16).
vv .... Frecuencia de corte de filtro = 00H a 7FH.
Control de portamento
Formato
1er. byte 2do. byte 3r. byte
BnH 54H kkH
n ....... Número de canal de voz = 0H a FH (canal 1 al ca-nal 16).
kk .... Número de nota de fuente = 00H a 7FH.
Profundidad de efecto 1 (Nivel de envío de re-verberación)Formato
1er. byte 2do. byte 3r. byte
BnH 5BH vvH
n ....... Número de canal de voz = 0H a FH (canal 1 al ca-nal 16).
vv .... Nivel de envío de reverberación = 00H a 7FH.
Profundidad de efecto 3 (Nivel de envío de coro)Formato
1er. byte 2do. byte 3r. byte
BnH 5DH vvH
n ....... Número de canal de voz = 0H a FH (canal 1 al ca-nal 16).
vv .... Nivel de envío de coro = 00H a 7FH.
NRPN (Números de parámetros sin registrar)
Con el instrumento, los NRPN son definidos como parámetrosde edición de sonido y parámetros de barra de arrastre. LosMSB y LSB de un NRPN especifican el parámetro que está sien-do controlado, mientras el valor del parámetro especificado seajusta de acuerdo con el ingreso de dato subsiguiente.La tabla siguiente muestra la relación entre los parámetros yNRPN como lo define el instrumento.
NRPN MSB NRPN LSB Parámetro
01H 08H Régimen de vibrato01H 09H Profundidad de vibrato01H 0AH Retardo de vibrato01H 20H Frecuencia de corte de TVF01H 21H Resonancia de TVF01H 63H Tiempo de ataque de envolvente
TVF/TVA.01H 64H Tiempo de extinción de envol-
vente TVF/TVA.01H 66H Tiempo de liberación de envol-
vente TVF/TVA.
Para la gama de valores de ingreso de datos y otros detallesvea “Regimen de vibrato” a “Tiempo de liberacion de en-volvente de TVF/TVA”.
Formato
1er. byte 2do. byte 3r. byte
BnH 63H pmH (MSB)BnH 62H plH (LSB)
n ....... Número de canal de voz = 0H a FH (canal 1 al ca-nal 16).
pm ... MSB de NRPN.pl ..... LSB de NRPN.
Reconocimiento• Los mensajes NRPN no definidos por el instrumento
también pueden ser recibidos, pero los valores de in-greso de datos subsiguientes después de los mensajesNRPN sin definir son ignorados.
• Después que se reciben los NRPN MSB y LSB y serealizan los ajustes de parámetros de control aplica-ble, el valor se ajusta por la recepción del MSB delingreso de datos subsiguientes. El ingreso de datosLSB es ignorado.
Régimen de vibratoNRPN MSB = 01HNRPN LSB = 08HMSB de ingreso de datos = mmH
mm .. Régimen de vibrato = 00H a 40H a 7FH (-64 a 0 a+63).
ReconocimientoCuando el instrumento recibe este mensaje, el valor derégimen de vibrato para el sonido es cambiado al valorde régimen de vibrato que corresponde al MSB de in-greso de datos del mensaje recibido. No hay cambio cuan-do el valor de MSB de ingreso de datos es 40H(0).
Profundidad de vibratoNRPN MSB = 01HNRPN LSB = 09HMSB de ingreso de datos = mmH
mm .. Profundidad de vibrato = 00H a 40H a 7FH (-64 a 0a +63).
ReconocimientoCuando el instrumento recibe este mensaje, el valor deprofundidad de vibrato para el sonido es cambiado alvalor que corresponde al MSB de ingreso de datos delmensaje recibido. No hay cambio cuando el valor de MSBde ingreso de datos es 40H(0).
Extinción de vibratoNRPN MSB = 01HNRPN LSB = 0AHMSB de ingreso de datos = mmH
mm .. Extinción de vibrato = 00H a 40H a 7FH (-64 a 0 a+63).
Brillo
Formato
427B-E-074B
AP31/33_S_MIDI Data.p65 03.10.22, 4:12 PMPage 10 Adobe PageMaker 6.5J/PPC

A-11
ReconocimientoCuando el instrumento recibe este mensaje, el valor deextinción de vibrato preajustado para el sonido es cam-biado al valor que corresponde al MSB de ingreso de datosdel mensaje recibido. No hay cambio cuando el valor deMSB de ingreso de datos es 40H(0).
Frecuencia de corte de filtroNRPN MSB = 01HNRPN LSB = 20HMSB de ingreso de datos = mmH
mm .. Frecuencia de corte = 00H a 40H a 7FH (-64 a 0 a+63).
ReconocimientoCuando el instrumento recibe este mensaje, el valor defrecuencia de corte de filtro para el sonido es cambiadoal valor que corresponde al MSB de ingreso de datos delmensaje recibido. No hay cambio cuando el valor de MSBde ingreso de datos es 40H(0).
Filtro de resonanciaNRPN MSB = 01HNRPN LSB = 21HMSB de ingreso de datos = mmH
mm .. Filtro de resonancia = 00H a 40H a 7FH (-64 a 0 a+63).
ReconocimientoCuando el instrumento recibe este mensaje, el valor deresonancia de filtro preajustado para el sonido es cam-biado al valor que corresponde al MSB de ingreso de datosdel mensaje recibido. No hay cambio cuando el valor deMSB de ingreso de datos es 40H(0).
Tiempo de ataque de envolvente de AMP/FiltroNRPN MSB = 01HNRPN LSB = 63HMSB de ingreso de datos = mmH
mm .. Tiempo de ataque de envolvente de AMP/Filtro =00H a 40H a 7FH (-64 a 0 a +63).
ReconocimientoCuando el instrumento recibe este mensaje, el valor deltiempo de ataque de envolvente AMP/Filtro para elsonido es cambiado al valor que corresponde al MSB deingreso de datos del mensaje recibido. No hay cambiocuando el valor de MSB de ingreso de datos es 40H(0).
Tiempo de extinción de envolvente de AMP/FiltroNRPN MSB = 01HNRPN LSB = 64HMSB de ingreso de datos = mmH
mm .. Tiempo de extinción de envolvente de AMP/Filtro= 00H a 40H a 7FH (-64 a 0 a +63).
NRPN MSB NRPN LSB Parámetros
00H 00H Sensibilidad de in-flexión de altura tonal
00H 01H Afinación fina maestra
00H 02H Afinación gruesa maestra
7FH 7FH RPN nulo
Los MSB y LSB de un RPN especifican el parámetro queestá siendo controlado, mientras el valor de parámetroespecificado se ajusta de acuerdo con el MSB del ingresode datos subsiguientes.Para la gama de valores MSB y otros detalles vea “Sensi-bilidad de inflexión de altura tonal” al “RPN nulo”.
Formato
1er. byte 2do. byte 3r. byteBnH 65H qmH (MSB)BnH 64H qlH (LSB)
n ....... Número de canal de voz = 0H a FH (canal 1 al ca-nal 16).
pm ... MSB de RPN.pl ..... LSB de RPN.
Reconocimiento• Los mensajes RPN no definidos por el instrumento tam-
bién pueden ser recibidos, pero los valores de ingresode datos subsiguientes después de los mensajes RPNsin definir son ignorados.
• Después que se reciben los MSB y LSB de un RPN y serealizan los ajustes de parámetros de control aplicable,el valor se ajusta mediante la recepción del MSB delingreso de datos subsiguientes. El ingreso de datos LSBes ignorado.
ReconocimientoCuando el instrumento recibe este mensaje, el valor deltiempo de extinción de envolvente de AMP/Filtro parael sonido es cambiado al valor que corresponde al MSBde ingreso de datos del mensaje recibido. No hay cam-bio cuando el valor de MSB de ingreso de datos es 40H(0).
Tiempo de liberación de envolvente de AMP/FiltroNRPN MSB = 01HNRPN LSB = 66HMSB de ingreso de datos = mmH
mm .. Tiempo de liberación de envolvente de AMP/Filtro= 00H a 40H a 7FH (-64 a 0 a +63).
ReconocimientoCuando el instrumento recibe este mensaje, el valor deltiempo de liberación de envolvente de AMP/Filtro parael sonido es cambiado al valor que corresponde al MSBde ingreso de datos del mensaje recibido. No hay cam-bio cuando el valor de MSB de ingreso de datos es 40H(0).
RPN (Números de parámetros registrados)En el instrumento, los RPN son definidos como ajustes paralos parámetros siguientes.
427B-E-075B
AP31/33_S_MIDI Data.p65 03.10.22, 4:12 PMPage 11 Adobe PageMaker 6.5J/PPC

A-12
1er. byte 2do. byte
CnH ppH
pp .... Número de programa = 00H a 7FH
EnvíoLos mensaje de cambio de programa son enviados cuan-do selecciona un sonido en el instrumento.
Cambio de inflexión de altura tonal Formato
1er. byte 2do. byte 3r. byte
EnH llH mmH
n ....... Número de canal de voz = 0H a FH (canal 1 al ca-nal 16).
ll ....... LSB de cambio de inflexión de altura tonal = 00H a7FH.
mm .. MSB de cambio de inflexión de altura tonal = 00Ha 7FH.
Reconocimiento• El valor 11H mmH es 00H 00H en la altura tonal más
baja, 00H 40H en la altura tonal media y 7FH 7FH en laaltura tonal más alta.
• Para formar un valor de 14 bit para hacer que el men-saje de cambio de altura tonal sea reconocido por elinstrumento, tiene que ajustar LSB y MSB juntos.
Mensaje de modo de canalTodos los sonidos desactivados
Formato
1er. byte 2do. byte 3r. byte
BnH 78H 00H
n ....... Número de canal de voz = 0H a FH (canal 1 al ca-nal 16).
ReconocimientoLa recepción de este mensaje silencia inmediatamentetodos los sonidos que se ejecutan sobre los canales MIDI.
Controlador de reposición completa
Formato
1er. byte 2do. byte 3r. byte
BnH 79H 00H
n ....... Número de canal de voz = 0H a FH (canal 1 al ca-nal 16).
ReconocimientoLa recepción del mensaje del controlador de reposicióncompleta ocasiona que los controladores siguientes sereposicionen.
EnvíoUn RPN es enviado siempre que una operación cambiael parámetro asignado al RPN.
Sensibilidad de inflexión de altura tonal
NRPN MSB = 00HNRPN LSB = 00HMSB de ingreso de datos = mmH
mm .. Sensibilidad de inflexión de altura tonal = 00H a18H (0 a 24 semitonos).
ReconocimientoEl LSB de ingreso de datos es siempre ignorado.
Afinación fina maestraRPN MSB = 00HRPN LSB = 01HMSB de ingreso de datos = mmHLSB de ingreso de datos = 11H
mm ll ... Afinación fina maestra = 00 00H a 40H 00H a7FH 7FH (-100 a 0 a +99,99 centésimas).
Afinación gruesa maestraRPN MSB = 00HRPN LSB = 02HMSB de ingreso de datos = mmH
mm ... Afinación fina maestra = 28H a 40H a 58H (-24 a 0a +24 semitonos).
ReconocimientoEl LSB de ingreso de datos siempre es ignorado.
RPN nuloRPN MSB = 7FHRPN LSB = 7FH
ReconocimientoUna vez que se envía un RPN nulo, todos los MSB y LSBde ingreso de datos recibidos son ignorados, hasta quese reciba otro mensaje RPN diferente a RPN nulo o unmensaje NRPN.
Cambio de programaFormato
Nombre de controlador Valor de reposición
Perilla de modulación vvH = 00HControlador de expresión vvH = 7FHRetención 1 vvH = 00HPortamento vvH = 00HSostenuto vvH = 00HSuave vvH = 00HNRPN msb = 7FH, lsb = 7FHRPN msb = 7FH, lsb = 7FHCambio de inflexión de altura tonal llH mmH = 00H 40H
427B-E-076B
AP31/33_S_MIDI Data.p65 03.10.22, 4:12 PMPage 12 Adobe PageMaker 6.5J/PPC

A-13
Desactivación de nota completaFormato
1er. byte 2do. byte 3r. byte
BnH 7BH 00H
n ....... Número de canal de voz = 0H a FH (canal 1 al ca-nal 16).
ReconocimientoLa recepción del mensaje de desactivación de nota com-pleta silencia todos los sonidos que están siendo repro-ducidos por los datos recibidos sobre los canales MIDI(desactivación de nota).Si retención 1 o sostenuto es activado cuando se recibeel mensaje de desactivación de nota completa, las notasson sostenidas de acuerdo con la operación de pedalcorrespondiente.
EnvíoEste mensaje es enviado cuando se presiona el botónCONTROL y caundo se para la reproducción de la me-moria.
Desactivación de modo Omni
Formato
1er. byte 2do. byte 3r. byte
BnH 7CH 00H
n ....... Número de canal de voz = 0H a FH (canal 1 al ca-nal 16).
ReconocimientoLa recepción del mensaje de activación de modo Omnino activa el modo Omni del instrumento. La recepciónde un mensaje de activación del modo Omni es tratadocomo un mensaje de desactivación de nota completa.
Activación del modo Omni
Formato
1er. byte 2do. byte 3r. byte
BnH 7DH 00H
n ....... Número de canal de voz = 0H a FH (canal 1 al ca-nal 16).
ReconocimientoLa recepción del mensaje de activación de modo Omnino activa el modo Omni del instrumento. La recepciónde un mensaje de activación del modo Omni es tratadocomo un mensaje de desactivación de nota completa.
Activación de modo monofónico
Formato
1er. byte 2do. byte 3r. byte
BnH 7EH vvH
n ....... Número de canal de voz = 0H a FH (canal 1 al ca-nal 16).
vv .... Número de canales del modo monofónico = 00H a10H.
ReconocimientoLa recepción de un mensaje de activación de modo mo-nofónico no activa el modo monofónico del instrumen-to. La recepción de un mensaje de activación del modomonofónico es tratado como un mensaje de desactiva-ción de sonido completo.
Activación de modo polifónico
Formato
1er. byte 2do. byte 3r. byte
BnH 7FH 00H
n ....... Número de canal de voz = 0H a FH (canal 1 al ca-nal 16).
RecepciónLa recepción de un mensaje de activación de modo polif-ónico por el instrumento ajusta el canal n al modo 3, y esprocesado como si se estuviera recibiendo un mensajede desactivación de sonido completo y mensaje de des-activación de nota completa.
Mensajes de sistemaMensaje exclusivo de sistema universalActivación del sistema GM
Formato
F0H 7EH 7FH 09H 01H F7H
EnvíoEste mensaje no puede ser enviado.
Tipo de reverberaciónFormato
F0 7F 7F 04 05 01 01 01 01 01 00 vv F7
Parámetro (vv) Ajuste Equivalente al nivel GM 2
00H ROOM Small Room02H STAGE Large Room03H HALL 1 Medium Hall04H HALL 2 Large Hall
Tipo de coroFormato
F0 7F 7F 04 05 01 01 01 01 02 00 vv F7
Parámetro (vv) Ajuste Equivalente al nivel GM 2
02H CHORUS Chorus 3
427B-E-077A
AP31/33_S_MIDI Data.p65 03.10.22, 4:12 PMPage 13 Adobe PageMaker 6.5J/PPC

427B-E-078B
Bas
icD
efau
ltC
han
nel
Ch
ang
ed
Def
ault
Mo
de
Mes
sag
esA
lter
ed
No
teN
um
ber
:T
rue
voic
e
Vel
oci
tyN
ote
ON
No
te O
FF
Aft
erK
ey’s
To
uch
Ch
’s
Pit
ch B
end
0, 3
2 1C
on
tro
l5
Ch
ang
e6,
38 7 10 11 64 65 66 67 71 72 73 74 84 91 93
98, 9
910
0, 1
01 120
121
Pro
gra
mC
han
ge
:T
rue
#
1 1-16
Mod
e 3
X
21-1
08
O9n
H V
= 1
-127
X8n
H V
= 6
4
X X X O X X O*1
X X X O X O O X X X X X O O X O X X O0-
7
** =
no
rela
tion
Ban
k se
lect
Mod
ulat
ion
Por
tam
ento
Tim
eD
ata
entr
yV
olum
eP
anE
xpre
ssio
nD
ampe
rP
orta
men
toS
oste
nuto
Sof
tR
eson
ance
Rel
ease
Tim
eA
ttack
Tim
eB
right
ness
Por
tam
ento
Con
trol
Rev
erb
send
Cho
rus
send
NR
PN
LS
B, M
SB
RP
N L
SB
, MS
BA
ll so
und
off
Res
et a
ll co
ntro
ller
Equ
ippe
d w
ith G
ener
al M
IDI
com
patib
lem
ode
(sw
itcha
ble
1-16
1-16
Mod
e 3
X 0-12
70-
127
O9n
H V
= 1
-127
X9n
H V
= 0
, 8nH
V =
**
X X O O O O O*1
O O O O O O O O O O O O O O O O O O O0-
70
7
Fu
nct
ion
...
Tra
nsm
itte
dR
eco
gn
ized
Rem
arks
Mod
elA
P-3
1/A
P-3
3M
IDI I
mp
lem
enta
tio
n C
har
tV
ersi
on: 1
.0
AP31/33_ES_MIDI Chart.p65 03.10.7, 11:00 AMPage 2 Adobe PageMaker 6.5J/PPC

427B-E-079B
11 64 65 66 67 71 72 73 74 84 91 9398
, 99
100,
101 12
012
1
Pro
gra
mC
han
ge
:T
rue
#
Sys
tem
Exc
lusi
ve
Sys
tem
: S
on
g P
os
Co
mm
on
: S
on
g S
el:
Tu
ne
Sys
tem
: C
lock
Rea
l Tim
e:
Co
mm
and
s
Au
x:
Lo
cal O
N/O
FF
: A
ll n
ote
s O
FF
Mes
sag
es:
Act
ive
Sen
se:
Sys
tem
Res
et
Rem
arks
X O X O O X X X X X O O X O X X O0-
7
O*2
X X X X X X O X X
Exp
ress
ion
Dam
per
Por
tam
ento
Sos
tenu
toS
oft
Res
onan
ceR
elea
se T
ime
Atta
ck T
ime
Brig
htne
ss
Por
tam
ento
Con
trol
Rev
erb
send
Cho
rus
send
NR
PN
LS
B, M
SB
RP
N L
SB
, MS
BA
ll so
und
off
Res
et a
ll co
ntro
ller
Equ
ippe
d w
ith G
ener
al M
IDI
com
patib
le m
ode
(sw
itcha
ble
type
).
O O O O O O O O O O O O O O O O O0-
70-
7
O*2
X X X X X X O O X
*1 :
Fin
e tu
ne a
nd c
oars
e tu
ne s
end/
rece
ive,
and
RP
N N
ull,
pitc
h be
nd s
ense
, vib
rato
rat
e,vi
brat
o de
pth,
vib
rato
del
ay, F
ilter
cut
off
freq
uenc
y, F
ilter
res
onan
ce, F
ilter
/AM
Pen
velo
pe a
ttack
tim
e, F
ilter
/AM
P e
nvel
ope
deca
y tim
e an
d F
ilter
/AM
P e
nvel
ope
rele
ase
time
rece
ives
*2 :
GM
Sys
tem
On
[F0]
[7E
][7F
][09]
[01]
[F7]
Rev
erb
Typ
e[F
0][7
F][7
F][0
4][0
5][0
1][0
1][0
1][0
1][0
1][0
0][X
X][F
7]X
X=
00:R
OO
M, 0
2:S
TAG
E, 0
3:H
ALL
1, 0
4:H
ALL
2C
horu
s Ty
pe[F
0][7
F][7
F][0
4][0
5][0
1][0
1][0
1][0
1][0
2][0
0][Y
Y][F
7]Y
Y=
02:C
HO
RU
S
Mod
e 1
: OM
NI O
N, P
OLY
Mod
e 2
: OM
NI O
N, M
ON
OO
: Yes
Mod
e 3
: OM
NI O
FF,
PO
LYM
ode
4 : O
MN
I OF
F, M
ON
OX
: N
o
AP31/33_ES_MIDI Chart.p65 03.10.7, 11:00 AMPage 3 Adobe PageMaker 6.5J/PPC

This recycle mark indicates that the packaging conforms to the environmental protection legislation in Germany.
Esta marca de reciclaje indica que el empaquetado conforma a la legislación de protección ambiental en Alemania.
MA0302-B Printed in China AP31/33-ES-1
CASIO COMPUTER CO.,LTD.6-2, Hon-machi 1-chome
Shibuya-ku, Tokyo 151-8543, JapanP
AP31/33_ES_cover.p65 03.10.7, 11:00 AMPage 5 Adobe PageMaker 6.5J/PPC