user manual - web swot team€¦ · user manual hipath 3000, hipath 5000, hipath allserve...
TRANSCRIPT

May 2003
User Manual
HiPath 3000, HiPath 5000, HiPath AllServeoptiClient Attendant V6.0
G281-0826-00

May 2003
Job No. 5253
No part of this publication may be reproduced, stored in a retrieval system, or transmitted, in any form or by any means, mechanical, electronic, photocopying, recording, or otherwise, without prior written permission of Siemens. The software described in this publication is furnished under a license agreement and may be used only in accordance with the terms of that agreement.
Request Siemens publications from your Siemens representative or the Siemens branch serving you. Publi-cations are not stocked at the address below.
Siemens Information and Communication Networks, Inc.1700 Technology DriveSan Jose, CA 95110(408) 492-20001 (800) 765-6123Fax: (408) 492-3430
Siemens is a registered trademark of Siemens AG.
All other trademarks and company names are the property of their respective owners.
Copyright Siemens Information and Communication Networks, Inc. 2003. All rights reserved.
Warning
Hackers who unlawfully gain access to customer telecommunications systems are criminals. Currently, we do not know of any telecommunications system that is immune to this type of criminal activity. Siemens Informa-tion and Communication Networks, Inc. will not accept liability for any damages, including long distance charg-es, which result from unauthorized use. Although Siemens has designed security features into its products, it is your sole responsibility to use the security features and to establish security practices within your company, including training, security awareness, and call auditing.
Siemens sales and service personnel, as well as Siemens business partners, are available to work with you to help you guard against this unauthorized use of your telecommunications system.

RSWL&OLHQW#$WWHQGDQW#9913
3&#DWWHQGDQW#FRQVROH
+L3DWK 633328333 5602$OO6HUYH
8VHU#0DQXDO

2
Before You BeginThese manual describes how to operate and configure the optiClient Attendant V6.0 PC attendant console on your HiPath communications platform.
This manual is supplied with the optiClient Attendant as online help and can be called up at any time Æ page 13.
While the instructions describe all optiClient Attendant functions, you may find that some functions you wish to use are not available. This is due to one of the following reasons:• The function has not been configured for your optiClient Attendant system. Address
any questions to your system administrator.• Your communications platform does not support this function. Address any questions
to the Siemens sales representative responsible for upgrading your system.• You do not have the latest version of the optiClient Attendant software. Contact your
Siemens sales representative to update the software.
The information provided in this document contains merely general descriptions or charac-teristics of performance which in case of actual use do not always apply as described or which may change as a result of further development of the products. An obligation to provide the respective characteristics shall only exist if expressly agreed in the terms of contract.
optiClient AttendantIn purchasing the optiClient Attendant, you have acquired an advanced PC attendant con-sole for your HiPath communications platform.Your PC must be connected to your communications platform to perform all switching functions from your PC.Three different options are available for this, depending on the implementation site:• Via the optiClient software installed on your PC.• Via a USB cable to an optiPoint 500 or optiPoint 600 office system telephone at your
communications platform.• Via the control/data adapter on the optiset E system telephone at your communications
platform.
The optiClient Attendant software is compatible with different Windows operating sys-tems so that you can conveniently transfer telephone calls and look up phone numbers in Outlook "Contacts" while simultaneously running other PC applications such as Microsoft® Office programs.
The optiClient Attendant attendant console provides you with:• A variety of switching and administration functions;• A high degree of user friendliness thanks to the:
– Clearly designed Windows-based user interface;– Straightforward operation using a keyboard and mouse;
• Simultaneous use of other PC applications;• Supports two screen solutions (ask your system administrator),• Direct switching from Microsoft Outlook "Contacts", and• A user-friendly search option in Microsoft Outlook "Contacts", busy lamp field and sys-
tem telephone directory.

Before You Begin. . . . . . . . . . . . . . . . . . . . . . . . . . . . . . 2
optiClient Attendant . . . . . . . . . . . . . . . . . . . . . . . . . . . 2
Basic Operating Instructions. . . . . . . . . . . . . . . . . . . . 7User Interface of optiClient Attendant. . . . . . . . . . . . . . . . . . . . . . . . . . . 7How To Use These Operating Instructions . . . . . . . . . . . . . . . . . . . . . . . 8Overview of Features . . . . . . . . . . . . . . . . . . . . . . . . . . . . . . . . . . . . . . . 9Target group . . . . . . . . . . . . . . . . . . . . . . . . . . . . . . . . . . . . . . . . . . . . . 10Requirements . . . . . . . . . . . . . . . . . . . . . . . . . . . . . . . . . . . . . . . . . . . . 10
Ø Operating the optiClient Attendant
Operating optiClient Attendant . . . . . . . . . . . . . . . . . 11
User Interface - Desktop . . . . . . . . . . . . . . . . . . . . . . 12Main Window . . . . . . . . . . . . . . . . . . . . . . . . . . . . . . . . . . . . . . . . . . . . 13
Menu bar . . . . . . . . . . . . . . . . . . . . . . . . . . . . . . . . . . . . . . . . . . . . . 13Toolbar . . . . . . . . . . . . . . . . . . . . . . . . . . . . . . . . . . . . . . . . . . . . . . . 14Status Bar . . . . . . . . . . . . . . . . . . . . . . . . . . . . . . . . . . . . . . . . . . . . 16Attendant Monitor . . . . . . . . . . . . . . . . . . . . . . . . . . . . . . . . . . . . . . 17
Busy Lamp Field . . . . . . . . . . . . . . . . . . . . . . . . . . . . . . . . . . . . . . . . . . 21Representation . . . . . . . . . . . . . . . . . . . . . . . . . . . . . . . . . . . . . . . . 21Calling the Busy Lamp Field . . . . . . . . . . . . . . . . . . . . . . . . . . . . . . 22Entering a Station. . . . . . . . . . . . . . . . . . . . . . . . . . . . . . . . . . . . . . . 23Moving station numbers . . . . . . . . . . . . . . . . . . . . . . . . . . . . . . . . . 24Deleting a Station. . . . . . . . . . . . . . . . . . . . . . . . . . . . . . . . . . . . . . . 25
Menu Window. . . . . . . . . . . . . . . . . . . . . . . . . . . . . . . . . . . . . . . . . . . . 26
Making and Answering Calls . . . . . . . . . . . . . . . . . . 27Answering Calls. . . . . . . . . . . . . . . . . . . . . . . . . . . . . . . . . . . . . . . . . . . 27
Answering a call. . . . . . . . . . . . . . . . . . . . . . . . . . . . . . . . . . . . . . . . 28Using Call Waiting (Second Call) . . . . . . . . . . . . . . . . . . . . . . . . . . . . . . 29
Answering a Second Call (Call Waiting) . . . . . . . . . . . . . . . . . . . . . . 29Turning the Call Waiting Tone On and Off . . . . . . . . . . . . . . . . . . . . 30
Picking up Calls . . . . . . . . . . . . . . . . . . . . . . . . . . . . . . . . . . . . . . . . . . . 30Activating/Deactivating the Ringer Signal . . . . . . . . . . . . . . . . . . . . . . . 31Setting the Volume . . . . . . . . . . . . . . . . . . . . . . . . . . . . . . . . . . . . . . . . 32Activating/Deactivating the Microphone (Mute) . . . . . . . . . . . . . . . . . . 32Actuating the Entrance Telephone Connection/Door Opener . . . . . . . . 33
3
Terminating a Call . . . . . . . . . . . . . . . . . . . . . . . . . . . .34
Making Calls . . . . . . . . . . . . . . . . . . . . . . . . . . . . . . . . .35Making External Calls . . . . . . . . . . . . . . . . . . . . . . . . . . . . . . . . . . . . . . 35
Personal Calls . . . . . . . . . . . . . . . . . . . . . . . . . . . . . . . . . . . . . . . . . 35Turning DTMF Suffix-Dialing On and Off . . . . . . . . . . . . . . . . . . . . . 36
Making Internal Calls . . . . . . . . . . . . . . . . . . . . . . . . . . . . . . . . . . . . . . . 36Making Calls With Repertory Dial Keys . . . . . . . . . . . . . . . . . . . . . . . . . 36Making Calls With the Busy Lamp Field . . . . . . . . . . . . . . . . . . . . . . . . 37
Idle State . . . . . . . . . . . . . . . . . . . . . . . . . . . . . . . . . . . . . . . . . . . . . 37Switching State . . . . . . . . . . . . . . . . . . . . . . . . . . . . . . . . . . . . . . . . 37
Making Calls With Redial. . . . . . . . . . . . . . . . . . . . . . . . . . . . . . . . . . . . 38Making Calls From "Contacts" in Microsoft Outlook . . . . . . . . . . . . . . . 38
Consultation/Transfer/Conference . . . . . . . . . . . . . .39Transferring Calls. . . . . . . . . . . . . . . . . . . . . . . . . . . . . . . . . . . . . . . . . . 39
Screened Transfer . . . . . . . . . . . . . . . . . . . . . . . . . . . . . . . . . . . . . . 40Unscreened Transfer . . . . . . . . . . . . . . . . . . . . . . . . . . . . . . . . . . . . 41Speed Transfer . . . . . . . . . . . . . . . . . . . . . . . . . . . . . . . . . . . . . . . . 42Transfer after parking/placing on hold . . . . . . . . . . . . . . . . . . . . . . . 43
Consultation Hold . . . . . . . . . . . . . . . . . . . . . . . . . . . . . . . . . . . . . . . . . 44Hold . . . . . . . . . . . . . . . . . . . . . . . . . . . . . . . . . . . . . . . . . . . . . . . . . . . . 45
Placing External Calls on Hold . . . . . . . . . . . . . . . . . . . . . . . . . . . . . 45Toggle . . . . . . . . . . . . . . . . . . . . . . . . . . . . . . . . . . . . . . . . . . . . . . . . . . 46
Interconnecting Two Parties . . . . . . . . . . . . . . . . . . . . . . . . . . . . . . 46Set up conference . . . . . . . . . . . . . . . . . . . . . . . . . . . . . . . . . . . . . . 46
Conference . . . . . . . . . . . . . . . . . . . . . . . . . . . . . . . . . . . . . . . . . . . . . . 47Terminate conference . . . . . . . . . . . . . . . . . . . . . . . . . . . . . . . . . . . 47
Park . . . . . . . . . . . . . . . . . . . . . . . . . . . . . . . . . . . . . . . . . . . . . . . . . . . . 48Answering Parked Calls . . . . . . . . . . . . . . . . . . . . . . . . . . . . . . . . . . 48
Overriding Calls . . . . . . . . . . . . . . . . . . . . . . . . . . . . . . . . . . . . . . . . . . . 49Overriding Do Not Disturb. . . . . . . . . . . . . . . . . . . . . . . . . . . . . . . . . . . 49Station Number Display Suppression . . . . . . . . . . . . . . . . . . . . . . . . . . 50
Reaching Parties More Effectively . . . . . . . . . . . . . .51Automatic Callback . . . . . . . . . . . . . . . . . . . . . . . . . . . . . . . . . . . . . . . . 51
Displaying and Canceling Callback Requests. . . . . . . . . . . . . . . . . . 52Paging . . . . . . . . . . . . . . . . . . . . . . . . . . . . . . . . . . . . . . . . . . . . . . . . . . 53Messages . . . . . . . . . . . . . . . . . . . . . . . . . . . . . . . . . . . . . . . . . . . . . . . 54
Sending a Message . . . . . . . . . . . . . . . . . . . . . . . . . . . . . . . . . . . . . 54Receiving a Message. . . . . . . . . . . . . . . . . . . . . . . . . . . . . . . . . . . . 55
Transferring an External Trunk. . . . . . . . . . . . . . . . . . . . . . . . . . . . . . . . 56Releasing an External Trunk . . . . . . . . . . . . . . . . . . . . . . . . . . . . . . . . . 57Radio Paging (PSE) (Not for U.S.) . . . . . . . . . . . . . . . . . . . . . . . . . . . . . 58
4

Forwarding Calls . . . . . . . . . . . . . . . . . . . . . . . . . . . . . 59
Night Answer . . . . . . . . . . . . . . . . . . . . . . . . . . . . . . . . 60Entering a Night Destination . . . . . . . . . . . . . . . . . . . . . . . . . . . . . . . . . 60Selecting a Night Destination . . . . . . . . . . . . . . . . . . . . . . . . . . . . . . . . 61Activating Night Answer . . . . . . . . . . . . . . . . . . . . . . . . . . . . . . . . . . . . 62Deactivating Night Answer . . . . . . . . . . . . . . . . . . . . . . . . . . . . . . . . . . 62
Notebook. . . . . . . . . . . . . . . . . . . . . . . . . . . . . . . . . . . . 63
Call Detail Recording for Individual Calls. . . . . . . . 64
Programming/Changing Repdial Keys. . . . . . . . . . . 65
Telephone Book Functionwith Outlook "Contacts" . . . . . . . . . . . . . . . . . . . . . . . 66Searching for a Station . . . . . . . . . . . . . . . . . . . . . . . . . . . . . . . . . . . . . 66Searching on the Basis of Other Station Data . . . . . . . . . . . . . . . . . . . . 68Updating Telephone Book Data. . . . . . . . . . . . . . . . . . . . . . . . . . . . . . . 68
Searching the Telephone Book . . . . . . . . . . . . . . . . 69
Starting the telephone directory CD . . . . . . . . . . . . 70Using a number on the telephone directory CD . . . . . . . . . . . . . . . . . . 70
Opening search window for LDAP server . . . . . . . 71
Emergency Operation . . . . . . . . . . . . . . . . . . . . . . . . . 72
Special Functions in the LAN (PC Network). . . . . . 73
5

Ø Configuring the optiClient Attendant
Entering Settings . . . . . . . . . . . . . . . . . . . . . . . . . . . . .75System . . . . . . . . . . . . . . . . . . . . . . . . . . . . . . . . . . . . . . . . . . . . . . . . . 75Calls . . . . . . . . . . . . . . . . . . . . . . . . . . . . . . . . . . . . . . . . . . . . . . . . . . . . 78Paging . . . . . . . . . . . . . . . . . . . . . . . . . . . . . . . . . . . . . . . . . . . . . . . . . . 79Repdial Keys . . . . . . . . . . . . . . . . . . . . . . . . . . . . . . . . . . . . . . . . . . . . . 80Night Destinations . . . . . . . . . . . . . . . . . . . . . . . . . . . . . . . . . . . . . . . . . 81Saving the Settings . . . . . . . . . . . . . . . . . . . . . . . . . . . . . . . . . . . . . . . . 82
Configuration Manager. . . . . . . . . . . . . . . . . . . . . . . .83Starting Configuration Manager. . . . . . . . . . . . . . . . . . . . . . . . . . . . . . . 83Configuration Manager User Interface . . . . . . . . . . . . . . . . . . . . . . . . . 83Performing Settings. . . . . . . . . . . . . . . . . . . . . . . . . . . . . . . . . . . . . . . . 84
Telephone Book. . . . . . . . . . . . . . . . . . . . . . . . . . . . . . . . . . . . . . . . 84Busy Lamp Field . . . . . . . . . . . . . . . . . . . . . . . . . . . . . . . . . . . . . . . 84Function Keys . . . . . . . . . . . . . . . . . . . . . . . . . . . . . . . . . . . . . . . . . 85Incoming and Outgoing Calls . . . . . . . . . . . . . . . . . . . . . . . . . . . . . . 86Connection via IP . . . . . . . . . . . . . . . . . . . . . . . . . . . . . . . . . . . . . . . 87
Saving Settings . . . . . . . . . . . . . . . . . . . . . . . . . . . . . . . . . . . . . . . . . . . 88
Ø Error Correction in optiClient Attendant
Error Correction in optiClient Attendant . . . . . . . . .89The optiClient Attendant does not start correctly . . . . . . . . . . . . . . . . . 89The optiClient Attendant is no longer responding . . . . . . . . . . . . . . . . . 89"Please wait" is permanently displayed on the status bar . . . . . . . . . . . 89The busy lamp field is malfunctioning . . . . . . . . . . . . . . . . . . . . . . . . . . 89Troubleshooting Using the Trace Button (System Administrator Only). 90
Index. . . . . . . . . . . . . . . . . . . . . . . . . . . . . . . . . . . . . . . .91
Ø Keyboard Commands
Important Keyboard Commands . . . . . . . . . . . . . . . .95
6

Basic Operating Instructions
Basic Operating Instructions
User Interface of optiClient Attendant
optiClient Attendant main window
Busy lamp field(s) (display optional)
Menu Window (may be activated)
7

Basic Operating Instructions
How To Use These Operating InstructionsYou will find a graphic representation of the steps in logical sequence on the left side. Below is an explanation of the symbols:
Click the right mouse button once.
Hold down the left mouse button and move the mouse (click and drag).
Click the left mouse button twice.
Click the left mouse button once.
Enter letters or numbers from the PC keyboard (user names and station numbers).
Select an option from the menu bar, a pop-up menu or a tab in a program window.
Press Return to accept input from the keyboard or confirm a program call.
Click the button with the left mouse button.
Press the key on the PC keyboard.
1. A numbered list describes steps you must complete in the order given.
• Bulleted text indicates an enumeration.
Æ page 7Reference to a page.
Space Bar
F3
Note or remark.
8

Basic Operating Instructions
Overview of Features• Incoming and outgoing call display• Call answering/dialing/transferring• Toggling between two calls• Three-party conference• Call holding and parking• Redialing of the last ten numbers dialed• Dialing with busy lamp field and repertory dial keys• Callback and send message• Call override• Activate/deactivate call forwarding• Activate/deactivate night answer• Telephone book functions (using Microsoft Outlook "Contacts"):
– Look up and display stations– Look up and display station data– Automatic provision of the station number for dialing from Microsoft
Outlook.
9

Basic Operating Instructions
Target groupThis manual is intended both for personnel working with the Hicom optiClient Attendant attendant console who are familiar with the Windows user interface and for System Support (service personnel), who configure and oversee the optiClient Attendant attendant console.
The manual contains all the information you will need to operate and con-figure the optiClient Attendant attendant console:• To make important information easy to find, the first section of this
manual deals with Operating the optiClient Attendant Æ page 11.• The second section describes Configuring the optiClient Attendant
and operating the Configuration Manager Æ page 75.• If you run into any problems operating the optiClient Attendant, refer to
the third section of this manual, Error Correction in optiClient Attendant Æ page 89.
• The chapter Important Keyboard Commands provides an overview of shortcuts and function keys Æ page 95.
RequirementsYou or System Support must install the attendant console hardware and optiClient Attendant software for the Microsoft Windows user interface on your PC (see Installation Instructions in the optiClient Attendant CD-ROM booklet).
The PC’s power management system must not be activated during optiClient Attendant operation.
To use the telephone book functions (ETB), Microsoft Outlook must be in-stalled on the PC.
Operating optiClient Attendant requires some elementary knowledge of PCs and Windows.
For hardware and software requirements, please refer to the Installation In-structions in the optiClient Attendant CD-ROM booklet.
Operating the optiClient Attendant
For Windows NT, Windows 2000 and Windows XP:Whenever the optiClient Attendant is used with various user pro-files, it may be necessary to change the access rights for the config-uration files before configuring the optiClient Attendant itself. If this is the case, please contact your system specialist or administrator.
10

Operating optiClient Attendant
Operating optiClient AttendantYou can configure your attendant console PC so that the optiClient Attendant switching program starts up automatically when you switch on the PC. If the program has not been configured to start up automatically, you must start it manually or set up optiClient Attendant for automatic start up.
Automatic startup
Switch on the attendant console PC. As soon as your operating system loads, optiClient Attendant automatically starts up and the program win-dow opens.
Manual startup
When you install the program, it is added to the Programs section of the Start menu of your operating system.
Start up the optiClient Attendant from the Start menu. The program win-dow with the attendant monitor opens.
Configuring Automatic Startup (Example: Windows 98)
1. Click on the “Start” button on the task bar and select “Settings”, “Taskbar & Start menu...", “Start Menu Programs”.
2. Press the “Advanced” radial button: the screen will display: “Exploring C:\Windows\Start menu”.
3. Open the “Programs” directory and locate the optiClient Attendant di-rectory.
4. Click the right mouse button to copy the “optiClient Attendant” short-cut to the right column.
5. Go to the "Autostart" folder in the left column and insert the “optiClient Attendant” shortcut into the right column, using the right mouse but-ton.
6. Close “Exploring”.
7. On the “TaskBar Properties” screen, click “Apply”, then “OK”.
8. Exit and re-start the PC.
11

User Interface - Desktop
User Interface - DesktopThe optiClient Attendant program windows are your work area.The program windows can be independently positioned on the screen.
Program windows include:• the optiClient Attendant main window
with menu bar Æ page 13, toolbarÆ page 14, the attendant monitor Æ page 17 and status bar Æ page 16.
• the busy lamp fields Æ page 21 (max. 3, display optional) and• the menu Window Æ page 26 (may be activated).
For certain functions, you can open additional windows, for example:Search the telephone book Æ page 69, Directory CD search window Æ page 70, LDAP server search window Æ page 71, Windows Notebook Æ page 63.
Busy lamp field(s)(Display optional)
Menu Window(may be activated)
Status Bar
Menu bar Toolbar
Switching monitor
12

User Interface - Desktop
Main Window
Menu barThe menu bar contains a series of main menu options. Clicking one of these main menu options with the left mouse button opens a correspond-ing submenu (pull-down menu) with additional menu options.• File
This menu allows you to configure general settings for the optiClient Attendant. The Exit command terminates the optiClient Attendant application.
• EditUse this option to activate DTMF suffix-dialing during a call, select the night answer destination and activate/deactivate various functions.
• WindowWith this menu, you can call the busy lamp field, the Windows note-book and the search window.
• Repdial keys (optional)You can dial your party directly from this menu with these repdial keys.(This menu option only if you have configured repdial keys in the optiClient Attendant).
• FindFrom this menu, you can selectively search for the names, companies, cities or postal codes of any stations in the Microsoft Outlook "Con-tacts" folder.
• Paging (optional)This menu option allows you to broadcast a speaker announcement to telephones in a specific group. (This menu option appears only if you have configured paging groups and have activated them in the optiClient Attendant.)
• LanguageUse this option to set the language that you want optiClient Attendant to use for menus and dialog boxes (windows)
• ? (Help)Use the "Help" option to access optiClient Attendant the context-sensi-tive online help function, where you will find general information on the program layout and explanations of the individual functions.Use the "About..." option to view general information about optiClient Attendant.
13

User Interface - Desktop
ToolbarIn the talk state or idle state you can call important functions from the tool-bar by clicking them with the mouse.In the case of functions which can be activated or deactivated, an icon that is struck through indicates a disabled/deactivated function.Some functions appear in the toolbar only if they are configured for your telephone.
In the Idle State
Call busy lamp field Æ page 21.
Display list of most recently dialed numbers Æ page 38.
Activate night answer Æ page 62.
Send message Æ page 54.
Open door lock Æ page 33.
Activate call forwarding Æ page 59.
Release trunk Æ page 57.
Transfer trunk Æ page 56.
Start telephone directory CD Æ page 70.
Open search window for LDAP server (company telephone directory) Æ page 71.
Open the menu Window Æ page 26.
Display call charges Æ page 64.
14

User Interface - Desktop
In the Talk State
Call busy lamp field Æ page 21.
Activate callback Æ page 51.
Override busy station Æ page 49.
Initiate conference Æ page 47.
Set volume Æ page 32.
Release trunk Æ page 57.
Transfer trunk Æ page 56.
Start telephone directory CD Æ page 70.
Start search window for LDAP server Æ page 71.
Open Menu Window Æ page 26.
Display call charges Æ page 64.
15

User Interface - Desktop
Status BarAdvisory and system messages on the status bar:
• The current status of optiClient Attendant during the loading operation is displayed on the right-hand side. The program is ready when System ready is displayed in the status bar.If the data of the communications platform has been modified, the Please wait message appears in the system bar to inform you that the program is being updated with the new system data.
• In operational status, icons for the current settings are displayed on the left-hand side e. g. "Camp-on with tone" . To deactivate a function, left-click the relevant icon.
16

User Interface - Desktop
Attendant MonitorThe attendant monitor is the main work area of the attendant console. From here, you can control the switching functions and obtain information from your communications platform.• You can answer all pending calls from the call display. • The switching area allows you to initiate the switching functions.• The traffic display indicates the current trunk seizures.• Any held or parked calls are indicated in the call list.
A pending call appears in the call display. When you call a party or answer a pending call, the data appears in the left column of the traffic display. If you call another station for switching purposes, the data for this station ap-pears in the right column of the traffic display; the data of the held station appears in the call display.
Call list
Call display Switching area Traffic display
17

User Interface - Desktop
Call Display
Waiting calls are displayed in the list boxes on the call display. Using the mouse, you can scroll through the list boxes and select individual calls. A call can be answered by clicking the answer call button .
The number of waiting calls is indicated to the right of the list boxes both numerically.
Switching area
You can call a user manually by entering the station number in the "Name / Station number" entry field of the switching area. If you enter a name, a search will be initiated in Microsoft Outlook "Contacts" for it Æ page 66.
Call Processing Buttons
Æ page 45
Æ page 34
Æ page 48
Æ page 46
Æ page 34
Dialing Buttons
Æ page 35
Æ page 35
Only visible in the case of automatic line seizure:
Æ page 36
E: 0891234567
I: 38041 Peters
P: 38559Miller
List boxes:
Answer call
Open list box
External callsInternal calls
Personal callsNumber of waiting calls
18

User Interface - Desktop
Traffic Display
The left column of the traffic display shows the first party when you an-swer or place a call.The right column of the traffic display shows the second call when, for ex-ample, you call a second party for the purpose of connecting him or her to the first party.
The party who is actually connected to the attendant console appears in the top half of the traffic display, while the station the caller wanted to reach--or the attendant wanted to call--appears in the bottom half. For ex-ample, the attendant wanted to reach a user named Green (station number 120), who, however, had activated call forwarding to Jones (station number 101). The attendant reaches Jones (entered in the top half of the display), but not Green (lower half of the display).
For internal calls, the station number and (if possible) station name are displayed. For external calls, the station number and possibly the name are displayed only in the case of an ISDN connection or digital tie trunk (CorNet-N).
If your party has activated call forwarding, the name and number of this station also appear in the traffic display. If call forwarding is not activated, the party’s name and station number are repeated.
The two Status fields in the traffic display indicate the status of the calls (such as Busy, Free, Call).
Name and station number of first party
Data ofsecond call
Data offirst call
Name number of de-sired first party
Name and number of desired second party
Status of thesecond call
Name and station number of second party
Status of the first call
19

User Interface - Desktop
Call list
The call list indicates all calls which are currently on hold or parked.If a text has been entered by the station user in connection with holding or parking, this is also displayed.For information about configuring text input in connection with holding or parking, see Æ page 86.
You can retrieve the call from the hold Æ page 45 or park Æ page 48 status by double-clicking the left mouse button on the entry in the call list.
Description of the situationHolding/parking positionHeld/parked station
Trunk> Position 0 - Smith is waiting for Miller
20

User Interface - Desktop
Busy Lamp Field
The Busy Lamp Field (BLF) is used for signaling the line status of individual stations (e. g. "external busy") with colors and for convenient and rapid sta-tion number dialing.
RepresentationUp to three busy lamp fields may be configured, each with max. 240 status keys, i.e. 720 status keys in total.
Every status key, which was assigned to a station Æ page 23, displays the station’s number in Number mode. When the mouse pointer pauses on the key, the associated name, if available, is displayed as a Tool Tip.
In Name mode, station numbers (if available) are immediately displayed as key labels. The relevant station number is displayed as a Tool Tip. Up to 140 status keys may be configured per BLF in this mode.
Depending on the status key color configuration, different colors are used to signal the trunk status of the station.
For details on configuring BLFs (number, labels, size, color, and mode) see Æ page 84 and Æ page 85.
To select a station, click the status key assigned to this station.
Special features must be taken into consideration if your optiClient Attendant operates with HiPath AllServe/5000 RSM (sys-tem networking via PC network) Æ page 73!
21

User Interface - Desktop
Calling the Busy Lamp FieldThe busy lamp fields open automatically when you start optiClient Attendant. If it doesn’t appear for some reason, follow the steps below to open it:
Click the busy lamp field button in the toolbar.
or
Select the BLF option from the Window menu.
The busy lamp field (max. 3 configurable) appears:
When you click one of the labeled status buttons, the number for this sta-tion is automatically dialed Æ page 37.
Double-clicking a status button has the same effect as single-clicking it.
Status button
22

User Interface - Desktop
Entering a StationTo assign status buttons to internal stations, you must label the buttons with the station numbers.This is possible by:• setting the phone numbers and names of internal stations on the sys-
tem Æ page 76,• manual input.
Manual Input
Call the busy lamp field.
To open the Station number dialog box, using the left mouse button, simul-taneously click the status button to be labeled while pressing the "Ctrl" key.The following dialog box opens.
Enter the station number and click OK to confirm your entry.
The following dialog box opens.
Specify, if desired, the name of the station. Confirm with the "OK" button.
The station is now saved under this status button.
Ctrl
23

User Interface - Desktop
Moving station numbersIn the BLF, you can move station numbers from one status button to an-other in order to, for example, group certain station numbers.
Select the busy lamp field.
Press the "Ctrl" and "Shift" keys while simultaneously clicking the status button to be moved with the left mouse button.
While holding down the mouse button, drag the status button to the posi-tion required. When you release the mouse button, the station is moved to the new position.
+Ctrl
24

User Interface - Desktop
Deleting a Station
Call the busy lamp field.
Press "Ctrl" while clicking the right mouse button on the status button of the station to be deleted. The station is deleted from the busy lamp field.Ctrl
Deleting a station from the busy lamp field does not delete it from your system; in other words, you can reconfigure it at any time.
25

User Interface - Desktop
Menu WindowThe Menu Window emulates the telephone display and keys (2 lines for optiset E and optiPoint 500 telephones/8 lines with optiset E memory and optiPoint 600 office).
Calling the Menu Window
The menu window dialog box automatically appears when you initiate a procedure such as sending messages.
You can also call the menu window manually to execute functions or pro-cedures that cannot be initiated via toolbar buttons or pop-up menus (for a description of these functions and procedures and how to execute them, refer to the user manual for your communications platform).
Click the "Menu Window" toolbar button.The menu window is displayed.
Operation
The keys have the following meanings:
Confirm a function.
Scroll between functions.
Confirm changes(corresponds to the "DIAL" key on the optiset E memory/optiPoint 600 office).
Scroll between lines.
Delete input one letter at a time from right to left.
Call up window to input alphanumeric characters.
Set telephone (e. g. ringer volume)
Close the menu window.
To avoid incorrect menu text display (some characters missing), data compression should not be activated in the communications plat-form (to deactivate, ask your service technician).
26

Making and Answering Calls
Making and Answering Calls
Answering CallsThe call display provides you with a convenient means of answering incom-ing calls. It contains pull-down list boxes that display all pending external, internal and personal calls. You can selectively choose and answer any call.
Call Types
• Internal: A call from another party to your communications platform.• External: A call from a party outside your communications platform
who has dialed the system number and operator number (such as 0) or whose call was not answered by an internal party (and optiClient Attendant is programmed as the intercept position).
• Private: A call from a party outside your communications platform who has dialed the system number and internal operator number (such as 100).
When you receive an incoming call, you hear a signal via the telephone speaker and/or the PC speaker (depending on the setting) and also see a display on the telephone screen (only if optiPoint or optiset E telephones are installed) and in the call display list box. If, on the basis of the number, an entry is found in the telephone directory file, the corresponding name is also displayed.
If you are working with another Windows application when a call is received, the system automatically changes to the optiClient Attendant.Note that the system cannot change to the optiClient Attendant while a screen saver is activated. In this case, the call is signaled by the speaker only.
E: 0891234567
I: 38041 Peters
P: 38559Miller
List boxes:
Answer call
Open list box
External callsInternal calls
Personal callsNumber of waiting calls
27

Making and Answering Calls
Answering a call
Click one of the answer call buttons with the left mouse button to answer the first call in the adjacent list box.
or
Click one of the arrows for the list box with the left mouse button to open the list and select the call that you wish to answer.
Answer the selected call.
or
Press the space bar on the keyboard.This answers the first call in the queue, depending on the priority. The calls are prioritized as follows:Recall - External calls - Internal calls - Personal calls.
or
possibly In the event of recall (the originating station is displayed):Press the "Enter" button. In the event of such a call, caused by intercept or a forwarded call, the originating station can be dialed again directly.
The answered call appears in the traffic display:
Space Bar
Enter
When you answer a call, it makes no difference whether the tele-phone handset is on-hook or off-hook because the telephone’s hookswitch is activated only during emergency operation Æ page 72 (not in conjunction with optiClient).
28

Making and Answering Calls
Using Call Waiting (Second Call)
Answering a Second Call (Call Waiting)While you engaged in a call, you are also available to additional callers. Dur-ing the call, you are informed acoustically (by a call waiting tone if this tone has not been deactivated) and visually (in the call display) that a second call is waiting. The call continues to be signaled in the call display until you have answered it.
1.
Terminate the current call with the "Clear" button.The waiting call is indicated in the call display.
or
Click the Hold button to place the current call on hold Æ page 45. The wait-ing call is signaled in the call display.
or
Click the Park button to park the current call Æ page 48. The waiting call is signaled in the call display.
2.
Accept the call.You are speaking to the second caller.
or
Space Bar
29

Making and Answering Calls
Turning the Call Waiting Tone On and OffThe call waiting tone lets you know that a second caller is trying to reach you while you are engaged in another call.
The call waiting tone is automatically deactivated when optiClient Attendant program starts up. The "Camp-on without tone" mes-sage appears in the menu window. The waiting call (second call) continues to be signaled visually in the display.
Activating the Call Waiting Tone
Select the "Camp-on without tone on/off" menu item from the "Edit" main menu.
The camp-on tone is activated and the icon appears in the status bar.
Deactivating the Call Waiting Tone
Select the "Camp-on without tone on/off" menu item from the "Edit" main menu.
or
Left-click the icon in the status bar.
The camp-on tone is deactivated and the icon disappears from the sta-tus bar.
Picking up CallsYou can pick up calls for other telephones on your own telephone using the busy lamp field (not for stations in a HiPath AllServe environment).When a station is being called, the background of the status key turns (to set up the colors see Æ page 84). You cannot pick up a call if you currently conducting a call or a call is being signaled in your call display.
You cannot pick up a call• if the status key is displaying one of the busy states; in this case the
destination party already picked up the call,• if you are engaged in another call or• If the call display is signaling a call
Prerequisite: The background or label of a status button in the busy lamp field changes color (e. g. yellow).
With the left mouse button, click the colored status button for the station being called.
The call is picked up and you can speak to the other party.
30

Making and Answering Calls
Activating/Deactivating the Ringer SignalBy connecting via USB or a control/data adapter you can deactivate the speaker on the system telephone, and thus the ringer signal on the tele-phone receiving an incoming call. When the ringer signal on the telephone is deactivated, the telephone signals the call only visually, although you can have it signaled audibly using wave files (to activate wave files Æ page 78 and Æ page 86).optiClient Attendant can be configured so that the ringer signal for incom-ing calls is automatically deactivated when optiClient Attendant starts up Æ page 80. The "Mute on/off" message then appears in the menu window and the icon appears in the status bar.This is not possible in combination with optiClient.
Activating the Ringer Signal
Select the menu item "Ringing on/off" from the "Edit" main window.
The ringer signal is deactivated at the telephone and the icon appears in the status bar.
Deactivating the Ringer Signal
Select the menu item "Ringing on/off" from the "Edit"main window.
or
Left-click the icon in the status bar.
The ringer signal is activated on the telephone and the icon disappears from the status bar.
31

Making and Answering Calls
Setting the VolumeYou can change the volume of the handset speaker; in other words, you can select the volume at which you would like to hear the other party.
Prerequisite: You are making a call.
Click the volume button in the toolbar.
The menu window is displayed:
You can use the and buttons to set the volume at which you would like to hear the other party at any of eight different levels.
Activating/Deactivating the Microphone (Mute)You can temporarily deactivate the microphone on your telephone handset or headset. If the microphone is deactivated, you can continue listening to the other party, but they can no longer hear you.
Prerequisite: You are making a call.
Deactivating the Microphone
Select the "Mute on/off" menu item fromthe "Edit" main menu.
or
Press the "F9" key (this must be programmed Æ page 85).
The microphone is deactivated.
Activating the Microphone
Select the "Mute on/off" menu item fromthe "Edit" main menu.
or
Press the "F8" key (this must be programmed Æ page 85).
The microphone is activated.
F9
F8
32

Making and Answering Calls
Actuating the Entrance Telephone Connection/Door OpenerIf the service technician has configured one or more entrance telephones, from your telephone you can speak to visitors using the entrance tele-phone and then you can activate the door opener. The entrance telephones are assigned internal station numbers.
Speaking to Visitors via the Entrance Telephone
Prerequisite: Your telephone rings and the entrance telephone station number appears in your call display.
Take the call within 30 seconds. You speak to the visitor on the entrance telephone.
or
Opening the Door
You can operate the door opener while engaged in a call with the entrance telephone or when your phone is idle.
Click the door lock button in the toolbar.
The following dialog box is displayed:
Enter the entrance telephone’s internal station number and click OK to confirm your entry.Simply click OK if the entrance telephone number appears in the window while you are talking to the entrance telephone party.
The door is opened.
Space Bar
33

Terminating a Call
Terminating a Call
One Party
orClick the "Clear" button (= hanging up) or the "F3" key (must be configured Æ page 85) to terminate your current call.
Two Parties
orClick the "Back" button or press "F5" button (this must be configured Æ page 85) to terminate your current call and change to the waiting call.
If you are speaking to two parties alternately (toggling) or simultaneously (conferencing), you can interconnect the two parties by clicking the Con-nect button (the Clear button is replaced by the Connect button).optiClient Attendant returns to idle mode and you can answer other calls again.
F3
F5
34

Making Calls
Making CallsYour optiClient Attendant attendant console allows you to initiate internal and external calls. When placing an external outgoing call, you also have the option of setting it up as a personal call. Such calls are specially marked during call charge evaluation so that they can be billed separately.
Making External CallsEnter the external code and the external station’s number. The number is dialed as soon as you press Enter.
or
Enter the external code and the external station’s number. Then click the General button. The station number is dialed.
Personal CallsUsing the Private button, you can conduct external personal calls. These calls are specially marked for call charge evaluation.
Enter the external code and the external station’s number. Then click the Private button. The station number is dialed.
Outgoing external calls can automatically be identified by the length of the number to be dialed. If the number exceeds a certain length, the external code is prefixed automatically. To configure automatic external codes see Æ page 86.
If you must dial the external code before dialing the external station number, the system is programmed so that automatic line seizure is deactivated. In this case, the Internal button does not appear in the attendant monitor. If automatic line seizure is activated, you do not need to dial the ex-ternal code. However, for internal calls you must then click the Inter-nal button before dialing.
35

Making Calls
Turning DTMF Suffix-Dialing On and OffWhile engaged in an external call, you can activate a sequence of digits to control answering machines or information and switching systems.
Select DTMF suffix dialing from the Edit menu.
A window for entering the DTMF digit sequence appears. Enter the digit sequence and click the "OK" button.
Making Internal CallsEnter the number of the internal station and press Enter to confirm.
You can also dial the station from Outlook "Contacts" Æ page 66, the busy lamp field Æ page 37, or the repertory dial keys Æ page 36.
Making Calls With Repertory Dial KeysUse the repertory dial keys to call a station directly. If repertory dial keys have been configured in optiClient Attendant Æ page 80, the Repdial keys option appears on the menu bar.
Select the Repdial keys option from the menu bar to open a pull-down menu with the repertory dial keys.
Select the name of the station that you want to call.The station number is dialed.
You can program the system so that automatic line seizure is activat-ed. It will then be unnecessary to dial the external code when plac-ing external calls. However, you will then have to click the Internal button before placing internal calls. This button is displayed only if automatic line seizure is activated.
You can also store codes for controlling voice mail systems and an-swering machines on repertory dial keys.
36

Making Calls
Making Calls With the Busy Lamp FieldClick the busy lamp field button in the toolbar to display the busy lamp field.
Idle StateYou are not in the talk state and want to place a call.
With the left mouse button, click the status button for the station that you want to call.
The station number is automatically dialed.
Switching StateYou are engaged in a call and want to forward the call to a station in the busy lamp field. There are three ways to do this:
• Screened transfer
With the left mouse button, click the status button for the station to which you want to transfer the call.
Wait until the destination station responds and announce the call.
Connect the station by clicking the Clear button.
• Unscreened transfer
With the left mouse button, click the status button for the station to which you want to transfer the call.
Wait for the ring tone.
Connect the station by clicking the Clear button.
• Speed transfer
With the right mouse button, click the status button for the station to which you want to transfer the call. The call is immediately forwarded to the selected station. If this station is busy, the busy station is automatically camped on after approximately five seconds (can be configured by the sys-tem administrator). If the station cannot be reached, the call is signaled in the call display as a recall after approximately forty seconds (can be config-ured by the system administrator).
Double-clicking a status button has the same effect as single-clicking it.
37

Making Calls
Making Calls With RedialThe last ten station numbers dialed are automatically stored. If the station you dialed is busy or unavailable, you can initiate a redial the next time you call instead of having to reenter the station number.
Click the redial button in the toolbar to open a pull-down menu with the last station numbers dialed.
Select the desired station number. The number is automatically dialed.
Making Calls From "Contacts" in Microsoft Outlook1.
Enter the name of the station you are looking for in the switching area of the attendant monitor and press Enter to confirm your entry. If the name is stored in the Microsoft Outlook, the Outlook search list window opens automatically and the entry/entries are listed.
2.
Using the left mouse button, double-click the line containing the required entry.
The number is dialed.
For a detailed description of this function see Æ page 68.
By default, optiClient Attendant saves both internal and external sta-tion numbers. However, you can program optiClient Attendant to store only external station numbers in the redial list Æ page 75.
38

Consultation/Transfer/Conference
Consultation/Transfer/Conference
Transferring CallsThe following methods can be used to transfer an answered call to an in-ternal or external station. If you are unable to transfer calls to external sta-tions, this is because you are not authorized to do so (consult your system administrator).• Screened transfer: The person you are talking to would like to consult
another party. Call the desired party and announce the call.• Unscreened transfer: The person you are talking to would like to con-
sult another party. Dial the number of the desired party, wait for the ring tone, and connect the two parties without announcing the call.
• Speed transfer: The person you are talking to would like to consult an-other party. Dial the number of the desired party and connected the two parties without waiting for the ring tone.
• Transfer after parking/holding: The external party you are talking to would like to consult another party. You place the call on hold or park the call. Dial the number of the wanted internal or external party, an-nounce the call and then connect the two parties.
39

Consultation/Transfer/Conference
Screened Transfer
1.
Accept the call.The call appears on the traffic display.
or
2.
While still conducting the call, use the left mouse button to click the status button for the station to which you want to transfer the call. The station number is dialed.
or
While still conducting the call, enter the number of the station you want to reach and press Enter to confirm your selection. The station number is di-aled. (You can also dial the station from Outlook "Contacts" Æ page 66 or using the repertory dial keys Æ page 36.)
The two stations appear in the traffic display:The first party is automatically placed on hold.
3.
H Wait until the destination station responds and announce the call.
4.
Connect the station by clicking the Clear button.
As soon as the stations are connected, their data is deleted from the traffic display and you are free to answer another call.
If the station is busy or does not answer, click the Back button to return to the first party.
Space Bar
40

Consultation/Transfer/Conference
Unscreened Transfer
1.
Accept the call.The call appears on the traffic display.
or
2.
While engaged in the call, click the status button for the station to which you want to transfer the call, using the left mouse button. The system dials the number.
or
While engaged in the call, enter the number of the station you wish to reach and press Return to confirm. The system dials the number (you can also dial the party from Outlook "Contacts" Æ page 66 or using repertory dial keys Æ page 36.)
Both stations appear in the traffic display.The first party is automatically placed on hold.
3.
Wait for the ring tone and connect the station by clicking the Clear button.
When the stations are connected, the data for the other party disappears from the traffic display and you can accept another call.
If the third party is busy or does not answer, click the Back button to return to the first party. If the third party does not answer the transferred call with-in 40 seconds (time can be programmed by the system administrator), the call appears as a recall in the call display.
Space Bar
41

Consultation/Transfer/Conference
Speed Transfer
1.
Accept the call.The call appears on the traffic display.
or
2.
While still conducting the call, use the right mouse button to click the sta-tus button for the station to which you want to transfer the call. The station number is dialed and the call is automatically forwarded to the station dialed.
If the party does not answer the transferred call within 40 seconds (time can be programmed by the system administrator), the call appears as a re-call in the call display.
Space Bar
42

Consultation/Transfer/Conference
Transfer after parking/placing on holdPrerequisite: You have placed an external call on hold Æ page 45 or parked it Æ page 48. The held/parked call is indicated in the call list.
1.
Click the left mouse button on the status button of the user whom you wish to call. The number is dialed.
or
During the call, enter the number of the internal or external party whom you wish to call, confirming your input with the "Return" button. The num-ber is dialed. (You can also use Outlook "Contacts" Æ page 66 or the reper-tory keys Æ page 36 to dial this party.
2.
H Announce the call to the wanted party.
3.
Click the "Hold" button.
or
Press the "F4" button (this must be configured Æ page 85).
4.
Double-click the left mouse button on the entry for the held/parked call in the traffic display.
Connect the station by clicking the Clear button.
As soon as the two parties have been connected, the data of the call par-ties is deleted from the traffic display and you can accept a new caller.
F4
43

Consultation/Transfer/Conference
Consultation HoldYou are conducting a call and want to obtain information from another in-ternal or external party without the first party overhearing. If you are unable to transfer calls to external stations, this is because you are not authorized to do so (consult your system administrator)
Prerequisite: You are currently conducting a call.
Enter the station number and press Enter to confirm your entry. The station number is dialed. (You can also dial the station from Outlook "Contacts" Æ page 66, the busy lamp field Æ page 37, or the repertory dial keys Æ page 36.)
H When the station answers, you can conduct a consultation call. The first party is automatically placed on consultation hold, meaning that he or she cannot overhear your conversation.
When the other party hangs up, you automatically return to the party on hold.
Terminating Consultation Hold
Click the Back button to terminate the consultation and return to the wait-ing party.
44

Consultation/Transfer/Conference
HoldYou can place external calls on hold whenever you want, for example, to call another station.
Placing External Calls on HoldPrerequisite: You are currently conducting an external call.
Click the "Hold" button.
or
Press the "F4" button (this must be configured).
If this is configured Æ page 86, you can enter any text for the party to be placed on hold. You can still speak with the caller while entering the text.Confirm the input.
The other party is placed on hold and cannot listen in. The held call is indi-cated in the call list.
Click the Clear button. You are now available to answer other calls.
You can also place more than one external call on hold.
Activating a Held Call
Prerequisite: You are not engaged in a call.
Using the left mouse button, double-click the line in the call list which con-tains the held call you wish to take.You are reconnected to the held party.
Internal calls cannot be placed on hold.They can, however, be placed on consultation hold Æ page 44 or parked Æ page 48.
F4
45

Consultation/Transfer/Conference
ToggleThe toggle function allows you to alternate between two calls. The station currently waiting cannot overhear your conversation.
Prerequisite: You are currently conducting a call and another party is waiting (for example, on consultation hold).
Click the Toggle button to change to the waiting party.
or
Press the "F6" button (this must be configured Æ page 85).
Interconnecting Two PartiesClick the Clear button to interconnect the two stations.
Set up conferenceYou can set up a three-party conference between yourself and the other two parties by clicking the "Set up conference" button Æ page 47.
F6
You cannot activate the toggle function if you used the Hold button to place one of the two parties on hold.
46

Consultation/Transfer/Conference
ConferenceYou can add another party to an existing call to form a three-party confer-ence in which all three parties can speak to one another.
Prerequisite: You are currently conducting a call and another party is wait-ing (for example, on consultation hold).
Click the "Initiating conference" symbol command button.
or
Press the "F10" button (this must be configured Æ page 85).
The message Conference is displayed in the status box for both parties. The three-party conference is initiated.
The icon appears in the status bar.
Terminate conference Left-click the icon in the status bar.
All conference members are then disconnected and the icon disap-pears from the status bar.
Click the Clear button to leave the conference; the other two parties remain interconnected.
F10
You can also initiate the conference after toggling (several times) Æ page 46.
47

Consultation/Transfer/Conference
ParkYou can park a call that you have answered but have not forwarded. The parked call can be connected to another party Æ page 43.Your optiClient Attendant can be configured so that a waiting call automat-ically places the current call on hold. For more information on this capabil-ity, please get in touch with your system administrator.
Prerequisite: You are currently conducting a call.
Click the Park button to park the call.
or
Press the "F7" button (this must be configured Æ page 85).
If this is configured Æ page 86, you can enter any text for the party to be parked. You can still speak with the caller while entering the text.Confirm the input.
The parked call is shown on the call display. The optiClient Attendant auto-matically parks the call in the next available park slot.
Each telephone system has park slots for ten calls, which both you and oth-er internal parties can park. When a user parks a call in the system, the oc-cupied park slot number appears on the status bar for ten seconds.
Answering Parked Calls Prerequisite: You are making a call.
Using the left mouse button, double-click the line in the call list which con-tains the parked call you wish to take.You are reconnected to the held party.
When a user picks up a parked call, the park slot number that is now avail-able appears on the status bar for ten seconds.
The parked call disappears from the call display.
F7
If calls simply "disappear" from your parking list, they may have been answered by other internal parties.
48

Consultation/Transfer/Conference
Overriding CallsIf an emergency arises and you must speak to a busy internal station, you can break into the busy station’s call and speak to the party. You will then hear an alerting tone.
In order to prevent parties from breaking into existing calls undetected, the message “Override: ...“ appears on the display of the telephone involved and the parties are reminded every two seconds by a dual tone that they are in an override situation.
1.
Dial the internal station number. You hear a busy signal. As soon as you heard the ring tone you are camping on at the other station.
2.
Click the override button in the toolbar. You can now speak with the two parties.
or
Press the "F8" button (this must be configured Æ page 85).You can speak to both parties.
Click the Clear button to leave the call. The other parties remain intercon-nected.
Overriding Do Not DisturbPrerequisite: You are authorized to override do not disturb (can be config-ured by the service technician).
You urgently need to reach an internal station that has activated do not dis-turb.
Dial the internal station number. You hear a busy signal. After a brief wait, the system automatically overrides do not disturb. You hear a ring tone and the destination telephone starts ringing.
F8
49

Consultation/Transfer/Conference
Station Number Display SuppressionYou can prevent the attendant console’s station number or name (for ex-ample, Switchboard) from appearing on the called party’s display (not for internal calls). You must activate this display suppression before dialing; it then remains activated until you cancel it.
Activating Display Suppression
Select the "Privacy on/off" menu itemfrom the "Edit" main menu.
The icon appears in the status bar.
If you now call external party, neither the station number nor the name of the attendant console will appear on his or her display.
Deactivating Display Suppression
Select the "Privacy on/off" menu item from the "Edit" main menu.
or
Left-click the icon in the status bar.
The icon disappears from the status bar.
The next time you place an external, your station number or name will ap-pear on the called party’s display.
50

Reaching Parties More Effectively
Reaching Parties More Effectively
Automatic CallbackWhen you cannot reach specific parties, you can send them callback re-quests to save yourself from attempting additional calls.
1.
Enter the station number and press Enter to confirm your entry. The station cannot be reached.
2.
Click “Activate callback“in the toolbar.The icon appears in the status bar.
Your callback request is sent to the called station.
The system automatically calls back when:• The called party hangs up.• The called party returns and has conducted a call.• The called party displays his or her messages and responds to the call-
back request.
When you answer the callback, you first will hear a dial tone and then the other party will be called.
You can store up to ten callback requests.
51

Reaching Parties More Effectively
Displaying and Canceling Callback RequestsYou can display and cancel callback requests that you have already issued.
Click the "Menu Window" toolbar button.
or
Left-click the icon in the status bar.
The menu window is displayed.
Using the , and buttons, you can retrieve and cancel the callback requests.
The icon disappears from the status bar.
Using the button in the menu window, you can cancel the input and close the window.
52

Reaching Parties More Effectively
PagingYou can issue a speaker announcement to specific groups through your telephone. These groups can be made up of telephones and speaker sys-tems; they are configured and assigned group numbers by the system administrator. These group numbers must be set to "active" mode in the optiClient Attendant Æ page 79.
Select the Paging option from the menu bar to open a pull-down menu with the paging groups.
Select the group that you want to page. The group number is dialed automatically. You can now make your an-nouncement.
The Paging menu option appears in the menu bar only if paging groups have been activated in the Settings window.
53

Reaching Parties More Effectively
MessagesInternal stations can send one another predefined, brief messages.
Sending a Message
Click the message button in the toolbar.
The following dialog box is displayed:
Enter the number of the internal station to which you want to send a message and click OK to confirm your entry.
The menu window appears.
Using the , and buttons, you can select from among ten predefined, brief messages, or enter a separate text:
0 = Please callback1 = Someone is waiting2 = Appointment 3 = Urgent call4 = Do not disturb5 = Fax waiting6 = Dictation please7 = Please come see me8 = Please make copies 9 = Ready to departEnter other text
The number and content of the brief messages listed here may differ from the messages actually stored in your system.
54

Reaching Parties More Effectively
If you selected “Enter other text" you can enter any text. Click the but-ton to open the text input window and enter a text.
As soon as you confirm the option “Send“in the menu, the message is sent.
Using the button in the menu window, you can cancel the input and close the window.
Receiving a MessageIf messages are waiting for you, these appear in the menu window.These are signaled by the "message“ icon in the status bar.
Click the "Menu Window" button.
or
Left-click the icon in the status bar.
The menu window is displayed.
Using the , and buttons, you can view the messages re-ceived, call the sender and delete the message.If there are no further messages in the list after deletion, the icon dis-appears from the status bar.
Using the button in the menu window, you can cancel the input and close the window.
55

Reaching Parties More Effectively
Transferring an External TrunkYou can transfer an external trunk to an internal user who is not authorized to set up outgoing external calls, thus enabling this party to set up an ex-ternal call independently.
Prerequisite: You are talking to a party who does not have direct trunk ac-cess.
Click the Transfer trunk button.
Click the Clear button. You are now available to answer other calls.
Parties without direct trunk access must enter the external code be-fore dialing an external number.
56

Reaching Parties More Effectively
Releasing an External TrunkYou want to place an urgent external call and receive a busy signal because no external trunk is available. You can select a busy trunk and disconnect the call on this trunk to make the trunk available for your call.
Keep in mind that this function disconnects calls in progress and should be used only in dire emergencies.
Releasing a Busy Trunk
You wish to dial an external station number but already hear a busy signal before you dial.
Click the release trunk icon in the toolbar.
The menu window appears.
Using the , and buttons, you can select and release an external trunk.
Using the button in the menu window, you can cancel the input and close the window.
Now enter the station number and press Enter to confirm your entry. The station is dialed via the released trunk.
If your system is not configured for releasing an external trunk, the release trunk button will not appear in the toolbar.
57

Reaching Parties More Effectively
Radio Paging (PSE) (Not for U.S.)If you call an internal station and cannot reach the party at his or her work-station, you can call the absent party using the radio paging equipment.
Prerequisite: radio paging must be programmed in the system.
Select the "PSE" menu item from the "Edit" main menu.
The following dialog box is displayed:
Enter the desired party’s station number (for example, his or her pager number) and press Enter to confirm your entry.
The menu window appears.
Using the , and buttons, you can enter a message (for example, a station number) for the party and page this party.
Using the button in the menu window, you can cancel the input and close the window.
If the party paged does not respond or if the radio paging equipment shuts off after a certain period of time, you can cancel the page by clicking the Clear button.
58

Forwarding Calls
Forwarding CallsYou can forward both internal and external calls to various destinations (in-ternal or external telephones) (whether external destination is possible de-pends on system configuration).
Activating Call Forwarding
Click “Activate call forwarding“in the toolbar.
The following dialog box is displayed:
Enter the station number of the call forwarding destination (internal or ex-ternal telephone) and click OK to confirm your entry.
Call forwarding is activated and the icon appears in the status bar.
Deactivating Call Forwarding
Left-click the icon in the status bar.
Call forwarding is deactivated and the icon disappears from the status bar.
59

Night Answer
Night AnswerNight answer is activated when your attendant console is unattended (for example, when the office is closed). External calls are forwarded to an in-ternal night destination (such as the security officer) that you select. The system administrator can configure whether or not the optiClient Attendant will be authorized to activate night answer.
You can enter and select from among up to eight different internal night destinations.
Entering a Night DestinationFrom the File menu, select the Settings option to open the Settings window.
Select the Night destinations tab.
Enter the possible internal night destinations in the text boxes.
Click the OK button to confirm your entries.
Click the Back button to return to the attendant monitor.
To select a night destination, click the Change night dest. option in theEdit menu Æ page 61 and click the Night service button to activate it Æ page 62.
60

Night Answer
Selecting a Night DestinationYou can select which night destination (from among up to eight internal night destinations) will answer incoming calls. To do this, either select a predefined night destination Æ page 60 or enter one manually.
Predefined night destination
From the Edit menu, select the Change night dest. option. The following pull-down menu appears, from which you can select a night destination. The following pull-down menu appears:
Select a night destination. The night destination selected is identified by a check mark.
After you activate the night service Æ page 62, all calls are forwarded to this night destination.
Entering a night destination manually
Select the Change night dest. option from the Edit menu. The following pull-down menu appears:
Select the "Manual input" option.
The following window appears:
Enter the night destination number and click OK to confirm.
To select the night service programmed in the system by the system ad-ministrator, enter an asterisk (*) for the night destination.
After you activate the night service Æ page 62, all calls are forwarded to this night destination.
61

Night Answer
Activating Night AnswerClick the "Activate night answer" icon in the toolbar.
Call forwarding to the night destination is activated and the icon ap-pears in the status bar.
Deactivating Night Answer Left-click the icon in the status bar.
Call forwarding to the night destination is deactivated and the icon dis-appears from the status bar.
You must still answer any waiting calls in the call display. Any new calls are forwarded to the night destination.
62

Notebook
Notebook
The Notebook function opens the "Editor" program in Windows.
Opening the Notebook
From the Window menu, select the Notebook option.
The Editor is displayed.
You can save, open and print the notebook files via "File" in the Editor menu.
63

Call Detail Recording for Individual Calls
Call Detail Recording for Individual CallsWhen a party using an internal telephone (one that is accessible to the public, such as a pay phone) terminates a chargeable call, the call charges can be displayed on the optiClient Attendant console.However, the service technician must have configured the pay phone func-tion in the system.
Click the "Callbox" button.
The menu window appears.
Using the , and buttons, you can select the internal sta-tion and display, print or delete the call charges incurred and the call dura-tion.
Using the button in the menu window, you can cancel the input and close the window.
64

Programming/Changing Repdial Keys
Programming/Changing Repdial KeysYou can program the station numbers or codes you use the most on the ten repertory dial keys. A sequence of codes can be used to control a voice mail system or an answering machine or activate functions on the commu-nications platform (such as entering "#82" to display the caller list).
You can program repertory dial keys (up to ten) for frequently dialed station numbers. You must configure these keys before you can use them.
From the File menu, select the Settings option to open the Settings window.
Select the Repdial keys tab.
In the text boxes, enter the names and station numbers of the stations desired.
Click OK to confirm your entries.
Click the Back button to return to the attendant monitor.
You can now reach your parties directly via the repdial keys.
From the menu bar, activate the Repdial keys menu Æ page 36 to access the pull-down menu with the repdial keys.
The Repdial keys option appears in the menu bar only if you have configured repertory dial keys in the Settings window Æ page 80.
65

Telephone Book Function with Outlook "Contacts"
Telephone Book Functionwith Outlook "Contacts"The telephone book function provides you with a convenient means of searching for stations and dialing the numbers. The Microsoft Outlook "Contacts" folder is used as a data source for this.
Searching for a StationYou wish to call Mr. Adams. The caller wants to be connected to a certain party (for example, Mr. Adam). However, you do not know Mr. Adam’s sta-tion number.
Enter the first few letters of the name of the party you want to find in the traffic display in the "Name / Station number" entry field of the attendant monitor (for instance, Ada) and press Enter to confirm. If "Contacts" in Mi-crosoft Outlook contains the combination of initial letters entered, the "Outlook search" list window displaying the search results is automatically opened.
The first station name that matches the initial letters entered is highlighted. Select the desired station.
Using the left mouse button, double-click the selected line.
or
Press Enter.
or
Right-click the selected line if you wish to call a user on his/her cellular phone, for example, instead of via the default number.
66

Telephone Book Function with Outlook "Contacts"
If several numbers were entered in the ETB for the same user, a pop-up menu appears. Select the required number from the menu.
The number is selected.
When you search for a station, the first 100 records located are dis-played. If you do not see the station you are looking for, enter a more specific search word.
67

Telephone Book Function with Outlook "Contacts"
Searching on the Basis of Other Station DataYou can also base a search on other data such as a company, city, postal code or station number. The example below uses a company name. A search by city, postal code or station number is conducted in a similar manner.
From the Find menu, select the Company option.
The following dialog box is displayed:
Enter the company desired and click OK to confirm your entry.
If the company is stored in "Contacts" in Microsoft Outlook, the "Outlook search" list window opens with a list of the parties employed by this com-pany. The first party is highlighted.
Updating Telephone Book DataTo enter new data or modify existing station data in the Microsoft Outlook "Contacts" folder, please refer to the Microsoft Outlook documentation.
Only the entries in the Outlook "Contacts" folder are used when run-ning searches in Microsoft Outlook. Sub-directories are not searched.
68

Searching the Telephone Book
Searching the Telephone BookThis function searches for names and phone numbers in the telephone book.
1.
Select the "Search the telephone book" menu item from the "Window" menu.
or
Press the "F12" key.
The "Search the telephone book" window opens.
2.
Enter a name. You can also enter part of a name, for example "mil" for "Mill-er". The search function is not case-sensitive. Confirm with "OK".
3. If one or more entries are found, these are displayed in the menu window.
Using the , and buttons, you can select and call a sta-tion.
Using the button in the menu window, you can cancel the input and close the window.
This function must be supported by your communications platform. Please ask your service technician to activate this function.
F12
69

Starting the telephone directory CD
Starting the telephone directory CDA telephone directory CD can be started by way of the "telephone directory CD" button in the main window of the optiClient Attendant.The precondition is that the telephone directory CD has been integrated into optiClient Attendant.Integration of the telephone directory CD function, see Æ page 84.
Operation of the telephone directory CD varies according to the telephone directory CD software which is used.In order to use the telephone directory CD, please read the documentation supplied with the telephone directory CD software.
Using a number on the telephone directory CDThe number located on the telephone directory CD is transferred by copy-ing it and then entering it in the traffic display of the optiClient Attendant.
Use the mouse to mark the wanted number in the telephone directory CD program.
Press "Ctrl" and "C" to place the data in temporary storage.
Position the mouse cursor in the "Name / Station number" field in the switching area.
Press "Ctrl" and "V" to copy the data from temporary storage to the traffic display.
Ctrl C+
Ctrl V+
70

Opening search window for LDAP server
Opening search window for LDAP serverThe search function within the LDAP server is activated with the "Search window for LDAP server" button in the main window of the optiClient Attendant.The precondition is that this search function has been integrated in the optiClient Attendant. To activate this search function, see Æ page 84.
This search function uses your PC operating system functions which are only available under Windows®98 and Windows®NT after an update.Please get in touch with your system administrator to update your operating system.
71

Emergency Operation
Emergency OperationWhen you exit the optiClient Attendant or in the event of an application fail-ure, the optiClient Attendant changes over to emergency operation. All the features of your telephone system are retained and you can continue to ex-ecute all switching functions from your optiPoint or optiset E system tele-phone (not in conjunction with optiClient).
To return to your PC attendant console, restart the optiClient Attendant program Æ page 11.
72

Special Functions in the LAN (PC Network)
Special Functions in the LAN (PC Network)If your optiClient Attendant is operating in a HiPath AllServe/5000 RSM en-vironment, multiple communications platforms are interconnected via a LAN (Local Area Network, e.g. proprietary PC network). Your telephone calls are conducted via the LAN (PC networks).
The status keys for stations in the LAN have the same meanings and func-tions as the conventional busy lamp field status keys Æ page 21.
Configuring the optiClient Attendant
Status key
73

Special Functions in the LAN (PC Network)
74

Entering Settings
Entering SettingsThe settings that can be activated in the optiClient Attendant "Settings" window are described in this section. For further settings see Æ page 83.
SystemIn the "System" directory, you can specify the connection type, activate the settings for the busy lamp fields (BLF) and activate general settings for the attendant console.
Connect to:
Select the PC interface for the following connection types in the selection list field:• optiset control/data adapter: "COM 2" or "COM 1"• USB: "COM 3"• optiClient: "IP"
If optiClient is not installed, the "IP" option is not offered.
System Update :
Data relevant to optiClient Attendant, such as the local call plan for exam-ple, are transferred from the system to the PC via the "System Update" key.
Whenever a change is detected in the system configuration (via As-sistant or Symac) after start of the optiClient Attendant or during its operation, the optiClient Attendant is automatically updated. This procedure is indicated in the status bar by the message “Please wait.”
75

Entering Settings
Set BLF
The "Set BLF" key allows you to transfer user data from the local call plan (your system’s users) to a busy lamp field.
Prerequisite: A call plan was loaded using "System Update" Æ page 75 and at least one BLF is displayed Æ page 22.
Click the "Set BLF" key. A list window displaying the current user data opens automatically.
Highlight some or all of the list entries by clicking and dragging.
or
Add individual entries to those highlighted or delete individual entries from your selection.
Click a highlighted list entry, holding down the mouse button, drag the en-try to the specific BLF status key after which you want to transfer the se-lected entries (a "+" icon appears at the mouse cursor).
The highlighted entries are transferred to the BLF once you release the mouse button.
To move status buttons on the BLF see Æ page 24.
Ctrl +
Highlighted entries
BLF
List window
Transferredentries
76

Entering Settings
Number redial only for external numbers
This option allows you to restrict the number redial list to external calls.
Deactivate night answer at start
If you select this option, night answer is automatically deactivated (if it was previously activated) when the optiClient Attendant is started.
Activate silent call at start
If you select this option, the ring tone is automatically deactivated when starting optiClient Attendant (only in the case of connection via USB or a control/data adapter).
Call detail file
If you select this option, all toll calls are stored with their values in the call detail file.
77

Entering Settings
CallsIn the other text boxes under this tab, specify the paths to the wave files (included in the software package) for ringer signaling on the PC. You can also assign individual Wave files with the "..." key and play them back with the speaker key. This must be activated for call signaling via wave files Æ page 86.
78
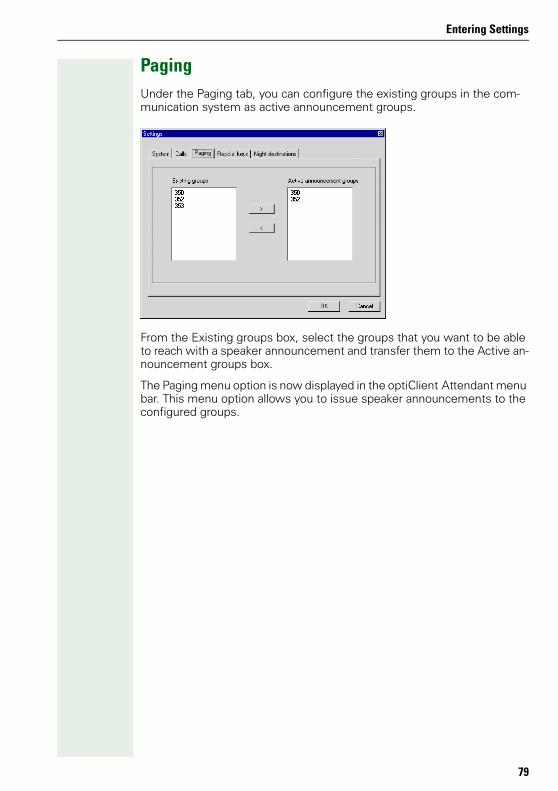
Entering Settings
PagingUnder the Paging tab, you can configure the existing groups in the com-munication system as active announcement groups.
From the Existing groups box, select the groups that you want to be able to reach with a speaker announcement and transfer them to the Active an-nouncement groups box.
The Paging menu option is now displayed in the optiClient Attendant menu bar. This menu option allows you to issue speaker announcements to the configured groups.
79

Entering Settings
Repdial KeysUse the Repdial keys tab to program the ten station numbers or codes you use the most on repertory dial keys. A sequence of codes can be used to control a voice mail system or an answering machine or activate functions on the communication server (such as entering "#82 to display the caller list).
In the input fields, enter either the name and station number of the station your wish to reach or the name and code for controlling a voice mail system or answering machine.
The Repdial keys menu option is now displayed in the optiClient Attendant menu bar. This option provides you with a pull-down menu from which you can call the configured stations and access the configured functions directly.
80

Entering Settings
Night DestinationsYou can enter up to eight different night destinations under the Night des-tinations tab. You can then select the Change night dest. option from the Edit menu to choose a night destination and activate it by clicking the night answer button in the toolbar. All calls are then forwarded to this destination.
81

Entering Settings
Saving the SettingsOnce you have entered your settings in the Settings window, you must save your entries in order for the changes to be applied.
In the Settings window, click OK to confirm your entries.
When you return to the attendant monitor, the message Please wait may appear in the status bar of the attendant monitor while optiClient Attendant is being updated with the new settings. As soon as the update operation has been completed, the message System ready is displayed. The optiClient Attendant is ready for operation.
Click the Back button to return to the attendant monitor without save the changes.
82

Configuration Manager
Configuration ManagerThis program can be used to activate additional settings not available under "File" - "Settings" for optiClient Attendant.
Starting Configuration ManagerRun the "Assistant.exe" file in the optiClient Attendant installation directory.
The path for standard installation is as follows:C:\Program Files\Siemens AG\Attendant\Assistant.exe
Configuration Manager User Interface
After starting the Configuration Manager, you are prompted to open the "config.cfg" file.
Select "Select configuration file" from the "File" menu.
Open the "config.cfg" file in the file selection dialog.
For further information on program shortcuts for the user-friendly startup of the Configuration Manager, please refer to the documen-tation about your operating system.
Menu bar
Transfer key Configuration area
Menu tree
83

Configuration Manager
Performing Settings
Telephone Book
To run a search in a Telephone book CD Æ page 70, enter the complete path to a telephone book program under "CDROM Telephone Book" or se-lect an executable file via "...".
To run a search on the LDAP server Æ page 71, enter a valid IP address or specify the name of the LDAP server under "LDAP Server".
Busy Lamp Field
Colors of BLF
You can determine the colors to be used for signaling the various line sta-tuses of the status keys on the BLF here Æ page 21.
Click the key beside the status whose color you wish to change. A color selection dialog appears.You can select one of the predefined colors by clicking it or alternatively you can mix your own color.Click "OK" to confirm.
Experience in configuring IP networks is required for certain set-tings. Please contact your system administrator for further informa-tion.Incorrect configuration can result in the failure of important optiClient Attendant functions.
The availability of the "Station is diverted" and "Do not Disturb is ac-tive" functions depends on your version of the communications plat-form.
84

Configuration Manager
BLF Configuration
The following settings can be performed for each of the three available BLFs Æ page 21.
Enter the text that should appear in the title bar of the relevant BLF in the "Text for the BLF" field.
Specify how many status keys the BLF contains in the selection list field. You can select 20 to 240 status keys (number specified in multiples of 20).Up to 140 keys can be selected in Name mode.
Activate "Display name" if you want the name to appear directly on the sta-tus key (Name mode). The names must be available for this.
If you activate "Display BLF" the relevant BLF is visible and is automatically displayed when starting optiClient Attendant. Configuration and key as-signment are not deleted if the BLF is deactivated.
Function KeysYou can select the assignment of function keys on your PC keyboard.
Select a function key from "F1" to "F10". For standard key assignment see Æ page 96.
85
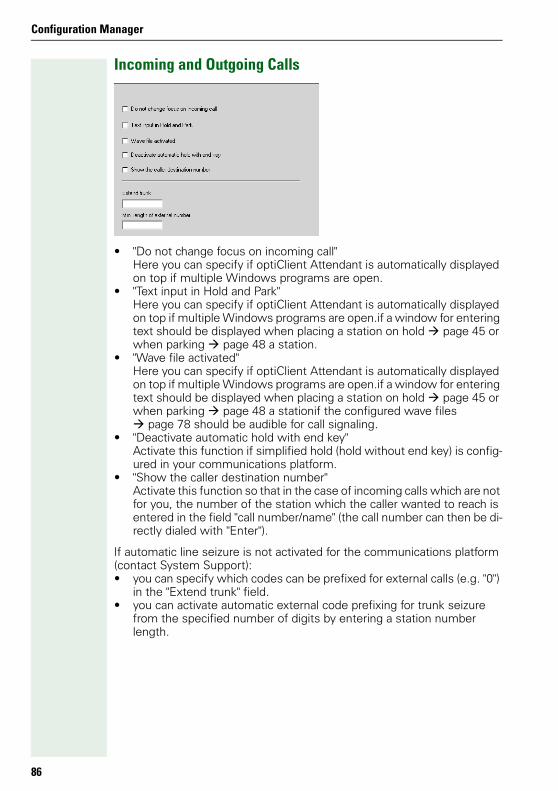
Configuration Manager
Incoming and Outgoing Calls
• "Do not change focus on incoming call"Here you can specify if optiClient Attendant is automatically displayed on top if multiple Windows programs are open.
• "Text input in Hold and Park"Here you can specify if optiClient Attendant is automatically displayed on top if multiple Windows programs are open.if a window for entering text should be displayed when placing a station on hold Æ page 45 or when parking Æ page 48 a station.
• "Wave file activated"Here you can specify if optiClient Attendant is automatically displayed on top if multiple Windows programs are open.if a window for entering text should be displayed when placing a station on hold Æ page 45 or when parking Æ page 48 a stationif the configured wave files Æ page 78 should be audible for call signaling.
• "Deactivate automatic hold with end key"Activate this function if simplified hold (hold without end key) is config-ured in your communications platform.
• "Show the caller destination number"Activate this function so that in the case of incoming calls which are not for you, the number of the station which the caller wanted to reach is entered in the field "call number/name" (the call number can then be di-rectly dialed with "Enter").
If automatic line seizure is not activated for the communications platform (contact System Support):• you can specify which codes can be prefixed for external calls (e.g. "0")
in the "Extend trunk" field.• you can activate automatic external code prefixing for trunk seizure
from the specified number of digits by entering a station number length.
86

Configuration Manager
Connection via IPThe following information is required for connection via IP (with optiClient).
Enter a valid IP address for the HG 1500 gateway in "IP Address HG1500" (if available).
Enter the station number and password for reaching the optiClient Attendant via IP in the relevant fields.
Under "Mixer device used", select the sound mixer to be used for audio sig-nals on the PC.
Under "Recording device used", you can select the device installed on the PC which is to be used for audio recording on the PC.
Under "Output device used", you can select the device installed on the PC which is to be used for audio playback on the PC.
Activate the function "Use the USB phone headset" if you want to conduct conversations via the Siemens USB phone headset.
87

Configuration Manager
Saving SettingsYou must save your entries in order for the changes in Configuration Man-ager to be applied.
Click "Transfer" to confirm changes.
Error Correction in optiClient Attendant
optiClient Attendant must be restarted in order for the changes to some functions to be applied.
To apply changes to BLFs Æ page 84, you must simply activate them via the key.
88

Error Correction in optiClient Attendant
Error Correction in optiClient AttendantThis section discusses possible solutions to problems that may arise when operating optiClient Attendant.
The optiClient Attendant does not start correctly• Check whether you have too many other programs open.• Shut down your computer and switch it off and on.• If the problem persists, uninstall the optiClient Attendant software and
then reinstall it (see the optiClient Attendant CD-ROM CD booklet).
The optiClient Attendant is no longer responding• Close any 16-bit applications that are open (such as Word 6.0).• Check whether the HiPath system is still operating by verifying another
telephone’s operation (the system may have failed).• Shut down your computer and switch it off and on.
"Please wait" is permanently displayed on the status bar• For optiset E telephones:
Check the cable to ensure that the connection between the system telephone’s optiset E data/control adapter and the PC has been estab-lished.
• For optiPoint telephones: Check the USB cable to ensure that connection between the system telephone’s USB port and the PC has been established.
Once the system is correctly connected, the message disappears and the optiClient Attendant is again ready for operation.
The busy lamp field is malfunctioning• If the status button for a station is always red (indicating that the station
is busy), it may not mean that the station is constantly conducting calls but, instead, that the station telephone is defective or was removed from the HiPath system. If such is the case, update the busy lamp field Æ page 75 and Æ page 76.
• If the status button for a station is always yellow (indicating that the sta-tion is being called) and you cannot transfer the call, it may mean that you are conducting a call or that you have a call waiting. In such cases, you cannot transfer the call.
89

Error Correction in optiClient Attendant
Troubleshooting Using the Trace Button (System Administrator Only)
The trace button allows you to store special error codes for reproducible errors in a text file that can then be passed on to a service technician at Siemens AG (intended for system administrator only).
Configuring the Trace Button• In the optiClient Attendant root directory, open the config.cfg file using
any text editor.• Insert the following line under <System>:
Trace=1• Save the file and restart the optiClient Attendant. The Trace button now
appears in the toolbar.
Click the Trace button in the toolbar to open the error code window. Delete any old error codes using the Clear button. Generate the reproducible er-rors and save the file. The file is saved as trace.txt in the optiClient Attendant root directory. Make a backup copy and send the file to the service technician for error analysis.
90

Index
Index
Aaccepting a waiting call ............................. 29answering calls ........................................... 27attendant monitor ...................................... 17
BBLF, setting ................................................. 76brief messages ........................................... 54Busy lamp field
Moving a status button ......................... 24busy lamp field ....................................... 7, 12
BLF name ................................................ 85configuring ............................................... 85defining colors ........................................ 84deleting a station .................................... 25labelling .................................................... 23making calls ............................................. 37representation ......................................... 21
buttons ......................................................... 20
Ccall detail file ............................................... 77call detail recording .................................... 64call display ............................................. 17, 18call list .................................................... 17, 20call number display
suppressing ............................................. 50call waiting on/off ....................................... 30callback
automatic ................................................. 51calls
answering ................................................ 27forwarding ............................................... 59picking up ................................................ 30terminating .............................................. 34
conference .................................................. 47configuration
saving ....................................................... 82Configuration Manager ............................. 83connection type .......................................... 75consultation hold ........................................ 44
Ddesktop ........................................................ 12dialing
with repdial keys .................................... 36do not disturb ............................................. 49door opener ................................................. 33
Eemergency operation ................................ 72entering a station ....................................... 23entrance telephone .................................... 33explanation of symbols ............................... 8external call ................................................. 35
Ffeatures .......................................................... 9function keys
configuring ............................................... 85default assignment ................................ 96
Hhold
external calls ........................................... 45
Iinternal call .................................................. 36IP telephony ................................................ 73
Kkeyboard commands ................................. 95
LLAN telephony ............................................ 73LDAP server ................................................ 71
activating searches ................................ 84
91

Index
Mmain window ................................................ 7making calls ................................................ 35
external .................................................... 35from Outlook "Contacts" ....................... 38internal ..................................................... 36with redial ................................................ 38with the busy lamp field ....................... 37
menu bar ............................................... 12, 13menu window ............................................ 26message
receiving .................................................. 55sending .................................................... 54
microphone activate/deactivate .............. 32mute ............................................................. 32
Nname mode ................................................. 85night answer ............................................... 60
activating ................................................. 62deactivating ............................................. 62
night destination ........................................ 81entering .................................................... 60selecting .................................................. 61
notebook ..................................................... 63
Oopening search window forLDAP server ................................................ 71operating procedure .................................... 8Outlook "Contacts"
editing entries ......................................... 68entering users ......................................... 68searching by station data ...................... 68searching for stations ...................... 66, 68searching on the basis of other station data ........................................................... 68telephone book function ....................... 66
override ........................................................ 49
92
Ppaging ..................................................... 53, 79park ............................................................... 48pull-down menu ......................................... 13
Rradio paging (PSE) ...................................... 58redial ............................................................. 38releasing an external trunk ....................... 57repdial keys ..................................... 36, 65, 80requirements .............................................. 10ringer signal
deactivating ............................................. 31
Sscreened transfer ....................................... 40search
Outlook "Contacts" ................................. 66telephone book ....................................... 69
second call .................................................. 29settings
calls ........................................................... 78night destinations ................................... 81paging ....................................................... 79repdial keys ............................................. 80saving ....................................................... 82system ..................................................... 75
silent call waiting ........................................ 30speed transfer ............................................ 42starting
Configuration Manager .......................... 83starting telephone directory CD .............. 70startup
automatic ................................................. 11manual ...................................................... 11
status bar ..................................................... 16Status button
move ........................................................ 24status key .................................................... 21
defining colors ........................................ 84defining the number .............................. 85

Index
system update ............................................ 75
Ttelephone book CD
activating searches ................................ 84toggle ........................................................... 46toolbar .................................................... 12, 14traffic display ......................................... 17, 19transfer ........................................................ 39
after parking/placing on hold ................ 43screened .................................................. 40speed ....................................................... 42unscreened ............................................. 41
transferring an external trunk ................... 56transferring calls ......................................... 39
Uunscreened transfer .................................. 41
Vvolume
setting ...................................................... 32
Wwave file ...................................................... 78
activating .................................................. 86
93

Keyboard Commands

Important Keyboard Commands
%
Important Keyboard CommandsYou can initiate the most important functions of the optiClient Attendant using the keyboard.
Keyboard
Answer calls.
Dial station number in General trunk group.
Place calls on hold.
Toggle between two calls.
Park calls.
Disconnect calls.
Dial station number in Private trunk group.
Return to waiting call.
Clear text boxes.
Dial station number.
Space Bar
Alt G+
Alt H+
Alt T+
Alt P+
Alt C+
Alt V+
Alt B+
Del.
95

Important Keyboard Commands
Function keys
The function keys on your PC keyboard can have the following functions (default assignment), depending on the configuration of your optiClient Attendant Æ page 85:
Call Help.
Find by name.
Terminate call (Clear).
Calls on hold.
Return to the waiting party.
Toggle between two calls.
Park the call.
Override a call.
Activate/deactivate microphone (mute).
Initiate conference.
Search the telephone book.
F1
F2
F3
F4
F5
F6
F7
F8
F9
F10
F12
96
%

�#6LHPHQV#$*#5336,QIRUPDWLRQ#DQG#&RPPXQLFDWLRQ#1HWZRUNV+RIPDQQVWU1#84#�#'0;468<#0XQLFK
5HI1#1R1=#$643360+43450&459060:94<
:LQGRZV <;�/#:LQGRZV 0(�/#:LQGRZV 17�/#:LQGRZV 5333�/#:LQGRZV ;3�#DQG#2XWORRN�#DUH#HLWKHU#UHJLVWHUHG#WUDGHPDUNV#RU#WUDGH0PDUNV#RI#0LFURVRIW#&RUSRUDWLRQ#LQ#WKH#8QLWHG#6WDWHV#DQG2RU#RWKHU#FRXQ0WULHV1
7KH#LQIRUPDWLRQ#SURYLGHG#LQ#WKLV#GRFXPHQW#FRQWDLQV#PHUHO\#JHQHUDO#GH0VFULSWLRQV#RU#FKDUDFWHULVWLFV#RI#SHUIRUPDQFH#ZKLFK#LQ#FDVH#RI#DFWXDO#XVH#GR#QRW#DOZD\V#DSSO\#DV#GHVFULEHG#RU#ZKLFK#PD\#FKDQJH#DV#D#UHVXOW#RI#IXUWKHU#GHYHORSPHQW#RI#WKH#SURGXFWV1#$Q#REOLJDWLRQ#WR#SURYLGH#WKH#UHVSHFWLYH#FKDUDFWHULVWLFV#VKDOO#RQO\#H[LVW#LI#H[SUHVVO\#DJUHHG#LQ#WKH#WHUPV#RI#FRQWUDFW1
6XEMHFW#WR#DYDLODELOLW\1#5LJKW#RI#PRGLILFDWLRQ#UHVHUYHG1#3ULQWHG#LQ#WKH#)HGHUDO#5HSXEOLF#RI#*HUPDQ\1
6413615336
ZZZ1KLSDWK1FRP