user manual tcs 2 - alluna optics · user manual tcs 2 english (current state 06/2017) this user...
TRANSCRIPT

USER MANUAL TCS 2
English (Current State 06/2017)
This user manual will familiarise you with your new ALLUNA Optics Telescope-Control-System. It describes all the important details about the functionality of the hardware, PC software and gives helpful tips for the installation, assembly, commissioning and the practical applications of the device.
Caution: Please read this product manual carefully before using your TCS2.

_______________________________________________________________________________________________________
Alluna Optics TCS2 Manual, 06/2017 2
Table of Contents Page
1. General information 3
2. Description of the TCS2 Control Box 4 - 5
3. Description of the TCS2 Hand-Control Box 5 - 8
4. Installation and commissioning 9
5. ASCOM compatible 9
6. Description Climate 10 - 11
7. Description Focuser 12 - 13
8. Description Rotator 14 - 15
9. Description Dust Cover 16 - 17
10. Description Settings 18 - 19
11. Application Programming Interface 20 - 24

_______________________________________________________________________________________________________
Alluna Optics TCS2 Manual, 06/2017 3
Dear customer, Thanks for choosing this product of ALLUNA Optics. We guarantee "Made in Germany” quality through the use of modern technology and only use the highest-quality components. We are also confident that you took the right decision of purchasing this product.
Application specific This product should be used exclusively for control functions of astronomical telescopes. For any other application contact the manufacturer. The CE declaration of conformity loses its validity as well as all guarantee and indemnification claims are lost if any changes are made to the equipment or to its configuration.
Safety and danger warnings The following points have to be urgently observed in order to have pleasure with the TCS Telescope controller and so that it works properly. The control-software "ALLUNA Optics TCS2" has been developed for the PC operating system "Microsoft Windows TM" and has been tested on different versions of " Microsoft Windows TM ". All tests have proved that TCS is stable and does not conflict with parallel applications. Nevertheless, it is possible under certain conditions,that program errors can happen. As a result by using this product you are agreeing that no liability will be attributed to Alluna for any resulting loss or damage to any hardware or software or any data loss . - The control should be used only with the supplied switch power supply with the operating voltage 13V.
- The switch power supply as well as the controller and its components are electrically operated devices and must only
be operated in a dry place. Always switch off the control when not in use by pulling out the plug of the switch power supply. Protect the components against moisture, dust, corrosive fluids and steam.
- Clean the TCS controller only with a slightly moist, lint free cloth or with an antistatic cloth.
- Never open this device yourself and avoid contact of metal objects with the plug-in contacts.
- The USB cable of your PC/notebook should not exceed the length of 5 metres. The excessive USB cable length can lead to data loss and malfunctions.
- Burnt-out fuses must only be replaced with the prescribed 2,5 A amp fuse.
- Ensure that the current supplying cables as well the USB cables are firmly plugged into the sockets of the controller and cannot be taken out accidentally or independently.
What is "ALLUNA Optics TCS2" ? The Telescope-Control-System TCS of ALLUNA Optics is a software supported electronic control system, which has been designed for the remote control of high-quality telescopes. The entire system is operated with a PC or Notebook by the supplied Windows software. With TCS several telescope functions are controlled and monitored: – Air conditioning of the optical tube and the main mirror – Focusing of the optics – Control of the optionally available CCD Rotator – Control of the optionally available robotic Dust Cover

_______________________________________________________________________________________________________
Alluna Optics TCS2 Manual, 06/2017 4
Description of the TCS2-Control Box
1 On / Off switch
On / off switch of the power supply for TCS2.
2 DC IN Current supplying socket (13V DC)
To operate the TCS2 controller only use the supplied 13Volt DC, switch power-supply . The 13V cable can be extended, but the extension cable may not be more than a maximum resistance of 0,5 Ohm.
3 Power LED (red)
This LED lights up red when the TCS2 controller is ready to be used.
4 Status LED (green)
This LED lights up green when the TCS controller has a online data link to the PC/Notebook.
5 Aux 1 LED (green)
This LED lights up green when the checkbox AUX1 in the climate mode of the TCS2 software is checked. You can connect a Dew Heater for the primary mirror on the telescope internal connection board. (The plug is not accessible of the outside). The AUX1-Output has 12V (MAX 20W).
6 Aux 2 LED (green)
This LED lights up green when the checkbox AUX2 in the climate mode of the TCS2 software is checked. You can connect a Dew Heater for the secondary mirror on the top of the telescopes secondary mirror support. (The plug is accessible of the outside). The AUX2-Output has 12V (MAX 20W).
7 Socket for telescope - SUB-D 9 pin
Connect the supplied cable for the telescope to this SUB-D socket.
8 CCD-Rotator (RJ48 socket)
Connect the optionally available CCD Rotator to this RJ48 socket with the supplied data cable.

_______________________________________________________________________________________________________
Alluna Optics TCS2 Manual, 06/2017 5
9 USB socket (Entry of the connecting cable of the PC/Notebook)
Connect the cable of the PC/Notebook to this USB socket. Please take care that the cable length is not longer than 5 m.
10 Socket for Hand-Controller box
The optional hand-controller can work stand alone or simultaneously with the PC/Notebook.
11 Dust Cover socket SUB-D 25 pin
If your telescope has an robotic Dust-Cover system, the plug of this is already connected to the SUB-D socket.
12 Focuser socket SUB-D 9 pin
Connected to this socket is the secondary focuser of the RC-telescope or the eyepiece focuser of the newtonian-telescope.
Fuse holder for 2,5A
The TCS2 electronics are protected against overload via a 2,5 A fuse.
Description of the TCS2 Hand-Controller Box

_______________________________________________________________________________________________________
Alluna Optics TCS2 Manual, 06/2017 6
The (optional) TCS2 Hand-Controller Box has a touch screen display. It can work stand alone with the telescope or simultaneously to the software on PC/Notebook. Just plug in the Hand-Controller Box on socket #10 at the TCS2 controller.
Main menu To navigate, touch on the menu button 1 - 4.
1. Climate menu.
2. Focuser menu.
3. Rotator menu.
4. Dust-Cover menu.
Climate menu
1. Fan performance slider. Has only effect when climate control
switch 2 is off.
2. Climate control switch. The Fan performance will be controlled
automatically, depending on delta between main mirror temperature and
ambient temperature.
3. 4.AUX 1 switch for a optional primary mirror dew heater.
4. 5.AUX 2 switch for a optional secondary mirror dew heater.
5. Back to main menu.
6. Temperature value of secondary mirror.
7. Temperature value of primary mirror.
8. Temperature value of ambient.

_______________________________________________________________________________________________________
Alluna Optics TCS2 Manual, 06/2017 7
Focuser main menue
1. Displays the current position. 2. Hold down this button to move the focuser backward. 3. Moves the focuser 1 skip-width backward. The mirror spacing gets
smaller and the back focus longer. The value of skip-width can be set in „Settings“ of the TCS2 software for PC/Notebook.
4. The Focuser goes to home position. 5. Moves the focuser to the desired position. Enter the position and
press „GoTo“. 6. Stops all focuser activities immediately. 7. Back to main menue. 8. Moves the focuser 1 skip-width forward. The mirror spacing gets
bigger and the back-focus shorter. The value of skip-width can be set in „Settings“ of the TCS2 software for PC/Notebook.
9. Hold down this button to move the focuser forward.
Focuser GoTo menue
1. Enter the desired position with digit buttons. 2. Displays the current position. 3. Displays the entered position. 4. Back to main menue. 5. The Focuser goes to the optimum position. 6. Starts positioning.

_______________________________________________________________________________________________________
Alluna Optics TCS2 Manual, 06/2017 8
Rotator main menue
1. Displays the current position. 2. Hold down this button to move the rotator counter clockwise. 3. Moves the rotator 1 skip-width counter clockwise. The value of skip-
width can be set in „Settings“ of the TCS2 software for PC/Notebook. 4. The rotator goes to home position. 5. Moves the rotator to the desired position. Enter the position and
press „GoTo“. 6. Stops all rotator activities immediately. 7. Back to main menue. 8. Moves the rotator 1 skip-width clockwise. The value of skip-width
can be set in „Settings“ of the TCS2 software for PC/Notebook. 9. Hold down this button to move the rotator clockwise.
Rotator GoTo menue
1. Enter the desired position with digit buttons.
2. Displays the current position.
3. Displays the entered position
4. Back to main menu
5. Starts positioning
Dust-Cover menue
1. Open/Close button.
2. LED's displays the current flap status
3. Back to main menu

_______________________________________________________________________________________________________
Alluna Optics TCS2 Manual, 06/2017 9
Installation and commissioning
Installation of the TCS2 software is very simple. Start the program "ALLUNA Optics TCS2 Setup.exe” on the CD/USB-Stick. An installation assistant leads you as usual with many other programs through the installation process. After completion the TCS2 control program is ready to be used. Now connect the PC/Notebook with the TCS2 controller on the telescope with a USB cable. Start the TCS2 program on the desktop of your PC/Notebook and make the data link to the telescope by pressing the connect button. For the first start, choose the needed COM-Port. With successful installation, the message Connected to the telescope appears in the status line. TCS2 is now connected to the telescope and ready to be operated. All dialog elements are activated and the green Status-LED lights up. If no connection can be done, because e.g. the USB cable is not plugged in or the TCS control box has no power, the connect button remains in its initial state and the fault message ERROR: No TCS2 Controller found ! appears in the status line. Click the Disconnect button to logout the system. This will be confirmed with the message Not connected to the telescope in the status line. The green Status-LED is off.
ALLUNA Optics TCS2 is ASCOM compatible
During the installation process, the following programs/drivers will be installed by the Setup program: - ALLUNA Optics TCS2.exe (the TCS2 controller software) - Serial Monitor.exe (a simple serial monitor for communication directly with the TCS2 controller) - TCS2 ASCOM Focuser Driver Setup.exe (the ASCOM Focuser driver) - TCS2 ASCOM Rotator Driver Setup.exe (the ASCOM Rotator driver) If you want to control the TCS2 via ASCOM, first install the current ASCOM platform on your PC/Notebook. To install the TCS2 ASCOM drivers, execute the "TCS2 ASCOM Focuser Driver Setup.exe” and/or "TCS2 ASCOM Rotator Driver Setup.exe”.

_______________________________________________________________________________________________________
Alluna Optics TCS2 Manual, 06/2017 10
Description Climate
1 Checkbox to display the ambient temperature
Uncheck this box to hide the measurement curve.
2 Checkbox to display the primary mirror temperature
Uncheck this box to hide the measurement curve.
3 Checkbox to display the secondary mirror temperature
Uncheck this box to hide the measurement curve.
4 Temperature measurement curve of the primary mirror
The temperature measurement curve of the primary mirror is displayed in colour green.
5 Temperature measurement curve of the secondary mirror
The temperature measurement curve of the secondary mirror is displayed in colour red.
6 Temperature measurement curve of ambient
The temperature measurement curve of ambient is displayed in colour blue.

_______________________________________________________________________________________________________
Alluna Optics TCS2 Manual, 06/2017 11
7 Temperature axis in degrees centigrade
The vertical temperature axis displays the temperature range of +35°C to -25°C.
8 Time axis in minutes
The horizontal time axis shows the elapsed time in minutes since the beginning of the measured value recording. The stop-watch (13) shows the value in the time format. INFORMATION: In the beginning of a new recording phase, the three measured values (4 - 6) are straight horizontal lines, which change to curves after a while due to the temperature change. The 1st vertical time marker moves from right to left on the display after the first 5 minutes. From now on another 12 five minutes time markers follow, until the whole display is divided by 12 five minutes time markers into 12 identical sections. This period represents the first progressed hour. From now on the number of time markers does not increase, but only the time information below the time markers changes.
9 Temperature metering bars
This 3 metering bars displays the current temperatures of ambient, primary mirror and secondary mirror.
10 AUX outputs (12V) for e.g. heating elements or external loads
The voltage supply 12V for the external heating elements/consumer loads can be switched on/off by marking the check boxes AUX1 and/or AUX2. INFO: The plug of AUX1 is not accessible of the outside. The outputs maximum load is 20W. AUX 2 is the secondary mirror heating or secondary focusser heating at low temperature version.
11 Automatic climate control
If this box is checked, the fans are controlled automatically. The power slider (12) is blocked. INFORMATION: The automatic mode has only effect if the primary mirror temperature is higher then the ambient temperature. The fans power decreases when the temperature delta gets smaller.
12 Manual power-slider for fans (0 – 100%)
The fans can be regulated with this slider between 0 and 100%. The slider is only operable when check box "Automatic” is off.
13 Elapsed Time since beginning of temperature measurement
In order to receive a precise measured value, TCS reads all 3 temperature sensors every 5 second and updates the display.

_______________________________________________________________________________________________________
Alluna Optics TCS2 Manual, 06/2017 12
Description Focuser
1 Home position in Focuser Monitor
If the secondary focuser is in home position, the back focus light-cone is in touch with the red Home line.
2 OptiPos position in Focuser Monitor
OptiPos is the optimum position between primary and secondary mirror. In this position the RC system has the very best imaging quality, best spots and flattest field. The light-cone is in touch with the green OptiPos line. This position can be edited in Settings. For the factory determined value for the OptiIPos, please consult the telescope manual. The spacer sleeves should be used which is the focal point setting near the OptiPos value. There, the telescope has its best optical performance. Deviations of +/- 3000 are perfectly acceptable.
3 Backfocus position in Focuser Monitor
The blue backfocus line is the current position of the light-cone. This distance between telescopes backplate and backfocus is displayed in millimeters and depends on the selected backoptic (4).
4 Backoptic selector in Focuser Monitor
The backfocus is calculated based on the selected backoptic. You can choose "None”, "Corrector AFFC” or "Reducer AFFR”.
5 Target position
Enter the target position and click GoTo or press Return. The secondary focuser starts to reach the entered position.

_______________________________________________________________________________________________________
Alluna Optics TCS2 Manual, 06/2017 13
6 GoTo
Enter the target position and click this button. The secondary focuser starts to reach the entered position.
7 Home position
The secondary focuser starts the initialization process. Home position is mechanical zero.
8 OptiPos
The secondary focuser moves to the optimum position. This position can be edited in Settings.
9 Stop
Stops immediately any secondary focuser action.
10 Skip backward
Moves the secondary focuser 1 skip-width backward. The mirror spacing gets smaller and the back focus longer. The value of skip-width can be set in "Settings".
11 Jog backward
Hold this button pressed to move the secondary focuser backward. The mirror spacing gets smaller and the back focus longer.
12 Jog forward
Hold this button pressed to move the secondary focuser forward. The mirror spacing gets bigger and the back-focus shorter.
13 Skip forward
Moves the secondary focuser 1 skip-width forward. The mirror spacing gets bigger and the back-focus shorter. The value of skip-width can be set in "Settings".
14 Current Focuser position
Displays the current position of the secondary focuser.
15 Positions memory
Saves the current focuser position. To enter a new position, simply click the input field of the combo box and give it the preferred name. Click the save button and the position name with the current focus position will be stored.

_______________________________________________________________________________________________________
Alluna Optics TCS2 Manual, 06/2017 14
Description Rotator
1 Rotator Monitor
The Rotator Monitor displays a virtual CCD-Camera. It represents the CCD's current angle. If the Rotator at the telescope is rotating, then also rotates the virtual CCD-Camera angle.
2 Target position
Enter the target position in angle degrees and click GoTo (3) or press Return. The Rotator starts to reach the entered position.
3 GoTo
Enter the target position in angle degrees and click this button. The Rotator starts to reach the entered position.
4 Home position
The Rotator starts the initialization process. Home position is mechanical zero = 0,0 angle degrees.
5 Stop
Stops immediately any Rotator action.
6 Skip backward
Turns the Rotator 1 skip-width backward. The value of skip-width can be set in "Settings".
7 Jog backward
Hold this button pressed to move the Rotator backward.

_______________________________________________________________________________________________________
Alluna Optics TCS2 Manual, 06/2017 15
8 Jog forward
Hold this button pressed to move the Rotator forward.
9 Skip forward
Turns the Rotator 1 skip-width forward. The value of skip-width can be set in "Settings".
10 Current Rotator position
Displays the current position of the Rotator.
11 Positions memory
Save the current rotator position. To enter a new position, simply click the input field of the combo box and give it the preferred name. Click the save button and the position name with the current rotator position will be stored.
12 Rotator 0 position
Sets the degree display to 0.

_______________________________________________________________________________________________________
Alluna Optics TCS2 Manual, 06/2017 16
Description Dust Cover
The opening and closing behaviour of the primary mirror dust protection flaps can be changed if needed. By double-clicking the Flap Monitor, the following parameters can be changed in an additional window:
Caution: Be careful when changing DustCover values. Incorrect changes may cause serious damage to the flap motors or electronics.

_______________________________________________________________________________________________________
Alluna Optics TCS2 Manual, 06/2017 17
1 Dust Cover Monitor
Blinking LED's indicate the Flaps are busy.
2 Open/Close button
Open or close the Dust-Cover flaps with this button.
3 Dust Cover Edit (Open time)
Here you can set the flap motors runtime in milliseconds for the open-procedure. For the open-procedure the "Fast Speed" value will be used. (Has no effect since firmware version 1.3.02)
4 Dust Cover Edit (Fast speed)
The speed you can set here will be used for the open-procedure and the close-procedure up to the "Breakpoint".
5 Dust Cover Edit (Slow speed)
This adjustable speed will be used for a soft touchdown of the flaps during the closing process after reaching the "Breakpoint". (Has no effect since firmware version 1.3.02)
6 Dust Cover Edit (Breakpoint)
The breakpoint will be triggered in milliseconds after start of the closing process and switches over the flap-closing speed from "Fast Speed" to "Slow Speed". With that it's possible to get a soft touchdown of the flaps. (Has no effect since firmware version 1.3.02)
7 Dust Cover Edit (Timeshift)
Here you can change the starting timeshift between the first flap pair (L + R) and the second flap pair (T + B) in milliseconds.

_______________________________________________________________________________________________________
Alluna Optics TCS2 Manual, 06/2017 18
Description Settings
1 General (Window stay on top)
By activating this checkbox, the TCS2 program-window stays on top of all other windows.
2 General (Acoustic Signals)
The TCS2 program signals the end of an secondary focuser or rotator activity with an beep sound.
3 General (Hand-Controller)
Indicates whether hand controller is present or not. Input ON / OFF with Serialmonitor command SetHandyBox. For more information, see the “Application Programming Interface (API)” starting on page 20.
4 Focuser (OptiPos)
OptiPos is the optimum position between primary and secondary mirror. In this position the RC system has the very best imaging quality, best spots and flattest field. Here you can change the position if necessary. In the description from your telescope, you can find the determined value in factory.
5 Focuser (Skip Width)
With the Skip-Buttons (10 + 13) on the focuser tab, the secondary focuser can skip forward and backward in fixed increments. The skip width can be changed in this entry field. Experience has shown that a value of 5 to 10 Steps is a good value in MicroStep mode (point7).

_______________________________________________________________________________________________________
Alluna Optics TCS2 Manual, 06/2017 19
6 Focuser (Microstep resolution)
Microstep is 16 times the resolution of speedstep. The secondary focusers travel range in this mode is 22400 steps, which means, the linear actuator has a resolution of 0,00046875 mm per step. The RC's F/8 mirror system has a ratio of 1:8 in the mirror spacing, which means, if the secondary mirror is moved 1 mm on axis, the back focus moves 8 mm. So 1 step = 0,00046875 * 8 = 0,00375 mm.
7 Focuser (Speedstep resolution)
Speedstep is the fast focuser mode. The secondary focusers travel range in this mode is 1400 steps, which means, the linear actuator has a resolution of 0,0075 mm per step. The RC's F/8 mirror system has a ratio of 1:8 in the mirror spacing, which means, if the secondary mirror is moved 1 mm on axis, the back focus moves 8 mm. So 1 step = 0,0075 * 8 = 0,06 mm.
8 Rotator (Resolution)
This value is the number of steps for exactly 1 complete 360° revolution of the rotator.
9 Rotator (Skip Width)
With the Skip-Buttons (6 + 9) on the rotator tab, the rotator can skip forward and backward in fixed increments. The skip width can be changed in this entry field.
10 General (Screensaver)
Here you can set the screensaver activation time for the display of the optional Hand-Controller box
11 Sensors
Temperature sensors can be adjusted. Normally no change necessary.
_______________________________________________________________________________________________________
Alluna Optics TCS2 Manual, 06/2017 20
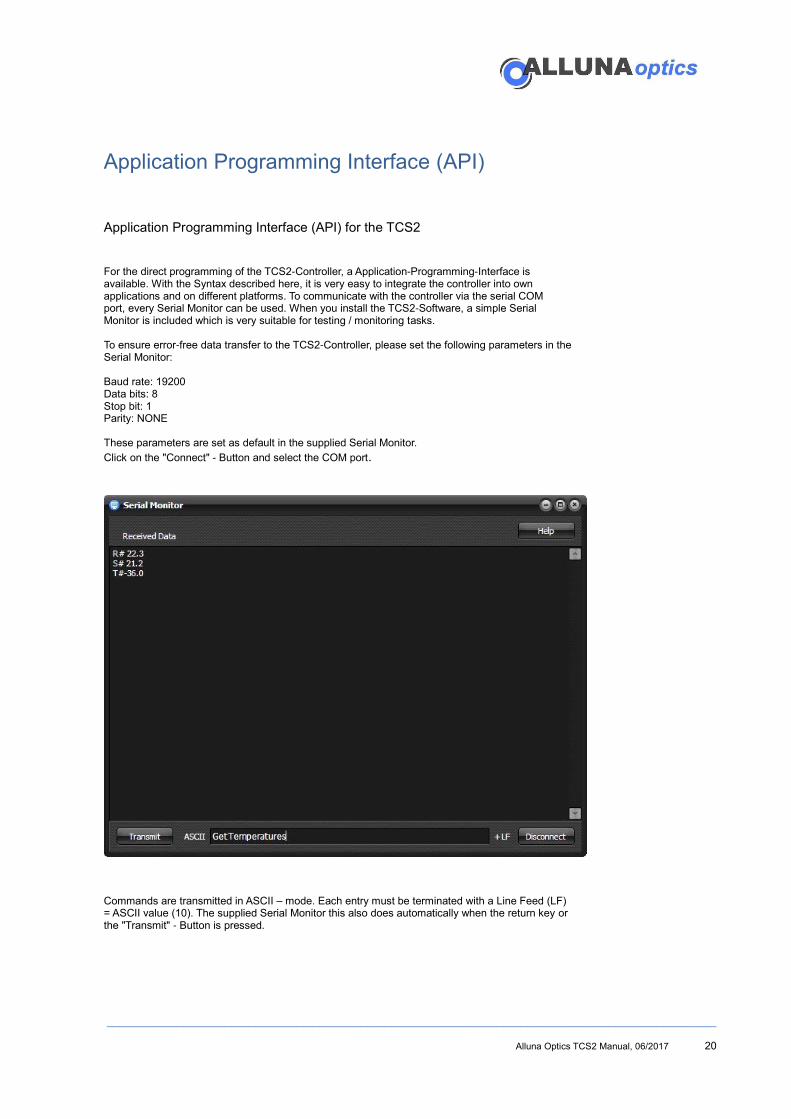
Application Programming Interface (API)
Application Programming Interface (API) for the TCS2 For the direct programming of the TCS2-Controller, a Application-Programming-Interface is available. With the Syntax described here, it is very easy to integrate the controller into own applications and on different platforms. To communicate with the controller via the serial COM port, every Serial Monitor can be used. When you install the TCS2-Software, a simple Serial Monitor is included which is very suitable for testing / monitoring tasks. To ensure error-free data transfer to the TCS2-Controller, please set the following parameters in the Serial Monitor: Baud rate: 19200 Data bits: 8 Stop bit: 1 Parity: NONE These parameters are set as default in the supplied Serial Monitor.
Click on the "Connect" - Button and select the COM port.
Commands are transmitted in ASCII – mode. Each entry must be terminated with a Line Feed (LF) = ASCII value (10). The supplied Serial Monitor this also does automatically when the return key or the "Transmit" - Button is pressed.

_______________________________________________________________________________________________________
Alluna Optics TCS2 Manual, 06/2017 21
The API syntax includes two command types: The so-called "getter" and "setter" - commands. Getter-commands return the current values of the controller, which are displayed after receiving in the "Received Data" section of the Serial Monitor. The returning of values is always done by the controller with a final Line Feed (LF) = ASCII value (10). Getter - commands are entered without additional parameters. Example: Command: GetFocuserPosition Returns: Current position of the Secondary Focuser in steps. Setter-commands set values in the controller. They can be entered with or without parameters. With some exceptions, setter-commands returning no values. Example: Command: SetFocuserPosition 12345 Returns: Positions the Secondary Focuser to 12345. The current positioning progress is displayed in the "Received Data" section of the Serial Monitor in realtime. Please note when you enter commands with parameters, always one (SPACE) = ASCII value (32) has to be set between command and parameter. Returns For application developement: When an action starts or ends, the returns of the TCS2-Controller starts with an identifier in every new line. The ID's consist of an uppercase letter followed by an number sign "#".
ID Return Value
A# AUX1 ON
B# AUX1 OFF
C# AUX2 ON
D# AUX2 OFF
E# Climate control ON
F# Climate control OFF
G# FAN-Slider return value
H# DustCover STOP
I# Focuser START
J# Focuser STOP
K# Focuser Position in Steps
L# Rotator START
M# Rotator STOP
N# Rotator Position in Steps
O# DustCover START
P# Rotator Homerun START
Q# Focuser Homerun START
R# Ambient temperature value
S# Primary temperature value
T# Secondary temperature value
U# BackFocus minimum for BackOptic „None“
V# BackFocus maximum for BackOptic „None“
W# BackFocus minimum for BackOptic „Corrector“
X# BackFocus maximum for BackOptic „Corrector“
Y# BackFocus minimum for BackOptic „Reducer“
Z# BackFocus maximum for BackOptic „Reducer“
a# Ambient Temperature Correction Value
b# Primary Mirror Temperature Correction Value
c# Secondary Mirror Temperature Correction Value

_______________________________________________________________________________________________________
Alluna Optics TCS2 Manual, 06/2017 22
COMMAND OVERVIEW:
Command Function
HandShake Identifies the COM-Port connected hardware as TCS2-Controller and on success a LineFeed (LF) = ASCII-value (10) is given back.
Connect Sets = 1 or Unsets = 0 the connected-bit in the TCS2-Controller. Indicator for this is the green Connected-LED at the TCS2-Controller.
GetTemperatures Returns the current sensor temperature values in C° of Ambient, Primary and Secondary.
GetFocuserPosition Returns the current Focuser position in Steps.
GetRotatorPosition Returns the current Rotator position in Steps.
GetBFValues Returns all BackFocus values in mm for the TCS-Focuser-Monitor in order 1 – 6.
SetBFValue1 Sets the minimum BackFocus value in mm for the BackOptic „None“.
SetBFValue2 Sets the maximum BackFocus value in mm for the BackOptic „None“.
SetBFValue3 Sets the minimum BackFocus value in mm for the BackOptic „Corrector“.
SetBFValue4 Sets the maximum BackFocus value in mm for the BackOptic „Corrector“.
SetBFValue5 Sets the minimum BackFocus value in mm for the BackOptic „Reducer“.
SetBFValue6 Sets the maximum BackFocus value in mm for the BackOptic „Reducer“.
SetMotor1Hold Sets the hold current of the Focuser stepper motor, 1 = ON or 0 = OFF.
SetMotor2Hold Sets the hold current of the Rotator stepper motor, 1 = ON or 0 = OFF.
GetTCValues Returns the temperature correction values in 0,1 C° units of Ambient, Primary and Secondary.
SetTCValue1 Sets the temperature correction value for Ambient in 0,1 C° units.
SetTCValue2 Sets the temperature correction value for Primary in 0,1 C° units.
SetTCValue3 Sets the temperature correction value for Secondary in 0,1 C° units.
RotatorZero Sets the current Rotator position to zero.
SetHandybox Tells the TCS2-controller a Hand-controller 1 = Connected or 0 = Not Connected.
GetHandybox Returns 1 if a Hand-Controller is set or 0 if it's not set.
SetScreenSaver Sets the ScreenSaver activation time in minutes or 0 = OFF.
GetScreenSaver Returns the ScreenSaver activation time in minutes or 0 = OFF.

_______________________________________________________________________________________________________
Alluna Optics TCS2 Manual, 06/2017 23
SetAux1 Sets the status of AUX1, 1 = ON or 0 = OFF.
GetAux1 Returns the status of AUX1, 1 = ON or 0 = OFF.
SetAux2 Sets the status of AUX2, 1 = ON or 0 = OFF.
GetAux2 Returns the status of AUX2, 1 = ON or 0 = OFF.
SetClimateControl Sets the status of Climate Control, 1 = ON or 0 = OFF.
GetClimateControl Returns the status of Climate Control, 1 = ON or 0 = OFF.
SetFanPower Sets the Fan power, between 121(47%) – 255(100%). Smaller values then 121 turning off the Fans.
GetFanPower Returns the Fan power, between 121(47%) - 255(100%).
SetDustCover Opens/Closes the DC-Flaps.
GetDustCover Returns the current DustCover status, 1 = Open or 0 = Closed.
SetFocuserMode Sets the Focuser resolution, 0 = SpeedStep or 1 = MicroStep.
GetFocuserMode Returns the Focuser resolution, 0 = SpeedStep or 1 = MicroStep.
SetFocuserSkipWidth Sets the Focuser Skip-Width in Steps.
GetFocuserSkipWidth Returns the Focuser Skip-Width in Steps.
SetFocuserOptiPos Sets the Focuser position „OptiPos“ in Steps.
GetFocuserOptiPos Returns the Focuser position „OptiPos“ in Steps.
SetRotatorResolution Sets the Rotator resolution in Steps for exactly one full revolution (360°).
GetRotatorResolution Returns the Rotator resolution in Steps.
SetRotatorSkipWidth Sets the Rotator Skip-Width in Steps.
GetRotatorSkipWidth Returns the Rotator Skip-Width in Steps.
SetDCOpenTime Sets the opening time in milliseconds of the DC-Flaps.
GetDCOpenTime Returns the opening time in milliseconds of the DC-Flaps.
SetDCBreakPoint Sets the BreakPoint in milliseconds of the DC-Flaps.
GetDCBreakPoint Returns the BreakPoint in milliseconds of the DC-Flaps.
SetDCTimeShift Sets the time shift of the DC-Flaps (first pair to second pair) in milliseconds.
GetDCTimeShift Returns the time shift of the DC-Flaps (first pair to second pair) in milliseconds.
SetDCFastSpeed Sets the fast open/close-speed of the DC-Flaps before BreakPoint.
GetDCFastSpeed Returns the fast open/close-speed of the DC-Flaps before BreakPoint.

_______________________________________________________________________________________________________
Alluna Optics TCS2 Manual, 06/2017 24
SetDCSlowSpeed Sets the slow open/close-speed of the DC-Flaps after BreakPoint.
GetDCSlowSpeed Returns the slow open/close-speed of the DC-Flaps after BreakPoint.
FocuserHomeRun Initialized the Focuser to Home-Position and set's the counter to 0.
FocuserOptiPos Moves the Focuser to optimum position (OptiPos).
FocuserGoTo Moves the Focuser to the given position in steps.
FocuserSkipForward Moves the Focuser one Skip-Width forward.
FocuserSkipBackward Moves the Focuser one Skip-Width backward.
FocuserJoggForward Starts the Jogg-Mode of the Focuser forward.
FocuserJoggBackward Starts the Jogg-Mode of the Focuser backward.
FocuserStop Stops the Focuser immediately.
RotatorHomeRun Initialized the Rotator to Home-Position and set's the counter to 0.
RotatorGoTo Moves the Rotator to the given position in steps.
RotatorSkipForward Moves the Rotator one Skip-Width clockwise.
RotatorSkipBackward Moves the Rotator one Skip-Width counterclockwise.
RotatorJoggForward Starts the Jogg-Mode of the Rotator clockwise.
RotatorJoggBackward Starts the Jogg-Mode of the Rotator counterclockwise.
RotatorStop Stops the Rotator immediately.
Our address:
Alluna Optics Dr.-Jaufmann-Strasse 18
86399 Bobingen, Germany Web: www.alluna-optics.com eMail: [email protected]