user manual of le pan mini manual of le pan mini table of contents ch1. before getting started 3...
TRANSCRIPT

User Manual of Le Pan Mini

Table of Contents CH1. BEFORE GETTING STARTED…………………………………………………………3
CH2. GETTING TO KNOW YOUR TABLET……………………………………………..4
CH3. GETTING STARTED……………………………………………………………………10
CH4. SETTINGS…………………………………………………………………………………19
CH5. MESSAGING…………………………………………………………………………….22
CH6. CONNECTING…………………………………………………………………………..25
CH7.MULTIMEDIA……………………………………………………………………………32
LIMITED WARRANTY……………………………………………………………………….37
FCC STATEMENT………………………………………………………………………………38

CH1. BEFORE GETTING STARTED Your tablet is a highly sophisticated electronic device. Please read this manual before using your tablet, battery, charger or any accessories.
Care and Maintenance
• Keep your tablet and all its parts out of the reach of children. • Keep your tablet dry. • Avoid exposing your tablet to extreme hot or cold temperatures. • Avoid placing your tablet close to lit cigarettes, naked flames or any heat source. • Do not attempt to disassemble your tablet. Non-expert handling of the device may damage it. • Do not drop, knock, or shake your tablet. Rough handling may break internal circuit boards. • Do not paint your tablet as the paint could obstruct the ports and prevent normal use. • Treat your tablet with care, and keep it in a clean and dust free place.

CH2. GETTING TO KNOW YOUR TABLET Your Tablet
1. Volume Button 5. Micro SD Slot 9. Reset Button 2. Micro USB Port 6. Power Button 10. Speaker 3. Microphone 7. Front Camera 4. Headphone Jack 8. Rear Camera

In the Box Tablet PC Quick Start Guide Charger Micro USB Cable
Install the Storage Card
You can install a micro SD card up to 32 GB to save more pictures, music, applications, etc.
Install Micro SD Card
1. Turn off the tablet. 2. Locate the slot for the micro SD card. 3. Open the slot door. 4. Insert the SD card micro.
Remove Micro SD Card
Turn off the tablet or unmount the micro SD card: 1. Go to Applications > Settings>Storage >Unmount SD
Card. 2. Push the micro SD card to eject it from the slot. 3. Pull out the micro SD card from the slot.
Micro SD Slot

Battery
Your tablet has an internal 3260 mAh rechargeable lithium-ion battery. The battery can only be replaced by the original manufacturer. To reduce the risk of fire or burns: •Do not crush, puncture, short external contacts, or dispose of battery in fire or water. •Do not expose to temperatures above 60°C (140°F). •Recycle or dispose of used battery as stipulated by local regulations. Battery Performance Battery performance depends on many factors, including the network configuration, signal strength, temperature, features or settings, items attached to connecting ports, and usage of programs or functions. Charge the Battery Your tablet comes with a USB Power Adapter (Wall Charger Output: 5V, 2A) to charge your tablet from any standard AC power outlet. Before using your tablet for the first time, you must fully charge

the battery for a minimum of eight hours. When battery is being charged, the icon will be displayed at the button of screen when tablet pc is on. After the battery has been fully charged, a full battery icon will be displayed in the status bar. Steps: 1. Insert the USB cable into your tablet’s charger port. 2. Insert the USB Connector into the USB Power Adapter. 3. Plug the USB Power Adapter (Wall Charger) into a standard
AC power outlet to start charging the battery.
BATTERY CAUTION & DISPOSAL INFORMATION:
Misuse or abuse of the lithium-ion battery may result personal injury or fire
• Keep away from dangerous goods or materials • Burn hazard • Abuse operation of battery (e.g., overcharge, crush,
puncture, excessive heat or moisture) may produce smoke. In such an event, ventilate the area.
• Extinguish any flames with carbon dioxide, dry-powder fire extinguisher, or cover with sand or mud.
• Do not disassemble, crush, puncture or incinerate. • Do not expose to temperature above 140°F.
Headphone Jack Location
USB Power Adapter Wall Charger

• Do not throw the battery away in the trash. • For normal charges, the battery temperature should be
between 32°F and 113°F, the charge time may increase at colder temperatures.
• Use at temperature below 104°F, charge fully prior to long storage periods or if it has been stored for more than three months.
• Do not dispose of batteries in fire. • Batteries should be recycled or disposed of as per state
or local guidelines.
Headphone Jack
For listening to music and watching videos, insert the headset into the headphone jack.
Tablet Controls
Function Keys Touch the control keys on the screen to do the followings:
Key Icon Function
Text search Text search on Google.
Voice search
Voice search on Google.
Headphone Jack Location
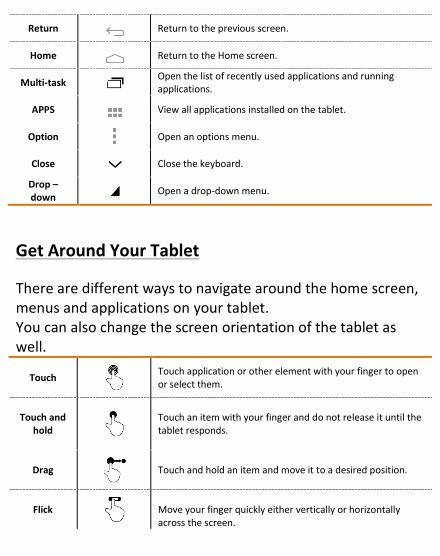
Return Return to the previous screen.
Home Return to the Home screen.
Multi-task Open the list of recently used applications and running applications.
APPS View all applications installed on the tablet.
Option Open an options menu.
Close Close the keyboard.
Drop – down Open a drop-down menu.
Get Around Your Tablet
There are different ways to navigate around the home screen, menus and applications on your tablet. You can also change the screen orientation of the tablet as well.
Touch
Touch application or other element with your finger to open or select them.
Touch and
hold
Touch an item with your finger and do not release it until the tablet responds.
Drag
Touch and hold an item and move it to a desired position.
Flick
Move your finger quickly either vertically or horizontally across the screen.

Double-
touch
Quickly touch the screen twice.
Pinch
Pinch your fingers together or move them apart.
Rotate
To change the screen orientation from portrait to landscape, or vice versa, simply turn the tablet sideways. When entering text, you can turn the tablet sideways to bring up a bigger keyboard.
CH3. GETTING STARTED
Turn Your Tablet On / Off
Turn On the Tablet Press the POWER key on the right side of the top of the tablet.
Turn Off the Tablet
Press and hold the POWER key until the options menu opens.
Power Key location

On the options menu, touch the Power Off button to turn off the tablet.
Start Using Your Tablet
After you get into the welcome page, touch and hold the UNLOCK icon and slide up to the right to unlock your tablet.
Set Up Your Tablet for the First Time
When you turn on the tablet for the first time, you will be requested to sign in to your Google account. Please follow the instruction displayed on the tablet. Turn Off the Screen When Not in Use To save battery power, your tablet screen automatically turns off when you leave it idle after a certain period of time. You can also turn off the screen by briefly pressing the POWER key. Pressing the POWER key again will turn on your tablet screen.
Unlock the screen
Unlock the Screen

Home Screen
The Home screen is your starting point for using the applications on your tablet. You can customize the Home screen to display application icons, shortcuts, folders, and widgets.
Extended Home Screen
The Home screen extends beyond the screen width to provide more space for adding icons, widgets, and more. Slide your finger horizontally across the screen (to the left or the right) to go to the left side or right side of the extended home screen. Press the Home key to go back to the main screen. Your tablet supports 5 extended Home screens.
Customize the Home Screen
Home Screen Items
Home Screen
Home Screen

Apps. Add shortcuts such as application, a bookmarked web page, a favorite contact, an email label, or a music playlist.
Widgets. Add wireless manager, profile mode, clock, Facebook widget, Weather widget, music player, picture frame, power control, or a calendar that shows upcoming appointments.
Wallpapers. Change the Home screen wallpaper.
Add a Home Screen Item
Add Icons to the Home Screen: Long press the icon till it magnifies, you can locate the icon at any extended home screens.
Reposition a Home Screen Item
1. Touch and hold the item on the screen you want to
reposition to activate Move mode. **Note: When Move mode is activated, the item will
magnify.

2. Without lifting your finger, drag the icon to the desired position on the screen, and then release it. **Tip: To move an item from the Home screen to an
extended Home screen, touch and hold the item and then drag it to the left or right edge of the
screen until the display shifts to the extended Home screen. Position the item on the screen, and then release it.
Remove a Home Screen Item
1. Touch and hold the item
on the screen you want to remove to activate Move mode. 2. Drag the icon to .
Change the Home Screen Wallpaper
1. While on the Home screen, touch
>Settings>Display>Wallpaper; or you can long press the empty area of the home screen to Choose wallpaper from Gallery/ Live Wallpapers/ Wallpapers.
2. Touch Gallery, Live wallpapers or Wallpapers. Touch Gallery to use a picture you captured using the
camera or copied to your tablet as wallpaper.
Change wallpaper

Touch Live wallpapers or Wallpapers to use preset wallpapers that came with the tablet. 3. Touch Save or Set Wallpaper.
Settings
Control and customize tablet settings on the Settings screen. Open the Settings Screen: Press Home , touch Applications , then select Settings.
Adjust the Volume
Adjusting the volume changes the volume level of sound notifications and music or video playback. Adjust the volume by pressing the volume key on the tablet.
Use the On-Screen Keyboard
When you start a program or select a field that requires text or numbers, the on-screen keyboard will be needed.
Notification

Tips for Using the On-Screen Keyboard: When the keyboard is not needed, you may close it by
pressing . To show the keyboard again, simply touch a text box on
the screen. To insert or delete a character, first position the cursor
next to the character you want to edit with your finger and then type or click 5 to delete.
Set On-Screen Keyboard Options
1. Press Home , touch Applications , and then touch
Settings>Language &input. 2. Set the options you want to use for the on-screen
keyboard.

Connect to Computer
Take the USB cable in box to connect Tablet and Computer. **Note: Please install “Windows Media Player 11” if your
computer is with windows XP or lower OS. 1. Select Disk “TC802A” to view files in Tablet or transfer
documents in between. 2. Disconnect cable when it is finished.

Create and Manage Contacts
View Contacts
Press Home , touch Applications , and then touch People
.
Add Contacts
1. In the People, touch to add new contact. 2. Enter the contact’s name and other contact information
such as phone number, email address, home address, etc. 3. Touch Add another field to input more information. 4. Touch Done at the left top corner.
Import Contacts from Micro SD Card
In the contact list, touch the icon to select Import/Export. **Note: Tablet accepts “.vcf” format files only.
Back Up or Sync Contacts

You can backup contacts in the SD card and cloud by doing one of following. In the contacts list, touch and select Import/Export to export
contacts and save them on Micro SD card, Or, touch Accounts from Settings to sync your contacts with your Google account by selecting sync now.
CH4. SETTINGS
Protect Your Tablet with a Screen Lock
You can secure your data by locking the screen and/or requiring a screen unlock pattern, where you need to input the password to turn the tablet on or wake it up from sleep mode. Locking the screen prevents accidental screen touches when the tablet is in your bag, purse, or pocket. Lock the Screen: 1. Press the POWER key to turn off the display. 2. The screen will be locked automatically. **Note: To unlock the screen, slide the “Unlock” icon to right to unlock the screen. Create and Enable a Screen Unlock Pattern: You can increase the security of your tablet by creating a screen unlock methods, such as Slide (as default), Face Unlock, Pattern, Pin and Password. When enabled, you have to input Screen Unlock Pattern

the correct instruction to unlock the tablet’s control keys and touch screen.
**Important! When you fail to input the correct instructions on the screen after five attempts, you will be prompted to wait for more than 30 seconds before next try. If you forget your screen unlock pattern, touch Forgot pattern. You will be prompted to sign in using your Google Account, and create a new screen unlock pattern before the Home screen displays. 1. Press Home , then touch to open the Applications ,
then select Settings . 2. Touch Security> select Screen lock. 3. Select preferred lock method from None, Slide, Face
Unlock, Pattern, PIN, Password.
Manage Applications
Clear Application Cache and Data: 1. Press Home , then touch to
open the Applications , then select Settings >Apps.
2. In the applications list, touch the application that has cache and/or data you want to clear.
Uninstall Applications:
Device Storage
Uninstall Application

1. Press Home , then touch to open the Applications , then select Settings >Apps.
2. In the applications list, touch the application you want to uninstall.
3. On the application info screen, touch Uninstall. **Note: Applications that pre-installed on the tablet
cannot be uninstalled. Free Up Tablet Memory or Storage Card Space: If your tablet is running low on memory, you can try one or both the following to free up space: Go to Browser and clear all temporary Internet files and
Browser history information. Refer to the “Browser” section for more details.
Move applications to the micro SD card if the selected application supports it.
Reset to Factory Defaults Resetting the tablet deletes all data, including downloaded applications, and resets the tablet back to its initial state -the state before you turned on the tablet for the first time. *Warning! Make sure you have backed up the important data you
Factory Reset
Resetting to Factory Defaults

have on the tablet before you perform a factory data reset. Reset Tablet: 2. Press Home , then touch to open the Applications ,
then select Settings >Backup & reset. 3. Touch Factory data reset. 4. On the Factory data reset screen, touch Reset tablet. If
prompted, enter your screen unlock pattern, then touch Erase everything.
**Warning! A factory data reset will erase your Google account information, system and application data and settings, and downloaded applications. Remember to back up any important data before resetting.
System Update
You could update the latest system version from two optional ways: Online Update Method
Press , find “About Tablet”, and go to “System Update”. You could update it according to the notice step by step.
Resetting to Factory Defaults
OTA- update

SD Card Update Method
You could download the latest “*.zip” image file from our official website. And then install in your tablet by SD card.
CH5. MESSAGING
Your tablet comes with an email wizard that lets you add external POP3 or IMAP email accounts from popular web-based email service providers such as Hotmail, Gmail, Yahoo!® Mail Plus, AOL, and more.
Online Update

Set Up Email
Home >touch Applications > touch Email , the on-screen keyboard will pop up for inputting your account information.
Add an Email Account
1. Home >touch Applications > touch Email . 2. After enter your email account information, touch Next.
**Note: If the email account you want to set up is not in the tablet’s email database, you will be prompted to manually enter the email account settings, such as the type of your account, email server, protocol and more after touching Next.
**Tip: Touch Manual setup instead of Next to directly enter the incoming and outgoing settings for the email account that you are setting up. Enter the name for the account and the name you want displayed in outgoing emails, and then touch Done.
Gmail
Google mail is a web-based e-mail service that allows you to check the email box directly without log in your mail account from web site.

Set Up Gmail
1. Press Home , touch Applications and then touch Gmail .
2. To set up, you will be requested to create a new account or sign-in your Gmail account.
CH6. CONNECTING Connect to the Internet Your tablet’s networking capabilities allow you to access the Internet through Wi-Fi.
Wi-Fi
To use the Wi-Fi function, you would need to access a wireless access point or hotspot.
Turn on Wi-Fi and Connect to an
Access Point
1. Press Applications ,select Settings
Turn on Wi-Fi
Turn on Wi-Fi
Enter Password

, and touch the checkbox to turn it on or turn it off. 2. When Wi-Fi turned on, you can see all available access
points that were shown and displayed in the list on the right.
3. Select the one you wish to connect to and enter the password if required.
4. Touch Connect to connect the wireless access point.
Add a New Wi-Fi Network
1. Press Applications , and then touch Settings . 2. Touch Wireless & networks, turn on the Wi-Fi and then
touch the Add Wi-Fi network at the top of right corner. 3. Enter the network SSID and select the security, then touch
Save.
Security
1. Open: No security. 2. WEP: Wired Equivalent Privacy. Note: A passphrase is
required. 3. WPA/WPA2 PSK: Wi-Fi Protected Access. Note: A
password is required. 4. 802.1x EAP: 802.1x Extensible Authentication Protocol.
Enter password

Check Network Status
1. Press , and then touch Settings. 2. Turn on the Wi-Fi to display available access points. 3. The status of network will be displayed.
View Web Pages
Your tablet’s browser offers a host of features that let you view web pages just like on a desktop computer. Change the Screen Orientation to Landscape View: Press Applications , select Settings , Accessibility, select the check box of Auto-rotate screen. The screen automatically adjusts according to how you hold the tablet. Open a Web Browser: Press Applications , and then touch Chrome .
**Note: Browser automatically opens when you touch a web link in an email.

Manage Bookmarks

Your tablet allows you to store as many bookmarks as you want. Bookmarks can also be copied from a Chrome browser on your PC to your tablet. This add-on feature will need to be installed on your Chrome browser on your PC.
Bookmark a Web Page:
When browsing a webpage, touch to add the web address as a bookmark. You can also touch to open the bookmark screen. Then touch and hold a bookmark to view more options.
Zoom In or Out of a Web Page: On a web page, you can pinch fingers or apart fingers away to zoom in or zoom out.
Search
1. Click search icon at the top of the screen, or go to the Applications and select . 2. You may also use the speech-to-text feature to search information using voice input by touching this icon:
Navigate on webpage
Bookmarks
Bookmarks

Find Text Within a Web Page
1. Press at the top of the screen and select Find on page. 2. Enter the search item. As you enter characters, matching
characters will be highlighted in green. Touch the left or right arrow to go to the previous or next matching item.
**Note: Touch DONE to close the search bar at any time.
Copy Text on a Web Page
1. Open the web page where you want to copy text.
2. Press a finger on the text that you want to copy and hold it for a moment until a blue ribbon covers it.
**Tip: Zoom out of the page before you select text. 3. Release your finger from the text and click Copy on the top
of the screen to copy it. 4. To paste text into an email, touch text box and hold it for a
moment, and then touch Paste on the option menu.
Incognito Tab
Pages you view in this tab won’t appear in your browser history or search history, and they won’t leave other traces, like cookies on your tablet.
Copy text on webpage
Copy text on webpage

In the main page of Chrome, touch > New Incognito tab. Touch to switch between normal tab and incognito tab.
Browser Settings
On the Browser screen, press > Settings to set the Browser settings and options.
Check Browser History: On the Browser screen, press and then select History tab to view history. Touch an item to open the web page. Clear Cache and History On the Browser screen, press >Settings>Privacy & security, select to touch Clear cache or Clear history.
Manage Links, History, and Downloads
Allow Download of Web Applications: 1. Press Applications > Settings >Security . 2. Select the Unknown sources check box. 3. When the Attention dialog box opens, touch OK.
**Tip: Before you can download web applications, you must first enable downloading from the tablet settings.
**Warning!

Applications downloaded from the web may be from unknown sources. To protect your tablet and personal data, download applications only from trusted sources.
Your tablet supports wireless connection between devices using Bluetooth. When using Bluetooth, keep the table within 10 meters of the other Bluetooth devices to which you want to connect. Bluetooth connectivity is affected by the surroundings. Obstacles like walls or other electronic device may interfere with your Bluetooth connection.
Bluetooth Modes:
Bluetooth
2. On: Bluetooth is turned on. Your tablet can detect other Bluetooth-enabled devices, but not vice versa.
3. Off: Bluetooth is turned off. Turn on Bluetooth and Set the Tablet to Discoverable: 1. Press Applications and then press Settings. 2. Then select the Bluetooth check box to turn on Bluetooth.
When on, the Bluetooth icon appears in the status bar. 3. Touch the tablet name on the right to change the
Bluetooth status to Visible to all nearby Bluetooth devices, and then the tablet becomes discoverable to other Bluetooth devices that are within range.

Touch the tablet name again to change the Bluetooth status to Not visible to other Bluetooth devices, then the tablet becomes invisible to other Bluetooth devices.
CH7. MULTIMEDIA
Camera
Your tablet have Front camera and Rear Camera which allow you to capture pictures and record videos. Turn On the Camera : 1. Select Camera . The screen automatically access the
Camera. Turn Off the Camera: On the Camera screen, press Home or RETURN . 1. Switch to Camera or Video 2. Take Picture/ Record Video 3. Switch to Front Camera 4. Setting 5. Function Tool Bar

Viewing Pictures
After you have taken a picture, you can slide your finger to the left side of screen, then you will see the pictures that you took just away. Note: All the files took by Camera will be stored at Camera folder in Gallery. Digital Zoom: Slide your finger outward and inward to zoom in and out.
Picture Gallery
Open Picture Gallery: Press Gallery .
**Tip: If you stored your files in folders (directories) on the storage card, Gallery will display these folders as separate albums. Simply touch an album to view the pictures in an album. If there are no picture albums, slide your finger upward or downward on the screen to view pictures.
Manage Picture Gallery: While in the Gallery screen, touch and hold any album to manage folder. Close Picture Gallery:

While in the Gallery screen, press Home or RETURN to close the application. Crop a Picture: 1. While viewing a
picture in full screen, touch to select Crop. The crop tool will appear.
2. Then do one of the followings:
5. To adjust the crop tool size, touch and hold the edge of the crop tool. When the crop arrows appear, drag your finger inward or outward from the center of the crop tool to resize it.
6. To keep the aspect ratio of the crop tool while resizing, touch and hold one of the 4 corners.
7. To move the crop tool to another area on the picture, touch and hold inside the crop tool, then drag it with your finger to the desired position.
3. Touch OK to apply the changes to the picture. **Note: The cropped picture will be saved in your tablet as
a copy. The original picture will remain unedited. Send a Picture via Email or Gmail:
Crop a Picture
Crop picture

1. While viewing a picture in full screen, touch the screen, and then touch Share
2. When prompted, touch Email or Gmail. 3. The picture is automatically attached to your email or
Gmail. Compose your message, and then touch Send. For more information on how to create and send emails, refer to the chapter of messaging.
Watch and Share Video
After you have recorded a video, you can view it or share it with friends. Watch Videos: 5. From the main Gallery screen, touch a video album. 6. Touch the video you want to watch to start playback of the
video. 7. Touch the screen, the playback control bar will appear. Send a Video to Email as an attachment: 4. While viewing the video list, touch and hold the video,
then touch Share . 5. Touch Share, and then touch Email/ Gmail. 6. The video is automatically attached to your email.
Compose your message, and then touch Send to share.

Limited Warranty WHAT DOES THIS WARRANTY COVER?
This warranty covers any defects or malfunctions in your new Le Pan tablet PC or accessories.
HOW LONG IS THE PERIOD OF COVERAGE? This warranty is valid for service as follows: one (1) year no charge for parts and labor from the date of purchase.
WHAT WILL LE PAN DO? LABOR: If the product is determined to be defective within one (1) year of the date of
purchase, Le Pan will repair or replace it at no charge. After the one (1) year has expired, you will be responsible for any labor charges.
PARTS: If service is being performed by a Le Pan technician, the cost of parts is covered for up to one (1) year from the date of purchase. Le Pan will not repair or replace defective parts unless the work is performed by a La Pan technician. Proof of purchase in the form of a bill of sale, receipt or an invoice must be provided at the time service is requested in order to receive warranty service.
WHAT DOES THIS WARRANTY NOT COVER? Any damage or problem that results from misuse, abuse, or an act of God (such as flood) are not covered. This warranty does not permit recovery of consequential or incidental damages. Some states do not allow the exclusion or limitation of incidental or consequential damages, so the above limitation may not apply to you.
HOW DO YOU GET SERVICE? You must be issued a Return Merchandise Authorization (RMA) number by Le Pan’s Customer Service Center. To receive a RMA number, please contact customer service at 1-855-537-2672.
HOW DOES STATE LAW APPLY? This warranty gives you specific legal rights, and you may also have other rights that vary from state to state.
LE PAN DOES NOT OFFER REFUNDS.
WARRANTY IS INVALID IF PRODUCT IS MODIFIED, ALTERED OR OPENED.
Periodic changes are made to our warranty. Please contact customer service or visit our website at: www.lepantab.com for the latest information regarding your product or warranty.
Service Hotline: 1-855-537-2672

FCC STATEMENT
FCC RF Exposure Information and Statement The SAR limit of USA (FCC) is 1.6 W/kg averaged over one gram of tissue. Device has also been tested against this SAR limit. The highest SAR value reported under this standard during product certification for use at when properly worn on the body is 0.365W/kg. This device was tested for typical body-worn operations with the back of the handset kept 0cm from the body. To maintain compliance with FCC RF exposure requirements, use accessories that maintain a 1.5cm separation distance between the user's body and the back of the handset. The use of belt clips, holsters and similar accessories should not contain metallic components in its assembly. The use of accessories that do not satisfy these requirements may not comply with FCC RF exposure requirements, and should be avoided. FCC WARNING This device complies with Part 15 of the FCC Rules. Operation is subject to the following two conditions: (1) this device may not cause harmful interference, and (2) this device must accept any interference received, including interference that may cause undesired operation. NOTE 1: This equipment has been tested and found to comply with the limits for a Class B digital device, pursuant to part 15 of the FCC Rules. These limits are designed to provide reasonable protection against harmful interference in a residential installation. This equipment generates, uses and can radiate radio frequency energy and, if not installed and used in accordance with the instructions, may cause harmful interference to radio communications. However, there is no guarantee that interference will not occur in a particular installation. If this equipment does cause harmful interference to radio or television reception, which can be determined by turning the equipment off and on, the user is encouraged to try to correct the interference by one or more of the following measures: - Reorient or relocate the receiving antenna. - Increase the separation between the equipment and receiver. -Connect the equipment into an outlet on a circuit different from that to which the receiver is connected. -Consult the dealer or an experienced radio/TV technician for help. NOTE 2: The manufacturer is not responsible for any radio or TV interference caused by unauthorized modifications to this equipment. Such modifications could void the user’s authority to operate the equipment.