user manual (iphone)download.algoriddim.com/manual/djay-ios-iphone-manual-loqual.pdfuser manual...
TRANSCRIPT

User Manual (iPhone)
User Manual (iPhone)

User Manual (iPhone)
Table of contents1 Introduction 6
1.1 Minimum requirements 71.2 Interface tour 8
2 Glossary of terms 113 Getting started 14
3.1 Installing djay for iOS 143.1.1 Restoring your subscription and purchases 14
3.2 Finding your music 153.3 Loading a track 15
3.3.1 Deck and scratch tools 163.4 Mixing your tracks 173.5 Adding hardware 18
4 Core features 204.1 Layout 214.2 Media library browser 224.3 Automix mode 234.4 View modes 25
4.4.1 Classic mode 264.5 Settings 27
4.5.1 General 284.5.2 Mixer 304.6.3 Library 304.5.4 Advanced 324.5.5 MIDI devices 334.5.6 Automix preferences 344.5.7 Volume and sync 35
4.6 Mix recorder 364.6.1 Audio 374.6.2 Video 37
4.7 PRO Subscription 384.7.1 Loyalty discount 384.7.2 Managing your subscription 39
5 Advanced tools 415.1 Advanced deck layouts 42
5.1.1 Two decks 42

User Manual (iPhone)
5.1.2 Looper 445.1.3 Four decks 455.1.4 Video decks 46
5.2 Waveforms 505.2.1 Track waveform 505.2.2 Scrolling waveform 50
5.3 Beatgrids 515.3.1 What are beatgrids? 515.3.2 Setting a beatgrid 515.3.3 Adjusting incorrect beatgrids 51
5.4 BPM and tempo 535.4.1 Adjusting BPM 535.4.2 Tempo sensitivity 54
5.5 Key lock and changing key 555.6 Syncing 57
5.6.1 Tempo sync 575.5.2 Beat sync 57
5.7 Slicer mode 585.8 Slip mode 595.9 Waveform orientation and zoom 605.10 Library management 61
5.10.1 Adding music to My Library 615.10.2 Playlists 635.10.3 Smart playlists 645.10.4 Playlist folders 655.10.5 Analyzing your music 665.10.6 Previewing tracks 675.10.7 Queue 685.10.8 Current Session 685.10.9 Match 695.10.10 Automix playlist 715.10.12 Metadata columns 725.10.13 Sorting your music 725.10.14 Spotify 735.10.15 Music 745.10.16 Videos 755.10.17 History 75
5.11 Effects 765.11.1 Audio 76

User Manual (iPhone)
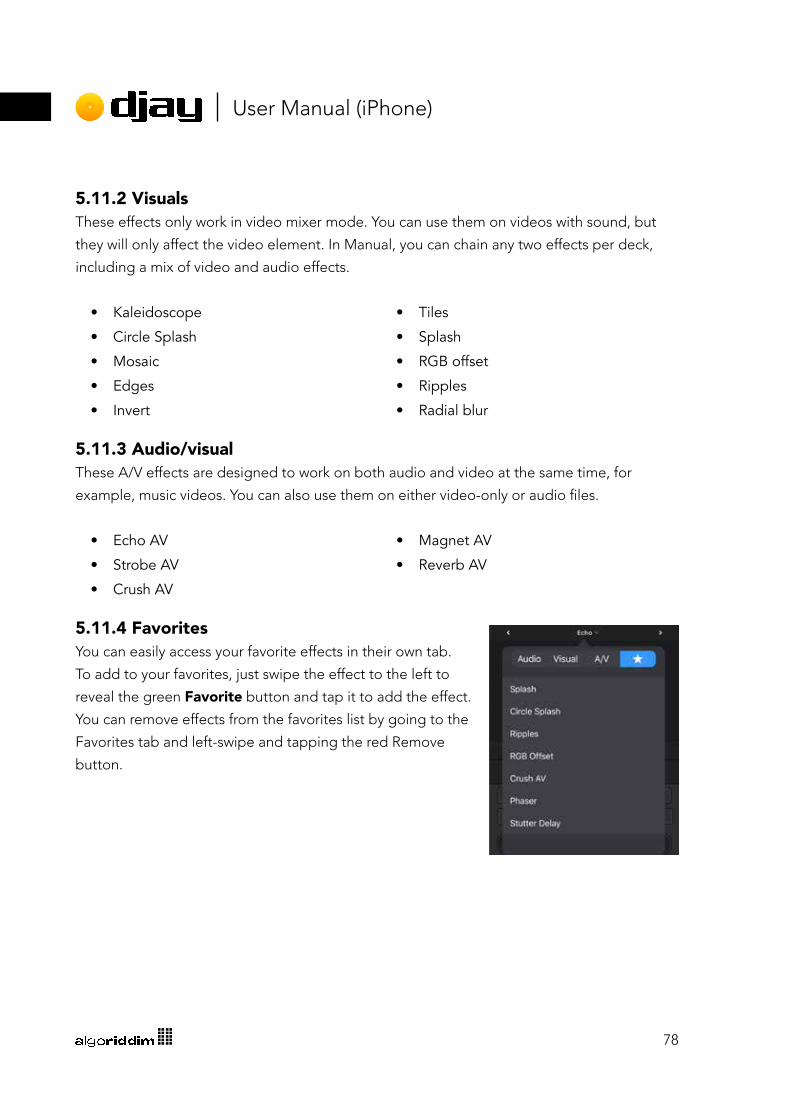
5.11.2 Visuals 785.11.3 Audio/visual 785.11.4 Favorites 785.11.5 Using effects 79
5.12 Loops 815.12.1 Loop creator 815.12.2 Loop panel 82
5.13 Cue points 845.13.1 Beat Skip 85
5.14 Looper & sampler 865.14.1 Interface at a glance 875.14.2 Using the Loop Grid 885.14.3 Sampler mode 915.14.4 Sampler sequencer 925.14.5 Customizing sample packs 95
5.15 Using hardware 1005.15.1 Official and natively-supported Controllers 1005.15.2 MIDI mapping 1015.15.3 Mapping Jog wheels 1065.15.4 Editing an existing mapping 108
6 Tips and support 1106.1 Special tips 110
6.1.1 Avoid the red 1106.1.2 Audio file quality 1116.1.3 Mixing in key 1116.1.4 Know your tracks 1116.1.5 Keep your library tip-top 1116.1.6 Cables 112
6.2 FAQ and Support 113

Introduction
User Manual (iPhone)

6
User Manual (iPhone)
1 IntroductionWelcome to the new djay for iOS!
Building on a user interface that has won multiple Apple Design Awards for excellence in
design and ease of use, the new djay offers the most intuitive yet powerful interface we’ve
ever made. A classic turntable and a mixer setup, immersive Automix view with gorgeous
album cover display, all-new 2 Deck PRO mode to view high resolution waveforms and your
library side by side, live music production tools, and so much more. Whether you are a
beginner or a seasoned professional, djay for iOS offers everything you need to mix music
on your iPhone or iPhone.
The FREE version of djay includes the following features:
• The two-deck Classic Mode, with vinyl control, a mixer, scrolling waveforms, looping,
EQ, filter, and five FX.
• Spotify integration, with Playlists, Browse, Match, Search, and more (requires Spotify
Premium account).
• Music integration, with filtering by Artist, Album, Genre.
• Ableton Link tempo syncing.
• Plug & play support for all official djay controllers including their built-in audio
interfaces: Reloop Mixon 4, Beatpad 1 & 2, Mixtour, Pioneer DJ DDJ-WeGO 1–4,
Pioneer DJ DDJ-200, ION iDJ 2 Go, Numark iDJ Live 1 & 2, Numark Mixdeck Quad.
The PRO subscription has all the above, plus the following:
• Custom playlists, including smart playlist filtering.
• Pre-cueing with headphones.
• 2 decks Pro view: view decks and library side by side.
• 4 decks Pro view: mix up to four music tracks at once with full control and library.
• Single deck preparation view.
• Automix AI: Automatic DJ mixes based on machine learning.
• VJ video mixing view with support for external monitors.

7
User Manual (iPhone)
• Pre-cueing with headphones.
• Advanced MIDI learn system to map each control on users’ hardware individually.
• Support for 50 controllers from Pioneer DJ, Reloop, Numark, Denon DJ, and others
out-of-the-box.
• Support for multi-channel audio interfaces.
• NEW Looper music performance mode lets you play up to eight quantized audio and
video loops out of a possible 48 loaded
• PLUS, over 1 GB of high quality samples, loops, FX and visuals, with much more added
in the future.
1.1 Minimum requirementsYou can run djay for iOS on any iPhone or iPhone running iOS 11.2 or later. The minimum
install size for the software is around 100 MB, plus any space for any music, videos, and loop
& sample packs.
Tip: Make sure you have space on your device for all your music and any other media
such as official packs!

8
User Manual (iPhone)
1.2 Interface tourNeed to know what everything is when you first load djay for iOS? Here's a at-a-glance tour
of the interface.
1. Track load & label artwork. Displays cover artwork and tap to load track selection
browser
2. Track name. Displays the track name metadata.
3. Artist name. Displays the artist(s) name metadata.
4. Musical key. Displays the current track root key.
5. Time remain/elapsed. Tap to toggle between time remaining to end, and time
elapsed from beginning.
6. Menu button. Opens user menu, with layout switcher, mix recorder panel, sample/
loop pack manager, and preferences.
7. Track waveform. Visual representation of the full track audio with progress indicator.
Tap anywhere to jump to that point.
8. Scrolling waveform panel toggle. Enables/disables a zoomed in, scrolling visual of
track audio, that follows your current progress.
23
45 6
71
9810
12
13
14
15
16 17
18 19 20 21
11

9
User Manual (iPhone)
9. Looper-sampler panel toggle. Enables/disables the looper-sampler panel.
10. Sync button. When a track is playing, tap to match BPM.
11. BPM/Tempo panel. Displays current BPM. Tap to open BPM/tempo pop up.
12. Tempo fader. Increases and decreases the tempo of the track.
13. Key lock. Prevents tempo changes from altering the musical key of the playing track.
14. Virtual turntable. Emulates the behavior of the classic turntable controls, including
needle drop, and scratch control.
15. Turntable start/stop. Turns the deck platter on/off.
16. FX/loop/cue/EQ panel toggle. Opens and closes the controls for deck audio effects,
loops, hot cues, and high/mid/low EQs.
17. Tempo bend +/-. progressively speeds up and slows do the playing track to nudge
while beatmatching.
18. Play/pause. Starts and stops the track playing, from the current location of the
progress bar.
19. Cue set. Sets a temporary cue point at the current location of the progress indicator.
20. Cue jump. Returns the deck to the existing cue point, plays audio from the cue point if
held down, or returns you to the start of the track if no cue point is set.
21. Crossfader. Horizontal linear fader to blend audio between two channels.

User Manual (iPhone)
Glossary of terms

11
User Manual (iPhone)
2 Glossary of termsThere are many common technical and DJ terms used throughout this manual.
Below is a quick list of some of these words along with a short definition.
BPM (Beats per minute). The standard unit of measuring the tempo of music.
Channel. An individual input route for audio on the mixer. A channel can output either video
or audio.
Cue point. Markers that can be set along the timeline of the track and jumped to instantly.
Up to eight can be created per track.
Deck. Like it’s physical counterpart, this is where your individual tracks are played and
controlled. You can change the tempo, view track progress and overall waveforms, and
emulate the behavior of CDJs and turntables.
Downbeat. The first beat of a measure.
Effect. A method of applying alterations to the audio of a track or mix. You can chain up to
three audio effects, and two video effects per channel.
EQ (equalizer). A filtering of the audio to cut out specific frequencies. djay for iOS features
the standard DJ mixer High, Mid, and Low EQs.
Fader/slider. A control method which uses a sliding action to fade between amounts. DJ
mixers tend to feature vertical faders and a crossfader.
Jog wheel. A round platter used for controlling music. They are designed to emulate the
feel of a turntable and usually come in pairs on DJ controllers.
Library. The section of djay for iOS where you can quickly browse, search and prepare your
music and videos to mix with.

12
User Manual (iPhone)
Loop. A segment of a track that’s repeated. The size and location of the loop can be
determined by the user.
Measure. Also known as a Bar, a measure is the number of beats corresponding to the
timing of the music. For example, most dance music is 4/4 timing, so one measure is four
beats.
Mixer. The hub of your equipment that controls the output of music by changing channel
volume, gain, EQs, filters, and crossfade.
Playlist. A saved list of tracks within your library. You can use these to prepare your mixes
and Automix queue.
Quantize. The act of ensuring music is precisely set to a rhythm. Quantized music will stay in
time with a set tempo, and will always launch at a selected interval of this tempo, even if it’s
off the beat.
Sample. A short clip of audio or video taken from another source that can be quickly played
back.
Sync. The act of automatically ensuring tracks stay in time, either by simply matching the
tempo, or quantizing the beats to stay together.
Tempo. The speed at which music is played. This is usually measured in beats per minute.
Transport. The buttons used to control a track. These include start/stop, cue start, and
sometimes rewind and fast forward.
UI (User interface). The system of screen elements the user interacts with, such as buttons,
menus, scrolling lists, or waveforms.
Waveform. The visual representation of the music, displaying audio volume, and sometimes
showing frequencies in different colors.

User Manual (iPhone)
Getting started

14
User Manual (iPhone)
3 Getting startedRebuilt from the ground up, djay for iOS, has all the features you need to get
mixing for free. Just bring the music, whether your Music collection, or your
Spotify Premium account
3.1 Installing djay for iOSYou can download the app via the iOS App Store. Should you start a PRO subscription, it
will be tied to your Apple ID, which means you will be able to use the subscription on up to
10 compatible iOS devices that share the account.
3.1.1 Restoring your subscription and purchasesIf you already have a PRO subscription, and want to use it on a new app installation or
device, you will need to restore your purchases via the Subscription sign-up page. Scroll to
the bottom and tap the Restore Purchases link above the terms and conditions.

15
User Manual (iPhone)
3.2 Finding your musicAll your music is shown in the library browser, which can be found by tapping the track
artwork window on one of the empty decks. You can access all your music and videos,
from your own collection as well as the Spotify streaming service (Spotify Premium account
required) by using the dropdown menu in the top right of the browser.
1. My Library. The My Library section is the built in
djay for iOS music library, which lets you edit, sort
and manage your music collection. See section 5.10 Library management for more information
2. Music playlists. You can browse the playlists on
your iPhone by tapping the Music icon in the
collection dropdown at the top-left of the browser.
The browser will then display your Music playlists.
3. Spotify. To access Spotify’s music streaming library,
you’ll need an active Spotify Premium account on
the service, and to be logged in to your account
within djay for iOS.
4. Videos. When switched to the Videos browser, you
will see all video content added to your iOS device,
both in the Music collection, and saved to your
Camera Roll and other device folders.
5. Searching. To find a specific track, choose the
relevant tab in your library and use the search box in
the top right of the library pop-up.
3.3 Loading a trackMove the crossfader at the middle-bottom of the screen all the way to the left, by tapping
and dragging it.
1
2
3
4
5

16
User Manual (iPhone)
Next, add a track to Deck 1 by tapping on the Touch to load song or track load button to
open the library browser and tap a track to load it. The track will start to play automatically
once it is loaded.
3.3.1 Deck and scratch toolsLong-pressing on the track artwork gives you access to extra scratching and deck functions
via a pop-up menu, including the DJ QBert Skratch Tools audio file.
Eject. Unloads the track and leaves an empty deck.
Load Next. Swaps the current track for the next one in the current playlist.
Double. Loads the track into the other deck at the exact same timestamp for 'instant
double' scratch performance tricks.
Scratch Tools. Loads the DJ QBert Skratch Tools audio file into the deck which contains a
series of iconic scratch samples you can use to practice.
TIP: You can use two finger scratching to automatically create a rhythmic crossfader
action while you move the record, for some quick and interesting cuts!

17
User Manual (iPhone)
3.4 Mixing your tracksAdd a new music track from Music or Spotify to Deck 2 then make sure it isn’t playing (if it is, use the PLAY button to stop playback).
Tap the SYNC button to match the new track's BPM with the first track.
Restart the track by either tap-dragging across the track waveform above the deck all the way to the left, or dragging the turntable tonearm to the outside of the virtual record. Ensure the red indicator is set to the start of the track on the waveform.
Press PLAY at the start of a measure on the first track to play both in time. Move the crossfader across to the middle to hear both tracks playing at once.
If you find that the beats sound a bit out, use the + and – symbols (1) below the turntable platter on the deck 2 to nudge the track in time. Keep practicing this until you get it right and you will have learned the fundamentals of beatmatching, one of the cornerstones of DJing.
Congratulations! You’ve just done a mix!
1

18
User Manual (iPhone)
3.5 Adding hardwareYou can see the full list of supported MIDI controllers on our website. The listed hardware is plug-and-play, meaning djay for iOS will recognize it’s connected and the all your controls will work without any extra settings. For more detailed information please read section 5.14 Using hardware.

User Manual (iPhone)PRO
Core features
User Manual

20
User Manual (iPhone)
4 Core featuresA fresh install of djay for iOS will present you with the default Classic Mode
view, a familiar layout of two virtual turntables and a crossfader. The core
features of the software are all at your fingertips from the moment you open
the software.

21
User Manual (iPhone)
4.1 LayoutThe main PRO djay for iOS interface consists of two virtual turntable decks, crossfader,
and transport controls. If you’re familiar with modern DJ paradigms or equipment, you will
recognize many of these functions.
1. Library browser: Access all your music and videos from here (see section 4.2 Media library browser and section 5.10 Library management for more details).
2. Menu button: switch deck modes and change preferences from here.
3. Decks: The music players used to play and control your audio and video.
4. Transport: Your basic controls for your decks.
5. Mixer toggle: see section 4.5 Mixer for more information
6. Sampler toggle: Access up to 16 samples to spice up your set. You can choose from
official purchasable sample packs, or add your own saved samples from your music
collection, as well as switch to the Looper. See section 5.14 Looper & sampler for
more information.
1
3
2
4 4
65

22
User Manual (iPhone)
4.2 Media library browserThe library browser is a powerful tool to help organize your music and prepare your sets. The
browser consists of two main views: the Playlist Tree and the Track List, and includes music
searching, track filtering and access to My Library, Music and the Spotify music streaming
service.
1. Playlist tree: Displays all your playlists, smart playlists, and playlist folders. Selecting a
playlist will display saved tracks in the track list on the right of the browser.
2. Search: The search box allows you to quickly find tracks within your current collection
(My Library, Music, Spotify, Videos) by searching for text strings in track metadata.
1
2
3
4

23
User Manual (iPhone)
3. Track list: Shows a list of all the tracks in the currently selected playlist or folder.
4. Library tab buttons: Easily switch between your different collections using the buttons
on the left of the browser. You can switch between My Library, Music, Spotify, and
Videos.
4.3 Automix modeSwitch to Automix mode to let djay for iOS take control of your mixing. When active,
tracks from the chosen playlist will be mixed together based on the user preferences you've
set. Read section 4.6.6 Automix preferences for more information on how to set up your
Automix transitions.
To start using Automix:
1. Load a first track onto the Currently Playing deck by tapping the music note button at
the bottom of the app to open the browser and choosing a track.

24
User Manual (iPhone)
2. The music can be controlled using the PLAY/PAUSE (1) and Next Track (2) buttons at
the bottom of the app.
3. Once the music has started playing, Automix will continue adding tracks based on
which list is set in the Automix side-panel (see section 5.10.10 Automix playlist).
4. When the current track nears the end, the incoming track will start to move to replace
it.
21

25
User Manual (iPhone)
4.4 View modesYou can switch to different deck views, depending on your preference, using the dashboard
when you tap the menu button center-top of the screen. More details for both the two and
four deck layouts in section 5.2 Advanced deck layouts.

26
User Manual (iPhone)
4.4.1 Classic modeThe default layout for djay for iOS displays your decks as virtual jog wheels, emulating the
look and feel of their real counterparts to help familiarity.
1. Crossfader section. The crossfader can be found in the center of the screen. The left/
right arrow buttons on either side automate a crossfade in the direction of the arrow.
The speed of the fade can be set in the preferences (see section 4.8.3 Automix preferences).
2. Transport controls. The transport section consists of three controls: the PLAY button,
CUE SET, and CUE PLAY (CUP). The PLAY button starts and stops the track based on
the start and stop times (see section 4.8.1 General preferences). The CUE SET button
sets a temporary cue point which can be recalled while the deck is playing music. When
the deck is stopped, the CUE SET button sets a new cue point.
2 21

27
User Manual (iPhone)
4.5 SettingsThe djay for iOS Settings can be accessed via the Menu button, then the Cog icon button.

28
User Manual (iPhone)
4.5.1 General
Song loadingPlay immediately: Automatically have songs begin playing as
soon as they load into a deck.
Jump to cue point: Loads the track at the first cue point set
with the CUE SET action.
Reset EQ: Sets your track EQ settings back to defaults upon
loading a new rack.
Protect active deck: Locks all your decks while they have a
track playing to prevent you accidentally replacing a loaded
track.
Vinyl appearanceShow tape marker: Adds a white sticker strip to mark your place on the record.

29
User Manual (iPhone)
Show artwork on label: Switch between a Real vinyl look and a Picture disc using the track
artwork.
Tempo sliderRange: Changes the +/- maximum percentage of the deck pitch slider. You can choose from
8%, 10%, 25%, 50%, or 75%. You can also Invert the +/- on both software and hardware
layouts.
PLAY/PAUSEStart time: Sets how long it takes for a track to gain full speed from when you hit PLAY.
This effect is similar to the torque adjust on a turntable.
Stop time: Sets how long it takes for a track to stop playing. This effect is similar to
adjusting the brake when stopping a track on a turntable.

30
User Manual (iPhone)
4.5.2 MixerCrossfader curve: Changes how the crossfader fades between
tracks. Choose from Default, Linear, Constant power, or Cut.
FXPost-fader: Switch between applying Pre-Fader or Post-Fader
effects, whereby the channel volume changes what the effect is
applied to.
VolumeAudio limiter: Toggles a audio limiter to help reduce distortion
and other artifacts related to clipping sound.
Auto gain: Toggles whether djay for iOS automatically sets the
channel gain when a track is loaded to match the rest of your
mix. Disable this to manually adjust the gain of each track.
4.6.3 Library
QueueRemove songs when played: With this active, songs will be
removed from the queue after they’ve been played. Otherwise,
your queue will remain.
GeneralShow artwork: Toggles whether album art is displayed in the
tracklist of the library browser. Hide songs in the cloud: Show or hide tracks that are
unavailable offline.

31
User Manual (iPhone)
SpotifyStreaming quality: Switch between Default (recommended) (96 kbps), High (160 kbps),
and Extreme (320 kbps) audio when streaming music from Spotify. Log out of Spotify: Logs you out of your current Spotify session.

32
User Manual (iPhone)
4.5.4 Advanced
RecordingFormat: Switch between recording using compressed AAC and
uncompressed WAV formats.
Pre-cueingAuto-select: Automatically sets the inactive deck to pre-cue
monitor.
KeyKey detection: Track analysis will detect root key. This will
mean longer analysis times. Distinguish major/minor: Toggle’s whether your key metadata
shows major or minor keys.
SyncingiCloud: Check the status of iCloud backups of library metadata
and cue points.

33
User Manual (iPhone)
4.5.5 MIDI devices
Supported controllersCheck the up-to-date list of official and plug-and-play MIDI
controllers on the Algoriddim site.
MIDI devicesLists your currently connected MIDI devices. For information on
MIDI mapping, see Section 5.15.2 MIDI mapping.
BluetoothBluetooth MIDI devices: Allows pairing with Bluetooth MIDI
devices.
Scratch settingsCrossfader cutting mode: Toggles hardware crossfader
between normal fader behavior and instant-cut mode.
Invert crossfader: Swaps the crossfader from left to right.
Rescan for MIDI devicesTap this link if your connected MIDI device isn’t listed as available to edit or use.

34
User Manual (iPhone)
4.5.6 Automix preferencesYou can change the way Automix behaves via the preferences pop-up at the top of the
Automix view.
Start Automix
Begins auto-mixing tracks when tapped, based on
current playlist.
Transition
Determines how Automix transitions between songs.
Choose from Automatic, Fade, EQ, Filter, Echo effect,
Brake, and Reverse.
Duration
Changes the duration of mix transitions. Automatic lets
djay for iOS decide, and set the number of bars for a
mix with Manual.
Tempo Adjust Mixes can occur with beatmatching Off, set to Sync
beats, and Morph the tempo between the outgoing and
incoming tracks.
Start Point Let Automix decide when in the track to start a transition
with Automatic, or set the number of seconds into the
track with Manual.
End Point
Let Automix decide at what point to start mixing out of a track with Automatic, or set the
number of seconds into the track with Manual.
Use start/end cue points When this is active, Automix will override the preferences and use any custom start/end cue points, if set, to transition tracks. See section 5.13.1 Beat Skip to find out how to set start/
end cue points.

35
User Manual (iPhone)
Shuffle
Toggles between playing the tracks in playlist order, or randomizing the play order.
TIP: If your playlist has music with a wide range of tempos, use Morph tempo adjust to
avoid changing the tempo of the individual tracks.
4.5.7 Volume and syncMaster volume
Set the master volume output, and choose a wireless device to
cast your audio to (e.g. AirPlay or Bluetooth audio devices).
Pre-cueing
When the option is available (for example on a controller with
built-in audio interface), you can control the volume of your
headphone pre-cueing, as well as the cue/master mix in your
headphones.
Split Output
If you are using a DJ splitter cable rather than a multi-channel
audio interface, you can split the stereo output of your iOS
device so the left and right outputs send mono master and cue out.
Ableton Link
Toggle active to have djay for iOS find and sync with compatible apps on the same network.

36
User Manual (iPhone)
4.6 Mix recorderRecording your mixes is as easy as tapping a couple of buttons. You can set up djay for iOS
to save recorded audio files as AAC (compressed, lossy) or WAV (uncompressed audio).
Pressing the REC button at the bottom-left of the menu brings up the mix recorder menu.
You can choose to record either just the audio output, or video and audio. While 'on air', the
REC button will turn red and show the elapsed recording time.

37
User Manual (iPhone)
4.6.1 AudioThe Audio tab lets you record your music sets and manage your
recordings in one place. Simply hit Start New Audio Recording
to record your mix. You can manage your saved mixes by
tapping a saved mix. From this menu, you can rename the file by
tapping it, listen to the recording, Share..., or Delete it.
4.6.2 VideoSelecting the Video tab switches the recorder to video mode. Like the audio tab, you can manage all your recorded video sets from here. When a video recording is selected, you can rename, view, Share..., or Delete it.
38
User Manual (iPhone)
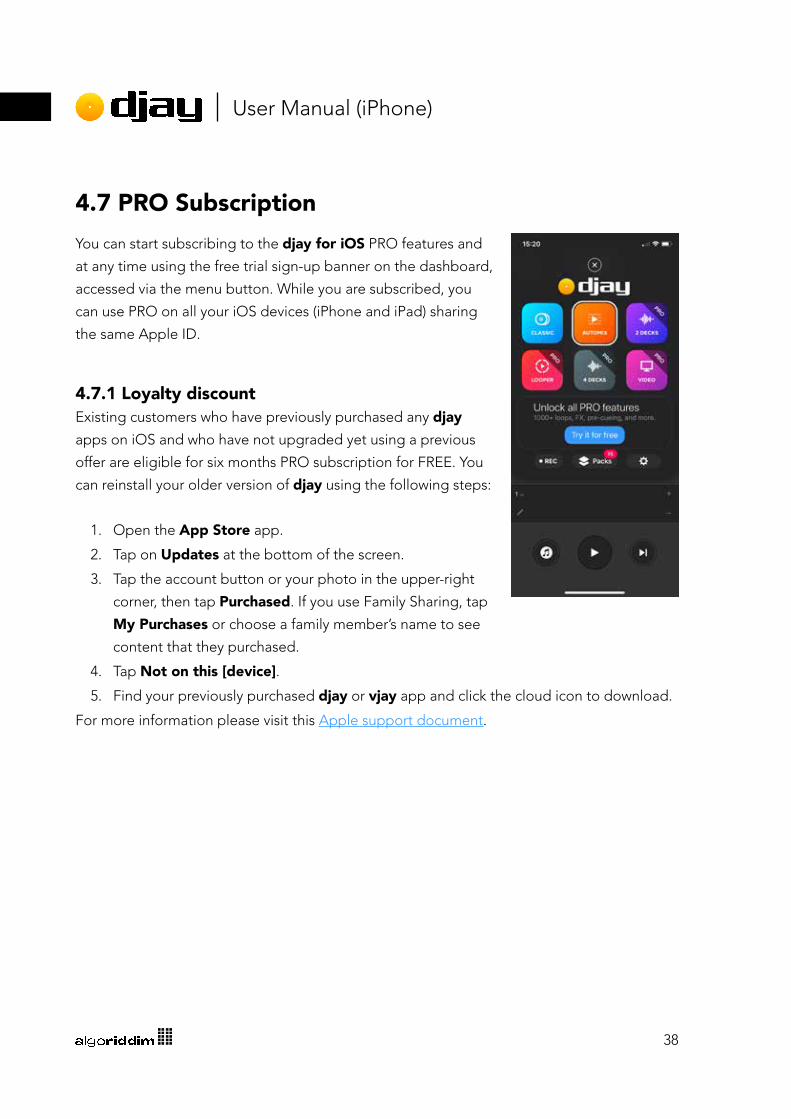
4.7 PRO Subscription You can start subscribing to the djay for iOS PRO features and
at any time using the free trial sign-up banner on the dashboard,
accessed via the menu button. While you are subscribed, you
can use PRO on all your iOS devices (iPhone and iPad) sharing
the same Apple ID.
4.7.1 Loyalty discountExisting customers who have previously purchased any djay
apps on iOS and who have not upgraded yet using a previous
offer are eligible for six months PRO subscription for FREE. You
can reinstall your older version of djay using the following steps:
1. Open the App Store app.
2. Tap on Updates at the bottom of the screen.
3. Tap the account button or your photo in the upper-right
corner, then tap Purchased. If you use Family Sharing, tap
My Purchases or choose a family member’s name to see
content that they purchased.
4. Tap Not on this [device].5. Find your previously purchased djay or vjay app and click the cloud icon to download.
For more information please visit this Apple support document.

39
User Manual (iPhone)
4.7.2 Managing your subscriptionYou can cancel or change your djay for iOS subscription at any time by clicking this link to
manage your subscriptions, or through the App Store on your iOS device.
1. On your iOS device go to the App Store app > [your profile image] > Manage
Subscriptions.
2. Tap the djay subscription.
3. Use the options to manage your subscription.
Note: If you are on the paid subscription, you will continue to have access to djay for iOS PRO until the end of your subscription cycle, after which all features and content will
be disabled and you will only be able to use the free app features.

User Manual (iPhone)PRO
Advanced features
User Manual

41
User Manual (iPhone)
5 Advanced toolsWhile the FREE version of djay for iOS has everything you need to create
a mix, the PRO subscription offers powerful tools and content to take your
sets even further. From having four decks of music, to improving your library
management or using the powerful Looper-Sampler, djay for iOS PRO offers a
lot more depth.

42
User Manual (iPhone)
5.1 Advanced deck layoutsAlong with the default two-deck layouts, you can run up to four separate decks of audio at
once, as well as video decks, the new Looper-Sampler Mode, and Automix Mode. Much
like with the two-deck layouts, you can present the track waveforms scrolling vertically or
horizontally.
5.1.1 Two decksDesigned to provide more information than Classic Mode, the 2 Decks mode is a much more traditional
DJ software layout which features taller scrolling
vertical waveforms in portrait, and longer horizontal
wavforms in landscape.

43
User Manual (iPhone)
Horizontal waveformsWith horizontal waveforms, the visuals scroll from right to left, in parallel. See section 5.9 Waveform orientation and zoom.
Vertical waveformsYou can set your track waveforms to flow from top to bottom, in parallel. See section 5.9 Waveform orientation and zoom.
44
User Manual (iPhone)
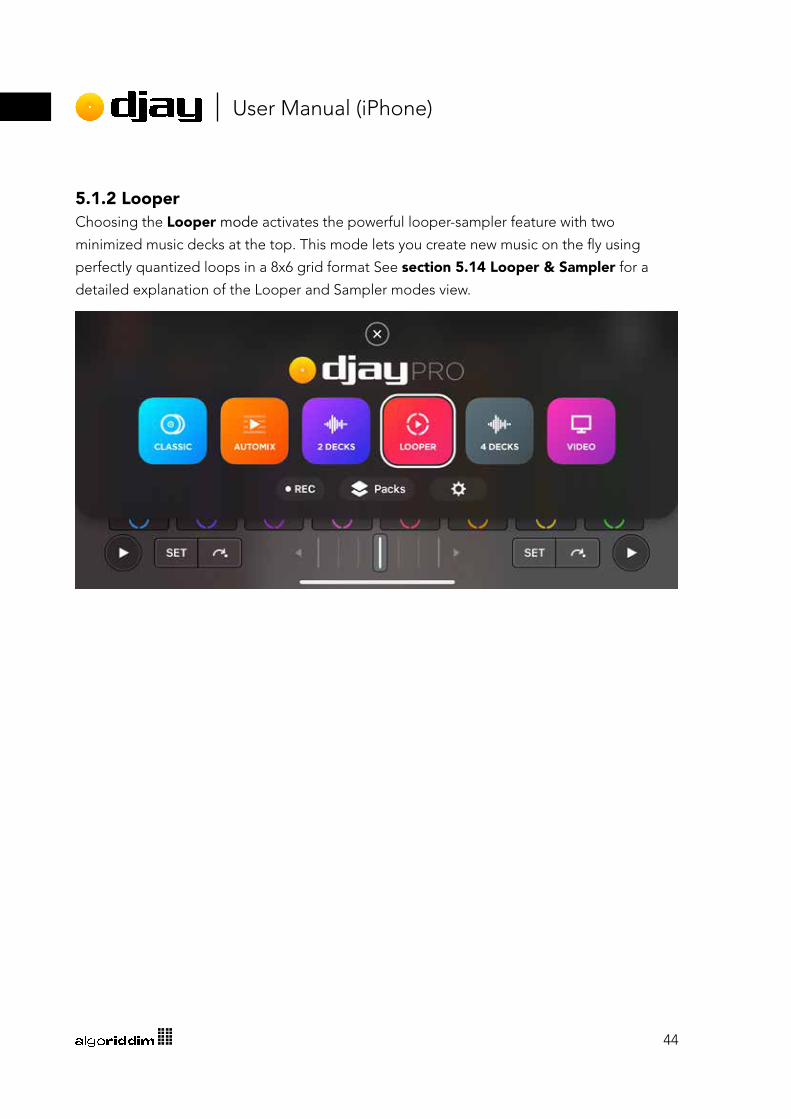
5.1.2 LooperChoosing the Looper mode activates the powerful looper-sampler feature with two
minimized music decks at the top. This mode lets you create new music on the fly using
perfectly quantized loops in a 8x6 grid format See section 5.14 Looper & Sampler for a
detailed explanation of the Looper and Sampler modes view.

45
User Manual (iPhone)
5.1.3 Four decksLike two deck mode, the 4 Decks mode can be activated using the layout switcher
accessed via the menu button at the top of the app. While similar to the default two deck
view, some parts of the user interface will be different to accommodate the extra controls.
Like its two-deck counterparts, the vertical waveform view has the music scrolling from top
to bottom.

46
User Manual (iPhone)
5.1.4 Video decksVideo mixing differs from mixing audio-only in several ways. Firstly, you will be able to output
as both audio and video. Secondly, you will have access to effects for both the audio and
video. Thirdly, you can add images and text to your output.
1. Deck video output Each deck has a video output screen to show you what effects and text are applied.
2. Master video output This screen will show the output that will appear on external screens, including all text,
images, video and effects.
3. Watermarks You can add custom images and text to your video mixes as watermarks. These watermarks
can either feed to one of the decks, or to the mix output. The Text Overlay menu button
can be found at the bottom left of the video output window, and the Image Overlay menu
button can be found at the bottom right of the video output window.
1 12
3 3
47
User Manual (iPhone)
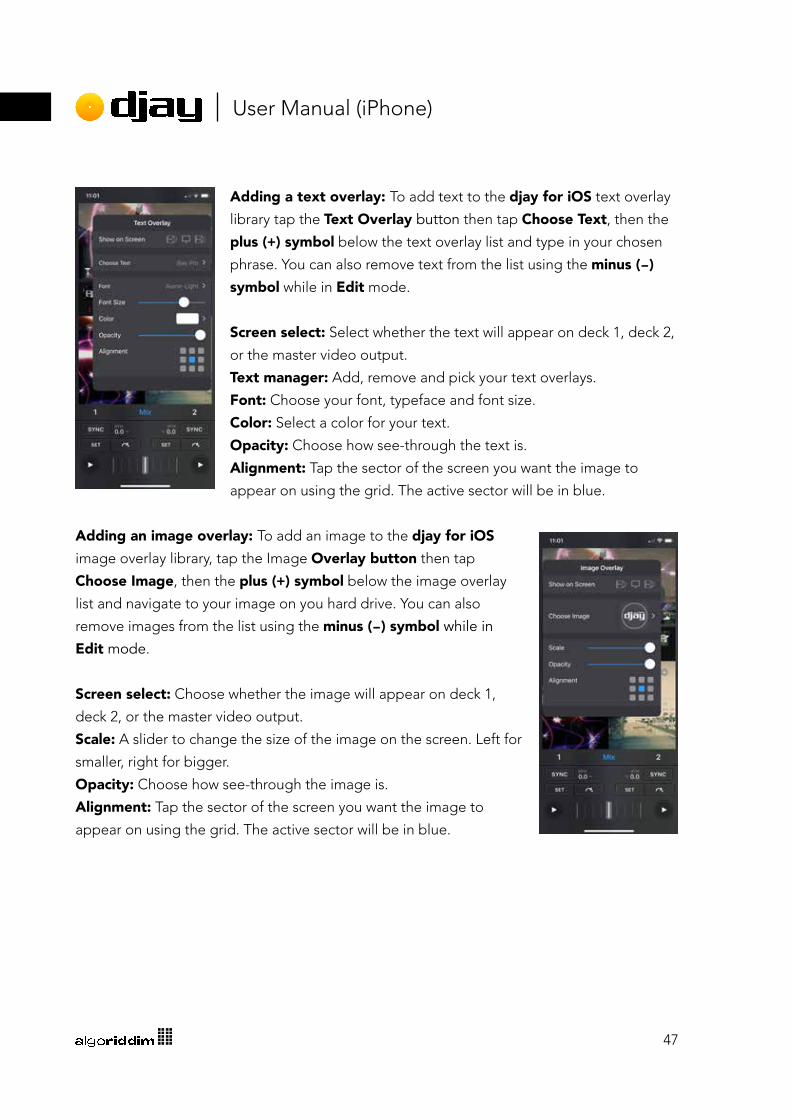
Adding a text overlay: To add text to the djay for iOS text overlay
library tap the Text Overlay button then tap Choose Text, then the
plus (+) symbol below the text overlay list and type in your chosen
phrase. You can also remove text from the list using the minus (-) symbol while in Edit mode.
Screen select: Select whether the text will appear on deck 1, deck 2,
or the master video output.
Text manager: Add, remove and pick your text overlays.
Font: Choose your font, typeface and font size.
Color: Select a color for your text.
Opacity: Choose how see-through the text is.
Alignment: Tap the sector of the screen you want the image to
appear on using the grid. The active sector will be in blue.
Adding an image overlay: To add an image to the djay for iOS
image overlay library, tap the Image Overlay button then tap
Choose Image, then the plus (+) symbol below the image overlay
list and navigate to your image on you hard drive. You can also
remove images from the list using the minus (-) symbol while in
Edit mode.
Screen select: Choose whether the image will appear on deck 1,
deck 2, or the master video output.
Scale: A slider to change the size of the image on the screen. Left for
smaller, right for bigger.
Opacity: Choose how see-through the image is.
Alignment: Tap the sector of the screen you want the image to
appear on using the grid. The active sector will be in blue.

48
User Manual (iPhone)
4. Crossfader transitions Along with all the extra effects for video, you can also change how the crossfader transition’s video between decks. To change the transition type, select one from the drop-down at the top left of the video output window.
You can choose from:
• Blend: A basic fade between two videos
• Luma: An alternate fade style
• Cube: Two sides of a cube rotating
• Swap: Full screens pulling back and forward
• Grid: A grid of screens replacing one another
• Mosaic: A mosaic of screens spinning into view
• Push: One screen pushing the other from the left or the right

49
User Manual (iPhone)
Playing only audio or videoDropping audio onto a deck in video mode gives you the option of a black screen for that
deck, or you can turn on the visualizer, which provides colorful visuals that react to the music.
First, load the audio track into the deck via a dropzone. Once the track is loaded, tap the
visualizer button that will appear on the deck screen (1), to show the visualizer options menu.
To change the visualizer, choose your visualization (2). You can also disable the visualizer
altogether using the toggle (3).
3
21

50
User Manual (iPhone)
5.2 WaveformsGlancing at a waveform in djay for iOS can give you critical information very quickly.
In 2 Deck, and 4 Deck modes, each deck has both a full track waveform and scrolling waveform to provide all the information you need. Both views are color coded to show
which audio frequency is playing at that point in the track: RED represents bass, YELLOW for
low-mid, GREEN for high-mid, and BLUE is for high frequencies.
5.2.1 Track waveformThe track waveform displays the full visual representation of the audio file, from start to
finish. This view also shows your colored cue points (1) (see section 5.13 Cue points) and a
red track progress marker (2).
TIP: You can quickly jump to any part of the loaded track by either tapping the location
or swiping across the waveform.
5.2.2 Scrolling waveformThis is a zoomed-in visualization showing your current location that scrolls along as the music
progresses. Since this view follows the music, it will move or jump backwards and forwards
should you manipulate the sound with scratching, scrubbing or jumping to cue points. In this
view, you can see your cue points (1) as they scroll past, the red progress marker (2) showing
the exact location in the music and the beat markers (3), including the downbeat of each
measure (4).
TIP: You can also change the zoom level of the scrolling waveform to suit your needs.
(See section 5.9 Waveform orientation and zoom)
1
2
1
2 3

51
User Manual (iPhone)
5.3 Beatgrids
5.3.1 What are beatgrids?The word beatgrid is a literal definition of itself. Track beatgrids are a grid of regular markers
overlaid on top of a track, to ensure the BPM of the music is consistent. In practice, beatgrids
are used by DJ software to make sure that tracks are synced in time (either quantized to the
beats, or just tempo synced) and that the timings of effects and samples are accurate.
5.3.2 Setting a beatgridWhen you first load a track into a deck, djay for iOS analyzes the file to create the visual
representation of the music, along with what it estimates is the correct beatgrid for the
music. This beatgrid is based on two things: the starting downbeat (i.e. the first beat of the
track), and the tempo (i.e. beats per minute) of the track.
5.3.3 Adjusting incorrect beatgridsOccasionally, djay for iOS will analyze a track’s beatgrid incorrectly, and might need manual
editing. This is a simple to do.
1. Make sure the offending track is loaded in a deck and that the track has finished analyzing.
2. Tap the little pencil icon on the waveform to open up the beatgrid editor.

52
User Manual (iPhone)
3. If the downbeat is incorrectly placed, set the progress marker to the right location, and in the downbeat tab, tap Set Grid Start to reset it.
4. You can also adjust the grid itself to further tweak your beatgrid by going to the Grid tab and using the back/forward Grid Shift arrows.
5. If, at any time, you need to roll back to the original beatgrid created by djay for iOS,
you can use the Restore button on either tab.

53
User Manual (iPhone)
5.4 BPM and tempo
5.4.1 Adjusting BPMOccasionally, djay for iOS analyses a track and guesses the wrong BPM, causing the
beatgrid to be set incorrectly, or guesses the BPM at half or double the actual tempo of
track. Using the BPM tab in the BPM & tempo pop-up, you can change the BPM, should
you need to.
1. Manual adjust: If you know the correct BPM, type it in after tapping the EDIT pencil
icon and hitting ENTER.
2. Half/Double BPM: Use these buttons if you find the BPM is half or double the correct
tempo.
3. Tap: You can approximate the correct BPM by using the Tap button. While the track is
playing, tap the Tap button in time with the beat until a BPM reading displays.
Once you've adjusted the BPM, you can tap Apply to save, or Restore to go back to
previous settings.
TIP: Many modern electronic productions will have a rounded off BPM which should be
easy to fix manually should djay for iOS not analyze correctly.
2
1
3

54
User Manual (iPhone)
5.4.2 Tempo sensitivityUse the Tempo tab of the BPM & tempo pop-up to tweak your tempo slider sensitivity and settings. From here, you can change the percentage increase/decrease Range the slider can change (1), as well as Invert the slider (2), like many turntables feature.
NOTE: djay for iOS determines the master deck based on whehre the mix transitioned
to. For example, if the crossfader is moved all the way to the left, deck 1 will be selected
as the master deck. While this is all done 'behind the scenes', it will help to be aware
how it works. The master deck helps maintain track sync, as well as determine key match
(see section 5.5 Key lock and changing key).
2
1

55
User Manual (iPhone)
5.5 Key lock and changing keyIn djay for iOS, you can keep your music from changing pitch as you increase or decrease the tempo by using Key lock. To activate Key lock, tap the musical note button (1) to the outside edge of the deck tempo slider. You can also map the command to a MIDI controller button (see section 5.14.2 MIDI mapping).
TIP: Key lock can sometimes affect audio quality, particularly with big tempo changes.
1

56
User Manual (iPhone)
You can also match the key of tracks using the key match feature, as well as transpose the key by semitones, all using the key options panel. To access the panel, tap on the track key display in the deck info (see section 1.2 Interface tour).
1. Down semitone. Transposes the audio down a semitone.
2. Key transpose activate. Toggle on/off the key transpose of the deck audio.
3. Up semitone. Transposes the audio up a semitone.
4. Key match. Matches the key of the audio to that of the master deck.
2
3
4
1

57
User Manual (iPhone)
5.6 SyncingThere are two ways to sync music within djay for iOS: tempo sync, and beat sync. Both
can be accessed using the deck sync buttons (see section 1.2 Interface tour). For a more
detailed explanation of syncing music, see section 2 Glossary of terms.
5.6.1 Tempo syncTempo sync simply matches the BPM of a deck track to the current
master deck, but allows decks to play independently. To activate
tempo sync, press the SYNC button once on the deck you would like
to match to the playing audio. A deck that is tempo matched will have
a blue outline around it.
5.5.2 Beat syncBeat sync takes it a step further and quantizes the beats to ensure they
stay in time, by matching the downbeat. To activate beat sync in djay for iOS, make sure the you already have a song playing, and press the
SYNC button on both decks with a track loaded and ready. When the
decks are beat synced, the sync button will be solid blue. While active,
your tracks will snap to the nearest beat of the current track when you
press play.

58
User Manual (iPhone)
5.7 Slicer modeSlicer mode helps you to quickly juggle hotcues on the fly while playing your tracks. As the
audio progresses, the slicer tracks the current four or eight beat measure and "slices" it,
creating a virtual hotcue for each beat, which can be mapped to buttons or pads on a MIDI
controller (see section 5.15.2 MIDI mapping).
To activate the Slicer, use the waveform pop-up on your preferred deck, and activate the
Slice option.
To disable the Slicer, reverse the process.

59
User Manual (iPhone)
5.8 Slip modedjay for iOS has a Slip mode for scratching. While enabled, Slip mode continues playing
audio when the jog wheel is used. This works for both virtual (software) and hardware jog
wheels (for example, see section 5.15.3 Mapping jog wheels).
To enable Slip mode, activate the option within the waveform pop-up. Reverse the steps to
disable the feature. You can also start deck playback with slip mode automatically activated
by using ⌘ + PLAY button.

60
User Manual (iPhone)
5.9 Waveform orientation and zoomThe waveform pop-up also lets you adjust both the zoom level, and orientation of the
scrolling waveform, as well as reset the waveform settings. Zoom in and out using the - and
+ buttons (1), and switch between horizontal and vertical using the orientation buttons (2).
You can revert the zoom level to default by tapping Restore (3) at the bottom of the pop-
up.
2
1
3

61
User Manual (iPhone)
5.10 Library managementWith today’s DJs carrying thousands of tracks in their collections, managing your music has become as important a skill as any. With djay for iOS, not only can you use Music playlists and Spotify, you have access to a powerful and flexible built in library browser, with features such as filters, smart playlists, and batch analysis.
Knowing your way round your music collection not only saves you time in your workflow, it can help give you confidence while you’re busy in a mix. The library browser within djay for iOS offers tools to help you get the most out of your music.
5.10.1 Adding music to My LibraryWhen you first launch djay for iOS, the My Library collection will be empty as there hasn't been any music added yet. There are two ways you can add your tracks: from your other collections available within djay for iOS, or using the Files app with iOS split screen drag-and-drop, or the Add from Files... pop-up. To add from existing collections:
1. Navigate to the existing playlist you would like to add media from.
2. Tap the playlist track count at the top left of the tracklist window and choose Add All to Playlist....
62
User Manual (iPhone)
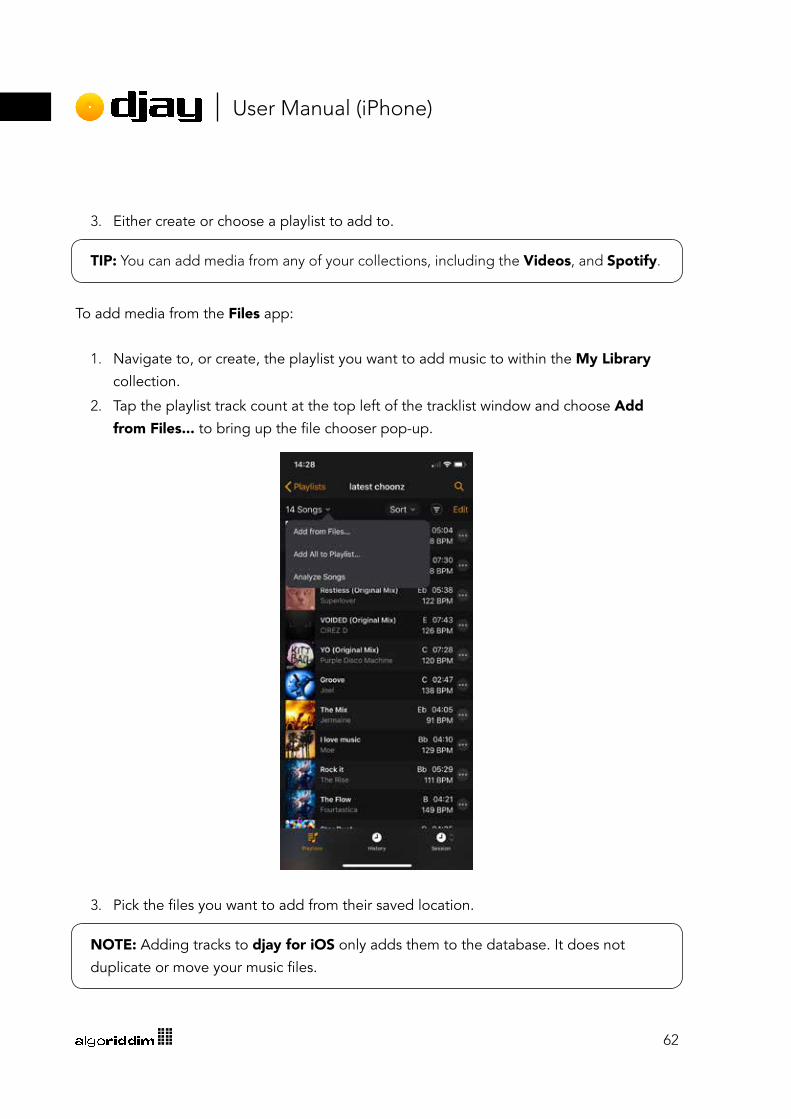
3. Either create or choose a playlist to add to.
TIP: You can add media from any of your collections, including the Videos, and Spotify.
To add media from the Files app:
1. Navigate to, or create, the playlist you want to add music to within the My Library
collection.
2. Tap the playlist track count at the top left of the tracklist window and choose Add from Files... to bring up the file chooser pop-up.
3. Pick the files you want to add from their saved location.
NOTE: Adding tracks to djay for iOS only adds them to the database. It does not
duplicate or move your music files.

63
User Manual (iPhone)
5.10.2 PlaylistsPlaylists are an easy way to keep track of your music, ready for a set, or to prepare a set list
for a gig. To add a playlist:
1. Make sure the My Library collection is active at the top of the browser.
2. Navigate to the location you’d like your playlist to exist.
3. Tap on the + button at the top left, and choose Playlist from the menu that appears.
4. Name your playlist in the textbox that appears, and tap Add.
5. You can now add tracks from your collections (see section 5.10.1 Adding music to My Library).
TIP: You can reorder your playlists using the metadata sort columns drop-down, or the
Edit button.

64
User Manual (iPhone)
5.10.3 Smart playlistsKeep your tracks in the right place without doing the work. Smart playlists sort through your
entire collection into playlists based on custom track metadata filter variables. As new music
is added, it automatically gets sorted into any relevant smart playlist.
1. Make sure the My Library collection is active.
2. Navigate to the location you’d like your smart playlist to exist.
3. Tap on the + button at the top left, and choose Smart Playlist from the menu that
appears.
4. Name your smart playlist in the textbox that appears, and tap Add.
5. Tap Edit at the top right of the tracklist window.
6. Tap the + button just below the playlist track count in the main tracklist window to start
adding rules for the playlist filtering.
7. To close the filter rules panel, tap the orange Done button, below the search bar.
8. You can further change your filter by tapping the Edit button again.
Rules can be set up based on Album, Artist, BPM, Comments, Date Added, Date Released, Genre, Grouping, Key, Rating, Released, and Title track metadata. With different
rules, you will have different parameter options you can choose from. For example, text fields
will have variables for:
• Contains
• Does not contain
• Is
• Is not
• Begins with
• Ends with
TIP: The order in which you set your rules will change how your music is filtered.

65
User Manual (iPhone)
5.10.4 Playlist foldersPlaylist folders are an easy way to contain multiple playlists together for organization. When
active in the library browser tree, the folders will display all the tracks from all the contained
playlists in the playlist window.
To create a playlist folder:
1. Make sure the My Library collection is active.
2. Navigate to the location you’d like your playlist folder to exist.
3. Tap on the + button at the top left, and choose Playlist Folder from the menu that
appears.
4. Name your playlist folder in the textbox that appears, and tap Add.
Once the folder is created, you can either add new, empty playlists or smart playlists using
the + button, or drag and drop existing playlists to re-home them. Tap on the folder icon or
name will display all the tracks from the playlists. Tap the triangle to the left of the folder will
expand the contents.
NOTE: Select a playlist, smart playlist, or folder, then tap it again to rename it.

66
User Manual (iPhone)
5.10.5 Analyzing your musicWhile djay for iOS analyzes each track the first time it’s loaded, this can take up computing resources and may interrupt playback. You can set up djay for iOS to analyze your whole music collection, or even just parts of it, as a batch operation. Navigate to the playlist or folder you want analyzed, and choose Analyze Songs from the drop-down next to the track count at the top of the track list window.
NOTE: Spotify tracks can not be pre-analyzed.
TIP: Batch analysis can be quite resource intensive so should be left running while your
device is free from other tasks. The task might be best left overnight or while you’re
away from your screen.

67
User Manual (iPhone)
5.10.6 Previewing tracksWith djay for iOS, you can preview your tracks directly from the library. Previewed tracks will play via your pre-cue channel. For example, should you have a controller with audio interface set up, you can hear your previews in your headphones.
To preview a track, tap the menu button on the far right of the track in the library tracklist (1), and hit the play button at the bottom of the pop-up.
1

68
User Manual (iPhone)
5.10.7 QueueThe play Queue acts as a playlist which can stay up to date by removing tracks that have
already been played. To access the queue, open up the library panel by tapping the panel select button (1) and use the first tab. There are two ways to add tracks to the queue:
1. You can add tracks to the Play queue by tapping a track's menu button (2) and
choose Add To Queue (3).
2. Swipe right on a track in the playlist.
TIP: You can add tracks from any of the library tabs to your play queue.
5.10.8 Current SessionThe Current Session is the second tab of the library panel and shows the historical playlist
of your current mix session. Any tracks that have been played and crossfaded in a deck will
show in the order they first played. You can also reset the list by tapping the + in the top
right and choosing New Session.
1
3
2

69
User Manual (iPhone)
5.10.9 MatchThird in the list is the Match tab, a feature that lets you find similar tracks from within
Spotify's entire library. Using the drop-down at the top left, switch between the Currently

70
User Manual (iPhone)
Playing track, a Custom choice via drag-and-drop.
NOTE: You will need djay for iOS to be logged in to a Spotify Premium account for
Match to search for similar music.
TIP: Use Track Match as a guide rather than the rule. Learn to trust your ears above all
else and you'll discover much more creativity.

71
User Manual (iPhone)
5.10.10 Automix playlistLet Automix take over your set, based on your preferences (see section 4.6.6 Automix preferences). You can use the Automix playlist panel to keep the music flowing. There are
three ways to add music to the Automix playlist: Queue, Matching Songs, and Current Playlist. Switch between the different sources by using the drop-down just below the Start/Stop Automix button.
• Queue lets you create and manage your own playlist by adding music manually, using
drag-and-drop, or the track pop-up.
• Matching Songs uses the djay for iOS Match feature to add tracks from Spotify that
work with the current track.
• Current Playlist loads all the tracks from the currently selected playlist, and plays
through them in the order they are listed.
To load the next track from the Automix playlist into the queue, tap the Start Automix
button at the top of the panel.

72
User Manual (iPhone)
5.10.12 Metadata columnsSimilar to many music apps, the playlists in djay for iOS display some track metadata (ID3
tags) as columns within the list view. If you need to edit your track metadata, you will need to
use Music or some other music management application.
NOTE: Spotify music metadata is managed by Spotify and isn’t user-editable.
5.10.13 Sorting your musicYou can use the metadata columns to sort your music quickly and easily. At the top of the playlist, tap on the Sort drop-down just below the search button, and select what you wish to sort by. For example, sorting by artists will make the list ordered alphabetically, and sorting by BPM will order from slowest to fastest tempo and vice versa.
You can toggle the order by tapping your sort order again, and you can reset to default by tapping Reset.
TIP: Sorting by key is a great way to see what tracks are grouped by key.

73
User Manual (iPhone)
5.10.14 SpotifyWith a Spotify Premium account, you can have access to millions of tracks, directly within djay for iOS. To get started, select the Spotify tab from the music sources at the top left of the library. All you need to do is log in using your account details to access everything in your Spotify library.
Playlists, and BrowseFrom the Spotify tab, you can access all the playlists you’ve previously created from the Spotify desktop or mobile music players. There are also sections for music categories to browse for hits. You can switch between these sections using the two tabs at the bottom of the browser tree.
NOTE: You can only view Spotify playlists within the djay for iOS library browser. You
will need to either edit your playlists within Spotify, or create a playlist within the My
Library collection.
NOTE: Mix recording will not work when you use tracks from Spotify, due to licensing
agreements. Recording a mix disables access to Spotify music, and using Spotify
disables the mix recorder.

74
User Manual (iPhone)
Searching SpotifyYou can search for any tracks within the Spotify database via the search box, while in the Spotify tab. Search results can then be expanded further using the Show all songs... button below each set of results. You can also expand results from Songs, Artists, Albums, and Playlists.
Logging outTo log out of Spotify within djay for iOS, go to the Library preferences and select Log Out Of Spotify. See section 4.6.3 Library preferences for more details.
NOTE: Remember that access to Spotify from within djay for iOS requires a Spotify premium account. You will need to upgrade if you have the free account.
5.10.15 MusicYou can access your Music collection (e.g. synced via iTunes) directly from within djay for iOS. This includes all your music, playlists and folders, as well as any smart playlists you have created. The collection can also be sorted by Playlists, Artists, Albums and Genres, using the buttons in the bottom bar.

75
User Manual (iPhone)
5.10.16 VideosThe videos tab of the browser has two folders in the browser tree:
• Music: Any video files found in your Music collection.
• My Videos: Your account’s Movies folder.
You can store any purchased or user-created video files in either the Music collection or Movies folder, and videos can be added to your My Library collection along with Spotify, Music, and local files.
TIP: It can be helpful to separate your silent and audio-based videos, either in Music
playlists or folders on your drive.
Live PhotosWith djay for iOS, Live Photos can be loaded directly into video mode using the visualizer
pop-up, by switching to the Live Photos tab.
5.10.17 HistoryAll your DJ sessions are automatically saved by djay for iOS in the History tab at the bottom of the My Library browser tree. Saved sessions are similar to playlists and show the tracks from each session in the main browser window. You can also delete your saved sessions by either left-swiping them and using the Delete button, or tapping Edit.
Individual sessions can also be shared when selected, as either a CSV file or Spotify playlist using the share menu at the top right, next to the filter button.

76
User Manual (iPhone)
5.11 EffectsThere are three different types of effects in djay for iOS: audio, visual, and A/V. Each
type of effect has a specific use, and may not be appropriate for all your collection. We
endeavored to collect a wide range of distinctive effects to help DJs push their creativity.
To access the effects controls, use the advanced deck panel toggle button in Classic and 4
deck modes, activating the Mixer Toggle button in 2 deck mode, or switching to the FX tab
in video mode.
5.11.1 AudioThere are a total of 39 different audio effects in djay for iOS, with five Essentials included
and the rest available to unlock within the app via the Pro subscription. The effects can only
be applied to audio, but also work on the audio within videos.
Essentials• Echo
• Flanger
• Phaser
• Bit crusher
• Gate

77
User Manual (iPhone)
Sugar Bytes Resonate• Reverb
• Beatverb
• Gate panner
• Gate masher
• Sweep delay
• Stutter delay
• Quack delay
Sugar Bytes Modulate• Space flanger
• Filter machine
• Zeitgeist
• Tonalizer
• Magnetizer
• Tremolizer
Sugar Bytes Warp• Deep phaser
• Vowel LFO
• Wobble
• Beatwobble
• Scratcher
• Reactor
• Deformer
Sugar Bytes Slice• Time travel
• Space hop
• Trippple trap
• Snare gun
• Bumble bee
Sugar Bytes Juggle• Looper
• Complexer
• Uhnk uhnk
• Bass gun
• Wake up
• Chromatic
• Freestyle
• Shuffle
• UFO
78
User Manual (iPhone)
5.11.2 VisualsThese effects only work in video mixer mode. You can use them on videos with sound, but
they will only affect the video element. In Manual, you can chain any two effects per deck,
including a mix of video and audio effects.
• Kaleidoscope
• Circle Splash
• Mosaic
• Edges
• Invert
• Tiles
• Splash
• RGB offset
• Ripples
• Radial blur
5.11.3 Audio/visualThese A/V effects are designed to work on both audio and video at the same time, for
example, music videos. You can also use them on either video-only or audio files.
• Echo AV
• Strobe AV
• Crush AV
• Magnet AV
• Reverb AV
5.11.4 FavoritesYou can easily access your favorite effects in their own tab.
To add to your favorites, just swipe the effect to the left to
reveal the green Favorite button and tap it to add the effect.
You can remove effects from the favorites list by going to the
Favorites tab and left-swipe and tapping the red Remove
button.

79
User Manual (iPhone)
5.11.5 Using effectsAudio decks display effects in three different ways. Different deck types let you switch
between them on the fly to change how you perform. Depending on whether you are using
audio or video decks, you will have access to different controls, which are outlined below.
When switched to the FX section of the advanced deck panel via the buttons at the bottom,
you can control up to two effects per deck, using three different methods: FX Pad, Instant,
and Manual.
FX Pad: Control the effects using an X/Y pad, similar to those on some traditional hardware
effects units and musical MIDI controllers. Using the X/Y pad automatically activates the
effect.
Instant: This is a panel of six pre-made effects designed for ‘instant gratification’. You can
choose from Absorb, Drift, Sway, Crush, Punch, and Twist.

80
User Manual (iPhone)
Manual: Decide the activation, as well as the effects quantity, giving you absolute control at
your fingertips.
TIP: In Manual mode, you have two effects per deck that you can chain together for
some wild sound mangling... even on four decks!

81
User Manual (iPhone)
5.12 LoopsYou can extend your music and create extra texture to your mix by using Loops. From
creating vocal stabs to playing a distinctive breakbeat over a track, loops open up a world of
mixing.
There are two ways to start a loop:
1. using the loop creator within the deck transport section;
or2. using the advanced loop panel.
5.12.1 Loop creatorTo activate a loop using the loop creator, select the loop length using the left/right arrow
buttons (1 & 2), and at the correct point in the track, tap the middle loop active button (3).
3 21

82
User Manual (iPhone)
5.12.2 Loop panelYou can use the advanced loop panel for even more looping options. To access the panel,
you will need to tap the advanced deck panel button, then tap the loop icon within the
panel. You can then switch between Auto, Bounce, and Pad at the top of the panel.
AutoYou can manually set loop length by triggering loop IN (1) and setting loop OUT (2) when
ready, or use the loop creator (3). Loops are automatically quantized to ensure they’re in
time.
1
3
2

83
User Manual (iPhone)
BounceUse six trigger pads to quickly jump between loops of different lengths. Loop length varies
from 1/16th of a beat to two beats.
PadMuch like with effects, you can use the X/Y pad to simultaneously apply a manual loop length
and high-pass/low-pass filter for an interesting effect.
TIP: Use the Bounce pads to create build up with a beat roll just before a drop or
breakdown in the music.
TIP: You can use loops to extend intros and outros on tracks that are too short to mix.

84
User Manual (iPhone)
5.13 Cue pointsYou can store up to eight cue points per track in djay for iOS. These cue points can be added on-the-fly or prepared beforehand and remain saved in your track information.
To add a cue point, simply move the track marker to where you want (1) and tap an unassigned cue button (2). Each of your cue points will be assigned its own color (3) to easily identify which is set where on the waveform. You can delete your cue points via the edit mode button (4) at the top right of your cue point panel. When edit mode is active, use the X on each button (5) to remove the cue point from the track.
13
2
4
53

85
User Manual (iPhone)
5.13.1 Beat SkipQuickly and accurately jump through your tracks via the Skip tab of the cue points panel
with the beat jumping controls. Set the beat length of your jump using the up/down arrows (1), then jump backwards and forwards by tapping the large beat skip buttons (2). Use the
Start/End points at the bottom of the panel (3) to create custom cues for Automix to mix
from.
1
2
3

86
User Manual (iPhone)
5.14 Looper & samplerA brand new feature to djay, the Looper lets you feed your creativity with endless variation in
building your own tracks. The simple grid layout and tight sample quantization make it easy
to use. Think of it as having eight different tracks broken down into small loops that you can
switch between at the tap of the screen or the press of a MIDI pad.
Choose from a constantly updated list of genres, including:
• Ambient House
• Analog Techno
• Deep House
• Deep Jazz
• Deep Soulful House
• DnB Ultra
• Dub Hop
• EDM Vol.1-3
• Electro House
• Electro Swing
• Electronic Fusion
• Funk Hop
• Hardstyle
• Hip Hop Fusion
• HipHop Vol.1-3
• House
• Latin House
• Lounge Hip Hop
• Maximum EDM
• Melbourne Bounce
• Neuro DnB
• Progressive UK House
• Retro 80s
• Trance
• Trance EDM
NOTE: The Looper and Sampler mode are only available with a PRO subscription,
which also includes all the loop and sample packs to download.
87
User Manual (iPhone)
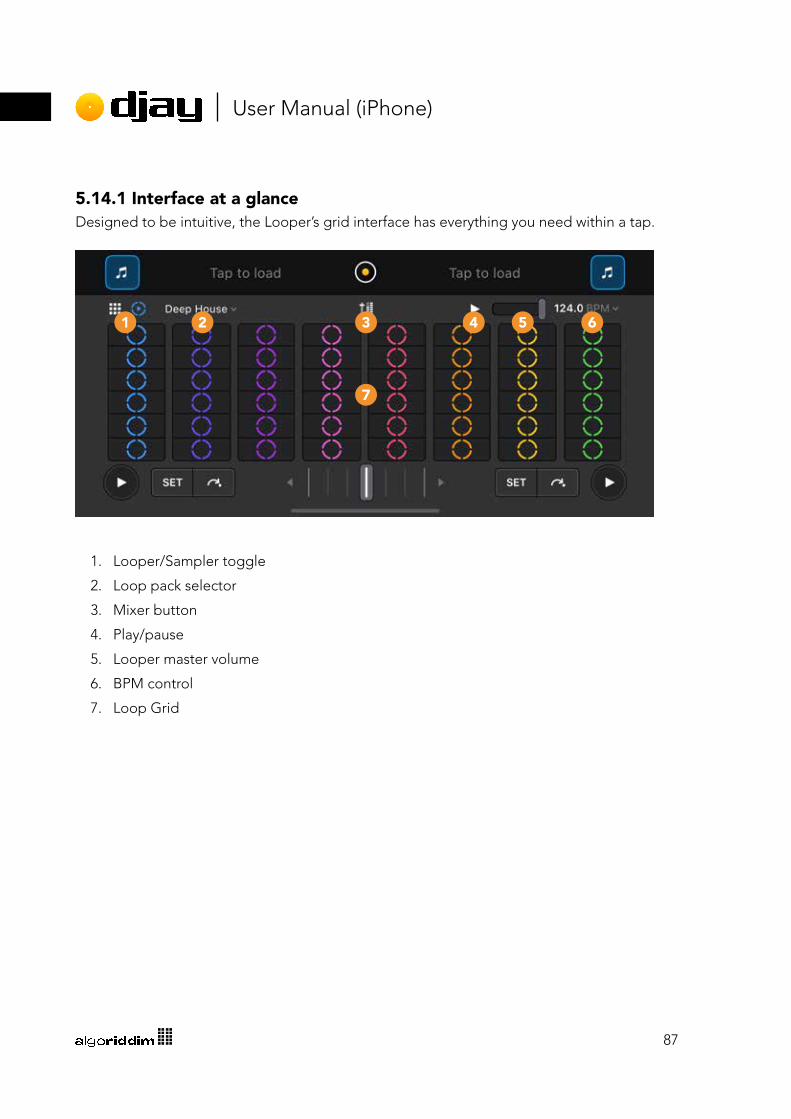
5.14.1 Interface at a glanceDesigned to be intuitive, the Looper’s grid interface has everything you need within a tap.
1. Looper/Sampler toggle
2. Loop pack selector
3. Mixer button
4. Play/pause
5. Looper master volume
6. BPM control
7. Loop Grid
1 2 3 4 5 6
7

88
User Manual (iPhone)
5.14.2 Using the Loop GridThe Loop Grid is a 6x8 button matrix which contains 48 perfectly quantized samples, and
able to play a sample from each of the eight columns at once.
When you load a loop pack, each column will contain similar parts of the track. For example,
kicks will be grouped together, as will percussion, or basslines, or vox samples. This is to
avoid having elements clashing with each other.
1. Select the LOOPER view from the layout panel.
2. Choose and load a loop pack using the Loop Pack selector.

89
User Manual (iPhone)
3. To start your music, either launch a loop from the first column (1) by tapping it,
or press PLAY/PAUSE (2) in the top of the UI to launch a random loop from each
column.
4. Tap a loop from each column to play them in time with the first loop.
5. Change the playing loop by tapping a different one.
6. STOP any currently playing loop by tapping it again. You can also stop all active loops
by tapping the PLAY/PAUSE button.
NOTE: All your loops will be quantized to a four beat measure, and will stop at the end
rather than start again, should you disable it.
1
2

90
User Manual (iPhone)
7. Switch to mixer mode by tapping the mixer button in the middle of the bottom
toolbar. You can control and monitor the volume of individual columns in this view.

91
User Manual (iPhone)
5.14.3 Sampler modeThe sampler mode offers a 4x4 grid of buttons to launch one-hit samples such as vocals,
drums or FX.
1. Looper/sampler toggle
2. Sample pack editor
3. Sample pack selector
4. RECORD button
5. CLEAR sequence button
6. Metronome on/off
7. Master volume slider
8. BPM controls
9. 4x4 sample grid
1 2 3 4 5 6 7
9
8

92
User Manual (iPhone)
There is a growing list of sample packs available when you're subscribed to the PRO version
of djay for iOS, inlcuding:
• Chill
• Deep House Vol.1
• DJ Sound Effects
• DJ Vocal Drops
• Drum & Bass
• Dub
• Dubstep
• EDM
• Essentials
• Funk & Breaks
• Hip Hop Vol.1-5
• House
• House Bass
• Percussion Pack
• R&B Vol.1
• Techno
• Trap Vol.1&2
5.14.4 Sampler sequencerThe sampler sequencer lets you temporarily record short loops using the one-shot samples
loaded into the sample grid. The loop is a single four beat bar.
1. Make sure the LOOPER view is active using the layout panel.
2. Make sure the Sampler is selected using the toggle switch to the right of the bottom
toolbar. The 3x3 grid icon should be blue when the Sampler is selected.
93
User Manual (iPhone)
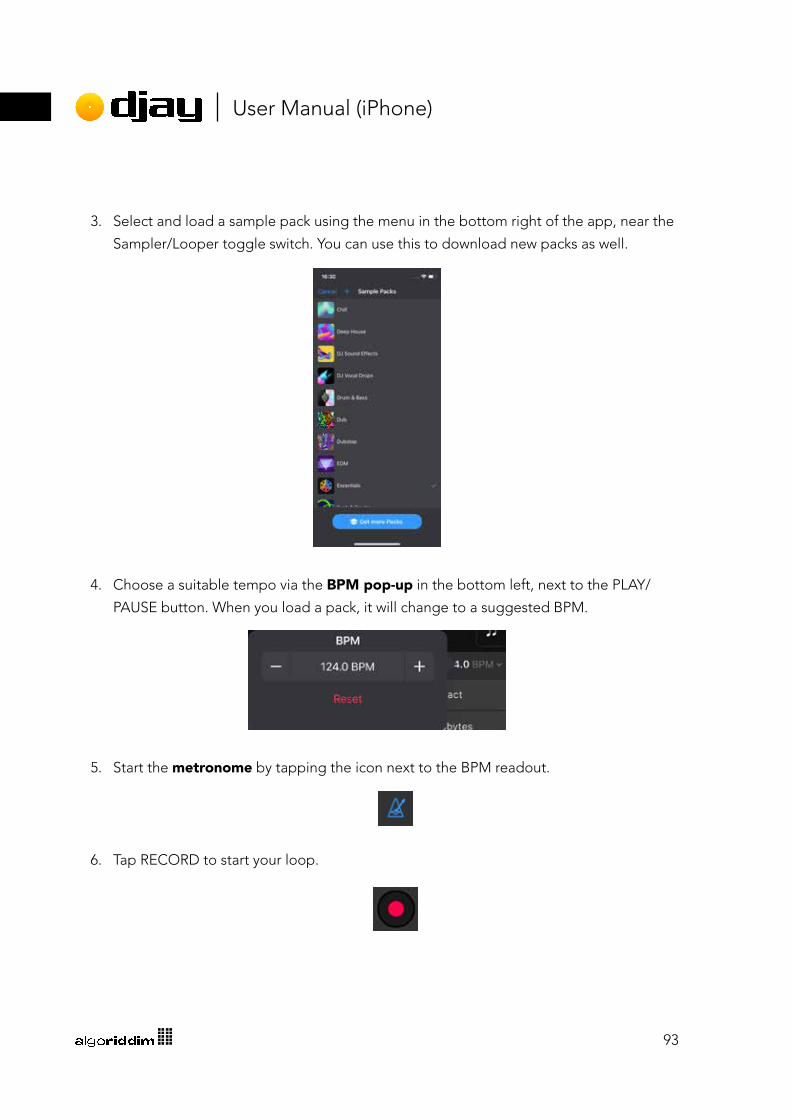
3. Select and load a sample pack using the menu in the bottom right of the app, near the
Sampler/Looper toggle switch. You can use this to download new packs as well.
4. Choose a suitable tempo via the BPM pop-up in the bottom left, next to the PLAY/
PAUSE button. When you load a pack, it will change to a suggested BPM.
5. Start the metronome by tapping the icon next to the BPM readout.
6. Tap RECORD to start your loop.

94
User Manual (iPhone)
7. Listen for the downbeat of the metronome, which will have a slightly higher pitch to the
other beats. There is also a visual indicator to show you where you are in the loop.
8. Start playing your rhythm from the downbeat by tapping any of the samples in the grid.
You can overdub the sequence by playing the same sample over the sequence.
TIP: You can switch sample pack while recording to swap out sample sequences on the
fly.
95
User Manual (iPhone)
5.14.5 Customizing sample packsAs well as using the official Algoriddim sample packs, you can also create, edit, and save
packs by activating the sample pack editor button. There are two choices to change the
sample: using the library of included official samples, or recorded/imported samples. To
create a new sample pack:
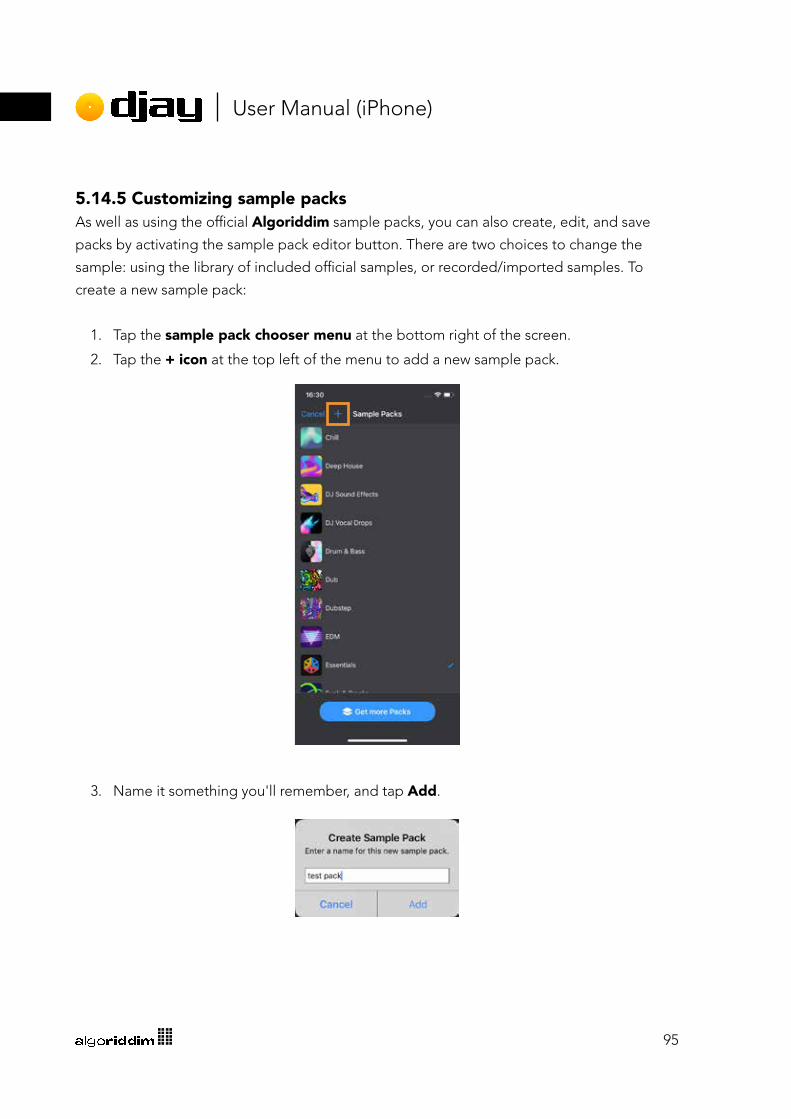
1. Tap the sample pack chooser menu at the bottom right of the screen.
2. Tap the + icon at the top left of the menu to add a new sample pack.
3. Name it something you'll remember, and tap Add.

96
User Manual (iPhone)
4. Each of the samples in the pad grid will now be empty and editable via their respective
three-dot menu button. Tap one to bring up the sample picker.
5. To add an official sample, make sure the Sample Packs tab is selected, and either
choose one from a sample pack.

97
User Manual (iPhone)
To swap out official samples in an existing pack:
1. Tap the edit button at the bottom right of the screen.
2. A pop-up will appear asking you to Copy Sample Pack. Rename it using a name you'll
remember, and tap Add.
3. Each of the samples in the pad grid will now be editable via their respective three-dot menu button. Tap one to bring up the sample picker.
4. To add an official sample, make sure the Sample Packs tab is selected, and either
choose one from the current pack, or tap back to the Sample Packs list at the top
right of the pop-up to choose a different sample pack.

98
User Manual (iPhone)
Using imported and recorded samplesAs well as the official samples and packs, you can add your own samples, either by importing
from the Files app, or by recording audio from Deck 1 or Deck 2. To add a user sample from
the Files app:
1. Tap the edit button at the bottom right of the screen.
2. A pop-up will appear asking you to Copy Sample Pack. Rename it using a name you'll
remember, and tap Add.
3. Each of the samples in the pad grid will now be editable via their respective three-dot menu button. Tap one to bring up the sample picker.
4. To add your own sample, make sure the My Samples tab is selected, and either
choose one from the list of available samples (1), or tap the Add from Files button (2)at the top right of the pop-up to browse to the files you'd like to add.
1
2

99
User Manual (iPhone)
To record a sample from Decks 1&2:
1. Tap the edit button at the bottom right of the screen.
2. A pop-up will appear asking you to Copy Sample Pack. Rename it using a name you'll
remember, and tap Add.
3. Each of the samples in the pad grid will now be editable via their respective three-dot menu button. Tap one to bring up the sample picker.
4. To record a sample, make sure the My Samples tab is selected, and that a track is
playing in either Deck 1 or Deck 2.
5. Tap and hold the record button for the playing deck at the top of the sample chooser pop-up for the duration of the audio you want to capture.
6. Once you release the record button, the sample will be added to your My Samples list, and you can select it to replace the current sample.

100
User Manual (iPhone)
5.15 Using hardwareAlgoriddim works closely with hardware partners to create the perfect integration of
hardware and software. With big brands like Pioneer DJ, Reloop, and Numark as partners,
there’s a controller to suit all styles of DJing.
5.15.1 Official and natively-supported ControllersUsing a MIDI controller is an important factor in a good DJ workflow. You can see a full list
of supported controllers on the Algoriddim website. Setting up an officially supported
controller is straightforward plug-and-play.
1. Ensure that djay for iOS is fully loaded.
2. Connect your Lightning to USB 3 Camera Adapter to your iPhone (if your controller
doesn't have a Lightning connector).
3. Connect the power adapter for your iPhone to the USB adapter to charge your iPhone
and power your controller if required.
4. Connect your controller in via a spare USB port and power it up if needed.
5. Once the controller has powered up, djay for iOS should automatically load default
settings for audio interface.
6. You should now have control of djay for iOS using your controller.
NOTE: If your preferred controller isn’t listed, you can always map any MIDI compatible
hardware using the powerful MIDI mapping system. See section 5.15.2 MIDI mapping
for more information.
TIP: Algoriddim recommends using the official Apple Lightning to USB 3 Camera
Adapter for connecting MIDI controllers via USB.

101
User Manual (iPhone)
5.15.2 MIDI mappingIf you need extra control beyond supported hardware, or have an
unsupported MIDI-capable controller, you can create, edit, and
save your own mappings to suit your needs. The built-in MIDI
mapping within djay for iOS is powerful and easy to use.
NOTE: A djay for iOS PRO subscription is required to create and edit MIDI mappings,
as well as use controllers from the supported list of hardware not included in the FREE
version.
102
User Manual (iPhone)
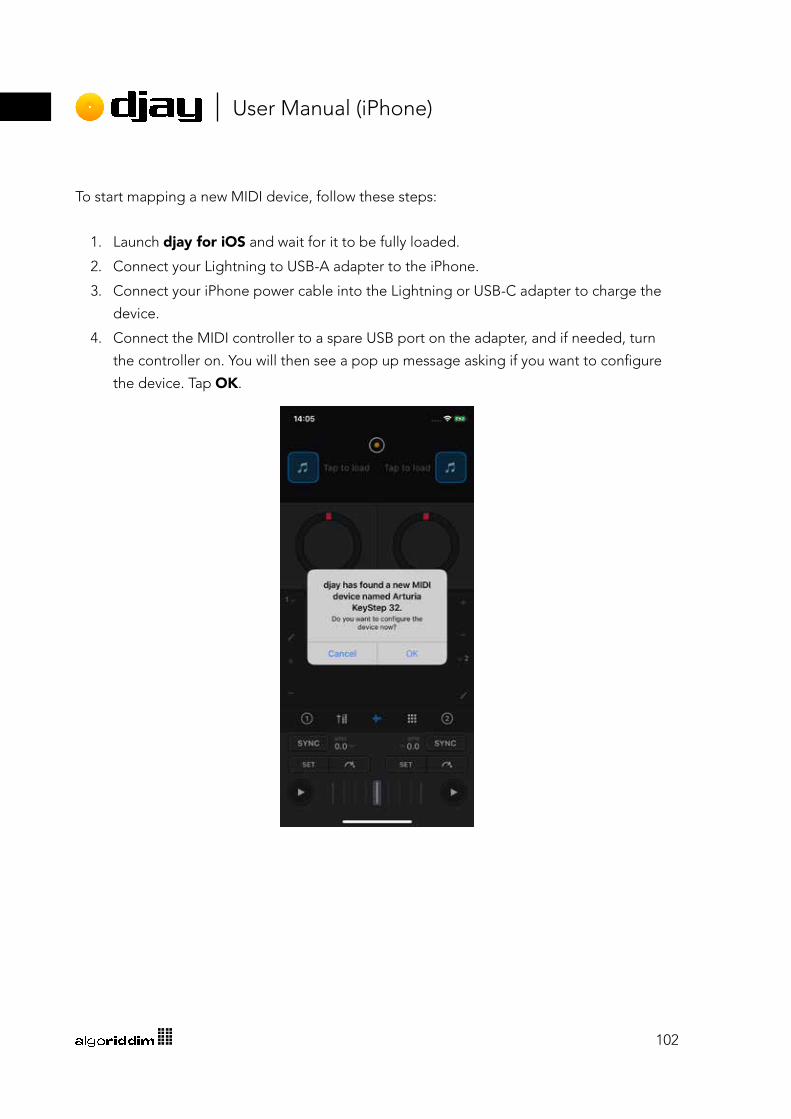
To start mapping a new MIDI device, follow these steps:
1. Launch djay for iOS and wait for it to be fully loaded.
2. Connect your Lightning to USB-A adapter to the iPhone.
3. Connect your iPhone power cable into the Lightning or USB-C adapter to charge the
device.
4. Connect the MIDI controller to a spare USB port on the adapter, and if needed, turn
the controller on. You will then see a pop up message asking if you want to configure
the device. Tap OK.

103
User Manual (iPhone)
5. Next, the device MIDI Configuration window will load, displaying a blank mapping
screen.
6. To start mapping your first MIDI signal, use the desired control for the editor to pick up
the correct note or CC to add to the list. Press a button on your controller to add this
to the list.
7. You then need to select the Action the control will perform. Tap the newly added
control, choose Deck 1 as your target, and from the General section, choose Play / Pause.
8. You have now mapped the Deck 1 PLAY / PAUSE button to your controller. Load a
track and test it out!
9. Keep mapping controls until you have everything you need, tap Save in the top right
of the pop up.
NOTE: You can access and edit your controller MIDI mapping as long as the device is
connected and detected, by going to your MIDI settings page. See section 4.6.5 MIDI device preferences.

104
User Manual (iPhone)
MIDI control targetsTargets are a simple way to break down what controls your MIDI signals are "targeting".
These targets are general areas of the user interface to help make it easier to find the right
command to map. You can choose from Decks 1 to 4, Mixer, Music library, Looper,
Sampler, or General. You can further drill down into these target sections through the
target's Actions controls.
Advanced ConfigurationThe Advanced Configuration settings are designed to tweak how your MIDI commands
respond, should they not work as you want them to.
Control type: Choose from Button, Fader/Knob, Rotary (01h/7Fh), Rotary (3Fh/41h), Rotary (absolute). Invert: Swaps the direction of your control.
Button Mode: Changes button behavior between Default, Toggle, Hold.
Pickup mode: Controls with this option checked will only start responding once they’ve
reached (“picked up”) the MIDI value they last received. This is useful when using one
control for different functions (i.e. two mixer channels sharing one fader as ‘layers’).
Sensitivity: Change the slider between Slow and Fast to alter the size of movement
between steps. This is particularly useful when using endless encoders for scrolling, for
example.
Reaction: Use this option to change how Smooth or Responsive you want your jog wheels
to feel. The more ‘responsive’ this is set, the more immediate jog wheel movements will feel.

105
User Manual (iPhone)
MIDI out: Activate this option for djay for iOS to return MIDI signals to your controller. You
can use MIDI out commands to let djay for iOS respond with LED feedback for controls that
allow it (for example, pads with backlight or LED toggles).
Channel: Change the MIDI channel for your MIDI signal.
Type: Choose between Note on/off or Control Change (CC). Control: Selects which control a return message is sent to. This can be different from the
mapped control.
Value: Set the minimum and maximum value of the MIDI out signal, between 0 and 127.You
can also toggle Blend, and/or Invert it.
TIP: Most controls should work by simply enabling the option, but some may need you
to experiment with the other settings or read your controller’s documentation.

106
User Manual (iPhone)
5.15.3 Mapping Jog wheelsThere are three essential commands that need to be mapped to get basic jog wheel
functionality working on a controller: Scratch (no touch detection) (note), Scratch (CC), and
Pitch bend (CC). Both the CCs also need their Speed and Reaction adjusted to suit user
taste. You can edit your jog wheel MIDI mappings within the device MIDI Configuration
editor.
1. The Scratch (no touch detection) MIDI command is designed to switch your jog
wheel to be able to scratch on non-touch-sensitive platters. Touch the top of the jog
wheel to add or focus on the note in the editor. Select Deck <number>, and Scratch (no touch detection) in the Jog Wheels section of the selected deck.
2. Touch the top of the jog wheel and move it backwards and forwards in a scratching
motion to add/focus the command in the editor. Add the Deck<number>, Scratch
action (from Jog Wheels section) to the command to add scratching capabilities to
your jog wheel. If your jog wheels are touch sensitive, you can use the Scratch CC
instead.
NOTE: Check your hardware specifications to find out if your controller has touch
sensitive jog wheels.

107
User Manual (iPhone)
3. To add Pitch bend functions, touch the side of the jog wheel and move it to add/focus
the command in the editor. Choose the Deck <number>, Pitch bend action in the Jog Wheels section.
4. Finally, you can adjust the Sensitivity and Acceleration via the Advanced Control Options section of your MIDI actions (see section 5.15.2 MIDI mapping). Play with
both the Sensitivity and Acceleration sliders until your are satisfied with the feel of all
the jog wheel behavior.

108
User Manual (iPhone)
If your controller supports it, you can also add an extra layer of SHIFT commands to control
other software features by holding down the SHIFT button while adding the commands in
the device MIDI Configuration editor.
TIP: The jog wheel is treated as any other rotary control, meaning you can also use
them for controlling effects or even browser navigation!
5.15.4 Editing an existing mappingYou can also modify an existing MIDI mapping to suit your needs. Select your existing
controller’s MIDI Configuration window to access these changes. The device MIDI editor
will already show a list of all the mapped controls. Using the guide above, you can add to or
alter the commands any way you need.
TIP: Sometimes you can find alternative mappings for hardware on the Algoriddim or
manufacturer forums.

User Manual (iPhone)PRO
Tips and support
User Manual
110
User Manual (iPhone)
6 Tips and supportWe all need some extra tips and assistance from time to time. If you have any
questions that haven't been covered so far, this section will point you in the
right direction.
6.1 Special tipsA big part of being a DJ is understanding how to get the best possible quality out of your
equipment, and djay for iOS is an important part of that. From mixing in key to ensuring the
sound stays under control, djay for iOS is designed to help you achieve that perfect sound.
Follow the tips below to help craft your mix and push your boundaries. Being a DJ is an ever-
evolving skill set, and you can never know too much.
6.1.1 Avoid the redIt’s important to get your audio levels right from the start. Making the sound too loud can
result in distortion and make the music unpleasant to listen to. While everyone likes loud
music, it’s important to give your audio plenty of space (known as headroom) to avoid any
unpleasantness.
1. First, make sure your channel gains are properly set. You want to set your channel gains
as close to zero as you can (this means setting it so it just avoids the red at its loudest
point)
2. Remember that each channel of audio will add extra volume to the master output and
adjust accordingly. Use EQ or the volume faders to cut out extra sound while you’re
mixing. This becomes especially important when you’re mixing with more than two
decks.
3. Never push the volume too much on any one part of the audio chain. If your amplifier is
at maximum, it’ll start to sound bad as it pushes too hard.
You can use the Auto Gain and Auto Limiter features built in to djay for iOS to assist you.
For more information on this, see section 4.6.4 Advanced preferences.

111
User Manual (iPhone)
6.1.2 Audio file qualityThe recording and encoding quality of your music files is critical to getting the most out of your sound
system. While the argument about what quality audio DJs should seek rages on, most everyone
agrees that you should aim for at least 192kbps stereo MP3 quality, with 320kbps stereo MP3 as
the ideal.
NOTE: AAC/MP4 files will have a lower bitrate than MP3 due to better compression
techniques.
6.1.3 Mixing in keyAll music has a root musical key, which works with other musical keys to create pleasant harmonies.
Tracks that have clashing keys can sound bad when played together (especially during ‘musical’ parts,
rather than percussive parts). You can use djay for iOS’s key lock and key analysis features to better
piece your music together.
EXTRA TIP: This is one of the ways the Track Match feature works, and is a skill many DJs find
essential.
6.1.4 Know your tracksModern digital music might be much better mastered than in the past, and there might be better ways
to be visually aware of your tracks, but there's no substitute for knowing them inside out. Not only
does it help you understand your volume levels, it also gives you insight into how best to structure
your mix.
6.1.5 Keep your library tip-topIt's easy to get overwhelmed with the wealth of music in your collection, so keeping it lean, and
ensuring all your track metadata is accurate and up-to-date will help you stay on top of things. Resist
the urge to fill your library without considering your musical tastes. DJs are known as music selectors
for a reason.

112
User Manual (iPhone)
6.1.6 CablesEvery step in the chain affects the quality of your audio. The condition, as well as quality, of any audio
or digital cables is important to ensuring consistent and reliable sound. That doesn’t mean you need
to spend a fortune on audiophile cables, just make sure you have cables you can trust.

113
User Manual (iPhone)
6.2 FAQ and SupportIf you have any technical issues, or questions not answered in this manual, please visit the
FAQ or contact Algoriddim email support directly by using the support portal to raise a
ticket.