user manual - id view
TRANSCRIPT

56
CHAPTER 9 CMS INSTALLATION AND USAGE GUIDE
9-1 CMS Installation
System Requirement:*Intel Pentium 4 processor or equivalent.*Microsoft Windows Vista、Windows XP、Windows 2003 Server.*Besides OS and other required APs, there will be 512MB remaining memory needed or above.*512MB memory above.(500M requested for group DVR connection and 180M for single DVR)*20MB HD space. Recording and image capturing require extra space for storage.*VGA Card needs to support DirectX9 and function well while running it. Please refer to p48 Note 1.
Installation:1. Connect to the manufacturer’s website and download the CMS software.2. Decompress and execute “setup.exe”.3. If “Visual C++ Runtime Libraries” has not been installed before in the operating PC, the
following sign will suggest an installation automatically.
4. Select “Next”, and then select “Browse” to change installation path if needed. To checkavailable space on hard disk, please select “Disk Cost” then please select “Next” to thenext step.
57
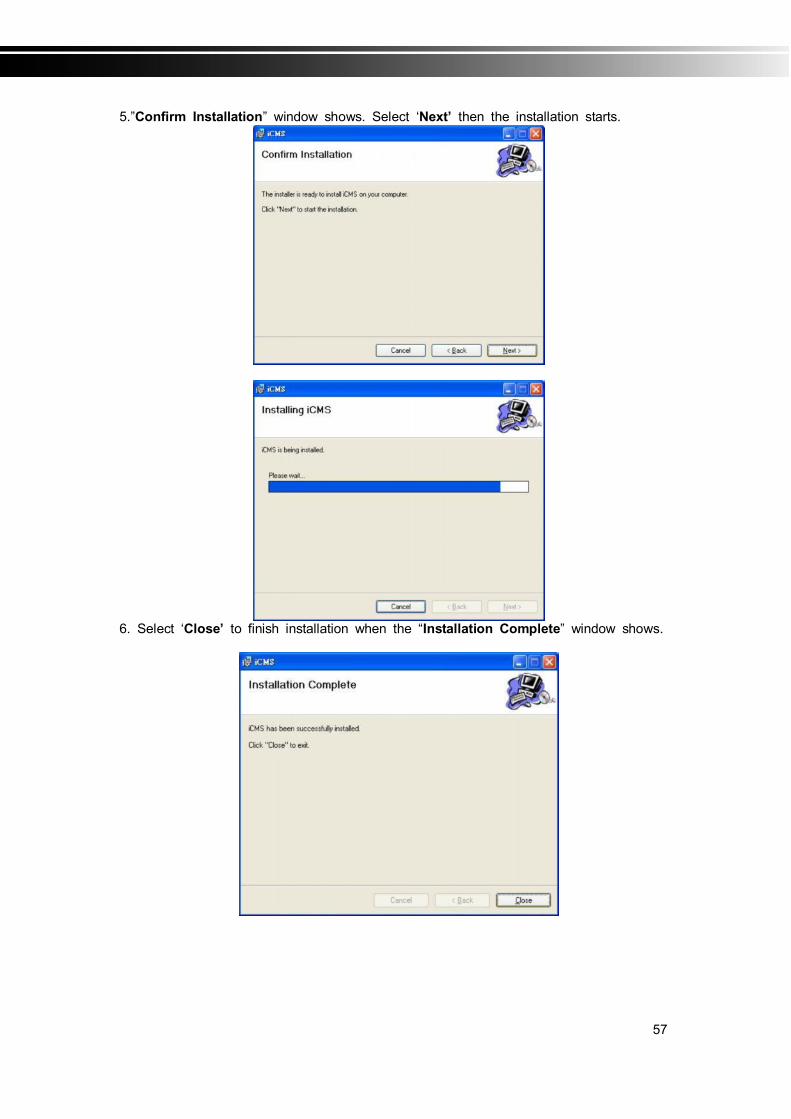
5.”Confirm Installation” window shows. Select ‘Next’ then the installation starts.
6. Select ‘Close’ to finish installation when the “Installation Complete” window shows.

58
Instruction for Log-in Failure to CMS after UpgradeLog in to CMS with the default account and password after CMS upgrade. If an error
message occurs as shown in the image, please follow the instruction to solve the error.
Step 1: Please enter file manager to enter folder, “Windows” and then folder “Systme32”(ex:C:\Windows\System32)
Step 2: Locate file, “iCMS.dat” and delete it.
Step 3: Restart CMS. Log-in successfully.

59
9-2 CMS LOGIN AND ENVIRONMENT
To enter CMS, the administrator’s user name and password are required. The defaults are‘admin’ and ‘123456’.
After successful login, the following image shows on your screen:
① DVRs, Groups &Events
Information about DVRs, groups and events.See “9-3 Information List” for more detail.
② PC informationand control
Information about local PC’s hard disk, volume, recording...etc.See “9-4 PC Information and Control” for more detail.
③ Main Display Live image display area. See “9-5 Main Display” for detail.
④ Display Modes Several choices of display modes supported by CMS.
⑤ Operation BarA set of 10 operations are provided by CMS. See “ 9-6 OperationBar” for detail.
9-3 DVRs, Groups & Events
①
②:
③
④ ⑤

60
Icon DescriptionView list of logged in DVR/ Group.
View Logs: list all the event information of DVR
9-3.1 View DVR/Group List
Single left click on ‘DVR’ or ‘Group’ willexpand/collapse the entire DVRs andgroups list.
On the DVR list, double left click on aconnected DVR will show its image inmain display. See “9-6.2 DVRAdministration” for further information.
On the Group list, double left click on agroup will show live image from thechannels of the group in the maindisplay. See “9-6.3 for GroupAdministration” for further information.
Left-clicking on a connected DVR will expand/collapse status of its all channels as below:
Icon Description
Video Loss
Motion Detected
Sensor Triggered
9-3.2 View Event Logs

61
Under this page, all the events of a DVR can be expanded/collapsed in the order of Remote in/Remote out, Video Loss, Motion, Sensor, Others (Power Reset, Key Lock, KeyUnlock, HD Full).
9-4 Local PC Information and Control
Located at the left lower corner of the screen, please see the chart below:
9-5 Main Display
Icon Function Description
HDD info Shows the ratio of available space / HDD capacity of C:\ drive(where CMS is installed).
RecordingDirectory
Setting Recording Directory.(Default is C:\Program files\iCMS)
RecordingCycle
Set the capacity size of the Recording space.(minimum is 10MB)
Volume PC volume or playback volume control bar.
RecordingRecord live image to local PC storage. To view locally storeddata, use “Record” under the operation bar. Also see“9-6.6 recording data” for detail.
SnapshotTake snapshot to save in local PC storage. To view all thesnapshots you’ve taken, please go to ” Snapshot” under theoperation bar. See “9-6.5 Snapshot data” for detail.

62
The main display area is where the live image of DVR is shown. You can drag to change thelocation of screen for each channel and turn on/off audio signal with mouse-click.
9-5.1 Audio Control
In live mode, you can turn on/off the audio signal of Ch1~Ch4:
「 」Audio signal is On
「 」Audio signal is Off
Turn on/off by clicking on the graphical icon, please note there can allow only one channel’s audio signal to be on at one time.
9-5.2 eMAP Display

63
In Live mode, pressing will bring the e-MAP drag-down menu. If the channel hasbeen set up to use e-MAP, the menu will show all the e-MAP titles that have beenentitled to this channel; otherwise, “No eMaps” will be shown. Please check “9-6.4eMAP administration” for setup information.

64
9-5.3 PTZ ControlIn the main display, right click on the channel will bring up PTZ control panel as below.
*PTZ communication protocols from different brands aren’t compatible 100% sometimes. Therefore, some of these functions may be unavailable.
Icon Description8 direction key Rotate the PTZ
ZOOM+:Zoom in
ZOOM : Zoom out
Setup the PTZ spot as pre-set N.
FOCUS+ : Focus in
FOCUS-:Focus out
Move to pre-set N.
Set PTZ Preset Setup 16 pre-set N.Goto PTZ Preset Move to specific pre-set N.
Activate auto pre-set tour*PTZ Sensitivity Setup PTZ sensitivity*
Setup the “start” and “end” of liner scan.*
Activate the liner scan cruise.*B Adjust the Brightness (Down is +)C Adjust the Contrast (Down is +)S Adjust the Sharpness (Down is +)

65
9-6 Operation Bar
10 Operations to be listed as below:
Table 9-6.1 description of 10 operations:Icon Description
User Administration. Please see “9-6.1 User administration”
DVR Administration. Please see “9-6.2 DVR Administration”
Group Administration. Please see “9-6.3 Group Administration”
eMap Administration. Please see “9-6.4 eMap Administration”.
Remote Playback. Please see “9-6.5 Remote Play”.
HDD Playback. Please see “9-6.6 HDD Play”
File Playback. Please see “9-6.7 File Play”
Event Playback. Please see “9-6.8 Event Play”
Snapshot Data. Please see “9-6.9 Snapshot”
Recording Data. Please see “9-6.10 Recording”

66
9-6.1 User administrationBefore the CMS can be used on a PC, user accounts should be added with proper authority.Each user should also be assigned a password and optionally a description. If a user does nothave certain authority assigned, he/she will not be able to operate the corresponding functionon the Operation Bar. The default is none of the authority is assigned. The administrator shouldassign proper authority to each user. These user accounts can be deleted or edited later on.
Select “OK” to save the setup.Icon Description
Add a user account. The default authority is with none permission.
Delete a user account.Language Switch display language
systray
If the turn on this feature, when the program reduced, it will be based in the system tray icon.(This feature is switched on / off, the need to re-open the CMS until after the program in force)
VGA turbo Increase the VGA efficiency

67
9-6.2 DVR AdministrationDVR connections can be added to or deleted from the CMS and their information can be edited.DVR’s channel names can be entered here or downloaded from the DVR by pressing ‘FromDVR’. Select “OK” to save the information.
9-6.3 Group AdministrationA ‘Group’ means a set of video channels from one or many DVRs, which means, user canorganize channels from different DVRs to be set in a group. This function allows you to monitorand manager channels from multiple DVRs easily and flexible.
Steps:1. Add a new group and set its name and description.2. Click ‘Select’ which will bring up a new window.
Name: DVR Name(Unrepeatable)Model: DVR ModelGeneric: For General ModelsGeneric MainStream: For DualStream ModelDUAL SDVR: For MPEG4 2U ModelsAddress: DVR IP AddressPort: DVR Network PortChannel: DVR Camera NumberID: DVR Login AccountPassword: DVR Login PasswordDescription: Other DescriptionCamera Description: Carera DescriptionFrom DVR: Load Camera name from DVR
1.
2.

68
3. Check the specific channels that you’d like them to be included in the group. To include allchannels of a DVR, just check the DVR.(1 Group up to select 64 camera)
4. Click “OK” to return to the previous window.5. Select a display mode.6. Drag a channel from the lower left panel into the main display to a preferred location. Or,
change the channel location in the main display by mouse dragging.7. You can ‘Select’ again to add other channels, but the un-saved channel locations will be
lost.8. Click “OK” to save the setup.

69
9-6.4 eMap AdministrationIf geographical locations are relevant, or if it is desired to use a picture as the background,eMap can be used for the purpose. With eMap, the background picture can be picked by theuser and channels from multiple DVRs can be placed and dragged around on the picture.
Steps to follow:
1. Click and a path for the picture will be prompted.2. Select a picture, click OK and the picture will show in the right panel.3. Drag channels in the left lower corner onto the picture to any position.
4. To delete a channel already on the picture, right click the channel and click ‘Remove’.

70
5. Click OK to save.

71
9-6.5 Remote PlayVideo images recorded on a DVR can be displayed on a remote CMS. With Remote Playfunction, select a DVR and a display mode on top of the screen. After the recorded segmentsare listed below, double click on one to show its image on the right.
Icon Description
Start playing.
Pause.
Fast forward.
Fast rewind.
Select the clip you want to watch the number of minutes and
seconds,Press the right button is set to start playing

72
9-6.6 HDD PlaybackYou can directly play the recording data in the HDD that’s uninstalled from DVR by CMS. Seethe picture below, the left part of screen is recording data in list that’s separated by hour and theright part is main display. You can change the display modes and play files fast forward orrewind.
Icon Description
Start playing.
Pause.
Fast forward.
Fast rewind.

73
9-6.7 File Playback
You can play the recorded .irf files by “File Play” in CMS. It allows you to change thedisplay mode, forward or rewind the file and drag the time bar.
Icon Description
Start playing.
Pause.
Stop playback.
Fast forward.
Fast rewind.

74
9-6.8 Event Playback
Event recordings on the DVR can be played back in CMS.
Steps to follow:1. Select a DVR and a display mode.2. Select a date.3. Double click an event and play back the images on the right.
Use buttons at the bottom to control the playback.
9-6.9 Snapshot DataIt can display all the snapshots you’ve taken in line in “Snapshot Data”. You can review, deleteor save as other files here.
*Capture images of the date and time will follow the PC-time display

75
9-6.10 Recording DataIt can play all the recording files you’ve recorded in line in “Recording Data”. You can play ordelete them here.
Steps to follow:1. Choose the recording time at upper left corner, it will be played on the main display.2. You can choose the display mode.3. Time bar will be shown at right lower corner, please drag the time bar to specify
the recording time you’d like to play.
Icon Description
Start playing.
Pause.
Stop playback.
Fast forward.
Fast rewind.