user manual gettin g started? easy. - electrolux … gettin g started? easy. user manual zwf 91483wh...
TRANSCRIPT

GETTING STARTED?EASY.
User Manual
ZWF 91483WHZWF 91483WR
EN User ManualWashing Machine

SAFETY INFORMATIONBefore the installation and use of the appliance, carefully read thesupplied instructions. The manufacturer is not responsible for anyinjuries or damages that are the result of incorrect installation orusage. Always keep the instructions in a safe and accessiblelocation for future reference.
CHILDREN AND VULNERABLE PEOPLE SAFETY• This appliance can be used by children aged 8 years and
above and by persons with reduced capabilities provided thatthey have been given instruction and/or supervision regardingthe safe use of the appliance and understand the potentialhazards involved.
• Do not let children play with the appliance.• Children aged 3 years and under must be kept away from this
appliance when it is in operation at all times.• Keep all packaging away from children and dispose of it
appropriately.• Keep detergents away from children.• Keep children and pets away from the appliance door when it is
open.• Children shall not carry out cleaning and user maintenance of
the appliance without supervision.
GENERAL SAFETY• Do not change the specification of this appliance.• Do not exceed the maximum load of 9 kg (refer to the
"Programme chart" chapter).• The operating water pressure at the water entry point from the
outlet connection must be between 0.5 bar (0.05 MPa) and 8bar (0.8 MPa).
• The ventilation opening in the base (if applicable) must not becovered by a carpet, mat, or any floor covering.
• The appliance must be connected to the water mains using thenew supplied hose sets, or other new hose sets supplied bythe Authorised Service Centre.
2

• Old hose sets must not be reused.• If the mains power supply cable is damaged, it must be
replaced by the manufacturer, its Authorised Service Centre orsimilarly qualified persons to avoid an electrical hazard.
• Before any maintenance operation, deactivate the applianceand disconnect the mains plug from the socket.
• Do not use high pressure water sprays and/or steam to cleanthe appliance.
• Clean the appliance with a moist cloth. Use only neutral,detergents. Do not use abrasive products, abrasive cleaningpads, solvents or metal objects.
SAFETY INSTRUCTIONSINSTALLATION• Remove all the packaging and the transit bolts.• Keep the transit bolts in a safe place. If the
appliance is to be moved in future they must bereattached to lock the drum to prevent internaldamage.
• Always take care when moving the appliance asit is heavy. Always use safety gloves andenclosed footwear.
• Do not install or use a damaged appliance.• Follow the installation instruction supplied with
the appliance.• Do not install or use the appliance where the
temperature can be less than 0°C or where it isexposed to the weather.
• The floor area where the appliance is to beinstalled must be flat, stable, heat resistant andclean.
• Make sure that there is air circulation betweenthe appliance and the floor.
• Adjust the feet to have the necessary spacebetween the appliance and the flooring.
• Do not install the appliance where the appliancedoor cannot be fully opened.
ELECTRICAL CONNECTION• The appliance must be earthed.• Always use a correctly installed shockproof
socket.• Make sure that the electrical information on the
rating plate agrees with the power supply. If not,contact an electrician.
• Do not use multi-plug adapters and extensioncables.
• Make sure not to cause damage to the mainsplug and to the mains cable. Should the mains
cable need to be replaced, this must be carriedout by our Authorised Service Centre.
• Connect the mains plug to the mains socketonly at the end of the installation. Make sure thatthere is access to the mains plug after theinstallation.
• Do not touch the mains cable or the mains plugwith wet hands.
• Do not pull the mains cable to disconnect theappliance. Always pull the mains plug.
• UK and Ireland only. This appliance is fitted witha 13 A mains plug. If it is necessary to changethe mains plug fuse, use only a 13 A ASTA (BS1362) fuse.
• This appliance complies with the E.E.C.Directives.
WATER CONNECTION• Do not cause damage to the water hoses.• Before connection to new pipes, pipes not used
for a long time, where repair work has beencarried out or new devices fitted (water meters,etc.), let the water flow until it is clean and clear.
• Ensure that there are no visible water leaksduring and after the first use of the appliance.
USE
WARNING! Risk of injury, electricalshock, fire, burns or damage to theappliance.
• This appliance is for household use only.• Follow the safety instructions on the detergent
packaging.
3

• Do not put flammable products or items that arewet with flammable products in, near or on theappliance.
• Make sure that all metal objects are removedfrom the laundry.
• Do not put a container to collect possible waterleakage under the appliance. Contact theAuthorised Service Centre to ensure whichaccessories can be used.
• Do not touch the glass door while a programmeis in operation. The glass can get hot.
SERVICE• To repair the appliance contact an Authorised
Service Centre.• Use original spare parts only.
DISPOSAL
WARNING! Risk of injury orsuffocation.
• Disconnect the appliance from the mainselectrical and water supplies.
• Cut off the mains electrical cable close to theappliance and dispose of it.
• Remove the door catch to prevent children orpets from becoming trapped in the drum.
• Dispose of the appliance in accordance withlocal requirements for the disposal of WasteElectrical and Electronic Equipment (WEEE).
PRODUCT DESCRIPTIONAPPLIANCE OVERVIEW
1 2 3
5
6
4
1 Worktop2 Detergent dispenser3 Control panel4 Door handle5 Rating plate6 Feet for levelling the appliance
INSTALLATION ON SUSPENDED FLOORINGSuspended wooden floors are particularlysusceptible to vibration.To limit vibration we recommend placing awaterproof wooden panel, at least 15 mm thick,under the appliance. It should be screwed to at
least 2 floor beams and should extend beyond thefront feet.If possible, install the appliance where the floor ismore stable.
4

CONTROL PANELCONTROL PANEL DESCRIPTION
Cotton ECO
90°
60°
40°
30°
Cottons
Synthetics
Delicates
Duvets
Mix 20°
1400
1200
800
Intensive
Easy Iron
Rinse Only
Drain & Spin
Wool/Handwash
Quick
POn/Off
Finish In
987621 3 4 5
1 On / Off button (On/Off)2 Programme selection touchpad 3 Temperature touchpad 4 Spin selection touchpad 5 Options selection touchpad
6 Start/Pause touchpad 7 Finish in touchpad (Finish In)8 Display9 Door locked indicator
DISPLAY
Finish In
A
DB C
A. The time area:
• : the programme duration
• : the "finish in" time
• : the alarm codes
• : the message of error
• : the programme is completed.B. The child lock indicator:
• The indicator comes on when you activatethis device.
C. The extra rinse indicator:• The indicator comes on when you activate
this option.D. The Finish In touchpad.
5

PROGRAMME CHART
ProgrammeTemperature range
Maximum loadMaximum spin
speed
Programme description(Type of load and soil level)
30'@30°30°C
3 kg800 rpm
A short cycle for synthetic and delicate items withlight soil level or for items to freshen up.
Cottons90°C - Cold
9 kg1400 rpm
White cotton and coloured cotton. Normal soil andlight soil.
CottonEco1)
60°C - 40°C
9 kg1400 rpm
White cotton and fast-coloured cotton. Normal soil.The energy consumption decreases and the time of thewashing programme is extended.
Synthetics60°C - Cold
3,5 kg1200 rpm
Synthetic items or mixed fabric items. Normal soil.
Delicates40°C - Cold
3,5 kg1200 rpm
Delicate fabrics such as acrylics, viscose, polyesteritems. Normal soil.
Wool/Handwash
40°C - Cold
1,5 kg1200 rpm
Machine washable wool, hand washable wool anddelicate fabrics with «hand washing» care symbol.2)
Duvets60°C - Cold
3 kg800 rpm
Special programme for one synthetic blanket, duvet,bedspread and so on.
Mix 20°20°C
2 kg1200 rpm
Special programme for cotton, synthetic and mixed fabricswith light soil. Set this programme to decrease the energyconsumption. Make sure that the detergent is for low tem-perature in order to have good washing results3).
1) Standard programmes for the Energy Label consumption values. According to regulation1061/2010, these programmes are respectively the «Standard 60°C cotton programme» and the «Stand-ard 40°C cotton programme». They are the most efficient programmes in terms of combined energy andwater consumption for washing normally soiled cotton laundry.
The water temperature of the washing phase may differ from the temperature declared for theselected programme.
2) During this cycle the drum rotates slowly to ensure a gentle wash. It can seem that the drum doesn'trotate or doesn't rotate properly, but this is normal for this programme.3) No temperature indicator is on .
6
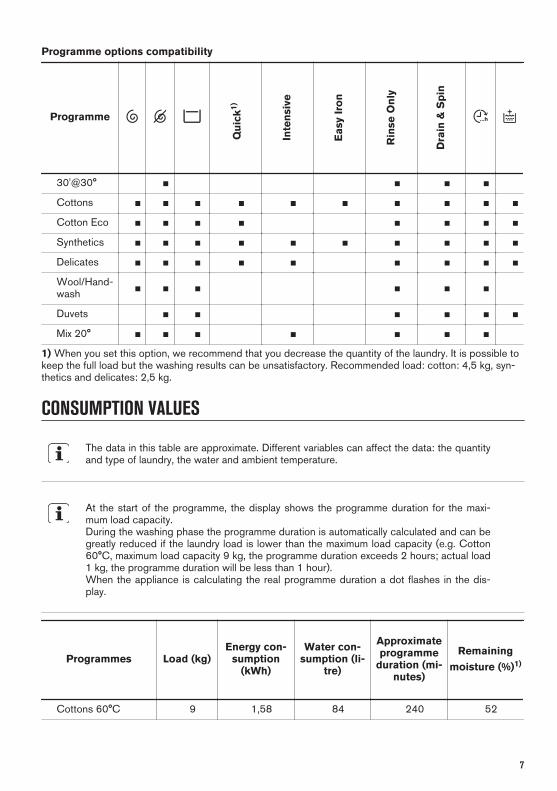
Programme options compatibility
Programme
Qui
ck1)
Inte
nsiv
e
Eas
y Ir
on
Rin
se O
nly
Dra
in &
Spi
n
30'@30° ■ ■ ■ ■
Cottons ■ ■ ■ ■ ■ ■ ■ ■ ■ ■
Cotton Eco ■ ■ ■ ■ ■ ■ ■ ■
Synthetics ■ ■ ■ ■ ■ ■ ■ ■ ■ ■
Delicates ■ ■ ■ ■ ■ ■ ■ ■ ■
Wool/Hand-wash ■ ■ ■ ■ ■ ■
Duvets ■ ■ ■ ■ ■ ■
Mix 20° ■ ■ ■ ■ ■ ■ ■
1) When you set this option, we recommend that you decrease the quantity of the laundry. It is possible tokeep the full load but the washing results can be unsatisfactory. Recommended load: cotton: 4,5 kg, syn-thetics and delicates: 2,5 kg.
CONSUMPTION VALUES
The data in this table are approximate. Different variables can affect the data: the quantityand type of laundry, the water and ambient temperature.
At the start of the programme, the display shows the programme duration for the maxi-mum load capacity.During the washing phase the programme duration is automatically calculated and can begreatly reduced if the laundry load is lower than the maximum load capacity (e.g. Cotton60°C, maximum load capacity 9 kg, the programme duration exceeds 2 hours; actual load1 kg, the programme duration will be less than 1 hour).When the appliance is calculating the real programme duration a dot flashes in the dis-play.
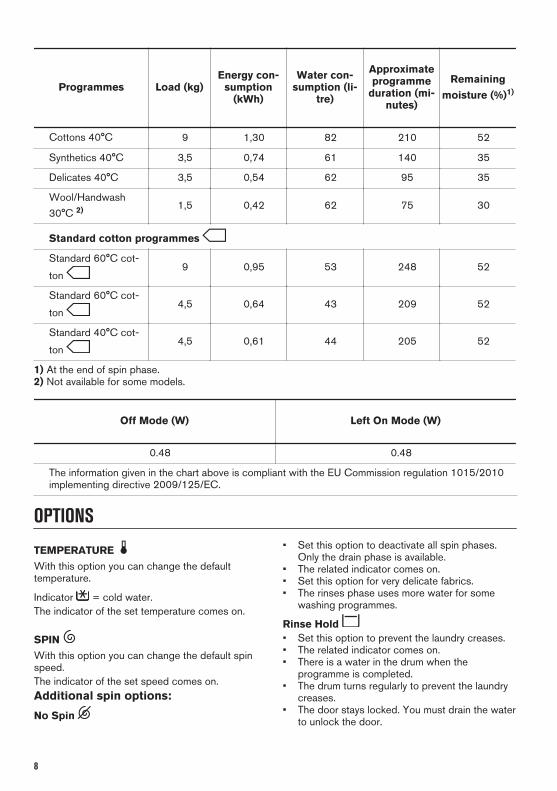
Programmes Load (kg)Energy con-
sumption(kWh)
Water con-sumption (li-
tre)
Approximateprogramme
duration (mi-nutes)
Remainingmoisture (%)1)
Cottons 60°C 9 1,58 84 240 52
7
Programmes Load (kg)Energy con-
sumption(kWh)
Water con-sumption (li-
tre)
Approximateprogramme
duration (mi-nutes)
Remainingmoisture (%)1)
Cottons 40°C 9 1,30 82 210 52
Synthetics 40°C 3,5 0,74 61 140 35
Delicates 40°C 3,5 0,54 62 95 35
Wool/Handwash30°C 2) 1,5 0,42 62 75 30
Standard cotton programmes
Standard 60°C cot-
ton 9 0,95 53 248 52
Standard 60°C cot-
ton 4,5 0,64 43 209 52
Standard 40°C cot-
ton 4,5 0,61 44 205 52
1) At the end of spin phase.2) Not available for some models.
Off Mode (W) Left On Mode (W)
0.48 0.48
The information given in the chart above is compliant with the EU Commission regulation 1015/2010implementing directive 2009/125/EC.
OPTIONS
TEMPERATURE With this option you can change the defaulttemperature.
Indicator = cold water.The indicator of the set temperature comes on.
SPIN With this option you can change the default spinspeed.The indicator of the set speed comes on.Additional spin options:
No Spin
• Set this option to deactivate all spin phases.Only the drain phase is available.
• The related indicator comes on.• Set this option for very delicate fabrics.• The rinses phase uses more water for some
washing programmes.
Rinse Hold • Set this option to prevent the laundry creases.• The related indicator comes on.• There is a water in the drum when the
programme is completed.• The drum turns regularly to prevent the laundry
creases.• The door stays locked. You must drain the water
to unlock the door.
8

To drain the water refer to ‘At the endof the programme’.
QUICKWith this option you can decrease the programmeduration.Use this option for items with light soil or items torefresh.The related indicator comes on.
INTENSIVEWith this option you can wash very soiled laundry.The washing cycle lasts longer with this option.The related indicator comes on.
EASY IRONThe appliance carefully washes and spins thelaundry to prevent the creases.The appliance decreases the spin speed, usesmore water and adapts the programme duration tothe type of laundry.The related indicator comes on.
RINSE ONLYWith this option you can perform only a last rinse ofa selected washing programme.
If you set also the Extra Rinse function ( ) theappliance adds two or more rinses.
The related indicator comes on.
DRAIN & SPINWith this option you can perform the spin and draincycle.The spin phase is suitable to the washingprogramme you set.
If you set also the No Spin option
( ) , the appliance only drains.
FINISH IN With this option you can set the number of hours inwhich you would like your washing programme tobe completed.You can set from minimum 3 hours to maximum 20hours.The display shows the number of hours and the
indicator above the button is on.
EXTRA RINSE With this option you can add some rinses to awashing programme.Use this option for persons allergic to detergentsand in areas where the water is soft.The related indicator comes on.1)
SETTINGS
PERMANENT EXTRA RINSE With this option you can permanently have an extrarinse when you set a new programme.• To activate/deactivate this option touch the
buttons and at the same time until the
indicator comes on/goes off.
CHILD LOCK With this option you can prevent that the childrenplay with the control panel.• To activate/deactivate this option, touch the
buttons and at the same time until the
indicator comes on/goes off.
Activate this option after you touch the button :
the buttons are locked (except for the button ) .
This option stays active even when youswitch off the appliance.
ACOUSTIC SIGNALSThe acoustic signals operate when:• The programme is completed.• The appliance has a malfunction.To deactivate/activate the acoustic signals,
touch the buttons and at the same time for 4seconds.
If you deactivate the acoustic signals,they continue operate when theappliance has a malfunction.
1) See in "Settings" how to activate this option.
9
BEFORE FIRST USE1. Put a small quantity of detergent in the
compartment for washing phase.2. Set and start a programme for cotton at the
highest temperature without laundry.
This removes all possible dirt from the drum and thetub.
DAILY USE
WARNING! Refer to Safety chapters.
LOADING THE LAUNDRYOpen the water tap. Connect the mains plug to themains socket.1. Pull the door handle to open the appliance
door.2. Put the laundry in the drum, one item at a time.3. Shake the items before you put them in the
appliance.Make sure not to put too much laundry in the drum.Refer to max. loads indicated in "Programme chart".4. Close the door.
CAUTION!Make surethat no laun-dry stays be-tween theseal and thedoor. Thereis a risk ofwater leak-age or dam-age to thelaundry.
USING DETERGENT AND ADDITIVES
1. Measure out the de-tergent and the fabricconditioner.
2. Put the detergentand the fabric condi-tioner into the com-partments.
3. Carefully close thedetergent drawer.
DETERGENT COMPARTMENTS
Detergent compartment forwashing phase.If you use liquid detergent, put itimmediately before you start theprogramme.
Compartment for liquid additives(fabric conditioner, starch).
CAUTION! Do notexceed the MAXlevel.
Flap for powder or liquid deter-gent.
LIQUID OR POWDER DETERGENT
A
The default position ofthe flap is A (powder de-tergent).
To use liquid detergent:1. Remove the drawer.Push the drawer edge inthe place with the arrow(PUSH) to remove thedrawer easily.
10

B
2. Adjust the flap in posi-tion B.3. Put back the drawer inthe recess.
When you use the liquid detergent:• Do not use gelatinous or thick liq-
uid detergents.• Do not put more liquid then 120
ml.• Do not set the delay start.
AWhen the flap is in posi-tion B and you want touse powder detergent:1. Remove the drawer.2. Adjust the flap in po-
sition A.3. Put back the drawer
in the recess.
• Measure out the detergent and the fabric condi-tioner.
• Put the detergent and the fabric conditioner intothe compartments.
• Carefully close the detergent drawer.
ACTIVATING THE APPLIANCEPress and hold for a couple of seconds the On/Offbutton to activate or deactivate the appliance.A tune sounds when the appliance is activated.The display shows the word On.
SETTING A PROGRAMME
1. Touch the programme button and set theprogramme:
• The indicator of the button flashes.• The display shows the programme duration.
2. If necessary, change the temperature and thespin speed or add available options. When youactivate an option, the indicator of the setoption comes on.
If you set something incorrect, the
display shows the message .
STARTING A PROGRAMME WITHOUT THEFINISH IN OPTION
Touch the button .
• The indicator of the button stops toflash and stays on.
• The programme starts, the door locks, the
indicator is on.• The drain pump can operate for a short time
at the beginning of the washing cycle.
After approximately 15 minutes fromthe start of the programme:• The appliance adjusts automatically
the programme duration agree withthe laundry load.
• The display shows the new value.
STARTING A PROGRAMME WITH THEFINISH IN OPTION
1. Touch the button again and again tochoose the number of hours in which you wantthe washing cycle to be finished.
The display shows the number of hours you set
(e.g. ) and the indicator above the button ison to show that his option is active.
2. Touch the button :• The door is locked.• The appliance starts the countdown.• When the countdown is completed, the
programme starts automatically.
You can cancel or change the set ofthe Finish In option before you touch
the button . After touching the
button you can only cancel theFinish In option.
To cancel the the Finish In option:
a. Touch the button to set the appliance
to pause. The indicator of button flashes.
b. Touch the button until the indicatorabove this button goes off.
Touch the button again to start theprogramme immediately.
INTERRUPTING A PROGRAMME ANDCHANGING THE OPTIONSYou can change only some options before theyoperate.
11

1. Touch .The indicator of this button flashes.2. Change the options. If you change any option
the Finish In option (if set) will be disabled.
3. Touch again.The programme continues.
CANCELLING A PROGRAMME
1. Press the button for some seconds tocancel the programme and to deactivate theappliance.
2. Press the same button again to activate theappliance. Now, you can set a new washingprogramme.
Before starting the new programmethe appliance could drain the water. Inthis case, make sure that the detergentis still in the detergent compartment, ifnot fill the detergent again.
OPENING THE DOOR
While a programme (or the ) operates, the
appliance door is locked. The indicator is on.
CAUTION! If the temperature andlevel of the water in the drum are toohigh, you cannot open the door.
To open the door during the first minutes of
the cycle (or when the operates) :
1. Touch the button to pause the appliance.
2. Wait until the indicator goes off.3. You can open the door.
4. Close the door and touch the button again.
The programme (or the ) continues.
AT THE END OF THE PROGRAMME• The appliance stops automatically.• The acoustic signal operates (if it is activated).
• In the display comes on.
• The indicator of the button goes off.
• The door lock indicator goes off.• You can open the door.• Remove the laundry from the appliance. Make
sure that the drum is empty.
• Press the button for some seconds todeactivate the appliance.
• Close the water tap.
• Keep the door and the detergent drawer ajar, toprevent the mildew and odours.
The washing programme is completed, butthere is water in the drum:• The drum turns regularly to prevent the creases
in the laundry.
• The indicator flashes to remind you to drainthe water.
• The door lock indicator is on. The indicator
of button flashes. The door stays locked.• You must drain the water to open the door.Draining the water:1. To drain the water.
• Touch the button . The appliancedrains the water and spins with themaximum spin speed for selected washingprogramme.
• Alternatively, touch the button to changethe spin speed and then touch the button
. The appliance drains the water and
spins. If you set , the appliance onlydrains.
2. When the programme is completed and the
door lock indicator goes off, you can openthe door.
3. Press the button for some seconds todeactivate the appliance.
The appliance drains and spinsautomatically after approximately 18hours (except for Wool programme).
AUTO-OFF OPTIONThe AUTO-OFF stand-by option automaticallydeactivates the appliance to decrease the energyconsumption. All the indicators and the display gooff when :• You do not use the appliance for 5 minutes
before you touch .
Press the button to activate the applianceagain.
• After 5 minutes from the end of the washingprogramme.
Press the button to activate the applianceagain.The display shows the end of the last setprogramme.
Touch the button if you want to set a newcycle.
12

HINTS AND TIPSTHE LAUNDRY LOAD• Divide the laundry in: white, coloured,
synthetics, delicates and wool.• Obey the washing instructions that are on the
laundry care labels.• Do not wash white and coloured items together.• Some coloured items can discolour with the first
wash. We recommend that you wash themseparately for the first times.
• Button up pillowcases, close zippers, hooks andpoppers. Tie up belts.
• Empty the pockets and unfold the items.• Turn multilayered fabrics, wool and items with
painted illustrations inside out.• Remove hard stains.• Wash heavy soil stains with a special detergent.• Be careful with the curtains. Remove the hooks
or put the curtains in a washing bag orpillowcase.
• Do not wash laundry without hems or with cuts.Use a washing bag to wash small and/ordelicate items (e.g. underwired bras, belts,tights, etc. ).
• A very small load can cause balance problemswith the spin phase. If this occurs, adjustmanually the items in the tub and start the spinphase again.
STUBBORN STAINSFor some stains, water and detergent is notsufficient.We recommend that you pre-treat these stainsbefore you put the items in the appliance.Special stain removers are available. Use thespecial stain remover that is applicable to the typeof stain and fabric.
DETERGENTS AND ADDITIVES• Only use detergents and additives specially
made for washing machines:
– powder detergents for all types of fabric,– powder detergents for delicate fabrics (40
°C max) and woollens,– liquid detergents, preferably for low
temperature wash programmes (60 °C max)for all types of fabric, or special for woollensonly.
• Do not mix different types of detergents.• To help the environment, do not use more than
the correct quantity of detergent.• Obey the instructions that you find on the on
packaging of these products.• Use the correct products for the type and colour
of the fabric, the programme temperature andthe level of soil.
• If your appliance does not have the detergentdispenser with the flap device, add the liquiddetergents with a dosing ball (supplied by thedetergent's manufacturer).
ECOLOGICAL HINTS• Always start a washing programme with the
maximum load of laundry allowed.• If necessary, use a stain remover when you set a
programme with a low temperature.• To use the correct quantity of detergent, check
the water hardness of your domestic system.Refer to "Water hardness".
WATER HARDNESSIf the water hardness in your area is high ormoderate, we recommend that you use a watersoftener for washing machines. In areas where thewater hardness is soft it is not necessary to use awater softener.To know the water hardness in your area, contactyour local water authority.Use the correct quantity of the water softener.Obey the instructions that you find on thepackaging of the product.
CARE AND CLEANING
WARNING! Refer to Safety chapters.
EXTERNAL CLEANINGClean the appliance with soap and warm wateronly. Fully dry all the surfaces.
CAUTION! Do not use alcohol,solvents or chemical products.
DESCALINGIf the water hardness in your area is high ormoderate, we recommend that you use a waterdescaling product for washing machines.
13

Regularly examine the drum to prevent limescaleand rust particles.To remove rust particles use only special productsfor washing machines. Do this separately from thelaundry wash.
Always obey the instructions that youfind on the packaging of the product.
MAINTENANCE WASHWith the low temperature programmes it is possiblethat some detergent stays in the drum. Perform amaintenance wash regularly. To do this:• Remove all laundry from the drum.
• Select the cotton programme with the highesttemperature with a small quantity of detergent.
DOOR SEALRegularly examine theseal and remove all ob-jects from the inner part.
CLEANING THE DETERGENT DISPENSER
1 2 3 4
5 6
CLEANING THE INLET HOSE AND THE VALVE FILTER
1
2
3
1 2 3
45°
20°
4
FROST PRECAUTIONSIf the appliance is installed in an area where thetemperature can be less than 0 °C, remove theremaining water from the inlet hose and the drainpump.
Do this procedure also when you wantto do the emergency drain.
1. Disconnect the mains plug from the mainssocket.
2. Remove the water inlet hose.
14

3. Remove the drain hose from the rear supportand unhook it from sink or spigot.
4. Put the ends of the drain and inlet hose in acontainer. Let the water flow out of the hoses.
5. When no more water flows, install the inlethose and the drain hose again.
WARNING! Make sure that thetemperature is more than 0 °C beforeyou use the appliance again. Themanufacturer is not responsible fordamages caused by low temperatures.
TROUBLESHOOTING
WARNING! Refer to Safety chapters.
INTRODUCTIONThe appliance does not start or it stops duringoperation.First try to find a solution to the problem (refer tothe table). If the problem persists, contact theAuthorised Service Centre.With some problems, the acoustic signalsoperate and the display shows an alarmcode:
• - The appliance does not fill with waterproperly.
• - The appliance does not drain the water.
• - The appliance door is open or notclosed correctly. Please check the door!
If the appliance is overloaded,remove some items from the drumand/or keep pressed the door and
push the button at the same
time until the indicator stopsflashing (see the picture below).
• - The mains supply is unstable. Wait untilthe mains supply is stable.
• - No communication between electronicelements of the appliance. Switch off andswitch on again.
WARNING! Deactivate the appliancebefore you do the checks.
15

POSSIBLE FAILURES
Problem Possible solution
The programme does notstart.
• Make sure that the mains plug is connected to the mains socket.• Make sure that the appliance door is closed.• Make sure that there is not a damaged fuse in the fuse box.• Make sure that the Start/Pause has been pressed.• If the delay start is set, cancel the setting or wait for the end of
countdown.• Deactivate the Child Lock function if it is on.
The appliance does not fillwith water properly.
• Make sure that the water tap is open.• Make sure that the pressure of the water supply is not too low. For
this information, contact your local water authority.• Make sure that the water tap is not clogged.• Make sure that the filter of the inlet hose and the filter of the valve
are not clogged. Refer to “Care and cleaning”.• Make sure that the inlet hose has no kinks or bends.• Make sure that the connection of the water inlet hose is correct.
The appliance does notdrain the water.
• Make sure that the sink spigot is not clogged.• Make sure that the drain hose has no kinks or bends.• Make sure that the connection of the drain hose is correct.• Set the drain option if you set a programme without drain phase.• Set the drain option if you set an option which ends with water in
the drum.• If above mentioned solutions do not help, contact the Authorised
Service Centre (as the filter of the drain pump may be clogged).
The spin phase does notoperate or the washing cy-cle lasts longer than usual-ly.
• Adjust manually the items in the tub and start the spin phase again.This problem may be caused by balance problems.
• Set the spin option.• Set the drain option if you set an option which ends with water in
the drum.• Adjust manually the items in the tub and start the spin phase again.
This problem may be caused by balance problems.• If above mentioned solutions do not help, contact the Authorised
Service Centre (as the filter of the drain pump may be clogged).
There is water on the floor. • Make sure that the couplings of the water hoses are tight and thereis not water leakages.
• Make sure that the water inlet hose and the drain hose have nodamages.
• Make sure you use the correct detergent and the correct quantity ofit.
You cannot open the appli-ance door.
• Make sure that the washing programme is finished.• Set the drain or the spin option if there is water in the drum.• Do the emergency drain procedure. See "Frost precautions" (in
"Care and Cleaning" chapter).
The appliance makes anunusual noise.
• Make sure the levelling of the appliance is correct. Refer to 'Installa-tion instruction'.
• Make sure that the packaging and/or the transit bolts are removed.Refer to 'Installation instruction'.
• Add more laundry in the drum. The load may be too small.
16
Problem Possible solution
The appliance fills with wa-ter and drain immediately.
• Make sure that the drain hose is in the correct position. The end ofthe hose may be too low. Refer to 'Installation instruction'.
The cycle is shorter thanthe time displayed.
• The appliance calculates a new time according to the laundry load.See the ‘Consumption Values’ chapter.
The cycle is longer thanthe time displayed.
• An unbalanced laundry load increases the duration time. This is anormal behaviour of the appliance.
The washing results arenot satisfactory.
• Increase the detergent quantity or use a different detergent.• Use special products to remove the stubborn stains before you
wash the laundry.• Make sure that you set the correct temperature.• Decrease the laundry load.
You cannot set an option. • Make sure that you press only the wanted touch button(s).
After the check, activate the appliance. Theprogramme continues from the point of interruption.If the problem occurs again, contact the AuthorisedService Centre.If the display shows other alarm codes. Deactivateand activate the appliance. If the problemcontinues, contact the Authorised Service Centre.
SERVICEWe recommend the use of original spare parts.When contacting the Authorised Service Centre,make sure that these data are available. You canfind the information on the rating plate: model, PNCand Serial Number. (Mod., Prod. No., Ser. No.)
TECHNICAL DATADimension Width/ Height/ Depth/ To-
tal depth600 mm/ 850 mm/ 600 mm/ 660 mm
Electrical connection VoltageOverall powerFuseFrequency
230-240 V2200 W13 A50 Hz
Level of protection against ingress of solid particles andmoisture ensured by the protective cover, except wherethe low voltage equipment has no protection againstmoisture
IPX4
Water supply pressure1)
MinimumMaximum
0,5 bar (0,05 MPa)8 bar (0,8 MPa)
Water supply 2) Cold water
Maximum Load Cotton 9 kg
Energy Efficiency Class A+++ -20%
17

Spin Speed Maximum 1400 rpm
1) The appliance works correctly if the water pressure is not lower than 0.05 MPa (0.5 bar). If you cannotconnect the water inlet hose to the cold water tap of the primary hydraulic system, connect it to your do-mestic cold water storage system. Make sure not to exceed a distance of 5.02 m (16.5 ft) between theappliance inlet hose and the bottom of the water storage tank.2) Connect the water inlet hose to a water tap with a 3/4'' thread.
ENVIRONMENTAL CONCERNS
Recycle the materials with the symbol . Put thepackaging in applicable containers to recycle it.Help protect the environment and human healthand to recycle waste of electrical and electronicappliances. Do not dispose appliances marked with
the symbol with the household waste. Return theproduct to your local recycling facility or contactyour municipal office.
18
*

19

WWW.ZANUSSI.COM/SHOP
1929
7498
1-A-
4920
15