user manual for market place - custom magento extension...
TRANSCRIPT

User Manual for Market PlaceVersion 3.1.0

This document will provide the full explanation of the functionality for the marketplace. Most of
the functionalities are dynamic as its customizable from admin side. For example, Admin can
add/remove vendors, review criterias, review products, account management for vendors,
reviews from customer etc.
ADMIN SECTION
At the top menu, you can find the Medma > Market Place menu from where you can access all
the functionality of marketplace.
Here, First four options allow admin to manage whole functionality. Admin can access pending
products, vendor details, reviews and ratings and verifications.
1. Pending Products
Here you can see the list of products which are recently added by vendors and pending for
review, admin can approve or reject any products as required.
2. Manage Vendors
To manage vendors, you need to click on Medma > Market Place > Manage Vendors. You
can add/modify vendors, manage vendor profiles, view transaction grid, view products added by
vendor and config for the vendors.
This Vendor directly assigned with the default role VENDORS, which is automatically created

and also assigned some default permissions, which is relavent to vendors. An admin can create
new role for vendors and use that role as vendor role from System > Configuration > Medma
> Market Place > General Information. There is an option vendor role, where admin can
change the role which will be applied to vendors.
There are list of products section which was added by customer. Admin can change product
status as per terms and conditions with vendor. There is a config section which will be used for
specific vendor and can change as per their need. This config has an options specific to vendors.
Balance Sheet is another option where admin can find all trasactions for the particular vendor.
Admin set the commission percentage per item, and this commission and vendor amount
management will be done automatically and will be reflected to this balance sheet. If admin will
pay to vendor any amount by check or cash then admin can add tranaction here, and
balancesheet will be maintained accordingly.
There is also an option to send request for the vendor to the admin from front end. Customer
can find the link Request Seller @footer on front end. There is a request form for the vendor.

3. Reviews and Ratings
Here, Admin can find all the reviews given by customer. Admin can change the content and its
status, based on that review will be display @front end. Here admin can see pending reviews
and all reviews. There is an option for All Reviews and Pending reviews in Medma > Market
Place > Reviews and Ratings menu.
To manage ratings, you need to click on Medma > Market Place > Reviews and Ratings >
Manage Ratings. You can add/modify the criteria for which vendor will be reviewed by
customer.
This review and ratings will be displayed on front end in my account section. Customer can give
feedback from My Account > My Orders > [View Order] > [Feedback].
Customer can only give feedback after invoice gets generated by vendor for that particular order
item. This reviews and ratings will be affected into vendor profile. There customer can review
the vendor from its ratings and reviews given by customer. A Customer can only submit review
once for a particular order item.
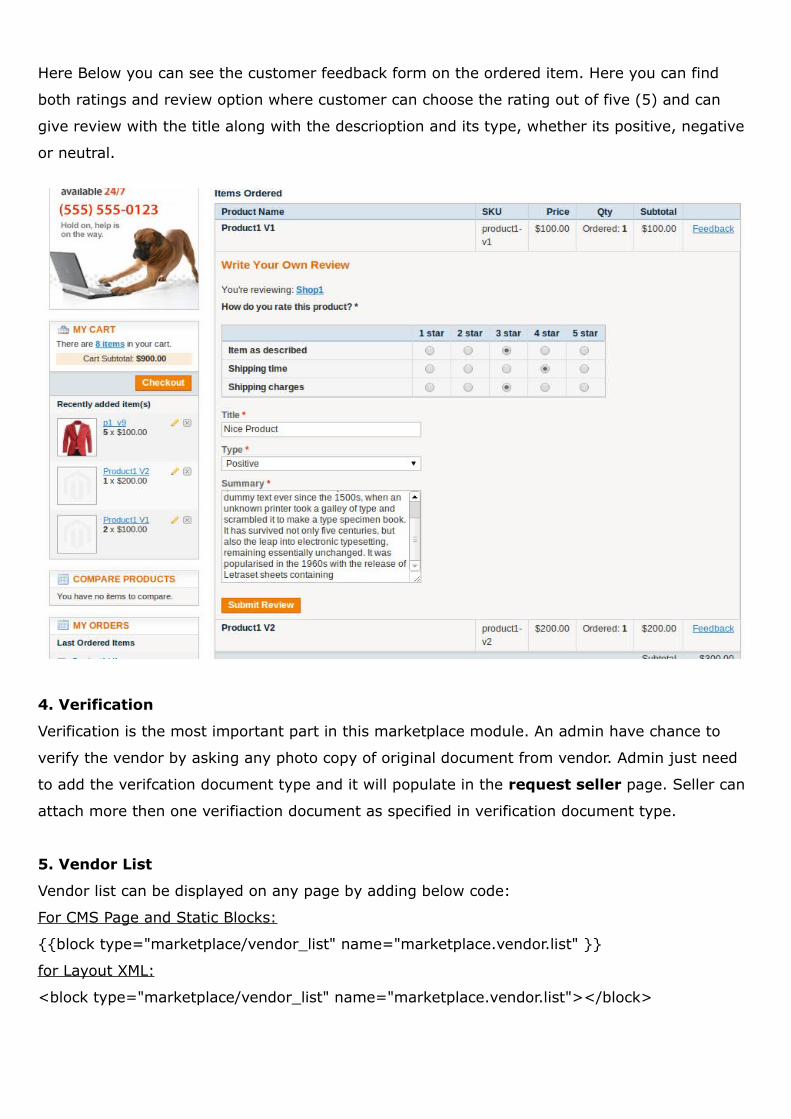
Here Below you can see the customer feedback form on the ordered item. Here you can find
both ratings and review option where customer can choose the rating out of five (5) and can
give review with the title along with the descrioption and its type, whether its positive, negative
or neutral.
4. Verification
Verification is the most important part in this marketplace module. An admin have chance to
verify the vendor by asking any photo copy of original document from vendor. Admin just need
to add the verifcation document type and it will populate in the request seller page. Seller can
attach more then one verifiaction document as specified in verification document type.
5. Vendor List
Vendor list can be displayed on any page by adding below code:
For CMS Page and Static Blocks:
{{block type="marketplace/vendor_list" name="marketplace.vendor.list" }}
for Layout XML:
<block type="marketplace/vendor_list" name="marketplace.vendor.list"></block>

6. Marketplace Configuration
There are several options available for admin to customize marketplace and make it easy to use
for vendors as well as customers. Here are some section defined in marketplace. General
Options section contains very basic option which will be used to manage vendor role as well as
product view page design to manage seller information block. Review Options section contains
the set of options for customer review based on vendor products. Vendor Registration
Options section contains set of options for file upload type(for verification proof), whether to
show seller information url at top links or not. There are several options related to mail which
will be sent automatically, when that particular event occurs.

VENDOR SECTION
Vendors can login from the same login page where admin can logged in. The difference is,
vendor just have limited rights to access the admin panel.
After logged into the vendor section, Vendor can do some limited stuffs like they can manage
their own profile, they can see their own orders, they can add products, they can see their
balance sheet, they can see the reviews given by customer and can approve.
1. My Account
After logged into the vendor section, vendor directly see their account section, where they can
change the relavent shop information which they want to display on a web store. Basically
vendor can change their profile information from here.
2. Manage Products
Vendor can see their own products in manage product section. Vendor can add product same
way as admin added, but the difference here is, The product which will added by vendor is
disabled by default. Vendor can not enable any product. Only product will be enabled after
admin review. Vendor only have right to disable product.
3. Orders
Vendor can see the orders related to their own products. Vendor can see their own product in
order detail page. Vendor can generate invoice and shipment to their own products only. After
shipment will generate, the order amount and relavent commission will be added into vendor

account.
4. Transaction
In transactions section, Vendor can see their own balance sheet, where they can find their own
transaction based on orders.
5. Reviews
In Reviews section, Vendor can see their own reviews given by the customer. They only can
change the status of it. They can approve or cancel the reivew.
6. Configuration
In Configuration section, Vendor can set the different settings related to marketplace.
7. Manage Products
For Manage Products section, Vendor can see their products and manage products. Vendor can
see their product's status whether they are approved, disapproved or rejected. In Add/Edit
Product section there is also a functionality for live SKU check(it checks whether SKU entered
exists or not in current system).
8. Import/Export Products
Vendor can Import/Export Products from System > Import/Export > Dataflow – Profiles.
To Export Products, vendor can select “Vendor Export Products” option. There are several tab
listed on that form. Vendor just need to go to “Run Profile” tab and click button “Run Profile in
Popup” button to download products CSV(to download CSV, vendor should have atleast one
product).
To Import Products, vendor can select “Vendor Import Products” option. There is “Upload File”
tab in left, where vendor needs to upload their product file and then press “Save and Continue
Button”. After that vendor needs to go to “Run Profile” tab and select his uploaded file from the
list and click “Run Profile in Popup” button to Import Product.
FRONT-END SECTION
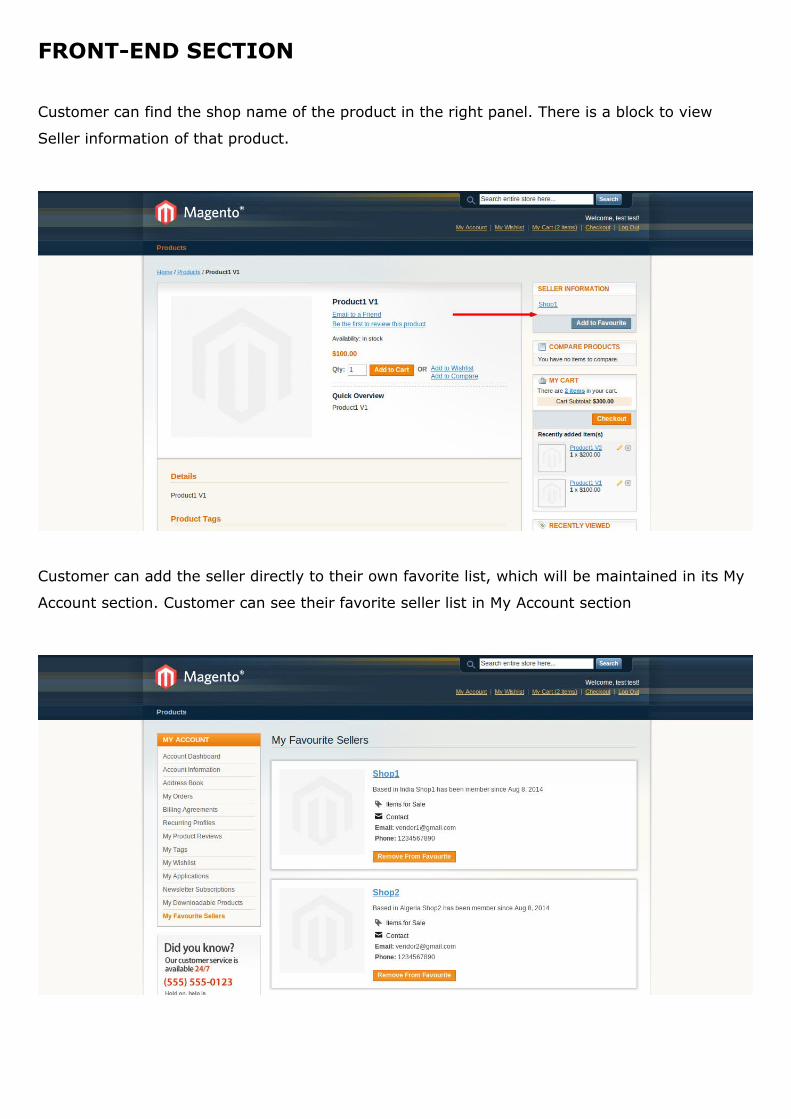
Customer can find the shop name of the product in the right panel. There is a block to view
Seller information of that product.
Customer can add the seller directly to their own favorite list, which will be maintained in its My
Account section. Customer can see their favorite seller list in My Account section

Here customer can see the list of sellers added into their own favorite list. They can view seller
profile page, seller's items or seller contact details from here. There is an option to remove seller
from their favorite list too.
After clicking on shop name, customer can see the seller profile page where they can get the
whole information related to seller. There is contact details, total ratings, total reviews, highest
selling product and latest five added products by seller.