user manual - baja sim | flight simulator design · pdf fileuser manual rev. 1.0. by. ... the...
TRANSCRIPT

User Manual
Rev. 1.0

by

You are about to start a whole new experience in Air Traffic Control
games. Bajasim brings to you ATC4Real, a real time air traffic
controller engine wich simulates an aproach radar facility operation
with real time air traffic! You will see the real planes in real time
coming and leaving into your radar screen, no simulated and fake
traffic, not just similar callsigns but real traffic!!! It gathers real time
flight track data and display the actual flights into your radar screen.
You will be able to play in many different airports, each one
designed based in real data navigation so you could practice real
STARs and SID procedures.

Highlights
Some main characteristics of this game are:
Approach and departure control.•Assign runways and authorize take offs and landings.•Real flight data displayed in real time.•All controls are reachable through your mouse, so you do not need any •keyboard input.Separated strips for arrivals and departures (plus a scheduled departures list)•Customize the visibility of screen elements .•Terrain heights simulated, avoid crashing into mountains!•Fixes and vors are accurate placed so you can practice instrument procedures •published.Real metar updated every 10 minutes.•Satellite image as background optional.•Graphical minimum separation area for each aircraft.•There is no pause button just as in real life.•Automatic or manual departure dispatch option.•Zoom feature so you can do precise vectors.•
RequirementsATC4Real is an online web based game. It requires an internet browser with Adobe Flash
plugin installed and an internet connection. A mouse or pointing device is required. It
does not install any software in your computer.
This software is for entertainment purposes only, should not be used for real flight navigation.

Welcome screen
In this screen you could be able to costomize some variables and see and select the airport you want play with.
1
2

Customization area.Control Arrivals: Select if you want to have arrival traffic in your radar screen.Control departures: Select if you want to have departure traffic in your radar screen.Automatic Departures: Select if you wish to the program decide when a new departure should appear. If off, you could push any scheduled flight from the Schedulded flight strips tab into Departures tab.
Available airports area.In this map you can see all airports available represented by the Bajasim icon Just click the icon of the airport you choose to start playing.
Some airports will require a KEY to be typed, this will be given to you once a membership has been purchased.Keys are valid for 30 days from purchase date and will be valid just for one airport.
1
2
3
3

Main Screen
This is the main screen where all action is. it is divided in 2 areas: Radar screen Dock console.
1
1
2
2

Radar Screen
This is the active radar area, it covers 30 x 30 nm from the airport. All flights will appear within here; if any aircraft goes beyond this area it will be deleted from your strips and will be marked as an error so your score will diminish.
1
23

Aircraft echo.This dot + tag represents the aircraft, the dot represents the actual lateral position.The tag shows 3 parameters: Flight code (Airline + Flight number) and Altitude / Speed. Altitude is shown in hundreds of feets. Speed is shown in knots.A click on the dot will move the tag in a clockwise 4 preset position, this is helpful to keep aircrafts visible.A click in the tag will bring up the Control menu.If the echo is in a gray color it means it is in automatic mode and can not be contolled.
Navaids.These cyan colored icons represents fixes and vors. They are helpful while doing instrument procedures. They can be turned on and off on the dock console.
Rings.Every blue ring represents 5 nm. it helps to keep separation between aircrafts and measure distance from airport. It can be turned on and off on the Dock console.
1
2
3

Dock console
This area shows the communications, flight information, metar and control buttons.
Local airport information: Airport ICAO code and Airport local time (Day / Hour:Minutes)
Menú button: Access to customization and exit options.
Metar: Coded weather for current airport. It is being refreshed every 10 minutes.
Communication console: Shows all communications between ATC and aircrafts plus system information.
Next Arrival: It shows the next aircraft to appear in the screen at the showed time. If Control Arrivals checkbox is unselected in the Welcome Screen this will be disabled.
Next Departure: It shows the next flight that will appear into the Departures tab at the showed time. If Control Departures is unselected in the Welcome Screen this will be disabled.
Flight Strips area. Here will appear all flight strips separated by Arrivals, Departures and Scheduled.
Flight Strip. it contains the flight information.
For arrivals:
11
3
34
4
5
5
6
7
7
6
8
9
10
2
2
Flight number Origin Transponder code
DestinationAircraft type

Flight number Origin Transponder code
Exit FixDestinationAircraft type
For departures:
Strips tab buttons: Click on each button to change the flight strips tab. They are separated by:
Arrivals: All incoming flights Departures: All outgoing flights Scheduled: All outgoing flights not ready for departure yet.
Customization buttons:
Score: Shows the sum of points currently achieved.
8
10
9
Zoom: Click to zoom in or zoom out the radar screen. If zoomed you could pan using the arrows located at the radar screen edges.
Rings: Click to turn on/off all distance separator blue rings in the radar screen.
Navaids: Click to turn on/off all navaids (Fixes and vors) in the radar screen.
Map: Click to turn on/off the background satellite image in the radar screen.
Terrain: Click to turn on/off the terrain elevation map in the radar screen.
Aircraft safe area: Click to turn on/off the 3 nm diameter circle around each aircraft wich depicts the minimum safe horizantal separation allowed between each airplane (3 nm).
Push arrival: Click to force the next arrival to appear in the radar screen.
Push departure: Click to force the next departure to appear in the Departures flights strip tab. Only works if Automatic Departures is selected in the Welcome Screen.
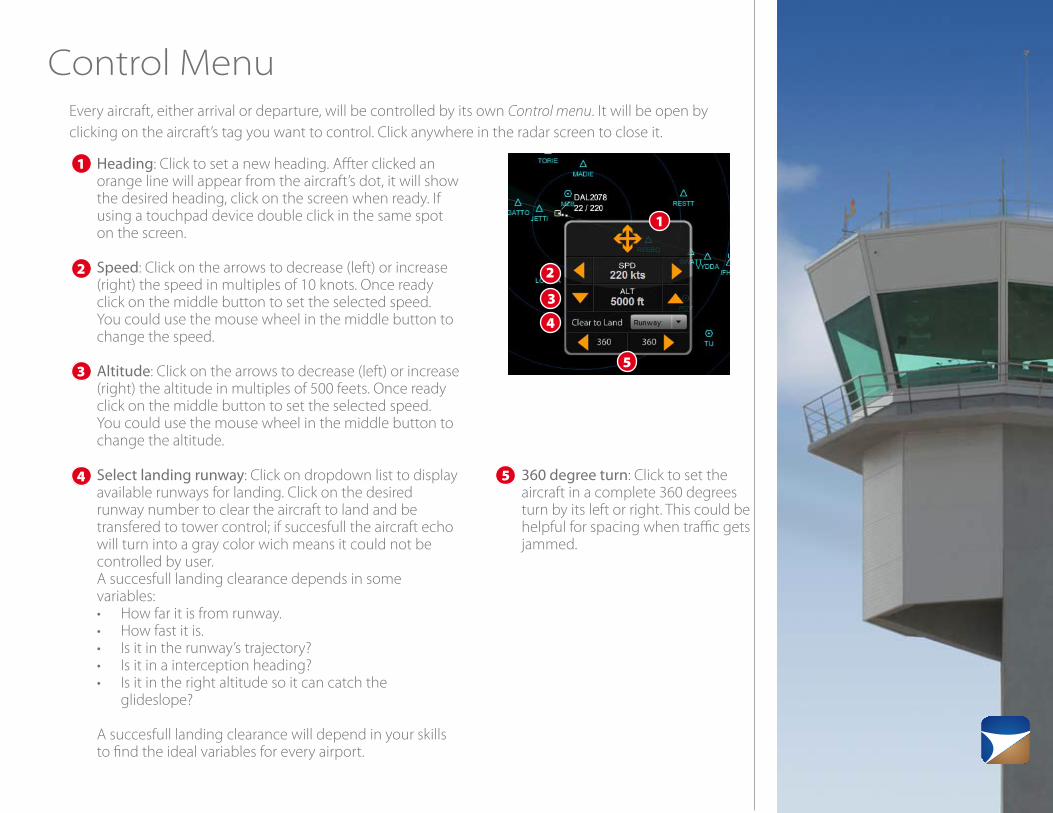
Control MenuEvery aircraft, either arrival or departure, will be controlled by its own Control menu. It will be open by clicking on the aircraft’s tag you want to control. Click anywhere in the radar screen to close it.
1
1
3
3
4
4
5
5
2 2
Heading: Click to set a new heading. Affter clicked an orange line will appear from the aircraft’s dot, it will show the desired heading, click on the screen when ready. If using a touchpad device double click in the same spot on the screen.
Speed: Click on the arrows to decrease (left) or increase (right) the speed in multiples of 10 knots. Once ready click on the middle button to set the selected speed. You could use the mouse wheel in the middle button to change the speed.
Altitude: Click on the arrows to decrease (left) or increase (right) the altitude in multiples of 500 feets. Once ready click on the middle button to set the selected speed. You could use the mouse wheel in the middle button to change the altitude.
Select landing runway: Click on dropdown list to display available runways for landing. Click on the desired runway number to clear the aircraft to land and be transfered to tower control; if succesfull the aircraft echo will turn into a gray color wich means it could not be controlled by user.A succesfull landing clearance depends in some variables:
How far it is from runway.•How fast it is.•Is it in the runway’s trajectory?•Is it in a interception heading?•Is it in the right altitude so it can catch the •glideslope?
A succesfull landing clearance will depend in your skills to find the ideal variables for every airport.
360 degree turn: Click to set the aircraft in a complete 360 degrees turn by its left or right. This could be helpful for spacing when traffic gets jammed.

Arrivals
One of the game’s main goal is to guide every arrival into the active runways; vector them through safe airspace, avoiding collide with terrain and another aircrafts, keeping a minimum safe distance between them (3 nm of horizontal separation and 1000 ft of vertical separation) and guiding them into the correct inbound trajectory for the active runway.
Arrivals are automatically pushed into the radar screen according to its arrival time. Arrivals will appear only if Control Arrivals checkbox is selected in the Welcome Screen, otherwise they will not be loaded and won’t appear. Aircrafts will appear in a fix navaid according to its origin airport. The fix name will appear in the Communication console. Check in to your STAR charts for help on vectoring to the active runway. You can practice any active STAR with ATC4Real.
Once the aircraft is guided towards the inbound trajectory of the active runway open the control menu and clear it to land in the selected runway, if succesfull it will be transfered to tower control and you will not be able to control it any more. Once landed it will dissapear from your radar screen and flight strips tab.
If not succesfull while clearing to land you should check if it is in the correct altitude, trajectory, speed and heading and make adjustmenst. IAP charts will help you in this process, a VOR or ILS chart will tell you how high the aircraft should be at certain distance to make a perfect catch. In the worst of cases just lead the aircraft into a missed approach course and get it on the line for a second try.

Departures
The another main goal is to guide every departure to its exit fix, where it will transfered to a center control. In order to load departures you must select the Control Arrivals checkbox in the Welcome Screen.
Departures does not appear automatically in the radar screen, they pop-up in the Departures flight strip tab, from there you must clear them to takeoff. However there are two ways of populate the Departure flight strip tab: automatically and manual.
Automatic departures. If you did select the Automatic departures checkbox in the Welcome Screen departure flights will automatically pop-up in the Departures flight strip tab according to its scheduled departure time.
Manual departures. If you left the Automatic departures checkbox in the Welcome Screen unselected departure flights will not appear in the Departures flight strips tab automatically. Instead you will have to push them from the Scheduled flight strips and then clear them for take off.
This mode let you have control of wich flights should departure at a specific time. This is because departures not always take off at its scheduled time (Arrivals are far more accurate); There are too many variables in its way from the gate to the (passenger load, delays, traffic, etc). The best way of having accurate departing flights is to listen to a live tower frequency (look for the links in the Resources page at http://www.atc4real.com) and push the flight when mentioned in the communications.
To push a flight from the Scheduled flight strips click on the flight strip you want and then, on the pup up menu, select Activate. The flight strip will be moved from this tab to the Departures flight strips tab. Once there you coud be able to clear it for takeoff.
Clearing for take off. Click on the flight strip in the Departures flight strips tab; a popup menu should appear with the availables runways at the airport, click on the desired one and the plane will appear in the radar screen after a few seconds (while turning its transponder on). The aircraft will take off in automatic mode and after a short period the tag will become white, from then you could be able to control it. All flights take off and climb until they reach 5000fts AGL (Airport altitude + 5000 feet).

You should guide the departing aircraft to its exit fix, look for its name in the Flight strip, and then locate it in the radar screen.
Exit Fix
Check in to your SID charts for help on vectoring to the exit fix. You can practice any active SID with ATC4Real.
Once the aircraft reaches the exit fix it will be transfered to a center control then it will dissapear from your radar screen and flight strips tab, mission acomplished!.
If not succesfull while reaching the exit fix the aircraft should go off the radar screen and dissapear from your flights, this will cost you a lot of points in your score.

All the files included in this package are copyright of bajasim.
Logotipes and trademarks presented in the scenery are property of its
holders and were used only as visual reference.