how density altitude determines flight characteristics
TRANSCRIPT

1
How Density Altitude Determines Flight Characteristics
Mike Moore
INTRODUCTION
This unit is designed to take a set of students through the rudimentary forces that creates
the lift an aircraft needs to fly through the air. The factors affecting the lifting forces are
temperature, pressure, and density. The density of an air mass determines the amount of
buoyant force the air mass has. The temperature determines the volume of the air mass.
The pressure determines the amount of force per unit of surface area an air mass exerts on
an object. The pressure of the air in a predetermined volume at a particular temperate is
called the pressure altitude. When students understand how these three factors interact to
create the lifting force on the airframe of an aircraft they will begin to understand the
forces that govern flight. The students will then be able to predict the affect these factors
cause during their interaction with the lifting force and use them to determine if a flight in
any weather condition, or at any apparent density altitude, is possible.
OUTLINE
Day 1 – Introduction to Gas Properties
Demonstration 1 -- Is It Full?
(Asks what is capable of filling a particular volume and why, using the Inquiry Method.)
Demonstration 2 – Is there a Set Volume?
(Asks what changes the volume in a fixed mass, using the Inquiry Method.)
Demonstration 3 -- Expansion Due to Pressure in a Closed System
(Determines what causes the volume to change in a closed system, using the Discovery
Method. Can be used as a laboratory experience if so desired. Followed by questions and
answers used to explain results at the end of the procedure.)
Day 2 – How Temperature Affects Density Altitude
Demonstration 4 – Absorption of Heat
(Explains how heat can change the volume of a fixed mass of substance and therefore
change the density of the system, using the Inquiry Method. Can be used as a Laboratory
experience for the students.)
Demonstration 5 – Forces in Fluids
(Explains how substances move from areas of high pressure to those of lower pressure,
using the Inquiry Method.)
Day 3 – How to Determine the Buoyant Force in the Atmosphere
Demonstration 6 – Buoyant Force
2
(Explains how Archimedes Principle can be related to the lifting forces experienced by
aircraft using a simple procedure.)
Demonstration 7 – Straw Glider
(Illustrates Archimedes Principle in a flight application.)
Laboratory Experiment – Experimental Gliders
(Allows students to develop and use the ideas that have been demonstrated thus far in a
practical application.)
Demonstration 8 – Balancing Pressure
(This illustrates the way air masses move from one temperate area to another, using the
Discovery Method. This can also be assigned, as a Discovery Laboratory experience if so
desired.)
Day 4 – Air Masses and Their Ability to Determine Flight Characteristics.
Demonstration 9 – What is a Front?
(This illustrates the way air masses move, using the Inquiry Method.)
Laboratory Experiment – Charting Flight Characteristics
(Using the different performance charts provided, the student will determine if a flight is
possible. The student will then determine at what density altitude and temperature the
flight can be safely made and over what obstacles.)
Chart A is the Takeoff Distance Requirements at different temperatures and pressure
altitudes.
Chart B is the Rate of Climb Requirements at different temperatures and pressure
altitudes.
Chart C is Landing Distance Requirement at different temperatures and pressure
altitudes.
NARRATIVE
Day One: Introduction to Gas Properties
The atmosphere is composed of various gaseous atoms and molecules that are able
to move independently of each other or as one apparently solid air mass composed of
millions of atoms and molecules. These gaseous particles act as if they are an isolated
part of the individual matter in the universe, while at the same time being part of the
larger mass of air that interact and move as a single unit(s). These units of gaseous
particles are what surround our planet and make up our atmosphere. The ability of these
gaseous particles to form layers at different altitudes above the Earth, in the Troposphere,
is a function of their density which is dependent on the temperature, volume, and number
of particles present in any vertical column off an air mass.
Density is defined as the amount of mass (matter in an object) divided by its volume
(amount of space that the object occupies in space). Matter with the greatest density will
have the greatest mass per unit of volume. It will settle to the bottom of any vertical
3
column of the atmosphere. Therefore, the layer closest to the ground is the densest air.
(This is the layer of the atmosphere where life is found on the planet Earth.) As you rise
vertically, the density of the atmosphere, or air, decreases. This characteristic of changing
density in the atmosphere is a function of the pressure of the particles above pushing
down on the particles below them. This pressure causes the volume to change if there is
no change in temperature accompanying it. The vapor content of the water is the other
factor that can affect the density of the air because it changes the amount (mixture or
mixture of gases) of gaseous matter in the atmosphere at any given location.
Demonstration 1 -- Is It Full?
(This is done to demonstrate that there is always a space between atoms and
molecules to place more substances. The additional amount of material changes the
density of an object in a confined space.)
Place a 500-ml mason jar on a counter top on an electronic balance. (Record the
weight after adding each set of objects.). Ask the students if the jar is full. They should
say no. Remind them that it is full of air. Ask them if you can add more things (mass)
into the jar (volume). They will either say yes or no. Tell them that you can. Add large
marbles until the jar is full of large marbles. Ask if it is full now. They should say yes.
Then add small marbles to the jar. Ask the question again. They should be becoming
skeptical by now. Then add BBs to the jar. Ask again. Then add sand to the jar. Ask
again. Then add water to the jar Ask again. Then add alcohol to the jar. Ask again. Then
pass gaseous carbon dioxide into the container. The students should be made aware that a
volume is never completely filled. That the total mass changes with the addition of each
substance and there is no end to the new substances that can be added. There is always
another smaller compound that can fit between the larger items already in the container.
(The smaller marbles fit between the larger ones, the BBs between the marbles. the sand
between the marbles and BBs, the water between the solids, the Alcohol between the
water molecules, and The Carbon Dioxide is able to fit between the solid and liquid
molecules; regardless of the size of an object there is always another object that will fit
between the last one added to the container. The ability to accommodate another particle
into a fixed volume helps us to understand and determine the way density changes in any
fixed volume of space.)
This demonstration illustrates that the density of an object is comparable to the ratio
of the mass in that volume, to a comparable substance in the same volume. The
atmosphere is composed of many different gases and substances, which change
constantly with a change in temperature or pressure. The ability of the atmosphere to
have density tells us that it must have a mass and a volume. This ability of the
atmosphere to have mass per unit of volume tells me it can exert a force on another object
when it encounters it. This force is experienced as a push or a pull on the object itself.
This push or pull can be felt as wind or as lift, two topics we will explore further.
4
Volume is the amount of space an object occupies. The volume is dependent upon
the temperature and pressure exerted on the container. The greater the temperature, the
greater the movement of the atoms within the container: the greater the number of
collisions between these particles and the container itself. The greater the number of
collisions within the container the greater will be the pushing force against the container.
This pushing force is felt as pressure against the sides of the container. Pressure is
defined as the amount of push per area of volume. Therefore the greater the number of
collisions against the container, the greater the amount of force applied to the container
and the greater will be the pressure against the container. If the pressure in the container
is great enough to exceed the force of attraction between the atoms of the container, then
the contain will rupture and the atoms contained within will escape from the container.
Therefore the rate of movement of the particles within the container is critical. The
greater the temperature in or on the container, the greater the movement of the atoms, and
by default the pressure inside the container. The opposite effect is true with a decrease in
temperature. The atmosphere is a container that is held together by gravity. The greater
the number of atoms or particles in the air, the greater will be the pull of gravity upon
them. The greater the attraction between the particles the greater the number of collisions
between the atoms contained within the container and the pressure in the container. This
affect of temperature and pressure explains the reason air can lift a plane. The greater the
number of particles in the air, the greater the density of the air within its volume and the
greater the pressure upon any object contained within that volume. This increase in
density and pressure explains the way that the atmosphere (atoms) is able to move an
object within its space.
Demonstration 2 -- Is there a set volume?
(Shows the affect of temperature on the volume of a sealed container)
Blow up a balloon. Tie off the end. Ask the students if the balloon has a fixed
volume? They should answer that it does. (In fact it does not.) Place the balloon in an ice
bath and leave it for five minutes. (You could place it in the freezer if you have.) Ask the
students if the balloon lost any volume in the ice bath? They should say yes. Now
place the balloon in a boiling water bath for five minutes. Ask if the balloon has
expanded. They should say yes. Ask the students if the number of atoms in the
balloon has changed. This should stump them. Half will say yes and half will say no.
(Actually the number of atoms is unaffected by this change in volume.) The temperature
change in the balloon proves Charles’ law, that the change in temperature is directly
proportional to the change in the volume of an object if the pressure is constant. The
number of atoms in the sample follows the Ideal Gas Law, which states that the number
of particles is constant if no change in the number of particles is made. The ability to
show that temperature and volume is independent of the number of particles proves the
pressure in the atmosphere is also independent of the number of particles present in the
air. Rather, it is the size and temperature of the particles in an air mass, or layer, that is
supplying the Kinetic Energy to change the volume of the air mass.
5
Demonstration 3 -- Expansion due to pressure in a closed system.
(The aim of this demonstration is to help prospective and experienced science teachers
illustrate the scientific laws and principles of pressure differences in containers and other
similar objects by using familiar items found in the home. The question that is posed to
these educators is: Why does volume change in a container related to its pressure
differences in the atmosphere.)
The next demonstration illustrates how the pressure and temperature affect the way
we breathe. On hot days we can barely catch our breath and on cold days our lungs feel
as if they are about to explode due to the amount of cold air we are inhaling. This
demonstration also indicates that an airplane must take in air to burn fuel in its cylinders
and uses the same air to support itself in the atmosphere. The ability to change the actual
volume of the atmosphere helps us to determine the correct density altitude of the
atmosphere and its lifting abilities at that density altitude.
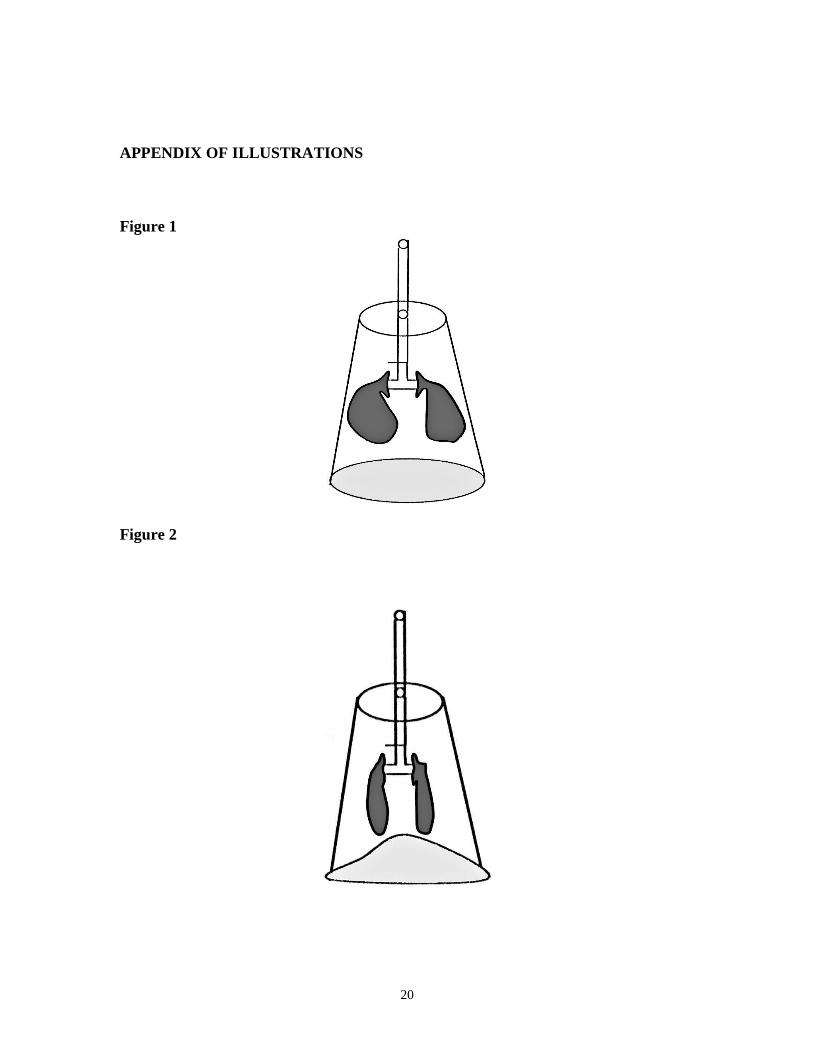
See Figure 1.
Most individuals have an idea that containers have pressure. Yet they do not
understand how a container can have a different pressure depending on its volume
changing under different conditions. Through life’s experiences, they have learned that a
plastic bag will inflate as one places one’s hand in to reach for the bottom, but do not
understand why. What most people do not realize is that a change in volume causes the
bag to expand. Similarly, a container’s pressure varies according to the volume changes it
undergoes. This idea involves the principles of pressure laws, which has been studied
extensively by physicists and engineers.
Materials:
One plastic cup, one approximately 8 to l2 inch piece of vinyl tubing, one tubing
T- adapter, Two 7inch balloons, one giant balloon, scissors and two rubber bands.
Procedure:
1. Insert the vinyl tubing through the plastic cup, which already has a hole drilled
out to receive it. Allow tubing to exit out of cup’s bottom approx. 1 in. (Note: this
may he a little difficult due to tight fitting)
2. Obtain the tubing T-adapter and tighten 2” balloons to horizontal ends on
adapter utilizing the 2 rubber bands.
3. Insert the vertical end of the t-adapter to the vinyl tubing. Which will protrude
out of the upper portion of the cup. Pull the vinyl tubing downward towards
the bottom end using the 1-inch portion. Pull the tubing until adapter/balloon
apparatus is setting approximately 1/3 to 1/2 up the cup. See Figure 4.
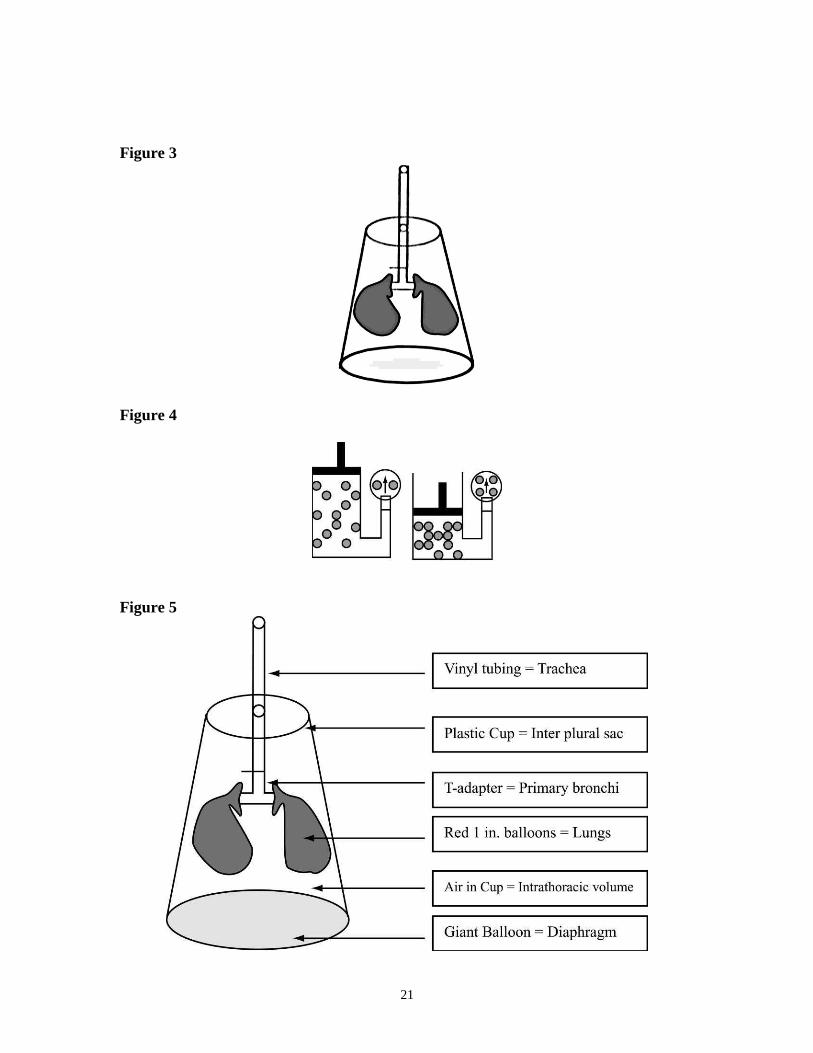
4. Cut the top portion of giant balloon and stretch over the top (mouth) of cup.
See Figure 4.

6
5. Explain to the students the reason for the demonstration, which is to determine
what happens to the pressure if the volume in the cup or balloon is changed. Ask
the students to predict what will happen when the cups inner volume is decreased.
Then record their predictions on the chalkboard.
6. Now push up on the giant balloon toward the inside of the cup and ask the
students to observe what happens to the balloons on the adapters. Observe their
reaction and ask them to think of why the action is occurring. Then, pull down on
the giant balloon and again ask the students to observe and explain what is
happening.
7. Another activity that can he undertaken after the demonstration is to ask
students to think of other everyday items could be used as examples for
discovering the pressure principles discussed today.
Questions and Answers
1. Why did the balloons deflate when the giant balloon was pushed inward?
ANSWER: As the rubber sheet moves up, the volume in the cup and the balloon
decreases with the corresponding increase in pressure within the cup. This causes air to
rush out of the tube, resulting in the collapse of the balloons.
2. Why did the balloons inflate when the giant balloon was pulled outward?
ANSWER: When the rubber sheet moves down, the volume increases with a
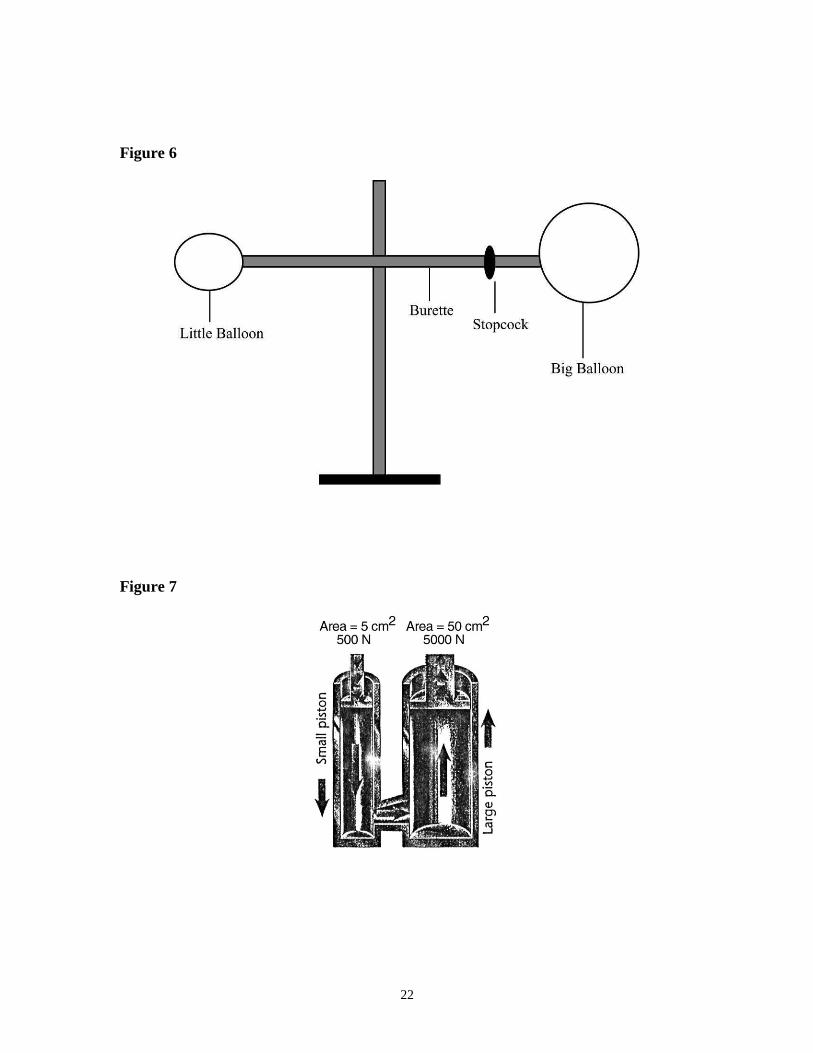
corresponding decrease in pressure. Thus, the balloons inflate. See Figure 3.
3. What Law does this demonstration represent?
ANSWER: Boyle’s Law, which states that the volume of a gas varies inversely with the
pressure. If the size of a container in decreased, then the pressure inside it increases. In
the following figure (1), for instance, the initial pressure is l atmosphere. The gas
molecules striking the wall of the container create this pressure. If the piston is pushed
down, the gas is concentrated in a smaller volume. This means that the same numbers of
gas molecules are striking less wall space. The gauge shows that the pressure doubles as
the gas is compressed to half its volume. The same number of molecules in half the space
produces twice the pressure. Conversely, if the piston is raised to increase the volume, the
pressure decreases. See Figure 4.
4. What was the demonstration a good representation of?
ANSWER: This demonstration is a good representation of the human lungs. This model
(fig. 2) allows students to visualize the fundamental physical changes which take place
during Breathing (Respiration). Inspiration during quiet breathing is mainly the result of
contraction of the diaphragm, which moves downward in the thorax and increases the
intrathoracic volume. Air enters the lungs during this phase of respiration. This breathing
process is also called inhalation. The phase of respiration during which air leaves the lung
is called expiration or exhalation.
7
See Figure 5.
5. What are other objects in our everyday lives also apply to Boyle’s Law?
ANSWER: Boyle’s law applies to the operation of a bicycle pump and the blowing up of
a balloon. Differences in pressure force air into our lungs when we inhale and force the
air out when we exhale.
Day Two: How Temperature Affects Density Altitude
This pressing of one layer upon another over a surface area is what we refer to as
pressure. Pressure is defined to be the amount of matter pressing down on the surface of
an object. This pressing of one air molecule upon another is what causes the layers to
compress. This affect also helps create and separate the different layers of the
atmosphere. Above a certain level the air’s density is too small to hold enough atoms per
unit of volume to support life. This occurs at about fourteen thousand feet.
The ability of the atmosphere to have density and pressure accounts for the
movement of the air above the earth. When the atoms in the atmosphere are heated or
cooled, the volume and pressure of the atmosphere changes. The greater the heating of
the atoms, the smaller the density becomes due to the particles separating or moving
apart. The cooler the temperature, the greater the density is due to the particles moving
closer together.
This heating and cooling of the air causes convection currents to form and moves the
air about its container both vertically and diagonally. The rising air will carry anything
whose density is less than itself into the air. The cooling air will push anything less dense
than itself out of the way to settle to a lower area. Thus the lift of the warm air, or the
push of the cool air, creates the lift needed to move objects into the air from the face of
the Earth or return them when necessary.
Demonstration 4 – Absorption of Heat
(The purpose of this demonstration is to show how heat can be absorbed and
reflected. It demonstrates how temperature changes the density of the air by changing its
volume.)
Heat energy, non-visible infrared rays from the sun or from other luminous sources,
travels and behaves similarly to visible light. Shiny and Smooth surfaces reflect heat,
dark and rough ones absorb it, and transparent ones let it go right through. In sunshine,
chromed car bumpers are cooler than black ones. This is why airplanes are left as
aluminum skinned bodies without paint. It helps them maintain their volume and their
density in the atmosphere when they travel through different heat layers during ascent,
flight, and descent. (The supersonic transports are unable to accommodate this effect and
they expand and contract during actual flights. Their design engineers must take this into
8
account when they are doing the structural calculations for the aircraft in flight.) People
in the tropics wear light-colored clothing, while Arctic explores wear dark clothes.
Houses in warm climates are white to reflect heat.
Materials:
Two identical bottles each with a narrow neck, black paint, two balloons, two
empty tin cans.
Cardboard, water, two thermometers
Procedure:
Fill the two bottles with water to the same level. Paint one bottle black. Stretch
the balloons, to check for their expansion. Snap a balloon on each bottle. Let the
bottles stay in the sun for a while.
Procedure:
Paint one tin can black. Place the same amount of water in both. Cover both tin
cans with a piece of cardboard. Pierce a hole in each and insert the thermometers.
Place both cans in the sun for 15 to 20 minutes.
PRE-LAB QUESTIONS
1. Explain what you think will happen to the plain bottle with water?
2. Explain what you think will happen to the black bottle?
3. Which tin can do you think will have the highest temperature reading?
POST-LAB QUESTIONS
1. Why did the painted bottle’s balloon rise?
2. Which tin can had the highest temperature? Explain.
3. What process was being used? Explain it.
EXPLANATION
The bottles:
The painted bottle will inflate the balloon more. It has expanded more because the black
paint absorbs more heat energy. The shiny glass has passed through or reflected the
infrared rays.
The tin cans:
The same process is true for the cans. The black can will show a higher water
temperature than the shiny one.
Demonstration 5 – Forces in Fluids
(Fluids will move from areas of higher pressure to areas of lower pressure. Liquids and
gases are fluids. The forces that exist in fluids are caused by the mass and motion of the
particles making up the fluid.)
Thought Starter:
9
1. Take a can of Coke, and shake it for several seconds. Hand it to a student and ask them
to please open the Coke can for you. Normally, the student will look at you and refuse.
Q: Why would you not open the can of Coke?
A: Because it will spray all over everything
Q: Why will it spray over everything?
A: Because the contents of the can is under pressure
Q: So what does that tell us about the forces in fluids?
A: That the forces in fluids will move from an area of higher pressure (the
inside of the can) to an area of lower pressure (the air/fluid outside of the
can)
2. Conduct an Eggciting Experiment
a. Obtain a glass bottle with a neck slightly smaller than the size of an egg.
b. Remove the shell from a hard-boiled egg
c. Crumble a small piece of paper in the bottle. Carefully light a match and drop it
in the bottle. (Caution: Observe safety rules when using a lighted match.)
d. When the paper catches fire, carefully place the egg on top of the bottle.
e. Q: Describe what happens to the egg when it is placed on top of the bottle.
A. The air is heated and expands in the bottle. It rushes past the egg on top
of the bottle, making the egg bounce for a second.
Q. When the burning paper consumes oxygen in the bottle, what
happens to the pressure inside of the bottle?
A. The pressure inside of the bottle decreases.
Q. Explain the behavior of the egg in terms of air pressure.
A. After the pressure in the bottle is decreased the pressure of the fluid
outside of the bottle (the air) pushes down on the egg and pushes it into
the bottle, allowing the fluid to move from an area of high pressure
(outside of the bottle) to an area of low pressure (inside the bottle).
In this unit we have seen that the density, temperature and pressure of the air causes
the air to move and creates a lifting forces that we use to fly planes through the air.
Day Three: How to Determine the Buoyant Force in the Atmosphere
10
Pressure was defined to be the amount of force per unit of area applied to a surface.
The greater the force, or the smaller the area, that is pushing against an area, the greater
the effect of the pressure on the object itself. For example; if the heel of a woman who
weighs one hundred pounds is placed onto a high heel point with an area of one fourth
inch square in total surface area, the pressure is above six thousand pounds per square
inch on the pavement she walks across. If she wears a normal loafer, the pressure is
applied over a greater surface area and the amount of force is reduced to six hundred
pounds per square inch. Therefore the greater the surface area to make contact between
the object and the force, the pressure on that area will be smaller.
Demonstration 6 -- Buoyant Force?
(This demonstration proves that a substance can support or displace the mass of another
object if it is placed within it. The ability of water to support the mass of any object that
has a density of less than one will be examined.)
Weigh a piece of wood 2” x 4” x 1” on an electronic balance. If you put the piece of
wood into a body of water the wood will partially sink. The water will exert enough force
to hold part of the weigh of the block above the surface of the water. This upward force
of the water is displacing some of the downward pull of gravity on the block. This
reduction in the pull of gravity can be measured by carefully adding one gram weighs to
the surface of the block. Add these one-gram weights one at a time until you completely
sink the wooden block. The amount of added weight measures the amount of weight that
the water is compensating for when it lifts the wooden block. This amount of weight is
directly proportional to the amount of weight the water is lifting. This displaced weight is
called the buoyant force of the liquid or the lifting power of the water. If the upward force
is 0.33 grams per cubic centimeter, then we say the buoyant force is equal to one-third the
mass of an equal volume of water that the object displaces. This is true because the
density of water is one gram per cubic centimeter of volume. That means that the water is
displacing some of the mass of the wood. This makes the wood’s density less than that of
the water. Because the wood’s density is less than one, the water is able to support part of
the mass of the wood above the surface of the water. This amount is equal to the lifting
force of the water or its buoyant force.
If we examine the demonstration, we realize that the mass is being partially
supported by the underlying denser layer of water. The water could only hold up one
third of the block’s mass. Because it could not hold up the entire block of wood it proves
that one substance (the water) can partially support another substance (the block) if the
density of the second object is less than the density of the first object. In our unit we will
show that the air itself holds up the largest planes ever built. This ability of the air to lift
an object is a function of its density.
11
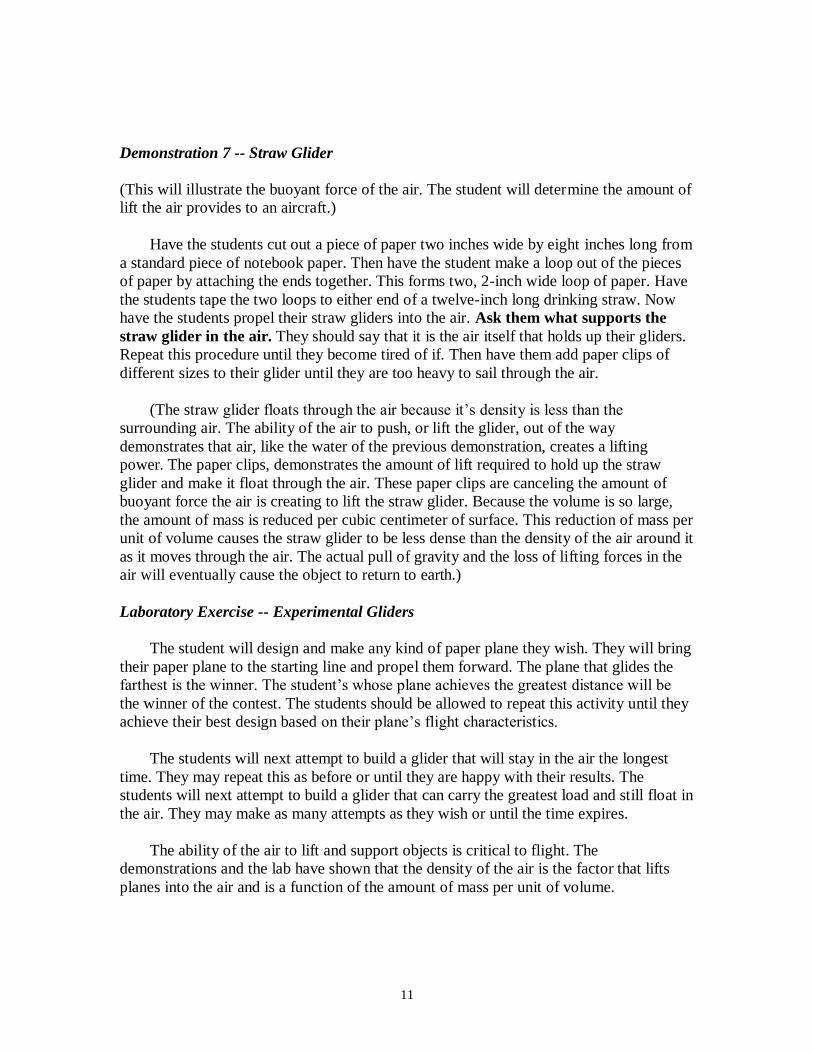
Demonstration 7 -- Straw Glider
(This will illustrate the buoyant force of the air. The student will determine the amount of
lift the air provides to an aircraft.)
Have the students cut out a piece of paper two inches wide by eight inches long from
a standard piece of notebook paper. Then have the student make a loop out of the pieces
of paper by attaching the ends together. This forms two, 2-inch wide loop of paper. Have
the students tape the two loops to either end of a twelve-inch long drinking straw. Now
have the students propel their straw gliders into the air. Ask them what supports the
straw glider in the air. They should say that it is the air itself that holds up their gliders.
Repeat this procedure until they become tired of if. Then have them add paper clips of
different sizes to their glider until they are too heavy to sail through the air.
(The straw glider floats through the air because it’s density is less than the
surrounding air. The ability of the air to push, or lift the glider, out of the way
demonstrates that air, like the water of the previous demonstration, creates a lifting
power. The paper clips, demonstrates the amount of lift required to hold up the straw
glider and make it float through the air. These paper clips are canceling the amount of
buoyant force the air is creating to lift the straw glider. Because the volume is so large,
the amount of mass is reduced per cubic centimeter of surface. This reduction of mass per
unit of volume causes the straw glider to be less dense than the density of the air around it
as it moves through the air. The actual pull of gravity and the loss of lifting forces in the
air will eventually cause the object to return to earth.)
Laboratory Exercise -- Experimental Gliders
The student will design and make any kind of paper plane they wish. They will bring
their paper plane to the starting line and propel them forward. The plane that glides the
farthest is the winner. The student’s whose plane achieves the greatest distance will be
the winner of the contest. The students should be allowed to repeat this activity until they
achieve their best design based on their plane’s flight characteristics.
The students will next attempt to build a glider that will stay in the air the longest
time. They may repeat this as before or until they are happy with their results. The
students will next attempt to build a glider that can carry the greatest load and still float in
the air. They may make as many attempts as they wish or until the time expires.
The ability of the air to lift and support objects is critical to flight. The
demonstrations and the lab have shown that the density of the air is the factor that lifts
planes into the air and is a function of the amount of mass per unit of volume.
12
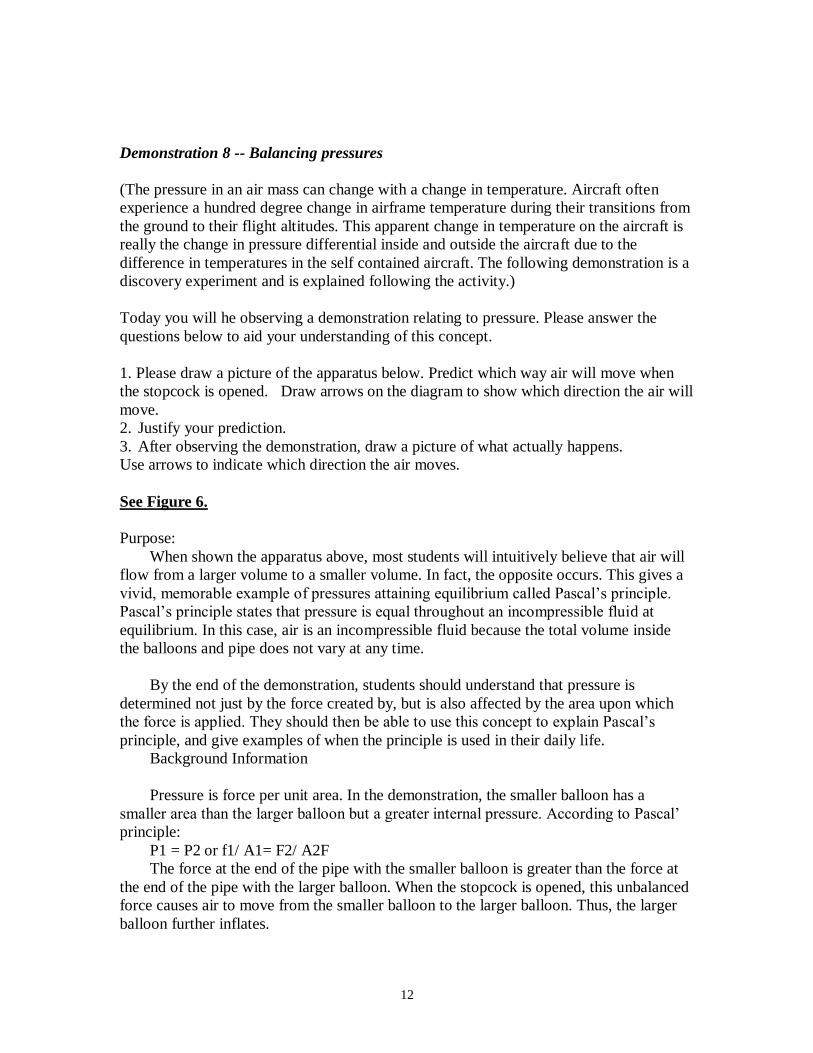
Demonstration 8 -- Balancing pressures
(The pressure in an air mass can change with a change in temperature. Aircraft often
experience a hundred degree change in airframe temperature during their transitions from
the ground to their flight altitudes. This apparent change in temperature on the aircraft is
really the change in pressure differential inside and outside the aircraft due to the
difference in temperatures in the self contained aircraft. The following demonstration is a
discovery experiment and is explained following the activity.)
Today you will he observing a demonstration relating to pressure. Please answer the
questions below to aid your understanding of this concept.
1. Please draw a picture of the apparatus below. Predict which way air will move when
the stopcock is opened. Draw arrows on the diagram to show which direction the air will
move.
2. Justify your prediction.
3. After observing the demonstration, draw a picture of what actually happens.
Use arrows to indicate which direction the air moves.
See Figure 6.
Purpose:
When shown the apparatus above, most students will intuitively believe that air will
flow from a larger volume to a smaller volume. In fact, the opposite occurs. This gives a
vivid, memorable example of pressures attaining equilibrium called Pascal’s principle.
Pascal’s principle states that pressure is equal throughout an incompressible fluid at
equilibrium. In this case, air is an incompressible fluid because the total volume inside
the balloons and pipe does not vary at any time.
By the end of the demonstration, students should understand that pressure is
determined not just by the force created by, but is also affected by the area upon which
the force is applied. They should then be able to use this concept to explain Pascal’s
principle, and give examples of when the principle is used in their daily life.
Background Information
Pressure is force per unit area. In the demonstration, the smaller balloon has a
smaller area than the larger balloon but a greater internal pressure. According to Pascal’
principle:
P1 = P2 or f1/ A1= F2/ A2F
The force at the end of the pipe with the smaller balloon is greater than the force at
the end of the pipe with the larger balloon. When the stopcock is opened, this unbalanced
force causes air to move from the smaller balloon to the larger balloon. Thus, the larger
balloon further inflates.

13
Applications of Pascal’s principal are commonly seen in hydraulic systems.
Hydraulic brakes on newer car models take advantage of Pascal’s law to ensure safe
stopping. Hydraulic lifts can be used to safely raise very heavy objects. When a student
sits in a dentist’s chair they also experience a hydraulic lift. In an aircraft the hydraulic
system moves the controls during flight. Without the hydraulic system the pilot could not
move the control surfaces against the airflow over the control surfaces. The tail of a
Boeing 747 is seventy feet high by thirty feet wide. This twenty one hundred square feet
of surface would never turn into a six hundred mile per hour wind created in flight if not
for the hydraulic system’s assist to the pilots.
Materials:
2 nine-inch balloons, ring stand, burette clamp, burette with a stopcock, and single
holed rubber stopper.
Procedure:
Note: Steps 1-4 should he performed before students enter.
1. Clamp the burette to the ring stand support. Make sure the stopcock is closed.
2. Wrap one of the balloons around the rubber stopper. Make sure the hole at one
end remains uncovered.
3. Remove the dropper on the burette and insert this into the hole of the stopper.
Blow up the balloon 1/4 of the way full. Twist the end so that it will not deflate as
you put it back onto the burette.
4. Blow up the second balloon completely several times. - It is important that it
be very stretched out. After it is stretched, blow up the balloon 2/3 of the way full
and attach it to the other end of the burette.
5. Hand out prediction sheet (see appendix below). Ask students to draw a
picture of the system/apparatus that they see.
6. Explain to students that the two balloons are not an open system. The closed
stopcock in the middle prevents the two volumes of gases from interacting and
reaching equilibrium.
7. Ask students to predict what will happen when the stopcock is opened.
Will the big balloon lose its volume to the smaller balloon or will the smaller
balloon give up its air to the larger balloon? Have them draw a picture of what
they believe the system will look like as well as write it in words. After giving
them a minute to consider, ask the students to raise their hands for the option
they believe to he correct. Record all predictions on the overhead or chalkboard.
8. Have students gather around the demonstration area. Release the stopcock. If
they are close enough, they will hear as well as see the air move from the small
balloon to the larger balloon. The observable effect takes about 20-30 seconds.
9. Give students a few minutes to write down their observations and thoughts
about what occurred. Then begin to ask questions about what happened.
10. Squeeze the smaller balloon until it is almost empty. It will then expand just
slightly to regain total equilibrium. This will demonstrate Pascal’s principal, as
the air will move to ensure equilibrium.
14
Therefore, the air moves from the smaller balloon to the larger balloon when the
stopcock is opened. This allows the external pressure to push the unexpanded balloon
back to its original size. The atoms within the smaller balloon enter the inflated balloon
where they are able to slip between the other atoms already there, just like in the first
day’s first demonstration.
Questions and Answers
1. Why did the smaller balloon lose its air to the larger balloon?
ANSWER: In an incompressible fluid, Pascal’s principle say’s that P1 = P2 at
equilibrium. Initially, the pressure in the smaller balloon is greater than the pressure in
the larger balloon. Since the area of the pipe is the same at each end, the region of high
pressure (smaller balloon) places a larger force on the air at that end of the tube. This
unbalanced force causes air to flow naturally toward regions of lower pressure (bigger
balloon).
2. What is pressure?
ANSWER: This is a concept students will have an intuitive idea about, hut rarely he able
to explain concretely. Pressure is a force per unit area. It is measured in units of Pascal
(Pa), which is a Newton per meter squared (N/rn2).
3. Why does the smaller balloon initially have a larger pressure?
ANSWER: This unusual circumstance is completely due to the latex rubber that makes
the balloon. Latex’s resistance to expansion reduces as it stretches and heats up. This can
be seen when blowing up a balloon. The first breath that causes the balloon to expand is
the most difficult. Subsequent breaths become easier. This is an analogy with which
students will have had experience.
4. How do the balloons “know” when to stop changing size?
ANSWER: Air flows until the force at each end of the tube is the same per unit area. This
means the pressure has been equalized. All systems move toward equilibrium. This is
what causes an untied balloon to deflate. It has a higher pressure than the surrounding
system.
5. If normal atmospheric is 101.3 kPa, what force does the atmosphere exert on the area
of the tabletop?
ANSWER: This question will help students clarify their understanding of pressure.
Students may estimate or measure the area of the tabletop. To answer this question
correctly, students must know the algebraic relationship between pressure, force, and
area. For example, if the tabletop area is 1.5 m squared then there will be approximately
152,000 N of force on the tabletop. Students may be surprised to learn that such a large
force acts on a tabletop. This could be extended further to have them calculate their own
body surface area and how much pressure acts on them everyday.
15
6. The television weather person often refers to regions of high and low pressure. How
does this relate to winds associated with these fronts?
ANSWER: Wind is air moving from a region of high pressure to low pressure. For
example, Galveston tends to be windier than Houston during the summer. This is because
warm air rises, and the partial vacuum (low pressure) is filled by cooler air coming in
from off the ocean. Depending on the class, this question may also be asked as the
students enter to see what their knowledge of pressure is.
7. What are some common applications that you can think of for Pascal’s principle?
ANSWER: A tube of toothpaste uses Pascal’s principle to get the toothpaste out onto
a toothbrush. When you squeeze the end of the tube, the toothpaste goes out the open end
to equalize the pressure. Hydraulic lifts like those in a barber’s chair or used by auto
mechanics, also use Pascal’s principle. The applied pressure on the smaller piston can be
transferred to the larger piston.
See Figure 7.
Day 4 – Air Masses and Their Ability to Determine Flight Characteristics
The ability of the atmosphere to have a density and variables that change the density at
the same time is what makes flying so much fun for those of us with a pilot’s license. The
ability to interpret and understand the changes that temperature and pressure has on the
density of the atmosphere while we are flying helps us stay one step ahead of the weather
and the undertaken. We become very adapt at reading the atmosphere as pressure density
instead of simply pressure or density. We become extremely sensitive to changes in
temperature.
The following demonstration shows how the density altitude is related to the
temperature extremes of the different gases that mix in the various layers of the
atmosphere at any given place on the earth. The ability of the different density gradients
to have different temperature and different pressures makes the world of the profession
pilot exciting.
Demonstration 9 -- What is a front?
When most students learn about the four states of matter and the changes in the states,
many important aspects of each of the properties are usually overlooked. They are aware
of the fact that liquid particles tend to flow and they take the shape of the container. They
are also usually knowledgeable of the fact that solids have a definite shape and volume,
and the particles in solid matter are held close together by forces between them. When it
comes to a gas, it is known that gases are free to move in all directions until they are
evenly distributed and gas particles are not held close together by electrical type bonds.
Although this information is known, students are usually unaware of the fact that
16
gases are fluids too. Perhaps it is because of their invisible nature or their lack of any self-
defined boundaries that give gases such a low profile. It is certainly an eye-opener when
students see a dense gas such as carbon dioxide in a confined space moving as though it
where a fluid. It points out the fact that some gases, such as the gas carbon dioxide, are
denser than air.
The central thrust to this demonstration is to help students observe visually that
gases are in fact a form of fluid. It is also the intent to observe that denser objects tend to
sink in air. The problem for the student in this demonstration is to state what the carbon
dioxide is doing in the demonstration and how does it manage to stay toward the bottom
of the container?
Background information on weather fronts in relation to density
During the First World War a Norwegian meteorologist named Vilhelm Bjerknes
discovered that air forms are distinct masses due to their densities. Because each air form
differs in its average temperature, and therefore its density, air masses do not mix. The
actual boundary between the air masses is known as a front. The way fronts move is an
area of mass that travels across the surface of the land and sea and has a similar
temperature throughout. If the air behind the advancing front is warmer, it is called a
warm front. If the air behind the advancing front is cooler, it is a cold front. Air behind
warm fronts is less dense than air behind cold fronts (warm fronts have a gradient of 1
degree or less and cold fronts are 2 degrees). Cold fronts tend to move faster across the
surface of land and sea than warm fronts. Cold air tends to undercut the warm air making
it rise upward along the edge of the cold front. This is due to density differences. The
warm air rises quickly making the warm air and cold air separate. Usually the cold front
produces thick clouds and heavy rain. Warm fronts commonly produce drizzles and
showers and in the winter freezing rain and snow.
See Figure 8.
Materials:
Dry ice, beaker, 150 ml of water, aquarium, long candles of different lengths, igniter
Procedure:
1. Ask students: What are examples of everyday events that you would associate
with density? (List events on the board)
2. Give the definition of density.
3. Explain frontal systems in relation to density (explanation above)
4. State the question of the demonstration: How does carbon dioxide gas tend to
stay at the bottom of a confined space, and in what state does the carbon dioxide
appear to be in?
5. Obtain an aquarium
6. Place the candles of different lengths on one side of the aquarium.
17
7. Obtain a beaker with 150 ml of water.
8. Place the beaker containing 150 ml of water in the aquarium on the Opposite
side of the candles.
9. Use the igniter and light each of the candles.
10. Ask the students: What is the carbon dioxide gas going to do when released in
the aquarium?
11. Using a pair of thermal gloves, place a small square of dry ice in the 150 ml of
water. Allow the carbon dioxide gas to fill the bottom of the tank. Taking out the
lit candles at different times.
12. Explain how gases are a fluid and have students observe this by moving the
carbon dioxide gas with fingers. (Students may also come to observe this
themselves).
13. Observe how the carbon dioxide gas is confined within the aquarium and the
fact that denser objects tend to stay at the bottom.
Questions and Answers
1. What is density?
ANSWER: Density is the mass per unit volume of a material (g/cm 3). Density describes
how tightly packed a substances molecules are.
2. What is the density of air and the gas, carbon dioxide?
ANSWER: CO2, which is the carbon dioxide gas, has a molecular weigh of 44.0 g/mole,
which makes it considerably denser than air with a molecular weight of 29.0 g/mole.
Thus, CO2 will tend to sink in air.
3. Why did the carbon dioxide stay toward the bottom of the contained area of the
aquarium?
ANSWER: The CO2 is denser than air so it tends to sit at the bottom of the confined area.
4. How did the carbon dioxide gas maneuver when moved with fingers?
ANSWER: Because most gases are considered fluids in air, the carbon dioxide appeared
to maneuver as a liquid would flow. Carbon dioxide gas stays in this state unless the
room temperature is minus 78 C. At this temperature, the substance is pulled into a solid.
5. What is a weather front?
ANSWER: A long, narrow band of changing weather that marks the area where 2
different kinds of air masses meet. For example: When a cold air mass pushes a warmer
air mass out of the way, we call the boundary between them a cold front.
6. Why do fronts give birth to storms?
ANSWER: Fronts create storms because the warm air is above the cold air, which is
heavier, and the conditions become favorable for rain or snow.
Laboratory Experiment -- Charting Flight Characteristics
18
Now that we understand the affect of density, temperature, and pressure we can look
at the way they affect the flight of an aircraft. If the day is warm the air is said to be thin.
That is the atoms in the atmosphere tend to spread apart and lose their lifting ability
because the air is less dense. If the day is cool the air is said to be thick. That is the atoms
in the atmosphere tend to come together and increase their lifting ability because the air is
denser. These temperature extremes are also felt when the pressure of one air mass is
different from another air mass if the two air masses have the same temperature. This is
due to the different number and kinds of atoms in the two different air masses.
The ability to predict and understand the affect of temperature and pressure has
created the science of meteorology. A skilled meteorologist can tell pilots the forecasted
weather conditions in any area of the country based on their understanding of weather
maps. The meteorologist is the first line of safety for any pilot.
If a pilot carefully studies the density, temperature and pressure in an area of
intended flight they can safely pass through the area. If they ignore weather warnings or
fail to determine safe conditions, they can have serious accidents or fatal crashes.
The following charts are used to determine where it is safe to take off from, fly
through, and land at during any flight. If the pilot follows the recommendations obtained
during the weather briefing they will always have a safe flight. Using your understanding
of the temperature, pressure, and density in your area, determine if a safe flight is
possible using the following informational weather chart.
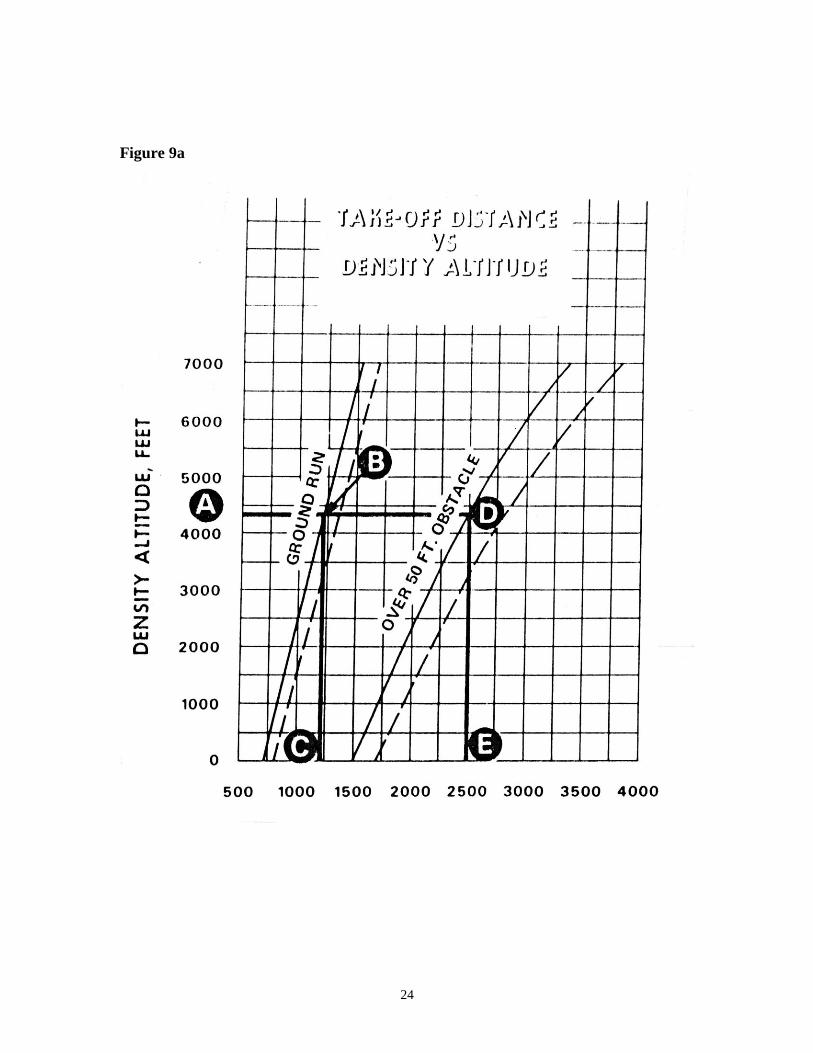
Using the following Takeoff Distance Chart to determine if a takeoff is possible in
your area today at the current temperature? If it is possible, tell me under what conditions
would it be unsafe or impossible to do?
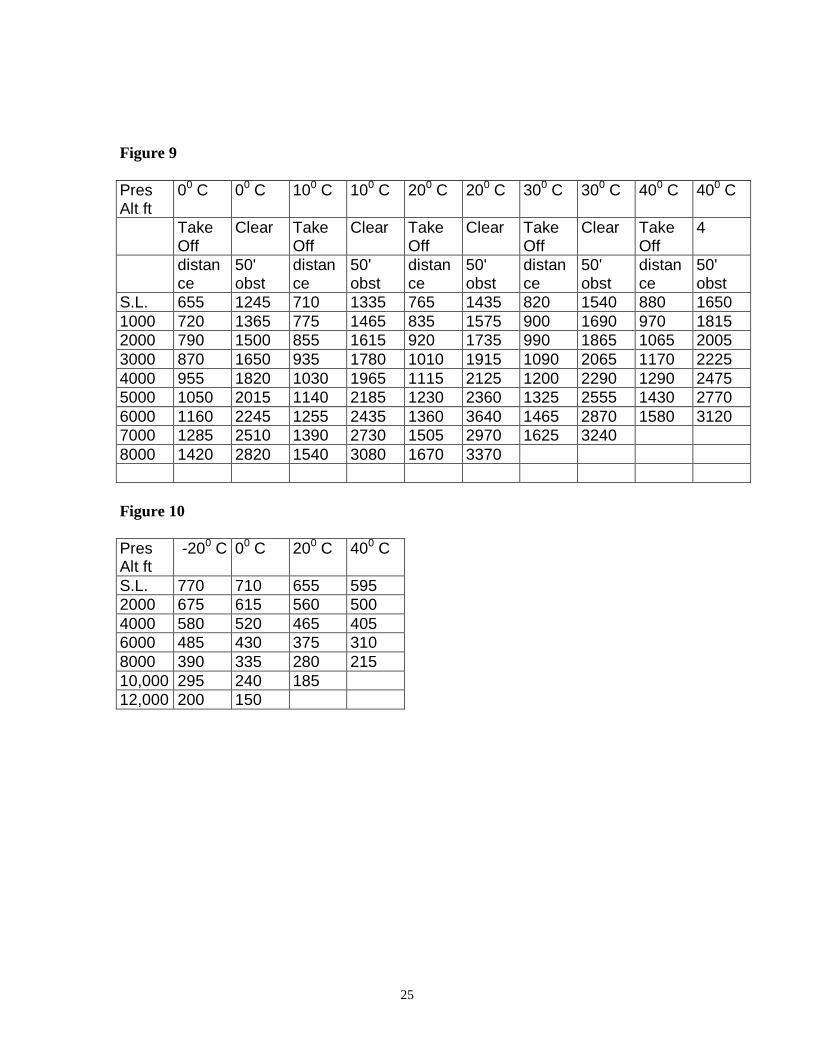
See Figure 9.
Using the following Rate of Climb Chart to determine what rate of climb is possible
in your area today and at what current temperature? If it is possible, tell me under what
conditions would it be unsafe, or impossible to do so?
See Figure 10.
The student will attempt to determine if the aircraft can safely land at a destination
of their choice. The student will determine the temperature and pressure altitude at that
destination from the chart below. The students will then decide if the necessary landing
distance needed to bring the aircraft to a complete stop at the destination is available.
Then determine if the landing is possible with or without an obstacle at the end of the
runway.
19
See Figure 11.
A brief examination of the performance charts demonstrates that the density altitude
determines the flight characteristics of any aircraft. The hotter the day, the longer the take
off roll, the less the weight that can be taken into the air and the longer the distance
needed to stop the plane on the ground. A cold day has the opposite affect on flight
characteristics. If we examine the performance charts for any given temperature or
density altitude, we can determine if a flight is possible from or to that location.
The performance charts also indicate that the density altitude is the critical factor in
any flight from any airfield in the world. Therefore the need to evaluate the weather
conditions one is flying from, through, and to determines the smoothness of that flight.
Have the students examine the extremes of temperature and density altitude in their
area to determine if a flight is possible on any given day of the year. Be sure to examine
the opposite extremes of cold and hot fronts.
ANNOTATED BIBLIOGRAPHY
Jeppensen, S. Sanderson. Private Pilot Manual: 1972 Edition: Jeppensen Sanderson,
Inc. 8025 E. 40th Ave., Denver, Colorado 80207, USA
This is the basic piloting manual used to qualify pilots to fly. The explanations and
problems are excellent for the beginner or the seasoned pilot. It explains in simple terms
the necessities of flight for any user. It details weather and the forces that relate to it in
flight.
McLaughlin, C.; Thompson, M. Physical Science: 1991 Edition: Glencoe / McGraw-
Hill 936 Eastwind Drive, Westerville, Ohio 43081
Basic Physical science textbook. It explains the concepts of density, pressure, and
temperature very well.
Roberson, P.; Mitchell, N. Aerospace Science: The Science of Flight: 1993 Edition: Air
Force Junior ROTC Maxwell Air Force Base, Alabama 36112-6106
This is the basic high school text of aviation history and simple flight characteristics. It
explains weather and air mass characteristics in detail. It is an excellent source reference
for any aviation information and the forces that affect flight.
20
APPENDIX OF ILLUSTRATIONS
Figure 1
Figure 2
21
Figure 3
Figure 4
Figure 5
22
Figure 6
Figure 7

23
Figure 8
24
Figure 9a
25
Figure 9
Pres Alt ft
00 C 00 C 100 C 100 C 200 C 200 C 300 C 300 C 400 C 400 C
Take Off
Clear Take Off
Clear Take Off
Clear Take Off
Clear Take Off
4
distance
50' obst
distance
50' obst
distance
50' obst
distance
50' obst
distance
50' obst
S.L. 655 1245 710 1335 765 1435 820 1540 880 1650
1000 720 1365 775 1465 835 1575 900 1690 970 1815
2000 790 1500 855 1615 920 1735 990 1865 1065 2005
3000 870 1650 935 1780 1010 1915 1090 2065 1170 2225
4000 955 1820 1030 1965 1115 2125 1200 2290 1290 2475
5000 1050 2015 1140 2185 1230 2360 1325 2555 1430 2770
6000 1160 2245 1255 2435 1360 3640 1465 2870 1580 3120
7000 1285 2510 1390 2730 1505 2970 1625 3240
8000 1420 2820 1540 3080 1670 3370
Figure 10
Pres Alt ft
-200 C 00 C 200 C 400 C
S.L. 770 710 655 595
2000 675 615 560 500
4000 580 520 465 405
6000 485 430 375 310
8000 390 335 280 215
10,000 295 240 185
12,000 200 150

26
Figure 11
Pres Alt ft
00 C 00 C 100 C 100 C 200 C 200 C 300 C 300 C 400 C 400 C
Take Off
Clear Take Off
Clear Take Off
Clear Take Off
Clear Take Off
4
distance
50' obst
distance
50' obst
distance
50' obst
distance
50' obst
distance
50' obst
S.L. 425 1045 440 1065 455 1110 485 1135 880 1650
1000 440 1065 455 1090 470 1135 505 1165 970 1815
2000 455 1090 470 1115 490 1165 520 1185 1065 2005
3000 470 1115 490 1140 505 1195 540 1215 1170 2225
4000 490 1140 505 1165 525 1225 560 1245 1290 2475
5000 510 1170 525 1195 545 1255 585 1285 1430 2770
6000 530 1200 545 1225 565 1285 605 1315 1580 3120
7000 550 1230 570 1260 590 1320 630 1350
8000 570 1260 590 1290 610 1350 655 1385