user manual apm100 access point controllerdocuments.4ipnet.com/manual/4ipnet_man_apm100.pdfuser...
TRANSCRIPT

Copyright Notification
4IPNET, INC.
This document contains proprietary information which is the property of 4IPNET, INC. and is strictly confidential. No part may be reproduced except as authorized by written permission of the contributing companies.
User Manual APM100 Access Point Controller
Verion 3.43.0

1
User Manual ENGLISH
APM100 Access Point Controller
Copyright © 2017, 4ipnet, Inc. All rights reserved. All other trademarks mentioned are the property of their respective owners.
TABLE OF CONTENT
1 4IPNET APM100 QUICK DEPLOYMENT .......................................................................................................................... 2
1.1 CHECK YOUR NETWORK ENVIRONMENT ................................................................................................................................ 2 1.2 START THE SETUP WIZARD WHEN DEPLOYED IN THE SAME SUBNET ........................................................................................... 2 1.3 ADD AN ACCESS POINT WHEN DEPLOYED ACROSS DIFFERENT SUBNETS ...................................................................................... 3
2 DASHBOARD ................................................................................................................................................................. 4
3 SITES ............................................................................................................................................................................. 6
3.1 Start the Maps Integration ..................................................................................................................................... 6 3.2 Sites ........................................................................................................................................................................ 6
4 ACCESS POINTS ............................................................................................................................................................. 7
4.1 AP LIST .......................................................................................................................................................................... 7 4.2 ADD METHOD ................................................................................................................................................................. 8
4.2.1 Add Method – Add an AP ....................................................................................................................................... 8 4.2.2 Add Method – Discovery ......................................................................................................................................... 8 4.2.3 Add Method – Auto-Provisioning ............................................................................................................................ 9
4.3 TEMPLATE ....................................................................................................................................................................... 9 4.4 CAPTIVE PORTALS ........................................................................................................................................................... 10 4.5 WDS LIST ..................................................................................................................................................................... 11 4.6 BACKUP CONFIGURATION ................................................................................................................................................. 11 4.7 FIRMWARE .................................................................................................................................................................... 12 4.8 CAPWAP .................................................................................................................................................................... 12 4.9 ROGUE AP DETECTION .................................................................................................................................................... 13 4.10 AP LOAD BALANCING ...................................................................................................................................................... 13
5 CLIENTS ....................................................................................................................................................................... 15
6 STATUS FOR LOGS AND REPORTS ................................................................................................................................ 16
6.1 SYSTEM REPORTS ........................................................................................................................................................... 16 6.2 CLIENT INFORMATION ..................................................................................................................................................... 16 6.3 LOGS ........................................................................................................................................................................... 16 6.4 REPORTING ................................................................................................................................................................... 16
7 SETTINGS TO CONFIGURE THE SYSTEM ....................................................................................................................... 18
7.1 GENERAL ...................................................................................................................................................................... 18 7.1.1 General Settings ................................................................................................................................................... 18 7.1.2 Backup/ Restore .................................................................................................................................................... 19 7.1.3 Firmware Upgrade ................................................................................................................................................ 19 7.1.4 Restart .................................................................................................................................................................. 20
7.2 WMI MANAGEMENT ACCESS ........................................................................................................................................... 20 7.3 NETWORK INTERFACE ...................................................................................................................................................... 20 7.4 ADMINISTRATORS ........................................................................................................................................................... 20
7.4.1 Administrator Group ............................................................................................................................................. 21 7.4.2 Administrator Accounts ........................................................................................................................................ 21
7.5 NETWORK UTILITIES ........................................................................................................................................................ 22

2
User Manual ENGLISH
APM100 Access Point Controller
Copyright © 2017, 4ipnet, Inc. All rights reserved. All other trademarks mentioned are the property of their respective owners.
1 4ipnet APM100 Quick Deployment
1.1 Check your Network
Environment
The 4ipnet APM1000 has a browser-based
interface for easy configuration and
management. To access the interface, perform
the following steps:
A. Setup your computer’s IP address within
192.168.1.1/24, except 192.168.1.10
B. Connect your computer to the APM100
with an Ethernet cable
C. Open a browser and type 192.168.1.10 as
the URL
D. Use the default administrator
username/password: admin/admin to sign
in
E. Change the administrator’s password from
the default to a new password
Before you start to add the 4ipnet access points
into AP Management, we would clarify the
network topology of your router and 4ipnet
access points. Based on your topology, this
chapter will provide the simplest way to deploy
Start the Setup Wizard When Deployed in
the Same Subnet
Add an Access Point When Deployed
Across Different Subnets
1.2 Start the Setup Wizard
When Deployed in the
Same Subnet
When entering the system interface for the first
time, the setup wizard will automatically be
executed and displayed on the interface. All you
need to do is follow the process to complete the
configuration. After you finish the wizard and
reboot the system, simply change your
computer’s network setting and, type the
newly-configured system IP address in the
browser to enter the User Interface (UI) again.
Furthermore, the auto-provisioning feature is
automatically enabled after entering the
“Managed IP Pool Start” and “Managed IP Pool
End” and completing the setup wizard. The
discovered 4ipnet APs with default settings will
be automatically added into the AP List and
applied with the template settings configured in
the wizard.

3
User Manual ENGLISH
APM100 Access Point Controller
Copyright © 2017, 4ipnet, Inc. All rights reserved. All other trademarks mentioned are the property of their respective owners.
For more information, see the corresponding
chapters:
“AP List” on chapter 3.1
“Add Method – Auto-Provisioning” on
chapter 3.2.3
“WMI Management Access” on chapter 5.2
1.3 Add an Access Point When
Deployed Across Different
Subnets
The other option for cross subnet deployment is
based on CAPWAP tunnel between the APs and
the APM100. It is fine to skip the setup wizard,
but you should confirm whether your default
interface, 192.168.1.10, needs to be modified.
Based on CAPWAP protocol, you may be
required to enter the interface of the access
point and configure the CAPWAP settings
(Home > System > CAPWAP Configuration) by
entering the APM100’s IP address. With the
CAPWAP tunnel, the access points deployed
under NAT are still able to establish
communication with the APM100.
This procedure takes about a minute, and this
AP will automatically be added into the AP List
of the APM100. Then, you may apply the
template to fulfill your Wi-Fi requirements.
For more information, see the corresponding
chapters:
“AP List” on chapter 3.1
“Template” on chapter 3.5
“CAPWAP” on chapter 3.9
“WMI Management Access” on chapter 5.2

4
User Manual ENGLISH
APM100 Access Point Controller
Copyright © 2017, 4ipnet, Inc. All rights reserved. All other trademarks mentioned are the property of their respective owners.
2 Dashboard
This section relates to the dashboard and the
information displayed.
The Dashboard is separated into the following
sections:
Statistics Overview
Network Traffic of the Last 24 Hours
System Status
Top Access Points By Clients
Statistics Overview
Online AP: Displays the number of Online
APs/Total Managed APs.
Associated Clients: Displays the total number
of clients connected to APs managed by the AP
Manager.
System Up Time: Displays how long the
system has been online.
USB Storage: Displays the amount of free
space left in the connected USB device.
Refresh: Button for refreshing the Dashboard.
Network Traffic of the Last 24 Hours
Graph: Displays the amount of data traffic in
bytes per second over the last 24-hour period.
System Status
Other useful system information is listed for the
administrator's reference, inclusive of System
Name, System Time, Firmware Version, Build
Number, NTP Server, and Auto-Provisioning.

5
User Manual ENGLISH
APM100 Access Point Controller
Copyright © 2017, 4ipnet, Inc. All rights reserved. All other trademarks mentioned are the property of their respective owners.
Top Access Points By Clients
Top 5 APs will be displayed on the Dashboard
for up-to-date information on which APs are
being utilized the most. This information can be
used for determining whether Load Balancing
should be enabled or additional APs deployed.
Top SSIDs By Clients
Top 5 SSIDs will be displayed on the Dashboard
for up-to-date information on which SSIDs are
being utilized the most. This information can be
used for determining how the distributed Wi-Fi
services are loaded.

6
User Manual ENGLISH
APM100 Access Point Controller
Copyright © 2017, 4ipnet, Inc. All rights reserved. All other trademarks mentioned are the property of their respective owners.
3 Sites
3.1 Start the Maps Integration
AP Management can be visualized using an
integrated Google Maps API Key following the
applying instructions at the page of
https://developers.google.com/maps/docume
ntation/javascript/.
3.2 Sites
Get more useful information from Sites by
letting administrators see the managed APs’
location with tier-administration.
Sites and AP filter: give a simple quick view
of the map and APs. “Overview” of the Site
allows browsing all managed APs by the current
logged-in administrator.
Distance: as previous distance calculation tool
Site Setting: mapping for the site - #AP –
template – portal,
- Site Name: the name of what managed
APs and other profiles belong to in
specific Administrator Group(s).
- Map Center and Type: if
administrators add a new site, the Map
Center and Type will automatically
access your default location setting if
you have logged in to the User Interface
in HTTPs format.
- Template: to select the prepared
profiles
- Captive Portal: to select the prepared
profiles
Search: to find locations or places from Google
Map, instead of searching the managed APs
Full screen button: to view the in full screen

7
User Manual ENGLISH
APM100 Access Point Controller
Copyright © 2017, 4ipnet, Inc. All rights reserved. All other trademarks mentioned are the property of their respective owners.
4 Access Points
4.1 AP List
This section relates to the AP Management
features and configuration.
AP List
Filter Actions
Type: This selection allows you to filter the AP
List via model type. The following options are
available: All, EAP705, EAP737, EAP760,
EAP767, OWL530, OWL630.
Map: This dropdown menu allows you to select
and filter your managed access points by their
maps. “None” can be selected to disable the
Map filter.
Status: This dropdown menu allows you to
select and filter your managed access points by
their statuses; All, Online, Offline, Un-Sync,
Limited.
Search Bar: A search bar for searching and
locating your managed AP(s) by their Name, IP
or MAC address.
Refresh Interval: This can be configured to
automatically refresh the AP List in 10s, 30s,
60s and 120s intervals to view the most up to
date information.
AP Actions
Add: Add an AP or add multiple APs.
Delete: Delete selected APs from the AP List.
Add to Site: assign a new Site to the AP’s.
Backup Config: Backup selected AP’s
configuration file to the APM.
Restore Config: Restore a backup
configuration to a selected AP.
Upgrade: Upgrade selected AP(s) with an
uploaded firmware on the APM.
Apply Settings: Apply a configured template
to selected AP(s).
Reboot: Reboot selected AP(s).
AP List Columns
Type: Displays the AP’s model name.
Name: Displays the mnemonic name of the AP.
Clicking the hyperlink allows configuration of
the following:
- AP Name: The mnemonic name of the
specific AP.
- SNMP Community/Write Community:
The configured string will be applied to
8
User Manual ENGLISH
APM100 Access Point Controller
Copyright © 2017, 4ipnet, Inc. All rights reserved. All other trademarks mentioned are the property of their respective owners.
the AP requiring an automatic reboot to
take effect.
- Latitude/Longitude: The geographic
location of the AP. The coordinates will
position the AP on the Map.
- Remark: Remark entered will be
displayed on the Map.
- URL: Each AP on the Map has a Link tab.
Under Link tab, there are three
configurable URL links. The URL inks can
be used for many applications, e.g. IP
Cam, and YouTube Video clips.
- Thumbnail: A thumbnail image can be
used to quickly identify APs on the Map.
IP: Displays the IP address configured for the
AP.
MAC: Displays the MAC address of the AP
device.
Map: Displays the Map the AP is categorized in.
Template: Displays the template name that
has been applied to the AP.
Status: Displays the status of the AP. Clicking
the hyperlink displays the following AP
information:
- Name, IP Address, MAC address,
Firmware Version, Uptime, CPU Idle
Time, # of radio cards, Band, Channel,
TX Power, Security setting, # of
Associated Stations, and Traffic
statistics.
# of Users: Displays the number of associated
clients connected to the AP. Clicking the
hyperlink displays the following user
information:
- User Name, IP Address, MAC Address,
Traffic statistics, Idle Timer, S/N, and
Access location.
AP Admin Web: Provides a drop-down menu
for shortcuts to the AP’s Web Management
Interface.
CAPWAP: Displays the CAPWAP status of the
AP.
AP Ver.: Displays the firmware version of the
AP.
4.2 Add Method
This section provides information on adding
access point(s) to the APM using three
methods.
The Add Methods include following:
Add an AP
Discovery
Auto-Provisioning
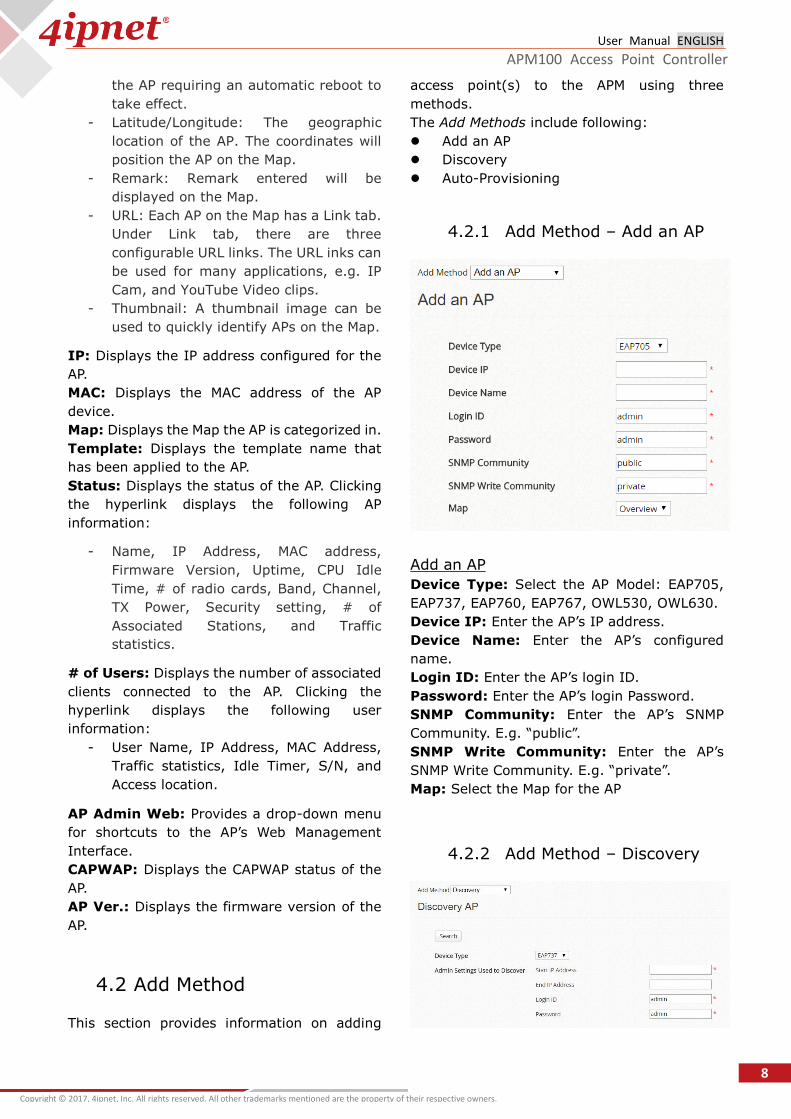
4.2.1 Add Method – Add an AP
Add an AP
Device Type: Select the AP Model: EAP705,
EAP737, EAP760, EAP767, OWL530, OWL630.
Device IP: Enter the AP’s IP address.
Device Name: Enter the AP’s configured
name.
Login ID: Enter the AP’s login ID.
Password: Enter the AP’s login Password.
SNMP Community: Enter the AP’s SNMP
Community. E.g. “public”.
SNMP Write Community: Enter the AP’s
SNMP Write Community. E.g. “private”.
Map: Select the Map for the AP
4.2.2 Add Method – Discovery

9
User Manual ENGLISH
APM100 Access Point Controller
Copyright © 2017, 4ipnet, Inc. All rights reserved. All other trademarks mentioned are the property of their respective owners.
Discovery AP
Search: Search button to scan for selected
device type, IP range and login credentials.
Device Type: Select the AP Model: EAP705,
EAP737, EAP760, EAP767, OWL530, OWL630.
Admin Settings Used to Discover: Enter
admin settings and AP details of the APs in the
network. This section includes the Start IP
Address, End IP Address, Login ID, Password.
Discovery Results
Add: Select discovered AP(s) and add to the AP
List.
Delete: Select discovered AP(s) and delete
from the Discovery Results list.
Discovery Results Table: Displays current
reachable APs connected in the network.
Device Type, IP Address, Device Name, SNMP
Community, SNMP Write Community and Map
are displayed.
4.2.3 Add Method –
Auto-Provisioning
Auto-provisioning APs in the network
automates the tedious task of manually
scanning and applying configurations to APs in
a network.
Auto-Provisioning
Auto-Provisioning: Enable/Disable (Default
is Enabled).
Port 1 IP Address: IP Address configured on
port 1 during the Setup Wizard.
Subnet Mask: Subnet Mask configured on port
1 during the Setup Wizard.
Pool Start Address: Starting IP address range
scanned by the APM for auto-provisioning.
Pool End Address: Ending IP address range
scanned by the APM for auto-provisioning.
Default Apply: Automatically applies the
selected Template to auto-provisioned AP.
4.3 Template
This section relates to configuring templates for
quickly applying settings to any number
managed APs. Up to 6 templates can be saved
for AP management. This allows different sets
of configurations to be applied to different AP
models, locations and application.
Template AP Setting
Select Template: Select the Template from
the dropdown list.
Template Name: Modify the template’s name.
Country Code: Select a country code using the
dropdown list; USA, Japan, Europe. Each
country code will determine configurable values
in accordance to the Wi-Fi channel regulation.
General Settings: The Band, Channel,
Transmit Power, and other general settings on
the AP.
VAP, SSID & Captive Portal: The Profile
Name, ESSID, VLAN ID and other VAP settings
on the AP.
Security Settings: The Security Type, Cipher
Suite, and other Wireless Security related
settings on the AP.
Advanced Wireless Settings: Additional
10
User Manual ENGLISH
APM100 Access Point Controller
Copyright © 2017, 4ipnet, Inc. All rights reserved. All other trademarks mentioned are the property of their respective owners.
advanced Settings on the AP.
Hotspot 2.0: Hotspot 2.0 related settings on
the AP.
Firewall Settings: Proxy ARP ON/OFF on the
AP.
4.4 Captive Portals
The Captive Portals feature enables a brand
new application scenario for guest Wi-Fi
provider. Administrators need to simply
configure
• Captive Portal Setting
• Captive Portal Editor
• Applying the setup template to APs
Limitation: if enable the captive portal feature,
the APM100 can only manage 20 APs and 200
concurrent users due to system resource
requirements.
Captive Portal Setting
Each captive portal possesses the related
condition when clients associate the SSID
access login page, and start surfing the
Internet.
Captive portal Name: the name of the captive
portal when mapping to the VAP.
Landing Page: "Redirect to the original URL"
points clients to the URL that the client is trying
to reach before the login procedure, while
“Redirect URL" points clients to the defined URL
filled in here.
Session Time: the time period the clients can
surf the Internet.
Captive Portal Editor
A WYSIWIG (What you see is what you get)
Captive Portal Editor with 3 different sections,
including operation, components, and styling
settings, to customize the value-added
business service.
Operation
- Mobile view: to edit the captive
portal as mobile border. It is
recommended to edit in mobile view
since the APM is able to automatically
adjust the border for tablet and desktop.
- Tablet view: toggle to tablet
border.
- Desktop view: toggle to desktop
border.
- View components: to check each
component with the dotted line border.
- Preview: to check final result as
viewing on clients’ devices.
- Advertisement: to insert attached
page in the captive portal when clients
access, which can be the formats of an
image, a YouTube video or a Vimeo video
with configured duration.
- Undo: to undo the design change.
- Redo: to redo the most recent action
that you undid.
- Empty: to clear the components
that you selected.
- View code: You don't have to care
about the code, but it's always there,
available for you. When the work is done
you can grab and use it wherever you
want.
- Save: to save the portal as a file for
further VAP configuration of the AP
template.
Components
- Background: it can be configured with
single color selection or by uploading one
or couples of images with different layers.
Just click the “Images” button to start to
upload.
- Basic – Text: it can be brand, slogan,
greeting or any simple words. Default
font size is 32. Double click the block to
start to edit.
- Basic – Divider: a simple divider to
separate the blocks.
- Basic – Image: to drop files here or
click to upload. The recommended file
size is 1200 x 800 in PNG, JPEG, GIF, and
BMP formats. No larger than 800 kB. 5
uploaded files maximum.
- Basic – Quote: it can be description,
explanation, quote or any meaningful
sentences. Default font size is 17.5.
Double click the block to start to edit.

11
User Manual ENGLISH
APM100 Access Point Controller
Copyright © 2017, 4ipnet, Inc. All rights reserved. All other trademarks mentioned are the property of their respective owners.
- Basic – Video: to upload the image by
connecting to YouTube or Vimeo with the
video ID. The ID is “rZUy_4ANQOQ” if
the link is
“https://youtu.be/rZUy_4ANQOQ
- Multilingual: to insert a drop-down list
for selection the displaying languages.
13 languages are saved in default or a
customization is available.
- Authentication – Facebook: to apply
Facebook account login when clients
access the internet. The Facebook App
ID and Secret are required by clicking
the pencil icon in the upper right side of
Sign in with Facebook button. For
Facebook API further details, please
refer to the Facebook developer Web.
- Authentication – Sign-in Button: to
login without any authentication, the
Sign-in Button is required. To login by
email, it is required as well.
- Authentication – Email: to login by
clients email address. It should be used
with Sign-in Button.
- Authentication – Terms of Service:
to notify the disclaimer or terms of
service for the Wi-Fi using clients. It is
highly to drop this option when you don’t
apply any authentication options. Double
click the block to start to edit.
Styling
Each component displaying is able to be
adjusted following CCS rule. Just have it a try to
see what happen on your WYSIWYG Captive
Portal Editor.
Applying the setup template to APs
Whenever the captive portal is updated, it is
necessary to apply the template again to the
managed APs to take effect. Please confirm
each captive portal mapping is over the VAP ,
SSID & Captive Portal of the Template.
4.5 WDS List
This section relates to configured WDS links
between managed APs in the AP List. WDS links
require manually configuring the main AP as
well as its “Peer” AP to establish a wireless link
connection.
WDS List
WDS Link Table: The table displays the
existing WDS links and information including
Peer AP, Band, Channel, Security, TX Power,
Link Speed, RSSI, TX Bytes, TX Packets, STP
and Status.
4.6 Backup Configuration
AP Backups performed through the APM are
stored in the Backup Configuration page. The
displayed files can be used during "Restore
Config" from the AP List, or downloaded to your
own computer for manual restoration.
Backup Config
Delete: Select and delete the backup file
stored in the APM.
Backup Configuration List: Details of each
backup perform is shown on the table. Details
include the Device Type, Version, Size, Backup
Time and File Name.
12
User Manual ENGLISH
APM100 Access Point Controller
Copyright © 2017, 4ipnet, Inc. All rights reserved. All other trademarks mentioned are the property of their respective owners.
Download: Backups are downloadable to your
PC using the download button.
4.7 Firmware
AP firmware files (.rom) can be uploaded and
stored on the APM to manage different
firmware. The firmware name and its related
information will be available in the table.
AP Firmware List
Add: Upload a firmware file (.rom) to the APM.
Delete: Select and delete firmware file(s)
stored in the APM.
Firmware List: Stored firmware and its
firmware information are displayed in the
firmware list. Information will include the
Filename, Device Type, Version and Size.
Actions: Stored firmwares are downloadable
to your PC using the download button.
4.8 CAPWAP
CAPWAP is a standard interoperable protocol
that enables the AP Manager to manage a
collection of Wireless Access Points. For a
complete CAPWAP setup, configuration on the
Access Points is required. Please refer to the
User Manual for more detailed information.
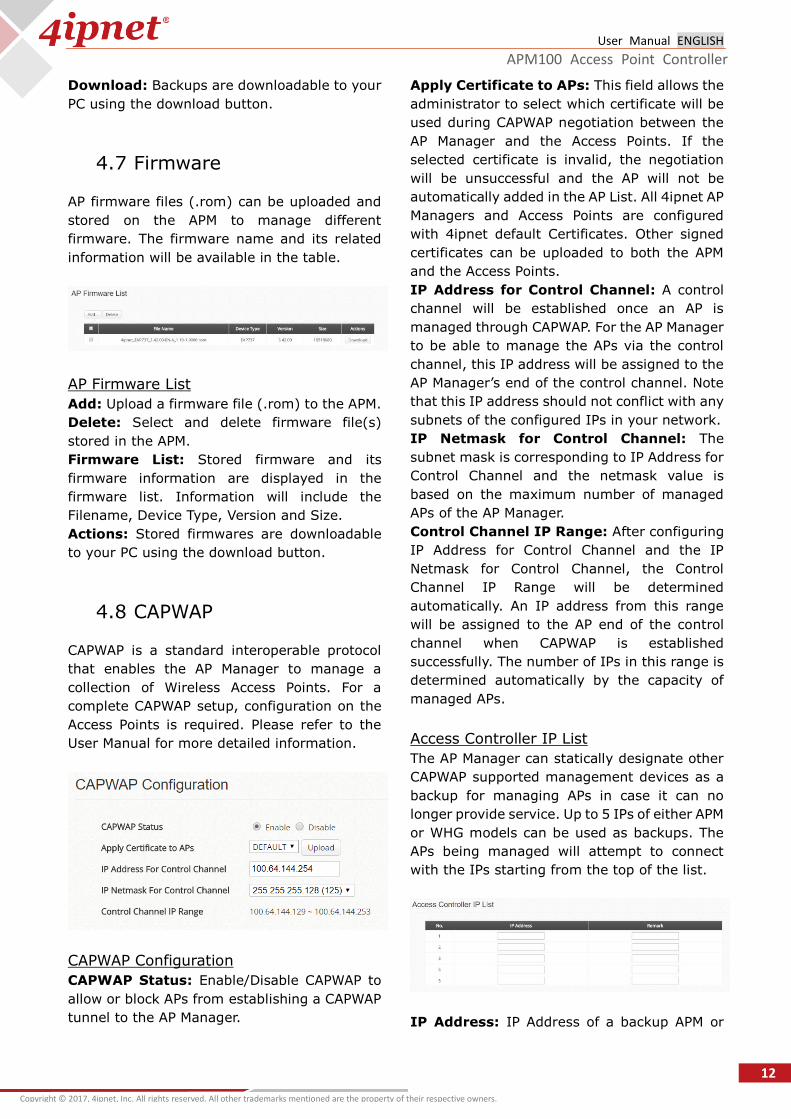
CAPWAP Configuration
CAPWAP Status: Enable/Disable CAPWAP to
allow or block APs from establishing a CAPWAP
tunnel to the AP Manager.
Apply Certificate to APs: This field allows the
administrator to select which certificate will be
used during CAPWAP negotiation between the
AP Manager and the Access Points. If the
selected certificate is invalid, the negotiation
will be unsuccessful and the AP will not be
automatically added in the AP List. All 4ipnet AP
Managers and Access Points are configured
with 4ipnet default Certificates. Other signed
certificates can be uploaded to both the APM
and the Access Points.
IP Address for Control Channel: A control
channel will be established once an AP is
managed through CAPWAP. For the AP Manager
to be able to manage the APs via the control
channel, this IP address will be assigned to the
AP Manager’s end of the control channel. Note
that this IP address should not conflict with any
subnets of the configured IPs in your network.
IP Netmask for Control Channel: The
subnet mask is corresponding to IP Address for
Control Channel and the netmask value is
based on the maximum number of managed
APs of the AP Manager.
Control Channel IP Range: After configuring
IP Address for Control Channel and the IP
Netmask for Control Channel, the Control
Channel IP Range will be determined
automatically. An IP address from this range
will be assigned to the AP end of the control
channel when CAPWAP is established
successfully. The number of IPs in this range is
determined automatically by the capacity of
managed APs.
Access Controller IP List
The AP Manager can statically designate other
CAPWAP supported management devices as a
backup for managing APs in case it can no
longer provide service. Up to 5 IPs of either APM
or WHG models can be used as backups. The
APs being managed will attempt to connect
with the IPs starting from the top of the list.
IP Address: IP Address of a backup APM or

13
User Manual ENGLISH
APM100 Access Point Controller
Copyright © 2017, 4ipnet, Inc. All rights reserved. All other trademarks mentioned are the property of their respective owners.
WHG.
Remark: Optional description of APM or WHG
for better management.
4.9 Rogue AP Detection
General Configuration
Rogue AP Detection: Enable/Disable this
feature.
Scanning Interval: Configure frequency of
APs configured as sensors to scan for Rogue
APs. Scanning interval ranges from 1-999
minutes. Apply to activate changes.
Channel Switching: Enable/Disable feature to
allow APs configured as sensors to scan for
channel interferences and switch to the lowest
utilized channel.
Sensor List: View and configure managed APs
to be set as a Sensor for Rogue AP Detection.
Select from the AP Model drop-down list and
click "List" to show available APs that can be set
as Sensors. Administrators may select one or
more APs as sensors to scan for rogue APs.
Click "View" to see logs regarding Rogue AP
detection. Supported AP models include
EAP737, EAP760, EAP767, OWL530 and
OWL630.
Trusted APs: The Trusted AP List allows the
administrator to maintain a list of detected
rogue APs and add them as a “Trusted AP”.
Trusted APs will not be displayed in the Rogue
AP List in future scans.
Rogue AP List
This list includes all detected Rogue APs. Each
rogue AP will be presented with relevant
information such as its BSSID, ESSID, Channel,
Encryption, Report Time etc. By checking the
checkboxes, the selected Rogue APs on this list
can be added into the Trusted AP List or deleted
if it can be ignored.
Add to Trusted AP List: Select AP(s) from the
Rogue AP List and add to the Trusted AP List.
Delete: Select AP(s) from the Rogue AP List
and delete it from the Rogue AP List.
Search Bar: ESSID, BSSID, Channel, or
Encryption can be searched from the Rogue AP
List.
Rogue AP List Table: The list includes the
following information on each AP; AP No.,
Rogue AP BSSID, ESSID, Type, Channel,
Encryption, RSSI and Report Time.
4.10 AP Load Balancing
When the system detects the occurrence of
APs' associated-client numbers exceeding a
predefined threshold at circumstances other
APs in the same group are still below the
threshold, the balancing function will be
activated. The system divides the managed APs
into groups, the administrators define the
group’s threshold, and a time interval which
triggers the AP load balancing feature.
AP Load Balancing
Load Balancing: Enable/Disable the feature.
The default setting is “Disable”.
AP Distance: The AP distance (with reference
to the Map) configured here determines the
Cluster grouping for load balancing. Click
"Apply" to activate changes.
Interval: A balance interval can be set for the
APs to check periodically for load balance. The

14
User Manual ENGLISH
APM100 Access Point Controller
Copyright © 2017, 4ipnet, Inc. All rights reserved. All other trademarks mentioned are the property of their respective owners.
valid range of Scanning Interval is from 1 to
999 minutes. Click "Apply" to activate changes.
Threshold: A threshold value for Load
Balancing can be set with number of clients or
the number of packets. When the number of
clients/packets is reached, load balancing will
begin.
Cluster: Click "Configure" for Cluster to show
clusters grouping and their status.
Device List
AP Type: Select from the dropdown list for
APs configured in a cluster for AP Load
Balancing.
Device List: Displays all the managed APs
sorted by model name with relative
information such as Cluster, Device Name,
MAC, IP, Power Level and Loading. The
managed APs will have a Cluster column for
indicating which AP group it belongs to for AP
Load Balancing feature to be enforced. Logs
regarding AP Load Balancing can be viewed in
the “Logs” column.

15
User Manual ENGLISH
APM100 Access Point Controller
Copyright © 2017, 4ipnet, Inc. All rights reserved. All other trademarks mentioned are the property of their respective owners.
5 Clients
An overview of the online clients associated to
the managed APs is provided here for the
administrator's reference.
Show number of entries: Select how many
results are displayed per page: 10, 25, 50, or
100.
If there is more than one page of entries to
display, click the navigation controls or page
numbers at the bottom right of the screen to
display different pages.
Search : Enter the text
you want to search for. Simply begin typing;
there is no need to press Enter.
(sort): You can click any column to sort the
displayed list. Each column displays or
to indicate ascending or descending order.
The administrators are able to click any column
headers to change the list order. The
information is MAC Address, SSID, AP,
Authentication, Download, Upload, Uptime,
RSSI, and Idle.
.

16
User Manual ENGLISH
APM100 Access Point Controller
Copyright © 2017, 4ipnet, Inc. All rights reserved. All other trademarks mentioned are the property of their respective owners.
6 Status for Logs and Reports
This section relates to system information, Logs
and Reports.
The Status displays the following tabs:
System Reports
Client Information
Logs
Reporting
6.1 System Reports
General Settings
Network Traffic: The time chart of the system
Network Traffic with selected intervals is
displayed in TX and RX
CPU Load: The time chart of the system CPU
usage with selected intervals
Memory Usage: The time chart of the system
memory usage with selected intervals is
displayed with Buffer, Cache, and Used
Memory.
Storage Usage: The time chart of the system
storage usage with selected intervals
6.2 Client Information
Whenever clients have logged-in to the APM
system, some information are collected for
further marketing application and listed in this
page, including Captive Portal, MAC address,
Username, Email, Authentication, AP, Last
Login, and Logins.
6.3 Logs
Configuration Change Log: This page shows
the account and IP of the administrator that has
made changes to the system WMI
configurations.
CAPWAP Log: This page shows the CAPWAP
message communicated between the APM100
and CAPWAP enabled APs.
System Log: This page displays system
related logs for event tracing.
6.4 Reporting
Notification
An overview of all the available System Logs is

17
User Manual ENGLISH
APM100 Access Point Controller
Copyright © 2017, 4ipnet, Inc. All rights reserved. All other trademarks mentioned are the property of their respective owners.
in this page. Selected logs can be sent to a
designated location (E-mail and FTP) during
customizable reporting intervals.
Email Subjects can be edited by clicking the
pencil icon under Detail, and click the send icon
under Test to send a test email to verify your
settings. Settings are configured at "SMTP
Settings".
The Server Folder for your FTP Server may be
specified by clicking the pencil icon. FTP
Settings are configured at "FTP Settings".
SMTP Settings
Allows the configuration of 5 recipient E-mail
addresses and necessary mail server settings
where various user related logs will be sent to.
SMTP Server: Enter the IP address of the
sender's SMTP server (For example,
"smtp.gmail.com").
SMTP Port: By default the port number is 25.
Administrator can specify other ports if the
SMTP server runs SMTP over SSL (For example,
Port 587).
Encryption: Enable this option if your SMTP
server runs SMTP over TLS or SSL.
SMTP Authentication: The system provides
four authentication methods, Plain, Login,
CRAM-MD5 and NTLMv1, or "None" to choose
none of the above. Depending on which
authentication method is selected from the
drop-down list, enter the Account Name,
Password and Domain.
- Plain is standardized authentication
mechanisms which can use a UNIX login
and password. Netscape use Plain as
default.
- Login is Microsoft proprietary mechanisms
which can use a UNIX login and password.
Outlook and Outlook express use Login as
default, although they can be set to use
NTLMv1.
- CRAM-MD5 is standardized authentication
mechanisms. Pegasus uses CRAM-MD5.
- NTLMv1 is Microsoft proprietary
mechanisms but it is currently not
available for general use.
Sender E-mail Address: The e-mail address
of the administrator in charge of the monitoring.
This will show up as the sender's e-mail.
Receiver E-mail Address (1 ~ 5): Up to 5
E-mail addresses can be set up here to receive
notifications.
FTP Settings
Allows the configuration of an external FTP
Server where selected users logs as well as
system logs will be sent to.
IP Address: Specify the IP address your FTP
server.
Port: FTP servers typically use Port 21.
Login: If the FTP server requires
authentication, enter the Username and
Password when select “Normal”.
Send Test File: A “Send” button can be used
to send a test file for testing your current FTP
destination settings.

18
User Manual ENGLISH
APM100 Access Point Controller
Copyright © 2017, 4ipnet, Inc. All rights reserved. All other trademarks mentioned are the property of their respective owners.
7 Settings to Configure the System
7.1 General
This section relates to fundamental system
configuration.
The General displays the following tabs:
General Settings
Backup/Restore
Firmware Upgrade
Restart
7.1.1 General Settings
General Settings
System Name: This is a mnemonic name
admin can give to the controller. Once
configured, it will show on the web browser’s
frame.
Management IP Address List: This allows
the network administrator to enter a selection
of reserved IP addresses/range that are
authorized to access the Web Management
Interface. The remote console interface is
disabled by default.
HTTPS Certificate: HTTPS network certificate
as the site’s safety verification, which can be
uploaded and selected.
User HTTPS Login: Presents the option to
allow end users authenticated with HTTPS for
encrypted content transfer. The Disable option
indicates the user will be redirected to HTTP
login page, while the Enable option to HTTPS
login page. The Secure option supports only
“High” encryption cipher suites i.e. SSLv3 and
TLSv1.
HTTPS Automatic Redirects provides an
option for allowing or denying HTTPS requests
when a user first connects to a network. When
enabled, HTTPS traffic will be redirected but
may prompt a certificate security warning.
When HTTPS is disabled, all HTTPS traffic is
denied and will be timed-out. This option will
effectively prevent all security warnings being
shown on the user’s devices. When HTTPS
requests are timed-out, some browsers may
automatically request a HTTP webpage to
redirect to a Captive Portal.
- Enable HTTPS Automatic Redirect:
users browsing with HTTPS may be shown a

19
User Manual ENGLISH
APM100 Access Point Controller
Copyright © 2017, 4ipnet, Inc. All rights reserved. All other trademarks mentioned are the property of their respective owners.
certificate security alert when browsing
before they access the Captive Portal.
- Block HTTPS Automatic Redirect: users
browsing with HTTPS will be timed-out,
meaning their webpage will appear blank
since they never reach their destination
- Bypass non-HTTP Traffic Prior to
Sign-In: all HTTPS websites are allowed for
browsing even though the user have not
accepted the disclaimer page or completed
the sign-in process on the Captive Portal.
Internal Domain Name: A fully qualified
domain name (FQDN) of the system. Ideal for
accessing the Controller instead of
remembering the IP address of the LAN
interfaces. When the administrator enters a
desired domain name in the Internal Domain
Name field, the entered Internal Domain Name
will be shown in the URL of the Login Success
page instead of a LAN IP address. In addition,
when HTTPS is enabled, enter the domain name
of the uploaded certificate will increase login
speed and the URL in the User Login page will
be changed. On the Social Media Login, this
Internal Domain Name help redirect the login
succeeded clients back the Login Success page.
Maps Integration
For details, please follow the instructions at
https://developers.google.com/maps/docume
ntation/javascript/ to obtain such Google
Maps API v3 key and provide the key info into
the field of “Google Maps Registration Key”
System Time
Current Time: The system time right away
following below configuration.
Time Zone: a dropdown list to select the local
time zone of the system.
Time Update (NTP): The system completes
automatic time synchronization by specifying
external NTP servers in the order of NTP Server
1 to 5. The checkbox of Use this controller as an
NTP server is checked by default to synchronize
the time of managed-APs.
Time Update (Manually Set Up): The system
time is manually configured.
7.1.2 Backup/ Restore
Backup System
General Backup: Simply click the “Backup”
button to save the system configuration as an
encrypted .db file to your PC/laptop.
Restore System
Restore System Settings: Click “Browse” to
specify backed-up .db file to the system. In the
meantime, restoring previous db configurations
may be performed with checking options.
Reset to Default
Reset to Factory Default: This action will
erase all configurations and restore the system
to the factory setting.
7.1.3 Firmware Upgrade
Current Version: The administrator can
obtain the latest firmware from the 4ipnet’s
Partner Center or 4ipnet’s Support Team.
Upgrade New Firmware: Click “Browse” to
search for the firmware file on your local drive
and click “Upload” to firmware upgrade. The
system needs to be restarted afterwards to
activate the new firmware.
Upgrade Firmware Via FTP: The other option
by entering the FTP server IP address, FTP
server port, and the FTP account name and
password, and lastly specify the complete
firmware filename stored on the FTP server that
will be used to upgrade the system.

20
User Manual ENGLISH
APM100 Access Point Controller
Copyright © 2017, 4ipnet, Inc. All rights reserved. All other trademarks mentioned are the property of their respective owners.
7.1.4 Restart
The administrators can manually restart the
system by clicking the “Apply” button, and state
the “Reason for Restart” so it can be recorded in
the Configuration Change Log for maintenance
purposes.
7.2 WMI Management Access
The administrator can grant access to the WMI
by specifying a list specific IP addresses or
ranges of IP addresses in web-based or in
console-based.
The Management IP Address displays the
following tabs:
Management Service
Management IP Address List
Management Service
SSH Service: The encrypted remote console
interface in port 22. For security purposes, SSH
Service is disabled by default to prevent
malicious users from accessing the system.
Telnet Service: The non-encrypted remote
console interface in port 23. For security
purposes, Telnet Service is disabled by default
to prevent malicious users from accessing the
system.
Management IP Address List
For remote access purposes, the IP Address/
Segment can be customized for the
administrators to access the WMI of the system.
Please confirm the entries as Active in the table
by switching to ON. For example, entering
"192.168.3.1" and "192.168.1.0/24" means
that only the device at 192.168.3.1 and devices
in the range of 192.168.1.0 to 192.168.1.255
can reach the web management interface.
If administrators would like to type a specific IP
address, there is not necessary to type the
segment. (type 192.168.5.44, instead of
192.168.5.44/32)
It is forbidden to switch OFF all IP
Address/Segment which results in there is no
permission to access the WMI anymore.
7.3 Network Interface
The 4ipnet APM100 has 5 physical RJ-45 ports
for supporting most scenarios. These 5 ports
are configured as a switch in default that the IP
address of the ports is the same.
RJ45 Ports
Static: Manually specifying the IP address of
the network interface.
IP Address: Specify an IP address of the
system on a TCP/IP network
Subnet Mask: Determine the local subnet of
the system
Default Gateway: Determine the upper host
of the local network
Preferred DNS Server: The Main DNS server
to translate domain name
Alternate DNS Server: The Secondary DNS
server to translate domain name
7.4 Administrators
This section relates to fundamental
administrators’ behaviors and settings.
The Administrators displays the following tabs:

21
User Manual ENGLISH
APM100 Access Point Controller
Copyright © 2017, 4ipnet, Inc. All rights reserved. All other trademarks mentioned are the property of their respective owners.
Administrator Group
Administrator Accounts
7.4.1 Administrator Group
This section provides 5 customized
administrator groups with a variety of the
accessibility for WMI pages for a particular
management group and in turn, create
management accounts for that group.
Super Admin is with all authority to
“Read/Write” the system Web Management
Interface, while other groups can be
customized as “Read/Write”, “Read Only” or
“Disable” permission of specific management
pages.
7.4.2 Administrator Accounts
Settings
Password Complexity: Enables the admin to
restrict how complex the passwords the
sub-admins should be.
- Min password Length sets a limit on
the minimum length of a password
string
- Min password Category allows an
admin to define how complex the
passwords of the sub-admins are
required. Below shows what each
number stands for:
Limit Login Attempts (if enabled): Enter the
number of times you would like sub-admins to
retry their passwords. If attempted more than
this number, the sub-admins will not be allowed
to log in.
Password expiration (if enabled): This is a
function for admins to decide the number of
days the password will expire. A valid period
can be defined for each password, counting
from the first login date. When a password
expires, the operator will be required to setup a
new password for future use. Expired
passwords cannot be reused.
Password Limits (if enabled): It is to
determine how many utilized passwords in the
past should be checked. For instance, if the
admin enters ‘5,’ the system will check if the
newly added password is identical to one of the
five most-recent ones; if it is, the server would
ask the admin to choose a new password again.
Account List
This table serves as a list for admins to track
the dynamics of each management accounts,
including the number of the online admins and
the state of each sub-admin.
Add: Click “Add” to create a sub-admin and
define his/her authority limits. In case the
administrator forgets his/her password, by
entering both email and the Elementary School
Name, the account credential will be email to
the assigned email address. For each generated
sub-admin account should be allocate to
specific Administrator Group with
corresponding permission. Besides, admin can
also click the hyperlinks in the ‘name’ column to
22
User Manual ENGLISH
APM100 Access Point Controller
Copyright © 2017, 4ipnet, Inc. All rights reserved. All other trademarks mentioned are the property of their respective owners.
edit admins’/ sub-admins’ related settings.
Delete: Only the created sub-admins can be
deleted
Lock/Unlock: to forbid certain sub-admins to
access the management page
Backup/Restore List: all the administrator
accounts can be saved to edit and upload to
fulfill the application
7.5 Network Utilities
IPv4
Ping: It allows administrator to detect a device
using IP address or Host domain name to see if
it is responding.
Trace Route: It allows administrator to
recover the real path of packets from the
gateway to a destination using IP address or
Host domain name.
ARPing: Allows administrator to send ARP
request for a specific IP address or domain
name.
ARP Table: It allows administrator to view the
IP-to-Physical address translation tables used
by address resolution protocol (ARP).
Status: When the administrator is executing
any Network Utilities features, the status of the
operation is displayed here.
Result: The operation result is displayed here.
Sniff
With this feature the administrator can listen
for packets from all interfaces (only physical
Ethernet ports). The "Packet” field is to
determine how many packets to capture. The
administrator can further filter the types of
packets to capture by using tcpdump
commands under the “Expression” field.
Status: When the administrator is executing
any Network Utilities features, the status of the
operation is displayed here.
Result: The operation result is displayed here.
P/N: V3430020171222