user manual - ads-tec · 5.4 odu-interface (optional) .....25 5.5 network connection (rj45) .....27...
TRANSCRIPT
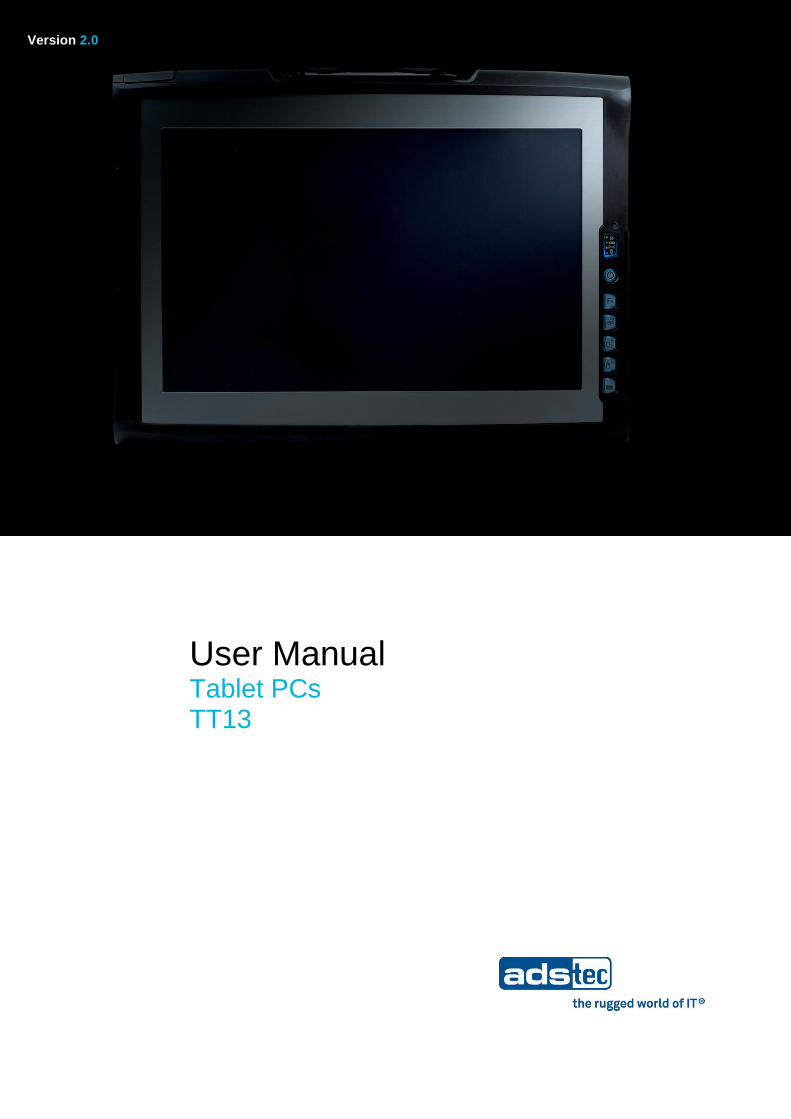
User Manual Tablet PCs TT13
Version 2.0
Version 2.0
Tablet PCs TT13 2
© ads-tec GmbH • Heinrich-Hertz-Str. 1 • D-72622 Nürtingen
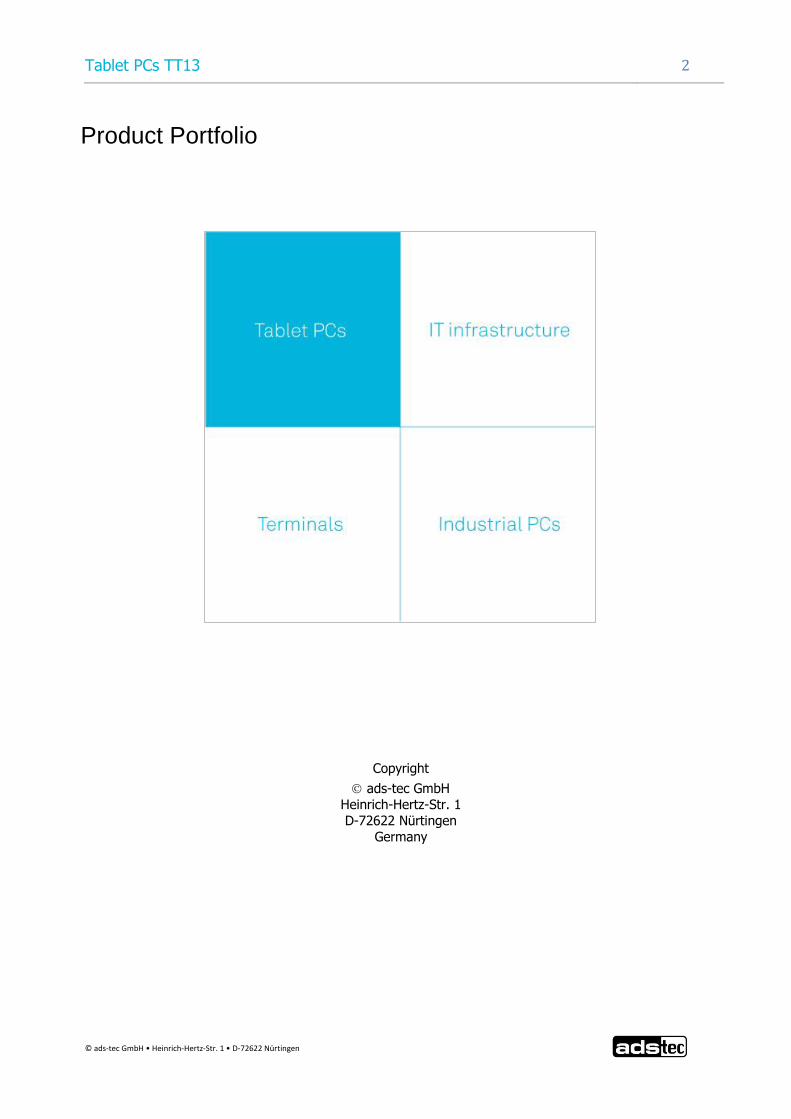
Product Portfolio
Copyright
ads-tec GmbH
Heinrich-Hertz-Str. 1
D-72622 Nürtingen
Germany

Tablet PCs TT13 3
© ads-tec GmbH • Heinrich-Hertz-Str. 1 • D-72622 Nürtingen
INDEX
About us ...................................................................................................................................... 5
1 Remarks ..................................................................................................................... 6
1.1 Relevant data communication with the device ....................................................................... 6 1.2 Description of the warning symbols used in this guide ........................................................ 6 1.3 Data, Images, Amendments and Variations ............................................................................ 6 1.4 Trademarks................................................................................................................................. 6 1.5 Copyright .................................................................................................................................... 7 1.6 Certifications / tests .................................................................................................................. 8 1.7 Scope of delivery ....................................................................................................................... 9
2 Operating instructions ............................................................................................ 10
2.1 Operating location ................................................................................................................... 10 2.2 Damages due to Improper Use ............................................................................................... 10 2.3 Warranty / Repairs ................................................................................................................... 11 2.4 Handling and proper disposal of lithium batteries ............................................................... 11 2.5 Safety Instructions .................................................................................................................. 11 2.6 External device dimensions ................................................................................................... 12
3 Commissioning ....................................................................................................... 13
3.1 Available interfaces ................................................................................................................. 13 3.2 Readiness for Operation Checks ........................................................................................... 14 3.3 Touchscreen............................................................................................................................. 14
4 Front panel functions .............................................................................................. 15
4.1 Status indicators ...................................................................................................................... 15 4.2 Front control keys ................................................................................................................... 18
5 Interfaces ................................................................................................................. 21
5.1 20V DC power supply .............................................................................................................. 21 5.2 14.4V DC Battery operating mode .......................................................................................... 21 5.3 USB connections ..................................................................................................................... 23 5.4 ODU-Interface (optional) ......................................................................................................... 25 5.5 Network connection (RJ45) .................................................................................................... 27 5.6 MIC in ........................................................................................................................................ 28 5.7 Line out ..................................................................................................................................... 29 5.8 ExpressCard slot ..................................................................................................................... 29
Tablet PCs TT13 4
© ads-tec GmbH • Heinrich-Hertz-Str. 1 • D-72622 Nürtingen
6 Software & driver installation ................................................................................. 30
6.1 Battery information & diagnostics tool ................................................................................. 30 6.2 TT13 HDD Protection .............................................................................................................. 33 6.3 TT13 Wireless Konfiguration ................................................................................................. 35 6.4 TT13 Touch Rotation .............................................................................................................. 38 6.5 TT13 Monitoring ...................................................................................................................... 41 6.6 TT13 adsxtern Test ................................................................................................................. 43 6.7 Manual Reinstallation ............................................................................................................. 43 6.8 Installation of the TT13 Software Package .......................................................................... 44 6.9 WLAN ........................................................................................................................................ 49 6.10 Bluetooth .................................................................................................................................. 52 6.11 UMTS (optional) ....................................................................................................................... 53 6.12 RFID reader (optional) ............................................................................................................ 62 6.13 Camera (optional) .................................................................................................................... 65 6.14 Soft keyboard .......................................................................................................................... 68
7 Accessories ............................................................................................................. 72
7.1 DVD drive / external type (optional ....................................................................................... 72 7.2 Laser product safety ............................................................................................................... 73 7.3 Transport Case ........................................................................................................................ 74 7.4 Battery Charging Station C4/TT13 ......................................................................................... 75 7.5 Substitution Power Supply .................................................................................................... 79 7.6 Car Power Supply ................................................................................................................... 79 7.7 Substitution-Battery ................................................................................................................ 79 7.8 TT13 Mechanical Docking Adapter ....................................................................................... 80 7.9 Table Stand .............................................................................................................................. 81 7.10 Wall Bracket ............................................................................................................................. 83 7.11 Substitution Pack of Touch Stylus ........................................................................................ 83 7.12 3 Point Cord ............................................................................................................................. 83 7.13 Hand Strap ............................................................................................................................... 87 7.14 ODU 10pol to RS232 Adaptercable 1m ................................................................................. 89 7.15 Protection Bezel ...................................................................................................................... 89
8 Certifications ........................................................................................................... 90
8.1 Certifications / tests ................................................................................................................ 90 8.2 Electromagnetic compatibility (EMC) ................................................................................... 91 8.3 FCC Approval .......................................................................................................................... 92
9 Technical details ..................................................................................................... 93
9.1 Display data ............................................................................................................................. 93 9.2 Computer data ......................................................................................................................... 93 9.3 General data............................................................................................................................. 94
10 Service and Support ............................................................................................... 95
10.1 ads-tec Support ....................................................................................................................... 95 10.2 Company Address .................................................................................................................. 95

Tablet PCs TT13 5
© ads-tec GmbH • Heinrich-Hertz-Str. 1 • D-72622 Nürtingen
ABOUT US
ads-tec GmbH
Heinrich-Hertz-Str. 1
D-72622 Nürtingen
Germany
Phone: +49 (0) 7022 2522-0
Fax: +49 (0) 7022 2522-400
E-Mail: [email protected]
Home: www.ads-tec.com
ads-tec GmbH provides large enterprises and globally active corporations with cutting edge technology, up-to-date know-how and comprehensive services in the area of automation technology, data processing technology and systems engineering.
ads-tec GmbH implements full automation solutions from planning to commissioning and is specialized in handling and material handling technologies.
The data systems division develops and produces PC based solutions and offers a broad range of industrial PCs, thin clients and embedded systems.
ads-tec is specialized in modifying and optimizing embedded operating systems and develops software tools to complement its hardware platforms.

Tablet PCs TT13 6
© ads-tec GmbH • Heinrich-Hertz-Str. 1 • D-72622 Nürtingen
1 REMARKS
1.1 RELEVANT DATA COMMUNICATION WITH THE DEVICE
The following documents are essential for setting up and operating this device:
USER MANUAL:
Contains information for installation, commissioning and operating the device along with technical data of the device hardware.
a
1.2 DESCRIPTION OF THE WARNING SYMBOLS USED IN THIS GUIDE
Warning:
The “Warning” symbol precedes warnings on uses or operations that might either lead to personal injury and/or hazards, or to any hardware and software damages.
Note:
This Symbol indicates special notes, terms and/or conditions that strictly need to be observed to ensure optimised and/or zero-defect operations. It also precedes tips and suggestions for efficient unit implementation and software optimisation.
1.3 DATA, IMAGES, AMENDMENTS AND VARIATIONS
The texts, data and images herein are not binding. The right to any subsequent amendment and/or variation due to any technical and engineering progresses in the art whatsoever is hereby reserved.
1.4 TRADEMARKS
It is hereby notified that any software and/or hardware trademarks further to any company brand names as mentioned in this User’s Guide are all strictly subject to the various trademark, brand name and patent protection rights.
Windows®, Windows
® CE are registered trademarks of Microsoft Corp.
Intel®, Pentium
®, Atom™ , Core™2 are registered trademarks of Intel Corp.
IBM®, PS/2
® and VGA
® are registered trademarks of IBM Corp.
CompactFlash™ and CF™ are registered trademarks of SanDisk Corp.
RITTAL® is a registered trademark of the Rittal Werk Rudolf Loh GmbH & Co. KG.
Any further additional trademarks and/or brand names herein, be they domestic or international, are hereby duly acknowledged.

Tablet PCs TT13 7
© ads-tec GmbH • Heinrich-Hertz-Str. 1 • D-72622 Nürtingen
1.5 COPYRIGHT
This User’s Guide inclusive of all the images it contains is entirely proprietary and subject to copyright. Any irregular use of this Guide by third parties infringing copyright terms is thus strictly forbidden. Reproduction, translation, as well as electronic and photographic image storage and/or amendment processes, are subject to prior written authorisation directly by M/s. ads-tec GmbH.
Any violation and infringement thereto will be held liable for compensation of all damages.
Tablet PCs TT13 8
© ads-tec GmbH • Heinrich-Hertz-Str. 1 • D-72622 Nürtingen
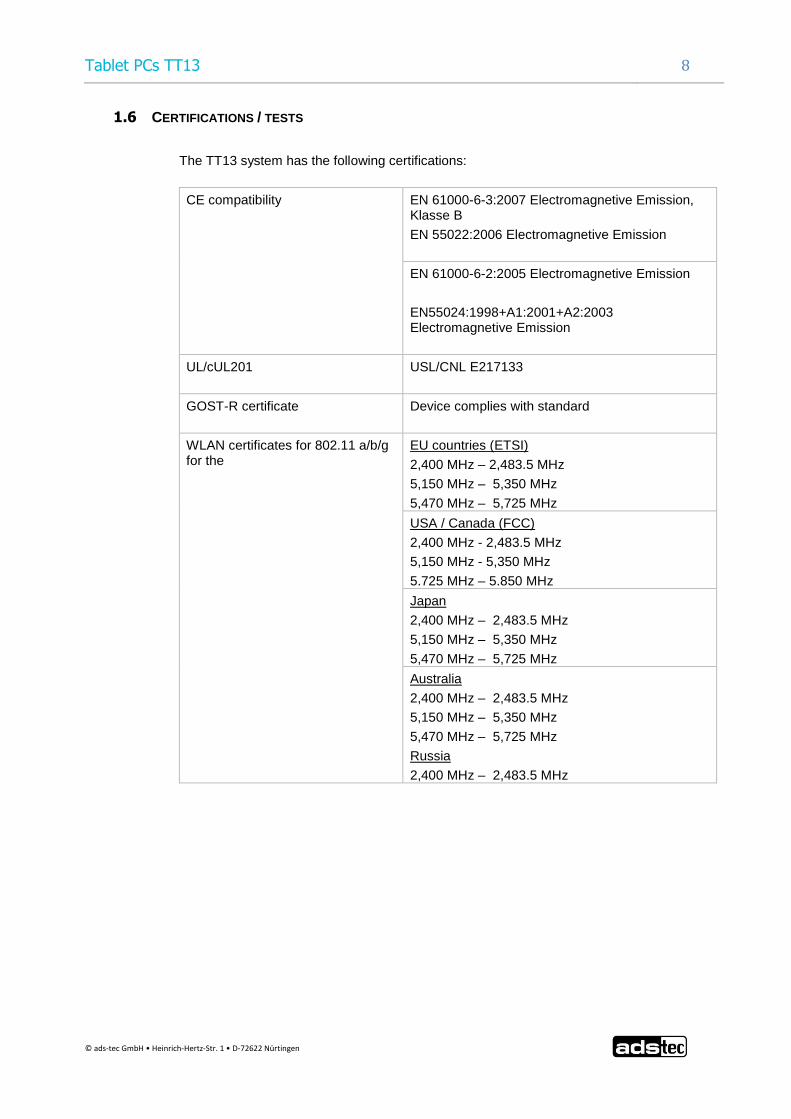
1.6 CERTIFICATIONS / TESTS
The TT13 system has the following certifications:
CE compatibility EN 61000-6-3:2007 Electromagnetive Emission, Klasse B
EN 55022:2006 Electromagnetive Emission
EN 61000-6-2:2005 Electromagnetive Emission
EN55024:1998+A1:2001+A2:2003 Electromagnetive Emission
UL/cUL201
USL/CNL E217133
GOST-R certificate
Device complies with standard
WLAN certificates for 802.11 a/b/g for the
EU countries (ETSI)
2,400 MHz – 2,483.5 MHz
5,150 MHz – 5,350 MHz
5,470 MHz – 5,725 MHz
USA / Canada (FCC)
2,400 MHz - 2,483.5 MHz
5,150 MHz - 5,350 MHz
5.725 MHz – 5.850 MHz
Japan
2,400 MHz – 2,483.5 MHz
5,150 MHz – 5,350 MHz
5,470 MHz – 5,725 MHz
Australia
2,400 MHz – 2,483.5 MHz
5,150 MHz – 5,350 MHz
5,470 MHz – 5,725 MHz
Russia
2,400 MHz – 2,483.5 MHz

Tablet PCs TT13 9
© ads-tec GmbH • Heinrich-Hertz-Str. 1 • D-72622 Nürtingen
Note:
A respective conformity declaration for the authority in charge is available at the manufacturer and may be viewed on request.
All connected components, as well as cable connections must also meet these requirements for compliance with the EMC legislation. For this reason, screened bus and LAN cables including screened connectors must be used and installed according to the instructions in this user manual.
1.7 SCOPE OF DELIVERY
The following components are included in the scope of delivery:
1 x device
1 x 20V DC power supply unit
2 x batteries
AS AN OPTION:
1 x DVD drive, external
1 x transport case

Tablet PCs TT13 10
© ads-tec GmbH • Heinrich-Hertz-Str. 1 • D-72622 Nürtingen
2 OPERATING INSTRUCTIONS
This device contains electrical voltages and extremely sensitive components. The manufacturer, or a service partner authorised by the manufacturer, should be consulted if you plan to make any modifications. For this type of work, the device must be switched off at the mains and the power lead must be disconnected. Suitable measures for avoiding electrostatic discharge towards parts of the components when touching the equipment must be taken. If the device is opened by an unauthorised person, hazards for the user might arise and any warranty claim will cease.
General instructions:
All users must read this manual and have access to it at all times.
Installation, commissioning and operation may only be carried out by trained and qualified staff.
The security instructions and the manual itself must be observed by all persons who work with this device.
At the location of use the valid guidelines and regulations for accident prevention must be observed.
The manual contains the most important instructions on how to use this device in a safe way.
Appropriate storage, proper transport, installation and commissioning, as well as careful operation are prerequisites for ensuring safe and proper operation of the device.
Warning:
Any leads (e.g. power leads, interface cables) may only be connected if the device is switched off in order to avoid damaging the device.
2.1 OPERATING LOCATION
This device is designed for professional and portable use indoors and outdoors. You have to take care that the environmental conditions specified in the technical data specification are met.
Warning:
The device may only be switched on after acclimatising to the ambient temperature in order to avoid condensate accumulation. The same applies if the device has previously been exposed to extreme temperature variations.
To avoid overheating in operation: The device must not be exposed to direct radiation by sunlight or any other light or heat source.
2.2 DAMAGES DUE TO IMPROPER USE
Should the service system have evident signs of damages incurred e.g. due to wrong operation or storage conditions or due to improper unit use, the unit must be decommissioned or scrapped. Ensure that it is safe from accidental re-implementation.
Tablet PCs TT13 11
© ads-tec GmbH • Heinrich-Hertz-Str. 1 • D-72622 Nürtingen
2.3 WARRANTY / REPAIRS
During the unit warranty period, any repairs thereto must strictly be conducted solely by the manufacturer or by service personnel that has been duly authorised by the manufacturer.
2.4 HANDLING AND PROPER DISPOSAL OF LITHIUM BATTERIES
This device contains a lithium battery to supply the systemclock until there is no power supply connected. Depending on exposure, the battery has a lifetime of 3-5 years.
Note:
High thermal exposure will age the battery faster.
Warning:
By using the wrong types of batteries, there is acute danger of explosion.
Warning:
Lithium batteries should not be exposed to fire, soldered, recharged, opened, short-circuited, reversed or heated above 100 °C and they should be disposed of properly as well as protected against sunlight, moisture and condensation.
The lithium battery can only be replaced by the same type or a type recommended by the manufacturer.
The used lithium battery should be disposed of in accordance with local legal regulations.
2.5 SAFETY INSTRUCTIONS
Warning:
All unit assembly operations must be strictly conducted only under safe, secure and zero-potential conditions.
Special Note:
When handling parts and components susceptible to electrical discharge, please accurately observe all the relevant safety provisions.
(DIN EN 61340-5-1 / DIN EN 61340-5-2 refers)

Tablet PCs TT13 12
© ads-tec GmbH • Heinrich-Hertz-Str. 1 • D-72622 Nürtingen
2.6 EXTERNAL DEVICE DIMENSIONS
Tablet PCs TT13 13
© ads-tec GmbH • Heinrich-Hertz-Str. 1 • D-72622 Nürtingen
3 COMMISSIONING
The power supply connection and interfaces of this device are installed at the side of case. All supply leads and all required data leads have to be connected before starting commissioning.
Warning:
The device must be switched off before connecting or disconnecting any cables in order to prevent damage to the electronics!
The device may only be switched on after acclimatising to the ambient temperature in order to avoid condensate accumulation. Make sure to meet the permissible voltage requirements for this device.
After switching off and before switching on you must wait for at least 10 seconds.
Note:
The screen of a data cable must always be connected with the connector housing (EMC).
Under the embedded operating system, interfaces must explicitly be enabled and required drivers must be installed in order to be able to use them.
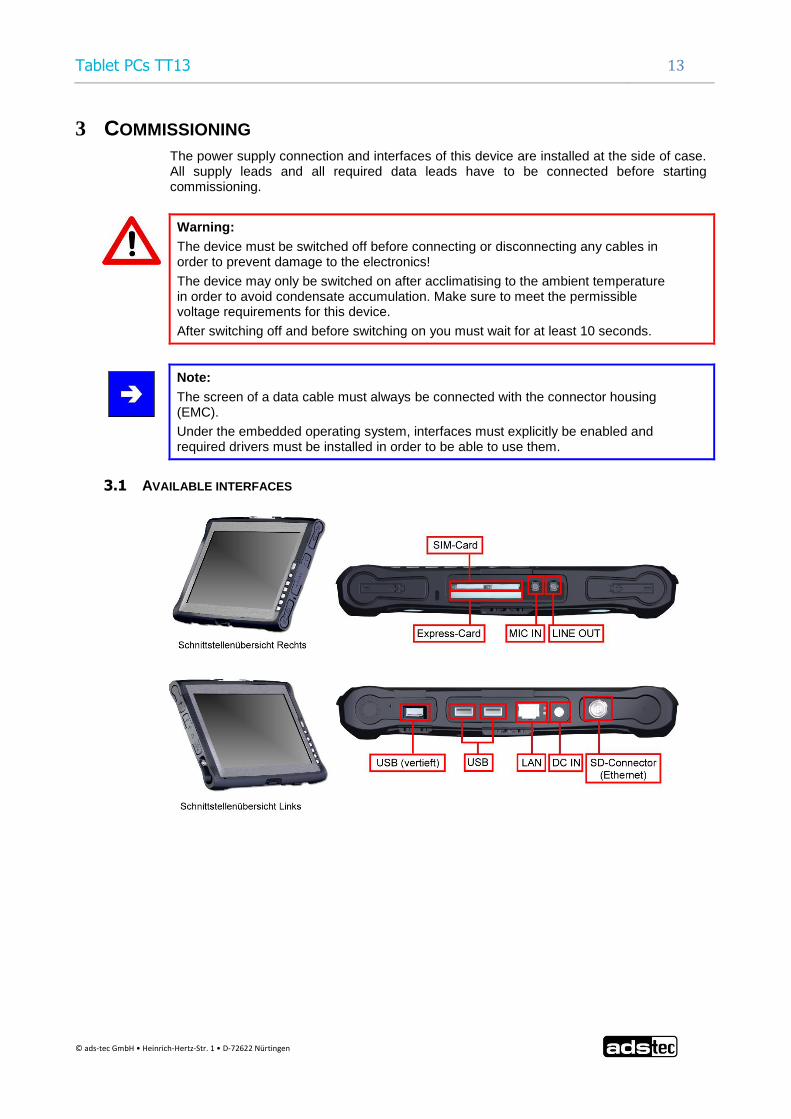
3.1 AVAILABLE INTERFACES
Tablet PCs TT13 14
© ads-tec GmbH • Heinrich-Hertz-Str. 1 • D-72622 Nürtingen
3.2 READINESS FOR OPERATION CHECKS
Accurately check the unit for any hidden damages possibly incurred during improper transport and/or handling or wrong operation site and/or storage conditions (e.g. smoke emissions or formation by the unit, etc.). If any damages are found, the unit must be decommissioned or scrapped. Ensure that it is safe from accidental re-implementation.
3.3 TOUCHSCREEN
The control system is equipped with an analogue, resistive touchscreen. The driver software required for its use is already integrated in the respective operating system.
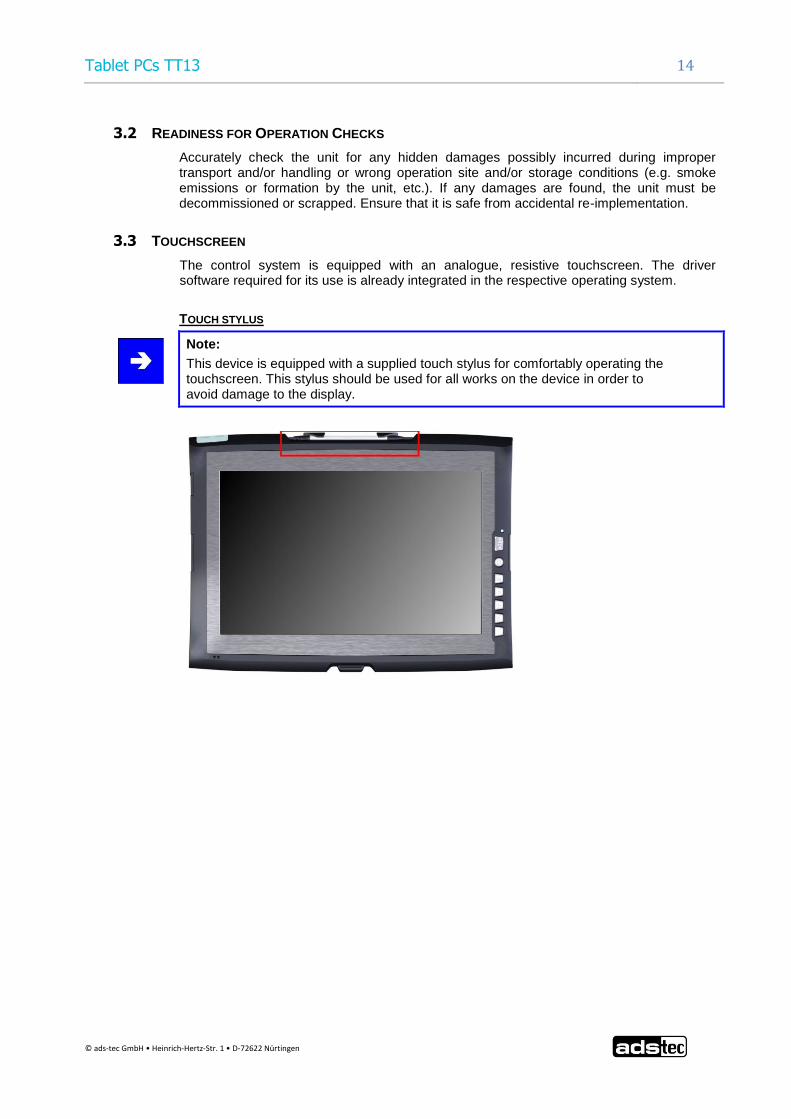
TOUCH STYLUS
Note:
This device is equipped with a supplied touch stylus for comfortably operating the touchscreen. This stylus should be used for all works on the device in order to avoid damage to the display.

Tablet PCs TT13 15
© ads-tec GmbH • Heinrich-Hertz-Str. 1 • D-72622 Nürtingen
4 FRONT PANEL FUNCTIONS
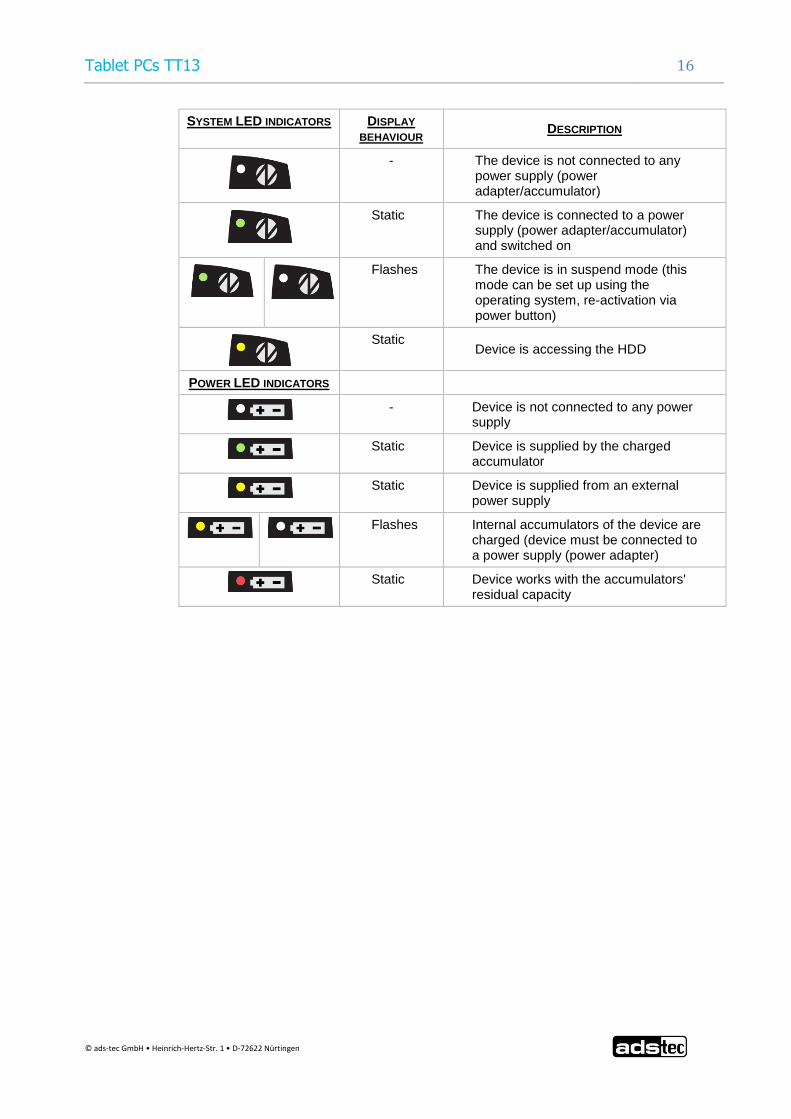
4.1 STATUS INDICATORS
This device is equipped with different status LEDs in the front. These LEDs indicate current events, like the system activity state, the current accumulator charge status and WLAN activities.
Tablet PCs TT13 16
© ads-tec GmbH • Heinrich-Hertz-Str. 1 • D-72622 Nürtingen
SYSTEM LED INDICATORS DISPLAY
BEHAVIOUR DESCRIPTION
- The device is not connected to any power supply (power adapter/accumulator)
Static The device is connected to a power supply (power adapter/accumulator) and switched on
Flashes The device is in suspend mode (this mode can be set up using the operating system, re-activation via power button)
Static Device is accessing the HDD
POWER LED INDICATORS
- Device is not connected to any power
supply
Static Device is supplied by the charged
accumulator
Static Device is supplied from an external
power supply
Flashes Internal accumulators of the device are
charged (device must be connected to a power supply (power adapter)
Static Device works with the accumulators'
residual capacity
Tablet PCs TT13 17
© ads-tec GmbH • Heinrich-Hertz-Str. 1 • D-72622 Nürtingen
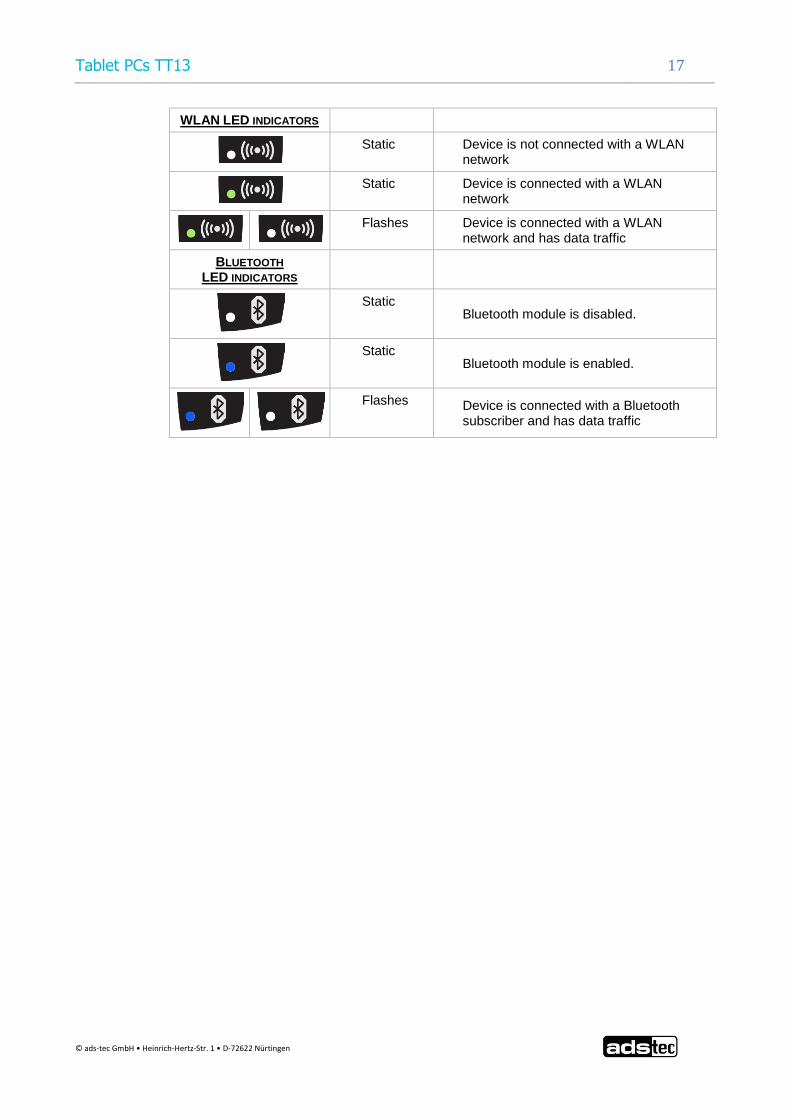
WLAN LED INDICATORS
Static Device is not connected with a WLAN
network
Static Device is connected with a WLAN
network
Flashes Device is connected with a WLAN
network and has data traffic
BLUETOOTH LED INDICATORS
Static Bluetooth module is disabled.
Static Bluetooth module is enabled.
Flashes Device is connected with a Bluetooth subscriber and has data traffic

Tablet PCs TT13 18
© ads-tec GmbH • Heinrich-Hertz-Str. 1 • D-72622 Nürtingen
4.2 FRONT CONTROL KEYS
The keys on the front panel are occupied with the following functions by a specific driver in the soft keyboard:

Tablet PCs TT13 19
© ads-tec GmbH • Heinrich-Hertz-Str. 1 • D-72622 Nürtingen
SYMBOL: FUNCTION:
ON / OFF pushbutton for the device (approx. 0,5 seconds delayed)
Shift key (SHIFT) for activating the second keyboard level. This key must be pressed simultaneously with the desired function key
Level 1:
Change task (Alt+ESC) in Windows
Level 2:
Increase the system volume
Level 1:
Switch from Potrait view to Landscape view
Level 2:
Decrease the system volume
Level 1:
Right mouse-key function
Level 2:
Increase display brightness
Level 1:
Activate and deactivate the soft keyboard for letter/character input using the touchscreen.
Level 2:
Decrease display brightness
Warning:
The front control keys should not be operated with a touch stylus but with the fingers, only.
Tablet PCs TT13 20
© ads-tec GmbH • Heinrich-Hertz-Str. 1 • D-72622 Nürtingen
Note:
All function keys in the front panel, except for the ON / OFF pushbutton and the Fn button, have 2 function levels each. The primary function is activated by simply pushing the respective key. The second function level (small symbol to the top right) can be activated each time by pushing the Fn key first, and then additionally pushing the desired function key. It is essential to keep the Fn key always pushed in order to activate the second function level.
Note:
If the software keyboard is not installed, only the functions for display settings and volume control are active. The controller display will not be output on the display, in this case. Above described functions are pre-set ex works.
Tablet PCs TT13 21
© ads-tec GmbH • Heinrich-Hertz-Str. 1 • D-72622 Nürtingen
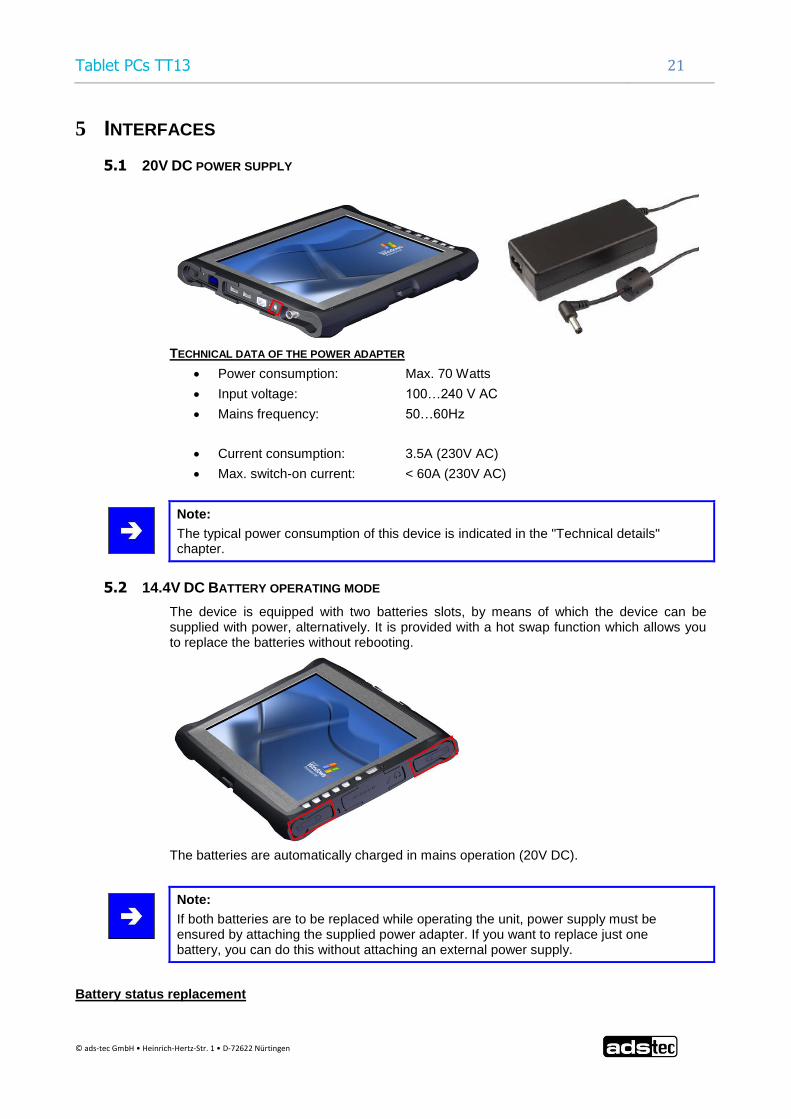
5 INTERFACES
5.1 20V DC POWER SUPPLY
TECHNICAL DATA OF THE POWER ADAPTER
Power consumption: Max. 70 Watts
Input voltage: 100…240 V AC
Mains frequency: 50…60Hz
Current consumption: 3.5A (230V AC)
Max. switch-on current: < 60A (230V AC)
Note:
The typical power consumption of this device is indicated in the "Technical details" chapter.
5.2 14.4V DC BATTERY OPERATING MODE
The device is equipped with two batteries slots, by means of which the device can be supplied with power, alternatively. It is provided with a hot swap function which allows you to replace the batteries without rebooting.
The batteries are automatically charged in mains operation (20V DC).
Note:
If both batteries are to be replaced while operating the unit, power supply must be ensured by attaching the supplied power adapter. If you want to replace just one battery, you can do this without attaching an external power supply.
Battery status replacement

Tablet PCs TT13 22
© ads-tec GmbH • Heinrich-Hertz-Str. 1 • D-72622 Nürtingen
The TT13 batteries can be removed by using a mechanical ejector on the back of the device.
The batteries status can be retrieved by pushing a button on the batteries. The batteries display will light up for a few seconds and show the current batteries charge status on a scale from 0 to 100. If the display lights red, this represents a weak battery. If the display is green, it shows that the battery is fully charged. If the device is in operating mode, the battery status can be retrieved by using the supplied Battery Information & Diagnostics Tool.
Note:
The "Hardware specific software” chapter describes the Battery Information & Diagnostics Tool, which can be used for retrieving the accumulator status while operating the unit.

Tablet PCs TT13 23
© ads-tec GmbH • Heinrich-Hertz-Str. 1 • D-72622 Nürtingen
5.3 USB CONNECTIONS
The USB interfaces are used for connecting peripherals with USB connection. The interfaces comply with the USB 2.0 standard.

Tablet PCs TT13 24
© ads-tec GmbH • Heinrich-Hertz-Str. 1 • D-72622 Nürtingen
PIN NUMBER SIGNAL NAME
1 VDC
2 D -
3 D+
4 GND
Note:
The two side USB ports together have a current limit of 1.5A. This allows trouble-free operation of external devices, like an external DVD drive. The in-depth USB interface is designed according to the standard for 0.5A.

Tablet PCs TT13 25
© ads-tec GmbH • Heinrich-Hertz-Str. 1 • D-72622 Nürtingen
5.4 ODU-INTERFACE (OPTIONAL)
By using the SD Connector, the device can be connected to an Ethernet network (10/100 Mbit). Data throughputs of 10MB can be achieved with a maximum cable length of 5m.
Note:
This interface does not allow booting via the network. If you want to boot the device via the network connection, we recommend using the LAN interface.
PIN-OUT: (LAN)
PIN-NUMBER SIGNAL NAME
1 RxD+
2 RxD-
3 TxD+
4 TxD-
PIN-OUT: USB
PIN-NUMBER SIGNAL NAME
1 Data-
2 Data+
3 GND
4 VCC
5 NC
Tablet PCs TT13 26
© ads-tec GmbH • Heinrich-Hertz-Str. 1 • D-72622 Nürtingen
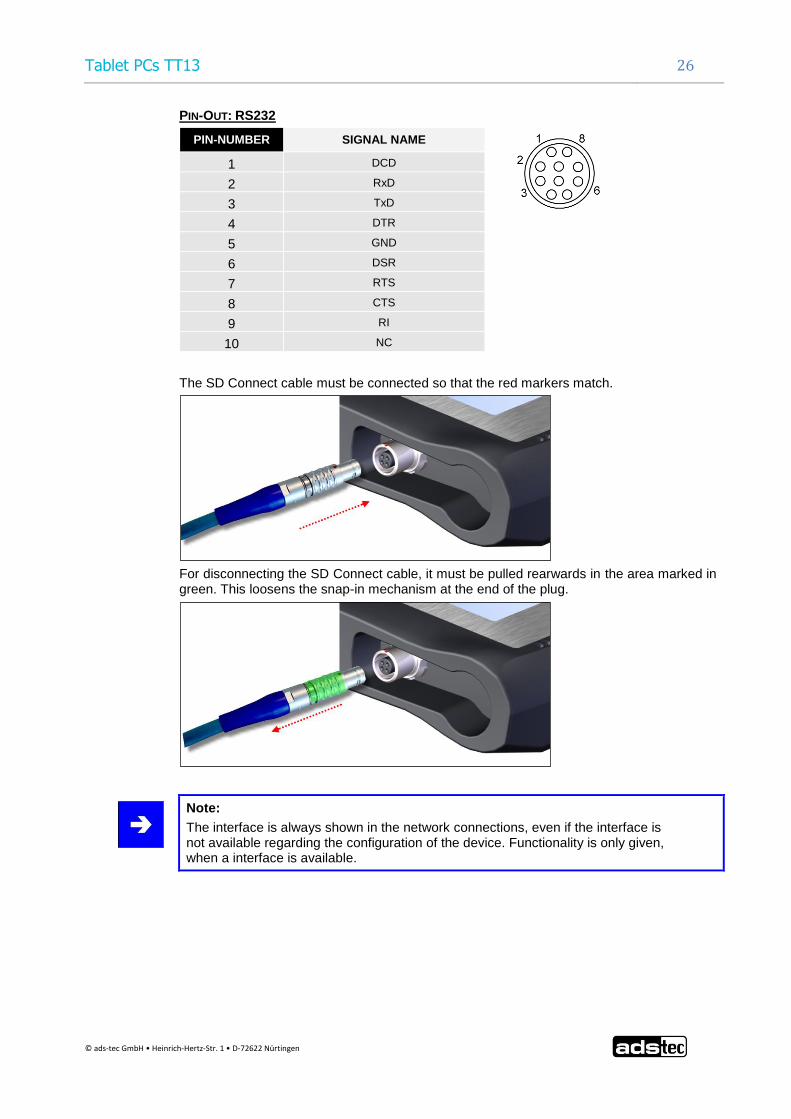
PIN-OUT: RS232
PIN-NUMBER SIGNAL NAME
1 DCD
2 RxD
3 TxD
4 DTR
5 GND
6 DSR
7 RTS
8 CTS
9 RI
10 NC
The SD Connect cable must be connected so that the red markers match.
For disconnecting the SD Connect cable, it must be pulled rearwards in the area marked in green. This loosens the snap-in mechanism at the end of the plug.
Note:
The interface is always shown in the network connections, even if the interface is not available regarding the configuration of the device. Functionality is only given, when a interface is available.
Tablet PCs TT13 27
© ads-tec GmbH • Heinrich-Hertz-Str. 1 • D-72622 Nürtingen
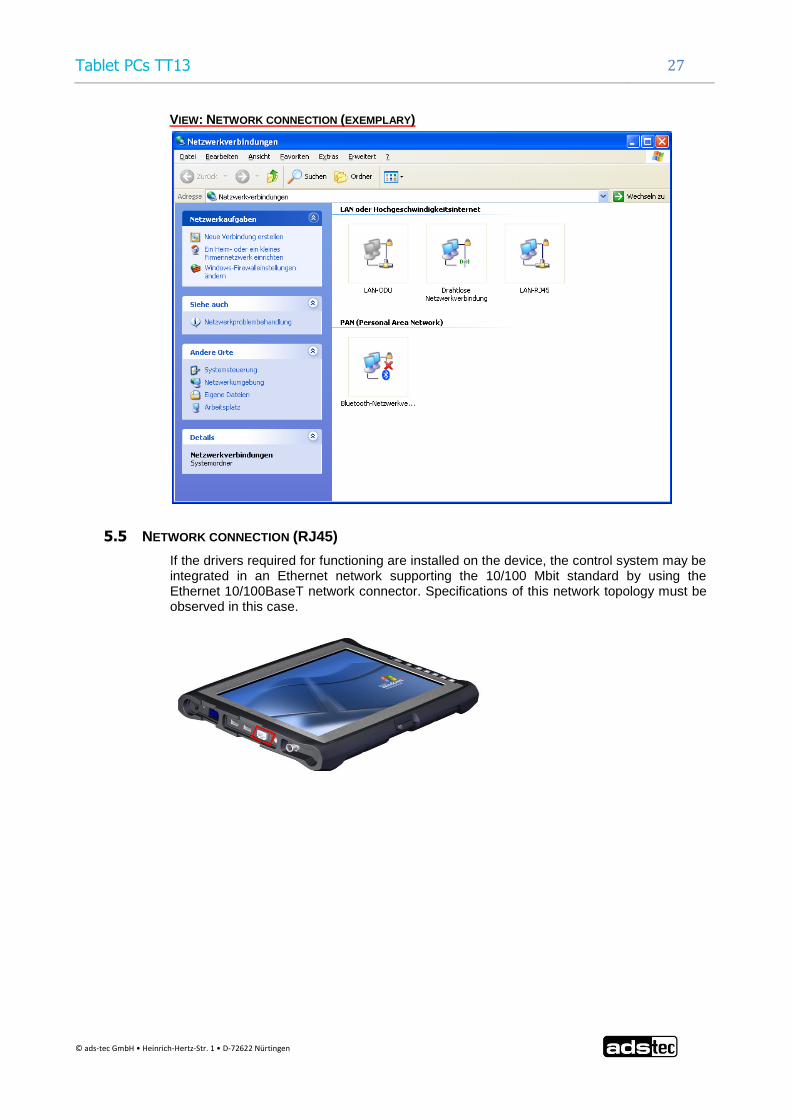
VIEW: NETWORK CONNECTION (EXEMPLARY)
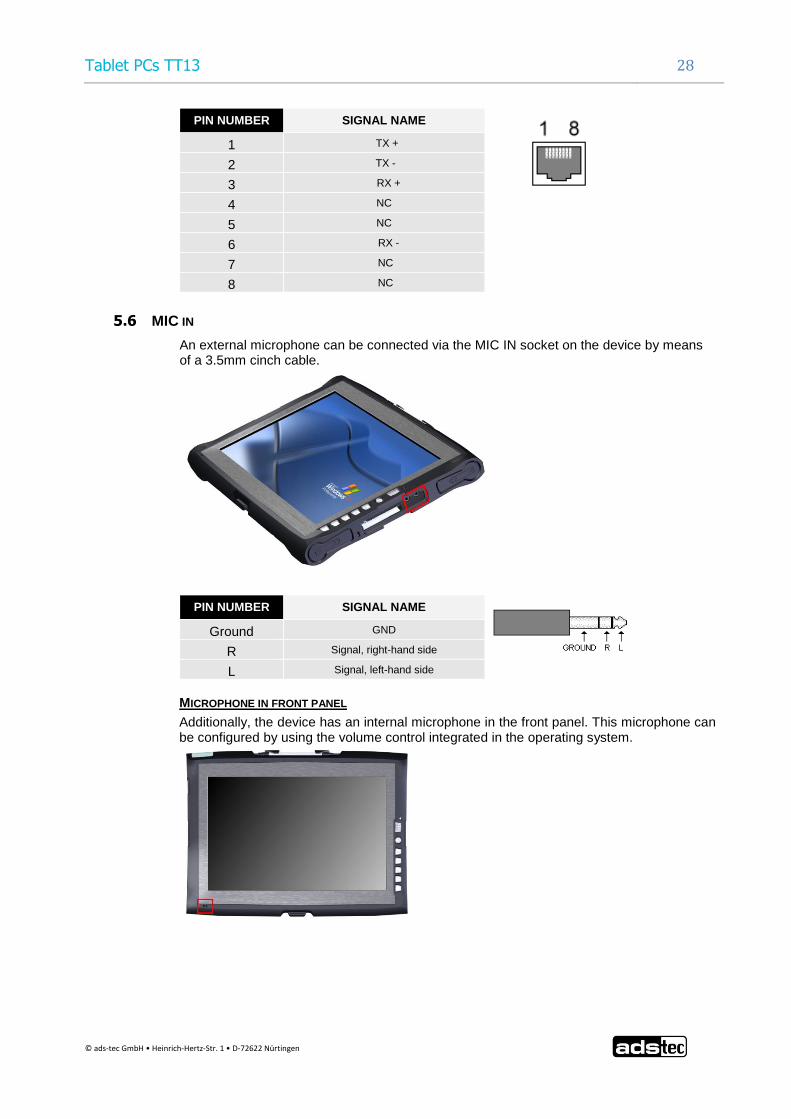
5.5 NETWORK CONNECTION (RJ45)
If the drivers required for functioning are installed on the device, the control system may be integrated in an Ethernet network supporting the 10/100 Mbit standard by using the Ethernet 10/100BaseT network connector. Specifications of this network topology must be observed in this case.
Tablet PCs TT13 28
© ads-tec GmbH • Heinrich-Hertz-Str. 1 • D-72622 Nürtingen
PIN NUMBER SIGNAL NAME
1 TX +
2 TX -
3 RX +
4 NC
5 NC
6 RX -
7 NC
8 NC
5.6 MIC IN
An external microphone can be connected via the MIC IN socket on the device by means of a 3.5mm cinch cable.
MICROPHONE IN FRONT PANEL
Additionally, the device has an internal microphone in the front panel. This microphone can be configured by using the volume control integrated in the operating system.
PIN NUMBER SIGNAL NAME
Ground GND
R Signal, right-hand side
L Signal, left-hand side
Tablet PCs TT13 29
© ads-tec GmbH • Heinrich-Hertz-Str. 1 • D-72622 Nürtingen
5.7 LINE OUT
By using the Line Out socket of this device and connecting via a 3.5mm cinch cable, a stereo audio signal can be output to earphones or to external speakers.
PIN NUMBER SIGNAL NAME
Ground GND
R Signal, right-hand side
L Signal, left-hand side
5.8 EXPRESSCARD SLOT
The device is equipped with an ExpressCard slot, which supports the following ExpressCard types.
Tablet PCs TT13 30
© ads-tec GmbH • Heinrich-Hertz-Str. 1 • D-72622 Nürtingen
6 SOFTWARE & DRIVER INSTALLATION
The device will be delivered with a pre-installed Windows operating system on request by the customer. The drivers required for this are already installed and the operating system will be enabled by entering the licence information. Should an initial installation be required, please follow the following steps. With a newer operating system like Windows XP, the network card and graphics card will properly be recognised during the initial installation, so that only the touchscreen driver and the soft keyboard must be installed separately.
Note:
If the hard drive was formatted, the operating system can be reinstalled by using one of the existing interfaces.
An external keyboard is required for installation.
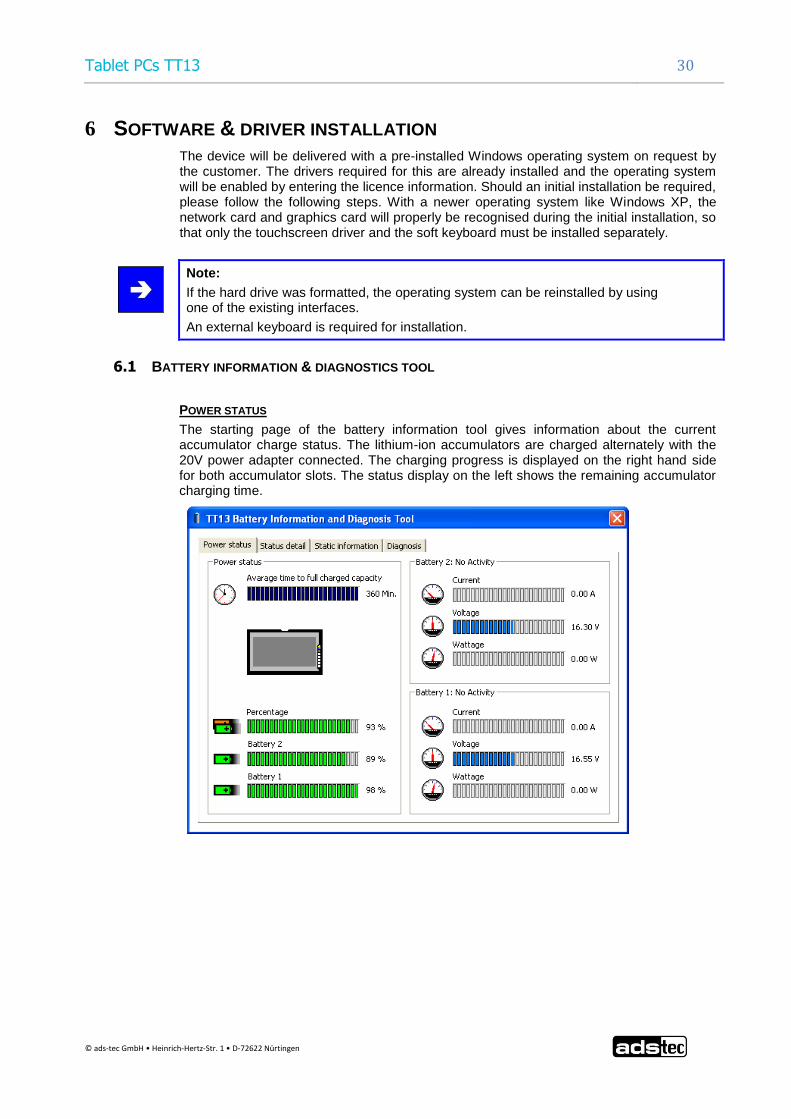
6.1 BATTERY INFORMATION & DIAGNOSTICS TOOL
POWER STATUS
The starting page of the battery information tool gives information about the current accumulator charge status. The lithium-ion accumulators are charged alternately with the 20V power adapter connected. The charging progress is displayed on the right hand side for both accumulator slots. The status display on the left shows the remaining accumulator charging time.

Tablet PCs TT13 31
© ads-tec GmbH • Heinrich-Hertz-Str. 1 • D-72622 Nürtingen
STATUS DETAILS
The Status Detail page lists all starting page data in a table.
STATIC INFORMATION
The "Static Information" tab displays all detail information, e.g. the manufacturer, and the capacity of the lithium-ion accumulator.
Tablet PCs TT13 32
© ads-tec GmbH • Heinrich-Hertz-Str. 1 • D-72622 Nürtingen
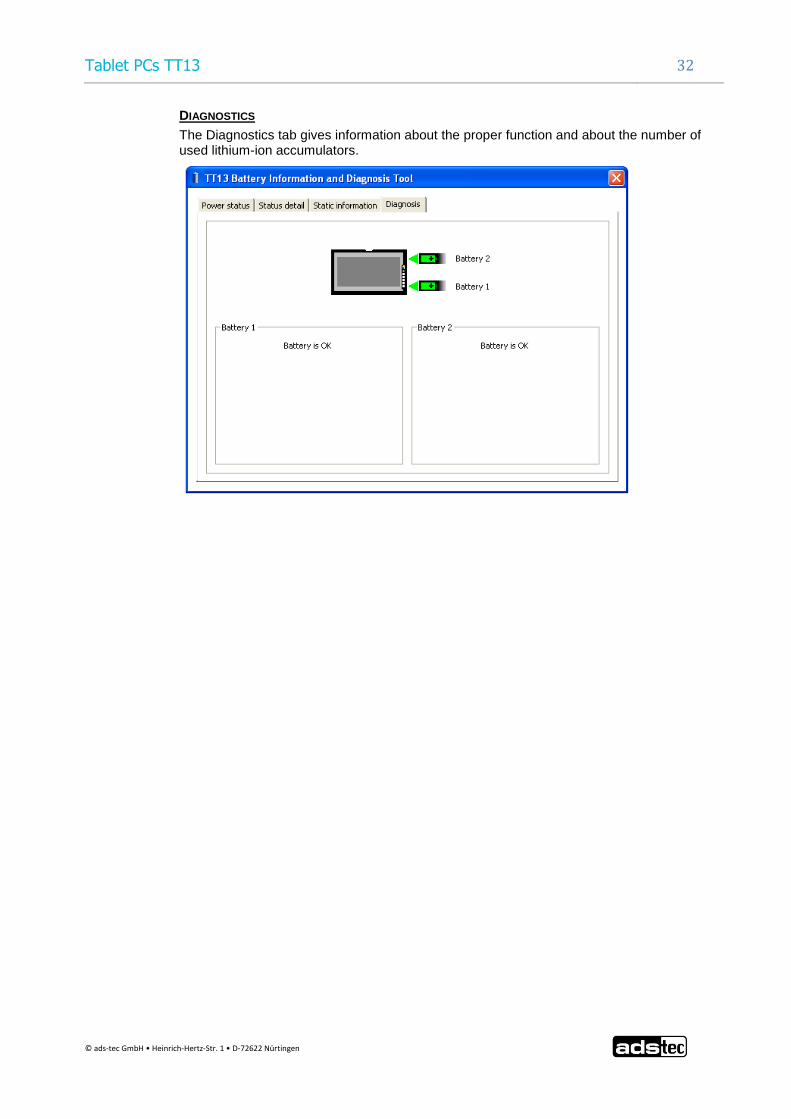
DIAGNOSTICS
The Diagnostics tab gives information about the proper function and about the number of used lithium-ion accumulators.

Tablet PCs TT13 33
© ads-tec GmbH • Heinrich-Hertz-Str. 1 • D-72622 Nürtingen
6.2 TT13 HDD PROTECTION
Note:
The application is attended to protect the read-/write cycle of the hard disk. Via a sensor, sudden kinetic changes or agitation is being recognized. To prevent damage and possible data loss, the reading head will be placed to a neutral position.
The application is used to control the HDD Protection drivers and services. It will start minimized and adds the tray bar a icon.
Illustration1: Traybar Icon
Via the icon, the current status of the HDD Protection is being shown. If the HDD is blocked, the following status is shown.
Illustration2: Traybar icon with activated HDD Protection
Double clicking or using the context menu will maximize the application.
The configuration application (Illustration3) enables the power on /off of the icon the traybar. Additionally the durability of protection after, a agitation, can be configured in ms at the “HDD Protection Time”. The sensibility of protection can be changed by four steps. These steps are: High, Middle, Low and Inactive. The protection can be activated manually and stays activated until the user is deactivating the protection.
Illustration3: Configuration surface

Tablet PCs TT13 34
© ads-tec GmbH • Heinrich-Hertz-Str. 1 • D-72622 Nürtingen
CONFIGURATION
The Configuration of the application is done by the file c4hddshock.ini
The following settings are possible:
Parameter Options
LanguageId Parameter to change the language of the surface. Right now the parameter can be DE or EN.
LANGUAGES
At the moment the languae English and German is supported by the application. The text is configured in the lang directory under c4hddshock_de.txt and c4hddshock_en.txt. The languages can be added by further files. The Ending of the file matches the code for the language which has to be added in the INI-File under LanguageID.

Tablet PCs TT13 35
© ads-tec GmbH • Heinrich-Hertz-Str. 1 • D-72622 Nürtingen
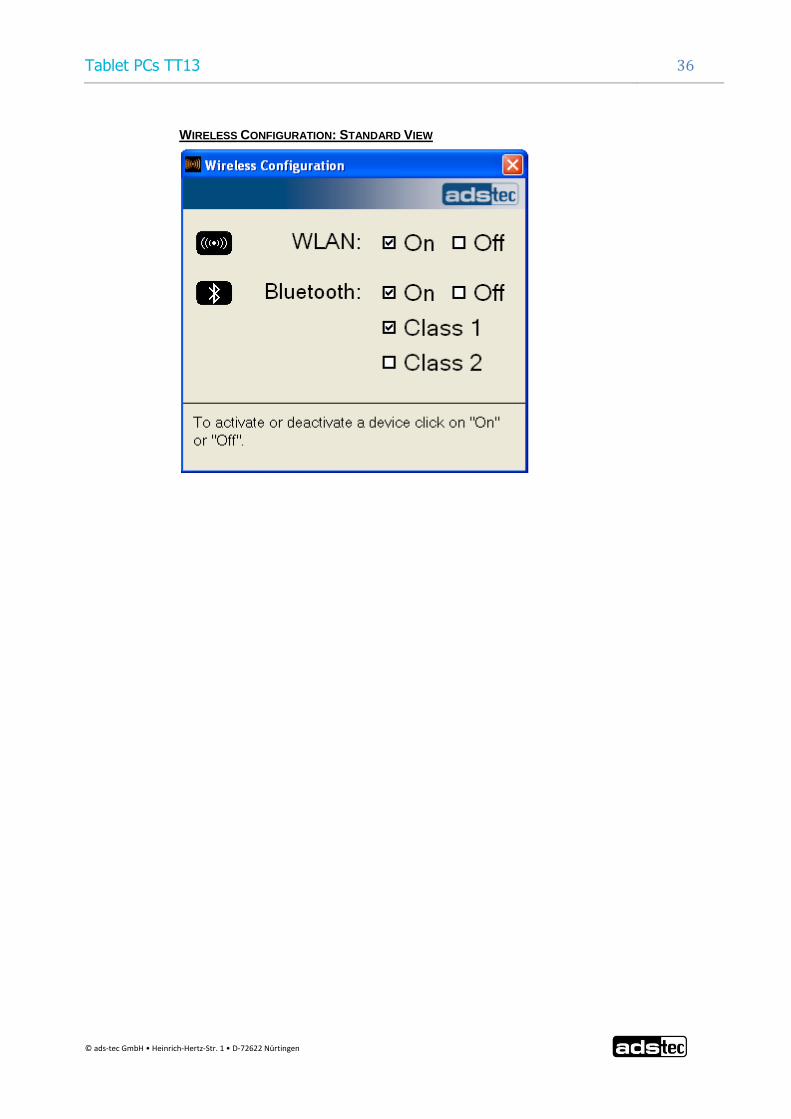
6.3 TT13 WIRELESS KONFIGURATION
Hinweis:
The application is intended to activate/ deactivate the whole hardware in the device, which is intended for wireless data communication.
Die Anwendung dient zur kompletten Aktivierung / Deaktivierung der Hardware im Gerät, welche für drahtlose Datenkommunikation dient.
Depending on your device configuration the power off of the following hardware is allowed:
WLAN
Bluetooth
UMTS
RFID
BLUETOOTH
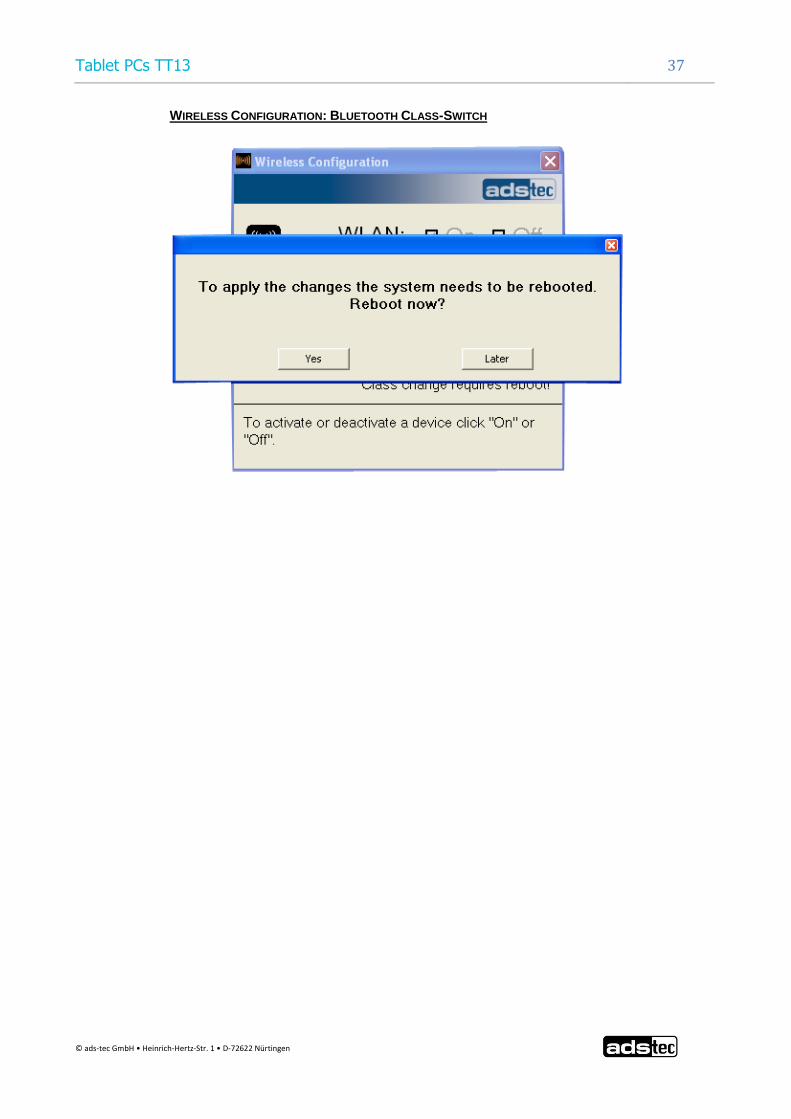
If a Bluetooth module is available, the Bluetooth class can be switched. With Class 1, a range of max. 100m open air can be reached, while Class 2 is limited to a range of 10m.
After changing the Bluetooth Class it is mandatory necessary to reebot the device, because the changes will only take effect after rebooting the device.
The Switch as well as the activation and deactivation of the separate components can take several seconds.
If the option “Controlled by Bios” in Advaned/Firmware is Enabled, the bios is able to activate or deactivate the several hardware components depending on the configuration in the Bios. The selected settings for the wireless configuration in Windows will be overwritten. For usage of the Wireless configuration, it is recommended to set the option Controlled by BIOS to Disabled.
Note:
The application can be started in the control panel after installation.
Tablet PCs TT13 36
© ads-tec GmbH • Heinrich-Hertz-Str. 1 • D-72622 Nürtingen
WIRELESS CONFIGURATION: STANDARD VIEW
Tablet PCs TT13 37
© ads-tec GmbH • Heinrich-Hertz-Str. 1 • D-72622 Nürtingen
WIRELESS CONFIGURATION: BLUETOOTH CLASS-SWITCH

Tablet PCs TT13 38
© ads-tec GmbH • Heinrich-Hertz-Str. 1 • D-72622 Nürtingen
6.4 TT13 TOUCH ROTATION
Note:
The service enables the loading for the best configuration for 0° and 90°.
If the button landscape/portrait is activated, the switch from 0° to 90 takes effect. Pushing the button again will switch back to 0°.
Note:
Every kind of exposure needs to be calibrated once via the 25 point calibration.

Tablet PCs TT13 39
© ads-tec GmbH • Heinrich-Hertz-Str. 1 • D-72622 Nürtingen
ELO TOUCH 25 POINT CALIBRATION
The calibration of the ELO Touchscreen can be done via the application in the control panel.
Note:
If you want to start the calibration for the 90°-View, you first have switch the display calibration via the landscape/portrait button before beginning the ELO Touchscreen calibration.
Start the calibration of the Touchscreen via the button “Adjust”
Tablet PCs TT13 40
© ads-tec GmbH • Heinrich-Hertz-Str. 1 • D-72622 Nürtingen
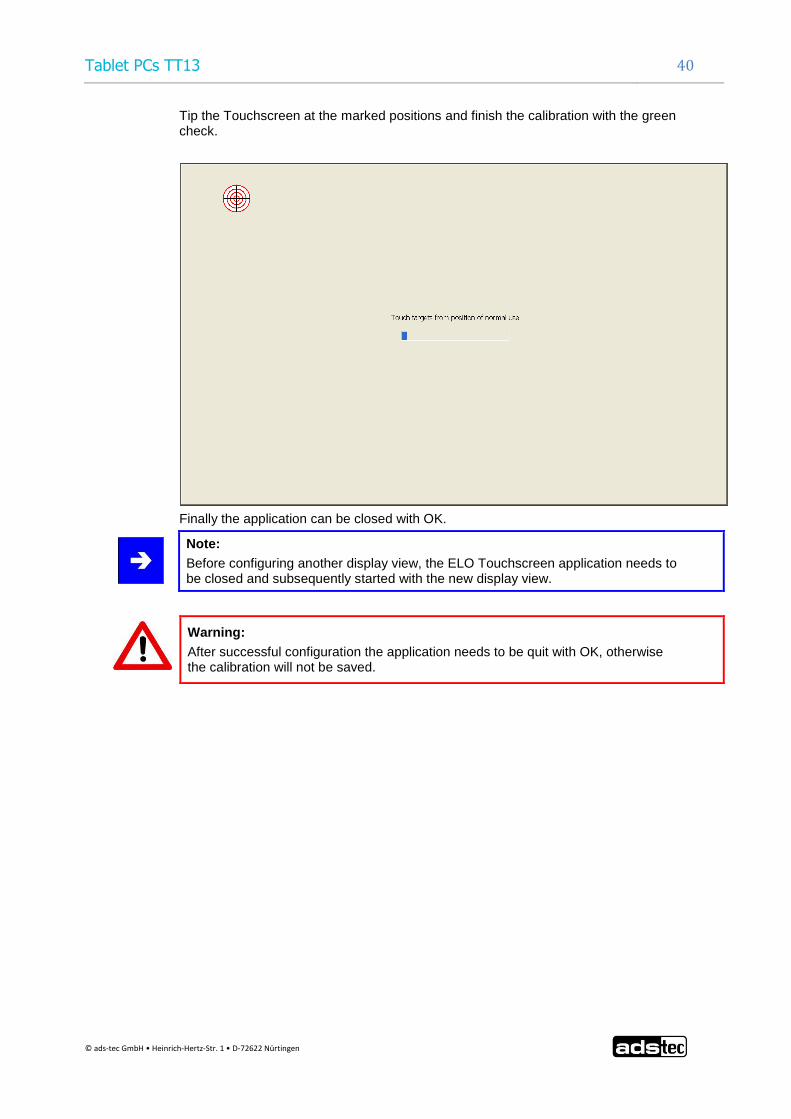
Tip the Touchscreen at the marked positions and finish the calibration with the green check.
Finally the application can be closed with OK.
Note:
Before configuring another display view, the ELO Touchscreen application needs to be closed and subsequently started with the new display view.
Warning:
After successful configuration the application needs to be quit with OK, otherwise the calibration will not be saved.

Tablet PCs TT13 41
© ads-tec GmbH • Heinrich-Hertz-Str. 1 • D-72622 Nürtingen
6.5 TT13 MONITORING
Note:
The application is pretended to monitor the temperature and the fan of the TT13.
The application starts minimized and is not visible until a fault is recognized. If a fault is recognized, the temperature or the fan icon in the traybar will be displayed.
Illustration1: Traybar Icon
A Warning is displayed additionally while the icon is faded in.
Illustration2: Warning message if fan breakdown
With a double click on the Icon or the context menu, the warning can be displayed as dialogue.
Illustration3: Temperature exeedence at TT13
CONFIGURATION
The configuration of the application is done by the file C4Monitoring.ini.
The following settings are possible:
Tablet PCs TT13 42
© ads-tec GmbH • Heinrich-Hertz-Str. 1 • D-72622 Nürtingen
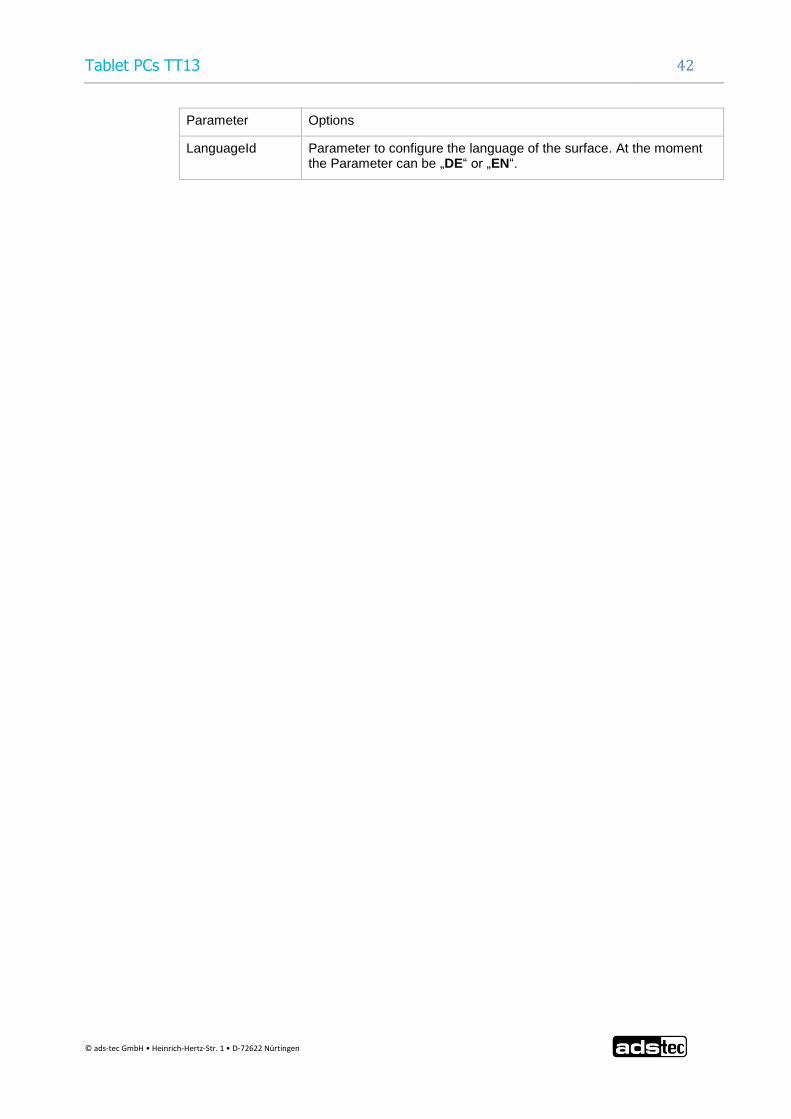
Parameter Options
LanguageId Parameter to configure the language of the surface. At the moment the Parameter can be „DE“ or „EN“.

Tablet PCs TT13 43
© ads-tec GmbH • Heinrich-Hertz-Str. 1 • D-72622 Nürtingen
LANGUAGES
At the moment the languae English and German is supported by the application. The text is configured in the lang directory under C4Monitoring _de.txt and C4Monitoring _en.txt. The languages can be added by further files. The Ending of the file matches the code for the language which has to be added in the INI-File under LanguageID.
With this text, the files for warning can be customized.
6.6 TT13 ADSXTERN TEST
Note:
More information for TT13 adsxtern can be seen on the Service-CD.
6.7 MANUAL REINSTALLATION
The following Stepps are only required if a reinstallation of the operating system is necessary.
INSTALLATION OF THE OPERATING SYSTEM
Install the operating system from a storage. (USB / LAN / CD/DVD)
INSTALLATION OF THE DEVICE DRIVERS FROM THE SERVICE CD
Additionally the device drivers have to be installed from the supplied Service-CD. The device drivers are placed in the directory Driver on the Service-CD.l
INSTALLATION OF THE TT13 TOOLS
The TT13 Software Tools can be installed via the TT13 Tools Installation V.x.x.exe. The Setup-File is placed in the directory Software Tools on the Service-CD.
Tablet PCs TT13 44
© ads-tec GmbH • Heinrich-Hertz-Str. 1 • D-72622 Nürtingen
6.8 INSTALLATION OF THE TT13 SOFTWARE PACKAGE
Note:
With the TT13 Software Tools hardware components can be controlled, monitored and evaluated. In case of high exposure the Software Tools will help to prevent lasting damage by protecting important hardware components actively. In diagnostic cases the Software Tools will give information about the system condition and enable fast troubleshooting.

Tablet PCs TT13 45
© ads-tec GmbH • Heinrich-Hertz-Str. 1 • D-72622 Nürtingen
Start the TT13 Tools Installation Vx.x.exe. Verify with OK.
Followed by a click on Next
Choose the directory where the Programs should be installed. It is recommended to use the Default Path.
Verify with Next

Tablet PCs TT13 46
© ads-tec GmbH • Heinrich-Hertz-Str. 1 • D-72622 Nürtingen
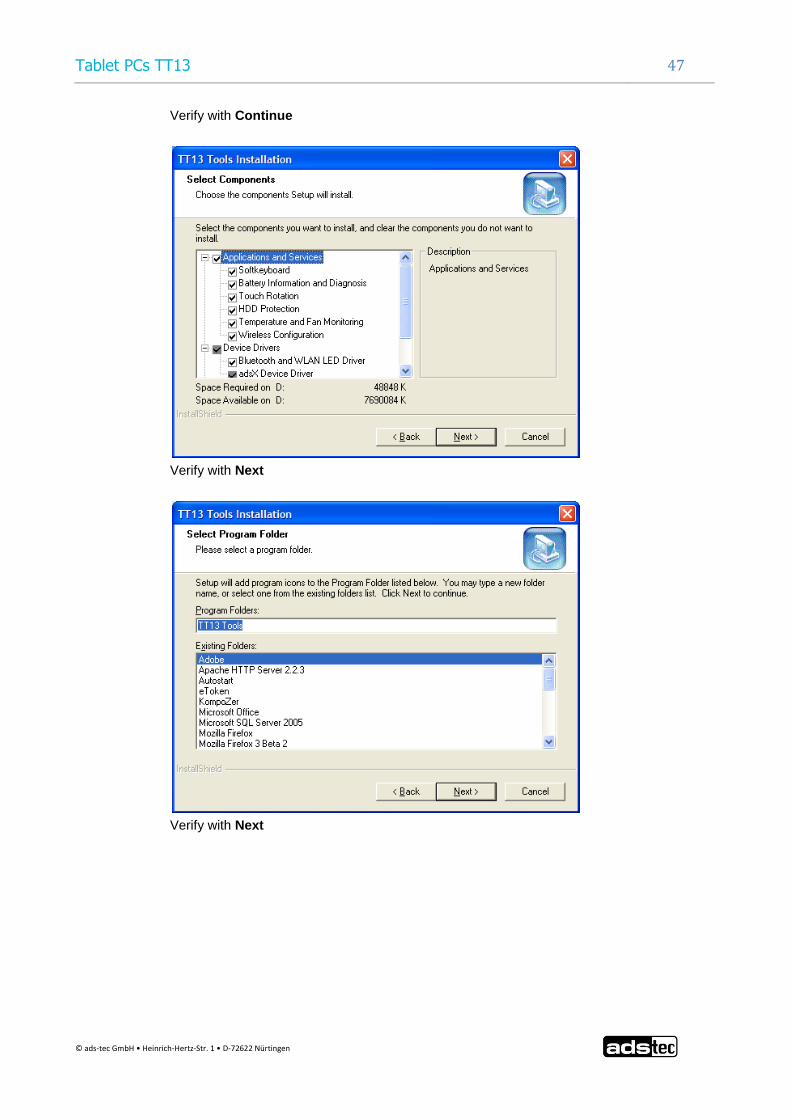
The folling dialogue box allows you to choose the Software Tools needed.
Note:
If device drivers are not installed, the functionality of system components like LED display will maybe not work properly.
Tablet PCs TT13 47
© ads-tec GmbH • Heinrich-Hertz-Str. 1 • D-72622 Nürtingen
Verify with Continue
Verify with Next
Verify with Next
Tablet PCs TT13 48
© ads-tec GmbH • Heinrich-Hertz-Str. 1 • D-72622 Nürtingen
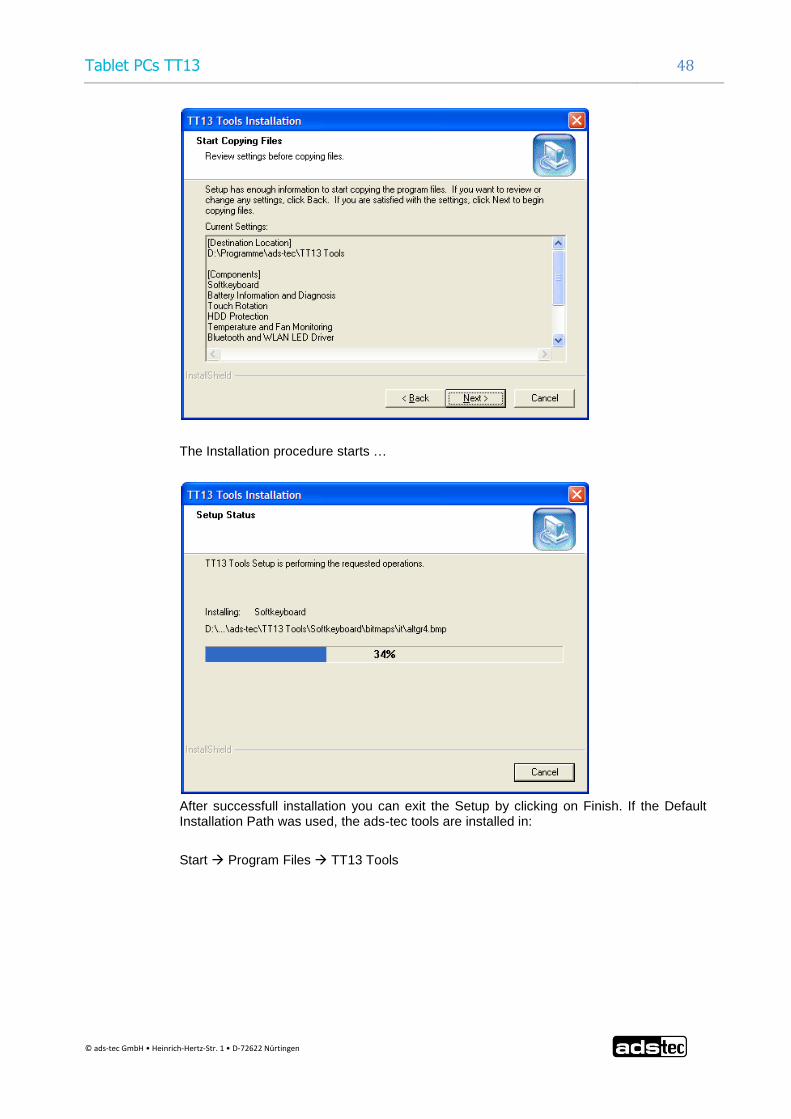
The Installation procedure starts …
After successfull installation you can exit the Setup by clicking on Finish. If the Default Installation Path was used, the ads-tec tools are installed in:
Start Program Files TT13 Tools

Tablet PCs TT13 49
© ads-tec GmbH • Heinrich-Hertz-Str. 1 • D-72622 Nürtingen
6.9 WLAN
The device is equipped with a wireless network card. If the operating system supports this card via drivers, the device can be integrated into a Ethernet Network with Support for 11 Mbit or 54Mbit (802.11 a/b/g). The specifications of this network topology has to be attended.
Note:
The device is equipped with a Mini PCI WLAN Card with Atheros Chip. If a device is delivered with a operating system from ads-tec, the needed system drivers will be integrated into the system. In the operating systems Windows XP Professional“ and „Windows XP Embedded“, the original “Atheros Client Utility (ACU)“ is installed, to define new WLAN networks and to define new connection settings. The mentioned utility supplies lots of settings, which are meeting the conditions of the own network.
Note:
The check and settings for country code of the WLAN-Card is the users responsibility. The default settings in a german image is Germany and in a English image it is United States.
Note:
In default condition Windows is used to manage the wireless connection. If the Atheros Client Utility should be used, you have to remove the checkbox from ”Use Windows to configure Settings” in the path: Start Settings Control Panel Network Connections. With the right mouse button you have to choose Wireless Netowrk Connection and navigate to the Properties section. Switch to the tab Wireless Networks
Tablet PCs TT13 50
© ads-tec GmbH • Heinrich-Hertz-Str. 1 • D-72622 Nürtingen
CONFIGURATION OF THE COUNTRY CODE
The default Installation of the WLAN driver, which is provided by Service-CD, installs the driver with the country code “United States”. The channels 1-11 are used. The country code can be changed later. The following chapter shows how to change the country code.
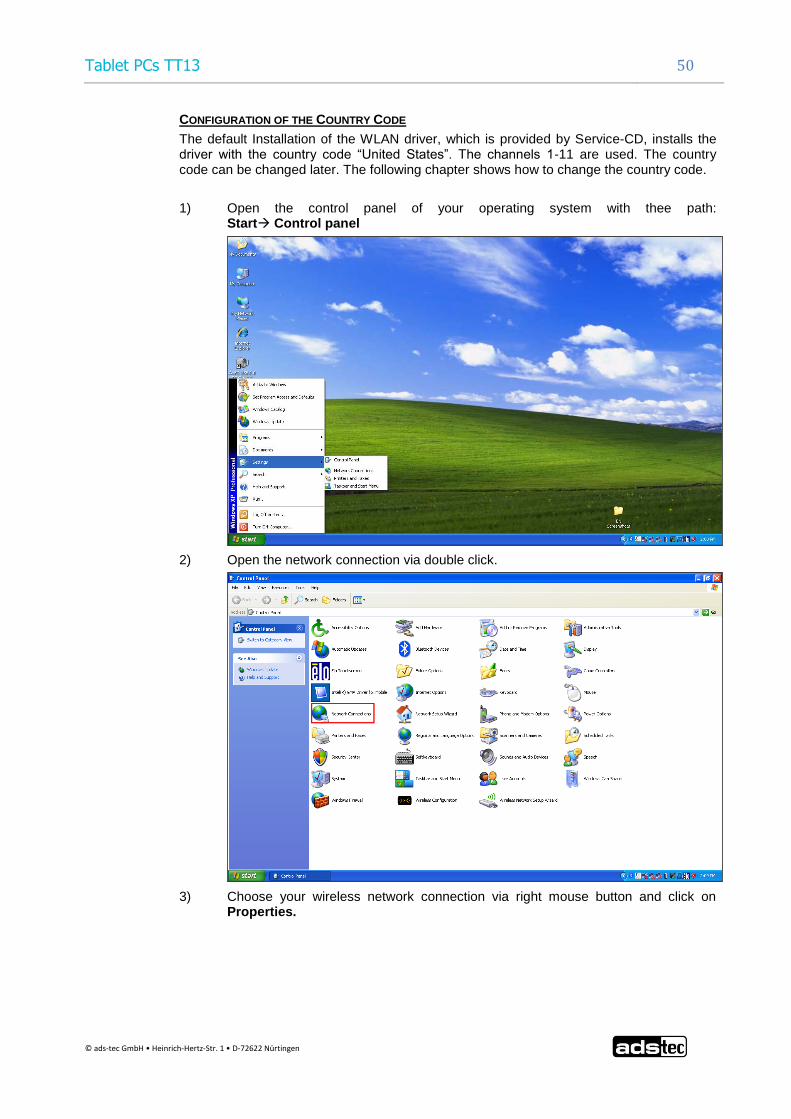
1) Open the control panel of your operating system with thee path: Start Control panel
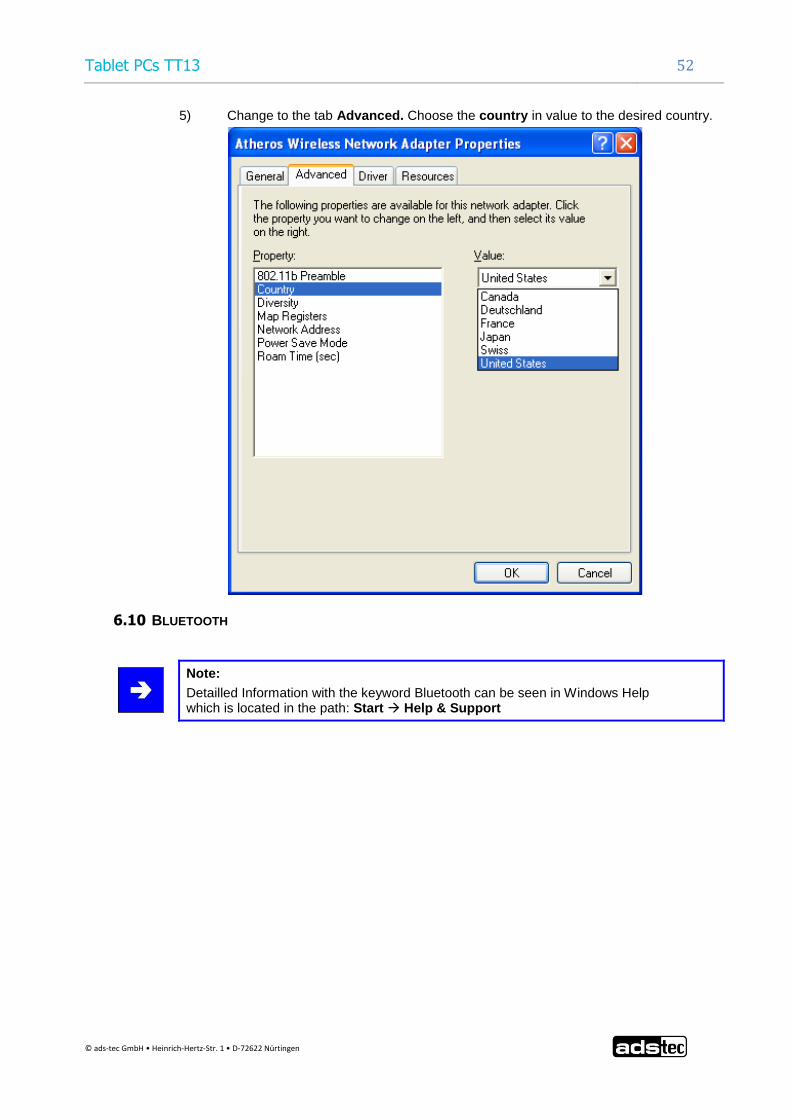
2) Open the network connection via double click.
3) Choose your wireless network connection via right mouse button and click on Properties.

Tablet PCs TT13 51
© ads-tec GmbH • Heinrich-Hertz-Str. 1 • D-72622 Nürtingen
4) The now showing dialgouebox you have to chosse configure
Tablet PCs TT13 52
© ads-tec GmbH • Heinrich-Hertz-Str. 1 • D-72622 Nürtingen
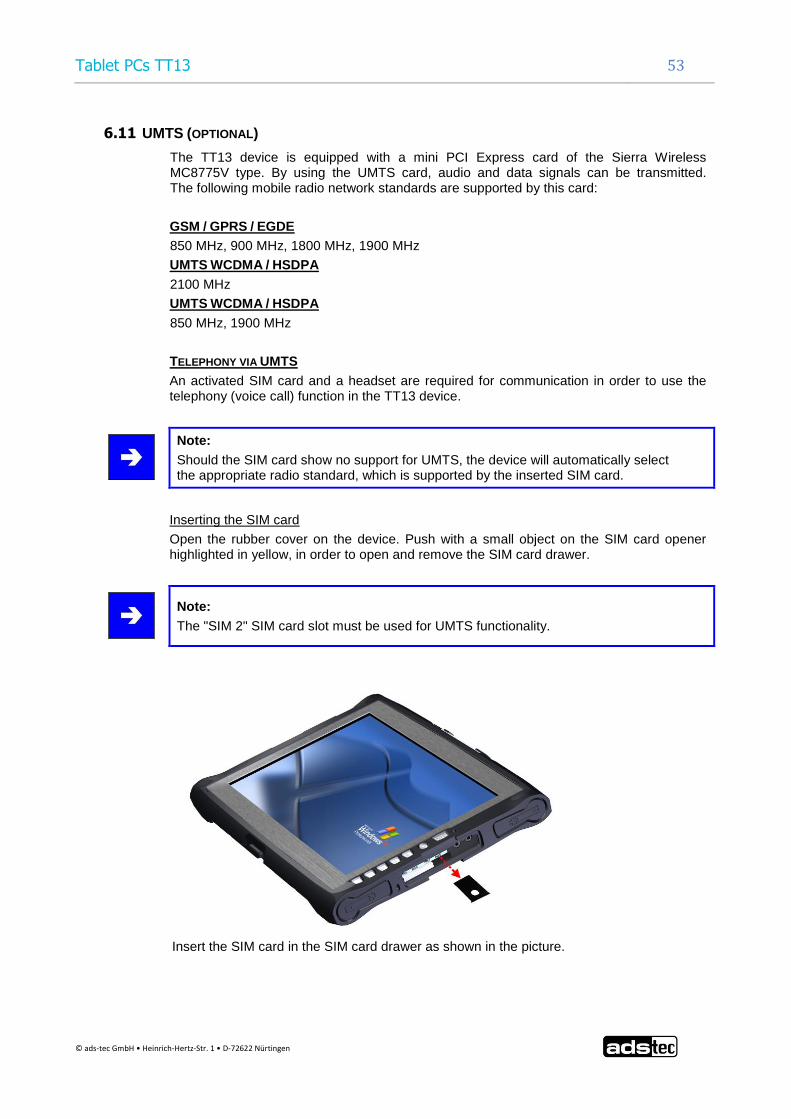
5) Change to the tab Advanced. Choose the country in value to the desired country.
6.10 BLUETOOTH
Note:
Detailled Information with the keyword Bluetooth can be seen in Windows Help which is located in the path: Start Help & Support
Tablet PCs TT13 53
© ads-tec GmbH • Heinrich-Hertz-Str. 1 • D-72622 Nürtingen
6.11 UMTS (OPTIONAL)
The TT13 device is equipped with a mini PCI Express card of the Sierra Wireless MC8775V type. By using the UMTS card, audio and data signals can be transmitted. The following mobile radio network standards are supported by this card:
GSM / GPRS / EGDE
850 MHz, 900 MHz, 1800 MHz, 1900 MHz
UMTS WCDMA / HSDPA
2100 MHz
UMTS WCDMA / HSDPA
850 MHz, 1900 MHz
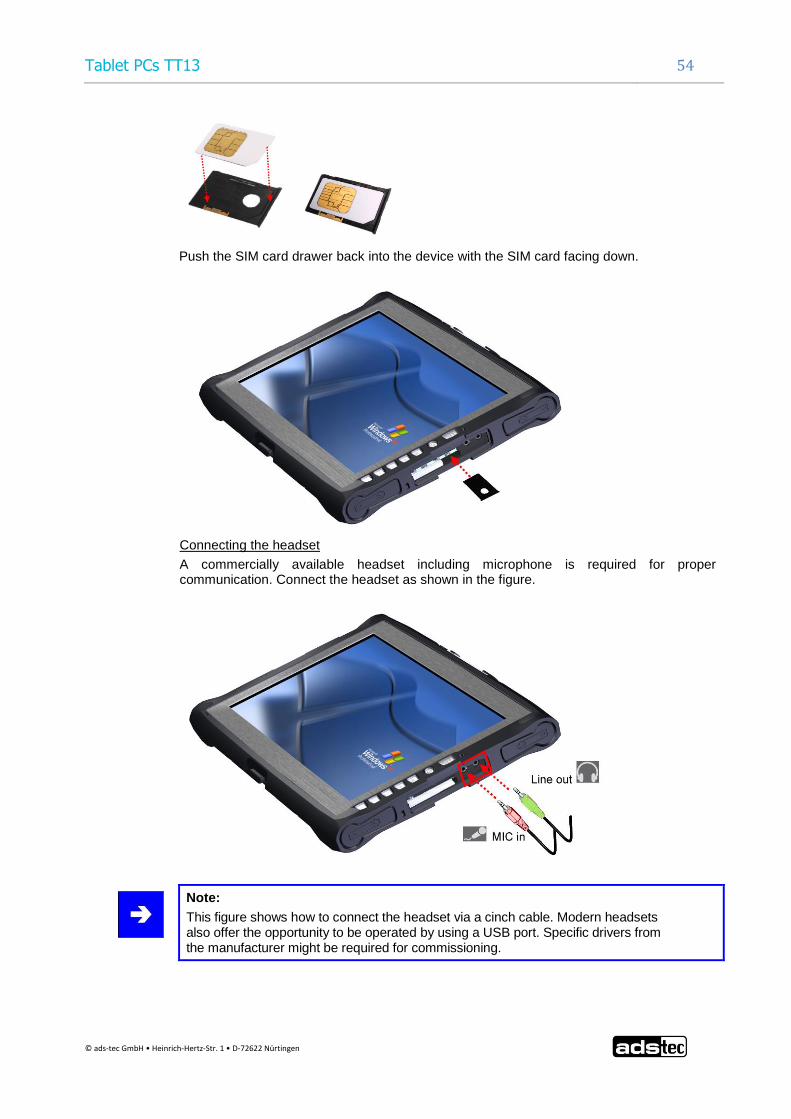
TELEPHONY VIA UMTS
An activated SIM card and a headset are required for communication in order to use the telephony (voice call) function in the TT13 device.
Note:
Should the SIM card show no support for UMTS, the device will automatically select the appropriate radio standard, which is supported by the inserted SIM card.
Inserting the SIM card
Open the rubber cover on the device. Push with a small object on the SIM card opener highlighted in yellow, in order to open and remove the SIM card drawer.
Note:
The "SIM 2" SIM card slot must be used for UMTS functionality.
Insert the SIM card in the SIM card drawer as shown in the picture.
Tablet PCs TT13 54
© ads-tec GmbH • Heinrich-Hertz-Str. 1 • D-72622 Nürtingen
Push the SIM card drawer back into the device with the SIM card facing down.
Connecting the headset
A commercially available headset including microphone is required for proper communication. Connect the headset as shown in the figure.
Note:
This figure shows how to connect the headset via a cinch cable. Modern headsets also offer the opportunity to be operated by using a USB port. Specific drivers from the manufacturer might be required for commissioning.

Tablet PCs TT13 55
© ads-tec GmbH • Heinrich-Hertz-Str. 1 • D-72622 Nürtingen
3G WATCHER
The integrated 3G Watcher software controls the functions of the built-in Sierra Wireless MC8775V PCI Express Card.
The following dialogue window will appear once the SIM card was inserted. Now enter the PIN code of your SIM card in the dialogue window and confirm by pushing Send.
Once the PIN code was entered successfully, the main menu of the 3G Watcher software will appear.
The appropriate network operator for the SIM card should be recognised after a few seconds.
Tablet PCs TT13 56
© ads-tec GmbH • Heinrich-Hertz-Str. 1 • D-72622 Nürtingen
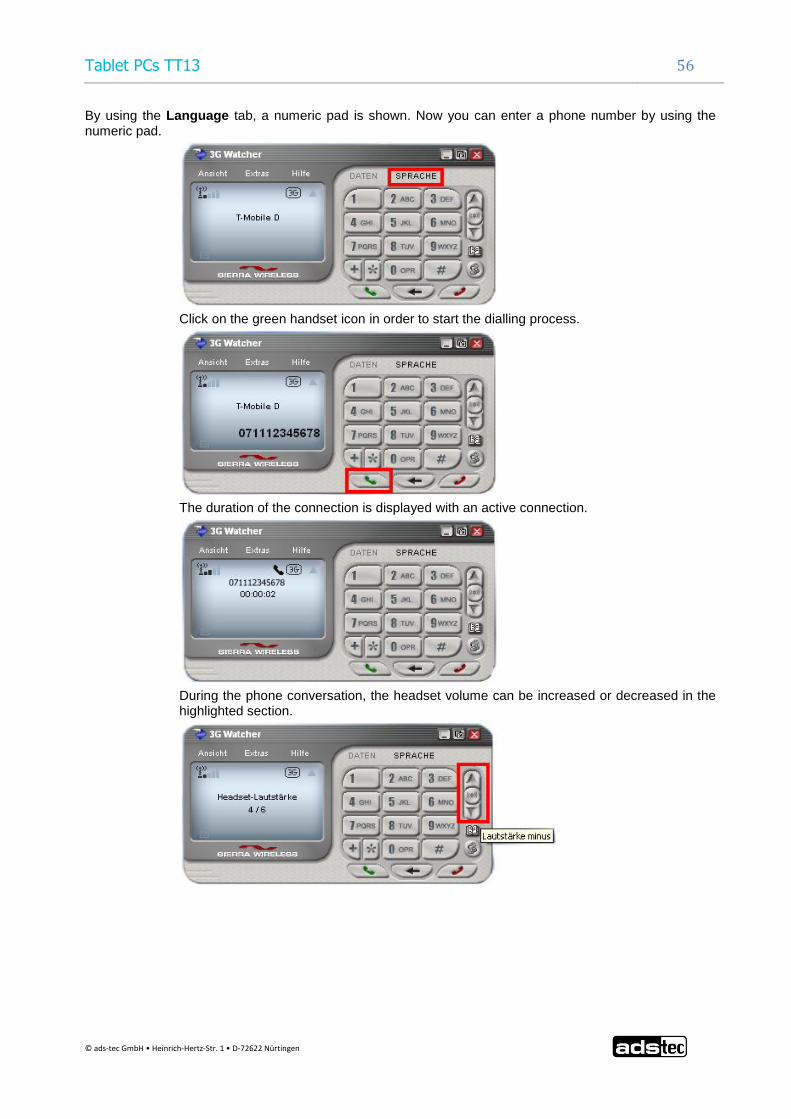
By using the Language tab, a numeric pad is shown. Now you can enter a phone number by using the numeric pad.
Click on the green handset icon in order to start the dialling process.
The duration of the connection is displayed with an active connection.
During the phone conversation, the headset volume can be increased or decreased in the highlighted section.

Tablet PCs TT13 57
© ads-tec GmbH • Heinrich-Hertz-Str. 1 • D-72622 Nürtingen
INTERNET VIA UMTS
The Internet can be used via the UMTS broadband network. The 3G Watcher software includes default WWAN providers, which are activated by creating a profile.
Open the connection administration by using ToolsConnections
Click on the following icon in order to create a new profile. Subsequently select your WWAN provider (network operator of your SIM card) from the pull down menu.
Tablet PCs TT13 58
© ads-tec GmbH • Heinrich-Hertz-Str. 1 • D-72622 Nürtingen
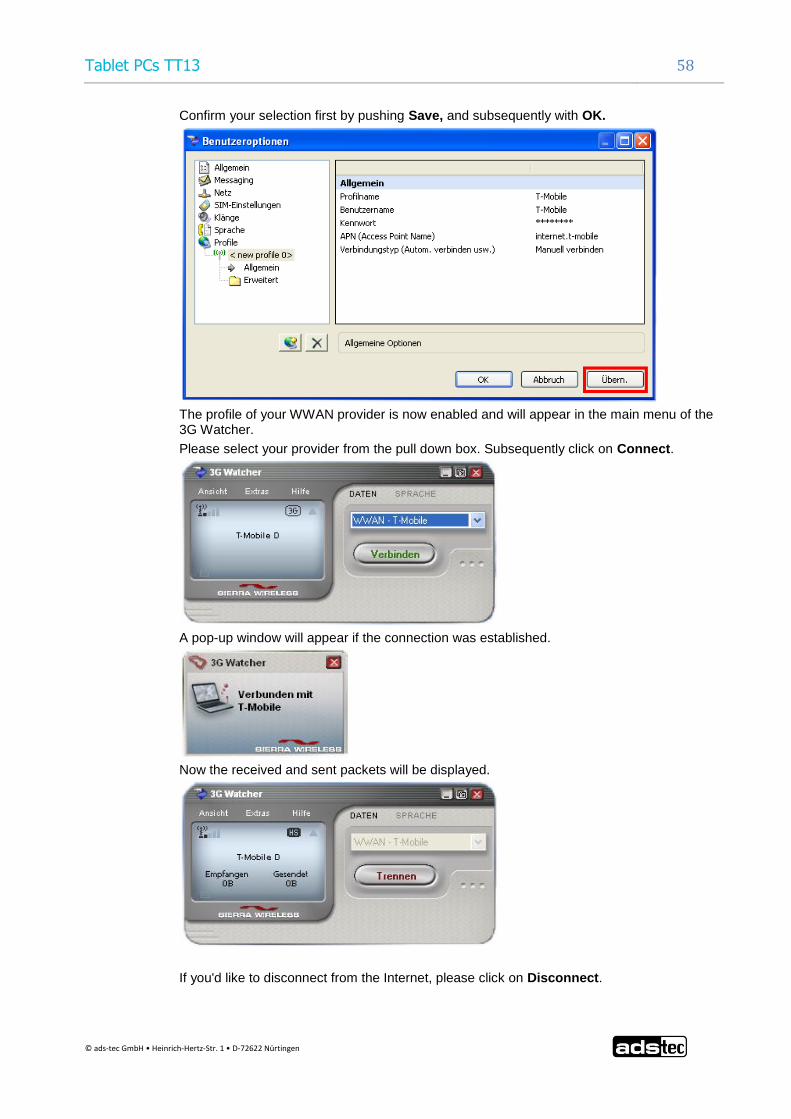
Confirm your selection first by pushing Save, and subsequently with OK.
The profile of your WWAN provider is now enabled and will appear in the main menu of the 3G Watcher.
Please select your provider from the pull down box. Subsequently click on Connect.
A pop-up window will appear if the connection was established.
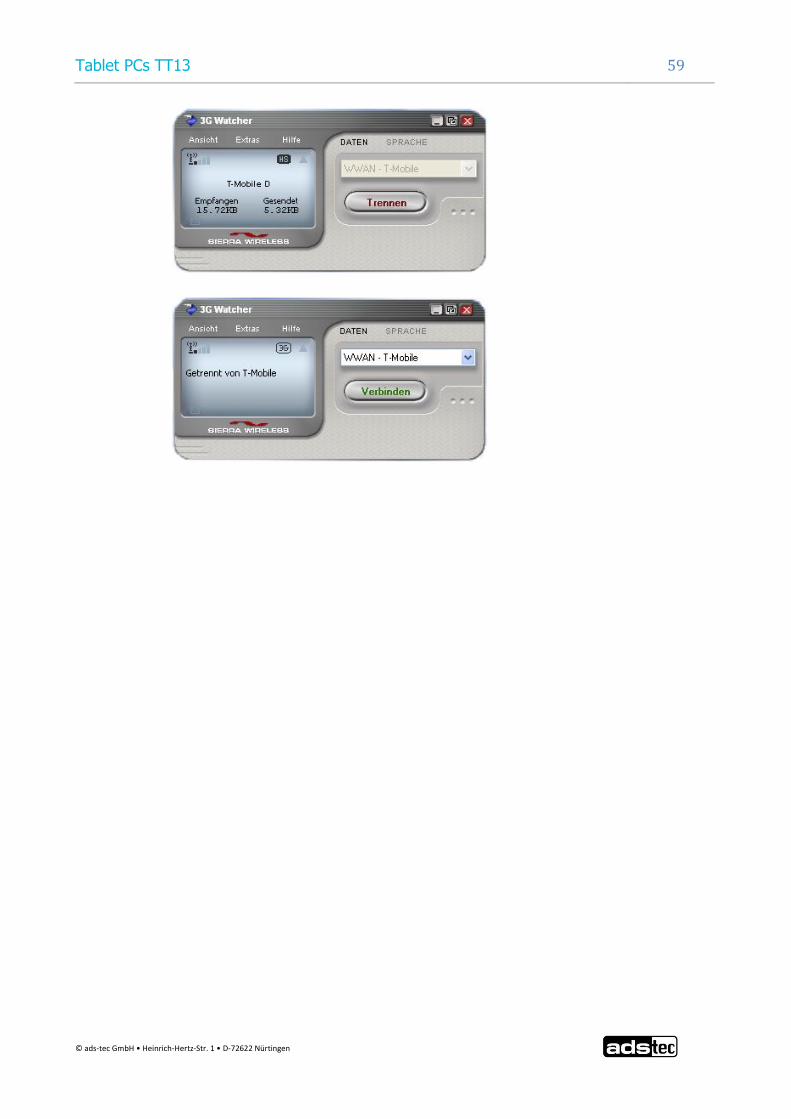
Now the received and sent packets will be displayed.
If you'd like to disconnect from the Internet, please click on Disconnect.
Tablet PCs TT13 59
© ads-tec GmbH • Heinrich-Hertz-Str. 1 • D-72622 Nürtingen

Tablet PCs TT13 60
© ads-tec GmbH • Heinrich-Hertz-Str. 1 • D-72622 Nürtingen
SMS FUNCTION
This software offers the opportunity of sending short messages (SMS).
In order to use this feature, open SMS Express in the ToolsSMS Express menu.
The main window opens now.
By pushing New, you can now edit a short message (SMS) in an additional dialogue window.

Tablet PCs TT13 61
© ads-tec GmbH • Heinrich-Hertz-Str. 1 • D-72622 Nürtingen
Select To and add a contact from your phone directory or enter a phone number manually.
As soon as your message was created, you'll click on the Send button. The message is now in the message Outbox and will be sent to the specified receiver.
Note:
The design of the SMS Express user interface is similar to the Microsoft® Office Outlook® E-Mail Client design.

Tablet PCs TT13 62
© ads-tec GmbH • Heinrich-Hertz-Str. 1 • D-72622 Nürtingen
6.12 RFID READER (OPTIONAL)
By using the RFID reader, passive RFID TAGS (RFID chip / keycard) are available for automatic system login. The user applies the RFID tag like a key and requires neither user name nor password.
For authentication, the keycard or the RFID chip are held in front of the position highlighted in the figure. The information from your keycard or RFID chip is read and evaluated by the device. This way, access rights of persons, e.g. with respect to a certain work area or job can be controlled.
The Mifare technology is used in the TT13 device. The frequency used in this case is 13.56 MHz.
(Keycard authentication) (RFID chip authentication)
Tablet PCs TT13 63
© ads-tec GmbH • Heinrich-Hertz-Str. 1 • D-72622 Nürtingen
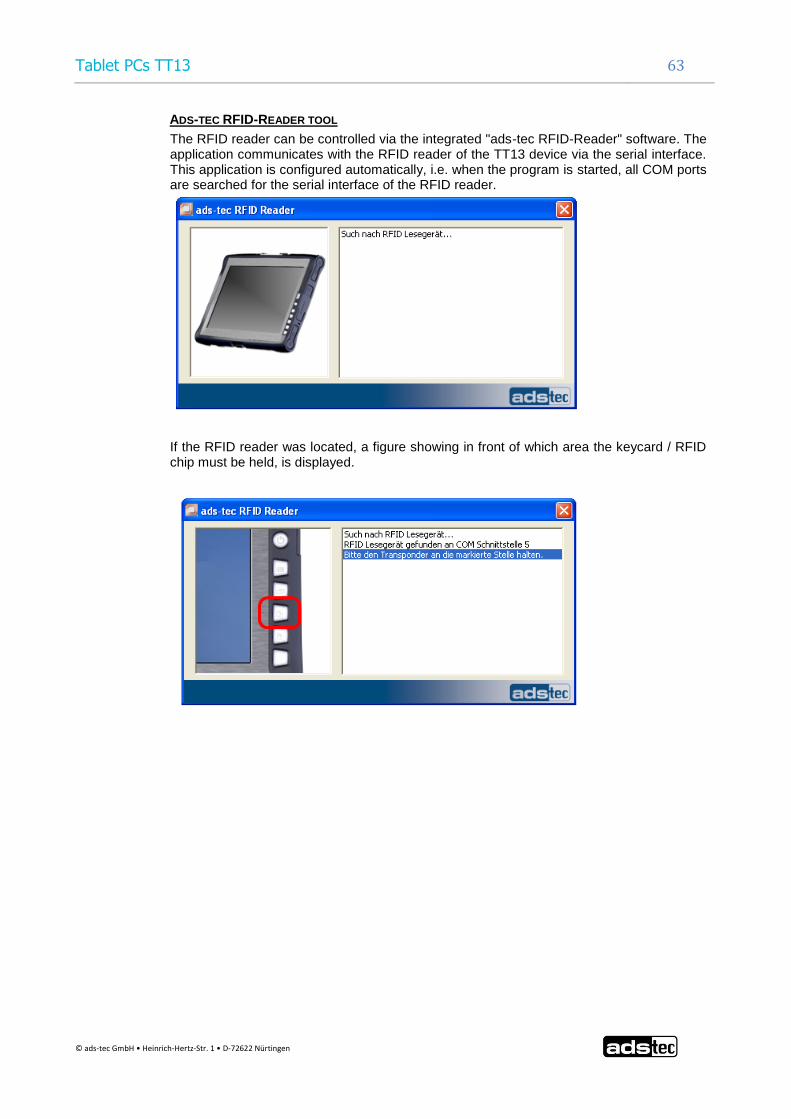
ADS-TEC RFID-READER TOOL
The RFID reader can be controlled via the integrated "ads-tec RFID-Reader" software. The application communicates with the RFID reader of the TT13 device via the serial interface. This application is configured automatically, i.e. when the program is started, all COM ports are searched for the serial interface of the RFID reader.
If the RFID reader was located, a figure showing in front of which area the keycard / RFID chip must be held, is displayed.

Tablet PCs TT13 64
© ads-tec GmbH • Heinrich-Hertz-Str. 1 • D-72622 Nürtingen
Once the authentication succeeded, the serial numbers received will be output.
If no RFID reader was located, a message is output.
This application supports German and English as languages. You can change the language via the "Rfid.ini" file by entering either "LanguageId = DE" or "LanguageId = EN".

Tablet PCs TT13 65
© ads-tec GmbH • Heinrich-Hertz-Str. 1 • D-72622 Nürtingen
6.13 CAMERA (OPTIONAL)
The integrated camera gives the opportunity of recording photographic or video data. The camera has the following characteristics:
Optical resolution: 1/3.2 inch
Pixel size: 2.8 um
Max. frame rate: 15fps @ UXGA
Effective resolution: 1600 x 1200 UXGA (Format: 4:3) / 2 megapixels
Auto focus: AF
CAMERA MODULE ACTIVATION
Open the Control Panel of your operating system by using the path:
Start Control panel
Now start the Scanner and camera wizard.
Tablet PCs TT13 66
© ads-tec GmbH • Heinrich-Hertz-Str. 1 • D-72622 Nürtingen
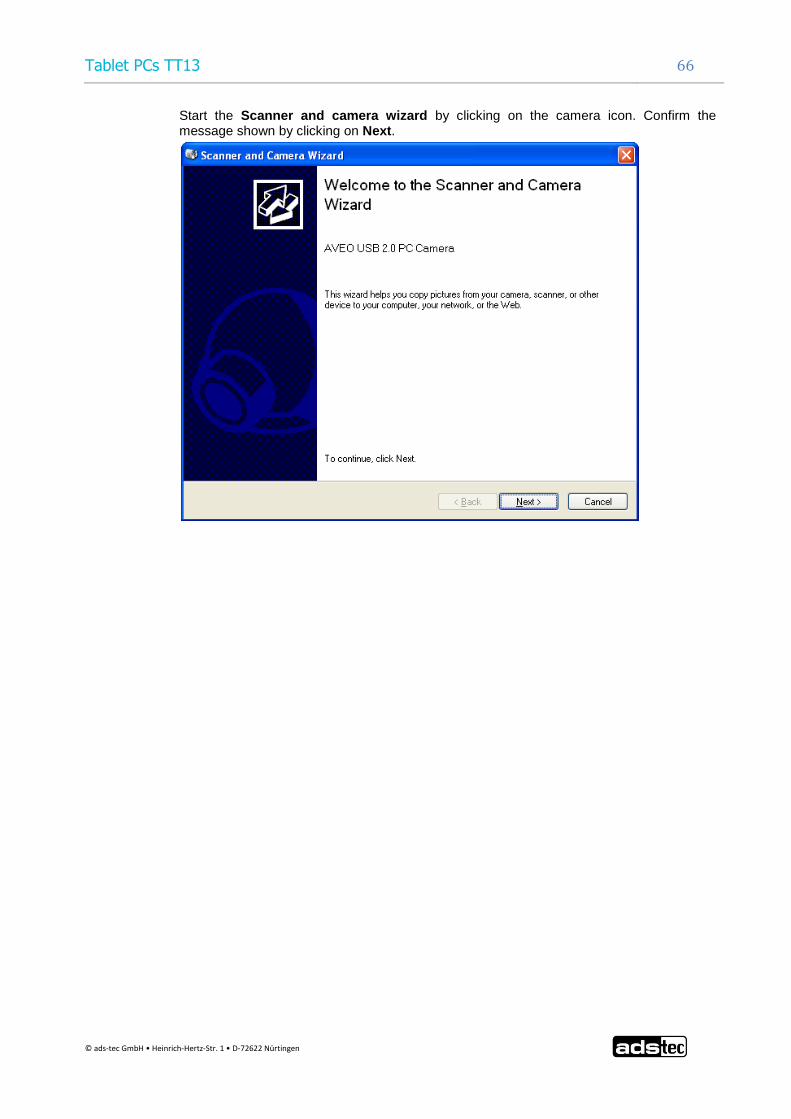
Start the Scanner and camera wizard by clicking on the camera icon. Confirm the message shown by clicking on Next.
Tablet PCs TT13 67
© ads-tec GmbH • Heinrich-Hertz-Str. 1 • D-72622 Nürtingen
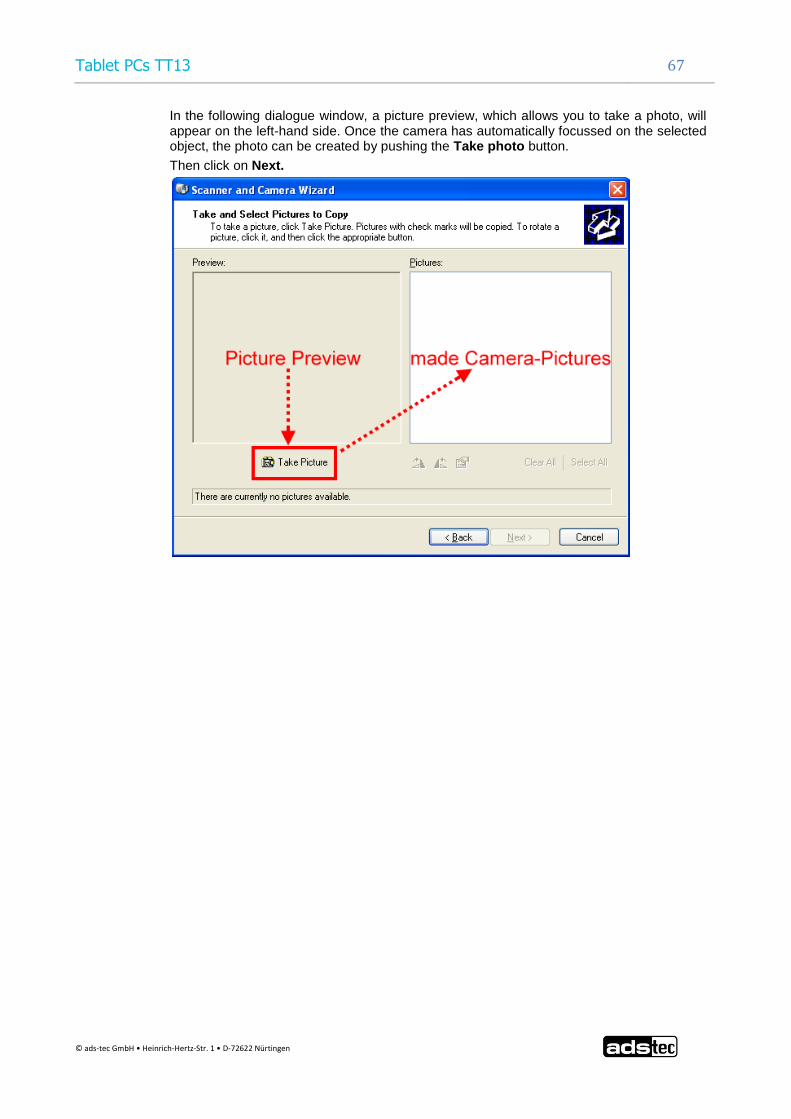
In the following dialogue window, a picture preview, which allows you to take a photo, will appear on the left-hand side. Once the camera has automatically focussed on the selected object, the photo can be created by pushing the Take photo button.
Then click on Next.
Tablet PCs TT13 68
© ads-tec GmbH • Heinrich-Hertz-Str. 1 • D-72622 Nürtingen
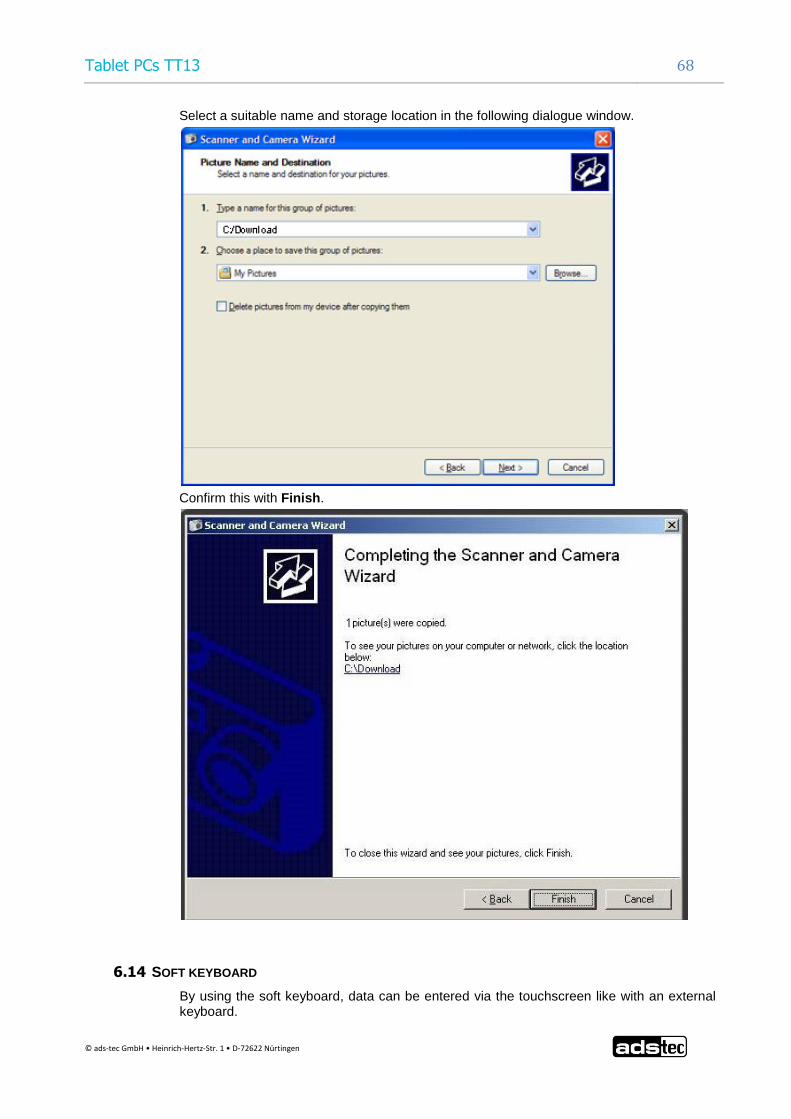
Select a suitable name and storage location in the following dialogue window.
Confirm this with Finish.
6.14 SOFT KEYBOARD
By using the soft keyboard, data can be entered via the touchscreen like with an external keyboard.
Tablet PCs TT13 69
© ads-tec GmbH • Heinrich-Hertz-Str. 1 • D-72622 Nürtingen
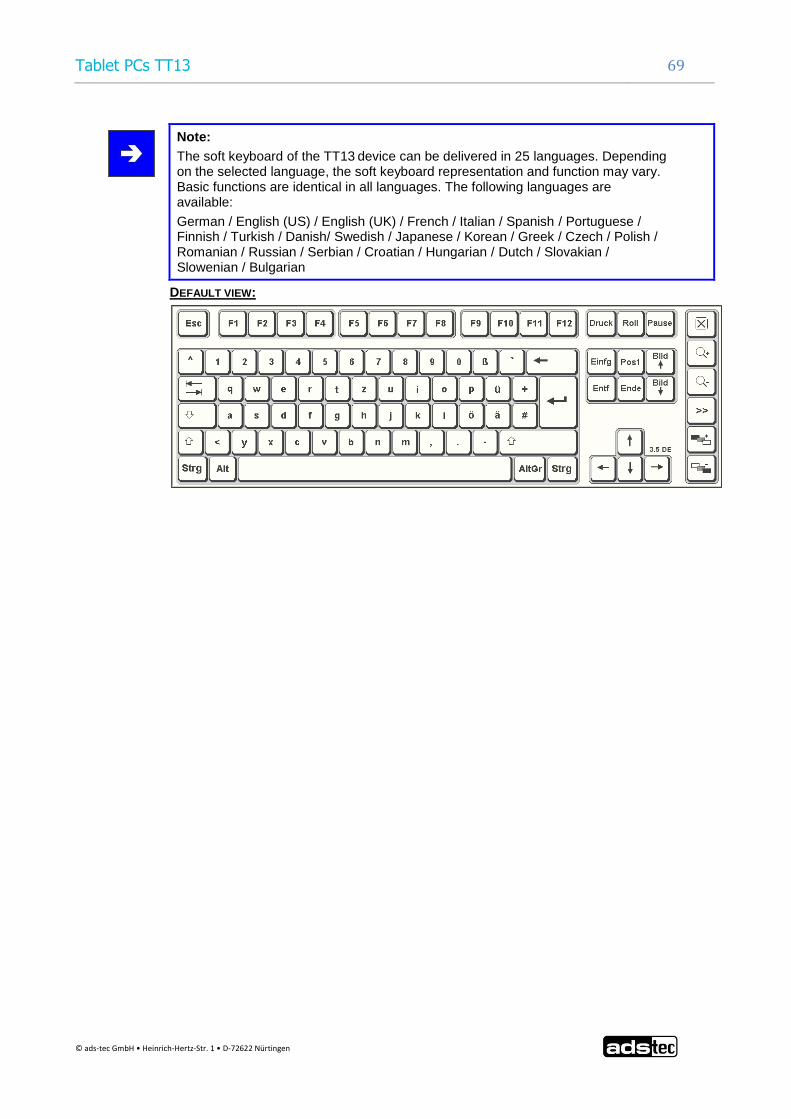
Note:
The soft keyboard of the TT13 device can be delivered in 25 languages. Depending
on the selected language, the soft keyboard representation and function may vary. Basic functions are identical in all languages. The following languages are available:
German / English (US) / English (UK) / French / Italian / Spanish / Portuguese / Finnish / Turkish / Danish/ Swedish / Japanese / Korean / Greek / Czech / Polish / Romanian / Russian / Serbian / Croatian / Hungarian / Dutch / Slovakian / Slowenian / Bulgarian
DEFAULT VIEW:
Tablet PCs TT13 70
© ads-tec GmbH • Heinrich-Hertz-Str. 1 • D-72622 Nürtingen
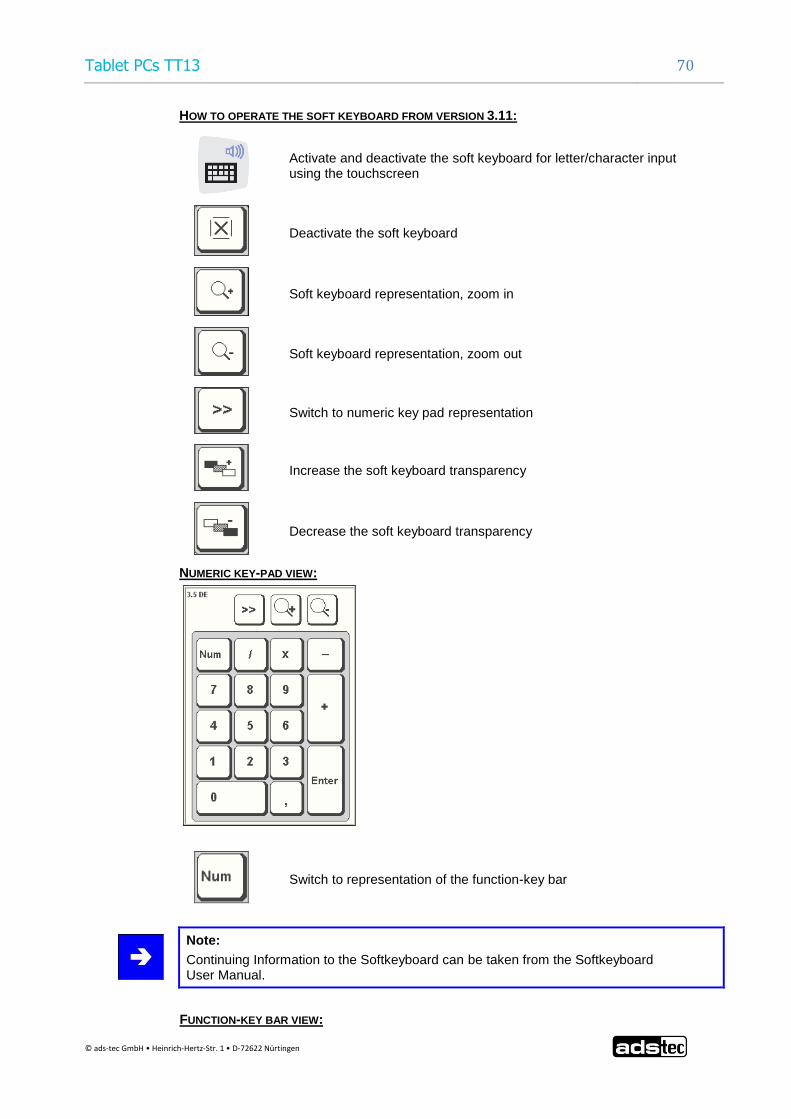
HOW TO OPERATE THE SOFT KEYBOARD FROM VERSION 3.11:
Activate and deactivate the soft keyboard for letter/character input using the touchscreen
Deactivate the soft keyboard
Soft keyboard representation, zoom in
Soft keyboard representation, zoom out
Switch to numeric key pad representation
Increase the soft keyboard transparency
Decrease the soft keyboard transparency
NUMERIC KEY-PAD VIEW:
Switch to representation of the function-key bar
Note:
Continuing Information to the Softkeyboard can be taken from the Softkeyboard User Manual.
FUNCTION-KEY BAR VIEW:

Tablet PCs TT13 71
© ads-tec GmbH • Heinrich-Hertz-Str. 1 • D-72622 Nürtingen
Note:
If a function is to be activated, which requires pressing two keys at the same time (e.g. Alt + F4), these keys have to be pushed one after another at the soft keyboard, and the special keys Shift, Alt and Ctrl must always be pushed first.
Due to differences in programming of a large variety of softwares, we cannot ensure that the soft keyboard works properly with all softwares.
When deactivating the soft keyboard, the previously active state (alphanumeric / numeric keys or function keys) will be stored and will be displayed when re-activating the keyboard.
Tablet PCs TT13 72
© ads-tec GmbH • Heinrich-Hertz-Str. 1 • D-72622 Nürtingen
7 ACCESSORIES
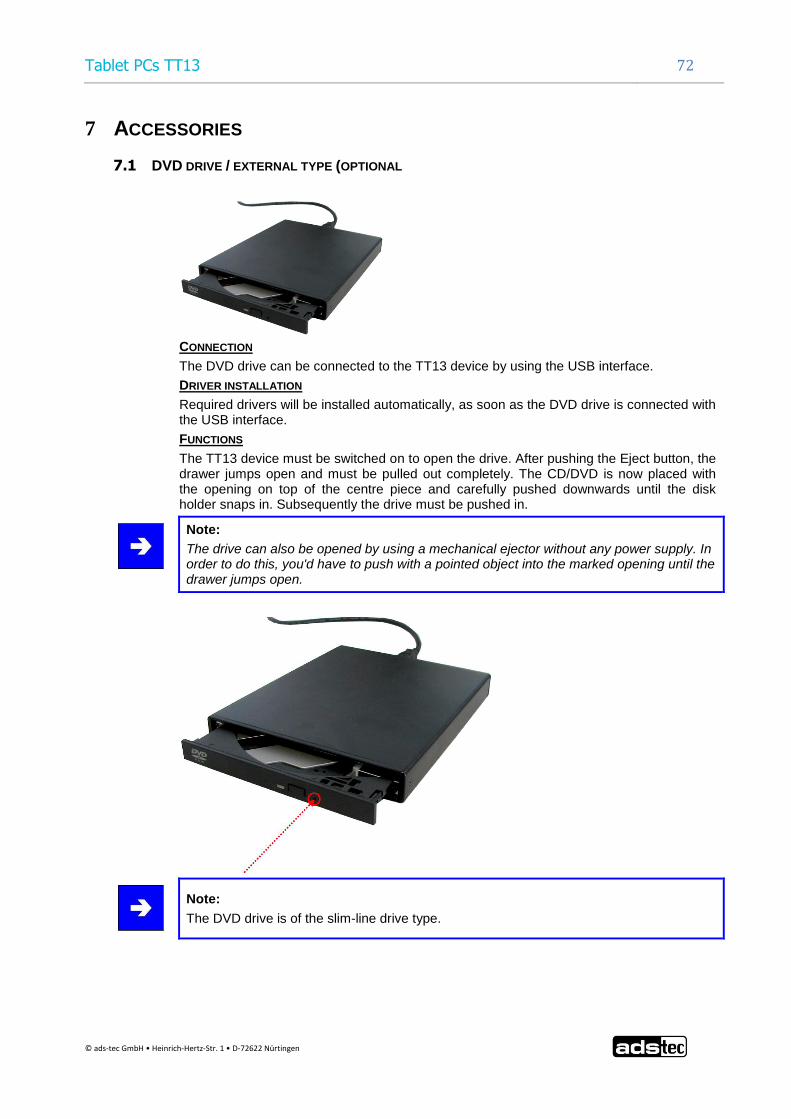
7.1 DVD DRIVE / EXTERNAL TYPE (OPTIONAL
CONNECTION
The DVD drive can be connected to the TT13 device by using the USB interface.
DRIVER INSTALLATION
Required drivers will be installed automatically, as soon as the DVD drive is connected with the USB interface.
FUNCTIONS
The TT13 device must be switched on to open the drive. After pushing the Eject button, the drawer jumps open and must be pulled out completely. The CD/DVD is now placed with the opening on top of the centre piece and carefully pushed downwards until the disk holder snaps in. Subsequently the drive must be pushed in.
Note:
The drive can also be opened by using a mechanical ejector without any power supply. In order to do this, you'd have to push with a pointed object into the marked opening until the drawer jumps open.
Note:
The DVD drive is of the slim-line drive type.
Tablet PCs TT13 73
© ads-tec GmbH • Heinrich-Hertz-Str. 1 • D-72622 Nürtingen
7.2 LASER PRODUCT SAFETY
This product has been designed and manufactured according to FDA regulations "title 21.CFR. chapter1, subchapter J. based on the Radiation Control for Health and Safety Act of 1968". This product is also classified as a class 1 laser product. There is no hazardous invisible laser radiation during operation, because invisible laser radiation emitted inside of this product is completely confined in the protective housings.
The label required by this regulation is shown below.
Caution:
Use of controls or adjustments or performance of procedures other than those specified herein may result in hazardous radiation exposure.
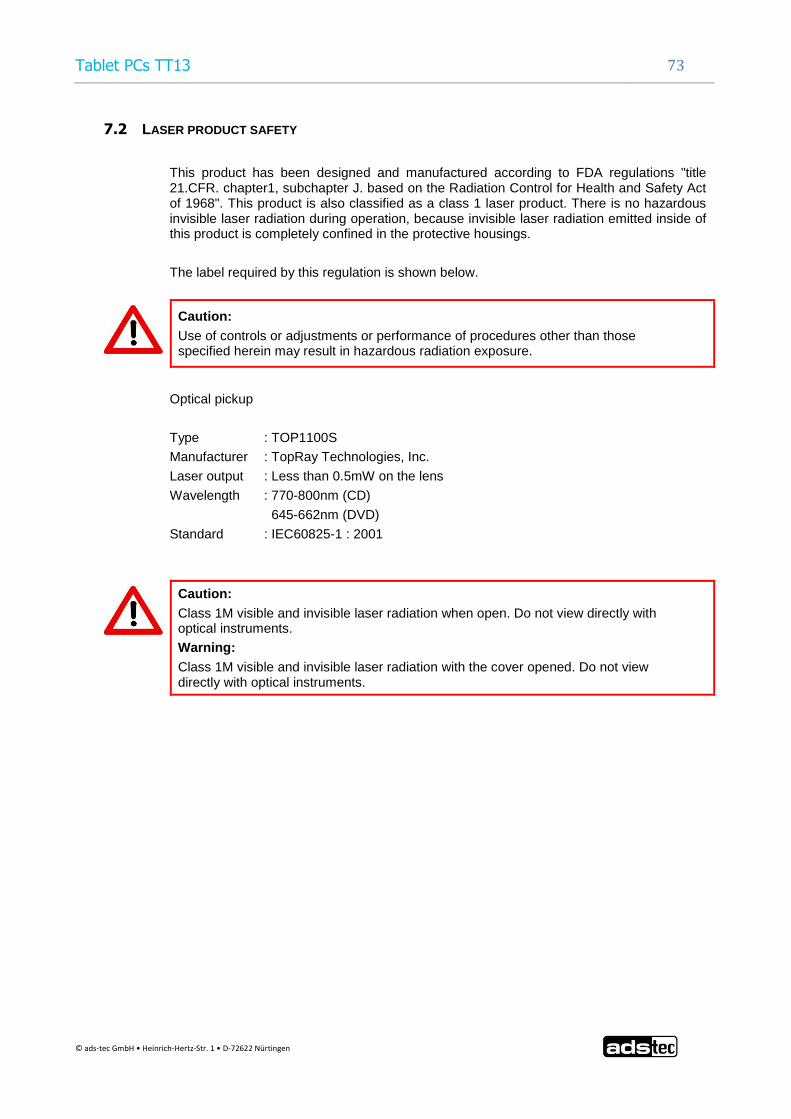
Optical pickup
Type : TOP1100S
Manufacturer : TopRay Technologies, Inc.
Laser output : Less than 0.5mW on the lens
Wavelength : 770-800nm (CD)
645-662nm (DVD)
Standard : IEC60825-1 : 2001
Caution:
Class 1M visible and invisible laser radiation when open. Do not view directly with optical instruments.
Warning:
Class 1M visible and invisible laser radiation with the cover opened. Do not view directly with optical instruments.
Tablet PCs TT13 74
© ads-tec GmbH • Heinrich-Hertz-Str. 1 • D-72622 Nürtingen
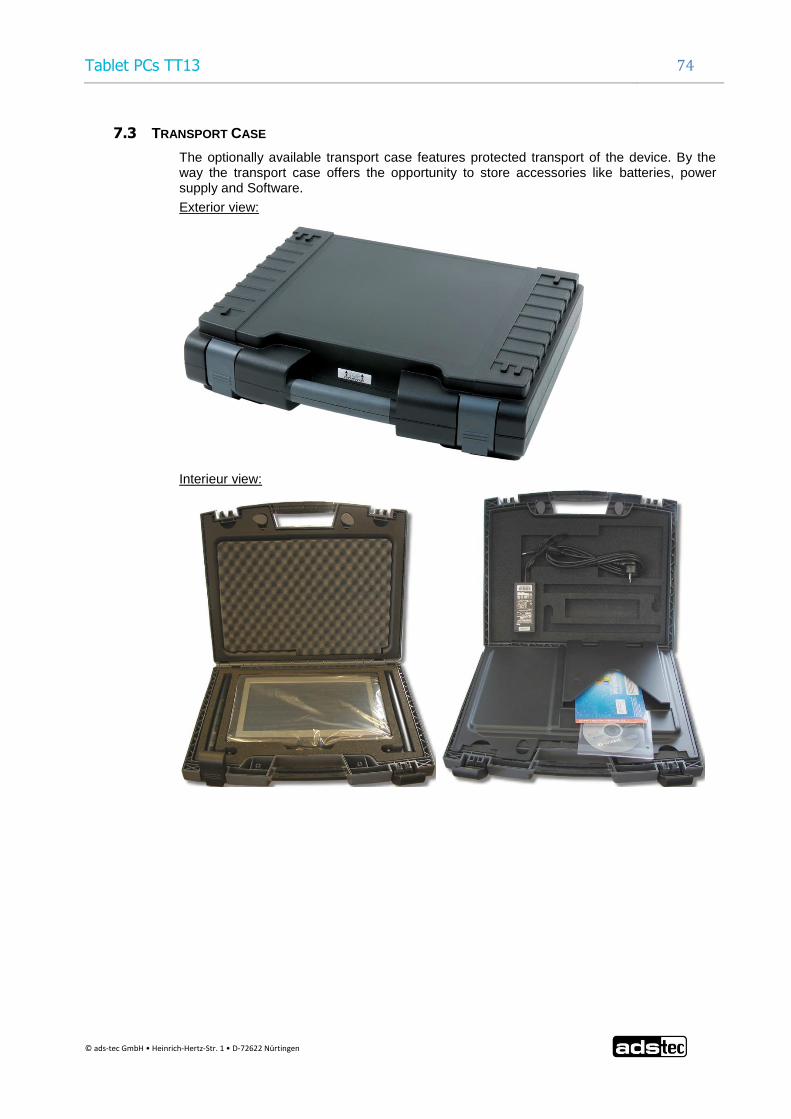
7.3 TRANSPORT CASE
The optionally available transport case features protected transport of the device. By the way the transport case offers the opportunity to store accessories like batteries, power supply and Software.
Exterior view:
Interieur view:

Tablet PCs TT13 75
© ads-tec GmbH • Heinrich-Hertz-Str. 1 • D-72622 Nürtingen
7.4 BATTERY CHARGING STATION C4/TT13
Optionally there is the opportunity to charge the battery of the device by an battery charging station. The battery charging station features two battery slots. This allows you to charge two batteries parallely.
CONNECTING THE 20V DC POWER SUPPLY
Before commisioning the battery charging station, a 20V DC power supply has to be connected. Connect the power supply at the back of the battery charging station.
Note:
The supplied power supply of the device can be used for the battery charging station (20V DC).
Note:
Make sure the system LED is flashing green.
Tablet PCs TT13 76
© ads-tec GmbH • Heinrich-Hertz-Str. 1 • D-72622 Nürtingen
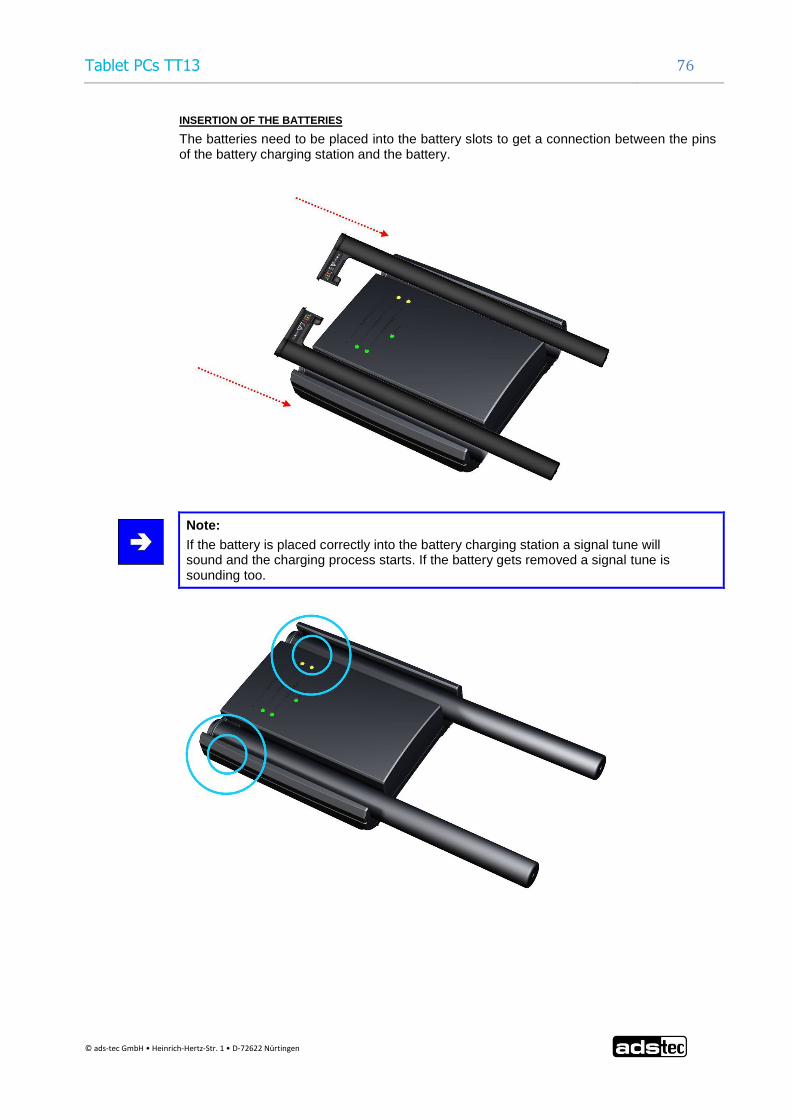
INSERTION OF THE BATTERIES
The batteries need to be placed into the battery slots to get a connection between the pins of the battery charging station and the battery.
Note:
If the battery is placed correctly into the battery charging station a signal tune will sound and the charging process starts. If the battery gets removed a signal tune is sounding too.

Tablet PCs TT13 77
© ads-tec GmbH • Heinrich-Hertz-Str. 1 • D-72622 Nürtingen
LED STATUS DISPLAY
During operation, different system activities will be displayed.
READY-LED DIPLAY BEHAVIOR DESCRIPTION
- No battery inserted
static battery completely charged
static battery is defective
CHARGE-LED DISPLAY
- battery is not charging
flashing battery is charging
SYS-LED DISPLAY
-
device is not connected via power supply (power supply/battery)
static device is connected to a power supply(power supply/ battery) and
powered on
static device is not ready / defective power supply
Tablet PCs TT13 78
© ads-tec GmbH • Heinrich-Hertz-Str. 1 • D-72622 Nürtingen
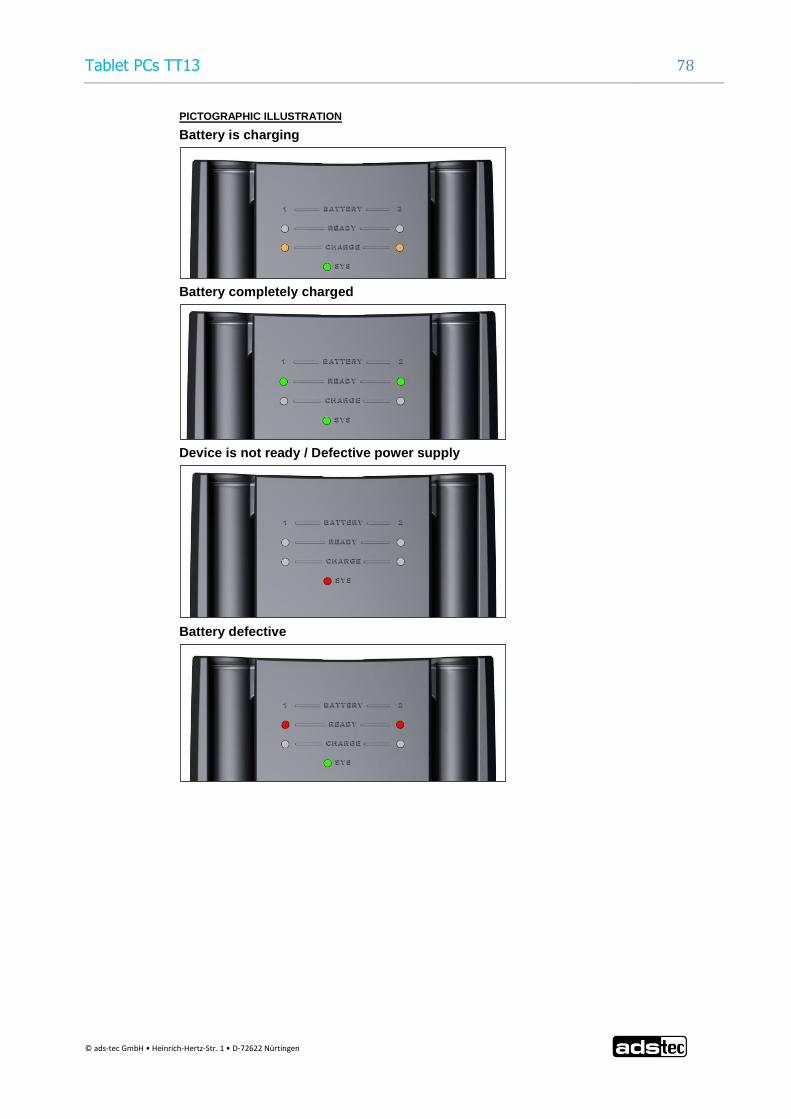
PICTOGRAPHIC ILLUSTRATION
Battery is charging
Battery completely charged
Device is not ready / Defective power supply
Battery defective

Tablet PCs TT13 79
© ads-tec GmbH • Heinrich-Hertz-Str. 1 • D-72622 Nürtingen
7.5 SUBSTITUTION POWER SUPPLY
Optional a substitution power supply for operating the device is available.
7.6 CAR POWER SUPPLY
Optional a car power supply for the device is available. The device can be comfortably supplied with power in vehicles.
7.7 SUBSTITUTION-BATTERY
Optional a substitution battery for operation is available.

Tablet PCs TT13 80
© ads-tec GmbH • Heinrich-Hertz-Str. 1 • D-72622 Nürtingen
7.8 TT13 MECHANICAL DOCKING ADAPTER
The available TT13 Docking offers in combination with the Table Stand -/ Wall bracket a stable mounting solution for every kind of location.
Via the Docking-Connector on the backside, the device can be connected to a Docking-Station.
The Docking is available in two different types. The first layout can only be used as a attachment for the device. The second layout offers a Docking Connector which is able to transfer data to the interface of the Docking Station.
MOUNTING THE DEVICE TO THE DOCKING
1) The Device needs to be placed on the red marked area behind the turquoise marked area.
2) The Device has to be pressed onto the Docking. The Device should engage perceptible.
Tablet PCs TT13 81
© ads-tec GmbH • Heinrich-Hertz-Str. 1 • D-72622 Nürtingen
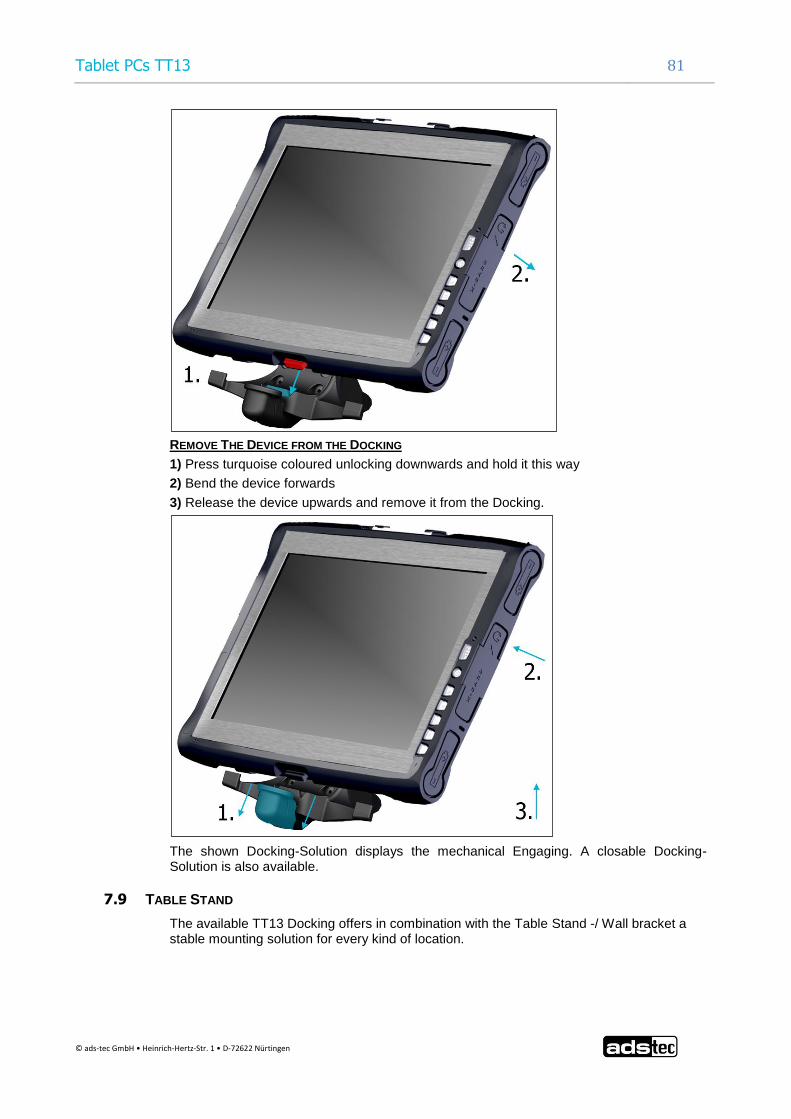
REMOVE THE DEVICE FROM THE DOCKING
1) Press turquoise coloured unlocking downwards and hold it this way
2) Bend the device forwards
3) Release the device upwards and remove it from the Docking.
The shown Docking-Solution displays the mechanical Engaging. A closable Docking-Solution is also available.
7.9 TABLE STAND
The available TT13 Docking offers in combination with the Table Stand -/ Wall bracket a stable mounting solution for every kind of location.

Tablet PCs TT13 82
© ads-tec GmbH • Heinrich-Hertz-Str. 1 • D-72622 Nürtingen
Mount the Docking via the supplied M5x30-8.8 SW Inbus screws to the Table Stand.
Tablet PCs TT13 83
© ads-tec GmbH • Heinrich-Hertz-Str. 1 • D-72622 Nürtingen
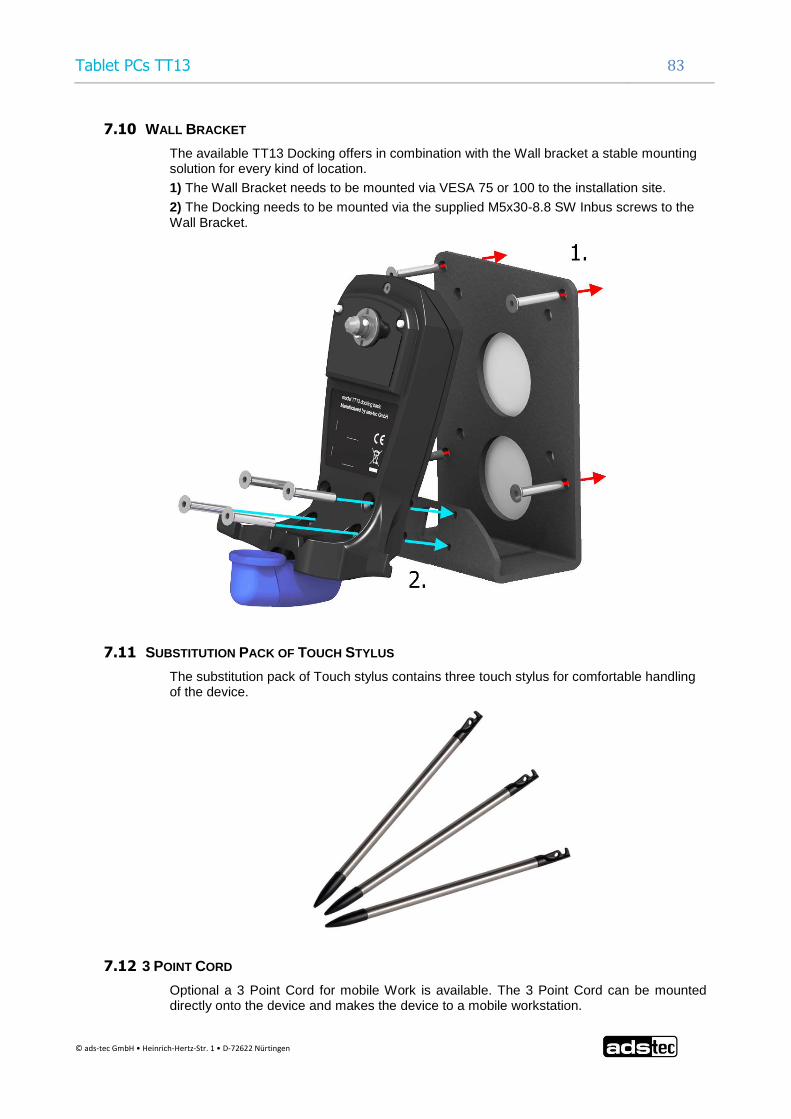
7.10 WALL BRACKET
The available TT13 Docking offers in combination with the Wall bracket a stable mounting solution for every kind of location.
1) The Wall Bracket needs to be mounted via VESA 75 or 100 to the installation site.
2) The Docking needs to be mounted via the supplied M5x30-8.8 SW Inbus screws to the Wall Bracket.
7.11 SUBSTITUTION PACK OF TOUCH STYLUS
The substitution pack of Touch stylus contains three touch stylus for comfortable handling of the device.
7.12 3 POINT CORD
Optional a 3 Point Cord for mobile Work is available. The 3 Point Cord can be mounted directly onto the device and makes the device to a mobile workstation.

Tablet PCs TT13 84
© ads-tec GmbH • Heinrich-Hertz-Str. 1 • D-72622 Nürtingen
3 x DZ-MECH-33255-0
3 x DZ-MECH-31033-0
1 x DZ-MECH-31039-0
MOUNTING THE 3 POINT CORD ONTO THE DEVICE
1) First the cord guides need to be mounted. Although the required mounting possibility for left and right handers has to be choosen.
Right handed operation: Choose red marking in picture
Left handed operation: Choose white marking in picture
2) Mount the screws as shown in the picture to marked positions.

Tablet PCs TT13 85
© ads-tec GmbH • Heinrich-Hertz-Str. 1 • D-72622 Nürtingen
Note:
Tighten the screws with max. 120 Ncm. The Cords should be movable but without loosening the screws.
MOUNTED VIEW FOR RIGHT HANDED OPERATION
3) The Cord can be added via the carabine intro the Cord guides. The Device is prepared for mobile operation.

Tablet PCs TT13 86
© ads-tec GmbH • Heinrich-Hertz-Str. 1 • D-72622 Nürtingen

Tablet PCs TT13 87
© ads-tec GmbH • Heinrich-Hertz-Str. 1 • D-72622 Nürtingen
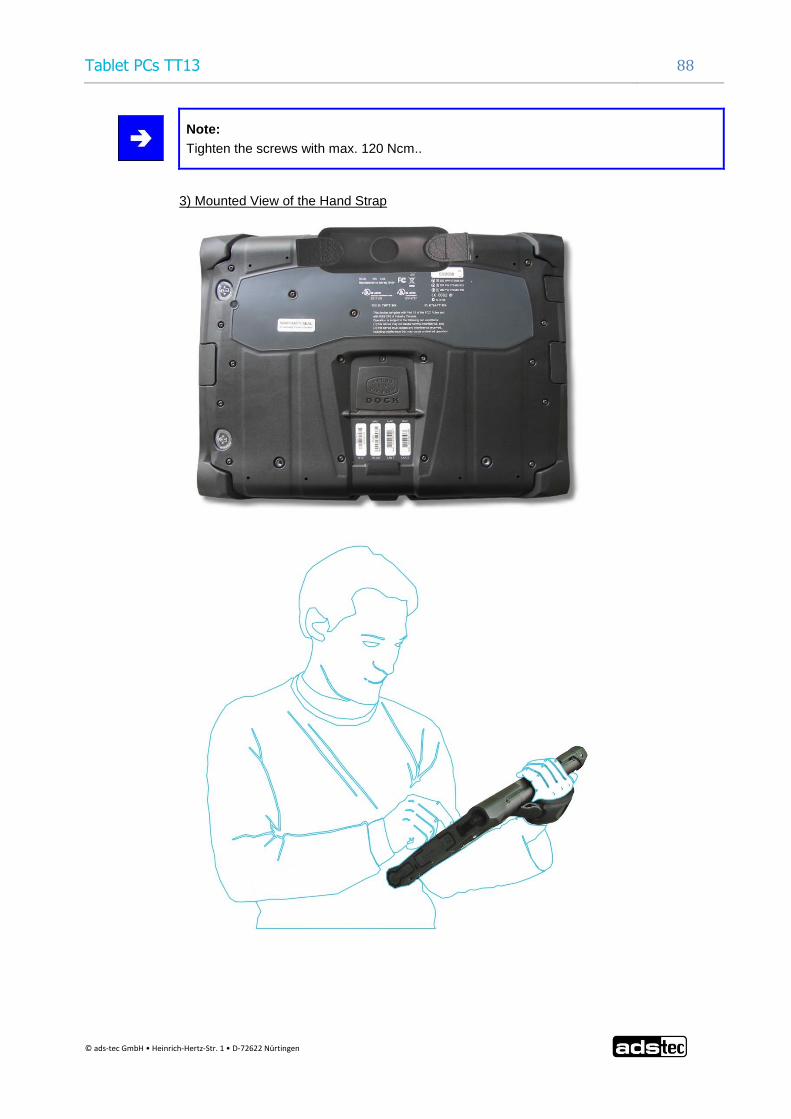
7.13 HAND STRAP
Alternative to the 3 Point Cord, a Hand Strap for mobile work is available. The Hand-Strap can be mounted directly to the device and makes it to a mobile workstation.
2 x DZ-MECH-33255-0
1 x DZ-MECH-31045-0
MOUTNING THE HAND STRAPS TO THE DEVICE
1) The Hand Strap has to be mounted at the marked positions
2) Mount the Hand Strap as shown in the picture.
Tablet PCs TT13 88
© ads-tec GmbH • Heinrich-Hertz-Str. 1 • D-72622 Nürtingen
Note:
Tighten the screws with max. 120 Ncm..
3) Mounted View of the Hand Strap
Tablet PCs TT13 89
© ads-tec GmbH • Heinrich-Hertz-Str. 1 • D-72622 Nürtingen
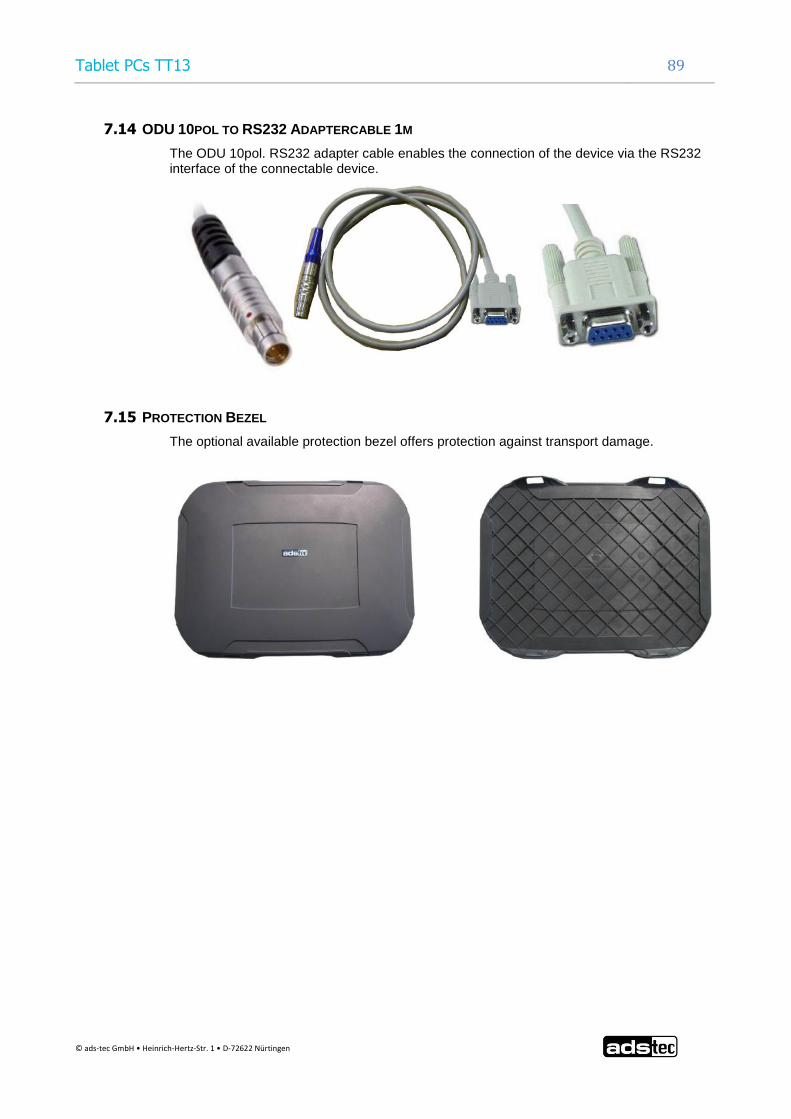
7.14 ODU 10POL TO RS232 ADAPTERCABLE 1M
The ODU 10pol. RS232 adapter cable enables the connection of the device via the RS232 interface of the connectable device.
7.15 PROTECTION BEZEL
The optional available protection bezel offers protection against transport damage.

Tablet PCs TT13 90
© ads-tec GmbH • Heinrich-Hertz-Str. 1 • D-72622 Nürtingen
8 CERTIFICATIONS
8.1 CERTIFICATIONS / TESTS
The TT13 system has the following certifications:
CE compatibility EN 61000-6-3:2007 Electromagnetive Emission, Klasse B
EN 55022:2006 Electromagnetive Emission
EN 61000-6-2:2005 Electromagnetive Emission
EN55024:1998+A1:2001+A2:2003 Electromagnetive Emission
UL/cUL201
USL/CNL E217133
GOST-R certificate
Device complies with standard
WLAN certificates for 802.11 a/b/g EU countries (ETSI)
2,400 MHz – 2,483.5 MHz
5,150 MHz – 5,350 MHz
5,470 MHz – 5,725 MHz
USA / Canada (FCC)
2,400 MHz - 2,483.5 MHz
5,150 MHz - 5,350 MHz
5.725 MHz – 5.850 MHz
Japan
2,400 MHz – 2,483.5 MHz
5,150 MHz – 5,350 MHz
5,470 MHz – 5,725 MHz
Australia
2,400 MHz – 2,483.5 MHz
5,150 MHz – 5,350 MHz
5,470 MHz – 5,725 MHz
Russia
2,400 MHz – 2,483.5 MHz
Note:
A respective conformity declaration for the authority in charge is available at the manufacturer and may be viewed on request.
All connected components, as well as cable connections must also meet these requirements for compliance with the EMC legislation. For this reason, screened bus and LAN cables including screened connectors must be used and installed according to the instructions in this user manual.

Tablet PCs TT13 91
© ads-tec GmbH • Heinrich-Hertz-Str. 1 • D-72622 Nürtingen
8.2 ELECTROMAGNETIC COMPATIBILITY (EMC)
Certificate of acceptance in accordance with the Federal Electromagnetic Compatibility Act in Germany ("EMVG") of 2007 (respectively the EMC Directive no. 2004/108/EC). In accordance with the Federal Electromagnetic Compatibility Act in Germany, this device is authorised to carry the EC conformity sign "CE". Liable party for this conformity declaration is according to para. 5 of the "EMVG" legislation:
ads-tec GmbH
Raiffeisenstrasse 14
D – 70771 Leinfelden – Echterdingen
Information in accordance with "EMVG", para. 3, section (2) 2:
This device complies with the protective requirements according to EN 61000-6-2 and EN 61000-6-4, class A.

Tablet PCs TT13 92
© ads-tec GmbH • Heinrich-Hertz-Str. 1 • D-72622 Nürtingen
8.3 FCC APPROVAL
Note:
This device complies with part 15 of the FCC Rules [and with RSS-210 of Industry Canada].
Operation is subject to the following two conditions:
This device may not cause harmful interference, and this device must accept any interference received, including interference that may cause undesired operation.
Note:
Changes or modifications made to this equipment not expressly approved by ads-tec GmbH may void the FCC authorization to operate this equipment.
Note:
This equipment has been tested and found to comply with the limits for a Class A digital device, pursuant to part 15 of the FCC Rules. These limits are designed to provide reasonable protection against harmful interference when the equipment is operated in a commercial environment. This equipment generates, uses, and can radiate radio frequency energy and, if not installed and used in accordance with the instruction manual, may cause harmful interference to radio communications. Operation of this equipment in a residential area is likely to cause harmful interference, in which case the users will be required to correct the interference at their own expense.
Note:
Radio frequency radiation exposure information:
This equipment complies with FCC radiation exposure limits set forth for an uncontrolled environment. This equipment should be installed and operated with a minimum distance of 0cm between the radiator and your body. This transmitter must not be co-located or operating in conjunction with any other antenna or transmitter.
Note:
This Class A digital apparatus complies with Canadian ICES-003.
Cet appareil numérique de la classe A est conforme à la norme NMB-003 du Canada.

Tablet PCs TT13 93
© ads-tec GmbH • Heinrich-Hertz-Str. 1 • D-72622 Nürtingen
9 TECHNICAL DETAILS
9.1 DISPLAY DATA
Display 13.3" TFT, WXGA 1280 x 800 pixels
Display colours 262.144 colours
Touchscreen Resistive 5-wire touchscreen
9.2 COMPUTER DATA
Processor Intel Pentium M Yonah ULV 1.06GHz Core Solo 423, Intel ULV 1.2GHz Core Duo (optional)
RAM 1GB DDR2 SO DIMM PC2-5300
2GB DDR2 SO DIMM PC2-5300 (optional)
Chip set Intel 945 GME
Graphic memory 945 GME Northbridge max. 64 MB shared
Mass storage device 2,5" SATA hard drive with at least 80 GB capacity, external USB DVD drive in a metal housing (optional)
Interfaces At the base device: 3 x USB 2.0 (of which 1 is mounted recessed in the housing, maximum load for 1 port up to 1.5A)
Network 1x Ethernet (10/100 Mbit RJ45 WAKE on LAN),
Wireless WLAN 802.11 a/b/g
Slots 1x Express card, wide slot
Sound 2x speakers, 1x microphone, 1x headphone out, 1x microphone in
Camera 2.0 megapixel auto-focus camera module (optional)
Power supply 20V DC +/- 20%
Accumulator Li-Ion smart-battery accumulator with 14.4V and 32Wh, 2 accumulator slots
Tablet PCs TT13 94
© ads-tec GmbH • Heinrich-Hertz-Str. 1 • D-72622 Nürtingen
9.3 GENERAL DATA
External dimensions 355 mm x 262 mm x 41 mm (W x H x D)
Weight approx. 3.0 kg
Protection class IP 54
Power consumption 24 Watts (typical)
Max. switch-on current 7 Amperes (for 2ms)
Tablet PCs TT13 95
© ads-tec GmbH • Heinrich-Hertz-Str. 1 • D-72622 Nürtingen
10 SERVICE AND SUPPORT
ads-tec and appointed partner companies offer you comprehensive maintenance and support services, ensuring quick and competent support should you have any questions or concerns with regard to ads-tec products and equipment.
ads-tec products may also be provided and installed by partner companies. Such devices may have customised configurations. Should any questions arise with regard to such specific settings and software installations, please contact the system supplier in question as ads-tec will not be able to reply to such questions.
ads-tec does not provide support services for any device or unit that was not bought directly from ads-tec. In any such case, maintenance and support is provided solely by the partner company that supplied the device or unit.
10.1 ADS-TEC SUPPORT
The ads-tec support team is available for direct clients from Monday to Friday from
08:30 AM to 05:00 PM using the following phone number:
Phone: +49 (0) 7022 2522-202
Email: [email protected]
10.2 COMPANY ADDRESS
ads-tec GmbH
Heinrich-Hertz-Str. 1
D-72622 Nürtingen
Germany
Phone: +49 (0) 7022 2522-0
Fax: +49 (0) 7022 2522-400
E-Mail: [email protected]
Home: www.ads-tec.de
Fax: +49 (0) 7022 2522-400