user guide - photoimpact | program graficzny table of contents table of contents ch. 1...
TRANSCRIPT
User Guide
Ulead Systems, Inc.
August 2000

First edition for Ulead® PhotoImpact® version 6, August 2000.
© 1992 – 2000 Ulead Systems, Inc.
All rights reserved. No part of this publication may be reproduced or transmitted in any form or by any means,electronic or mechanical, including photocopying, recording, or storing in a retrieval system, or translated intoany language in any form without the express written permission of Ulead Systems, Inc.
Software licenseThe software described in this document is furnished under a License Agreement which is included with theproduct. This Agreement specifies the permitted and prohibited uses of the product.
Licenses and trademarksICI Library © 1991–1992 C-Cube Microsystems.
Ulead is a registered trademark and Ulead PhotoImpact, PhotoImpact, EasyPalette, and the Ulead Systems logoare trademarks of Ulead Systems, which may be registered in certain jurisdictions. Microsoft, Windows, theWindows logo, Windows NT, and Microsoft Office are either registered trademarks or trademarks of MicrosoftCorporation in the United States and/or other countries. Acrobat® Reader Copyright© 1999 Adobe SystemsIncorporated. All rights reserved. Adobe, the Adobe logo, Acrobat, and the Acrobat logo are trademarks of AdobeSystems Incorporated. All other product names and any registered and unregistered trademarks mentioned in thismanual are used for identification purposes only and remain the exclusive property of their respective owners.
Sample filesFiles provided as samples on the program CD can be used for personal demonstrations, productions andpresentations. No rights are granted for commercial reproduction or redistribution of any sample files.
North & South America InternationalUlead Systems, Inc. Ulead Systems, Inc.
970 West 190th Street, Suite 520 10F, #45 Tung Hsing Rd.Torrance, CA 90502 Taipei, Taiwan 110U.S.A. Tel: +886 2 2764-8599Tel: +1 310 523-9393 Fax: +886 2 2764-9599Fax: +1 310 523-9399 http://www.ulead.comhttp://www.ulead.com http://www.uleadasia.comE-mail: [email protected] http://www.ulead.com.tw
E-mail: [email protected]
Europe JapanUlead Systems GmbH Ulead Systems, Inc.
Wolfenbuetteler Str. 33 2F, TE Building38102 Braunschweig 4-5-16 Yohga, Setagaya-ku,Germany Tokyo 158-0097Tel: +49 531 220 7920 JapanFax: +49 531 220 7999 Tel: +81 3 5491 5661http://www.ulead.de Fax: +81 3 5491 5663E-mail: [email protected] http://www.ulead.co.jp
E-mail: [email protected]
3
TABLE OF CONTENTS
Table of Contents
Ch. 1 Introduction.............................................................................. 11What would you like to do? ............................................................................................... 12
Installation ................................................................................................................... ....... 13
Running the programs ............................................................................................................. 13
Overview of the programs ................................................................................................. 14
PhotoImpact .................................................................................................................... ......... 14
Album ....................................................................................................................................... 15
GIF Animator ................................................................................................................... ........ 16
What’s New ..................................................................................................................... .... 17
Learning PhotoImpact ....................................................................................................... 18
Installing the Acrobat Reader ........................................................................................... 18
Ch. 2 PhotoImpact Fundamentals ................................................... 19Understanding the basics ................................................................................................. 20
Customizing the way you work ......................................................................................... 22
Customizing toolbars ........................................................................................................... .... 26
Color Management .................................................................................................................. 28
Working with image files ................................................................................................... 29
Opening image files ............................................................................................................ ..... 29
Creating new images ............................................................................................................ ... 30
Partially loading images ........................................................................................................... 30
Acquiring images from scanners and digital cameras ............................................................. 32
Acquiring images from the Internet .......................................................................................... 36
Acquiring photos from CDs ...................................................................................................... 38
Making a screen capture ......................................................................................................... 38
Stitching images together ........................................................................................................ 40
Import/Export .................................................................................................................. ......... 42
Duplicating images ............................................................................................................. ..... 42
Performing OLE operations ..................................................................................................... 43
Outputting images .............................................................................................................. 44
Saving images ......................................................................................................................... 44
Sending images through the Internet ...................................................................................... 45
Printing images ................................................................................................................ ........ 46
Recovering from mistakes ................................................................................................ 47
4
PHOTOIMPACT USER GUIDE
Viewing images ................................................................................................................. . 48
Zooming on an image ............................................................................................................ .. 48
Adding a view.................................................................................................................. ......... 49
Using the Global Viewer .......................................................................................................... 49
Applying commands to multiple files .............................................................................. 50
Viewing images in other modes ............................................................................................... 50
Batch Convert .................................................................................................................. ........ 50
Batch Manager .................................................................................................................. ...... 51
Using the Quick Command Panel ............................................................................................ 51
Using the EasyPalette ........................................................................................................ 52
Creating and organizing your gallery/library ............................................................................ 53
The Layer Manager ................................................................................................................. 54
Customizing the EasyPalette ................................................................................................... 54
Modifying and adding Gallery thumbnails ................................................................................ 54
Using images as thumbnails .................................................................................................... 55
Understanding objects & selections ................................................................................ 56
Working with selections .................................................................................................... 56
Pick Tool ...................................................................................................................... ............ 57
Standard Selection Tool – selecting regularly shaped areas .................................................. 57
Lasso Tool – selecting irregularly shaped areas ..................................................................... 58
Magic Wand – selecting an area containing similar colors ...................................................... 58
Mask Mode ...................................................................................................................... ........ 59
Moving a selection area marquee ........................................................................................... 62
Preserving the base image ...................................................................................................... 62
Creating smooth-edged selection areas .................................................................................. 62
Softening a selection edge ...................................................................................................... 63
Creating a border around a selection ...................................................................................... 63
Working with objects ......................................................................................................... 64
Adding to or subtracting from a selection ................................................................................ 64
Expanding a selection area ..................................................................................................... 64
Managing object layers ............................................................................................................ 65
Setting an object’s properties ................................................................................................. . 67
Editing objects ......................................................................................................................... 68
Adding shadows to an object ................................................................................................... 68
Copying and moving an object between images ..................................................................... 69
Duplicating an object .......................................................................................................... ..... 69
Deleting an object .................................................................................................................... 69
Retrieving an object’s original appearance .............................................................................. 69
Using the clipboard ............................................................................................................ 70
Spacing and aligning objects ................................................................................................... 70
Performing a cut and copy operation ....................................................................................... 70
5
TABLE OF CONTENTS
Performing a paste operation .................................................................................................. 71
The Clipboard submenu .......................................................................................................... 72
Using Object Libraries ....................................................................................................... 73
Saving selections to the object libraries .................................................................................. 73
Retrieving an image or selection ............................................................................................. 75
Ch. 3 Image Editing ........................................................................... 77Automatically enhancing an image .................................................................................. 78
Cropping an image ............................................................................................................. 7 8
Resizing an image .............................................................................................................. 79
Changing resolution ................................................................................................................. 79
Changing dimensions ............................................................................................................ .. 80
Understanding color correction ....................................................................................... 81
Using the color correction commands ..................................................................................... 81
Working with colors ........................................................................................................... 8 4
Using the Color Palette ............................................................................................................ 84
Using the color cache .......................................................................................................... .... 84
Selecting colors from the Color Picker popup menu ............................................................... 84
Editing the color table for an Indexed color image .................................................................. 86
Loading and saving color tables .............................................................................................. 86
Using the Painting Tools ................................................................................................... 87
Working with paint tool attributes ............................................................................................. 88
Erasing colors from an image .................................................................................................. 88
Specifying the Brush Panel attributes ...................................................................................... 89
Using the Mode Buttons .......................................................................................................... 89
Working with Object Eraser Tools .................................................................................... 90
Retouching images ............................................................................................................ 91
Using the Stamp Tool ........................................................................................................ 93
Cloning parts of an image ................................................................................................. 94
Saving a tool’s attributes to My Gallery ........................................................................... 95
Filling an area with color, textures, and gradients ......................................................... 95
Using the Fill Tools ........................................................................................................... ....... 95
Choosing a fill method ............................................................................................................. 96
Using the Fill command ......................................................................................................... .. 98
Using Delete and drag-and-drop to fill ..................................................................................... 99
Performing drag-and-drop texture fills ..................................................................................... 99
Working with paths .......................................................................................................... 100
Tracing and converting images into paths ............................................................................. 100
Creating paths ................................................................................................................. ...... 101

6
PHOTOIMPACT USER GUIDE
Editing paths .................................................................................................................. ........ 112
Using the Bezier Curve Tool .................................................................................................. 115
Adding text .................................................................................................................... .... 117
Saving path objects ............................................................................................................ ... 117
Creating text effects .......................................................................................................... ..... 118
Editing text as a path object .................................................................................................. 120
Wrap effects ................................................................................................................... ... 121
Applying special effects to text .............................................................................................. 121
Applying wrap effects from the EasyPalette .......................................................................... 121
Creating your own wrap effects ............................................................................................. 122
Modifying wrap effects ........................................................................................................... 123
Bending text objects ........................................................................................................... ... 125
Adding 3D properties to text and path objects ............................................................. 126
The Material dialog box ......................................................................................................... 127
Making the surface of 3D objects smoother .......................................................................... 130
Creating transparent objects ................................................................................................. 130
Using bump maps ................................................................................................................ .. 131
Using the Transform Tool ................................................................................................ 132
Transform Tools ................................................................................................................ ..... 132
Rotating images ................................................................................................................ ..... 134
Ch. 4 Special Effects ....................................................................... 137Special effects and filters ................................................................................................ 138
Applying effects and filters to an image ................................................................................. 138
Customizing effects and filters ............................................................................................... 139
Modifying an effect or filter .................................................................................................... 139
Creating special effects ................................................................................................... 143
Warping ........................................................................................................................ .......... 143
Custom Filter ......................................................................................................................... 144
Custom Effect ........................................................................................................................ 144
Paint on Edges ................................................................................................................. ..... 145
More special effects for text and path objects ....................................................................... 146
Using Creative & Magic effects ....................................................................................... 147
Animation effects .............................................................................................................. ..... 147
Saving animations .............................................................................................................. ... 149
Artist Texture ......................................................................................................................... 150
Creative Warp .................................................................................................................. ...... 151
Lighting .................................................................................................................................. 152
Painting .................................................................................................................................. 154
Particle ....................................................................................................................... ............ 154
Transform ...................................................................................................................... ........ 155
7
TABLE OF CONTENTS
Adding special Type Effect .................................................................................................... 156
Kaleidoscope ......................................................................................................................... 156
Applying a Light effect ........................................................................................................... 157
Applying a Magic Gradient ..................................................................................................... 157
Creating a Turnpage effect .................................................................................................... 158
Ch. 5 Creating Web Pages .............................................................. 159Designing a Web page ..................................................................................................... 160
Structure of a Web page ........................................................................................................ 161
Creating a new Web page ..................................................................................................... 162
Customizing Web backgrounds ............................................................................................. 164
Adding objects for a Web page ...................................................................................... 167
Objects on a Web page ......................................................................................................... 167
Linked Objects ................................................................................................................. ...... 167
HTML Text Objects .............................................................................................................. .. 167
Component Objects .............................................................................................................. . 169
Advanced rollover button ....................................................................................................... 176
Button Designer ................................................................................................................ ..... 177
Creating hyperlinks in objects ................................................................................................ 179
Creating hyperlinks in objects by image maps ...................................................................... 179
Slicer ......................................................................................................................... ............. 180
Optimizing Web images in Image Optimizer ................................................................. 182
Optimizing an image as a JPEG ............................................................................................ 183
Optimizing an image as a GIF ............................................................................................... 184
Optimizing an image as a PNG ............................................................................................. 186
Testing your files with different settings ................................................................................ 187
Exporting a Web page...................................................................................................... 188
Previewing in a browser ......................................................................................................... 188
Saving for the Web ............................................................................................................. ... 189
Posting to the Web ............................................................................................................. ... 189
Other Web tools ................................................................................................................ 190
Opening the original file of a Web page ................................................................................ 190
Tutorial ....................................................................................................................... ....... 191
Opening a Web page as a single image ................................................................................ 191
Putting a Web page together ................................................................................................. 191
Ch. 6 GIF Animator .......................................................................... 193GIF Animator at a glance ................................................................................................. 194
Customizing how you work ............................................................................................. 195
Creating a new animation ................................................................................................ 196
8
PHOTOIMPACT USER GUIDE
Working with the Layer pane .......................................................................................... 197
Editing image layers ........................................................................................................ 198
Retouching image layers ....................................................................................................... 198
Cropping and resampling images .......................................................................................... 199
Duplicating image layers ........................................................................................................ 200
Merging image layers ........................................................................................................... . 200
Other editing tools ............................................................................................................ ...... 201
Working with layer attributes .......................................................................................... 202
Global information layer ......................................................................................................... 202
Positioning images in Compose mode .................................................................................. 203
Setting an image layer’s transparency .................................................................................. 204
Removing image layers ......................................................................................................... 205
Other image layer attributes .................................................................................................. 206
Using plug-in filters .......................................................................................................... 207
Saving GIF images ........................................................................................................... 208
Using video F/X ................................................................................................................ 208
Exporting image layers .......................................................................................................... 209
Ch. 7 Image Management with Album ........................................... 213Understanding the basics ............................................................................................... 214
Customizing the way you work ....................................................................................... 216
Creating an album ............................................................................................................ 21 8
Editing an album’s properties ......................................................................................... 219
Inserting thumbnails ........................................................................................................ 219
Inserting files from a folder .................................................................................................. .. 220
Getting images from a TWAIN device ................................................................................... 220
Entering field data ............................................................................................................ 221
Visual Insert .................................................................................................................. ......... 221
Entering keywords ................................................................................................................. 222
Creating a value list .......................................................................................................... ..... 224
Importing field data ........................................................................................................... ..... 225
Copying thumbnails and field data using the clipboard .............................................. 226
Exporting field data to an external file ................................................................................... 226
Viewing ........................................................................................................................ ...... 227
Viewing mode layout ............................................................................................................ .. 228
Splitting the album window .................................................................................................... 228
Viewing by tabs ................................................................................................................ ...... 229
Scrolling through an album .................................................................................................... 229
Using Scan Play .................................................................................................................... 229
9
TABLE OF CONTENTS
Printing ....................................................................................................................... ....... 230
Performing drag-and-drop operations ........................................................................... 231
Drag-and-drop thumbnails to albums .................................................................................... 231
Drag-and-drop thumbnails between tabs .............................................................................. 231
Drag-and-drop to the Tool panel ............................................................................................ 231
Working in Compact mode .............................................................................................. 232
Drag-and-drop to another program ........................................................................................ 232
Using the Tool Panel Menu ............................................................................................. 233
Adding programs to the Tool Panel ....................................................................................... 233
Managing albums ............................................................................................................. 234
Using the Album Panel .......................................................................................................... 234
Deleting programs from the Tool Panel ................................................................................. 234
Repositioning the Tool Panel ................................................................................................. 234
Checking the thumbnails in an album .................................................................................... 235
Copying or moving an album file ........................................................................................... 235
Backing up an album file ........................................................................................................ 236
Backing up to floppy disks ..................................................................................................... 236
Sharing albums and files ................................................................................................. 237
Restoring an album file .......................................................................................................... 237
Sharing albums over a network ............................................................................................. 237
Showcasing image collections ............................................................................................... 238
Creating a Web slide show .................................................................................................... 238
Creating a Web album ........................................................................................................... 240
Sending files by e-mail ........................................................................................................... 241
Maintaining thumbnails ................................................................................................... 242
Updating a thumbnail ............................................................................................................. 242
Changing a thumbnail’s image .............................................................................................. 242
Relinking thumbnails with their associated files .................................................................... 242
Annotating a thumbnail .......................................................................................................... 243
Reordering thumbnail index numbers .................................................................................... 243
Assigning marks ................................................................................................................ .... 244
Maintaining source files .................................................................................................. 245
Viewing and opening files ...................................................................................................... 245
Viewing and updating file properties ...................................................................................... 245
Locating thumbnails ........................................................................................................ 246
Converting a file’s format and data type ................................................................................ 246
Changing the program associated with a file ......................................................................... 246
Search criteria and queries .................................................................................................... 247
Logical operators ................................................................................................................... 247
Search operators ................................................................................................................... 248
10
PHOTOIMPACT USER GUIDE
Performing a search ........................................................................................................ 249
Using the Search toolbar ....................................................................................................... 250
Performing OLE operations ............................................................................................ 251
Linking and embedding objects ............................................................................................. 251
Editing linked or embedded objects ....................................................................................... 251
Appendix .......................................................................................... 253Images on the Web........................................................................................................... 254
How an image is displayed on the Web ................................................................................ 254
Shortcuts ......................................................................................... 257
Index ................................................................................................. 265

1
INTRODUCTION
Welcome to Ulead PhotoImpact 6, a must for image editing
enthusiasts who want to get serious about the Web. With a
comprehensive array of innovative and easy-to-use tools for Web
page design and image manipulation, PhotoImpact offers you the
most complete package for your particular Web design and
imaging needs. Both professionals and novices alike will discover
that PhotoImpact provides all that’s required to create stunning
results for Web pages, online presentations, business documents,
and much more.
Introduction at a glance:
• What would you like to do? ..................................................................................... 12
• Installation ................................................................................................................ 13
• Overview of the programs ....................................................................................... 14
• What’s New ............................................................................................................. 17
• Learning PhotoImpact ............................................................................................. 18
• Installing the Acrobat Reader ................................................................................. 18
12
PHOTOIMPACT USER GUIDE
What would you like to do?
• Press F1 on your keyboard anywhere within the program.
• Select Help: Ulead PhotoImpact Help on the Menu bar.
• Click the question mark button on the Standard Toolbar, and then click theitem of interest. A help topic for that item then appears with further links torelated topics.
I want to see what’s new in this version
The What’s New section on page 17 offers an overview of all the powerful newfeatures in the package. For current PhotoImpact users, you can immediately beginusing the program more efficiently by taking advantage of these new and useful tools.
I am a first time user
If you’re new to PhotoImpact, look for the Tip of the Day, which pops up each timeyou run the program. This will give you hints on how to best take advantage of all thefeatures. For further assistance while you are actually using PhotoImpact, theTutorials section in the Online Help offers easy-to-follow step-by-step instructions.You can also take a look at Learning PhotoImpact on page 18 and What’s New onpage 17.
I want to design for the Web
To create the most impressive and dynamic Web sites around, Webmasters and Webdesigners should go to Chapter 5: Creating Web Pages on page 159. This revealsthe extensive range of tools available for creating amazing Web pages and Web-efficient images.
I am a Microsoft Office user and want to work closely with those programs
Microsoft Office users can go to Chapter 7: Image Management with Album onpage 213. This will show you how you can use Album together with Windows to linkand embed images files into Office documents. You can also discover how to use thepowerful features in Album to manage and organize image files.
With PhotoImpact, you can quickly familiarize yourself with all the features througha variety of sources. Tips of the Day and tutorials guide you along the basics of theprogram, while Help topics can clue you in on the finer points of the features. Thefollowing list should help you determine which method is best suited to your needs.
I want to skip the manual and get started
The PhotoImpact Online Help is the best way to learn things for those who preferexploring the program on their own instead of reading the user guide. Online Helpcan be accessed in one of the following ways:
13
CHAPTER 1: INTRODUCTION
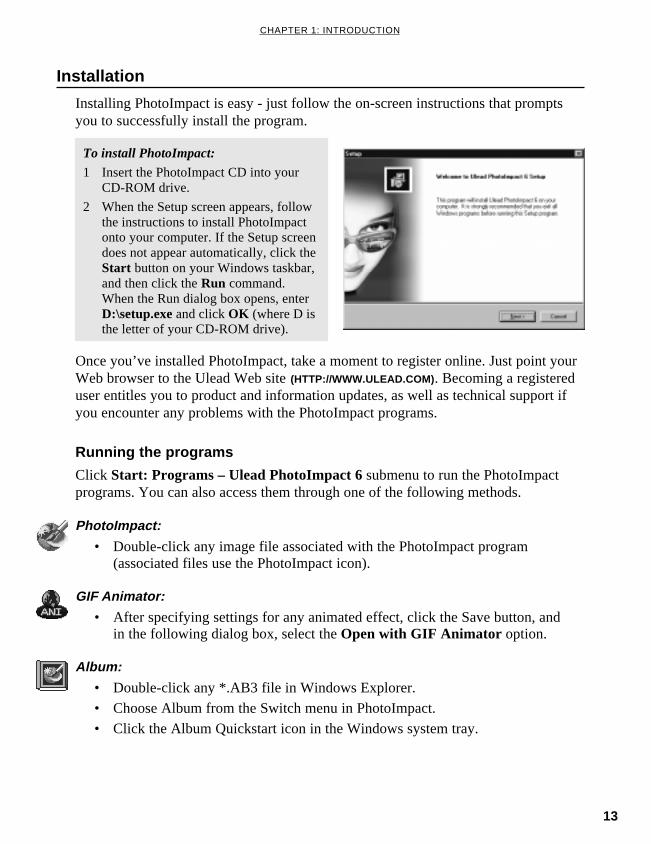
Installation
Installing PhotoImpact is easy - just follow the on-screen instructions that promptsyou to successfully install the program.
Once you’ve installed PhotoImpact, take a moment to register online. Just point yourWeb browser to the Ulead Web site (HTTP://WWW.ULEAD.COM) . Becoming a registereduser entitles you to product and information updates, as well as technical support ifyou encounter any problems with the PhotoImpact programs.
Running the programs
Click Start: Programs – Ulead PhotoImpact 6 submenu to run the PhotoImpactprograms. You can also access them through one of the following methods.
PhotoImpact:
• Double-click any image file associated with the PhotoImpact program(associated files use the PhotoImpact icon).
GIF Animator:
• After specifying settings for any animated effect, click the Save button, andin the following dialog box, select the Open with GIF Animator option.
Album:
• Double-click any *.AB3 file in Windows Explorer.
• Choose Album from the Switch menu in PhotoImpact.
• Click the Album Quickstart icon in the Windows system tray.
To install PhotoImpact:
1 Insert the PhotoImpact CD into yourCD-ROM drive.
2 When the Setup screen appears, followthe instructions to install PhotoImpactonto your computer. If the Setup screendoes not appear automatically, click theStart button on your Windows taskbar,and then click the Run command.When the Run dialog box opens, enterD:\setup.exe and click OK (where D isthe letter of your CD-ROM drive).

14
PHOTOIMPACT USER GUIDE
The following is a brief overview of the programs in the PhotoImpact suite.
PhotoImpact
PhotoImpact is an all-in-one solution for Web page design, Web graphics and imageediting. With a wealth of tools at your fingertips, there’s virtually no limit to theimages you can create for great-looking and efficient Web pages and other projects.Some of PhotoImpact’s unique and innovative features are listed below.
Unmatched Web page creation offers you an integrated program that allows you tocreate entire Web pages, including images, text content and components, without thehassle of coding. And, because Web pages are saved in the object-based UFO fileformat, you can update and edit Web page content, whether text or image, at anytime.
• Web page output capability lets you generate the HTML code and attachits image references instantly.
• Component Designer and Background Designer help you generateattractive Web page elements, such as buttons, banners, Web pagebackgrounds - in just a few steps.
• HTML text support lets you add text content that is embedded in the Webpage and easily edit it at a later time.
• Hyperlinks, image maps, JavaScript rollovers, and image slicing areeasy to make using special Web features in PhotoImpact. These let youquickly add all the functionality and extras needed to get your Web pagesup and running.
• Optimization capability with Image Optimizer lets you prepare all imagesand components so that file sizes are minimized, allowing the entire Webpage to download quickly.
Overview of the programs
Powerful graphic imaging tools let you work intuitively to give your creativity thelimelight in Web and imaging projects.
• Enhanced vector graphics capabilities let you easily create and editstunning 2D and 3D graphics and images with the Path Tools. Addedoptions allow you to achieve exactly the shape, look, and feel that you want.
• Flexible text creation tools allow you to easily create text for yourgraphics and give you options to fine-tune text spacing, kerning, and others.You can also enter text in any language that’s supported by Windows 2000.In addition, unique type effects offer you the ability to twist and wrapwords, skew them in an direction, create special 3D text, and animate them,so that your messages make a greater impact, whether as an animated GIFor as a still image.
15
CHAPTER 1: INTRODUCTION
• Special effects and animations are easy to apply. You have a wide rangeof options to choose from, including particle and wild pattern effects, aswell as still and animated effects.
• Animation Studio features let you create wild, realistic, and vibrant effectsfor both photos and 3D objects, which you can use to liven up your Webpages.
Enhanced productivity functions let you work with a large number of image fileswith maximum speed and ease.
• EasyPalette puts a vast number of presets within easy reach, so that youcan quickly apply them to your images with drag-and-drop ease. You caneven create and save your own presets, including animated effects.
• Macro recording and playback allows you to simplify and catalogrepetitive tasks or procedures through the Quick Command Panel, so thatyou can work at maximum speed and efficiency.
• Integrated screen capture lets you capture any part of your workspace,and then open the captured image directly in PhotoImpact, save it to file, orpaste it to the clipboard.
• Guided workflow puts the power of a complete image editing solutionright at your fingertips through the Post-processing Wizard.
• Push-model awareness streamlines the acquisition of images fromscanners and digital cameras by eliminating the need for extra steps such assetting post-processing and image destination options.
• Extensive file format support allows you to work with most populargraphic formats for greater imaging options, now including layer supportfor Photoshop and Paint Shop Pro files.
Album
Album is another major module included in the PhotoImpact package, and it is apowerful tool for image file management. Not only can you organize and catalogyour files visually through thumbnails, but you can create your own database that youcan edit and update. Album also provides convenient tools for sharing your imagesover the Internet. Album's features include:
• OLE 2 support lets Album work in close conjunction with other programs,such as other Ulead products and Microsoft Office programs. In manycases, you can simply drag and drop thumbnails to the desired application.
• User definable fields give you the power of a searchable database throughfields or categories that you can specify - an essential feature for anyonewho needs to organize large collections of images.
• Extensive Web support features give you several ways in which to shareyour images over the Internet. Create Web albums as well as slide shows,

16
PHOTOIMPACT USER GUIDE
and automatically generate HTML files or create a single self-extracting fileready to be set by e-mail. You can also send individual images by e-maildirectly from Album.
• Folder monitoring allows Album to check your system for any changes tofiles in a folder and then automatically update the albums accordingly.
• Compact mode provides convenient access to your albums while at thesame time revealing background programs. This allows you to easily dragand drop thumbnails between Album and other programs.
• Album Manager helps you quickly and conveniently open, close, delete, orremove multiple albums from the album panel for more effectiveorganization of your image files.
GIF Animator
This award-winning GIF animation program helps you build Web-animations whilegiving you room for creativity. Its built-in optimization engine makes your animationcompact and ready for the Web in seconds, while retaining its overall quality. It canalso generate all the necessary HTML code for you. Here are some of the features:
• A streamlined interface improves your workflow, placing all that yourequire within easy reach. The color palette is located conveniently in theworkspace, and four mode tabs make it a snap to edit and optimize imagelayers. The Layer Pane also offers three different modes for viewing layers.
• Extensive tools in Edit mode give you even greater flexibility and controlwhile editing your image layers. The Onion Skin feature lets you see imagelayers below the current one, making it possible to edit individual layerswith greater accuracy.
• Animation merging capability lets you merge two animations together tocreate an exciting and unique effect.
• Dynamic banner text effects and video fx let you add flair to animatedGIFs. You can create even more stunning banner text that scrolls acrossyour project, radiates a message, moves in complex sequences, speed acrossa frame, or simply changes colors.
• Powerful optimization retains amazing image quality while reducing thesize of your animated GIF files. For greater convenience, you can use eitherthe Optimization Wizard or a previously saved preset to optimize and savefiles.
• Preset Manager lets you organize the optimization presets that you'vesaved in the Optimize tab. Sort them by frequency of use to improve yourworkflow.
• Batch Process is the perfect feature for those who have an entire Web siteof animated GIF files that need to be re-optimized. You can run every file
17
CHAPTER 1: INTRODUCTION
through the GIF Animator optimization engine and see the results inseconds.
• An animation packager creates stand-alone animations that don’t require aWeb browser to be viewed. A wide range of options let you hyperlink theanimation, customize the message box style, and more.
• Custom preview unfolds your animation in a browser of your choice byassigning it to one of the browser buttons on the Standard toolbar.
• Improved resampling new options allow you to specify the resamplingquality in order to best accommodate your particular needs.
Ulead PhotoImpact 6 comes with significant changes and upgrades to further enhanceits power as a tool for creating Web pages and images. Some of its powerful newfeatures are described below.
An all-in-one integrated Web solution for Web designers. PhotoImpact hasexpanded its wealth of Web features to bring you a total Web design solution,including:
What’s New
• Web page output A wide range of features let you design entire Web pageswithin PhotoImpact and output them as HTML files plus their associatedimages.
• HTML text support In addition to creating and editing images, you canconveniently enter text content to your Web page.
• Enhanced hyperlinking Create and manage all hyperlinks, including imagemaps, from one convenient window.
• Web page editing You can choose to update entire Web pages, or justindividual objects, depending on the way you prefer to work. All Webobjects remain “live” for easy modification.
• Browser preview functionality Check your work before you upload pagesto the Web.
• Free Web hosting at iMira.com, Ulead’s digital media sharing Web site, isjust a click away. The Drop Spot lets you upload files to your account witha single click from Windows Explorer.
New tools for unrivaled creativity enable you to make even more amazing Webpages, graphics, and images.
• Improved Path Tools allow you to generate and manipulate vector-basedobjects and text with even greater flair and ease. In addition, wrap anddeform effects, fadeout options for masks, new lighting effects, and manynew presets are just a few of the cool things you can apply to your images.

18
PHOTOIMPACT USER GUIDE
• Object Stamp tool makes it possible to go wild in enhancing anddecorating images with unique flair and effect.
• Expanded text options and effects let you create exactly the kind of textthat you want, including spacing, leading, and kerning, in any language!New type effects have also been added, allowing you to create astoundingstill and animated text.
• Animation Studio gives you the ability to create eye-catching animationsin just a few steps.
• New special effects give you the power to instantly convert your colorimages to RGB monotone or to give images a unique two-color effect.
• Additional object layer editing functions greatly facilitate the process ofediting the transparencies, or masks, of individual objects by “painting”directly on the objects themselves.
• Easy-to-use interface paves your way to greater efficiency andproductivity when working on projects. Toolbars and buttons can becustomized to fit the way you like to work. Path tools, crop and colorselection functions have been enhanced. The EasyPalette now displaysanimated effects.
Learning PhotoImpactThere are a number of ways to learn PhotoImpact, including reading the user guide,or clicking the Help button whenever necessary. And be sure to visit Ulead’sLearning Center (at http://www.ulead.com ) for further tutorials and tips. But the mosteffective method of all is to explore the program itself. Play with the software andyou’ll be a pro in no time. After all, experience is always the best teacher.
Installing the Acrobat Reader
An electronic copy of the user guide is available in the Adobe Acrobat format, or thePortable Document Format (PDF). To view this:
1 Run the file ar405eng.exe located in the PhotoImpact CD in the folderUtilities\AcrobatReader\English and follow the installation instructions.
2 Select File: Open from Acrobat Reader, and then open the fileUPI-6 MANUAL.PDF found on the PhotoImpact CD. You can then viewthe user guide online.

2
PHOTOIMPACT FUNDAMENTALS
This chapter describes the basic commands and features you will
use most often in PhotoImpact. It begins with a discussion of the
PhotoImpact preferences and then goes on to examine common file
operations such as opening and saving a file, recovering from
mistakes, and printing out your images.
In this chapter you will learn:
• Understanding the basics ........................................................................................ 20
• Customizing the way you work ................................................................................ 22
• Working with image files .......................................................................................... 29
• Outputting images .................................................................................................... 44
• Recovering from mistakes ....................................................................................... 47
• Viewing images ........................................................................................................ 48
• Applying commands to multiple files ....................................................................... 50
• Using the EasyPalette.............................................................................................. 52
• Understanding objects & selections ........................................................................ 56
• Working with selections ........................................................................................... 56
• Working with objects ................................................................................................ 64
• Using the clipboard .................................................................................................. 70
• Using Object Libraries ............................................................................................. 73
20
PHOTOIMPACT USER GUIDE
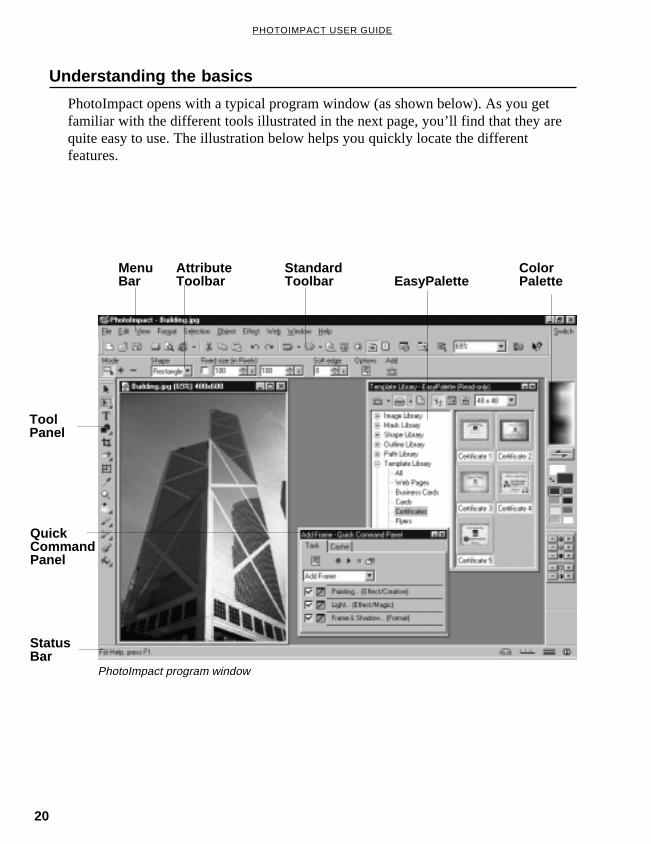
Understanding the basics
PhotoImpact opens with a typical program window (as shown below). As you getfamiliar with the different tools illustrated in the next page, you’ll find that they arequite easy to use. The illustration below helps you quickly locate the differentfeatures.
StatusBar
ToolPanel
PhotoImpact program window
MenuBar
AttributeToolbar
StandardToolbar
ColorPaletteEasyPalette
QuickCommandPanel
21
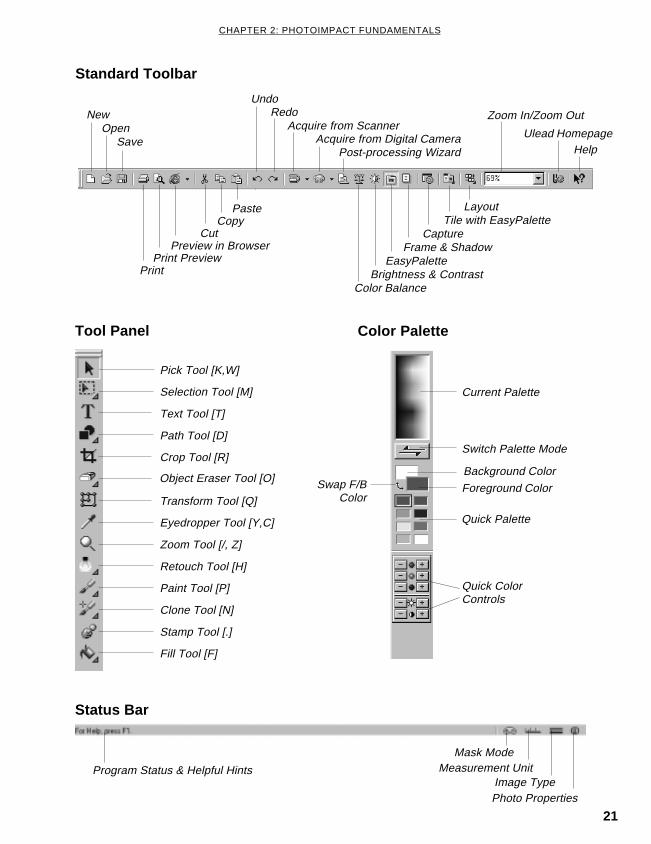
CHAPTER 2: PHOTOIMPACT FUNDAMENTALS
Swap F/BColor
Color Palette
Current Palette
Switch Palette Mode
Background Color
Foreground Color
Quick Palette
Quick ColorControls
Program Status & Helpful Hints
Status Bar
Measurement UnitImage Type
Mask Mode
Photo Properties
Object Eraser Tool [O]
Eyedropper Tool [Y,C]
Tool Panel
Pick Tool [K,W]
Selection Tool [M]
Retouch Tool [H]
Paint Tool [P]
Clone Tool [N]
Fill Tool [F]
Crop Tool [R]
Path Tool [D]
Text Tool [T]
Zoom Tool [/, Z]
Stamp Tool [.]
Transform Tool [Q]
Standard Toolbar
NewOpen
Save Acquire from Digital Camera
Paste
EasyPalettePreview in Browser
Post-processing Wizard
UndoRedo
Acquire from Scanner
PrintPrint Preview
CopyCut
Ulead Homepage
Zoom In/Zoom Out
Help
Layout
Capture
Brightness & Contrast
Tile with EasyPalette
Frame & Shadow
Color Balance

22
PHOTOIMPACT USER GUIDE
Customizing the way you work
Before moving on, select File: Preferences or press [F6] to set various optionsspecific to PhotoImpact. This enables you to customize the way your program worksand to move around your workspace with ease. The Category section in thePreferences dialog box contains all the different aspects that determine a program’sperformance, displayed in a tree view style. Clicking a category displays the optionswith their respective settings or attributes.
PhotoImpact
The PhotoImpact category modifies the way the program operates. You can, for example, setthe measurement unit to inches instead of pixels, increase the levels of undo, and performenhancements at higher quality levels.
• Measurement unit can be in pixels, inches, orcentimeters. This determines the unit of measureto use when displaying image size informationand ruler measurements. (This can also bechanged by clicking the Measurement Unitbutton on the Status bar.)
• Enable undo allows you to take advantage ofthe multiple undo/redo feature in PhotoImpact(up to 99). As PhotoImpact allocates morememory for each level of undo/redo, you mayfind that too high a level adversely affectsperformance. In such cases, try a lower valuesetting, such as 3 or 4. You can, of course,disable Undo, but this means that any editingdone to an image is final.
• Number of recently opened files specifies the number of files listed on the submenu of theRecent Files menu command in the File menu (up to 9). Clicking a name from the listimmediately reopens that file in the workspace.
• Generation quality allows you to set the quality of any effects and filters. A higher qualityresults in better image reproduction, but may take longer to calculate.
• Resample method specifies how pixels are added and removed when you resize an imageby resampling. Nearest Neighbor is the fastest method but produces the least precise results,Bilinear produces medium quality results, and Bicubic produces the best results, but at thecost of speed.
• Highlight inactive selections and objects displays or hides a dark border around objectsand selections that are not active. Select this option if you have trouble keeping track ofobjects in an image.
• Display quick samples shows sample thumbnails for visual adjustment guides wheneveryou open an enhancement or effect dialog box. Clear to open the corresponding dialog boxdirectly for more precise editing.
• Check Ulead's Web site specifies how often you would want to check out Ulead's Web siteat the start of the program. Options range from one until 99 days.
• Include OLE information when copying to the clipboard allows you to use PhotoImpact asan OLE server. Or, if the check box is cleared, it will disable the OLE paste commands inyour program.
23
CHAPTER 2: PHOTOIMPACT FUNDAMENTALS
Note : To use the guidelines feature, select View:Ruler menu command first to display the ruler andthen select the desired command from the View:Guidelines & Grid submenu. Refer to the Shortcutkeys for easier access (see page 257).
• Mask mode modifies the mask color from white (default) to any color in the Ulead ColorPicker and adjust the transparency from zero up to 100 percent before entering mask mode.
Plug-ins
The Plug-ins category lets you specify the plug-in programs you want to use with PhotoImpactand where they can be found. Plug-ins are external, third-party enhancements to your imageediting options. Any changes you make to this category take effect only after restartingPhotoImpact.
Guidelines & Grid
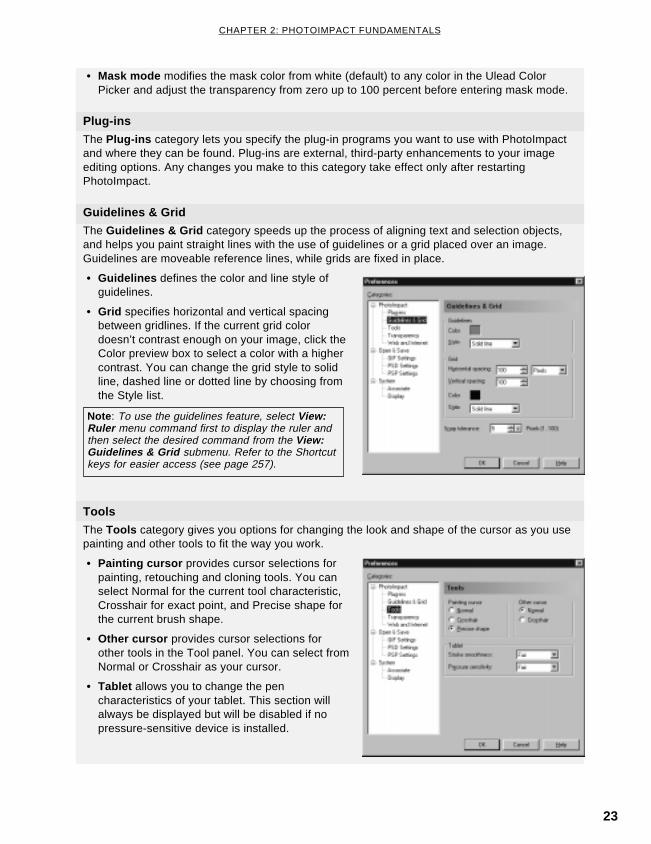
The Guidelines & Grid category speeds up the process of aligning text and selection objects,and helps you paint straight lines with the use of guidelines or a grid placed over an image.Guidelines are moveable reference lines, while grids are fixed in place.
• Guidelines defines the color and line style ofguidelines.
• Grid specifies horizontal and vertical spacingbetween gridlines. If the current grid colordoesn’t contrast enough on your image, click theColor preview box to select a color with a highercontrast. You can change the grid style to solidline, dashed line or dotted line by choosing fromthe Style list.
Tools
The Tools category gives you options for changing the look and shape of the cursor as you usepainting and other tools to fit the way you work.
• Painting cursor provides cursor selections forpainting, retouching and cloning tools. You canselect Normal for the current tool characteristic,Crosshair for exact point, and Precise shape forthe current brush shape.
• Other cursor provides cursor selections forother tools in the Tool panel. You can select fromNormal or Crosshair as your cursor.
• Tablet allows you to change the pencharacteristics of your tablet. This section willalways be displayed but will be disabled if nopressure-sensitive device is installed.
24
PHOTOIMPACT USER GUIDE
Transparency
Lets you customize the size and appearance of the grid for transparent backgrounds. You canalso set the lightness and color of the grid as well.
Web & Internet
This category lets you make default settings for creating and saving Web projects.
• Color of box around Web objects sets the color of the bounding box for Web objects sothat you can control the layout of your Web page more easily. Web objects are one of thefollowing: HTML text, linked objects, component objects (made with Component Designer).
• Color of box around normal objects sets the color of the bounding box for non-Webobjects, such as image, text, and path objects.
• Check for rendering errors generates a report listing problems that you may encounterwhen outputting a project as a Web page.
• Display reminder to refresh sets the program to remind you to refresh images that havebeen placed as linked objects in a separate document.
Open & Save
The Open & Save category collects preferences related to Save options. If the image type of theactive document does not match the selected file formats, PhotoImpact automatically convertsthe image.
• Use Visual Open to open images lets you use the Visual Open feature by default toconveniently browse for and open files by visual thumbnail representations instead of filenames.
• List all file formats in Save As dialog box displays all file formats found in the system thatare related to the image type that you are working with. For example, if your image is indexedcolor, then only file formats that support indexed-color images are listed.
• Display a confirmation message when saving shows a message whenever you save a filecontaining objects to a non-UFO format, or when you save a file to a format that involves acompression scheme that may involve the loss of data, such as JPEG.
• Display file save options dialog allows you to select which file formats that supportadditional save options, to display when saving.
GIF Settings
This category is useful for setting how you want to open animated GIF files. You can choose toopen all frames of the animated GIF into a single document, while retaining each as separateobjects (use Layer Manager in the EasyPalette to help you view and edit the individual objects.See page 54). Or, you can open each frame in its own document. Select Use GIF Animator toopen GIF files , so that you can directly use GIF Animator to edit and optimize an image. Youcan also set PhotoImpact to display these options each time you open these files.
PSD/PSP Settings
These options let you determine how you want PhotoImpact to handle the layer structure of PSDand PSP files. Similar to GIF Settings, you can open each layer in a single document asindividual object or open just the first layer in the file. For PSD files, there are additional optionsfor saving images from PhotoImpact as an Adobe Photoshop file. You can save each object inits own individual layer, or save the merged image. You can also set PhotoImpact to ask you toselect one of these options each time you open these files.

25
CHAPTER 2: PHOTOIMPACT FUNDAMENTALS
Note: This option does not allow you to specify compressed hard drives as the source of additionalvirtual memory folders.
System
The System category specifies folders that provide additional swap space when working withfiles. You can also determine how much hard disk space is allocated to virtual memory as wellas how much RAM is allocated to be used by all Ulead programs.
• Define additional folders for virtual memoryspecifies the folder used by the PhotoImpactprograms as additional working space. Forexample, when you don’t have enough RAM, thePhotoImpact programs can use extra memoryfrom the hard disk (virtual memory) as temporaryRAM. The first folder is the TEMP folder definedby the SET TEMP statement in yourAUTOEXEC.BAT file. If you have more than onedrive on your system, you can specify more thanone temporary folder in the available entryboxes.
• Hard disk indicates the space available on yourhard disk.
• Limit hard disk usage to allows you to specifyhow much memory you want to allocate to the PhotoImpact programs for use as virtualmemory. If you want to run other programs in the background, then choose about ½ themaximum amount. To use PhotoImpact defaults, leave this option cleared.
• Limit RAM usage to allows you to specify how much memory PhotoImpact programs canuse from your RAM. If you want to run other programs in the background, then choose about½ the maximum amount. To let PhotoImpact manage this automatically, leave this optioncleared.
Associate
The Associate category determines which file format is linked to PhotoImpact. For example,when you associate BMP files to PhotoImpact, all BMP files that you double-click will open up inPhotoImpact.
• Associate file extension with PhotoImpactdisplays all the file formats supported byPhotoImpact. To associate a file format toPhotoImpact, select the check box of thedesired file format extension.
• Select All quickly selects all supported fileextension.
• Customize allows you to assign user-definedfile extensions to file formats supported by thePhotoImpact program to be able read imagedata.

26
PHOTOIMPACT USER GUIDE
Customizing toolbars
PhotoImpact lets you set the workspace to fit the way you work best. There are a fewways to do this:
• Drag toolbars away from theiroriginal position to make them“float” anywhere on the screen or todock them to another section of theprogram window. You can also resizemost floating toolbars.
• For tools in the Tool panel, somehave a submenu with further tools. Toaccess these tools, click on the triangleicon on the lower left of the button.When the submenu pops up, you candrag it away from its original positionto make it float anywhere on the screenor dock it to another part of the programwindow.
Display
The Display category allows you to modify the way images are displayed and to calibrate yourmonitor. Because lighting and temperature can also affect a monitor's performance, you shouldcalibrate your monitor whenever you change monitors, display adapters, or the environment inwhich you work.
• HiColor dithering improves the display of TrueColor images when you are in High Colordisplay mode.
• View images with a common palette displaysall images using the system palette. This is onlyenabled when you are in 256-Color displaymode and makes your work quicker as there isno need to repaint any of the images with a newpalette. This option is particularly useful whenpreparing CD-ROM based titles and you need tosee how images appear in 256-Color displaymodes.
• Ignore background quality enabled when in256-Color display mode and improvesperformance by not repainting any background images when you change views. (Do notselect this option if you need to identify background images.)
• Monitor gamma allows you to calibrate your monitor for the optimum display of images.
• Add and remove buttons on theStandard Toolbar, depending on the
27
CHAPTER 2: PHOTOIMPACT FUNDAMENTALS
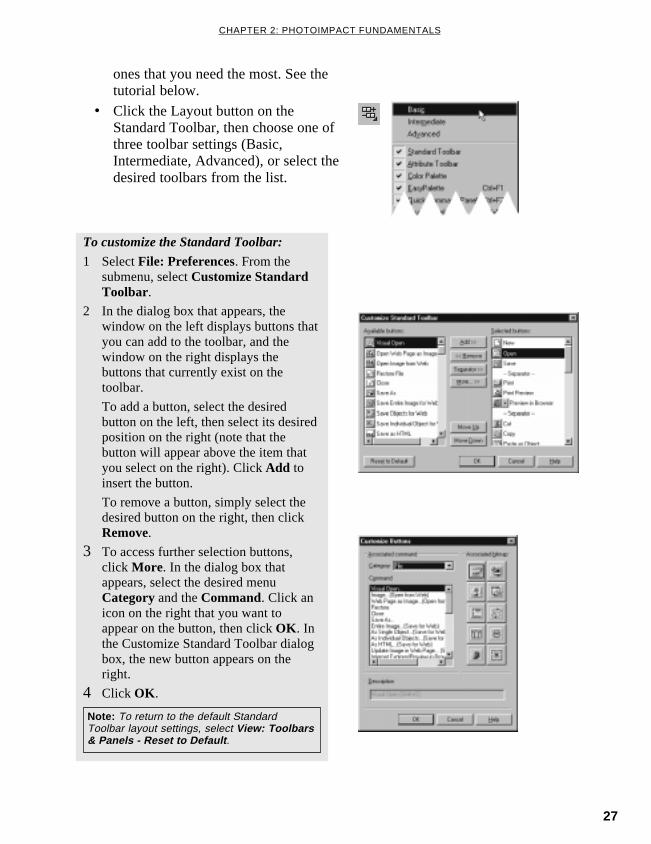
To customize the Standard Toolbar:
1 Select File: Preferences. From thesubmenu, select Customize StandardToolbar.
2 In the dialog box that appears, thewindow on the left displays buttons thatyou can add to the toolbar, and thewindow on the right displays thebuttons that currently exist on thetoolbar.
To add a button, select the desiredbutton on the left, then select its desiredposition on the right (note that thebutton will appear above the item thatyou select on the right). Click Add toinsert the button.
To remove a button, simply select thedesired button on the right, then clickRemove.
3 To access further selection buttons,click More. In the dialog box thatappears, select the desired menuCategory and the Command. Click anicon on the right that you want toappear on the button, then click OK . Inthe Customize Standard Toolbar dialogbox, the new button appears on theright.
4 Click OK .
ones that you need the most. See thetutorial below.
• Click the Layout button on theStandard Toolbar, then choose one ofthree toolbar settings (Basic,Intermediate, Advanced), or select thedesired toolbars from the list.
Note: To return to the default StandardToolbar layout settings, select View: Toolbars& Panels - Reset to Default .

28
PHOTOIMPACT USER GUIDE
Note: PhotoImpact includes Microsoft’s “Image Color Matching” 2.0 (ICM 2.0), a color managementtechnology producing consistent color results. ICM 2.0 is available if you use Windows 98 or Windows2000.
Color Management
Due to variations in monitor calibration, the color gamut of your device, and the typeof paper you are printing on, the color you see on your screen may not necessarily bethe color you get on your final printed copy. Therefore, you want to use a ColorManagement System (CMS) to match the colors on your monitor to a printed paper.
A CMS has 3 key functions:
• Maps color gamuts between selected devices.
• Matches colors in different color models (for example, RGB to CMYK).
• Provides an accurate display of colors on screen. To complete thesefunctions, the CMS creates a profile or profiles for selected devices.
To set up a Color Management Profile:
1 Select File: Preferences - ColorManagement.
2 Select Enable Color Management andchoose Basic if you want to match thecolor displayed on your monitor withthat of the color gamut of a selecteddevice such as a printer; and chooseProofing if you want to emulate thecolors that make up your image bedisplayed on another device.
3 Select Monitor and Printer profilesfrom the drop-down lists.
4 Select a Rendering Intent for mappingcolors of an image to your monitor andprinter. For more on rendering intent,refer to the Online Help.
5 If you selected Proofing ColorManagement in step 2, choose a profilefor the device selected in step 3.
6 Click OK .
29
CHAPTER 2: PHOTOIMPACT FUNDAMENTALS
After setting up your Preferences, you are now ready to work in PhotoImpact. First,you need to open an image in your workspace.
Opening image files
There are several ways to open your image files:
• Click the Open button on the Standard toolbar.
• Select the File: Open [CTRL+O] menu command.
• Double-click an associated image file name from Windows Explorer.
• Select the File: Visual Open [SHIFT+O] menu command for selecting filesrepresented by thumbnail images.
• Select the File: Recent Files menu command and choose a recently usedfile from the list.
Working with image files
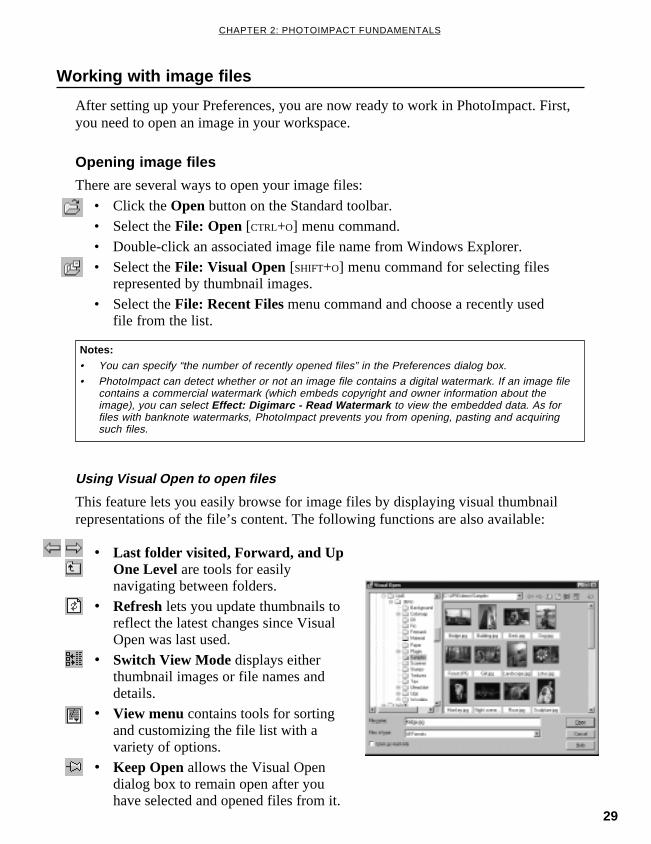
Using Visual Open to open files
This feature lets you easily browse for image files by displaying visual thumbnailrepresentations of the file’s content. The following functions are also available:
• Last folder visited, Forward, and UpOne Level are tools for easilynavigating between folders.
• Refresh lets you update thumbnails toreflect the latest changes since VisualOpen was last used.
• Switch View Mode displays eitherthumbnail images or file names anddetails.
• View menu contains tools for sortingand customizing the file list with avariety of options.
• Keep Open allows the Visual Opendialog box to remain open after youhave selected and opened files from it.
Notes:• You can specify “the number of recently opened files” in the Preferences dialog box.• PhotoImpact can detect whether or not an image file contains a digital watermark. If an image file
contains a commercial watermark (which embeds copyright and owner information about theimage), you can select Effect: Digimarc - Read Watermark to view the embedded data. As forfiles with banknote watermarks, PhotoImpact prevents you from opening, pasting and acquiringsuch files.

30
PHOTOIMPACT USER GUIDE
Note: To select a custom area to load, clearthe “Grid” option. Click the image and drag thehandles of the frame to select an area of theimage.
Partially loading images
Working with large images is sometimes frustrating while you wait for the screen toredraw everytime you create a selection, apply an effect, or use the brush/clone tool.Partial editing speeds up your editing process by displaying only the area you want tomodify.
To partially open a file:
1 Select File: Open [CTRL+O]. Select thePartial load option and then click onthe files to open. (Select files with theSHIFT key to select a range of files orCTRL to randomly select multiple files.)
2 Click Open. The image is divided intogrids. Selecting the Grid option dividesthe image into equal parts. Enter valuesfor the number of grid columns androws.
3 Click OK to close the Partial Loaddialog box and the selected area opensin the workspace.
Now you can edit the loaded selectionarea. Once you have finished editing,save the image as usual. If you changethe data type or dimensions of thepartially loaded area, you must save itas a new image.
Creating new images
When making a new image from scratch, a wide range of options let you customizethe appearance of your page in order to prepare it for Web use or normal imageediting.
Notes:• Partial editing can be applied to almost all file formats readable by PhotoImpact except .UFO files
or files with a saved selection area.
• RGB 48-bit and Grayscale 16-bit images do not support Partial editing.

31
CHAPTER 2: PHOTOIMPACT FUNDAMENTALS
Note: Check the Preview window to see howthe new image looks so far. The Preview drop-down list offers the different possibledestinations for your image so you canestimate if current settings are applicable.
To create your own image from scratch:
1 Select File: New [CTRL+N].
2 Click the desired data type that definesthe image format to use for the newimage.
3 Select one of the Canvas options:
• Single color sets the base image to bea solid color of your choice.
• Transparent hides the base imageand displays the default backgroundgrid.
• Web background lets you set thebackground <BGR> of a Web pagewith a color, texture or image fileusing the Background tab of theHTML Properties dialog box. (Seepage 163).
4 Set the image dimensions in the Imagesize set of options.
• Standard offers commonly usedonscreen and paper sizes.
• Active image opens a new imagewith the exact same size as thecurrently active image in theworkspace.
• User defined lets you customize thesize. Once you specify a size, you canclick the Reverse button to switch thewidth and height, or click the User-defined button to add the dimensionsas a preset for easy access (see thefollowing tutorial).
5 Enter Resolution values to determinethe distance between the centers of thepixel. Increasing the resolution reducesthe physical size of an image whenprinted on paper.
6 Click OK . A new image opens in theworkspace.
Solid color, transparent, and Web backgrounds
New image with Transparent Canvas
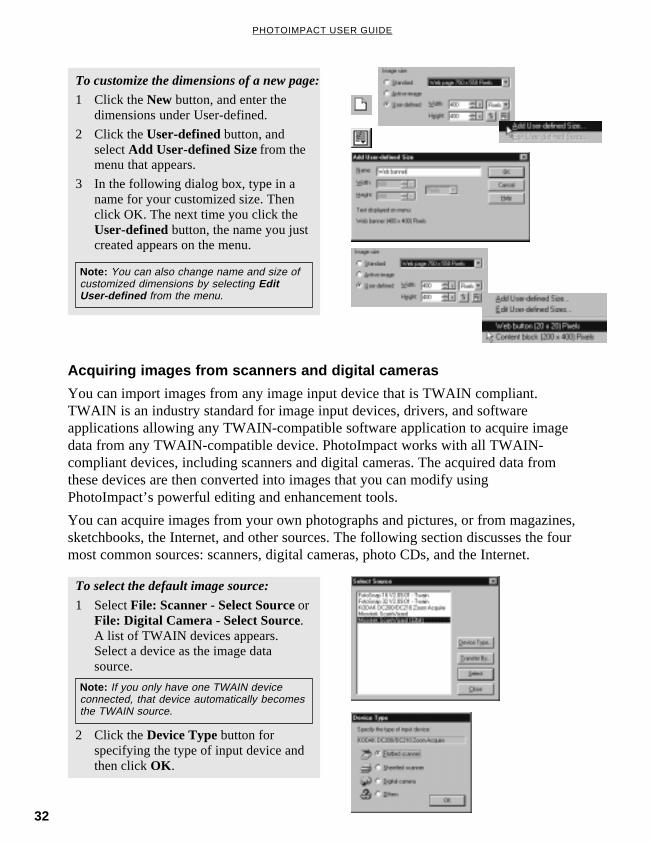
32
PHOTOIMPACT USER GUIDE
Note: If you only have one TWAIN deviceconnected, that device automatically becomesthe TWAIN source.
2 Click the Device Type button forspecifying the type of input device andthen click OK .
To select the default image source:
1 Select File: Scanner - Select Source orFile: Digital Camera - Select Source.A list of TWAIN devices appears.Select a device as the image datasource.
Acquiring images from scanners and digital cameras
You can import images from any image input device that is TWAIN compliant.TWAIN is an industry standard for image input devices, drivers, and softwareapplications allowing any TWAIN-compatible software application to acquire imagedata from any TWAIN-compatible device. PhotoImpact works with all TWAIN-compliant devices, including scanners and digital cameras. The acquired data fromthese devices are then converted into images that you can modify usingPhotoImpact’s powerful editing and enhancement tools.
You can acquire images from your own photographs and pictures, or from magazines,sketchbooks, the Internet, and other sources. The following section discusses the fourmost common sources: scanners, digital cameras, photo CDs, and the Internet.
To customize the dimensions of a new page:
1 Click the New button, and enter thedimensions under User-defined.
2 Click the User-defined button, andselect Add User-defined Size from themenu that appears.
3 In the following dialog box, type in aname for your customized size. Thenclick OK. The next time you click theUser-defined button, the name you justcreated appears on the menu.
Note: You can also change name and size ofcustomized dimensions by selecting EditUser-defined from the menu.
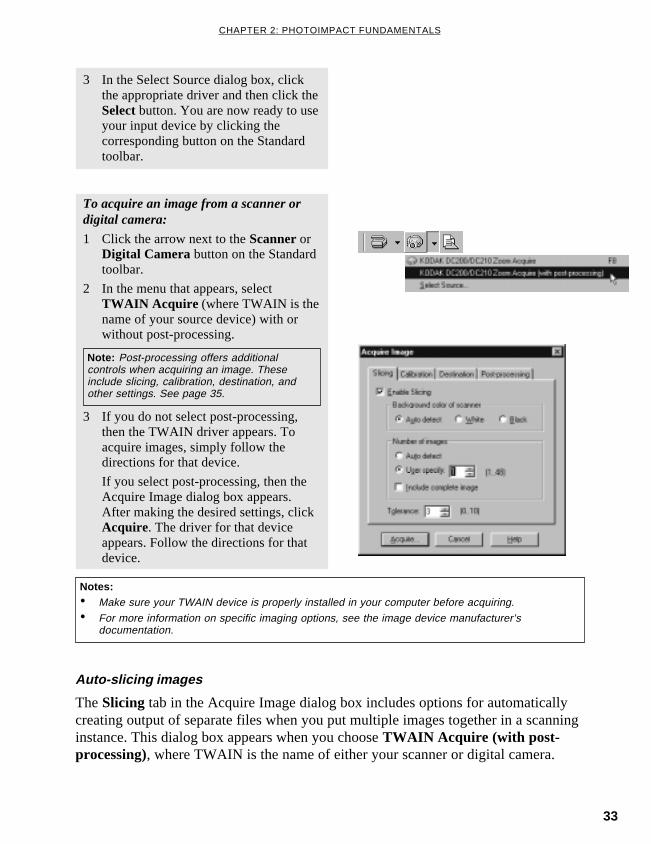
33
CHAPTER 2: PHOTOIMPACT FUNDAMENTALS
Note: Post-processing offers additionalcontrols when acquiring an image. Theseinclude slicing, calibration, destination, andother settings. See page 35.
Notes:• Make sure your TWAIN device is properly installed in your computer before acquiring.
• For more information on specific imaging options, see the image device manufacturer’sdocumentation.
To acquire an image from a scanner ordigital camera:
1 Click the arrow next to the Scanner orDigital Camera button on the Standardtoolbar.
2 In the menu that appears, selectTWAIN Acquire (where TWAIN is thename of your source device) with orwithout post-processing.
3 In the Select Source dialog box, clickthe appropriate driver and then click theSelect button. You are now ready to useyour input device by clicking thecorresponding button on the Standardtoolbar.
3 If you do not select post-processing,then the TWAIN driver appears. Toacquire images, simply follow thedirections for that device.
If you select post-processing, then theAcquire Image dialog box appears.After making the desired settings, clickAcquire. The driver for that deviceappears. Follow the directions for thatdevice.
Auto-slicing images
The Slicing tab in the Acquire Image dialog box includes options for automaticallycreating output of separate files when you put multiple images together in a scanninginstance. This dialog box appears when you choose TWAIN Acquire (with post-processing), where TWAIN is the name of either your scanner or digital camera.
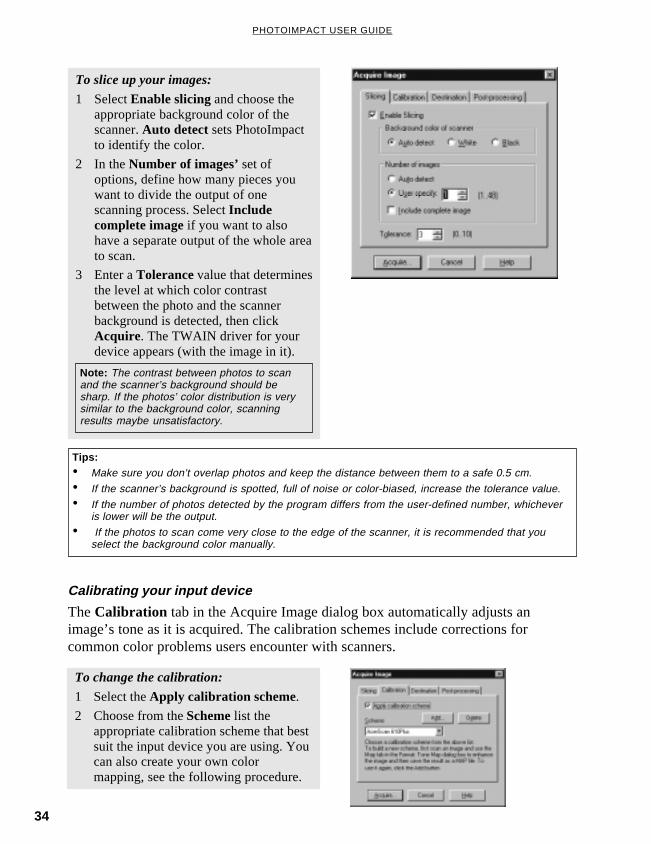
34
PHOTOIMPACT USER GUIDE
Calibrating your input device
The Calibration tab in the Acquire Image dialog box automatically adjusts animage’s tone as it is acquired. The calibration schemes include corrections forcommon color problems users encounter with scanners.
To change the calibration:
1 Select the Apply calibration scheme.2 Choose from the Scheme list the
appropriate calibration scheme that bestsuit the input device you are using. Youcan also create your own colormapping, see the following procedure.
Note: The contrast between photos to scanand the scanner’s background should besharp. If the photos’ color distribution is verysimilar to the background color, scanningresults maybe unsatisfactory.
Tips:• Make sure you don’t overlap photos and keep the distance between them to a safe 0.5 cm.
• If the scanner’s background is spotted, full of noise or color-biased, increase the tolerance value.
• If the number of photos detected by the program differs from the user-defined number, whicheveris lower will be the output.
• If the photos to scan come very close to the edge of the scanner, it is recommended that youselect the background color manually.
To slice up your images:
1 Select Enable slicing and choose theappropriate background color of thescanner. Auto detect sets PhotoImpactto identify the color.
2 In the Number of images’ set ofoptions, define how many pieces youwant to divide the output of onescanning process. Select Includecomplete image if you want to alsohave a separate output of the whole areato scan.
3 Enter a Tolerance value that determinesthe level at which color contrastbetween the photo and the scannerbackground is detected, then clickAcquire. The TWAIN driver for yourdevice appears (with the image in it).
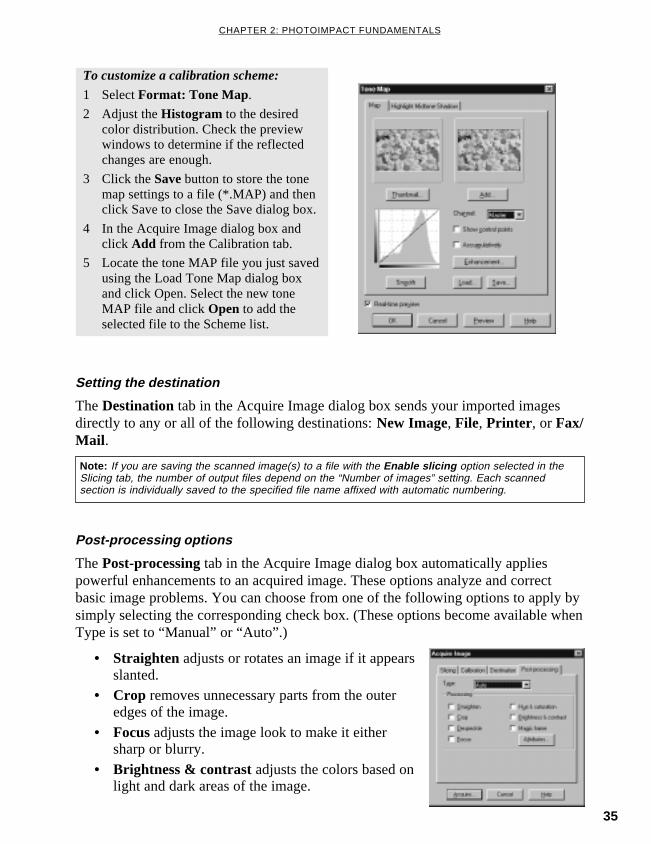
35
CHAPTER 2: PHOTOIMPACT FUNDAMENTALS
Post-processing options
The Post-processing tab in the Acquire Image dialog box automatically appliespowerful enhancements to an acquired image. These options analyze and correctbasic image problems. You can choose from one of the following options to apply bysimply selecting the corresponding check box. (These options become available whenType is set to “Manual” or “Auto”.)
Note: If you are saving the scanned image(s) to a file with the Enable slicing option selected in theSlicing tab, the number of output files depend on the “Number of images” setting. Each scannedsection is individually saved to the specified file name affixed with automatic numbering.
To customize a calibration scheme:
1 Select Format: Tone Map.
2 Adjust the Histogram to the desiredcolor distribution. Check the previewwindows to determine if the reflectedchanges are enough.
3 Click the Save button to store the tonemap settings to a file (*.MAP) and thenclick Save to close the Save dialog box.
4 In the Acquire Image dialog box andclick Add from the Calibration tab.
5 Locate the tone MAP file you just savedusing the Load Tone Map dialog boxand click Open. Select the new toneMAP file and click Open to add theselected file to the Scheme list.
Setting the destination
The Destination tab in the Acquire Image dialog box sends your imported imagesdirectly to any or all of the following destinations: New Image, File, Printer , or Fax/Mail .
• Straighten adjusts or rotates an image if it appearsslanted.
• Crop removes unnecessary parts from the outeredges of the image.
• Focus adjusts the image look to make it eithersharp or blurry.
• Brightness & contrast adjusts the colors based onlight and dark areas of the image.

36
PHOTOIMPACT USER GUIDE
Note: You can always move from one tool toanother using the Next and Back buttons.
Using the Post-processing WizardThe Post-processing Wizard makes a quick and painless task of cleaning up scannedimages. It examines and applies necessary modifications to common problemsencountered when scanning. You can set PhotoImpact to run the Post-processingWizard automatically from the Post-processing tab in the Acquire Image dialog box.
Notes:• Auto Hue & Saturation and Despeckle are only supported in “Auto” and “Manual” Type. Despeckle
is disabled in “Manual” Type.
• For more information on post-processing options, see Automatically enhancing an image, onpage 78. Also see Using the Post-processing Wizard in the following section.
• Hue & saturation balances the color intensity in an image.
• Despeckle “cleans” the image if there appears to be random spots in it.
• Magic frame adds a frame, shadow, and canvas border to an image. ClickAttributes (only applicable when in Auto Type) to specify the Frame andShadow properties.
To run the Post-processing Wizard:
1 Select Format: Post-processingWizard .
2 Each time you click Next, the Wizardmoves to another post-processing toolyou can use. To set up the options for aparticular tool, click the correspondingbutton found in that tool’s dialog box.
3 After setting up your options, click OKto apply to the image and then clickNext to move to the next tool.
4 Click Finish when satisfied with thepreview.
Acquiring images from the Internet
Nowadays, working with images directly from the Internet is becoming increasinglyimportant. For Web designers and Web masters, having direct access to images on aWeb site makes it easier to modify and update them. On a recreational level, manypeople download images from the Internet for personal use. For example, you mightsee a cool graphic that you want to show a friend through e-mail, or maybe you wantto create desktop wallpaper from it. PhotoImpact gives offers you different ways toget images from the Internet:
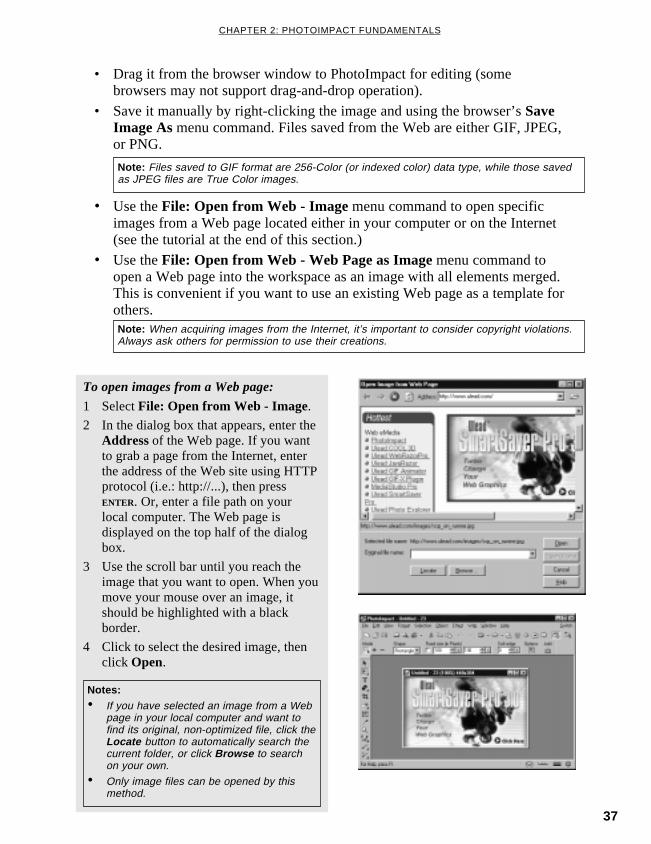
37
CHAPTER 2: PHOTOIMPACT FUNDAMENTALS
• Drag it from the browser window to PhotoImpact for editing (somebrowsers may not support drag-and-drop operation).
• Save it manually by right-clicking the image and using the browser’s SaveImage As menu command. Files saved from the Web are either GIF, JPEG,or PNG.
Note: Files saved to GIF format are 256-Color (or indexed color) data type, while those savedas JPEG files are True Color images.
• Use the File: Open from Web - Image menu command to open specificimages from a Web page located either in your computer or on the Internet(see the tutorial at the end of this section.)
• Use the File: Open from Web - Web Page as Image menu command toopen a Web page into the workspace as an image with all elements merged.This is convenient if you want to use an existing Web page as a template forothers.
To open images from a Web page:
1 Select File: Open from Web - Image.2 In the dialog box that appears, enter the
Address of the Web page. If you wantto grab a page from the Internet, enterthe address of the Web site using HTTPprotocol (i.e.: http://...), then pressENTER. Or, enter a file path on yourlocal computer. The Web page isdisplayed on the top half of the dialogbox.
3 Use the scroll bar until you reach theimage that you want to open. When youmove your mouse over an image, itshould be highlighted with a blackborder.
4 Click to select the desired image, thenclick Open.
Notes:• If you have selected an image from a Web
page in your local computer and want tofind its original, non-optimized file, click theLocate button to automatically search thecurrent folder, or click Browse to searchon your own.
• Only image files can be opened by thismethod.
Note: When acquiring images from the Internet, it’s important to consider copyright violations.Always ask others for permission to use their creations.
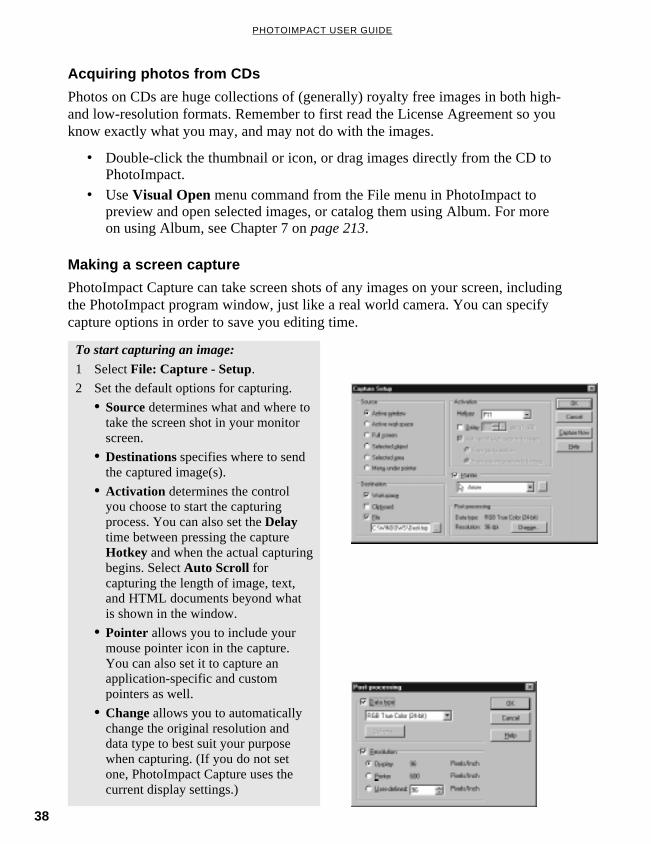
38
PHOTOIMPACT USER GUIDE
• Double-click the thumbnail or icon, or drag images directly from the CD toPhotoImpact.
• Use Visual Open menu command from the File menu in PhotoImpact topreview and open selected images, or catalog them using Album. For moreon using Album, see Chapter 7 on page 213.
Acquiring photos from CDs
Photos on CDs are huge collections of (generally) royalty free images in both high-and low-resolution formats. Remember to first read the License Agreement so youknow exactly what you may, and may not do with the images.
Making a screen capture
PhotoImpact Capture can take screen shots of any images on your screen, includingthe PhotoImpact program window, just like a real world camera. You can specifycapture options in order to save you editing time.
To start capturing an image:
1 Select File: Capture - Setup.2 Set the default options for capturing.
• Source determines what and where totake the screen shot in your monitorscreen.
• Destinations specifies where to sendthe captured image(s).
• Activation determines the controlyou choose to start the capturingprocess. You can also set the Delaytime between pressing the captureHotkey and when the actual capturingbegins. Select Auto Scroll forcapturing the length of image, text,and HTML documents beyond whatis shown in the window.
• Pointer allows you to include yourmouse pointer icon in the capture.You can also set it to capture anapplication-specific and custompointers as well.
• Change allows you to automaticallychange the original resolution anddata type to best suit your purposewhen capturing. (If you do not setone, PhotoImpact Capture uses thecurrent display settings.)
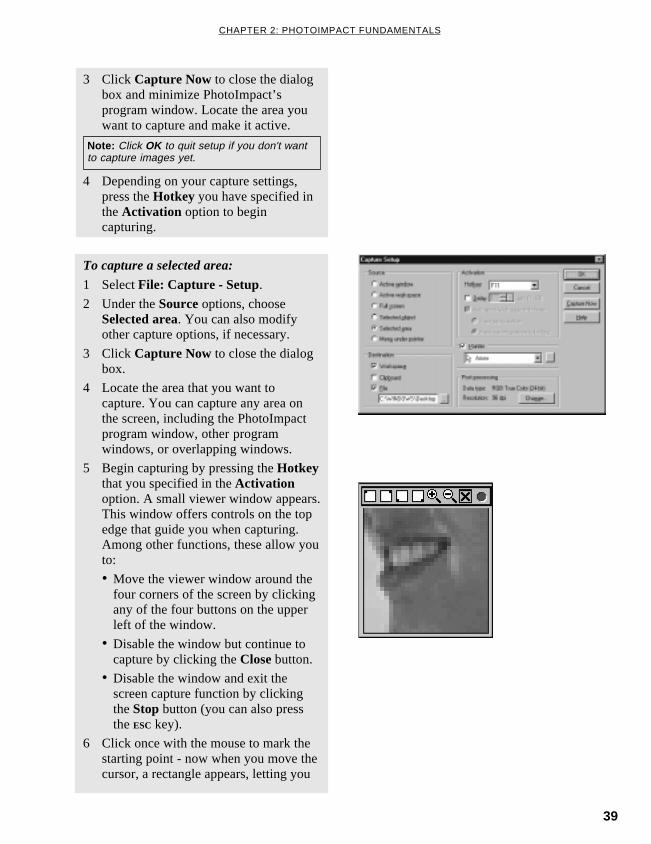
39
CHAPTER 2: PHOTOIMPACT FUNDAMENTALS
To capture a selected area:
1 Select File: Capture - Setup.2 Under the Source options, choose
Selected area. You can also modifyother capture options, if necessary.
3 Click Capture Now to close the dialogbox.
4 Locate the area that you want tocapture. You can capture any area onthe screen, including the PhotoImpactprogram window, other programwindows, or overlapping windows.
5 Begin capturing by pressing the Hotkeythat you specified in the Activationoption. A small viewer window appears.This window offers controls on the topedge that guide you when capturing.Among other functions, these allow youto:
• Move the viewer window around thefour corners of the screen by clickingany of the four buttons on the upperleft of the window.
• Disable the window but continue tocapture by clicking the Close button.
• Disable the window and exit thescreen capture function by clickingthe Stop button (you can also pressthe ESC key).
6 Click once with the mouse to mark thestarting point - now when you move thecursor, a rectangle appears, letting you
3 Click Capture Now to close the dialogbox and minimize PhotoImpact’sprogram window. Locate the area youwant to capture and make it active.
Note: Click OK to quit setup if you don't wantto capture images yet.
4 Depending on your capture settings,press the Hotkey you have specified inthe Activation option to begincapturing.
40
PHOTOIMPACT USER GUIDE
Notes:• You can only join images that share the same data type and are either Grayscale or True Color.
• The Stitch tool only works with base images; objects cannot be stitched. To stitch an object, itmust first be merged onto the base image.
Automatic image stitching
Use the Auto-stitch option to make a fast and easy way to stitch two images together.This option works for a wide range of images and is useful for images that show a lotof detail and are fairly clear.
Stitching images together
There are a number of instances in which your image may not be in one piece. Forinstance, an image might be too big for a scanner. Or maybe you want to create apanorama image from separate photos. It’s also possible that you have made separatescreen captures of an image whose dimensions extend beyond that of the monitor.Whatever the case, the Stitch command lets you accurately and efficiently reconstructan image from multiple pieces.
The way in which you use the Stitch tool to join image strips depends entirely on thecondition of the images you have. For this reason, Stitch command provides multipleoptions and controls for both manual and automatic stitching, giving you pixel-levelcontrol for seamless joining of images. You can:
• Set auto-stitching parameters to make automatic matches and align afloating image over an active image.
• Drag a floating image until it matches up with an active image.
• Define the reference point in each image to align the two images.
• Select Auto fine-tune to help the images snap into the correct relativeposition when manually stitching photos.
• Set the transparency of the floating image to aid manual stitching and todefine how images are combined in the overlap area.
specify the area to be captured. Whenyou have the desired area, click themouse again to mark the end point ofthe selection area.
Note: If the small viewer window gets in theway of what you want to capture, you caneither move it around the four corners of yourmonitor screen or close it.

41
CHAPTER 2: PHOTOIMPACT FUNDAMENTALS
Note: Overlap range or Vertical/Horizontaltolerance values that are off by more than 50%of the image size prevent the Auto-stitchoption from properly joining image strips.
6 Click Test to preview the auto stitchedimage.
7 Click OK and a window appearscontaining the newly stitched image.
To stitch two images automatically:
1 Open the images you want to jointogether in the workspace and make oneof them active.
2 Select Edit: Stitch .
3 In the Stitch with drop-down list, selectthe image you want to join to the activeimage. (If can’t see all the images tojoin in the preview, use the zoombuttons below the preview window.)
4 Use the Switch direction buttons tomove the images around the workspace.
5 Select the Auto stitch option, and enterthe values in the Overlap range(percentage of overlap) and Vertical/Horizontal tolerance (misalignment oftwo images) entry boxes.
Manual image stitching
The manual image stitching option joins images in unusual ways to create interestingspecial effects, such as creating a mirrored effect by placing the same image againstitself or a flipped version of itself.
To stitch two images manually:
1 Follow steps 1 through 4 of automaticimage stitching (see previousprocedure).
2 Drag the floating image until you aresatisfied with its position.
3 Click OK and a window appearscontaining the newly stitched image.

42
PHOTOIMPACT USER GUIDE
To export RAW data:
1 Select File: Export - RAW Export .
2 Enter a file name and click Save. TheExport RAW File dialog box opens.
3 Specify the Image type options forsaving.
4 Click OK .
Import/Export
RAW is a file format useful for transferring files between applications and computerplatforms. It supports CMYK, RGB, and Grayscale data types with alpha channelsand multichannel, Lab, indexed-color, and duotone files without alpha channel. It isdesigned to save image data in undocumented formats like those created by scientificapplications. You can import/export RAW data into PhotoImpact and convert it intoimages that you can modify.
To import RAW data:
1 Select File: Import - RAW Import .
2 Locate the RAW file you want and clickOpen. The Import RAW File dialog boxopens displaying file information andopening options. (Click Help for moreinformation).
3 Click OK to open the image in theworkspace.
Duplicating images
As you work with an image, you may find the need to make copies of it. This can beuseful because you can edit the copies without having to worry about causing anydamage to the original image. Whenever you duplicate an image, a copy of it opensin a new window. One method to do this is using the Edit: Duplicate submenu. Youcan choose from duplicating any of the following:
• Base Image with Objects [CTRL+D] duplicates the entire image (includingthe base image and all objects).
• Base Image with Objects Merged duplicates the image with all the objectsmerged onto the base image.
• Base Image Only duplicates the base image only.
(For more details about objects, see page 64.)

43
CHAPTER 2: PHOTOIMPACT FUNDAMENTALS
To create a duplicate of an image with themouse:
1 With the Standard Selection Toolactive, right-click on an image andselect All from the resulting popupmenu to select the entire image. (Makesure you have the Selection: PreserveBase Image [F5] command selected.)
2 Click and drag the image onto an emptyspace on the program window.
3 Right-click on the image and selectMerge from the resulting popup menu.
Note: If the Preserve Base Image option iscleared, you can still duplicate an image bypressing the CTRL key as you drag the selectedimage to an empty workspace.
Tips:• You can also copy an image onto the clipboard and select Edit: Paste - As A New Image .
• To create a copy of only a part of an image, use any of the Selection tools to select the sectionsyou want to duplicate and drag it to an empty workspace.
Performing OLE operations
PhotoImpact supports OLE (object linking and embedding) features that let youeasily modify objects embedded into other programs. The following section describesthe different ways to link and embed objects, and also how to edit them once they arein place.
To link an object from PhotoImpact:
1 Select Edit: Copy [CTRL+C] to place theactive image onto the clipboard.
2 Open or switch to the containerprogram that has the document intowhich you want to place the object.
3 Select the container program’s PasteSpecial command.
Note: Some container programs have a PasteLink command. You can use this as analternative to the Paste Special command.
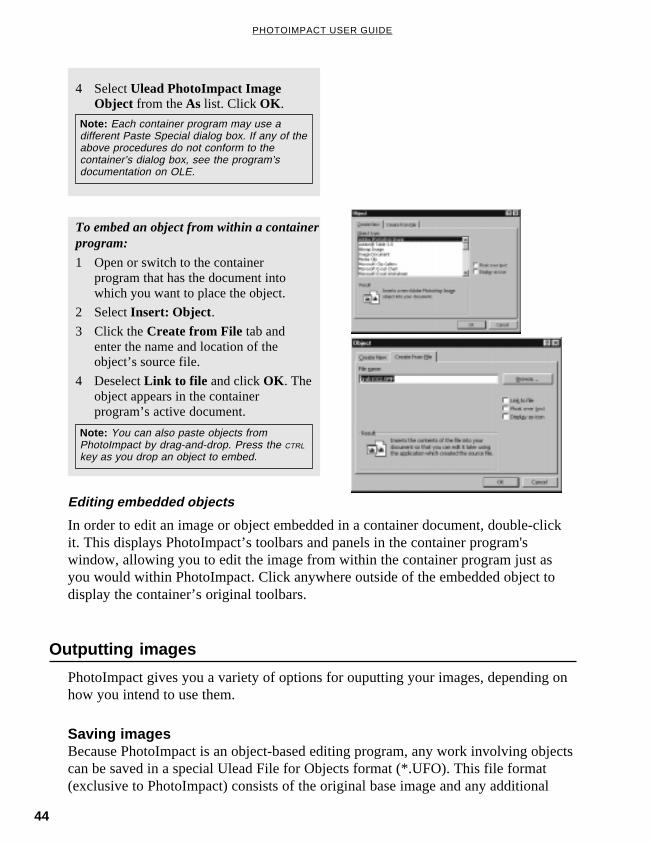
44
PHOTOIMPACT USER GUIDE
To embed an object from within a containerprogram:
1 Open or switch to the containerprogram that has the document intowhich you want to place the object.
2 Select Insert: Object .3 Click the Create from File tab and
enter the name and location of theobject’s source file.
4 Deselect Link to file and click OK . Theobject appears in the containerprogram’s active document.
Note: You can also paste objects fromPhotoImpact by drag-and-drop. Press the CTRL
key as you drop an object to embed.
Editing embedded objects
In order to edit an image or object embedded in a container document, double-clickit. This displays PhotoImpact’s toolbars and panels in the container program'swindow, allowing you to edit the image from within the container program just asyou would within PhotoImpact. Click anywhere outside of the embedded object todisplay the container’s original toolbars.
4 Select Ulead PhotoImpact ImageObject from the As list. Click OK .
Note: Each container program may use adifferent Paste Special dialog box. If any of theabove procedures do not conform to thecontainer’s dialog box, see the program’sdocumentation on OLE.
Outputting images
PhotoImpact gives you a variety of options for ouputting your images, depending onhow you intend to use them.
Saving imagesBecause PhotoImpact is an object-based editing program, any work involving objectscan be saved in a special Ulead File for Objects format (*.UFO). This file format(exclusive to PhotoImpact) consists of the original base image and any additional
45
CHAPTER 2: PHOTOIMPACT FUNDAMENTALS
objects created (for more on objects, see page 64). The next time you open this typeof file, you can still edit the objects and the base image independently from oneanother. When saving an image in other formats (for example, BMP or JPG), allobjects are merged onto the base image and cannot be edited the next time you openthe file.
To save an image:
1 Select File: Save [CTRL+S] or File: SaveAs.
2 Select the folder you want to save theimage in the Save in list and select afile format from the Save as type list.
3 Enter the name for saving in the Filename box. A file extension is notneeded.
4 Click Save to start the process.
Sending images through the Internet
There are a number of ways to send images via the Internet or post them to a Website, all of which are located in the File: Export submenu.
• Post a project to a Web site, if you have Microsoft’s Web PublishingWizard installed. (See page 189).
• Send projects to iMira, Ulead’s new Web site in which you can sharephotos with friends and family, make e-cards and much more. If you havenot yet set up an account, use this command to run the Drop Spot andcreate an account, and configure your uploading options. Once you have anaccount set up and configured in the Drop Spot, you can easily upload filesto your account simply by dragging image files from Windows Explorer tothe Drop Spot.
• Send a document by e-mail as a single image or as a Web page. Just selectFile: Export - Send and choose one of the following options:
ú Web page This creates a compressed *.EXE file, including the HTMLcode as well as its associated images. PhotoImpact then invokes yourdefault e-mail program with the *.EXE file as an attachment ready forsending. The recipient only has to run this EXE file in order to view theWeb page.
ú Image file This sends the document as a single image attachmentthrough your default e-mail program. Select the Smart send option to
Note: Select Effect: Digimarc - Embed Watermark to include a digital watermark into your imagesbefore saving them. This allows you to imperceptibly embed data (such as copyright and ownerinformation) and protect your images from unauthorized use. Register first and acquire a Digimarc IDbefore you try to embed digital watermarks into your images. (Click the Personalize button in theEmbed Watermark dialog box, then click Register to apply for a Digimarc ID.)
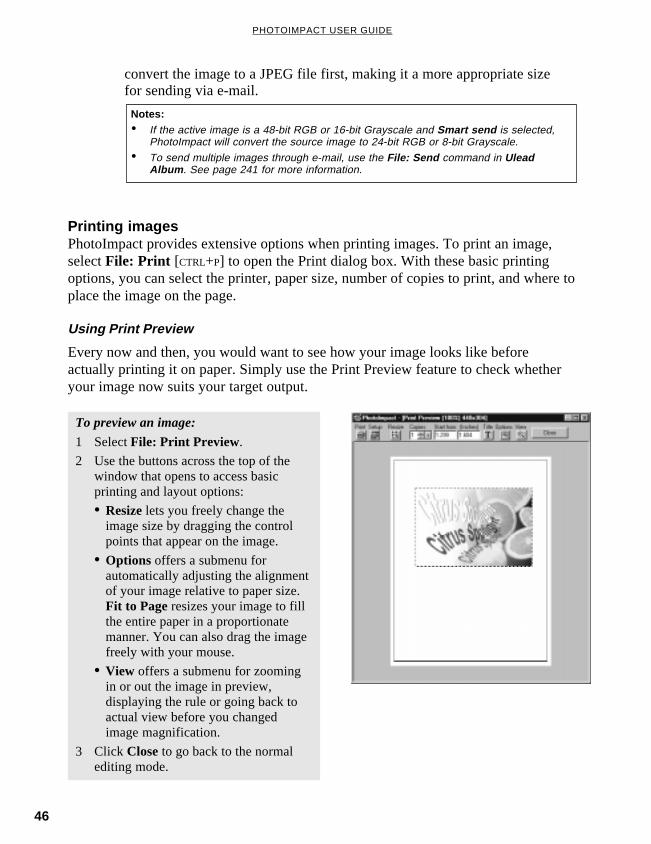
46
PHOTOIMPACT USER GUIDE
Printing imagesPhotoImpact provides extensive options when printing images. To print an image,select File: Print [CTRL+P] to open the Print dialog box. With these basic printingoptions, you can select the printer, paper size, number of copies to print, and where toplace the image on the page.
Using Print Preview
Every now and then, you would want to see how your image looks like beforeactually printing it on paper. Simply use the Print Preview feature to check whetheryour image now suits your target output.
To preview an image:
1 Select File: Print Preview.
2 Use the buttons across the top of thewindow that opens to access basicprinting and layout options:
• Resize lets you freely change theimage size by dragging the controlpoints that appear on the image.
• Options offers a submenu forautomatically adjusting the alignmentof your image relative to paper size.Fit to Page resizes your image to fillthe entire paper in a proportionatemanner. You can also drag the imagefreely with your mouse.
• View offers a submenu for zoomingin or out the image in preview,displaying the rule or going back toactual view before you changedimage magnification.
3 Click Close to go back to the normalediting mode.
convert the image to a JPEG file first, making it a more appropriate sizefor sending via e-mail.
Notes:• If the active image is a 48-bit RGB or 16-bit Grayscale and Smart send is selected,
PhotoImpact will convert the source image to 24-bit RGB or 8-bit Grayscale.
• To send multiple images through e-mail, use the File: Send command in UleadAlbum . See page 241 for more information.

47
CHAPTER 2: PHOTOIMPACT FUNDAMENTALS
To calibrate your printer:
1 Select File: Print [CTRL+P].
2 Click Options for more detailed printeroptions.
3 In the Calibration tab:
• Deselect the Use printer’s defaultoption to manually adjust thecalibration curve.
• Click Apply Enhancement andchoose an enhancement command tocorrect one or more of your printer’sproblems, or manually adjust thecalibration curve.
4 In the Halftone tab, clear Use printer’sdefault to manually adjust thefrequency and angle that will determinehow your printer interprets each pixel toprint. Click OK .
Note: To remove all actions in the Undo Before and Redo To submenus, select Clear Undo/Redo History from the Edit menu. This removes all actions automatically and permanently.
Recovering from mistakes
Note: Because the Restore command cannot be undone, it is always best to duplicate animage before restoring it. For more on duplicating images, see page 42.
PhotoImpact keeps track of actions and commands that are used to edit images. Thereis a maximum of 99 levels of undo and redo to help you recover from mistakes. Thiscan be configured in File: Preferences. There are three ways to reverse actions:
• To cancel all changes made to the image since it was last saved, select File:Restore. This closes and reopens the file.
• To reverse the most recent action, click the Undo [CTRL+Z] or Redo[CTRL+Y] buttons on the Standard Toolbar.
• To reverse a sequence of actions to a specific step, select either Edit: UndoBefore or Edit: Redo To. Select the desired action from the resultingsubmenu.
Calibrating your printer
All printers print images differently. For example, some print shadowed areas toodark or highlighted areas too light. You can compensate for this printing problemthrough calibration.
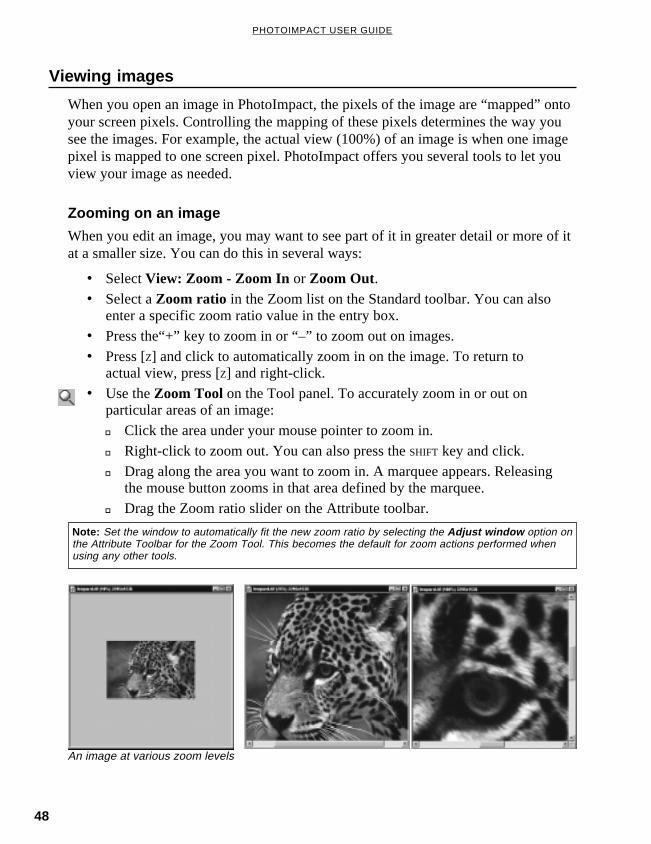
48
PHOTOIMPACT USER GUIDE
Viewing images
When you open an image in PhotoImpact, the pixels of the image are “mapped” ontoyour screen pixels. Controlling the mapping of these pixels determines the way yousee the images. For example, the actual view (100%) of an image is when one imagepixel is mapped to one screen pixel. PhotoImpact offers you several tools to let youview your image as needed.
Zooming on an image
When you edit an image, you may want to see part of it in greater detail or more of itat a smaller size. You can do this in several ways:
An image at various zoom levels
Note: Set the window to automatically fit the new zoom ratio by selecting the Adjust window option onthe Attribute Toolbar for the Zoom Tool. This becomes the default for zoom actions performed whenusing any other tools.
• Select View: Zoom - Zoom In or Zoom Out.• Select a Zoom ratio in the Zoom list on the Standard toolbar. You can also
enter a specific zoom ratio value in the entry box.
• Press the“+” key to zoom in or “–” to zoom out on images.
• Press [Z] and click to automatically zoom in on the image. To return toactual view, press [Z] and right-click.
• Use the Zoom Tool on the Tool panel. To accurately zoom in or out onparticular areas of an image:
ú Click the area under your mouse pointer to zoom in.
ú Right-click to zoom out. You can also press the SHIFT key and click.
ú Drag along the area you want to zoom in. A marquee appears. Releasingthe mouse button zooms in that area defined by the marquee.
ú Drag the Zoom ratio slider on the Attribute toolbar.

49
CHAPTER 2: PHOTOIMPACT FUNDAMENTALS
Using the Global Viewer
The Global Viewer lets you easily navigate around in an image after you've zoomedin on it.
Editing an image with an added view at 1x
Adding a view
After you have zoomed in on an image, it is easy to get lost in a sea of pixels. To helpyou keep the “big picture” in mind, select View: Add a View [CTRL+I]. This creates anew window which is a dynamic “mirror” of the original. When you do any editing ineither of the windows, the changes are reflected on both.
To reposition the viewer:
1 Click the box that appears at theintersection of the scroll bars in thelower right corner of an image window.This only appears when an image ismagnified to a size that is larger than itswindow. Alternatively, press [G] on thekeyboard. A thumbnail appears of theentire image.
2 While holding down the mouse button,drag the frame to the area you want toview. If you have used the shortcutmethod, simply move the mouse to thedesired area.
3 Release the mouse button when you seethe desired view in the window. If youused the shortcut, click once when youhave the desired area.
Global Viewer
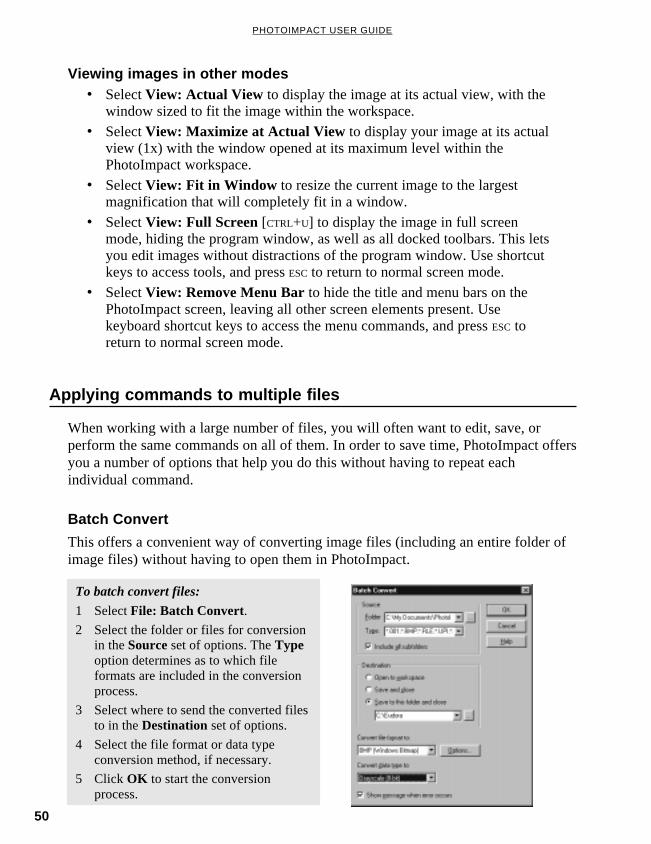
50
PHOTOIMPACT USER GUIDE
When working with a large number of files, you will often want to edit, save, orperform the same commands on all of them. In order to save time, PhotoImpact offersyou a number of options that help you do this without having to repeat eachindividual command.
Batch Convert
This offers a convenient way of converting image files (including an entire folder ofimage files) without having to open them in PhotoImpact.
Applying commands to multiple files
To batch convert files:
1 Select File: Batch Convert.2 Select the folder or files for conversion
in the Source set of options. The Typeoption determines as to which fileformats are included in the conversionprocess.
3 Select where to send the converted filesto in the Destination set of options.
4 Select the file format or data typeconversion method, if necessary.
5 Click OK to start the conversionprocess.
Viewing images in other modes• Select View: Actual View to display the image at its actual view, with the
window sized to fit the image within the workspace.
• Select View: Maximize at Actual View to display your image at its actualview (1x) with the window opened at its maximum level within thePhotoImpact workspace.
• Select View: Fit in Window to resize the current image to the largestmagnification that will completely fit in a window.
• Select View: Full Screen [CTRL+U] to display the image in full screenmode, hiding the program window, as well as all docked toolbars. This letsyou edit images without distractions of the program window. Use shortcutkeys to access tools, and press ESC to return to normal screen mode.
• Select View: Remove Menu Bar to hide the title and menu bars on thePhotoImpact screen, leaving all other screen elements present. Usekeyboard shortcut keys to access the menu commands, and press ESC toreturn to normal screen mode.
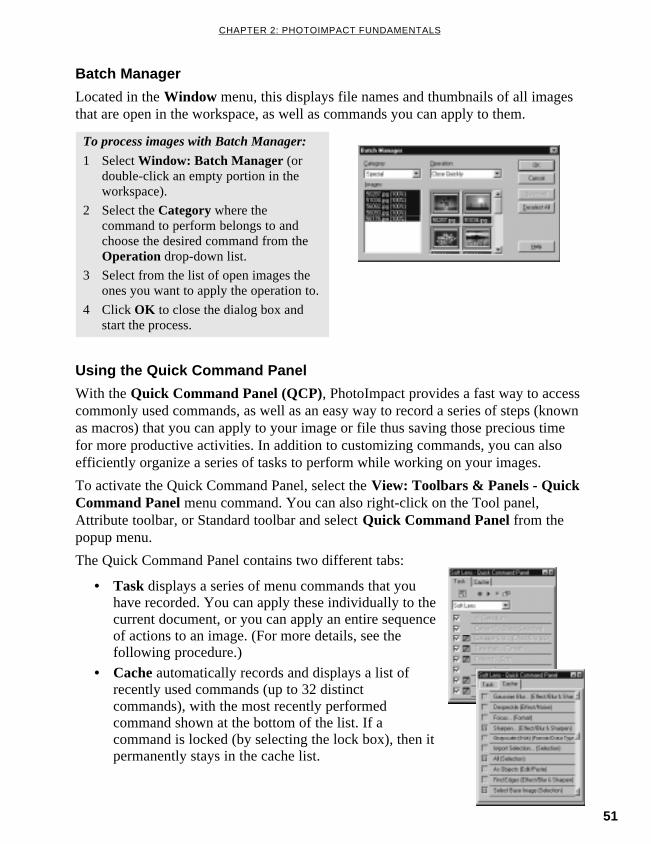
51
CHAPTER 2: PHOTOIMPACT FUNDAMENTALS
Batch Manager
Located in the Window menu, this displays file names and thumbnails of all imagesthat are open in the workspace, as well as commands you can apply to them.
To process images with Batch Manager:
1 Select Window: Batch Manager (ordouble-click an empty portion in theworkspace).
2 Select the Category where thecommand to perform belongs to andchoose the desired command from theOperation drop-down list.
3 Select from the list of open images theones you want to apply the operation to.
4 Click OK to close the dialog box andstart the process.
Using the Quick Command Panel
With the Quick Command Panel (QCP), PhotoImpact provides a fast way to accesscommonly used commands, as well as an easy way to record a series of steps (knownas macros) that you can apply to your image or file thus saving those precious timefor more productive activities. In addition to customizing commands, you can alsoefficiently organize a series of tasks to perform while working on your images.
To activate the Quick Command Panel, select the View: Toolbars & Panels - QuickCommand Panel menu command. You can also right-click on the Tool panel,Attribute toolbar, or Standard toolbar and select Quick Command Panel from thepopup menu.
The Quick Command Panel contains two different tabs:
• Task displays a series of menu commands that youhave recorded. You can apply these individually to thecurrent document, or you can apply an entire sequenceof actions to an image. (For more details, see thefollowing procedure.)
• Cache automatically records and displays a list ofrecently used commands (up to 32 distinctcommands), with the most recently performedcommand shown at the bottom of the list. If acommand is locked (by selecting the lock box), then itpermanently stays in the cache list.

52
PHOTOIMPACT USER GUIDE
The easiest and most convenient method for applying special effects and filters is todrag them from the EasyPalette directly onto an image, selection area, or object.EasyPalette has a full range of predefined textures, effects, gradient fills, animations,and objects that can be applied to your image. They are located in various galleries
After recording a series of actions, you can apply the entire series or just a select fewto another image document.
• To apply an entire series of actions to an image, simply press the Playbutton on the Task tab. All recorded actions will be applied. Make sure thatthe Use preset properties option is selected for all recorded commands sothat all previous settings are applied. Otherwise, only the dialog box foreach command will be displayed.
• To apply a single command to an image, you can use either the Task orCache tab, and simply click the desired command.
Using the EasyPalette
To record a series of actions:
1 On the Task tab click the Task menucommands button, and select New.
2 Enter a name for the sequence ofactions that you want to apply, thenclick Record.
3 Begin applying a series of menucommands to your image. For instance,you can first apply some effects fromthe Effect menu, and then you canretouch the image with the Formatmenu commands. These will berecorded in the QCP.
4 After you have applied the desiredcommands, click the Stop button on theTask tab. If you want to add to the listof tasks for that set, click the Recordbutton and continue applying menucommands to the image.
Notes:• To organize and edit tasks in a set, click the Task menu command button , and select Task
Manager .• To apply a command to all image files in a selected folder, click the Batch Task button.
• For more on using the Quick Command Panel and macros, check the Online Help.

53
CHAPTER 2: PHOTOIMPACT FUNDAMENTALS
Note: You can toggle from displaying or hidingthe Tree view using the Show/Hide tree viewbutton on the EasyPalette toolbar. Hide theTree view if you want to display morethumbnails in the EasyPalette in a viewinginstance.
To apply an effect from the EasyPalette:
1 Select View: Toolbars & Panels -EasyPalette.
2 Click Galleries for special effects, painttools, fill tools, and so on.
Click Object Libraries for object orpath presets.
3 Click “+” / “-” or double-click eachgallery and library to display and hidedetails.
4 Select an effect from the availablegalleries and double-click it to apply toan image.
and libraries, such as the Fill Gallery, the Frame Gallery, the Path Library, and so on.You can even create your own galleries and libraries.
Creating and organizing your gallery/library
You can create and save your own gallery of objects (see page 64) and special effects(see page 137). Because both galleries and libraries store numerous images, objects,and animated effects, they can become quite cluttered at times. You can organizethem by placing them into user-defined tab groups.
To create a gallery or library:
1 In the EasyPalette, choose Create fromthe Gallery Manager or ObjectLibrary Manager menu.
2 Enter a name for your gallery or libraryin the Name box. To change the pathand the folder, enter a new destinationin the Folder box.
3 The Tab groups window specifies thetabs belonging to the new gallery. ClickAdd/Remove to add or remove tabsfrom the gallery.
4 Click OK .

54
PHOTOIMPACT USER GUIDE
Note: To select multiple objects in the Layer Manager, press the CTRL or SHIFT key as you click objects.To select all objects, press [CTRL+SHIFT+A].
Customizing the EasyPalette
There are numerous ways of modifying the EasyPalette to suit the way that you work.The View menu commands include the following:
• EasyPalette options include thumbnail display as well as category andobject organization. The General group lets you specify how you want thethumbnails to look and if they should display animated effects or not. Withthe Gallery group, you can have the EasyPalette automatically open todisplay the related category of effects whenever you select a tool from thetool panel. The Layer Manager options provide automated tasks, such asassigning names to groups and scrolling to any object that you select in theworkspace.
• Resize commands allow you specify the dimensions of the EasyPalette.
Thumbnail menu commands contain a wide range of options to further specify whatyou want the thumbnails to display. (See the following section.)
Modifying and adding Gallery thumbnailsYou might find it convenient to modify your collection of customized tools andspecial effects directly on the EasyPalette. By clicking the Thumbnail menucommands button, you can choose to modify thumbnail effects and add new effects,including Adobe Photoshop plug-in effects and image fills. You can also add a
• Import allows you to store any gallery files (*.SMP) or object library files(*.UOL) into the EasyPalette.
• Export saves the active gallery/library as another file in a specified folder.
• Properties displays the file size, number of tabs, and number of thumbnailsfor each gallery or library.
• Menu Layout adds or removes submenus and separators, and also renamesthe galleries or libraries.
The Layer Manager
The Layer Manager displays all the objects present in your active image asindividual thumbnails. The thumbnails reflect any editing that you apply to theobjects, and each thumbnail is numbered sequentially by the order in which it wascreated. Change the order of each object’s layer by dragging the thumbnails directlyfrom within the Layer Manager (see page 65).
Importing and exporting galleries
From the Gallery Manager or Object Library Manager submenu, click one of thefollowing:

55
CHAPTER 2: PHOTOIMPACT FUNDAMENTALS
variety of commands for image adjustment and conversion by selecting AddCommand Thumbnails.
To change and add a Gallery thumbnailpreset:
1 Click the Thumbnail menu commandsicon or right-click a thumbnail, thenselect Modify Properties and Apply.The dialog box for that effect appears.
2 Modify the desired settings and clickAdd to store the modified thumbnail tothe EasyPalette for future use.
3 Click OK to apply the current settingsto the active image.
Using images as thumbnails
The Try button on the EasyPalette window (for Gallery only) lets you use the currentimage, selected area or active object as a thumbnail representation. This way, you getan immediate preview of how your image will look with different effects and filters.Select a gallery and click Try . For more options, click the arrow next to the Trybutton and choose from the following options:
Note: To update a particular thumbnail effectwithout adding a new thumbnail to theEasyPalette, select Properties fromThumbnail menu commands . This onlyworks for special effect thumbnails.
• Selected Thumbnails changes thecurrently selected thumbnail with theactive image.
• Visible Thumbnails changes thethumbnails that are visible in theEasyPalette window with that of theactive image.
• All Thumbnails changes all thethumbnails in the currently selectedgallery with that of the active image.
• Use Image as Thumbnails uses aspecific area of the active image as athumbnail in the selected gallery.
• Reset Thumbnails brings thethumbnails back to their originalpreset.
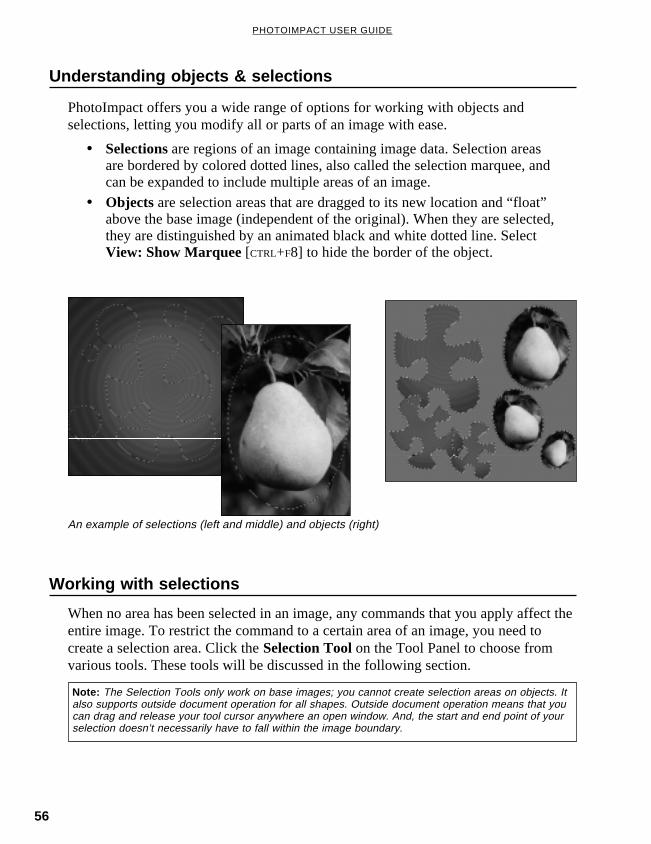
56
PHOTOIMPACT USER GUIDE
An example of selections (left and middle) and objects (right)
Note: The Selection Tools only work on base images; you cannot create selection areas on objects. Italso supports outside document operation for all shapes. Outside document operation means that youcan drag and release your tool cursor anywhere an open window. And, the start and end point of yourselection doesn’t necessarily have to fall within the image boundary.
When no area has been selected in an image, any commands that you apply affect theentire image. To restrict the command to a certain area of an image, you need tocreate a selection area. Click the Selection Tool on the Tool Panel to choose fromvarious tools. These tools will be discussed in the following section.
Understanding objects & selections
PhotoImpact offers you a wide range of options for working with objects andselections, letting you modify all or parts of an image with ease.
Working with selections
• Selections are regions of an image containing image data. Selection areasare bordered by colored dotted lines, also called the selection marquee, andcan be expanded to include multiple areas of an image.
• Objects are selection areas that are dragged to its new location and “float”above the base image (independent of the original). When they are selected,they are distinguished by an animated black and white dotted line. SelectView: Show Marquee [CTRL+F8] to hide the border of the object.

57
CHAPTER 2: PHOTOIMPACT FUNDAMENTALS
Note: If you want to create a selection areabased on precise dimensions, select the Fixedsize option and then enter the desired widthand height.
Pick Tool
The Pick Tool is used mainly to select objects, static selections, and base images. Italso moves and copies objects. With this tool you can perform the followingfunctions:
The original image and that image with aselection area
• Click an object or static selection to make it active.
• Select multiple objects by dragging the Pick Tool from an empty areaacross the edges of a group of objects (or encase them within the PickTool’s selection area).
• Select a set of objects by pressing the CTRL or SHIFT key as you click onthem.
• Merge all the objects together as a single object: first select all the objects,and then select Object: Merge as Single Object (or right-click any objector group of objects).
With the Pick Tool, you can change the layers of objects by using the four orderarrow buttons on the Attribute toolbar, as well as change the alignment using theAlign buttons (or by selecting Object: Align ).
Standard Selection Tool – selecting regularly shaped areas
The Standard Selection Tool lets you select areas of an image based on a preset sizeand/or shape, such as a rectangle or circle. You can also use this to convert selectionareas into object by dragging on the selection.
To create a standard selection:
1 Click the Standard Selection Tool andselect the desired shape in the Shapedrop-down list.
2 Drag your mouse over the image. Oncethe dotted line area covers the area youwant to select, release the mouse button.

58
PHOTOIMPACT USER GUIDE
Note: Enter a value in the Sensitivity entry box(up to 10). If you find the selection “drags” toinclude unwanted areas, then clear the Snapto edges option or decrease the sensitivity.
Note: If you make a mistake while creating theselection area or want to start again, pressESC. Press BACKSPACE to take you back onestep.
Lasso Tool – selecting irregularly shaped areas
The Lasso Tool lets you select an area of any shape. It is especially useful forselecting irregularly shaped areas, such as a person’s head, and other objects.
To use the Lasso Tool:
1 Click the Lasso Tool on the Tool Panel.
2 Select Snap to edges and a wavy lineselects adjacent pixels with similarcolor. Clear Snap to edges and astraight line selects whatever you click.
3 Click to mark the starting point anddouble-click to end the selection line orarea.
Magic Wand – selecting an area containing similar colors
The Magic Wand Tool creates a selection area by selecting specific colors. This isparticularly useful if either the subject of the image or the background is a distinctcolor
To make a selection:
1 Click the Magic Wand Tool on theTool panel.
2 Enter a value in the Similarity box.Any colors that fall within the valuesspecified in the Similarity box areincluded in the selection area.
3 Choose an option for Select by.To create a selection around straightedges, such as borders or frames, selectLine.
To create a selection around irregularareas of similar color, select Area.

59
CHAPTER 2: PHOTOIMPACT FUNDAMENTALS
4 Select Search connected pixels to findconnected or unconnected pixels withsimilar colors. Leaving it cleared willautomatically select similar pixelswithin the entire image.
5 Click on your image to select thereference color to create a selectionarea.
Determining color similarity
To use the Similarity entry box, enter a value that you feel most closely reflects therange of colors you want to select. To help determine the color similarity rangeconsider the following:
• As you move the Magic Wand over the target pixels in the image the RGBand HSB color values are displayed accordingly on the Status bar.
• On the Attribute Toolbar, click the Options button and choose Compare byRGB or Compare by HSB color values to convert the similarity value. Inthe RGB model, the Similarity ranges from 0 to 255. In the HSB model, theSimilarity ranges from 0 to 100.
Below is a guideline on what to expect when choosing particular color ranges:
• A value of 0 selects neighboring pixels with exactly the same color value.
• A value of 255 selects pixels of all colors – thereby selecting the entireimage.
• A value of 50 selects neighboring pixels that have values which differ fromthe pixel you click by 50. For example, if you click a pixel with values R25,G60, B190, neighboring pixels with values between R0, G10, B140, andR75, G110, B240 will be selected.
Mask Mode
The Mask Mode simply gives you another way of making selections. However, theadvantage here is that you have much more flexibility in how you make selectionareas, and you can also make selections that can contain various degrees oftransparency. In addition, you can use any combination of Text, Path, Paint, and Filltools along with the traditional Selection tools to make much more complex selectionareas on your images. This can be particularly useful for selecting portions of theimage that are perhaps not as easily distinguishable from the background. A typicaluse for the Mask Mode, among its many uses, is to select portions of images that youcut out and paste into another image to create a collage. Because the Mask Mode hastransparency options, it lets you more effectively blend one image object withanother.
Note: Mask Mode can only be used with RGB and 8-bit Grayscale images.

60
PHOTOIMPACT USER GUIDE
The Mask Mode basically operates on a Grayscale buffer, which means that youmake selections based on tonal values of the Grayscale. When in Mask Mode, youwill only be able to access Grayscale values in the color palette. Each tonal value inthe grayscale buffer represents a combination of two things: degree of transparencyand selection area status. Selecting white results in 0% selection transparency ,while black results in 100% transparency (meaning that there’s no selection). A grayvalue represents partial selection, or a selection with partial transparency. Keep inmind that when you paint on the mask itself, areas that you paint with black willbecome the default white mask, while areas that you paint on with white willcompletely penetrate the mask to reveal the image beneath it.
From left to right: using Mask Mode to create a selection, the resulting selection, the selection asan object, the object merged with another image.
From left to right: Grayscale mask selections created with white, gray and black values (top tobottom), the resulting selections, and the resulting objects.

61
CHAPTER 2: PHOTOIMPACT FUNDAMENTALS
To use Mask Mode:
1 Open an image in the workspace.
2 Select Edit: Mask Mode [CTRL+K] orclick Mask Mode on the Status bar. Bydefault, a semi-transparent white layerappears, covering the entire image. Thismeans that you are now working in aGrayscale mask mode.
Note: After you have created a selection usingMask Mode, you can save the selection asmask and use it later as a mask for otherimages. See page 73.
Note: You can always make a selection areafirst, then click the Mask Mode button. This isuseful if the image is large and you only wantto mask a small portion of it.
3 Choose a Selection, Paint, or Fill tool tomodify the mask. Let's say you click thePaint Tool and select Paintbrush.Adjust the attributes of the brush in theBrush Panel .
4 On the Attribute Toolbar, pick a colorfor the brush. Notice that onlyGrayscale values are available.Selecting black means that you will addto the mask, thus covering the imagewith the default mask color, while whitesubtracts from the mask so that theimage appears clearly through the masklayer.
5 Paint on the image until you have thearea you want. After you're done, exitMask Mode by pressing [CTRL+K] orMask Mode on the Status bar.
A selection marquee appears where youhave painted on the mask. All areas thatyou painted using White and Grayscalevalues fall within the selection areas.Grayscale areas will be semi-transparent, depending on the value ofgray.
6 You can either convert the selection toan object and paste it into anotherimage, or you can edit the marqueefurther by returning to Mask Mode orusing a Selection Tool.

62
PHOTOIMPACT USER GUIDE
From left to right: the original image, Preserve base image on, Preserve base image off
Note: Press the CTRL key as you move a selection to preserve the base image, irrespective of itscurrent status.
Moving a selection area marquee
After you have created a selection area with any of the Selection Tools, you mightfind that the selection area is not positioned exactly where you want it. For example,the selection might include part of the image that you don’t want. There are two waysto move the selection so that only the selection marquee moves.
• On the Attribute Toolbar for a Selection Tool, click the Options button andchoose the Move Selection Marquee command, then drag the selection toanother position.
• On the Tool Panel, click the Pick Tool, then drag the selection to anotherposition.
Preserving the base image
Whenever a selection area becomes an object, the original image (or the base image)can be affected in different ways. On the Attribute Toolbar for all Selection Tools,the Preserve Base Image command [F5] in the Options menu lets you determine thisin one of two ways:
Creating smooth-edged selection areas
Choose the Anti-aliasing command from the Options menu to smooth out selectionarea edges. It is especially helpful in keeping curved selections smooth. However,since Anti-aliasing modifies the edges of selection areas, the extent of the selectionarea may change.
• Select this option when you want to duplicate parts of an image or leave itunaffected by any actions you may perform on it.
• Deselect this option to create a cut-out of the selection and fill it with thecurrent background color when you move the selection.

63
CHAPTER 2: PHOTOIMPACT FUNDAMENTALS
From left to right: the original selection, the softened selection, and the selection converted to anobject against a dark background
Note: If you do not have the Preserve Base Image [F5] command selected and you move the selection,you will notice that the base image shows a corresponding diffuse-edged hole filled in with thebackground color where the selection area was before.
Softening a selection edge
Click Selection: Soften (or right-click and select Soften) to make the edge of aselection area appear diffused, creating a “halo-like” effect. Higher values increasethe diffusion of the edges. This effect will be apparent when you convert the selectionto an object and move it to a different background.
Creating a border around a selection
There are various instances when you might want to create a border around aselection area. By applying a fill to this area, you can easily create a frame around themain subject of an image (for rectangular and oval selections). If you have anirregular selection, you can create a custom outline shape, or simply emphasize thesubject of an image by outlining it. After creating a selection, click Selection:Border (or right-click and select Border). You can specify the width of the borderand add a soft edge if desired. After the border selection has been created, fill it witha color or pattern.
From left to right: the original selection, the selection with a border, and the border with a fill color

64
PHOTOIMPACT USER GUIDE
Adding to or subtracting from a selection
You can select multiple parts of an image at one time. In the same way, you can alsoexclude portions of existing selection areas. Follow these procedures:
• To add an area, select from the Mode options on the Attribute toolbar andchoose (+), or press [A] while selecting more of the image (the pointerchanges to display a plus sign).
• To exclude an area choose (–), or press [S] while selecting the unwantedarea (the pointer changes to display a minus sign).
The original selection area (left), and subtracting from the selection area (right)
Expanding a selection area
If your initial selection is not big enough to include all parts of the image that youwant, you have a few different ways of enlarging it:
Working with objects
• Drag a selection anywhere within the current document or directly intoanother open document in PhotoImpact.
• Drag a selection outside of the current document to create a new document
Objects are created from selections. They float above the base image in independentlayers, allowing you to move and manipulate them without affecting other objects orthe base image.
There are several ways to create objects from selections:
• Click Selection: Similar (or right-click and select Similar). Based on theexisting selection area, it expands the selection to include similar pixelsfrom the entire image or from neighboring areas.
• Click Selection: Expand/Shrink (or right-click and select Expand/Shrink ). All sides are expanded by equal values.
• Click the Transform Tool on the Tool Panel to reshape and resize theselection area by dragging on the control handles.

65
CHAPTER 2: PHOTOIMPACT FUNDAMENTALS
containing only that object. This is useful if you want to edit this particularobject independently from the rest of the original image. When you havefinished working on it, you can then merge it back into the base image bydragging it as an object.
• Perform a transformation on a selection, using the Transform Tool (seepage 132).
• Select the Selection: Convert to Object menu command.
• Select the Object: New - Image Via Cut or Image Via Copy menucommand.
Managing object layers
The Layer Manager in the EasyPalette helps you keep track of objects within animage. Click the Layer Manager button to view objects in their individual layers.The following describes some its features and functions:
• Click an object in the Layer Manager to select that object in the workspaceThis is particularly useful if the object is small, overlapped or hiddenbehind other objects.
• Click Show/Hide list view to toggle between a list of object names and athumbnail view of objects.
• Each object thumbnail has the following icons:
ú The eye icon shows or hides an object (you can also open the ObjectProperties dialog box and select or clear the Show option).
ú The lock icon locks or unlocks the object to its position.
ú The object type icon identifies whether it is an image, text, path, Webobject, or a group of objects.
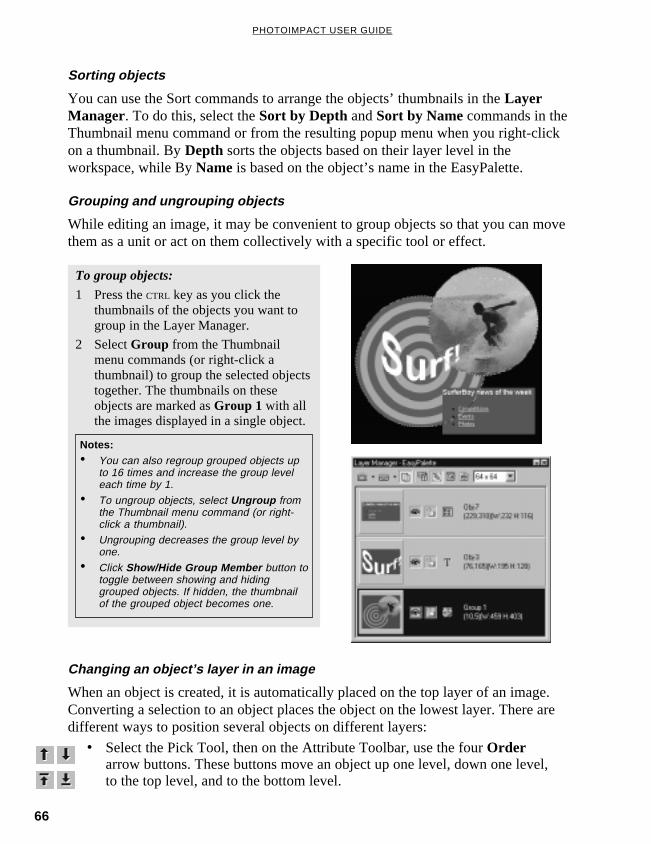
66
PHOTOIMPACT USER GUIDE
Notes:• You can also regroup grouped objects up
to 16 times and increase the group leveleach time by 1.
• To ungroup objects, select Ungroup fromthe Thumbnail menu command (or right-click a thumbnail).
• Ungrouping decreases the group level byone.
• Click Show/Hide Group Member button totoggle between showing and hidinggrouped objects. If hidden, the thumbnailof the grouped object becomes one.
Sorting objects
You can use the Sort commands to arrange the objects’ thumbnails in the LayerManager. To do this, select the Sort by Depth and Sort by Name commands in theThumbnail menu command or from the resulting popup menu when you right-clickon a thumbnail. By Depth sorts the objects based on their layer level in theworkspace, while By Name is based on the object’s name in the EasyPalette.
Grouping and ungrouping objects
While editing an image, it may be convenient to group objects so that you can movethem as a unit or act on them collectively with a specific tool or effect.
Changing an object’s layer in an image
When an object is created, it is automatically placed on the top layer of an image.Converting a selection to an object places the object on the lowest layer. There aredifferent ways to position several objects on different layers:
• Select the Pick Tool, then on the Attribute Toolbar, use the four Orderarrow buttons. These buttons move an object up one level, down one level,to the top level, and to the bottom level.
To group objects:
1 Press the CTRL key as you click thethumbnails of the objects you want togroup in the Layer Manager.
2 Select Group from the Thumbnailmenu commands (or right-click athumbnail) to group the selected objectstogether. The thumbnails on theseobjects are marked as Group 1 with allthe images displayed in a single object.

67
CHAPTER 2: PHOTOIMPACT FUNDAMENTALS
Setting an object’s propertiesThe Object Properties dialog box lets you further specify the attributes of image, textand path objects as well as Web component objects. Different options are available,depending on what type of object it is. Among other things, you can set itstransparency and merge attributes, precisely specify its position and dimensions, andassign a hyperlink to it. To access this dialog box, select Object: Properties. Youcan also right-click it, then select Properties from the menu.
• Select Object: Arrange (or right-click an object and select Arrange) anduse one of the four submenu commands.
• In the Layer Manager of the EasyPalette, drag a thumbnail to the desiredlayer in the image.
Changing the object layer

68
PHOTOIMPACT USER GUIDE
Shadow dialog box
Note: The Split Shadow command is disabled when multiple objects are selected.
Separating a shadow from its object
Separating a shadow and making it as a separate object from its original image iseasy. To do this, select Object: Split Shadow or right-click an object and select SplitShadow. The split shadow now becomes a new object whose attributes you canmodify such as changing the color or applying a painting texture.
Editing objects
Objects can be edited on their individual layers without affecting any of the otherobjects or the base image. In addition to editing them as you would any otherselection (see page 64), you can also remove parts of it so that images and objectsthat lie beneath it are visible, thus creating a transparent object effect. You can do thiswith the Object Paint Eraser and the Object Magic Eraser, both of which arelocated on the Tool Panel.
To use the Object Paint Eraser, simply make adjustments to the brush on theAttribute Toolbar, then begin painting on the area of the object that you want toremove. (For more on adjusting brush attributes, see page 89.)
To use the Object Magic Eraser, set the Similarity of the colors that you want toselect from the object, then click on the desired color in the object. The selected colorwill become transparent. (Using the Object Magic Eraser is similar to the MagicWand Tool. See page 58 for more information on how it works.)
Adding shadows to an objectYou can introduce depth to an image by applying a shadow to an object or a group ofobjects. To add a shadow, select Object: Shadow (or right-click an object and selectShadow). Here you can control the direction, length, transparency, edge blending,and color of the shadow.
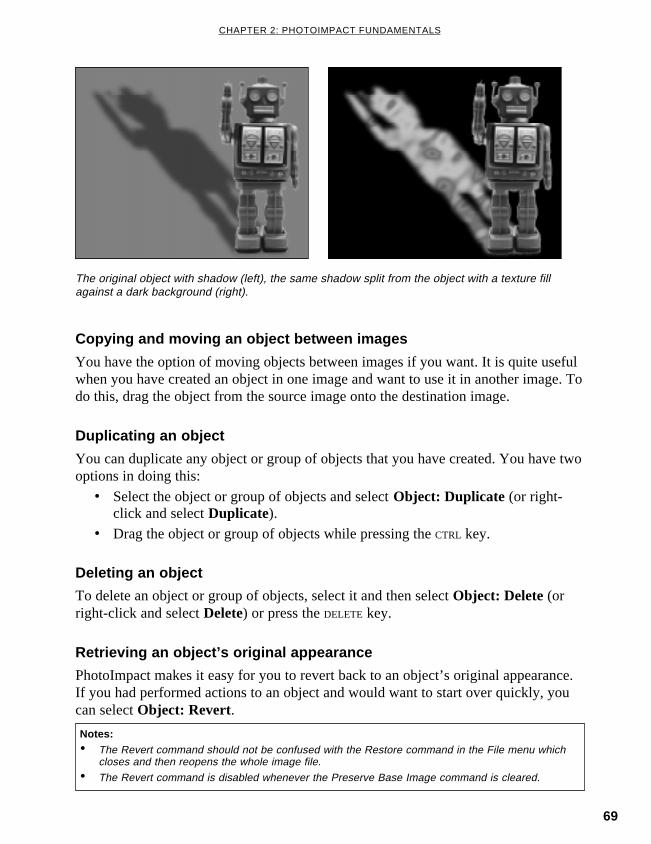
69
CHAPTER 2: PHOTOIMPACT FUNDAMENTALS
The original object with shadow (left), the same shadow split from the object with a texture fillagainst a dark background (right).
Copying and moving an object between images
You have the option of moving objects between images if you want. It is quite usefulwhen you have created an object in one image and want to use it in another image. Todo this, drag the object from the source image onto the destination image.
Duplicating an object
You can duplicate any object or group of objects that you have created. You have twooptions in doing this:
• Select the object or group of objects and select Object: Duplicate (or right-click and select Duplicate).
• Drag the object or group of objects while pressing the CTRL key.
Deleting an object
To delete an object or group of objects, select it and then select Object: Delete (orright-click and select Delete) or press the DELETE key.
Retrieving an object’s original appearance
PhotoImpact makes it easy for you to revert back to an object’s original appearance.If you had performed actions to an object and would want to start over quickly, youcan select Object: Revert.
Notes:• The Revert command should not be confused with the Restore command in the File menu which
closes and then reopens the whole image file.
• The Revert command is disabled whenever the Preserve Base Image command is cleared.
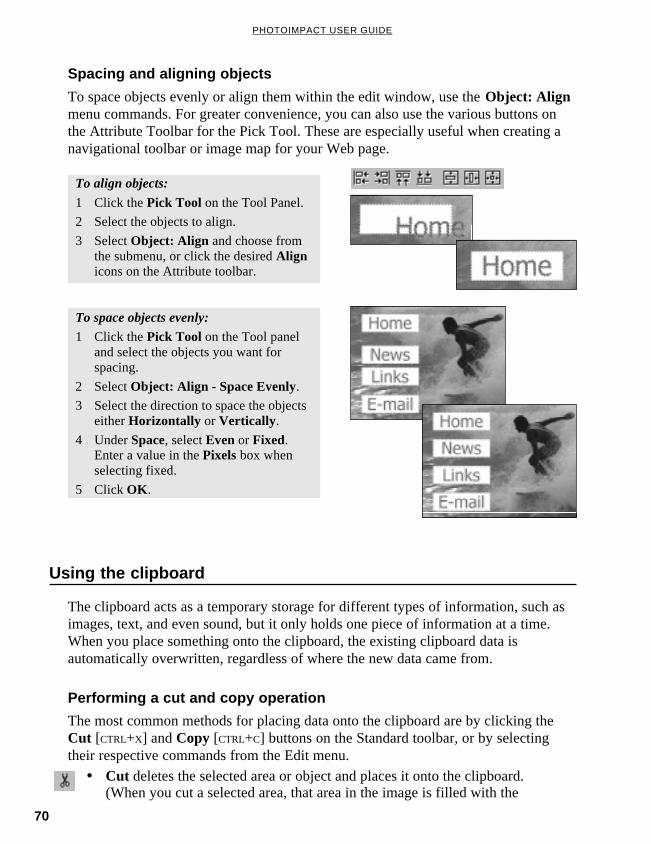
70
PHOTOIMPACT USER GUIDE
Spacing and aligning objects
To space objects evenly or align them within the edit window, use the Object: Alignmenu commands. For greater convenience, you can also use the various buttons onthe Attribute Toolbar for the Pick Tool. These are especially useful when creating anavigational toolbar or image map for your Web page.
To align objects:
1 Click the Pick Tool on the Tool Panel.
2 Select the objects to align.
3 Select Object: Align and choose fromthe submenu, or click the desired Alignicons on the Attribute toolbar.
To space objects evenly:
1 Click the Pick Tool on the Tool paneland select the objects you want forspacing.
2 Select Object: Align - Space Evenly.3 Select the direction to space the objects
either Horizontally or Vertically .
4 Under Space, select Even or Fixed.Enter a value in the Pixels box whenselecting fixed.
5 Click OK .
The clipboard acts as a temporary storage for different types of information, such asimages, text, and even sound, but it only holds one piece of information at a time.When you place something onto the clipboard, the existing clipboard data isautomatically overwritten, regardless of where the new data came from.
Performing a cut and copy operation
The most common methods for placing data onto the clipboard are by clicking theCut [CTRL+X] and Copy [CTRL+C] buttons on the Standard toolbar, or by selectingtheir respective commands from the Edit menu.
• Cut deletes the selected area or object and places it onto the clipboard.(When you cut a selected area, that area in the image is filled with the
Using the clipboard

71
CHAPTER 2: PHOTOIMPACT FUNDAMENTALS
current background color.)
• Copy places a duplicate of a selected area or object onto the clipboard.
To paste image data into a selection area:
1 Select an area on the image where youwant to paste the clipboard image into.
2 Select Edit: Paste - Into Selection. Theclipboard image appears inside theselection and remains attached to yourmouse.
3 Move your mouse around to positionthe clipboard image in the desiredselection area.
4 Click to anchor the clipboard image inthe selection area.
Note: When there is no selection area, both Cut and Copy apply to the entire image.
Notes:• If pasting an object onto an image of a different data type, the pasted data is automatically
converted (for example, when pasting a True Color image into an Indexed 16-Color image). Thismay cause extreme change in color.
• When pasting an image, it is placed pixel-on-pixel. If your source and target images are at differentzoom levels, the clipboard image may appear to be enlarged or reduced after pasting.
• All Paste commands are disabled if the clipboard is empty or the content of the clipboard is notsupported in PhotoImpact.
Note: Press ESC to undo (before you havefinished the pasting operation). The contents inthe clipboard are not removed.
Pasting images as objects
Select Paste: As Objects [CTRL+V] to paste an image as a separate object. The imageis pasted at the top left corner of the current view. (For details about objects, seepage 64.)
Pasting images into a selection area
After copying image data to the clipboard, you can now paste the contents to anyselection area.
Performing a paste operation
To paste an image, click the Paste [CTRL+V] button on the Standard toolbar, or choosea command from the Edit: Paste submenu after cutting or copying image data to theclipboard. Whenever you paste data into an image, it becomes an object and floatsabove the base image and all other objects.

72
PHOTOIMPACT USER GUIDE
Pasting images to fit into a selection area
Select Paste: Fit into Selection when you want to paste the clipboard image inside aselection area so that the entire image fills the selection. Try to make sure that theclipboard image and the selection area are about the same size. If the sizes varygreatly, then the quality of the clipboard image is affected by resampling (resizing) tofit the selection.
Pasting images into a new image window
Select Paste: As New Image to paste a selection in its own image window.Alternatively, you can drag an object from an existing image to the workspace. Thisis useful when you want to save an object or selection area as its own image, or whenyou have copied an image from another program and want to place it in its ownwindow.
Pasting images beneath the mouse pointer
Select Paste: Under Pointer to place the clipboard image onto the base imagewherever you click your mouse. This is useful when you know where to exactlyanchor the clipboard image.
The Clipboard submenu
PhotoImpact provides the following commands in the Edit: Clipboard submenu:
• Load brings an image file onto the clipboard.• Save stores clipboard image data to a file.
• Display shows the current clipboard image in a Windows clipboard viewer.To close the clipboard viewer, press any key or click your mouse.
The original selection (left), the image to be pasted into the selection (middle), and the final result
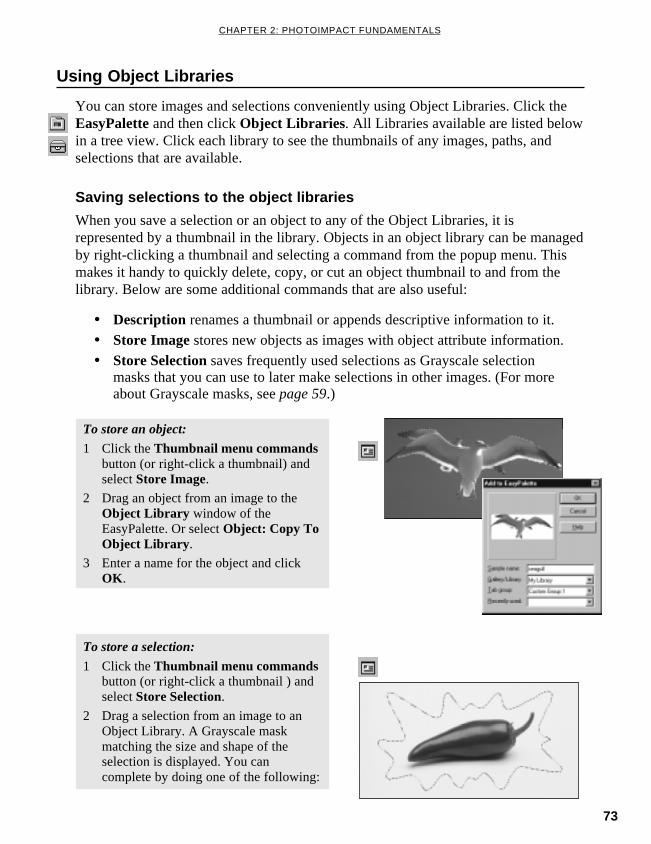
73
CHAPTER 2: PHOTOIMPACT FUNDAMENTALS
Using Object Libraries
To store an object:
1 Click the Thumbnail menu commandsbutton (or right-click a thumbnail) andselect Store Image.
2 Drag an object from an image to theObject Library window of theEasyPalette. Or select Object: Copy ToObject Library .
3 Enter a name for the object and clickOK .
To store a selection:
1 Click the Thumbnail menu commandsbutton (or right-click a thumbnail ) andselect Store Selection.
2 Drag a selection from an image to anObject Library. A Grayscale maskmatching the size and shape of theselection is displayed. You cancomplete by doing one of the following:
You can store images and selections conveniently using Object Libraries. Click theEasyPalette and then click Object Libraries . All Libraries available are listed belowin a tree view. Click each library to see the thumbnails of any images, paths, andselections that are available.
Saving selections to the object libraries
When you save a selection or an object to any of the Object Libraries, it isrepresented by a thumbnail in the library. Objects in an object library can be managedby right-clicking a thumbnail and selecting a command from the popup menu. Thismakes it handy to quickly delete, copy, or cut an object thumbnail to and from thelibrary. Below are some additional commands that are also useful:
• Description renames a thumbnail or appends descriptive information to it.
• Store Image stores new objects as images with object attribute information.
• Store Selection saves frequently used selections as Grayscale selectionmasks that you can use to later make selections in other images. (For moreabout Grayscale masks, see page 59.)

74
PHOTOIMPACT USER GUIDE
• Use the Selection: Copy Selection toObject Library menu command asyou create a selection.
• Press [M] as you drag a selection tothe Object Library (regardless ofwhether Store Selection is selected ornot).
3 Enter a name for the mask and clickOK .
To save the entire image to the ObjectLibrary:
1 Select Selection: All (or right-click animage and select All ).
2 Drag it to the Object Library.
3 Enter a name for the whole image andclick OK .
Store Image as Selection savesGrayscale images as a mask. Grayscalemasks can be used to create manyinteresting effects because transparencyis based on the darkness of individualpixels.
Note: To export a selection as a new image inthe workspace, or to save it as a file in aspecific file format, choose Selection: ExportSelection . In both cases, the selectionbecomes a Grayscale image (Grayscalemask).
4 To use your mask, drag the saved maskto the desired image. A selectionmarquee appears.
5 Make any needed adjustments to theselection using the Transform tool.Then, using the Selection tool, drag theselection area out of the image to form anew image document in the workspace.

75
CHAPTER 2: PHOTOIMPACT FUNDAMENTALS
Retrieving an image or selection
To retrieve an object or selection, drag them from the Object Library into an editwindow or the workspace. Remember the following points when retrieving:
• When you drag an object to an open document, the object is placedwherever you release the mouse.
• When you double-click a thumbnail in the Object Library, or when youclick Thumbnail menu commands and choose Copy Object to Image, theobject appears at the top-left of the image.
• When you drag an object back to its original image or another image ofequal size, the object is placed in its original position. Each image elementis repositioned automatically. This is especially helpful when you want to:
ú Preserve the position of image elements in an image whose backgroundneeds to be modified.
To store an image as a selection and applyits mask to another image:
1 Prepare a Grayscale image of the imagethat you want to use as a selection. Ifthe original image is color, selectFormat: Data Type - Grayscale (8-bit) .
2 Open the Object Library in theEasyPalette. Click the Thumbnailmenu commands button, and selectStore Image as Selection.
3 Select the entire image, or just a portionof the image, to use as the selectionmask.
4 Drag the selection to the Object Libraryand save it.
5 To use your mask, drag the saved maskto the desired image. A selectionmarquee appears.
6 Make any needed adjustments to theselection using the Transform tool.Then, using the Selection tool, drag theselection area out of the image to form anew image document in the workspace.

76
PHOTOIMPACT USER GUIDE
Notes:• When the destination image is of different size, the selection is placed wherever you
release the mouse.
• When placing a selection that has been created from a Grayscale image into an Indexed-Color or Black & White image, the gray areas of the selection are converted to pure blackor white.
• To import a previously saved selection (or any Grayscale image) into the active image as aselection area, click Selection: Import Selection .
ú Preserve the position of stationery objects across all sequences in imageand animation sequences.
• When the base image is active, you can select Fit Selection (or right-click athumbnail, or click Thumbnail menu commands on the EasyPalette). Themask object is centered and scaled to fit the image. If Fit Selection iscleared, the mask object is placed at the mouse point when you drag thepreviously saved mask object into a new image and release the mouse.
3
IMAGE EDITING
Having mastered the basics as covered in the previous chapters,
you're now ready for more advanced and interesting techniques. In
this chapter, you will learn image editing operations such as
converting data type, using the Auto-process feature, adjusting
your image’s brightness and contrast, adjusting its hue and
saturation, cropping and transforming images, as well as using the
Bezier Curve Tool and the Path Tool.
In this chapter you will learn:
• Automatically enhancing an image .......................................................................... 78
• Cropping an image ................................................................................................... 78
• Resizing an image ................................................................................................... 79
• Understanding color correction ............................................................................... 81
• Working with colors .................................................................................................. 84
• Using the Painting Tools .......................................................................................... 87
• Working with Object Eraser Tools ........................................................................... 90
• Retouching images .................................................................................................. 91
• Using the Stamp Tool .............................................................................................. 93
• Cloning parts of an image ........................................................................................ 94
• Saving a tool’s attributes to My Gallery/Library ...................................................... 95
• Filling an area with color, textures, and gradients .................................................. 95
• Working with paths ................................................................................................. 100
• Adding text ............................................................................................................. 117
• Wrap effects ........................................................................................................... 121
• Adding 3D properties to text and path objects ...................................................... 126
• Using the Transform Tool ...................................................................................... 132
78
PHOTOIMPACT USER GUIDE
Automatically enhancing an image
Note: Most of the options in the Auto-Process dialog box can be accessed independently by choosingtheir respective commands in the Format: Auto-process submenu.
Cropping an image
The Auto-process commands are used for automatic and intelligent control overimage appearance.
To use Auto-process:
1 Select Format: Auto-process - Batch.2 Click the Auto-process button(s) you
want to apply.
3 To remove an option, click its buttonagain or drag it off the queue at thebottom of the dialog box.
4 Click OK to apply the auto-processoption(s) to the image.
Cropping trims the edges of an image and removes unwanted areas. To crop animage, select the area you wish to retain and select Edit: Crop [CTRL+R]. However,the Crop menu command only reference crop dimensions to what is currently activein the edit window, for example a selection area or an active object. To have bettercontrol on the crop dimensions, use the Crop Tool in the Tool panel instead. Itprovides you the capability of defining crop dimensions based on a selected areatogether with other objects present in the image. Another very important function ithas is that it allows you to save the crop dimensions information to the EasyPalette soyou can use the same exact settings for trimming other images in the future.
Notes:• If you select a non-rectangular area, the image is cropped to the smallest rectangle that can
contain the selected area.
• When cropping the base image, all objects are not merged.
• Use either the Auto-process Crop option or the Post-processing Wizard option to quickly crop animage that has extra space along its borders.

79
CHAPTER 3: IMAGE EDITING
Resizing an image
Notes:• To reset the crop bounding box, press ESC.• To reposition the bounding box, move your mouse within the bounding box and when the pointer
changes to a 4-directional arrow, drag to the desired position.
• Resize the bounding box with the SHIFT key held down to keep the width and height change ratioeven. Or, use the CTRL key to keep the center point of the bounding box in a fixed position.
• Click Add to save the current settings to the EasyPalette. From the EasyPalette, double-click ordrag-and-drop to apply saved settings to an image(s).
You can resize an entire image in two ways. The method that you choose depends onthe desired quality and the target destination for the image.
Changing resolution
Resolution determines the physical size (as when printed on paper) of an image bydefining the size of its constituent pixels. This method changes the number of pixelsthat appear per unit area. For example, increasing the resolution places more pixelscloser together, and thereby reduces the size of the image, while decreasing theresolution places pixels farther apart, thus making the image larger. In this way, youcan resize an image without actually changing the number of pixels the imagecontains; as such, you are able to retain the original quality of the image.Additionally, because no pixels are added or lost, the size of the image file remainsunchanged.
To use the Crop Tool:
1 Click Crop Tool in the Tool Panel.
2 Click the Options button to select thebasis for creating the crop boundingbox. You can choose from encasing theactive selection, if any, together withobject(s), whichever is active beforeclicking the Crop Tool, or the EntireImage if you want to freely resize thecrop bounding box.
3 When done adjusting the bounding box,click the Crop button or press ENTER.
Note: Remember that even after defining a new resolution, the appearance of the image does notchange on-screen. Changes are only apparent when you print the image or place it into anotherprogram that reads its resolution.
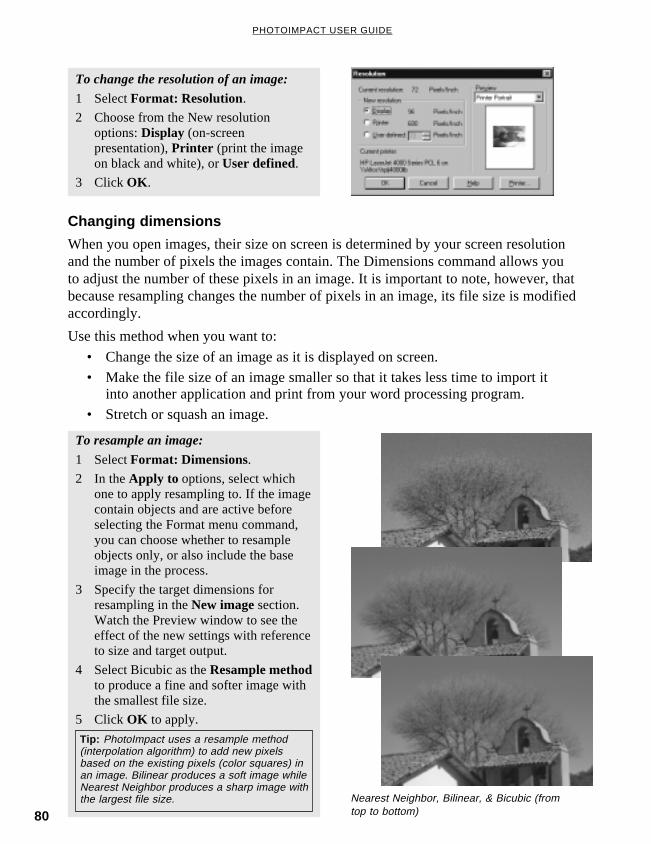
80
PHOTOIMPACT USER GUIDE
To change the resolution of an image:
1 Select Format: Resolution.
2 Choose from the New resolutionoptions: Display (on-screenpresentation), Printer (print the imageon black and white), or User defined.
3 Click OK .
Tip: PhotoImpact uses a resample method(interpolation algorithm) to add new pixelsbased on the existing pixels (color squares) inan image. Bilinear produces a soft image whileNearest Neighbor produces a sharp image withthe largest file size. Nearest Neighbor, Bilinear, & Bicubic (from
top to bottom)
Changing dimensions
When you open images, their size on screen is determined by your screen resolutionand the number of pixels the images contain. The Dimensions command allows youto adjust the number of these pixels in an image. It is important to note, however, thatbecause resampling changes the number of pixels in an image, its file size is modifiedaccordingly.
Use this method when you want to:
• Change the size of an image as it is displayed on screen.
• Make the file size of an image smaller so that it takes less time to import itinto another application and print from your word processing program.
• Stretch or squash an image.
To resample an image:
1 Select Format: Dimensions.2 In the Apply to options, select which
one to apply resampling to. If the imagecontain objects and are active beforeselecting the Format menu command,you can choose whether to resampleobjects only, or also include the baseimage in the process.
3 Specify the target dimensions forresampling in the New image section.Watch the Preview window to see theeffect of the new settings with referenceto size and target output.
4 Select Bicubic as the Resample methodto produce a fine and softer image withthe smallest file size.
5 Click OK to apply.
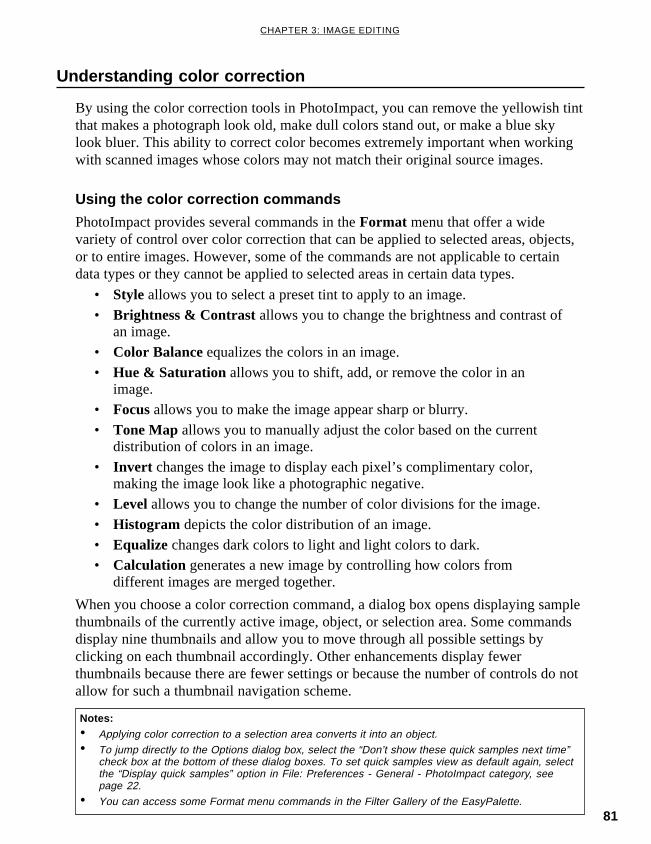
81
CHAPTER 3: IMAGE EDITING
Understanding color correction
By using the color correction tools in PhotoImpact, you can remove the yellowish tintthat makes a photograph look old, make dull colors stand out, or make a blue skylook bluer. This ability to correct color becomes extremely important when workingwith scanned images whose colors may not match their original source images.
Using the color correction commands
PhotoImpact provides several commands in the Format menu that offer a widevariety of control over color correction that can be applied to selected areas, objects,or to entire images. However, some of the commands are not applicable to certaindata types or they cannot be applied to selected areas in certain data types.
• Style allows you to select a preset tint to apply to an image.
• Brightness & Contrast allows you to change the brightness and contrast ofan image.
• Color Balance equalizes the colors in an image.
• Hue & Saturation allows you to shift, add, or remove the color in animage.
• Focus allows you to make the image appear sharp or blurry.
• Tone Map allows you to manually adjust the color based on the currentdistribution of colors in an image.
• Invert changes the image to display each pixel’s complimentary color,making the image look like a photographic negative.
• Level allows you to change the number of color divisions for the image.
• Histogram depicts the color distribution of an image.
• Equalize changes dark colors to light and light colors to dark.• Calculation generates a new image by controlling how colors from
different images are merged together.
When you choose a color correction command, a dialog box opens displaying samplethumbnails of the currently active image, object, or selection area. Some commandsdisplay nine thumbnails and allow you to move through all possible settings byclicking on each thumbnail accordingly. Other enhancements display fewerthumbnails because there are fewer settings or because the number of controls do notallow for such a thumbnail navigation scheme.
Notes:• Applying color correction to a selection area converts it into an object.• To jump directly to the Options dialog box, select the “Don’t show these quick samples next time”
check box at the bottom of these dialog boxes. To set quick samples view as default again, selectthe “Display quick samples” option in File: Preferences - General - PhotoImpact category, seepage 22.
• You can access some Format menu commands in the Filter Gallery of the EasyPalette.
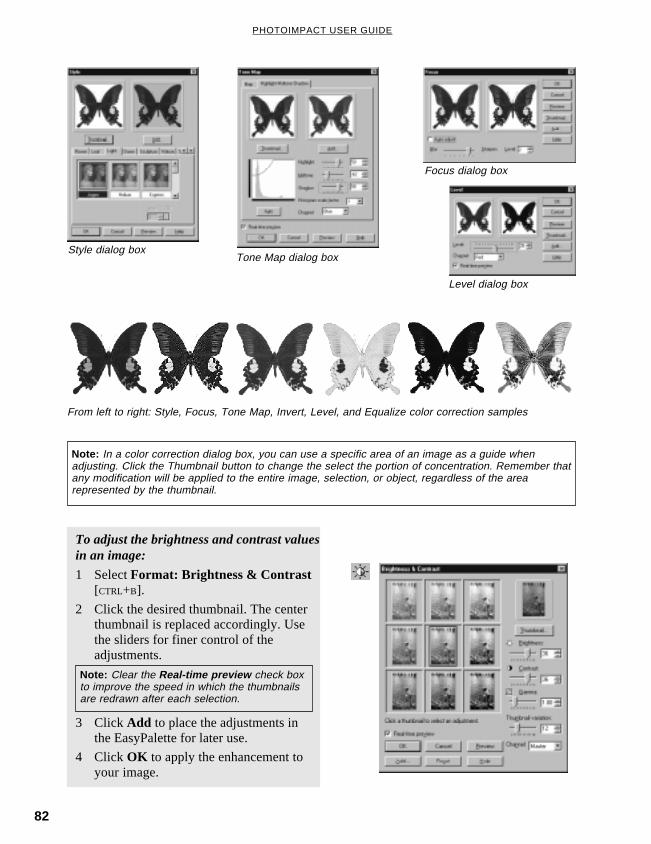
82
PHOTOIMPACT USER GUIDE
To adjust the brightness and contrast valuesin an image:
1 Select Format: Brightness & Contrast[CTRL+B].
2 Click the desired thumbnail. The centerthumbnail is replaced accordingly. Usethe sliders for finer control of theadjustments.
Note: In a color correction dialog box, you can use a specific area of an image as a guide whenadjusting. Click the Thumbnail button to change the select the portion of concentration. Remember thatany modification will be applied to the entire image, selection, or object, regardless of the arearepresented by the thumbnail.
3 Click Add to place the adjustments inthe EasyPalette for later use.
4 Click OK to apply the enhancement toyour image.
Note: Clear the Real-time preview check boxto improve the speed in which the thumbnailsare redrawn after each selection.
Style dialog boxTone Map dialog box
Focus dialog box
Level dialog box
From left to right: Style, Focus, Tone Map, Invert, Level, and Equalize color correction samples
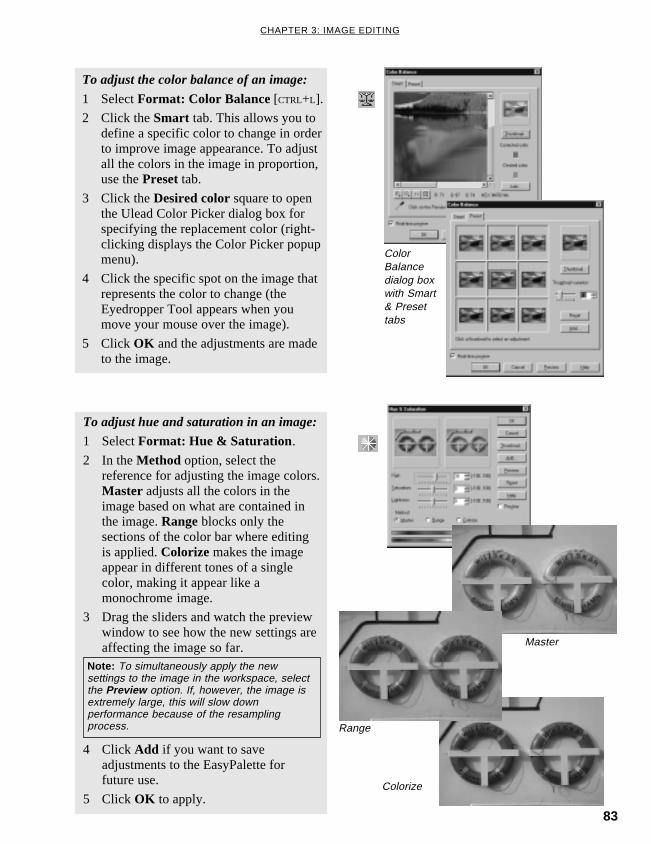
83
CHAPTER 3: IMAGE EDITING
To adjust hue and saturation in an image:
1 Select Format: Hue & Saturation .
2 In the Method option, select thereference for adjusting the image colors.Master adjusts all the colors in theimage based on what are contained inthe image. Range blocks only thesections of the color bar where editingis applied. Colorize makes the imageappear in different tones of a singlecolor, making it appear like amonochrome image.
3 Drag the sliders and watch the previewwindow to see how the new settings areaffecting the image so far.
To adjust the color balance of an image:
1 Select Format: Color Balance [CTRL+L].
2 Click the Smart tab. This allows you todefine a specific color to change in orderto improve image appearance. To adjustall the colors in the image in proportion,use the Preset tab.
3 Click the Desired color square to openthe Ulead Color Picker dialog box forspecifying the replacement color (right-clicking displays the Color Picker popupmenu).
4 Click the specific spot on the image thatrepresents the color to change (theEyedropper Tool appears when youmove your mouse over the image).
5 Click OK and the adjustments are madeto the image.
Note: To simultaneously apply the newsettings to the image in the workspace, selectthe Preview option. If, however, the image isextremely large, this will slow downperformance because of the resamplingprocess.
4 Click Add if you want to saveadjustments to the EasyPalette forfuture use.
5 Click OK to apply.
Range
Master
Colorize
ColorBalancedialog boxwith Smart& Presettabs

84
PHOTOIMPACT USER GUIDE
Working with colors
One of the most important aspects when it comes to painting is choosing the rightcolor. PhotoImpact provides a number of ways to help you achieve this while givingyou maximum freedom in your choice of how to display and select colors. Theeasiest way to do this is to use the Color Palette.
Using the Color Palette
The Color Palette is normally used with painting tools and contains colors that youcan apply to any given image. The way colors are displayed varies according to thetype of image you are working on. Examples of data types are:
• Grayscale image display shades of gray.
• Indexed Color image displays 16 or 256 colors.
• True Color image displays a complete range of colors.
Of the available colors in an image, two are active at any given time. These twocolors, referred to as the foreground and background colors, are displayed in thecolor squares just below the color area on the color panel. The foreground color is inthe front, slightly lower and to the right of the background color. Clicking on any ofthe colors displayed in the color panel selects the color as foreground, while right-clicking selects the color as background.
Using the color cache
The Color cache displays eight color squares that you can conveniently use as theforeground color in just a mouse click. It keeps the eight most used colors readilyavailable for painting, much as an artist’s color palette holds only those colors neededfor his/her work. To change a color in the color cache, right-click over a color squareand select from the Color Picker popup menu.
Selecting colors from the Color Picker popup menu
The Color Picker popup menu, displayed when you right-click over anycolor squares on the Color Palette, allows you to choose and replacecolors from a range of methods applicable to different situations.
Using the Ulead Color Picker
The Ulead Color Picker command opens a dialog box showing acontinuous color spectrum. The color spectrum displays hue or color(from top to bottom) and luminance or the amount of brightness (from leftto right). When you move your mouse over the colors, their RGB and HSB values aredisplayed below the color spectrum.
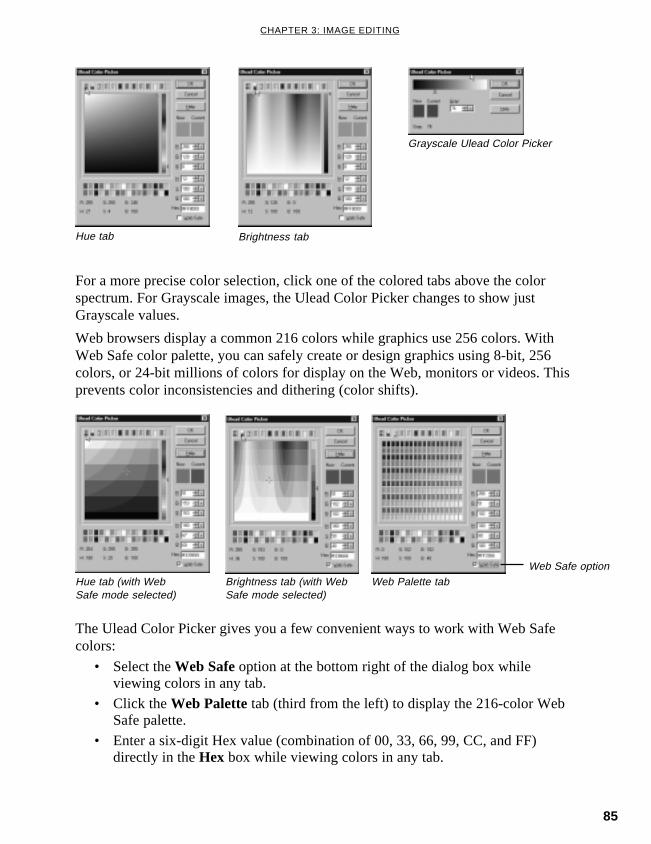
85
CHAPTER 3: IMAGE EDITING
For a more precise color selection, click one of the colored tabs above the colorspectrum. For Grayscale images, the Ulead Color Picker changes to show justGrayscale values.
Web browsers display a common 216 colors while graphics use 256 colors. WithWeb Safe color palette, you can safely create or design graphics using 8-bit, 256colors, or 24-bit millions of colors for display on the Web, monitors or videos. Thisprevents color inconsistencies and dithering (color shifts).
The Ulead Color Picker gives you a few convenient ways to work with Web Safecolors:
• Select the Web Safe option at the bottom right of the dialog box whileviewing colors in any tab.
• Click the Web Palette tab (third from the left) to display the 216-color WebSafe palette.
• Enter a six-digit Hex value (combination of 00, 33, 66, 99, CC, and FF)directly in the Hex box while viewing colors in any tab.
Web Safe option
Grayscale Ulead Color Picker
Hue tab Brightness tab
Hue tab (with WebSafe mode selected)
Brightness tab (with WebSafe mode selected)
Web Palette tab

86
PHOTOIMPACT USER GUIDE
Picking colors from an image or entire screen
The Eyedropper Tool (from the Tool Panel) and the Eyedropper command (fromthe Color Picker popup menu) allow you to select a color directly from an activeimage. By zooming in on an image, you can precisely select the desired color bysimply clicking on it. However, color choices are limited to what the image contains.In instances where the color you want to use is visible within the monitor screen, usethe Color on Screen command (from the Color Picker popup menu). Once activated,the pointer changes to an eyedropper cursor, and you can then click on the spot whereyou see the desired color from within the screen.
Editing the color table for an Indexed color image
Indexed color images are unique in that they are small in file size (compared to TrueColor images), yet offer a wide range of colors which can be arranged to make itappear as if they contain more. This is done through the use of a color table whichallocates a single color in either 16 or 256 discrete cells (depending on the data typeyou are currently working in). To view a color table, select Format: Color Table.(This command is disabled when the active image is not Indexed-color.)
16-color Indexed palette 256-color Indexed palette
As each color is in its own cell, you can change it to affect the color composition ofan image. For example, you can change all occurrences of white by simply changingthe white color cell. To change a color, double-click the cell to open the Ulead ColorPicker dialog box and choose a new color. Clicking OK replaces the old color withthe new one and returns you to the Color Table dialog box.
Loading and saving color tables
In PhotoImpact, you can save color tables and then load them into another compatibleIndexed-color image. This allows you to ensure that two or more images share thesame composition, which is particularly important if you are preparing images to bedisplayed in a 256-color display mode, such as CD titles or for the Web. You can alsoload in color tables to colorize an image.
Note: Color tables containing 16 colors can only be loaded into Indexed 16-Color images. Likewise,color tables containing 256 colors can only be loaded into Indexed 256-Color images.
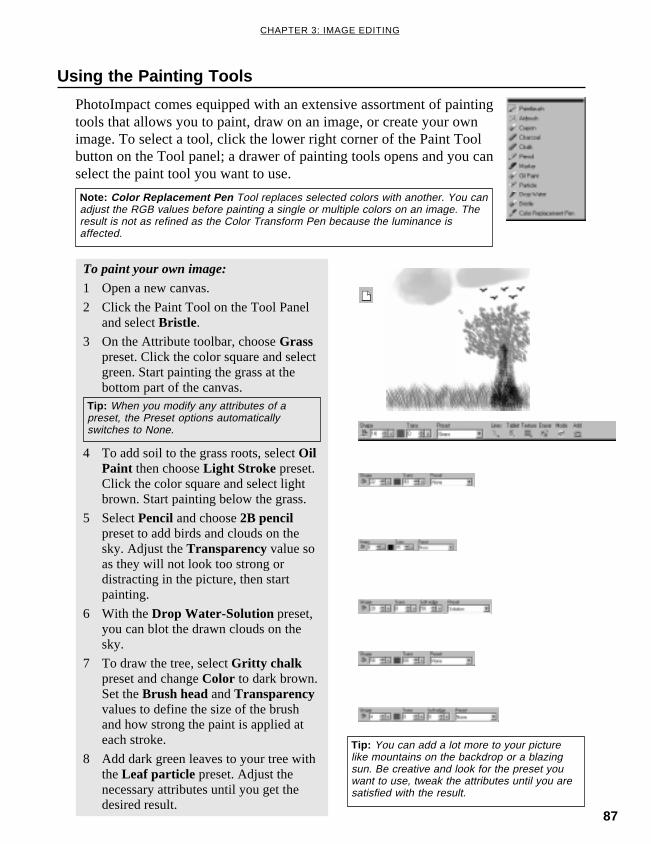
87
CHAPTER 3: IMAGE EDITING
Using the Painting Tools
PhotoImpact comes equipped with an extensive assortment of paintingtools that allows you to paint, draw on an image, or create your ownimage. To select a tool, click the lower right corner of the Paint Toolbutton on the Tool panel; a drawer of painting tools opens and you canselect the paint tool you want to use.
To paint your own image:
1 Open a new canvas.
2 Click the Paint Tool on the Tool Paneland select Bristle.
3 On the Attribute toolbar, choose Grasspreset. Click the color square and selectgreen. Start painting the grass at thebottom part of the canvas.
Tip: When you modify any attributes of apreset, the Preset options automaticallyswitches to None.
Tip: You can add a lot more to your picturelike mountains on the backdrop or a blazingsun. Be creative and look for the preset youwant to use, tweak the attributes until you aresatisfied with the result.
4 To add soil to the grass roots, select OilPaint then choose Light Stroke preset.Click the color square and select lightbrown. Start painting below the grass.
5 Select Pencil and choose 2B pencilpreset to add birds and clouds on thesky. Adjust the Transparency value soas they will not look too strong ordistracting in the picture, then startpainting.
6 With the Drop Water-Solution preset,you can blot the drawn clouds on thesky.
7 To draw the tree, select Gritty chalkpreset and change Color to dark brown.Set the Brush head and Transparencyvalues to define the size of the brushand how strong the paint is applied ateach stroke.
8 Add dark green leaves to your tree withthe Leaf particle preset. Adjust thenecessary attributes until you get thedesired result.
Note: Color Replacement Pen Tool replaces selected colors with another. You canadjust the RGB values before painting a single or multiple colors on an image. Theresult is not as refined as the Color Transform Pen because the luminance isaffected.
88
PHOTOIMPACT USER GUIDE
Working with paint tool attributes
PhotoImpact gives you an amazing level of control over painting tools, right down tothe coarseness of the bristles. There are many ways to do this:
• Define the attributes directly on the Attribute Toolbar after selecting acertain paint tool.
• Click the Layout icon and select Brush Panel. To hide or display the brushpanel, double-click the corresponding tools (paint, retouch, clone, orstamp).
When you select a painting tool, its various attributes appear along the AttributeToolbar. Many of these attributes are shared and work for all of the available painttools. Listed below are some common attributes:
• Shape allows you to choose a brush shape. You can specify the size of thebrush head by entering a value between 1 and 100.
• Color allows you to change the color that you will apply to an image.• Transparency defines the degree of transparency of the paint to be applied
to your image. Values range from 0 to 99%.• Soft edge determines how much the color blends along the edges of an
image. Values range from 0% (no blending) to 100% (completely softensthe edge and blends with the underlying image).
• Texture allows you to set a painting texture for the selected paint tool(except Drop Water, Particle, and Color Replacement Pen).
Specifying the painting mode
As you paint, click the Lines button on the Attribute Toolbar to switch between threedifferent painting modes:
• Freehand allows you to paint in irregularly shaped strokes.• Straight Lines lets you paint in straight lines. Click the point where you
want the line to start, then move to the point where you want it to end andclick again. Pressing SHIFT during this process lets you create lines atdifferent angles.
• Connected Lines functions much like the Straight Line mode except thatafter a line is painted, you can select a new line segment and continuepainting. Double-click to automatically paint a straight line connecting theend point to the starting point.
Erasing colors from an image
There are three ways to remove colors from an image: erase paint applied using thePaint, Clone or Retouch tools, erase a selected color, and erasing the pixels from thebackground image.
To erase paint applied using the Paint, Clone or Retouch tools, click the Erase Modebutton on the Attribute Toolbar or Brush Panel while using the Paint Tool. The PaintTool then becomes an eraser and you can proceed to remove the colors addedpreviously.

89
CHAPTER 3: IMAGE EDITING
To erase a selected color, use the Magic Wandselection tool as described on page 58 (and page64 for information on adding and subtractingfrom selection areas.)
Finally, you can remove the pixels from thebackground, or original, image. To do this,simply use the paint tool to paint over the pixelsin question with a neutral color (PhotoImpactuses the Foreground color for this.)
Specifying the Brush Panel attributes
Just as the attributes appear along the Attribute Toolbar when you select a specificpainting tool, the Brush Panel also displays the attributes for that tool in five tabs:Shape, Options, Color, Texture, and Advanced. Open the Brush Panel by clickingthe Layout icon on the Standard Toolbar and selecting the appropriate menucommand.
The current settings of these attributes are the same as they werewhen last selected. If you change them, you can save the newsettings to the Brush Gallery or My Gallery of the EasyPaletteby clicking the Add button on the Attribute Toolbar. The BrushGallery of the EasyPalette also has a large number of paintbrush presets, such as specific types of art-pencils (2B, 6H),felt-tip pens and effect brushes like fog and light. To use themas the current brush, double-click the thumbnail of the one youwant or drag-and-drop it onto an image. (For more informationon Saving a tool's attributes to My Gallery, see page 95.)
Normal and Paint asObject mode samples
Using the Mode Buttons
PhotoImpact provides two modes for painting, cloning, and retouching tools (withthe exception of Stamp Tool and Color Replacement Pen). These are:
• Normal mode allows you to paint directly onto the base image.• Paint as Object mode allows you to paint on the base image and create an
object with a transparent layer atop the active image. Click the mode buttonto activate this mode and click again after painting to change the paint intoan object.
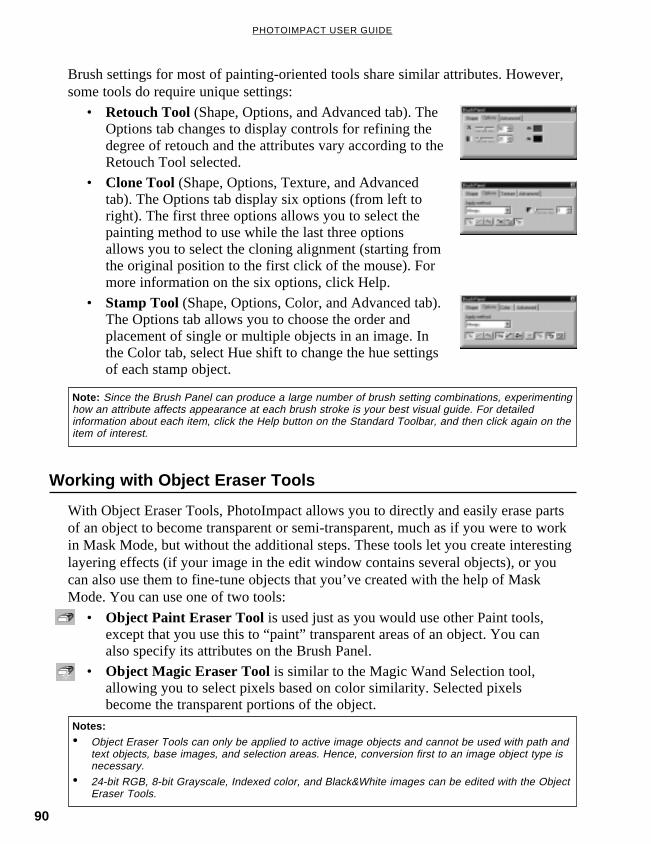
90
PHOTOIMPACT USER GUIDE
Brush settings for most of painting-oriented tools share similar attributes. However,some tools do require unique settings:
• Retouch Tool (Shape, Options, and Advanced tab). TheOptions tab changes to display controls for refining thedegree of retouch and the attributes vary according to theRetouch Tool selected.
• Clone Tool (Shape, Options, Texture, and Advancedtab). The Options tab display six options (from left toright). The first three options allows you to select thepainting method to use while the last three optionsallows you to select the cloning alignment (starting fromthe original position to the first click of the mouse). Formore information on the six options, click Help.
• Stamp Tool (Shape, Options, Color, and Advanced tab).The Options tab allows you to choose the order andplacement of single or multiple objects in an image. Inthe Color tab, select Hue shift to change the hue settingsof each stamp object.
Working with Object Eraser Tools
With Object Eraser Tools, PhotoImpact allows you to directly and easily erase partsof an object to become transparent or semi-transparent, much as if you were to workin Mask Mode, but without the additional steps. These tools let you create interestinglayering effects (if your image in the edit window contains several objects), or youcan also use them to fine-tune objects that you’ve created with the help of MaskMode. You can use one of two tools:
• Object Paint Eraser Tool is used just as you would use other Paint tools,except that you use this to “paint” transparent areas of an object. You canalso specify its attributes on the Brush Panel.
• Object Magic Eraser Tool is similar to the Magic Wand Selection tool,allowing you to select pixels based on color similarity. Selected pixelsbecome the transparent portions of the object.
Note: Since the Brush Panel can produce a large number of brush setting combinations, experimentinghow an attribute affects appearance at each brush stroke is your best visual guide. For detailedinformation about each item, click the Help button on the Standard Toolbar, and then click again on theitem of interest.
Notes:• Object Eraser Tools can only be applied to active image objects and cannot be used with path and
text objects, base images, and selection areas. Hence, conversion first to an image object type isnecessary.
• 24-bit RGB, 8-bit Grayscale, Indexed color, and Black&White images can be edited with the ObjectEraser Tools.

91
CHAPTER 3: IMAGE EDITING
To erase an object:
1 On the EasyPalette - Image Library ,select Rose 2 then double-click.
2 Click Object Eraser Tool on the ToolPanel and select Object Paint Eraser.
3 On the Attribute Toolbar, set Brushhead 10, Transparency 10, Soft edge10, and Zoom to 200. Start painting offthe leaves.
4 Click the Trim button to remove anyspace around the object that iscompletely transparent. (The results ofthis will be apparent in the LayerManager thumbnail in the EasyPalette.)
Retouching images
The Retouch tools are not strictly painting tools in the sense that they donot “paint” over an image with a selected color. Instead, they are used toenhance areas of an image by adjusting existing color pixels. To select atool, click the lower right corner of the Retouch Tool button on the Toolpanel; a drawer of retouching tools opens and you can select the type oftool you want to use.
When you apply a retouch tool on an area, the tool uses the shape andsize of the current brush each time you click the mouse. To perform theeffect over a larger area, drag the mouse or increase the size of yourbrush. To reapply and increase the effect on a specific area, click repeatedly.
Tip: The Recover button only works if youhave already erased an area and have not yetapplied the Trim button. Otherwise, you willhave to use Undo on the Standard Toolbar,which may result to going back more stepsthan desired.

92
PHOTOIMPACT USER GUIDE
To apply a retouch tool to an area:
1 Open the image to edit.
2 Click the Retouch Tool and selectRemove Scratch.
3 Right-click on the Attribute Toolbar andselect Brush Panel. In the ShapeOptions tab, define your brushattributes. You can also specify thestrength of the effect for each brushstroke in the Options tab.
4 Paint over the area to fix andPhotoImpact regenerates pixels to coverthe damaged area based on neighboringpixels.
Some effects are subtle and you mayhave to work with the brush a little toget the desired results.
Note: The Retouch tools can only be appliedto Grayscale and True Color images.
Tip: You can apply a number of Retouchtools to an image, burn for tan effect, dodgefor light effect, blur to smoothen rough skintexture, and many others.
There are two very useful Retouch tools for colorizing images, these are:
• Color Transform Pen alters the appearance of an image by changing theoriginal color with another color. You can adjust the Hue and Saturationvalues but the luminance (lightness of a color) is retained. The result isvivid and more realistic than the Color Replacement Pen.
• Colorize Pen applies a tint or shade to an image with a uniform Hue. Tocreate a single color effect, apply Monochrome effect or use a Grayscaleimage (convert to RGB) then use the Colorize Pen to enhance. Or, you canaccess the Hue & Saturation dialog box and select Colorize.
Brush Panel - Shape tab dialog box
Blur
Fixed Image using Remove Scratch Tool
Dodge Burn
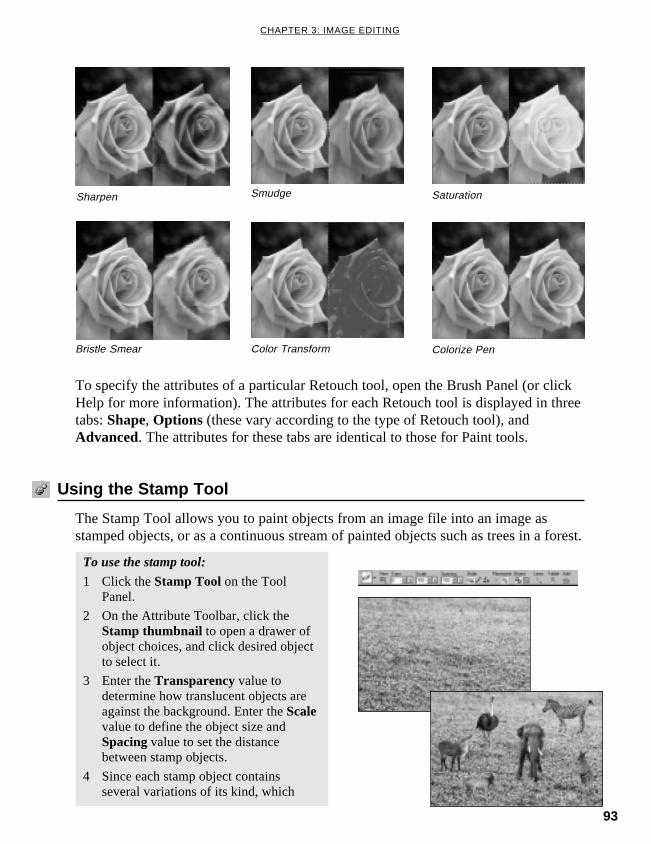
93
CHAPTER 3: IMAGE EDITING
To specify the attributes of a particular Retouch tool, open the Brush Panel (or clickHelp for more information). The attributes for each Retouch tool is displayed in threetabs: Shape, Options (these vary according to the type of Retouch tool), andAdvanced. The attributes for these tabs are identical to those for Paint tools.
Using the Stamp Tool
The Stamp Tool allows you to paint objects from an image file into an image asstamped objects, or as a continuous stream of painted objects such as trees in a forest.
Bristle Smear
Sharpen
Color Transform Colorize Pen
Smudge Saturation
To use the stamp tool:
1 Click the Stamp Tool on the ToolPanel.
2 On the Attribute Toolbar, click theStamp thumbnail to open a drawer ofobject choices, and click desired objectto select it.
3 Enter the Transparency value todetermine how translucent objects areagainst the background. Enter the Scalevalue to define the object size andSpacing value to set the distancebetween stamp objects.
4 Since each stamp object containsseveral variations of its kind, which
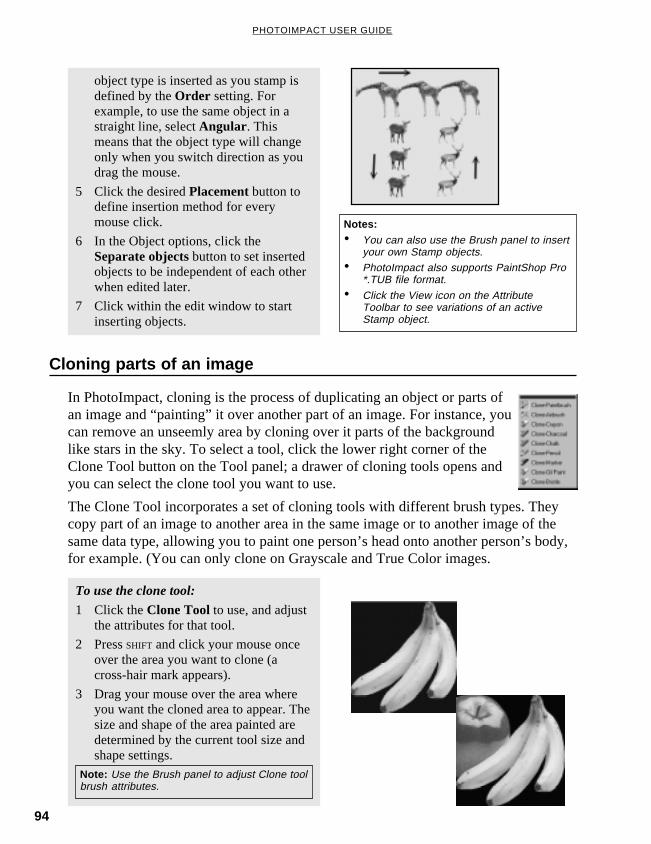
94
PHOTOIMPACT USER GUIDE
To use the clone tool:
1 Click the Clone Tool to use, and adjustthe attributes for that tool.
2 Press SHIFT and click your mouse onceover the area you want to clone (across-hair mark appears).
3 Drag your mouse over the area whereyou want the cloned area to appear. Thesize and shape of the area painted aredetermined by the current tool size andshape settings.
Note: Use the Brush panel to adjust Clone toolbrush attributes.
Notes:• You can also use the Brush panel to insert
your own Stamp objects.• PhotoImpact also supports PaintShop Pro
*.TUB file format.
• Click the View icon on the AttributeToolbar to see variations of an activeStamp object.
object type is inserted as you stamp isdefined by the Order setting. Forexample, to use the same object in astraight line, select Angular . Thismeans that the object type will changeonly when you switch direction as youdrag the mouse.
5 Click the desired Placement button todefine insertion method for everymouse click.
6 In the Object options, click theSeparate objects button to set insertedobjects to be independent of each otherwhen edited later.
7 Click within the edit window to startinserting objects.
Cloning parts of an image
In PhotoImpact, cloning is the process of duplicating an object or parts ofan image and “painting” it over another part of an image. For instance, youcan remove an unseemly area by cloning over it parts of the backgroundlike stars in the sky. To select a tool, click the lower right corner of theClone Tool button on the Tool panel; a drawer of cloning tools opens andyou can select the clone tool you want to use.
The Clone Tool incorporates a set of cloning tools with different brush types. Theycopy part of an image to another area in the same image or to another image of thesame data type, allowing you to paint one person’s head onto another person’s body,for example. (You can only clone on Grayscale and True Color images.
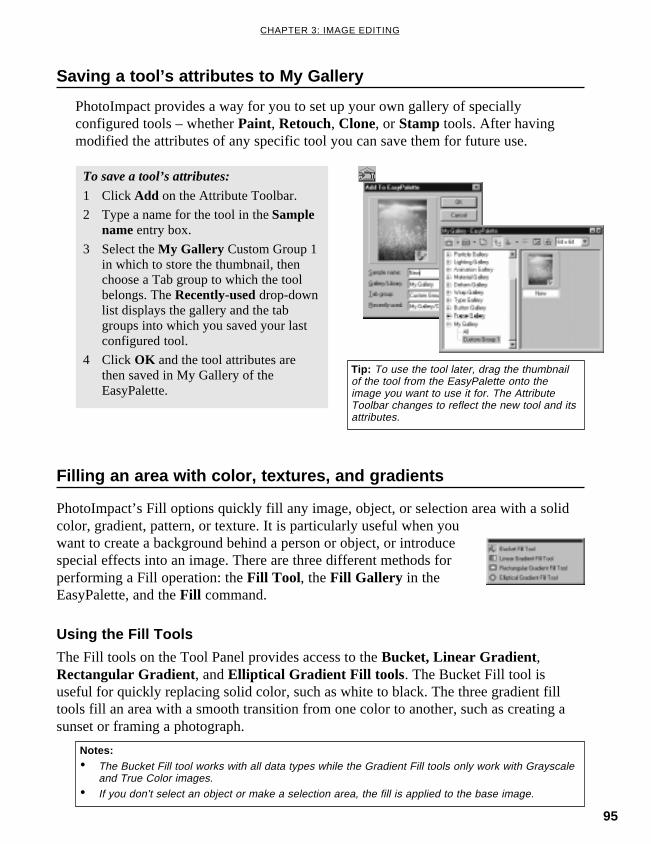
95
CHAPTER 3: IMAGE EDITING
Saving a tool’s attributes to My Gallery
PhotoImpact provides a way for you to set up your own gallery of speciallyconfigured tools – whether Paint, Retouch, Clone, or Stamp tools. After havingmodified the attributes of any specific tool you can save them for future use.
To save a tool’s attributes:
1 Click Add on the Attribute Toolbar.
2 Type a name for the tool in the Samplename entry box.
3 Select the My Gallery Custom Group 1in which to store the thumbnail, thenchoose a Tab group to which the toolbelongs. The Recently-used drop-downlist displays the gallery and the tabgroups into which you saved your lastconfigured tool.
4 Click OK and the tool attributes arethen saved in My Gallery of theEasyPalette.
Tip: To use the tool later, drag the thumbnailof the tool from the EasyPalette onto theimage you want to use it for. The AttributeToolbar changes to reflect the new tool and itsattributes.
Filling an area with color, textures, and gradients
PhotoImpact’s Fill options quickly fill any image, object, or selection area with a solidcolor, gradient, pattern, or texture. It is particularly useful when youwant to create a background behind a person or object, or introducespecial effects into an image. There are three different methods forperforming a Fill operation: the Fill Tool , the Fill Gallery in theEasyPalette, and the Fill command.
Using the Fill Tools
The Fill tools on the Tool Panel provides access to the Bucket, Linear Gradient,Rectangular Gradient, and Elliptical Gradient Fill tools . The Bucket Fill tool isuseful for quickly replacing solid color, such as white to black. The three gradient filltools fill an area with a smooth transition from one color to another, such as creating asunset or framing a photograph.
Notes:• The Bucket Fill tool works with all data types while the Gradient Fill tools only work with Grayscale
and True Color images.• If you don’t select an object or make a selection area, the fill is applied to the base image.
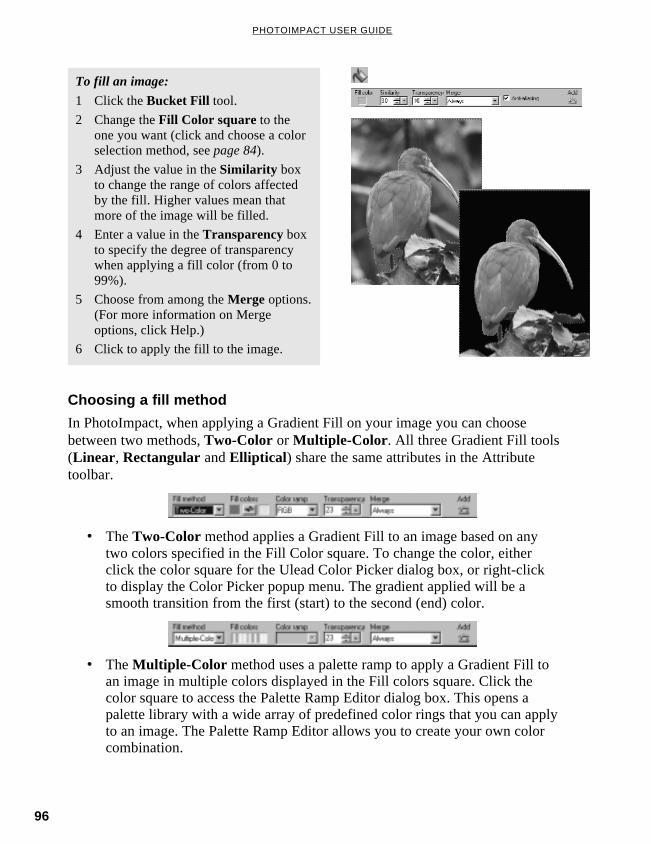
96
PHOTOIMPACT USER GUIDE
To fill an image:
1 Click the Bucket Fill tool.
2 Change the Fill Color square to theone you want (click and choose a colorselection method, see page 84).
3 Adjust the value in the Similarity boxto change the range of colors affectedby the fill. Higher values mean thatmore of the image will be filled.
4 Enter a value in the Transparency boxto specify the degree of transparencywhen applying a fill color (from 0 to99%).
5 Choose from among the Merge options.(For more information on Mergeoptions, click Help.)
6 Click to apply the fill to the image.
Choosing a fill method
In PhotoImpact, when applying a Gradient Fill on your image you can choosebetween two methods, Two-Color or Multiple-Color . All three Gradient Fill tools(Linear , Rectangular and Elliptical ) share the same attributes in the Attributetoolbar.
• The Two-Color method applies a Gradient Fill to an image based on anytwo colors specified in the Fill Color square. To change the color, eitherclick the color square for the Ulead Color Picker dialog box, or right-clickto display the Color Picker popup menu. The gradient applied will be asmooth transition from the first (start) to the second (end) color.
• The Multiple-Color method uses a palette ramp to apply a Gradient Fill toan image in multiple colors displayed in the Fill colors square. Click thecolor square to access the Palette Ramp Editor dialog box. This opens apalette library with a wide array of predefined color rings that you can applyto an image. The Palette Ramp Editor allows you to create your own colorcombination.

97
CHAPTER 3: IMAGE EDITING
To make a Two-Color gradient fill:
1 Click the Fill button and select any ofthe three gradient fill tools.
2 On the Attribute Toolbar, click the FillMethod and choose Two-Colorgradient fill.
3 Select the start and end fill colors in theFill Colors squares.
4 Click the point where you want the fillto start, and drag the mouse to the pointwhere you want it to end, then release.
Note: If you are using the Linear GradientTool, press SHIFT while dragging to constrainthe fill to a certain angle. If you are using theRectangular and Elliptical Gradient Tools,press SHIFT to create a square or circular fillrespectively.
To apply a Multiple-Color gradient fill onan image:
1 Click the Fill button and select any ofthe three gradient fill tools. Change theFill Method to Multiple-Color gradientfill.
2 Click the Fill Colors square. ThePalette Ramp Editor dialog box openswith the palette library displayingthumbnails of color rings.
3 Select a color ring on the thumbnaildisplayed. Right-click a specific controlpoint to adjust the color of the ring andselect Change Color. Click OK .
4 Enter a value from 0 to 359 in the HueShift box or click the color hue bar andselect the best color combination.
5 Enter a value from 0 to 359 in the Ringbox to adjust the rotation of the colorring. Click OK .
6 Click the point where you want the fillto start, and drag the mouse to the pointwhere you want it to end, then release.
Note: Click Add to save your customizedpalette ramp as a thumbnail in the PaletteRamp Editor dialog box.

98
PHOTOIMPACT USER GUIDE
Using the Fill command
The Fill [CTRL+F] command in the Edit menu gives you greater control over the fillprocess. It allows you to fill an image, object or selection area with either a color, animage from a file, or a texture. You can control exactly how the fill occurs and whatis used to fill the area in the Fill dialog box.
Filling an area with a texture
The Texture tab in the Fill dialog box contains Magic Texture fills (computergenerated) and Natural Texture fills (real-world textures such as wood grain, stone,and fabric). You can select either type from the Tab group drop-down list.
To change the Magic Texture:
1 Select a texture in the texture list boxand click the More button.
2 An array of thumbnails are displayed,where the center thumbnail representsthe current texture.
To change this texture, click any of theneighboring thumbnails. The thumbnailyou selected then replaces the centerone and the others are redrawnaccordingly.
3 Click OK to fill the base image orselection area with the new texture.
To change the Natural Texture:
1 Select a texture in the texture list boxand click More.
2 The Open dialog box opens listing allthe different Natural Texture files. Clickthe desired texture file.
3 Click Open and the selected file will bedisplayed on the Sample previewwindow.
4 Click OK to fill the base image orselection area with the new texture.
Fill - Magic Texture dialog box
Open dialog box for choosing your owntexture
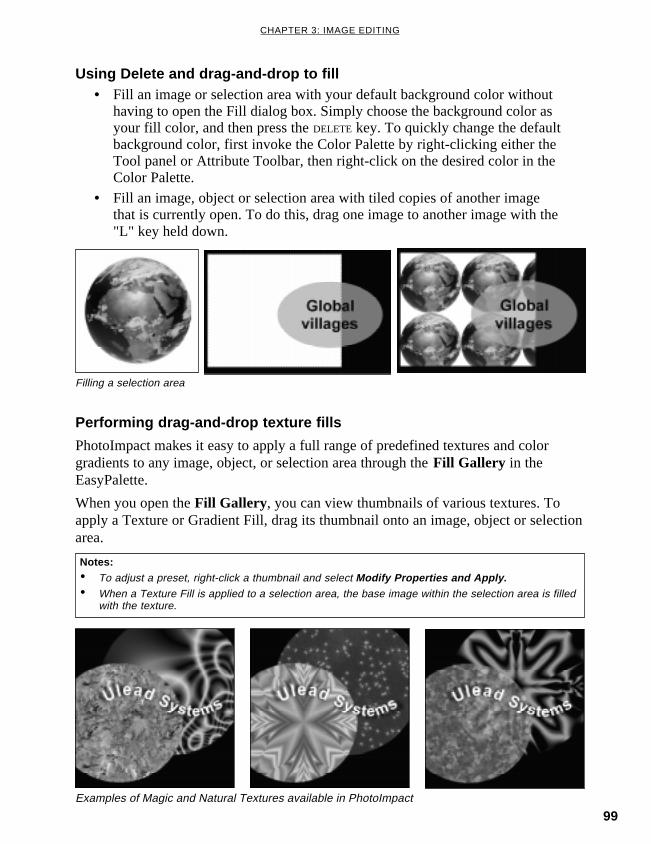
99
CHAPTER 3: IMAGE EDITING
Using Delete and drag-and-drop to fill• Fill an image or selection area with your default background color without
having to open the Fill dialog box. Simply choose the background color asyour fill color, and then press the DELETE key. To quickly change the defaultbackground color, first invoke the Color Palette by right-clicking either theTool panel or Attribute Toolbar, then right-click on the desired color in theColor Palette.
• Fill an image, object or selection area with tiled copies of another imagethat is currently open. To do this, drag one image to another image with the"L" key held down.
Performing drag-and-drop texture fills
PhotoImpact makes it easy to apply a full range of predefined textures and colorgradients to any image, object, or selection area through the Fill Gallery in theEasyPalette.
When you open the Fill Gallery , you can view thumbnails of various textures. Toapply a Texture or Gradient Fill, drag its thumbnail onto an image, object or selectionarea.
Notes:• To adjust a preset, right-click a thumbnail and select Modify Properties and Apply.• When a Texture Fill is applied to a selection area, the base image within the selection area is filled
with the texture.
Examples of Magic and Natural Textures available in PhotoImpact
Filling a selection area
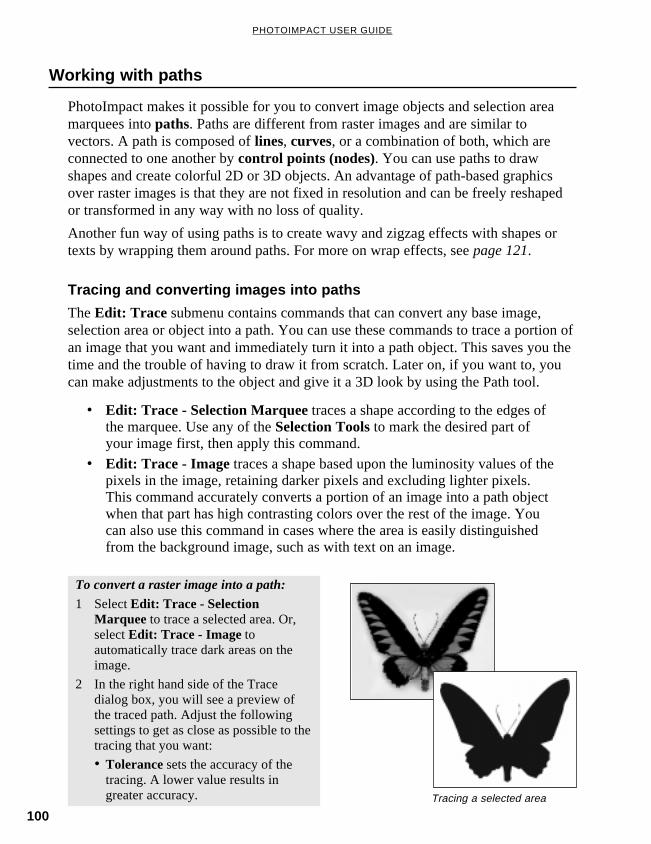
100
PHOTOIMPACT USER GUIDE
Working with paths
PhotoImpact makes it possible for you to convert image objects and selection areamarquees into paths. Paths are different from raster images and are similar tovectors. A path is composed of lines, curves, or a combination of both, which areconnected to one another by control points (nodes). You can use paths to drawshapes and create colorful 2D or 3D objects. An advantage of path-based graphicsover raster images is that they are not fixed in resolution and can be freely reshapedor transformed in any way with no loss of quality.
Another fun way of using paths is to create wavy and zigzag effects with shapes ortexts by wrapping them around paths. For more on wrap effects, see page 121.
Tracing and converting images into paths
The Edit: Trace submenu contains commands that can convert any base image,selection area or object into a path. You can use these commands to trace a portion ofan image that you want and immediately turn it into a path object. This saves you thetime and the trouble of having to draw it from scratch. Later on, if you want to, youcan make adjustments to the object and give it a 3D look by using the Path tool.
• Edit: Trace - Selection Marquee traces a shape according to the edges ofthe marquee. Use any of the Selection Tools to mark the desired part ofyour image first, then apply this command.
• Edit: Trace - Image traces a shape based upon the luminosity values of thepixels in the image, retaining darker pixels and excluding lighter pixels.This command accurately converts a portion of an image into a path objectwhen that part has high contrasting colors over the rest of the image. Youcan also use this command in cases where the area is easily distinguishedfrom the background image, such as with text on an image.
To convert a raster image into a path:
1 Select Edit: Trace - SelectionMarquee to trace a selected area. Or,select Edit: Trace - Image toautomatically trace dark areas on theimage.
2 In the right hand side of the Tracedialog box, you will see a preview ofthe traced path. Adjust the followingsettings to get as close as possible to thetracing that you want:
• Tolerance sets the accuracy of thetracing. A lower value results ingreater accuracy. Tracing a selected area

101
CHAPTER 3: IMAGE EDITING
• Jump point determines thesmoothness of the curves used fortracing. A lower value createssmoother curves.
• Threshold - Sets a luminance valuefor deciding which pixels to includein the trace. All pixels whoseluminance value falls below this areincluded.
3 After you have made your settings,click OK .
4 The traced path appears on top of theraster image, with deformation handlesvisible. Drag the handles to change thepath shape.
Tracing an image
Note: For more precise editing of the tracedpath, you can use the Path Edit Tool . Formore information on the Path Edit Tool, seepage 112.
Creating paths
The Path Tool provides four tools for you to create path objects and edit their shapes.To draw closed paths, use the Path Drawing Tool or Outline Drawing Tool. Use theLine and Arrow Tool to draw open paths. When you select one of these tools, theAttribute toolbar changes to give you the drawing options for that tool. The fourthone, Path Edit Tool, lets you easily adjust the shape of a path by giving you totalcontrol over the nodes, lines and curve segments that make up a path. (See thesection, “Editing paths”, on page 112 for details on how to edit paths.)
Examples of closed path and open path
When creating path objects, start with a True Color image file to apply 3D propertiesand other effects to your objects. If you open a new file with only 256 colors or less,you will be able to create 2D objects and selections only.
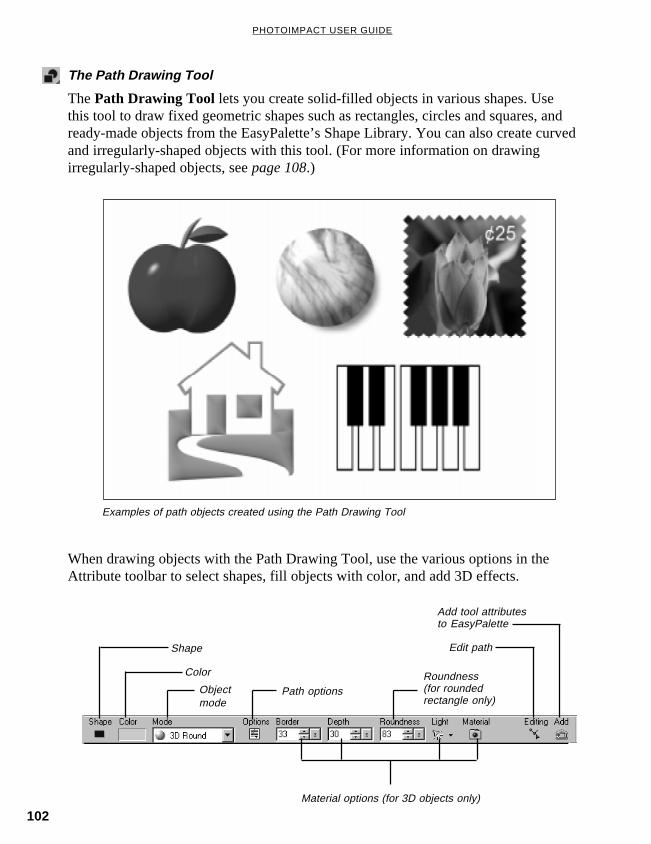
102
PHOTOIMPACT USER GUIDE
The Path Drawing Tool
The Path Drawing Tool lets you create solid-filled objects in various shapes. Usethis tool to draw fixed geometric shapes such as rectangles, circles and squares, andready-made objects from the EasyPalette’s Shape Library. You can also create curvedand irregularly-shaped objects with this tool. (For more information on drawingirregularly-shaped objects, see page 108.)
Examples of path objects created using the Path Drawing Tool
When drawing objects with the Path Drawing Tool, use the various options in theAttribute toolbar to select shapes, fill objects with color, and add 3D effects.
Path options
Shape
Color
Objectmode
Roundness(for roundedrectangle only)
Material options (for 3D objects only)
Edit path
Add tool attributesto EasyPalette
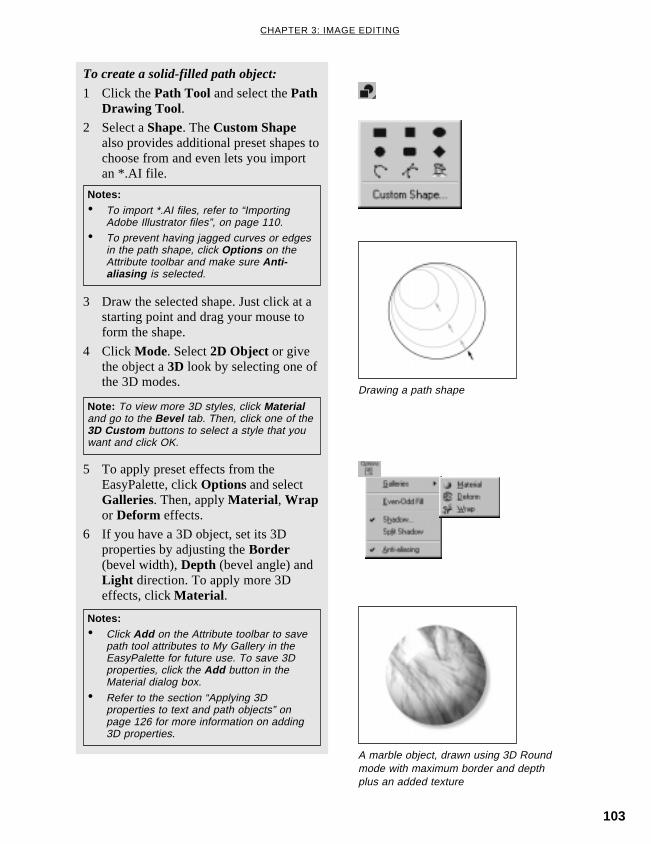
103
CHAPTER 3: IMAGE EDITING
5 To apply preset effects from theEasyPalette, click Options and selectGalleries. Then, apply Material , Wrapor Deform effects.
6 If you have a 3D object, set its 3Dproperties by adjusting the Border(bevel width), Depth (bevel angle) andLight direction. To apply more 3Deffects, click Material .
Notes:• To import *.AI files, refer to “Importing
Adobe Illustrator files”, on page 110.• To prevent having jagged curves or edges
in the path shape, click Options on theAttribute toolbar and make sure Anti-aliasing is selected.
Note: To view more 3D styles, click Materialand go to the Bevel tab. Then, click one of the3D Custom buttons to select a style that youwant and click OK.
To create a solid-filled path object:
1 Click the Path Tool and select the PathDrawing Tool.
2 Select a Shape. The Custom Shapealso provides additional preset shapes tochoose from and even lets you importan *.AI file.
3 Draw the selected shape. Just click at astarting point and drag your mouse toform the shape.
4 Click Mode. Select 2D Object or givethe object a 3D look by selecting one ofthe 3D modes.
Notes:• Click Add on the Attribute toolbar to save
path tool attributes to My Gallery in theEasyPalette for future use. To save 3Dproperties, click the Add button in theMaterial dialog box.
• Refer to the section “Applying 3Dproperties to text and path objects” onpage 126 for more information on adding3D properties.
A marble object, drawn using 3D Roundmode with maximum border and depthplus an added texture
Drawing a path shape

104
PHOTOIMPACT USER GUIDE
With the Path Drawing Tool, you can draw multiple path shapes and make them bepart of just one single object. Click Mode on the Attribute toolbar and selectContinue Draw Mode to draw multiple paths within an object. The figure belowshows an illustration.
Drawing multiple paths in Continue Draw Mode
Note: After drawing multiple paths in Continue Draw Mode, use the Path Edit Tool to group andorganize the paths. For more information, refer to the section “The Path Edit Tool” on page 112.
Drawing the first path
Final path object1
4
Drawing the second path
Drawing the final path3
2

105
CHAPTER 3: IMAGE EDITING
The Outline Drawing Tool
The Outline Drawing Tool draws similar shapes as the Path Drawing Tool, exceptthat it creates hollowed objects. Use this tool to create a path object with a hole at thecenter, for instance, a rectangular frame or a doughnut.
Sample outline path objects with 3D properties
The Attribute toolbar options of the Outline Drawing Tool are just about the same asthat of the Path Drawing Tool, but with additional settings for defining outline widthand style.
Path options
Outlineshape
Color
Objectmode
Roundness(for roundedrectangle only)
Material options (for 3D objects only)
Edit path
Add tool attributesto EasyPalette
Line width
Line style

106
PHOTOIMPACT USER GUIDE
To create an outline path:
1 Click the Path Tool and select theOutline Drawing Tool.
2 Click the Shape button, then select yourdesired outline shape.
Or, select Custom Shape... to select apreset shape from the Outline Library.Then, click the Custom Shape button inthe Shape menu.
Note: You can also import Adobe Illustrator*.AI files. For more information, refer to thesection “Importing Adobe Illustrator files”, onpage 110.
3 Draw the selected shape. Click at astarting point and drag your mouse toform the outline shape.
4 Click the Mode button and select 2DObject or any of the 3D object modes.
5 Click the Width and Style buttons tomodify the thickness of the outline andthe type of line to use.
6 Click the Color box to modify thecolor, apply Gradient or Texture fills, oradd a Fadeout effect.
7 Click Options, then select Anti-aliasing to have smoother edges orcurves, add Shadow or select Materialto apply preset 3D effects from theEasyPalette’s Material Gallery.
8 If you have a 3D outline object, adjustits Border (bevel width), Depth (bevelangle) and Light direction. To addtransparency and apply other 3Dproperties, click Material .
Notes:• Click Add on the Attribute toolbar to save
path tool attributes to My Gallery in theEasyPalette for future use. To save 3Dproperties, click the Add button in theMaterial dialog box.
• Refer to the section “Applying 3Dproperties to text and path objects” onpage 126 for more information on adding3D properties.
A jade bracelet, drawn using an ellipticaloutline shape with added texture and light
1
3
2
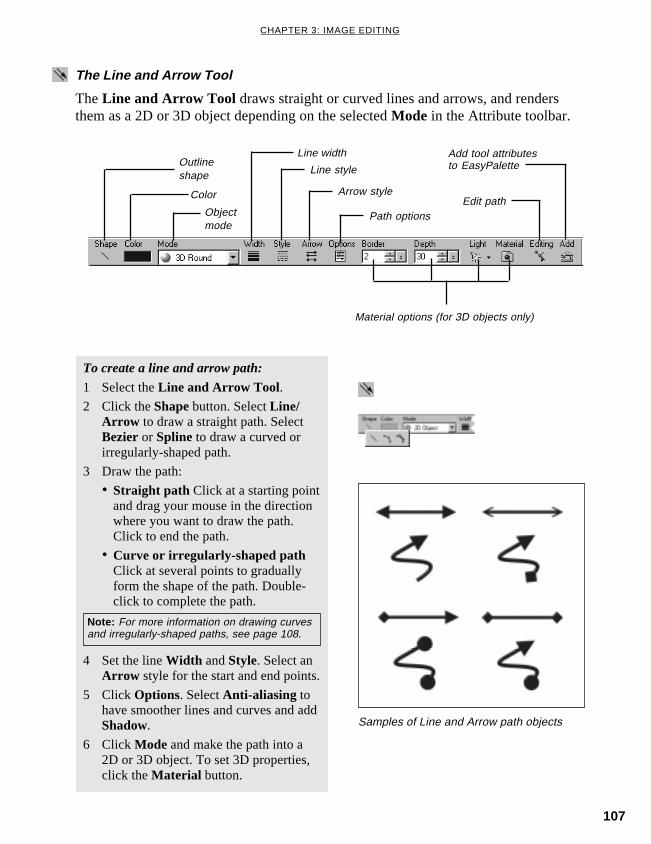
107
CHAPTER 3: IMAGE EDITING
The Line and Arrow Tool
The Line and Arrow Tool draws straight or curved lines and arrows, and rendersthem as a 2D or 3D object depending on the selected Mode in the Attribute toolbar.
To create a line and arrow path:
1 Select the Line and Arrow Tool .2 Click the Shape button. Select Line/
Arrow to draw a straight path. SelectBezier or Spline to draw a curved orirregularly-shaped path.
3 Draw the path:
• Straight path Click at a starting pointand drag your mouse in the directionwhere you want to draw the path.Click to end the path.
• Curve or irregularly-shaped pathClick at several points to graduallyform the shape of the path. Double-click to complete the path.
Note: For more information on drawing curvesand irregularly-shaped paths, see page 108.
4 Set the line Width and Style. Select anArrow style for the start and end points.
5 Click Options. Select Anti-aliasing tohave smoother lines and curves and addShadow.
6 Click Mode and make the path into a2D or 3D object. To set 3D properties,click the Material button.
Samples of Line and Arrow path objects
Path options
Outlineshape
Color
Objectmode
Material options (for 3D objects only)
Edit path
Add tool attributesto EasyPalette
Line width
Line style
Arrow style

108
PHOTOIMPACT USER GUIDE
Drawing curves and irregularly-shaped paths
Select the Spline tool or Bezier/Polygon tool from the Shape menu on the Attributetoolbar to draw curves and irregularly-shaped path objects.
By default, the Spline tool draws curves and the Bezier/Polygon tool draws straightline segments, but actually, either one can be used to draw curved and linear paths.For smoother mouse control, however, it is advisable to use the Spline tool whendrawing paths that consist of more curves than straight lines. It would also be mucheasier to use the Bezier/Polygon tool for drawing paths that contain more linesegments than curves.
To draw a path using the Spline Tool:
1 Click the Path Tool button and select adrawing tool.
2 Click Shape on the Attribute toolbar,then click Spline in the shape menu.
3 Click at a position in the edit windowwhere you want the path to begin. Astart node appears.
4 Position the cursor where you want thefirst segment to end, then click.
5 Move the cursor around. Notice that thesegment smoothly bends into a curveusing the node as a reference point.
6 Continue clicking and moving yourmouse until you have created the desiredshape. The path automatically curvesbased on the position of the nodes.
7 Double-click to complete the path.
Note: To draw a straight line segment within a path, hold down the CTRL key while you click on the startand end positions of the line segment.
Solid-filled Outline Line and Arrow path path path
Drawing a line segment with the Spline tool
[Ctrl + Click] atthe start of theline segment
1
3
2
[Ctrl +Click] atthe end of theline segment

109
CHAPTER 3: IMAGE EDITING
Notes:• To limit the angle between segments in 45 degrees, hold down the SHIFT key as you draw.• Press the BACKSPACE key to remove the previous curve or line segment drawn.• Use the same drawing procedures given in this section when drawing open-path lines and curves
with the Line and Arrow Tool.
To draw a path with the Bezier/Polygon tool:
1 Click the Path Tool button and select adrawing tool.
2 Click the Shape button, then clickBezier/Polygon in the shape menu.
3 Click at the position where to start a linesegment. A node appears. Move thecursor in the direction where you wantthe line to be drawn.
4 Continue clicking and moving thecursor around until you have created thedesired shape.
5 Double-click to complete the path.
Notes:• To draw a curve segment, click and drag in
one direction at the starting position, thenclick and drag in the opposite direction atthe end position of the segment. (Seefigure below.)
• To draw an “S” curve segment, click anddrag your mouse in the same directionswhen starting and ending the segment.(See figure below at the right.)
Solid-filled Outline Line and Arrow path path path
Startnode
Drag mousedownwards
Drawing a curve with the Bezier/Polygon tool
Drag mousedownwards
Result
Drawing an “S” curve with the Bezier/Polygon tool
1 2
3
Endnode
Drag mouseupwards
Result
Endnode
Drag mousedownwards
1
3
2 1
3
2
Startnode

110
PHOTOIMPACT USER GUIDE
Importing Adobe Illustrator files
You can import vector graphics created in Adobe Illustrator into PhotoImpact. Youcan directly use them as path objects or further edit them.
To import Adobe Illustrator files:
1 Click the Path Tool button, then selectthe Path Drawing Tool or OutlineDrawing Tool.
2 Select Custom Shape... in the Shapemenu. The Custom Shape dialog boxopens displaying preset objects.
3 Click the Import button. The Input AIfile dialog box opens.
4 Select an *.AI file to import and clickOpen. The selected *.AI file is added tothe selected gallery in the CustomShape dialog box.
5 Select the object and click OK .
6 Click and drag your mouse to draw theobject. The vector-based illustrationnow appears, allowing you to easilymanipulate it using the Path DrawingTool, Outline Drawing Tool, Path EditTool, or the Bezier Curve Tool. (Thefunctions of each are discussed onpages 102, 105, 112 and 115respectively.)
Custom Shape dialog box
Import File dialog box
Note: Only closed path shapes and single-path outlines can be imported from AdobeIllustrator.
Filling a path with the Even-Odd Fill option
Whenever you render a path object, the object is always filled with the color specifiedin the Color square on the Attribute toolbar. Using the Even-Odd Fill option in theOptions menu, you can determine how this fill takes place.
• When the Even-Odd Fill optionis selected, the fill only occupiesthose areas that are notoverlapped by the path(s). Thisoption is ideal to use when youhave an irregularly-shapedobject which folds over onto

111
CHAPTER 3: IMAGE EDITING
itself or a complex objectcontaining multiple shapesinside, and you want to keepoverlapping areas free of paint.For instance, you can easilycreate a pattern with alternatingfills. The parts that are not filledwill show the base image.
This alternate filling effect canonly be applied to path objectsthat were drawn in ContinueDraw Mode using the PathDrawing Tool. (For informationon Continue Draw Mode, referto the section “The PathDrawing Tool” on page 102.)
• If left cleared, the fill occupiesthe entire interior of the objectirregardless of whether pathsoverlap or not.
Without Even-Odd fill
With Even-Odd fill
Note: When the Even-Odd Fill option is notselected, overlapping areas may still becleared, depending on how the path wasdrawn. If the path’s inner curve or linesegments were drawn in the opposite directionas the outer segments, overlapping regions willnot be filled. See the sample figures below foran illustration.
Multiple paths drawn inContinue Draw Mode
ResultResult
Inner pathshapes drawnin the oppositedirection asthe outershape
Inner pathshapes drawnin the samedirection as theouter shape
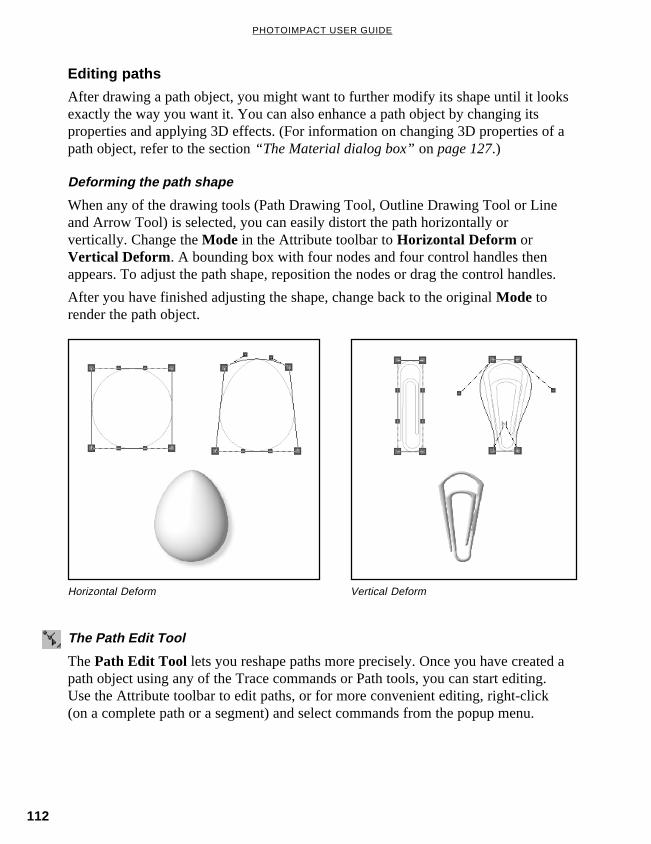
112
PHOTOIMPACT USER GUIDE
Horizontal Deform Vertical Deform
Editing paths
After drawing a path object, you might want to further modify its shape until it looksexactly the way you want it. You can also enhance a path object by changing itsproperties and applying 3D effects. (For information on changing 3D properties of apath object, refer to the section “The Material dialog box” on page 127.)
Deforming the path shape
When any of the drawing tools (Path Drawing Tool, Outline Drawing Tool or Lineand Arrow Tool) is selected, you can easily distort the path horizontally orvertically. Change the Mode in the Attribute toolbar to Horizontal Deform orVertical Deform . A bounding box with four nodes and four control handles thenappears. To adjust the path shape, reposition the nodes or drag the control handles.
After you have finished adjusting the shape, change back to the original Mode torender the path object.
The Path Edit Tool
The Path Edit Tool lets you reshape paths more precisely. Once you have created apath object using any of the Trace commands or Path tools, you can start editing.Use the Attribute toolbar to edit paths, or for more convenient editing, right-click(on a complete path or a segment) and select commands from the popup menu.

113
CHAPTER 3: IMAGE EDITING
Reshaping acurve segment
Convert to line
Toggle between objectand path edit modes
Pick point
Duplicate, Delete, Align, and Group/Ungroup paths(only used for editing multiple-path objects that weredrawn using Path Drawing Tool’s Continue Draw Mode)
Switch to thecorrespondingdrawing tool
Add tool attributes toMy Gallery in theEasyPalette
Add point
Deletepoint
Convert to curve
Non-free edit
Free edit
Edit point buttons:
Convert line buttons:
Edit mode buttons:
To edit a path object:
1 Click the Path Edit Tool button. Then,click the Toggle button to switch frompath object mode to path edit mode (orclick the path object). Path nodes andsegments then appear.
Notes:To easily change between the Path Edit Tooland the drawing tool which you used to createthe object:
• Click the Edit button on the Attributetoolbar.
• Right-click the object. From the popupmenu, select Edit Path to switch to thePath Edit Tool or select Edit Attributes toreturn to the drawing tool.
2 To edit the path, start by moving thenodes. Click and drag the nodes toreposition them.
3 Reshape a curve segment by clickingany of its two end nodes. At most, twocontrol handles will appear on theselected node. Drag a handle to adjustthe shape of the curve.
Use the Edit mode buttons to changethe way control handles affect curvesegments.
Path object mode
Path edit mode
Moving path nodes
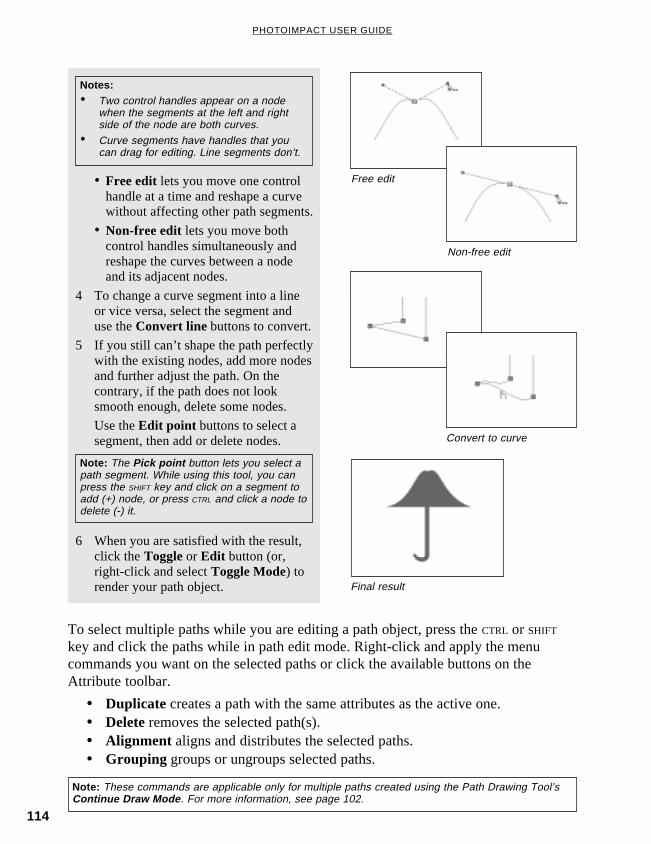
114
PHOTOIMPACT USER GUIDE
• Free edit lets you move one controlhandle at a time and reshape a curvewithout affecting other path segments.
• Non-free edit lets you move bothcontrol handles simultaneously andreshape the curves between a nodeand its adjacent nodes.
4 To change a curve segment into a lineor vice versa, select the segment anduse the Convert line buttons to convert.
5 If you still can’t shape the path perfectlywith the existing nodes, add more nodesand further adjust the path. On thecontrary, if the path does not looksmooth enough, delete some nodes.
Use the Edit point buttons to select asegment, then add or delete nodes.
Note: The Pick point button lets you select apath segment. While using this tool, you canpress the SHIFT key and click on a segment toadd (+) node, or press CTRL and click a node todelete (-) it.
6 When you are satisfied with the result,click the Toggle or Edit button (or,right-click and select Toggle Mode) torender your path object. Final result
Free edit
Non-free edit
Notes:• Two control handles appear on a node
when the segments at the left and rightside of the node are both curves.
• Curve segments have handles that youcan drag for editing. Line segments don’t.
Convert to curve
To select multiple paths while you are editing a path object, press the CTRL or SHIFT
key and click the paths while in path edit mode. Right-click and apply the menucommands you want on the selected paths or click the available buttons on theAttribute toolbar.
• Duplicate creates a path with the same attributes as the active one.• Delete removes the selected path(s).• Alignment aligns and distributes the selected paths.• Grouping groups or ungroups selected paths.
Note: These commands are applicable only for multiple paths created using the Path Drawing Tool’sContinue Draw Mode . For more information, see page 102.
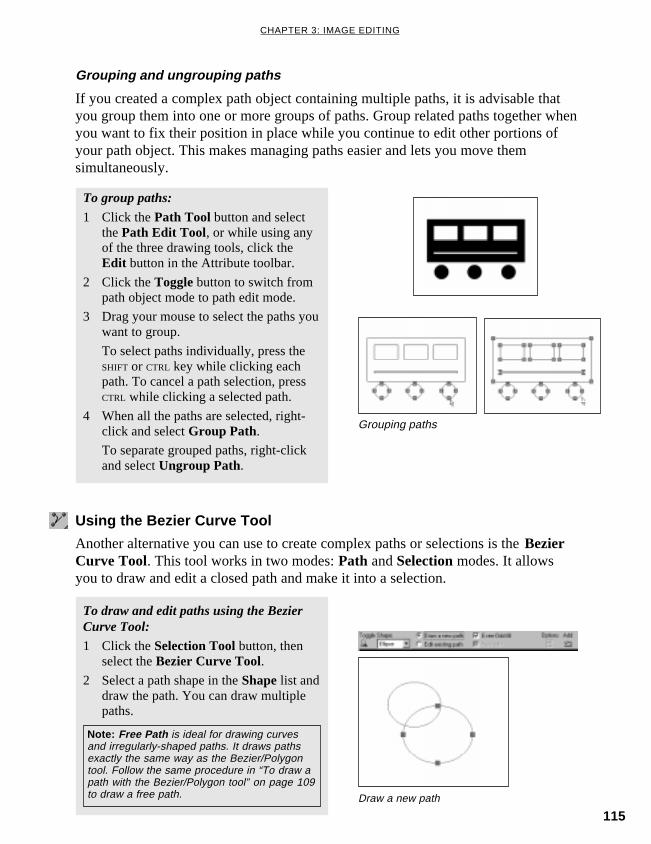
115
CHAPTER 3: IMAGE EDITING
Using the Bezier Curve Tool
Another alternative you can use to create complex paths or selections is the BezierCurve Tool. This tool works in two modes: Path and Selection modes. It allowsyou to draw and edit a closed path and make it into a selection.
To draw and edit paths using the BezierCurve Tool:
1 Click the Selection Tool button, thenselect the Bezier Curve Tool.
2 Select a path shape in the Shape list anddraw the path. You can draw multiplepaths.
Note: Free Path is ideal for drawing curvesand irregularly-shaped paths. It draws pathsexactly the same way as the Bezier/Polygontool. Follow the same procedure in “To draw apath with the Bezier/Polygon tool” on page 109to draw a free path. Draw a new path
Grouping and ungrouping paths
If you created a complex path object containing multiple paths, it is advisable thatyou group them into one or more groups of paths. Group related paths together whenyou want to fix their position in place while you continue to edit other portions ofyour path object. This makes managing paths easier and lets you move themsimultaneously.
To group paths:
1 Click the Path Tool button and selectthe Path Edit Tool, or while using anyof the three drawing tools, click theEdit button in the Attribute toolbar.
2 Click the Toggle button to switch frompath object mode to path edit mode.
3 Drag your mouse to select the paths youwant to group.
To select paths individually, press theSHIFT or CTRL key while clicking eachpath. To cancel a path selection, pressCTRL while clicking a selected path.
4 When all the paths are selected, right-click and select Group Path.
To separate grouped paths, right-clickand select Ungroup Path.
Grouping paths

116
PHOTOIMPACT USER GUIDE
3 To edit the path(s) you have just drawn,select the Edit existing path option.
4 Click a path segment, then click theOptions menu and select Convert tocurve or Convert to line to change aline segment into a curve or vice versa.
5 Click a node to show control handlesand adjust path segments. Use the Freeedit option to determine how to adjusttwo connected path segments.
6 Double-click to complete the path.
7 Finally, to make the path(s) into a pathobject, click the Path Tool and selectthe Path Drawing Tool. Then, clickMode and render as a 2D object orchoose any of the 3D modes.
Notes:• The Free edit option works the same way
as the Edit mode buttons of the Path EditTool . See page 112 for information.
• How color fills overlapping paths isdetermined by the Even-Odd fill option.See “Filling a path with the Even-Odd Filloption” on page 110 for more details.
• To delete a node, click Options and selectDelete Point . Nodes cannot be added to apath with the Bezier Curve.
Edit an existing path
Without Even-Odd fill
With Even-Odd fill
Note: The Bezier Curve Tool can be used toedit paths that were created with the Pathtools. While the Path tool is selected, set thepath’s Mode to Selection . Then, change to theBezier Curve Tool and click Toggle to switchto path edit mode and edit the path.
To make the path into a selection:
Click the Toggle button in the BezierCurve Tool’s Attribute toolbar. Thisbutton lets you switch between path andselection modes.
Making the path into a selection
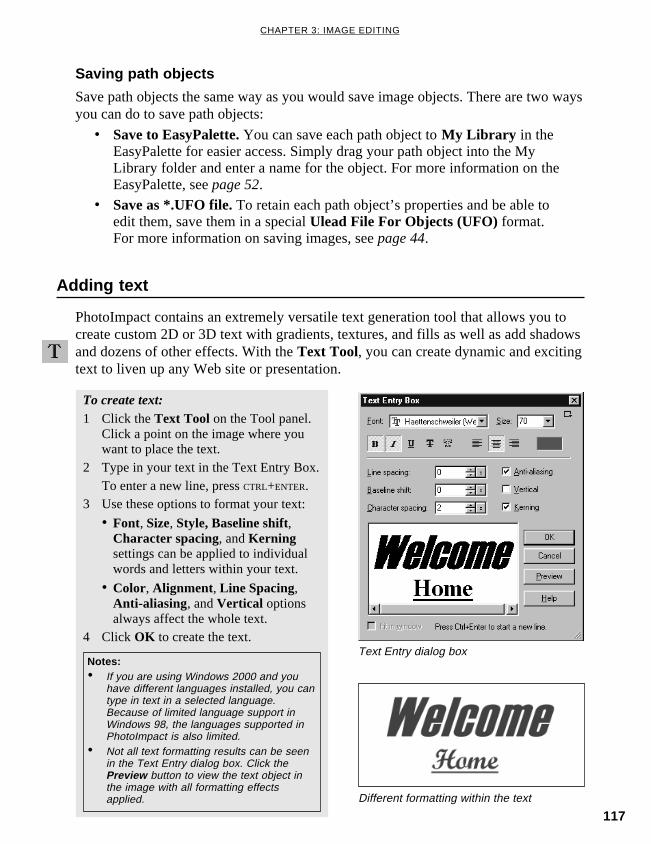
117
CHAPTER 3: IMAGE EDITING
Text Entry dialog box
Different formatting within the text
Adding text
To create text:1 Click the Text Tool on the Tool panel.
Click a point on the image where youwant to place the text.
2 Type in your text in the Text Entry Box.To enter a new line, press CTRL+ENTER.
3 Use these options to format your text:
• Font, Size, Style, Baseline shift,Character spacing, and Kerningsettings can be applied to individualwords and letters within your text.
• Color, Alignment, Line Spacing,Anti-aliasing, and Vertical optionsalways affect the whole text.
4 Click OK to create the text.
PhotoImpact contains an extremely versatile text generation tool that allows you tocreate custom 2D or 3D text with gradients, textures, and fills as well as add shadowsand dozens of other effects. With the Text Tool, you can create dynamic and excitingtext to liven up any Web site or presentation.
Notes:• If you are using Windows 2000 and you
have different languages installed, you cantype in text in a selected language.Because of limited language support inWindows 98, the languages supported inPhotoImpact is also limited.
• Not all text formatting results can be seenin the Text Entry dialog box. Click thePreview button to view the text object inthe image with all formatting effectsapplied.
Saving path objects
Save path objects the same way as you would save image objects. There are two waysyou can do to save path objects:
• Save to EasyPalette. You can save each path object to My Library in theEasyPalette for easier access. Simply drag your path object into the MyLibrary folder and enter a name for the object. For more information on theEasyPalette, see page 52.
• Save as *.UFO file. To retain each path object’s properties and be able toedit them, save them in a special Ulead File For Objects (UFO) format.For more information on saving images, see page 44.
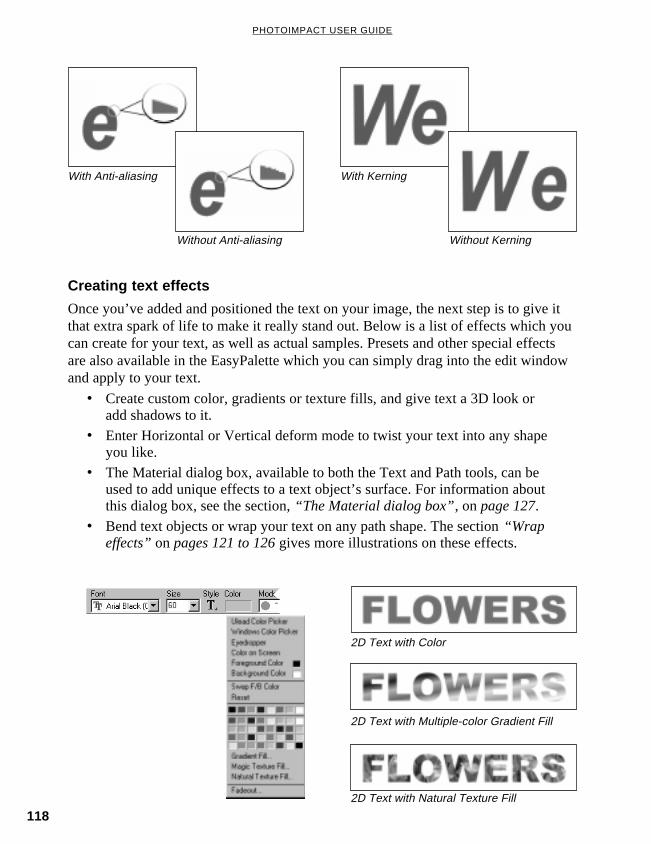
118
PHOTOIMPACT USER GUIDE
Creating text effects
Once you’ve added and positioned the text on your image, the next step is to give itthat extra spark of life to make it really stand out. Below is a list of effects which youcan create for your text, as well as actual samples. Presets and other special effectsare also available in the EasyPalette which you can simply drag into the edit windowand apply to your text.
• Create custom color, gradients or texture fills, and give text a 3D look oradd shadows to it.
• Enter Horizontal or Vertical deform mode to twist your text into any shapeyou like.
• The Material dialog box, available to both the Text and Path tools, can beused to add unique effects to a text object’s surface. For information aboutthis dialog box, see the section, “The Material dialog box”, on page 127.
• Bend text objects or wrap your text on any path shape. The section “Wrapeffects” on pages 121 to 126 gives more illustrations on these effects.
2D Text with Color
2D Text with Multiple-color Gradient Fill
2D Text with Natural Texture Fill
With Anti-aliasing
Without Anti-aliasing
With Kerning
Without Kerning

119
CHAPTER 3: IMAGE EDITING
Text with Shadow
3D Text with Bevel
3D Text with more advanced 3D properties(with light and shading properties applied)
Material dialog box: Shading tab
Shadow dialog box

120
PHOTOIMPACT USER GUIDE
Editing text as a path object
If you want to make wild changes to individual letters in your text, PhotoImpact givesyou a way of turning your text into a path object. Each letter in the text will beconverted to a closed path, which you can easily reshape using the Path Edit Tool.Take note, however, that paths cannot be converted back into text. The text propertiesare lost and you cannot further modify the text’s contents and settings.
To edit text as a path object:
1 Click the Text Tool. Enter your text andselect options for formatting your text.
2 Select Object: Convert Object Type -From Text To Path. Notice that thetext attributes are grayed out in theAttribute toolbar after your text hasbeen converted into a path object.
3 Click Path Tool, then select the PathEdit Tool.
4 Click the Toggle button to switch frompath object mode to path edit mode (orclick the path object).
5 Adjust the path nodes and segments ineach path the way you want it.
6 Change to the Path Drawing Tool. Inthe Mode list, select one of the 3Doptions to give the path object a 3Dlook. Click the Material button to applymore 3D effects to the path object.
Note: See pages 112 to 115 for moreinformation on editing path objects.
Original text
Editing text as a path object
Result
Horizontal Deform Vertical Deform

121
CHAPTER 3: IMAGE EDITING
Wrap effects
Wrap effects make objects appear in unique formations by making them follow thepath of a shape. In previous versions of PhotoImpact, ready-to-use wrap effects wereprovided in the EasyPalette which can be directly applied to text and path objects. Inaddition to these presets, PhotoImpact now allows you to create your own wrapeffects just the way you want it.
Applying wrap effects from the EasyPalette
Just like in previous PhotoImpact versions, preset wrap effects are found in the WrapGallery of the EasyPalette.
Applying special effects to text
EasyPalette’s Type Gallery provides special text effects which are far morepowerful than the Text and Path tools. You can apply glass-like or metallic effects, aswell as add snow, fire, holes, neon glows, and more.
To apply a special effect to text:
1 Click the Text Tool on the Tool panel.Enter your text and click OK .
2 On the Attribute toolbar, adjust theFont, Size and Color of the selectedtext.
3 Click the EasyPalette button on theStandard toolbar to open the galleriesand libraries.
4 Select Type Gallery and choose theeffect thumbnail you want.
5 Drag or double-click to apply the effectto the text.
Chisel
Fire
Original text
Notes:• The text becomes an image object once a
type effect has been applied. You will notbe able to further edit the text attributes.
• You can also select Effect: Creative -Type Effect to apply type effects to text.

122
PHOTOIMPACT USER GUIDE
To apply a wrap effect from theEasyPalette:
1 Create a text or path object.
2 Click the Galleries button in theEasyPalette, then double-click WrapGallery.
The Wrap Gallery that opens allows youto apply Bend Text, Text Wrap, andPath Wrap effects to both text and pathobjects.
3 Choose the effect you want and drag ordouble-click to apply the effect.
Creating your own wrap effects
In the Object: Wrap submenu, there are two available commands which can be usedto create wrap effects:
• Add Text to Active Pathcreates text on a path. Use anyof the Path Tools to draw a path,then click this command to entertext and place it on the path.
• Fit Together wraps a text orpath object over another path.Select the object and the path onwhich to wrap, then click thiscommand to combine them.
When you wrap a path objectover another path, PhotoImpactautomatically makes manyduplicates of the object and linesthem up over the path.
Path Wrap
Text Wrap
Adding text to a pathNotes:• Outline path as well as line and arrow path
objects cannot be wrapped over a path.
• The path on which objects wrap can be ofany type (solid-filled paths, outline paths,or line and arrow paths).

123
CHAPTER 3: IMAGE EDITING
Different Start height and End height
Modifying wrap effects
PhotoImpact now allows you to change the way an object wraps. You can wrap asingle object only, or create many duplicates of it and wrap them on a path. You canalso deform the objects and make them smoothly follow the shape of their path.
Use the Wrap dialog box to change an object’s wrap properties. To access thisdialog box, you can:
• Select the wrapped object, then select Object: Wrap - Properties;
• Right-click on a wrapped object and select Wrap: Properties from thepopup menu; Or,
• Before applying a preset wrap effect from the EasyPalette, modify itsproperties first. Right-click on an effect thumbnail in the Wrap Gallery andselect Modify Properties and Apply.
To change wrap properties:
1 In the Repeat section of the Wrapdialog box, specify whether or not tomake duplicates of the object.
• Automatic determines the number ofduplicates automatically.
• Count sets the number of duplicatesyou want to create.
• Spacing sets the distance betweentext or duplicated objects.
• Stretch to fit, when selected, furtheradjusts the spacing and makes theobject(s) the same length as the path.
2 Make the Start height setting largerthan the End height, or vice versa, tosomewhat give perspective to theobjects. Entering negative values forboth options will turn the objects upsidedown.
Type in “100” for both the beginningand end height to set the objects back totheir normal orientation and size.
3 By default, the objects start to wrap atthe tip of a path. Enter a higher value inthe Start position entry box to shift theobjects along the path.
Stretch to fit
Duplicating the wrappedobject

124
PHOTOIMPACT USER GUIDE
4 The Baseline option determines whichside on a path the objects wrap. Forinstance, you can set the value to “0” toplace the objects on top of its path, “50”to place them at the middle, or “100” toplace them below the path (or inside apath shape).
5 Select Advanced style options tofurther adjust the objects and makethem smoothly follow the shape of thepath.
• Fit text position to path lines up theobjects, with their base rested on thepath.
• Distort text to fit path adjusts theobjects so that they conform to theshape of the path.
• Mitre joint smoothly wraps objectsaround path edges.
• Vertical , when selected, uses the leftside of the objects as wrappingreference.
Notes:• When the Automatic option is selected
and you have a text object, the lastduplicate might be truncated if it cannot fiton the path. If this happens, try to reducethe number of duplicates.
• The Baseline setting can only be adjustedfor path objects. This option is disabledwhen you have a text object.
• Click the Add button in the Wrap dialogbox to save a wrap effect to My Gallery inthe EasyPalette.
Objects at different sides of the baseline
Fitting text positionto path
Without fitting textposition to path
Vertical wrapping
Distorting textto fit path
Without distorting text
With Mitrejoint
Without Mitre joint
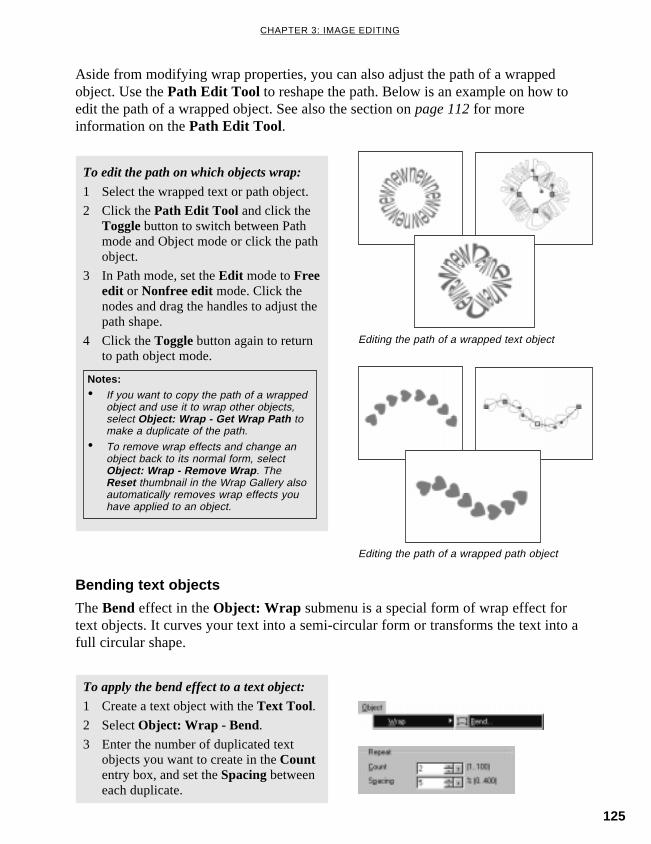
125
CHAPTER 3: IMAGE EDITING
Aside from modifying wrap properties, you can also adjust the path of a wrappedobject. Use the Path Edit Tool to reshape the path. Below is an example on how toedit the path of a wrapped object. See also the section on page 112 for moreinformation on the Path Edit Tool.
To edit the path on which objects wrap:
1 Select the wrapped text or path object.
2 Click the Path Edit Tool and click theToggle button to switch between Pathmode and Object mode or click the pathobject.
3 In Path mode, set the Edit mode to Freeedit or Nonfree edit mode. Click thenodes and drag the handles to adjust thepath shape.
4 Click the Toggle button again to returnto path object mode.
Notes:• If you want to copy the path of a wrapped
object and use it to wrap other objects,select Object: Wrap - Get Wrap Path tomake a duplicate of the path.
• To remove wrap effects and change anobject back to its normal form, selectObject: Wrap - Remove Wrap . TheReset thumbnail in the Wrap Gallery alsoautomatically removes wrap effects youhave applied to an object.
Bending text objects
The Bend effect in the Object: Wrap submenu is a special form of wrap effect fortext objects. It curves your text into a semi-circular form or transforms the text into afull circular shape.
Editing the path of a wrapped text object
Editing the path of a wrapped path object
To apply the bend effect to a text object:
1 Create a text object with the Text Tool.2 Select Object: Wrap - Bend.
3 Enter the number of duplicated textobjects you want to create in the Countentry box, and set the Spacing betweeneach duplicate.
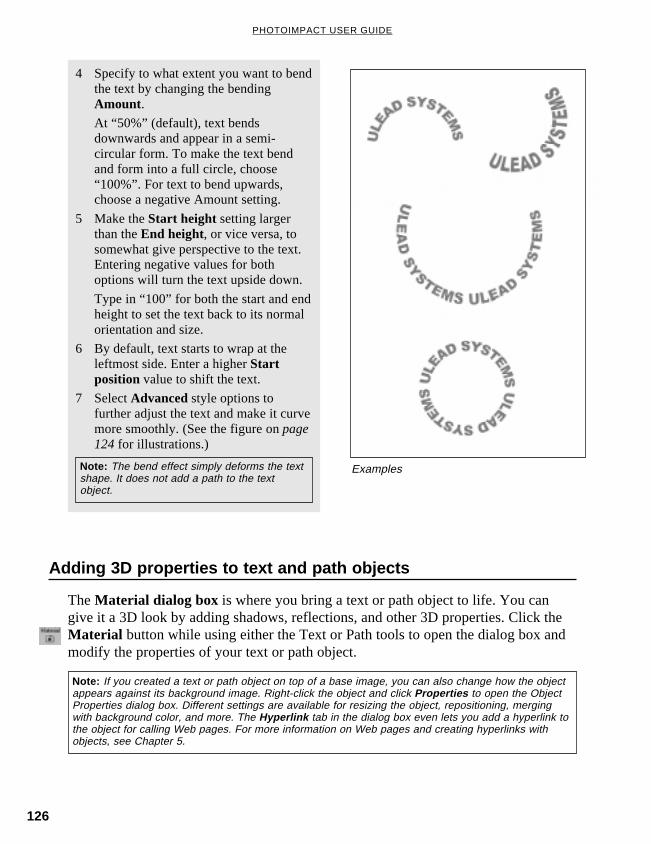
126
PHOTOIMPACT USER GUIDE
Note: The bend effect simply deforms the textshape. It does not add a path to the textobject.
4 Specify to what extent you want to bendthe text by changing the bendingAmount.At “50%” (default), text bendsdownwards and appear in a semi-circular form. To make the text bendand form into a full circle, choose“100%”. For text to bend upwards,choose a negative Amount setting.
5 Make the Start height setting largerthan the End height, or vice versa, tosomewhat give perspective to the text.Entering negative values for bothoptions will turn the text upside down.
Type in “100” for both the start and endheight to set the text back to its normalorientation and size.
6 By default, text starts to wrap at theleftmost side. Enter a higher Startposition value to shift the text.
7 Select Advanced style options tofurther adjust the text and make it curvemore smoothly. (See the figure on page124 for illustrations.)
Adding 3D properties to text and path objects
The Material dialog box is where you bring a text or path object to life. You cangive it a 3D look by adding shadows, reflections, and other 3D properties. Click theMaterial button while using either the Text or Path tools to open the dialog box andmodify the properties of your text or path object.
Note: If you created a text or path object on top of a base image, you can also change how the objectappears against its background image. Right-click the object and click Properties to open the ObjectProperties dialog box. Different settings are available for resizing the object, repositioning, mergingwith background color, and more. The Hyperlink tab in the dialog box even lets you add a hyperlink tothe object for calling Web pages. For more information on Web pages and creating hyperlinks withobjects, see Chapter 5.
Examples

127
CHAPTER 3: IMAGE EDITING
The figure below shows an example of a path object drawn using the Path DrawingTool and then further enhanced by applying 3D properties.
The Material dialog box
This section briefly describes the different tabs in the Material dialog box. Forinformation on the various options in each tab, click the Help button in the Materialdialog box.
Roundedrectangle
A 3D path object created by using simple shapes and applying 3D properties
Final 3D path object
3D Round withtransparency
Final editedshape
Ellipse 3D Pipe withtransparency
Duplicatedshapes
Roundedrectangle
3D Round withthin border
Final editedshape
Rectangle Continue Draw Final shape
Circle 3D Chisel withthin border
With bump map
Material dialog box
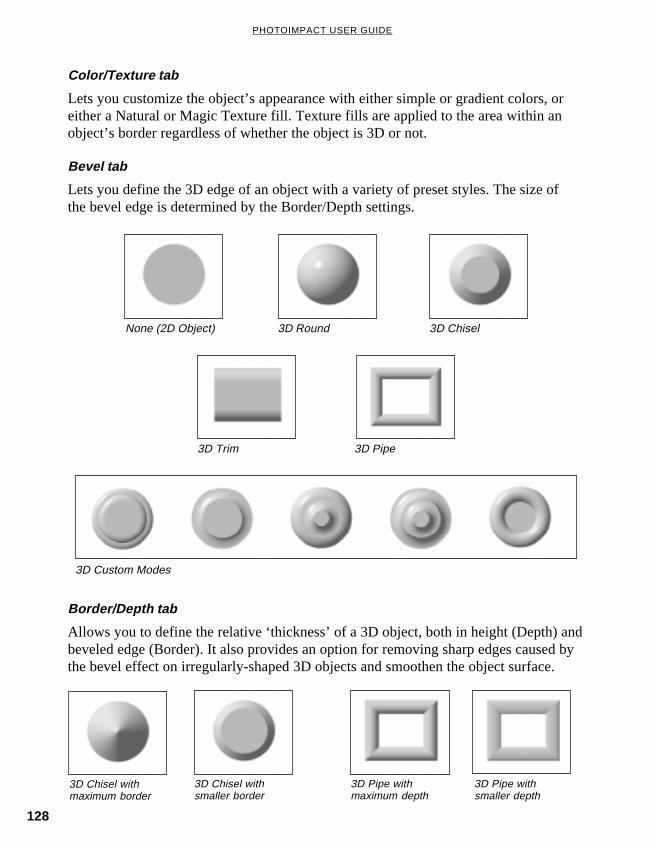
128
PHOTOIMPACT USER GUIDE
Color/Texture tab
Lets you customize the object’s appearance with either simple or gradient colors, oreither a Natural or Magic Texture fill. Texture fills are applied to the area within anobject’s border regardless of whether the object is 3D or not.
Bevel tab
Lets you define the 3D edge of an object with a variety of preset styles. The size ofthe bevel edge is determined by the Border/Depth settings.
Border/Depth tab
Allows you to define the relative ‘thickness’ of a 3D object, both in height (Depth) andbeveled edge (Border). It also provides an option for removing sharp edges caused bythe bevel effect on irregularly-shaped 3D objects and smoothen the object surface.
3D Custom Modes
3D Trim 3D Pipe
3D Round 3D ChiselNone (2D Object)
3D Chisel withsmaller border
3D Pipe withmaximum depth
3D Chisel withmaximum border
3D Pipe withsmaller depth

129
CHAPTER 3: IMAGE EDITING
Bump tab
Create grooves and extrusions on the surface of a 3D object based on the contrastingdark and light areas.
Reflection tab
Projects an image reflection on the object’s surface. This differs from the Color/Texture tab which simply fills an object with an image.
Transparency tab
Lets you set whether or not you can ‘see through’ the object, and if so, to whatdegree.
Shadow tab
Adds a drop-shadow to your object. It also gives you the option of havingPhotoImpact ‘render’ the backside of a transparent 3D object.
Light tab
Allows you to adjust the direction and number of lights shining on the object. It alsoprovides an option for automatically moving the light as the 3D object rotates.
At most, you can add up to four lights. To select a light and make adjustments to it,you can open the Material dialog box and go to the Light tab. Or, for more directcontrol, just click the arrow right beside the Light button in the Attribute toolbar andselect an active light number in the menu. Move your mouse around the objectsurface to adjust the position where to direct a selected light.
Shading
The Shading tab allows you to define whether the material reflects light like metal orlike plastic. Plastic, or ‘Phong’, refers to a glossy shading scheme. While ‘Metallic’refers to a diffused light.
With reflection image (Reflection tab)
Note: PhotoImpact provides several image files in the Material folder which you can add as textures,reflections, and bump maps to your objects.
With texture image (Color/Texture tab)

130
PHOTOIMPACT USER GUIDE
Smooth spine option not selected Smooth spine option selected
Making the surface of 3D objects smoother
If you created a complex or irregularly-shaped 3D text or 3D path object, bevel edgescan sometimes be obviously seen on the object surface. If you want to make theobject surface look smoother, go to the Border/Depth tab and select the Smoothspine option. Take a look at the sample images below to see the difference.
Creating transparent objects
To create a transparent object, for example, a glass jar, draw a 3D object and simplymake the transparency setting higher. The procedure below and the figure next pageshows a clear example.
To create a transparent object:
1 Click the Path Drawing Tool. Then,select a Shape and draw the path.
2 Click the Editing button on the Attributetoolbar to edit the path shape.
Click Editing again to return to the PathDrawing Tool.
3 Change the Mode of the path object to3D Round on the Attribute toolbar.
4 Click the Material button, then click theBorder/Depth tab. Set the Bordersetting lower (about 20).
5 Click the Transparency tab. Select theTransparency option and set it to atleast 75% to mimic the appearance ofglass. Set the minimum transparency to35% for the object’s edges.
6 Click the Shadow tab and select theRender backface option.
7 Click OK .
Note: The Smooth Spine option can only be used with 3D Round, 3D Chisel and 3D Custom objects,and when the Type of border is “In”.
3D rounded rectangle withtransparency

131
CHAPTER 3: IMAGE EDITING
Using bump maps
“Bump map” is a term describing an image file that, when applied to a text or pathobject, creates the appearance of 3D grooves and extrusions on the surface. Thedarker a particular region is, the ‘deeper’ the groove, while the lighter a region is, the‘higher’ the extrusion appears.
To add a bump map texture to an object:
1 Create a 3D path object or 3D text.
2 Click the Material button and select theBump tab.
3 Click the Bump map option, thenlocate the file you want to use as abump map and click Open.
4 Enter the Density of the bump, where100% is the maximum and 0% is theminimum.
5 Clear the Use bump as reflectionoption if the object has a ‘flat’ surface.However, if your object has a round orcurved surface, select this option to mapthe image across the entire surface.
6 Click OK .
This is the final object, with fourelliptical shapes added (using 3D Pipemode) on the jar’s opening.
Example of creating a glass jar
Set the Transparency (between 75% to100%) and select Render backface in theShadow tab.
Set the object Mode to 3D Round .1
3
2
4
Circle in 3D Chiselmode with thin borderand maximum depth
With bump mapapplied
Draw a Rounded rectangle , then editthe shape to form a glass jar.

132
PHOTOIMPACT USER GUIDE
Transform Tools
Using the Transform Tool
The Transform Tool allows you to take an image (or selection), text or path objectand then manipulate it so that it changes shape and even perspective.
To perform a transformation:
1 Select an object or selection area thatyou want to transform.
2 Click the Transform Tool button onthe Tool panel.
3 A set of eight different transformoptions appear as buttons on theAttribute toolbar. Some of theseoptions are also available in the Edit:Rotate & Flip submenu. (Click theOnline Help for more information onthe eight different transform buttons.) An example of a transformation
Notes:• If you rotate or distort an entire image by anything other than 90º, 180º or 270º, extra space
appears around the image, filled with the background color. (Objects are not affected in this way.)
• If there is no selection or active object , the transformation will be applied to the base image.
• If your selection area is a circle or an ellipse, a rectangular box covering the area closest to yourselection will automatically be displayed, allowing you to easily transform your object through thecontrol points at each of the four corners.
Rotate by horizontal line
Rotate by vertical line
Rotate freely
3D
Resize
Slant
Distort
Perspective
Rotate counterclockwise by degree
Degree of rotation
Reset center
Rotate clockwise by degree
Rotate & flip
Add

133
CHAPTER 3: IMAGE EDITING
Rotating
Slanting
Resizing
Distorting
Changing Perspective
Rotating horizontally
3D TransformationRotating vertically
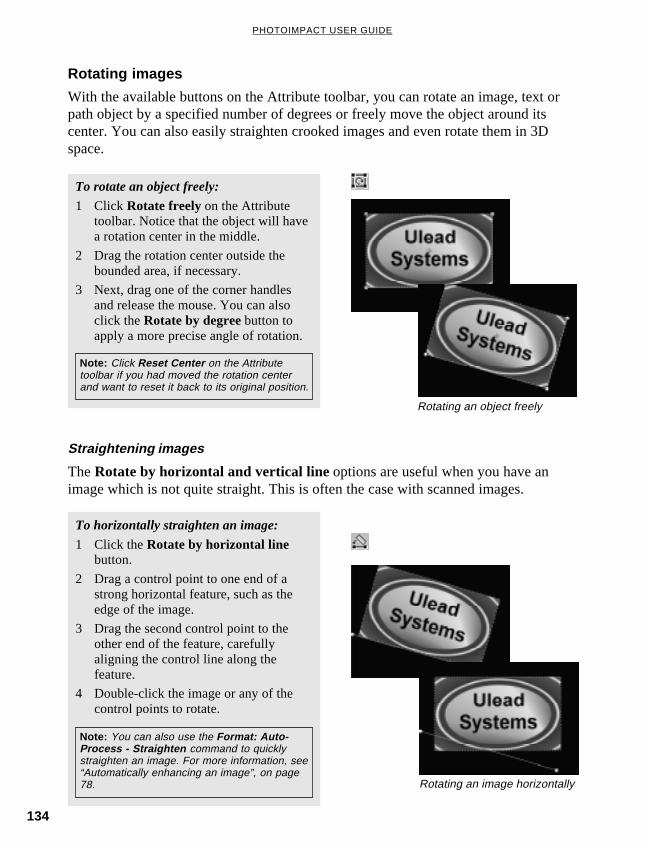
134
PHOTOIMPACT USER GUIDE
To horizontally straighten an image:
1 Click the Rotate by horizontal linebutton.
2 Drag a control point to one end of astrong horizontal feature, such as theedge of the image.
3 Drag the second control point to theother end of the feature, carefullyaligning the control line along thefeature.
4 Double-click the image or any of thecontrol points to rotate.
Rotating images
With the available buttons on the Attribute toolbar, you can rotate an image, text orpath object by a specified number of degrees or freely move the object around itscenter. You can also easily straighten crooked images and even rotate them in 3Dspace.
To rotate an object freely:
1 Click Rotate freely on the Attributetoolbar. Notice that the object will havea rotation center in the middle.
2 Drag the rotation center outside thebounded area, if necessary.
3 Next, drag one of the corner handlesand release the mouse. You can alsoclick the Rotate by degree button toapply a more precise angle of rotation.
Straightening images
The Rotate by horizontal and vertical line options are useful when you have animage which is not quite straight. This is often the case with scanned images.
Note: Click Reset Center on the Attributetoolbar if you had moved the rotation centerand want to reset it back to its original position.
Note: You can also use the Format: Auto-Process - Straighten command to quicklystraighten an image. For more information, see“Automatically enhancing an image”, on page78. Rotating an image horizontally
Rotating an object freely
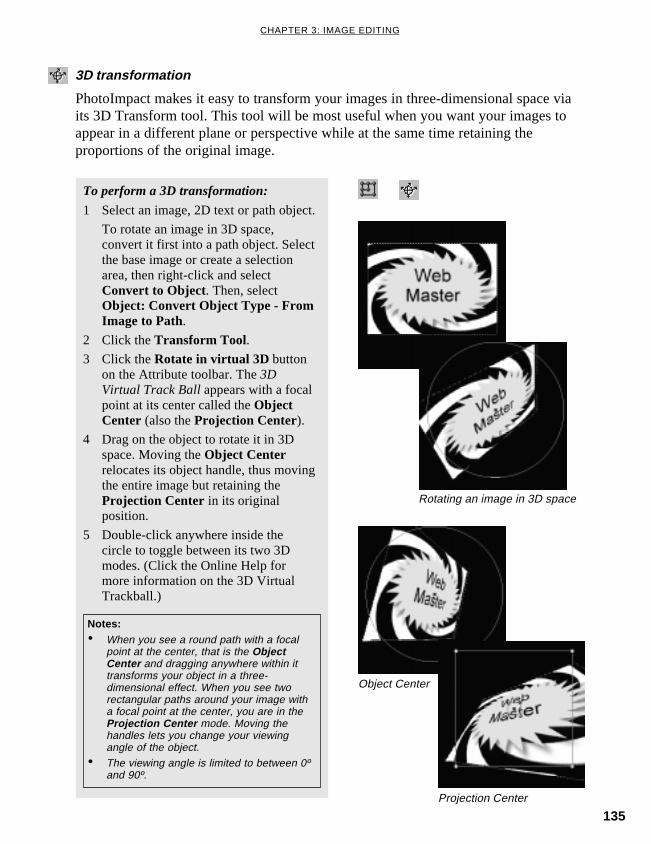
135
CHAPTER 3: IMAGE EDITING
Notes:• When you see a round path with a focal
point at the center, that is the ObjectCenter and dragging anywhere within ittransforms your object in a three-dimensional effect. When you see tworectangular paths around your image witha focal point at the center, you are in theProjection Center mode. Moving thehandles lets you change your viewingangle of the object.
• The viewing angle is limited to between 0ºand 90º.
Projection Center
Object Center
To perform a 3D transformation:
1 Select an image, 2D text or path object.
To rotate an image in 3D space,convert it first into a path object. Selectthe base image or create a selectionarea, then right-click and selectConvert to Object. Then, selectObject: Convert Object Type - FromImage to Path.
2 Click the Transform Tool.3 Click the Rotate in virtual 3D button
on the Attribute toolbar. The 3DVirtual Track Ball appears with a focalpoint at its center called the ObjectCenter (also the Projection Center).
4 Drag on the object to rotate it in 3Dspace. Moving the Object Centerrelocates its object handle, thus movingthe entire image but retaining theProjection Center in its originalposition.
5 Double-click anywhere inside thecircle to toggle between its two 3Dmodes. (Click the Online Help formore information on the 3D VirtualTrackball.)
3D transformation
PhotoImpact makes it easy to transform your images in three-dimensional space viaits 3D Transform tool. This tool will be most useful when you want your images toappear in a different plane or perspective while at the same time retaining theproportions of the original image.
Rotating an image in 3D space

136
PHOTOIMPACT USER GUIDE

SPECIAL EFFECTS
Special effects are a fun, and sometimes essential part, of imaging.
With them, you can turn plain old photographs into virtual pieces
of artwork. PhotoImpact contains a host of special effects, filters,
and plug-ins to give your work that extra bit of flair. In this
chapter, you will learn how to create such effects as Lightning and
Fireworks. Also find tools you can tweak to mimic more
complicated real-world painting effects in Creative and Magic
plug-ins. And there’s more, Animation Studio is just what you need
to make still images come to life so you can design dynamic Web
pages.
In this chapter you will learn:
• Special effects and filters ....................................................................................... 138
• Creating special effects ......................................................................................... 143
• Using Creative & Magic effects ............................................................................. 147
4
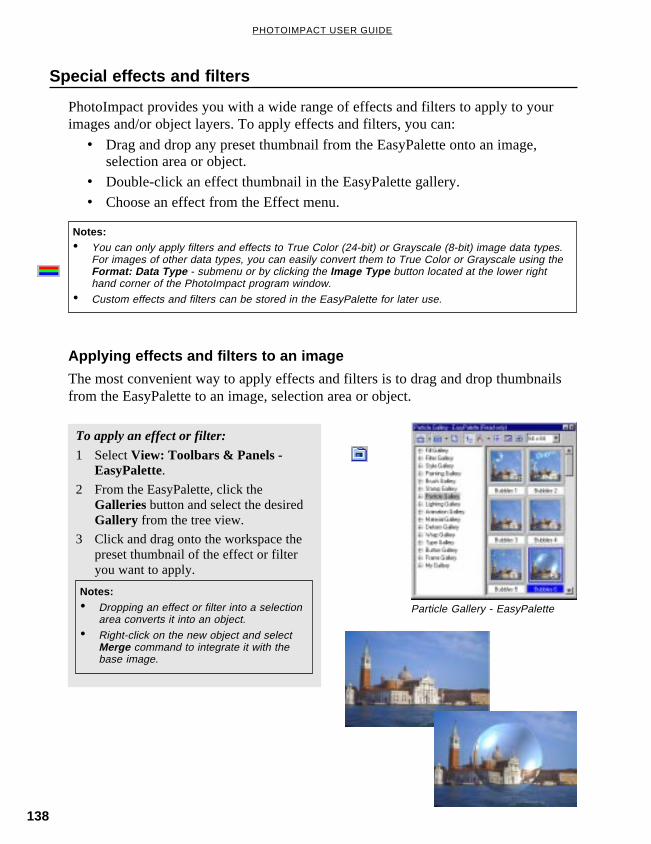
138
PHOTOIMPACT USER GUIDE
Special effects and filters
PhotoImpact provides you with a wide range of effects and filters to apply to yourimages and/or object layers. To apply effects and filters, you can:
• Drag and drop any preset thumbnail from the EasyPalette onto an image,selection area or object.
• Double-click an effect thumbnail in the EasyPalette gallery.
• Choose an effect from the Effect menu.
Notes:• You can only apply filters and effects to True Color (24-bit) or Grayscale (8-bit) image data types.
For images of other data types, you can easily convert them to True Color or Grayscale using theFormat: Data Type - submenu or by clicking the Image Type button located at the lower righthand corner of the PhotoImpact program window.
• Custom effects and filters can be stored in the EasyPalette for later use.
Applying effects and filters to an image
The most convenient way to apply effects and filters is to drag and drop thumbnailsfrom the EasyPalette to an image, selection area or object.
To apply an effect or filter:
1 Select View: Toolbars & Panels -EasyPalette.
2 From the EasyPalette, click theGalleries button and select the desiredGallery from the tree view.
3 Click and drag onto the workspace thepreset thumbnail of the effect or filteryou want to apply.
Particle Gallery - EasyPalette
Notes:• Dropping an effect or filter into a selection
area converts it into an object.
• Right-click on the new object and selectMerge command to integrate it with thebase image.

139
CHAPTER 4: SPECIAL EFFECTS
Customizing effects and filters
You can gain access to most effects or filters from the EasyPalette and in the Effectmenu. In some cases where in you want to apply an effect or filter in lesser detail,select an effect or filter command from the Effect menu to open the Quick Samplesdialog box. This dialog box displays thumbnails that show varying results of aneffect or filter when applied to your image, selection area or object. The centerthumbnail in the dialog box is a preview of current settings.
The surrounding thumbnails offer quick access for increasing or decreasing theintensity of how an effect or filter is applied. Simply click the thumbnail of thedesired result you want to achieve and the center thumbnail changes simultaneously.
Quick samplesdialog box
To customize the settings of an effect orfilter in detail:
1 Click the Options button and adjust thesettings until you see the result youwant on the Preview window.
2 Click OK to apply the settings. (To savethe custom effect to the EasyPalette forfuture use, click Add.)
Modifying an effect or filter
To modify an effect or filter, right-click on a thumbnail in the EasyPalette and selectModify Properties and Apply command, or choose its corresponding commanddirectly from the Effect menu. A dialog box opens with attributes you can adjust toachieve desired result. (For more information on the Modify Properties and Applydialog box, click the Help button found in that particular dialog box.)
Average Blur Emphasize Edges
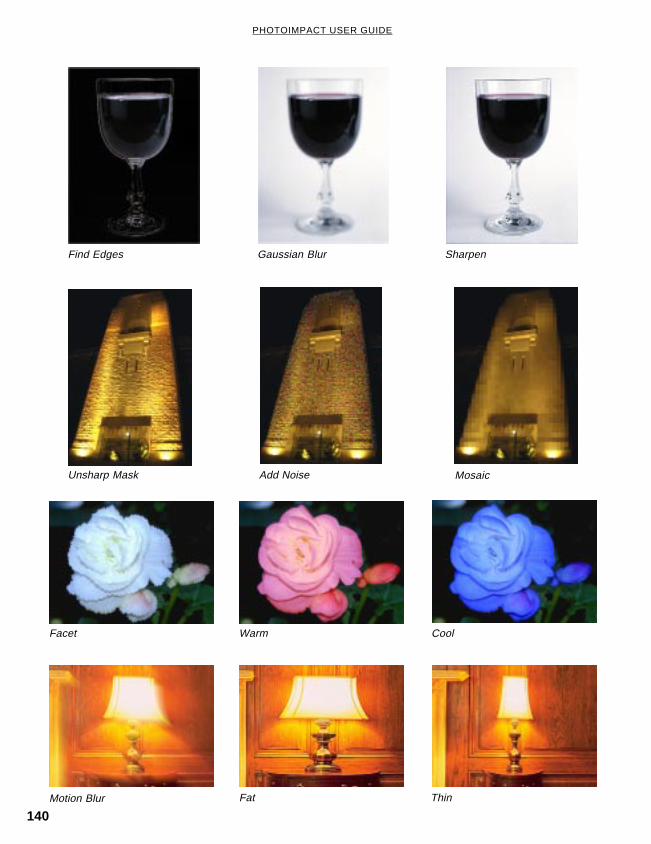
140
PHOTOIMPACT USER GUIDE
Unsharp Mask Add Noise Mosaic
Find Edges Gaussian Blur Sharpen
Facet Warm Cool
Motion Blur Fat Thin

141
CHAPTER 4: SPECIAL EFFECTS
Pinch Punch Warp
Ripple Sphere Whirlpool
Oil Paint Colored Pen Charcoal
Watercolor Puzzle Tile

142
PHOTOIMPACT USER GUIDE
With red eye
Photo Retouched withRemove Red Eye
Blast
Wind Stagger
Emboss
Monochrome
Two-Color
Original

143
CHAPTER 4: SPECIAL EFFECTS
To warp an image:
1 Select Effect: Warping .
2 Select Fine as the Grid size to displaythe maximum number of possible gridpartition.
Creating special effects
PhotoImpact lets you create special effects to exactly suit your imaging requirements.A variety of effects like warping, custom effects, and custom filters are available foryou to explore with your creative talent.
Warping
Warping is a method of bending or curving an image using a grid (or mesh) basedpattern. Unlike other 3D effects, you have the option of tweaking only specific areasof an image with the aid of grid partition and control point handles.
Tips:• Show control points option offers ease
handling of grid intersection pointadjustments. However, if these pointsbegin to distract your view of the image,clear the check box.
• To protect or preserve specific areas fromwarping, select Fine for Grid size.
Note: You can only warp True Color andGrayscale images.
3 In the Sample image window, clickand drag the control points (or gridintersection) on the area to warp.
4 Click Test and check the Previewwindow at the bottom left to see howmuch warping you have done so far.
5 Click OK .
Tips:• For a larger size view of the warping effect,
click the Preview button.• To quickly start over again, click Reset .
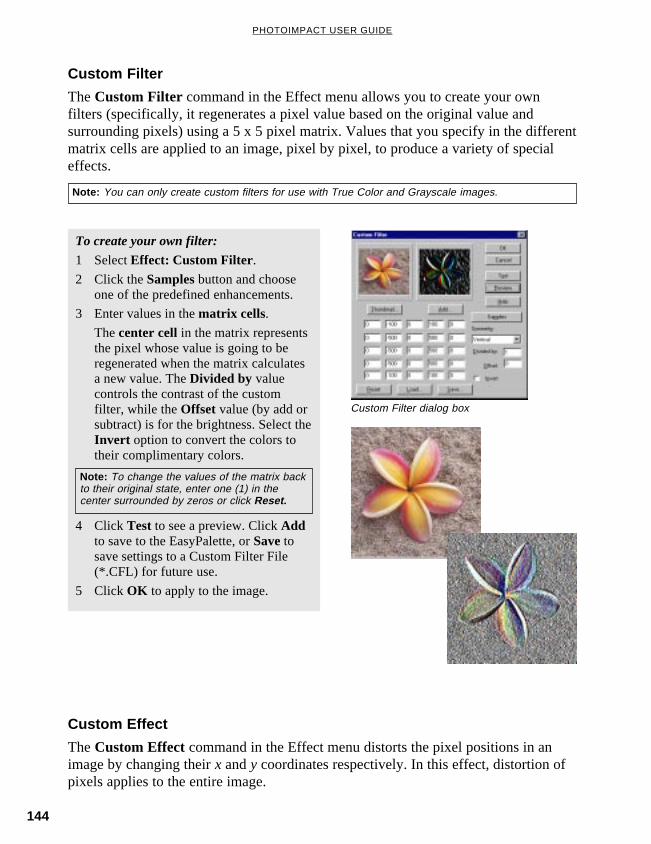
144
PHOTOIMPACT USER GUIDE
Custom Filter dialog box
Custom Filter
The Custom Filter command in the Effect menu allows you to create your ownfilters (specifically, it regenerates a pixel value based on the original value andsurrounding pixels) using a 5 x 5 pixel matrix. Values that you specify in the differentmatrix cells are applied to an image, pixel by pixel, to produce a variety of specialeffects.
To create your own filter:
1 Select Effect: Custom Filter.2 Click the Samples button and choose
one of the predefined enhancements.
3 Enter values in the matrix cells.
The center cell in the matrix representsthe pixel whose value is going to beregenerated when the matrix calculatesa new value. The Divided by valuecontrols the contrast of the customfilter, while the Offset value (by add orsubtract) is for the brightness. Select theInvert option to convert the colors totheir complimentary colors.
Note: You can only create custom filters for use with True Color and Grayscale images.
Note: To change the values of the matrix backto their original state, enter one (1) in thecenter surrounded by zeros or click Reset.
4 Click Test to see a preview. Click Addto save to the EasyPalette, or Save tosave settings to a Custom Filter File(*.CFL) for future use.
5 Click OK to apply to the image.
Custom Effect
The Custom Effect command in the Effect menu distorts the pixel positions in animage by changing their x and y coordinates respectively. In this effect, distortion ofpixels applies to the entire image.
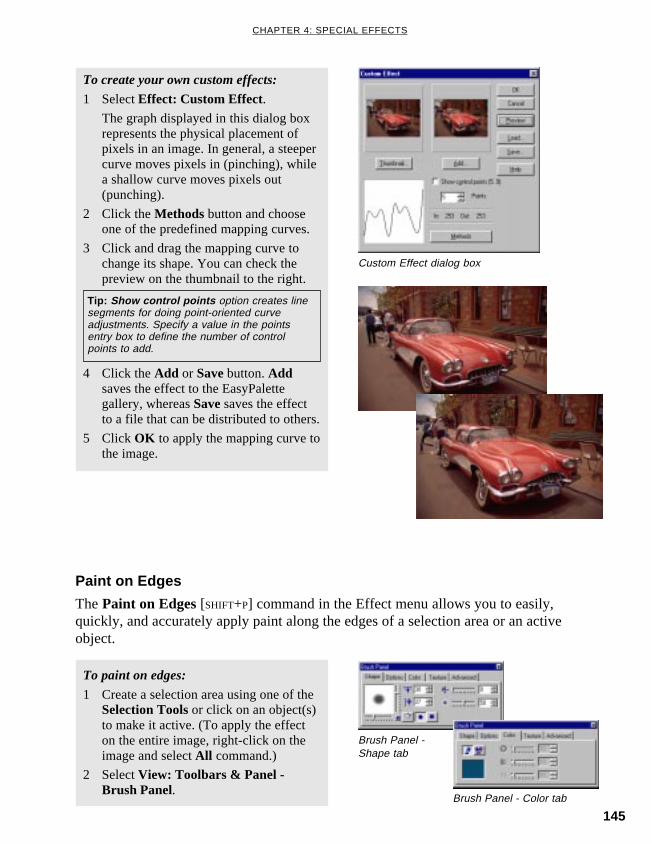
145
CHAPTER 4: SPECIAL EFFECTS
To create your own custom effects:
1 Select Effect: Custom Effect.The graph displayed in this dialog boxrepresents the physical placement ofpixels in an image. In general, a steepercurve moves pixels in (pinching), whilea shallow curve moves pixels out(punching).
2 Click the Methods button and chooseone of the predefined mapping curves.
3 Click and drag the mapping curve tochange its shape. You can check thepreview on the thumbnail to the right.
Paint on Edges
The Paint on Edges [SHIFT+P] command in the Effect menu allows you to easily,quickly, and accurately apply paint along the edges of a selection area or an activeobject.
To paint on edges:
1 Create a selection area using one of theSelection Tools or click on an object(s)to make it active. (To apply the effecton the entire image, right-click on theimage and select All command.)
2 Select View: Toolbars & Panel -Brush Panel.
Brush Panel -Shape tab
Custom Effect dialog box
Tip: Show control points option creates linesegments for doing point-oriented curveadjustments. Specify a value in the pointsentry box to define the number of controlpoints to add.
4 Click the Add or Save button. Addsaves the effect to the EasyPalettegallery, whereas Save saves the effectto a file that can be distributed to others.
5 Click OK to apply the mapping curve tothe image.
Brush Panel - Color tab

146
PHOTOIMPACT USER GUIDE
To save Material dialog box settings to theEasyPalette:
1 With a text or path object active in theworkspace, switch to the appropriatetool in the Tool Panel, and click theMaterial button on the Attributetoolbar.
2 In the Material dialog box, click Add.
3 In the Material Save Options dialogbox, select All to save everything orPartial to choose the specific settings tosave.
4 Click OK to switch to the Add ToEasyPalette dialog box.
5 Specify the Sample name, Gallery, andTab group information for saving.
6 Click OK to add the settings to theEasyPalette.
Note: For more details, see Specifying theBrush Panel attributes on page 89.
More special effects for text and path objects
Aside from the already tons of effects available in the Effect menu and EasyPalette,Text and path objects’ appearance can be further modified in detail or enhanced usingthe Material dialog box. Unlike simple selections and regular image objects, textand path objects have attribute settings that can be independently adjusted and savedto the EasyPalette for future use. This way, you can save time in having to recreatethe same effect you commonly use on your text or path objects. For more informationabout the Material dialog box, see page 127.
3 In the Brush Panel, define basic brushsettings in the Shape and Color tabs.
Image with painted edges
Material Save Options dialog box
Imagewithoutedgepainting
4 Select Effect: Paint on Edges. Theedges of the selection or object reflectsthe color you’ve specified in the BrushPanel.

147
CHAPTER 4: SPECIAL EFFECTS
Using Creative & Magic effects
PhotoImpact has two libraries of powerful and unique effects: Creative & Magic.These effects give you the maximum amount of versatility and creativity with aminimum amount of work. With them, you can create any kind of special or customeffect to give your work that extra edge.
Animation effects
Creating animations to place on your Web pages doesn't have to be difficult. Some ofthe more popular effects in PhotoImpact have integrated animation dialog boxes toassist you in creating them.
There are basically two types of animation creation sections available in variousEffect dialog boxes. These are namely Frame-based, as in the Animation Studio,Lighting, and Type Effect dialog boxes; and Storyboard-based, as in the ArtistTexture, Creative Warp, and Transform dialog boxes.
Note: The Magic and Creative effects only work with True Color images. Quickly access these effectsfrom the EasyPalette or the Effect menu.
Frame-based animation dialog boxes arebroken into 4 sections: (clockwise fromtop left) the Preview window, BasicParameters (and Advanced whereapplicable), Key frame control, and theEffect gallery.
The layout of Storyboard-basedanimation dialog boxes differ according tothe effect used. However, they each havetwo sections in common: an effectTemplate section and a Storyboardsection. The purpose of the Storyboard isto display a modifiable sequence ofaccumulative applied effects. Eachtemplate effect is applied to the previousframe of the animation, which is viewablein the storyboard section.
Frame-based dialog box
Storyboard-based dialog box
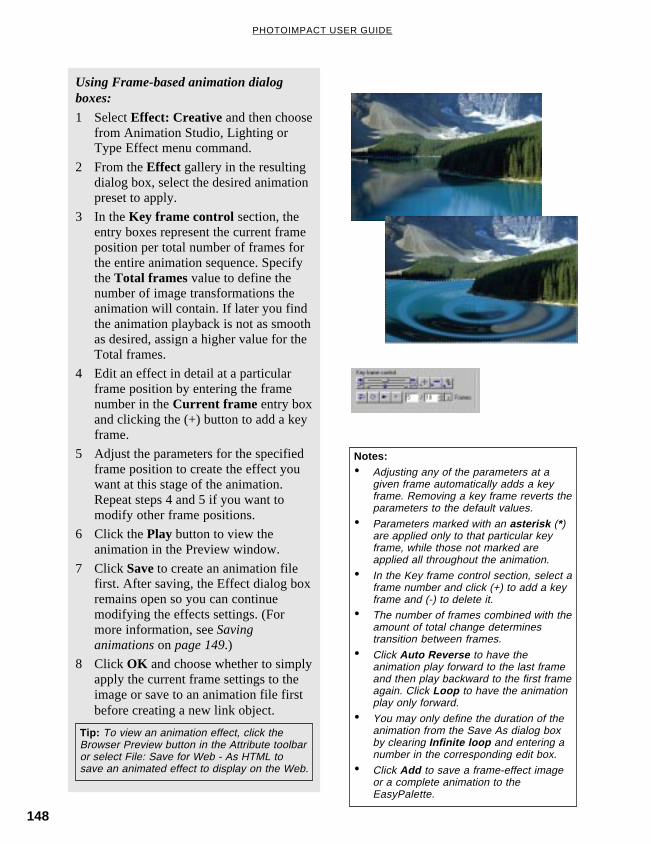
148
PHOTOIMPACT USER GUIDE
Using Frame-based animation dialogboxes:
1 Select Effect: Creative and then choosefrom Animation Studio, Lighting orType Effect menu command.
2 From the Effect gallery in the resultingdialog box, select the desired animationpreset to apply.
3 In the Key frame control section, theentry boxes represent the current frameposition per total number of frames forthe entire animation sequence. Specifythe Total frames value to define thenumber of image transformations theanimation will contain. If later you findthe animation playback is not as smoothas desired, assign a higher value for theTotal frames.
4 Edit an effect in detail at a particularframe position by entering the framenumber in the Current frame entry boxand clicking the (+) button to add a keyframe.
5 Adjust the parameters for the specifiedframe position to create the effect youwant at this stage of the animation.Repeat steps 4 and 5 if you want tomodify other frame positions.
6 Click the Play button to view theanimation in the Preview window.
7 Click Save to create an animation filefirst. After saving, the Effect dialog boxremains open so you can continuemodifying the effects settings. (Formore information, see Savinganimations on page 149.)
8 Click OK and choose whether to simplyapply the current frame settings to theimage or save to an animation file firstbefore creating a new link object.
Notes:• Adjusting any of the parameters at a
given frame automatically adds a keyframe. Removing a key frame reverts theparameters to the default values.
• Parameters marked with an asterisk (*)are applied only to that particular keyframe, while those not marked areapplied all throughout the animation.
• In the Key frame control section, select aframe number and click (+) to add a keyframe and (-) to delete it.
• The number of frames combined with theamount of total change determinestransition between frames.
• Click Auto Reverse to have theanimation play forward to the last frameand then play backward to the first frameagain. Click Loop to have the animationplay only forward.
• You may only define the duration of theanimation from the Save As dialog boxby clearing Infinite loop and entering anumber in the corresponding edit box.
• Click Add to save a frame-effect imageor a complete animation to theEasyPalette.
Tip: To view an animation effect, click theBrowser Preview button in the Attribute toolbaror select File: Save for Web - As HTML tosave an animated effect to display on the Web.
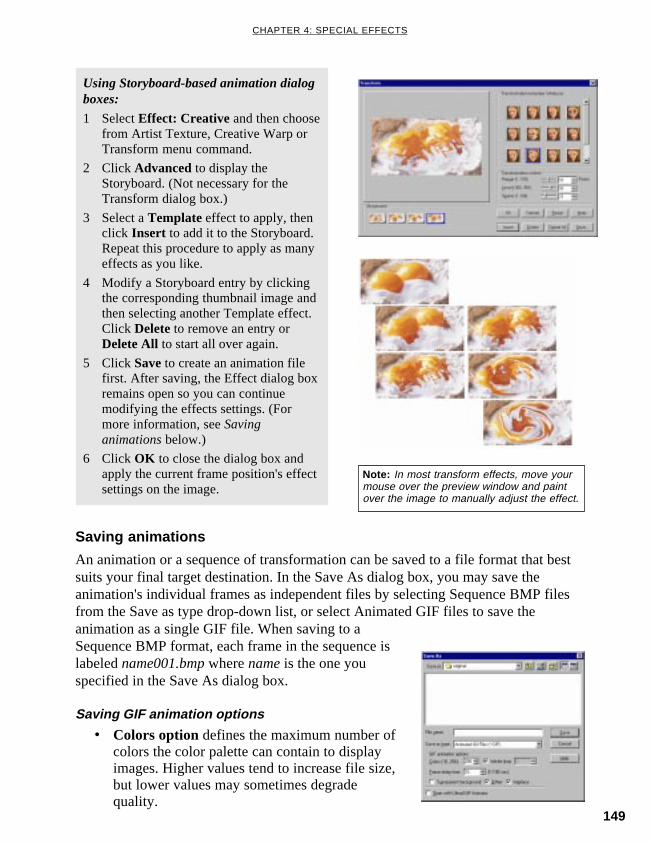
149
CHAPTER 4: SPECIAL EFFECTS
Note: In most transform effects, move yourmouse over the preview window and paintover the image to manually adjust the effect.
Using Storyboard-based animation dialogboxes:
1 Select Effect: Creative and then choosefrom Artist Texture, Creative Warp orTransform menu command.
2 Click Advanced to display theStoryboard. (Not necessary for theTransform dialog box.)
3 Select a Template effect to apply, thenclick Insert to add it to the Storyboard.Repeat this procedure to apply as manyeffects as you like.
4 Modify a Storyboard entry by clickingthe corresponding thumbnail image andthen selecting another Template effect.Click Delete to remove an entry orDelete All to start all over again.
5 Click Save to create an animation filefirst. After saving, the Effect dialog boxremains open so you can continuemodifying the effects settings. (Formore information, see Savinganimations below.)
6 Click OK to close the dialog box andapply the current frame position's effectsettings on the image.
Saving animations
An animation or a sequence of transformation can be saved to a file format that bestsuits your final target destination. In the Save As dialog box, you may save theanimation's individual frames as independent files by selecting Sequence BMP filesfrom the Save as type drop-down list, or select Animated GIF files to save theanimation as a single GIF file. When saving to aSequence BMP format, each frame in the sequence islabeled name001.bmp where name is the one youspecified in the Save As dialog box.
Saving GIF animation options
• Colors option defines the maximum number ofcolors the color palette can contain to displayimages. Higher values tend to increase file size,but lower values may sometimes degradequality.

150
PHOTOIMPACT USER GUIDE
Artist Texture
The Artist Texture effect allows you to create wild, psychedelic patterns and semi-random animations using Palette ramps. It works in conjunction with GIF Animatorwhen creating animations and lets you generate single image layers that can beapplied to both selection areas and objects.
To create an Artist Texture:
1 Select Effect: Creative - ArtistTexture.
2 Click the Edit button to customize thePalette ramp or change to an entirelynew one. Select the Palette ramp youwish to use or modify the existing one,then click OK .
Alternatively, to edit the existing rampfrom within the Artist Texture dialogbox, adjust the Hue shift, Ring, andRepeat number options.
3 Select a style from the Pattern samplespreview boxes or create a new set of 6by selecting a base image from thePattern templates. The Patterntemplates define the basic ‘warp’ that isapplied to the Palette ramp.
4 Click OK to create a single pattern.
• Infinite loop creates a continuous animation. You can clear it and enter anumber in the adjacent box to define a limited duration.
• Frame delay time, in hundredths of a second, determines how long a framewill be displayed before switching to the next one.
• Transparent background creates empty spaces between images to betransparent when the animation is played in a Web browser.
• Dither allows GIF Animator to compensate for colors not found in thepalette. It then simulates missing colors by mixing combinations of existingcolors in the area that the original color occupied.
• Interlace allows the image layer to open gradually as it downloadssimulating a 'fade-in' effect. This however may increase file size a little.
• Open with Ulead GIF Animator launches Ulead GIF Animator forviewing and doing further editing to your GIF animation files. (This optionis available only if you have a version of Ulead GIF Animator programinstalled in your computer.)
Artist Texture Effect dialog box
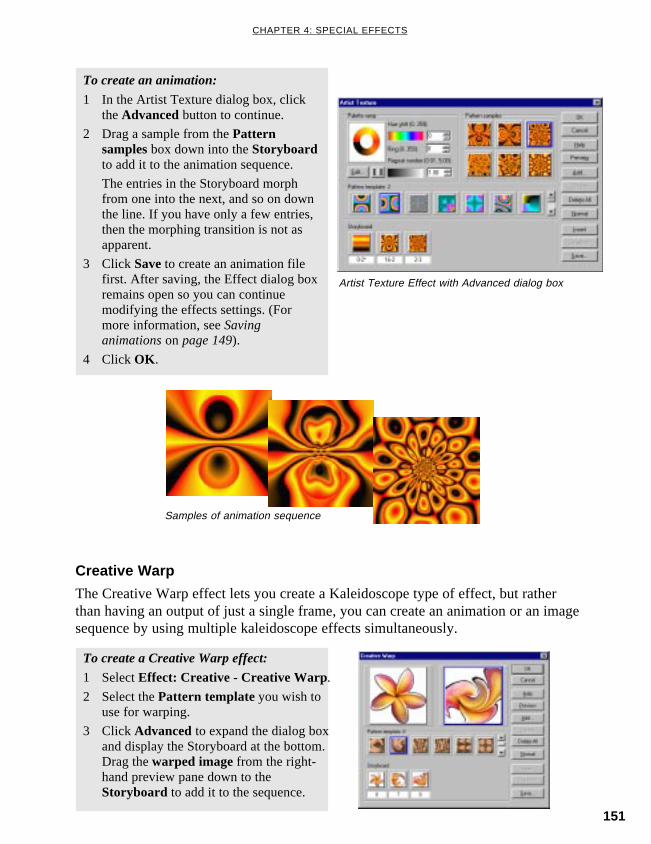
151
CHAPTER 4: SPECIAL EFFECTS
Artist Texture Effect with Advanced dialog box
To create an animation:
1 In the Artist Texture dialog box, clickthe Advanced button to continue.
2 Drag a sample from the Patternsamples box down into the Storyboardto add it to the animation sequence.
The entries in the Storyboard morphfrom one into the next, and so on downthe line. If you have only a few entries,then the morphing transition is not asapparent.
3 Click Save to create an animation filefirst. After saving, the Effect dialog boxremains open so you can continuemodifying the effects settings. (Formore information, see Savinganimations on page 149).
4 Click OK .
Samples of animation sequence
Creative Warp
The Creative Warp effect lets you create a Kaleidoscope type of effect, but ratherthan having an output of just a single frame, you can create an animation or an imagesequence by using multiple kaleidoscope effects simultaneously.
To create a Creative Warp effect:
1 Select Effect: Creative - Creative Warp.
2 Select the Pattern template you wish touse for warping.
3 Click Advanced to expand the dialog boxand display the Storyboard at the bottom.Drag the warped image from the right-hand preview pane down to theStoryboard to add it to the sequence.
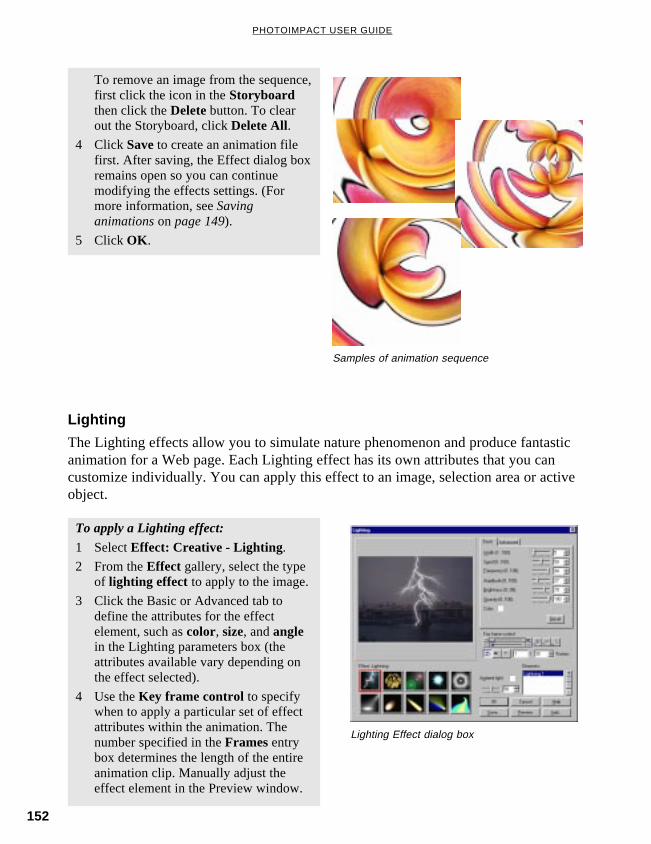
152
PHOTOIMPACT USER GUIDE
Lighting
The Lighting effects allow you to simulate nature phenomenon and produce fantasticanimation for a Web page. Each Lighting effect has its own attributes that you cancustomize individually. You can apply this effect to an image, selection area or activeobject.
To apply a Lighting effect:
1 Select Effect: Creative - Lighting.
2 From the Effect gallery, select the typeof lighting effect to apply to the image.
3 Click the Basic or Advanced tab todefine the attributes for the effectelement, such as color, size, and anglein the Lighting parameters box (theattributes available vary depending onthe effect selected).
4 Use the Key frame control to specifywhen to apply a particular set of effectattributes within the animation. Thenumber specified in the Frames entrybox determines the length of the entireanimation clip. Manually adjust theeffect element in the Preview window.
Lighting Effect dialog box
Samples of animation sequence
To remove an image from the sequence,first click the icon in the Storyboardthen click the Delete button. To clearout the Storyboard, click Delete All.
4 Click Save to create an animation filefirst. After saving, the Effect dialog boxremains open so you can continuemodifying the effects settings. (Formore information, see Savinganimations on page 149).
5 Click OK .
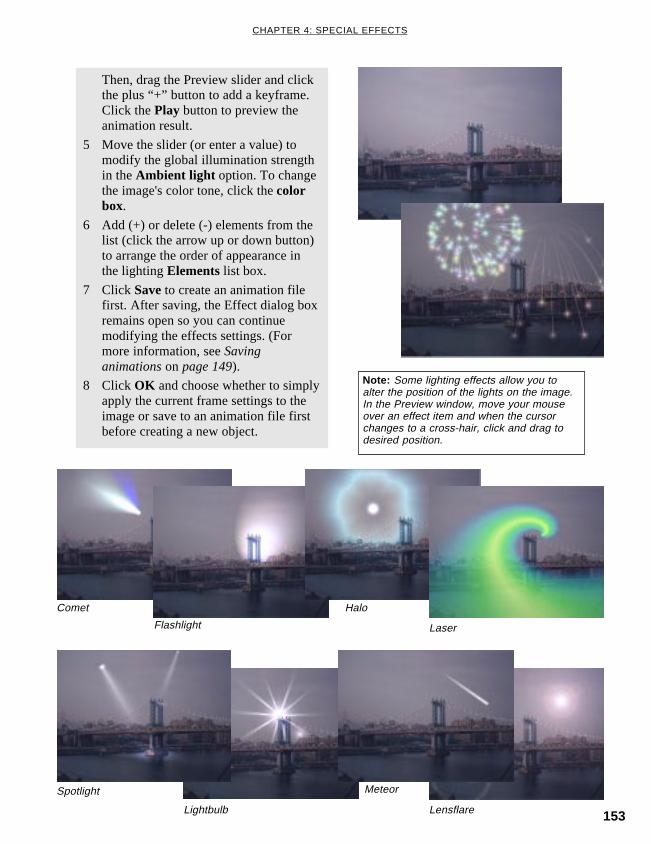
153
CHAPTER 4: SPECIAL EFFECTS
Note: Some lighting effects allow you toalter the position of the lights on the image.In the Preview window, move your mouseover an effect item and when the cursorchanges to a cross-hair, click and drag todesired position.
Then, drag the Preview slider and clickthe plus “+” button to add a keyframe.Click the Play button to preview theanimation result.
5 Move the slider (or enter a value) tomodify the global illumination strengthin the Ambient light option. To changethe image's color tone, click the colorbox.
6 Add (+) or delete (-) elements from thelist (click the arrow up or down button)to arrange the order of appearance inthe lighting Elements list box.
7 Click Save to create an animation filefirst. After saving, the Effect dialog boxremains open so you can continuemodifying the effects settings. (Formore information, see Savinganimations on page 149).
8 Click OK and choose whether to simplyapply the current frame settings to theimage or save to an animation file firstbefore creating a new object.
Comet
Flashlight
Halo
Laser
Spotlight
Lightbulb
Meteor
Lensflare
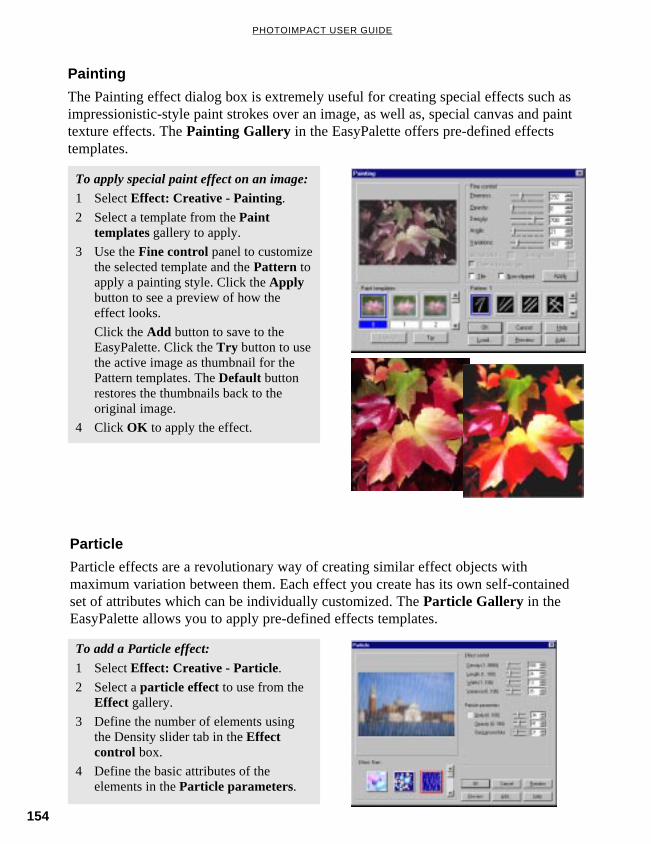
154
PHOTOIMPACT USER GUIDE
Particle
Particle effects are a revolutionary way of creating similar effect objects withmaximum variation between them. Each effect you create has its own self-containedset of attributes which can be individually customized. The Particle Gallery in theEasyPalette allows you to apply pre-defined effects templates.
To add a Particle effect:
1 Select Effect: Creative - Particle.
2 Select a particle effect to use from theEffect gallery.
3 Define the number of elements usingthe Density slider tab in the Effectcontrol box.
4 Define the basic attributes of theelements in the Particle parameters.
Painting
The Painting effect dialog box is extremely useful for creating special effects such asimpressionistic-style paint strokes over an image, as well as, special canvas and painttexture effects. The Painting Gallery in the EasyPalette offers pre-defined effectstemplates.
To apply special paint effect on an image:
1 Select Effect: Creative - Painting.
2 Select a template from the Painttemplates gallery to apply.
3 Use the Fine control panel to customizethe selected template and the Pattern toapply a painting style. Click the Applybutton to see a preview of how theeffect looks.
Click the Add button to save to theEasyPalette. Click the Try button to usethe active image as thumbnail for thePattern templates. The Default buttonrestores the thumbnails back to theoriginal image.
4 Click OK to apply the effect.
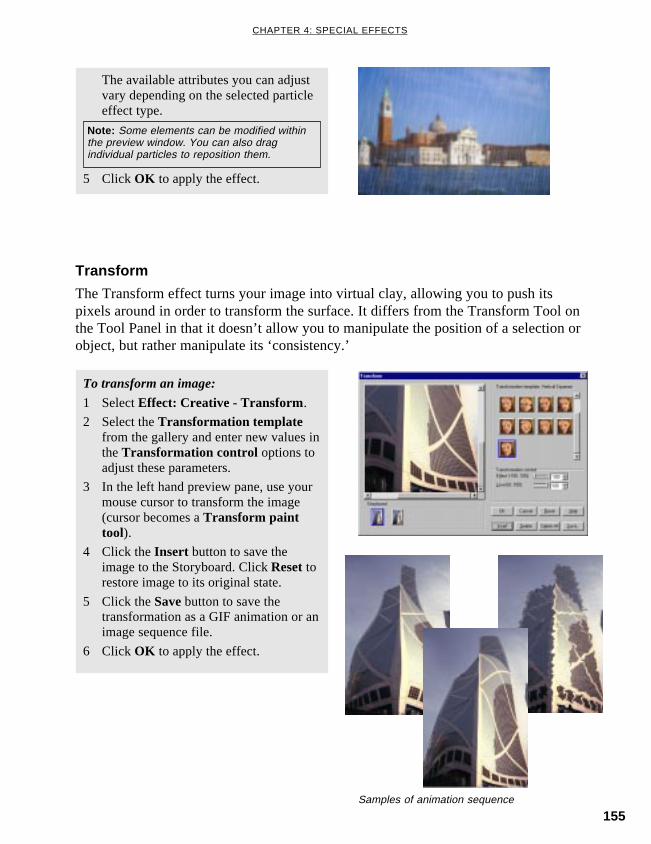
155
CHAPTER 4: SPECIAL EFFECTS
The available attributes you can adjustvary depending on the selected particleeffect type.
Transform
The Transform effect turns your image into virtual clay, allowing you to push itspixels around in order to transform the surface. It differs from the Transform Tool onthe Tool Panel in that it doesn’t allow you to manipulate the position of a selection orobject, but rather manipulate its ‘consistency.’
To transform an image:
1 Select Effect: Creative - Transform.
2 Select the Transformation templatefrom the gallery and enter new values inthe Transformation control options toadjust these parameters.
3 In the left hand preview pane, use yourmouse cursor to transform the image(cursor becomes a Transform painttool).
4 Click the Insert button to save theimage to the Storyboard. Click Reset torestore image to its original state.
5 Click the Save button to save thetransformation as a GIF animation or animage sequence file.
6 Click OK to apply the effect.
Samples of animation sequence
Note: Some elements can be modified withinthe preview window. You can also dragindividual particles to reposition them.
5 Click OK to apply the effect.

156
PHOTOIMPACT USER GUIDE
To add a Kaleidoscope effect:
1 Select Effect: Magic - Kaleidoscope. Aset of quick samples of the currentlyselected effect opens. If you find thestyle you want from the thumbnailssurrounding the center previewthumbnail, click on it. Otherwise, clickthe Options button to change the typeof Kaleidoscope effect to use.
2 In the resulting dialog box, adjust thecontrol points found in the thumbnailwindow at left. This determines wherethe kaleidoscope pattern starts as well asthe size. You can also choose from theset pattern styles found below thepreview windows.
3 Click OK to apply the effect.
Note: When you apply a Type Effect to textobjects, you will lose the text attributes of thatobject. Thus, you will not be able to use theText Tool anymore for further editing.
Kaleidoscope
Kaleidoscope allows you to create multiple and spiraling images creating an effectsimilar to the one found in a child’s kaleidoscope toy.
To add a special Type Effect:
1 Select Effect: Creative - Type Effect.2 Choose the effect to apply from the
Effect gallery.
3 Modify the effect’s parameters until youachieve the result you want from theParameters box.
4 Click OK and choose whether to simplyapply the current frame settings to theimage or save to an animation file firstthen create as a new link object.
Adding special Type Effect
The Type Effect plug-in allows you to modify text or objects in ways beyond thecapabilities of the Text and Path Tools. You can add fire, ice, neon glows, andemboss effect, among other things, to objects. Combined with the innate functions ofthe other tools, this effect can be quite powerful.
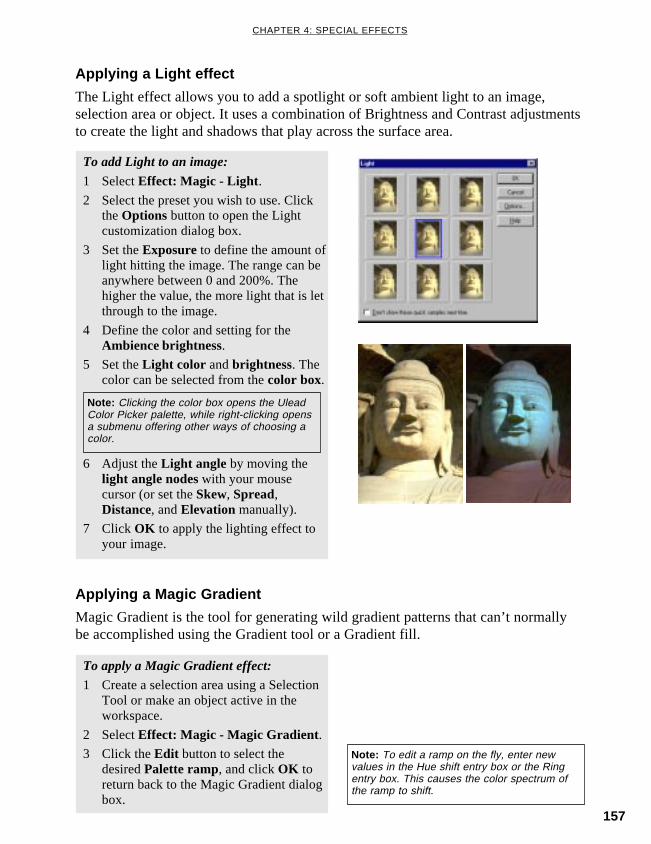
157
CHAPTER 4: SPECIAL EFFECTS
Applying a Light effect
The Light effect allows you to add a spotlight or soft ambient light to an image,selection area or object. It uses a combination of Brightness and Contrast adjustmentsto create the light and shadows that play across the surface area.
To add Light to an image:
1 Select Effect: Magic - Light .
2 Select the preset you wish to use. Clickthe Options button to open the Lightcustomization dialog box.
3 Set the Exposure to define the amount oflight hitting the image. The range can beanywhere between 0 and 200%. Thehigher the value, the more light that is letthrough to the image.
4 Define the color and setting for theAmbience brightness.
5 Set the Light color and brightness. Thecolor can be selected from the color box.
6 Adjust the Light angle by moving thelight angle nodes with your mousecursor (or set the Skew, Spread,Distance, and Elevation manually).
7 Click OK to apply the lighting effect toyour image.
Note: Clicking the color box opens the UleadColor Picker palette, while right-clicking opensa submenu offering other ways of choosing acolor.
Applying a Magic Gradient
Magic Gradient is the tool for generating wild gradient patterns that can’t normallybe accomplished using the Gradient tool or a Gradient fill.
To apply a Magic Gradient effect:
1 Create a selection area using a SelectionTool or make an object active in theworkspace.
2 Select Effect: Magic - Magic Gradient.3 Click the Edit button to select the
desired Palette ramp, and click OK toreturn back to the Magic Gradient dialogbox.
Note: To edit a ramp on the fly, enter newvalues in the Hue shift entry box or the Ringentry box. This causes the color spectrum ofthe ramp to shift.
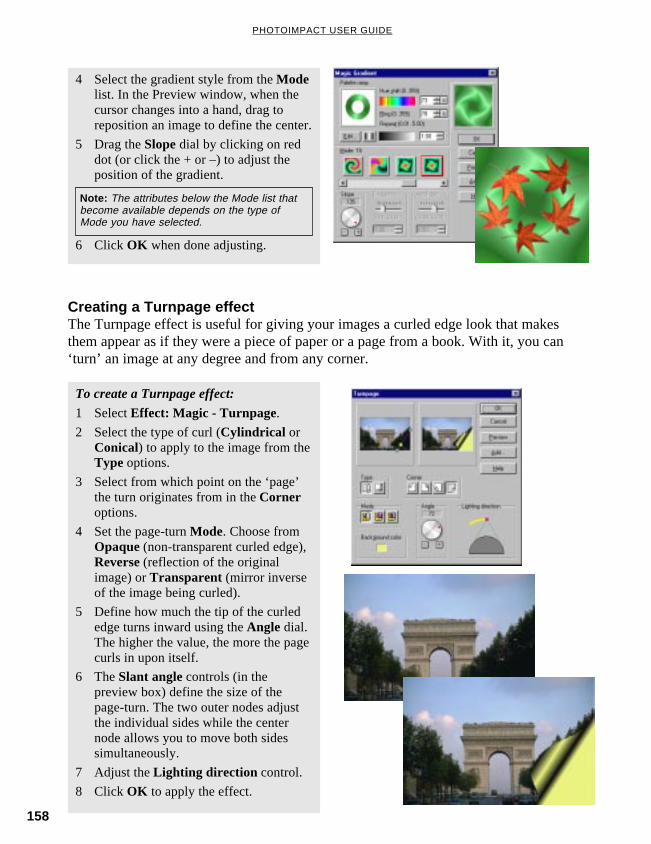
158
PHOTOIMPACT USER GUIDE
Note: The attributes below the Mode list thatbecome available depends on the type ofMode you have selected.
4 Select the gradient style from the Modelist. In the Preview window, when thecursor changes into a hand, drag toreposition an image to define the center.
5 Drag the Slope dial by clicking on reddot (or click the + or –) to adjust theposition of the gradient.
6 Click OK when done adjusting.
Creating a Turnpage effectThe Turnpage effect is useful for giving your images a curled edge look that makesthem appear as if they were a piece of paper or a page from a book. With it, you can‘turn’ an image at any degree and from any corner.
To create a Turnpage effect:
1 Select Effect: Magic - Turnpage.
2 Select the type of curl (Cylindrical orConical) to apply to the image from theType options.
3 Select from which point on the ‘page’the turn originates from in the Corneroptions.
4 Set the page-turn Mode. Choose fromOpaque (non-transparent curled edge),Reverse (reflection of the originalimage) or Transparent (mirror inverseof the image being curled).
5 Define how much the tip of the curlededge turns inward using the Angle dial.The higher the value, the more the pagecurls in upon itself.
6 The Slant angle controls (in thepreview box) define the size of thepage-turn. The two outer nodes adjustthe individual sides while the centernode allows you to move both sidessimultaneously.
7 Adjust the Lighting direction control.
8 Click OK to apply the effect.

5
CREATING WEB PAGES
Creating Web pages has become, in recent years, a major concern
for both businesses and individuals. There is no other single
medium like the World Wide Web that allows people to reach
others interactively and goes beyond the limitations of time,
location, and nationality. The quality of a Web site’s content has
great impacts on a company’s or individual’s existence on the Web.
That’s why you need the best tools available for creating unique
and eye-catching Web content, and PhotoImpact is just the right
one for you.
In this chapter you will learn:
• Designing a Web page........................................................................................... 160
• Adding objects for a Web page ............................................................................. 167
• Optimizing Web images in Image Optimizer ......................................................... 182
• Exporting a Web page ........................................................................................... 188
• Other Web tools ..................................................................................................... 190
• Tutorial ................................................................................................................... 191

160
PHOTOIMPACT USER GUIDE
Designing a Web page
A Web page is a hypermedia document coded with Hypertext Markup Language(HTML). HTML forms tag elements such as text and graphics so browsers likeInternet Explorer or Netscape Navigator can recognize and display a Web pageproperly on the World Wide Web.
More than just an image and Web graphics editor, PhotoImpact also helps you easilydesign a Web page, no matter if it is image intensive or text-based. PhotoImpact thengenerates the necessary HTML code, conveniently saving you from coding hassles.This section introduces you to the fundamental techniques in developing a Web pagewith PhotoImpact 6.
Notes:• For more information about Web images, see Appendix on page 253.• To create a complete Web page, see “Tutorial” on page 191.
• PhotoImpact currently does not support the making of multi-frame Web pages. Yet, you can makea Web page with frames and define linked Web pages in an HTML editor first. Then create thesepages in PhotoImpact.
<!DOCTYPE HTML PUBLIC “-//W3C//DTD
HTML 3.2 //EN”>
<HTML>
<HEAD>
<META HTTP-EQUIV=”Content-Type”
CONTENT=”text/html; charset=iso-8859-1">
<META NAME=”Generator”
CONTENT=”PhotoImpact”> <META
NAME=”PhotoImpact Document”
CONTENT=”C:\org_pi6\page1.ufo”>
</HEAD>
<BODY BACKGROUND=”BG067.jpg”
LEFTMARGIN=”0" MARGINWIDTH=”0"
TOPMARGIN=”0" MARGINHEIGHT=”0">
<TABLE CELLPADDING=”0"
CELLSPACING=”0" BORDER=”0"> <TR> <TD
COLSPAN=”11"><IMG SRC=”space.gif”
WIDTH=”750" HEIGHT=”24"></TD> </TR>...
</TABLE></BODY> </HTML>A Web page created in PhotoImpactand its HTML source code (partial)
HTML textbutton bar
bannerimage
Web background
161
CHAPTER 5: CREATING WEB PAGES
Structure of a Web page
Just what exactly is a Web page? Creating one is simple in PhotoImpact because youare spared the pain of having to code everything manually. However, because HTMLcode is involved, creating Web pages is not as straightforward as creating images.The following illustration will show you how a browser interprets and analyzes aWeb page. It looks like neatly organized graphics and text that you could create intext and graphics editing programs.
In reality, though, the page itself is built with an HTML document (*.htm or *.html)at its core, which contains all the code and information in plain text. The code, inturn, tells the browser what it should display and how. An HTML document lookslike this:
Note: PhotoImpact outputs two things: the HTML document describing the basic layout of the page,and the images linked to the document.
The most fundamental outline of an HTML document follows this structure:
All of the images you see in the browser (the background, buttons, banners, etc.) aresimply embedded in the HTML code as links to the original image files, so if thebrowser is going to display the images properly, the linked images need to be therealong with the HTML document itself. The HTML code tells the browser to load thelinked image files like this:
<IMG SRC="imagename.gif">
<IMG> tags are inserted between the <BODY></BODY> tags.
So when you are creating an entire Web page in PhotoImpact, it looks like you aresimply working with graphics as usual, but PhotoImpact is really simulating how thepage would look like in a browser, so that you can visually construct a Web page inPhotoImpact. Once it’s done, you can export it as an HTML document and relatedimages. Later, you can still edit the page itself as any of the linked images inPhotoImpact if you saved them in the *.UFO file format. This allows you to retain allcomponents of the Web page as individual objects with their HTML attributes.
Defines the documentas HTML
Contains internal browser relevantinformation, as well as JavaScript
Contains page content, such as text andimages
<html>
<head>
</head>
<body>
</body>
</html>
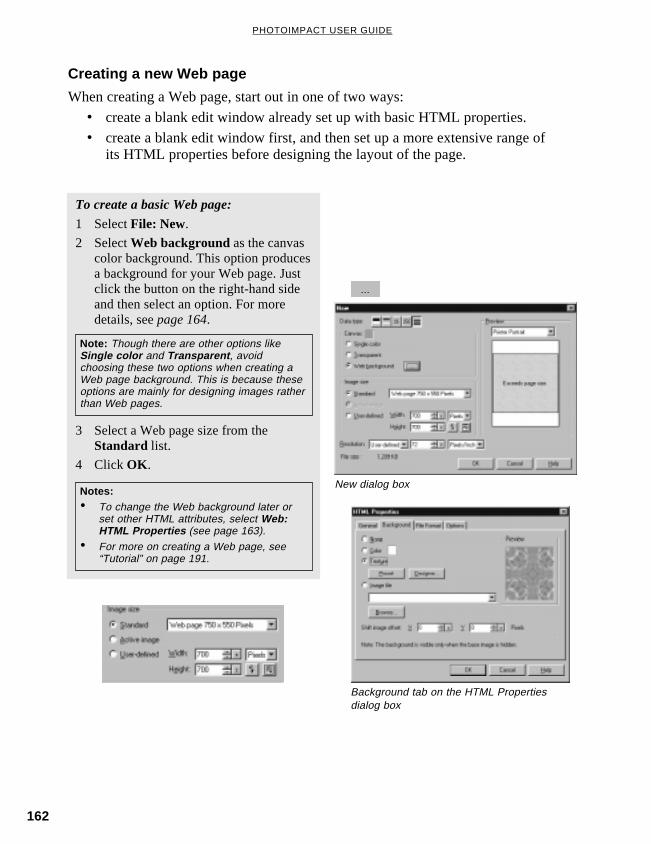
162
PHOTOIMPACT USER GUIDE
Creating a new Web page
When creating a Web page, start out in one of two ways:
• create a blank edit window already set up with basic HTML properties.
• create a blank edit window first, and then set up a more extensive range ofits HTML properties before designing the layout of the page.
To create a basic Web page:
1 Select File: New.
2 Select Web background as the canvascolor background. This option producesa background for your Web page. Justclick the button on the right-hand sideand then select an option. For moredetails, see page 164.
New dialog box
Background tab on the HTML Propertiesdialog box
Note: Though there are other options likeSingle color and Transparent , avoidchoosing these two options when creating aWeb page background. This is because theseoptions are mainly for designing images ratherthan Web pages.
Notes:• To change the Web background later or
set other HTML attributes, select Web:HTML Properties (see page 163).
• For more on creating a Web page, see“Tutorial” on page 191.
3 Select a Web page size from theStandard list.
4 Click OK .

163
CHAPTER 5: CREATING WEB PAGES
Using the HTML Properties dialog box
This feature sets detailed properties for your Web page anytime as desired. Simplyselect Web: HTML Properties to open this dialog box with the following options:
General
defines HTML tag attributes in your page.Though this information does not affect theappearance of your Web page, it containsimportant data such as keywords for searchengines.
Background
provides the options for choosing theWeb page background, as well as thecontrols for shifting a tiled image to fit theoutput window when viewed in abrowser.
File Format
designates the file formats for objects such asimage objects, or an image background inyour current edit window. These images arethen optimized and saved to the file formatyou specify.
Options
provides advanced settings for thebackground, relative URL, and image filesaving options.
General tab Background tab
File Format tab Options tab
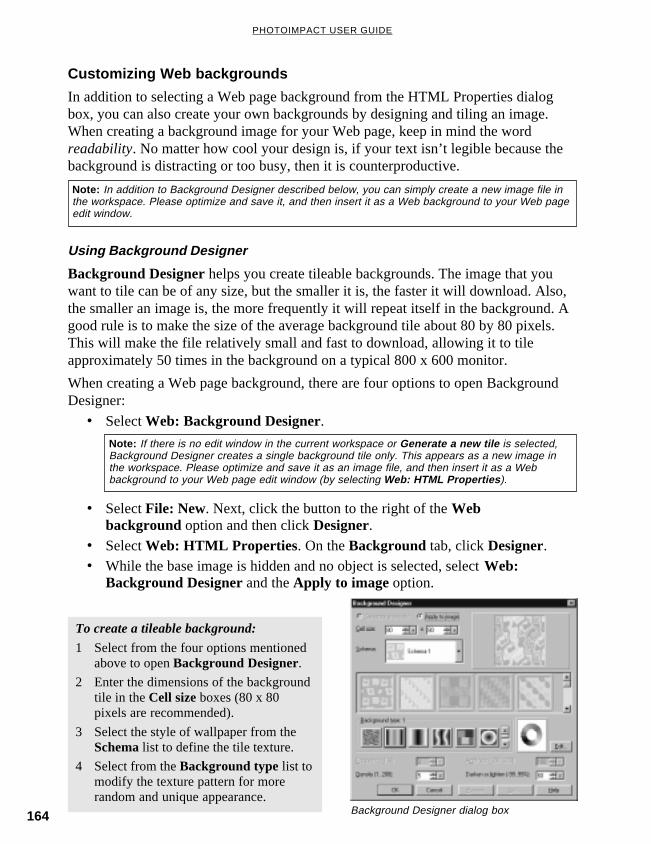
164
PHOTOIMPACT USER GUIDE
Customizing Web backgrounds
In addition to selecting a Web page background from the HTML Properties dialogbox, you can also create your own backgrounds by designing and tiling an image.When creating a background image for your Web page, keep in mind the wordreadability. No matter how cool your design is, if your text isn’t legible because thebackground is distracting or too busy, then it is counterproductive.
To create a tileable background:
1 Select from the four options mentionedabove to open Background Designer.
2 Enter the dimensions of the backgroundtile in the Cell size boxes (80 x 80pixels are recommended).
3 Select the style of wallpaper from theSchema list to define the tile texture.
4 Select from the Background type list tomodify the texture pattern for morerandom and unique appearance.
Background Designer dialog box
Note: If there is no edit window in the current workspace or Generate a new tile is selected,Background Designer creates a single background tile only. This appears as a new image inthe workspace. Please optimize and save it as an image file, and then insert it as a Webbackground to your Web page edit window (by selecting Web: HTML Properties ).
• Select File: New. Next, click the button to the right of the Webbackground option and then click Designer.
• Select Web: HTML Properties . On the Background tab, click Designer.• While the base image is hidden and no object is selected, select Web:
Background Designer and the Apply to image option.
Using Background Designer
Background Designer helps you create tileable backgrounds. The image that youwant to tile can be of any size, but the smaller it is, the faster it will download. Also,the smaller an image is, the more frequently it will repeat itself in the background. Agood rule is to make the size of the average background tile about 80 by 80 pixels.This will make the file relatively small and fast to download, allowing it to tileapproximately 50 times in the background on a typical 800 x 600 monitor.
When creating a Web page background, there are four options to open BackgroundDesigner:
• Select Web: Background Designer.
Note: In addition to Background Designer described below, you can simply create a new image file inthe workspace. Please optimize and save it, and then insert it as a Web background to your Web pageedit window.
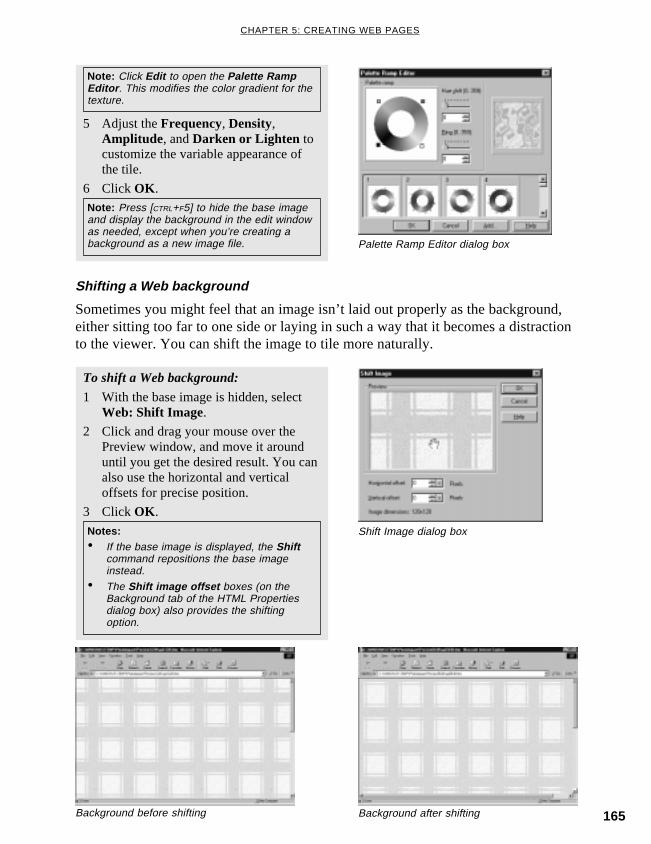
165
CHAPTER 5: CREATING WEB PAGES
5 Adjust the Frequency, Density,Amplitude , and Darken or Lighten tocustomize the variable appearance ofthe tile.
6 Click OK .
Notes:• If the base image is displayed, the Shift
command repositions the base imageinstead.
• The Shift image offset boxes (on theBackground tab of the HTML Propertiesdialog box) also provides the shiftingoption.
Background before shifting Background after shifting
Palette Ramp Editor dialog box
Shifting a Web background
Sometimes you might feel that an image isn’t laid out properly as the background,either sitting too far to one side or laying in such a way that it becomes a distractionto the viewer. You can shift the image to tile more naturally.
To shift a Web background:
1 With the base image is hidden, selectWeb: Shift Image.
2 Click and drag your mouse over thePreview window, and move it arounduntil you get the desired result. You canalso use the horizontal and verticaloffsets for precise position.
3 Click OK .
Shift Image dialog box
Note: Press [CTRL+F5] to hide the base imageand display the background in the edit windowas needed, except when you’re creating abackground as a new image file.
Note: Click Edit to open the Palette RampEditor . This modifies the color gradient for thetexture.

166
PHOTOIMPACT USER GUIDE
Creating a seamlessly tiled background
When tiling an image selection as a Web page background, you can create a tile thatis “seamless” or one that tiles in a way giving the appearance of a single texture. So,distinctions between tiles become invisible. These tiles are not only eye-catching butless distracting when reading the Web contents.
Settings for no seamless effect
Displayed preview result when no seamlesseffect is applied
To create a seamless tile:
1 Create a selection (not an object) in animage.
2 Select Web: Create Seamless Tile.3 Adjust the Merge size and Merge ratio
boxes to change how strongly the imageselection area overlaps upon itself andhow strongly it blends the overlap withthe native image pixels.
4 Click Preview to see how the imageselection area appears when tiled.Clicking anywhere on the previewimage or pressing [ESC] returns to theprevious dialog box.
5 Click OK . A new tile appears in theworkspace as a new image. Save it as animage file for later use as a background.
Note: A smaller image selection providesmore tiles. For a very large image selection,it might not tile. PhotoImpact automaticallydetects this situation when you clickPreview .
Warning messagewhen an image selection is too large
Displayed preview result when a seamlesseffect is applied
An example of settings for a seamless effect
Image selection in the original image
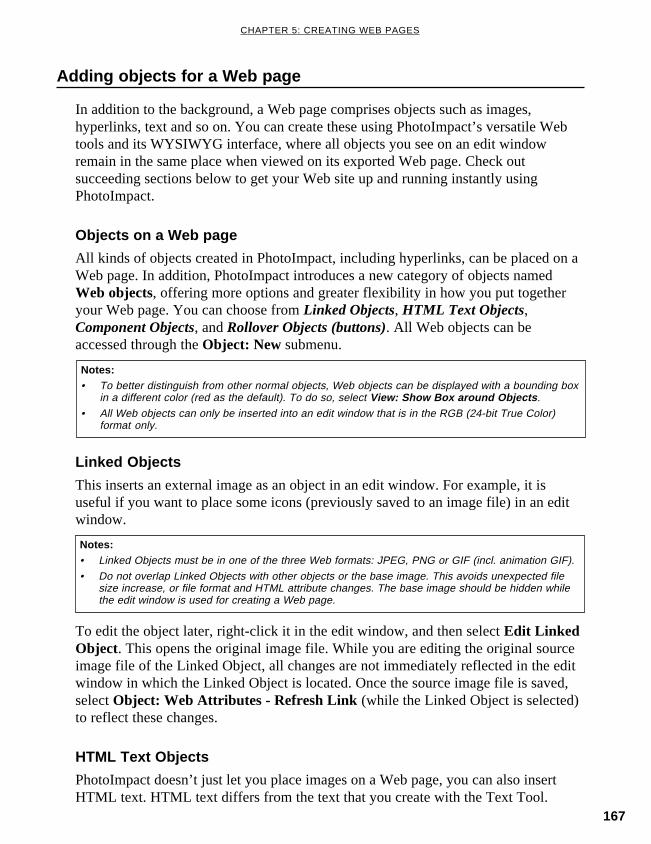
167
CHAPTER 5: CREATING WEB PAGES
Adding objects for a Web page
Linked Objects
This inserts an external image as an object in an edit window. For example, it isuseful if you want to place some icons (previously saved to an image file) in an editwindow.
In addition to the background, a Web page comprises objects such as images,hyperlinks, text and so on. You can create these using PhotoImpact’s versatile Webtools and its WYSIWYG interface, where all objects you see on an edit windowremain in the same place when viewed on its exported Web page. Check outsucceeding sections below to get your Web site up and running instantly usingPhotoImpact.
Objects on a Web page
All kinds of objects created in PhotoImpact, including hyperlinks, can be placed on aWeb page. In addition, PhotoImpact introduces a new category of objects namedWeb objects, offering more options and greater flexibility in how you put togetheryour Web page. You can choose from Linked Objects, HTML Text Objects,Component Objects, and Rollover Objects (buttons). All Web objects can beaccessed through the Object: New submenu.
To edit the object later, right-click it in the edit window, and then select Edit LinkedObject. This opens the original image file. While you are editing the original sourceimage file of the Linked Object, all changes are not immediately reflected in the editwindow in which the Linked Object is located. Once the source image file is saved,select Object: Web Attributes - Refresh Link (while the Linked Object is selected)to reflect these changes.
HTML Text Objects
PhotoImpact doesn’t just let you place images on a Web page, you can also insertHTML text. HTML text differs from the text that you create with the Text Tool.
Notes:• To better distinguish from other normal objects, Web objects can be displayed with a bounding box
in a different color (red as the default). To do so, select View: Show Box around Objects .
• All Web objects can only be inserted into an edit window that is in the RGB (24-bit True Color)format only.
Notes:• Linked Objects must be in one of the three Web formats: JPEG, PNG or GIF (incl. animation GIF).
• Do not overlap Linked Objects with other objects or the base image. This avoids unexpected filesize increase, or file format and HTML attribute changes. The base image should be hidden whilethe edit window is used for creating a Web page.
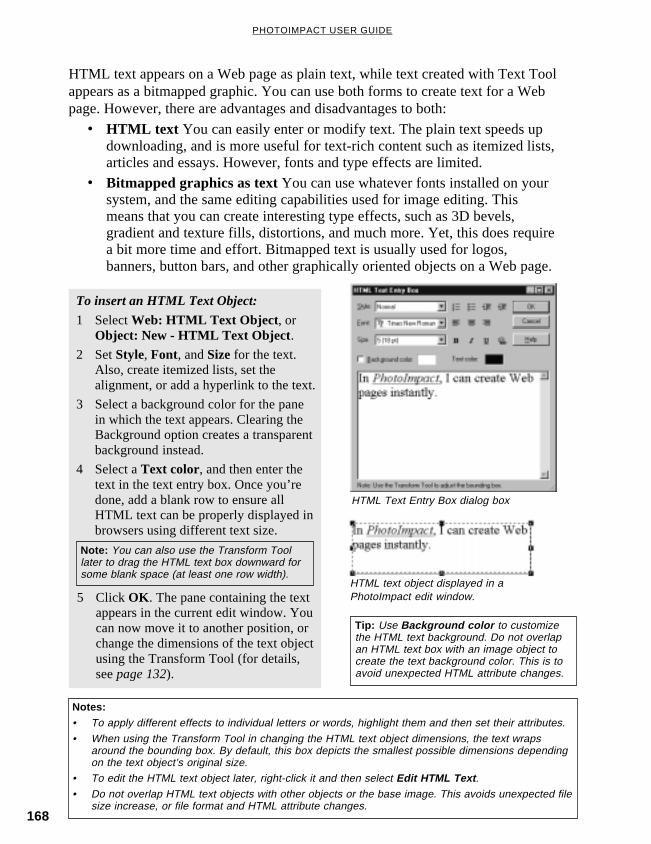
168
PHOTOIMPACT USER GUIDE
HTML text appears on a Web page as plain text, while text created with Text Toolappears as a bitmapped graphic. You can use both forms to create text for a Webpage. However, there are advantages and disadvantages to both:
• HTML text You can easily enter or modify text. The plain text speeds updownloading, and is more useful for text-rich content such as itemized lists,articles and essays. However, fonts and type effects are limited.
• Bitmapped graphics as text You can use whatever fonts installed on yoursystem, and the same editing capabilities used for image editing. Thismeans that you can create interesting type effects, such as 3D bevels,gradient and texture fills, distortions, and much more. Yet, this does requirea bit more time and effort. Bitmapped text is usually used for logos,banners, button bars, and other graphically oriented objects on a Web page.
Notes:• To apply different effects to individual letters or words, highlight them and then set their attributes.
• When using the Transform Tool in changing the HTML text object dimensions, the text wrapsaround the bounding box. By default, this box depicts the smallest possible dimensions dependingon the text object’s original size.
• To edit the HTML text object later, right-click it and then select Edit HTML Text .
• Do not overlap HTML text objects with other objects or the base image. This avoids unexpected filesize increase, or file format and HTML attribute changes.
To insert an HTML Text Object:
1 Select Web: HTML Text Object , orObject: New - HTML Text Object .
2 Set Style, Font, and Size for the text.Also, create itemized lists, set thealignment, or add a hyperlink to the text.
3 Select a background color for the panein which the text appears. Clearing theBackground option creates a transparentbackground instead.
4 Select a Text color, and then enter thetext in the text entry box. Once you’redone, add a blank row to ensure allHTML text can be properly displayed inbrowsers using different text size.
HTML Text Entry Box dialog box
Note: You can also use the Transform Toollater to drag the HTML text box downward forsome blank space (at least one row width).
5 Click OK . The pane containing the textappears in the current edit window. Youcan now move it to another position, orchange the dimensions of the text objectusing the Transform Tool (for details,see page 132).
Tip: Use Background color to customizethe HTML text background. Do not overlapan HTML text box with an image object tocreate the text background color. This is toavoid unexpected HTML attribute changes.
HTML text object displayed in aPhotoImpact edit window.
169
CHAPTER 5: CREATING WEB PAGES
Component Objects
Making the individual buttons, banners, and other objects for your Web page is oneof the fun parts of Web creation. PhotoImpact offers you a vast range of possibilitiesfor creating these fascinating objects through Component Designer. It helps youquickly and easily create seven stunning high-quality path- and text-based Webcomponents, including banners, bullets, buttons, button bars, icons, rolloverbuttons, and separators. Its intuitive user interface lets you make a Web componentin just three steps: select a component, customize it and then export it. You canexport the image to PhotoImpact for further customization, or to Image Optimizer tominimize image file size and download time. For button bars and rollover buttons,you can even export the HTML code directly to a Web page.
To reduce your efforts in designing Web components, Component Designer providesnumerous component presets. After you have selected a component, you can modifyvarious aspects and preview the changes in real-time. Once you’ve finished changingsettings, you can export it immediately.
There are two ways to run Component Designer:
• Select Web: Component Designer. Here you can keep creating as manyWeb components as you like, since the program will still remain running,even if you have already closed PhotoImpact.
• Select Object: New - Component Designer. This accesses ComponentDesigner more directly, because you don’t have to make an extra clickwhen exporting it to PhotoImpact workspace, and still need to drag it intoan edit window that you want. Instead, when you’re done, just click OK .The object then appears in the current edit window immediately.
Note: When you access Component Designer from the Object menu, it is closed once you click OK .
Individual components (including all presets for that component) are made of severallayers of text and paths, each with its own attributes. The layers may have differentnames, but they do share similar attributes. This means that all components can becreated using basically the same method. The following sections show you how tocreate components using a specific preset, but of course you can always follow thesame procedure for any other preset.
Once a component is created, you can always edit it again in Component Designer.Just right-click the object, and then select Edit Component.
Notes:• In Component Designer, if you choose to export as individual objects, they are still editable in
PhotoImpact. Yet, their Component attributes are lost, making them uneditable in ComponentDesigner.
• Component objects can be inserted to an edit window in the RGB (True Color) format only.
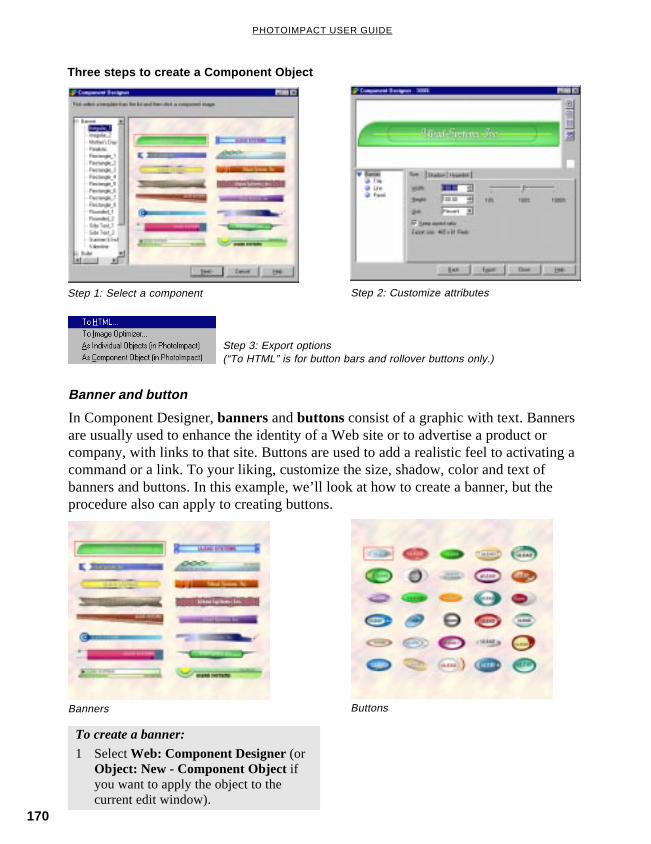
170
PHOTOIMPACT USER GUIDE
Banner and button
In Component Designer, banners and buttons consist of a graphic with text. Bannersare usually used to enhance the identity of a Web site or to advertise a product orcompany, with links to that site. Buttons are used to add a realistic feel to activating acommand or a link. To your liking, customize the size, shadow, color and text ofbanners and buttons. In this example, we’ll look at how to create a banner, but theprocedure also can apply to creating buttons.
Step 2: Customize attributesStep 1: Select a component
Step 3: Export options(“To HTML” is for button bars and rollover buttons only.)
Three steps to create a Component Object
ButtonsBanners
To create a banner:
1 Select Web: Component Designer (orObject: New - Component Object ifyou want to apply the object to thecurrent edit window).

171
CHAPTER 5: CREATING WEB PAGES
2 Click the plus (+) sign to expand theBanner folder for template lists, andthen select one.
3 Click the desired banner and then clickNext, or simply double-click it.
4 Click the root layer or sub layers formodifications. The lower right panedisplays the associated attributes youcan alter. Clicking tabs switches todifferent sets of attributes.
A banner template
Hyperlink tab in the Banner (root) layer
5 Click Export to select where to sendthe banner:
• To Image Optimizer optimizes filesizes for the Web and saves it in theGIF, JPEG or PNG format.
• As Individual Objects (inPhotoImpact) keeps objectsunmerged from the background. Yet,further editing on ComponentDesigner attributes are not available,as the format loses all ComponentDesigner attributes, allowing editingas normal images only.
• As Component Object (inPhotoImpact) keeps objects intact forfurther editing in ComponentDesigner.
Notes:• Depending on the selected banner,
available layers and their names vary.• For the banner size, we recommend the
use of preset default values, as they arealready optimized to fit in a Web page.
• The Hyperlink tab is where you canspecify a URL address and related optionsfor accessing a Web site.
Note: Click OK if accessing ComponentDesigner from the Object menu. This sends thebanner directly to the current edit window andcloses Component Designer automatically.
Selected banner preset
Submenu on the Export button
6 Click Back to create more Webcomponents, or click Close.
Sub layers
Root layer

172
PHOTOIMPACT USER GUIDE
Button bar
A button bar is an array of buttons (usually uniformly shaped) aligned horizontallyor vertically, offering a list of choices for navigating a Web site. A button bar hasattributes such as size, shadow, color, text, options and hyperlinks.
A button bar template
Selected button bar preset
Button bars
To create a button bar:
1 Select Web: Component Designer (orObject: New - Component Object ifyou want to apply the object to thecurrent edit window).
2 Click the plus (+) sign to expand theButton Bar folder for template lists,and then select one.
3 Click the desired button bar and thenclick Next, or simply double-click it.
4 On the Options tab, highlighted text inthe list indicates that it is ready formodification. Type in desired text andthen press ENTER. Click the next text foranother change accordingly. Whileediting the text, enter hyperlinkinformation for each button such asURL.
Options tab in the Button Bar (root) layer
Note: To change the order of text that appearsover the buttons, use the Move button up/down buttons. You can also add or deletebuttons on the same tab.
5 On the Layout tab, decide how toorganize the button bar. For example,selecting the Same width for allbuttons option gives all buttons thesame size, even if the text length variesamong various buttons.
Sub layers
Root layer

173
CHAPTER 5: CREATING WEB PAGES
6 Modify the text appearance, thedimensions of the button bar, and theshadow on the Text, Size, and Shadowtabs respectively.
7 Click other layers for modifications asneeded.
Submenu on the Export button
Bullet, icon, and separator
A bullet has no text, and serves as a typographical symbol representing differentlevels of information. It is often used when you’re preparing an itemized list on aWeb page. And an icon is a small image without text. It uses an image to symbolize asoftware program where users can open by double-clicking or other methods. It canalso stand for a commonly recognized destination or action (such as a home page ore-mail). As for a separator, it is a graphic used to set apart different sections of aWeb page. So, viewers of this Web page can have a visual clue to notice thedifference between sections, especially when they need to scroll down the page.
Even though a bullet, an icon, and a separator look different, they share the samecreation procedure and have the same size, shadow, color and hyperlink attributes.Therefore, though the following procedure uses a bullet preset, same steps apply toall.
Layout tab in the Button Bar (root) layer
Bullets Icons
Note: Depending on the selected button bar,available layers and their names might vary.
8 Click Export to select where to sendthe button bar. Selecting To HTMLsaves the button bar and associatedimages to a Web page file (*.htm or*.html). For other options, see step 5about banners on page 171.
9 Click Back to create more Webcomponents, or click Close.
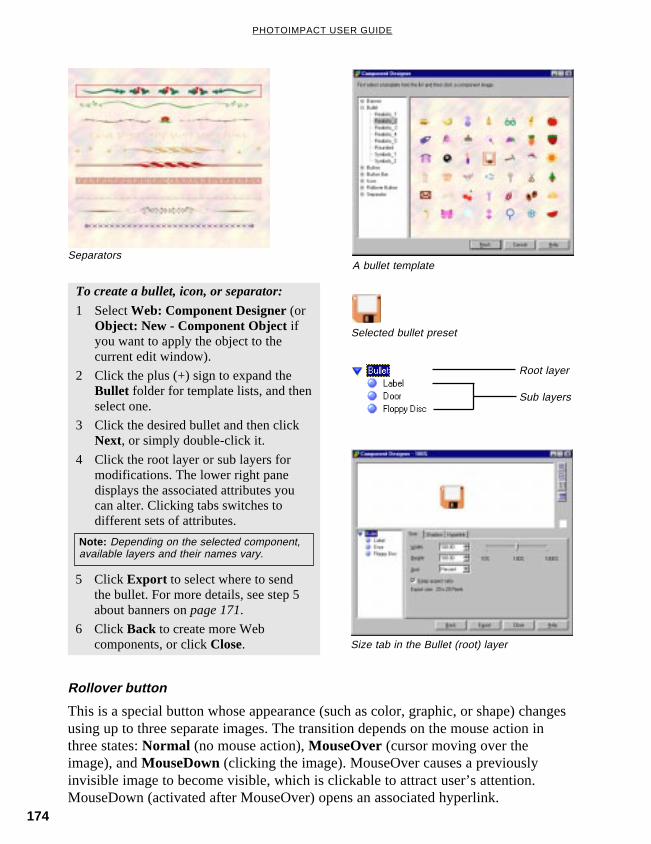
174
PHOTOIMPACT USER GUIDE
To create a bullet, icon, or separator:
1 Select Web: Component Designer (orObject: New - Component Object ifyou want to apply the object to thecurrent edit window).
2 Click the plus (+) sign to expand theBullet folder for template lists, and thenselect one.
3 Click the desired bullet and then clickNext, or simply double-click it.
4 Click the root layer or sub layers formodifications. The lower right panedisplays the associated attributes youcan alter. Clicking tabs switches todifferent sets of attributes.
SeparatorsA bullet template
Note: Depending on the selected component,available layers and their names vary.
5 Click Export to select where to sendthe bullet. For more details, see step 5about banners on page 171.
6 Click Back to create more Webcomponents, or click Close.
Selected bullet preset
Size tab in the Bullet (root) layer
Rollover button
This is a special button whose appearance (such as color, graphic, or shape) changesusing up to three separate images. The transition depends on the mouse action inthree states: Normal (no mouse action), MouseOver (cursor moving over theimage), and MouseDown (clicking the image). MouseOver causes a previouslyinvisible image to become visible, which is clickable to attract user’s attention.MouseDown (activated after MouseOver) opens an associated hyperlink.
Sub layers
Root layer
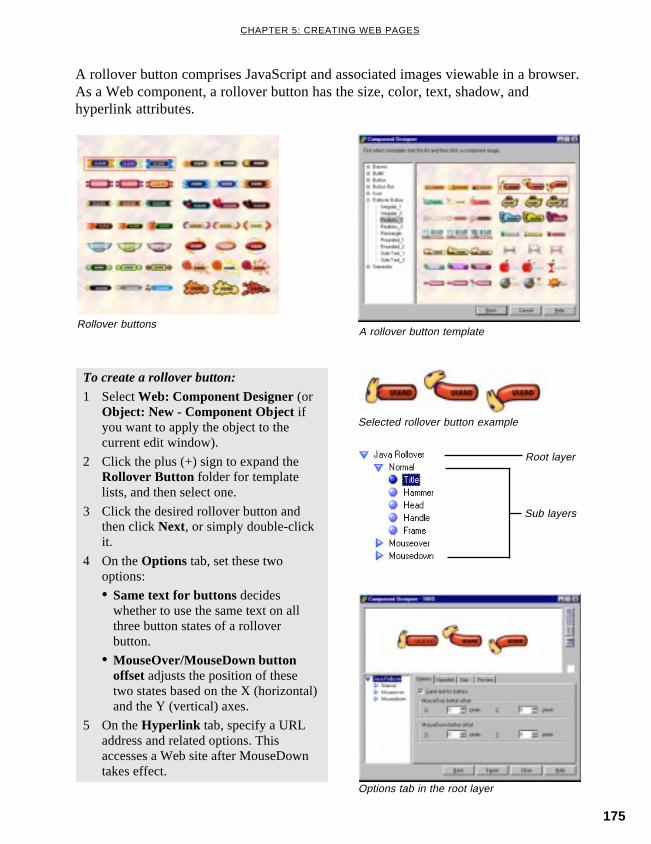
175
CHAPTER 5: CREATING WEB PAGES
A rollover button comprises JavaScript and associated images viewable in a browser.As a Web component, a rollover button has the size, color, text, shadow, andhyperlink attributes.
To create a rollover button:
1 Select Web: Component Designer (orObject: New - Component Object ifyou want to apply the object to thecurrent edit window).
2 Click the plus (+) sign to expand theRollover Button folder for templatelists, and then select one.
3 Click the desired rollover button andthen click Next, or simply double-clickit.
4 On the Options tab, set these twooptions:
• Same text for buttons decideswhether to use the same text on allthree button states of a rolloverbutton.
• MouseOver/MouseDown buttonoffset adjusts the position of thesetwo states based on the X (horizontal)and the Y (vertical) axes.
5 On the Hyperlink tab, specify a URLaddress and related options. Thisaccesses a Web site after MouseDowntakes effect.
Rollover buttonsA rollover button template
Selected rollover button example
Options tab in the root layer
Sub layers
Root layer
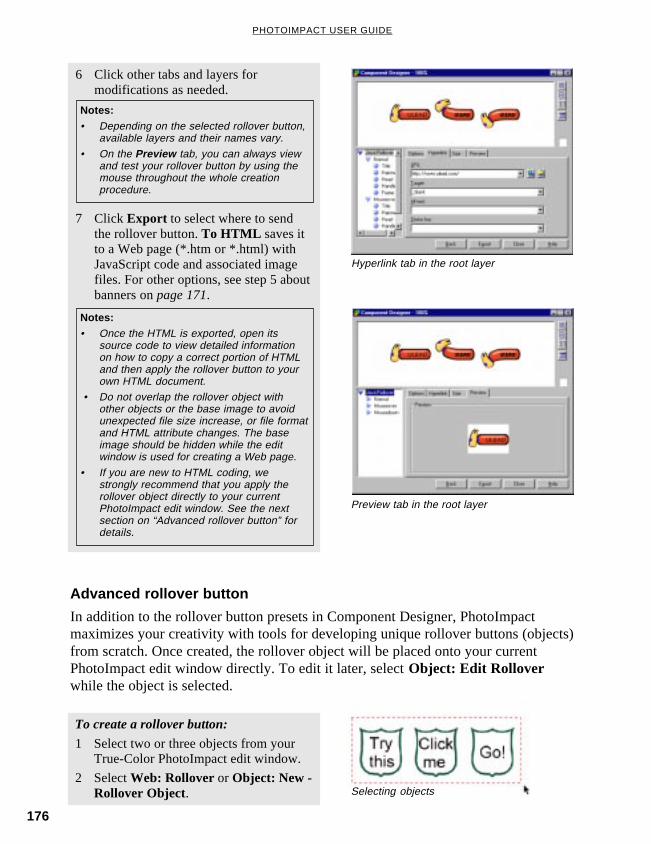
176
PHOTOIMPACT USER GUIDE
Advanced rollover button
In addition to the rollover button presets in Component Designer, PhotoImpactmaximizes your creativity with tools for developing unique rollover buttons (objects)from scratch. Once created, the rollover object will be placed onto your currentPhotoImpact edit window directly. To edit it later, select Object: Edit Rolloverwhile the object is selected.
Preview tab in the root layer
6 Click other tabs and layers formodifications as needed.
Notes:• Depending on the selected rollover button,
available layers and their names vary.
• On the Preview tab, you can always viewand test your rollover button by using themouse throughout the whole creationprocedure.
Notes:• Once the HTML is exported, open its
source code to view detailed informationon how to copy a correct portion of HTMLand then apply the rollover button to yourown HTML document.
• Do not overlap the rollover object withother objects or the base image to avoidunexpected file size increase, or file formatand HTML attribute changes. The baseimage should be hidden while the editwindow is used for creating a Web page.
• If you are new to HTML coding, westrongly recommend that you apply therollover object directly to your currentPhotoImpact edit window. See the nextsection on “Advanced rollover button” fordetails.
7 Click Export to select where to sendthe rollover button. To HTML saves itto a Web page (*.htm or *.html) withJavaScript code and associated imagefiles. For other options, see step 5 aboutbanners on page 171.
To create a rollover button:
1 Select two or three objects from yourTrue-Color PhotoImpact edit window.
2 Select Web: Rollover or Object: New -Rollover Object.
Hyperlink tab in the root layer
Selecting objects
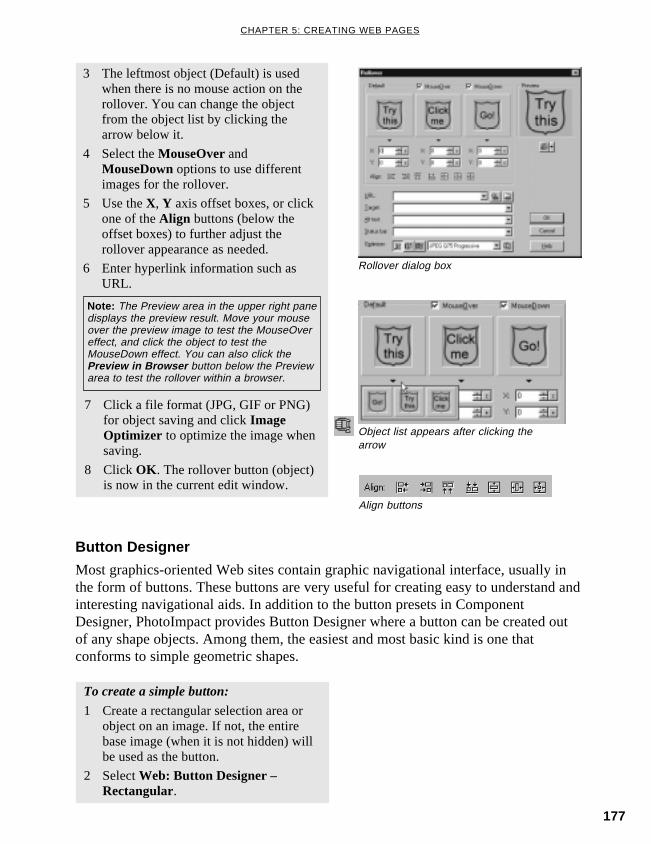
177
CHAPTER 5: CREATING WEB PAGES
Rollover dialog box
3 The leftmost object (Default) is usedwhen there is no mouse action on therollover. You can change the objectfrom the object list by clicking thearrow below it.
4 Select the MouseOver andMouseDown options to use differentimages for the rollover.
5 Use the X, Y axis offset boxes, or clickone of the Align buttons (below theoffset boxes) to further adjust therollover appearance as needed.
6 Enter hyperlink information such asURL.
Object list appears after clicking thearrow
Note: The Preview area in the upper right panedisplays the preview result. Move your mouseover the preview image to test the MouseOvereffect, and click the object to test theMouseDown effect. You can also click thePreview in Browser button below the Previewarea to test the rollover within a browser.
7 Click a file format (JPG, GIF or PNG)for object saving and click ImageOptimizer to optimize the image whensaving.
8 Click OK . The rollover button (object)is now in the current edit window.
Align buttons
Button Designer
Most graphics-oriented Web sites contain graphic navigational interface, usually inthe form of buttons. These buttons are very useful for creating easy to understand andinteresting navigational aids. In addition to the button presets in ComponentDesigner, PhotoImpact provides Button Designer where a button can be created outof any shape objects. Among them, the easiest and most basic kind is one thatconforms to simple geometric shapes.
To create a simple button:
1 Create a rectangular selection area orobject on an image. If not, the entirebase image (when it is not hidden) willbe used as the button.
2 Select Web: Button Designer –Rectangular.
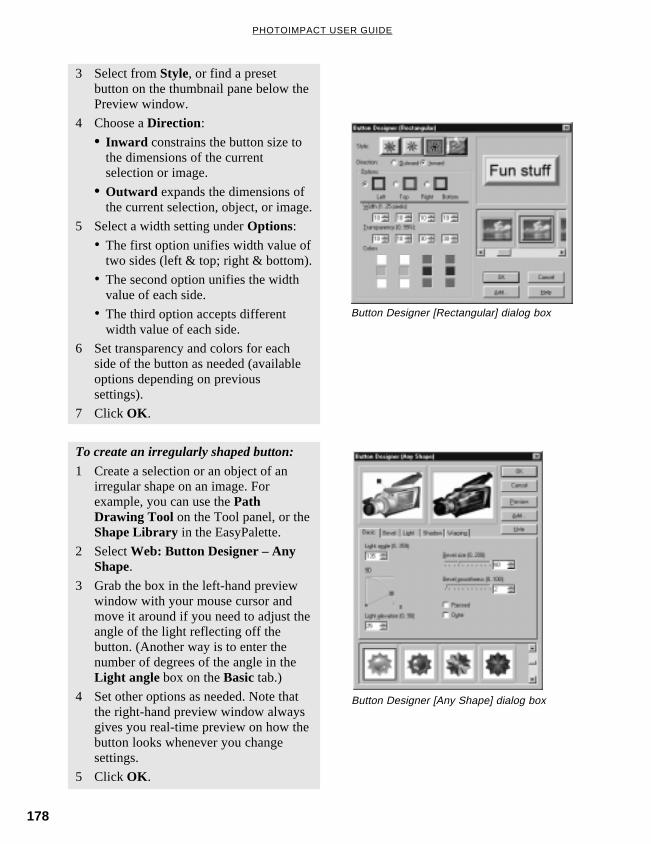
178
PHOTOIMPACT USER GUIDE
Button Designer [Any Shape] dialog box
3 Select from Style, or find a presetbutton on the thumbnail pane below thePreview window.
4 Choose a Direction:
• Inward constrains the button size tothe dimensions of the currentselection or image.
• Outward expands the dimensions ofthe current selection, object, or image.
5 Select a width setting under Options:
• The first option unifies width value oftwo sides (left & top; right & bottom).
• The second option unifies the widthvalue of each side.
• The third option accepts differentwidth value of each side.
6 Set transparency and colors for eachside of the button as needed (availableoptions depending on previoussettings).
7 Click OK .
To create an irregularly shaped button:
1 Create a selection or an object of anirregular shape on an image. Forexample, you can use the PathDrawing Tool on the Tool panel, or theShape Library in the EasyPalette.
2 Select Web: Button Designer – AnyShape.
3 Grab the box in the left-hand previewwindow with your mouse cursor andmove it around if you need to adjust theangle of the light reflecting off thebutton. (Another way is to enter thenumber of degrees of the angle in theLight angle box on the Basic tab.)
4 Set other options as needed. Note thatthe right-hand preview window alwaysgives you real-time preview on how thebutton looks whenever you changesettings.
5 Click OK .
Button Designer [Rectangular] dialog box

179
CHAPTER 5: CREATING WEB PAGES
Creating hyperlinks in objects
Since hyperlinks are a common attribute on aWeb page, all types of PhotoImpact objectsare now empowered to include hyperlinks.So, these objects can be stylish and eye-catching alternatives to simple text-basedhyperlinks. While one (or multiple objects) isselected, double-click it or select Object:Properties to enter hyperlink information.
Hyperlink tabin the Object: Properties dialog box
Creating hyperlinks in objects by image maps
Sometimes, hyperlinks exist in multiple objects, or grouped objects. And you maywant to use a different shape for a clickable area in an object. To help you bettermanipulate these types of object hyperlinks and easily create a navigational aid onhyperlinks, use the Image Map feature.
To create hyperlinks using image maps:
1 Select an area that you want to makeclickable, and then convert it to anobject. (Skip this step if objects alreadyexist in the current window.)
2 Select Web: Image Map.
3 An object list appears in the lower leftpane. Select an object from the list, orclick the object itself in the upperpreview window.
4 Enter hyperlink information such asURL for the selected object.
5 If you want to use a different shape asthe clickable area, click one of theShape buttons. To test the image map ina browser, click the Browser previewbutton.
6 Repeat steps 3 and 5 as needed. Whenyou’re done, click OK .
7 Select File: Save for Web - As HTMLto save it as a Web page along with allnecessary image files.
Image Map dialog box
Notes:• In the object list, right-click each object to display a popup menu where you can quickly copy,
paste, or clear an object’s entire hyperlink attributes.
• If the default clickable shape of an object is changed in an image map, you will only see thechange when the Web page is viewed in a browser.
180
PHOTOIMPACT USER GUIDE
Slicer
Similar to image maps, Slicer also creates hyperlinks within an image. Yet, whileimage maps are based on objects and allow irregular “shapes,” Slicer applies to bothobjects and the base image with rectangular slices only.
Slicer divides the image into specified slices where each one can be assigned to ahyperlink. In a browser, clicking any of the slices in the image brings you to itslinked Web page. Also, each slice can be saved to different Web image formats.
Note: Slicer can slice an object to several pieces which access different Web sites. Yet, selecting theProtect Linked, Rollover, and HTML Text objects option prevents these objects from being sliced.
Basic controls in Slicer
Slicer provides the following control buttons when you’re slicing an image.
Auto slice automatically slices the image. This is especially useful when you haveWeb objects on the image (see page 167 for details), because Web objects areprotected and slices are created around the object’s border.
Pick mode selects a slice so you can customize its hyperlink information.
Add horizontal sliced lines inserts lines based on the horizontal axis.
Add vertical sliced lines inserts lines based on the vertical axis.
Erase sliced lines removes a line.
Slice evenly creates slices of the same size.
Erase all sliced lines removes all lines.
Import table data applies a Ulead Slicer Table file (*.uss file extension) to thecurrent image. It is especially useful in applying exactly the same slicing method toseveral images.
Export table data saves the slicing information to a Ulead Slicer Table file (*.ussfile extension) for later use.
Optimization preview displays the optimized image result in the preview window.
Zoom in increases the image magnification in the preview window.
Zoom out decreases the image magnification in the preview window.
Show actual size displays the image at 1:1 ratio in the preview window.
Fit in window displays the image with the largest magnification to fit in the previewwindow.
Center in window places the image in the center of the preview window.
Sliced line color selects a line color for better distinction between slices.
Preview in Browser shows how the sliced image looks in a browser.

181
CHAPTER 5: CREATING WEB PAGES
To slice an image:
1 Select Web: Slicer.2 Click Add horizontal (or vertical)
sliced lines, and then click a desiredlocation on the image in the previewwindow. While holding down themouse button, drag the mousehorizontally or vertically to choose thelocation of the line. Then release themouse button. A line separating theslices is added accordingly.
Deleting lines in the Slicer dialog box
Slicer dialog box
Note: Holding down the CTRL key quicklytoggles between adding horizontal line andadding vertical line, when you’re in either oneof the states.
3 Repeat step 2 to add more lines asneeded. If you want to adjust the linebetween borders or intersections, clickPick mode and drag the lineaccordingly. To remove a line, clickErase sliced lines, and then move themouse over the line and click it.
Note: To move part of a line, hold down theCTRL key in the Pick mode state. To deletepart of a line, hold down the CTRL key in theErase sliced lines state.
4 In the Pick mode, click each slice in theimage (or select a slice from the slicelist in the lower left pane) to enterhyperlink information. Here all slicesare named using original file name plusindex numbers. To change it, double-clicking the slice name or directly entera new name in the Image column.
5 Select JPG, GIF or PNG file formatfrom the Optimizer area for respectiveslices. You can click Image Optimizerfor further customization.
6 Click Preview in Browser to test theimage in a browser. Then click OK .
7 Select File: Save for Web - As HTMLto save as a Web page along with allassociated image files.
182
PHOTOIMPACT USER GUIDE
Optimizing Web images in Image Optimizer
Once you’ve created the images for your Web page, whether they are backgrounds ornavigational elements, you can save them in a Web-optimized format such as the twomost common Web formats: GIF and JPEG, or a newer format named PNG. (SeeAppendix on page 253 for details.)
PhotoImpact offers an easy-to-use GIF, JPEG and PNG Image Optimizer to saveyour images with the highest possible quality at the lowest possible file sizes. Youcan open Image Optimizer in a number of ways:
• Select File: Save As and choose JPEG, GIF, or PNG from the Save as typelist. Then click Options. You can select from the Display save options list(in the Preferences: Open & Save tab), so everytime you select Save/SaveAs, Image Optimizer opens first before the saving process starts.
• Select File: Save for Web and its submenu.
• Right-click a selected object and select Image Optimizer.• Click Export: To Image Optimizer in Component Designer.
• Click the Image Optimizer button (represented as an icon) in Slicer orRollover.
• Select Web: Image Optimizer.
Basic controls in Image Optimizer
Image Optimizer provides the following control buttons:
Zoom in increases the image magnification in the preview windows.
Zoom out decreases the image magnification in the preview windows.
Show actual size displays images at 1:1 ratio in the preview windows.
Fit in window displays images with the largest magnification to fit in the previewwindows.
Center in window places images in the center of the preview windows.
Display the original and compressed images / Display the compressed imagedisplays both the original and compressed images, or only the compressed image inthe preview windows.
Modem speed menu specifies the modem speed to use as the basis for calculatingInternet download time.
Browser preview shows how the optimized image looks in a browser.
Resample resizes the image by resampling pixels. Carefully use this feature becauseresampling may deteriorate the image quality.
Note: When opening Image Optimizer in various ways, the dialog box and available features can beslightly different to meet appropriate situations.

183
CHAPTER 5: CREATING WEB PAGES
Image to Optimize dialog box
To optimize an image as a JPEG:
1 Select Web: Image Optimizer. Ifobjects exist, decide how to save theseobjects for optimization:
• Entire image combines all objectsand the Web background (or the baseimage, depending on which one isdisplayed on screen).
• Selected objects saves selectedobjects as one whole image.
• Selected objects individually savesselected objects one by one. ImageOptimizer prompts a confirmationmessage before displaying the nextobject, once the saving process of thecurrent displayed object is completed.
2 On the JPEG Options tab, select a typeof JPEG file from the Preset list or theMode list:
• Progressive creates an image thatgradually fades in as it downloads.This creates a smaller file, but somebrowsers may have difficultydisplaying it properly.
Note: Use the Zoom in mode, and move the mouse over the images in the preview windows to aspecific location. This provides a closer look at the image quality.
Crop cuts away unwanted portions of the image.
Display with/without preview windows shows or hides preview windows for theoriginal and compressed images. The button is represented by an arrow.
Whenever the optimization settings are changed, both the original file size as well asestimated download time and the optimized ones are displayed above the previewwindows. This gives you quick reference to judge the desired file size and downloadtime.
Optimizing an image as a JPEG
JPEG Image Optimizer saves your images as JPEGs, which tend to be smaller thanGIF files. The JPEG format is a lossy format, meaning that the more it is compressed,the more image data is lost. Yet, you can control precisely how much compression isapplied to images in order to get exactly the results you want. JPEGs support 24-bitcolors, so they are especially suitable for photorealistic images. For more details onJPEGs, see Appendix on page 256.
Continue Optimizing dialog box
JPEG Image Optimizer: JPEG Options tab
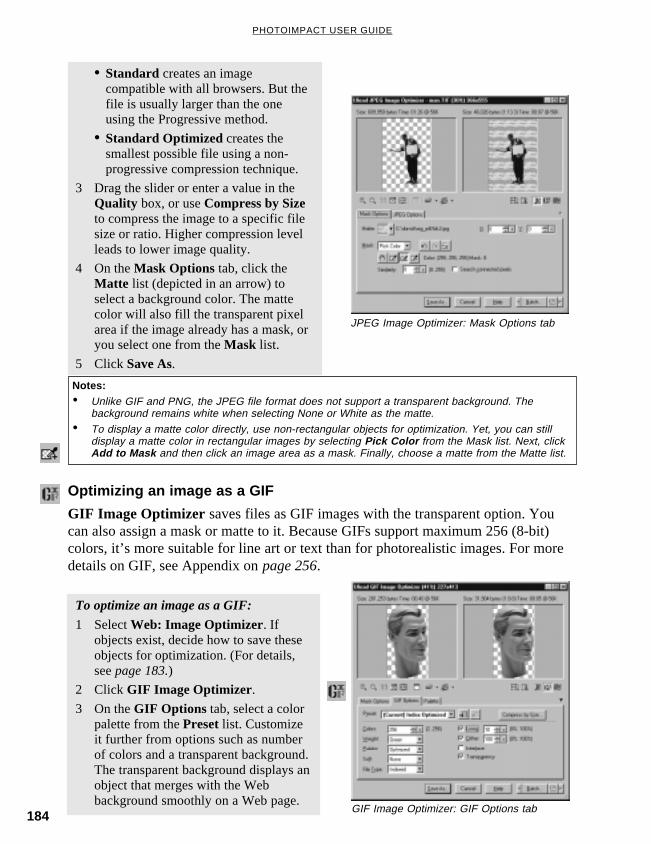
184
PHOTOIMPACT USER GUIDE
• Standard creates an imagecompatible with all browsers. But thefile is usually larger than the oneusing the Progressive method.
• Standard Optimized creates thesmallest possible file using a non-progressive compression technique.
3 Drag the slider or enter a value in theQuality box, or use Compress by Sizeto compress the image to a specific filesize or ratio. Higher compression levelleads to lower image quality.
4 On the Mask Options tab, click theMatte list (depicted in an arrow) toselect a background color. The mattecolor will also fill the transparent pixelarea if the image already has a mask, oryou select one from the Mask list.
5 Click Save As.
JPEG Image Optimizer: Mask Options tab
Notes:• Unlike GIF and PNG, the JPEG file format does not support a transparent background. The
background remains white when selecting None or White as the matte.
• To display a matte color directly, use non-rectangular objects for optimization. Yet, you can stilldisplay a matte color in rectangular images by selecting Pick Color from the Mask list. Next, clickAdd to Mask and then click an image area as a mask. Finally, choose a matte from the Matte list.
Optimizing an image as a GIF
GIF Image Optimizer saves files as GIF images with the transparent option. Youcan also assign a mask or matte to it. Because GIFs support maximum 256 (8-bit)colors, it’s more suitable for line art or text than for photorealistic images. For moredetails on GIF, see Appendix on page 256.
To optimize an image as a GIF:
1 Select Web: Image Optimizer. Ifobjects exist, decide how to save theseobjects for optimization. (For details,see page 183.)
2 Click GIF Image Optimizer.3 On the GIF Options tab, select a color
palette from the Preset list. Customizeit further from options such as numberof colors and a transparent background.The transparent background displays anobject that merges with the Webbackground smoothly on a Web page.
GIF Image Optimizer: GIF Options tab
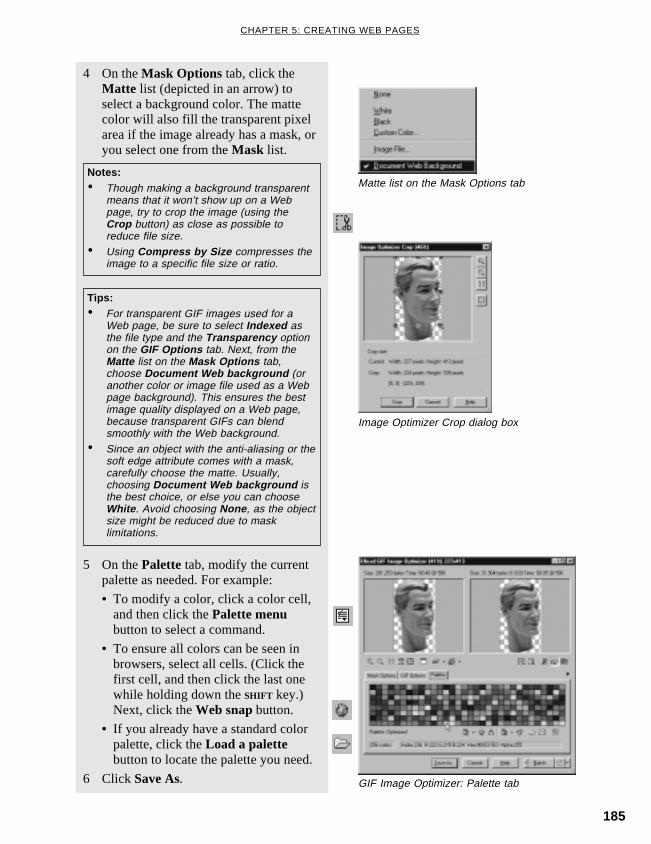
185
CHAPTER 5: CREATING WEB PAGES
4 On the Mask Options tab, click theMatte list (depicted in an arrow) toselect a background color. The mattecolor will also fill the transparent pixelarea if the image already has a mask, oryou select one from the Mask list.
Matte list on the Mask Options tab
GIF Image Optimizer: Palette tab
5 On the Palette tab, modify the currentpalette as needed. For example:
• To modify a color, click a color cell,and then click the Palette menubutton to select a command.
• To ensure all colors can be seen inbrowsers, select all cells. (Click thefirst cell, and then click the last onewhile holding down the SHIFT key.)Next, click the Web snap button.
• If you already have a standard colorpalette, click the Load a palettebutton to locate the palette you need.
6 Click Save As.
Notes:• Though making a background transparent
means that it won’t show up on a Webpage, try to crop the image (using theCrop button) as close as possible toreduce file size.
• Using Compress by Size compresses theimage to a specific file size or ratio.
Image Optimizer Crop dialog box
Tips:• For transparent GIF images used for a
Web page, be sure to select Indexed asthe file type and the Transparency optionon the GIF Options tab. Next, from theMatte list on the Mask Options tab,choose Document Web background (oranother color or image file used as a Webpage background). This ensures the bestimage quality displayed on a Web page,because transparent GIFs can blendsmoothly with the Web background.
• Since an object with the anti-aliasing or thesoft edge attribute comes with a mask,carefully choose the matte. Usually,choosing Document Web background isthe best choice, or else you can chooseWhite . Avoid choosing None , as the objectsize might be reduced due to masklimitations.

186
PHOTOIMPACT USER GUIDE
Optimizing an image as a PNG
PNG Image Optimizer saves image files in a PNG format. This file format offers24-bit images and supports gamma information and transparency. An advantage toPNG (over JPEG and a lesser extent GIF) is that it uses a lossless compressionmethod while supporting True Color images. For more details on PNG, see Appendixon page 256.
PNG Image Optimizer: PNG Options tab
To optimize an image as a PNG:
1 Select Web: Image Optimizer. Ifobjects exist, decide how to save theseobjects for optimization. (For details,see page 183.)
2 Click PNG Image Optimizer.3 On the PNG Options tab, select a color
palette from the Preset list. Customizeit further through options such asnumber of colors and a transparentbackground.
Notes:• A transparent background displays an
object merging with the Web backgroundsmoothly on a Web page.
• Using Compress by Size (not available forTrue Color images) compresses the imageto a specific file size or ratio.
4 On the Mask Options tab, click theMatte list (depicted in an arrow) toselect a background color. The mattecolor will also fill the transparent pixelarea if the image already has a mask, oryou select one from the Mask list.
5 For an index PNG file (no more than256 colors), further customize thecurrent palette from the Palette tab.(For details, see page 185.)
6 Click Save As.
PNG Image Optimizer: Mask Options tab
Tips:• For transparent True-Color or Grayscale PNG images used for a Web page, there is no need to
choose a matte. This is because these types of PNGs inherently come with a mask. Yet, the filesize could be large and might not be displayed properly in some browsers.
• For transparent indexed PNG images used for a Web page, they share the same characteristics asindexed transparent GIF images. See page 185 for details.

187
CHAPTER 5: CREATING WEB PAGES
Testing your files with different settings
The Batch dialog box in Image Optimizer allows you to try out different color andcompression settings on the JPEG, GIF, and PNG files before these files are actuallysaved. Here, you can quickly experiment with the variables that affect these imagefile formats the most. The Batch dialog boxes for both GIF and PNG test the numberof colors, while the Batch dialog box for JPEG tests the extent of compression.
Batch dialog boxfor JPEG Image Optimizer
An example of the Batch Result
Batch dialog boxfor GIF and PNG Image Optimizer
To perform a batch test:
1 Click the Batch button in the UleadImage Optimizer dialog box.
2 For GIF and PNG, enter the lowestnumber of colors to test in the Fewestcolors box. For JPEG, enter apercentage (0 to 100%) of compressionin the Lowest quality box.
3 Similarly, for GIF and PNG, enter thehighest number of colors to test in theMost colors box. For JPEG, enter apercentage of compression in theHighest quality box.
4 Select either Number of tests toperform a specific number of tests orIncrement to perform a single test forevery increment of 0-20 colors. If youchoose to have tests done by Increment,entering a smaller number of incrementswill result in more tests beingperformed.
Note: For PNG True Color images, the Batchtest is based on the Filter options and isautomatically performed for six times.
5 Click OK . Once the tests have beengenerated, you can view the results inthe Batch Results dialog box. Highlighta test result and click Select to apply thesetting into Image Optimizer’s previewwindow.

188
PHOTOIMPACT USER GUIDE
Exporting a Web page
An example ofthe HTML Render Error dialog box
Note: For further editing at a later time, select File: Save to save the current edit window in the .*UFOfile format. This retains all Web attributes you previously set. All individual components also remainindependent objects. After editing a UFO file, you can always export it as a Web page.
Note: If clicking Continue , you can still preview or save the Web page while ignoring all possibleerrors. But, avoid doing this because the exported Web page might not display or function properly.
How does the Web page look on the Net?How do people view my Web page? Whocan help me fix problems? These are oftenthe questions in mind when creating a Webpage. PhotoImpact provides these solutionsalong with a diagnostic mechanism.
When you are trying to preview, save, orexport a Web page in PhotoImpact, thisautomatic mechanism detects possibleHTML rendering problems. If found, adialog box appears and gives usefulsuggestions. In the dialog box, just clickeach object item, a solution is displayedaccordingly in the box below the list. ClickReport to generate a report for referencelater if needed. Then click Cancel. Thisreturns to the current edit window so youcan correct these errors.
Previewing in a browser
No matter if the current Web page or image is completed or still in progress, you canalways preview it as an entire Web page in a browser of your choice.
In the File: Preview in Browser submenu, by default, Internet Explorer is alreadylisted for quick access. You can customize it with the following commands:
• Edit Browser List adds and removes browsers from the list as needed.
• As Tiled Background When using an image as a tiled background for aWeb page, select this command to preview the edited image as it wouldappear on that Web page. This option is available only when accessed usingthe File: Preview in Browser submenu.
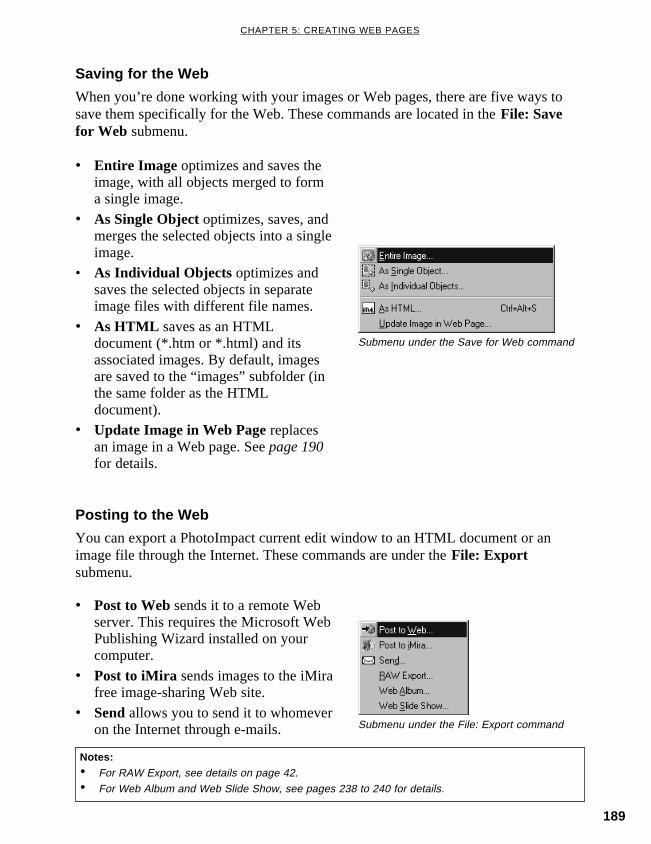
189
CHAPTER 5: CREATING WEB PAGES
Saving for the Web
When you’re done working with your images or Web pages, there are five ways tosave them specifically for the Web. These commands are located in the File: Savefor Web submenu.
Submenu under the Save for Web command
Posting to the Web
You can export a PhotoImpact current edit window to an HTML document or animage file through the Internet. These commands are under the File: Exportsubmenu.
• Entire Image optimizes and saves theimage, with all objects merged to forma single image.
• As Single Object optimizes, saves, andmerges the selected objects into a singleimage.
• As Individual Objects optimizes andsaves the selected objects in separateimage files with different file names.
• As HTML saves as an HTMLdocument (*.htm or *.html) and itsassociated images. By default, imagesare saved to the “images” subfolder (inthe same folder as the HTMLdocument).
• Update Image in Web Page replacesan image in a Web page. See page 190for details.
• Post to Web sends it to a remote Webserver. This requires the Microsoft WebPublishing Wizard installed on yourcomputer.
• Post to iMira sends images to the iMirafree image-sharing Web site.
• Send allows you to send it to whomeveron the Internet through e-mails. Submenu under the File: Export command
Notes:• For RAW Export, see details on page 42.
• For Web Album and Web Slide Show, see pages 238 to 240 for details.
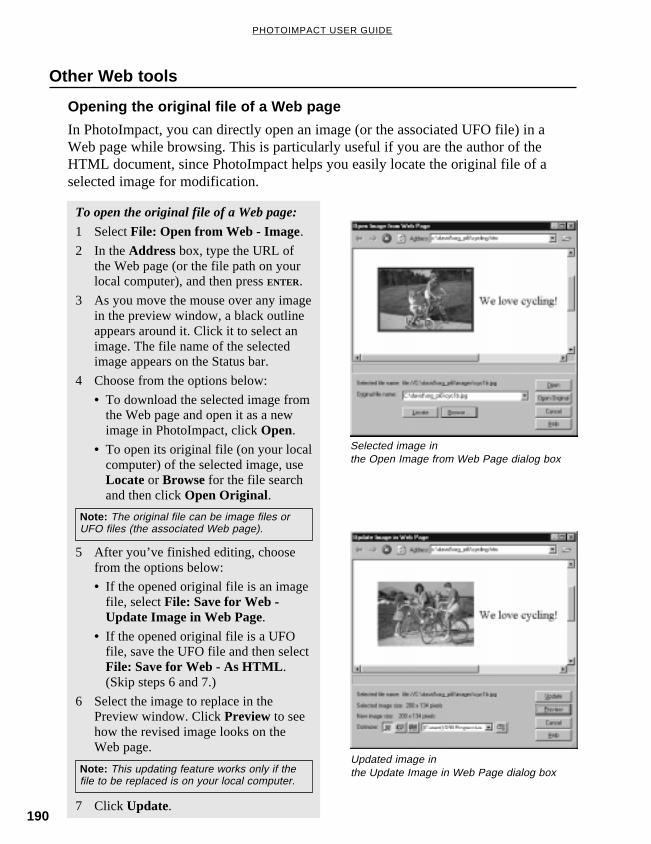
190
PHOTOIMPACT USER GUIDE
Other Web tools
Opening the original file of a Web page
In PhotoImpact, you can directly open an image (or the associated UFO file) in aWeb page while browsing. This is particularly useful if you are the author of theHTML document, since PhotoImpact helps you easily locate the original file of aselected image for modification.
To open the original file of a Web page:
1 Select File: Open from Web - Image.2 In the Address box, type the URL of
the Web page (or the file path on yourlocal computer), and then press ENTER.
3 As you move the mouse over any imagein the preview window, a black outlineappears around it. Click it to select animage. The file name of the selectedimage appears on the Status bar.
4 Choose from the options below:
• To download the selected image fromthe Web page and open it as a newimage in PhotoImpact, click Open.
• To open its original file (on your localcomputer) of the selected image, useLocate or Browse for the file searchand then click Open Original.
Updated image inthe Update Image in Web Page dialog box
Selected image inthe Open Image from Web Page dialog box
Note: This updating feature works only if thefile to be replaced is on your local computer.
Note: The original file can be image files orUFO files (the associated Web page).
5 After you’ve finished editing, choosefrom the options below:
• If the opened original file is an imagefile, select File: Save for Web -Update Image in Web Page.
• If the opened original file is a UFOfile, save the UFO file and then selectFile: Save for Web - As HTML.(Skip steps 6 and 7.)
6 Select the image to replace in thePreview window. Click Preview to seehow the revised image looks on theWeb page.
7 Click Update.
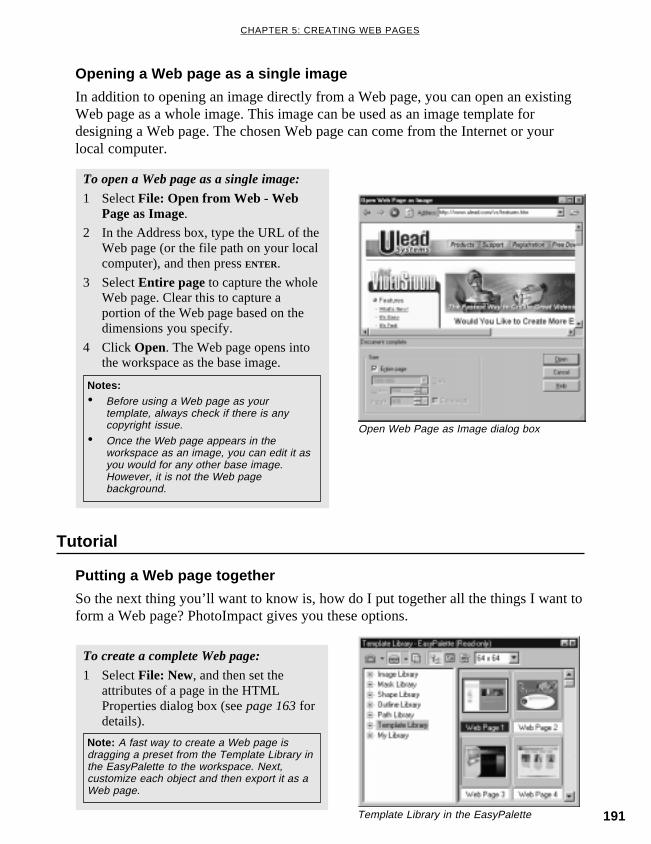
191
CHAPTER 5: CREATING WEB PAGES
Opening a Web page as a single image
In addition to opening an image directly from a Web page, you can open an existingWeb page as a whole image. This image can be used as an image template fordesigning a Web page. The chosen Web page can come from the Internet or yourlocal computer.
Notes:• Before using a Web page as your
template, always check if there is anycopyright issue.
• Once the Web page appears in theworkspace as an image, you can edit it asyou would for any other base image.However, it is not the Web pagebackground.
Open Web Page as Image dialog box
Tutorial
Putting a Web page together
So the next thing you’ll want to know is, how do I put together all the things I want toform a Web page? PhotoImpact gives you these options.
Template Library in the EasyPalette
To open a Web page as a single image:
1 Select File: Open from Web - WebPage as Image.
2 In the Address box, type the URL of theWeb page (or the file path on your localcomputer), and then press ENTER.
3 Select Entire page to capture the wholeWeb page. Clear this to capture aportion of the Web page based on thedimensions you specify.
4 Click Open. The Web page opens intothe workspace as the base image.
To create a complete Web page:
1 Select File: New, and then set theattributes of a page in the HTMLProperties dialog box (see page 163 fordetails).
Note: A fast way to create a Web page isdragging a preset from the Template Library inthe EasyPalette to the workspace. Next,customize each object and then export it as aWeb page.

192
PHOTOIMPACT USER GUIDE
2 Place objects you want on the page.These can be either Web objects orimages.
Notes:• Web objects include Link Objects,
Component Objects, Rollover Objects, andHTML Text Objects.
• Images can be objects created fromscratch, images used for graphics/illustrations, or any Web componentscreated from the Web menu.
3 Select File: Preview in Browser, andthen choose a browser to use forpreviewing the page.
4 When you have the Web page the wayyou want it, select File: Save to save itin the UFO file format. This preservesall objects as well as all HTMLattributes, so that you can edit it at alater time.
5 Finally, select File: Save for Web - AsHTML . This outputs the Web page asan HTML file (*.htm or *.html) alongwith its associated image files. Bydefault, the images are stored in aseparate folder labelled “images”,which is found in the folder containingthe HTML file.
6 To view the Web page, double-click theHTML file. The default browser willopen to display the page.
Edit window for a Web page in PhotoImpact
Previewing the Web page in a browser
Notes:• Do not use the base image as the Web page background, because the base image is for image
editing rather than Web page creating. Thus, the base image should be hidden while the editwindow is used for creating a Web page.
• To edit a Web page created in PhotoImpact later, open its UFO file or use the Open Originalbutton in the Open Image from Web dialog box (see page 190 for details).

6
GIF ANIMATOR
You can see them everywhere, on virtually every Web page that you
hit: Web animations. Some animations are created using complex
proprietary plug-in based tools, while others are created as Web-
based movies, but the most common are created by a simple file:
GIF. Using GIF Animator, you can create eye-catching animated
banners, rotating business logos and fun animations in just a few
easy steps. GIF Animator is the perfect Web-imaging partner when
working with PhotoImpact.
In this chapter you will learn:
• GIF Animator at a glance ....................................................................................... 194
• Customizing how you work .................................................................................... 195
• Creating a new animation ...................................................................................... 196
• Working with the Layer pane ................................................................................. 197
• Editing image layers ............................................................................................... 198
• Working with layer attributes ................................................................................. 202
• Using plug-in filters ................................................................................................ 207
• Using video F/X ...................................................................................................... 208
• Saving GIF images................................................................................................. 208

194
PHOTOIMPACT USER GUIDE
GIF Animator at a glance
GIF Animator works flawlessly with PhotoImpact and more so, it can also be used asa stand-alone application (not a plug-in or add-on).
Everything you need to build great animations is included in GIF Animator’s single,what-you-see-is-what-you-get (WYSIWYG) interface. With its drag-and-dropcapabilities and the power to import files from more than 30 different file formats,the sky’s the limit to what GIF Animator can help you create.
To open GIF Animator:
1 Click the Start button and point toPrograms.
2 Point to the Ulead PhotoImpact 6program folder and click GIFAnimator 4 .
3 The Startup Wizard appears. Selectwhat you want to open in theworkspace:
• Click Animation Wizard forguidance on how to create a newanimation.
• Click Blank animation to create anew animation file.
• Click one of the Open buttons toopen an animated GIF, video orsample animation file.
Layer pane
Workspace
Attribute toolbarStandard toolbar
GIF Animator
Startup Wizard
Edit toolbar
Palette toolbar
Mode tabs:Compose, Edit,Optimize, andPreview
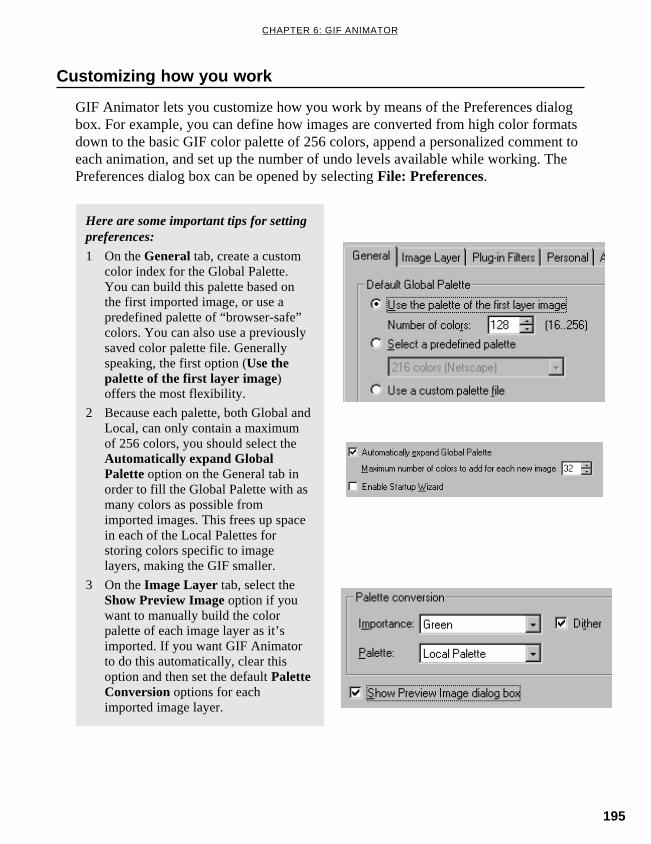
195
CHAPTER 6: GIF ANIMATOR
Customizing how you work
GIF Animator lets you customize how you work by means of the Preferences dialogbox. For example, you can define how images are converted from high color formatsdown to the basic GIF color palette of 256 colors, append a personalized comment toeach animation, and set up the number of undo levels available while working. ThePreferences dialog box can be opened by selecting File: Preferences.
Here are some important tips for settingpreferences:
1 On the General tab, create a customcolor index for the Global Palette.You can build this palette based onthe first imported image, or use apredefined palette of “browser-safe”colors. You can also use a previouslysaved color palette file. Generallyspeaking, the first option (Use thepalette of the first layer image)offers the most flexibility.
2 Because each palette, both Global andLocal, can only contain a maximumof 256 colors, you should select theAutomatically expand GlobalPalette option on the General tab inorder to fill the Global Palette with asmany colors as possible fromimported images. This frees up spacein each of the Local Palettes forstoring colors specific to imagelayers, making the GIF smaller.
3 On the Image Layer tab, select theShow Preview Image option if youwant to manually build the colorpalette of each image layer as it’simported. If you want GIF Animatorto do this automatically, clear thisoption and then set the default PaletteConversion options for eachimported image layer.
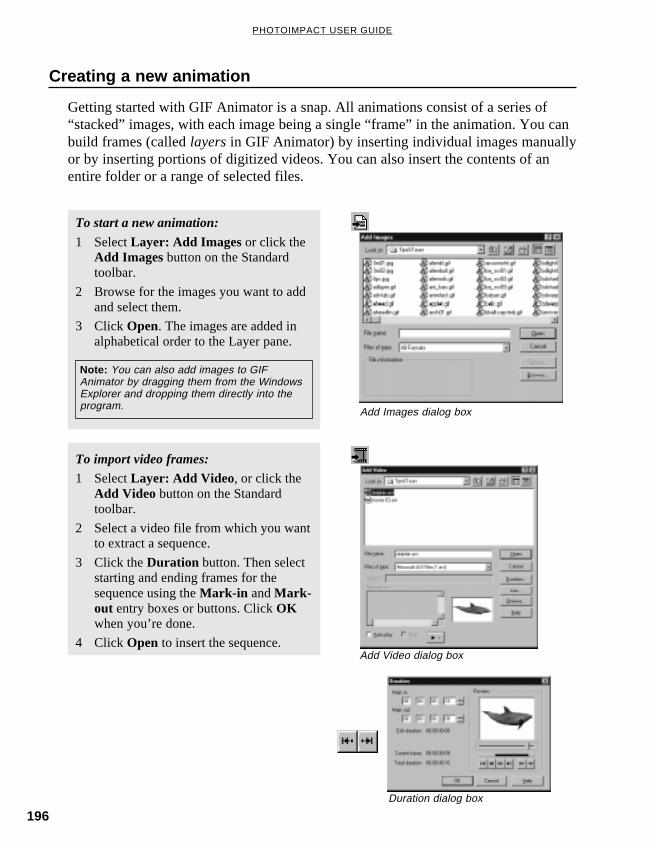
196
PHOTOIMPACT USER GUIDE
Creating a new animation
Getting started with GIF Animator is a snap. All animations consist of a series of“stacked” images, with each image being a single “frame” in the animation. You canbuild frames (called layers in GIF Animator) by inserting individual images manuallyor by inserting portions of digitized videos. You can also insert the contents of anentire folder or a range of selected files.
To start a new animation:
1 Select Layer: Add Images or click theAdd Images button on the Standardtoolbar.
2 Browse for the images you want to addand select them.
3 Click Open. The images are added inalphabetical order to the Layer pane.
To import video frames:
1 Select Layer: Add Video, or click theAdd Video button on the Standardtoolbar.
2 Select a video file from which you wantto extract a sequence.
3 Click the Duration button. Then selectstarting and ending frames for thesequence using the Mark-in and Mark-out entry boxes or buttons. Click OKwhen you’re done.
4 Click Open to insert the sequence.
Add Images dialog box
Add Video dialog box
Note: You can also add images to GIFAnimator by dragging them from the WindowsExplorer and dropping them directly into theprogram.
Duration dialog box

197
CHAPTER 6: GIF ANIMATOR
• List displays image layers as alist in the Layer pane. Each imagelayer’s default name is based onits original file name (if it wasinserted via the Clipboard, then itis assigned a generic name).
• Thumbnail displays each imagelayer as a thumbnail image. Allthumbnails are in the same size(sizes can be selected from theView: Thumbnail Size- Sizesubmenu).
• Filmstrip displays the layers asthumbnail images, each one sizedin relation to the others in theanimation to show how theycorrespond with one another.
To move image layers in the Layer pane:
Select the layer you want to move andthen click either the Move Layer Up orMove Layer Down buttons on theStandard toolbar.
To use the context menu:
Right-click any layer in the Layer pane toget the popup context menu of commonlayer-editing commands.
Working with the Layer pane
Understanding how to work with image layers (also called frames or cels) in theLayer pane, is the key to understand how animations are built in GIF Animator. Onceyou comprehend the basics of image layers, everything else is easy.
In the Layer pane, you can set the display mode for viewing image layers. SelectView: Layer Pane - Mode, and select one of the following:
Note: Select multiple layers using either the[CTRL] or [SHIFT] keys while clicking the mousebutton, or simply drag over the layers you wantto select.
Context menu
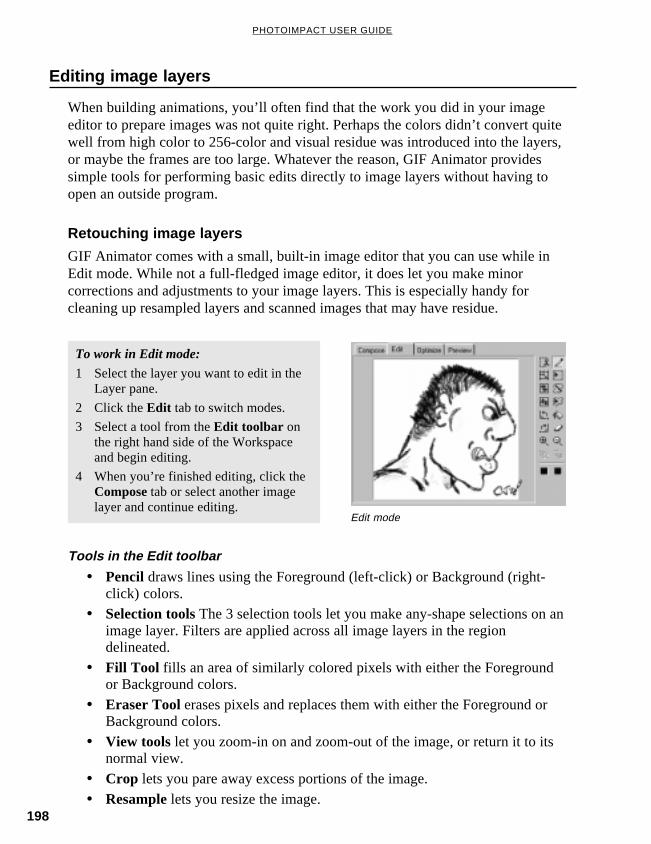
198
PHOTOIMPACT USER GUIDE
When building animations, you’ll often find that the work you did in your imageeditor to prepare images was not quite right. Perhaps the colors didn’t convert quitewell from high color to 256-color and visual residue was introduced into the layers,or maybe the frames are too large. Whatever the reason, GIF Animator providessimple tools for performing basic edits directly to image layers without having toopen an outside program.
Retouching image layers
GIF Animator comes with a small, built-in image editor that you can use while inEdit mode. While not a full-fledged image editor, it does let you make minorcorrections and adjustments to your image layers. This is especially handy forcleaning up resampled layers and scanned images that may have residue.
Editing image layers
To work in Edit mode:
1 Select the layer you want to edit in theLayer pane.
2 Click the Edit tab to switch modes.
3 Select a tool from the Edit toolbar onthe right hand side of the Workspaceand begin editing.
4 When you’re finished editing, click theCompose tab or select another imagelayer and continue editing.
Edit mode
Tools in the Edit toolbar
• Pencil draws lines using the Foreground (left-click) or Background (right-click) colors.
• Selection tools The 3 selection tools let you make any-shape selections on animage layer. Filters are applied across all image layers in the regiondelineated.
• Fill Tool fills an area of similarly colored pixels with either the Foregroundor Background colors.
• Eraser Tool erases pixels and replaces them with either the Foreground orBackground colors.
• View tools let you zoom-in on and zoom-out of the image, or return it to itsnormal view.
• Crop lets you pare away excess portions of the image.
• Resample lets you resize the image.

199
CHAPTER 6: GIF ANIMATOR
• Flip tools re-orient the image either horizontally, vertically, left, or right.
• Onion Skin lets you see translucent copies of the previous layers. This isuseful for tracing previous layers for creating smoother animations. You cancustomize onion skin settings in File: Preferences.
• Color boxes let you set the Foreground and Background colorsrespectively. Click to select a color from either the Workspace or the Palettetoolbar.
Cropping and resampling images
Another common situation when building GIF animations is to discover, afterworking on your image layers in an outside editor, that they are too large to displayproperly on a Web page. One way to remedy this is to pare away the excess spacearound the core animation using the Crop Tool. Another solution is to resize theentire animation (or just portions of it) with the Resample tool.
To crop image layers:
1 Select Edit: Crop , or click the Cropbutton on the Edit toolbar.
2 Select the image that you want to cropfrom the Select source image list.Choose whether to apply your cropsettings to all image layers or just toselected layers.
3 Use the Crop Box in the previewwindow to establish which portions ofthe image you want to retain(everything inside the box). You candrag the blue handles to resize the boxand drag the center of it to position it.
4 Click OK to apply the crop settings.
To resample image layers:
1 Select the layers you want to resample.
2 Select Edit: Resample, or click theResample button on the Edit toolbar.
3 Enter the new Width and Height. Forthe resampled image layers to retaintheir intrinsic shape, select the Keepaspect ratio option.
4 Click OK .
Crop dialog box
Resample dialog box

200
PHOTOIMPACT USER GUIDE
Merging image layers
Merging image layers helps you create an effect with blended images where oneimage floats above an ever shifting background, or reduce the number of frames(cels) your animation uses. There are two ways to merge images in GIF Animator:
• Simple cross-layer merging allows you to combine one image layer withanother, creating a new image layer that is a hybrid of the two.
• Background merging allows you to select multiple layers and then mergeeach one with a common background layer.
To duplicate image layers:
1 Select a sprite from the layer pane.
2 Select Edit: Duplicate.
3 Enter the number of Copies you want tomake of the sprite.
4 Enter the number of pixels that eachsubsequent copied sprite should bemoved from the preceding one in theHorizontal and Vertical shiftingboxes.
For example, if you enter -10 in each,the first sprite is duplicated and thenpositioned -10 pixels in both directionsaway from the original. The secondsprite is positioned -10 pixels in bothdirections away from the first copy, andso on.
5 Click OK .
Note: If the sprite is not duplicated exactly asyou had intended, click the Undo button andtry it again. Experiment a little.
Duplicate dialog box
Duplicating image layers
A useful tool for creating moving sprites from a still image is Duplicate. This allowsyou to import a small, sprite-like image and place it over a larger background image.Using the Edit: Duplicate menu command is one method of taking a single imageand moving it across a larger background. You can also use the Layer: MovingSprite menu command to achieve similar results with an animation rather than asingle image.

201
CHAPTER 6: GIF ANIMATOR
To merge images:
1 Select Layer: Merge Images.2 Select the images you want to merge
together. Images are merged so that thehigher-numbered layers are mergedback into the lower numbered layers.
3 Select the Replace original layersoption if you want to remove theselected layers and replace them withthe new merged layer.
4 Click OK .
To merge image layers to a background:
1 Select Layer: Background Merge.
2 Select the common background layerfrom the Background list.
3 Select the layers from the Images listto be individually merged with thechosen background layer.
4 Click OK .
Other editing tools
GIF Animator comes with other tools to help you edit image layers, offering you acomplete and convenient toolkit to use for your projects.
Realigning images
You can change an image’s physical alignment by using Edit: Rotate & Flip or theFlip tools on the Edit toolbar.
Background Merge dialog box
An example when merging images
Note: You can make the backgrounds ofselected image layers transparent. Thenmerge these layers to a chosen background.This chosen background will “replace” thecurrent backgrounds of these layers.
To realign images:
1 Select the image layer(s) to realign.
2 In the Edit mode, click one of the Flipbuttons on the Edit toolbar. The effect isthen applied to the selected imagelayer(s).

202
PHOTOIMPACT USER GUIDE
To manually adjust the Logical Screen:
1 Select the Global information layer inthe Layer pane. The Attribute toolbarchanges to display the layer’sproperties.
2 Clear the Automatic option underLogical screen on the Attribute toolbar.
3 Enter in a new Width and Height.
Rebuilding “broken” image layers
Sometimes, after optimizing and then saving an image, you’ll want to return and editit again - but once it’s been optimized, the frames are “broken”. The solution to this isFrame Regeneration.
To regenerate frames:
1 Select the image layer(s) you want toregenerate.
2 Select Edit: Regenerate Frames. Theframes are automatically rebuilt and canbe edited.
Working with layer attributes
Each image layer has its own set of “controls” that dictate how that image layer isdisplayed; you can decide whether it has a Local Palette, define its general position,and select the transparent color. However, all the attributes assigned to an imagelayer work with the other layers, and formulate the properties of the animation as awhole.
Global information layer
In addition to the image layers constituting the animation, there is one layercontaining the universal properties of the animation as a whole: the Globalinformation layer . Here you can work with the Global Palette (the color palette fromwhich all image layers can draw color information), define whether the animation isplayed nonstop or a set number of times, and set the dimensions of the LogicalScreen. The Logical Screen contains the dimensions of the entire animation as awhole. It is usually determined automatically by GIF Animator as layers are insertedand moved around.
Note: In some cases, selected frames may notregenerate properly due to massive disparitybetween them and their preceding frames.

203
CHAPTER 6: GIF ANIMATOR
To have the animation play endlessly:
1 Select the Global information layer inthe Layer pane.
2 On the Attribute toolbar, underLooping, select the Infinite option.
Positioning images in Compose mode
Each image layer contains its own set of attributes that pertain only to that layer, eventhough the attributes may be the same for every layer. One of the more importantattributes is the ability to position image layers anywhere within the Logical Screen.
Note: You can also specify the number oftimes you want the animated GIF to play in thebox below the “Infinite” option. However, forsome browsers that cannot recognize thedefined looping, the animation will playendlessly.
To position image layers:
1 Select the layer you want to positionfrom the Layer pane.
2 On the Attribute toolbar, enter in the X-and Y- coordinates for the image (thecoordinate position 0, 0 is the top leftcorner of the Logical Screen).
Or,
In Compose mode, click the layer anddrag it to its new position. If you drag itoutside the boundaries of the LogicalScreen, the Logical Screen’sdimensions are updated accordingly(only when the Automatic option isselected on the Attribute toolbar).
4 The Logical Screen (in the Workspace)changes accordingly.
Note: The Logical Screen cannot be smallerthan the largest image layer in the animation.
Note: Since the coordinates always originateat 0, 0, you cannot enter negative values foran image layer’s position.
A layer beforepositioning
A layer afterpositioning
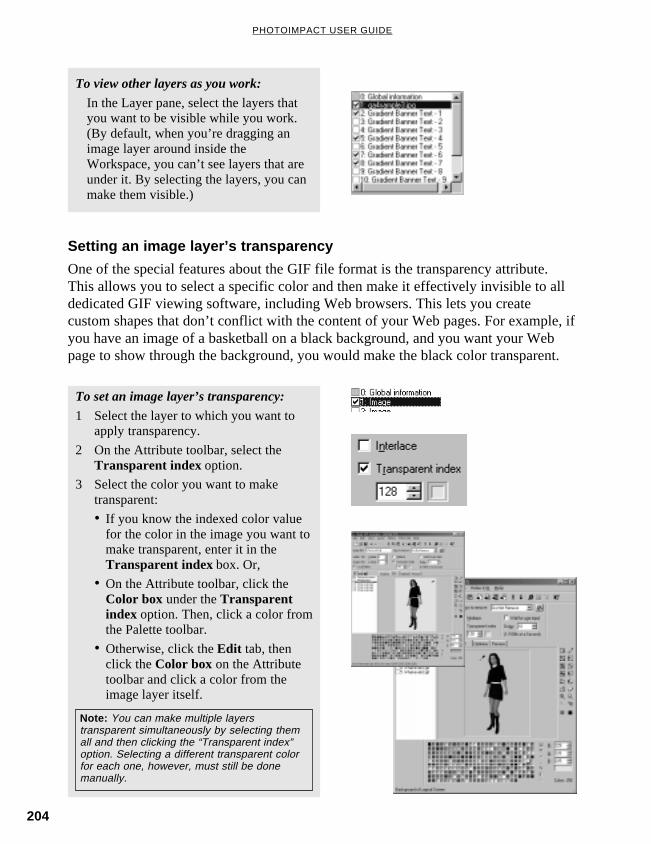
204
PHOTOIMPACT USER GUIDE
To view other layers as you work:
In the Layer pane, select the layers thatyou want to be visible while you work.(By default, when you’re dragging animage layer around inside theWorkspace, you can’t see layers that areunder it. By selecting the layers, you canmake them visible.)
Setting an image layer’s transparency
One of the special features about the GIF file format is the transparency attribute.This allows you to select a specific color and then make it effectively invisible to alldedicated GIF viewing software, including Web browsers. This lets you createcustom shapes that don’t conflict with the content of your Web pages. For example, ifyou have an image of a basketball on a black background, and you want your Webpage to show through the background, you would make the black color transparent.
To set an image layer’s transparency:
1 Select the layer to which you want toapply transparency.
2 On the Attribute toolbar, select theTransparent index option.
3 Select the color you want to maketransparent:
• If you know the indexed color valuefor the color in the image you want tomake transparent, enter it in theTransparent index box. Or,
• On the Attribute toolbar, click theColor box under the Transparentindex option. Then, click a color fromthe Palette toolbar.
• Otherwise, click the Edit tab, thenclick the Color box on the Attributetoolbar and click a color from theimage layer itself.
Note: You can make multiple layerstransparent simultaneously by selecting themall and then clicking the “Transparent index”option. Selecting a different transparent colorfor each one, however, must still be donemanually.
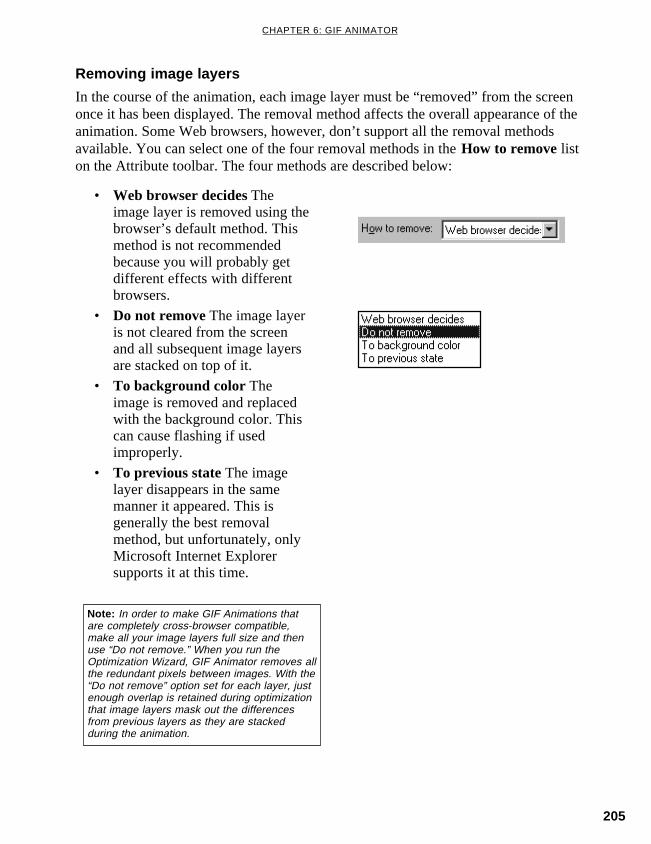
205
CHAPTER 6: GIF ANIMATOR
Removing image layers
In the course of the animation, each image layer must be “removed” from the screenonce it has been displayed. The removal method affects the overall appearance of theanimation. Some Web browsers, however, don’t support all the removal methodsavailable. You can select one of the four removal methods in the How to remove liston the Attribute toolbar. The four methods are described below:
• Web browser decides Theimage layer is removed using thebrowser’s default method. Thismethod is not recommendedbecause you will probably getdifferent effects with differentbrowsers.
• Do not remove The image layeris not cleared from the screenand all subsequent image layersare stacked on top of it.
• To background color Theimage is removed and replacedwith the background color. Thiscan cause flashing if usedimproperly.
• To previous state The imagelayer disappears in the samemanner it appeared. This isgenerally the best removalmethod, but unfortunately, onlyMicrosoft Internet Explorersupports it at this time.
Note: In order to make GIF Animations thatare completely cross-browser compatible,make all your image layers full size and thenuse “Do not remove.” When you run theOptimization Wizard, GIF Animator removes allthe redundant pixels between images. With the“Do not remove” option set for each layer, justenough overlap is retained during optimizationthat image layers mask out the differencesfrom previous layers as they are stackedduring the animation.

206
PHOTOIMPACT USER GUIDE
Other image layer attributes
The final three image layer attributes are Delay, Wait for user input , and Interlace.Like all the image layer attributes, their presence is required by the file format(GIF89a), but only one has any apparent effect on an animation as it plays in a Webbrowser. They are described below:
• Delay Of the three image layerattributes, this is perhaps themost useful. The delay timemeasures the time that the imageremains on screen before beingremoved and replaced bysubsequent images. The delaytime is measured in hundredthsof a second.
• Wait for user input This optionis currently not supported in themajor browsers, but it isimplemented in dedicated GIFviewers. Setting this option onan image layer forces the layerto pause the animation until theuser either clicks the mousebutton or presses a key on thekeyboard.
• Interlace Interlacing breaks animage into two separate fields,allowing one field to downloadfirst while waiting for the other.This gives users an immediatepreview of the image rather thanhaving to wait for the entirepicture to finish downloading.Static GIF images (i.e., thosewith single image layers)support this, but in an animatedGIF this feature doesn’t work onany image layer except the first.If you import any GIF imageswith their interlacing enabled, besure to clear the option insideGIF Animator so that Webbrowsers won’t encounter anyproblems with them.
The Delay attribute onthe Attribute toolbar
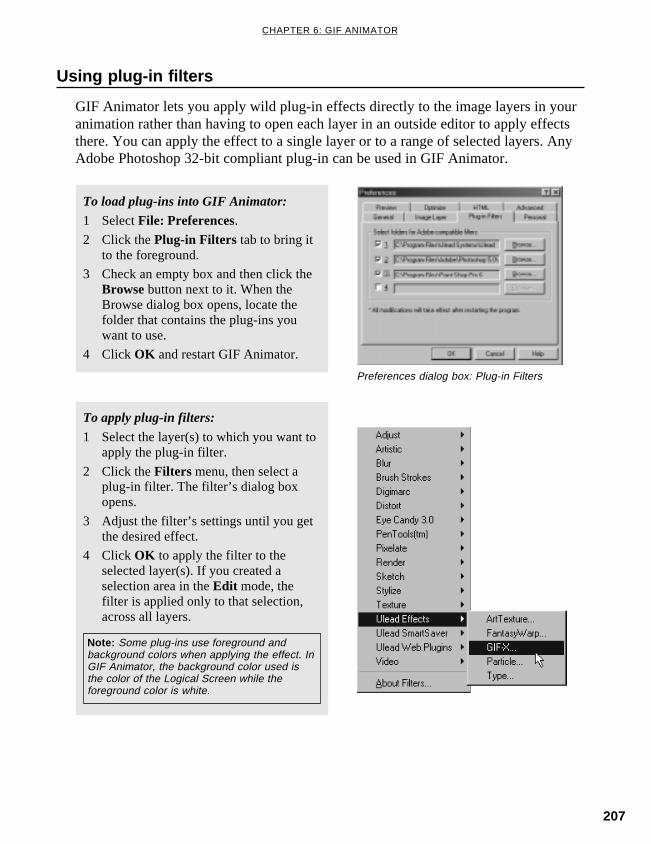
207
CHAPTER 6: GIF ANIMATOR
Using plug-in filters
GIF Animator lets you apply wild plug-in effects directly to the image layers in youranimation rather than having to open each layer in an outside editor to apply effectsthere. You can apply the effect to a single layer or to a range of selected layers. AnyAdobe Photoshop 32-bit compliant plug-in can be used in GIF Animator.
To load plug-ins into GIF Animator:
1 Select File: Preferences.2 Click the Plug-in Filters tab to bring it
to the foreground.
3 Check an empty box and then click theBrowse button next to it. When theBrowse dialog box opens, locate thefolder that contains the plug-ins youwant to use.
4 Click OK and restart GIF Animator.
To apply plug-in filters:
1 Select the layer(s) to which you want toapply the plug-in filter.
2 Click the Filters menu, then select aplug-in filter. The filter’s dialog boxopens.
3 Adjust the filter’s settings until you getthe desired effect.
4 Click OK to apply the filter to theselected layer(s). If you created aselection area in the Edit mode, thefilter is applied only to that selection,across all layers.
Preferences dialog box: Plug-in Filters
Note: Some plug-ins use foreground andbackground colors when applying the effect. InGIF Animator, the background color used isthe color of the Logical Screen while theforeground color is white.

208
PHOTOIMPACT USER GUIDE
Saving GIF images
There are a number of ways to save your work. The first step, obviously, is to save itas an animated GIF file. GIF Animator also offers other output methods. You cansave the image layers of an animation individually, export the animation as a stand-alone executable file, or even output it as a digital movie file.
To save an animation:
1 Select File: Save or Save As.2 Locate the folder to which you want to
save the file, then enter the animation’sfile name.
3 Click Save.
Using video F/X
Video F/X is a collection of special filters for GIF Animator. Borrowed from Ulead’saward-winning digital video software, MediaStudio Pro and VideoStudio, these filtersare professional level video transitions and filter effects. Each filter automaticallycreates a string of new image layers once it’s engaged, so it’s usually best to have onlyone or two image layers at most in your animation when using them. Otherwise, theadditional layers generated by the Video FX may make your animation too large andunwieldy.
To apply a video effect:
1 Select the layer you want to use as thetemplate image in the transition.
2 Click the Video F/X menu, then select atransition or filter effect (transitioneffects occupy the top-half of the menu,filters are on the bottom-half). A dialogbox opens for that filter.
3 Enter the number of frames over whichyou want the effect to occur (these arethe image layers that will be added toyour animation).
4 Enter the Delay time for the transitionitself. (The delay time for the imagelayers themselves is decided by acombination of this and the totalnumber of frames specified in step 3.)
5 Set up the custom options for the effect,then click OK .
Add Effects dialog box
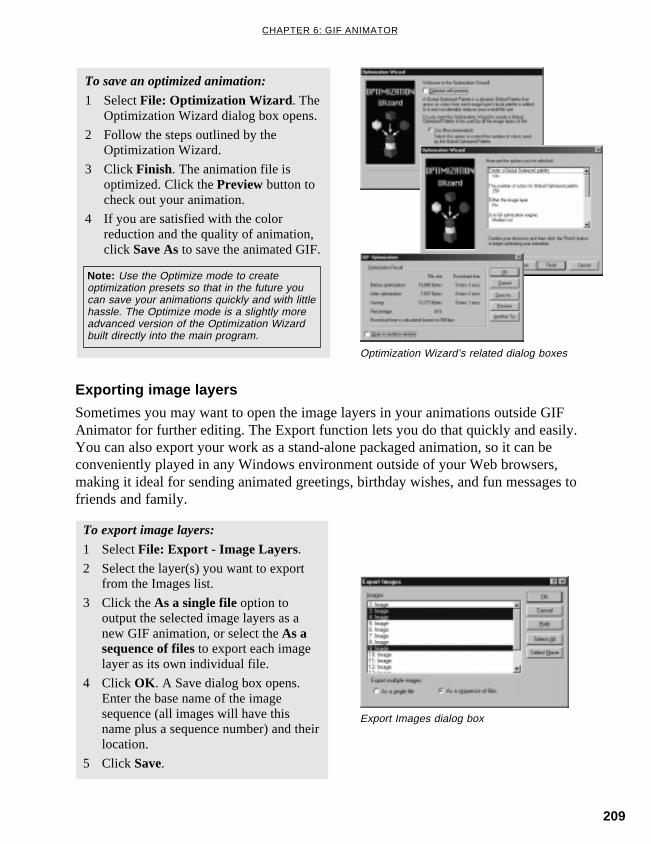
209
CHAPTER 6: GIF ANIMATOR
To save an optimized animation:
1 Select File: Optimization Wizard . TheOptimization Wizard dialog box opens.
2 Follow the steps outlined by theOptimization Wizard.
3 Click Finish. The animation file isoptimized. Click the Preview button tocheck out your animation.
4 If you are satisfied with the colorreduction and the quality of animation,click Save As to save the animated GIF.
Optimization Wizard’s related dialog boxes
Note: Use the Optimize mode to createoptimization presets so that in the future youcan save your animations quickly and with littlehassle. The Optimize mode is a slightly moreadvanced version of the Optimization Wizardbuilt directly into the main program.
Exporting image layers
Sometimes you may want to open the image layers in your animations outside GIFAnimator for further editing. The Export function lets you do that quickly and easily.You can also export your work as a stand-alone packaged animation, so it can beconveniently played in any Windows environment outside of your Web browsers,making it ideal for sending animated greetings, birthday wishes, and fun messages tofriends and family.
To export image layers:
1 Select File: Export - Image Layers.2 Select the layer(s) you want to export
from the Images list.
3 Click the As a single file option tooutput the selected image layers as anew GIF animation, or select the As asequence of files to export each imagelayer as its own individual file.
4 Click OK . A Save dialog box opens.Enter the base name of the imagesequence (all images will have thisname plus a sequence number) and theirlocation.
5 Click Save.
Export Images dialog box

210
PHOTOIMPACT USER GUIDE
3 Select a sound file to play along withyour animation. Click the browse buttonnext to the entry line and locate it onyour computer. The AnimationPackager supports both MIDI and WAVfiles.
4 In the Generate executable file line,enter the name and location to whichyou want to save the new packagedanimation.
5 Select a Start frame position, this isthe position on the viewer’s Windowsdesktop where the animation beginsplaying.
6 Select an End Frame position, this isthe position on the viewer’s Windowsdesktop where the animation terminates.
7 Enter a message and select the font.
8 Click OK .
Export HTML Code dialog box
To export HTML:
1 Select File: Export - As HTML Code .
2 The Export HTML Code dialog boxopens. Enter the name of the HTML fileto be created and specify where to savethe file.
3 Click Save.
Note: You can customize the message filesused in the Animation Packager by openingthem up in a vector-imaging program, such asCorelDRAW or Adobe Illustrator, and thenmodifying them. Similarly, you can create newones from scratch and then save them to the“Msgfiles” folder in the GIF Animator directory.
To export as a Packaged Animation:
1 Select File: Export - As AnimatedPackage.
2 Select a Message Box Style from the listof those provided (or select the Noneoption to forego this). This creates avirtual notepad or greeting card inwhich to play your message andanimation.
¦
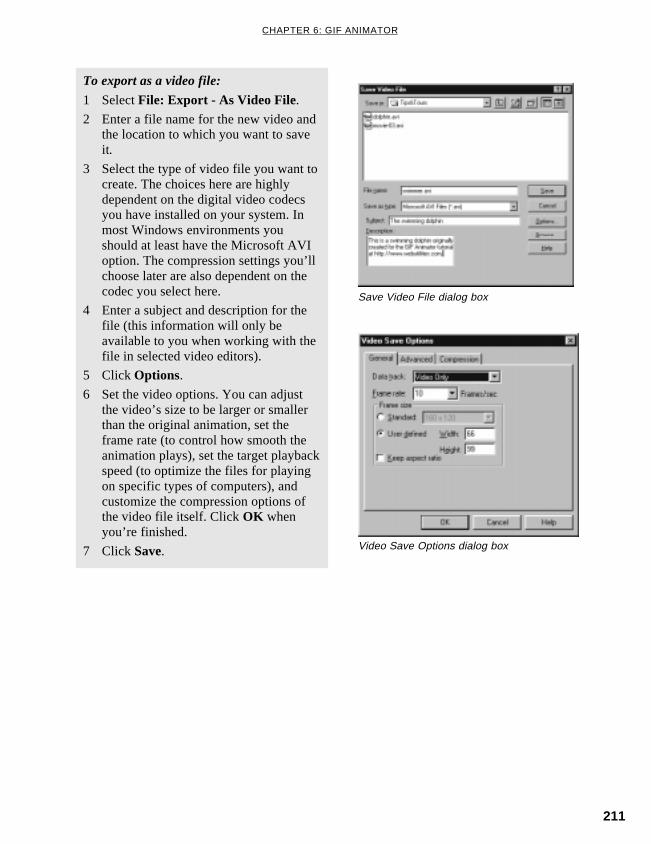
211
CHAPTER 6: GIF ANIMATOR
Save Video File dialog box
Video Save Options dialog box
To export as a video file:
1 Select File: Export - As Video File.
2 Enter a file name for the new video andthe location to which you want to saveit.
3 Select the type of video file you want tocreate. The choices here are highlydependent on the digital video codecsyou have installed on your system. Inmost Windows environments youshould at least have the Microsoft AVIoption. The compression settings you’llchoose later are also dependent on thecodec you select here.
4 Enter a subject and description for thefile (this information will only beavailable to you when working with thefile in selected video editors).
5 Click Options.
6 Set the video options. You can adjustthe video’s size to be larger or smallerthan the original animation, set theframe rate (to control how smooth theanimation plays), set the target playbackspeed (to optimize the files for playingon specific types of computers), andcustomize the compression options ofthe video file itself. Click OK whenyou’re finished.
7 Click Save.

212
PHOTOIMPACT USER GUIDE

7
IMAGE MANAGEMENT WITH ALBUM
Album is the program to use for viewing and managing media files
on your system. When you place files into Album, they are
represented as viewable graphical thumbnails thereby making it
easier to locate files and better organize your work.
In this chapter you will learn:
• Understanding the basics ...................................................................................... 214
• Customizing the way you work .............................................................................. 216
• Creating an album .................................................................................................. 218
• Editing an album’s properties ................................................................................ 219
• Inserting thumbnails ............................................................................................... 219
• Entering field data .................................................................................................. 221
• Copying thumbnails & field data using the clipboard ............................................ 226
• Viewing ................................................................................................................... 227
• Printing ................................................................................................................... 230
• Performing drag-and-drop operations ................................................................... 231
• Working in Compact mode .................................................................................... 232
• Using the Tool Panel Menu ................................................................................... 233
• Managing albums ................................................................................................... 234
• Sharing albums and files ....................................................................................... 237
• Maintaining thumbnails .......................................................................................... 242
• Maintaining source files ......................................................................................... 245
• Locating thumbnails ............................................................................................... 246
• Performing a search ............................................................................................... 249
• Performing OLE operations ................................................................................... 251
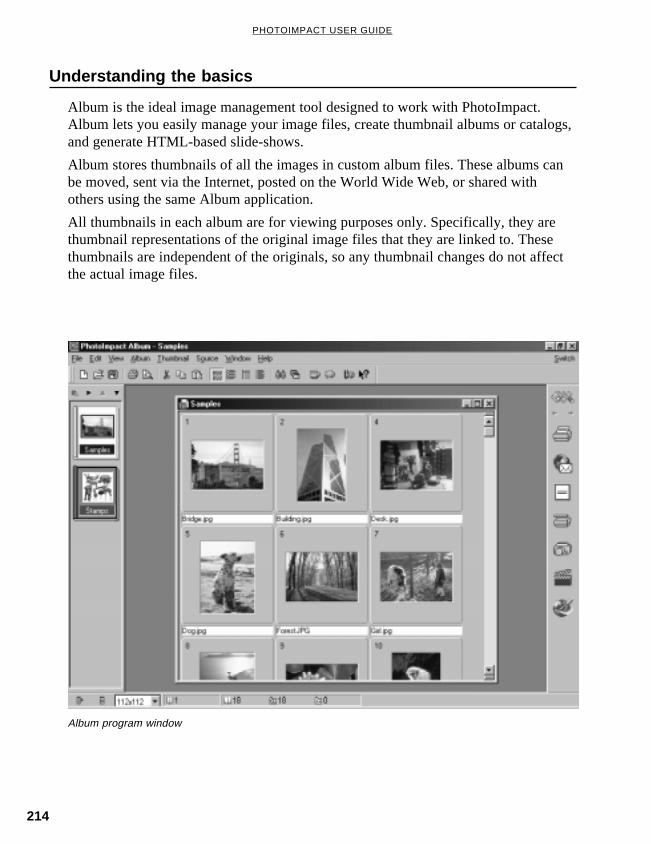
214
PHOTOIMPACT USER GUIDE
Understanding the basics
Album is the ideal image management tool designed to work with PhotoImpact.Album lets you easily manage your image files, create thumbnail albums or catalogs,and generate HTML-based slide-shows.
Album stores thumbnails of all the images in custom album files. These albums canbe moved, sent via the Internet, posted on the World Wide Web, or shared withothers using the same Album application.
All thumbnails in each album are for viewing purposes only. Specifically, they arethumbnail representations of the original image files that they are linked to. Thesethumbnails are independent of the originals, so any thumbnail changes do not affectthe actual image files.
Album program window
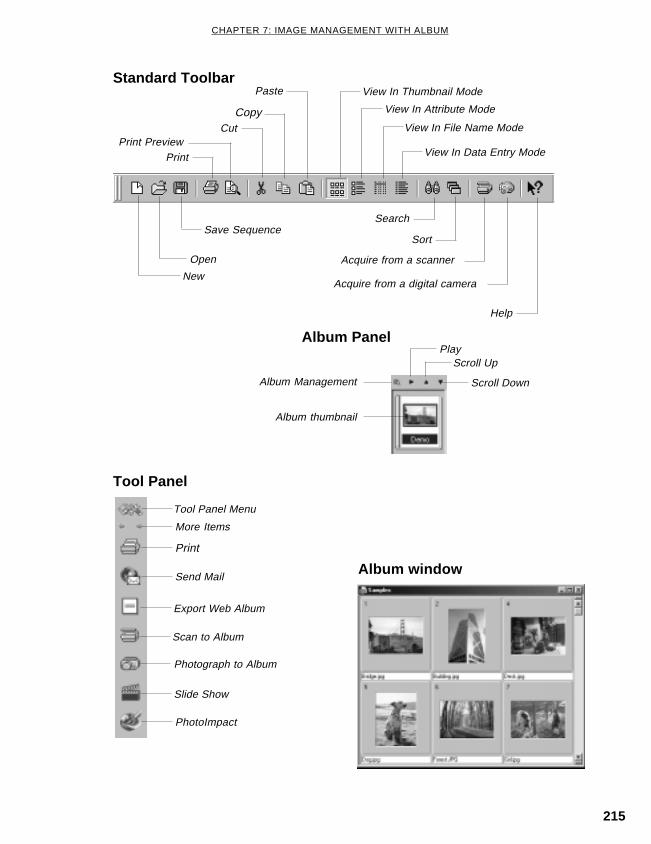
215
CHAPTER 7: IMAGE MANAGEMENT WITH ALBUM
New
Open
Save Sequence
PrintPrint Preview
CutCopy
Paste View In Thumbnail Mode
View In Attribute Mode
View In File Name Mode
View In Data Entry Mode
Search
Acquire from a scanner
Help
Acquire from a digital camera
Standard Toolbar
Sort
Album Panel
Album Management
Album thumbnail
PlayScroll Up
Scroll Down
Album window
Tool Panel
Tool Panel Menu
Send Mail
Export Web Album
Scan to Album
Photograph to Album
Slide Show
PhotoImpact
More Items

216
PHOTOIMPACT USER GUIDE
Customizing the way you work
Album lets you control both the program and how it interacts with MicrosoftWindows. This is done with the Preferences command [F6] on the File menu. ThePhotoImpact Album category in the Preferences dialog box defines font and OLEsettings for Album only, whereas the System category includes options like virtualmemory and display, and is for both PhotoImpact and Album. The following detailsthe settings for PhotoImpact Album. For System, see page 25.
• Check links to source files makes Album performan automatic check between each thumbnail in analbum and its source file. The checking is donewhenever a thumbnail is selected or the view in thealbum changes, such as from scrolling orperforming a sort operation. This may slow downprocessing time as you wait for Album to finishchecking. Leave this option cleared if you arecertain files have not been modified, if it is notnecessary to update existing thumbnails, or if youwish to scroll quickly through an album.
Note: To quickly open the Album Preferences dialog box, double-click the Status bar or press [F6].
Note: If, during a check, Album comes acrossany missing files, the index number of theappropriate thumbnail is grayed-out.
PhotoImpact Album
• Minimize on use minimizes Album as soon as you invoke another program from the Toolpanel or Switch menu. This saves system resources as Album is no longer occupying thedesktop.
• Free up memory when minimized releases any system memory used by an album byswapping it out to disk whenever it is minimized.
• Confirm on thumbnail deletion prompts you with a confirmation message whenever you tryto delete thumbnails.
• Create best quality thumbnail images tells Album to generate the best quality images foruse as thumbnails. Select this option if you want your thumbnails to be as clear as possible.However, this requires a longer thumbnail insertion time. Leave this option cleared if you aresatisfied with the existing thumbnail image quality.
• Display fixed-length tabs makes all the tabs in an album appear at a fixed size. If this optionis left cleared, each tab appears as large as the number of characters it contains. (Youcontrol the number of characters with the “Maximum tab width” option below.)
• Print field data with source files attaches field data to source files when printed.
• Play annotation file after viewing thumbnails plays the annotation file associated with athumbnail after you open the thumbnail’s source file, (selecting Source: View ).
• Backup album file automatically creates backups of album files everytime you open analbum file from the Album Panel.

217
CHAPTER 7: IMAGE MANAGEMENT WITH ALBUM
• Maximum tab width (in characters) allows you to specify the length of the names thatappear in tabs (from 3 to 30). Keep this number low when you need more space to showtabs. To see tab names in full, increase this number.
• Number of recently opened files specifies the number of files to list at the bottom of the Filemenu, (up to 9). Clicking a name from the list reopens the album.
• Delimiter used in Search toolbar allows you to choose the symbol (character) to use whendefining a search criteria consisting of more than one word.
Controls the type and size of the font used to displaythe text in an album. (The options and dialog boxlayout displayed here are standard to all Windowscompatible programs.) If you are in high resolutiondisplay mode, such as 1024x768, you may want toincrease your font size so you can better see thenames of your thumbnails. Likewise, if you are in alower resolution display mode, such as 640x480, youmay want to decrease the font size.
OLE
Defines how an object looks when placed into another program (the container program).
• Object thumbnail link is broken sets Album asthe object broker during OLE hand-offs to otherprograms.
• Source object displays the entire file in thecontainer document. This allows you to clearly seethe contents and dimensions of the object file butdoes increase the container’s file size and slowdown its operation.
• Thumbnail only replaces the source file with itsthumbnail in the container’s document. Thisprovides a visual clue as to the contents of the filewithout affecting the container’s file size or speedof operation too much.
• Low resolution placeholder places a low resolution version of the object file into thecontainer document. This is particularly helpful in preparing images for publication when it isnot necessary to have a good quality image displayed on screen at all times. When you printthe document, however, the low resolution image is printed. To print the original file, you mustfirst update the thumbnail from the container program.
• Album’s program icon allows you to use Album’s program icon to represent the object file.This adds the least to the container’s file size, but you do not have a visual clue as to thecontents of the file.
• Convert images as display mode converts the data type of an image (when placed onto theclipboard) to that of your current display mode. This is particularly useful if you are using alow resolution display and wish to save on system resources. (This option is only enabled ifyou are running in 256-Color display mode.)
Font
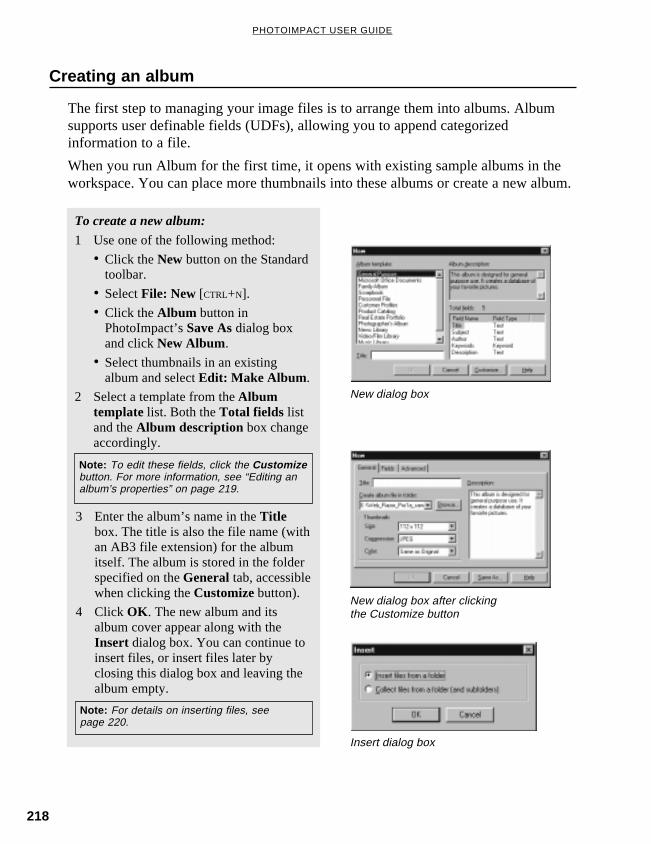
218
PHOTOIMPACT USER GUIDE
Creating an album
The first step to managing your image files is to arrange them into albums. Albumsupports user definable fields (UDFs), allowing you to append categorizedinformation to a file.
When you run Album for the first time, it opens with existing sample albums in theworkspace. You can place more thumbnails into these albums or create a new album.
To create a new album:
1 Use one of the following method:
• Click the New button on the Standardtoolbar.
• Select File: New [CTRL+N].
• Click the Album button inPhotoImpact’s Save As dialog boxand click New Album.
• Select thumbnails in an existingalbum and select Edit: Make Album .
2 Select a template from the Albumtemplate list. Both the Total fields listand the Album description box changeaccordingly.
New dialog box
New dialog box after clickingthe Customize button
Insert dialog box
Note: To edit these fields, click the Customizebutton. For more information, see “Editing analbum’s properties” on page 219.
Note: For details on inserting files, seepage 220.
3 Enter the album’s name in the Titlebox. The title is also the file name (withan AB3 file extension) for the albumitself. The album is stored in the folderspecified on the General tab, accessiblewhen clicking the Customize button).
4 Click OK . The new album and itsalbum cover appear along with theInsert dialog box. You can continue toinsert files, or insert files later byclosing this dialog box and leaving thealbum empty.
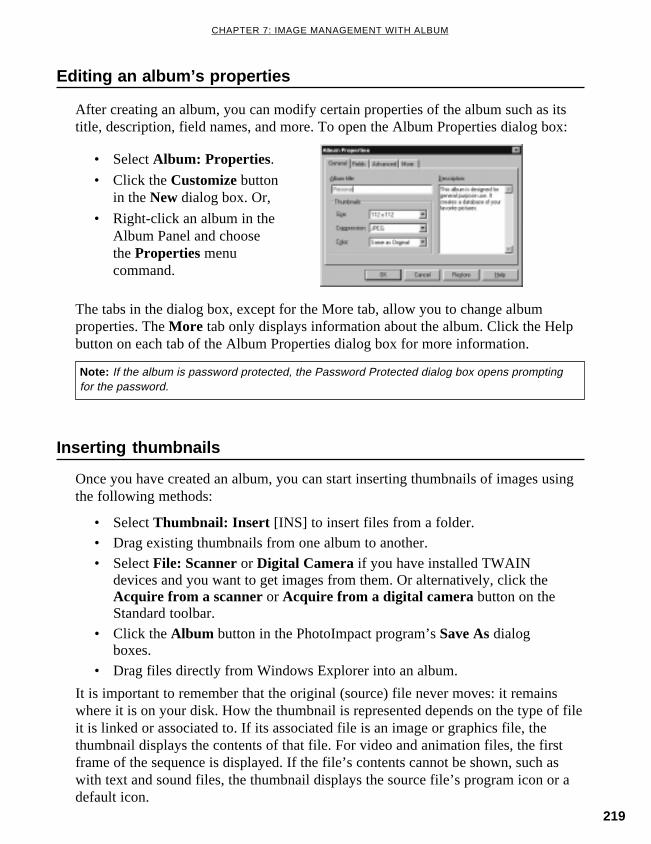
219
CHAPTER 7: IMAGE MANAGEMENT WITH ALBUM
After creating an album, you can modify certain properties of the album such as itstitle, description, field names, and more. To open the Album Properties dialog box:
Editing an album’s properties
Note: If the album is password protected, the Password Protected dialog box opens promptingfor the password.
Once you have created an album, you can start inserting thumbnails of images usingthe following methods:
• Select Thumbnail: Insert [INS] to insert files from a folder.• Drag existing thumbnails from one album to another.
• Select File: Scanner or Digital Camera if you have installed TWAINdevices and you want to get images from them. Or alternatively, click theAcquire from a scanner or Acquire from a digital camera button on theStandard toolbar.
• Click the Album button in the PhotoImpact program’s Save As dialogboxes.
• Drag files directly from Windows Explorer into an album.
It is important to remember that the original (source) file never moves: it remainswhere it is on your disk. How the thumbnail is represented depends on the type of fileit is linked or associated to. If its associated file is an image or graphics file, thethumbnail displays the contents of that file. For video and animation files, the firstframe of the sequence is displayed. If the file’s contents cannot be shown, such aswith text and sound files, the thumbnail displays the source file’s program icon or adefault icon.
Inserting thumbnails
The tabs in the dialog box, except for the More tab, allow you to change albumproperties. The More tab only displays information about the album. Click the Helpbutton on each tab of the Album Properties dialog box for more information.
• Select Album: Properties.
• Click the Customize buttonin the New dialog box. Or,
• Right-click an album in theAlbum Panel and choosethe Properties menucommand.

220
PHOTOIMPACT USER GUIDE
Inserting files from a folder
When inserting files into an album, you can select only the ones that you want orcollect all the files contained in a folder (as well its subfolders).
Note: The thumbnail of a given file can only beinserted into the same album once. If youinsert a thumbnail from the same file morethan once, the original thumbnail andinformation are updated each time.
Insert dialog box
Insert Files dialog box
Collect Files dialog box
Getting images from a TWAIN device
If you have installed a TWAIN device, such as a frame grabber or scanner, you caninput images directly to albums, fax machines, printers, or electronic mails using thefollowing methods:
• Click the Acquire from a scanner or Acquire from a digital camerabutton on the Standard toolbar.
• Select File: Scanner/Digital Camera.
See associated Help for details.
To insert thumbnails of files:
1 Select Thumbnail: Insert .
• To insert specific files, select Insertfiles from a folder.
• To insert all the files of a folder andits subfolders, select Collect filesfrom a folder.
2 Locate the folder containing the filesyou want to insert.
3 Select the media type you want from theFiles of type list, and other options.
4 Select the files you want to insert fromthe File name box. (Not necessary ifyou are inserting a folder.)
5 If you chose Insert files from a folderin step 1, click Insert. The selected filesare inserted into the currently activealbum. The dialog box remains open foryou to insert more files into the samealbum. When you’re done, click Close.If you selected Collect files from afolder in step 1, click Collect.

221
CHAPTER 7: IMAGE MANAGEMENT WITH ALBUM
Notes:• Before you use the Scanner/Digital Camera command, you may need to select a TWAIN device
from the Select Source dialog box, opened by selecting the Select Source command from eitherFile: Scanner or File: Digital Camera submenu.
• Auto Slicing becomes available depending on the submenu selected.
To visually insert thumbnails:
1 Select Thumbnail: Visual Insert .
2 Find an image file location using thefile folder tree structure in the left pane.Once located, the contents of these filesare displayed in thumbnails in the rightpane.
3 Click the thumbnail you want to insert.Press [CTRL] or [SHIFT] key with mouseclick to select multiple files. Click theright pane (or any thumbnail) and press[CTRL+A] to select all files in that folder.
4 Click Open. Visual Insert dialog box
Visual Insert
Visual Insert helps you quickly locate the thumbnails you want to insert into youralbum by directly displaying the contents of image files in your system. This lets youfind images visually rather than having to remember file names.
Entering field data
Entering field information about each thumbnail helps you easily locate and sortthumbnails later on. To enter data, first click the View In Data Entry Mode buttonon the Standard toolbar. The first thumbnail in your album then appears with all ofthe fields associated with that album to the right of it. Click in one of the field boxesto begin entering data. Use the four scroll buttons at the top right corner of thewindow to advance forward or backward in the album.
Data Entry Mode

222
PHOTOIMPACT USER GUIDE
New dialog box
Note: Fields are defined at the time an album was created. To edit these fields, see “Editing analbum‘s properties” on page 219.
The different types of fields in which you can enter information include thefollowing:
• Number A number field accepts any numeric data from 0 to 4,294,967,294.If decimals are used, the numbers after the decimals are truncated. Forexample, 16.75 becomes 16.
• Date When entering the date, use the same date format as defined in theWindows operating system (such as YY/MM/DD).
• Text Text fields hold up to 255 characters. You can enter relatedinformation for a later search or for sorting.
• File name You can enter a file name of up to 259 characters. When enteringa file name, you need not include a file extension.
• Keyword lets you assign keywords or phrases to thumbnails, making it easyto find files that share common themes. For example, the keyword “Sports”can be assigned to all files related to sports in an album.
• List The data in the list fields is taken from a predefined list of values,called a value list. For example, if you are setting up an employee database,you may have a list field for marital status. Your value list would providethe values: Single and Married.
• Memo This is a special type of text data. The memo is useful for appendingmiscellaneous information and holds up to 65,635 characters.
Entering keywords
Keywords are text information that you can assign to thumbnails to help you easilyremember the contents of the corresponding files. They are also useful for searchingand organizing thumbnails in an album.
While creating a new album, you can predefine a set of keywords for thumbnails tobe inserted into that album by creating a keyword list. Then, after you have insertedthumbnails, you can simply select your desired keywords from this list and assignthem to each thumbnail.
To create a keyword list:
1 When creating a new album, clickCustomize in the New dialog box. Or,for an existing album, open the AlbumProperties dialog box (see page 219).
2 On the Fields tab, click a Keyword fieldfrom the Total fields list. The EditKeyword button then appears.

223
CHAPTER 7: IMAGE MANAGEMENT WITH ALBUM
To assign keywords to a thumbnail:
1 Click the View In Data Entry Modebutton on the Standard toolbar.
2 Click the Keywords field name andthen click the blank box next to it.
3 Select a keyword from the Currentkeywords available list for thethumbnail, or enter a new keyword inthe New keyword box.
4 Click Add to place that keyword intothe Current keywords in field list.Repeat until all keywords for this fieldare added and then click OK .
3 Click Edit Keyword and enter akeyword in the New keyword box.
4 Click Add. To add more keywords,repeat this step.
5 Click OK . The new keywords are nowincluded in the album. (They are notyet assigned to any thumbnails.)
Edit Keywords dialog boxNote: The maximum number of keywords in analbum is 8,000. You can assign up to 32keywords to each keyword field, but eachkeyword cannot exceed 255 characters.
Keywords dialog box
Saving and loading keywords
After creating or editing a keyword list, you can save it for use in another album.
To save the keyword list as a file:
1 Click Save in the Edit Keyword dialogbox.
2 Select the path you want to save thekeyword file to, and enter a file nameusing a TXT file format.
3 Click OK .
Edit Keywords dialog box

224
PHOTOIMPACT USER GUIDE
Album Properties dialog box
To load keywords:
1 Click the Load button in the EditKeywords dialog box.
2 Choose the keyword file and clickOpen.
3 You will be asked if you want to retainthe current keywords. Click Yes to addthe new keywords to those currently inthe keyword list; No replaces thecurrent keywords with those from thefile.
Load Keywords dialog box
Note: If you are preparing a large number ofkeywords, you may find it easier to firstprepare the keywords in a word processingprogram and then load them into an album. Bydoing so, you can easily edit your work andcheck the spelling before assigning keywordsto thumbnails. Each keyword must appear onits own line.
To create a value list:
1 When creating a new album, clickCustomize in the New dialog box. Or,for an existing album, open the AlbumProperties dialog box (see page 219).
2 On the Fields tab, click a field with“List” field type from the Total fieldslist. The Edit List button then appears.
Note: If you cannot find a field with “List” fieldtype, create a new field name and select “List”as its field type from the Field type list. Thenclick Add .
New dialog box
3 Click Edit List .
4 In the New value box, enter a word youwant the list to contain – for example,Single.
Creating a value list
A value list is a predefined list of choices. If you created an album for cataloguingemployee photos and data, for instance, you can have value lists that contain presetchoices for job position, marital status, educational attainment, etc. Then, for eachemployee’s entry in the album, you can just select values from the lists.

225
CHAPTER 7: IMAGE MANAGEMENT WITH ALBUM
To import field data:
1 Select Thumbnail: Import - FromFile.
2 On the File tab, locate the database fileyou want to import.
3 On the Fields tab, select fields in theFields in Album list to match withthose in the import file.
4 Click OK .
Import dialog box
5 Click Add or press the ENTER key. Toadd more values, repeat steps 4 to 5.
6 Click OK . The values are now availableto the album. (They are not yet assignedto any thumbnails.)
To select a value from the value list:
1 In the data entry mode, click theappropriate list field.
2 Select a value from the Current valuesavailable list for the thumbnail, or entera new value in the New value box.
3 Click OK .
Importing field data
In an album, you can include database file information from another album or from adatabase program such as dBASE IV.
Edit List dialog box
List dialog box
Note: You can have a maximum of 8,000values in a single value list.
Note: If there are more records in the input filethan thumbnails in the album, the extrarecords are discarded. If there are fewerrecords, the fields are left empty in theremaining thumbnails.

226
PHOTOIMPACT USER GUIDE
Exporting field data to an external fileYou can save selected field data to an external file.
To export field data:
1 Select Thumbnail: Export - To File .
2 On the File tab, specify the file nameand format of the exported file. You canchoose file type as:• Formatted Text Files.• Tab Delimited Text Files (field data
separated by tabs).• Comma Delimited Text Files (field
data separated by commas).• dBASE IV Files.
3 On the Fields tab, select fields to exportin the Export fields list. You can alsodrag these selections to change theorder that they appear in the file.
4 In the Character set list, choose toexport the file as either Windows orDOS text. Select DOS text if you planto import the data to a DOS program.
5 Click OK .
Export dialog box: File
Export dialog box: FieldNotes:• If there are thumbnails selected in the
current album, only the field data fromthose selected is exported. To export dataof all thumbnails, make sure that all ornone are selected.
• You can have anywhere from 1 to 999characters reserved for each field.
Copying thumbnails and field data using the clipboard
One easy way to copy thumbnails is by dragging them into other albums. Analternative way is to use the clipboard and the following Edit menu commands:
• Cut [CTRL+X] removes a thumbnail from the album and places it onto theclipboard. Only the thumbnail is cut, not the source file.
• Copy [CTRL+C] provides the option of copying the thumbnail, its field dataor the file name. To only copy certain field data, highlight the data you wantto copy and right-click the data entry pane to choose Copy in the popupmenu.
• Paste [CTRL+V] duplicates or moves the thumbnail or field data to a destinedalbum. If pasting single field data, right-click a field and select Paste.

227
CHAPTER 7: IMAGE MANAGEMENT WITH ALBUM
Note: In each viewing mode, you can view a thumbnail if you double-click it, or right-click it andselect View .
Viewing
To view files in an album, you can toggle between Thumbnail, Attribute , FileName or Data Entry modes using the following three methods:
• Click the corresponding viewing mode buttons on the Standard toolbar.
• Select a command from the View: Mode submenu.• Click the Viewing Mode Layout button on the Status bar and choose a
corresponding mode.
Each viewing mode displays information about the files in the album in a differentway:
• Thumbnail displays the thumbnails of files from left to right and top tobottom.
• Attribute displays both the thumbnails and information about each file.
• File Name displays file names from top to bottom in the album. You cansort all files in the order of each header once you click it.
• Data Entry displays the field names and data for each thumbnail with theimage shown to the left of the fields. Choose this mode if you want to addor edit information in the fields of an album.
Thumbnail mode
Attribute mode
File Name mode
Data Entry mode

228
PHOTOIMPACT USER GUIDE
Viewing mode layoutYou can customize the information to display in different viewing modes.
To customize viewing mode layout:
1 Select View: Mode, or click theViewing Mode Layout button on theStatus bar.
2 Choose Layout.3 Click the tab on the top which
corresponds to the viewing mode youwant to edit (click arrow buttons ifnecessary).
4 Select the field in the Show fields list todisplay. Clear to hide.
5 Click OK .Layout dialog box
Splitting the album windowYou can also view an album in two different modes simultaneously by splitting thealbum window into an upper and lower pane. To split an album window, drag up thesplitter at the bottom of the scroll bar.
To change the viewing mode in each pane, you can:
• Click the corresponding viewing mode button on the Standard toolbar. Thisonly changes the mode for the upper pane.
• For both the upper and lower panes, use the Viewing Mode Layout buttonon the Status bar or the View: Mode submenu. The submenu has two sets ofcommands. The upper set is for the upper pane and the lower set is for thelower pane.
• Right-click the pane (not thumbnail) and select the mode you want from itsMode submenu.
An album with two different viewing modes
Splitter
Upper Pane
Lower Pane

229
CHAPTER 7: IMAGE MANAGEMENT WITH ALBUM
Viewing by tabsYou can view thumbnails by categorized tabs.
To view by tabs:
1 Select View: Show Tabs, or drag downthe splitter at the top of each albumwindow’s vertical scroll bar.
2 Click each tab to view its categorizedthumbnails.
Tab Splitter
Note: To hide displayed tabs, select View:Hide Tabs . You can also drag up the splitter oruse the Tab Menu button at the top of thescroll bar.
The default classification is by mediatype (such as image and sound). Tocustomize it, add a new value list. Thenselect the View: Tabs By submenu toview these new tabs. For details oncreating a value list, see page 224.
Scrolling through an album
If there are tens or hundreds of thumbnails in an album, use any of these methods toscroll through the album and find the thumbnails that you want:
• Click the scroll bar or the arrow buttons, or move the slider on the right sideof an album. While moving the slider, you will see the index number of thefirst thumbnail in the row that you are scrolling to.
• Select View: Auto Scroll. In the Delay time box, enter the time (inseconds) that you want Album to wait before each scroll.
• Select View: Scroll To to go to a specific thumbnail.
Using Scan Play
To quickly browse through a large number of wave, MIDI, video, or animation files,select View: Scan Play. The multimedia files of the selected thumbnails are playedsequentially in a media window.
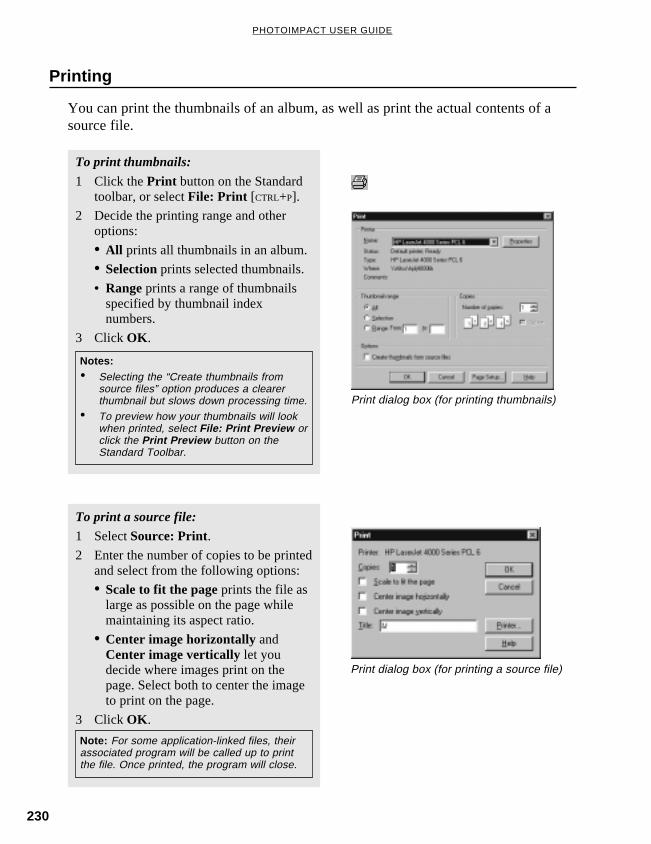
230
PHOTOIMPACT USER GUIDE
Printing
You can print the thumbnails of an album, as well as print the actual contents of asource file.
To print thumbnails:
1 Click the Print button on the Standardtoolbar, or select File: Print [CTRL+P].
2 Decide the printing range and otheroptions:
• All prints all thumbnails in an album.
• Selection prints selected thumbnails.
• Range prints a range of thumbnailsspecified by thumbnail indexnumbers.
3 Click OK .
Notes:• Selecting the “Create thumbnails from
source files” option produces a clearerthumbnail but slows down processing time.
• To preview how your thumbnails will lookwhen printed, select File: Print Preview orclick the Print Preview button on theStandard Toolbar.
Print dialog box (for printing thumbnails)
To print a source file:
1 Select Source: Print.2 Enter the number of copies to be printed
and select from the following options:
• Scale to fit the page prints the file aslarge as possible on the page whilemaintaining its aspect ratio.
• Center image horizontally andCenter image vertically let youdecide where images print on thepage. Select both to center the imageto print on the page.
3 Click OK .
Note: For some application-linked files, theirassociated program will be called up to printthe file. Once printed, the program will close.
Print dialog box (for printing a source file)

231
CHAPTER 7: IMAGE MANAGEMENT WITH ALBUM
Performing drag-and-drop operations
Album supports drag-and-drop operations, which are a simple yet powerful techniquefor transferring information within and between albums as well as to other programs.
Note: As the action of dragging actually includes dropping, this user guide uses “drag” in all othersections to indicate drag-and-drop operations (except the current section on drag-and-drop details.)
Drag-and-drop thumbnails to albums
Using drag-and-drop, you can easily move thumbnails within or between albums byselecting the thumbnails and dragging them to their new destination, either an openalbum or an album icon on the Album Panel. If you hold the [CTRL] key down whiledragging, the thumbnails are copied.
Note: Thumbnails dropped into an album will change to match the properties of the thumbnails in thatalbum.
Drag-and-drop thumbnails between tabs
To move thumbnails from one tab to another, select and drag them to the other tab.This not only moves the thumbnails but changes their list values. For example, if youhave thumbnails on a tab for Sales and drag them to the tab for Marketing, the valuefor the department field changes from Sales to Marketing.
Note: The list value is entered in fields with the “List” field type in an Album. See Viewing by tabs onpage 229 for how to view thumbnails by tabs.
Drag-and-drop to the Tool panel
You can drag one or more thumbnails from an album and drop them onto a programicon on the Tool panel to open them in that program. If the associated file iscompatible with the program and the program accepts command line opening of files,the file associated with the thumbnail is opened in that program (represented by theprogram icon on the Tool panel).
Note: Pressing the ENTER key with a thumbnail selected also opens the file (not thumbnail) in theassociated program.

232
PHOTOIMPACT USER GUIDE
Drag-and-drop to another program
If you have other programs running at the same time, you can drag-and-dropthumbnails directly to the program’s workspace or to the appropriate program icon onthe Tool panel of the Album. Depending on the OLE settings in the AlbumPreferences (page 217), this embeds, links or opens the file.
If you are working from Windows Explorer, you can drag-and-drop:
• program files (EXE) to an empty icon on the Tool panel of Album to createprogram icons.
• album files (AB3) into the Album workspace to open them.
• files into albums to create thumbnails of the files.
When dragging thumbnails to other programs, the resulting action is determined bythe particular program. In general, if you drop a thumbnail onto a minimized programicon, or onto the program window’s title bar, the program will attempt to open it.
Notes :
• Holding down the CTRL key as you drop an object into the destination program embeds it,irrespective of the OLE settings in the Album Preferences, see page 217.
• Holding down the CTRL+SHIFT keys links it. (If you do not hold down any keys, the embedded objectis linked to it associated program.)
Note: In Compact mode, clicking the Display Menu button also accesses other Album commands.
Working in Compact mode
When dropping thumbnails into another program, it is often easier to have Album inCompact mode and have the destination program running at the same time. To enterCompact mode, select View: Compact Mode or click the Compact Mode button onthe Status bar.
In Compact mode, the Album program window occupies minimum screen space withno menu bar. To switch back to normal mode, click the Display Menu button on theStatus bar and choose Switch To Normal Mode.
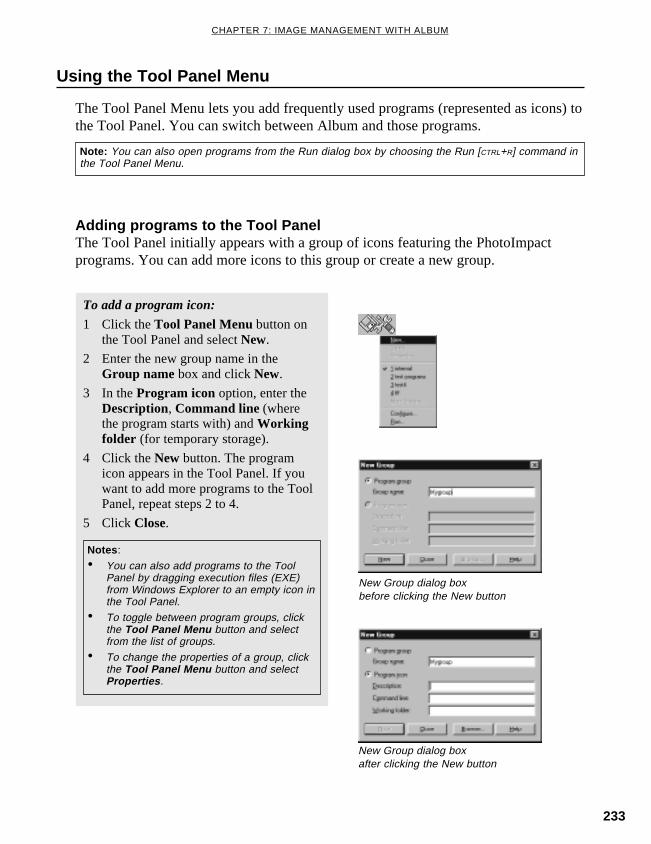
233
CHAPTER 7: IMAGE MANAGEMENT WITH ALBUM
Using the Tool Panel Menu
The Tool Panel Menu lets you add frequently used programs (represented as icons) tothe Tool Panel. You can switch between Album and those programs.
To add a program icon:
1 Click the Tool Panel Menu button onthe Tool Panel and select New.
2 Enter the new group name in theGroup name box and click New.
3 In the Program icon option, enter theDescription, Command line (wherethe program starts with) and Workingfolder (for temporary storage).
4 Click the New button. The programicon appears in the Tool Panel. If youwant to add more programs to the ToolPanel, repeat steps 2 to 4.
5 Click Close.
New Group dialog boxbefore clicking the New button
New Group dialog boxafter clicking the New button
Note: You can also open programs from the Run dialog box by choosing the Run [CTRL+R] command inthe Tool Panel Menu.
Adding programs to the Tool PanelThe Tool Panel initially appears with a group of icons featuring the PhotoImpactprograms. You can add more icons to this group or create a new group.
Notes :
• You can also add programs to the ToolPanel by dragging execution files (EXE)from Windows Explorer to an empty icon inthe Tool Panel.
• To toggle between program groups, clickthe Tool Panel Menu button and selectfrom the list of groups.
• To change the properties of a group, clickthe Tool Panel Menu button and selectProperties .

234
PHOTOIMPACT USER GUIDE
Deleting programs from the Tool Panel
You can delete a program group or individual programs from the Tool Panel.
To delete programs from the Tool Panel:
1 Click the Tool Panel Menu button onthe Tool Panel and select Delete.
2 Choose an option:
• Delete current program groupdeletes the group and all associatedprogram icons.
• Delete program icon from currentgroup lets you select the individualprogram icon to be deleted from theIcon list.
3 Click OK .
Repositioning the Tool Panel
You can choose your preferred position for the Tool Panel.
To reposition the Tool Panel:
1 Click the Tool Panel Menu button onthe Tool Panel and choose Configure.
2 Select a position and click OK .
Delete dialog box
Configure dialog box
Managing albums
Use the Album Panel at the left side of the program window as well as the Albummenu commands to manage your album files. It is important to remember that whenperforming operations on album files, you are not affecting the actual source files ofthe thumbnails.
Using the Album PanelYou can have many albums open in the workspace at one time. Tomanage these albums, use the Album Panel. It arranges all youralbums in a vertical pane to the left of the workspace, helping youeasily and quickly find the album file you need.

235
CHAPTER 7: IMAGE MANAGEMENT WITH ALBUM
To open an album, click its representative thumbnail in the Album Panel. Right-clicking the thumbnail lists some commonly used commands.
To customize the album’s cover, click the Play button in the Album Panel to scrollthrough the thumbnails. Then click Stop to select a thumbnail as the Albumthumbnail in the Album Panel. The Scroll Up/Down buttons also helps you navigatethe Album Panel if it contains too many albums to fit in a single screen.
Checking the thumbnails in an album
When the original files of thumbnails have been moved, renamed, or deleted, theirlinks with thumbnails “break”.
To determine if this link is broken, select Album: Check. The Check dialog boxopens with the following two tabs:
• The Missing Files tab lists thosethumbnails whose original sourcefiles are currently missing. You canthen choose to relink or delete thethumbnails of these files.
• The Modified Files tab lists thosefiles which have been changed sincethey were originally inserted into analbum. Here you can choose toRelink, Update or Delete thethumbnails.
Check Album dialog boxNote: The Check command cannot beperformed on read-only albums. To change theattributes of the album, right-click Album:Sharing menu command and clear the “Shareas Read-only” option.
Copying or moving an album file
Select the Album: Copy or Move command if you only want to create a duplicate ofan album file or transfer it to a different folder location.
Select Album: Package to copy the album file and all associated source files to thefolder you specify.

236
PHOTOIMPACT USER GUIDE
Backup dialog box
Backing up an album file
When you back up an album, you back up not only the album file but all those filesassociated with the thumbnails. This creates a copy of the files. You can also deletethe backed up files later when you need more storage space.
If you choose to delete the original files after a backup, you can still keep a record ofthem by not deleting the album file. This lets you view the thumbnails of the files inthe album. (You need to restore the original album first.)
Backing up to floppy disks
When backing up to floppy disks, you may need additional disks. Album splitsbackup files so that the disks are filled efficiently. For the number of disks required,check the Total size to backup indicator in the Backup dialog box and divide this bythe capacity of your disks.
Note: Any files in the target folder are deletedbefore backing up begins.
To back up an album:
1 Select the album you want to backup.
2 Select Album: Backup .
3 Select a folder from the Look in list tosave the album.
4 If you have selected specific thumbnailsto back up, select the Backup selectedfiles only option.
5 Select the Compress files option if youwant to compress the files as they arebacked up.
Note: If it is important to achieve maximumcompression, convert all image files in thealbum to the JPEG format before backing up.JPEG, however, is a lossy compressionscheme, so the quality of the compressed filesmay not be as good as the originals.
6 Click OK to begin the backup process.(displayed in Album’s Status bar)
Note: Sequentially number and label each disk for convenience when restoring the album.

237
CHAPTER 7: IMAGE MANAGEMENT WITH ALBUM
With Album, you can easily share your files by giving file access to other users in alocal network, sending them by e-mail or by sharing them on the Web. If you haveimages and other media files, you can let Album create captivating slide shows foryou. Album can also instantly generate Web pages, producing stunning Web albumsand Web slide shows that are ready to be posted on the Internet.
Sharing albums over a network
To allow multiple users to access the same album file at the same time, selectAlbum: Sharing. Here you can set related read/write rights to the currently activealbum.
When you are sharing albums over a network, changes made to the source files maynot be reflected in the current thumbnails. To update the album, select Album:Refresh. Each thumbnail in an album is updated accordingly if its source file haschanged.
Note: You can restore an album file that hasthe same title as an existing one, as long asthe file name is different or you restore it to adifferent folder. However, once restored, youcannot open it in Album until you haverenamed, removed, or deleted the other.
Restore dialog box
Restoring an album fileAfter backing up an album, you must restore it first before you can use the files in it.
To restore an album:
1 Select Album: Restore.
2 Find the folder containing the albumyou wish to restore from the Look inlist.
3 Under Restore to, select the subfolderto restore the backed up files to.
4 Click OK .
Notes :
• If others are already using an album, you will not be able to change sharing options.
• The Refresh command is disabled if you are not currently sharing an album over the network.
Sharing albums and files

238
PHOTOIMPACT USER GUIDE
Creating a Web slide show
A Web slide show is an attractive way of showcasing images on the Internet. Bysimply selecting options in the Export to Web Slide Show dialog box, you can designa simple Web page layout for the slide show. Album will then automatically generatethe HTML files for you.
Showcasing image collections
Album provides a slide show feature which showcases your images, graphics, andsound files. You can choose from impressive transition effects and choose eithermanual or automatic controls.
To run a slide show:
1 Select the thumbnails you wish to use inthe slide show, or select none to use allthumbnails in an album.
2 Select View: Slide Show, or click theSlide Show button on the Tool Panel.
3 On the General tab, select the type oftransition between images from theEffect list. Also, adjust the speed of theslide show by moving the Speed sliderand enter the delay between frames inthe Delay box.
4 On the Text & Color tab, assign thecolor and font to the text andbackground. Also, select whichattributes to display during the slideshow.
5 On the Music tab, select an audio file tobe played with the slide show.
6 Click Play to see the results. To stop theslide show at any time, press ESC.
7 The Slide Show dialog box closes afterthe playback. To save the slide showsettings, select View: Slide Show againand then click Save.
Slide Show dialog box: General, Text &Color, and Music tabs
Note: Slide show settings are saved in an*.SHW file. Images are not saved in this file.The next time you want to play a slide showusing the settings which you have alreadydefined, first select images from an album.Then, select View: Slide Show and click Loadto access your slide show settings.

239
CHAPTER 7: IMAGE MANAGEMENT WITH ALBUM
To create an HTML-based slide show:
1 Select the thumbnails that you want,then select Thumbnail: Export - WebSlide Show.
2 In the Output tab, choose to generateWeb pages or a self-extracting file.Select a folder location in your localdrive where to save the files.
Note: Generating a self-extracting *.EXE filewill combine and compress the HTML files andimages into a single file, which you can easilysend by e-mail. To run the Web slide show,first double-click the *.EXE file to extract all thefiles contained in it. Then, open the mainHTML file in a Web browser.
3 The Page Setup tab determines theoverall Web page layout:
• Specify a Title tag for the Webbrowser’s title bar.
• Add Heading and Footer annotationsas well as Format the text.
• In the Links Between Pages section,select which style of page links youwant to appear on the Web page.
4 Click the Advanced button tocustomize the page layout further. (Youcan add a background color or image,music file, and text/hyperlink coloring.)
5 In the Slide tab, set the image size fordisplaying the images. Enter the Delaytime between slides.
Note: If you want the viewer of the slide showto manually control its playback, clear the“Automatically advance to the next page”option.
Sample Web slide show
6 Click Preview to see the results in yourdefault Web browser.
7 Click OK . The generated HTML filesas well as the image files that are part ofthe Web slide show (or the single*.EXE file) will be saved in yourspecified folder.
Export to Web Slide Show dialog box:Output, Page Setup, and Slide tabs
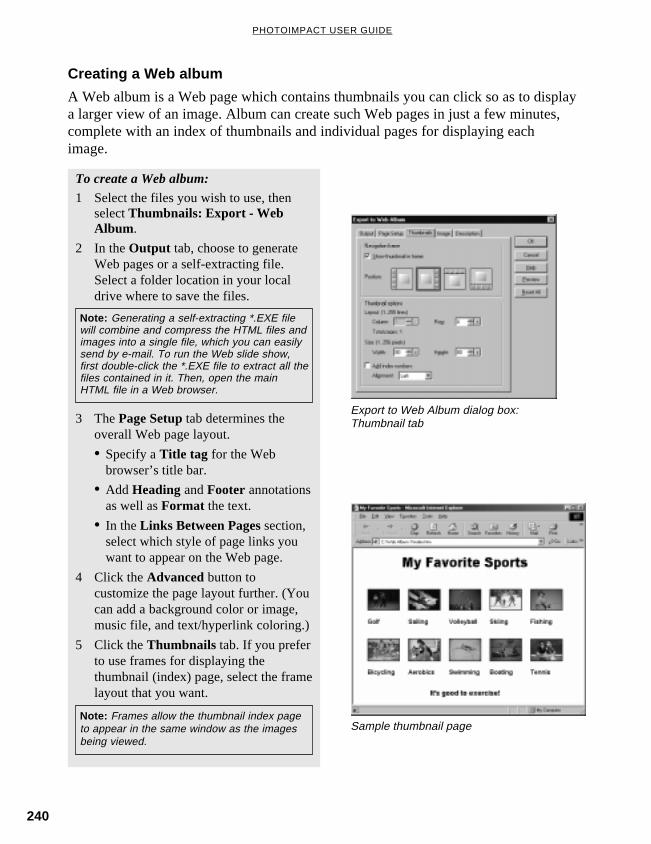
240
PHOTOIMPACT USER GUIDE
Creating a Web album
A Web album is a Web page which contains thumbnails you can click so as to displaya larger view of an image. Album can create such Web pages in just a few minutes,complete with an index of thumbnails and individual pages for displaying eachimage.
To create a Web album:
1 Select the files you wish to use, thenselect Thumbnails: Export - WebAlbum .
2 In the Output tab, choose to generateWeb pages or a self-extracting file.Select a folder location in your localdrive where to save the files.
Sample thumbnail page
Note: Generating a self-extracting *.EXE filewill combine and compress the HTML files andimages into a single file, which you can easilysend by e-mail. To run the Web slide show,first double-click the *.EXE file to extract all thefiles contained in it. Then, open the mainHTML file in a Web browser.
3 The Page Setup tab determines theoverall Web page layout.
• Specify a Title tag for the Webbrowser’s title bar.
• Add Heading and Footer annotationsas well as Format the text.
• In the Links Between Pages section,select which style of page links youwant to appear on the Web page.
4 Click the Advanced button tocustomize the page layout further. (Youcan add a background color or image,music file, and text/hyperlink coloring.)
5 Click the Thumbnails tab. If you preferto use frames for displaying thethumbnail (index) page, select the framelayout that you want.
Note: Frames allow the thumbnail index pageto appear in the same window as the imagesbeing viewed.
Export to Web Album dialog box:Thumbnail tab
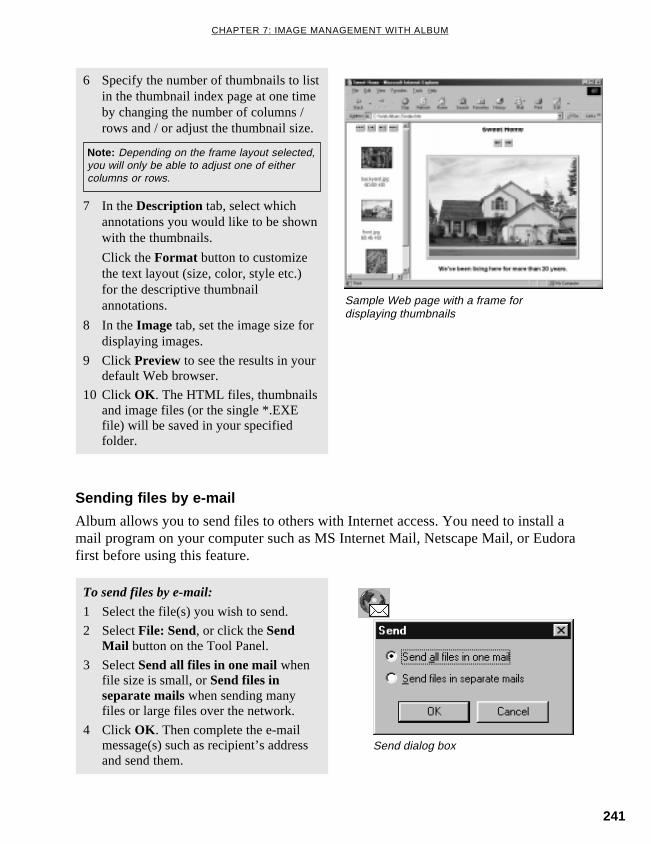
241
CHAPTER 7: IMAGE MANAGEMENT WITH ALBUM
Sending files by e-mail
Album allows you to send files to others with Internet access. You need to install amail program on your computer such as MS Internet Mail, Netscape Mail, or Eudorafirst before using this feature.
To send files by e-mail:
1 Select the file(s) you wish to send.
2 Select File: Send, or click the SendMail button on the Tool Panel.
3 Select Send all files in one mail whenfile size is small, or Send files inseparate mails when sending manyfiles or large files over the network.
4 Click OK . Then complete the e-mailmessage(s) such as recipient’s addressand send them.
Sample Web page with a frame fordisplaying thumbnails
6 Specify the number of thumbnails to listin the thumbnail index page at one timeby changing the number of columns /rows and / or adjust the thumbnail size.
Note: Depending on the frame layout selected,you will only be able to adjust one of eithercolumns or rows.
7 In the Description tab, select whichannotations you would like to be shownwith the thumbnails.
Click the Format button to customizethe text layout (size, color, style etc.)for the descriptive thumbnailannotations.
8 In the Image tab, set the image size fordisplaying images.
9 Click Preview to see the results in yourdefault Web browser.
10 Click OK . The HTML files, thumbnailsand image files (or the single *.EXEfile) will be saved in your specifiedfolder.
Send dialog box

242
PHOTOIMPACT USER GUIDE
Maintaining thumbnails
Note: If you have the “Check links to source files” option selected in the Album Preferences dialog box(see page 216), thumbnails are updated whenever the view in the album changes. To update a largenumber of thumbnails, it is quicker to first select this option and then scroll through the album.
Changing a thumbnail’s image
When you first insert the thumbnail of a file, it displays the contents of that file. Youcan change the thumbnail, especially for those thumbnails whose contents cannot bedisplayed such as sound and text files.
When you change a thumbnail, you can replace it with image or graphics data fromthe clipboard using the From Clipboard command in the Thumbnail: Updatesubmenu. So, you can use your favorite images as your thumbnails, or you cancustomize thumbnails to represent particular files.
Relinking thumbnails with their associated files
When the thumbnail of a file is inserted into an album, it maintains a link with thelocation of this file. If you move the file or remap disk drives, Album may lose thislink. When the Check links to source files option is selected in the AlbumPreferences dialog box, thumbnails that have lost their links appear with their indexnumbers grayed-out.
To maintain thumbnails so that they always accurately represent the files associatedwith them, you can:
• Set an album to monitor a particular folder (see Online Help for theAdvanced tab in the Album Properties dialog box).
• Reinsert their associated files.
• Choose one of the update commands in the Thumbnail menu.
Updating a thumbnail
When you need to check a selected thumbnail with its source file, select Thumbnail:Update – From Source File. Holding the [CTRL+SHIFT] keys down as you choose thiscommand creates a thumbnail at the best quality; holding [CTRL] only produces agood quality thumbnail.
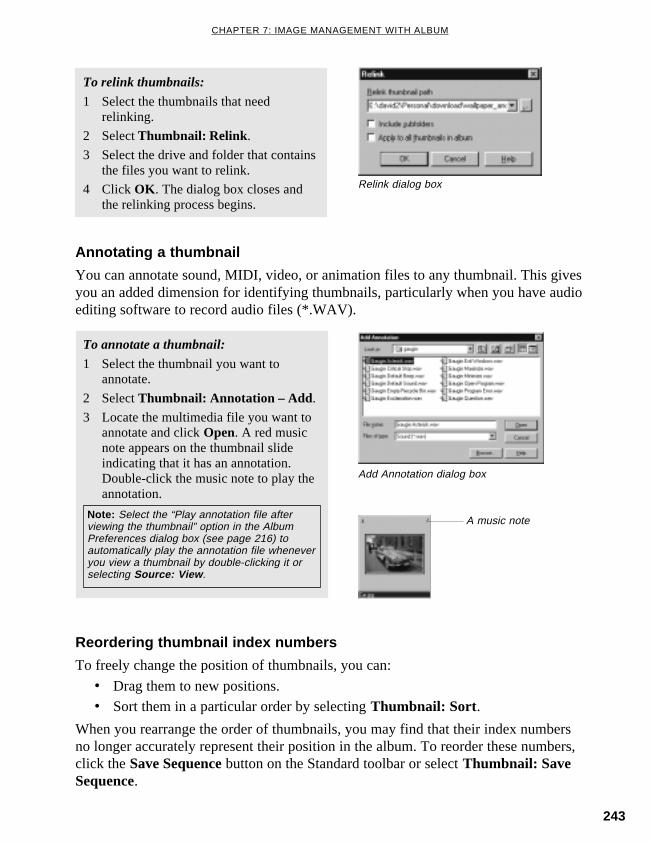
243
CHAPTER 7: IMAGE MANAGEMENT WITH ALBUM
Add Annotation dialog box
A music noteNote: Select the “Play annotation file afterviewing the thumbnail” option in the AlbumPreferences dialog box (see page 216) toautomatically play the annotation file wheneveryou view a thumbnail by double-clicking it orselecting Source: View .
Annotating a thumbnail
You can annotate sound, MIDI, video, or animation files to any thumbnail. This givesyou an added dimension for identifying thumbnails, particularly when you have audioediting software to record audio files (*.WAV).
Reordering thumbnail index numbers
To freely change the position of thumbnails, you can:
• Drag them to new positions.
• Sort them in a particular order by selecting Thumbnail: Sort .
When you rearrange the order of thumbnails, you may find that their index numbersno longer accurately represent their position in the album. To reorder these numbers,click the Save Sequence button on the Standard toolbar or select Thumbnail: SaveSequence.
To annotate a thumbnail:
1 Select the thumbnail you want toannotate.
2 Select Thumbnail: Annotation – Add .
3 Locate the multimedia file you want toannotate and click Open. A red musicnote appears on the thumbnail slideindicating that it has an annotation.Double-click the music note to play theannotation.
Relink dialog box
To relink thumbnails:
1 Select the thumbnails that needrelinking.
2 Select Thumbnail: Relink .
3 Select the drive and folder that containsthe files you want to relink.
4 Click OK . The dialog box closes andthe relinking process begins.
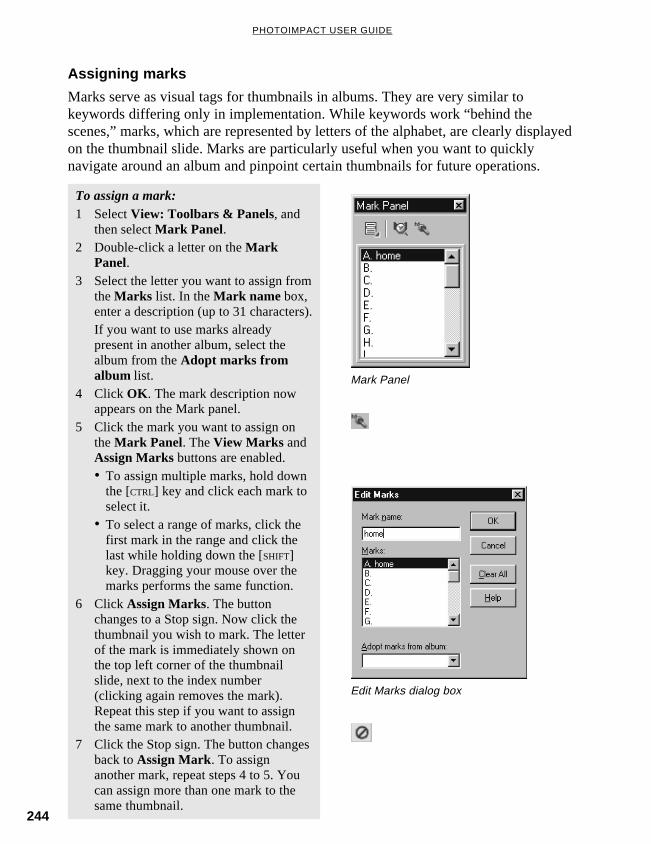
244
PHOTOIMPACT USER GUIDE
Assigning marks
Marks serve as visual tags for thumbnails in albums. They are very similar tokeywords differing only in implementation. While keywords work “behind thescenes,” marks, which are represented by letters of the alphabet, are clearly displayedon the thumbnail slide. Marks are particularly useful when you want to quicklynavigate around an album and pinpoint certain thumbnails for future operations.
To assign a mark:1 Select View: Toolbars & Panels, and
then select Mark Panel.2 Double-click a letter on the Mark
Panel.3 Select the letter you want to assign from
the Marks list. In the Mark name box,enter a description (up to 31 characters).If you want to use marks alreadypresent in another album, select thealbum from the Adopt marks fromalbum list.
4 Click OK . The mark description nowappears on the Mark panel.
5 Click the mark you want to assign onthe Mark Panel. The View Marks andAssign Marks buttons are enabled.• To assign multiple marks, hold down
the [CTRL] key and click each mark toselect it.
• To select a range of marks, click thefirst mark in the range and click thelast while holding down the [SHIFT]key. Dragging your mouse over themarks performs the same function.
6 Click Assign Marks. The buttonchanges to a Stop sign. Now click thethumbnail you wish to mark. The letterof the mark is immediately shown onthe top left corner of the thumbnailslide, next to the index number(clicking again removes the mark).Repeat this step if you want to assignthe same mark to another thumbnail.
7 Click the Stop sign. The button changesback to Assign Mark. To assignanother mark, repeat steps 4 to 5. Youcan assign more than one mark to thesame thumbnail.
Mark Panel
Edit Marks dialog box
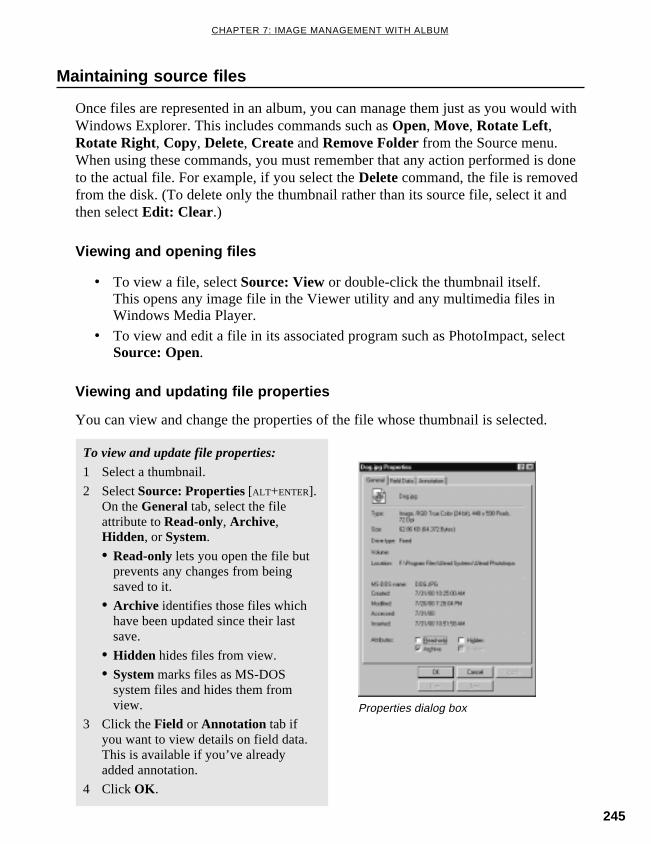
245
CHAPTER 7: IMAGE MANAGEMENT WITH ALBUM
Maintaining source files
Once files are represented in an album, you can manage them just as you would withWindows Explorer. This includes commands such as Open, Move, Rotate Left,Rotate Right, Copy, Delete, Create and Remove Folder from the Source menu.When using these commands, you must remember that any action performed is doneto the actual file. For example, if you select the Delete command, the file is removedfrom the disk. (To delete only the thumbnail rather than its source file, select it andthen select Edit: Clear .)
Viewing and opening files
To view and update file properties:
1 Select a thumbnail.
2 Select Source: Properties [ALT+ENTER].On the General tab, select the fileattribute to Read-only, Archive,Hidden, or System.
• Read-only lets you open the file butprevents any changes from beingsaved to it.
• Archive identifies those files whichhave been updated since their lastsave.
• Hidden hides files from view.
• System marks files as MS-DOSsystem files and hides them fromview.
3 Click the Field or Annotation tab ifyou want to view details on field data.This is available if you’ve alreadyadded annotation.
4 Click OK .
Properties dialog box
• To view a file, select Source: View or double-click the thumbnail itself.This opens any image file in the Viewer utility and any multimedia files inWindows Media Player.
• To view and edit a file in its associated program such as PhotoImpact, selectSource: Open.
Viewing and updating file properties
You can view and change the properties of the file whose thumbnail is selected.
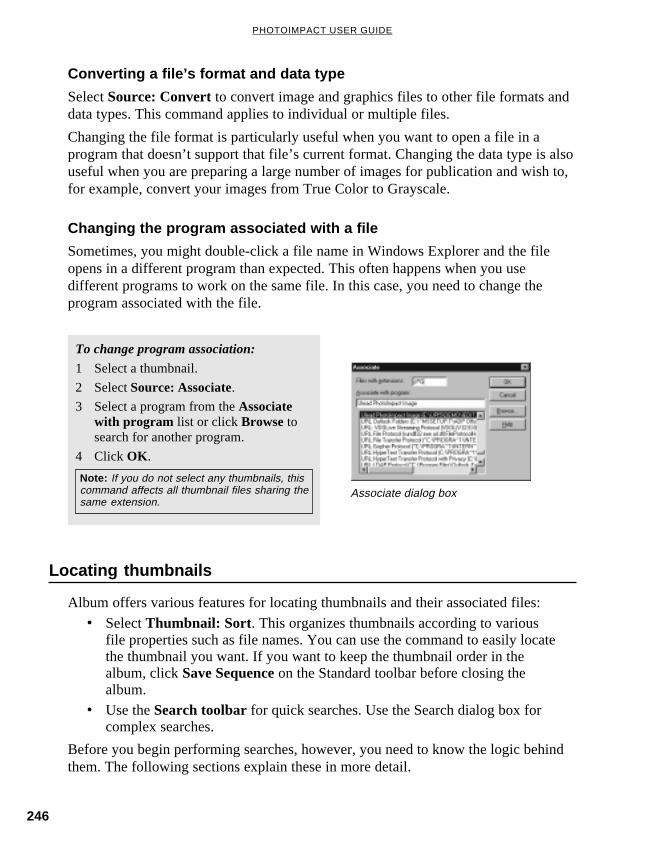
246
PHOTOIMPACT USER GUIDE
Associate dialog boxNote: If you do not select any thumbnails, thiscommand affects all thumbnail files sharing thesame extension.
Converting a file’s format and data type
Select Source: Convert to convert image and graphics files to other file formats anddata types. This command applies to individual or multiple files.
Changing the file format is particularly useful when you want to open a file in aprogram that doesn’t support that file’s current format. Changing the data type is alsouseful when you are preparing a large number of images for publication and wish to,for example, convert your images from True Color to Grayscale.
Changing the program associated with a file
Sometimes, you might double-click a file name in Windows Explorer and the fileopens in a different program than expected. This often happens when you usedifferent programs to work on the same file. In this case, you need to change theprogram associated with the file.
Locating thumbnails
To change program association:
1 Select a thumbnail.
2 Select Source: Associate.3 Select a program from the Associate
with program list or click Browse tosearch for another program.
4 Click OK .
Album offers various features for locating thumbnails and their associated files:
• Select Thumbnail: Sort . This organizes thumbnails according to variousfile properties such as file names. You can use the command to easily locatethe thumbnail you want. If you want to keep the thumbnail order in thealbum, click Save Sequence on the Standard toolbar before closing thealbum.
• Use the Search toolbar for quick searches. Use the Search dialog box forcomplex searches.
Before you begin performing searches, however, you need to know the logic behindthem. The following sections explain these in more detail.

247
CHAPTER 7: IMAGE MANAGEMENT WITH ALBUM
Search criteria and queries
Whenever you perform a search, you must first specify what you want to search onthrough the query. A query consists of a single or multiple items and criteria. Forexample, if you have chosen file names as the query, the criteria would be the filename you are looking for.
Note: If the criteria consist of more than one word, you must enclose them with a double quotationmark such as “New York.”
Note: To use an operator, double-click (or select) the desired operator in any of the dialog boxes thatsupport this feature. The operator then appears in the Query entry box. To add additional operators,repeat this procedure.
Logical operators
Album supports logical (Boolean) operators: Not, And, Or and ( ). These let yousearch through a vast number of files quickly, looking only for specific file features.Below is a brief description of how each of the operators work.
• Not defines the opposite of the indicated criteria. This isolates thumbnailswhose attributes make them a minority in an album. For example, in analbum consisting largely of TIF files, performing a file format search with“Not *.TIF” results in the display of all thumbnails, except those linked toTIF files.
• And specifies more than one criteria to base search on. Matchingthumbnails must meet all of these criteria. For example, you can perform asearch on “holidays And Spain”. All thumbnails with both “holiday” and“Spain” will be displayed.
• Or matches thumbnails that meet one or more of a specified criteria. Forexample, performing a description search on, “holiday” Or “Spain”,displays all those thumbnails with description containing “holiday”, “Spain”or “holiday” and “Spain”.
• ( ) groups criteria together. This is particularly important if you have severalcriteria, some of which must be paired together. For example, if you aresearching on the values, A, B and C, then you could define the search as, “AAnd (B Or C)”, or “(A And B) Or C”. In the first example, the thumbnailsmust have A and either B or C. In the second example, the thumbnails musthave either A and B together, or C only.

248
PHOTOIMPACT USER GUIDE
Search operators
Operators are characters or phrases defining the range of a search. Most searchoperators are self-explanatory, for example, = (equal to), > (greater than), < (lessthan) and < > (not equal to). However, two operators need some clarification:Contains and Empty. Both are operators that appear whenever you have a queryconsisting of Text, Memo, List , Mark , and Keyword fields.
• Contains finds all thumbnails that contain whatever is entered in the Querybox in the searched field.
• Empty, on the other hand, finds all thumbnails with nothing entered intothe searched field. This is particularly useful when you want to locatethumbnails having empty fields that you want to complete.
Matching case and whole words
When performing a search on text, many of the search options let you use Matchcase or Match whole word.
• Match case finds those thumbnails matching the upper or lower case of thequery. For example, to match the case of “New York”, only text with NewYork would be found. Any variations, such as “new York” or “NEWYORK” are ignored.
• Match whole word searches for occurrences of a defined word.For example, to match the word “man,” only “man” would be selected, not“woman.” If this option is left cleared, any occurrence of the letter sequence(not the word) would be found, such as “man,” “woman,” “manage,” and“human.”
Start with
Select the Start with option if you want thumbnails with words that begin with theentered text in the specified keyword or list field. For example, if you entered “ch” inthe Query box, then all thumbnails with words beginning with “ch” in the specifiedkeyword or list field will be displayed.
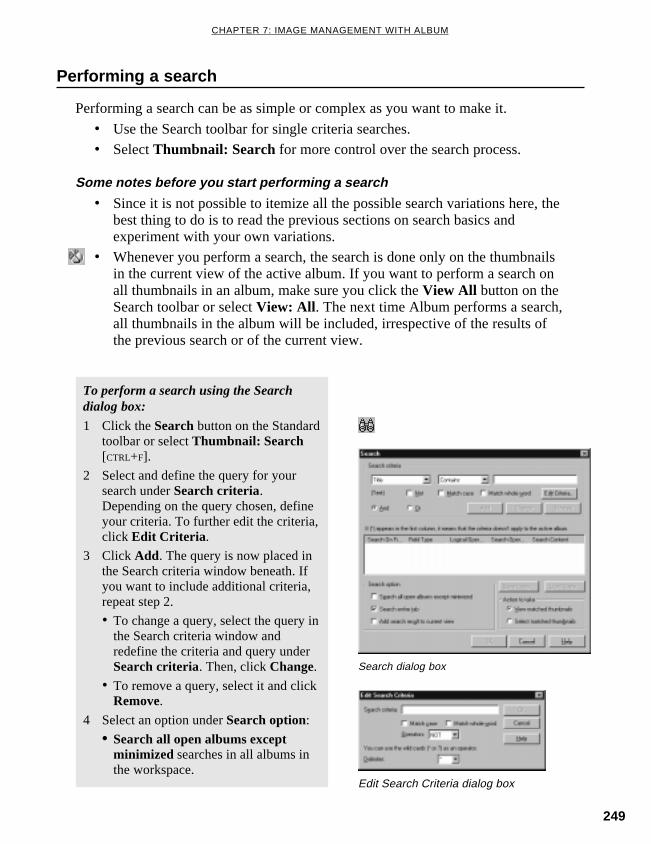
249
CHAPTER 7: IMAGE MANAGEMENT WITH ALBUM
Performing a search
To perform a search using the Searchdialog box:
1 Click the Search button on the Standardtoolbar or select Thumbnail: Search[CTRL+F].
2 Select and define the query for yoursearch under Search criteria.Depending on the query chosen, defineyour criteria. To further edit the criteria,click Edit Criteria .
3 Click Add. The query is now placed inthe Search criteria window beneath. Ifyou want to include additional criteria,repeat step 2.
• To change a query, select the query inthe Search criteria window andredefine the criteria and query underSearch criteria. Then, click Change.
• To remove a query, select it and clickRemove.
4 Select an option under Search option:• Search all open albums except
minimized searches in all albums inthe workspace.
Performing a search can be as simple or complex as you want to make it.
• Use the Search toolbar for single criteria searches.
• Select Thumbnail: Search for more control over the search process.
Some notes before you start performing a search
• Since it is not possible to itemize all the possible search variations here, thebest thing to do is to read the previous sections on search basics andexperiment with your own variations.
• Whenever you perform a search, the search is done only on the thumbnailsin the current view of the active album. If you want to perform a search onall thumbnails in an album, make sure you click the View All button on theSearch toolbar or select View: All . The next time Album performs a search,all thumbnails in the album will be included, irrespective of the results ofthe previous search or of the current view.
Search dialog box
Edit Search Criteria dialog box
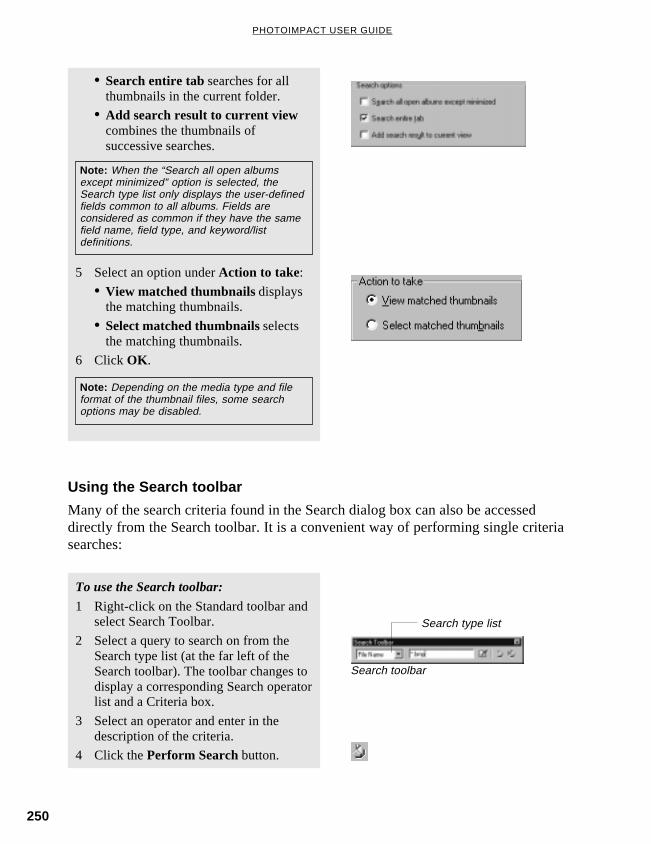
250
PHOTOIMPACT USER GUIDE
Note: When the “Search all open albumsexcept minimized” option is selected, theSearch type list only displays the user-definedfields common to all albums. Fields areconsidered as common if they have the samefield name, field type, and keyword/listdefinitions.
Note: Depending on the media type and fileformat of the thumbnail files, some searchoptions may be disabled.
• Search entire tab searches for allthumbnails in the current folder.
• Add search result to current viewcombines the thumbnails ofsuccessive searches.
Using the Search toolbar
Many of the search criteria found in the Search dialog box can also be accesseddirectly from the Search toolbar. It is a convenient way of performing single criteriasearches:
5 Select an option under Action to take:
• View matched thumbnails displaysthe matching thumbnails.
• Select matched thumbnails selectsthe matching thumbnails.
6 Click OK .
To use the Search toolbar:
1 Right-click on the Standard toolbar andselect Search Toolbar.
2 Select a query to search on from theSearch type list (at the far left of theSearch toolbar). The toolbar changes todisplay a corresponding Search operatorlist and a Criteria box.
3 Select an operator and enter in thedescription of the criteria.
4 Click the Perform Search button.
Search toolbar
Search type list
251
CHAPTER 7: IMAGE MANAGEMENT WITH ALBUM
Performing OLE operations
Album supports linking and embedding features that let you easily modify objectsembedded in other container program’s documents. The container document (thedocument into which you insert the object) only stores a connection to the source fileand a representation of the linked object.
• When an object is linked, information gets updated each time the sourcefile is modified.
• When an object is embedded, it becomes part of the container file itself andthe information does not change if the source file is modified.
Linking and embedding objects
You can link objects by:
• Holding down the [CTRL] and [SHIFT] keys while you drag a thumbnail to acontainer program.
• Using Copy: Thumbnail command from the Edit menu in Album, and thePaste Special command (with the Paste Link option selected) in thecontainer program’s Edit menu.
• Using Insert/Object command in the container program.
You can embed objects by:
• Holding down the [CTRL] key while you drag a thumbnail to the containerprogram.
• Using Copy: Thumbnail command in Album and the Paste Specialcommand (with the Paste option selected) in the container program.
• Using Copy: Thumbnail command in Album and the Paste command in thecontainer program.
• Using Insert/Object command in the container program.
Editing linked or embedded objects
Right-clicking an object in a container program’s document brings up the followingcommands:
• Ulead Album Thumbnail Object: View/Play opens the object in Viewerfor image and graphics files and in Windows Media Player for sound,animation, and video files.
• Ulead Album Thumbnail Object: Reselect (for embedded objects) letsyou select another thumbnail to replace the current thumbnail.
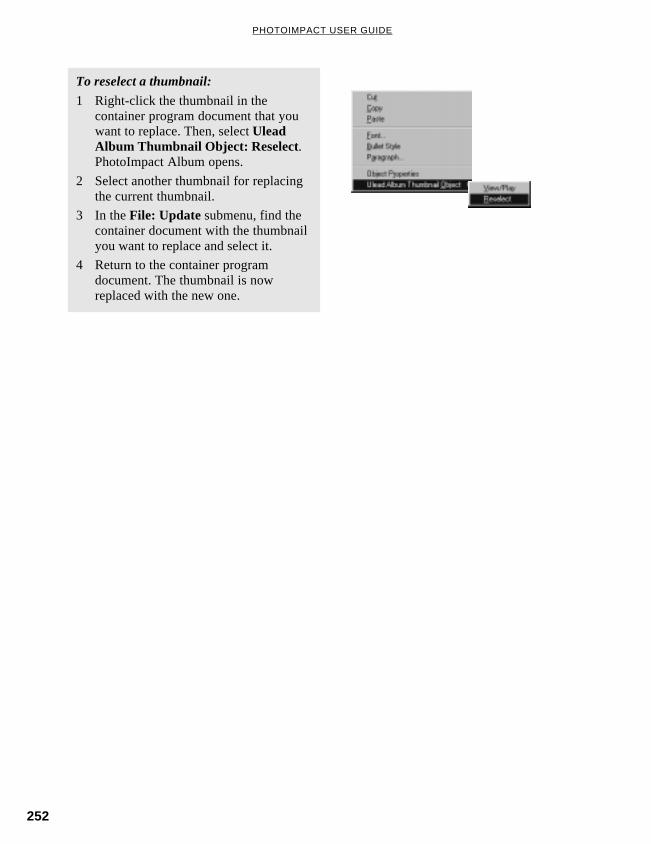
252
PHOTOIMPACT USER GUIDE
To reselect a thumbnail:
1 Right-click the thumbnail in thecontainer program document that youwant to replace. Then, select UleadAlbum Thumbnail Object: Reselect.PhotoImpact Album opens.
2 Select another thumbnail for replacingthe current thumbnail.
3 In the File: Update submenu, find thecontainer document with the thumbnailyou want to replace and select it.
4 Return to the container programdocument. The thumbnail is nowreplaced with the new one.

A
APPENDIX

254
PHOTOIMPACT USER GUIDE
Images on the Web
Graphics set the Web apart from other Internet protocols. Dynamic and interactiveimages can make the Web a powerful form of communication. Images add color,detail, and information that enhance your Web site and make it more interesting tobrowse.
How an image is displayed on the Web
Displaying images on a Web page, at first glance, is as easy as writing the HTMLcode to place it there. Yet, it’s not that simple. The method of displaying imagesvaries significantly from computer to computer, platform to platform, and browser tobrowser. For example, different computers have different gamma values for theirmonitors; different display cards interpret colors in their own way. Though in manycases the color display differences are quite minor, they can be quite severe in someother instances.
To compensate for possible display differences, you should create images with strongcontrast and color values so that they display clearly regardless of the monitor theyappear on and the settings for that monitor. For more on adjusting an image’s contrastand color values, see page 82.
Gamma
Gamma is the amount of brightness and contrast for a monitor. Very rarely do youfind two computers with the same gamma, especially since temperature andenvironment play a big role in determining how color appears. As a result, imagesdisplayed on one monitor usually look slightly different on another.
To ensure more accurate image reproduction on other monitors, calibrate your ownmonitor display by selecting File: Preferences - General - System - Display.
Bit-depth
Bit-depth is the maximum number of colors that an image or monitor can contain anddisplay. For Web imaging, images created and saved at one depth will not displayproperly when viewed at a lower depth.
For example, GIF files can display up to 8 bits of color data, but if an 8-bit GIF file isviewed on a 4-bit (16 color) monitor, colors will be lost in the transition as the 4-bitmonitor cannot display more than 16 distinct colors at one time. In a 256-color GIFfile, that means 240 colors are going to be lost, effectively destroying the quality ofthe image.
So what can be done to compensate for different bit-depths? Unfortunately, notmuch. One of the hazards in designing for the Web is that not everyone is using the

255
APPENDIX
same hardware. Graphic and Web designers are all invariably using True Color (24/48-bit, or more than 16.7 million colors) monitors, while some people may still beusing 16-bit monitors.
The best thing to do, in this case, is to:
• Know your audience and design specifically for them.
or
• Design your graphics (with limited color palette, for example) so that theycan make a relatively decent transition from one bit-depth to another. Thisalternative is very suitable for a Web site which is more content orientedrather than one containing lots of flashy 16-bit or 24-bit images.
Notes:• All images contain information about the number and type of colors the image needs to display
properly. These are called color palettes or color tables. Each bit-depth describes the size of agiven image’s color palette, so when you are creating your images, know exactly how many colorsyou can work with; otherwise, you may find yourself severely limited.
• Using a reduced palette reduces file sizes considerably, but this could deteriorate the imagequality. For more information on color palettes, see pages 84.
1-bit image24-bit image 8-bit image 4-bit image
RGB 48-bit and Grayscale 16-bit support
PhotoImpact supports two new image data types: 48-bit True Color and 16-bitGrayscale, helping you capture and save high quality images. Yet, commandsavailable for images of these data types are limited and the only tools available areTransform, Eyedropper, and Zoom.
Note: File format support for 48- and 16-bit images is limited to uncompressed PSD files, TIF with LZWor no compression, or UFO files with RLE or no compression.
Changing the bit-depth of an image
You can change the bit-depth of an image to either experiment with how it looks or tocompensate for your target audience’s viewing capabilities. Other times, you mayneed to convert an image to a higher bit-depth or different data type in order to takeadvantage of having more colors.
256
PHOTOIMPACT USER GUIDE
Note: Conversions change the original image, unless you have the Create New Image commandselected in the Format: Data Type submenu.
Your choice of data type directly relates to an image’s file size and quality. Forexample, by converting to a data type that supports more colors, you can takeadvantage of the extra colors, but the image’s file size will increase.
To convert an image’s data type, choose an appropriate command from the Format:Data Type submenu or click the Image Type button on the right side of the Statusbar.
A quick word about Web file formats
The three most commonly used image file formats for Web pages are:
• GIF (Graphic Interchange Format) created by CompuServe to facilitateefficient online transmission of images across the Internet. GIF is a losslessformat, meaning images created as GIFs won’t lose any of their inherentquality while undergoing compression.
Because GIFs are an 8-bit file format, the number of colors available islimited to 256 or less. Which colors to use mainly depend on you. Note thatthe size of a GIF file depends on the number of colors used.
Generally, GIFs are ideal for line art, text, clip art, and other kinds of“hand-drawn” images.
• JPEG (Joint Photographic Experts Group) for distribution of highlycompact, photorealistic images using a unique compression scheme. JPEGcreates 24-bit True Color images containing over 16 million colors.However, JPEG is lossy, meaning that the image loses quality whileundergoing compression. The amount of loss depends upon the amount ofcompression applied.
JPEGs are the perfect medium for photorealistic images or imagescontaining hundreds or even thousands of colors.
• PNG (Portable Network Graphic) like GIF, PNG is a lossless file format. Itsupports both indexed (8-bit) and True Color (24-bit) images.
PNG’s lossless behavior carries over to 24-bit mode, and this is why PNGfiles are often larger than their JPEG equivalents. Of course, unlike JPEGs,PNG image quality is 100% true to the original. Because PNG is a relativelyyoung file format, major Web browsers like Netscape Navigator andMicrosoft Internet Explorer didn't natively support PNG until version 4.0.However, as more and more people discover the benefits of PNG, this fileformat is becoming increasingly more popular.
SHORTCUTS
While working in PhotoImpact, keying in shortcuts (NOTE: “using the
shortcuts on your keyboard” instead of “keying in shortcuts”) can greatly
increase your efficiency.
S

258
PHOTOIMPACT USER GUIDE
File Menu
Command Shortcuts
New Ctrl + N
Open Ctrl + O
Visual Open Shift + O
Close Ctrl + W
Save Ctrl + S
Save as Ctrl + Shift+ S
Save for Web/HTML Ctrl + Alt + S
Preview in Browser Ctrl + Alt + ( 0-9) (the order depends on the installed browser)
Scanner F7
Digital Camera F8
Print Preview Ctrl + Alt + P
Print Ctrl + P
Start capturing and Activation F11
Preferences F6
Exit/Quit Ctrl + Q
Edit Menu
Command Shortcuts
Undo Ctrl + Z
Redo Ctrl + Y
Repeats the last menu command Ctrl + T
Cut Ctrl + X
Copy Ctrl + C
Paste as Objects Ctrl + V
Paste as a New Image Ctrl + Shift + V
Clear/Delete Del
Crop Ctrl + R
Duplicate/Base image with objects Ctrl + D
Fill Ctrl + F
Fadeout Ctrl + H
Enables/Disables Mask mode Ctrl + K
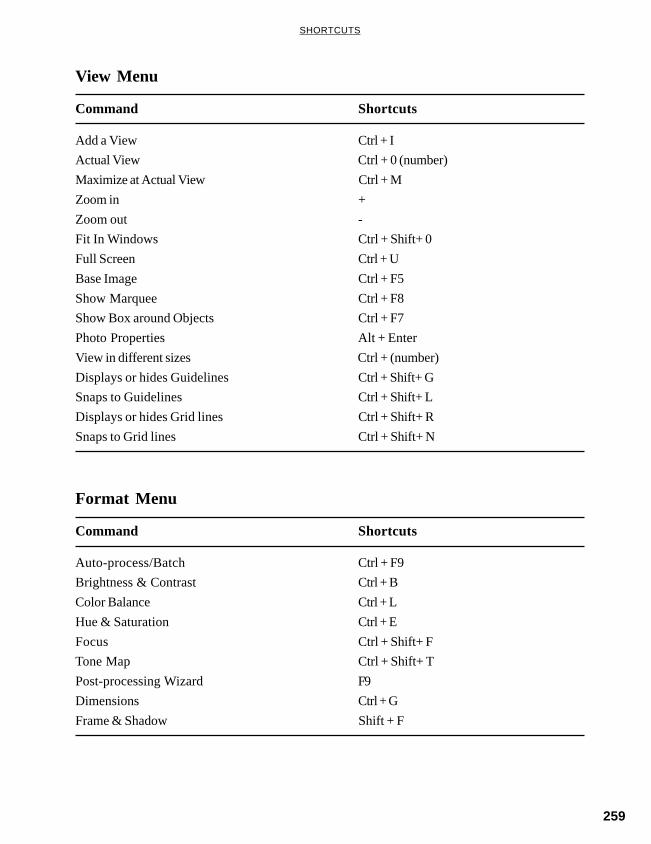
259
SHORTCUTS
View Menu
Command Shortcuts
Add a View Ctrl + I
Actual View Ctrl + 0 (number)
Maximize at Actual View Ctrl + M
Zoom in +
Zoom out -
Fit In Windows Ctrl + Shift+ 0
Full Screen Ctrl + U
Base Image Ctrl + F5
Show Marquee Ctrl + F8
Show Box around Objects Ctrl + F7
Photo Properties Alt + Enter
View in different sizes Ctrl + (number)
Displays or hides Guidelines Ctrl + Shift+ G
Snaps to Guidelines Ctrl + Shift+ L
Displays or hides Grid lines Ctrl + Shift+ R
Snaps to Grid lines Ctrl + Shift+ N
Format Menu
Command Shortcuts
Auto-process/Batch Ctrl + F9
Brightness & Contrast Ctrl + B
Color Balance Ctrl + L
Hue & Saturation Ctrl + E
Focus Ctrl + Shift+ F
Tone Map Ctrl + Shift+ T
Post-processing Wizard F9
Dimensions Ctrl + G
Frame & Shadow Shift + F
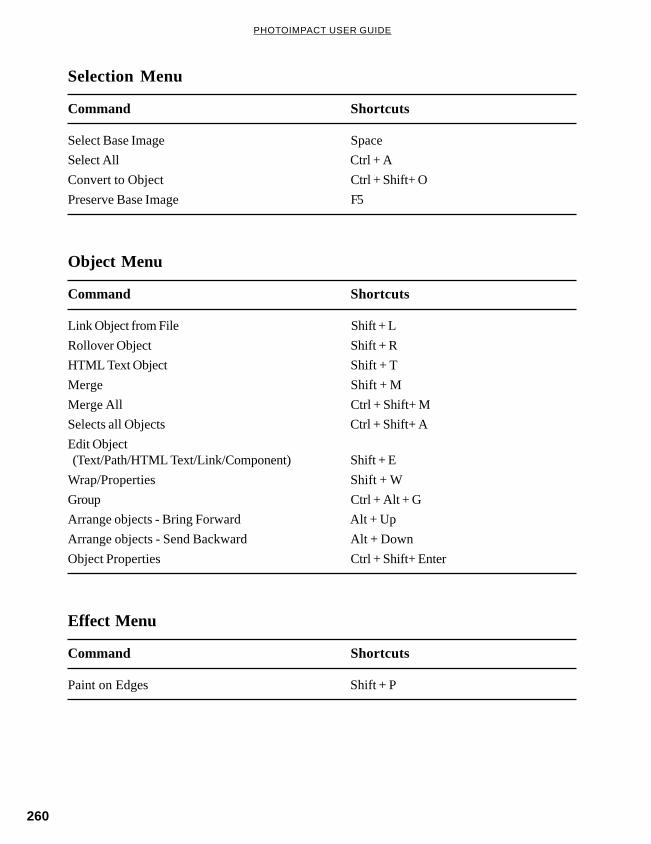
260
PHOTOIMPACT USER GUIDE
Selection Menu
Command Shortcuts
Select Base Image Space
Select All Ctrl + A
Convert to Object Ctrl + Shift+ O
Preserve Base Image F5
Object Menu
Command Shortcuts
Link Object from File Shift + L
Rollover Object Shift + R
HTML Text Object Shift + T
Merge Shift + M
Merge All Ctrl + Shift+ M
Selects all Objects Ctrl + Shift+ A
Edit Object (Text/Path/HTML Text/Link/Component) Shift + E
Wrap/Properties Shift + W
Group Ctrl + Alt + G
Arrange objects - Bring Forward Alt + Up
Arrange objects - Send Backward Alt + Down
Object Properties Ctrl + Shift+ Enter
Effect Menu
Command Shortcuts
Paint on Edges Shift + P

261
SHORTCUTS
Web Menu
Command Shortcuts
Component Designer F12
Background Designer Shift + B
HTML Text Object Shift + T
HTML Properties Shift + Enter
Hyperlink Shift + H
Rollover Shift + R
Slicer Shift + S
Helper Program F10
Image Optimizer F4
Window Menu
Command Shortcuts
Arranges all open windows diagonally in the workspace from left to right and top to bottom Shift + F5
Evenly distributes all open windows vertically in the workspace Shift + F4
Help Menu
Command Shortcuts
Starts the Ulead PhotoImpact Online help F1
Activates the Context Sensitive Help then click an item in question Shift + F1
Miscellaneous
Command Shortcuts
Move selection marquee on/off Ctrl + Shift + K
Show Global Viewer (if available) G
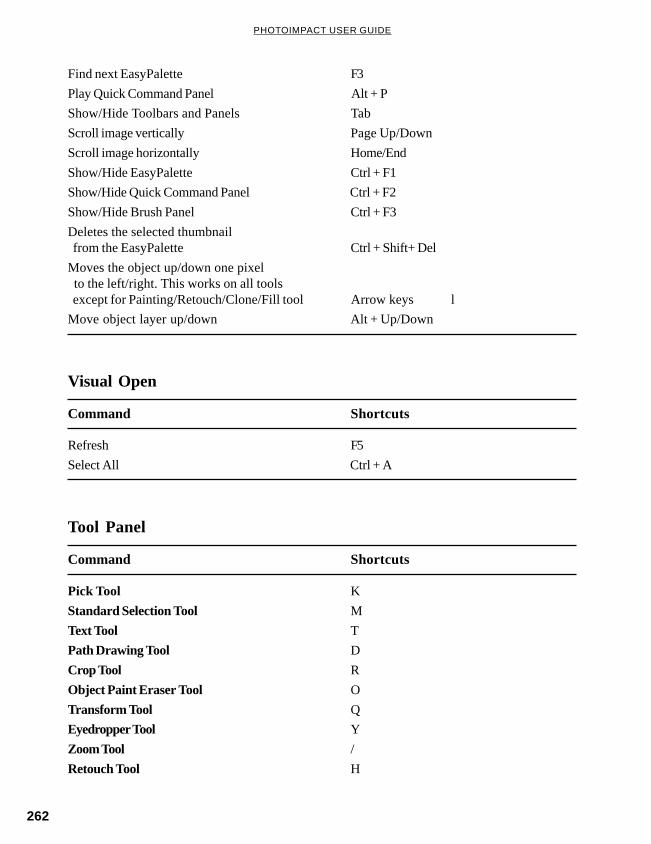
262
PHOTOIMPACT USER GUIDE
Find next EasyPalette F3
Play Quick Command Panel Alt + P
Show/Hide Toolbars and Panels Tab
Scroll image vertically Page Up/Down
Scroll image horizontally Home/End
Show/Hide EasyPalette Ctrl + F1
Show/Hide Quick Command Panel Ctrl + F2
Show/Hide Brush Panel Ctrl + F3
Deletes the selected thumbnail from the EasyPalette Ctrl + Shift+ Del
Moves the object up/down one pixel to the left/right. This works on all tools except for Painting/Retouch/Clone/Fill tool Arrow keys l
Move object layer up/down Alt + Up/Down
Visual Open
Command Shortcuts
Refresh F5
Select All Ctrl + A
Tool Panel
Command Shortcuts
Pick Tool K
Standard Selection Tool M
Text Tool T
Path Drawing Tool D
Crop Tool R
Object Paint Eraser Tool O
Transform Tool Q
Eyedropper Tool Y
Zoom Tool /
Retouch Tool H

263
SHORTCUTS
Paint Tool P
Clone Tool N
Stamp Tool .
Fill Tool F
Display Tools submenu ‘
Switch to the Eyedropper Tool C
Switch to the Pick Tool W
Switch to the Zoom Tool Z
Switch Foreground and Background color X
Toggles between Painting and Erase mode when in Painting Tool E
To tile fill an image with an object, hold the L-key down while dragging the object to the document L
To apply an object’s mask as your document’s selection, simply hold the M-key down while dragging the object to the document M
Add selection in selection tool A
Subtract selection in selection tool S
Invoke Global Viewer G
Show /Hide all toolbars Tab
Toolbar
Command Shortcuts
To cycle through hidden tools Press Alt + Click toolPress Ctrl + Shortcut keyUse the tool’s shortcut key
To constrain dragging or drawing multiples of 45 degrees Press Shift

264
PHOTOIMPACT USER GUIDE

INDEX
I
266
PHOTOIMPACT USER GUIDE
Symbols
2D object 1033D object 103
smoother surface 1303D properties 1263D transformation 135
A
Acquiringdestination 35image sources 32, 36Internet 36photo CDs 38post-processing 35scanners 36
Addingshadows to objects 68text 117views 49
Adding annotations 243Adding objects for a Web page 167Adjust focus 35Adjust lighting 35, 36Adobe Illustrator files 110Advanced rollover button 176Albums
backing up 236creating 218linking 251maintaining 242OLE
editing linked objects 251embedding 251
properties 219refreshing 235restoring 237scan play 229scrolling 229sharing 237updating 235
Aligning 70Ambient light 153Animation
create 151effects 147
frame-based 147play 153saving 149sequence 151storyboard-based 147
Animation Studio 147Annotations
adding 243removing 243
Anti-aliasing 103Any shape selections 58Applying effects and filters 138Artist Texture 150Auto Reverse 148Auto-process 78Auto-slicing 33
B
Background 162customizing Web backgrounds 164seamless tile 166shifting 165tileable 164
Background colors 84Background Designer 164Backing up
albums 236source files 236to floppy disks 236
Banner 170Baseline 124Batch test 187Bending text objects 125Bevel
Material dialog box 128Bezier Curve Tool 115Bezier/Polygon 108Bit-depth 254
changing 255True Color 255
Boolean operators 247Border 128
Material dialog box 128Brightness & Contrast 81Brush Gallery 89Brush panel 89

267
INDEX
Bullet 173Bump map 131
density 131Button 170, 172
irregular 178rectangular 177
Button bar 172Button Designer 177
C
Calculation 81Calibrating
input device 34printers 47
Capturing an image 38Changing
dimensions 80image resolution 80
Checkinglinks to source files 216thumbnails manually 235
Clipboard 70, 71, 72Clone Tools
saving attributes 95Color balance 81, 83Color cache 84Color correction 81Color Management 28Color palettes 84
editing 86loading 86saving 86
Color picker 84Web safe 85
Color Replacement Pen 87Color table 86Color Transform Pen 92Colorize Pen 92Colors
background 84filling an area 95foreground 84Material dialog box 127selecting 84
with Ulead color picker 84selecting similar 64
Component Designer 169export 171
Component Objects 169Connected Lines 88Continue Draw Mode 104, 111Control points 100Convert line 114Converting
images into paths 100source files
data type 246format 246
Copyingobjects 69, 70selection areas 70
Creatingalbums 218animation 151Component Object 170hyperlinks in objects 179
by image maps 179keyword lists 222new image 30outline path 106special effects 143text 117value lists 224Web page 159
Creative & Magic effectsusing 147
Creative - Lighting 152Creative - Particle 154Creative - Transform 155Creative - Type Effect 121Creative Warp 151Crop 35, 78Custom Effect 144Custom Filter 144Custom Shape 110
import AI file 110Customizing
Album 216effects and filters 139galleries & object libraries 53GIF Animator 195PhotoImpact 22
268
PHOTOIMPACT USER GUIDE
toolbars 26Cutting
objects 70selection areas 70
D
Data type 50, 71, 75, 84, 138Deforming the path shape 112Depth 128
Material dialog box 128Destination 35Determining color similarity 59Digimarc 29, 45Digital camera 32Distort text 124Dither 150
Hi-Color 26Drag-and-drop
between tabs 231to other program workspace 232
Drawingcurves 108
Duplicatingimages 42objects 69
E
EasyPalette 52, 138exporting galleries 54galleries 52importing galleries 54layer manager 54object libraries 53, 73
Edit existing path 116Edit point 114Effect
custom 144Effect: Creative Menu
Particle 154Transform 155
Effect: Creative menuArtist Texture 150Creative Warp 151Lighting 152Painting 154Type Effect 156
Effect: Magic menuKaleidoscope 156Light 157Magic Gradient 157
Effect: magic menuTurnpage 158
Effects and Filtersapplying 138customizing 139modifying 139
Embed Watermark 45Embedding 251Enhancing
images automatically 78Equalize 81Erasing
colors 88objects 91
Even-Odd Fill 110Expanding selection areas 64Exporting
Component Object 171field data 226galleries 54Web page 188
Eyedropper Tool 86
F
Field dataexporting 226importing 225
Filesassociations 25
Fill Gallery 99magic 98natural 98
Fill methods 96Fill Tools
elliptical gradient fill 95linear 95rectangular 95solid fill 95
Fillingdrag-and-drop 99using clear 99using drag-and-drop 99

269
INDEX
Filter 144Filter Gallery 81Focus 81Foreground color 84Frame delay time 150Frames 81Free edit 114Free Path 115Freehand 88Fundamentals 22
G
Galleries 138customizing 53
Gamma 26, 254GIF 256
GIF Image Optimizer 184transparency 185
optimizing imagesbatch test 187
GIF animationsaving 149
GIF Animator 194open GIF Animator 194
Global Viewer 49Grayscale 84Grayscale 16-bit 255Grouping 66
Show/Hide group member 66Grouping and ungrouping paths 115
H
Histogram 81Horizontal Deform 112HTML 160HTML document 161HTML properties 163HTML Text Objects 167HTML-based slide shows 239HTML-based thumbnails 246Hue & Saturation 81Hyperlinks 179
I
Icon 173
Image layerscropping 199duplicating 200editing 197exporting 209merging 200moving 197positioning 203rebuilding 202removing 205resampling 199
Image Map 179Image Optimizer 182
basic controls 182batch testing 187
Image type 138Images
adding frames 81bit depth 254creating new 30cropping 78display differences 254duplicating 42enhancing automatically 78filling with color 95fitting to window 50gamma 254opening 29optimizing images 182preserving base image 62printing 46resizing 79retouching 91retrieving 75rotating 134saving 44saving from clipboard to disk 72sending by e-mail 45straighten 134using as thumbnails 55zooming 48
Importvideo frames 196
ImportingAdobe Illustrator files 110galleries 54

270
PHOTOIMPACT USER GUIDE
Indexed Color 84Infinite loop 148, 150Input devices
calibrating 47Interlace 150Internet 36Invert 81Irregularly-shaped paths 108
J
JPEG 256JPG (JPEG)
compression 184JPEG Image Optimizer 183
matte 184optimizing images
batch test 187Jump point 101
K
Kaleidoscope effect 151, 156Key frame control 148, 152Keywords
assigning 223creating a list 222loading 223saving 223
L
Lasso Tool 58adding 64subtracting 64
Layer attributes 202, 206Layer Manager 54, 65
changing layer order 66Show/Hide listview 65
Layer Pane 197Level 81Light 129Light effect 157Lighting 152Limiting
hard disk usage 25RAM usage 25
Line and Arrow Tool 101, 107Linked Objects 167Lists
assigning 225Loading
color palettes 86Locating thumbnails 246Logical operators 247Logical Screen 202Loop 148Lossless 256Lossy 256
M
Magic - Kaleidoscope 156Magic frame 36Magic Texture 98Magic Wand Tool 58
adding 64determining color similarity 59subtracting 64
Maintaining source files 245Managing objects 54Marks 244Mask Mode 59Material dialog box
bevel 128border 128bump 129, 131color 127depth 128EasyPalette 146light 129reflection 129shading 129texture 127transparency 129
Matte 184Metallic 129Minimum transparency 130Mitre joint 124Mode Buttons 89Modes
sharing 237Modify and Apply 55
271
INDEX
Monitor gamma 26More special effects
text and path objects 146Moving
image layers 197Moving objects 69Multiple-Color method 96
N
Natural Texture 98New 30
album 218animation 196Web page 162
Nodes 100Non-free edit 114
O
Objectconvert object type 120hyperlink 179
Object Eraser ToolsObject Magic Eraser Tool 90Object Paint Eraser Tool 90
Object libraries 53copy object to image 75copy to object library 73customizing 53description 73fit selection 76saving 73store image 73store image as selection 73store selection 73
Objects 56adding shadows 68aligning 70copying 70cutting 70deleting 69duplicating 69embedding 44filling with color 95grouping & ungrouping 66
Layer Manager 65libraries 73linked
editing 251linking via OLE 43moving 69order 66properties 65restoring 69selecting multiple 57sorting 66spacing evenly 70
OLE 22, 43editing linked objects 251embedded objects 44embedding 44, 251linking 251
OLE operations 43Opaque 158Opening 29
image file 29source files 245Visual Open 29
Outline Drawing Tool 101, 105color 106shape 106style 106width 106
Outline path 106
P
Paint modedraw line 88draw polygon 88freehand 88specifying 88
Paint on Edges 145Painting effect 154Painting Gallery 154Painting Tools 87
erasing colors 88saving attributes 95
Palette ramp 157Palettes 26, 186Particle effects 154

272
PHOTOIMPACT USER GUIDE
Pastingas a new image 72as an object 78by mouse position 72data into images 71into selection areas 71to fit into selection areas 72
Path Drawing Tool 101, 102, 104deform 103material 103wrap 103
Path Edit Tool 101, 112edit mode 113, 116edit points 114
Path objectediting 113
Path objectssaving 117
Path shapedeforming 112
Paths 100creating 101grouping and ungrouping 115into a selection 116
Pattern templates 150Phong 129Photo CDs 38PhotoImpact
file associations 25preferences 22understanding the basics 20
Pick Tool 57Play 148, 153Plug-in filters 207PNG 256
optimizing imagesbatch test 187
PNG Image Optimizer 186Post-processing 35
Wizard 36Preferences
Album 216PhotoImpact 216
Preserve base image 62Preview 143Previewing in a browser 188Print Preview 46
Printerscalibrating 47
Printingimages 46source files 246
Program associationchanging 246
Program menusremoving 50
Projection Center 135Properties
album 219displaying 245
Q
Quick Command Panel 51Quick samples 22
R
RAW dataImport/Export 42
Read Watermark 29Real-time preview 82Relinking
thumbnails 242Removing
annotations 243program menus 50
Resample an image 80Resize 79
dimensions 79resolution 79
Restore 69Retouch Tools
saving attributes 95Retouching
images 91Retrieving images 75Revert 69RGB 48-bit 255Rollover button 174
MouseDown 174MouseOver 174Normal 174
Rotating images 134

273
INDEX
S
Savinganimations 149color palettes 86GIF images in GIF Animator 208images 44images from clipboard to disk 72keywords 223opimizing images 182to object libraries 73tool’s attributes 95UFO files 44Web page 189
Scan play 229Scanner 32Scanners 36Scanning files 229Screen Capture 38Scrolling through albums 229Seamlessly tiled background 166Search
boolean operators 247criteria and queries 247logical operators 247matching case 248matching whole word 248operators 248simple 250thumbnails 246toolbar 250
Select similar 64Selecting
colorswith Ulead color picker 84
image source 32Selection areas 56
adding to 64copying 70cutting 70determining color similarity 59expanding 64filling with color 95moving 62retrieving 75saving to object libraries 73
similar colors 58smooth-edged 62softening edges 63subtracting from 64
Selection Tools 57, 100Selections
copy selection to object library 74import selection 76
Sending images 45Separator 173Shading 129Shadow 68Shape 88Shape Library 102Sharing
albums 237Shifting a Web background 165Slicer 180
basic controls 180Slicing 33Slide shows
creating 238HTML-based 239
Soft edge 88Solid-filled path object 103Sorting
by depth 66by name 66
Sorting objects 66Source files
convertingdata type 246file format 246
Space Evenly 70Special effects
creating 143Special effects and filters 138Special effects to text 121Special Type Effect 156Spline 108Stitching 40Straight Lines 88Straighten 35Straightening images 134Style 81
274
PHOTOIMPACT USER GUIDE
T
Template effect 149Text
apply special effects 131as a path object 120bump maps 131special characters 117special effects 121
Text effects 118Text objects
bending 125Text Tool 117Texture 98, 127
Material dialog box 127Threshold 101Thumbnail menu commands 75Thumbnails
adding annotations 243changing index numbers 243changing the image 242checking 235HTML-based 246locating 246maintaining 242maintaining source files 245relinking 235, 242removing annotations 243searching 246updating 235, 242using images as 55
Tolerance 100Tone Map 81Tool Panel 233
adding program icons 233Bezier Curve Tool 115Fill Tool 95Pick Tool 57removing program icons 234repositioning 234Selection Tools
Lasso Tool 58Magic Wand 58Standard Selection Tool 57
Zoom Tool 48Tracing 100
Transform effect 155Transform Tool 132
3D 135Transformation template 155Transparency 88, 158, 204Transparent background 150Transparent object 130True Color 84Turnpage effect 158Tutorial 191Two-color gradient fill 97Two-Color method 96Type Effect 156Type Gallery 121
U
UFO filessaving 44
Ulead Color Picker 84Undo 22Ungrouping 66Ungrouping paths 115Updating albums 235Use bump as reflection 131Use image as thumbnails 55Using the Stamp Tool 93
V
Value lists 225Vertical Deform 112Video F/X 208Viewing
adding views 49by tabs 229full screen 50global viewer 49source files 245
Virtual 3D button 135Virtual memory 24Visual Open 29
W
Warped image 151Warping 143Watermark 29, 45
275
INDEX
Webalbum 240bit depth 254creating slide shows 239designing image frames 81gamma 254image thumbnails 246images
display differences 254slide show 238
Web background 164Web page 160
adding objects 167advanced rollover button 176background 162banner 170bullet 173button 170
irregular 178rectangular 177
button bar 172Button Designer 177Component Designer 169Component Objects 169design 160EasyPalette
Template Library 191exporting 188HTML 160HTML document 161HTML properties 163HTML Text Objects 167icon 173Linked Objects 167multi-frame 160new 162opening a Web page 191opening an image 190previewing 188Rollover button 174saving 189separator 173Slicer 180structure 161tutorial 191Web Publishing Wizard 189
Wrap - Bend 125Wrap effects 121
modifying 123your own 122
Z
Zoomingimages 48