photoimpact x3 user guide
TRANSCRIPT
User Guide
InterVideo Digital Technology Corporation
August 2007

Ulead® PhotoImpact® X3, August 2007
© 1992-2007 InterVideo Digital Technology Corporation. All rights reserved. No part of this publication may be reproduced or transmitted in any form or by any means, electronic or mechanical, including photocopying, recording, or storing in a retrieval system, or translated into any language in any form without the express written permission of InterVideo Digital Technology Corporation.
Software LicenseThe software described in this document is furnished under a License Agreement which is included with the product. This Agreement specifies the permitted and prohibited uses of the product.
Legal Statement© 1992-2007 InterVideo Digital Technology Corporation. All rights reserved. Corel, the Corel Logo, InterVideo, Ulead, PhotoImpact, EasyPalette, Ulead DVD MovieFactory and Ulead VideoStudio are trademarks or registered trademarks of Corel Corporation and/or its subsidiaries. Intel and Pentium are registered trademarks of Intel Corporation. Microsoft, Windows and other Microsoft products referenced herein are either trademarks or registered trademarks of Microsoft Corporation in the United States and/or other countries. Adobe, the Adobe logo, Acrobat and the Acrobat logo are trademarks of Adobe Systems Incorporated. Digimarc, MarcCentre and Marcspider are registered trademarks of Digimarc Corporation. Java and all Java-based marks are registered trademarks of Sun Microsystems, Inc. in the U.S. and other countries. All other product names and any registered and unregistered trademarks mentioned are used for identification purpose only and remain the exclusive property of their respective owners.
This product is protected under US Patents: 6,119,080; 6,601,032; 6,542,863; 6,999,919; 6,678,648; 6,850,566; 7,149,592; 6,963,877; 7,110,452; 7,164,717; 7,003,033; 7,164,716; 6,940,903; 6,993,075; 6,970,506; 7,133,451; 7,197,072; 6,944,224; 6,121,976; 5,828,380; 7,075,529; 6,545,674; 6,774,894; 6,714,317; 6,577,444; 6,947,610; 6,788,318; 6,876,777; 6,839,065; 6,983,081; Japan Patent: 3,789,109; China Patent:270360; and Taiwan Patents: 162876; 170617; 179717; 79758; 85576; 109773; 113432; 113401; 110651; 168056; 142208; 159038; 167729; 150657; 147957; 159483; 198779; 162787; 164083; 162759; 183455; 220505; 190711; 167505; 187006; 193676; 220231; 200239; 204235; 201318; 220349; I263935; I234763; I248316; I280501; I243320; I267801; I226573; I221746; I277061; I251174; I249690; I255430; I252683; I256599; I260537; I246031 and corresponding patents in other jurisdictions. Other patents pending.
Sample FilesFiles provided as samples on the program CD can be used for personal demonstrations, productions and presentations. No rights are granted for commercial reproduction or redistribution of any sample files.
Corel Support ServicesFor the most current information on available support and professional services for your Corel product, please visit www.corel.com/support.
Internationalhttp://www.corel.comSupport: http://www.corel.com/support
Japanhttp://www.corel.jpSupport: http://www.corel.jp/support
North and South Americahttp://www.corel.comSupport: http://www.corel.com/support
Francehttp://www.corel.frSupport: http://www.corel.fr/support
Germanyhttp://www.corel.deSupport: http://www.corel.de/support
Spainhttp://www.es.corel.comSupport: http://www.es.corel.com/support/
United Kingdomhttp://www.corel.co.ukSupport: http://www.corel.co.uk/support
PHOTOIMPACT USER GUIDE 3
TABLE OF CONTENTSWelcome to PhotoImpact! .....................................................7
What's new .................................................................................7About Corel Corporation .............................................................. 10
Workspace Tour ..................................................................11Working in ExpressFix mode ........................................................ 12The User Interface ..................................................................... 15Personalizing the workspace ........................................................ 18Using the EasyPalette ................................................................. 19About PhotoImpact dialog boxes .................................................. 24
Getting Started ....................................................................27Creating new images .................................................................. 27Opening image files .................................................................... 28Working with digital cameras and scanners .................................... 31Handling 48-bit images ............................................................... 32Zooming on an image ................................................................. 33Resizing an image ...................................................................... 34Cropping an image ..................................................................... 36Rotating images ......................................................................... 39Duplicating images ..................................................................... 40Performing cut, copy or paste operations ...................................... 41Recovering from mistakes ........................................................... 43Converting between data types .................................................... 44Changing indexed image colors .................................................... 45Making a screen capture ............................................................. 45Saving images ........................................................................... 47Using plug-ins ........................................................................... 48
Adjusting and enhancing your images .................................49Style ........................................................................................ 50Color Adjustment ....................................................................... 50Color Replacement ..................................................................... 50Invert ....................................................................................... 50Posterize ................................................................................... 50Threshold ................................................................................. 51Equalize .................................................................................... 51Calculation ................................................................................ 51Light ........................................................................................ 51Color ........................................................................................ 54Focus ....................................................................................... 56Lens Distortion .......................................................................... 56Remove Red Eye ........................................................................ 56Enhancing digital camera photos using RAW data support ................ 57Stitching images together ........................................................... 59
Enhancement effects ...........................................................61
PHOTOIMPACT USER GUIDE4
Blur ......................................................................................... 61Sharpen ................................................................................... 63Noise ....................................................................................... 63Enhance ................................................................................... 63Lens Filters ............................................................................... 67
High Dynamic Range ........................................................... 69Enhancing the dynamic range of an image with SmartCurves .......... 70Creating and saving a camera curve profile ................................... 70Importing a camera curve profile ................................................. 71Composing an HDR image using multiple images ........................... 71Optimizing the HDR image .......................................................... 74Editing the HDR image ............................................................... 75SmartRemove ........................................................................... 77
Using Retouch Tools ............................................................ 79Using the Burn and Dodge Tools .................................................. 80Changing the colors of an image .................................................. 80Cloning parts of an image ........................................................... 81Using the Touch-up Tool ............................................................. 82
Working with selections ...................................................... 83Determining color similarity ........................................................ 88Select by Color Range ................................................................ 88Creating smooth-edged selection areas ......................................... 89Preserving the base image .......................................................... 89Selecting on objects ................................................................... 90Extracting objects ...................................................................... 90Mask Mode ............................................................................... 92Saving selections to the libraries .................................................. 95
Working with objects .......................................................... 97Managing object layers ............................................................... 97Setting an object's properties ...................................................... 98Hiding and showing objects ......................................................... 99Sorting objects .......................................................................... 99Grouping and ungrouping objects ................................................ 99Changing an object's layer in an image ........................................100Editing objects .........................................................................100Copying and moving an object between images ............................103Duplicating an object ................................................................103Spacing and aligning objects ......................................................103Deleting an object ....................................................................104
Using additional tools ........................................................ 105Using the Measure Tool .............................................................106Using the Transform Tool ...........................................................106Working with Object Eraser Tools ................................................108Using the Stamp Tool ................................................................109
Using the Painting Tools .................................................... 111
PHOTOIMPACT USER GUIDE 5
Erasing ................................................................................... 112Customizing Paint Tools ............................................................ 112Painting with textures ............................................................... 113Painting an outline or border ..................................................... 114Painting clouds in your images using the Cloud pen ...................... 114Using Paint as Object mode ....................................................... 115Editing active objects only ......................................................... 116
Using the Fill Tools ............................................................ 117Choosing a Gradient Fill method ................................................. 118Filling an area with a texture ..................................................... 119
Working with Colors ..........................................................121Using the Corel Color Picker ...................................................... 121Picking colors from an image or entire screen .............................. 122Changing foreground and background colors ................................ 122Using the Color Panel ............................................................... 122
Adding text ........................................................................127Tool Settings ........................................................................... 127Applying text effects ................................................................. 129Editing text as a path object ...................................................... 129Saving text objects .................................................................. 130
Working with paths ...........................................................131Creating paths ......................................................................... 131Drawing multiple paths ............................................................. 139Filling a path with the Even-Odd Fill option .................................. 139Editing paths ........................................................................... 140Grouping and ungrouping paths ................................................. 142Tracing and converting images into paths .................................... 142Adding 3D properties ................................................................ 143Type effects ............................................................................ 148Wrap effects ............................................................................ 149The Z-Merge Tool ..................................................................... 151Saving custom paths and attributes ............................................ 152
Applying special effects .....................................................153Lights ..................................................................................... 153Artistic ................................................................................... 153Distort .................................................................................... 155Magic Gradient ........................................................................ 155Paint on Edges ......................................................................... 155Turnpage ................................................................................ 156DeInterlace ............................................................................. 156Animation effects ..................................................................... 156
Printing .............................................................................163Color Management ................................................................... 163Calibrating your printer ............................................................. 164Using Print Preview .................................................................. 164
PHOTOIMPACT USER GUIDE6
More print options ....................................................................165E-mailing and photo sharing ............................................. 167
Photo Projects ..........................................................................167Calendar .................................................................................170Web Album ..............................................................................171Web Slideshow .........................................................................172Mobile Image ...........................................................................172Adding a frame and photo caption ...............................................173Resampling images for E-mail ....................................................173Sending images ........................................................................174Slideshow Prep Wizard ..............................................................175
Using the Quick Command Panel ....................................... 177Using tasks in the EasyPalette ....................................................178Using the History Tab ................................................................178Applying commands to multiple files ............................................179
Creating video assets in PhotoImpact ............................... 181Lower-third ..............................................................................181Overlay objects ........................................................................182Text titles ................................................................................183Special animation effects ...........................................................184Masks .....................................................................................185Using the DVD Menu Maker ........................................................186
Appendix: Supported RAW formats ................................... 187Index ................................................................................ 189

Welcome to PhotoImpact!PhotoImpact is a complete image-editing suite with easy-to-use tools for all your image and photo-editing needs. Whether you're new to digital photography or want to take creative expression to the next level, PhotoImpact makes professional image editing easy.
What's new Intuitive user interface
• Enhanced! ExpressFix Mode ExpressFix mode features a simplified workspace that contains larger buttons and the most common functions mainly used for basic photo editing.
• Enhanced! SmartGuide This allows you to easily create new projects through step-by-step task-based tutorials. Links take you directly to the tools you need.
Essential photo tools
• New! Golden Ratio Crop and Rule of Thirds Crop Tools These new crop tools help you frame your images and compositions better using the Golden Ratio Spiral and the Rule of Thirds principle.
Note: The Golden Ratio Crop tool can be used both in ExpressFix and Full Edit Modes, however, the ExpressFix version is based on the standard crop tool, while the Full Edit version is for more experienced users and allows you to start by setting a focus point for your image.

PHOTOIMPACT USER GUIDE8
• New! COOL 360 PhotoImpact lets you accurately and efficiently reconstruct an image from multiple pieces. You can stitch images horizontally or vertically.
• New! Cloud Pen This tool creates varied strokes, colors and patterns that simulate natural clouds.
• New! My Wallpaper PhotoImpact gives you an easy way of displaying an image as your desktop wallpaper.
• Enhanced! Raw camera file support You can open and edit raw files from leading digital cameras.
More multiple sharing functions
• Enhanced! Photo Projects Transform your images to different creative projects done using the Photo Project wizard.
• New! Photo Collage Templates Creating collages in PhotoImpact easily combines different images into one photo project.
• New! Comic Strip Templates Add extra creativity to your images by turning it to comic strips. PhotoImpact provides templates for your images that resemble pages from a comic book.
• Enhanced! Calendar Send personalized calendars to friends and relatives. PhotoImpact gives you a focused environment where you can easily create custom calendars.
• New! Slideshow Prep Wizard Images do not need to be manually imported to a video editing software to create a video slideshow. Now, you can simply compile all images in PhotoImpact then export one file to MediaOne, Ulead VideoStudio or Ulead DVD MovieFactory.
• New! Resample for E-mail Sharing images and photo projects has never been easier. PhotoImpact efficiently reduces the file size of your images for easier e-mail attachments.
Complete creative suite
• Enhanced! DVD Menu designs and disc covers The EasyPalette comes with more DVD backgrounds, buttons, and frames for use with Ulead VideoStudio and DVD MovieFactory. You can also take advantage of customizable SmartScene, HD DVD and widescreen menu templates. What’s more, these menu templates are coupled with similar disc cover and sticker designs that you can print.

PHOTOIMPACT USER GUIDE 9
• Enhanced! DVD Menu Maker The DVD Menu Maker allows you to create your DVD menu templates using PhotoImpact tools and export to Ulead DVD MovieFactory and VideoStudio.
• Blog Templates The EasyPalette provides you with new blog design ideas and templates that you can customize to fit your style and taste.
Compatibility
• Windows Vista support PhotoImpact is designed to run on Windows Vista, the latest Microsoft operating system.
MediaOneCorel MediaOne offers you a series of great image-editing and photo-management tools that work in tandem with PhotoImpact. These tools can help you import, edit, and share your images.
Painter Essentials 3
Built on the award-winning power of Corel Painter IX, Corel Painter Essentials 3 is a complete home art studio that includes everything a new user needs to get started with digital art and create stunning paintings from photos.

PHOTOIMPACT USER GUIDE10
About Corel CorporationCorel is a leading global packaged software company with an estimated installed base of more than 40 million users. The company provides high-quality, affordable, and easy-to-use productivity, graphics, and digital imaging software and enjoys a favorable market position among value-conscious consumers and small businesses. Corel’s product portfolio features well-established, globally recognized brands, including CorelDRAW Graphics Suite, Corel WordPerfect Office, WinZip, Corel Paint Shop Pro, and Corel Painter. Headquartered in Ottawa, Canada, Corel Corporation is traded on The NASDAQ Stock Market under the symbol CREL and on the Toronto Stock Exchange under the symbol CRE. For more information, please visit www.corel.com.

Workspace TourThe PhotoImpact workspace can be displayed in ExpressFix or Full Edit modes which contain specific sets of tools depending on what you want to do in the program.
When you run PhotoImpact for the first time, the Welcome Screen appears, which allows you to do the following:
• Get Photos downloads images from a digital camera or retrieves images from a flash memory card that is inserted in a memory card reader.
• Browse Photos allows you to use tools for acquiring, viewing, organizing, adjusting and printing digital images in a single easy-to-use interface.
• Open ExpressFix offers a simpler workspace that address the more common tasks. This mode helps new users to easily learn the main tools of the program, and provides those users mainly interested in using basic program functions with a clean and intuitive workspace.
• Full Edit Mode displays the entire PhotoImpact toolset allowing you to perform a range of simple to complex tasks.
• Create New Image allows you to create a new image.
• Photo Project opens a dialog box allowing you to create customized photo projects like greeting cards.
• Calendar creates personal monthly calendars.
• Collage combines a series of photos into wide angle panoramic scenes.
• DVD Menu allows you to create images (with TV safe area) for use in DVD menus.
Note: Selecting Browse Photos launches Corel MediaOne if it is installed in your computer.
Tip: Selecting Window: Welcome Screen opens the Welcome Screen. It is also displayed when you start PhotoImpact in ExpressFix Mode.
PHOTOIMPACT USER GUIDE12
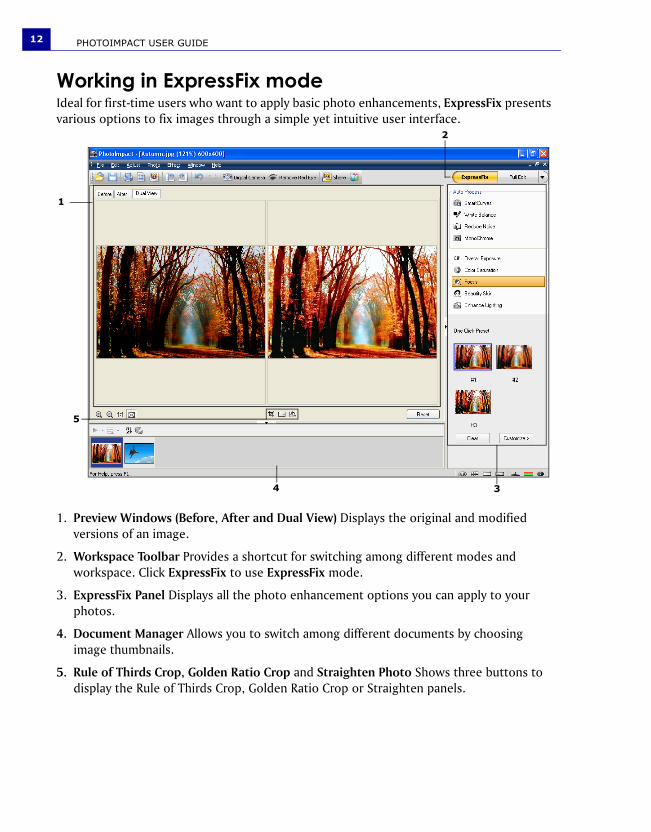
Working in ExpressFix modeIdeal for first-time users who want to apply basic photo enhancements, ExpressFix presents various options to fix images through a simple yet intuitive user interface.
1. Preview Windows (Before, After and Dual View) Displays the original and modified versions of an image.
2. Workspace Toolbar Provides a shortcut for switching among different modes and workspace. Click ExpressFix to use ExpressFix mode.
3. ExpressFix Panel Displays all the photo enhancement options you can apply to your photos.
4. Document Manager Allows you to switch among different documents by choosing image thumbnails.
5. Rule of Thirds Crop, Golden Ratio Crop and Straighten Photo Shows three buttons to display the Rule of Thirds Crop, Golden Ratio Crop or Straighten panels.
1
2
3
5
4
PHOTOIMPACT USER GUIDE 13
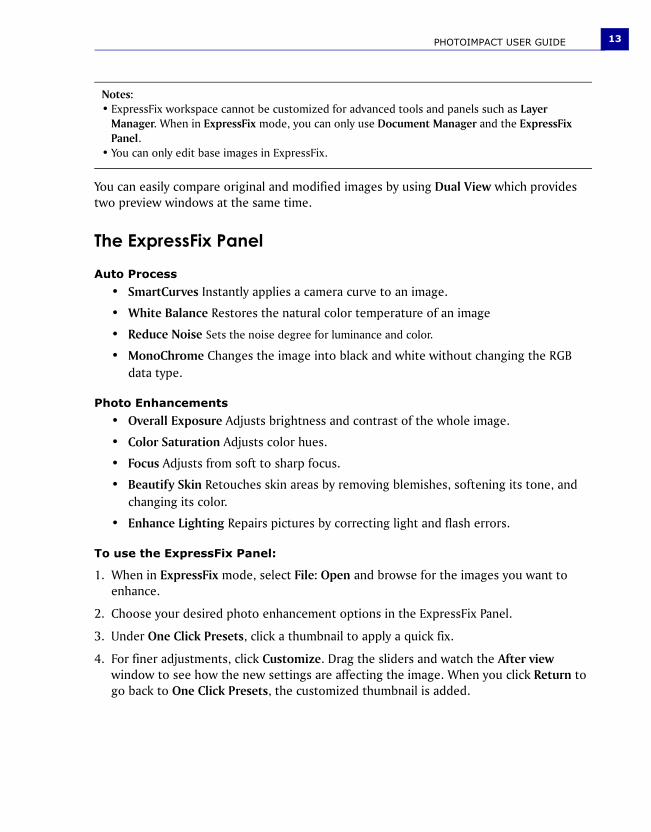
You can easily compare original and modified images by using Dual View which provides two preview windows at the same time.
The ExpressFix Panel
Auto Process
• SmartCurves Instantly applies a camera curve to an image.
• White Balance Restores the natural color temperature of an image
• Reduce Noise Sets the noise degree for luminance and color.
• MonoChrome Changes the image into black and white without changing the RGB data type.
Photo Enhancements
• Overall Exposure Adjusts brightness and contrast of the whole image.
• Color Saturation Adjusts color hues.
• Focus Adjusts from soft to sharp focus.
• Beautify Skin Retouches skin areas by removing blemishes, softening its tone, and changing its color.
• Enhance Lighting Repairs pictures by correcting light and flash errors.
To use the ExpressFix Panel:
1. When in ExpressFix mode, select File: Open and browse for the images you want to enhance.
2. Choose your desired photo enhancement options in the ExpressFix Panel.
3. Under One Click Presets, click a thumbnail to apply a quick fix.
4. For finer adjustments, click Customize. Drag the sliders and watch the After view window to see how the new settings are affecting the image. When you click Return to go back to One Click Presets, the customized thumbnail is added.
Notes:• ExpressFix workspace cannot be customized for advanced tools and panels such as Layer
Manager. When in ExpressFix mode, you can only use Document Manager and the ExpressFix Panel.
• You can only edit base images in ExpressFix.
PHOTOIMPACT USER GUIDE14
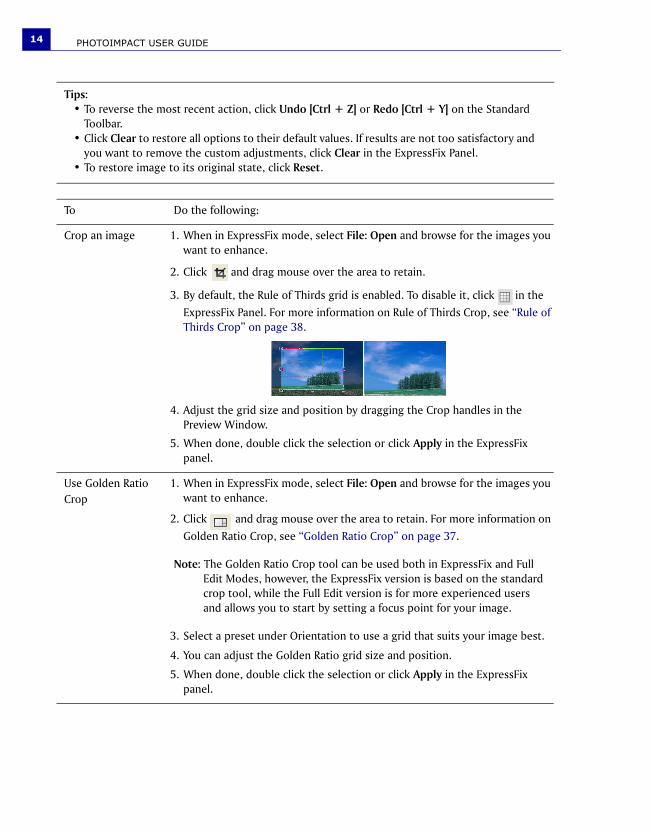
Tips: • To reverse the most recent action, click Undo [Ctrl + Z] or Redo [Ctrl + Y] on the Standard
Toolbar.• Click Clear to restore all options to their default values. If results are not too satisfactory and
you want to remove the custom adjustments, click Clear in the ExpressFix Panel.• To restore image to its original state, click Reset.
To Do the following:
Crop an image 1. When in ExpressFix mode, select File: Open and browse for the images you want to enhance.
2. Click and drag mouse over the area to retain.
3. By default, the Rule of Thirds grid is enabled. To disable it, click in the ExpressFix Panel. For more information on Rule of Thirds Crop, see “Rule of Thirds Crop” on page 38.
4. Adjust the grid size and position by dragging the Crop handles in the Preview Window.
5. When done, double click the selection or click Apply in the ExpressFix panel.
Use Golden Ratio Crop
1. When in ExpressFix mode, select File: Open and browse for the images you want to enhance.
2. Click and drag mouse over the area to retain. For more information on Golden Ratio Crop, see “Golden Ratio Crop” on page 37.
Note: The Golden Ratio Crop tool can be used both in ExpressFix and Full Edit Modes, however, the ExpressFix version is based on the standard crop tool, while the Full Edit version is for more experienced users and allows you to start by setting a focus point for your image.
3. Select a preset under Orientation to use a grid that suits your image best.
4. You can adjust the Golden Ratio grid size and position.
5. When done, double click the selection or click Apply in the ExpressFix panel.

PHOTOIMPACT USER GUIDE 15
The User InterfaceFamiliarizing yourself with the components of the workspace is a great way to start learning the program.
Straighten an image 1. Click . This will display a line at the center of your image.
2. Click to use a Horizontal line or for a Vertical line.
3. When done, double click the image or click Apply in the ExpressFix panel.
Add a photo frame 1. Select File: Share - Photo Frame.
2. In the Frame tab, select Frame.
3. Select a frame style from Style drop-down menu.
Note: The selected frame will be merged with the image.
4. Set the frame Options.
Tip: Select Shadow or Canvas to add a shadow or to enlarge the size of the document canvas. Click Options to customize the settings.
5. Click OK.
Panel Manager
Panels
Status Bar
Toolbox
Menu barStandard Toolbar Attribute
Toolbar
PHOTOIMPACT USER GUIDE16
Panel ManagerThe Panel Manager, by default docked at the right side of the PhotoImpact window, allows you to open or close various panels. Just click a button to open the associated panel, and click again to close it.
Panel Description
Layer Manager The Layer Manager displays all the objects present in your active document as individual thumbnails.
Selection Manager The Selection Manager lets you store up to 99 items or frequently-used selections and masks for easy storage and retrieval.
Document Manager The Document Manager displays open documents in the workspace as thumbnails.
Browse Manager Browse for image files on your computer or local network with the Browse Manager.
EasyPalette The EasyPalette contains preset effects, masks and objects that you can easily access and use in your images.
Color Panel The Color Panel is a centralized color manager that sets and organizes colors for the various tools used throughout PhotoImpact.
Quick Command Panel The Quick Command Panel gives you a fast way to access and apply commonly used commands and actions to your images. With the Quick Command Panel, you can also easily retrace or redo steps you have done.
Layer Manager
Selection Manager
Document Manager
Browse Manager
EasyPalette
Color Panel
Quick Command Panel
Tool Settings
Histogram Panel
SmartGuide
PHOTOIMPACT USER GUIDE 17
ToolboxYou can use the Toolbox when selecting objects, drawing, painting, cropping images and other tasks for your project. For tools in the Toolbox, some have a submenu with further tools. To access these tools, click the triangle icon on the lower right of the button.
Tool Settings The Tool Settings Panel allows you to define custom settings for the different tools in the Toolbox, which include the Text Tool, Path Tools, Paint Tools, Retouch Tools, Clone Tools, Stamp Tool, and Object Eraser Tools.
Histogram Panel The Histogram Panel displays the color distribution of either the entire image or just the selected area of your image.
SmartGuide SmartGuide allows you to easily start a project by following through step-by-step tutorials.
Pick Tool Stamp Tool
Selection Tools Clone Tools
Z-merge Eraser Tools
Path Tools Fill Tools
Text Tool Zoom Tool
Crop Tool Eyedropper and Measure Tools
Transform Tool Slice Tool
Retouch Tools Image Map Tool
Paint Tools Foreground and Background Colors
PHOTOIMPACT USER GUIDE18
Personalizing the workspacePhotoImpact gives you the flexibility to customize the workspace to suit your needs.
To Do the following
Set Preferences Select File: Preferences - General or press [F6] to set various options specific to PhotoImpact and to customize the way the program works.
Dock or float a toolbar and panel
In the PhotoImpact interface, you can freely drag floating toolbars and panels around the workspace or dock them to the sides of the workspace.To dock a toolbar from the Toolbox, such as the Selection Tools or Retouch Tools, click on the title bar of the toolbar then drag it to any side of the workspace.When docking a panel, 8 directional keys are shown for fast, easy and accurate docking. Drag and drop the panel to a directional (target) key to complete docking.
The docking mechanism can be toggled on/off in File: Preferences - General - Docking.
Display guidelines 1. Select View: Show Ruler to display the ruler.
2. Select View: Guidelines and Grid - Guidelines [Ctrl+Shift+G] to begin using guidelines.
3. Drag the pointer from the Ruler towards your image to add a guideline.
4. Drag from the left to create a horizontal guideline or drag from the top to create a vertical one.
5. To remove a guideline, drag it to the edge of the workspace.
Tips: • Select Snap to Guidelines from View: Guidelines and Grid to
make objects snap to the nearest guideline when being repositioned.
• To change the line style and color of the guideline, select File: Preferences - General [F6] and select the Guidelines and Grid category.
PHOTOIMPACT USER GUIDE 19
Using the EasyPaletteThe EasyPalette is a panel that provides quick access to preset and customized effects and objects. Galleries contain various effects you can apply to your images while Libraries contain various objects, paths, Web templates and more.
To use the EasyPalette:
• Click or to switch between galleries and libraries.
• Click to toggle between displaying the EasyPalette in the Tree or Tab view.
• In Galleries, allows you to use your images as preview thumbnails.
Display grid 1. Select View: Guidelines and Grid - Grid [Ctrl+Shift+R] to display the grid.
2. To change the grid style and color, click File: Preferences – General [F6] and select the Guidelines and Grid category. Adjust the Horizontal and Vertical spacing to increase or decrease the distance between gridlines.
Tip: Adjust Snap tolerance to set how close an object needs to be from a guideline or grid before snapping to it.
Use the Customize dialog box
Selecting Window: Customize opens the Customize dialog box for options on your preferred PhotoImpact interface.After adjusting the PhotoImpact interface to your own preferences, you can save your profile in the Profiles tab. This adds your profile to the mode choices in the Workspace Toolbar.
Note: Click Galleries or Object Libraries to use Gallery Manager or Object Library Manager.
GalleriesShow or hide tree
Use an image, selected area, or object as thumbnail
Thumbnail menu commandsCustomize EasyPalette
FindThumbnail size
Object LibrariesShow or hide tree
Thumbnail menu commandsCustomize EasyPalette
FindThumbnail size
Galleries Libraries
PHOTOIMPACT USER GUIDE20
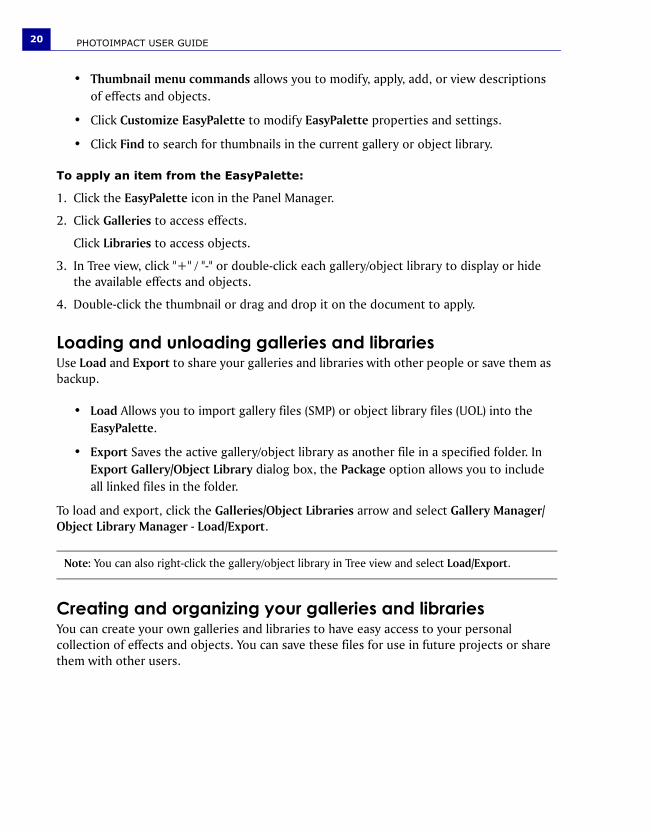
• Thumbnail menu commands allows you to modify, apply, add, or view descriptions of effects and objects.
• Click Customize EasyPalette to modify EasyPalette properties and settings.
• Click Find to search for thumbnails in the current gallery or object library.
To apply an item from the EasyPalette:
1. Click the EasyPalette icon in the Panel Manager.
2. Click Galleries to access effects.
Click Libraries to access objects.
3. In Tree view, click "+" / "-" or double-click each gallery/object library to display or hide the available effects and objects.
4. Double-click the thumbnail or drag and drop it on the document to apply.
Loading and unloading galleries and librariesUse Load and Export to share your galleries and libraries with other people or save them as backup.
• Load Allows you to import gallery files (SMP) or object library files (UOL) into the EasyPalette.
• Export Saves the active gallery/object library as another file in a specified folder. In Export Gallery/Object Library dialog box, the Package option allows you to include all linked files in the folder.
To load and export, click the Galleries/Object Libraries arrow and select Gallery Manager/Object Library Manager - Load/Export.
Creating and organizing your galleries and librariesYou can create your own galleries and libraries to have easy access to your personal collection of effects and objects. You can save these files for use in future projects or share them with other users.
Note: You can also right-click the gallery/object library in Tree view and select Load/Export.
PHOTOIMPACT USER GUIDE 21
To create a gallery or object library:
1. Click the Galleries/Object Libraries down arrow and select Gallery Manager/Object Library Manager - Create.
2. Create Gallery/Create Object Library dialog box is displayed. Enter a name for your gallery / object library in Name. To change the path and the folder, enter or browse for a new destination in Folder.
3. Tab groups lists the tabs in the new gallery/object library. Click Add/Remove to manage your tab groups. See “Organizing your tab groups” on page 21 for details.
4. Click OK. The new gallery file (SMP) or object library file (UOL) is then created in the specified folder.
Organizing your tab groupsThere are a number of ways to create a new tab group:
• Right-click a gallery/object library in Tree view and select New Group. Enter a name for your new tab group in the New Group dialog box and click OK. Your new tab group is added to the selected gallery/object library.
• Right-click a gallery/object library or tab group and select Manage Group. In the Manage Group dialog box, click New to open the New Group dialog box and create a new tab group.
• When creating a new gallery/object library, click Add/Remove in the Create Gallery/Object Library dialog box. This also opens the Manage Group dialog box.
In the Manage Group dialog box, you can rename, arrange, and remove tab groups. Only custom tab groups, however, can be removed.
Notes:• You cannot edit a tab group in read-only galleries/object libraries. To disable this setting, right-
click the gallery/object library in Tree view and clear Read-only (for Sharing).• When in Tab mode, you can simply right-click the tab and select Manage Group.
Tip: To sort galleries and object libraries alphabetically, click the Galleries/Object Libraries arrow and select Gallery Manager/Object Library Manager - Sort Ascending/Sort Descending.
PHOTOIMPACT USER GUIDE22
To Do the Following
Use your images as preview thumbnails
Clicking on the EasyPalette (for Galleries only) lets you use the
current image, selected area or active object as a thumbnail representation. This way, you get an immediate preview of how your image will look with different effects.
Select a gallery thumbnail and click .
Change and add a Gallery thumbnail preset
By clicking Thumbnail menu commands, you can choose to modify thumbnail effects and add new effects, including Adobe Photoshop plug-in effects and image fills. You can also add a variety of commands for image adjustment and conversion by selecting Add Command Thumbnails.
1. Select a Gallery thumbnail.
2. Click Thumbnail menu commands or right-click a thumbnail, then select Modify Properties and Apply. The dialog box for that effect appears.
3. Modify the settings of your thumbnail.
4. Click Add in the dialog box to store a modified thumbnail in the EasyPalette for future use. This adds a new thumbnail without replacing an existing one.
5. Click OK to apply the settings to the active image.
6. OK to apply the settings to the active image.
Note: To update a particular thumbnail effect without adding a new thumbnail to the EasyPalette, select Properties from Thumbnail menu commands. This only works for special effect thumbnails.
Customize the EasyPalette To modify the EasyPalette to suit the way that you work, click Customize EasyPalette. This opens the Customize EasyPalette dialog box that includes options for thumbnail display as well as category and object organization.
PHOTOIMPACT USER GUIDE 23
Adding custom effects to the EasyPaletteThe effects that you customize in the Adjust, Photo and Effect dialog boxes can be added to the EasyPalette.
Click in the dialog box to save all the settings of your custom effect into a gallery.
To add a custom effect to the EasyPalette:
1. Select a command from the Adjust, Photo or Effect menu.
2. Customize your effect using the available options in the dialog box.
3. Click Add.
4. Enter a name for the effect in the Add to EasyPalette dialog box. Select also the gallery to put the effect in.
5. Click OK.
EasyPalette can also store settings that you apply to tools, such as paint brushes and stamps. To add custom settings for Tools, select a tool in the Toolbox, specify its settings
on the Attribute Toolbar or in the Tool Settings Panel, and click on the Attribute Toolbar. This opens the Add to EasyPalette dialog box. Enter a name for the tool setting, select the gallery to put the sample in, and click OK.
Adjust effects using Variations
1. Select a gallery thumbnail.
2. Click Thumbnail menu commands and select Variations. You can also right-click on the thumbnail then select Variations.
3. The Variations: (Effect) dialog box opens. A number of thumbnails will be displayed showing the filter applied to the image or object in varying degrees.
4. Double-click the thumbnail or select the thumbnail then click OK to apply the effect.
Note: After you apply the effect, when you go back to the Variations dialog box of the same effect, the available thumbnails will have varying degrees from before. You can continue to choose the thumbnails until you achieve your desired effect.
Note: Some commands open a quick samples dialog box first. You need to click Options to open the custom dialog box. (See “Using quick samples” on page 25 for details)
PHOTOIMPACT USER GUIDE24
Packaging galleries and librariesWhen exporting, it is best to select Package if you are sharing galleries and libraries that contain your own original image files. This saves your active gallery/object library as a new file in a specified folder, including all the linked files.
To package a gallery or object library into a folder:
1. Click or and then select Gallery Manager/ Object Library Manager - Export.
The Export Gallery/Object Library dialog box opens.
2. Specify the destination folder where your packaged gallery/library files and other external files will be saved.
3. Enter a file name.
4. Select Package.
5. Click Save.
Using librariesYou can store images and selections conveniently using Libraries. Click Libraries in the EasyPalette.
All available libraries are listed below in a tree view. Click each library to see the thumbnails of any images, paths, and selections that are available.
About PhotoImpact dialog boxesMost of the dialog boxes in PhotoImpact that can be used to adjust or enhance images provide quick presets that be directly applied to your images.
Note: By default, all the galleries (except My Gallery) in the EasyPalette are read-only. To put your effects and tool settings in an EasyPalette gallery, right-click the gallery and clear the Read-only (for Sharing) option.
Note: You can also right-click the gallery/object library in Tree view and select Load/Export.
Tip: Select Open dialog box in Full Screen size in Preferences to display dialog boxes in full screen.
PHOTOIMPACT USER GUIDE 25
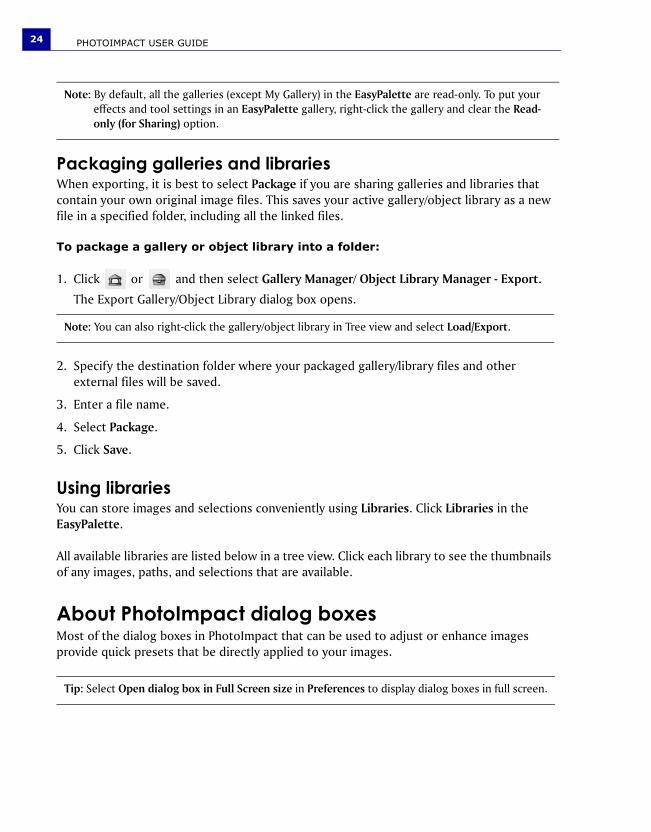
Using quick samples Quick samples are presets represented by visual thumbnails that you can directly apply to your image. To apply a quick sample to your image, click the thumbnail that shows the result you want.
If you want to define settings for the effect, click Options to open the custom dialog box where you can tweak the settings.
Split View and Dual ViewMost of the image adjustment and effect dialog boxes provide two types of Preview Windows: Split View and Dual View. The preview dialog boxes are resizable and can be maximized, depending on your viewing preference.
• Dual View allows you to see a full view of the original and modified versions of your image by showing them in separate Preview Windows.
• Split View shows an overlapped display with the Splitter bar dividing your image into its original and modified versions.
Tip: To hide the quick samples dialog box, clear Display quick samples in the PhotoImpact category of the Preferences dialog box. This will allow the custom dialog box to be opened directly.
PHOTOIMPACT USER GUIDE26
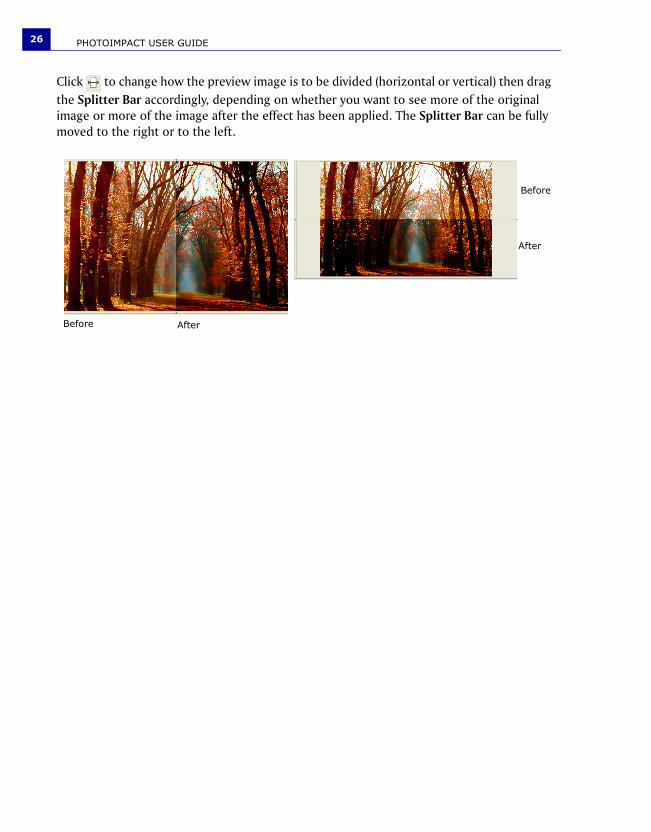
Click to change how the preview image is to be divided (horizontal or vertical) then drag the Splitter Bar accordingly, depending on whether you want to see more of the original image or more of the image after the effect has been applied. The Splitter Bar can be fully moved to the right or to the left.
Before
Before
After
After
Getting StartedThis section gets you started on the basics of using PhotoImpact. Here you will learn to create, modify, and save images, as well as acquire them from imaging devices or the Internet.
Creating new imagesPhotoImpact gives you a wide range of options when creating a new image from scratch.
To create your own image from scratch:
1. Select File: New - New Image [Ctrl+N].
2. Click the desired data type that defines the image format to use for the new image.
3. Select one of the Canvas options:
• White Sets the base image to plain color white.
• Custom color Sets the base image to be a solid color of your choice.
• Background color Sets the base image using the assigned background color in the Toolbox. By default, a document’s background color is white.
• Transparent Hides the base image and displays the default background grid.
4. Set the image dimensions in the Image size set of options.
• Standard Offers commonly used on screen and paper sizes.
• Active image Opens a new image with the same size as the currently active image in the workspace.
• Same as image in clipboard Opens a new image with the exact same size as the image in the clipboard.
• User-defined Lets you customize the size.
5. Enter Resolution values to determine the distance between the centers of the pixel.
6. Click OK.
Note: Check the Preview Window to see how the new image looks so far. If the image size is bigger than the printable area, a message “Exceeds page size” will appear.
PHOTOIMPACT USER GUIDE28
To customize the dimensions of a new image:
1. Click New Image. Under Image size, select User-defined. Enter the dimensions of the new page.
2. Click , and then select Add User-defined Size.
3. In the following dialog box, type in a name for your customized size. Then click OK. The next time you click again, the new size created appears on the menu.
Opening image filesThere are several ways to open your image files:
• Select File: Open [Ctrl+O].
• Use the Browse Manager to browse for image files on your computer and open multiple images.
• PhotoImpact is also able to open and edit RAW data files from digital cameras. For details, see “Enhancing digital camera photos using RAW data support” on page 57.
Tip: You can also change the name and size of customized dimensions by selecting Edit User-defined Sizes from the menu.
You can also:
Create a DVD menu image 1. Select File: New - New DVD Menu.
2. Select a preset which determines the dimensions of your DVD menu image.
3. Click OK.
Note: A 16:9 DVD menu image is compatible with DVD MovieFactory 4.0 or above.
Tip: PhotoImpact provides a number of DVD menu samples in the EasyPalette.
Create a basic Web page 1. Select File: New - New Web Page.
2. Click Details to invoke the Web Properties dialog box to enter more detail about the page’s properties.
3. Click OK.
Note: To change the Web background later or set other HTML attributes, select Web: Web Properties.
PHOTOIMPACT USER GUIDE 29
To partially open a file:
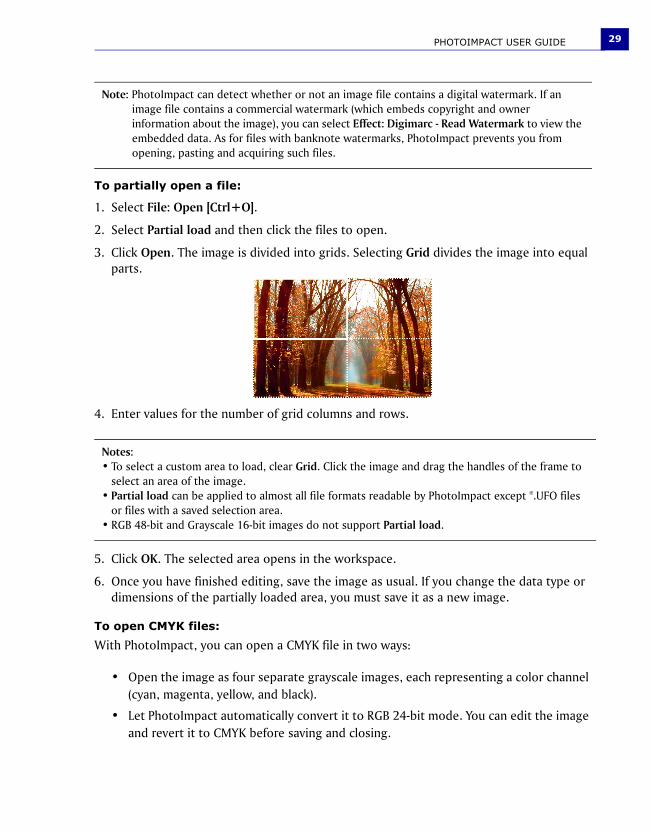
1. Select File: Open [Ctrl+O].
2. Select Partial load and then click the files to open.
3. Click Open. The image is divided into grids. Selecting Grid divides the image into equal parts.
4. Enter values for the number of grid columns and rows.
5. Click OK. The selected area opens in the workspace.
6. Once you have finished editing, save the image as usual. If you change the data type or dimensions of the partially loaded area, you must save it as a new image.
To open CMYK files:
With PhotoImpact, you can open a CMYK file in two ways:
• Open the image as four separate grayscale images, each representing a color channel (cyan, magenta, yellow, and black).
• Let PhotoImpact automatically convert it to RGB 24-bit mode. You can edit the image and revert it to CMYK before saving and closing.
Note: PhotoImpact can detect whether or not an image file contains a digital watermark. If an image file contains a commercial watermark (which embeds copyright and owner information about the image), you can select Effect: Digimarc - Read Watermark to view the embedded data. As for files with banknote watermarks, PhotoImpact prevents you from opening, pasting and acquiring such files.
Notes:• To select a custom area to load, clear Grid. Click the image and drag the handles of the frame to
select an area of the image.• Partial load can be applied to almost all file formats readable by PhotoImpact except *.UFO files
or files with a saved selection area.• RGB 48-bit and Grayscale 16-bit images do not support Partial load.
PHOTOIMPACT USER GUIDE30
Upon opening a CMYK file, PhotoImpact will prompt you to choose the method your image will be opened.
If you decide to open it by combining all color channels, you will be asked to specify the separation profile and the rendering intent method.
For a more convenient way of setting how to open CMYK images, go to File: Preferences - General.
To open files using the Browse Manager:
1. Select File: Browse or click Browse Manager from the Panel Manager to open the Browse Manager window.
2. Browse for image files on your computer or local network by manually entering their location in the Address bar or by clicking Show/Hide Tree View and navigating to a specific folder.
3. Double-click a file to open it.
You can also:
Open multiple files Drag your mouse over the image files to select them, then drag the selected files to the workspace
Resize the thumbnails Resize the thumbnails by clicking Thumbnail Size on the Browse Manager Toolbar and selecting a preset display size.
Sort files Click Sort to arrange files by name, file type, size, or date in ascending or descending order.
View EXIF information You can view EXIF information of digital camera photos in the lower left window of the Browse Manager.
Click to specify which EXIF tag information to display.
PHOTOIMPACT USER GUIDE 31
Working with digital cameras and scannersWith PhotoImpact, transfer photos that were taken from a digital camera or transform photo prints or documents into digital images via scanners.
To get images from a Digital Camera:
1. Click Get Photos on the Welcome Screen, or select File: Digital Camera.
2. Select an option under Select Image Source then click the link next to it to specify where to get the images.
3. Click Browse and select the destination folder where the imported images will be saved.
4. Select the following options to delete or rename images after transferring them:
• Delete files after successful transfer Select to remove all images from the memory card after they are transferred to your computer.
• Renumber images to ensure every file name is unique Select to renumber images to avoid files having duplicated file names.
5. Click Start to transfer images.
6. After the transfer is complete, the Browse Manager window opens allowing you to easily access your image.
Acquiring images from scannersYou can import images from any image input device that is TWAIN compliant. TWAIN is an industry standard for image input devices, drivers, and software applications allowing TWAIN-compatible applications and devices to communicate with each other.
To select the default image source:
1. Select File: Scanner - Select Source. A list of TWAIN devices appears. Select a device as the image data source.
2. Click Device Type to specify the type of input device and then click OK.
3. In the Select Source dialog box, click the appropriate driver and then click Select. You are now ready to use your input device by clicking the corresponding button on the Standard Toolbar.
Note: If you only have one TWAIN device connected, that device automatically becomes the TWAIN source.
PHOTOIMPACT USER GUIDE32
To acquire an image from a scanner:
1. Click the arrow next to the Scanner icon on the Standard Toolbar.
2. In the menu that appears, select “Device Name” TWAIN (where Device Name is the name of your source device) either with or without post-processing.
3. If you select TWAIN without post-processing, the TWAIN driver appears. To acquire images, simply follow the directions for that device.
If you select post-processing, then the Acquire Image dialog box appears. After making the desired settings, click Acquire. The driver for that device appears. Follow the directions for that device.
Acquiring images from WIA devicesWindows Image Acquisition (WIA) devices are digital scanners and cameras that support the plug-and-play technology found in newer versions of Windows operating systems.
To acquire images from WIA devices, click Open and select the drive that corresponds to the scanner, camera, or any other imaging device that is plugged into your PC. You can then select the file you want to open.
Handling 48-bit imagesPhotoImpact supports 48-bit (16 bits per R, G, B channel) image processing and editing. This allows you over 280 trillion colors, tones and shades to work with in your images instead of the 16 million colors of 24-bit image editing.
Working with more colors gives you smoother gradations between colors in your image. And since there is more data per channel, a higher level of detail in images can be attained in 48-bit images. Editing in this mode also avoids major loss of color information during digital retouching and color correction processes. You can acquire 48-bit images via scanners, by opening a RAW file from a digital camera, and by adjusting/converting the data type of an existing image file.
Note: Post-processing offers additional controls when acquiring an image. These include slicing, calibration, destination, and other settings.
Notes:• Make sure your TWAIN device is properly installed in your computer before acquiring. • For more information on specific imaging options, see the image device manufacturer’s
documentation.
PHOTOIMPACT USER GUIDE 33
The following are features that can be adjusted for 48-bit images:
Zooming on an imageWhen you edit an image, you may want to see part of it in greater detail or more of it at a smaller size. You can do this in several ways:
• Select View: Zoom - Zoom In or Zoom Out.
• To zoom in on images, press [+]. To zoom out, press [–].
• Press [Z] and click to automatically zoom in on the image. To return to actual view, press [Z] and right-click.
To reposition the viewer:
1. Click the box that appears at the intersection of the scroll bars in the lower right corner of an image window.
This only appears when an image is magnified to a size that is larger than its window. Alternatively, press [G] on the keyboard. A thumbnail of the entire image appears.
2. While holding down the mouse button, drag the frame to the area you want to view.
• Brightness and Contrast • Unsharp Mask • Color Balance *
• Levels • Reduce Noise * • Invert
• Curves • Crop • Color Cast *
• Hue and Saturation * • Rotate • Equalize
• Highlight Midtone Shadow • Flip • Gaussian Blur
• Posterize • Zoom • Threshold
• Color Adjustment * • Auto-process
Notes:• You can save 48-bit images in TIF or UFO format.• * does not support 16-bit grayscale images.
Note: Set the window to automatically fit the new zoom ratio by selecting Adjust window on the Attribute Toolbar for the Zoom Tool. This becomes the default for any zoom action performed when using any other tools.
PHOTOIMPACT USER GUIDE34
If you used the shortcut method, simply move the mouse to the desired area.
3. Release the mouse button when you see the desired view in the window. If you used the shortcut, click once when you have the desired area.
Resizing an imageYou can resize an entire image in two ways. The method that you choose depends on the desired quality and the target destination for the image.
Changing resolutionResolution determines the physical size of an image by defining the number of pixels that appear per unit area.
Increasing the resolution places more pixels closer together, reducing the size of the image, while decreasing the resolution places pixels farther apart, making the image larger.
To change an image’s resolution:
1. Select Adjust: Resize.
2. Turn resampling off by clearing Resample method. By doing this, PhotoImpact will automatically adjust image size according to the adjustments you made in the resolution (next step).
3. In Resolution, choose between Display (on-screen presentation), Printer (print the image on black and white), or User-defined. Specify the value and unit of measurement.
4. Click OK.
Note: Defining a new resolution does not change the appearance of the image on-screen. Changes will only be apparent when you print the image or place it into another program that reads the resolution.
Note: For units of measurement, the only units available are pixel/inch and pixel/cm.

PHOTOIMPACT USER GUIDE 35
Changing dimensions by resamplingImage Size allows you to adjust the number of pixels in an image. As resampling changes the image’s number of pixels, the file size is modified correspondingly.
Use Resample when:
• Changing the size of an image as it is displayed on screen.
• Making the file size of an image smaller so that it takes less time to import it into another application and print it from there.
• Resizing or distorting an image.
To resample an image:
1. Select Adjust: Resize.
2. In Apply to, select which objects are being resampled.
If the image contains multiple objects, you can choose whether to resample only selected objects, or all objects including the base image.
3. Specify the target dimensions for resampling in New image or Document size.
You can also change Resolution (usually for printing), and use Preview to check the effect of the new settings with reference to size and target output.
4. Select Resample and method of resampling.
5. Click OK.
Tip: PhotoImpact uses a resample method (interpolation algorithm) to add new pixels based on the existing pixels (color squares) in an image. Bicubic makes a fine and softer image using the smallest file size. Bilinear makes a soft image, while Nearest Neighbor makes a sharp image with the largest file size.
PHOTOIMPACT USER GUIDE36
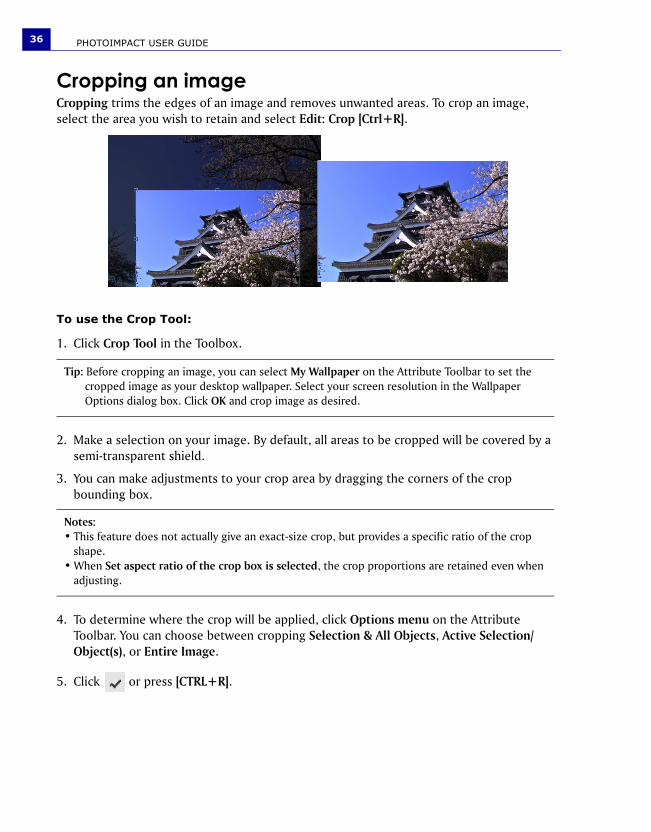
Cropping an imageCropping trims the edges of an image and removes unwanted areas. To crop an image, select the area you wish to retain and select Edit: Crop [Ctrl+R].
To use the Crop Tool:
1. Click Crop Tool in the Toolbox.
2. Make a selection on your image. By default, all areas to be cropped will be covered by a semi-transparent shield.
3. You can make adjustments to your crop area by dragging the corners of the crop bounding box.
4. To determine where the crop will be applied, click Options menu on the Attribute Toolbar. You can choose between cropping Selection & All Objects, Active Selection/Object(s), or Entire Image.
5. Click or press [CTRL+R].
Tip: Before cropping an image, you can select My Wallpaper on the Attribute Toolbar to set the cropped image as your desktop wallpaper. Select your screen resolution in the Wallpaper Options dialog box. Click OK and crop image as desired.
Notes:• This feature does not actually give an exact-size crop, but provides a specific ratio of the crop
shape.• When Set aspect ratio of the crop box is selected, the crop proportions are retained even when
adjusting.
PHOTOIMPACT USER GUIDE 37
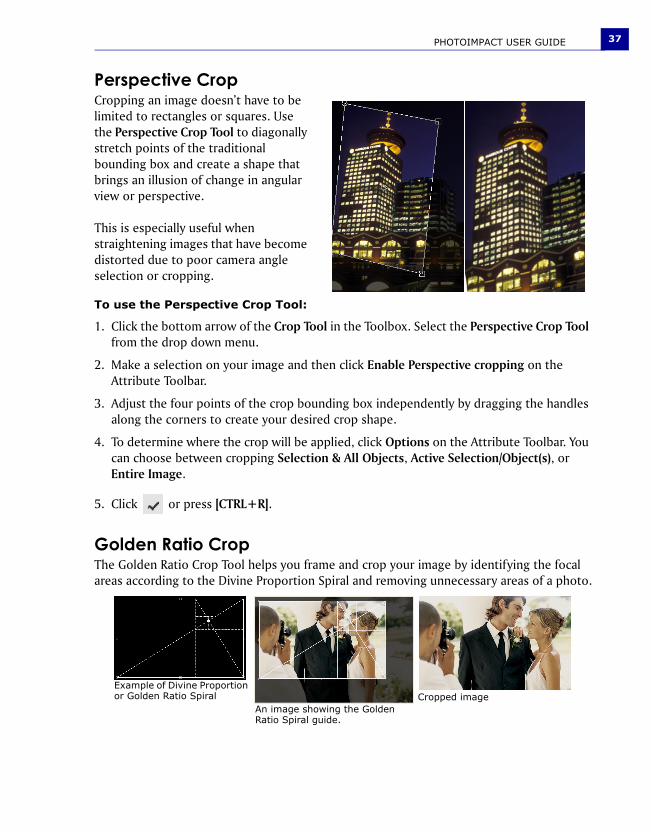
Perspective CropCropping an image doesn’t have to be limited to rectangles or squares. Use the Perspective Crop Tool to diagonally stretch points of the traditional bounding box and create a shape that brings an illusion of change in angular view or perspective.
This is especially useful when straightening images that have become distorted due to poor camera angle selection or cropping.
To use the Perspective Crop Tool:
1. Click the bottom arrow of the Crop Tool in the Toolbox. Select the Perspective Crop Tool from the drop down menu.
2. Make a selection on your image and then click Enable Perspective cropping on the Attribute Toolbar.
3. Adjust the four points of the crop bounding box independently by dragging the handles along the corners to create your desired crop shape.
4. To determine where the crop will be applied, click Options on the Attribute Toolbar. You can choose between cropping Selection & All Objects, Active Selection/Object(s), or Entire Image.
5. Click or press [CTRL+R].
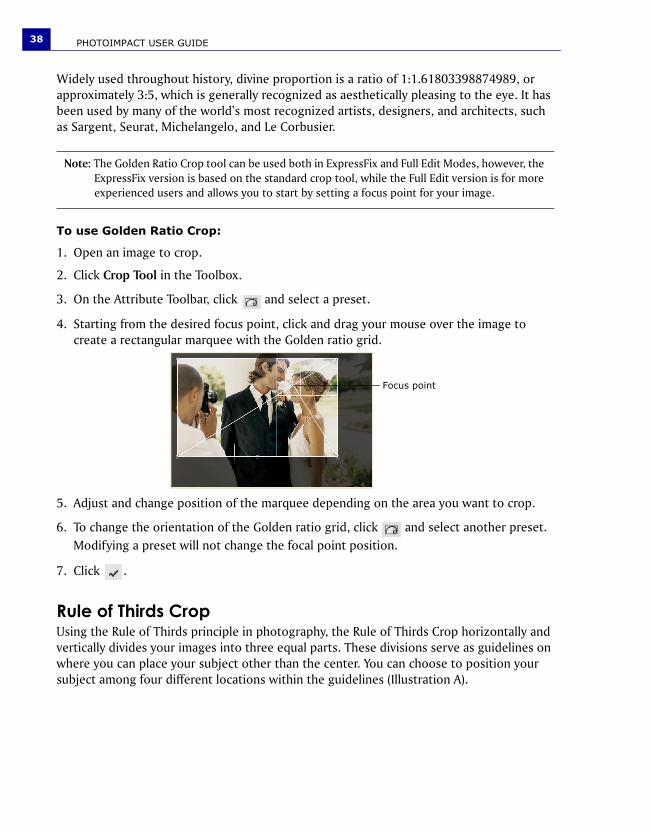
Golden Ratio CropThe Golden Ratio Crop Tool helps you frame and crop your image by identifying the focal areas according to the Divine Proportion Spiral and removing unnecessary areas of a photo.
Example of Divine Proportion or Golden Ratio Spiral
An image showing the Golden Ratio Spiral guide.
Cropped image
PHOTOIMPACT USER GUIDE38
Widely used throughout history, divine proportion is a ratio of 1:1.61803398874989, or approximately 3:5, which is generally recognized as aesthetically pleasing to the eye. It has been used by many of the world’s most recognized artists, designers, and architects, such as Sargent, Seurat, Michelangelo, and Le Corbusier.
To use Golden Ratio Crop:
1. Open an image to crop.
2. Click Crop Tool in the Toolbox.
3. On the Attribute Toolbar, click and select a preset.
4. Starting from the desired focus point, click and drag your mouse over the image to create a rectangular marquee with the Golden ratio grid.
5. Adjust and change position of the marquee depending on the area you want to crop.
6. To change the orientation of the Golden ratio grid, click and select another preset. Modifying a preset will not change the focal point position.
7. Click .
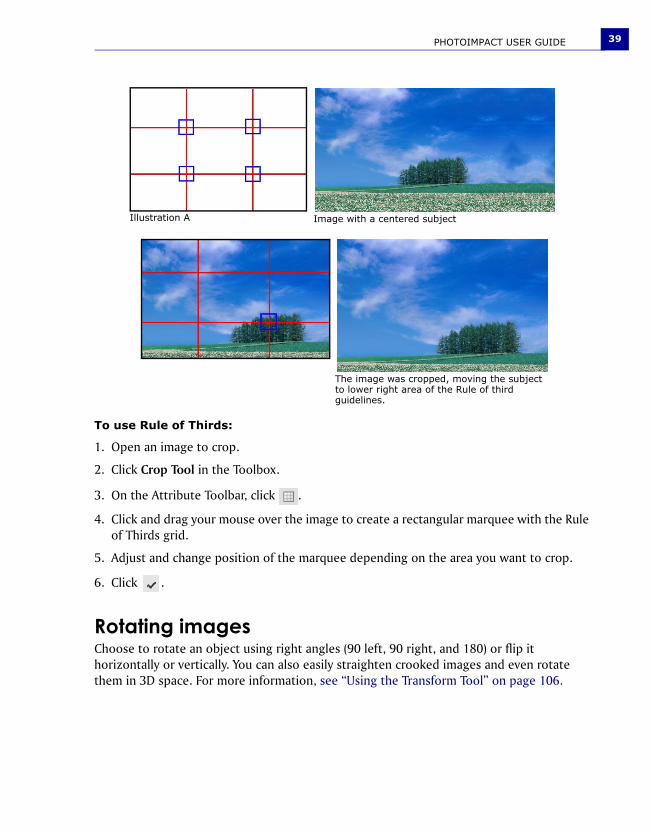
Rule of Thirds CropUsing the Rule of Thirds principle in photography, the Rule of Thirds Crop horizontally and vertically divides your images into three equal parts. These divisions serve as guidelines on where you can place your subject other than the center. You can choose to position your subject among four different locations within the guidelines (Illustration A).
Note: The Golden Ratio Crop tool can be used both in ExpressFix and Full Edit Modes, however, the ExpressFix version is based on the standard crop tool, while the Full Edit version is for more experienced users and allows you to start by setting a focus point for your image.
Focus point
PHOTOIMPACT USER GUIDE 39
To use Rule of Thirds:
1. Open an image to crop.
2. Click Crop Tool in the Toolbox.
3. On the Attribute Toolbar, click .
4. Click and drag your mouse over the image to create a rectangular marquee with the Rule of Thirds grid.
5. Adjust and change position of the marquee depending on the area you want to crop.
6. Click .
Rotating imagesChoose to rotate an object using right angles (90 left, 90 right, and 180) or flip it horizontally or vertically. You can also easily straighten crooked images and even rotate them in 3D space. For more information, see “Using the Transform Tool” on page 106.
Illustration A Image with a centered subject
The image was cropped, moving the subject to lower right area of the Rule of third guidelines.

PHOTOIMPACT USER GUIDE40
To freely rotate an object:
1. Select an object that you want to transform.
2. Click Transform Tool in the Toolbox.
3. Select Rotate Freely under Rotate method on the Attribute Toolbar.
4. Drag one of the corner handles to rotate the object. You can also click Rotate by degree to apply a more precise angle of rotation.
To horizontally straighten an image:
1. Select Rotate Using a Horizontal line under Transform on the Attribute Toolbar.
2. Drag a control point to one end of a strong horizontal feature, such as the edge of the image.
3. Drag the second control point to the other end of the feature, carefully aligning the control line along the feature.
4. Double-click the image or any of the control points to rotate.
Duplicating imagesAs you work with an image, you may find the need to make copies of it. Whenever you duplicate an image, a copy of it opens in a new window.
Tip: You will notice that the object will have a rotation center in the middle. Reposition the rotation center if necessary.
Tip: Click Rotate center: Center on the Attribute Toolbar if you moved the rotation center and want to reset it back to its original position.
Note: You can also use Adjust: Auto-process - Straighten to quickly straighten an image.
Before After
PHOTOIMPACT USER GUIDE 41
One method to do this is using the Edit: Duplicate submenu. You can choose from duplicating any of the following:
• Base Image with Objects [Ctrl+D] Duplicates the entire image, including the base image and all other objects.
• Base Image with Objects Merged Duplicates the image with all the objects merged onto the base image.
• Base Image Only Duplicates the base image only.
• Another method to duplicate images is by using the mouse.
To duplicate an image by using the mouse:
1. With the Standard Selection Tool active, right-click an image and select All from the resulting pop-up menu to select the entire image. (Make sure you have Selection: Preserve Base Image [F5] selected.)
2. Click and drag the image onto an empty space in the program window.
3. Right-click the image and select Merge from the resulting pop-up menu.
Performing cut, copy or paste operationsThe most common methods for placing data onto the clipboard are by clicking Cut [Ctrl+X] and Copy [Ctrl+C] on the Standard Toolbar, or by selecting their respective commands from the Edit menu.
• Cut Deletes the selected area or object and places it onto the clipboard. When you cut a selected area, that area in the image is filled with the current background color.
• Copy Places a duplicate of a selected area or object onto the clipboard.
• To paste an image, click Paste [Ctrl+V] on the Standard Toolbar, or choose a command from the Edit: Paste submenu after cutting or copying image data to the clipboard.
Notes:• If Preserve Base Image is cleared, you can still duplicate an image by pressing [Ctrl] as you drag
the selected image to an empty workspace.• To copy part of an image, use any Selection tool to choose any part you want to duplicate and
drag it to an empty workspace.
Note: When there is no selection area, both Cut and Copy apply to the entire image.
PHOTOIMPACT USER GUIDE42
Notes:• When pasting an object onto an image of a different data type, the pasted data is automatically
converted (for example, when pasting a True Color image into an Indexed 16-Color image). This may cause extreme change in color.
• When pasting an image, it is placed pixel-on-pixel. If your source and target images are at different zoom levels, the clipboard image may appear to be enlarged or reduced after pasting.
• All Paste commands are disabled if the clipboard is empty or its contents are not supported in PhotoImpact.
To Do the following
Paste an image as a separate object
Select Paste: As Object [Ctrl+V] to paste an image as a separate object. The image is pasted at the top left corner of the current view.
Paste image data into a selection area
1. Select an area on the image where you want to paste the clipboard image into.
2. Select Edit: Paste - Into Selection. The clipboard image appears inside the selection and remains attached to your mouse.
Note: Press [Esc] to undo (before you have finished the pasting operation). The contents in the clipboard are not removed.
3. Move your mouse around to position the clipboard image in the desired selection area.
4. Click to anchor the clipboard image in the selection area.
Paste an image to fit into a selection area
Select Paste: Fit into Selection when you want to paste the clipboard image inside a selection area so that the entire image fills the selection. Try to make sure that the clipboard image and the selection area are about the same size. If the sizes vary greatly, then the quality of the clipboard image is affected by resampling (resizing) to fit the selection.
Paste an image as new image Select Paste: As New Image to paste a selection in its own image window.
Alternatively, you can drag an object from an existing image to the workspace.
This is useful when you want to save an object or selection area as its own image, or when you have copied an image from another program and want to place it in its own window.
PHOTOIMPACT USER GUIDE 43
Using the clipboardThe clipboard acts as a temporary storage for different types of data, such as images, text, or sound. However, it only holds data one at a time.
Whenever new information is placed in the clipboard, the previous data is automatically overwritten, regardless of where the new data came from.
The Clipboard submenuThe following clipboard commands are available under Edit: Clipboard.
• Load Brings an image file onto the clipboard.
• Save Stores clipboard image data to a file.
• Display Shows the current clipboard image in a Windows clipboard viewer. To close the clipboard viewer, press any key or click your mouse.
Recovering from mistakesPhotoImpact keeps track of actions and commands used in editing images. A maximum of 200 levels of Undo and Redo commands can be set in File: Preferences - General, to help you monitor all the changes made since you last saved your document.
There are four ways to recover from mistakes:
• To reverse the most recent action, click Undo [Ctrl + Z] or Redo [Ctrl + Y] on the Standard Toolbar.
• To reverse a sequence of actions to a specific step, select either Edit: Undo Before or Edit: Redo To. From the submenu, select the desired action. All actions prior to the action selected will be undone/redone.
• To cancel all changes made to the image since it was last saved, select File: Restore. This closes and reopens the file in its last saved state.
Paste images beneath the mouse pointer
Select Paste: Under Pointer to place the clipboard image onto the base image wherever you click your mouse.
This is useful when you know where to exactly anchor the clipboard image.
PHOTOIMPACT USER GUIDE44
• To undo any changes made in the image, click the desired action in the History tab in the Quick Command Panel. To redo any changes, choose the desired action by moving the slider down. All actions prior to the item selected will also be undone/redone. The number of actions displayed in the History tab is equal to the number of Undo and Redo levels set in File: Preferences - General.
Converting between data typesImages come in various data types. A data type can generally be understood in terms of the number of colors an image contains, its bit resolution, and the number of channels it uses.
Images with more colors tend to have larger file sizes compared to images with less colors. Common data type examples include: black and white, indexed 256-color, and CMYK true color.
To convert between data types:
1. Click Adjust: Data Type then select which data type to use from the submenu.
You can also do this directly by clicking Data Type (image) from the status bar.
2. Depending on what data type you are converting your image to, a dialog box may open where you can specify conversion options.
3. After specifying the desired conversion options, click OK.
Notes:• To remove all actions in the Undo Before and Redo To submenus, select Clear Undo/Redo History
from the Edit menu. This removes all actions permanently.• Restore cannot be undone, so it is advisable to duplicate an image before restoring it. See
“Duplicating images” on page 40 for details.
Tip: To convert between data types while leaving your original file intact, select Adjust: Data Type – Convert as New Image, or click Data Type (image) on the status bar and select Convert as New Image. Clear this command to simply replace the data type of the image you are currently working on.
PHOTOIMPACT USER GUIDE 45
Changing indexed image colorsAn indexed image is an image that contains up to 256 colors where all colors that are used in the image are stored in a color information table.
You can change the way an indexed image appears by adding, removing, or replacing specific colors used by the image.
To change an indexed image’s colors:
1. Select Adjust: Color Table.
2. In the Color Table dialog box, double-click the color square you want to change.
3. In the Color Picker dialog box, select the desired replacement color and click OK.
4. When finished changing the colors of the color table, click OK to save the new settings and return to the image.
Making a screen captureScreen Capture can take screen shots of any images on your screen, including the PhotoImpact program window, just like a real world camera. You can specify capture options in order to save you editing time.
To start capturing an image:
1. Select File: Screen Capture - Setup.
2. Set the default options for capturing.
3. Click Capture Now. If you don’t want to capture images yet, click OK instead. Select File: Screen Capture - Start when you’re ready to capture.
4. Depending on your capture settings, press the Hotkey specified in Activation to start capturing images.
Note: Before performing any of these actions, make sure that your image is already in indexed format. See “Converting between data types” on page 44 for details.
Note: Click Load to change the entire palette in the Color Table dialog box. This will replace the existing color palette with a previously saved one.
Note: If you chose to capture a Selected area, you will have to define an area by clicking the mouse on the starting point of the selection and then drag it to enclose the area in a rectangle.
PHOTOIMPACT USER GUIDE46
To capture a selected area:
1. Select File: Screen Capture - Setup.
2. Under the Source options, choose Selected area. You can also modify other capture options, if necessary.
3. Click Capture Now to close the dialog box.
4. Locate the area that you want to capture.
5. Take the screen shot by pressing the Hotkey specified in Activation. A small viewer window appears. This window offers controls on the top edge that guide you when capturing.
6. Click once to mark the starting point - when you move the cursor, a rectangle appears, letting you specify the area to be captured.
7. After marking the desired area, click again to signify the end point of the selection area.
To capture a selected object:
1. Select File: Screen Capture - Setup.
2. Under the Source options, choose Selected object.
3. Click Capture Now to close the dialog box.
4. Take the screen shot by pressing the Hotkey specified in Activation.
The program then “divides” the active window into separate objects for each button, menu, or workspace. The mouse pointer changes from an arrow icon into a circle with crosshairs inside it.
5. Select the object you want to capture by placing the cursor directly over the object.
You can tell if the object has been selected by the presence of a black border surrounding it.
6. Click once to capture.
Note: If the small viewer window gets in the way of what you want to capture, you can either move it around the four corners of your monitor screen or close it.
PHOTOIMPACT USER GUIDE 47
Saving imagesPhotoImpact is an object-based editing program. Any work involving objects can be saved in the Ulead File for Objects format (*.UFO) which consists of the original base image and any additional objects created. See “Working with objects” on page 97 for details.
Saving your file in this format allows you to edit the objects and the base image independently from one another as opposed to saving an image in other formats (ex. BMP and JPG) where all objects are merged onto the base image and cannot be edited the next time you open the file.
To save an image:
1. Select File: Save [Ctrl+S] or File: Save As [Ctrl+Shift+S].
2. Select the folder where you want to save the image in Save in and select a file format from Save as type.
3. Enter the name for saving in File name. A file extension is not needed.
4. Click Save.
AutoSave AutoSave automatically saves documents during set intervals where changes are tracked and saved in a temporary file. The original file is only modified when it is actually saved by pressing [Ctrl + S] or by clicking Save.
To enable AutoSave, click Preferences - General. In Category of the Preferences dialog box, select Open & Save and set the interval between saves.
Note: Select Effect: Digimarc - Embed Watermark to include a digital watermark into your images before saving them. This allows you to imperceptibly embed data (such as copyright and owner information) and protect your images from unauthorized use. Register first and acquire a Digimarc ID before you try to embed digital watermarks into your images. (Click Personalize in the Embed Watermark dialog box, then click Register to apply for a Digimarc ID.)
PHOTOIMPACT USER GUIDE48
Using plug-insPlug-ins are small third-party programs that can be plugged into another piece of software to add functionality to it. Plug-ins for PhotoImpact usually come in the form of additional effects.
To import plug-ins into PhotoImpact:
1. Locate and install the plug-in into your computer. Do not forget to take note of the installation directory.
2. From PhotoImpact select File: Preferences - General then select Plug-ins.
3. Locate the folder where you installed the plug-in and look for the folder which contains the file with the extension *.8bf (Ex. MyFilter.8bf).
4. Click OK then select the checkbox beside the specified folder.
5. Click OK to close the window then restart the program.
6. To select the plug-in, open an image then select Effect. You will see the plug-in at the bottom of the menu.
Note: To import plug-ins that do not need to be installed on your PC, simply locate the *.8bf file and then import it into PhotoImpact.
Adjusting and enhancing your imagesThere are some issues to take into consideration when dealing with digital pictures and scanned images. Problems like overexposure, underexposure, poor lighting, or incorrect tint can be corrected by using the Adjust and Photo commands in PhotoImpact.
These commands can be applied to selected areas, objects or entire images.
Note: Some of the commands are not applicable to certain data types or they cannot be applied to selected areas in certain data types.
Tips: • Adjusting a selection area converts it into an object.• To jump directly to the Options dialog box, select Don't show these quick samples next
time. To show quick samples again, select Display quick samples in File: Preferences - General - PhotoImpact category.
• You can also adjust the image by selecting presets in the EasyPalette's Effect Gallery.
You can also:
Use Auto-process commands
The Auto-process commands are used for automatic and intelligent control over image appearance. It automates the format process and lets PhotoImpact estimate and apply changes needed to enhance images accordingly.
To apply an Auto-process command (other than Batch) to your image, simply select an item under the Auto-process submenu.
Use Auto-process: Batch commands
1. Select Adjust: Auto-process - Batch [Ctrl+F9].
2. Click the Auto-process option(s) you want to apply.
3. To remove an option, click its button again or drag it off the queue at the bottom of the dialog box.
4. Click OK to apply the Auto-process option(s) to the image.
Note: Most of the options in the Auto-process dialog box can be accessed independently by selecting their respective commands on the Adjust: Auto-process submenu.
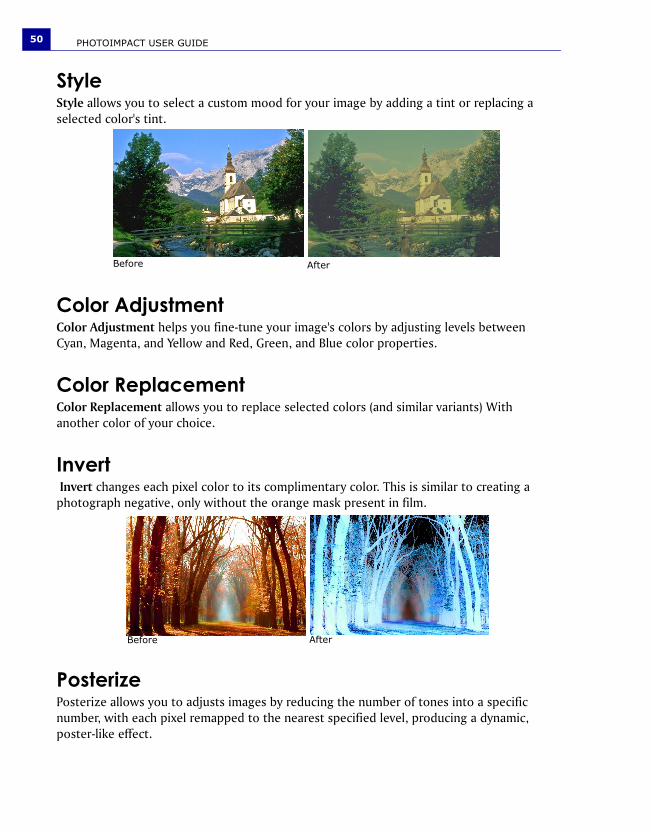
PHOTOIMPACT USER GUIDE50
StyleStyle allows you to select a custom mood for your image by adding a tint or replacing a selected color's tint.
Color AdjustmentColor Adjustment helps you fine-tune your image's colors by adjusting levels between Cyan, Magenta, and Yellow and Red, Green, and Blue color properties.
Color ReplacementColor Replacement allows you to replace selected colors (and similar variants) With another color of your choice.
Invert Invert changes each pixel color to its complimentary color. This is similar to creating a photograph negative, only without the orange mask present in film.
PosterizePosterize allows you to adjusts images by reducing the number of tones into a specific number, with each pixel remapped to the nearest specified level, producing a dynamic, poster-like effect.
Before After
Before After

PHOTOIMPACT USER GUIDE 51
ThresholdAdjusting the threshold of images separates the image pixels into black or white extreme values.
Equalize Equalize automatically redistributes all brightness levels of an image to adjust uneven and dark areas of your photo.
CalculationMerge specified color channels of an image file or files to produce a new image that shows remarkable depth using Calculation. When using different images, both images must have the same pixel dimensions.
LightLight and camera flash are two factors that affect image quality, as they control the amount of light in a given photograph. However, many images are ruined due to improper use of these two settings.
SmartCurvesSmartCurves produces high-quality tonal correction tailored for different cameras. For more details, see “Enhancing the dynamic range of an image with SmartCurves” on page 70.
Before After
Before After
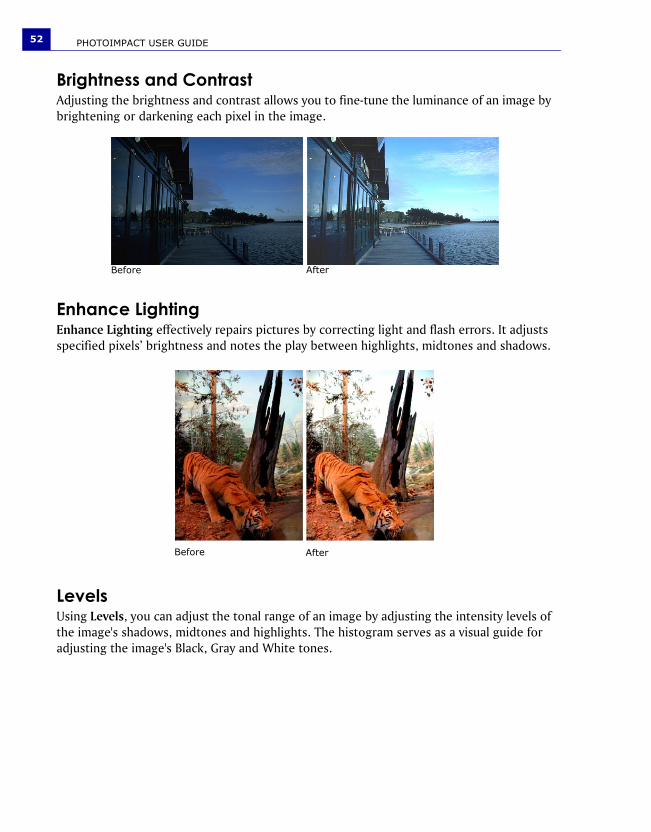
PHOTOIMPACT USER GUIDE52
Brightness and ContrastAdjusting the brightness and contrast allows you to fine-tune the luminance of an image by brightening or darkening each pixel in the image.
Enhance LightingEnhance Lighting effectively repairs pictures by correcting light and flash errors. It adjusts specified pixels’ brightness and notes the play between highlights, midtones and shadows.
LevelsUsing Levels, you can adjust the tonal range of an image by adjusting the intensity levels of the image's shadows, midtones and highlights. The histogram serves as a visual guide for adjusting the image's Black, Gray and White tones.
Before After
Before After
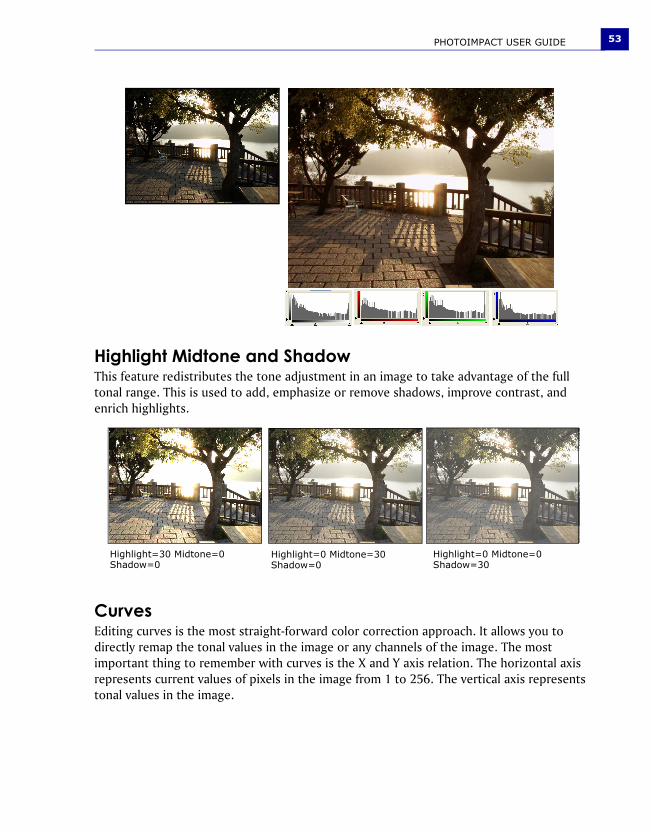
PHOTOIMPACT USER GUIDE 53
Highlight Midtone and ShadowThis feature redistributes the tone adjustment in an image to take advantage of the full tonal range. This is used to add, emphasize or remove shadows, improve contrast, and enrich highlights.
CurvesEditing curves is the most straight-forward color correction approach. It allows you to directly remap the tonal values in the image or any channels of the image. The most important thing to remember with curves is the X and Y axis relation. The horizontal axis represents current values of pixels in the image from 1 to 256. The vertical axis represents tonal values in the image.
Highlight=30 Midtone=0 Shadow=0
Highlight=0 Midtone=30 Shadow=0
Highlight=0 Midtone=0 Shadow=30
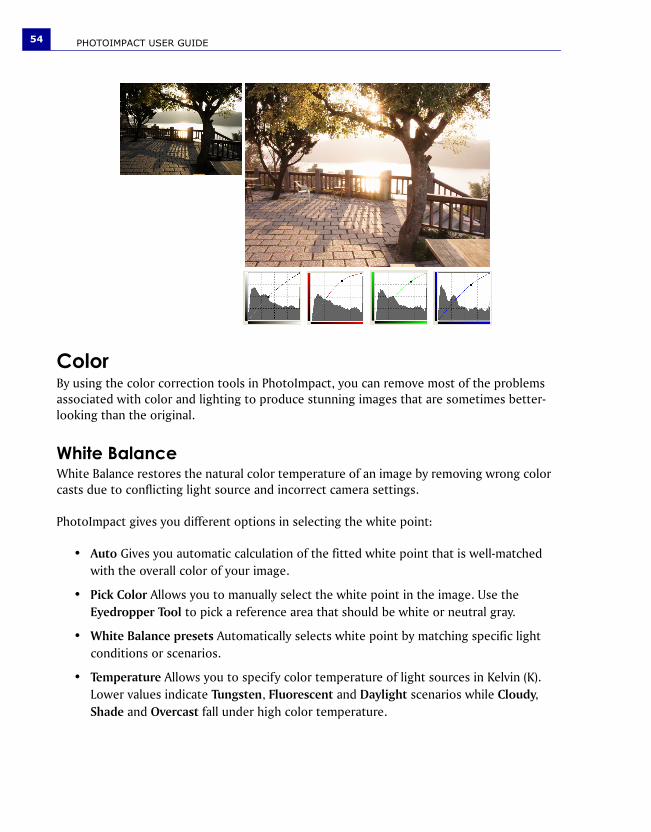
PHOTOIMPACT USER GUIDE54
ColorBy using the color correction tools in PhotoImpact, you can remove most of the problems associated with color and lighting to produce stunning images that are sometimes better-looking than the original.
White BalanceWhite Balance restores the natural color temperature of an image by removing wrong color casts due to conflicting light source and incorrect camera settings.
PhotoImpact gives you different options in selecting the white point:
• Auto Gives you automatic calculation of the fitted white point that is well-matched with the overall color of your image.
• Pick Color Allows you to manually select the white point in the image. Use the Eyedropper Tool to pick a reference area that should be white or neutral gray.
• White Balance presets Automatically selects white point by matching specific light conditions or scenarios.
• Temperature Allows you to specify color temperature of light sources in Kelvin (K). Lower values indicate Tungsten, Fluorescent and Daylight scenarios while Cloudy, Shade and Overcast fall under high color temperature.
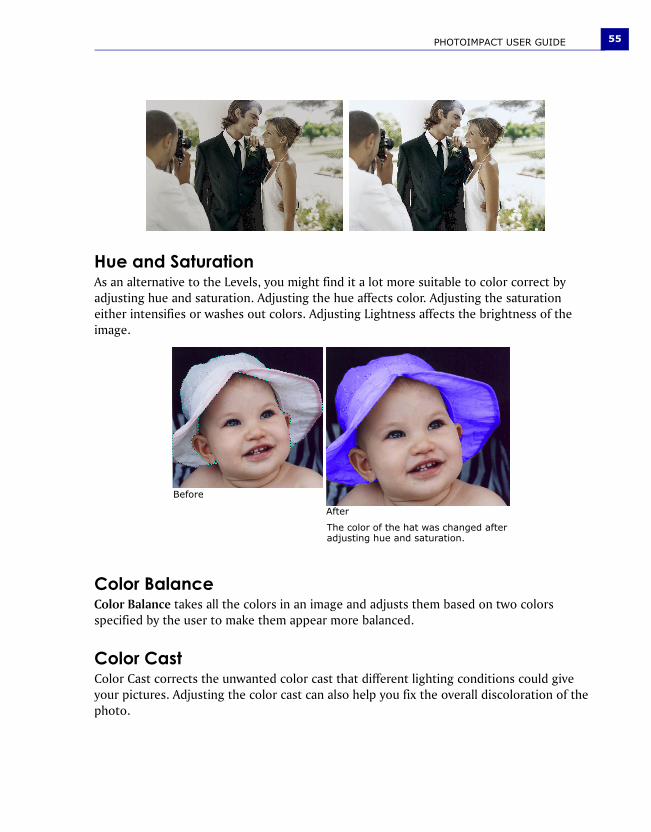
PHOTOIMPACT USER GUIDE 55
Hue and SaturationAs an alternative to the Levels, you might find it a lot more suitable to color correct by adjusting hue and saturation. Adjusting the hue affects color. Adjusting the saturation either intensifies or washes out colors. Adjusting Lightness affects the brightness of the image.
Color BalanceColor Balance takes all the colors in an image and adjusts them based on two colors specified by the user to make them appear more balanced.
Color CastColor Cast corrects the unwanted color cast that different lighting conditions could give your pictures. Adjusting the color cast can also help you fix the overall discoloration of the photo.
The color of the hat was changed after adjusting hue and saturation.
Before
After

PHOTOIMPACT USER GUIDE56
Correct Chromatic AberrationThis feature corrects chromatic aberration, which is the colored (usually purple) fringing on image objects caused by different light wavelengths striking the camera’s sensor at different angles.
FocusSelecting Focus adjusts the image’s overall convergence to sharpen or blur it.
Lens DistortionIn the Camera Lens range of effects, the Lens Distortion effect simulates the bending of an image through different shaped lenses, distorting the image in various ways.
Remove Red EyeFix red eye problems associated with photos taken using the camera flash with the Remove Red Eye tool or command.
Before After
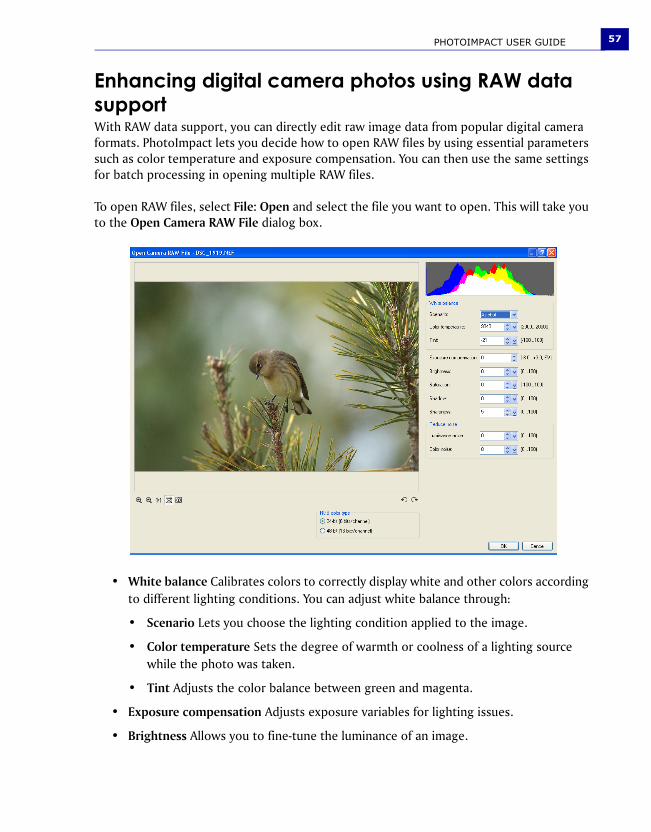
PHOTOIMPACT USER GUIDE 57
Enhancing digital camera photos using RAW data supportWith RAW data support, you can directly edit raw image data from popular digital camera formats. PhotoImpact lets you decide how to open RAW files by using essential parameters such as color temperature and exposure compensation. You can then use the same settings for batch processing in opening multiple RAW files.
To open RAW files, select File: Open and select the file you want to open. This will take you to the Open Camera RAW File dialog box.
• White balance Calibrates colors to correctly display white and other colors according to different lighting conditions. You can adjust white balance through:
• Scenario Lets you choose the lighting condition applied to the image.
• Color temperature Sets the degree of warmth or coolness of a lighting source while the photo was taken.
• Tint Adjusts the color balance between green and magenta.
• Exposure compensation Adjusts exposure variables for lighting issues.
• Brightness Allows you to fine-tune the luminance of an image.
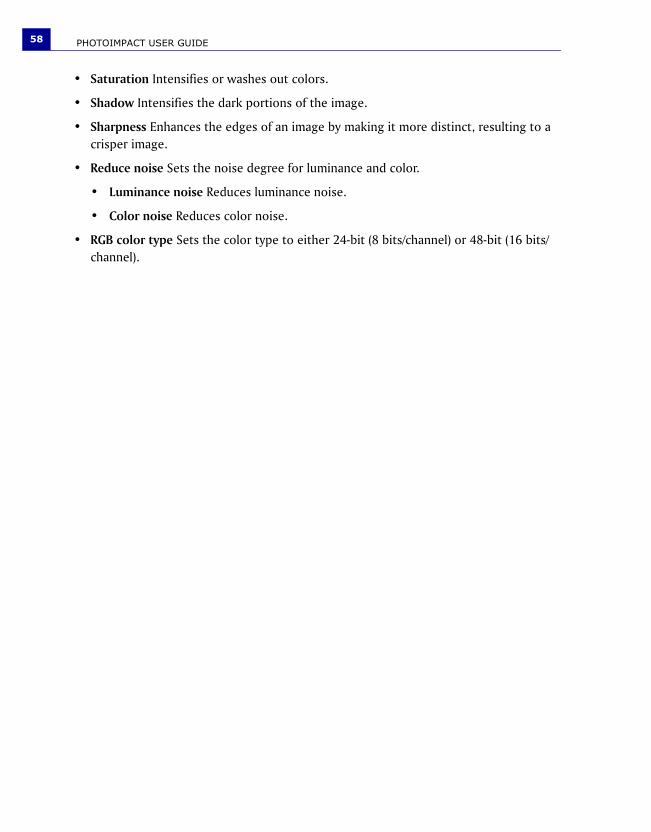
PHOTOIMPACT USER GUIDE58
• Saturation Intensifies or washes out colors.
• Shadow Intensifies the dark portions of the image.
• Sharpness Enhances the edges of an image by making it more distinct, resulting to a crisper image.
• Reduce noise Sets the noise degree for luminance and color.
• Luminance noise Reduces luminance noise.
• Color noise Reduces color noise.
• RGB color type Sets the color type to either 24-bit (8 bits/channel) or 48-bit (16 bits/channel).
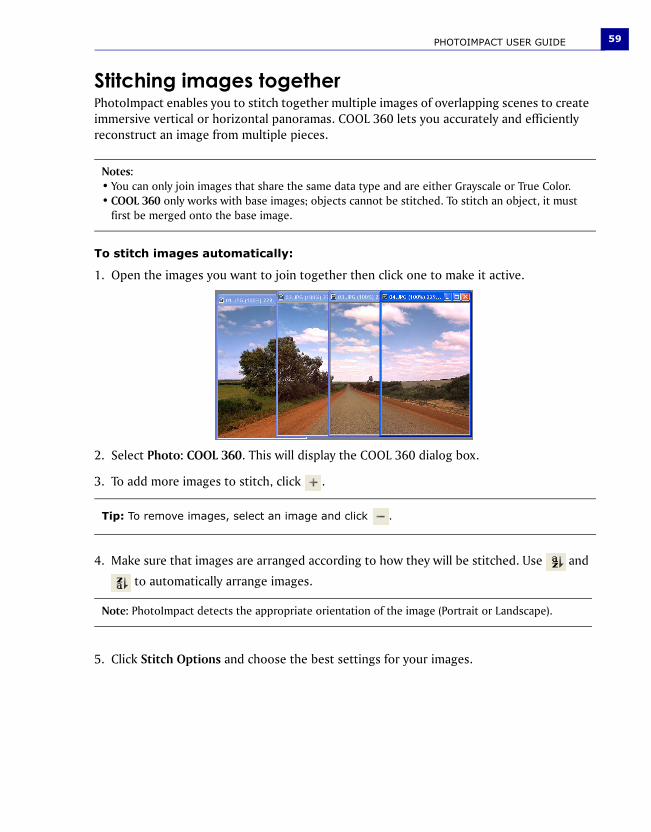
PHOTOIMPACT USER GUIDE 59
Stitching images togetherPhotoImpact enables you to stitch together multiple images of overlapping scenes to create immersive vertical or horizontal panoramas. COOL 360 lets you accurately and efficiently reconstruct an image from multiple pieces.
To stitch images automatically:
1. Open the images you want to join together then click one to make it active.
2. Select Photo: COOL 360. This will display the COOL 360 dialog box.
3. To add more images to stitch, click .
4. Make sure that images are arranged according to how they will be stitched. Use and
to automatically arrange images.
5. Click Stitch Options and choose the best settings for your images.
Notes:• You can only join images that share the same data type and are either Grayscale or True Color.• COOL 360 only works with base images; objects cannot be stitched. To stitch an object, it must
first be merged onto the base image.
Tip: To remove images, select an image and click .
Note: PhotoImpact detects the appropriate orientation of the image (Portrait or Landscape).
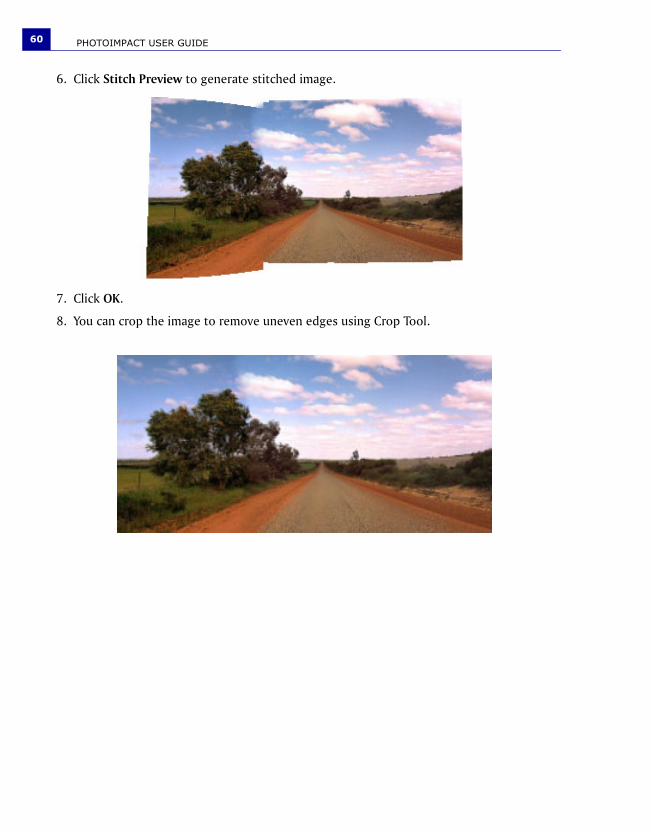
PHOTOIMPACT USER GUIDE60
6. Click Stitch Preview to generate stitched image.
7. Click OK.
8. You can crop the image to remove uneven edges using Crop Tool.
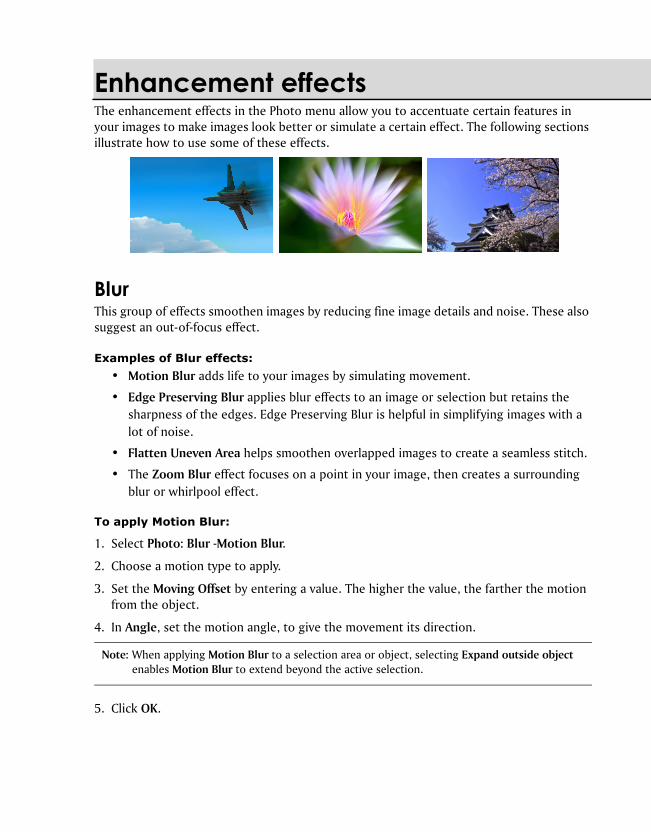
Enhancement effectsThe enhancement effects in the Photo menu allow you to accentuate certain features in your images to make images look better or simulate a certain effect. The following sections illustrate how to use some of these effects.
BlurThis group of effects smoothen images by reducing fine image details and noise. These also suggest an out-of-focus effect.
Examples of Blur effects:
• Motion Blur adds life to your images by simulating movement.
• Edge Preserving Blur applies blur effects to an image or selection but retains the sharpness of the edges. Edge Preserving Blur is helpful in simplifying images with a lot of noise.
• Flatten Uneven Area helps smoothen overlapped images to create a seamless stitch.
• The Zoom Blur effect focuses on a point in your image, then creates a surrounding blur or whirlpool effect.
To apply Motion Blur:
1. Select Photo: Blur -Motion Blur.
2. Choose a motion type to apply.
3. Set the Moving Offset by entering a value. The higher the value, the farther the motion from the object.
4. In Angle, set the motion angle, to give the movement its direction.
5. Click OK.
Note: When applying Motion Blur to a selection area or object, selecting Expand outside object enables Motion Blur to extend beyond the active selection.
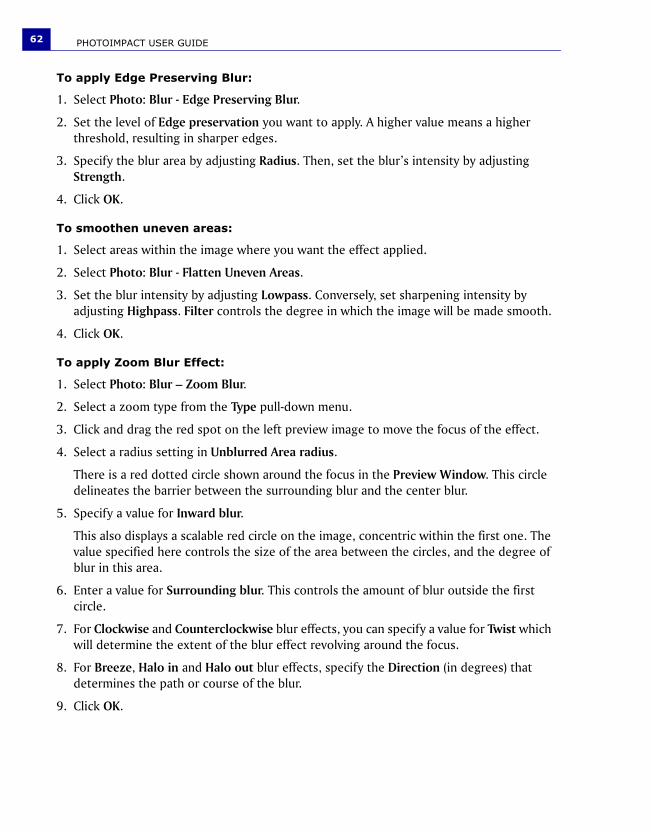
PHOTOIMPACT USER GUIDE62
To apply Edge Preserving Blur:
1. Select Photo: Blur - Edge Preserving Blur.
2. Set the level of Edge preservation you want to apply. A higher value means a higher threshold, resulting in sharper edges.
3. Specify the blur area by adjusting Radius. Then, set the blur’s intensity by adjusting Strength.
4. Click OK.
To smoothen uneven areas:
1. Select areas within the image where you want the effect applied.
2. Select Photo: Blur - Flatten Uneven Areas.
3. Set the blur intensity by adjusting Lowpass. Conversely, set sharpening intensity by adjusting Highpass. Filter controls the degree in which the image will be made smooth.
4. Click OK.
To apply Zoom Blur Effect:
1. Select Photo: Blur – Zoom Blur.
2. Select a zoom type from the Type pull-down menu.
3. Click and drag the red spot on the left preview image to move the focus of the effect.
4. Select a radius setting in Unblurred Area radius.
There is a red dotted circle shown around the focus in the Preview Window. This circle delineates the barrier between the surrounding blur and the center blur.
5. Specify a value for Inward blur.
This also displays a scalable red circle on the image, concentric within the first one. The value specified here controls the size of the area between the circles, and the degree of blur in this area.
6. Enter a value for Surrounding blur. This controls the amount of blur outside the first circle.
7. For Clockwise and Counterclockwise blur effects, you can specify a value for Twist which will determine the extent of the blur effect revolving around the focus.
8. For Breeze, Halo in and Halo out blur effects, specify the Direction (in degrees) that determines the path or course of the blur.
9. Click OK.
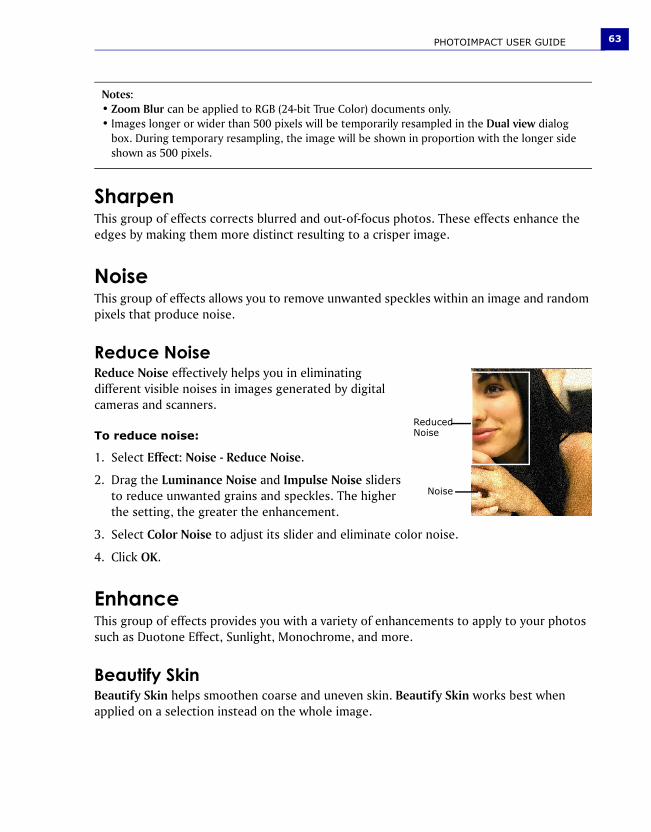
PHOTOIMPACT USER GUIDE 63
SharpenThis group of effects corrects blurred and out-of-focus photos. These effects enhance the edges by making them more distinct resulting to a crisper image.
NoiseThis group of effects allows you to remove unwanted speckles within an image and random pixels that produce noise.
Reduce NoiseReduce Noise effectively helps you in eliminating different visible noises in images generated by digital cameras and scanners.
To reduce noise:
1. Select Effect: Noise - Reduce Noise.
2. Drag the Luminance Noise and Impulse Noise sliders to reduce unwanted grains and speckles. The higher the setting, the greater the enhancement.
3. Select Color Noise to adjust its slider and eliminate color noise.
4. Click OK.
EnhanceThis group of effects provides you with a variety of enhancements to apply to your photos such as Duotone Effect, Sunlight, Monochrome, and more.
Beautify SkinBeautify Skin helps smoothen coarse and uneven skin. Beautify Skin works best when applied on a selection instead on the whole image.
Notes:• Zoom Blur can be applied to RGB (24-bit True Color) documents only.• Images longer or wider than 500 pixels will be temporarily resampled in the Dual view dialog
box. During temporary resampling, the image will be shown in proportion with the longer side shown as 500 pixels.
Reduced Noise
Noise

PHOTOIMPACT USER GUIDE64
To apply Beautify Skin:
1. Select Photo: Enhance - Beautify Skin.
2. Use the Eyedropper Tool and click to select a suitable skin tone from the original image. The selected tone will be shown in Skin tone.
3. In Level, determine the intensity of the effect. The higher the setting, the greater the enhancement.
4. Select a Complexion which controls the overall appearance of the skin, and the level of the effect. The higher the setting, the greater the variation.
5. Click OK.
Diffuse GlowDiffuse Glow brightens the entire image by applying luminosity to the highlights of the image. Light radiates from the center to its neighboring pixels.
Aside from brightening the image, Diffuse Glow adds noise to the entire image. The combination of adjusting brightness and adding noise creates an illusion of a foggy layer on top of the image.
To apply Diffuse Glow Effect:
1. Select Photo: Enhance - Diffuse Glow.
2. Specify the area and extent of brightness adjustment in Threshold and Degree of glow parameters.
3. Set the noise level by adjusting Graininess.
4. Click OK to apply the effect.
Tip: Click to save the effect in the EasyPalette. Click Preview to view the effect at actual size. Zoom in to a region to see the effect at closer range.
Note: Beautify Skin effect can only be applied to RGB (24-bit True Color) documents.
Before After
Before
After
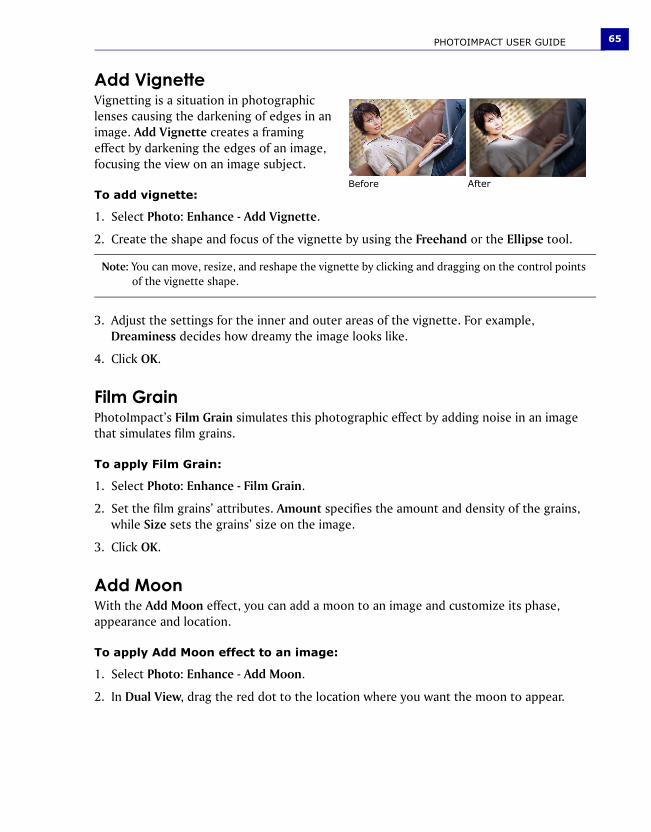
PHOTOIMPACT USER GUIDE 65
Add VignetteVignetting is a situation in photographic lenses causing the darkening of edges in an image. Add Vignette creates a framing effect by darkening the edges of an image, focusing the view on an image subject.
To add vignette:
1. Select Photo: Enhance - Add Vignette.
2. Create the shape and focus of the vignette by using the Freehand or the Ellipse tool.
3. Adjust the settings for the inner and outer areas of the vignette. For example, Dreaminess decides how dreamy the image looks like.
4. Click OK.
Film GrainPhotoImpact’s Film Grain simulates this photographic effect by adding noise in an image that simulates film grains.
To apply Film Grain:
1. Select Photo: Enhance - Film Grain.
2. Set the film grains’ attributes. Amount specifies the amount and density of the grains, while Size sets the grains’ size on the image.
3. Click OK.
Add MoonWith the Add Moon effect, you can add a moon to an image and customize its phase, appearance and location.
To apply Add Moon effect to an image:
1. Select Photo: Enhance - Add Moon.
2. In Dual View, drag the red dot to the location where you want the moon to appear.
Note: You can move, resize, and reshape the vignette by clicking and dragging on the control points of the vignette shape.
Before After
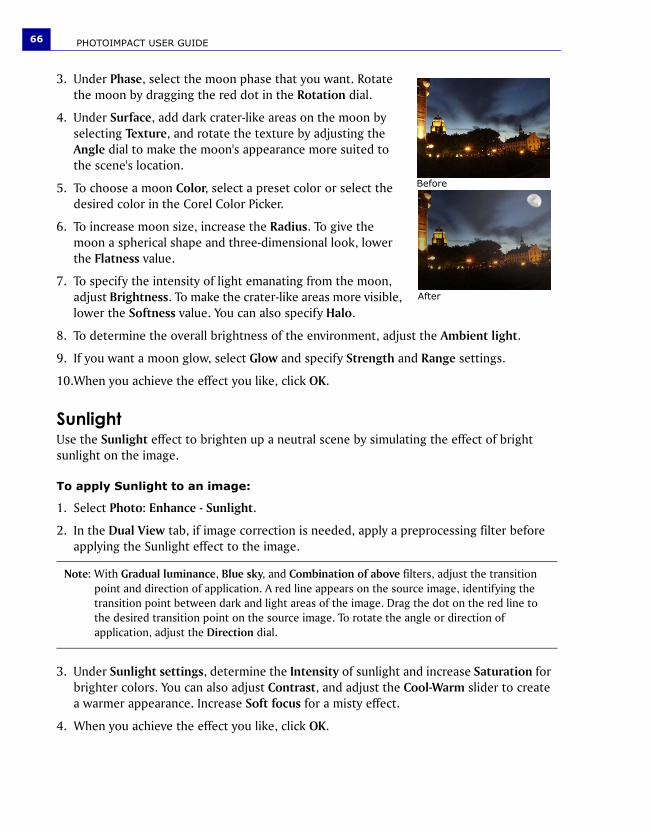
PHOTOIMPACT USER GUIDE66
3. Under Phase, select the moon phase that you want. Rotate the moon by dragging the red dot in the Rotation dial.
4. Under Surface, add dark crater-like areas on the moon by selecting Texture, and rotate the texture by adjusting the Angle dial to make the moon's appearance more suited to the scene's location.
5. To choose a moon Color, select a preset color or select the desired color in the Corel Color Picker.
6. To increase moon size, increase the Radius. To give the moon a spherical shape and three-dimensional look, lower the Flatness value.
7. To specify the intensity of light emanating from the moon, adjust Brightness. To make the crater-like areas more visible, lower the Softness value. You can also specify Halo.
8. To determine the overall brightness of the environment, adjust the Ambient light.
9. If you want a moon glow, select Glow and specify Strength and Range settings.
10.When you achieve the effect you like, click OK.
SunlightUse the Sunlight effect to brighten up a neutral scene by simulating the effect of bright sunlight on the image.
To apply Sunlight to an image:
1. Select Photo: Enhance - Sunlight.
2. In the Dual View tab, if image correction is needed, apply a preprocessing filter before applying the Sunlight effect to the image.
3. Under Sunlight settings, determine the Intensity of sunlight and increase Saturation for brighter colors. You can also adjust Contrast, and adjust the Cool-Warm slider to create a warmer appearance. Increase Soft focus for a misty effect.
4. When you achieve the effect you like, click OK.
Note: With Gradual luminance, Blue sky, and Combination of above filters, adjust the transition point and direction of application. A red line appears on the source image, identifying the transition point between dark and light areas of the image. Drag the dot on the red line to the desired transition point on the source image. To rotate the angle or direction of application, adjust the Direction dial.
Before
After

PHOTOIMPACT USER GUIDE 67
Lens FiltersIn traditional and digital photography, filters are placed over the camera lens for the purpose of modifying the appearance of a photo. Different filters are used to achieve different effects such as eliminating reflections on shiny surfaces, saturate colors, or deepen blue skies. The same output can be achieved in digital imaging using PhotoImpact's Lens Filters.
• The Diffraction Filter creates rainbow-like reflections in highlights and point light sources. This effect adds a colorful and dramatic accent to images.
• Multivision Filter simulates the effect of a camera’s multi-image filter, which creates reproductions of a subject.
• Star Filter creates brilliant, star-like points in areas of an image where light is noticeably bright. This effect adds a dramatic and brilliant accent to ordinary-looking images.
To create Diffraction Filter effects:
1. To apply diffraction to a specific area on the image, use the Selection Tool to select an area.
2. Select Photo: Lens Filters - Diffraction Filter.
3. From the Filter type list, select the type of formation for the diffraction effect. If Starburst or Circular is the selected filter type, specify the pairs of Streaks.
4. Luminosity threshold determines the amount of highlights (or light areas) in the image to which the effect will be applied.
5. If there are too many diffractions generated which do not look quite realistic on your image, adjust Convergence. Increasing the value merges multiple clusters into one cluster and recalculates the center of the new cluster.
6. Under Streak settings, drag the red dot on the Angle dial to change the angle of the beams. Click + or – for more precise settings.
7. If you made a selection on the base image, select Expand outside selection to make the diffraction go beyond the selection.
8. Click OK.
Before
After

PHOTOIMPACT USER GUIDE68
To create Multivision Filter effects:
1. Select Photo: Lens Filters - Multivision Filter.
2. In the Dual View tab, the before and after views show the applied effects in real time. Use the zoom buttons to adjust the viewing size of your image and see the effects more clearly.
3. You can either select a Preset multivision filter or create a Custom filter.
4. In the Before View, drag the red dot to determine the location coordinates of the center of the image to be duplicated.
5. Under Filter settings, change the Radius to adjust the subject’s area and the distance between the center image and its reproductions. Also adjust the Transparency, Softness, and Rotation of the reproductions.
6. When you achieve the effect you like, click OK.
To create Star Filter effects:
1. With an image open, select Photo: Lens Filters - Star Filters.
2. Specify the Filter Setting by entering the number of Spikes, and values for Variance. Determine the effect’s generated density by setting the Luminosity Threshold.
3. Choose between using a Standard Filter or PL (polarized light) Filter. PL filters simulate the use of two lenses while Standard uses one. Specify a value in Rotate (if you chose PL) to simulate the rotation of the lenses against each other.
4. Set the star points’ spikes by adjusting the Spikes setting. Depending on your filter setting, you can adjust the points’ Brightness, Length, Width, and Spread Angle.
5. Click OK.
Before
After
Before
After
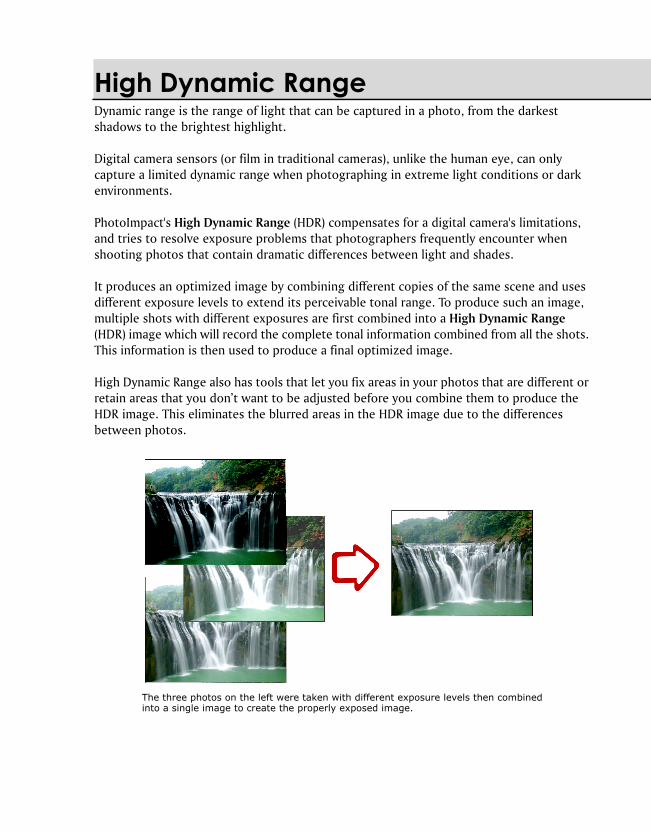
High Dynamic RangeDynamic range is the range of light that can be captured in a photo, from the darkest shadows to the brightest highlight.
Digital camera sensors (or film in traditional cameras), unlike the human eye, can only capture a limited dynamic range when photographing in extreme light conditions or dark environments.
PhotoImpact's High Dynamic Range (HDR) compensates for a digital camera's limitations, and tries to resolve exposure problems that photographers frequently encounter when shooting photos that contain dramatic differences between light and shades.
It produces an optimized image by combining different copies of the same scene and uses different exposure levels to extend its perceivable tonal range. To produce such an image, multiple shots with different exposures are first combined into a High Dynamic Range (HDR) image which will record the complete tonal information combined from all the shots. This information is then used to produce a final optimized image.
High Dynamic Range also has tools that let you fix areas in your photos that are different or retain areas that you don’t want to be adjusted before you combine them to produce the HDR image. This eliminates the blurred areas in the HDR image due to the differences between photos.
The three photos on the left were taken with different exposure levels then combined into a single image to create the properly exposed image.
PHOTOIMPACT USER GUIDE70
Enhancing the dynamic range of an image with SmartCurvesYou can enhance the dynamic range of an image by directly applying a camera curve to an image. (To make a camera curve, see “Creating and saving a camera curve profile” on page 70 for details.)
To enhance the dynamic range of an image with SmartCurves:
1. Select Photo: Light - SmartCurves.
2. Select a camera curve from the Use camera curve list.
3. Click OK.
Creating and saving a camera curve profileWhen using High Dynamic Range to optimize photos from a certain camera, you first need to select an existing or generate a camera response curve for your camera. (A camera response curve indicates how the camera's light sensor responds to different light intensity levels.)
A camera response curve must be saved as a camera curve profile if you want to optimize a single-shot photo or a photo of a subject photographed in motion.
To be able to create an accurate camera curve profile, the image shots that are used as basis to create the camera curve must show all the highlights, details, and shadows of the photographed scene. Here are some guidelines on how to set your digital camera when photographing the image shots:
• Mount your camera on a tripod and set your camera to aperture priority to shoot photos at a fixed aperture with varying shutter speeds.
• Take at least three shots (five shots or more is recommended) of the same scene with different exposures.
Tips: • You can create your own camera curve in the High Dynamic Range dialog box.• To import new camera curves, see “Importing a camera curve profile” on page 71.
Tip: If you only have one photo of a particular scene and you don’t have a camera curve profile for your camera, you can use one of the camera curve profile presets to create the HDR image.
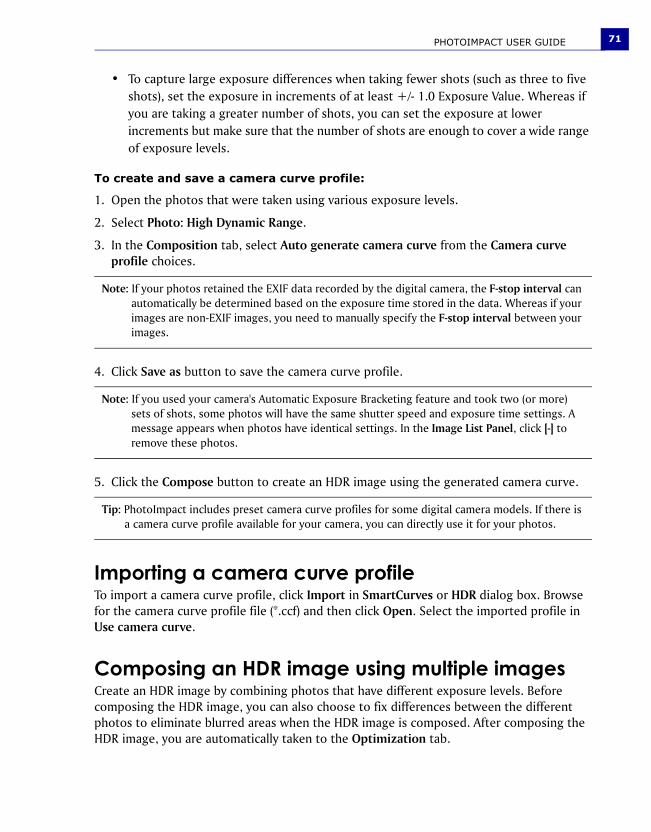
PHOTOIMPACT USER GUIDE 71
• To capture large exposure differences when taking fewer shots (such as three to five shots), set the exposure in increments of at least +/- 1.0 Exposure Value. Whereas if you are taking a greater number of shots, you can set the exposure at lower increments but make sure that the number of shots are enough to cover a wide range of exposure levels.
To create and save a camera curve profile:
1. Open the photos that were taken using various exposure levels.
2. Select Photo: High Dynamic Range.
3. In the Composition tab, select Auto generate camera curve from the Camera curve profile choices.
4. Click Save as button to save the camera curve profile.
5. Click the Compose button to create an HDR image using the generated camera curve.
Importing a camera curve profileTo import a camera curve profile, click Import in SmartCurves or HDR dialog box. Browse for the camera curve profile file (*.ccf) and then click Open. Select the imported profile in Use camera curve.
Composing an HDR image using multiple imagesCreate an HDR image by combining photos that have different exposure levels. Before composing the HDR image, you can also choose to fix differences between the different photos to eliminate blurred areas when the HDR image is composed. After composing the HDR image, you are automatically taken to the Optimization tab.
Note: If your photos retained the EXIF data recorded by the digital camera, the F-stop interval can automatically be determined based on the exposure time stored in the data. Whereas if your images are non-EXIF images, you need to manually specify the F-stop interval between your images.
Note: If you used your camera's Automatic Exposure Bracketing feature and took two (or more) sets of shots, some photos will have the same shutter speed and exposure time settings. A message appears when photos have identical settings. In the Image List Panel, click [-] to remove these photos.
Tip: PhotoImpact includes preset camera curve profiles for some digital camera models. If there is a camera curve profile available for your camera, you can directly use it for your photos.
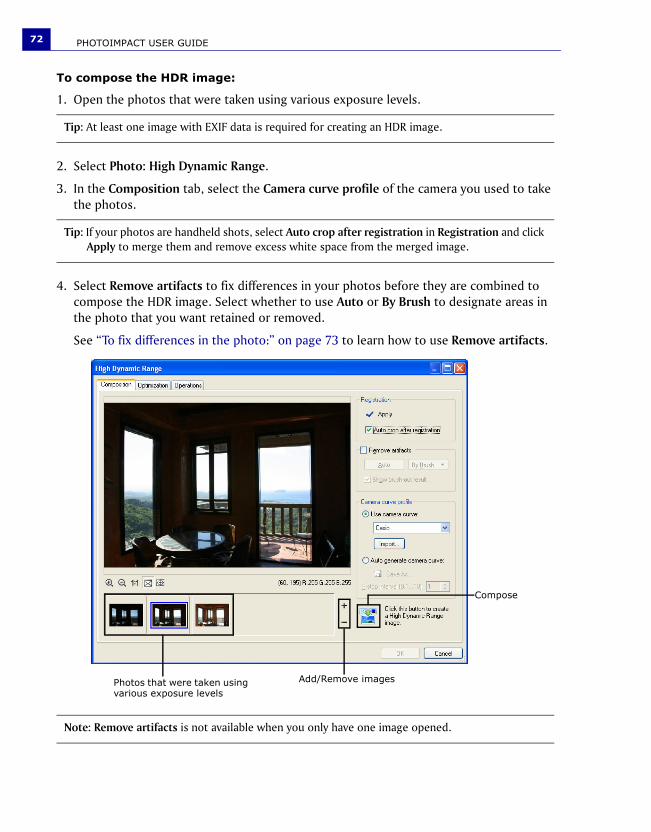
PHOTOIMPACT USER GUIDE72
To compose the HDR image:
1. Open the photos that were taken using various exposure levels.
2. Select Photo: High Dynamic Range.
3. In the Composition tab, select the Camera curve profile of the camera you used to take the photos.
4. Select Remove artifacts to fix differences in your photos before they are combined to compose the HDR image. Select whether to use Auto or By Brush to designate areas in the photo that you want retained or removed.
See “To fix differences in the photo:” on page 73 to learn how to use Remove artifacts.
Tip: At least one image with EXIF data is required for creating an HDR image.
Tip: If your photos are handheld shots, select Auto crop after registration in Registration and click Apply to merge them and remove excess white space from the merged image.
Note: Remove artifacts is not available when you only have one image opened.
Photos that were taken using various exposure levels
Add/Remove images
Compose
PHOTOIMPACT USER GUIDE 73
5. Click the Compose button to create the HDR image.
The program then automatically brings you to the Optimization tab.
To fix differences in the photo:
1. Select Remove artifacts.
2. Choose a method, Auto or By Brush, how to fix differences in the photos.
• Auto Automatically fixes differences in the photos.
• By Brush Lets you manually define areas in your photos that you want to remove or retain.
3. Click an image in the Image List Panel. Select the image where there is an area you want to remove or retain.
4. Click Brush-out then drag over the area that you want removed.
5. Click Brush-in then drag over the area where you do not want any changes to be made.
When specifying the area to retain or remove, you don’t have to be precise with the marked area. The area you want to fix or retain only has to be more or less covered by the brush strokes.
6. Click Done.
Note: If you choose Auto, you do not have to do the proceeding steps. If you select By Brush, continue with the procedure below.
Tips: • When the size of a zoomed-in image exceeds that of the Preview Window, you can right-click
to pan the image.• Select Stack images to superimpose all the photos to see if your brush-in/out areas have
covered the areas that you want to remove/retain.• You can adjust the Brush size to make the brush strokes thicker or thinner when painting over
the photo.• It is recommended that the brush stroke colors for Brush-out and Brush-in be different. Click
the Color box to change the color.
Tip: Select Erase then drag over brush strokes to erase them. If you want to delete brush-in strokes, Brush-in must be pressed. If you want to erase brush-out strokes, Brush-out must be pressed.

PHOTOIMPACT USER GUIDE74
Optimizing the HDR imageYou can also refine the HDR image by adjusting its tone and contrast.
To optimize the HDR image:
1. Click the Optimization tab.
2. Histogram clipping displays the full histogram data of the HDR image. Drag the two triangle sliders (black and white) to define the optimized histogram range to be used in the HDR image.
The gray area is the optimized histogram range to be used in the HDR image while the pink area is the clipped histogram data not to be used in the HDR image. The pink area are the colors that cannot be displayed on screen.
3. The Histogram adjustments are separated into Coarse and Details. Drag the Coarse Contrast slider to adjust the overall contrast of the image.
4. Adjust the Highlight, Midtone or Shadow (both in Coarse and Details) to bring out finer details in the light, midtone or dark areas in the image.
Tips: • Click View to view the HDR version of the composite image in the Preview Window. Use the
slider to preview different exposure levels of the image.• Select Show HDR color to display the HDR image’s luminance quantities as floating point RGB
values. Move the mouse over the image in the Preview Window to see the RGB values (displayed below the Preview Window).
Histogram clipping
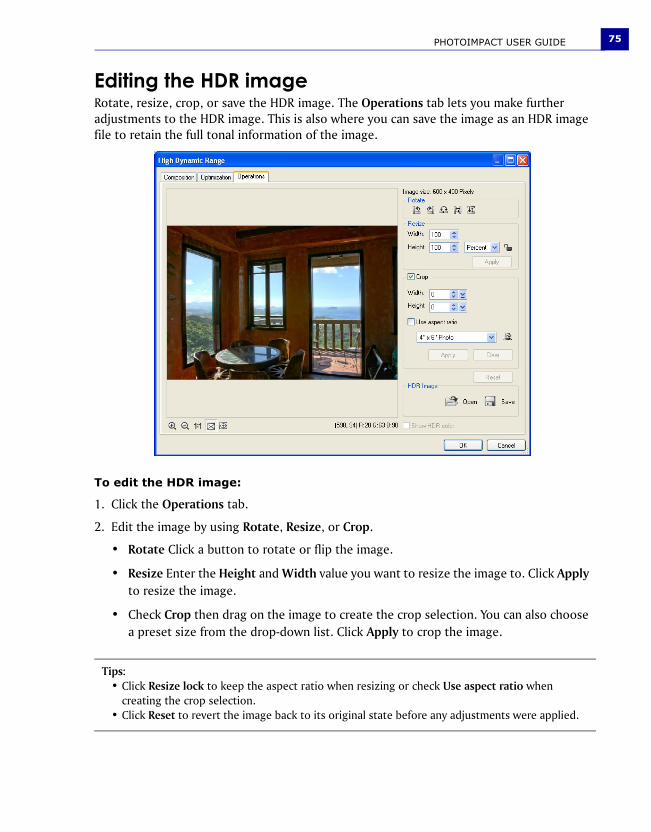
PHOTOIMPACT USER GUIDE 75
Editing the HDR imageRotate, resize, crop, or save the HDR image. The Operations tab lets you make further adjustments to the HDR image. This is also where you can save the image as an HDR image file to retain the full tonal information of the image.
To edit the HDR image:
1. Click the Operations tab.
2. Edit the image by using Rotate, Resize, or Crop.
• Rotate Click a button to rotate or flip the image.
• Resize Enter the Height and Width value you want to resize the image to. Click Apply to resize the image.
• Check Crop then drag on the image to create the crop selection. You can also choose a preset size from the drop-down list. Click Apply to crop the image.
Tips: • Click Resize lock to keep the aspect ratio when resizing or check Use aspect ratio when
creating the crop selection.• Click Reset to revert the image back to its original state before any adjustments were applied.

PHOTOIMPACT USER GUIDE76
3. Click Save to save the image as an HDR file (HDR). This lets you open the HDR image in the future if you need to optimize it again.
4. Click OK to open the edited image as a new document in the workspace.

PHOTOIMPACT USER GUIDE 77
SmartRemoveSmartRemove lets you remove unwanted objects or areas from at least two images of the same scene. You can even expand your creativity by preserving and/or deleting particular objects or areas.
To use SmartRemove:
1. Open at least two EXIF images of the same image size, aperture, shutter speed, and ISO values.
2. There are two ways you can use SmartRemove:
• Auto Automatically removes moving objects from the images (at least 3). Once Auto is clicked, automatic brush-out strokes are shown. Next, jump to Step 6 below.
• By Brush Lets you manually select the objects you want to remove from the images.
3. Click an image in the Image List Panel. Select the image where there is an object you want to remove.
Note: Images without these data can also be used but the result may be limited.
Tip: For best result, select an image with the minimum number of objects to be removed, and then click Set as key image (the lock button).

PHOTOIMPACT USER GUIDE78
4. Click Brush-out and drag over the objects you want to remove.
5. Click Brush-in and drag over the objects you want retained.
6. Click SmartRemove. The result is shown in the Preview Window. To make further changes, click SmartRemove again and continue with auto or brush options.
7. Click OK.
Tips: • You don’t need to be precise in marking the objects. They only have to be more or less
covered by the brush strokes.• Select at least two images in the Image List Panel, and select Show brush-out result of
stacked images to preview superimposed result of these selected images.
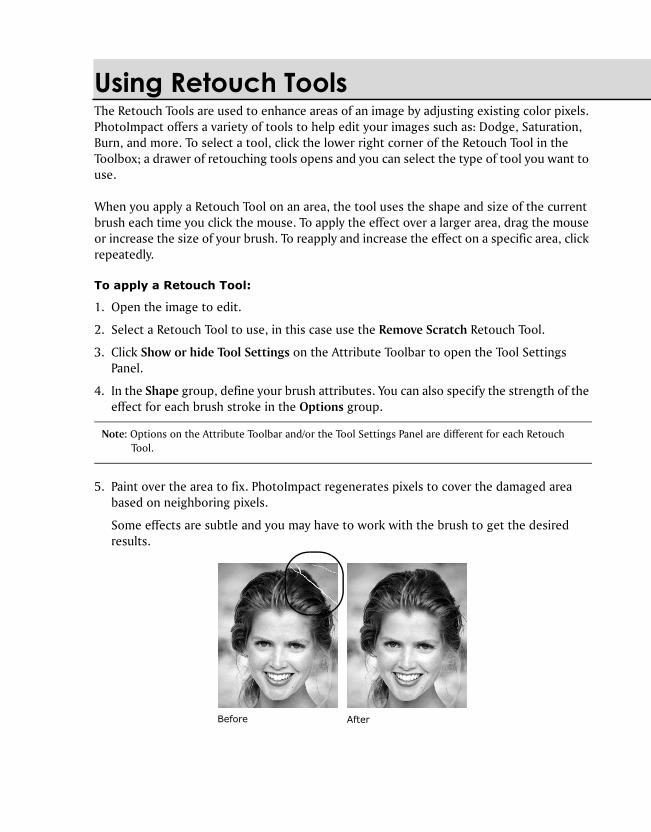
Using Retouch ToolsThe Retouch Tools are used to enhance areas of an image by adjusting existing color pixels. PhotoImpact offers a variety of tools to help edit your images such as: Dodge, Saturation, Burn, and more. To select a tool, click the lower right corner of the Retouch Tool in the Toolbox; a drawer of retouching tools opens and you can select the type of tool you want to use.
When you apply a Retouch Tool on an area, the tool uses the shape and size of the current brush each time you click the mouse. To apply the effect over a larger area, drag the mouse or increase the size of your brush. To reapply and increase the effect on a specific area, click repeatedly.
To apply a Retouch Tool:
1. Open the image to edit.
2. Select a Retouch Tool to use, in this case use the Remove Scratch Retouch Tool.
3. Click Show or hide Tool Settings on the Attribute Toolbar to open the Tool Settings Panel.
4. In the Shape group, define your brush attributes. You can also specify the strength of the effect for each brush stroke in the Options group.
5. Paint over the area to fix. PhotoImpact regenerates pixels to cover the damaged area based on neighboring pixels.
Some effects are subtle and you may have to work with the brush to get the desired results.
Note: Options on the Attribute Toolbar and/or the Tool Settings Panel are different for each Retouch Tool.
Before After

PHOTOIMPACT USER GUIDE80
To specify the attributes of a Retouch Tool, open the Tool Settings Panel. The attributes for each Retouch Tool are displayed in three groups: Shape, Options (settings available vary according to the type of Retouch Tool), and Pressure options. The attributes for these tabs are identical to those for Paint Tools (“Using the Painting Tools”).
Using the Burn and Dodge ToolsThe Burn and Dodge Retouch Tools let you darken or lighten areas of an image. On the Attribute Toolbar or Options in the Tool Settings Panel, select to modify only the Shadows, Midtones or Highlights when using these Retouch Tools. To use these tools, select the tool then drag over the area in the image you want to lighten or darken.
Changing the colors of an imageThere are two very useful Retouch Tools for colorizing or changing the color of images, these are:
• Color Transform Pen Alters the appearance of an image by changing the original color to another color. You can adjust the Hue and Saturation values but the luminance (lightness of a color) is retained. The result is vivid and more realistic than the Color Replacement Pen.
• Colorize Pen Applies a tint or shade to an image of uniform hue. To create a single color effect, apply Monochrome effect or use a Grayscale image (convert to RGB) then use the Colorize Pen to enhance. Or, you can access the Hue and Saturation dialog box and select Colorize.
To colorize old photos:
1. Scan an old photo then open it in PhotoImpact.
2. Select Photo: Enhance - Monochrome to change the image into black and white without changing the RGB data type.
Note: The Retouch Tools can only be applied to Grayscale and True Color images.
Tip: You can apply a number of Retouch Tools to an image, burn for tan effect, dodge for light effect, blur to smoothen rough skin texture, and many others.
Note: The Monochrome effect converts an image to a uniform hue and saturation without changing the brightness values. When you apply color to an image, only the RGB and the brightness values changes.
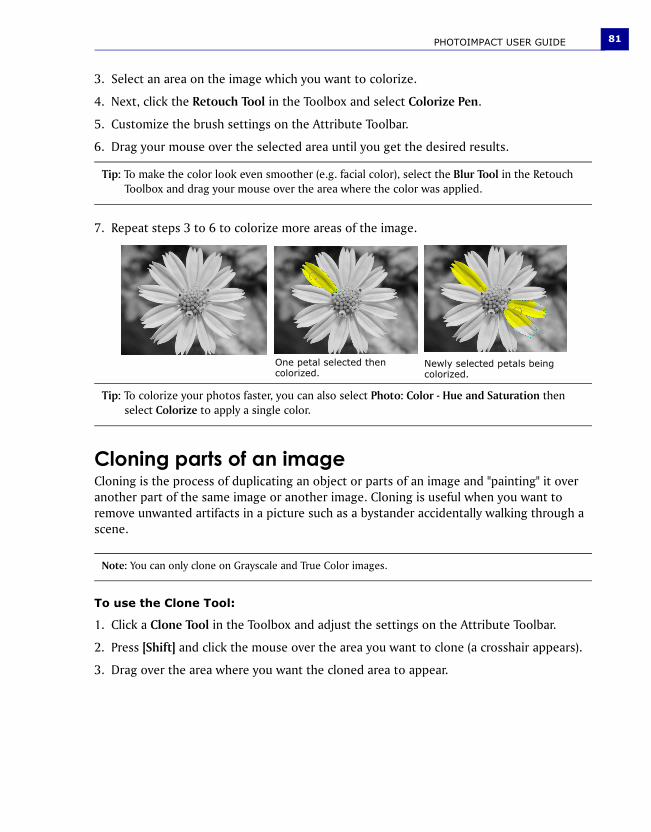
PHOTOIMPACT USER GUIDE 81
3. Select an area on the image which you want to colorize.
4. Next, click the Retouch Tool in the Toolbox and select Colorize Pen.
5. Customize the brush settings on the Attribute Toolbar.
6. Drag your mouse over the selected area until you get the desired results.
7. Repeat steps 3 to 6 to colorize more areas of the image.
Cloning parts of an imageCloning is the process of duplicating an object or parts of an image and "painting" it over another part of the same image or another image. Cloning is useful when you want to remove unwanted artifacts in a picture such as a bystander accidentally walking through a scene.
To use the Clone Tool:
1. Click a Clone Tool in the Toolbox and adjust the settings on the Attribute Toolbar.
2. Press [Shift] and click the mouse over the area you want to clone (a crosshair appears).
3. Drag over the area where you want the cloned area to appear.
Tip: To make the color look even smoother (e.g. facial color), select the Blur Tool in the Retouch Toolbox and drag your mouse over the area where the color was applied.
Tip: To colorize your photos faster, you can also select Photo: Color - Hue and Saturation then select Colorize to apply a single color.
Note: You can only clone on Grayscale and True Color images.
One petal selected then colorized.
Newly selected petals being colorized.

PHOTOIMPACT USER GUIDE82
Using the Touch-up ToolThe Touch-up Tool is primarily used to correct blemishes on a person’s face or skin. Similar to the other Clone Tools, it copies pixels from one part of your image to another. In addition, the Touch-up Tool takes into consideration the texture and lighting of the image and therefore creating a realistic touch-up job.
To use the Touch-up Tool:
1. Click the Touch-up Tool in the Toolbox.
2. On the Attribute Toolbar, Set the options for the Touch-up Tool.
Source color and Source texture determine how much texture and color are copied from the source area.
3. Set the Texture mode.
Replicate and Smoothen determine how the texture from the source area will be applied to the target area.
4. Press [Shift] and click the mouse on the area you want to use as the reference point (a crosshair mark appears).
Drag your mouse over the area you want to touch up.
Note: The size and shape of the area painted are determined by the current tool's size and shape settings.
Tip: Click Show or hide Tool Settings to open the Tool Settings Panel to adjust additional Clone Tool brush attributes.
Before After
Working with selectionsWhen no area has been selected in an image, any command that you apply affects the entire image. To restrict the command to a certain area of an image, you need to create a selection area. Click the Selection Tools in the Toolbox, then choose a type of selection tool to use.
To create a standard selection:
1. Click the Standard Selection Tool and select the desired shape in Shape.
2. Drag your mouse over the image. Once the dotted line area covers the area you want to select, release the mouse button.
Tip: Press the [Spacebar] to toggle between showing and hiding a selection marquee.
Selection Tool Description
Pick Tool The Pick Tool is used mainly to select objects and static selections.
Standard Selection Tool The Standard Selection Tool lets you select areas of an image based on a preset size and/or shape, such as a rectangle or circle. You can also use this to convert selection areas into objects by dragging the selection.
Lasso Tool The Lasso Tool lets you easily select irregularly-shaped subjects, such as a person’s head. This is useful when you want to separate a foreground object from the background. This works best when the foreground subject and background have high contrasting colors.
Select Smart Lasso in the Attribute Toolbar to allow easier selection by automatically snapping to the edges of the desired object.
Magic Wand Tool The Magic Wand Tool creates a selection area by selecting specific colors. This is particularly useful if either the subject of the image or the background is a distinct color.
Bezier Curve Tool The Bezier Tool draws straight selection by default, but can also create curves.
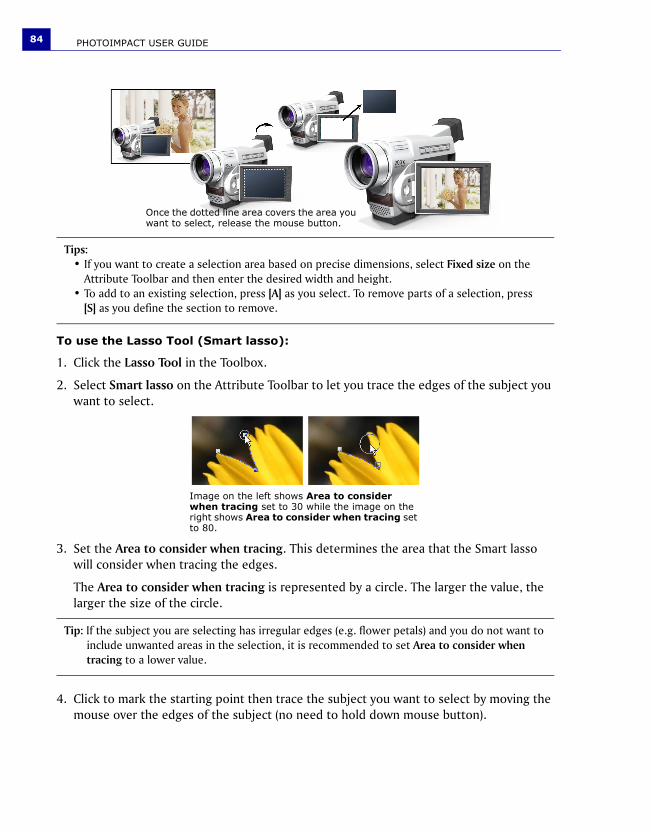
PHOTOIMPACT USER GUIDE84
To use the Lasso Tool (Smart lasso):
1. Click the Lasso Tool in the Toolbox.
2. Select Smart lasso on the Attribute Toolbar to let you trace the edges of the subject you want to select.
3. Set the Area to consider when tracing. This determines the area that the Smart lasso will consider when tracing the edges.
The Area to consider when tracing is represented by a circle. The larger the value, the larger the size of the circle.
4. Click to mark the starting point then trace the subject you want to select by moving the mouse over the edges of the subject (no need to hold down mouse button).
Tips: • If you want to create a selection area based on precise dimensions, select Fixed size on the
Attribute Toolbar and then enter the desired width and height.• To add to an existing selection, press [A] as you select. To remove parts of a selection, press
[S] as you define the section to remove.
Tip: If the subject you are selecting has irregular edges (e.g. flower petals) and you do not want to include unwanted areas in the selection, it is recommended to set Area to consider when tracing to a lower value.
Once the dotted line area covers the area you want to select, release the mouse button.
Image on the left shows Area to consider when tracing set to 30 while the image on the right shows Area to consider when tracing set to 80.

PHOTOIMPACT USER GUIDE 85
5. While tracing, when you have made a desired edge selection, click on the selection path to add an anchor point. Adding an anchor point prevents you from accidentally retracing (deleting) your selection path.
6. Click on the starting anchor point to close the selection. The selection path, instead of the usual dotted path, becomes a line path.
7. Drag and adjust the nodes to make your selection more precise.
8. Click to generate a lasso selection.
To use the Lasso Tool (no Smart lasso):
1. Drag the mouse to select the subject.
2. Follow steps 6 to 8 of the “To use the Lasso Tool (Smart lasso):” procedure.
To use the Magic Wand Tool:
1. Click the Magic Wand Tool in the Toolbox.
2. Set Similarity value to determine the range of colors to select relative to the reference color.
Tips: • If you make a mistake in selecting, just retrace along the selection path to the point where
you want to begin selecting again. You cannot retrace a path that is in between two anchor points.
• To delete a selection path that is between two anchor points, press [Backspace].
Tip: You can also double-click to close the selection.
Tip: Click to cancel the current selection.
Tip: If you are selecting a straight edge, release the mouse when you reach the starting point of the straight line then click the end of the straight line.
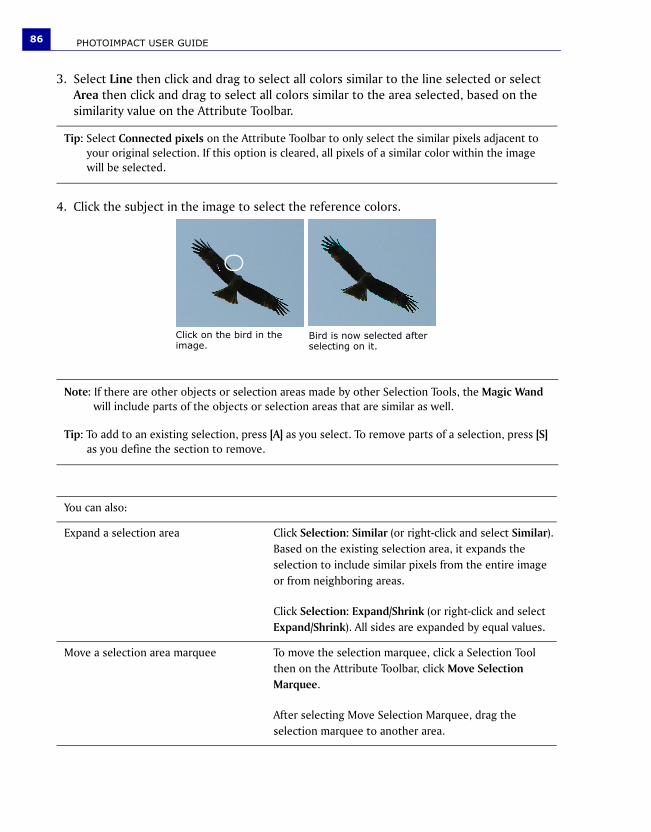
PHOTOIMPACT USER GUIDE86
3. Select Line then click and drag to select all colors similar to the line selected or select Area then click and drag to select all colors similar to the area selected, based on the similarity value on the Attribute Toolbar.
4. Click the subject in the image to select the reference colors.
Tip: Select Connected pixels on the Attribute Toolbar to only select the similar pixels adjacent to your original selection. If this option is cleared, all pixels of a similar color within the image will be selected.
Note: If there are other objects or selection areas made by other Selection Tools, the Magic Wand will include parts of the objects or selection areas that are similar as well.
Tip: To add to an existing selection, press [A] as you select. To remove parts of a selection, press [S] as you define the section to remove.
You can also:
Expand a selection area Click Selection: Similar (or right-click and select Similar). Based on the existing selection area, it expands the selection to include similar pixels from the entire image or from neighboring areas.
Click Selection: Expand/Shrink (or right-click and select Expand/Shrink). All sides are expanded by equal values.
Move a selection area marquee To move the selection marquee, click a Selection Tool then on the Attribute Toolbar, click Move Selection Marquee.
After selecting Move Selection Marquee, drag the selection marquee to another area.
Click on the bird in the image.
Bird is now selected after selecting on it.
PHOTOIMPACT USER GUIDE 87
Add or subtract from a selection To add an area, select from the Mode options on the Attribute Toolbar and click [+], or press [A] while selecting more of the image (the pointer changes to display a plus sign).
To exclude an area click [-], or press [S] while selecting the unwanted area (the pointer changes to display a minus sign).
Create a border around the selection By applying a fill to this area, you can easily create a frame around the main subject of an image (for rectangular and oval selections).
If you have an irregular selection, you can create a custom outline shape, or simply emphasize the subject of an image by outlining it.
After creating a selection, select Selection: Border (or right-click and select Border). You can specify the width of the border and add a soft edge if desired.
After the border selection has been created, fill it with a selected color or pattern.
Soften a selection edge Click Selection: Soften (or right-click and select Soften) to make the edge of a selection area appear diffused, creating a “halo-like” effect.
Note: If you do not have Preserve Base Image [F5] selected and you move the selection, you will notice that the base image shows a corresponding diffuse-edged hole filled in with the background color where the selection area was before.
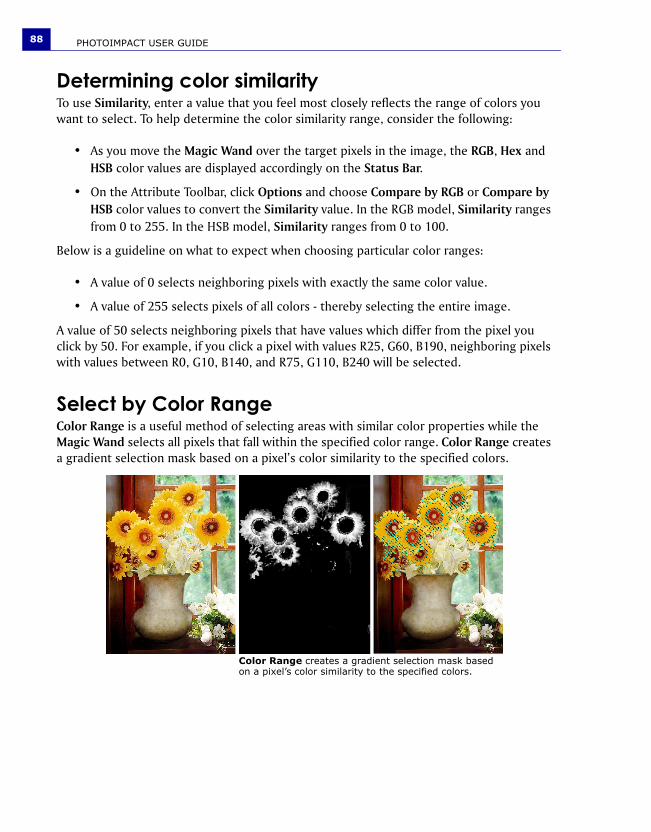
PHOTOIMPACT USER GUIDE88
Determining color similarityTo use Similarity, enter a value that you feel most closely reflects the range of colors you want to select. To help determine the color similarity range, consider the following:
• As you move the Magic Wand over the target pixels in the image, the RGB, Hex and HSB color values are displayed accordingly on the Status Bar.
• On the Attribute Toolbar, click Options and choose Compare by RGB or Compare by HSB color values to convert the Similarity value. In the RGB model, Similarity ranges from 0 to 255. In the HSB model, Similarity ranges from 0 to 100.
Below is a guideline on what to expect when choosing particular color ranges:
• A value of 0 selects neighboring pixels with exactly the same color value.
• A value of 255 selects pixels of all colors - thereby selecting the entire image.
A value of 50 selects neighboring pixels that have values which differ from the pixel you click by 50. For example, if you click a pixel with values R25, G60, B190, neighboring pixels with values between R0, G10, B140, and R75, G110, B240 will be selected.
Select by Color RangeColor Range is a useful method of selecting areas with similar color properties while the Magic Wand selects all pixels that fall within the specified color range. Color Range creates a gradient selection mask based on a pixel’s color similarity to the specified colors.
Color Range creates a gradient selection mask based on a pixel’s color similarity to the specified colors.
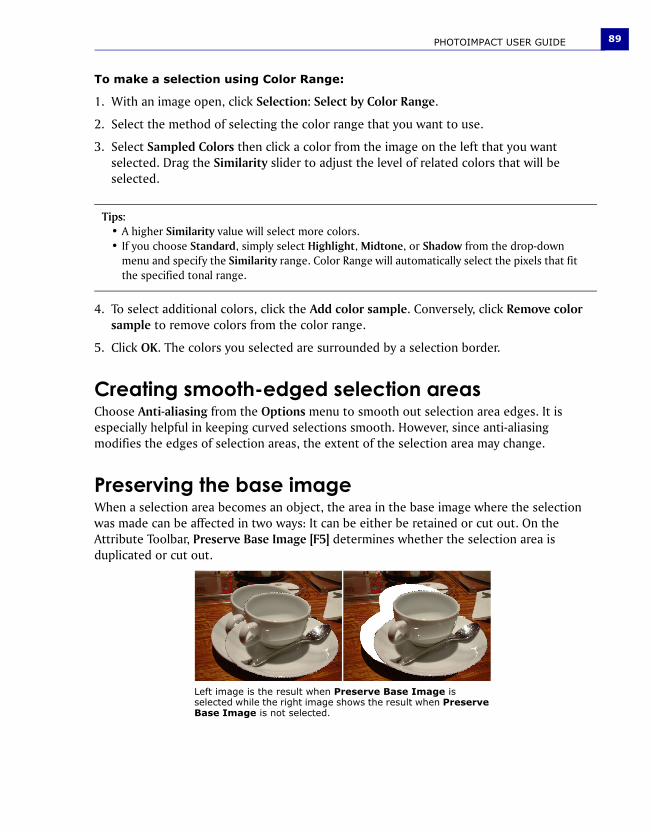
PHOTOIMPACT USER GUIDE 89
To make a selection using Color Range:
1. With an image open, click Selection: Select by Color Range.
2. Select the method of selecting the color range that you want to use.
3. Select Sampled Colors then click a color from the image on the left that you want selected. Drag the Similarity slider to adjust the level of related colors that will be selected.
4. To select additional colors, click the Add color sample. Conversely, click Remove color sample to remove colors from the color range.
5. Click OK. The colors you selected are surrounded by a selection border.
Creating smooth-edged selection areas Choose Anti-aliasing from the Options menu to smooth out selection area edges. It is especially helpful in keeping curved selections smooth. However, since anti-aliasing modifies the edges of selection areas, the extent of the selection area may change.
Preserving the base imageWhen a selection area becomes an object, the area in the base image where the selection was made can be affected in two ways: It can be either be retained or cut out. On the Attribute Toolbar, Preserve Base Image [F5] determines whether the selection area is duplicated or cut out.
Tips: • A higher Similarity value will select more colors.• If you choose Standard, simply select Highlight, Midtone, or Shadow from the drop-down
menu and specify the Similarity range. Color Range will automatically select the pixels that fit the specified tonal range.
Left image is the result when Preserve Base Image is selected while the right image shows the result when Preserve Base Image is not selected.

PHOTOIMPACT USER GUIDE90
Selecting on objectsYou can create a new selection on an object or a group of objects. This is useful when there are several objects in your image and you only need to select on one particular object.
To select on objects:
1. Select the object or objects where you want to create a selection area.
Tip: To select multiple objects, press [Shift] or [Ctrl] while clicking on each object.
2. Click a Selection Tool then click Select on object on the Attribute Toolbar.
3. Create the selection. To learn how to use the different selection tools, see “Working with selections” on page 83.
Extracting objectsExtracting is another method for selecting and drawing out a subject from your image or object for further compositing. You can extract the object in 4 steps: Draw boundary, Extract object, Adjust degree of extraction, then Refine object.
Step 1 of 4: Drawing the boundary
1. Select Object: Extract Object.
2. In the Extract Object dialog box, set the Color and Size of the brush.
3. Drag to trace the edges of the subject that you want to extract. Make sure that the subject you want to extract is enclosed by the brush strokes.
Tip: If you want to remove parts of the selection, click Eraser then drag on the edges that you want to remove.
4. Click Next.
Note: Press [Ctrl] as you move a selection to preserve the base image even if Preserve Base Image is not selected.
Note: When selecting on several objects and the selection area includes areas that are not part of the group of objects, the areas that are not part of the objects will not be included in the selection.
Drag to trace the edges of the subject that you want to extract.
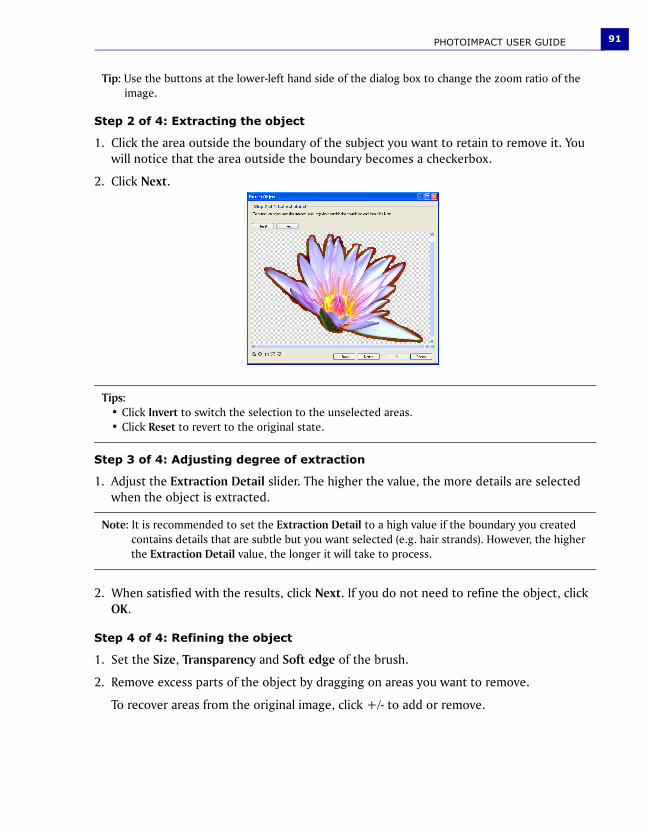
PHOTOIMPACT USER GUIDE 91
Tip: Use the buttons at the lower-left hand side of the dialog box to change the zoom ratio of the image.
Step 2 of 4: Extracting the object
1. Click the area outside the boundary of the subject you want to retain to remove it. You will notice that the area outside the boundary becomes a checkerbox.
2. Click Next.
Step 3 of 4: Adjusting degree of extraction
1. Adjust the Extraction Detail slider. The higher the value, the more details are selected when the object is extracted.
2. When satisfied with the results, click Next. If you do not need to refine the object, click OK.
Step 4 of 4: Refining the object
1. Set the Size, Transparency and Soft edge of the brush.
2. Remove excess parts of the object by dragging on areas you want to remove.
To recover areas from the original image, click +/- to add or remove.
Tips: • Click Invert to switch the selection to the unselected areas.• Click Reset to revert to the original state.
Note: It is recommended to set the Extraction Detail to a high value if the boundary you created contains details that are subtle but you want selected (e.g. hair strands). However, the higher the Extraction Detail value, the longer it will take to process.
PHOTOIMPACT USER GUIDE92
3. After you remove or recover parts you want from the extracted object, click OK.
The extracted object in the image is automatically selected after the dialog box closes. You can save it in the UFO file format to retain the object as needed.
Mask ModeMasking is a process where changes are applied to a selected area of an image, while the rest of the image is masked or protected from those changes.
Masking is particularly useful for selecting portions of the image that are not distinguishable from the background. A typical use for the Mask Mode is to select portions of images that you cut out and paste into another image to create a collage. Also, since Mask Mode has transparency options, it lets you blend more effectively one image object with another.
Mask Mode basically operates on a Grayscale buffer, which means that you make selections based on tonal values of the Grayscale. When in Mask Mode, you will only be able to access Grayscale values in the color palette. Each tonal value in the grayscale buffer represents a combination of two things: Degree of transparency and Selection area status.
Selecting white results in 0% selection transparency, while black results in 100% transparency (meaning that there’s no selection). A gray value represents partial selection, or a selection with partial transparency.
Keep in mind that when you paint on the mask itself, areas that you paint with black will become the default white mask, while areas that you paint on with white will completely penetrate the mask to reveal the image underneath.
To use Mask Mode:
1. Open an image in the workspace.
2. Select Edit: Mask Mode [Ctrl+K], click Mask Mode in the Status Bar, or click Enter Mask Mode in the Layer Manager.
By default, a semitransparent red layer appears, covering the entire image. This means that you are now working in a Grayscale mask mode.
Tip: You can change the Background color and set the Background transparency. If Background transparency is set to 100, the original image will show through.
Note: Mask Mode can only be used with RGB and 8-bit Grayscale images
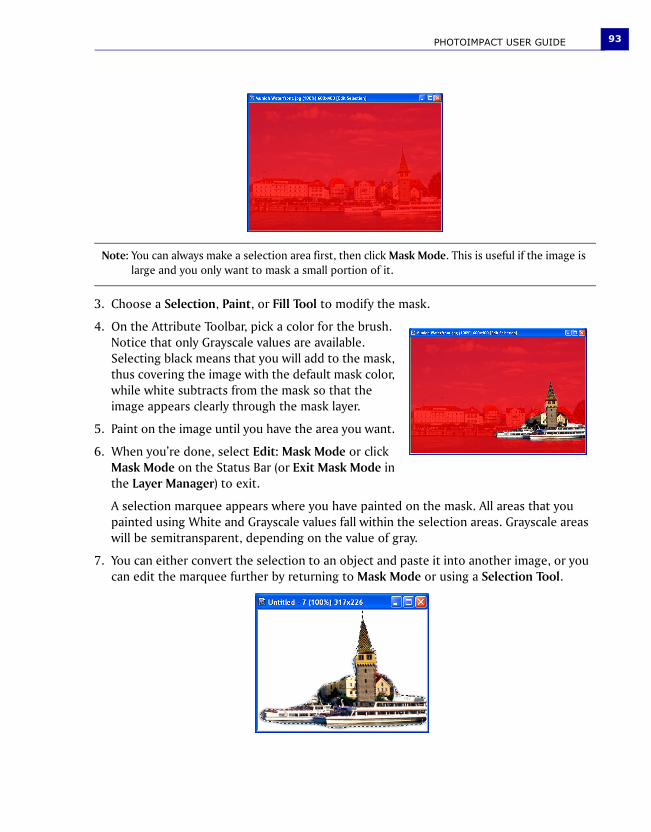
PHOTOIMPACT USER GUIDE 93
3. Choose a Selection, Paint, or Fill Tool to modify the mask.
4. On the Attribute Toolbar, pick a color for the brush. Notice that only Grayscale values are available. Selecting black means that you will add to the mask, thus covering the image with the default mask color, while white subtracts from the mask so that the image appears clearly through the mask layer.
5. Paint on the image until you have the area you want.
6. When you’re done, select Edit: Mask Mode or click Mask Mode on the Status Bar (or Exit Mask Mode in the Layer Manager) to exit.
A selection marquee appears where you have painted on the mask. All areas that you painted using White and Grayscale values fall within the selection areas. Grayscale areas will be semitransparent, depending on the value of gray.
7. You can either convert the selection to an object and paste it into another image, or you can edit the marquee further by returning to Mask Mode or using a Selection Tool.
Note: You can always make a selection area first, then click Mask Mode. This is useful if the image is large and you only want to mask a small portion of it.
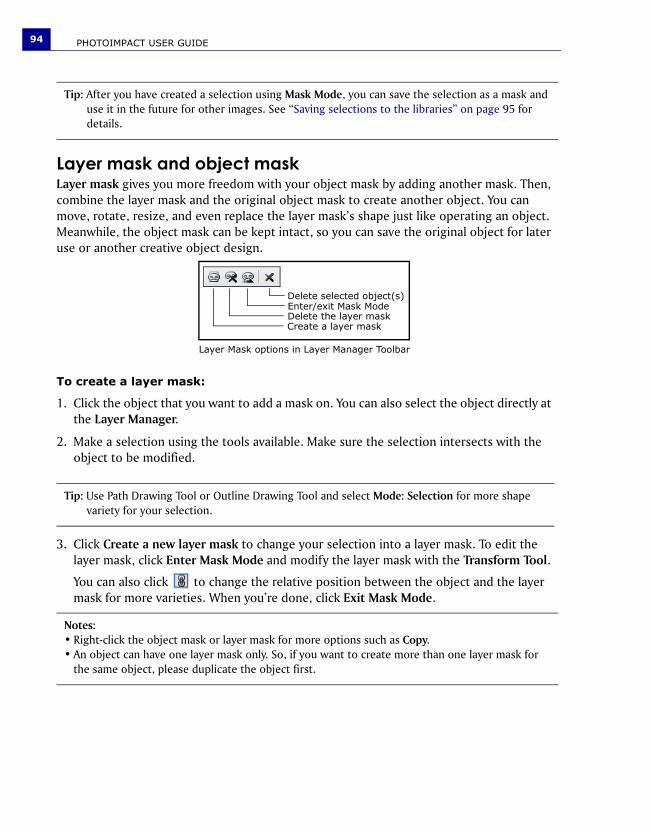
PHOTOIMPACT USER GUIDE94
Layer mask and object maskLayer mask gives you more freedom with your object mask by adding another mask. Then, combine the layer mask and the original object mask to create another object. You can move, rotate, resize, and even replace the layer mask’s shape just like operating an object. Meanwhile, the object mask can be kept intact, so you can save the original object for later use or another creative object design.
To create a layer mask:
1. Click the object that you want to add a mask on. You can also select the object directly at the Layer Manager.
2. Make a selection using the tools available. Make sure the selection intersects with the object to be modified.
3. Click Create a new layer mask to change your selection into a layer mask. To edit the layer mask, click Enter Mask Mode and modify the layer mask with the Transform Tool.
You can also click to change the relative position between the object and the layer mask for more varieties. When you’re done, click Exit Mask Mode.
Tip: After you have created a selection using Mask Mode, you can save the selection as a mask and use it in the future for other images. See “Saving selections to the libraries” on page 95 for details.
Tip: Use Path Drawing Tool or Outline Drawing Tool and select Mode: Selection for more shape variety for your selection.
Notes:• Right-click the object mask or layer mask for more options such as Copy.• An object can have one layer mask only. So, if you want to create more than one layer mask for
the same object, please duplicate the object first.
Create a layer maskDelete the layer maskEnter/exit Mask ModeDelete selected object(s)
Layer Mask options in Layer Manager Toolbar
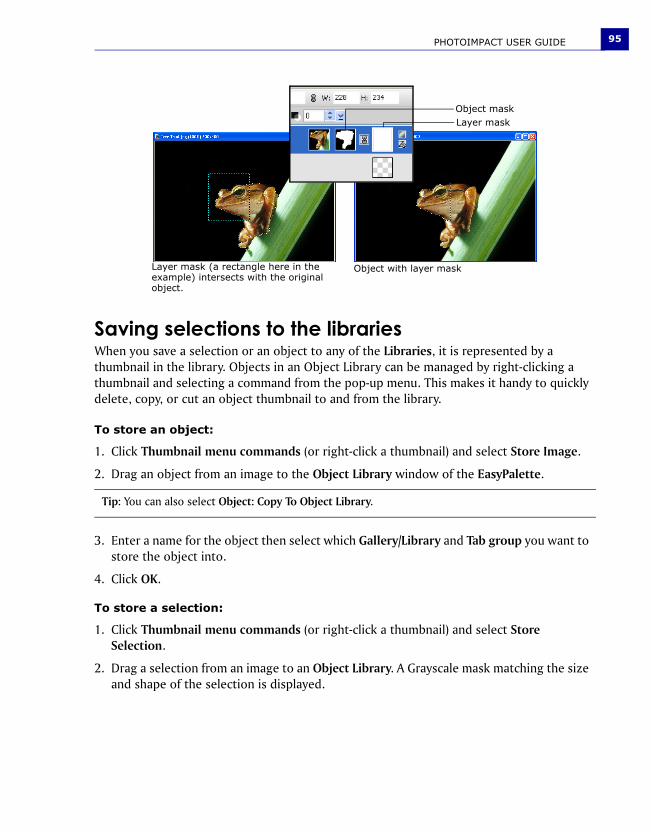
PHOTOIMPACT USER GUIDE 95
Saving selections to the librariesWhen you save a selection or an object to any of the Libraries, it is represented by a thumbnail in the library. Objects in an Object Library can be managed by right-clicking a thumbnail and selecting a command from the pop-up menu. This makes it handy to quickly delete, copy, or cut an object thumbnail to and from the library.
To store an object:
1. Click Thumbnail menu commands (or right-click a thumbnail) and select Store Image.
2. Drag an object from an image to the Object Library window of the EasyPalette.
3. Enter a name for the object then select which Gallery/Library and Tab group you want to store the object into.
4. Click OK.
To store a selection:
1. Click Thumbnail menu commands (or right-click a thumbnail) and select Store Selection.
2. Drag a selection from an image to an Object Library. A Grayscale mask matching the size and shape of the selection is displayed.
Tip: You can also select Object: Copy To Object Library.
Layer mask (a rectangle here in the example) intersects with the original object.
Object with layer mask
Object maskLayer mask

PHOTOIMPACT USER GUIDE96
3. Enter a name for the selection and click OK.
To save the entire image to the Object Library:
1. Select Selection: All (or right-click an image and select All).
2. Drag it to the Object Library.
3. Enter a name for the whole image and click OK.
To store an image as a selection:
1. Prepare a Grayscale image of the image that you want to use as a selection.
2. Open the Object Library in the EasyPalette. Click Thumbnail menu commands, and select Store Image as Selection.
3. Select the entire image or a portion of the image to use as the selection mask.
Drag the selection to the Object Library and save it.
Tips: • You can also copy a selection into the Object Library by:
•Select Selection: Copy Selection to Object Library after you create a selection.•Press [M] as you drag a selection to the Object Library (regardless of whether Store Selection is
selected or not).
Note: To export a selection as a new image in the workspace, or to save it as a file in a specific file format, choose Selection: Export Selection.
Note: If the original image is in color, select Adjust: Convert Data Type - Grayscale.
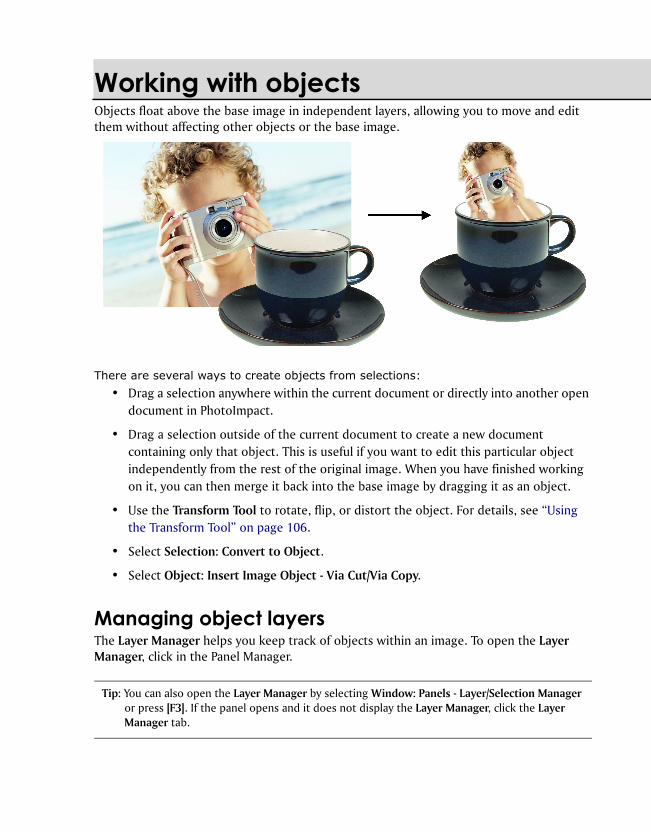
Working with objectsObjects float above the base image in independent layers, allowing you to move and edit them without affecting other objects or the base image.
There are several ways to create objects from selections:
• Drag a selection anywhere within the current document or directly into another open document in PhotoImpact.
• Drag a selection outside of the current document to create a new document containing only that object. This is useful if you want to edit this particular object independently from the rest of the original image. When you have finished working on it, you can then merge it back into the base image by dragging it as an object.
• Use the Transform Tool to rotate, flip, or distort the object. For details, see “Using the Transform Tool” on page 106.
• Select Selection: Convert to Object.
• Select Object: Insert Image Object - Via Cut/Via Copy.
Managing object layersThe Layer Manager helps you keep track of objects within an image. To open the Layer Manager, click in the Panel Manager.
Tip: You can also open the Layer Manager by selecting Window: Panels - Layer/Selection Manager or press [F3]. If the panel opens and it does not display the Layer Manager, click the Layer Manager tab.
PHOTOIMPACT USER GUIDE98
Here are some ways to manage objects in your image:
• Click an object in the Layer Manager to select that object in the workspace. This is particularly useful if the object is small, overlapped or hidden behind other objects.
• Click Thumbnail Display to toggle between displaying your objects as thumbnails with details or thumbnails only.
• Each object thumbnail has the following icons:
• Eye Shows or hides an object (you can also open the Object Properties dialog box and select or clear Show).
• Lock Locks or unlocks the object to its position.
• Properties Identifies whether it is an image, text, path, Web object, or a group of objects.
• Z-merge Shows whether an object has undergone Z-merge or not.
Setting an object's propertiesSetting Object Properties lets you further specify the attributes of image, text and path objects as well as Web component objects.
Different options are available, depending on what type of object is selected.
You can change an object’s name, size and position, set its transparency, merge attributes, specify its position and dimensions, and assign an image map (when the selected item is a normal object) or a hyperlink (when the selected item is a Web object) to it.
You can change an object’s properties by using any of the following methods:
• In the Layer Manager, double-click a property item (size, position, or object name) to directly change its value.
• Select Object: Properties.
• Right-click an object and select Properties.
Note: The Properties icon changes depending on the type of object.

PHOTOIMPACT USER GUIDE 99
Hiding and showing objectsTemporarily hide objects to view different variations of your image. When printing an image, hidden objects will not be printed.
Sorting objectsYou can use Sort to arrange the objects’ thumbnails in the Layer Manager. To sort, select Sort by Depth or Sort by Name in Thumbnail menu commands.
Sorting by Depth sorts the objects based on their layer level in the workspace, while sorting by Name is based on the object’s name in the Layer Manager.
Grouping and ungrouping objectsWhile editing an image, it may be convenient to group objects so that you can move them as a unit or edit them collectively.
To group objects:
1. Press [Ctrl] as you click the thumbnails of the objects you want to group in the Layer Manager.
2. Select Group from Thumbnail menu commands (or right-click a thumbnail) to group the selected objects together.
To show/hide objects, you can:
Use Object Properties dialog box 1. Select the object you want to hide or show.
Note: Hidden objects can only be selected from the Layer Manager.
2. With the object selected, select Object: Properties.
3. To hide an object in the image, clear Show. To make it visible, select Show.
Use the Layer Manager 1. Select the object you want to hide or show.
2. Click Eye beside the object thumbnail. An opened eye means the object is showing; an empty square means the object is hidden.
Tip: You can also sort the objects by right-clicking a thumbnail and selecting Sort by Depth/Name.
PHOTOIMPACT USER GUIDE100
When is pressed, thumbnails of the objects are merged as one and are marked as
Group 1 with all the images displayed in a single object.
When is not pressed, the objects that belong to the group are highlighted.
Changing an object's layer in an imageWhen an object is created, it is automatically placed on the top layer of an image. Converting a selection to an object places the object on the lowest layer.
There are different ways to position several objects on different layers:
• Select the Pick Tool then use the four Arrange arrow buttons on the Attribute Toolbar. These buttons move an object up one level, down one level, to the top level, and to the bottom level.
• Select Object: Arrange Order (or right-click an object and select Arrange) and use one of the four submenu commands.
• In the Layer Manager, drag a thumbnail to the desired layer in the image.
Editing objectsObjects can be edited on their individual layers without affecting any of the other objects or the base image. In addition to editing them as you would any other selection, you can also remove parts of the object so that images and objects that lie beneath it are visible, thus creating a transparent object effect. You can do this with the Object Paint Eraser and the Object Magic Eraser, both of which are located in the Toolbox.
Notes:• You can also regroup grouped objects up to 16 times and increase the group level each time by 1.• To ungroup objects, select Ungroup from Thumbnail menu commands (or right-click a thumbnail
and select Ungroup).• Ungrouping decreases the group level by one.
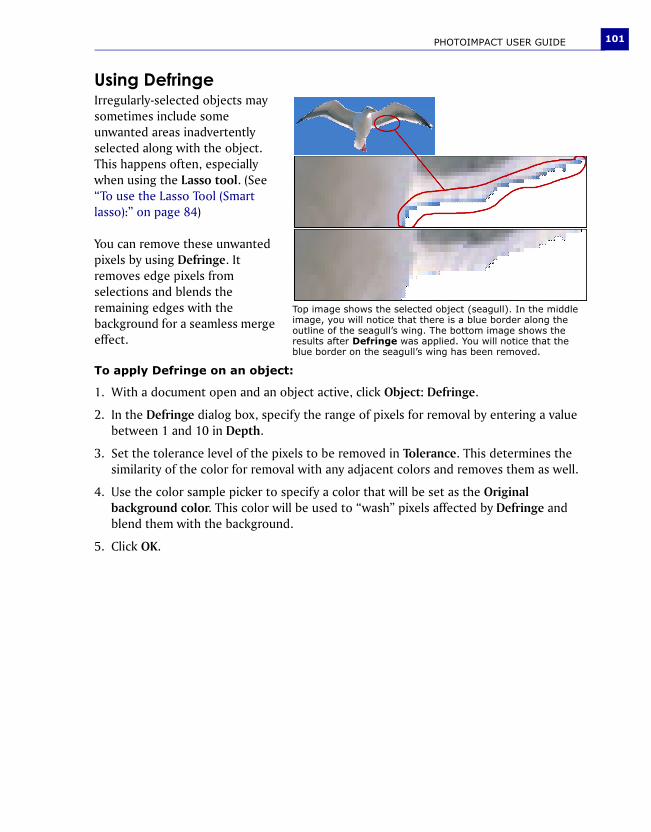
PHOTOIMPACT USER GUIDE 101
Using DefringeIrregularly-selected objects may sometimes include some unwanted areas inadvertently selected along with the object. This happens often, especially when using the Lasso tool. (See “To use the Lasso Tool (Smart lasso):” on page 84)
You can remove these unwanted pixels by using Defringe. It removes edge pixels from selections and blends the remaining edges with the background for a seamless merge effect.
To apply Defringe on an object:
1. With a document open and an object active, click Object: Defringe.
2. In the Defringe dialog box, specify the range of pixels for removal by entering a value between 1 and 10 in Depth.
3. Set the tolerance level of the pixels to be removed in Tolerance. This determines the similarity of the color for removal with any adjacent colors and removes them as well.
4. Use the color sample picker to specify a color that will be set as the Original background color. This color will be used to “wash” pixels affected by Defringe and blend them with the background.
5. Click OK.
Top image shows the selected object (seagull). In the middle image, you will notice that there is a blue border along the outline of the seagull’s wing. The bottom image shows the results after Defringe was applied. You will notice that the blue border on the seagull’s wing has been removed.
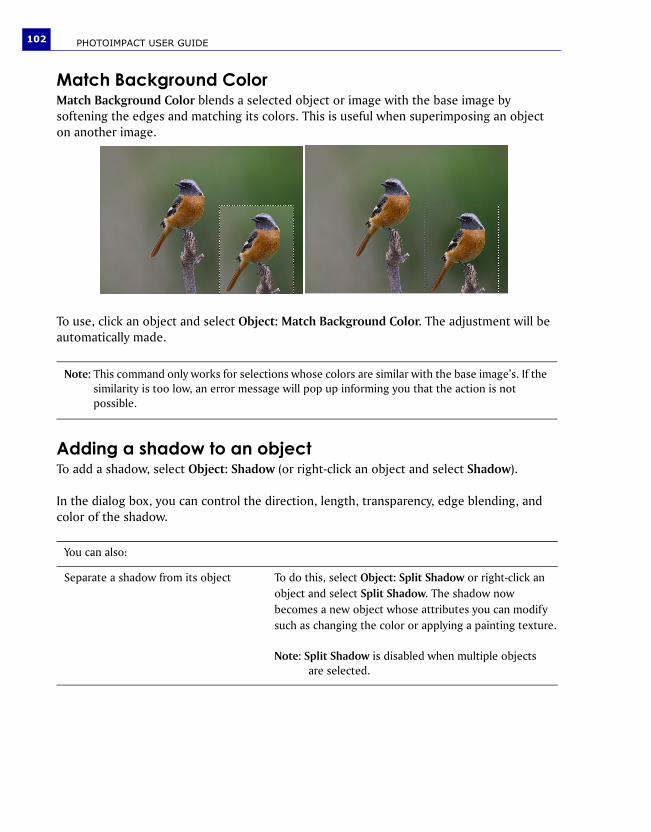
PHOTOIMPACT USER GUIDE102
Match Background ColorMatch Background Color blends a selected object or image with the base image by softening the edges and matching its colors. This is useful when superimposing an object on another image.
To use, click an object and select Object: Match Background Color. The adjustment will be automatically made.
Adding a shadow to an objectTo add a shadow, select Object: Shadow (or right-click an object and select Shadow).
In the dialog box, you can control the direction, length, transparency, edge blending, and color of the shadow.
Note: This command only works for selections whose colors are similar with the base image’s. If the similarity is too low, an error message will pop up informing you that the action is not possible.
You can also:
Separate a shadow from its object To do this, select Object: Split Shadow or right-click an object and select Split Shadow. The shadow now becomes a new object whose attributes you can modify such as changing the color or applying a painting texture.
Note: Split Shadow is disabled when multiple objects are selected.

PHOTOIMPACT USER GUIDE 103
Copying and moving an object between imagesYou have the option of moving objects between images if you want. It is useful when you have created an object in one image and want to use it in another image.
To move objects between images, drag the object from the source image onto the destination image.
Duplicating an objectYou can duplicate any object or group of objects that you have created. You can duplicate objects by:
• Selecting the object or group of objects and selecting Object: Duplicate (or right-click and select Duplicate).
• Dragging the object or group of objects while pressing [Ctrl].
Spacing and aligning objectsAligning and spacing objects are useful when creating navigation buttons for your Web pages. To space objects evenly or align them within the document, use Object: Align. Select the objects to align. Press [Ctrl] or [Shift] to select multiple objects. Select Object: Align then from the submenu, choose how you want to align the objects.
To space objects evenly:
1. Click the Pick Tool in the Toolbox and select the objects.
2. Select Object: Align - Space Evenly.
3. Select which Direction you want to space the objects, Horizontally or Vertically.
Tip: When you copy an object and paste it into another image, the position of the object when pasted will be relative to the position of the object in the source image.
Note: By default, a duplicated object will be copied and superimposed on top of the source object. To displace the duplicated object and make it more visible, select File: Preferences - General and select Shift objects after doing Duplicate.
Tip: You can also use the buttons on the Attribute Toolbar to align the objects.
PHOTOIMPACT USER GUIDE104
4. In Space, select how you want to space the objects, Even or Fixed.
5. Click OK.
Deleting an objectTo delete an object or group of objects, select it and then select Object: Delete (or right-click and select Delete) or press [Delete].
Note: If Fixed is selected, enter how much space you want in between each object in Pixels.
Using additional toolsTool Description
Measure Tool The Measure Tool helps you gain accurate information over dimensions, distances, and angles of an image, text or object component.
The Measure Tool is composed of a Measure Handle and a Baseline, which are adjustable points and lines used to take measurements of images, objects or selections.
• The Measure Handle is poled by a square node and a circular node, each positioned by points X1, Y1 and X2, Y2, respectively.
• The Baseline, on the other hand, is a reference line for the angle measurement you make with the Measure Handle.
Transform Tool The Transform Tool allows you to take an image, text, path object, or selection and manipulate it so that it changes shape and even perspective.
Object Eraser Tools With Object Eraser Tools, PhotoImpact lets you directly and easily erase parts of an object to become transparent or semi-transparent.
The Object Eraser Tools are:
• Object Paint Eraser Tool lets you erase parts of an object by painting it.
• Object Magic Eraser Tool lets you erase parts of image based on color similarity. When you click on a color, colors similar to color clicked will be erased.
Stamp Tool The Stamp Tool lets you paint ready-made objects onto an image. Choose from the preset stamp objects or create your own objects.
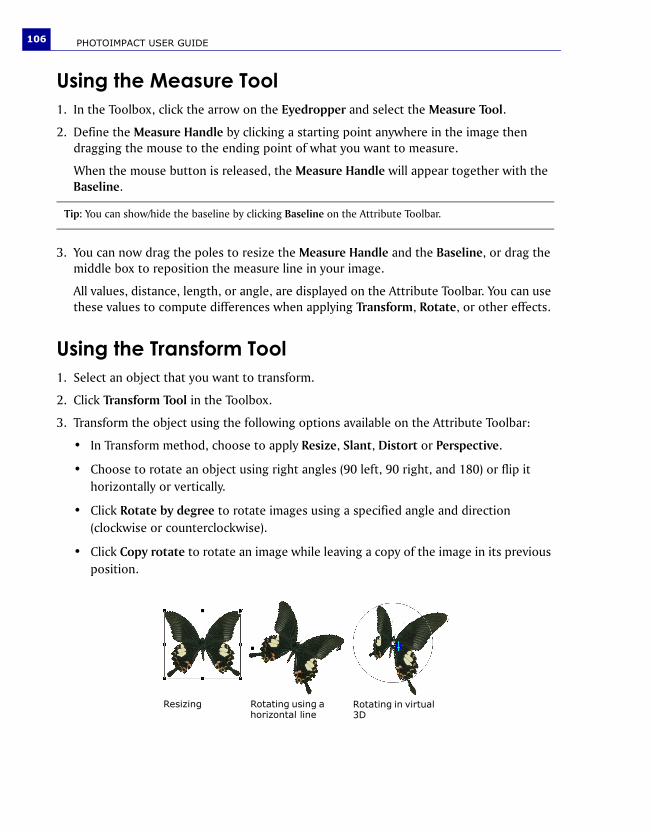
PHOTOIMPACT USER GUIDE106
Using the Measure Tool1. In the Toolbox, click the arrow on the Eyedropper and select the Measure Tool.
2. Define the Measure Handle by clicking a starting point anywhere in the image then dragging the mouse to the ending point of what you want to measure.
When the mouse button is released, the Measure Handle will appear together with the Baseline.
3. You can now drag the poles to resize the Measure Handle and the Baseline, or drag the middle box to reposition the measure line in your image.
All values, distance, length, or angle, are displayed on the Attribute Toolbar. You can use these values to compute differences when applying Transform, Rotate, or other effects.
Using the Transform Tool1. Select an object that you want to transform.
2. Click Transform Tool in the Toolbox.
3. Transform the object using the following options available on the Attribute Toolbar:
• In Transform method, choose to apply Resize, Slant, Distort or Perspective.
• Choose to rotate an object using right angles (90 left, 90 right, and 180) or flip it horizontally or vertically.
• Click Rotate by degree to rotate images using a specified angle and direction (clockwise or counterclockwise).
• Click Copy rotate to rotate an image while leaving a copy of the image in its previous position.
Tip: You can show/hide the baseline by clicking Baseline on the Attribute Toolbar.
Resizing Rotating using a horizontal line
Rotating in virtual 3D
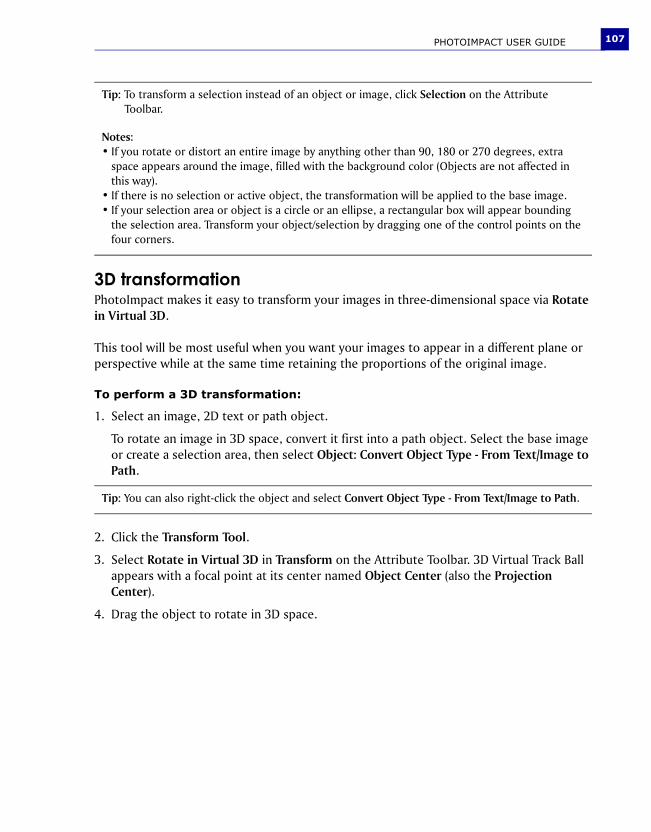
PHOTOIMPACT USER GUIDE 107
3D transformationPhotoImpact makes it easy to transform your images in three-dimensional space via Rotate in Virtual 3D.
This tool will be most useful when you want your images to appear in a different plane or perspective while at the same time retaining the proportions of the original image.
To perform a 3D transformation:
1. Select an image, 2D text or path object.
To rotate an image in 3D space, convert it first into a path object. Select the base image or create a selection area, then select Object: Convert Object Type - From Text/Image to Path.
2. Click the Transform Tool.
3. Select Rotate in Virtual 3D in Transform on the Attribute Toolbar. 3D Virtual Track Ball appears with a focal point at its center named Object Center (also the Projection Center).
4. Drag the object to rotate in 3D space.
Tip: To transform a selection instead of an object or image, click Selection on the Attribute Toolbar.
Notes:• If you rotate or distort an entire image by anything other than 90, 180 or 270 degrees, extra
space appears around the image, filled with the background color (Objects are not affected in this way).
• If there is no selection or active object, the transformation will be applied to the base image.• If your selection area or object is a circle or an ellipse, a rectangular box will appear bounding
the selection area. Transform your object/selection by dragging one of the control points on the four corners.
Tip: You can also right-click the object and select Convert Object Type - From Text/Image to Path.
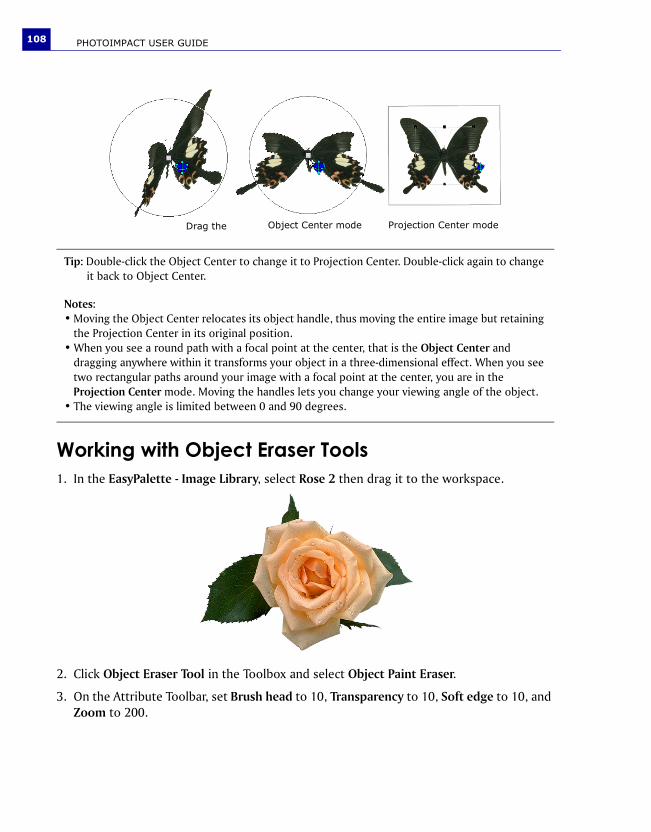
PHOTOIMPACT USER GUIDE108
Working with Object Eraser Tools1. In the EasyPalette - Image Library, select Rose 2 then drag it to the workspace.
2. Click Object Eraser Tool in the Toolbox and select Object Paint Eraser.
3. On the Attribute Toolbar, set Brush head to 10, Transparency to 10, Soft edge to 10, and Zoom to 200.
Tip: Double-click the Object Center to change it to Projection Center. Double-click again to change it back to Object Center.
Notes:• Moving the Object Center relocates its object handle, thus moving the entire image but retaining
the Projection Center in its original position.• When you see a round path with a focal point at the center, that is the Object Center and
dragging anywhere within it transforms your object in a three-dimensional effect. When you see two rectangular paths around your image with a focal point at the center, you are in the Projection Center mode. Moving the handles lets you change your viewing angle of the object.
• The viewing angle is limited between 0 and 90 degrees.
Drag the Object Center mode Projection Center mode

PHOTOIMPACT USER GUIDE 109
4. Drag over the leaves to erase them.
Using the Stamp Tool
1. Click the Stamp Tool in the Toolbox.
2. On the Attribute Toolbar, click the Stamp thumbnail to display stamp object choices. Click the desired stamp object.
3. Set the Transparency, Scale, and Spacing for the stamp objects.
Tip: Click Trim to remove any space around the object that is completely transparent. The results of this will be apparent when you view the thumbnail in the Layer Manager.
Notes:• Object Eraser Tools can only be used on image objects. To use the Object Eraser Tools on a path
and text object, base image, or selection area, it needs to be converted into an image object first.• Only 24-bit RGB, 8-bit Grayscale, Indexed color, and Black & White images can be edited with the
Object Eraser Tools.• Recover only works if you have already erased an area and have not yet applied Trim. Otherwise,
you will have to use Undo [Ctrl+Z], which may result to going back more steps than desired.
Examples of Stamp Tool objects
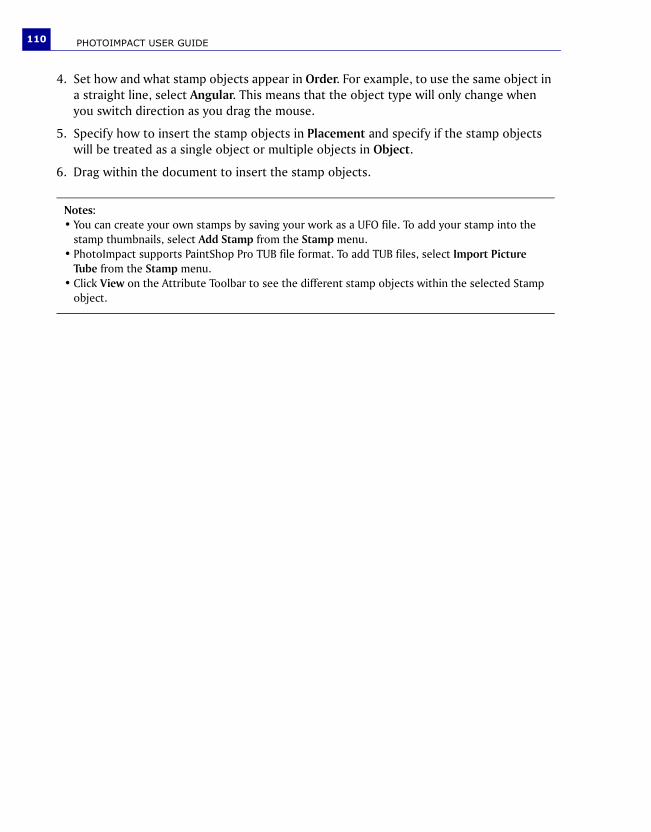
PHOTOIMPACT USER GUIDE110
4. Set how and what stamp objects appear in Order. For example, to use the same object in a straight line, select Angular. This means that the object type will only change when you switch direction as you drag the mouse.
5. Specify how to insert the stamp objects in Placement and specify if the stamp objects will be treated as a single object or multiple objects in Object.
6. Drag within the document to insert the stamp objects.
Notes:• You can create your own stamps by saving your work as a UFO file. To add your stamp into the
stamp thumbnails, select Add Stamp from the Stamp menu. • PhotoImpact supports PaintShop Pro TUB file format. To add TUB files, select Import Picture
Tube from the Stamp menu.• Click View on the Attribute Toolbar to see the different stamp objects within the selected Stamp
object.
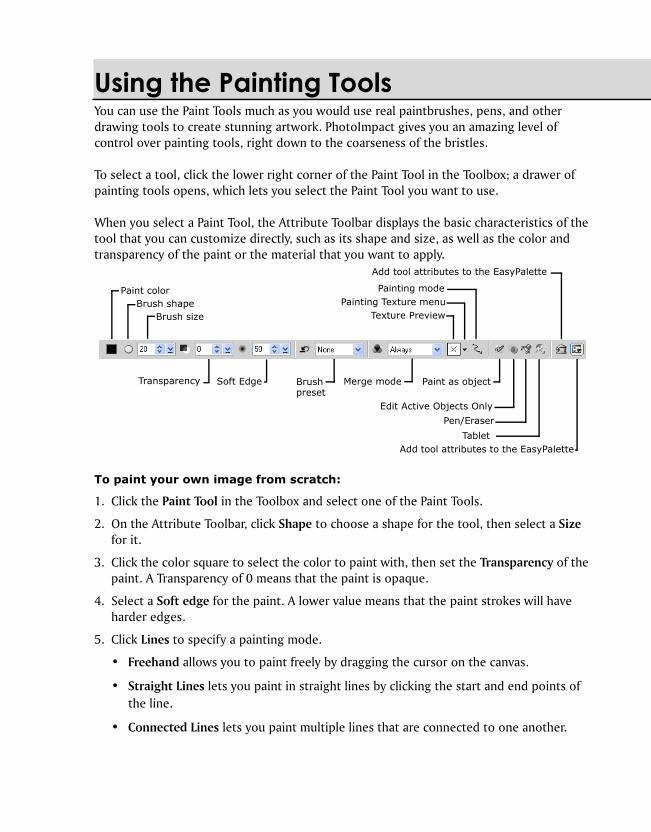
Using the Painting ToolsYou can use the Paint Tools much as you would use real paintbrushes, pens, and other drawing tools to create stunning artwork. PhotoImpact gives you an amazing level of control over painting tools, right down to the coarseness of the bristles.
To select a tool, click the lower right corner of the Paint Tool in the Toolbox; a drawer of painting tools opens, which lets you select the Paint Tool you want to use.
When you select a Paint Tool, the Attribute Toolbar displays the basic characteristics of the tool that you can customize directly, such as its shape and size, as well as the color and transparency of the paint or the material that you want to apply.
To paint your own image from scratch:
1. Click the Paint Tool in the Toolbox and select one of the Paint Tools.
2. On the Attribute Toolbar, click Shape to choose a shape for the tool, then select a Size for it.
3. Click the color square to select the color to paint with, then set the Transparency of the paint. A Transparency of 0 means that the paint is opaque.
4. Select a Soft edge for the paint. A lower value means that the paint strokes will have harder edges.
5. Click Lines to specify a painting mode.
• Freehand allows you to paint freely by dragging the cursor on the canvas.
• Straight Lines lets you paint in straight lines by clicking the start and end points of the line.
• Connected Lines lets you paint multiple lines that are connected to one another.
Brush shapeBrush size
Transparency Brush preset
Merge mode
Paint color
Soft Edge
Texture PreviewPainting Texture menu
Painting mode
Paint as object
Edit Active Objects Only
Pen/Eraser
Tablet
Add tool attributes to the EasyPalette
Add tool attributes to the EasyPalette
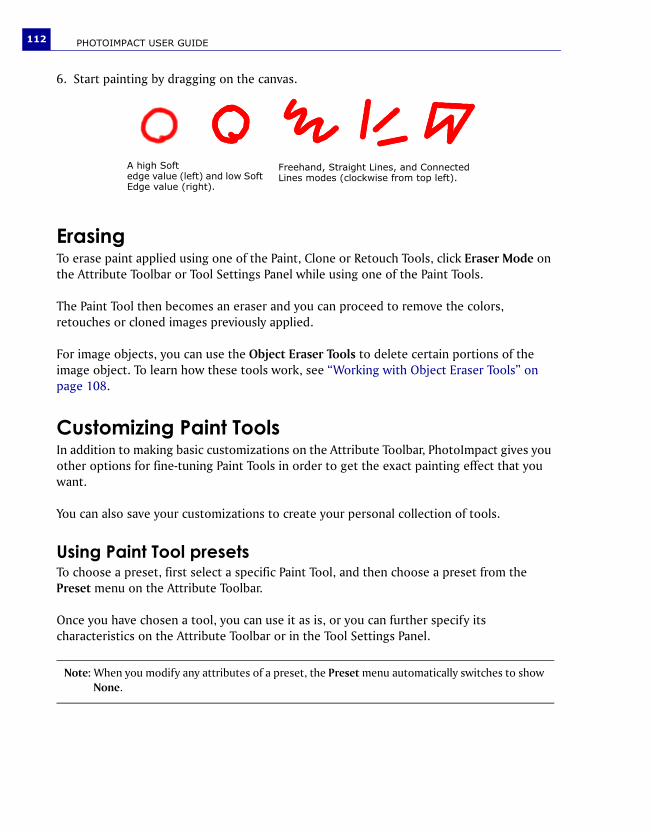
PHOTOIMPACT USER GUIDE112
6. Start painting by dragging on the canvas.
ErasingTo erase paint applied using one of the Paint, Clone or Retouch Tools, click Eraser Mode on the Attribute Toolbar or Tool Settings Panel while using one of the Paint Tools.
The Paint Tool then becomes an eraser and you can proceed to remove the colors, retouches or cloned images previously applied.
For image objects, you can use the Object Eraser Tools to delete certain portions of the image object. To learn how these tools work, see “Working with Object Eraser Tools” on page 108.
Customizing Paint ToolsIn addition to making basic customizations on the Attribute Toolbar, PhotoImpact gives you other options for fine-tuning Paint Tools in order to get the exact painting effect that you want.
You can also save your customizations to create your personal collection of tools.
Using Paint Tool presetsTo choose a preset, first select a specific Paint Tool, and then choose a preset from the Preset menu on the Attribute Toolbar.
Once you have chosen a tool, you can use it as is, or you can further specify its characteristics on the Attribute Toolbar or in the Tool Settings Panel.
Note: When you modify any attributes of a preset, the Preset menu automatically switches to show None.
A high Soft edge value (left) and low Soft Edge value (right).
Freehand, Straight Lines, and Connected Lines modes (clockwise from top left).
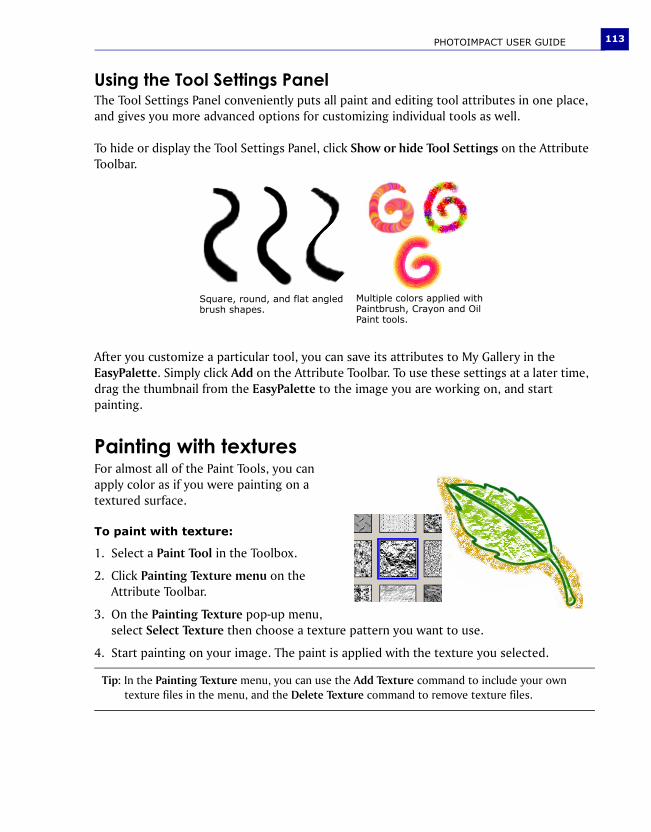
PHOTOIMPACT USER GUIDE 113
Using the Tool Settings PanelThe Tool Settings Panel conveniently puts all paint and editing tool attributes in one place, and gives you more advanced options for customizing individual tools as well.
To hide or display the Tool Settings Panel, click Show or hide Tool Settings on the Attribute Toolbar.
After you customize a particular tool, you can save its attributes to My Gallery in the EasyPalette. Simply click Add on the Attribute Toolbar. To use these settings at a later time, drag the thumbnail from the EasyPalette to the image you are working on, and start painting.
Painting with texturesFor almost all of the Paint Tools, you can apply color as if you were painting on a textured surface.
To paint with texture:
1. Select a Paint Tool in the Toolbox.
2. Click Painting Texture menu on the Attribute Toolbar.
3. On the Painting Texture pop-up menu, select Select Texture then choose a texture pattern you want to use.
4. Start painting on your image. The paint is applied with the texture you selected.
Tip: In the Painting Texture menu, you can use the Add Texture command to include your own texture files in the menu, and the Delete Texture command to remove texture files.
Square, round, and flat angled brush shapes.
Multiple colors applied with Paintbrush, Crayon and Oil Paint tools.
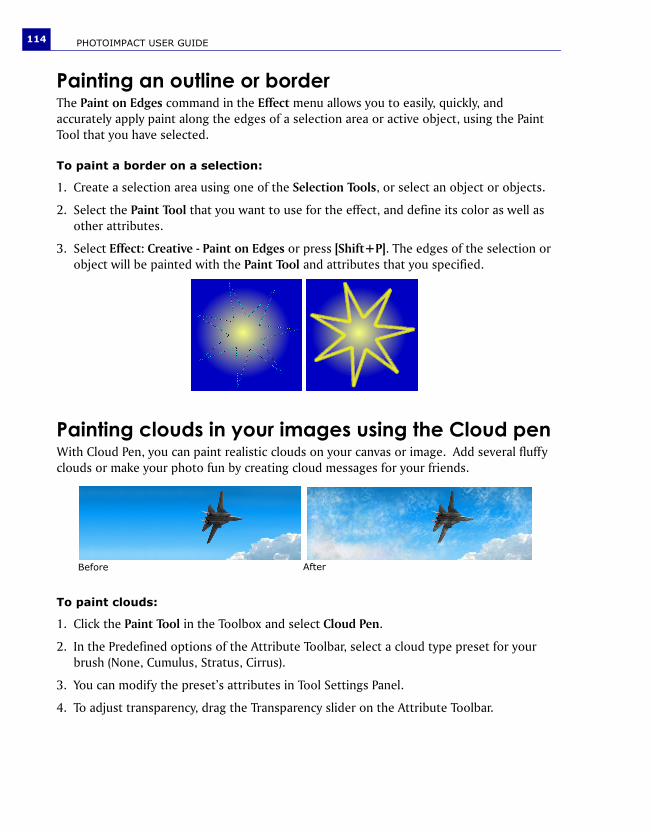
PHOTOIMPACT USER GUIDE114
Painting an outline or borderThe Paint on Edges command in the Effect menu allows you to easily, quickly, and accurately apply paint along the edges of a selection area or active object, using the Paint Tool that you have selected.
To paint a border on a selection:
1. Create a selection area using one of the Selection Tools, or select an object or objects.
2. Select the Paint Tool that you want to use for the effect, and define its color as well as other attributes.
3. Select Effect: Creative - Paint on Edges or press [Shift+P]. The edges of the selection or object will be painted with the Paint Tool and attributes that you specified.
Painting clouds in your images using the Cloud penWith Cloud Pen, you can paint realistic clouds on your canvas or image. Add several fluffy clouds or make your photo fun by creating cloud messages for your friends.
To paint clouds:
1. Click the Paint Tool in the Toolbox and select Cloud Pen.
2. In the Predefined options of the Attribute Toolbar, select a cloud type preset for your brush (None, Cumulus, Stratus, Cirrus).
3. You can modify the preset’s attributes in Tool Settings Panel.
4. To adjust transparency, drag the Transparency slider on the Attribute Toolbar.
Before After

PHOTOIMPACT USER GUIDE 115
5. Start painting by dragging the Cloud Pen on the canvas.
Using Paint as Object modePhotoImpact provides two modes when using the Paint, Clone, and Retouch Tools (with the exception of the Color Replacement Pen). The default mode is Normal Mode, which allows you to paint, clone or retouch the base image directly. The Paint as Object Mode lets you do the same but on an independent layer on top of the base image. This is convenient if you want to use a particular image as a basis for artwork, or if you want to apply paint on individual layers, for example.
To use the Paint as Object Mode:
1. Click Paint as Object on the Attribute Toolbar.
2. Paint, clone, or retouch the image as desired.
3. When you are done, click Paint as Object again to deactivate the mode. The painted, cloned or retouched area turns into an object.
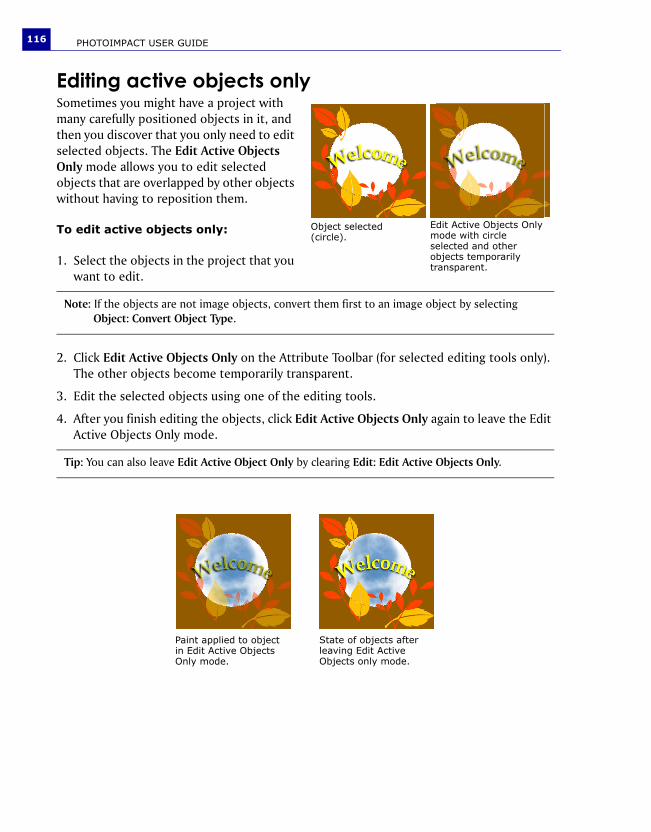
PHOTOIMPACT USER GUIDE116
Editing active objects onlySometimes you might have a project with many carefully positioned objects in it, and then you discover that you only need to edit selected objects. The Edit Active Objects Only mode allows you to edit selected objects that are overlapped by other objects without having to reposition them.
To edit active objects only:
1. Select the objects in the project that you want to edit.
2. Click Edit Active Objects Only on the Attribute Toolbar (for selected editing tools only). The other objects become temporarily transparent.
3. Edit the selected objects using one of the editing tools.
4. After you finish editing the objects, click Edit Active Objects Only again to leave the Edit Active Objects Only mode.
Note: If the objects are not image objects, convert them first to an image object by selecting Object: Convert Object Type.
Tip: You can also leave Edit Active Object Only by clearing Edit: Edit Active Objects Only.
Object selected (circle).
Edit Active Objects Only mode with circle selected and other objects temporarily transparent.
Paint applied to object in Edit Active Objects Only mode.
State of objects after leaving Edit Active Objects only mode.
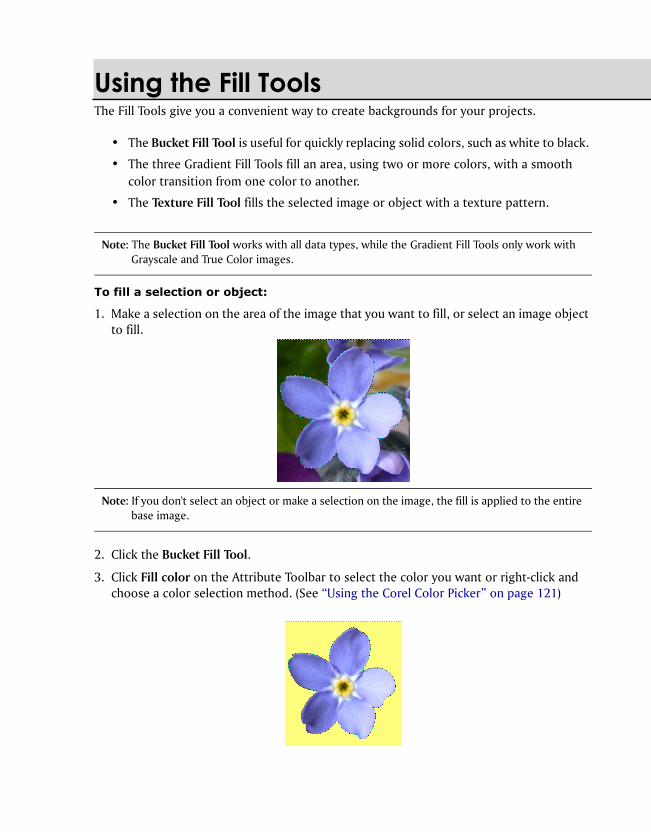
Using the Fill ToolsThe Fill Tools give you a convenient way to create backgrounds for your projects.
• The Bucket Fill Tool is useful for quickly replacing solid colors, such as white to black.
• The three Gradient Fill Tools fill an area, using two or more colors, with a smooth color transition from one color to another.
• The Texture Fill Tool fills the selected image or object with a texture pattern.
To fill a selection or object:
1. Make a selection on the area of the image that you want to fill, or select an image object to fill.
2. Click the Bucket Fill Tool.
3. Click Fill color on the Attribute Toolbar to select the color you want or right-click and choose a color selection method. (See “Using the Corel Color Picker” on page 121)
Note: The Bucket Fill Tool works with all data types, while the Gradient Fill Tools only work with Grayscale and True Color images.
Note: If you don't select an object or make a selection on the image, the fill is applied to the entire base image.
PHOTOIMPACT USER GUIDE118
4. Adjust the value in Similarity to change the range of colors affected by the fill. Higher values mean that more of the image will be filled.
5. Enter a value in Transparency to specify the degree of transparency when applying a fill color (0 to 99%).
6. Select from among the Merge options.
7. Click to apply the fill to the image.
Choosing a Gradient Fill methodIn PhotoImpact, when applying a Gradient Fill on your image you can choose between two methods: Two-color or Multiple-color.
• The Two-color method applies a Gradient Fill to an image based on any two colors specified in the Fill colors color squares.
• The Multiple-color method uses a palette ramp to apply a Gradient Fill to an image.
To change the color, either click the color square for the Corel Color Picker dialog box, or right-click to display the Color Picker pop-up menu. The gradient applied will be a smooth transition from the first (start) to the second (end) color.
The colors used for the fill are displayed in the Fill colors square. Click the color square to access the Palette Ramp Editor dialog box. The Palette Ramp Editor allows you to create your own color combination.
To make a Two-color gradient fill:
1. Click Fill in the Toolbox and select any of the gradient fill tools (except Texture Fill).
2. On the Attribute Toolbar, click Fill method and select Two-color.
3. Select the start and end fill colors in the Fill colors color squares.
Tip: Fill an image or selection area with your default background color without having to open the Fill dialog box. On the Toolbox, click or right-click the Background color square to select the color you want to use, and then press [Delete]. The image or selection area is filled with the background color.
Note: You can also use the Color Panel to set your Two-color or Multiple-color gradient colors. Click the arrow below Mode in the Color tab to switch between Two-colors and Multiple-colors.
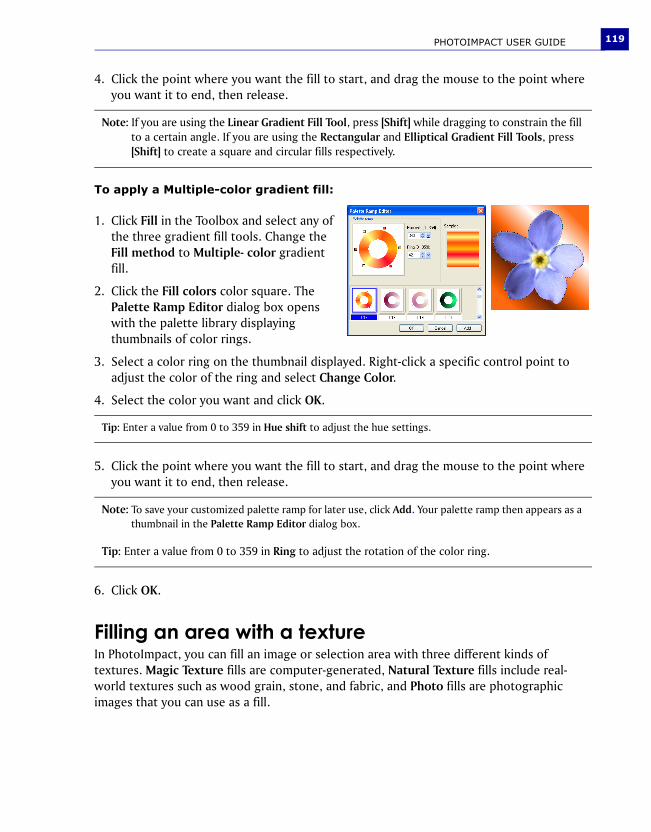
PHOTOIMPACT USER GUIDE 119
4. Click the point where you want the fill to start, and drag the mouse to the point where you want it to end, then release.
To apply a Multiple-color gradient fill:
1. Click Fill in the Toolbox and select any of the three gradient fill tools. Change the Fill method to Multiple- color gradient fill.
2. Click the Fill colors color square. The Palette Ramp Editor dialog box opens with the palette library displaying thumbnails of color rings.
3. Select a color ring on the thumbnail displayed. Right-click a specific control point to adjust the color of the ring and select Change Color.
4. Select the color you want and click OK.
5. Click the point where you want the fill to start, and drag the mouse to the point where you want it to end, then release.
6. Click OK.
Filling an area with a textureIn PhotoImpact, you can fill an image or selection area with three different kinds of textures. Magic Texture fills are computer-generated, Natural Texture fills include real-world textures such as wood grain, stone, and fabric, and Photo fills are photographic images that you can use as a fill.
Note: If you are using the Linear Gradient Fill Tool, press [Shift] while dragging to constrain the fill to a certain angle. If you are using the Rectangular and Elliptical Gradient Fill Tools, press [Shift] to create a square and circular fills respectively.
Tip: Enter a value from 0 to 359 in Hue shift to adjust the hue settings.
Note: To save your customized palette ramp for later use, click Add. Your palette ramp then appears as a thumbnail in the Palette Ramp Editor dialog box.
Tip: Enter a value from 0 to 359 in Ring to adjust the rotation of the color ring.
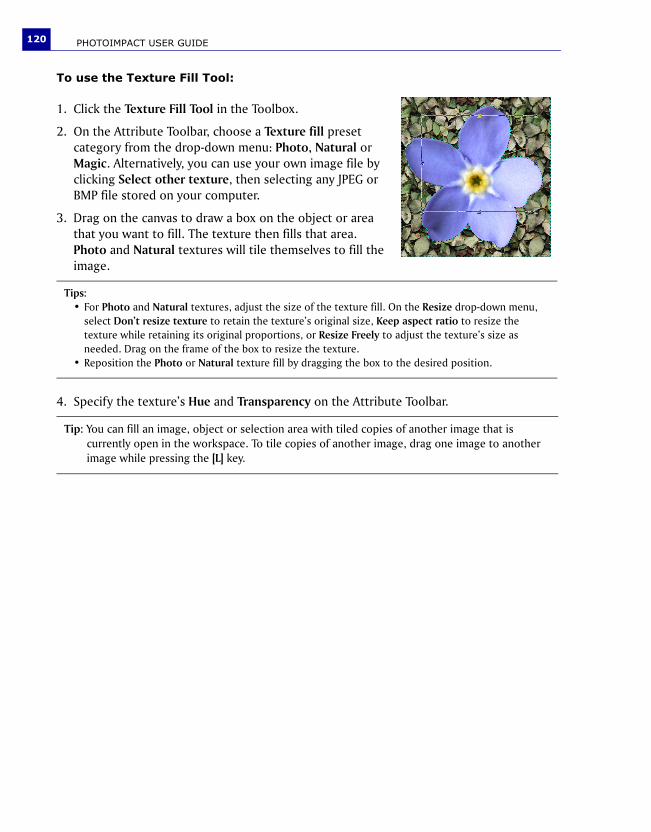
PHOTOIMPACT USER GUIDE120
To use the Texture Fill Tool:
1. Click the Texture Fill Tool in the Toolbox.
2. On the Attribute Toolbar, choose a Texture fill preset category from the drop-down menu: Photo, Natural or Magic. Alternatively, you can use your own image file by clicking Select other texture, then selecting any JPEG or BMP file stored on your computer.
3. Drag on the canvas to draw a box on the object or area that you want to fill. The texture then fills that area. Photo and Natural textures will tile themselves to fill the image.
4. Specify the texture’s Hue and Transparency on the Attribute Toolbar.
Tips: • For Photo and Natural textures, adjust the size of the texture fill. On the Resize drop-down menu,
select Don’t resize texture to retain the texture’s original size, Keep aspect ratio to resize the texture while retaining its original proportions, or Resize Freely to adjust the texture’s size as needed. Drag on the frame of the box to resize the texture.
• Reposition the Photo or Natural texture fill by dragging the box to the desired position.
Tip: You can fill an image, object or selection area with tiled copies of another image that is currently open in the workspace. To tile copies of another image, drag one image to another image while pressing the [L] key.
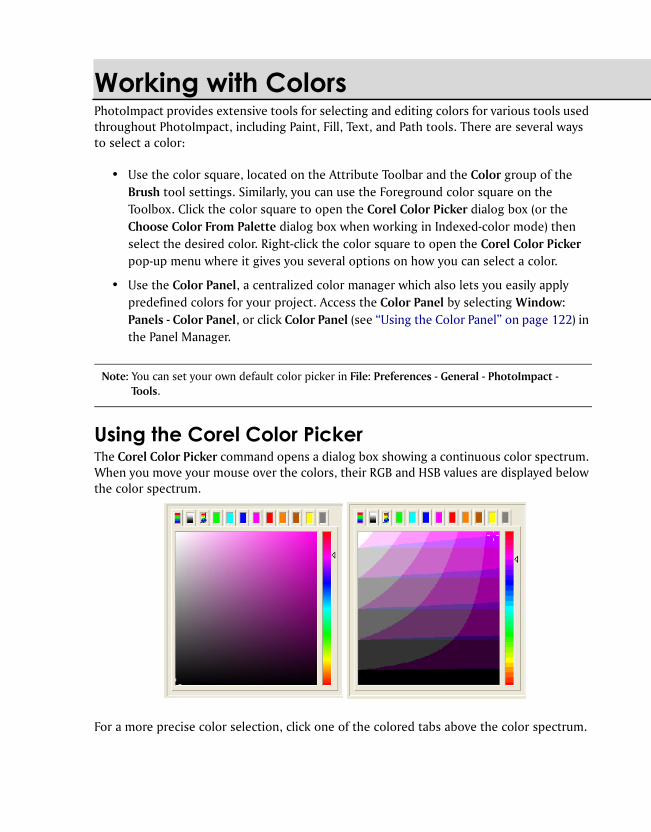
Working with ColorsPhotoImpact provides extensive tools for selecting and editing colors for various tools used throughout PhotoImpact, including Paint, Fill, Text, and Path tools. There are several ways to select a color:
• Use the color square, located on the Attribute Toolbar and the Color group of the Brush tool settings. Similarly, you can use the Foreground color square on the Toolbox. Click the color square to open the Corel Color Picker dialog box (or the Choose Color From Palette dialog box when working in Indexed-color mode) then select the desired color. Right-click the color square to open the Corel Color Picker pop-up menu where it gives you several options on how you can select a color.
• Use the Color Panel, a centralized color manager which also lets you easily apply predefined colors for your project. Access the Color Panel by selecting Window: Panels - Color Panel, or click Color Panel (see “Using the Color Panel” on page 122) in the Panel Manager.
Using the Corel Color PickerThe Corel Color Picker command opens a dialog box showing a continuous color spectrum. When you move your mouse over the colors, their RGB and HSB values are displayed below the color spectrum.
For a more precise color selection, click one of the colored tabs above the color spectrum.
Note: You can set your own default color picker in File: Preferences - General - PhotoImpact - Tools.

PHOTOIMPACT USER GUIDE122
Picking colors from an image or entire screenThere are two ways to select a color directly from an active image:
• Use the Eyedropper Tool, located in the Toolbox.
• Use the Eyedropper command, located on the Corel Color Picker pop-up menu when you right-click a color square.
Sometimes, the color you want to use might be visible within the monitor screen, but not necessarily within the PhotoImpact workspace. To select that color, right-click on a color square and use the Color on Screen command on the Color Picker pop-up menu. Once activated, the pointer changes to an eyedropper cursor, and you can then click on the spot on the screen that contains the desired color.
Changing foreground and background colorsThe Foreground and Background color squares are found in the Toolbox for easy access.
• The Foreground color refers to the color currently being used for a specific tool, such as the Paint Tools, Bucket Fill Tools, and the Path Drawing Tool, among others.
• The Background color is the base color of the canvas when you remove a portion of the image and Preserve Base Image is not selected.
Click or right-click the color squares to select the Background and Foreground colors respectively. Click to switch the Foreground and Background colors.
Using the Color PanelYou can access the Color Panel by selecting Window: Panels - Color Panel or click Color Panel in the Panel Manager.
Tip: Select the Web Safe option at the bottom right of the dialog box while viewing colors in any tab. Web browsers display a common 216 colors while graphics use 256 colors. With Web Safe Color Palette, you can safely create or design graphics using 8-bit, 256 colors, or 24-bit millions of colors for display on the Web, monitors or videos. This prevents color inconsistencies and dithering (color shift).
Notes:• By zooming in on an image, you can precisely select the desired color by simply clicking on it.• Color choices are limited to what the image contains.

PHOTOIMPACT USER GUIDE 123
The Color tabThe Color tab in the Color Panel gives you an alternate location besides the Attribute Toolbar and Toolbox where you can set solid or gradient colors for the various PhotoImpact tools you work with.
Click the arrow under Mode to choose between using a solid color (Single-color) or a gradient color (Two-color or Multiple-color).
Setting a Single-color
There are several ways to set the color when in Single-color mode:
• Corel Color Picker Click the color square to open the Corel Color Picker dialog box and select a color.
• Color Picker pop-up menu Right-click the color square to open a pop-up menu where there are several methods available for choosing a color.
• RGB/HSB Enter the RGB and HSB values in their respective boxes.
• Hexadecimal value Enter the color's hexadecimal value in the Hex Box. Right-click this field to open the Copy for Web menu.
• Spectrum Bar Left-click to select the foreground color, and right-click to select the background.
Notes:• Right-click the Hex field to open a pop-up menu where you can quickly copy the color's hex value
or the color's HTML equivalent code to the clipboard to use in other programs.• Click the arrow to open a pop-up menu where there are options for you to set what colors to use
in the Color tab.
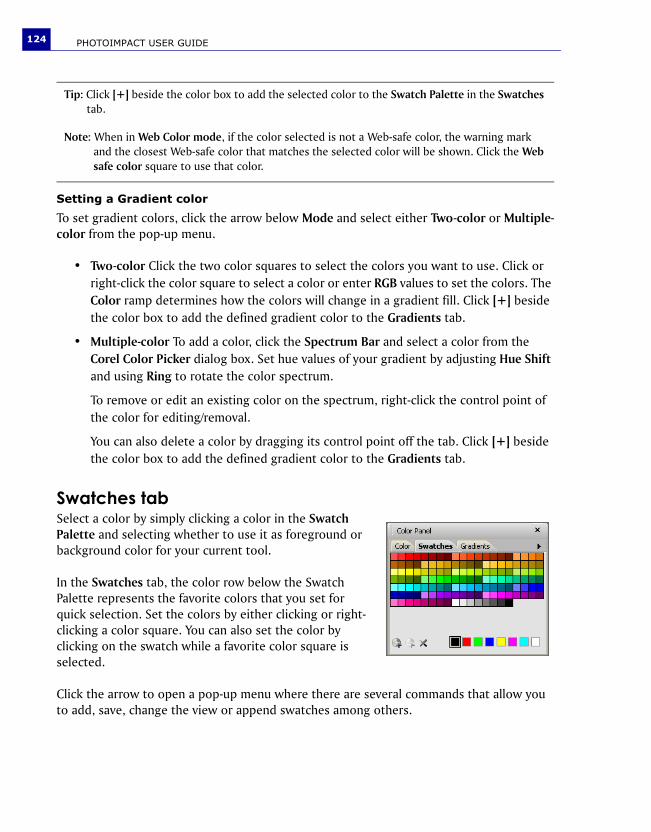
PHOTOIMPACT USER GUIDE124
Setting a Gradient color
To set gradient colors, click the arrow below Mode and select either Two-color or Multiple-color from the pop-up menu.
• Two-color Click the two color squares to select the colors you want to use. Click or right-click the color square to select a color or enter RGB values to set the colors. The Color ramp determines how the colors will change in a gradient fill. Click [+] beside the color box to add the defined gradient color to the Gradients tab.
• Multiple-color To add a color, click the Spectrum Bar and select a color from the Corel Color Picker dialog box. Set hue values of your gradient by adjusting Hue Shift and using Ring to rotate the color spectrum.
To remove or edit an existing color on the spectrum, right-click the control point of the color for editing/removal.
You can also delete a color by dragging its control point off the tab. Click [+] beside the color box to add the defined gradient color to the Gradients tab.
Swatches tabSelect a color by simply clicking a color in the Swatch Palette and selecting whether to use it as foreground or background color for your current tool.
In the Swatches tab, the color row below the Swatch Palette represents the favorite colors that you set for quick selection. Set the colors by either clicking or right-clicking a color square. You can also set the color by clicking on the swatch while a favorite color square is selected.
Click the arrow to open a pop-up menu where there are several commands that allow you to add, save, change the view or append swatches among others.
Tip: Click [+] beside the color box to add the selected color to the Swatch Palette in the Swatches tab.
Note: When in Web Color mode, if the color selected is not a Web-safe color, the warning mark and the closest Web-safe color that matches the selected color will be shown. Click the Web safe color square to use that color.
PHOTOIMPACT USER GUIDE 125
Saving the current Swatch Palette, as a Ulead Swatch Library file (USL), allows you to use the same Swatch Palette for future projects or even share the palette to others.
To add a color to the Swatch Palette:
1. Click the arrow then select Add New Swatch on the pop-up menu or click Add Swatch.
2. In the Add New Swatch dialog box, click the color box to open the Corel Color Picker dialog box and select the color you want to add.
Alternatively, you can enter the color's RGB and HSB in the respective boxes.
3. Type in a Name for the new swatch color then click OK.
Gradients tabThe Gradients tab appears in the Color Panel except when working in indexed 256-color mode. Click a gradient square to select it.
The Gradients tab displays a palette of your gradient fills that you can use in the current project.
Click the arrow to open a pop-up menu where there are several commands that allow you to add, save, change the view or append gradients among others.
In this tab, you can also create custom gradient fills then save them as a Ulead Gradient Library file (UGL) which you can use for future projects.
Tip: You can select multiple swatches by pressing [Ctrl] while clicking the swatches you want selected. You can also press [Shift] to select several adjacent swatches. When multiple swatches are selected, Edit is disabled. To deselect the swatch, press [Ctrl] and click the swatch again.
Tip: You can also add a new swatch from the Color tab. For details, see “The Color tab” on page 123.
Tip: You can select multiple gradients by pressing [Ctrl] while clicking on the gradients that you want selected. You can also press [Shift] to select several adjacent swatches. When multiple swatches are selected, Edit is disabled. To deselect the gradient, press [Ctrl] and click the gradient again.
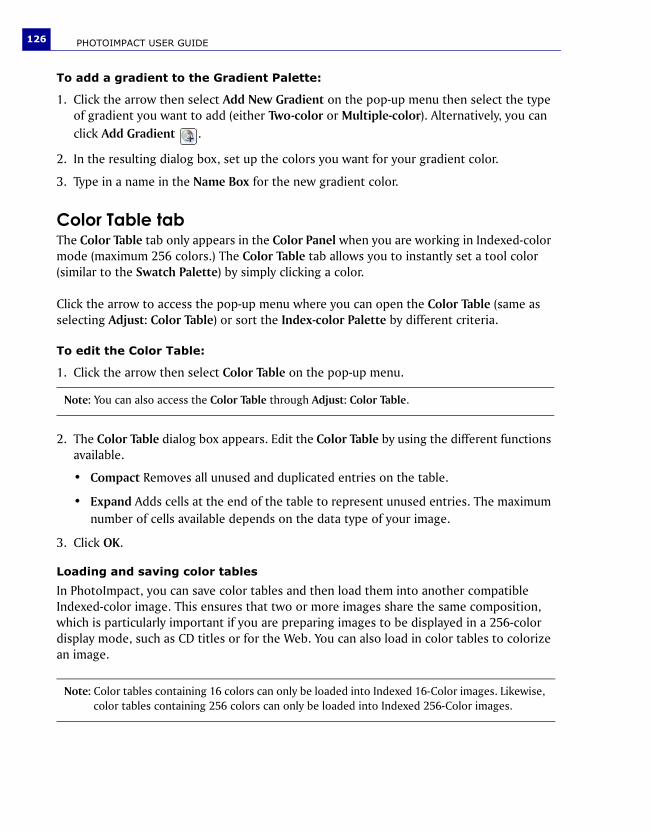
PHOTOIMPACT USER GUIDE126
To add a gradient to the Gradient Palette:
1. Click the arrow then select Add New Gradient on the pop-up menu then select the type of gradient you want to add (either Two-color or Multiple-color). Alternatively, you can click Add Gradient .
2. In the resulting dialog box, set up the colors you want for your gradient color.
3. Type in a name in the Name Box for the new gradient color.
Color Table tabThe Color Table tab only appears in the Color Panel when you are working in Indexed-color mode (maximum 256 colors.) The Color Table tab allows you to instantly set a tool color (similar to the Swatch Palette) by simply clicking a color.
Click the arrow to access the pop-up menu where you can open the Color Table (same as selecting Adjust: Color Table) or sort the Index-color Palette by different criteria.
To edit the Color Table:
1. Click the arrow then select Color Table on the pop-up menu.
2. The Color Table dialog box appears. Edit the Color Table by using the different functions available.
• Compact Removes all unused and duplicated entries on the table.
• Expand Adds cells at the end of the table to represent unused entries. The maximum number of cells available depends on the data type of your image.
3. Click OK.
Loading and saving color tables
In PhotoImpact, you can save color tables and then load them into another compatible Indexed-color image. This ensures that two or more images share the same composition, which is particularly important if you are preparing images to be displayed in a 256-color display mode, such as CD titles or for the Web. You can also load in color tables to colorize an image.
Note: You can also access the Color Table through Adjust: Color Table.
Note: Color tables containing 16 colors can only be loaded into Indexed 16-Color images. Likewise, color tables containing 256 colors can only be loaded into Indexed 256-Color images.
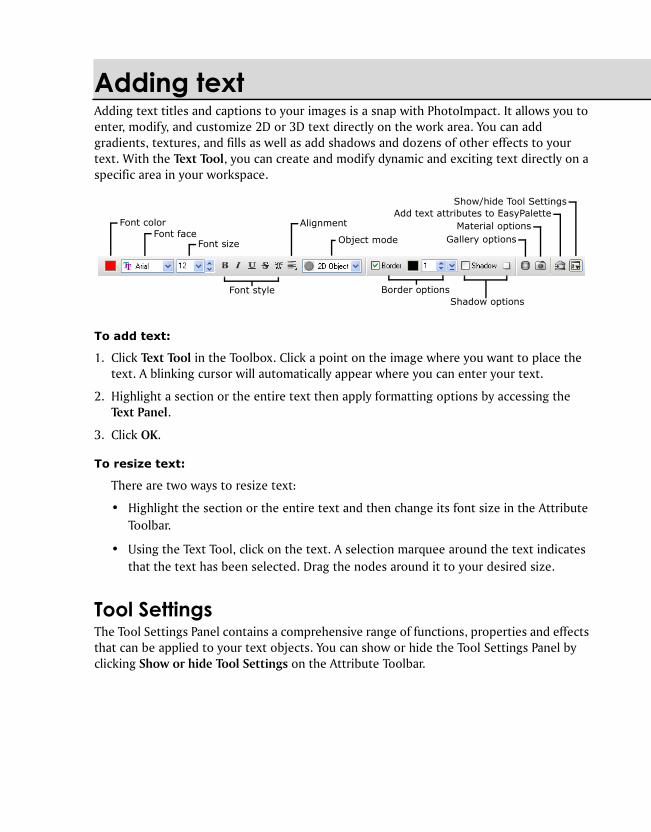
Adding textAdding text titles and captions to your images is a snap with PhotoImpact. It allows you to enter, modify, and customize 2D or 3D text directly on the work area. You can add gradients, textures, and fills as well as add shadows and dozens of other effects to your text. With the Text Tool, you can create and modify dynamic and exciting text directly on a specific area in your workspace.
To add text:
1. Click Text Tool in the Toolbox. Click a point on the image where you want to place the text. A blinking cursor will automatically appear where you can enter your text.
2. Highlight a section or the entire text then apply formatting options by accessing the Text Panel.
3. Click OK.
To resize text:
There are two ways to resize text:
• Highlight the section or the entire text and then change its font size in the Attribute Toolbar.
• Using the Text Tool, click on the text. A selection marquee around the text indicates that the text has been selected. Drag the nodes around it to your desired size.
Tool SettingsThe Tool Settings Panel contains a comprehensive range of functions, properties and effects that can be applied to your text objects. You can show or hide the Tool Settings Panel by clicking Show or hide Tool Settings on the Attribute Toolbar.
Font faceFont size
Font style
Alignment
Border options
Object mode
Font color
Gallery optionsMaterial options
Add text attributes to EasyPaletteShow/hide Tool Settings
Shadow options
PHOTOIMPACT USER GUIDE128
3DDetermines the appearance of depth, and the extent of the border of a 3D text object.
Options
• Anti-aliasing controls the smoothness or sharpness of your text. Choose from three anti-aliasing levels.
• Disable object pick mode while drawing lets you create new text wherever you click your mouse, even if you happen to click on another text object.
StyleDefines the font and character style for the text.
• Line spacing and Character spacing Apply to the entire text block.
• Automatic line spacing Applies to the entire text block. When Line spacing is set to zero (default value), this calculates the ideal spacing between lines based on the largest character in each line.
When Line spacing is set to a negative value, and the value approaches the negative equivalent of the font size, the lines will all merge to the same baseline. Decreasing the value past this point will not affect the text block further.
• Baseline shift Determines the amount of space between lines. This can be applied to individual characters, words, or the entire text block.
• Character spacing and Kerning Determine the amount of space between characters and words. These can also be applied to individual words and letters as well as the whole text block.
• Rotate This can be applied to individual characters, words or the whole text block.
Note: Applying the 3D Pipe effect to a multicolored text block will change the color attributes of the whole block.
Note: If you use Windows 2000 or higher and you have different languages installed, you can type in text in a selected language. If you use Windows 98, which has limited language support, then PhotoImpact will also have limited language support.
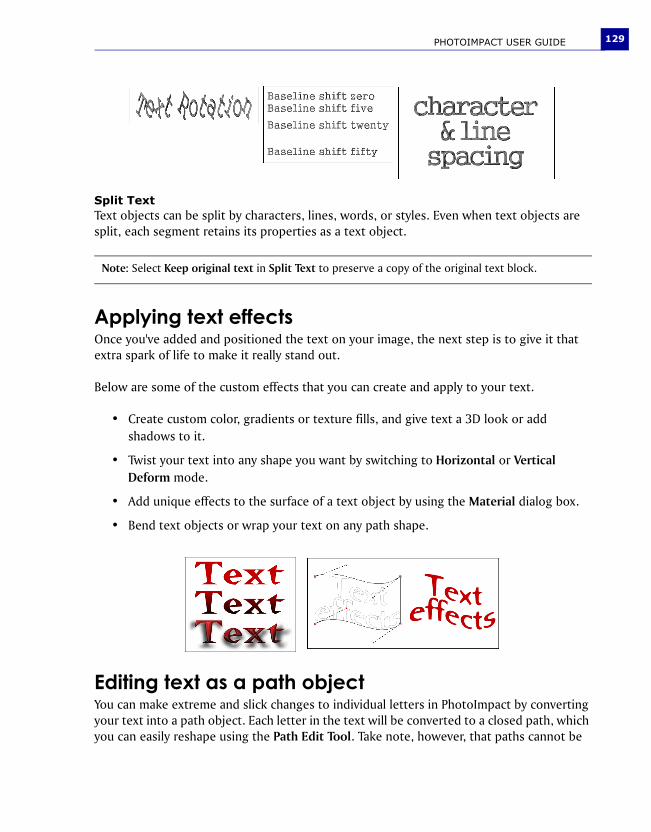
PHOTOIMPACT USER GUIDE 129
Split TextText objects can be split by characters, lines, words, or styles. Even when text objects are split, each segment retains its properties as a text object.
Applying text effectsOnce you've added and positioned the text on your image, the next step is to give it that extra spark of life to make it really stand out.
Below are some of the custom effects that you can create and apply to your text.
• Create custom color, gradients or texture fills, and give text a 3D look or add shadows to it.
• Twist your text into any shape you want by switching to Horizontal or Vertical Deform mode.
• Add unique effects to the surface of a text object by using the Material dialog box.
• Bend text objects or wrap your text on any path shape.
Editing text as a path objectYou can make extreme and slick changes to individual letters in PhotoImpact by converting your text into a path object. Each letter in the text will be converted to a closed path, which you can easily reshape using the Path Edit Tool. Take note, however, that paths cannot be
Note: Select Keep original text in Split Text to preserve a copy of the original text block.
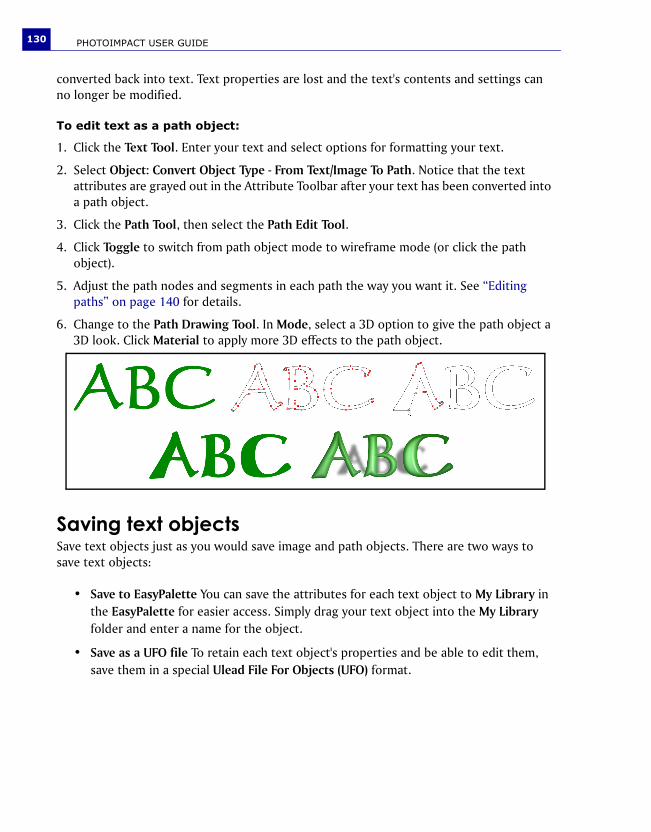
PHOTOIMPACT USER GUIDE130
converted back into text. Text properties are lost and the text's contents and settings can no longer be modified.
To edit text as a path object:
1. Click the Text Tool. Enter your text and select options for formatting your text.
2. Select Object: Convert Object Type - From Text/Image To Path. Notice that the text attributes are grayed out in the Attribute Toolbar after your text has been converted into a path object.
3. Click the Path Tool, then select the Path Edit Tool.
4. Click Toggle to switch from path object mode to wireframe mode (or click the path object).
5. Adjust the path nodes and segments in each path the way you want it. See “Editing paths” on page 140 for details.
6. Change to the Path Drawing Tool. In Mode, select a 3D option to give the path object a 3D look. Click Material to apply more 3D effects to the path object.
Saving text objectsSave text objects just as you would save image and path objects. There are two ways to save text objects:
• Save to EasyPalette You can save the attributes for each text object to My Library in the EasyPalette for easier access. Simply drag your text object into the My Library folder and enter a name for the object.
• Save as a UFO file To retain each text object's properties and be able to edit them, save them in a special Ulead File For Objects (UFO) format.
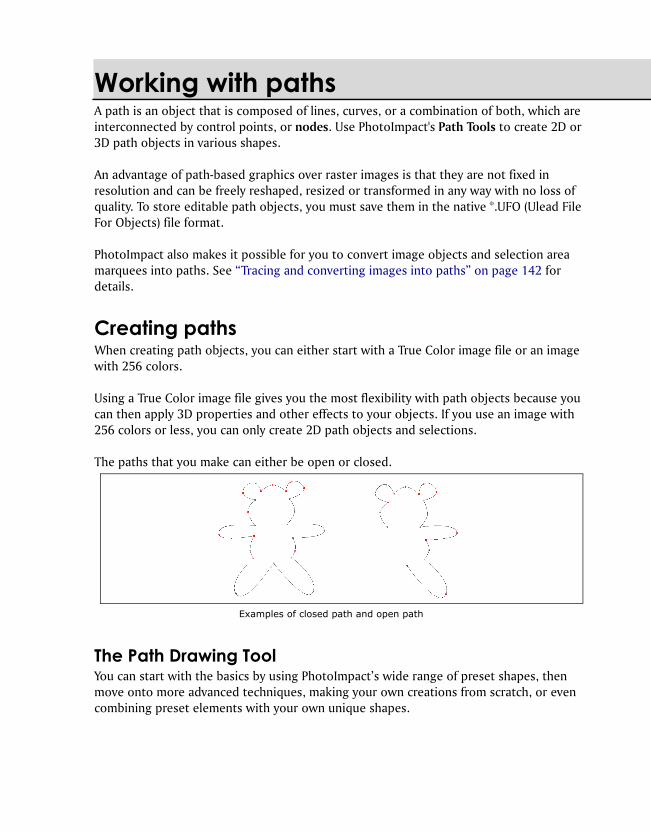
Working with pathsA path is an object that is composed of lines, curves, or a combination of both, which are interconnected by control points, or nodes. Use PhotoImpact's Path Tools to create 2D or 3D path objects in various shapes.
An advantage of path-based graphics over raster images is that they are not fixed in resolution and can be freely reshaped, resized or transformed in any way with no loss of quality. To store editable path objects, you must save them in the native *.UFO (Ulead File For Objects) file format.
PhotoImpact also makes it possible for you to convert image objects and selection area marquees into paths. See “Tracing and converting images into paths” on page 142 for details.
Creating pathsWhen creating path objects, you can either start with a True Color image file or an image with 256 colors.
Using a True Color image file gives you the most flexibility with path objects because you can then apply 3D properties and other effects to your objects. If you use an image with 256 colors or less, you can only create 2D path objects and selections.
The paths that you make can either be open or closed.
The Path Drawing ToolYou can start with the basics by using PhotoImpact’s wide range of preset shapes, then move onto more advanced techniques, making your own creations from scratch, or even combining preset elements with your own unique shapes.
Examples of closed path and open path
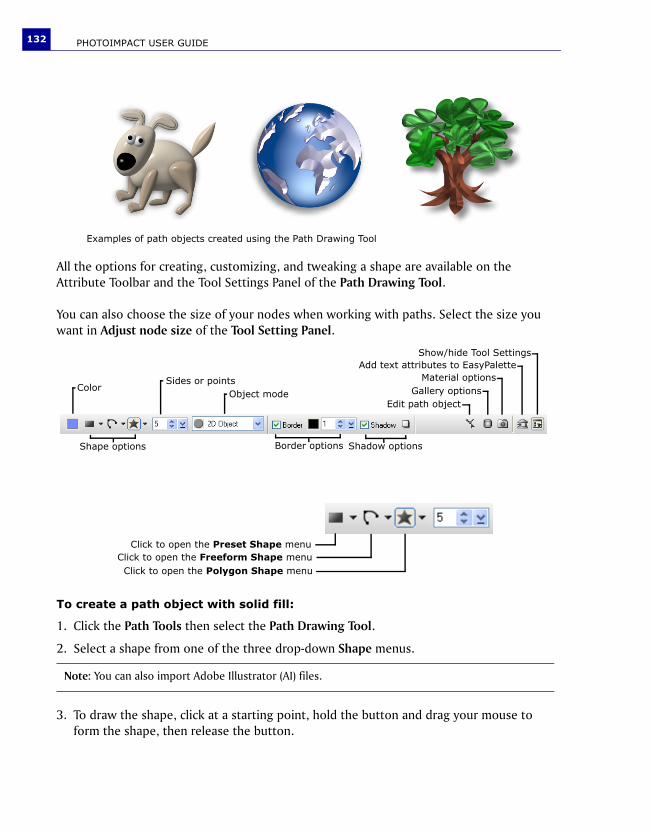
PHOTOIMPACT USER GUIDE132
All the options for creating, customizing, and tweaking a shape are available on the Attribute Toolbar and the Tool Settings Panel of the Path Drawing Tool.
You can also choose the size of your nodes when working with paths. Select the size you want in Adjust node size of the Tool Setting Panel.
To create a path object with solid fill:
1. Click the Path Tools then select the Path Drawing Tool.
2. Select a shape from one of the three drop-down Shape menus.
3. To draw the shape, click at a starting point, hold the button and drag your mouse to form the shape, then release the button.
Note: You can also import Adobe Illustrator (AI) files.
Examples of path objects created using the Path Drawing Tool
Shape options
Sides or points
Border options
Object modeColor
Shadow options
Gallery optionsMaterial options
Add text attributes to EasyPaletteShow/hide Tool Settings
Edit path object
Click to open the Preset Shape menuClick to open the Freeform Shape menuClick to open the Polygon Shape menu
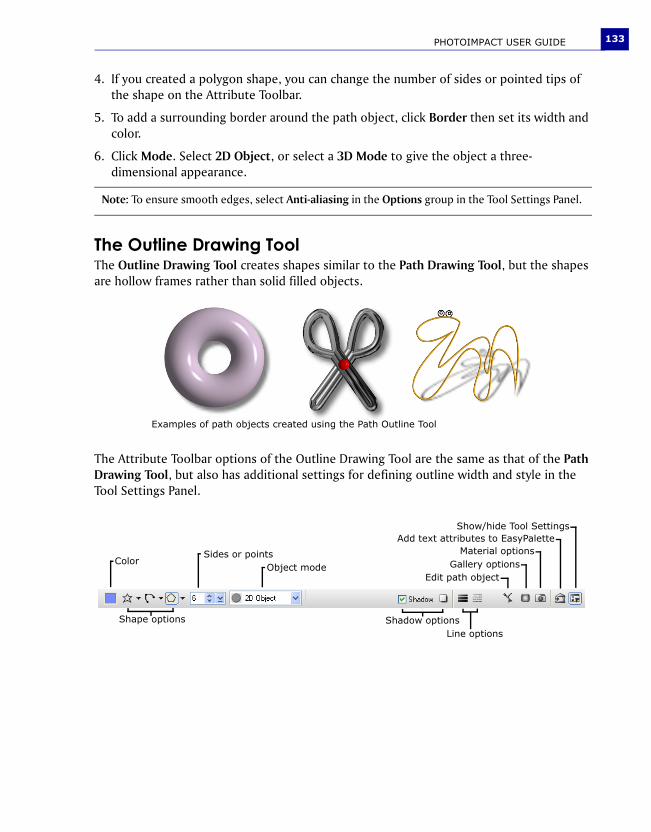
PHOTOIMPACT USER GUIDE 133
4. If you created a polygon shape, you can change the number of sides or pointed tips of the shape on the Attribute Toolbar.
5. To add a surrounding border around the path object, click Border then set its width and color.
6. Click Mode. Select 2D Object, or select a 3D Mode to give the object a three-dimensional appearance.
The Outline Drawing ToolThe Outline Drawing Tool creates shapes similar to the Path Drawing Tool, but the shapes are hollow frames rather than solid filled objects.
The Attribute Toolbar options of the Outline Drawing Tool are the same as that of the Path Drawing Tool, but also has additional settings for defining outline width and style in the Tool Settings Panel.
Note: To ensure smooth edges, select Anti-aliasing in the Options group in the Tool Settings Panel.
Examples of path objects created using the Path Outline Tool
Gallery optionsMaterial options
Add text attributes to EasyPaletteShow/hide Tool Settings
Edit path object
Line optionsShadow options
Sides or pointsObject mode
Color
Shape options
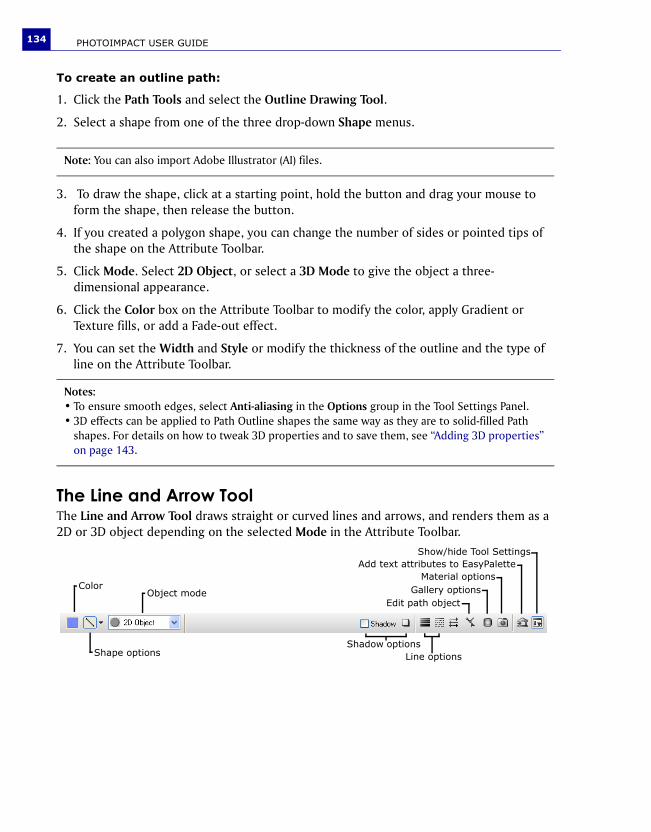
PHOTOIMPACT USER GUIDE134
To create an outline path:
1. Click the Path Tools and select the Outline Drawing Tool.
2. Select a shape from one of the three drop-down Shape menus.
3. To draw the shape, click at a starting point, hold the button and drag your mouse to form the shape, then release the button.
4. If you created a polygon shape, you can change the number of sides or pointed tips of the shape on the Attribute Toolbar.
5. Click Mode. Select 2D Object, or select a 3D Mode to give the object a three-dimensional appearance.
6. Click the Color box on the Attribute Toolbar to modify the color, apply Gradient or Texture fills, or add a Fade-out effect.
7. You can set the Width and Style or modify the thickness of the outline and the type of line on the Attribute Toolbar.
The Line and Arrow ToolThe Line and Arrow Tool draws straight or curved lines and arrows, and renders them as a 2D or 3D object depending on the selected Mode in the Attribute Toolbar.
Note: You can also import Adobe Illustrator (AI) files.
Notes:• To ensure smooth edges, select Anti-aliasing in the Options group in the Tool Settings Panel. • 3D effects can be applied to Path Outline shapes the same way as they are to solid-filled Path
shapes. For details on how to tweak 3D properties and to save them, see “Adding 3D properties” on page 143.
Gallery optionsMaterial options
Add text attributes to EasyPaletteShow/hide Tool Settings
Edit path object
Line optionsShadow options
Object modeColor
Shape options
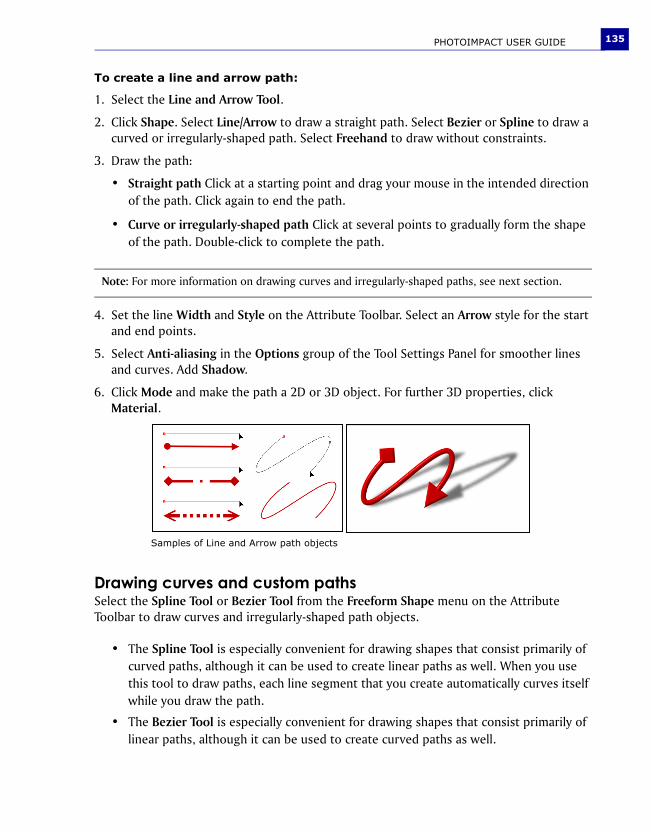
PHOTOIMPACT USER GUIDE 135
To create a line and arrow path:
1. Select the Line and Arrow Tool.
2. Click Shape. Select Line/Arrow to draw a straight path. Select Bezier or Spline to draw a curved or irregularly-shaped path. Select Freehand to draw without constraints.
3. Draw the path:
• Straight path Click at a starting point and drag your mouse in the intended direction of the path. Click again to end the path.
• Curve or irregularly-shaped path Click at several points to gradually form the shape of the path. Double-click to complete the path.
4. Set the line Width and Style on the Attribute Toolbar. Select an Arrow style for the start and end points.
5. Select Anti-aliasing in the Options group of the Tool Settings Panel for smoother lines and curves. Add Shadow.
6. Click Mode and make the path a 2D or 3D object. For further 3D properties, click Material.
Drawing curves and custom pathsSelect the Spline Tool or Bezier Tool from the Freeform Shape menu on the Attribute Toolbar to draw curves and irregularly-shaped path objects.
• The Spline Tool is especially convenient for drawing shapes that consist primarily of curved paths, although it can be used to create linear paths as well. When you use this tool to draw paths, each line segment that you create automatically curves itself while you draw the path.
• The Bezier Tool is especially convenient for drawing shapes that consist primarily of linear paths, although it can be used to create curved paths as well.
Note: For more information on drawing curves and irregularly-shaped paths, see next section.
Samples of Line and Arrow path objects
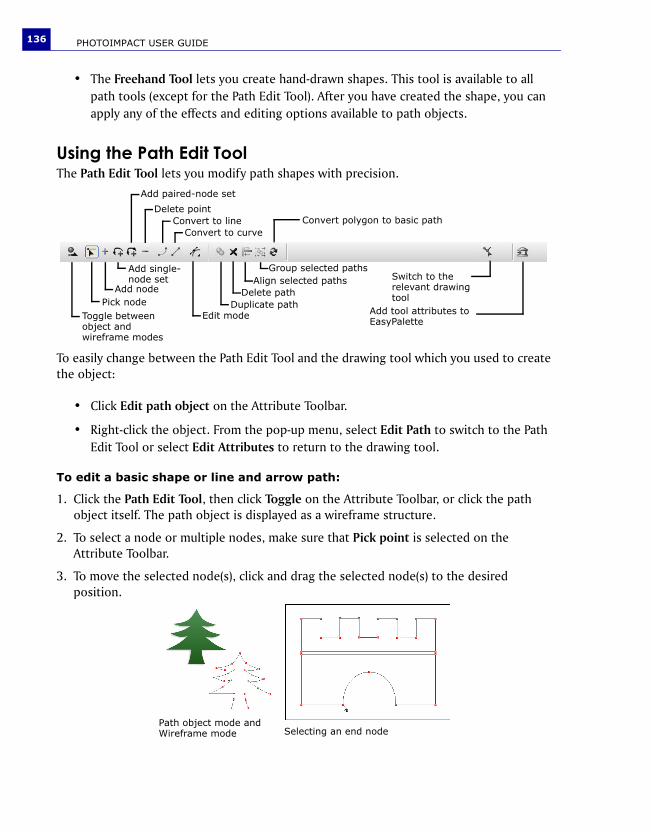
PHOTOIMPACT USER GUIDE136
• The Freehand Tool lets you create hand-drawn shapes. This tool is available to all path tools (except for the Path Edit Tool). After you have created the shape, you can apply any of the effects and editing options available to path objects.
Using the Path Edit ToolThe Path Edit Tool lets you modify path shapes with precision.
To easily change between the Path Edit Tool and the drawing tool which you used to create the object:
• Click Edit path object on the Attribute Toolbar.
• Right-click the object. From the pop-up menu, select Edit Path to switch to the Path Edit Tool or select Edit Attributes to return to the drawing tool.
To edit a basic shape or line and arrow path:
1. Click the Path Edit Tool, then click Toggle on the Attribute Toolbar, or click the path object itself. The path object is displayed as a wireframe structure.
2. To select a node or multiple nodes, make sure that Pick point is selected on the Attribute Toolbar.
3. To move the selected node(s), click and drag the selected node(s) to the desired position.
Convert polygon to basic path
Switch to the relevant drawing tool
Add tool attributes to EasyPalette
Toggle between object and wireframe modes
Pick nodeAdd node
Add single-node set
Add paired-node set
Delete pointConvert to line
Convert to curve
Edit modeDuplicate path
Delete pathAlign selected paths
Group selected paths
Path object mode and Wireframe mode Selecting an end node

PHOTOIMPACT USER GUIDE 137
4. To move the selected node(s), click and drag the selected node(s) to the desired position.
5. To reshape a curve segment, click either of its two end nodes. Up to two control handles will appear on the selected node. Drag a handle to adjust the shape of the curve.
Use the Edit mode buttons to change the way control handles affect curve segments.
• Non-free edit Moves both control handles simultaneously and reshapes the curves between a node and its adjacent nodes.
• Free edit Moves one control handle at a time and reshapes a curve without affecting other path segments.
6. To change a curve segment into a line or vice versa, select the segment then click the Convert line button.
7. If you want to create a path with more detail and nuances, add more nodes and further adjust the path.
To add a node, select the target segment, click Add point on the Attribute Toolbar, then click on the part of the segment on which to add the node.
8. Alternatively, if you want to create a smoother, simpler path, remove some nodes and adjust the remaining nodes. To remove a node, click Delete point on the Attribute Toolbar, then click a node to be removed.
9. When you are satisfied with the result, click Toggle or Editing (or, right-click and select Toggle Mode) to render your path object.
Tip: Multiple path segments can be selected in order to simultaneously convert them to line or curve segments. Click a segment of the path to select it, then press [Shift] or [Ctrl] while selecting other segments. To deselect a segment, press [Ctrl] then click on the segment.
Tip: When Pick point is selected on the Attribute Toolbar, press [Shift] and click a segment to add [+] node, or press [Ctrl] and click a node to delete [-] it.
Dragging control handles to adjust curve shape
Editing in Free edit mode
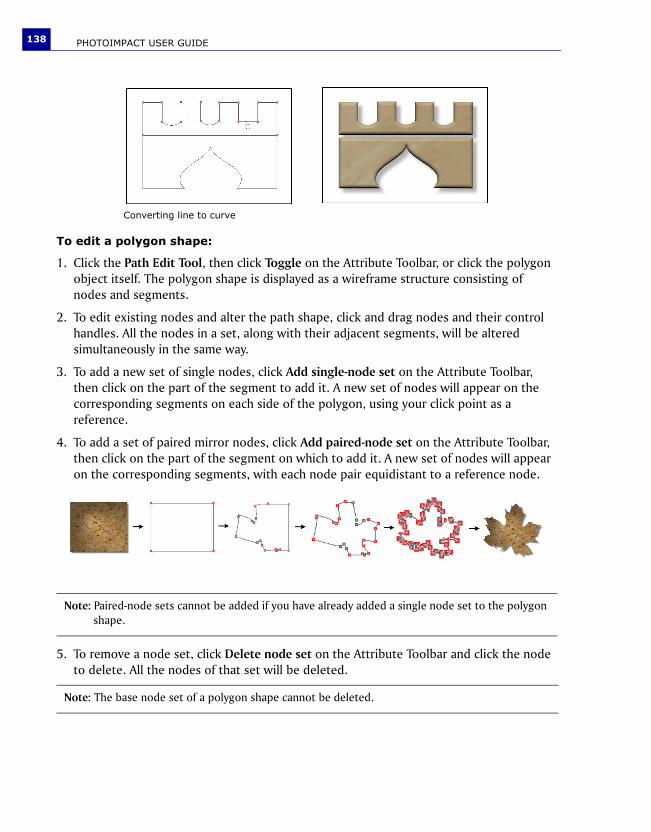
PHOTOIMPACT USER GUIDE138
To edit a polygon shape:
1. Click the Path Edit Tool, then click Toggle on the Attribute Toolbar, or click the polygon object itself. The polygon shape is displayed as a wireframe structure consisting of nodes and segments.
2. To edit existing nodes and alter the path shape, click and drag nodes and their control handles. All the nodes in a set, along with their adjacent segments, will be altered simultaneously in the same way.
3. To add a new set of single nodes, click Add single-node set on the Attribute Toolbar, then click on the part of the segment to add it. A new set of nodes will appear on the corresponding segments on each side of the polygon, using your click point as a reference.
4. To add a set of paired mirror nodes, click Add paired-node set on the Attribute Toolbar, then click on the part of the segment on which to add it. A new set of nodes will appear on the corresponding segments, with each node pair equidistant to a reference node.
5. To remove a node set, click Delete node set on the Attribute Toolbar and click the node to delete. All the nodes of that set will be deleted.
Note: Paired-node sets cannot be added if you have already added a single node set to the polygon shape.
Note: The base node set of a polygon shape cannot be deleted.
Converting line to curve
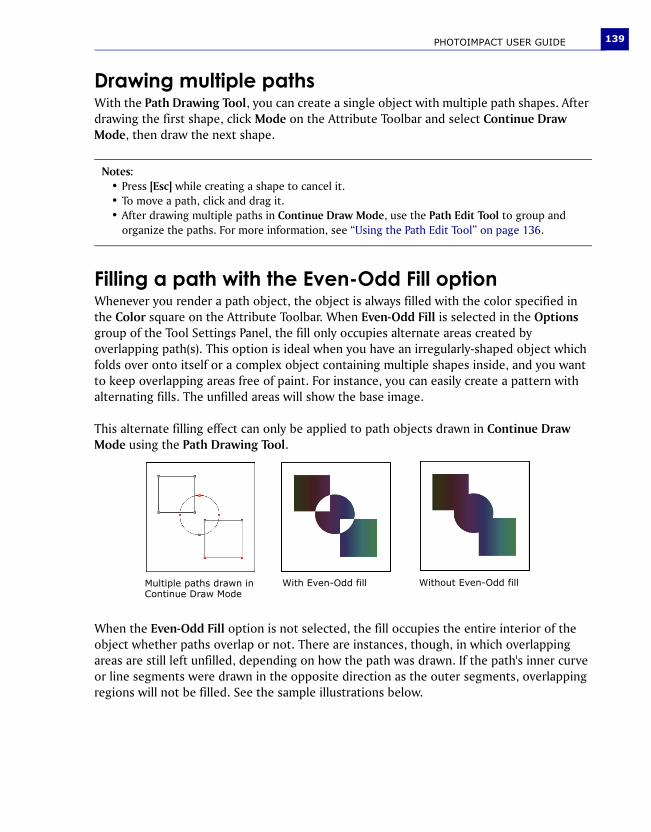
PHOTOIMPACT USER GUIDE 139
Drawing multiple pathsWith the Path Drawing Tool, you can create a single object with multiple path shapes. After drawing the first shape, click Mode on the Attribute Toolbar and select Continue Draw Mode, then draw the next shape.
Filling a path with the Even-Odd Fill optionWhenever you render a path object, the object is always filled with the color specified in the Color square on the Attribute Toolbar. When Even-Odd Fill is selected in the Options group of the Tool Settings Panel, the fill only occupies alternate areas created by overlapping path(s). This option is ideal when you have an irregularly-shaped object which folds over onto itself or a complex object containing multiple shapes inside, and you want to keep overlapping areas free of paint. For instance, you can easily create a pattern with alternating fills. The unfilled areas will show the base image.
This alternate filling effect can only be applied to path objects drawn in Continue Draw Mode using the Path Drawing Tool.
When the Even-Odd Fill option is not selected, the fill occupies the entire interior of the object whether paths overlap or not. There are instances, though, in which overlapping areas are still left unfilled, depending on how the path was drawn. If the path's inner curve or line segments were drawn in the opposite direction as the outer segments, overlapping regions will not be filled. See the sample illustrations below.
Notes:• Press [Esc] while creating a shape to cancel it.• To move a path, click and drag it. • After drawing multiple paths in Continue Draw Mode, use the Path Edit Tool to group and
organize the paths. For more information, see “Using the Path Edit Tool” on page 136.
Multiple paths drawn in Continue Draw Mode
With Even-Odd fill Without Even-Odd fill

PHOTOIMPACT USER GUIDE140
Editing pathsThe limitless potential of path objects can be unlocked through editing existing paths. Add, delete, and move edit points in order to reshape, tweak, and adjust your shapes. Turn curved segments into straight sections, or vice versa. PhotoImpact gives you editing tools that let you completely customize and tweak path objects with great versatility.
When you edit path objects, they will be displayed as a wireframe structure. This structure essentially consists of the line and curve segments that comprise the path. Each segment contains nodes and up to two control handles at each end, all of which you can adjust by dragging. Nodes let you control the start or end position of a line segment, whereas control handles let you control the shape of a curve.
• Nodes that are adjoined by two line segments do not have control handles, unless the path has been created with the Spline Tool.
• Nodes that are adjoined by two curve segments will display two control handles that let you adjust the curve.
• Nodes that are adjoined by one line segment and one curve segment will display one control handle that lets you adjust the curve segment only.
Deforming the path shapeWhen any of the drawing tools (Path Drawing Tool, Outline Drawing Tool or Line and Arrow Tool) is selected, you can easily distort the path horizontally or vertically by changing the Mode in the Attribute Toolbar to Horizontal Deform or Vertical Deform.
Inner path shapes drawn in the same direction as the outer shape
Inner path shapes drawn in the opposite direction as the outer shape
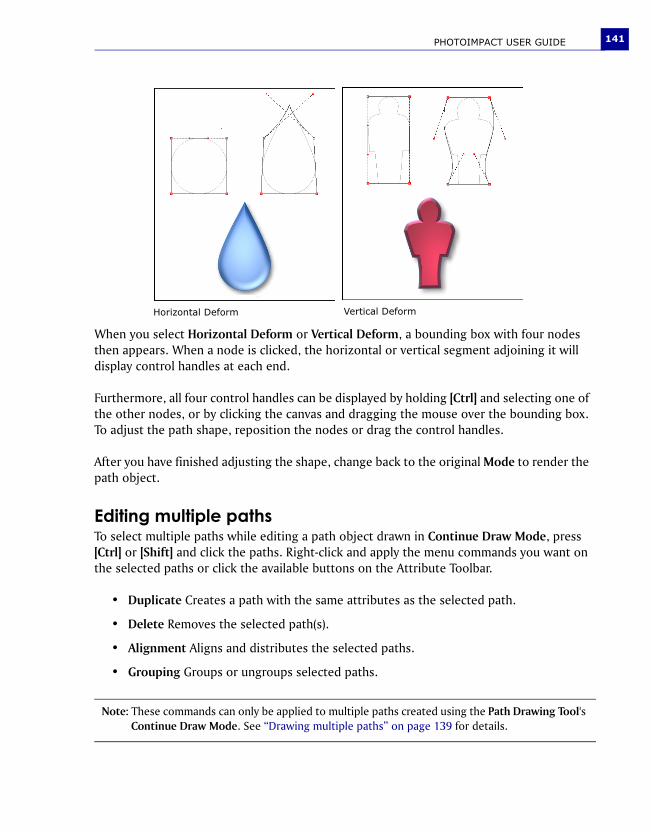
PHOTOIMPACT USER GUIDE 141
When you select Horizontal Deform or Vertical Deform, a bounding box with four nodes then appears. When a node is clicked, the horizontal or vertical segment adjoining it will display control handles at each end.
Furthermore, all four control handles can be displayed by holding [Ctrl] and selecting one of the other nodes, or by clicking the canvas and dragging the mouse over the bounding box. To adjust the path shape, reposition the nodes or drag the control handles.
After you have finished adjusting the shape, change back to the original Mode to render the path object.
Editing multiple pathsTo select multiple paths while editing a path object drawn in Continue Draw Mode, press [Ctrl] or [Shift] and click the paths. Right-click and apply the menu commands you want on the selected paths or click the available buttons on the Attribute Toolbar.
• Duplicate Creates a path with the same attributes as the selected path.
• Delete Removes the selected path(s).
• Alignment Aligns and distributes the selected paths.
• Grouping Groups or ungroups selected paths.
Note: These commands can only be applied to multiple paths created using the Path Drawing Tool's Continue Draw Mode. See “Drawing multiple paths” on page 139 for details.
Horizontal Deform Vertical Deform

PHOTOIMPACT USER GUIDE142
Grouping and ungrouping pathsIf you have created a path object using Continue Draw Mode containing multiple paths, it is advisable that you group them into one or more groups of paths. Group related paths together when you want to fix their position in place while you continue to edit other portions of your path object. This makes managing paths easier and lets you move them together.
To group paths:
1. Click the Path Edit Tool, then click Toggle on the Attribute Toolbar, or click the path object itself.
2. Select the paths you want to group by holding down [Shift] or [Ctrl] while clicking each path. To deselect a path, press [Ctrl] while clicking the path.
3. When all the paths are selected, right-click and select Group Path.
To separate grouped paths, right-click and select Ungroup Path.
Tracing and converting images into pathsThe Edit: Trace Edges submenu contains commands that can convert any base image, selection area or object into a path. You can use these commands to trace a portion of an existing image and turn it into a path object. This saves you the time and the trouble of having to draw it from scratch. Later on, you can make adjustments to the object and give it a 3D look using the Path Tools.
• Edit: Trace - Selection Marquee traces a shape according to the edges of the marquee. Use any of the Selection Tools to mark the desired part of your image first, then apply this command.
• Edit: Trace - Image traces a shape based upon the luminosity values of the pixels in the image, retaining darker pixels and excluding lighter pixels. This command accurately converts a portion of an image into a path object when that part has high contrasting colors over the rest of the image. You can also use this command in cases where the area is easily distinguished from the background image, such as with text on an image.
Tracing a selected area

PHOTOIMPACT USER GUIDE 143
To convert a raster image into a path:
1. Select Edit: Trace Edges - Selection Marquee to trace a selected area. Or, select Edit: Trace Edges - Image to automatically trace dark areas on the image.
2. In the right hand side of the Trace dialog box, you will see a preview of the traced path. Adjust the following settings to get as close as possible to the tracing that you want:
• Tolerance The accuracy of the tracing. A lower value results in greater accuracy.
• Jump point The smoothness of the curves used for tracing. A lower value creates smoother curves.
• Threshold The luminance value determines which pixels to include in the trace. All pixels whose luminance value falls below this are included.
3. Click OK.
4. The traced path appears on top of the raster image, with deformation handles visible. Drag the handles to change the path shape.
Adding 3D propertiesThe Material dialog box is where you bring a text or path object to life. You can give it a 3D look by adding shadows, reflections, and other 3D properties. Click Material on the Attribute Toolbar while using either the Text or Path tools, to open the Material dialog box.
Note: To edit the traced path more precisely, use the Path Edit Tool. For more information, see “Using the Path Edit Tool” on page 136.
Tip: You can also convert an image object to a path object by selecting Object: Convert Object Type - From Text/Image to Path. The boundaries of the object becomes a path which you can distort using the Path Drawing Tool's deform modes or reshape using the Path Edit Tool.
Note: If you create a text or path object on top of a base image, you can also change how the object appears against its background image. Right-click the object and click Properties to open the Object Properties dialog box. Different settings are available for resizing the object, repositioning, merging with background color, and more. The Image Map tab in the dialog box even lets you add hyperlink properties to the object.
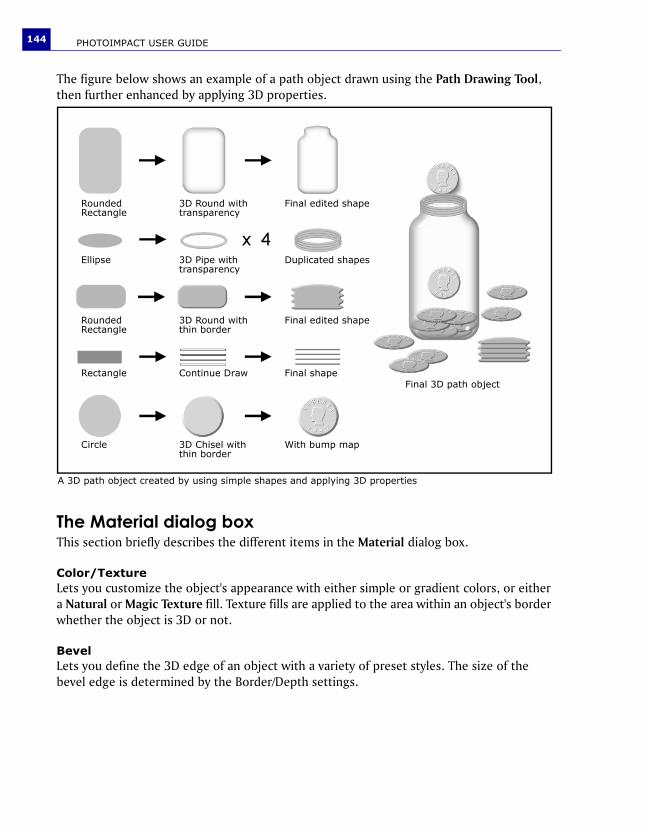
PHOTOIMPACT USER GUIDE144
The figure below shows an example of a path object drawn using the Path Drawing Tool, then further enhanced by applying 3D properties.
The Material dialog boxThis section briefly describes the different items in the Material dialog box.
Color/TextureLets you customize the object's appearance with either simple or gradient colors, or either a Natural or Magic Texture fill. Texture fills are applied to the area within an object's border whether the object is 3D or not.
BevelLets you define the 3D edge of an object with a variety of preset styles. The size of the bevel edge is determined by the Border/Depth settings.
Rounded Rectangle
3D Round with transparency
Ellipse
Rounded Rectangle
Rectangle
Circle
Final edited shape
3D Chisel with thin border
With bump map
3D Pipe with transparency
3D Round with thin border
Continue Draw
Duplicated shapes
Final shape
Final edited shape
Final 3D path object
A 3D path object created by using simple shapes and applying 3D properties
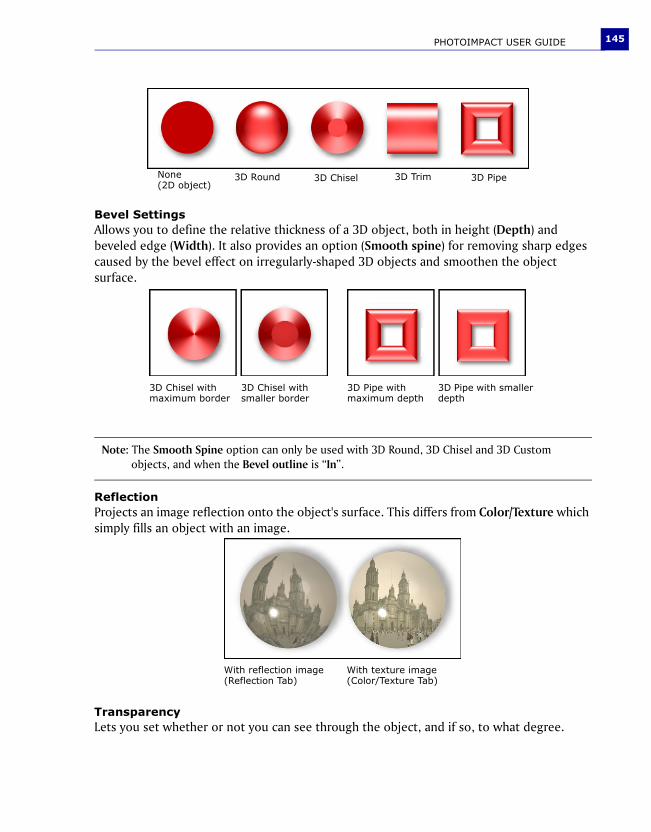
PHOTOIMPACT USER GUIDE 145
Bevel SettingsAllows you to define the relative thickness of a 3D object, both in height (Depth) and beveled edge (Width). It also provides an option (Smooth spine) for removing sharp edges caused by the bevel effect on irregularly-shaped 3D objects and smoothen the object surface.
ReflectionProjects an image reflection onto the object's surface. This differs from Color/Texture which simply fills an object with an image.
TransparencyLets you set whether or not you can see through the object, and if so, to what degree.
Note: The Smooth Spine option can only be used with 3D Round, 3D Chisel and 3D Custom objects, and when the Bevel outline is “In”.
None (2D object)
3D Round 3D Chisel 3D Trim 3D Pipe
3D Chisel with maximum border
3D Chisel with smaller border
3D Pipe with maximum depth
3D Pipe with smaller depth
With reflection image(Reflection Tab)
With texture image(Color/Texture Tab)

PHOTOIMPACT USER GUIDE146
BorderLets you add a line border around a path object. The border color and width can be specified.
ShadowAdds a drop-shadow to your object. It also gives you the option of having PhotoImpact render the backside of a transparent 3D object.
LightAllows you to adjust the direction and number of lights shining on the object. This also provides an option for moving light sources in the same relative position to the object if the object is rotated (Rotate light when object rotates).
You can use up to four lights. To select a light and make adjustments to it, open the Material dialog box then select Light. Click and drag your mouse over the object surface to adjust the position of each light source.
ShadingShading allows you to define whether the material reflects light like metal or like plastic. Plastic, or Phong, refers to a glossy shading scheme. While Metallic refers to a diffused light.
BumpCreate grooves and extrusions on the surface of a 3D object based on contrasting dark and light areas.
Creating transparent objectsTo create a transparent object, for example, a glass jar, draw a 3D object and simply make the transparency setting higher.
Tip: PhotoImpact provides several image files in the Material folder which you can add as textures, reflections, and bump maps to your objects.

PHOTOIMPACT USER GUIDE 147
To create a transparent object:
1. Click the Path Drawing Tool, then select a Shape and draw the path.
2. Click Editing on the Attribute Toolbar to edit the path shape.
Click Editing again to return to the Path Drawing Tool.
3. Change the Mode of the path object to 3D Round on the Attribute Toolbar.
4. Click Material, then click Border/Depth. Lower the Border setting.
5. Click Transparency. Select Transparency then set it to at least 75% to mimic the appearance of glass. Set the minimum transparency to 35% for the object’s edges.
6. Click Shadow and select the Render backface option.
7. Click OK.
Using bump mapsBump map is a term describing an image file that, when applied to a text or path object, creates the appearance of 3D grooves and extrusions on the surface. The darker a particular region is, the deeper the groove, while the lighter a region is, the higher the extrusion appears.
To add a bump map texture to an object:
1. Create a 3D path object or 3D text.
2. Click Material and select Bump.
3. Click Bump map, then locate the file you want to use as a bump map and click Open.
4. Enter the Density of the bump, where 100% is the maximum and 0% is the minimum.
5. If the 3D path object has texture, select Displacement mapping to give the object a more realistic appearance. Change the X and Y values to adjust the texture's displacement over the bump map.
PHOTOIMPACT USER GUIDE148
6. Clear the Use bump as reflection option if the object has a flat surface. However, if your object has a round or curved surface, select this option to map the image across the entire surface.
7. Select Invert bump map to make the image appear raised instead of carved out of the surface of the object.
8. Click OK.
Saving material properties to the EasyPaletteAfter enhancing text and path objects using the Material dialog box, you can save custom attributes and 3D properties in the EasyPalette for future use. If you find that you use a particular look or effect frequently for text or path objects, this will help you save time by providing you with that effect ready to be used, instead of having to recreate the effect each time from scratch.
To save Material dialog box settings to the EasyPalette:
1. Select a text or path object to make it active, then switch to its corresponding tool in the Toolbox, and click Material on the Attribute Toolbar.
2. In the Material dialog box, click Add.
3. In the Material: Save Options dialog box, select All to save everything or Partial to choose the specific settings to save.
4. Click OK. The Add to EasyPalette dialog box then opens.
5. Specify the Sample name, Gallery, and Tab group information for saving.
6. Click OK to add the settings to the EasyPalette.
7. Next time you want to apply the saved 3D properties to any text or path object, simply drag the thumbnail from the gallery to the active object.
Type effectsThe EasyPalette's Type Gallery provides a wide selection of preset colors and gradients, as well as glass, metallic, and other outstanding textures that you can directly apply to text objects.
To apply a preset Type effect:
1. Click the Text Tool on the Toolbox. Enter your text and click OK.
2. Adjust the Font, Size and Color of the selected text on the Attribute Toolbar.
3. Click EasyPalette on the Standard Toolbar to open the galleries and libraries.
PHOTOIMPACT USER GUIDE 149
4. Open Text/Path Effects in the EasyPalette, select Type gallery, then choose a preset effect.
5. Drag or double-click to apply the effect to the text.
Wrap effectsWrap effects bend objects in unique ways by aligning them to the path of a shape. The EasyPalette’s Wrap gallery provides ready-to-use wrap effects which can be directly applied to text and path objects. In addition to these presets, PhotoImpact allows you to create your own wrap effects.
To apply a wrap effect from the EasyPalette:
1. Create a text or path object.
2. Open Text/Path Effects in the EasyPalette, select Type gallery, then choose a preset effect.
The Wrap Gallery allows you to apply Bend Text, Text Wrap, and Path Wrap effects to both text and path objects.
3. Drag or double-click a thumbnail to apply the effect.
Modifying wrap effectsPhotoImpact allows you to change the way an object wraps. You can wrap a single object only, or create many duplicates of it and wrap them on a path. You can also deform the objects and make them follow the shape of their path more smoothly.
Use the Wrap dialog box to change an object’s wrap properties. To access this dialog box, you can:
• Select the wrapped object, then select Object: Wrap - Properties;
• Right-click a wrapped object and select Wrap: Properties from the pop-up menu;
• Modify a wrap effect in the EasyPalette before applying it. Right-click a preset effect thumbnail in the Wrap gallery then select Modify Properties and Apply.
Notes:• Once a type effect has been applied, the text object becomes an image object, and you will not be
able to further edit the text attributes.• To create custom type effects and apply them to your text, select Effect: Creative - Type Effect.
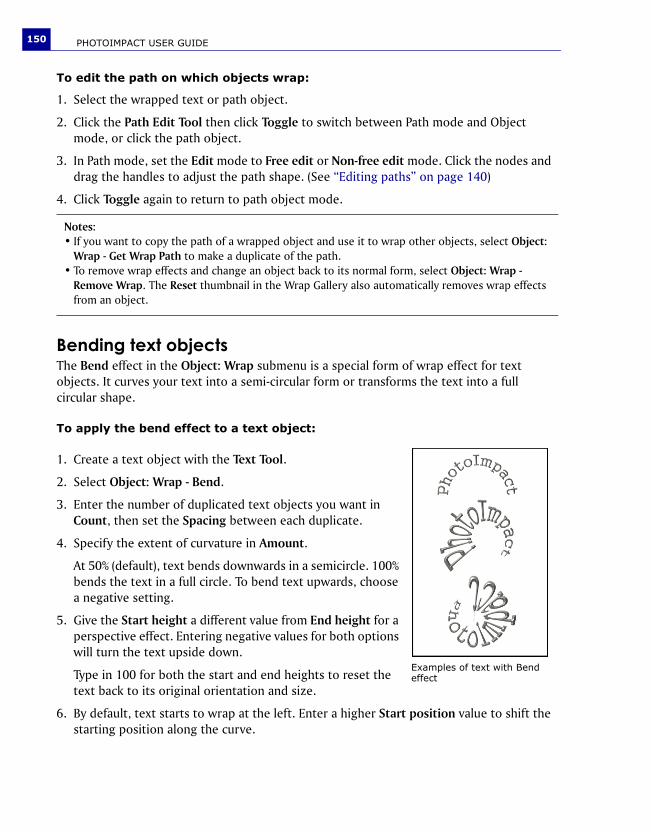
PHOTOIMPACT USER GUIDE150
To edit the path on which objects wrap:
1. Select the wrapped text or path object.
2. Click the Path Edit Tool then click Toggle to switch between Path mode and Object mode, or click the path object.
3. In Path mode, set the Edit mode to Free edit or Non-free edit mode. Click the nodes and drag the handles to adjust the path shape. (See “Editing paths” on page 140)
4. Click Toggle again to return to path object mode.
Bending text objectsThe Bend effect in the Object: Wrap submenu is a special form of wrap effect for text objects. It curves your text into a semi-circular form or transforms the text into a full circular shape.
To apply the bend effect to a text object:
1. Create a text object with the Text Tool.
2. Select Object: Wrap - Bend.
3. Enter the number of duplicated text objects you want in Count, then set the Spacing between each duplicate.
4. Specify the extent of curvature in Amount.
At 50% (default), text bends downwards in a semicircle. 100% bends the text in a full circle. To bend text upwards, choose a negative setting.
5. Give the Start height a different value from End height for a perspective effect. Entering negative values for both options will turn the text upside down.
Type in 100 for both the start and end heights to reset the text back to its original orientation and size.
6. By default, text starts to wrap at the left. Enter a higher Start position value to shift the starting position along the curve.
Notes:• If you want to copy the path of a wrapped object and use it to wrap other objects, select Object:
Wrap - Get Wrap Path to make a duplicate of the path.• To remove wrap effects and change an object back to its normal form, select Object: Wrap -
Remove Wrap. The Reset thumbnail in the Wrap Gallery also automatically removes wrap effects from an object.
Examples of text with Bend effect

PHOTOIMPACT USER GUIDE 151
7. Select Advanced style options to further adjust the text and make it curve more smoothly.
The Z-Merge ToolOne of the exciting features in PhotoImpact is the powerful Z-Merge Tool. Z-Merge introduces the third axis, enabling you to not only control the width and height of objects in your document, but also the elevation, or depth.
By doing this, Z-Merge enables complex interactions among Z-Merged objects in slick new ways. Z-Merge can be applied to both 2D and 3D objects including text objects.
The Z-Merge Tool is located in the Toolbox. The Attribute Toolbar of the Z-Merge Tool is only activated when an object or group of objects that can be assigned Z-Merge values (z-values) is selected. By default, all Z-Merged objects have a z-value of zero.
Assigning a z-value to an object will lift it out of the document towards you and above all non-Z-Merged objects, even if the z-value is negative. The greater the z-value, the greater the distance of the object from the surface of the document. Z-values can range from -1024 to 1024.
To assign a z-value to an object:
1. Select an object or group of objects to elevate.
2. Select the Z-Merge Tool in the Toolbox.
Note: The bend effect simply deforms the text object. It does not add a path.
Notes:• Z-Merge cannot be applied to Web objects.• Z-Merge can be applied to objects in RGB (24-bit True Color) documents only.
With Z-merge appliedWithout Z-merge applied
PHOTOIMPACT USER GUIDE152
3. Select Z-Merge.
4. Assign a value to the elevation of the object or objects using the Z-Elevation slider.
Now that objects have been assigned z-values, they can interact with each other instead of sliding independently over and under one another.
Saving custom paths and attributesTo save the entire path object, including its attributes and 3D properties, simply drag it to the EasyPalette. The Add to EasyPalette dialog box opens, letting you save the object to the desired Object Library. Later on, you can simply drag the thumbnail of the path object to the workspace to add it to another document.
When you click Add on the Attribute Toolbar, the Add to EasyPalette dialog box opens, and by default allows you to save all the path attributes that you see on the Attribute Toolbar (except for the color) to My Gallery - Gallery 1 in the EasyPalette. Next time you want to use the same attributes, drag the thumbnail from My Gallery - Gallery 1 to the workspace. The Attribute Toolbar changes to reflect the saved attributes. You can then apply these attributes to the next path object that you create.
You can also save 3D properties to the EasyPalette. For details, see “Saving material properties to the EasyPalette” on page 148.
Note: Any object with a z-value will appear to be positioned higher in the stack than an object without a z-value, even if the object without a z-value is positioned higher in the Layer Manager.
Notes:• When multiple Z-Merged objects are selected, the Z-Elevation slider box will display the z-value
of the object with the lowest z-value. • If the value in the Z-Elevation slider box is changed, the new value will be applied to only the
lowest z-value object. All other selected objects will calculate their new value by adding the difference between its original z-value and the lowest object's original z-value, to the new value entered in the box.
• To reset all objects to zero, click Reset elevation.
Note: By default, the galleries and object libraries (except for the Shape Library, Outline Library, My Gallery, and My Library) are set to read-only to prevent the presets to be overwritten. To save custom settings and objects to a gallery or library, right-click its folder then clear Read-only (for Sharing).

Applying special effectsChoose from the special effects in the Effect menu to customize and apply to your images. Various effects ranging from lighting, artistic, distort, to animated effects and custom filters are available.
LightsThe Lights effect allows you to add a spotlight or soft ambient light to an image, selection area or object. It uses a combination of Brightness and Contrast adjustments to create the light and shadows effects.
ArtisticThe effects under the Effect: Artistic menu transform your photos into works of art. Convert your photos into artwork such as cartoons, mosaic tiles, or pen and ink. Imitate different types of art media to produce painting effects such as impressionist, finger paint, oil paint, and more.
Notes:• Filters and effects can only be applied to True Color (24-bit) or Grayscale (8-bit) image data types.
Convert images of other data types to True Color or Grayscale using the Adjust: Convert Data Type submenu, or by clicking Data Type located at the lower right hand corner of the PhotoImpact’s status bar.
• Custom effects and filters can be stored in the EasyPalette for later use.
Before Lights are cast on the center of the image to emphasize the wine glass at the middle.
PHOTOIMPACT USER GUIDE154
Brick Tiles This effect creates outlined tiles, each filled with a graded blend of the colors from the original image or tiled using the original image.
Cartoon PhotoImpact’s Cartoon effect transforms images into stills in the style of contemporary cartoons.
Contour Drawing This effect transforms a true-color image into an illustration drawing by outlining the detected edges in the image into simple brush strokes.
Note: The best settings for this effect are greatly dependent on the image you are working with. This effect works particularly well with images containing higher contrast and bold shapes.
Engraving Engraving is a traditional graphical technique where an image is scratched into a metal surface. The surface is coated with ink, and then paper is applied to it. When the paper is pulled away, it bears an impression of the original image. PhotoImpact’s Engraving effect replicates this technique, providing three detailed layers of filters and settings to enable maximum fine tuning.
Finger Paint Finger painting is a painting style using the fingers instead of a brush to apply paint to the canvas. The result is a rustic and fun effect that conveys spontaneity and gives the image a dynamic sense of movement.
Impressionist Impressionism began as a 19th century art movement, rejecting traditional painting techniques and embracing a fresh new perspective of depicting the world. Although diverse, the movement is generally characterized by spontaneous brush strokes and colors conveying movement and light. PhotoImpact's Impressionist effect applies this dynamic appearance to your images.
Mosaic Tiles Mosaic art is an ancient design technique featuring an assembly of many tiny colored tiles to form an image or a pattern. Use PhotoImpact’s Mosaic Tiles effect to transform your images to mosaic artwork.
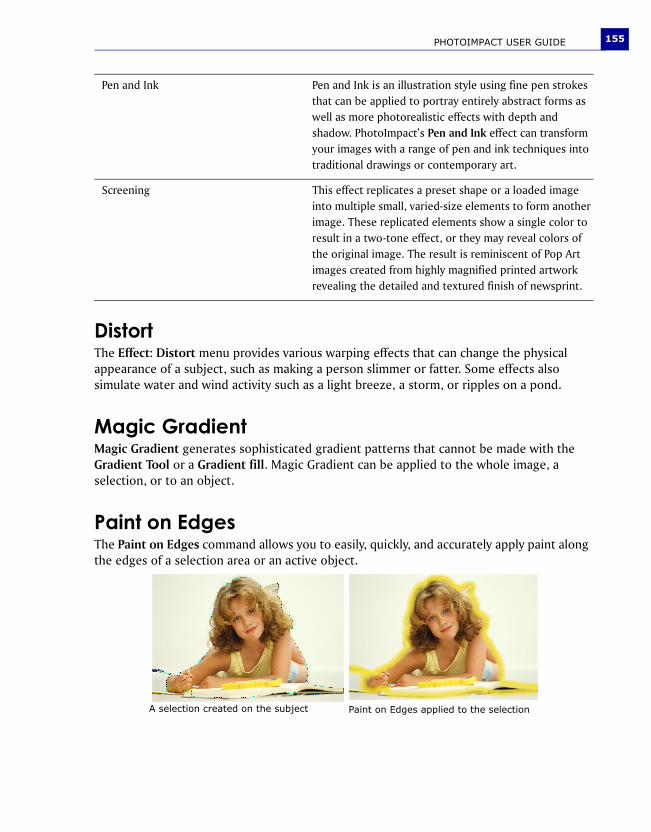
PHOTOIMPACT USER GUIDE 155
DistortThe Effect: Distort menu provides various warping effects that can change the physical appearance of a subject, such as making a person slimmer or fatter. Some effects also simulate water and wind activity such as a light breeze, a storm, or ripples on a pond.
Magic GradientMagic Gradient generates sophisticated gradient patterns that cannot be made with the Gradient Tool or a Gradient fill. Magic Gradient can be applied to the whole image, a selection, or to an object.
Paint on EdgesThe Paint on Edges command allows you to easily, quickly, and accurately apply paint along the edges of a selection area or an active object.
Pen and Ink Pen and Ink is an illustration style using fine pen strokes that can be applied to portray entirely abstract forms as well as more photorealistic effects with depth and shadow. PhotoImpact’s Pen and Ink effect can transform your images with a range of pen and ink techniques into traditional drawings or contemporary art.
Screening This effect replicates a preset shape or a loaded image into multiple small, varied-size elements to form another image. These replicated elements show a single color to result in a two-tone effect, or they may reveal colors of the original image. The result is reminiscent of Pop Art images created from highly magnified printed artwork revealing the detailed and textured finish of newsprint.
A selection created on the subject Paint on Edges applied to the selection

PHOTOIMPACT USER GUIDE156
TurnpageThe Turnpage effect gives your image the appearance of curling up from the corner as if it were a piece of paper or a page in a book. With this effect, you can ‘turn’ an image at any degree from any corner.
DeInterlaceA common problem among video captures is the inadvertent capture of two or more frames in one image, resulting in the presence of ungainly lines throughout. DeInterlace solves this problem by eliminating one overlying frame and smoothing out the remainder.
Animation effectsThere are two types of animation creation sections available in Effect dialog boxes. These are Frame-based, including the Crystal and Glass, Animation Studio, Creative Lighting, Particle Effect, Texture Effect and Type Effect dialog boxes; and Storyboard-based, including the Creative Warp, and Creative Transform dialog boxes.
Before After
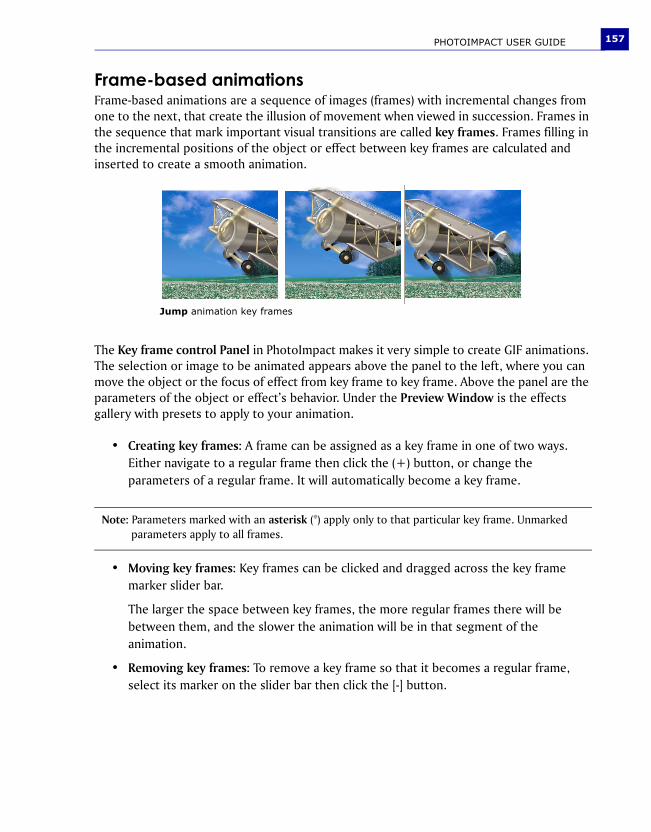
PHOTOIMPACT USER GUIDE 157
Frame-based animationsFrame-based animations are a sequence of images (frames) with incremental changes from one to the next, that create the illusion of movement when viewed in succession. Frames in the sequence that mark important visual transitions are called key frames. Frames filling in the incremental positions of the object or effect between key frames are calculated and inserted to create a smooth animation.
The Key frame control Panel in PhotoImpact makes it very simple to create GIF animations. The selection or image to be animated appears above the panel to the left, where you can move the object or the focus of effect from key frame to key frame. Above the panel are the parameters of the object or effect’s behavior. Under the Preview Window is the effects gallery with presets to apply to your animation.
• Creating key frames: A frame can be assigned as a key frame in one of two ways. Either navigate to a regular frame then click the (+) button, or change the parameters of a regular frame. It will automatically become a key frame.
• Moving key frames: Key frames can be clicked and dragged across the key frame marker slider bar.
The larger the space between key frames, the more regular frames there will be between them, and the slower the animation will be in that segment of the animation.
• Removing key frames: To remove a key frame so that it becomes a regular frame, select its marker on the slider bar then click the [-] button.
Note: Parameters marked with an asterisk (*) apply only to that particular key frame. Unmarked parameters apply to all frames.
Jump animation key frames
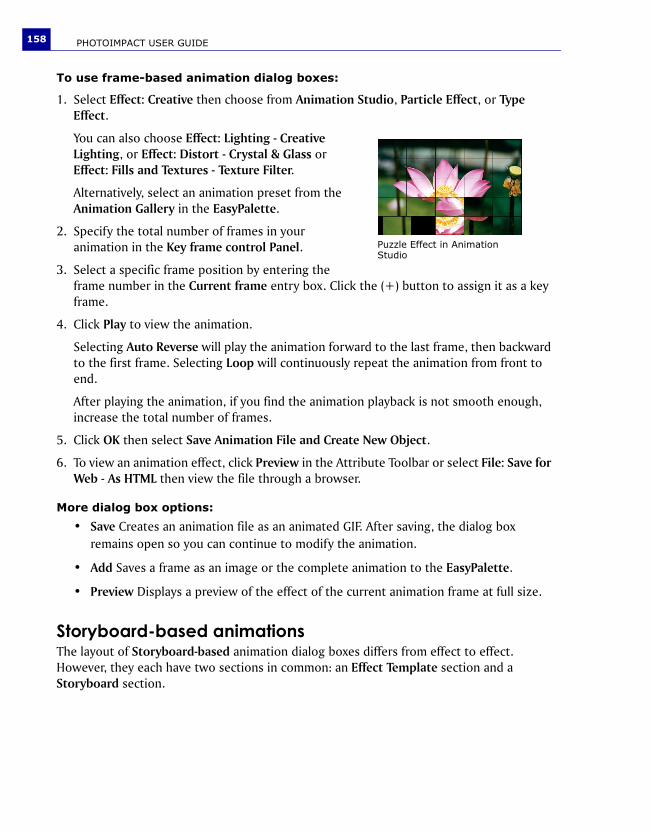
PHOTOIMPACT USER GUIDE158
To use frame-based animation dialog boxes:
1. Select Effect: Creative then choose from Animation Studio, Particle Effect, or Type Effect.
You can also choose Effect: Lighting - Creative Lighting, or Effect: Distort - Crystal & Glass or Effect: Fills and Textures - Texture Filter.
Alternatively, select an animation preset from the Animation Gallery in the EasyPalette.
2. Specify the total number of frames in your animation in the Key frame control Panel.
3. Select a specific frame position by entering the frame number in the Current frame entry box. Click the (+) button to assign it as a key frame.
4. Click Play to view the animation.
Selecting Auto Reverse will play the animation forward to the last frame, then backward to the first frame. Selecting Loop will continuously repeat the animation from front to end.
After playing the animation, if you find the animation playback is not smooth enough, increase the total number of frames.
5. Click OK then select Save Animation File and Create New Object.
6. To view an animation effect, click Preview in the Attribute Toolbar or select File: Save for Web - As HTML then view the file through a browser.
More dialog box options:
• Save Creates an animation file as an animated GIF. After saving, the dialog box remains open so you can continue to modify the animation.
• Add Saves a frame as an image or the complete animation to the EasyPalette.
• Preview Displays a preview of the effect of the current animation frame at full size.
Storyboard-based animationsThe layout of Storyboard-based animation dialog boxes differs from effect to effect. However, they each have two sections in common: an Effect Template section and a Storyboard section.
Puzzle Effect in Animation Studio

PHOTOIMPACT USER GUIDE 159
The purpose of the Storyboard is to display a modifiable sequence of applied effects. Each template effect is applied to the previous slide of the animation, which is viewable in the Storyboard section. In most cases, you can click Reset to start a new slide with a fresh copy of the original image instead of continuing to apply effects to the previous slide.
To use storyboard-based animation dialog boxes:
1. Select Effect: Distort - Creative Warp, or Effect: Distort - Creative Transform.
2. Click Advanced to display the Storyboard. (Not necessary for the Transform dialog box).
3. Select a template effect to apply, then click Insert to add it to the Storyboard. Repeat this procedure to apply as many effects as you like. You can insert up to ten frames in the animation.
4. Modify a storyboard entry by clicking the corresponding thumbnail image and then selecting another template effect. Click Delete to remove an entry or Delete All to start over.
5. Click Save to create an animation file. After saving, the Effect dialog box remains open so you can continue modifying the effects settings. (See “Saving animations” on page 159 for details)
6. Click OK to close the dialog box and apply the current frame position's effect settings to the image.
Saving animationsAn animation or a sequence of transformations can be saved to a file format that best suits your final target destination. In the Save As dialog box, you may save the animation's individual frames as independent files by selecting Sequence BMP files from the Save as type drop-down list, or select Animated GIF files to save the animation as a single GIF file. When saving to a Sequence BMP format, each frame in the sequence is labeled name001.bmp where you can specify name in the Save As dialog box.
Note: In most Transform effects, you can move your mouse over the Preview Window and paint over the image to manually adjust the effect.
Changed face shape after Creative Transform
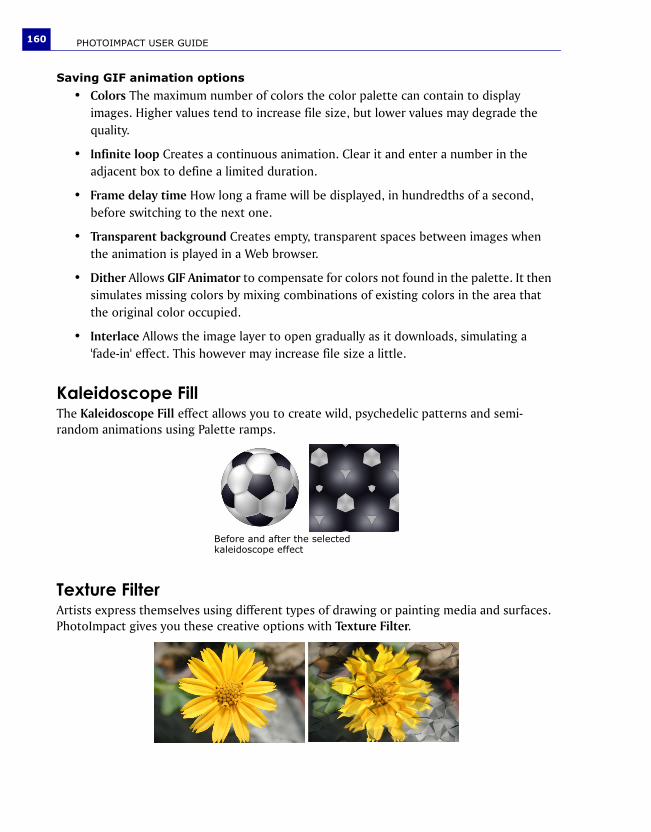
PHOTOIMPACT USER GUIDE160
Saving GIF animation options
• Colors The maximum number of colors the color palette can contain to display images. Higher values tend to increase file size, but lower values may degrade the quality.
• Infinite loop Creates a continuous animation. Clear it and enter a number in the adjacent box to define a limited duration.
• Frame delay time How long a frame will be displayed, in hundredths of a second, before switching to the next one.
• Transparent background Creates empty, transparent spaces between images when the animation is played in a Web browser.
• Dither Allows GIF Animator to compensate for colors not found in the palette. It then simulates missing colors by mixing combinations of existing colors in the area that the original color occupied.
• Interlace Allows the image layer to open gradually as it downloads, simulating a 'fade-in' effect. This however may increase file size a little.
Kaleidoscope FillThe Kaleidoscope Fill effect allows you to create wild, psychedelic patterns and semi-random animations using Palette ramps.
Texture FilterArtists express themselves using different types of drawing or painting media and surfaces. PhotoImpact gives you these creative options with Texture Filter.
Before and after the selected kaleidoscope effect

PHOTOIMPACT USER GUIDE 161
Creative WarpCreative Warp lets you create a kaleidoscopic effect, but rather than having an output of just a single frame, you can create an animation or an image sequence by using multiple kaleidoscopic effects simultaneously.
Crystal and GlassCrystal and Glass places transparent, curved objects over your image, refracting light and simulating distortions seen when viewing images through a crystal. This effect can be applied to the whole image, a selection, or an object.
Creative LightingCreative Lighting effects allow you to simulate natural phenomena to produce fantastic animations for Web pages. Each lighting effect has its own attributes that can be customized individually. You can apply this effect to an image, selection area or active object.
Particle EffectThe Particle Effect adds the realism of fire, smoke, snow, and other natural effects to your images. Each effect has its own self-contained set of attributes which can be individually customized. The Particle Gallery in the EasyPalette also provides preset particle effects that can be directly applied to images.
Flashlight effectLight bulb and Comet effects
Lightning effect
Rain effect
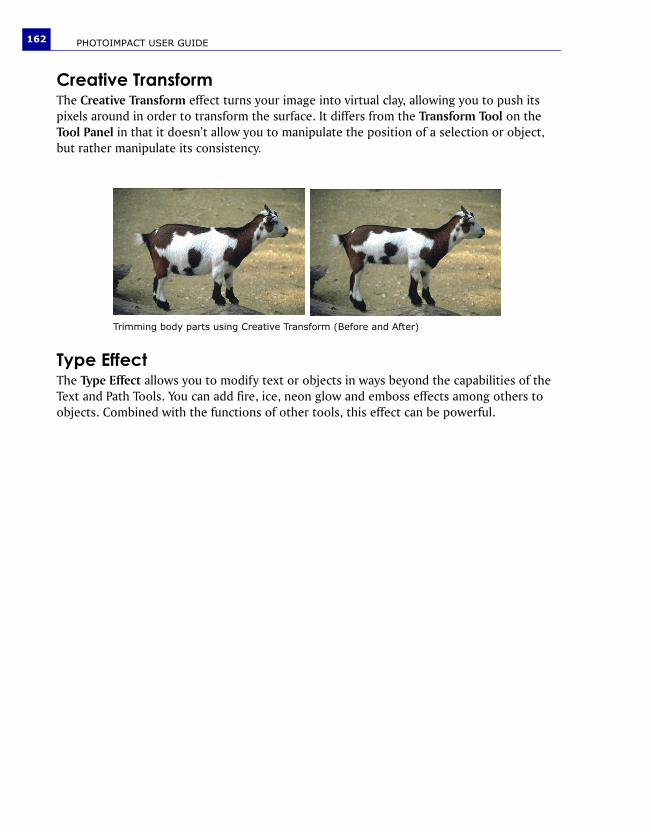
PHOTOIMPACT USER GUIDE162
Creative TransformThe Creative Transform effect turns your image into virtual clay, allowing you to push its pixels around in order to transform the surface. It differs from the Transform Tool on the Tool Panel in that it doesn’t allow you to manipulate the position of a selection or object, but rather manipulate its consistency.
Type EffectThe Type Effect allows you to modify text or objects in ways beyond the capabilities of the Text and Path Tools. You can add fire, ice, neon glow and emboss effects among others to objects. Combined with the functions of other tools, this effect can be powerful.
Trimming body parts using Creative Transform (Before and After)
Printing To print an image, select File: Print [Ctrl+P] to open the Print dialog box. You can select the printer, paper size, number of copies to print, and where to place the image on the page.
Color ManagementDue to variations in monitor calibration, the color gamut of your device, and the type of paper you are printing on, the color you see on your screen may not necessarily be the color you get on your final printed copy. Therefore, you may need to use Color Management System (CMS) to match the colors on your monitor with a printed version.
A CMS has 3 key functions:
• Maps color gamuts between selected devices.
• Matches colors in different color models (for example, RGB to CMYK).
• Provides an accurate display of colors on screen.
To set up a Color Management Profile:
1. Select File: Preferences - Color Management.
2. Select Enable Color Management and select Basic if you want to match the color displayed on your monitor with that of the color gamut of a selected device such as a printer; and select Proofing if you want to emulate the colors that make up your image to be displayed on another device.
3. Select color profiles for your Monitor and Printer from their respective lists.
4. Click OK.
Note: PhotoImpact includes Microsoft’s “Image Color Matching” 2.0 (ICM 2.0), a color management technology producing consistent color results. ICM 2.0 is available if you use Windows 98, Windows 2000, or Windows XP.
Note: If you selected Proofing Color Management in step 2, you can select a profile to emulate another device on your monitor and printer.

PHOTOIMPACT USER GUIDE164
Calibrating your printerAll printers print images differently. For example, some print shadowed areas too dark or highlighted areas too light. You can compensate for this printing problem through calibration.
To calibrate your printer:
1. Select File: Print [Ctrl+P].
2. Click Options for more detailed printer settings.
3. In the Calibration tab:
• Clear Use printer’s default to manually adjust the calibration curve.
• Click Apply enhancement and choose an enhancement command to correct one or more of your printer’s problems, or manually adjust the calibration curve.
4. In the Halftone tab, clear Use printer’s default to manually adjust the frequency and angle that will determine how your printer interprets each pixel to print. Click OK.
Using Print PreviewEvery now and then, you would want to see how your image looks like before actually printing it. Simply use Print Preview to check whether your image now suits your target output.
To preview an image:
1. Select File: Print Preview.
2. Select a printer from Printer name. Change printer settings by clicking Printer Properties. You can also specify color printer options by clicking Color printer options at the bottom of the panel.
3. Select Paper size and Layout. If you want to adjust print margins, select File: Page Setup.
PHOTOIMPACT USER GUIDE 165
4. Adjust the image’s location within the print Preview Window by dragging it. To resize the image while maintaining aspect ratio, drag the handles at the four corners of the image. To resize the image without maintaining aspect ratio, use the non-corner handles of the image.
5. Under Layout, specify settings of the image for printing. You can assign the paper’s orientation, provide an image title, automatically resize it to fit the page, and center it horizontally and vertically.
6. Specify number of copies to print in Copies.
7. Click Print if you want to print, or Close to return to the normal editing mode.
More print optionsLet your creativity flow with PhotoImpact's unique capability to print CD labels, stickers, and even posters.
Print LayoutUsing Print Layout, you can print the same image many times over or different images on a single page. Some layouts are designed for use with special paper available from Avery or Kodak, which you can use by selecting the corresponding product number. You can also use plain, non-branded paper by selecting either Disc Labels & Tray or Multiple Holders.
To print images:
1. With an image open in the workspace, select File: More Print Options - Print Layout.
2. Select a printer from Printer name. Change printer settings by clicking Printer Properties.
3. Click Paper layout to select a preset layout from the list. Then select paper orientation. Then, click Next.
4. Select whether to use the images found in the workspace, or add more images using a different source folder. Then, click Next.
5. If you are printing a single image multiple times, proceed to step 6 immediately. If you choose to print different images, drag selected image(s) from the thumbnail list to a placeholder in the Preview Window.
Notes:• Select the appropriate alignment settings in the Options Panel to reposition the document.• Click Modify Printable Area on the Shortcut Bar to adjust the printable area.• Click Reset to undo any change and return the image to its original state.
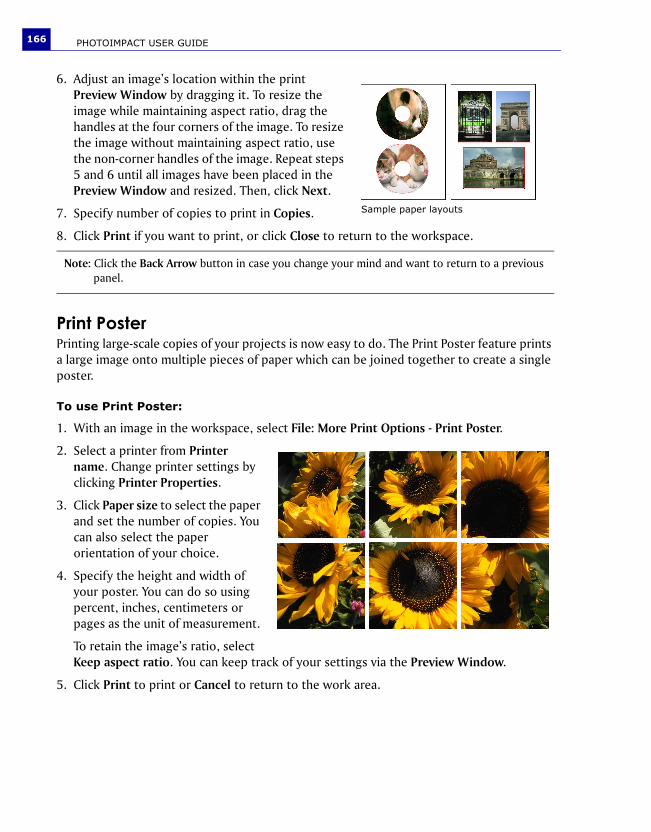
PHOTOIMPACT USER GUIDE166
6. Adjust an image’s location within the print Preview Window by dragging it. To resize the image while maintaining aspect ratio, drag the handles at the four corners of the image. To resize the image without maintaining aspect ratio, use the non-corner handles of the image. Repeat steps 5 and 6 until all images have been placed in the Preview Window and resized. Then, click Next.
7. Specify number of copies to print in Copies.
8. Click Print if you want to print, or click Close to return to the workspace.
Print PosterPrinting large-scale copies of your projects is now easy to do. The Print Poster feature prints a large image onto multiple pieces of paper which can be joined together to create a single poster.
To use Print Poster:
1. With an image in the workspace, select File: More Print Options - Print Poster.
2. Select a printer from Printer name. Change printer settings by clicking Printer Properties.
3. Click Paper size to select the paper and set the number of copies. You can also select the paper orientation of your choice.
4. Specify the height and width of your poster. You can do so using percent, inches, centimeters or pages as the unit of measurement.
To retain the image’s ratio, select Keep aspect ratio. You can keep track of your settings via the Preview Window.
5. Click Print to print or Cancel to return to the work area.
Note: Click the Back Arrow button in case you change your mind and want to return to a previous panel.
Sample paper layouts

E-mailing and photo sharingPhotoImpact makes it easy to share your photo to families and friends through various ways:
• Customize and print cards or send them by email.• Personalize a calendar with your own photos.
• Post multiple images as a Slideshow or Album in your Web page.
• Adjust images for transmission to your to your mobile device as large images might be distorted when viewed on a small-sized screen.
Photo ProjectsIf you’ve already opened images in the workspace, you can choose Photo Projects to create custom greeting cards, name cards, invitations, collages and much more by providing you with a large range of templates. Photo Projects also contains a large selection of tools to prepare your images for projects, and special enhancements.
To create a photo project:
1. Click File: Share - Photo Projects.
2. In the Template tab, select a project template from the project category drop-down menu.
Or you can import Photo Project templates. Click Open Project and browse for the template file.
Photo Project template with placeholder
New Photo Project
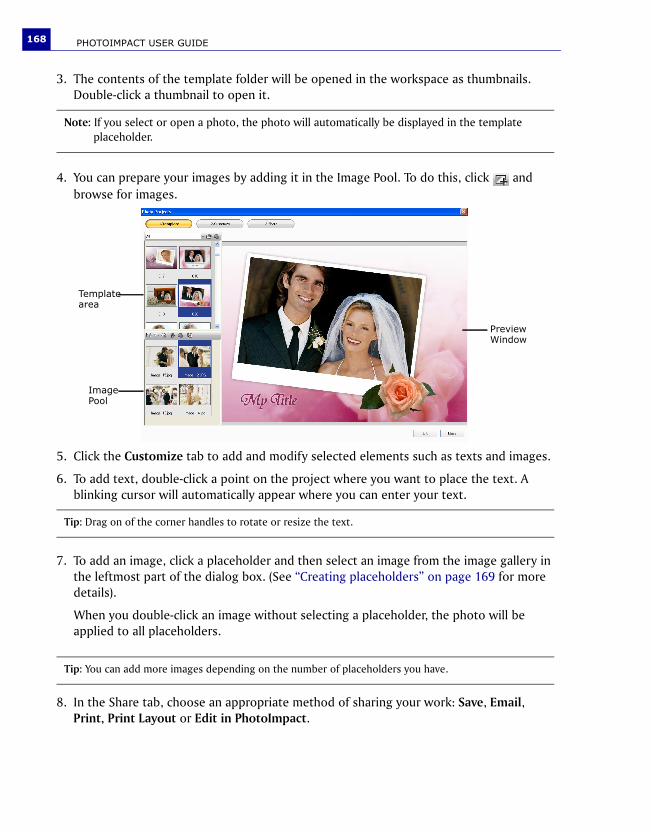
PHOTOIMPACT USER GUIDE168
3. The contents of the template folder will be opened in the workspace as thumbnails. Double-click a thumbnail to open it.
4. You can prepare your images by adding it in the Image Pool. To do this, click and browse for images.
5. Click the Customize tab to add and modify selected elements such as texts and images.
6. To add text, double-click a point on the project where you want to place the text. A blinking cursor will automatically appear where you can enter your text.
7. To add an image, click a placeholder and then select an image from the image gallery in the leftmost part of the dialog box. (See “Creating placeholders” on page 169 for more details).
When you double-click an image without selecting a placeholder, the photo will be applied to all placeholders.
8. In the Share tab, choose an appropriate method of sharing your work: Save, Email, Print, Print Layout or Edit in PhotoImpact.
Note: If you select or open a photo, the photo will automatically be displayed in the template placeholder.
Tip: Drag on of the corner handles to rotate or resize the text.
Tip: You can add more images depending on the number of placeholders you have.
Template area
Image Pool
Preview Window
PHOTOIMPACT USER GUIDE 169
Creating your own Photo Project templatesFor starters, you can use the templates provided in the EasyPalette which you can customize to fit your taste. Or start creating your templates from scratch --combining objects and layers or applying effects and enhancements. Read through the next chapters to learn how to work with objects, texts and special effects.
It is also important to have a placeholder included in your template. Otherwise, you won’t be able to add new images. To learn to create placeholders for your template, see “Creating placeholders”.
When you have successfully finished your template, make sure to save it in the Ulead File For Photo Project format (*.UFP). This allows you to open and use your template in the Photo Projects dialog box. In the Template tab, click Open Project and browse for the created file.
Creating placeholdersA placeholder is an image area or an active element on the project template that indicates that this may be replaced by another element or image. Creating placeholders can help you change or replace images in your template easily.
To create placeholders:
1. Create or select an object that you want to use as a placeholder.
2. To be able to assign the object as a placeholder, you need to create a layer mask on the object. See “To create a layer mask:” on page 94 for more details.
3. Right-click the object and then select Properties.
4. In the General tab of Object Properties dialog box, select Placeholder.
5. Click OK.
Note: If the object is a path, it is important to convert it to an image. Select Object: Convert Object Type - From Text/Path to Image.

PHOTOIMPACT USER GUIDE170
CalendarCreate a monthly calendar to remind you of important and special dates.
To create a calendar:
1. Open an image and click File: Share - Calendar.
2. In the Template tab, select a project template from the project category drop-down menu.
3. Set the Start Date by the year and month.
4. Specify the number of monthly calendars to create. To create 12-month calendar, set 12 in Number.
5. Click to select the created calendar thumbnails below the Preview Window.
6. Click the Customize tab to add and modify selected elements such as texts and images.
7. To add text, double-click a point on the project where you want to place the text. A blinking cursor will automatically appear where you can enter your text.
Tip: Drag on of the corner handles to rotate or resize the text.
Object assigned as placeholder
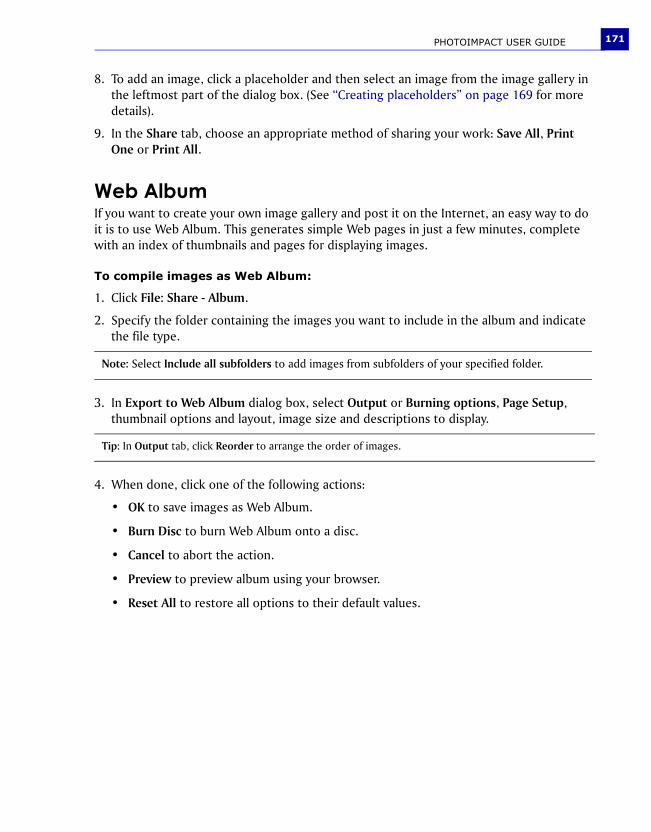
PHOTOIMPACT USER GUIDE 171
8. To add an image, click a placeholder and then select an image from the image gallery in the leftmost part of the dialog box. (See “Creating placeholders” on page 169 for more details).
9. In the Share tab, choose an appropriate method of sharing your work: Save All, Print One or Print All.
Web AlbumIf you want to create your own image gallery and post it on the Internet, an easy way to do it is to use Web Album. This generates simple Web pages in just a few minutes, complete with an index of thumbnails and pages for displaying images.
To compile images as Web Album:
1. Click File: Share - Album.
2. Specify the folder containing the images you want to include in the album and indicate the file type.
3. In Export to Web Album dialog box, select Output or Burning options, Page Setup, thumbnail options and layout, image size and descriptions to display.
4. When done, click one of the following actions:
• OK to save images as Web Album.
• Burn Disc to burn Web Album onto a disc.
• Cancel to abort the action.
• Preview to preview album using your browser.
• Reset All to restore all options to their default values.
Note: Select Include all subfolders to add images from subfolders of your specified folder.
Tip: In Output tab, click Reorder to arrange the order of images.
PHOTOIMPACT USER GUIDE172
Web SlideshowYou can also transform all your image collections to slideshows for your Web pages.
To save images as a slideshow:
1. Click File: Share - Web Slideshow.
2. Specify the folder containing the images you want to include in the slideshow and indicate the file type.
3. In Export to Web Slideshow dialog box, select your preferred Output or Burning options, Page Setup, Image size and Time settings.
4. Click OK or Burn Disc when done.
Mobile ImageMobile Image lets you adjust images for transmission to your mobile device such as a cell phone or PDA. It lets you adjust the image for mobile device’s screen size as large images might be distorted when viewed on a small-sized screen.
To save an image for a mobile device:
1. Open the image you want to adjust then select File: Share - Mobile Image.
2. Choose an output target.
Target defines the height and width in pixels, file format and file size limit of the image allowed in your device. Select the device or define your own variables and click Next.
3. Set the range to crop by dragging the box or the four control points to define the part of the image you want to save. Then, click Next.
4. Select a file format and click Save As.
5. To transmit the image to your mobile device, check its user guide for instructions.
Note: Select Include all subfolders to add images from subfolders of your specified folder.
Tip: In Output tab, click Reorder to arrange the order of images.
Note: To transmit the image to your mobile device, check its user guide for instructions.
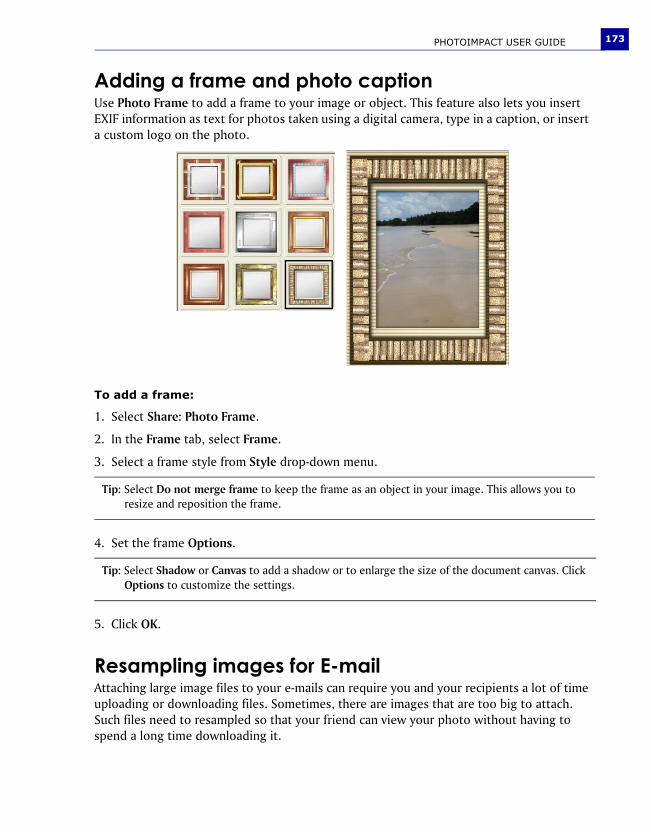
PHOTOIMPACT USER GUIDE 173
Adding a frame and photo caption Use Photo Frame to add a frame to your image or object. This feature also lets you insert EXIF information as text for photos taken using a digital camera, type in a caption, or insert a custom logo on the photo.
To add a frame:
1. Select Share: Photo Frame.
2. In the Frame tab, select Frame.
3. Select a frame style from Style drop-down menu.
4. Set the frame Options.
5. Click OK.
Resampling images for E-mailAttaching large image files to your e-mails can require you and your recipients a lot of time uploading or downloading files. Sometimes, there are images that are too big to attach. Such files need to resampled so that your friend can view your photo without having to spend a long time downloading it.
Tip: Select Do not merge frame to keep the frame as an object in your image. This allows you to resize and reposition the frame.
Tip: Select Shadow or Canvas to add a shadow or to enlarge the size of the document canvas. Click Options to customize the settings.
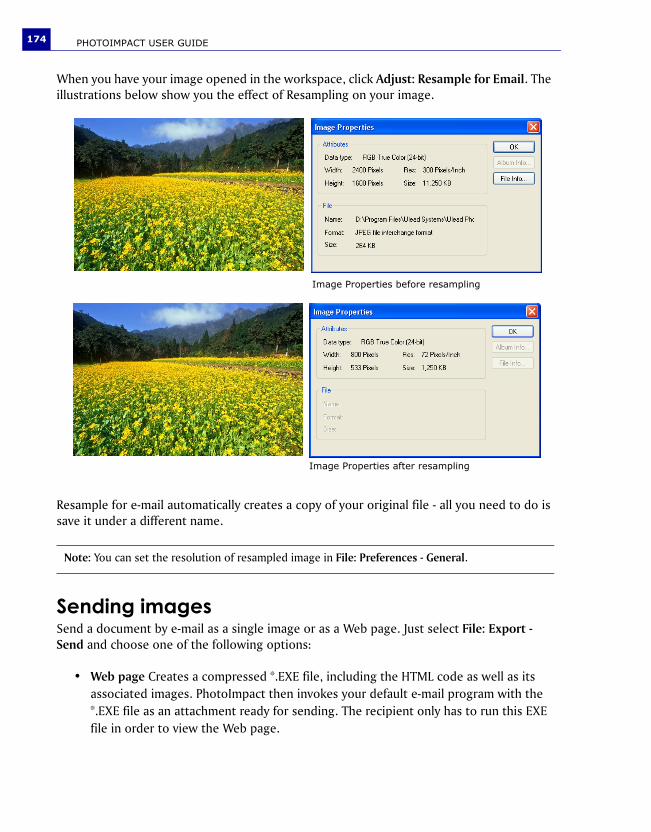
PHOTOIMPACT USER GUIDE174
When you have your image opened in the workspace, click Adjust: Resample for Email. The illustrations below show you the effect of Resampling on your image.
Resample for e-mail automatically creates a copy of your original file - all you need to do is save it under a different name.
Sending imagesSend a document by e-mail as a single image or as a Web page. Just select File: Export - Send and choose one of the following options:
• Web page Creates a compressed *.EXE file, including the HTML code as well as its associated images. PhotoImpact then invokes your default e-mail program with the *.EXE file as an attachment ready for sending. The recipient only has to run this EXE file in order to view the Web page.
Note: You can set the resolution of resampled image in File: Preferences - General.
Image Properties before resampling
Image Properties after resampling
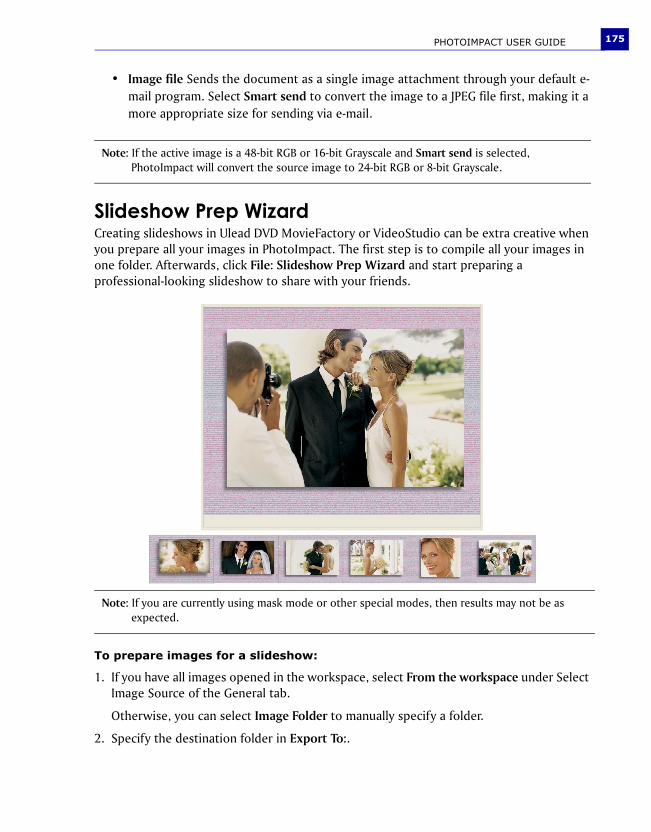
PHOTOIMPACT USER GUIDE 175
• Image file Sends the document as a single image attachment through your default e-mail program. Select Smart send to convert the image to a JPEG file first, making it a more appropriate size for sending via e-mail.
Slideshow Prep WizardCreating slideshows in Ulead DVD MovieFactory or VideoStudio can be extra creative when you prepare all your images in PhotoImpact. The first step is to compile all your images in one folder. Afterwards, click File: Slideshow Prep Wizard and start preparing a professional-looking slideshow to share with your friends.
To prepare images for a slideshow:
1. If you have all images opened in the workspace, select From the workspace under Select Image Source of the General tab.
Otherwise, you can select Image Folder to manually specify a folder.
2. Specify the destination folder in Export To:.
Note: If the active image is a 48-bit RGB or 16-bit Grayscale and Smart send is selected, PhotoImpact will convert the source image to 24-bit RGB or 8-bit Grayscale.
Note: If you are currently using mask mode or other special modes, then results may not be as expected.
PHOTOIMPACT USER GUIDE176
3. Select the Image Ratio Size of your target DVD format.
4. Click Next. This will take you to Background tab.
5. Choose a background style (One color, Gradient, Texture, or Fill Image File). To change the selected color/gradient/texture, click the color box and choose a color/gradient fill/texture.
When Fill Image File is selected, browse for the image and specify its Fill type.
6. Click Next.
7. Select Frame and/or Shadow. You can choose among the Frame and Shadow presets displayed.
8. Click Next. The next tab allows you to include the EXIF information (i.e. Date/Time). Select Add date and time from EXIF to add and customize EXIF text.
9. Click Next.
10.Before previewing the slideshow, render all images for playback. To do this, click Start.
11.When files have been successfully rendered, click .
12.When done, click Export. This automatically saves edited image files to the destination folder.
13.To import these images to Ulead VideoStudio and DVD MovieFactory, check its corresponding user guides.
Note: Modifying images for slideshow needs to be re-rendered in order to make sure all of your changes have been applied.
Using the Quick Command PanelWith the Quick Command Panel (QCP), PhotoImpact provides a fast way to access commonly used menu commands and toolbar actions, to retrace or redo steps you have done, as well as an easy way to record a series of steps (known as macros) that you can apply to your image or file and thus save precious time for more productive activities. In addition to customizing commands, you can efficiently organize a series of tasks to perform while working on your images.
To activate the Quick Command Panel:
• Select Window: Panels - Quick Command Panel.
• Click Quick Command Panel in the Panel Manager,
• Drag-and-drop (or double-click) a task saved in the EasyPalette, or
• Press [Ctrl+F2].
To record a quick command:
1. In the Task tab, click Create a new task.
2. Enter a name for the sequence of actions that you want to record, then click Record.
3. Begin applying a series of commands to your image. All of these will be automatically recorded in the QCP.
4. After you have applied the desired commands, click Stop. To add more commands to the task, click Record again and continue working on image.
After recording a series of actions, you can apply them all or just a select few to another image.
• To apply an entire series of actions to an image, simply click Play in the Task tab. All recorded actions will be applied.
• To apply a single command to an image, use the Task tab and click the desired command.
Note: You can also rearrange the task commands here by simply dragging a task command to a different location on the Task list. You can also right-click the list to open a pop-up menu to customize the Task list.

PHOTOIMPACT USER GUIDE178
Using tasks in the EasyPaletteEasyPalette provides the Task Gallery in which a number of commonly used preset tasks are available. You can also store your own tasks in the EasyPalette.
To apply a task stored in the EasyPalette:
• In the EasyPalette, drag a task to an image in the workspace.
• In the EasyPalette, double-click a task.
• Select one or more image files in the Document Manager or the Browse Manager, and then drag a task to these files.
Using the History TabThe History tab is a very useful tool when you often use the Undo/Redo commands, which are very important tools when you want to test the effect of a function applied to your image. After making a large number of changes to an image, the quickest way to return to a previous state is to select it from the list in the History tab.
To duplicate an earlier image state:
1. In the History Tab, drag the slider or select the state in the history list.
2. Click Duplicate on the toolbar.
3. Select the original image in the workspace, then drag the slider or select the last command in the history list to reapply all commands.
Notes:• Click Task menu commands and select Task Manager on the pop-up menu to organize and edit
tasks in a set.• Click Batch Task to apply a command to all image files in a selected folder.• Click Add to EasyPalette to save a task in the EasyPalette for later use. You can choose the
current image or a default task icon as the EasyPalette thumbnail.
Notes:• Click Clear Undo/Redo History to purge the history list for the selected image. This can be
beneficial for program performance as it frees up system resources. If you find that your system’s performance is slow after applying a lot of effects, click Change Undo Level to decrease the number of undo levels to improve performance.
• When Enable/Disable Undo is depressed, Undo is enabled. If you are running a low-memory system, you can disable Undo to improve overall performance.

PHOTOIMPACT USER GUIDE 179
Applying commands to multiple filesWhen working with a large number of files, you will often want to edit, save, or perform the same commands on some or all of them. To save time and effort, PhotoImpact provides you with a number of options that help you perform the same commands across a number of files.
Batch ManagerBatch Manager displays file names and thumbnails of all images that are open in the workspace, including all commands that can be applied.
To process images with Batch Manager:
1. Select Window: Batch Manager. You’ll find all open images displayed as thumbnails.
2. From the list of open images, select the ones where you want the operation applied. You can select multiple images by holding [Ctrl] or [Shift] while clicking, or click Select All to choose all files.
3. Select the command you to run from the Category and Operation lists.
4. Click OK.
Notes:• Clicking the Batch Manager icon instead of the arrow next to it performs the last specified batch
command. To find out what the last command is, place the mouse pointer over the icon for a few seconds.
• Batch Manager can also be accessed through the Document Manager.
PHOTOIMPACT USER GUIDE180
Batch ConvertBatch Convert offers a convenient way of converting image files (including an entire folder of image files) without having to actually open them one by one in any image editing program.
To batch convert files:
1. Select File: Batch Convert.
2. Select the folder or files for conversion in Source. Type determines what file formats are included in the conversion process.
3. Select where to send the converted files by specifying options in Destination.
4. Select the file format or data type conversion method.
5. Click OK.
Batch test in Image OptimizerThe Batch test in the Image Optimizer lets you try different color and compression settings on your file before you actually save it, so you can experiment more quickly with the variables that affect these image file formats the most.
To perform a batch test:
1. Click the Batch button in the Image Optimizer dialog box.
2. For GIF and PNG, enter the lowest number of colors to test in the Fewest colors box. For JPEG, enter a number for Lowest quality.
3. For GIF and PNG, enter the highest number of colors to test in the Most colors box. For JPEG, enter the Highest quality percentage.
4. Select either a specific number of tests to perform, or perform a single test for each increment of 0-20 colors. If you choose to have tests done by Increment, then be aware that entering a smaller number of increments results in more tests.
5. Click OK. Once the tests have been generated, you can view the results in the Batch Results dialog box that appears. Highlight a particular test image, and then click the Select button to use the settings to optimize your image in the Image Optimizer's main window.
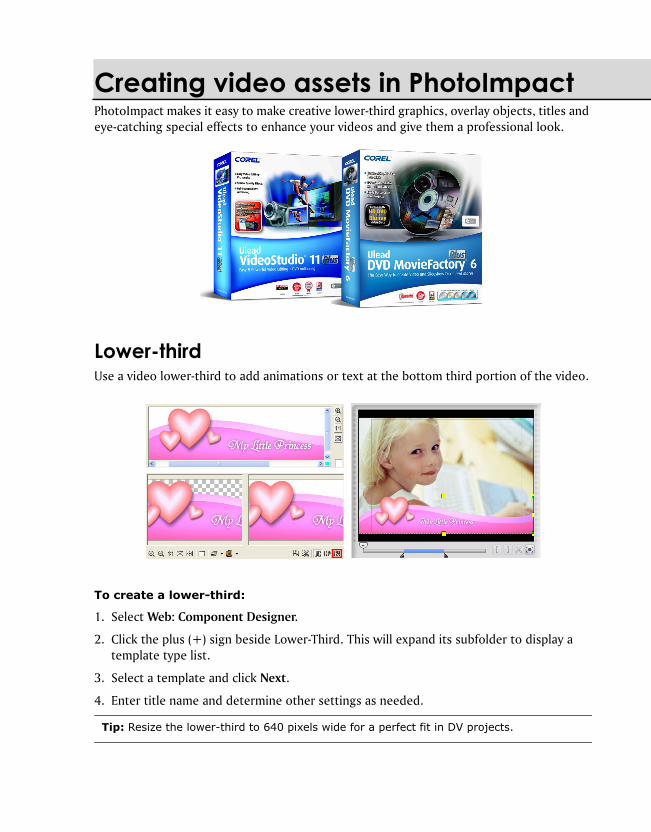
Creating video assets in PhotoImpactPhotoImpact makes it easy to make creative lower-third graphics, overlay objects, titles and eye-catching special effects to enhance your videos and give them a professional look.
Lower-thirdUse a video lower-third to add animations or text at the bottom third portion of the video.
To create a lower-third:
1. Select Web: Component Designer.
2. Click the plus (+) sign beside Lower-Third. This will expand its subfolder to display a template type list.
3. Select a template and click Next.
4. Enter title name and determine other settings as needed.
Tip: Resize the lower-third to 640 pixels wide for a perfect fit in DV projects.

PHOTOIMPACT USER GUIDE182
5. Click Export then select To Image Optimizer.
6. Click and then select Transparency in the Mask Options tab.
7. Click Save As. Enter the name for saving in File name and click Save.
8. Run Ulead VideoStudio.
9. Proceed to the Overlay Step.
10.In the Library, select the Image media folder.
11.Click . In the dialog box that opens, locate the PNG file and click Open.
12.Drag the PNG file from the Library to the Overlay Track in the Timeline.
Overlay objectsEasyPalette provides you with plenty of path and image objects that you can use as overlays for your video clips.
To create overlay objects:
1. From the EasyPalette, drag the selected object to the workspace.
2. Press [F4] to open Image to Optimize dialog box.
3. Choose Selected objects.
4. Click and then select Transparency in the Mask Options tab.
5. Click Save As. Enter the name for saving in File name and click Save.
6. Run Ulead VideoStudio.
7. Proceed to the Overlay Step.
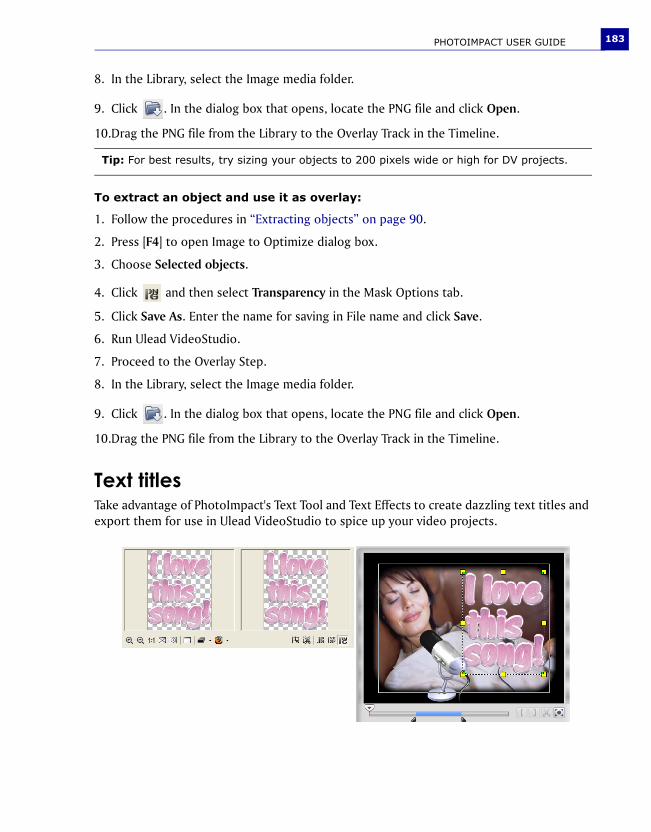
PHOTOIMPACT USER GUIDE 183
8. In the Library, select the Image media folder.
9. Click . In the dialog box that opens, locate the PNG file and click Open.
10.Drag the PNG file from the Library to the Overlay Track in the Timeline.
To extract an object and use it as overlay:
1. Follow the procedures in “Extracting objects” on page 90.
2. Press [F4] to open Image to Optimize dialog box.
3. Choose Selected objects.
4. Click and then select Transparency in the Mask Options tab.
5. Click Save As. Enter the name for saving in File name and click Save.
6. Run Ulead VideoStudio.
7. Proceed to the Overlay Step.
8. In the Library, select the Image media folder.
9. Click . In the dialog box that opens, locate the PNG file and click Open.
10.Drag the PNG file from the Library to the Overlay Track in the Timeline.
Text titlesTake advantage of PhotoImpact's Text Tool and Text Effects to create dazzling text titles and export them for use in Ulead VideoStudio to spice up your video projects.
Tip: For best results, try sizing your objects to 200 pixels wide or high for DV projects.
PHOTOIMPACT USER GUIDE184
To create titles:
1. Click Text Tool in the Toolbox.
2. Click a point on the image where you want to place the text. Enter text.
3. Highlight a section or the entire text then apply formatting options by accessing the Text Panel.
4. Press [F4] to open Image to Optimize dialog box.
5. Choose Selected objects.
6. Click and then select Transparency in the Mask Options tab.
7. Click Save As. Enter the name for saving in File name and click Save.
8. Run Ulead VideoStudio.
9. Proceed to the Overlay Step.
10.In the Library, select the Image media folder.
11.Click . In the dialog box that opens, locate the PNG file and click Open.
12.Drag the PNG file from the Library to the Overlay Track in the Timeline.
Special animation effectsSome of the more popular effects in PhotoImpact have integrated animation dialog boxes to assist you in creating them. Apply animation effects such as Lighting and Particle effects from the EasyPalette and make your images come to life.
To apply animation:
1. Open the image where you want to apply the animation effect. In the EasyPalette’s Animation Gallery, drag an effect.
2. Specify your desired animation settings.
3. Click Save. Save animation as Animated GIF Files (*.GIF).
4. Run Ulead VideoStudio.
5. In the Library, select the Video media folder.
6. Click to import the animation to the Library.
7. In the Open Video File dialog box, select Animated GIF Files (*.gif) in Files of type and then locate the file.
8. Click Open.

PHOTOIMPACT USER GUIDE 185
9. Click OK. The GIF file is now added into the Library.
10.Drag the animation file from the Library to the Video Track in the Timeline.
MasksMasking is a powerful method to control your clips’ transparency. A mask or a matte, as it is also called, is simply a black and white image you can use in your projects to define which areas of your video become transparent and which remain opaque.
To create mask frames:
1. From EasyPalette, double-click or drag a selected mask or image to the workspace.
2. Save the file in BMP format.
3. Run Ulead VideoStudio.
4. Open the video or image file where you want to place the image and drag it to the Overlay Track.
5. Click Mask & Chroma Key in the Attribute tab to go to the Overlay Options Panel.
6. Select Apply Overlay options then Mask Frame in Type.
7. Click and browse for the image file.
8. Watch the Preview Window to see how the new settings are affecting the image.
Video file Mask from the EasyPalette
Click to import saved mask file
Combined video and mask files

PHOTOIMPACT USER GUIDE186
Using the DVD Menu MakerDVD Menu Maker is a wizard that allows you to export PhotoImpact-designed menu templates to Ulead DVD MovieFactory and VideoStudio. Each menu template must contain certain elements (objects) for it to be recognized as a menu template.
Create your menu template using PhotoImpact tools then use the wizard to make the menu template elements interactive when the selection menu is viewed on DVD players. To learn more on this, open the DVD Menu Maker and click to view its user guide.

Appendix: Supported RAW formatsAAdobe Digital Negative (DNG) AVT F-201C AVT F-810C AVT F-145C AVT F-510C CCanon PowerShot 600 Canon EOS D30 Casio QV-5700 Canon PowerShot A5 Canon EOS D60 Casio QV-R51Canon PowerShot A5 Zoom Canon EOS 5D Casio QV-R61 Canon PowerShot A50 Canon EOS 10D Casio EX-S100 Canon PowerShot Pro70 Canon EOS 20D Casio EX-Z50 Canon PowerShot Pro90 IS Canon EOS 30D Casio EX-Z55Canon PowerShot G1 Canon EOS 300D / Digital Rebel / Kiss
Digital Casio Exlim Pro 505
Canon PowerShot G2 Canon EOS 350D / Digital Rebel XT / Kiss Digital N
Casio Exlim Pro 600
Canon PowerShot G3 Canon EOS D2000C Casio Exlim Pro 700 Canon PowerShot G5 Canon EOS-1D Contax N Digital Canon PowerShot G6 Canon EOS-1DS Creative PC-CAM 600 Canon PowerShot S30 Canon EOS-1D Mark IICanon PowerShot S40 Canon EOS-1D Mark II NCanon PowerShot S45 Canon EOS-1Ds Mark II Canon PowerShot S50 Casio QV-2000UX Canon PowerShot S60 Casio QV-3000EX Canon PowerShot S70 Casio QV-3500EXCanon PowerShot Pro1 Casio QV-4000EEpson R-D1 FFoculus 531C Fuji FinePix F810 Fuji FinePix S7000 Fuji FinePix E550 Fuji FinePix S2Pro Fuji FinePix S9000/S9500 Fuji FinePix E900 Fuji FinePix S3Pro Fuji FinePix F700 Fuji FinePix S5000 Fuji FinePix F710 Fuji FinePix S5100/S5500Fuji FinePix F800 Fuji FinePix S5200/S5600IImacon Ixpress 16-megapixel Imacon Ixpress 22-megapixel ISG 2020x1520 KKodak DC20 (see Oliver Hartman's page)
Kodak DCS620C Kodak PB645H
Kodak DC25 (see Jun-ichiro Itoh's page)
Kodak DCS620X Kodak PB645M
Kodak DC40 Kodak DCS660C Kodak DCS Pro 14n Kodak DC50 Kodak DCS660M Kodak DCS Pro 14nx Kodak DC120 (also try kdc2tiff) Kodak DCS720X Kodak DCS Pro SLR/c Kodak DCS315C Kodak DCS760C Kodak DCS Pro SLR/n Kodak DCS330C Kodak DCS760M Kodak P850 Kodak DCS420 Kodak EOSDCS1 Kodak P880 Kodak DCS460 Kodak EOSDCS3B Kodak KAI-0340 Kodak DCS460A Kodak NC2000F Konica KD-400Z Kodak DCS520C Kodak ProBack Konica KD-510Z Kodak DCS560C Kodak PB645C LLeaf Aptus 17 Leaf Aptus 75 Leaf Valeo 17 Leaf Aptus 22 Leaf Valeo 6 Leaf Valeo 22 Leaf Aptus 65 Leaf Valeo 11 Leaf Volare
PHOTOIMPACT USER GUIDE188
Leica Digilux 2 Logitech Fotoman Pixtura Leica D-LUX2 MMicron 2010 Minolta DiMAGE A1 Minolta DiMAGE G600 Minolta RD175 Minolta DiMAGE A2 Minolta DiMAGE Z2 Minolta DiMAGE 5 Minolta DiMAGE A200 Minolta Alpha/Dynax/Maxxum 5D Minolta DiMAGE 7 Minolta DiMAGE G400 Minolta Alpha/Dynax/Maxxum 7D Minolta DiMAGE 7i Minolta DiMAGE G500 Minolta DiMAGE 7Hi Minolta DiMAGE G530 NNikon D1 Nikon D70 Nikon E8400 Nikon D1H Nikon D70s Nikon E8700 Nikon D1X Nikon D100 Nikon E8800 Nikon D2H Nikon D200 Nikon D2Hs Nikon E5000 Nikon D2X Nikon E5400 Nikon D50 Nikon E5700 OOlympus C3030Z Olympus C770UZ Olympus E-330 Olympus C5050Z Olympus C8080WZ Olympus E-500 Olympus C5060WZ Olympus E-1 Olympus SP350 Olympus C7070WZ Olympus E-10 Olympus SP500UZ Olympus C70Z,C7000Z Olympus E-20 Olympus C740UZ Olympus E-300 PPanasonic DMC-FZ30 Pentax Optio 33WR Phase One P 45 Panasonic DMC-LC1 Phase One LightPhase Pixelink A782 Panasonic DMC-LX1 Phase One H 10 Polaroid x530 Pentax *ist D Phase One H 20 Pentax *ist DL Phase One H 25 Pentax *ist DS Phase One P 20 Pentax Optio S Phase One P 25 Pentax Optio S4 Phase One P 30 RRollei d530flex RoverShot 3320af SSarnoff 4096x5440 Sinar STI format Sony DSC-R1 Sigma SD9 SMaL Ultra-Pocket 3 Sony DSC-V3 Sigma SD10 SMaL Ultra-Pocket 4 Sony DSLR-A100 Sinar 3072x2048 SMaL Ultra-Pocket 5 Sony XCD-SX910CR Sinar 4080x4080 Sony DSC-F828 STV680 VGA
PHOTOIMPACT USER GUIDE 189
Index
Numerics3D 1073D text 128Adding 3D properties 143Transformation 107
48-bit images 32
AAdd Moon 65Adjust 49Animation 156
Frame-based animations 157Storyboard-based animations 158
Artistic 153Auto-process 49Auto-process - Batch 49
BBatch Convert 180Batch convert files 180Batch Manager 179Batch Task 178Batch test in Image Optimizer 180Beautify Skin 63Bevel 144Bevel Settings 145Bezier Tool 83, 135Brick Tiles 154Browse Manager 16, 30Bump maps 147Burn and Dodge Tools 80
CCalculation 51Calendar 170Camera curve profile 71
Creating and saving 70Importing 71
Cartoon 154Changing Foreground and Back-ground colors 122
Changing indexed image colors 45Choosing a Gradient Fill method 118Clipboard 43Cloning parts of an image 81Color 54
Color Adjustment 50Color Balance 55Color Cast 55Color Panel 122Color Range 88Color Replacement 50Color similarity 88Color tab 123Color Transform Pen 80Color/Texture tab 144Colorize Pen 80
Color Management System 163Color Panel 16, 122Contour Drawing 154Converting between data types 44COOL 360 59Copy 41Corel Color Picker 121Correct Chromatic Aberration 56Creative Lighting 161Creative Transform 162Creative Warp 161Cropping 36
Golden Ratio Crop 37Divine Proportion Spiral 37
Perspective Crop 37Rule of Thirds Crop 38
Crystal and Glass 161Curves, drawing 135Cut 41
DDefringe 101DeInterlace 156Deleting an object 104Dialog boxes 24Diffraction Filter 67
PHOTOIMPACT USER GUIDE190
Diffuse Glow 64Digimarc 47Digital cameras 31Distort 155Document Manager 16Dual View 13, 25Duplicating an object 103DVD Menu Maker 186
EEasyPalette 16, 19
Creating and organizing 20Custom effects 23Tab groups 21
Edge Preserving Blur 61Edit Active Objects Only 116Effect 153Engraving 154Enhance 63Enhance Lighting 52Enhancement effects 61Equalize 51Erasing 112ExpressFix mode 12
ExpressFix Panel 12Beautify Skin 13Color Saturation 13Enhance Lighting 13Focus 13Monochrome 13Overall Exposure 13Reduce Noise 13SmartCurves 13White Balance 13
Extracting objects 90
FFill Tools 117
Bucket Fill Tool 117Gradient Fill Tools 117Texture Fill Tool 117
Filling an area with a texture 119
Film Grain 65Finger Paint 154Flatten Uneven Area 61Focus 56Freehand Tool 136
GGalleries 19Gradients tab 125Guidelines and Grid 18
HHexadecimal value 123High Dynamic Range 69
Composing the HDR image 71Editing the HDR image 75Optimizing HDR image 74
Highlight, Midtone and Shadow 53Histogram clipping 74Histogram Panel 17Hue and Saturation 55
IImages 27
Acquiring images from scanners31
CMYK files 29Create a DVD menu image 28Creating 27Customize the dimensions of a
new image 28Duplicating images 40Image Size 35Opening image files 28Resizing 34Rotating images 39Saving images 47
AutoSave 47Import plug-ins into PhotoImpact 48Impressionist 154Invert 50
KKaleidoscope Fill 160
PHOTOIMPACT USER GUIDE 191
Key frames 157Key frame control Panel 157
LLasso Tool 83Layer Manager 16Layer mask 94Lens Distortion 56Lens Filters 67Levels 52Libraries 19Lights 153Lower-third 181
MMagic Gradient 155Magic Wand Tool 83Managing object layers 97Mask Mode 92Masks 185Match Background Color 102Material dialog box 144Measure Tool 106Mobile Image 172Mosaic Tiles 154Motion Blur 61Multiple files 179Multiple paths 141Multiple-color 118Multivision Filter 68
NNoise 63
OObject Eraser Tools 108Object mask 94Objects 97Optimization tab 74Optimize the HDR image 74Overlay objects 182
PPackage a gallery or object library
into a folder 24Paint on Edges 155Paint Tools 111Painting 114
Outline or border 114Paint as Object mode 115Paint Tool presets 112Paint your own image 111Painting clouds 114Painting with textures 113
Palette Ramp Editor 118Panel Manager 16Particle Effect 161Paste 41Paths 131
Adding 3D properties 143Continue Draw Mode 139Creating 131Deforming path shape 140Editing 140Line and Arrow Tool 134Multiple paths 141Outline Drawing Tool 133Path Drawing Tool 131Path Edit Tool 136Transparent objects 146Wrap effects 149
Pen and Ink 155Photo 49Photo Frame 173Photo Projects 167
Creating your own Photo Projecttemplates 169
Placeholder 169Pick Tool 83Picking colors from an image or en-tire screen 122Placeholder 169Plug-ins 48Posterize 50Preferences 18Printing 163
Calibrating your printer 164More print functions 165Print Layout 165Print Poster 166
PHOTOIMPACT USER GUIDE192
Print Preview 164Process images with Batch Manager179
QQuick Command Panel 16, 177
History tab 178Record a quick command 177
Quick samples 25
RRAW data support 57RAW formats 187Redo 43Reduce noise 63Reflection 145Resample for Email 174Resampling 35
Changing dimensions 35Resolution 34Retouch Tools 79RGB/HSB 123
SSaving 47
Animations 159GIF animation options 160Images 47Material properties to EasyPalette
148Scanners 31
Select the default image 31TWAIN 32
Screen Capture 45Screening 155Selection Manager 16Selections 83Setting a Single-color 123Shadow 102Sharpen 63Show HDR color 74Slideshow Prep Wizard 175Smart lasso 84SmartCurves 51, 70SmartGuide 17
SmartRemove 77Spacing and aligning objects 103Special animation effects 184Spectrum Bar 123Spline Tool 135Split View 25Splitter bar 25Stamp Tool 109Standard Selection Tool 83Star Filter 67Style 50Sunlight 66Swatches tab 124
TText 127
Effects 129Objects, bending 150Tool settings 127
Text titles 183Texture Filter 160Threshold 51Thumbnail menu commands 20Tool Settings Panel 17Toolbox 17
Clone Tools 17Crop Tool 17Eraser Tools 17Eyedropper and Measure Tools 17Fill Tools 17Foreground and Background Col-
ors 17Image Map Tool 17Paint Tools 17Path Tools 17Pick Tool 17Retouch Tools 17Selection Tools 17Slice Tool 17Stamp Tool 17Text Tool 17Transform Tool 17Z-merge 17Zoom Tool 17
Touch-up Tool 82Tracing and converting images into
PHOTOIMPACT USER GUIDE 193
paths 142Turnpage 156TWAIN 31Two-color 118Type Effect 148, 162
UUlead File for Objects 47Undo 43
VVideo assets 181View HDR Image 74Vignette 65
WWeb Album 171Web Slideshow 172Welcome Screen 11
Browse Photos 11Create Calendar 11Create Collage 11Create DVD Menu 11Create New Image 11Create Photo Project 11Get Photos 11Open ExpressFix 11Open Full Edit 11
White Balance 54White Balance presets 54
Windows Image Acquisition (WIA)32Wrap effects 149
ZZ-merge 151Zoom Blur 61Zooming on an image 33
