user guide and guarantee (en.) - sklep xtrm … · user guide and guarantee (en.) it is important...
TRANSCRIPT
USER GUIDE AND GUARANTEE (En.)
It is important to keep this guide.
BLACKMOUNTAIN 08 User’s Guide 1

THANK YOU FOR BUYING A BLACKMOUNTAIN™ SNOWSCOOT!
You have just bought a BLACKMOUNTAIN™ Snowscoot, so that you will be satisfied for as long as possible, we invite you to familiarise yourself with this User's Guide: It will give you all the information necessary for the proper use, adjustment and maintenance of your Snowscoot …
INDEX
1 - General Warning 3a- Snowscoot Glossary 4
2 - User Advice for Safe Snowscooting 6a- General Warning 6b- Getting Started 6c- Skidding & Stopping 6d- Turning 7
3 - Snowscoot Adjustment Advice 8a- Handlebar/Stem 8b- Footstrap. 9c- Fork 10d- Front Cylinder 10e- Shock Absorber/Pressure Table 12
4 - Safe Use of Ski Lifts 13a- Button Lift 13b- Chair Lift 13c- Cable Cars 13
5 - List of Ski Stations in France 136 - Safety Checks Before Use 147 - Maintaining Your Snowscoot 15
a- Regular Maintenance 15b- Components to check and maintain 16 to 18c- Components to Lubricate 18d- Dismantling the board 19 to 22e- Tools required 23f- Exploded Views with References & Tightening Torque 24 to 31
8 - Technical Specification 329 - Fitting of Accessories 3310- STRM [French ski lift operators’ society] Notice - Snowscoot BLACKMOUNTAIN™11- Guarantee 34
BLACKMOUNTAIN 08 User’s Guide 2

GENERAL WARNING
As with all sports, Snowscooting carries risks of injury and damage. In using your Snowscoot, you accept responsibility for this risk. BLACKMOUNTAIN™ denies all liability in the event of modification of the product by the user.
This manual contains warnings and information. The symbol indicates a risk of serious or fatal injury. The symbol gives information about the safety, use or maintenance of the Snowscoot. Failure to read and respect these symbols may lead to serious or even fatal injuries, cause irreversible damage to your Snowscoot and invalidate the guarantee.
On the pistes, you must comply with the regulations and codes governing the ski areas. The use of Snowscoot is not yet permitted in some ski areas; consult our website www.snowscoot-blackmountain.com, or contact the relevant authorities.
It is your responsibility to properly maintain and correctly use your Snowscoot, thus reducing the risk of accidents. Good maintenance of your Snowscoot will enable the retention of its original use and safety features.
Blackmountain™ Snowscoots are not recommended for use by children younger than 14 years old.
Note to Parents:
As a parent or guardian, you are responsible for the behaviour and the safety of your underage child. You must, therefore, satisfy yourself that the Snowscoot is properly adjusted to his/her size, that is in good working condition, and that you and your child have a proper understanding of all the safety rules. Before letting him/her try out his/her new Snowscoot, you should read this manual with your child, in order to properly understand the potential dangers, the procedures to follow and the operation of the Snowscoot.
The suspension improves comfort and handling, by enabling the boards to follow the ground well and to flex. They will enable you to go faster than would a rigid Snowscoot. Do not overestimate your capabilities and take the time to practice and to gain control of your BLACKMOUNTAIN™ Snowscoot.
BLACKMOUNTAIN 08 User’s Guide 3

Handgrips
Snowscoot Glossary
HandlebarHeadsetStemHandlebar end cap
FootstrapLinking rodsMiddle shock absorberCylinderForkRear shock absorberBoardsProtective foam pads
BLACKMOUNTAIN 08 User’s Guide 4

BLACKMOUNTAIN 08 User’s Guide 5
USAGE ADVICE FOR SAFE SNOWSCOOTING
a- General Warning
The mountain environment presents serious risks, according to the ground on which you ride. Find out about snow and weather conditions before using your Snowscoot.The high mountains and glaciers require special equipment (avalanche transceiver, shovel, probe …) and knowledge about this hostile environment (crevasses, avalanches, seracs …). Take advice from the mountain professionals.
Snowscooting, of any kind, is not without risk. So wear the protection necessary for practising the sport (helmet, kneepads, back protector, gloves and other protective shells), as well as the safety leash.
Wearing the safety leash is mandatory on the pistes and ski lifts, for your own safety and that of other users. Do not overestimate your level; start on a beginner's piste.
Snowscooting, though easy, requires the learning of basic principles about handling and safety. The following advice represents the minimum required for using your Snowscoot. Nonetheless, it is no substitute for Snowscoot instruction from a professional.
Failure to wear your safety leash is liable to lead to banning or exclusion from the ski area and could cause serious or fatal wounding to other people.
b- Getting started
First of all, adjust the Snowscoot to your size, your weight and your level. Put on your protective equipment, and get onto a beginner's piste (a green piste). Do not overestimate your level. Inform yourself about the authorised ski lifts. Put on your safety leash. Position yourself behind the handlebar with the front of each foot one third into the footstrap. Your legs and arms should be flexed. You are ready to ride!
BLACKMOUNTAIN 08 User’s Guide 6

c- Turning
Thanks to its four points of contact, turning the Snowscoot is really easy. The principal is based on the pressure of the board edges on the snow, while increasing or decreasing the weighting to the front or the rear as the turn progresses. We advise you never to take your inside foot out of the footstrap, except to recover your balance in an emergency. You are facing down the slope and you wish to turn to the right. Start by pressing on the right-hand side of the handlebar while gently turning it as your turn progresses; shift the pressure backwards, still on the right-hand side. To turn to the left, repeat these movements while pressing on the left-hand side. As in many extreme sports, it is easier to turn at high speed.
First time Second time Third time
Pressing only on the front Pressing simultaneously on the front and on Pressing only on the rear partwhile, gently turning the handlebar the rear.
d- Skidding & Stopping
Learning to skid is fundamental to stopping and to safety. To skid, you must place yourself perpendicular to the slope. You must balance the pressure between the front and the rear to remain absolutely perpendicular to the slope, increasing or decreasing pressure, on the front or the rear. The less your Snowscoot is tilted into the slope, the faster you will go; the more your Snowscoot is tilted, the less fast, you will go. This effect is due to how much the edges dig into the snow.
Before pushing off and picking up speed, learn to get the feel of the Snowscoot and to brake: for this, all you need to do is to start with a traditional turn. The change comes about once the turn is completed, when you are perpendicular to the slope: from that moment, continue into a skid and tilt your Snowscoot over to stop. Just as in skidding, the more you tilt your Snowscoot over the more quickly you brake.
BLACKMOUNTAIN 08 User’s Guide 7

3 SNOWSCOOT ADJUSTMENT ADVICE
Unsuitable adjustment can cause irreversible damage to your Snowscoot and its accessories as well as serious or fatal injury to yourself and others.
To get the best out of your BLACKMOUNTAINTM Snowscoot, adjust the settings to suit your body shape, your level and the environment in which it is to be used.
The adjustment of the Snowscoot and the rider's position are very important for safety, comfort and performance. Being in the correct position on your Snowscoot and adjusting it require experience, dexterity and specialised tools. Entrust this procedure to your retailer. If you decide to do it yourself, check the results with your retailer before use.
The various components to adjust:
a- Stem/handlebar
Adjustment of the handlebar height:
To reduce the height suitable tools must be used (Allen keys numbers 5 or 6 according to the model).
- Completely unscrew screw A, then the two screws B of the stem.- Remove the stem- Take off one or several ring sleeves- Replace the stem.- Replace the ring sleeves that you have removed putting them above the stem.- Re-tighten screw A and tighten screws B, then unscrew screw A by a quarter turn.
Checking the correct assembly of the stem and the headset:To check the assembly of your stem, gently tap the front board of your Snowscoot on clean and even ground, holding the handlebar.If you feel play in the steering, tighten screw A.For the second check, lift the front of the Snowscoot and turn the handlebar to the left and to the right. If you feel any difficulty in turning the handlebar, slacken screw A.If this procedure seems complicated to you, please do not hesitate to consult your BLACKMOUNTAIN™ reseller’s workshop.
Adjustment of the handlebar angle:
-31369038735To increase or decrease the angle of your handlebar, slacken the four front screws of the stem diagonally (see diagram) and tilt the handlebar to suit you.To re-tighten your handlebar, re-tighten the screws diagonally just as before.
BLACKMOUNTAIN 08 User’s Guide 8
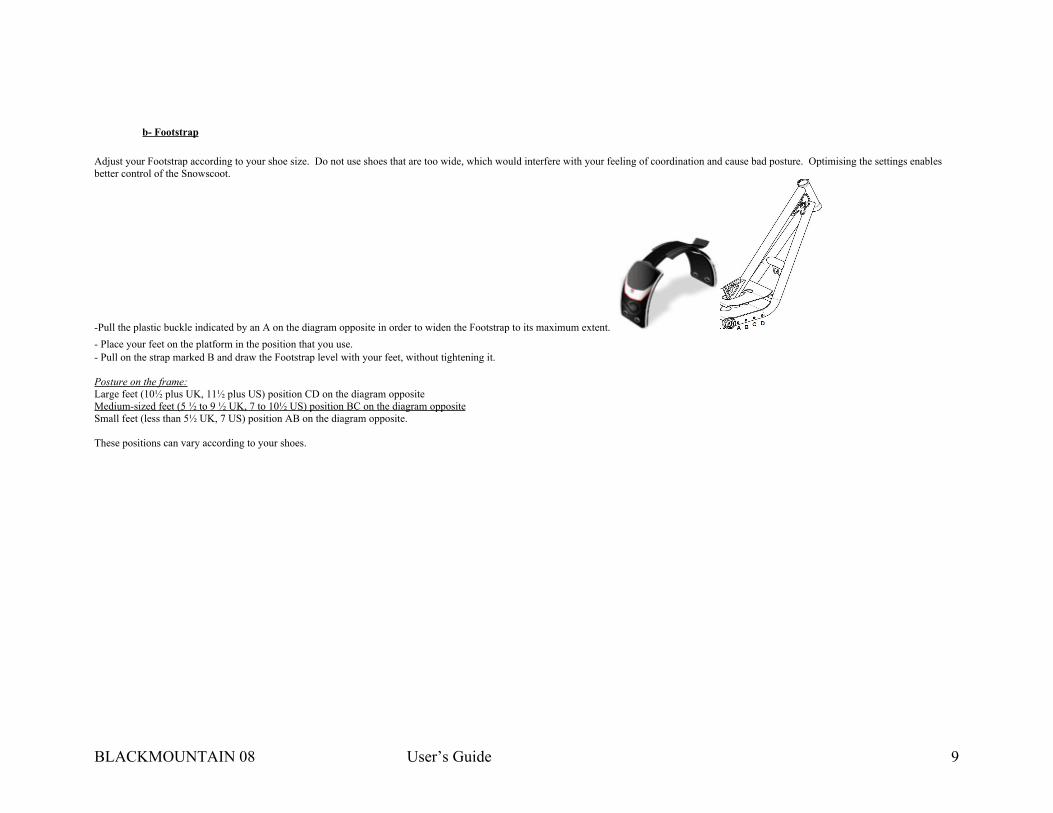
b- Footstrap
Adjust your Footstrap according to your shoe size. Do not use shoes that are too wide, which would interfere with your feeling of coordination and cause bad posture. Optimising the settings enables better control of the Snowscoot.
-Pull the plastic buckle indicated by an A on the diagram opposite in order to widen the Footstrap to its maximum extent. - Place your feet on the platform in the position that you use.- Pull on the strap marked B and draw the Footstrap level with your feet, without tightening it.
Posture on the frame:Large feet (10½ plus UK, 11½ plus US) position CD on the diagram oppositeMedium-sized feet (5 ½ to 9 ½ UK, 7 to 10½ US) position BC on the diagram oppositeSmall feet (less than 5½ UK, 7 US) position AB on the diagram opposite.
These positions can vary according to your shoes.
BLACKMOUNTAIN 08 User’s Guide 9

c- Fork
37528502239010
Rear shock absorber
Fork
The fork should be adjusted in conjunction with the shock absorbers. We advise you in the first instance to adjust the shock absorber and to set the fork accordingly. When you mount the Snowscoot, the front and rear should sink down at the same time. To adjust the hardness of the suspension of your fork, tighten the compression screws or change the springs. On certain models, you can adjust the tension release, which should be the same front and rear. In all cases refer to the User Manual for your fork (available on the Internet) or see your BLACKMOUNTAIN™ reseller.Manufacturers’ websites: www.magura.com, www.srsuntour-cycling.com and www.spinner-usa.com.
List of resellers: www.snowscoot-blackmountain.com
d- Front Cylinder
Certain models of front cylinder are not adjustable. For adjustable models, inflate the cylinder to 8 bars minimum and do not exceed 18 bars. Regarding the tension release, do not reduce this to less than three clicks below the maximum tension release. Replace the retaining rings if play is detected.
BLACKMOUNTAIN 08 User’s Guide 10

e- Shock Absorber Pressure Table
General:
The shock absorbers are subjected to many impacts. To reduce wear to the frame, the shock absorber is fixed to it with ring sleeves. If you feel play around the shock absorbers, replace these ring sleeves.
Spring type shock absorbers:
To adjust the shock absorber turn the spring tightening the screw more or less to compress or relax it. There are several types of spring available according to your weight; consult your BLACKMOUNTAIN™ retailer, or a retailer for your shock absorber brand.
To change the spring:
-Dismantle the two spindles that hold it on to the frame.-unscrew the spring tightening screw.-remove the cup noting the direction of its mounting.
Cupped Threaded Spring
-Remove the spring and replace it.To reassemble the spring and the shock absorber, follow this procedure in reverse.
Pneumatic Shock Absorbers
To inflate your shock absorber please use a pump specified as a high pressure one. Never use your Snowscoot if the shock absorbers are uninflated or if you do not know the current pressure. This could damage your Snowscoot and make it uncontrollable. Never exceed the pressure indicated by the manufacturer. For further information, visit your shock absorber manufacturer’s website.
Inflation procedure:
-Unscrew the valve cap of the shock absorber.-Screw the high-pressure pump to the valve end.-Inflate your shock absorber to the pressure suited to your use and your body shape. See the table on the following page.- Unscrew the pump and screw back the cap onto the valve.- Test the new setting.
BLACKMOUNTAIN 08 User’s Guide 11
Shock Absorber Pressure Table
The following pressures are given for indicative purposes, for normal use on ordinary snow Try several adjustments. If you're not sure of your adjustments have your Snowscoot checked by a BLACKMOUNTAIN™ reseller.
BeginnerExperiencedFront Shock Absorber - Beginner and Experienced Riders
For extreme use (freeride, freestyle) increase the pressure by one bar. On hard and icy snow reduce the level by 0.5 to 1 bar. On spring snow, increase the pressure by one bar.
BLACKMOUNTAIN 08 User’s Guide 12

4. SAFE USE OF MECHANICAL SKI LIFTS Button Lift:
Put your foot on the ground beside the pole and take hold of the pole. The leash should not be attached to your leg on the button lift side.
Put the pole between your legs; put your foot back in the strap and your hand on the handlebar.
Let yourself be pulled along by the pole. At the end, use one hand to release the pole from your legs.
Chair Lift:
Keep one foot in the strap of the Snowscoot and await the arrival of seat to sit down.
Keep your foot in the strap, pull the handlebar towards you and close the safety bar. Rest the Snowscoot on the ski rest
At the end, raise the safety bar and push the handlebar forwards. Once on the ground, get out of the seat and skate towards the exit.
Cable Cars
Hold your Snowscoot upright, against yourself, to reduce the space occupied by the Snowscoot and to avoid inconveniencing other users.
Always wear your safety leash on mechanical ski lifts and keep a firm hold of your Snowscoot. Never let it go.
5. LIST OF AUTHORISED SKI STATIONS IN FRANCE
Before leaving for your winter sports, consult the up-to-date list of ski stations on our website www.snowscoot-blackmountain.com, heading "stations". Depending on the ski areas concerned, not all the lifts are authorised. The following list is given for indicative purposes and regularly changes. For abroad, consult our website.
BLACKMOUNTAIN 08 User’s Guide 13
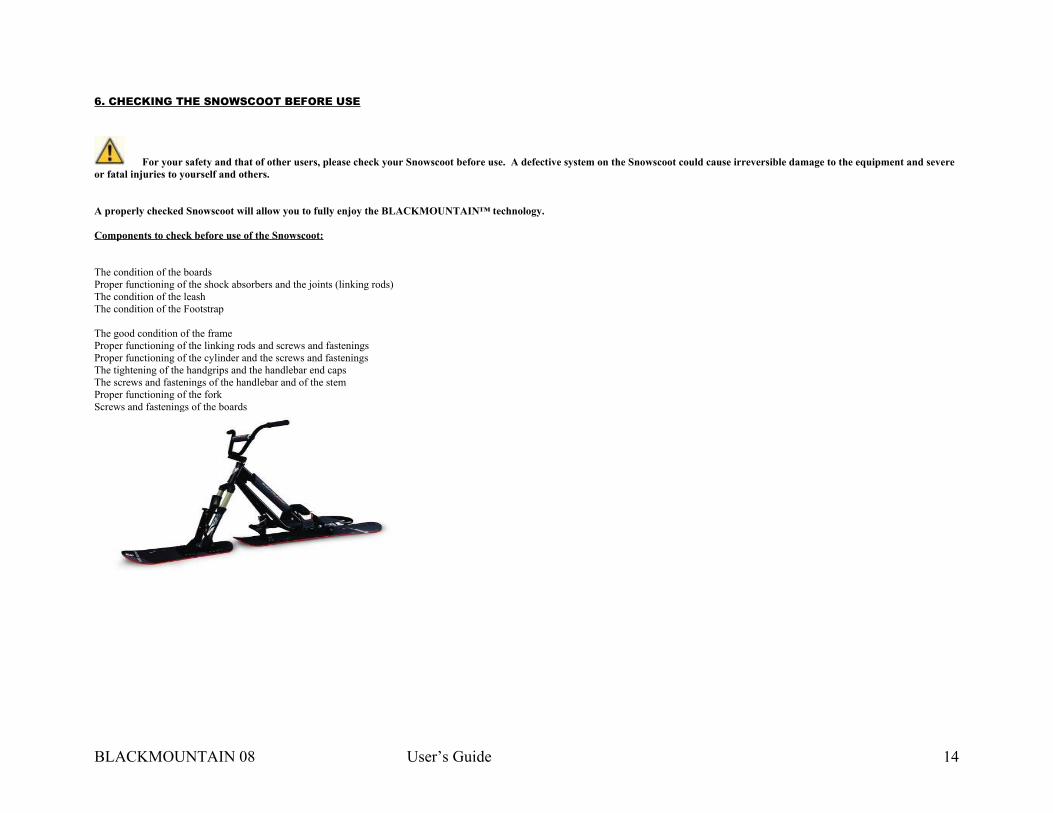
6. CHECKING THE SNOWSCOOT BEFORE USE
For your safety and that of other users, please check your Snowscoot before use. A defective system on the Snowscoot could cause irreversible damage to the equipment and severe or fatal injuries to yourself and others.
A properly checked Snowscoot will allow you to fully enjoy the BLACKMOUNTAIN™ technology.
Components to check before use of the Snowscoot:
The condition of the boardsProper functioning of the shock absorbers and the joints (linking rods)The condition of the leashThe condition of the Footstrap
The good condition of the frameProper functioning of the linking rods and screws and fasteningsProper functioning of the cylinder and the screws and fasteningsThe tightening of the handgrips and the handlebar end capsThe screws and fastenings of the handlebar and of the stemProper functioning of the forkScrews and fastenings of the boards
BLACKMOUNTAIN 08 User’s Guide 14

7. MAINTAINING YOUR SNOWSCOOT
Regular Maintenance
Ensure that you comply with the maintenance table below for the sake of your safety and that of others, and to optimise the lifespan of the product.Respect the tightening torques indicated in Section 7.f.
Normal Use!
Checking the joints and linkages;Visual checking of the condition of the welds;Visual checking of the boards, which should also be carried out when violent impacts occur during use;Checking of the leash;Checking the screws and fastenings of the board;Checking the shock absorber settings.
Visual checking of the frame tubes (crushing, impacts, chipped paint)Checking the edges on the boardsConditioning the board soles with liquid or solid waxChecking the condition of the fork, the front cylinder and the shock absorbersChecking the pressure of the fork and the shock absorbers (according to model)Checking the accessories (Footstrap, stem, handlebar)General checking of the screws and fastenings (accessories and mechanical systems)
BLACKMOUNTAIN 08 User’s Guide 15
Checking and lubrication of the bearings;Grinding, sharpening and waxing in a BLACKMOUNTAIN™ workshop;Lubrication of all the spindles;General tightening of screws and fastenings.
Checking and lubrication of the bearings;Grinding, sharpening and waxing in a BLACKMOUNTAIN™ workshop. Do not scrape the wax before the start of next season;Lubrication of all the spindles;General tightening of screws and fastenings;General cleaning of the frame and the boards;Store the Snowscoot in a dry place protected from damp.
b- Components to check and maintain
Checking the welds:
Make a visual check of the welds; never use a frame if you have detected the slightest anomaly (cracks, breaks or other faults).
Checking the tubes:
Carry out a visual check of possible impacts to the tubes (you can compete this check by passing your hand over the tubes in order to detect any anomaly).
Checking the leash:
The leash is a mandatory safety component. In the event of wear or damage, ensure that you change it quickly. It must be kept on the frame.
Checking the screws and fastenings:
The screws and fastenings must be checked and tightened regularly. Certain screws require the use of thread lock, see Page 17.
BLACKMOUNTAIN 08 User’s Guide 16
Boards:
Particular attention should be paid to checking, testing and tightening the board screws. In the event of a screw coming undone, a board could injure somebody.The screws and fastenings must be checked, tested and tightened regularly. Replace all damaged screws. The board screws must be fixed with thread lock.
Frame and Accessories:
Particular attention should be paid to checking, testing and tightening the frame and accessory screws. In the event of a screw coming undone, an accessory or a loss of control over your trajectory could injure somebody else or yourself. Replace all damaged screws. Some of these must be fixed with thread lock and tightened observing a tightening torque. See Section 7.f.
Checking Spindles and Bearings:
The bearings and spindles must be in good working order to assure the lifespan of your machine. They must be lubricated and maintained in their housings. For dismantling, use a suitable tool in order not to cause wear to the spindle, the bearing and its housing. Excessive play, a split bearing, a twisted or split spindle could threaten your safety and that of others.
Checking the Boards:
Checking the condition of the board soles: Check that there is no serious damage to the board sole, possibly resulting from going over rocks or other obstacles, if a scratch is too deep and you can see the core of your board, have it repaired urgently, by building up, by a professional. Leaving the core in direct contact with the snow would risk permanently damaging your board. Waxing is a delicate operation. The boards must be taken off for this procedure. You are advised to use the services of a ski professional, to assure the lifespan of the equipment.
Checking the edges of the boards:
The edges are safety components, as they ensure the efficiency of your trajectories and also enable you to brake. For your safety and that of others, you must pay particular attention to their maintenance and good condition. Never set out on the pistes with defective, worn or inefficient edges.
Checking the Footstrap:
The Footstrap is a safety component. It must not be removed. In the event of wear or damage, ensure that you change it quickly. Its bindings must be checked.
Checking the handlebar:
The handlebar is a safety component. To assure your safety and that of others it must be regularly checked. Check that it is not starting to get out of shape or broken. A handlebar in poor condition should not be used on the pistes. It could injure you.
Checking the handgrips:
The handgrips must be securely tightened onto the handlebar; the handgrips tightening system must not be damaged. If your handlebar is not equipped with lock on hand grips, ensure that the grips are stuck on with a suitable adhesive.Using Snowscoot with poorly tightened or damaged handgrips could cause serious injury to yourself and to others and lead to loss of control of the Snowscoot.
Checking the handlebar end caps:
Never remove the handlebar end caps; if they are damaged, replace them before using your Snowscoot. The handlebar end caps are safety components, removing them or using faulty end caps could lead to fatal injury to yourself and others (puncture wounds).
The handlebar end caps must be in good condition and mounted on your Snowscoot.
BLACKMOUNTAIN 08 User’s Guide 17

Checking the shock absorbers:
The shock absorbers must be maintained in good working order. In order to check them, consult your shock absorber manufacturer's maintenance manual (available on each brand’s website).Shock absorbers in good working order will assure you the optimum use of your machine and ensure your safety and that of others. For optimum performance and to assure the lifespan of your Snowscoot, please check the settings of the shock absorbers.
The shock absorbers must be set to your weight. See the "shock absorber" settings table.
Checking the fork:
The fork must be maintained in good working order. To check it, see the fork manufacturer’s maintenance manual (available on each brand’s website). A fork in good working order will enable you to get the optimum use out of your machine and will assure your safety and that of others.
Checking the Front Cylinder:
The front cylinder must function correctly, check that the movement of the piston is not jammed or stuck. Check the sets of retaining rings and the gaskets/seals. As necessary, replace defective parts or the entire cylinder in the event of poor functioning.
Components to LubricateThe lubrication of components is necessary for the optimum functioning and lifespan of your Snowscoot and to avoid corrosion of the components. Use a dry oil. Immediately after use, dry and grease the components of your Snowscoot.
BLACKMOUNTAIN 08 User’s Guide 18

Points to lubricate
Dismantling the Boards
Rear Board Position:
809625415925
1104902943860
BLACKMOUNTAIN 08 User’s Guide 19

1Dismantling procedure:
-Gently unscrew the four spindle screws marked 1, on the right and left side.-Gently unscrew the four screws of the two spindle supports, marked 2.-Unscrew the screws 1, without removing them, enough for the washers to be able to come out of their housing.1-If you do not manage to unscrew the screws marked 1, use the flat bar on the spindle with a fine, flat, size 13 spanner at the front or size 15 at the rear.-Pull on the rear arch to remove the board from the frame, if it does not come out, ensure that the washers are out of their housing.
Reassembly procedure:
2-Turn the Snowscoot over as in the diagram opposite.-Ensure that the spindle screws are adequately undone and that the washers do not rest against the board support.-Ensure that the spindle supports, screwed into the insert bolts, are unscrewed to avoid damaging the insert bolts.-Start by reassembling the front of the board, with the Snowscoot upside down, as shown in the diagram opposite.-Once the spindle is firmly fitted into its housing, tighten the screws to 15 Nm.-Re-tighten the insert bolt screws.-Carry out the identical procedure for the rear, marked 2 on the diagram opposite. Check that the spindle is firmly fitted into its housing.
BLACKMOUNTAIN 08 User’s Guide 20

BLACKMOUNTAIN 08 User’s Guide 21
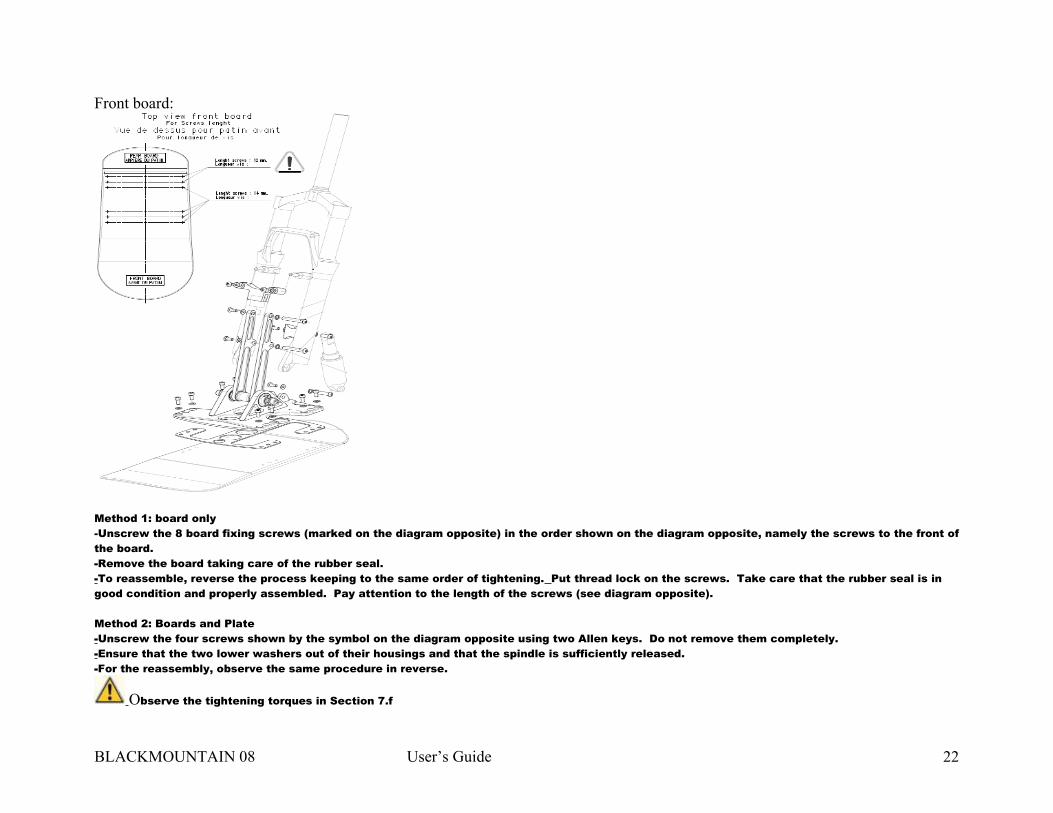
Front board:
Method 1: board only-Unscrew the 8 board fixing screws (marked on the diagram opposite) in the order shown on the diagram opposite, namely the screws to the front of the board.-Remove the board taking care of the rubber seal.-To reassemble, reverse the process keeping to the same order of tightening. Put thread lock on the screws. Take care that the rubber seal is in good condition and properly assembled. Pay attention to the length of the screws (see diagram opposite).
Method 2: Boards and Plate-Unscrew the four screws shown by the symbol on the diagram opposite using two Allen keys. Do not remove them completely.-Ensure that the two lower washers out of their housings and that the spindle is sufficiently released.-For the reassembly, observe the same procedure in reverse.
Observe the tightening torques in Section 7.f
BLACKMOUNTAIN 08 User’s Guide 22
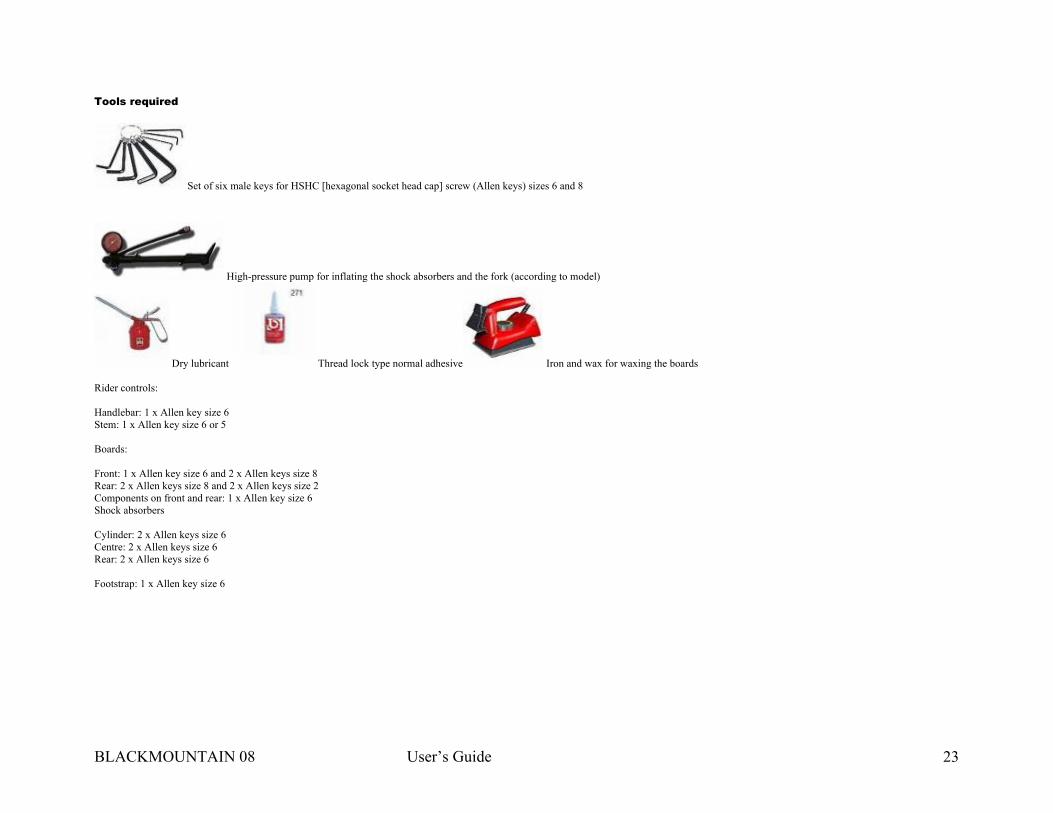
Tools required
Set of six male keys for HSHC [hexagonal socket head cap] screw (Allen keys) sizes 6 and 8
High-pressure pump for inflating the shock absorbers and the fork (according to model)
Dry lubricant Thread lock type normal adhesive Iron and wax for waxing the boards
Rider controls:
Handlebar: 1 x Allen key size 6Stem: 1 x Allen key size 6 or 5
Boards:
Front: 1 x Allen key size 6 and 2 x Allen keys size 8Rear: 2 x Allen keys size 8 and 2 x Allen keys size 2Components on front and rear: 1 x Allen key size 6Shock absorbers
Cylinder: 2 x Allen keys size 6Centre: 2 x Allen keys size 6Rear: 2 x Allen keys size 6
Footstrap: 1 x Allen key size 6
BLACKMOUNTAIN 08 User’s Guide 23
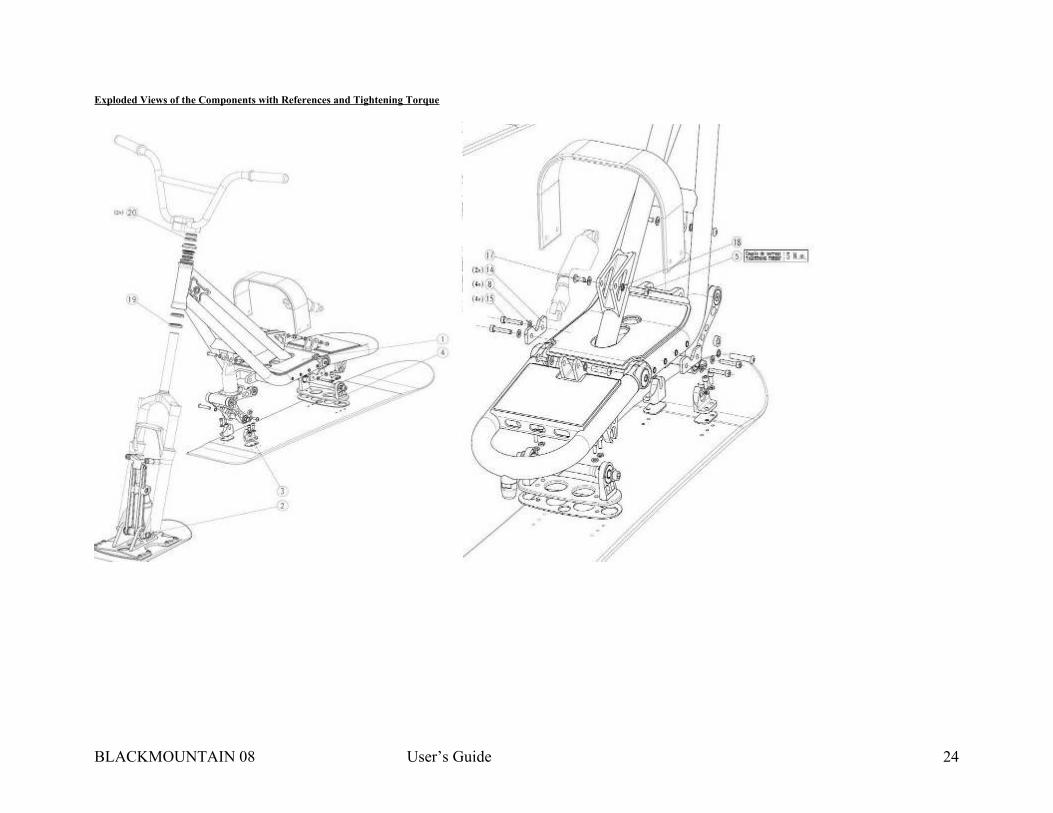
Exploded Views of the Components with References and Tightening Torque
BLACKMOUNTAIN 08 User’s Guide 24

BLACKMOUNTAIN 08 User’s Guide 25

BLACKMOUNTAIN 08 User’s Guide 26

BLACKMOUNTAIN 08 User’s Guide 27
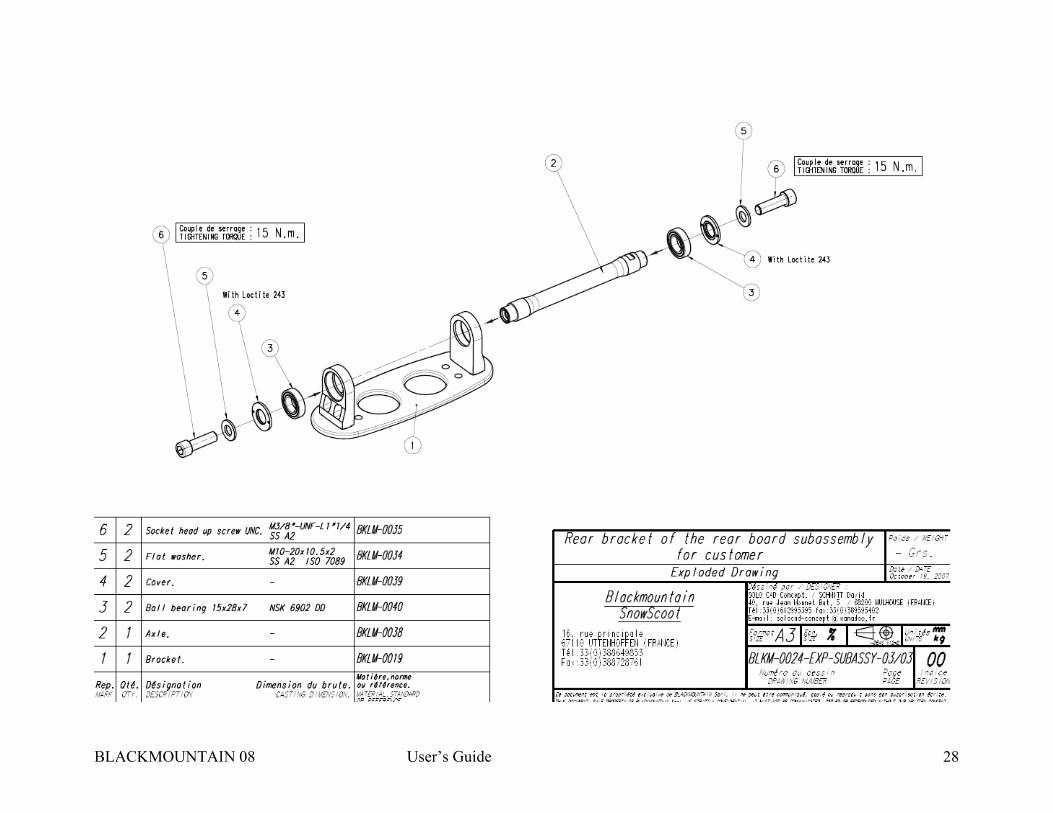
BLACKMOUNTAIN 08 User’s Guide 28

BLACKMOUNTAIN 08 User’s Guide 29

BLACKMOUNTAIN 08 User’s Guide 30

BLACKMOUNTAIN 08 User’s Guide 31
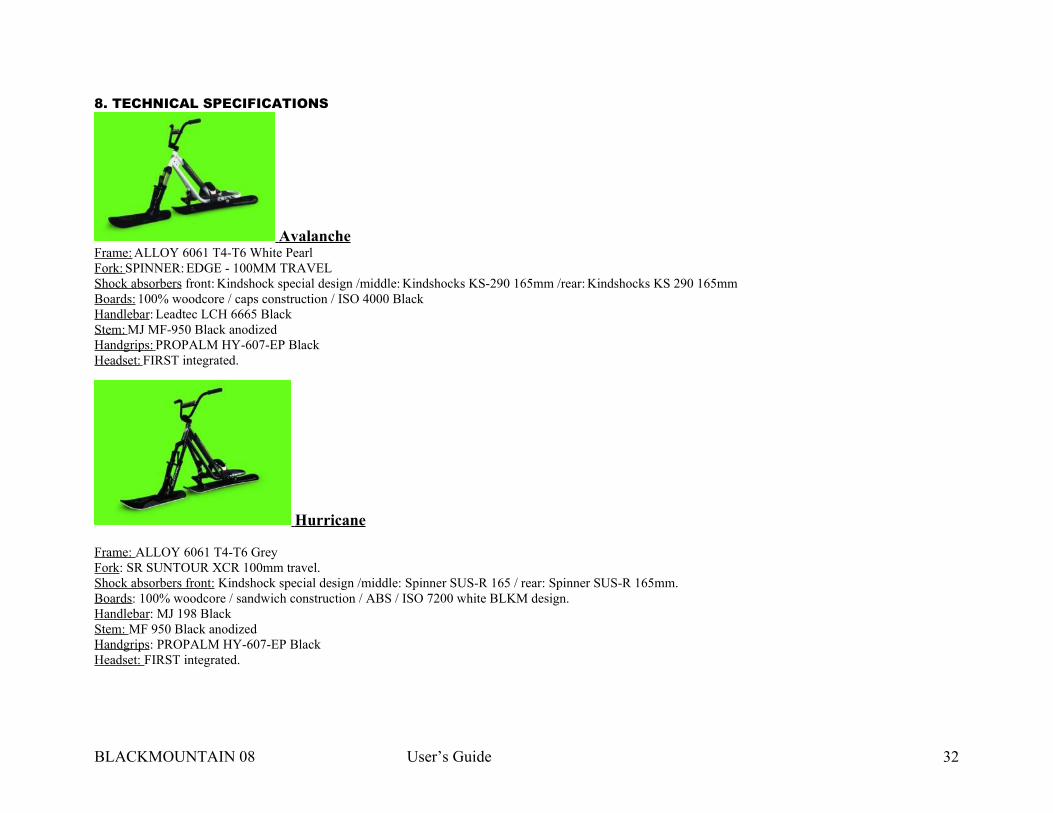
8. TECHNICAL SPECIFICATIONS
Avalanche Frame: ALLOY 6061 T4-T6 White PearlFork: SPINNER: EDGE - 100MM TRAVELShock absorbers front: Kindshock special design /middle: Kindshocks KS-290 165mm /rear: Kindshocks KS 290 165mmBoards: 100% woodcore / caps construction / ISO 4000 BlackHandlebar: Leadtec LCH 6665 BlackStem: MJ MF-950 Black anodizedHandgrips: PROPALM HY-607-EP BlackHeadset: FIRST integrated.
Hurricane
Frame: ALLOY 6061 T4-T6 GreyFork: SR SUNTOUR XCR 100mm travel.Shock absorbers front: Kindshock special design /middle: Spinner SUS-R 165 / rear: Spinner SUS-R 165mm.Boards: 100% woodcore / sandwich construction / ABS / ISO 7200 white BLKM design.Handlebar: MJ 198 BlackStem: MF 950 Black anodizedHandgrips: PROPALM HY-607-EP BlackHeadset: FIRST integrated.
BLACKMOUNTAIN 08 User’s Guide 32

Vector
Frame: ALLOY 6061 T4-T6 Skinny Black.Fork: MAGURA Odure 100mm Travel.Shock absorbers front: Kindshock special design /middle: Rockshox Bar 2.1 165mm / rear: Rockshox Bar 2.1 165mmBoards: 100% woodcore / sandwich construction / ABS / Nano-carbon Black BLKM design.Handlebar: MJ: 198 BlackStem: AtomlabHandgrips: SPANK Lock-on BlackHeadset: FIRST integrated.
9. FITTING OF ACCESSORIES
A large choice of accessories, originating from cycles, is on offer to you to improve the appearance, comfort, or performance of your Snowscoot. Nonetheless, in changing a component or an accessory, you do so at your own risk. The manufacturer cannot check the reliability of these parts and their compatibility with your model of Snowscoot. Before installing any part or accessory, or changing the boards, check with your retailer for compatibility with your Snowscoot. Ensure that you correctly read and follow the instructions that come with the relevant products.
Any addition of incompatible or badly fitted and maintained parts or accessories can lead to serious accidents and even death.
Changing the parts on your Snowscoot can invalidate the guarantee. Consult your guarantee and your BLACKMOUNTAIN™ retailer before proceeding with alterations.
We recommend following the assembly instructions provided with the accessory.
Pay particular attention to accessories that may interfere with the turning of the fork, interact with the frame at full speed or deform the frame through their tightening devices.
BLACKMOUNTAIN™ Snowscoots are not designed to accept baby carriers.
BLACKMOUNTAIN 08 User’s Guide 33
The BLACKMOUNTAIN boards have been specially developed for our frames; using boards of another brand can really actually reduce the performance of your Snowscoot or lead to premature wearing out. Boards have a special and patented flex and shape which enables optimum use of your Snowscoot.By using a different brand of boards, you would invalidate the BLACKMOUNTAIN™ guarantee and you would risk breaking your boards of that different brand. Some of these boards do not have any flex, which leads to a loss of handling and stability.Whatever the range, we advise you against fitting boards of a different brand.
11. THE BLACKMOUNTAIN™ GUARANTEE
BLACKMOUNTAIN™ guarantees the cost of replacement or repair of any original part judged defective because of a material and/or manufacturing fault for a period of one year effective from the original date of purchase. That purchase must be proved by the registration of the Snowscoot through return of the attached coupon.
Any breakage of the frame or of a part resulting from an accident, abuse, negligence normal wear and tear, a fall, freestyle, rails (slide bar), freeride, competition, or from poor assembly, adjusting or maintenance, or from assembly carried out by somebody other than a BLACKMOUNTAIN™ authorised retailer, or from the use of parts not compliant with the intended use of the BLACKMOUNTAIN™ Snowscoot at the time of sale shall not be covered by this guarantee.
By the very nature of the Snowscoot sport, it is not possible to foresee all abuses liable to be encountered daily with a Snowscoot. Every part has its limits. The more you abuse it, the quicker you will reach its limits There is no other BLACKMOUNTAIN™ guarantee whatsoever whether explicit or implicit. With regard to this guarantee, the sole responsibility of BLACKMOUNTAIN™ and/or its authorised retailers, affiliates or agents is the replacement or repair of the defective part. Consequential or immaterial damage is expressly excluded by this document.
The BLACKMOUNTAIN™ Registration:
By registering your Snowscoot with BLACKMOUNTAIN™, you will gain many benefits: a one year guarantee on the Snowscoot, a search system for stolen Snowscoots, the sending of targeted offers and BLACKMOUNTAIN™ events and other benefits to be announced during the season … So send us the attached coupon as soon as possible to benefit from the BLACKMOUNTAIN™ service!
Surname:First name:Address:
Town:Postcode:Purchase date:Serial number:Retailer’s stamp:
Attach your proof of purchase here!
BLACKMOUNTAIN 08 User’s Guide 34