u.s. department of energy · desk administrator will be notified and will create your account in...
TRANSCRIPT

1
U.S. Department of Energy
OOffffiiccee ooff tthhee EEnnggiinneeeerriinngg aanndd
CCoonnssttrruuccttiioonn MMaannaaggeemmeenntt
UUsseerr AAccccoouunntt AAcccceessss GGuuiiddee
ffoorr PPAARRSS IIII
Version 1.1
May 10, 2010
Submitted by:
Energy Enterprise Solutions
20440 Century Blvd. Suite 150
Germantown, MD 20874
Phone 301-916-0050 Fax 301-916-0066
www.eesllc.net

2
Title Page
Document Name: User Account Access Guide for PARS II
Publication Date: May 10, 2010
Contract Number: DE-AT01-06IM00102
Project Number: 1ME07 CLIN 2
Prepared by: Kai Mong, EES
Norm Ayers, EES
Reviewed by: Ken Henderson, EES
Josephine Peck, EES
Approval: _________________________________
John Makepeace, DOE OECM MA-50

3
Change Control Page The change control page is used to record information about the changes (i.e., additions,
modifications, deletions) that have been made to this document.
Revision Date
Version Number
Section & Title
Page Numbers
Summary Of Changes Author
4/26/10 1.0 All All Final draft ready for peer review.
Norm Ayers
4/27 1.1 1.0 5 Corrected the iManage email address to read: [email protected]
Kai Mong
4/27 1.1 3.1 6 Re-formatted the word” main”. Kai Mong
4/27 1.1 4.4 17 Changed lead-in text to read: “The login error page (Figure 18) will display if the user has entered an invalid password three times. If this is the case, PARS II has automatically locked the account and the user should contact the PARS II Help Desk for assistance.”
Kai Mong
5/3/2010 1.1 1 1 Change title of document to “User Account Access Guide for PARS II”
Norm Ayers

4
Table of Contents
1.0 Introduction ............................................................................................................................... 5
2.0 PARS II Welcome Page ............................................................................................................ 5
3.0 Account Request Procedures .................................................................................................... 6
3.1 Step 1: Identity Verification ................................................................................................. 6
3.2 Step 2: Login to MIS Application Gateway ........................................................................ 8
3.3 Step 3: Receiving the PARS II Account ............................................................................ 13
4.0 Logging into PARS II ............................................................................................................. 14
4.1 Security Notice Screen ........................................................................................................ 14
4.2 PARS II Login Screen ........................................................................................................ 15
4.3 PARS II Projects Screen ..................................................................................................... 16
4.4 PARS II Login: Invalid Password Screen .......................................................................... 17
5.0 Steps for Changing the Password ........................................................................................... 18
5.1 Rules of Behavior Screen.................................................................................................... 19
5.2 Change Password Screen .................................................................................................... 20
5.3 Change Password Error Message........................................................................................ 21
5.4 Change Password – Success Message ................................................................................ 22
5.5 Changing an Expired or Reset Password ............................................................................ 24
5.6 Password About To Expire ................................................................................................. 25
6.0 Email the PARS II Help Desk ................................................................................................ 26

5
1.0 Introduction This document describes the account access procedures for PARS II and was written for PARS II
Help Desk personnel and new users of the application. The following topics are covered in this
document:
• PARS II Welcome Page
• PARS II Account Request Procedures
• Logging into PARS II
• Changing PARS II Password
• Help Desk Procedures
Additional questions can be directed to the PARS II Help Desk by calling 301-903-2500 and
selecting option 4, and then option 5. PARS II Help Desk personnel can be reached by email at
the following address: [email protected].
2.0 PARS II Welcome Page The preferred method for accessing the PARS II application, to obtain the latest information
about events, notices and updates, is to click on the PARS II Welcome Page (Figure 1). The
PARS II Welcome Page can also be accessed by typing the following address into the web
browser’s address window: http://www.management.energy.gov/online_resources/pars2.htm
The Department of Energy’s Office of Engineering and Construction Management (OECM)
maintains the PARS II Welcome Page and posts helpful information, such as links to commonly
used functions, contact information for the PARS II Help Desk, and instructions for obtaining an
account. Links are located on the right side of the Welcome Page and connect to the PARS II
Login, Change Password, Request an Account, and PARS II Help Desk functions.
Figure 1 - PARS II Welcome Page (OECM Website)

6
3.0 Account Request Procedures Individuals requiring access to PARS II must apply for a PARS II user account. The application
process utilizes the Department of Energy’s MIS Application Gateway web software to verify
the identity of new users and to manage account application and approval process. To apply for
a PARS II user account, follow the instructions listed in the steps below.
Step 1: Identity Verification
If the federal employee or contractor (called the requestor) already has an account on the
Department of Energy's MIS Application Gateway then the requestor can skip Step 1 and
proceed to Step 2. If the requestor does not have an MIS Application Gateway account, then the
requestor must use the “Request Access” Menu Option on the MIS Application Gateway to
verify his/her identity with the Department of Energy. Instructions for using identity verification
features are listed on the screen (Figure 2).
To access the MIS Application Gateway, run the
web browser (Microsoft Explorer) and connect to
the MIS Application Gateway by typing the
following address into the web browser’s address
window https://mis.doe.gov/ When the MIS
Application Gateway main page appears, click the
screen’s Request Access Menu Option (Figure 2).
After selecting the Request Access Menu Option
the General Information screen appears (Figure
3); offering additional information about the
identify verification process. After reading the
screen text click the CONTINUE link at the
bottom of the screen.
Figure 2 - MIS Gateway: Request Access
Figure 3 - MIS Gateway: General Information

7
Next, the Profile Information screen appears (Figure 4),
requiring entry of personnel profile information. Enter
your last name, social security number, citizenship
status and federal/contractor employee status.
The Select Sponsor screen
appears next (Figure 5),
requiring additional profile
information to be entered,
such as employer name, job
title, email address and phone
number.
Click on the “Search”
dropdown box, located near
the center of the form, to
select a name from the list of
federal sponsors. The person
selected should be someone
from your site (e.g., federal
manager, federal supervisor)
who is familiar with your job
responsibilities and
requirements for verification.
Next, read the DOE Rules of
Behavior, located near the
bottom of the screen and click
the I AGREE button, if in
agreement with the terms.
When done, exit from the
MIS Application Gateway and
wait approximately one week
for an email response from the federal sponsor, indicating approval or rejection. If approved,
Figure 4 - MIS Gateway: Profile Information
Figure 5 - MIS Gateway - Select Sponsor and Read Rules of Behavior

8
you will receive instructions and a User name and password that will permit you to log into the
MIS Application Gateway and complete the application process,
Step 2: Login to MIS Application Gateway
The purpose of this step is to provide the verified DOE federal employee or contractor with a
mechanism for choosing a DOE Headquarters software application (e.g., PARS II, STARS,
STRIPES, IDW). The MIS Application Gateway also manages the workflow aspects of the
approval and communication processes.
This step assumes that you (the requestor) have received an account to access the MIS
Application Gateway and that you are prepared to log into the MIS Application Gateway to
apply for a PARS II user account.
When ready to use the MIS Application Gateway, type
this address into the web browser’s address window
https://mis.doe.gov/
When the MIS Application Gateway main web page
appears, click the screen’s “Login” Menu Option
(Figure 6).
Next, the MIS Application Gateway LOGIN
screen will appear (Figure 7). Enter your
previously assigned MIS Application Gateway
Username and Password and then press the
AUTHENTICATE ME button.
Figure 6 - MIS Application Gateway
Figure 7 - MIS Gateway: Login Screen

9
Next, the Applications Gateway
screen will appear (Figure 8).
Select the DOE Corporate
Applications menu option,
located on the left side of the
screen. A sub-menu item will
appear. Select the Application
Access Request option from
the sub-menu.
The User Verification
Form appears next (Figure
9). Update all profile
information, such as site,
building, address, mailstop,
room number and phone.
When done, click on the
Update/Continue button at
the bottom of the screen.
Figure 8 - MIS Gateway - Applications
Figure 9 - MIS Gateway: User Verification

10
The Application Access Request screen
appears next (Figure 10). Click the
PARS II Menu Option and then click
the Close this Window item at the
bottom of the screen.
The Rules of Behavior screen appears next (Figure
11). Make sure to read all of the rules and then, if
in agreement with the terms, click the I Do Agree
With The Rules button.
Figure 10 - MIS Gateway - Application Request
Figure 11 - MIS Gateway: Rules of Behavior

11
The PARS II Custom Form screen appears next (Figure 12). Enter the following information on
this form:
• User Role: Select one role from the list of roles on the screen that most closely represents
your job function as it pertains to using PARS II. If unsure about your role in PARS II,
please call the PARS II Help Desk.
• Approving Official: Select one name, from the list of names in the dropdown box, of the
Program Approving Official who will be responsible for approving your request to obtain a
PARS II user account.
• PARS II Project Number (optional): If applicable, enter the DOE Project Number for each
project that you are responsible for updating. A maximum of five projects can be entered.
• Requestor Comments: Enter text in this block that pertains to questions or issues that you
might have about this request (e.g. “this is my second request”).
• Business Reason: Enter a brief justification for using PARS II (e.g., it is required by my job,
I want to monitor projects in my area of responsibility, etc.).
After entering all items on the screen, click the SUBMIT button at the bottom of the screen.
Figure 12 - MIS Gateway: Custom Form for PARS II

12
The last screen to appear in the request sequence is called the Confirmation screen (Figure 13)
and its purpose is to inform the requestor that his/her information was entered correctly and that
a response from the approving official, to approve or reject the request, should be expected
within one week.
Figure 13 – MIS Gateway - Request Confirmation Screen

13
Step 3: Receiving the PARS II Account
If the approving official and authorizing official approve your request, then the PARS II Help
Desk Administrator will be notified and will create your account in the PARS II system. The
PARS II Help Desk Administrator will then send you a PARS II user name and password so that
you will be able to access the application. Please contact the PARS II Help Desk if you have
additional questions.
Note: Instructions for completing the account application process are also available on the DOE
Office of Management’s OECM Request User Account web page (Figure 14) and can be
accessed by typing the following address into the browser’s address window:
http://management.energy.gov/online_resources/pars2ar.htm.
Figure 14 - Request User Account Link: OECM Website

14
4.0 Logging into PARS II
The PARS II web application can be accessed in two different ways:
1. By connecting to the Department of Energy’s OECM website PARS II Welcome Page and
by clicking the link titled: Login to PARS II which is located on the right-hand side of the
PARS II Welcome Page;
2. Or, by typing the PARS II URL address https://pars2.doe.gov into the browser’s address
window.
When either of these methods is chosen, PARS II will run and display the following three
screens in succession:
• Security Notice screen (Figure 15)
• Login screen (Figure 16)
• PARS II Project screen (Figure 17)
4.1 Security Notice Screen
The Security Notice screen (Figure 15) prompts the user to read the text on the screen and then
directs the user to press the “continue” button.
\ Figure 15 - PARS II Security Notice Screen

15
4.2 PARS II Login Screen
After agreeing to the terms of the PARS II Security Notice, the PARS II Login screen will
appear (Figure 16). To access PARS II, the user must enter the pre-assigned PARS II User name
and password and then click the OK button. Other relevant information appears below.
• Values for the user name and password must be entered with 60 seconds of the initial screen
display, or an error screen will appear. Values entered for user name are not case sensitive
but values entered for password are case sensitive.
• An invalid username or invalid password entry, followed by pressing the OK button, will
cause the screen to re-display and prompt the user for new values (up to three separate times).
• After three invalid attempts at entering user name or password, the Windows Domain Error
Screen will appear (Figure 18) and the user’s account will be locked for 30 minutes. The user
can wait 30 minutes and then re-enter correct values for user name and password, or the user
can contact the PARS II Help Desk Administrator to request that the account be unlocked.
Figure 16 - PARS II Login Screen

16
4.3 PARS II Projects Screen
After successfully logging into PARS II, the Projects screen will appear (Figure 17), indicating
that the account is valid and that all login steps have been followed correctly.
Figure 17 - PARS II Project Screen

17
4.4 PARS II Login: Invalid Password Screen
The login error page (Figure 18) will display if the user has entered an invalid password three
times. If this is the case, PARS II has automatically locked the account and the user should
contact the PARS II Help Desk for assistance.
Figure 18 - PARS II Windows Domain: Password Error Message

18
5.0 Steps for Changing the Password A change to an existing PARS II password can be made by clicking the Change PARS II
Password link, located on the PARS II Welcome Page. PARS II will then display the following
three screens in succession:
1. Security Notice screen (Figure 19)
2. Rules of Behavior screen (Figure 20)
3. Change Password screen (Figure 21)
The PARS II Security Notice screen (Fig 19) will be the first screen to appear. The requestor
must read the terms posted on the notice and, if in agreement with these terms, press the
“continue” button at the bottom of the page. Pressing the “cancel” button will re-display the
Welcome Page.
Figure 19 - PARS II Security Notice Page

19
5.1 Rules of Behavior Screen
The PARS II Rules of Behavior screen will appear next in sequence (Figure 20). The terms on
the screen should be read carefully to understand what will be required to change your password.
Use the vertical scroll bar to read the entire page and, when done, click the “I Accept These
Rules of Behavior” button.
Figure 20 - PARS II Rules of Behavior Screen

20
5.2 Change Password Screen
The PARS II Change Password screen appears in order (Figure 21). The reader will be required
to develop password text that complies with the guidelines shown on the Rules of Behavior
screen. To change the password, the user must enter the following information on the screen:
• The value of your previously assigned PARS II user name, to be placed in the User ID field;
• The value of your current PARS II password, to be placed in the Old Password field;
• The value of the new password you are creating, to be placed in the New Password field.
Remember that passwords are case-sensitive.
• Enter the new password (again), to be placed in the Confirm Password field.
• And then press the Submit button.
• Please take note of the help text located in the lower left-hand corner of the screen.
Figure 21 - PARS II Domain: Change Password Screen

21
5.3 Change Password Error Message
If the password entered does not meet the criteria described in the Rules of Behavior, PARS II
will display an error message on the screen (see red text at top of Figure 22).
Figure 22 - PARS II Change Password – Operation Failed Message

22
5.4 Change Password – Success Message
Success in changing the password will result in a message at the top of the screen that displays
“Password Successfully Changed” (see red text near the top of Figure 23).
When ready to access PARS II, click on the link Continue to PARS II with New Password link.
This action will display the PARS II Logon screen (Figure 24).
Figure 23 - PARS II Change Password: Success Message

23
To access PARS II, enter the username and new password in the PARS II Logon screen.
Figure 24 - PARS II Logon Screen
24
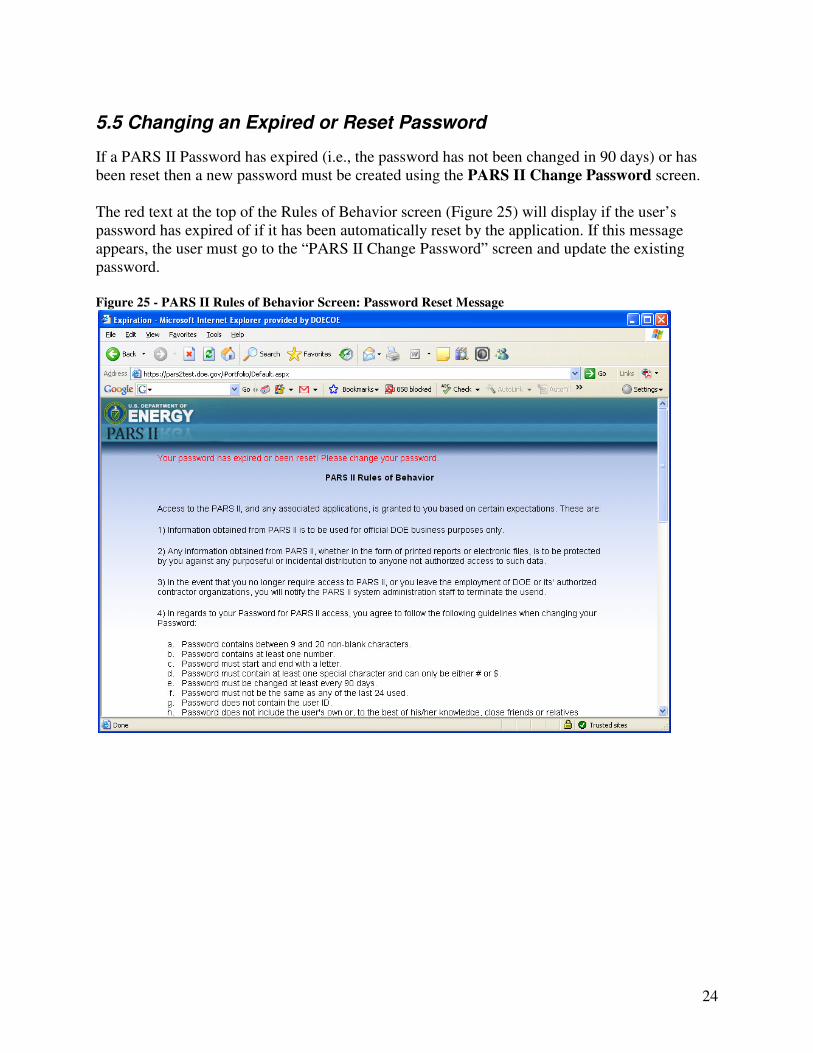
5.5 Changing an Expired or Reset Password
If a PARS II Password has expired (i.e., the password has not been changed in 90 days) or has
been reset then a new password must be created using the PARS II Change Password screen.
The red text at the top of the Rules of Behavior screen (Figure 25) will display if the user’s
password has expired of if it has been automatically reset by the application. If this message
appears, the user must go to the “PARS II Change Password” screen and update the existing
password.
Figure 25 - PARS II Rules of Behavior Screen: Password Reset Message

25
5.6 Password About To Expire
If a PARS II Password is about to expire within the next 14 days, the screen and accompanying
text shown in Figure 26 will appear after logging into PARS II. This screen will allow the user
to indicate his/her intent to change the password now, or to change it in the future.
Clicking the Yes button will display the PARS II Change Password screen. Clicking the No
button will display the PARS II Select Project screen.
Figure 26 – PARS II Password Expiration Warning Message
26
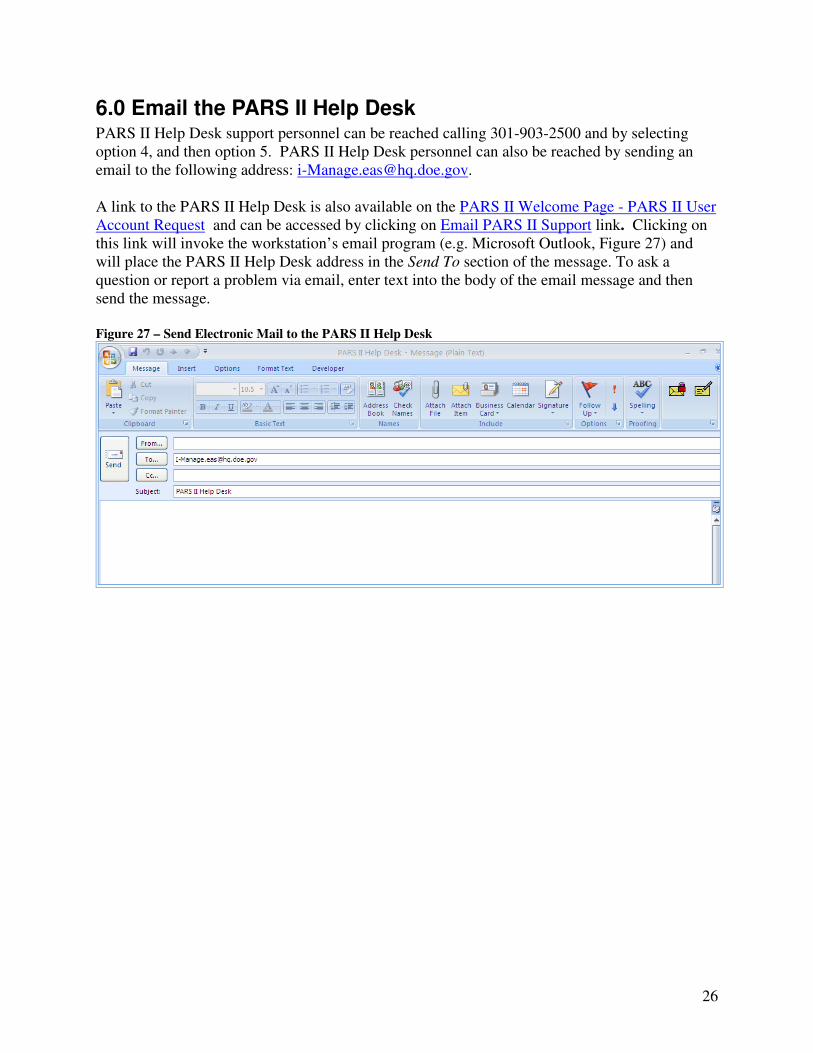
6.0 Email the PARS II Help Desk PARS II Help Desk support personnel can be reached calling 301-903-2500 and by selecting
option 4, and then option 5. PARS II Help Desk personnel can also be reached by sending an
email to the following address: [email protected].
A link to the PARS II Help Desk is also available on the PARS II Welcome Page - PARS II User
Account Request and can be accessed by clicking on Email PARS II Support link. Clicking on
this link will invoke the workstation’s email program (e.g. Microsoft Outlook, Figure 27) and
will place the PARS II Help Desk address in the Send To section of the message. To ask a
question or report a problem via email, enter text into the body of the email message and then
send the message.
Figure 27 – Send Electronic Mail to the PARS II Help Desk