“urv” - the old robot's · are pressed, urv shuts down. urv’s lights go out and his...
TRANSCRIPT

www.rescueheroes.com
Model Number: 78362Please keep this instruction sheet for future reference, as it contains important information.
Requires four “C” (LR14) alkaline batteries (not included). Adult assembly is required for battery installation.Tool required for battery installation: Phillips screwdriver (not included).
Ultimate Robotic Vehicle™“URV” with Remote Control
Figures sold separately.

BATTERY INSTALLATION
1.5V x 4”C” (LR14)
SHOWN ACTUAL SIZE
Battery Tips• Do not mix old and new batteries.• Do not mix different types of batteries: alkaline, stan-
dard (carbon-zinc) or rechargeable (nickel-cadmium).• Remove the batteries during long periods of non-use.
Always remove exhausted batteries from the toy. Batteryleakage and corrosion can damage this toy. Dispose ofbatteries safely.
• Do not dispose of batteries in a fire. The batteries mayexplode or leak.
• Never short circuit the battery terminals.• Non-rechargeable batteries are not to be recharged.• Only batteries of the same or equivalent type as recom-
mended in the “Battery Installation” instructions are tobe used.
• If removable rechargeable batteries are used, they areonly to be charged under adult supervision.
• Rechargeable batteries are to be removed from the toybefore they are charged.
• If you use a battery charger, it should be examined reg-ularly for damage to the cord, plug, enclosure and otherparts. Do not use a damaged battery charger until it hasbeen properly repaired.
For best results, use only alkaline batteries.
2
• Locate the battery compartment door on the bottomof each foot.
• Loosen the screw in each battery compartment doorwith a Phillips screwdriver. Open the battery compartment doors.
• Insert two “C” (LR14) alkaline batteries as indicatedin each battery compartment.
Hint: We recommend using alkaline batteries for longer battery life.• Close each battery compartment door and tighten
each screw with a Phillips screwdriver. Do not over-tighten.
• When lights, sounds or motion from this toy become faint or stop, it’s time for an adult to change the batteries!
BatteryCompartmentDoorsBottom View
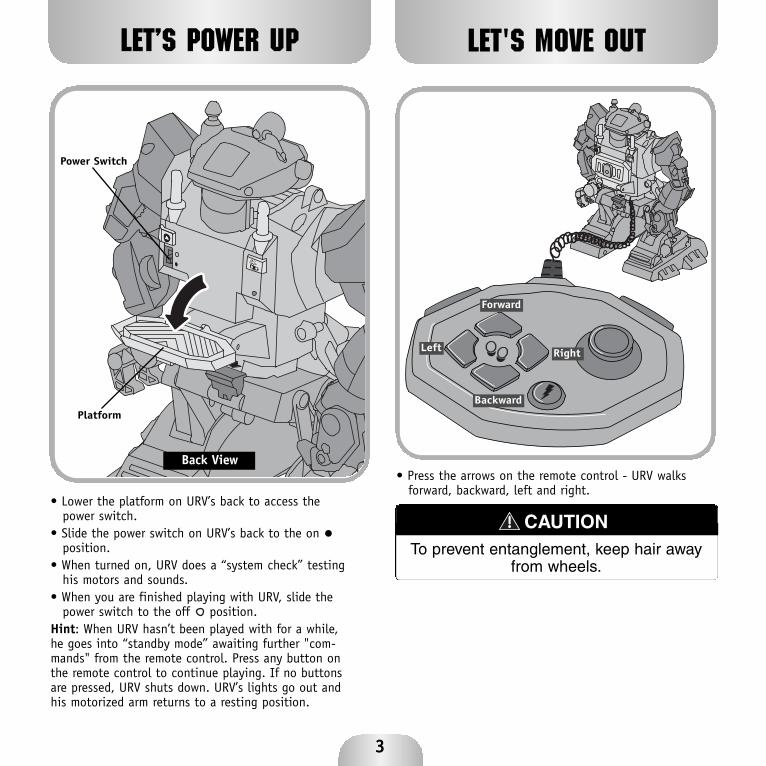
LET’S POWER UP
3
• Lower the platform on URV’s back to access thepower switch.
• Slide the power switch on URV’s back to the on •position.
• When turned on, URV does a “system check” testinghis motors and sounds.
• When you are finished playing with URV, slide thepower switch to the off position.
Hint: When URV hasn’t been played with for a while,he goes into “standby mode” awaiting further "com-mands" from the remote control. Press any button onthe remote control to continue playing. If no buttonsare pressed, URV shuts down. URV’s lights go out andhis motorized arm returns to a resting position.
Platform
Power Switch
• Press the arrows on the remote control - URV walksforward, backward, left and right.
LET'S MOVE OUT
CAUTIONTo prevent entanglement, keep hair away
from wheels.
Backward
RightLeft
Forward
Back View
4
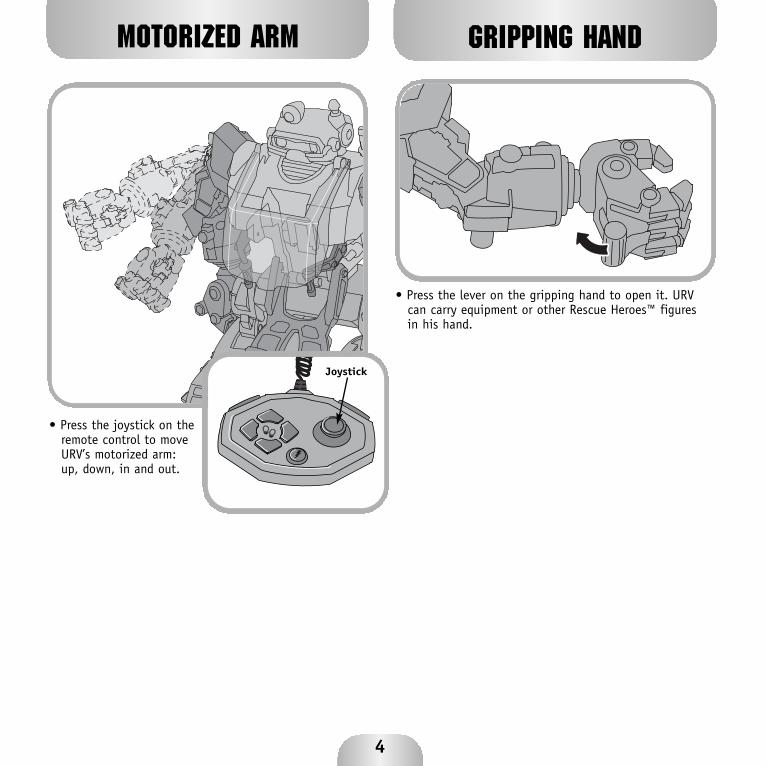
• Press the lever on the gripping hand to open it. URVcan carry equipment or other Rescue Heroes™ figuresin his hand.
• Press the joystick on theremote control to moveURV’s motorized arm:up, down, in and out.
MOTORIZED ARM GRIPPING HAND
Joystick
5
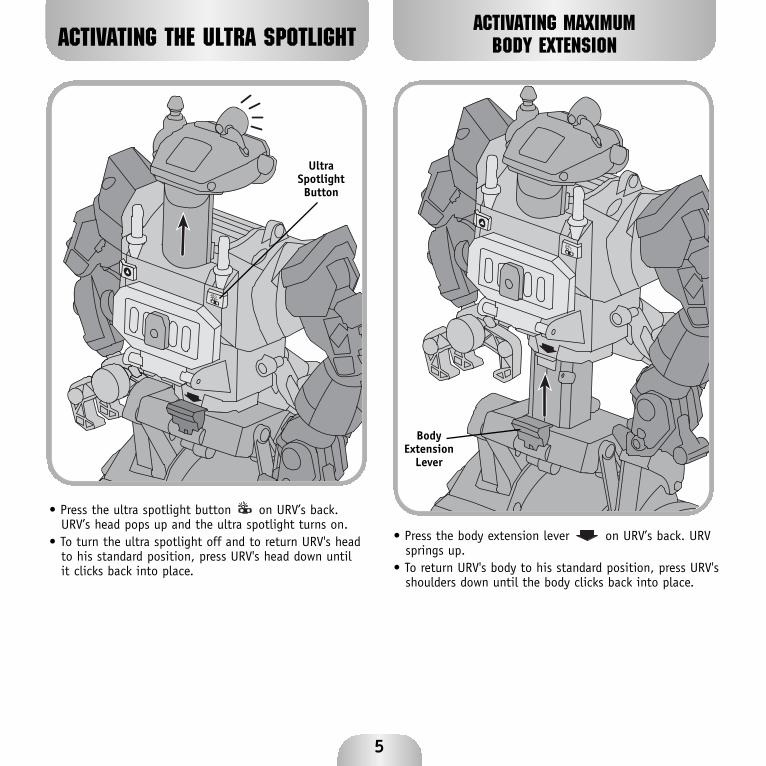
• Press the body extension lever on URV’s back. URVsprings up.
• To return URV's body to his standard position, press URV'sshoulders down until the body clicks back into place.
• Press the ultra spotlight button on URV’s back.URV’s head pops up and the ultra spotlight turns on.
• To turn the ultra spotlight off and to return URV's headto his standard position, press URV's head down untilit clicks back into place.
ACTIVATING THE ULTRA SPOTLIGHTACTIVATING MAXIMUM
BODY EXTENSION
UltraSpotlightButton
BodyExtension
Lever
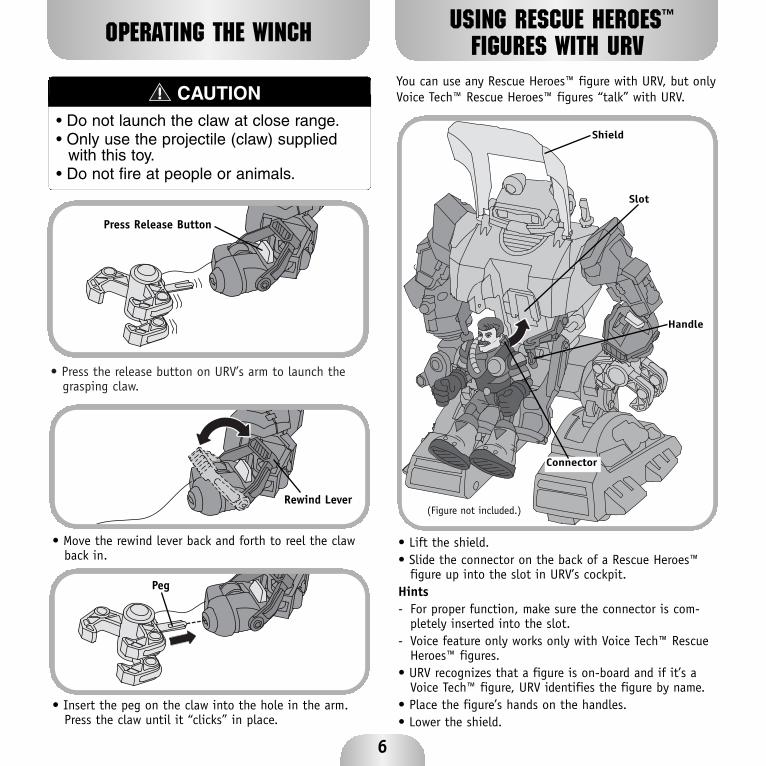
• Press the release button on URV’s arm to launch thegrasping claw.
OPERATING THE WINCH
Press Release Button
• Move the rewind lever back and forth to reel the clawback in.
• Insert the peg on the claw into the hole in the arm.Press the claw until it “clicks” in place.
Rewind Lever
Peg
• Lift the shield.• Slide the connector on the back of a Rescue Heroes™
figure up into the slot in URV’s cockpit. Hints- For proper function, make sure the connector is com-
pletely inserted into the slot.- Voice feature only works only with Voice Tech™ Rescue
Heroes™ figures.• URV recognizes that a figure is on-board and if it’s a
Voice Tech™ figure, URV identifies the figure by name. • Place the figure’s hands on the handles.• Lower the shield.
USING RESCUE HEROES™
FIGURES WITH URV
Connector
Slot
Handle
You can use any Rescue Heroes™ figure with URV, but onlyVoice Tech™ Rescue Heroes™ figures “talk” with URV.CAUTION
• Do not launch the claw at close range.• Only use the projectile (claw) supplied
with this toy.• Do not fire at people or animals.
6
Shield
(Figure not included.)

OTHER RESCUE HEROES™ FIGURES
7
• Press the mission button on URV’s back. URV assigns a mission to the Rescue Heroes™.
• Press the mission button to hear the Voice Tech™figure “talk” with URV.
• Press the speech button on URV’s remote controlagain and again. URV and the Voice Tech™ figure “talk”to each other.
• Press the sound effects button on the remote con-trol to hear robotic sounds.
USING URV WITHVOICE TECH™ FIGURES
• Press the mission button on URV’s back. URV assignsa mission to the Rescue Heroes™.
• Continue pressing the mission button to hear otherphrases and missions from URV.
• Press the speech button on URV’s remote control tohear URV say different phrases.
• Press the sound effects button on the remote con-trol to hear robotic sounds.
• Other figures can ride along on URV’s back.• Lower the platform on URV’s back. Place a figure on the
platform. Fit the figure’s hands to the handles.
Platform
Handle
RIDE ALONG
MissionButton
Back View

STORAGE
8
• Slide the tab on the tool arm into the slot in URV’smotorized arm.
• Fit the handle on the tool into the hole in URV’s hand.
USING POWERMAX™ TOOLS
• Insert the plug from the tool into the PowerMax™ socketin URV’s back.
PowerMax™ Socket
Plug
• Press the PowerMax™ tool button on the remotecontrol to activate the tool.
• To store the remote control, slide it on to the connec-tor on URV’s back as shown.
Connector
PowerMax™Tool Button
Back View
Tab
Slot
PowerMax™ Tool
Hole
USING POWERMAX™ TOOLS
Motorized Arm
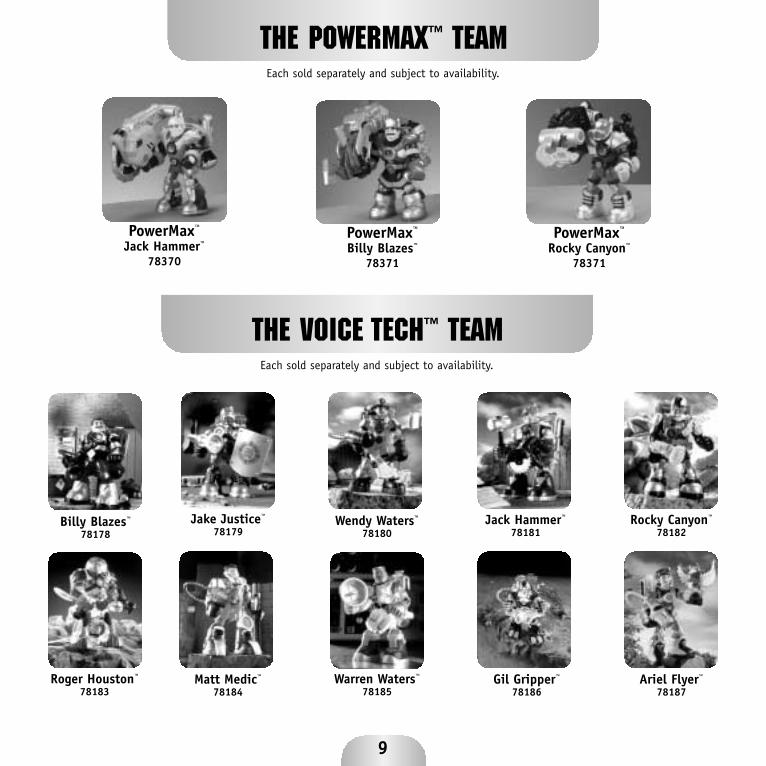
THE VOICE TECH™ TEAMEach sold separately and subject to availability.
THE POWERMAX™ TEAM
9
PowerMax™
Jack Hammer™
78370
Each sold separately and subject to availability.
PowerMax™
Rocky Canyon™
78371
PowerMax™
Billy Blazes™
78371
Jack Hammer™
78181Jake Justice™
78179
Warren Waters™
78185
Wendy Waters™
78180Rocky Canyon™
78182
Gil Gripper™
78186Ariel Flyer™
78187
Billy Blazes™
78178
Matt Medic™
78184Roger Houston™
78183
FCC NOTE (UNITED STATES ONLY)
• Wipe this toy with a clean cloth dampened with a mildsoap and water solution. Do not immerse this toy.
• This toy has no consumer serviceable parts. Do not takethis toy apart.
• Do not drop this toy on a hard surface.
Note: This equipment has been tested and found to com-ply with the limits for a Class B digital device, pursuant toPart 15 of the FCC Rules. These limits are designed to pro-vide reasonable protection against harmful interference ina residential installation. This equipment generates, usesand can radiate radio frequency energy and, if notinstalled and used in accordance with the instructions,may cause harmful interference to radio communications.However, there is no guarantee that interference will notoccur in a particular installation. If this equipment doescause harmful interference to radio or television recep-tion, which can be determined by turning the equipmentoff and on, the user is encouraged to try to correct theinterference by one or more of the following measures:• Reorient or relocate the receiving antenna.• Increase the separation between the equipment and
receiver.• Consult the dealer or an experienced radio/TV technician
for help.Note: Changes or modifications not expressly approved bythe manufacturer responsible for compliance could voidthe user's authority to operate the equipment.
Fisher-Price, Inc., subsidiary of Mattel, Inc., East Aurora, NY 14052 U.S.A.2002 Mattel, Inc. All Rights Reserved.® and ™ designate U.S. trademarks of Mattel, Inc.
For other countries, outside the United States: Canada: call 1-800-567-7724, or write to: Mattel Canada Inc.,6155 Freemont Blvd., Mississauga, Ontario L5R 3W2. Great Britain: telephone 01628 500302.Australia: Mattel Australia Pty. Ltd., 658 Church Street, Locked Bag #870, Richmond, Victoria 3121 Australia. Consumer Advisory Service 1300 135 312.New Zealand: 16-18 William Pickering Drive, Albany 1331, Auckland.
Printed in China78362pr-0920
Questions? We’d like to hear from you! Call Fisher-Price® Consumer Relations, toll-free at 1-800-432-KIDS, 8 AM - 6 PM EST Monday through Friday.Hearing-impaired consumers using TTY/TDD equipment,please call 1-800-382-7470. Or, write to: Fisher-Price® Consumer Relations 636 Girard Avenue East Aurora, New York 14052
CARE CONSUMER INFORMATION