understanding css selection t - university of …carl.sandiego.edu/itmg494/css_chap2.pdf · the...
TRANSCRIPT

CHAPTER
2UNDERSTANDING CSSSELECTION TECHNIQUES
In this chapter you will learn:♦ How to use basic CSS selectors that match element names to
apply style rules ♦ How to use the CLASS and ID attributes ♦ How to apply style rules to <DIV> and <SPAN> elements♦ About the pseudo-classes and elements that allow you to apply
style rules to abstract characteristics of a document♦ About the newest CSS2 selector characteristics and capabilities
The power in CSS comes from the various methods of selecting elements,allowing an HTML author to apply style rules in a variety of ways. In
this chapter, you will learn about basic selection techniques, some of whichyou saw in the previous chapter, and how you can combine these to createsimple but powerful style rules.You will also explore the advanced selectiontechniques, which allow a wide range of expression and many ways to honein on the exact element you want to affect.You will see how CSS providesmethods of selecting abstract document characteristics, such as the first let-ter of a paragraph, that are not expressed with standard HTML elements.Youalso will see these techniques in action as you step through the creation ofstyle sheets using both basic and advanced selection. Finally, you will explorethe newest CSS2 selectors and see the power they will provide for the futureof publishing on the Web.
27
may be reproduced without prior permission in writing from Course Technology. Some of the product names and company names have beenused for identification purposes only and may be trademarks or registered trademarks of their respective manufactures and sellers.
Copyright © 2001 by Course Technology. All rights reserved.This publication is protected by federal copyright law. No part of this publication

28 Chapter 2 Understanding CSS Selection Techniques
BASIC SELECTION TECHNIQUES
In this section, you will review style rule syntax and learn about the following basicselection techniques:
■ Using type selectors
■ Grouping selectors
■ Combining declarations
■ Using descendant selectors
Using Type SelectorsAs you learned in the “Introducing Cascading Style Sheets” chapter, the selector deter-mines the element to which a style declaration is applied.To review, examine the syntaxof the style rule shown in Figure 2-1.This rule selects the H1 element in the documentand sets the text color to red.
This rule uses a type selector to apply the rule to every instance of the element in thedocument.This is the simplest type of selector, and many style sheets are composed pri-marily of type selector style rules, as shown in the following code:
BODYƒ{color:ƒgray;}H2ƒ{color:ƒred;}Pƒ{font-size:ƒ10pt;}
The style rules in this chapter use a variety of CSS style rules as examples.Although you have not yet learned about these properties in detail, you willsee that the CSS property names express common desktop publishing char-acteristics, such as font-family, margin, text-indent, and so on. The propertyvalues sometimes use abbreviations such as px for pixel and pt for point, per-centages such as 200%, or keywords such as bold. You will learn about theseproperties and values in detail as you progress through this book.
Tip
H1 {color: red;}
Figure 2-1 Style rule syntax
Selector Declaration
may be reproduced without prior permission in writing from Course Technology. Some of the product names and company names have beenused for identification purposes only and may be trademarks or registered trademarks of their respective manufactures and sellers.
Copyright © 2001 by Course Technology. All rights reserved.This publication is protected by federal copyright law. No part of this publication

Basic Selection Techniques 29
2
Grouping SelectorsTo make your style rules more concise, you can group selectors to which the same rulesapply. For example, the following style rules set the same declaration for two differentelements—they set the color of <H1> and <H2> elements to red:
H1ƒ{color:ƒred;}H2ƒ{color:ƒred;}
These two style rules can be expressed in a simpler way by separating the selectors withcommas:
H1,ƒH2ƒ{color:ƒred;}
Combining Declarations In many instances, you will want to state multiple property declarations for the sameselector.The following style rules set the <P> element to 12-point blue text:
Pƒ{color:ƒblue;}Pƒ{font-size:ƒ12pt;}
These two style rules can be expressed in a simpler fashion by combining the declara-tions in one rule.The declarations are separated by semicolons:
Pƒ{color:ƒblue;ƒfont-size:ƒ12pt;}
Using Descendant SelectorsA descendant selector (sometimes known as a contextual selector) is based on the hier-archical structure of the elements in the document tree.This selector lets you select ele-ments that are the descendants of other elements. For example, the following rule selectsonly <B> elements that are contained within <P> elements. All other <B> elementsin the document will not be affected.
PƒBƒ{color:ƒblue;}
Notice that the selector contains multiple elements, separated only by white space.Youcan use more than two elements if you prefer to choose more specific selection charac-teristics. For example, the following rule selects <B> elements within <LI> elementswithin <UL> elements only:
ULƒLIƒBƒ{color:ƒblue;}
Using the Basic Selection TechniquesIn the following set of steps, you will build a style sheet that uses basic selection tech-niques. Save your file and test your work in the browser as you complete each step. Referto Figure 2-3 as you progress through the steps to see the results you will achieve.
may be reproduced without prior permission in writing from Course Technology. Some of the product names and company names have beenused for identification purposes only and may be trademarks or registered trademarks of their respective manufactures and sellers.
Copyright © 2001 by Course Technology. All rights reserved.This publication is protected by federal copyright law. No part of this publication
30 Chapter 2 Understanding CSS Selection Techniques
To build the style sheet:
1. Open the file oz.htm in your HTML editor, and save it in your work folderas oz1.htm.
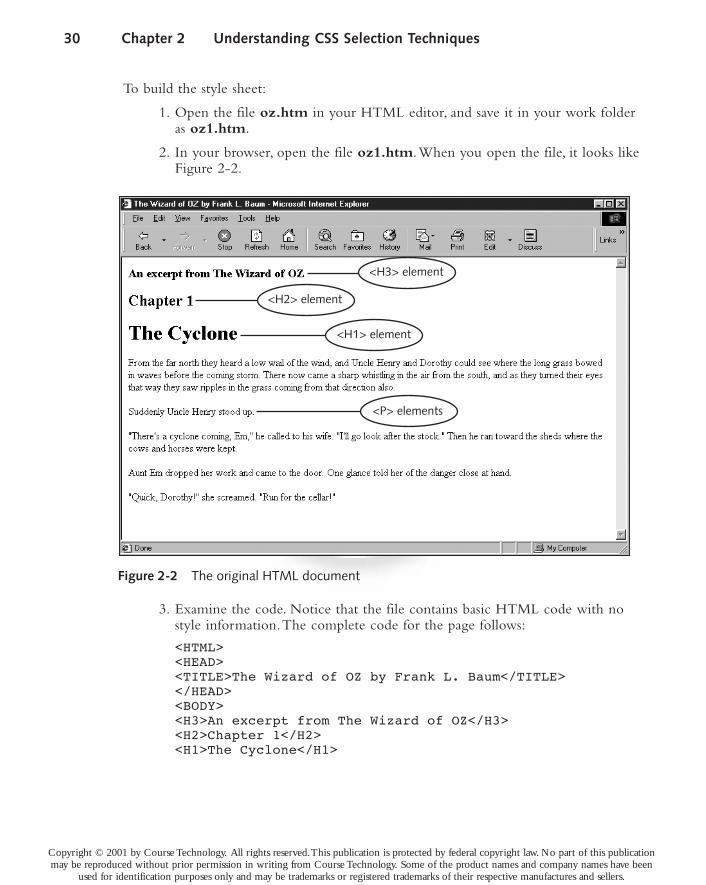
2. In your browser, open the file oz1.htm.When you open the file, it looks likeFigure 2-2.
3. Examine the code. Notice that the file contains basic HTML code with nostyle information.The complete code for the page follows:
<HTML><HEAD><TITLE>TheƒWizardƒofƒOZƒbyƒFrankƒL.ƒBaum</TITLE></HEAD><BODY><H3>AnƒexcerptƒfromƒTheƒWizardƒofƒOZ</H3><H2>Chapterƒ1</H2><H1>TheƒCyclone</H1>
Figure 2-2 The original HTML document
<H3> element
<H2> element
<H1> element
<P> elements
may be reproduced without prior permission in writing from Course Technology. Some of the product names and company names have beenused for identification purposes only and may be trademarks or registered trademarks of their respective manufactures and sellers.
Copyright © 2001 by Course Technology. All rights reserved.This publication is protected by federal copyright law. No part of this publication

Basic Selection Techniques 31
2
<P>Fromƒtheƒfarƒnorthƒtheyƒheardƒaƒlowƒwailƒofƒtheƒwind,ƒandƒUncleƒHenryƒandƒDorothyƒcouldƒseeƒwhereƒtheƒlongƒgrassƒbowedƒinƒwavesƒbeforeƒtheƒcomingƒstorm.ƒThereƒnowƒcameƒaƒsharpƒwhistlingƒinƒtheƒairƒfromƒtheƒsouth,ƒandƒasƒtheyƒturnedƒtheirƒeyesƒthatƒwayƒtheyƒsawƒripplesƒinƒtheƒgrassƒcomingƒfromƒthatƒdirectionƒalso.</P><P>SuddenlyƒUncleƒHenryƒstoodƒup.</P><P>"There'sƒaƒcycloneƒcoming,ƒEm,"ƒheƒcalledƒtoƒhisƒwife."I'llƒgoƒlookƒafterƒtheƒstock."ƒƒThenƒheƒranƒtowardƒtheƒshedsƒwhereƒtheƒcowsƒandƒhorsesƒwereƒkept.</P><P>AuntƒEmƒdroppedƒherƒworkƒandƒcameƒtoƒtheƒdoor.ƒƒOneƒglanceƒtoldƒherƒofƒtheƒdangerƒcloseƒatƒhand.</P>ƒ<P>"Quick,ƒDorothy!"ƒsheƒscreamed.ƒƒ"Runƒforƒtheƒcellar!"</P></BODY></HTML>
4. Add a <STYLE> element in the <HEAD> section to contain your stylerules as shown in the following code. Leave a few lines of white spacebetween the <STYLE> tags to contain the style rules.
<HEAD><TITLE>TheƒWizardƒofƒOZƒbyƒFrankƒL.ƒBaum</TITLE><STYLEƒtype="text/css">
</STYLE></HEAD>
5. Write the style rule for the <H3> element.The requirements for this ele-ment are right-aligned gray text.The style rule looks like this:
<HEAD><TITLE>TheƒWizardƒofƒOZƒbyƒFrankƒL.ƒBaum</TITLE><STYLEƒtype="text/css">H3ƒ{text-align:ƒright;ƒcolor:ƒgray;}</STYLE></HEAD>
may be reproduced without prior permission in writing from Course Technology. Some of the product names and company names have beenused for identification purposes only and may be trademarks or registered trademarks of their respective manufactures and sellers.
Copyright © 2001 by Course Technology. All rights reserved.This publication is protected by federal copyright law. No part of this publication

32 Chapter 2 Understanding CSS Selection Techniques
6. Write the style rules for the <H1> and <H2> elements, which share somecommon property values. Both elements have a left margin of 20 pixels(abbreviated as px) and a sans-serif font style. Because they share these prop-erties, group the two elements to share the same style rule as shown in thefollowing code:
<HEAD><TITLE>TheƒWizardƒofƒOZƒbyƒFrankƒL.ƒBaum</TITLE><STYLEƒtype="text/css">H3ƒ{text-align:ƒright;ƒcolor:ƒgray;}H1,ƒH2ƒ{margin-left:ƒ20px;ƒfont-family:ƒsans-serif;}</STYLE></HEAD>
7. Write an additional rule for the <H1> element.The <H1> element has twostyle properties that it does not share with <H2>, so a separate style rule isnecessary to express the border and padding white space within the border.This rule uses the border shortcut property to specify multiple border charac-teristics—a 1 pixel border-weight and solid border-style.
<HEAD><TITLE>TheƒWizardƒofƒOZƒbyƒFrankƒL.ƒBaum</TITLE><STYLEƒtype="text/css">H3ƒ{text-align:ƒright;ƒcolor:ƒgray;}H1,ƒH2ƒ{margin-left:ƒ20px;ƒfont-family:ƒsans-serif;}H1ƒ{border:ƒ1pxƒsolid;ƒpadding:ƒ5px;}</STYLE></HEAD>
8. Write a style rule for the <P> elements so they have a 20-pixel left margin(to line up with the other elements on the page), a serif font style, and a14-point font size.
<HEAD><STYLEƒtype="text/css">H3ƒ{text-align:ƒright;ƒcolor:ƒgray;}H1,ƒH2ƒ{margin-left:ƒ20px;ƒfont-family:ƒsans-serif;}H1ƒ{border:ƒ1pxƒsolid;ƒpadding:ƒ5px;}Pƒ{margin-left:ƒ20px;ƒfont-family:ƒserif;ƒfont-size:ƒ14pt;}</STYLE></HEAD>
Figure 2-3 shows the finished document with the style properties.
may be reproduced without prior permission in writing from Course Technology. Some of the product names and company names have beenused for identification purposes only and may be trademarks or registered trademarks of their respective manufactures and sellers.
Copyright © 2001 by Course Technology. All rights reserved.This publication is protected by federal copyright law. No part of this publication

Advanced Selection Techniques 33
2
ADVANCED SELECTION TECHNIQUES
This section describes the CSS advanced selection techniques that are supported inInternet Explorer 5.0, Netscape 6.0, and Opera 5.0.These techniques allow more thanthe basic element-based selection described in the previous section.You will learn toselect elements of an HTML document using the following methods:
■ The CLASS attribute
■ The ID attribute
■ The <DIV> and <SPAN> elements
■ The pseudo-class and pseudo-element selectors
■ The universal selector
Figure 2-3 The document styled with CSS rules
text-align: right;color: gray
margin-left: 20px;font-family: sans serif;
border: 1 px, solid;padding: 5 px;
margin-left: 20px;font-family:sans-serif;
margin-left: 20px;font-family: serif;font-size: 14 pt;
may be reproduced without prior permission in writing from Course Technology. Some of the product names and company names have beenused for identification purposes only and may be trademarks or registered trademarks of their respective manufactures and sellers.
Copyright © 2001 by Course Technology. All rights reserved.This publication is protected by federal copyright law. No part of this publication

34 Chapter 2 Understanding CSS Selection Techniques
Using the Class Attribute SelectorThe CLASS attribute selector lets you write rules, give them a name, and then apply thatname to any elements you choose.You can use CLASS with any HTML element becauseit is a core attribute.The core attributes are ID,CLASS, STYLE, and TITLE,which applyto all HTML elements. To apply the style rule to an element, you can add the CLASSattribute to the element and set it to the name you have specified.
To create a class, declare a style rule.The period (.) flag character indicates that the selec-tor is a class selector. Figure 2-4 shows an example of a rule with a class selector.
After writing the style rule, add it to the document by using the CLASS attribute, asshown in the following code fragment:
<PƒCLASS="quote">Thisƒtextƒwillƒappearƒredƒwithƒaƒ30ƒpixelƒmargin.</P>
The CLASS attribute lets you select elements with greater precision. For example, readthe following style rule:
Pƒ{font-size:ƒ10pt;}
This rule sets all <P> elements in the document to a font size of 10 points. Now supposethat you want one <P> element in your document to have a different style characteristic,such as bold text.You need a way to specifically select that one paragraph.To do this, usea CLASS selector.The following style rule sets the style for the class named “special.”
.specialƒ{font-size:ƒ10pt;ƒfont-weight:ƒbold;}
The class selector can be any name you choose. In this instance, the class name “special”denotes a special paragraph of the document. Now apply the rule to the <P> elementin the document using the CLASS attribute:
<PƒCLASS="special">Thisƒisƒtheƒfirstƒparagraphƒofƒtheƒdocument.ƒItƒhasƒaƒdifferentƒstyleƒbasedƒonƒtheƒ"special"ƒCLASSƒselector.</P><P>Thisƒisƒtheƒsecondƒparagraphƒofƒtextƒinƒtheƒdocument.ƒItisƒaƒstandardƒparagraphƒwithoutƒaƒCLASSƒattribute.</P>
.quote {color: red; margin: 30px:}
Figure 2-4 Class syntax
DeclarationFlag character
Class name
may be reproduced without prior permission in writing from Course Technology. Some of the product names and company names have beenused for identification purposes only and may be trademarks or registered trademarks of their respective manufactures and sellers.
Copyright © 2001 by Course Technology. All rights reserved.This publication is protected by federal copyright law. No part of this publication

Advanced Selection Techniques 35
2
Figure 2-5 shows the result of the style rule.
Making CLASS Selectors More Specific
Using the CLASS attribute is a powerful selection technique, because it allows you towrite style rules with names that are meaningful to your organization or informationtype.The more specific your class names become, the greater control you need over theway they are applied. In the preceding example, you saw a style rule named “special”that was applied to a <P> element. However, the special style can be applied to any ele-ment in the document, not just <P>.To solve this problem, you can restrict the use ofthe CLASS attribute to a single element type.
For example, your organization might use a special style for a procedure heading. Thestyle is based on an <H1> element, with a sans-serif font and left margin of 20 pixels.Everyone in your organization knows this style is named “procedure.”You can use thissame style name in your style sheet as shown in the following style rule:
.procedureƒ{font-family:ƒsans-serif;ƒmargin-left:ƒ20px;}
To use these rules in the document, you apply the CLASS attribute as shown in the fol-lowing code fragment:
<H1ƒCLASS="procedure">ProcedureƒHeading</H1>
This works well, but what happens if someone on your staff neglects to apply the classesproperly? For the style rule to work, it must be applied to an <H1> element.To restrictthe use of the class to <H1> elements, include a prefix for the CLASS selector with theelement to which you want it applied:
H1.procedureƒ{font-family:ƒsans-serif;ƒmargin-left:ƒ20px;}
These style rules restrict the use of the procedure style to <H1>.
Figure 2-5 Styling with a class attribute
may be reproduced without prior permission in writing from Course Technology. Some of the product names and company names have beenused for identification purposes only and may be trademarks or registered trademarks of their respective manufactures and sellers.
Copyright © 2001 by Course Technology. All rights reserved.This publication is protected by federal copyright law. No part of this publication

36 Chapter 2 Understanding CSS Selection Techniques
Using the ID Attribute SelectorThe ID attribute, like the CLASS attribute, is an HTML core attribute.The differencebetween ID and CLASS is that ID refers to only one instance of the ID attribute valuewithin a document.This allows you to specify an ID value and apply it to one uniqueelement in a document. For example, you might want to specify that only one <P> ele-ment can have the ID preface and its associated style rule. Figure 2-6 shows a style rulethat uses the ID preface as a selector.
Notice that the ID selector uses a pound sign (#) flag character instead of the periodyou used with the CLASS selector.You can apply the ID name to the appropriate ele-ment in the document, in this example a <P> element:
<PƒID="preface">Thisƒisƒaƒuniqueƒparagraphƒthatƒisƒtheƒprefaceƒofƒtheƒdocument.</P>
The ID value uniquely identifies this one <P> element as the preface. No other ele-ments in the document can share this exact ID value.
Using the <DIV> and <SPAN> ElementsThe <DIV> (division) and <SPAN> (span of words) elements are designed to be usedwith CSS.They let you specify logical divisions within a document that have their ownname and style properties. The difference between <DIV> and <SPAN> is their ele-ment display type, which is described in more detail in the “Box Properties” chapter.<DIV> is a block-level element, whereas <SPAN> is its inline equivalent. Used withthe CLASS and ID attributes, <DIV> and <SPAN> let you effectively create your ownelement names for your HTML documents.
Working with <DIV>
You can use <DIV> with the CLASS attribute to create customized block-level ele-ments. Like other block-level elements, <DIV> contains a leading and trailing linebreak. However, unlike other block-level elements, <DIV> contains no additional whitespace around the element.You can set the margin or padding to any value that you wish.You will learn more about these properties in the “Box Properties” chapter.
#preface {font-weight: bold; font-size: 12 pt;}
Figure 2-6 Using the ID selector
Flag characterID name
Declaration
may be reproduced without prior permission in writing from Course Technology. Some of the product names and company names have beenused for identification purposes only and may be trademarks or registered trademarks of their respective manufactures and sellers.
Copyright © 2001 by Course Technology. All rights reserved.This publication is protected by federal copyright law. No part of this publication

Advanced Selection Techniques 37
2
To create a customized division, declare it with a CLASS or ID selector in the style rule.The following example specifies a division with a class named “introduction” as theselector for the rule:
DIV.introductionƒ{font-size:ƒ14pt;ƒmargin:ƒ24pt;ƒtext-indent:ƒ28pt;}
To apply this rule, specify the <DIV> element in the document.Then use the CLASSattribute to specify the exact type of division. In the following example, the code definesthe <DIV> element as the class named “introduction.”
<DIVƒclass="introduction">Thisƒisƒtheƒintroductionƒtoƒtheƒdocument.</DIV>
Working with <SPAN>
The <SPAN> element lets you specify inline elements within a document that havetheir own name and style properties. Inline elements reside within a line of text, like the<B> or <EM> element.You can use <SPAN> with the CLASS or ID attribute to cre-ate customized inline elements.
To create a span, declare it within the <STYLE> element first.The following examplespecifies a span named “logo” as the selector for the rule:
SPAN.logoƒ{color:ƒwhite;ƒbackground-color:ƒblack;}
Next, specify the <SPAN> element in the document.Then use the CLASS attribute tospecify the exact type of span. In the following example, the code defines the <SPAN>element as the class named “logo.”
<P>Welcomeƒtoƒtheƒ<SPANƒCLASS="logo">WonderƒSoftware</SPAN>ƒWebƒsite.</P>
Figure 2-7 shows the result of the style rule.
Using Pseudo-Class and Pseudo-Element SelectorsPseudo-classes and pseudo-element selectors let you express style declarations for char-acteristics of a document that are not signified with the standard HTML elements.Pseudo-classes select elements based on characteristics other than their element name.For example, assume that you want to change the color of a new or visited hypertextlink. There is no HTML element that directly lets you express these characteristics ofthe <A> element.With CSS, you can use the link pseudo-class selector to change the
Welcome to the Wonder Software Web site.
Figure 2-7 Using the <SPAN> element
may be reproduced without prior permission in writing from Course Technology. Some of the product names and company names have beenused for identification purposes only and may be trademarks or registered trademarks of their respective manufactures and sellers.
Copyright © 2001 by Course Technology. All rights reserved.This publication is protected by federal copyright law. No part of this publication

38 Chapter 2 Understanding CSS Selection Techniques
link color. CSS2 includes a number of other pseudo-class selectors that are not consis-tently supported at this time. You will learn about these newer pseudo-classes in the“CSS2 Selectors” section later in this chapter.
Pseudo-elements let you change other aspects of a document that are not classified byelements, such as applying style rules to the first letter or first line of a paragraph. Forexample, you might want to create an initial capital or drop capital that extends belowthe line of type, or make the first line of a paragraph all uppercase text.These are com-mon publishing design techniques that are not possible with standard HTML code.WithCSS you can use the :first-letter and :first-line pseudo-elements to add these two stylecharacteristics to your documents.
Using the Link Pseudo-Classes
The :link and :visited pseudo-classes let you change the style characteristics for new,unvisited links (:link) and visited links (:visited).These pseudo-classes only apply to the<A> element with an HREF attribute, because <A> is the only element in HTML thatcan be a hypertext link. In future applications, such as Extensible Markup Language(XML), any element could be defined as a hypertext link and could have these pseudo-classes apply. In most instances you only want to change the colors of the link from thedefault blue for new and purple for visited.
The following rules change the colors of the hypertext links:
:linkƒ{color:ƒred;}:visitedƒ{color:ƒgreen;}
Because these pseudo-classes only affect the <A> element, the following style rules arethe same as the ones above:
A:linkƒ{color:ƒred;}A:visitedƒ{color:ƒgreen;}
Some Web sites choose to remove the underlining of their links.You can achieve thiseffect with the text-decoration property, which is described in more detail in the “Usingthe Font and Text Properties” chapter. The following rule removes the default linkunderline:
A:linkƒ{text-decoration:ƒnone;}A:visitedƒ{text-decoration:ƒnone;}
These style rules create <A> elements that have the standard blue and purple colors,but no underlining.Whether you choose to use this style for your links depends on thedesign of your site and the needs of your users. Remember that many Web users arecomfortable with the default underlining and that color alone may not be enough todifferentiate links from the rest of your text.
may be reproduced without prior permission in writing from Course Technology. Some of the product names and company names have beenused for identification purposes only and may be trademarks or registered trademarks of their respective manufactures and sellers.
Copyright © 2001 by Course Technology. All rights reserved.This publication is protected by federal copyright law. No part of this publication

Advanced Selection Techniques 39
2
Using the :first-letter Pseudo-Element
Use the :first-letter pseudo-element to apply style rules to the first letter of any element.This lets you create interesting text effects, such as initial capitals and drop capitals, whichare usually set in a bolder and larger font. Initial capitals share the same baseline as therest of the text, whereas drop capitals extend down two or more lines below the text base-line.To apply :first-letter to build an initial capital, specify a style rule like the following:
P:first-letterƒ{font-weight:ƒbold;ƒfont-size:ƒ200%;}
This creates a first letter that is bold and twice the size of the <P> font. For example, ifthe <P> element has a font size of 12 points, the initial cap will be 24 points.This stylerule applies to the first letter of every <P> element in the document without any furtheradditions to the HTML code. However, the problem with this selector is that every <P>element gets the initial capital, even though you probably want only the first paragraph inthe document to have one.To solve this problem, add a class name, such as “initial,” to therule, as shown in Figure 2-8.
This style rule affects only <P> elements with the CLASS value of “initial,” as shownin the following code:
<PƒCLASS="initial">Fromƒtheƒfarƒnorthƒtheyƒheardƒaƒlowƒwailofƒtheƒwind,ƒandƒUncleƒHenryƒandƒDorothyƒcouldƒseeƒwhereƒtheƒlongƒgrassƒbowedƒinƒwavesƒbeforeƒtheƒcomingƒstorm.ƒThereƒnowƒcameƒaƒsharpƒwhistlingƒinƒtheƒairƒfromƒtheƒsouth,andƒasƒtheyƒturnedƒtheirƒeyesƒthatƒwayƒtheyƒsawƒripplesƒintheƒgrassƒcomingƒfromƒthatƒdirectionƒalso.</P>
Figure 2-9 shows the result of the style rule.
You can make the initial capital a drop capital by adding the float property to the rule,whichallows the letter to extend downwards.The float property is described in the “Using theBox Properties” chapter. Here is a :first-letter style rule with the float property added:
P.dropcap:first-letterƒ{font-weight:ƒbold;ƒfont-size:ƒ200%;ƒfloat:ƒleft;}
P.initial:first-letter {font-weight:bold; font-size:200%}
Declaration
Figure 2-8 Using a class selector with a :first-letter pseudo-element
Class name
Pseudo-elementselector
Type selector
may be reproduced without prior permission in writing from Course Technology. Some of the product names and company names have beenused for identification purposes only and may be trademarks or registered trademarks of their respective manufactures and sellers.
Copyright © 2001 by Course Technology. All rights reserved.This publication is protected by federal copyright law. No part of this publication

40 Chapter 2 Understanding CSS Selection Techniques
Notice that the CLASS has been changed to signify that this first letter is a drop capi-tal. Remember, you can set the CLASS attribute to any naming value that makes senseto you.
This style rule affects only <P> elements with the CLASS value of “dropcap” as shownin the following code:
<PƒCLASS="dropcap">Fromƒtheƒfarƒnorthƒtheyƒheardƒaƒlowƒwailofƒtheƒwind,ƒandƒUncleƒHenryƒandƒDorothyƒcouldƒseeƒwhereƒtheƒlongƒgrassƒbowedƒinƒwavesƒbeforeƒtheƒcomingƒstorm.ƒThereƒnowƒcameƒaƒsharpƒwhistlingƒinƒtheƒairƒfromƒtheƒsouth,andƒasƒtheyƒturnedƒtheirƒeyesƒthatƒwayƒtheyƒsawƒripplesƒintheƒgrassƒcomingƒfromƒthatƒdirectionƒalso.</P>
Figure 2-10 shows the result of the new style rule.
The :first-letter pseudo-element can only be applied to a block-level element.Additionally, only the following properties can be applied to the :first-letter selector:
■ Font properties
■ Color properties
■ Background properties
■ Margin properties
Figure 2-10 A drop capital using the :first-letter pseudo-class
Drop capital
Figure 2-9 An initial capital styled with the :first-letter pseudo-class
Initial capital
may be reproduced without prior permission in writing from Course Technology. Some of the product names and company names have beenused for identification purposes only and may be trademarks or registered trademarks of their respective manufactures and sellers.
Copyright © 2001 by Course Technology. All rights reserved.This publication is protected by federal copyright law. No part of this publication

Advanced Selection Techniques 41
2
■ Padding properties
■ Word-spacing
■ Letter-spacing
■ Text-decoration
■ Vertical-align
■ Text-transform
■ Line-height
■ Text-shadow
■ Clear
Using the :first-line Pseudo-Element
The :first-line pseudo-element works in much the same way as :first-letter, except forthe obvious difference that it affects the first line of text in an element. For example, thefollowing rule sets the first line of every <P> element to uppercase letters:
P:first-lineƒ{text-transform:ƒuppercase;}
The problem with this code is that it affects every <P> element in the document. Asyou saw in the :first-letter selector above, you can add a CLASS attribute to more nar-rowly define the application of the :first-line style:
P.introduction:first-lineƒ{text-transform:ƒuppercase;}
This rule transforms to uppercase the first line of the <P> element when it contains thefollowing code:
<PƒCLASS="introduction">Fromƒtheƒfarƒnorthƒtheyƒheardƒaƒlowwailƒofƒtheƒwind,ƒandƒUncleƒHenryƒandƒDorothyƒcouldƒseeƒwhereƒtheƒlongƒgrassƒbowedƒinƒwavesƒbeforeƒtheƒcomingƒstorm.ƒThereƒnowƒcameƒaƒsharpƒwhistlingƒinƒtheƒairƒfromƒthesouth,ƒandƒasƒtheyƒturnedƒtheirƒeyesƒthatƒwayƒtheyƒsawƒripplesƒinƒtheƒgrassƒcomingƒfromƒthatƒdirectionƒalso.</P>
Figure 2-11 shows the results of the style rule.
Figure 2-11 First line transformation using the :first-line pseudo-element
may be reproduced without prior permission in writing from Course Technology. Some of the product names and company names have beenused for identification purposes only and may be trademarks or registered trademarks of their respective manufactures and sellers.
Copyright © 2001 by Course Technology. All rights reserved.This publication is protected by federal copyright law. No part of this publication
42 Chapter 2 Understanding CSS Selection Techniques
The :first-line pseudo-element can only be applied to a block-level element.Additionally,only the following properties can be applied to :first-line. Notice that :first-line does notsupport padding, margin, or border properties.
■ Font properties
■ Color properties
■ Background properties
■ Word-spacing
■ Letter-spacing
■ Text-decoration
■ Text-transform
■ Line-height
■ Text-shadow
■ Clear
Using the Universal Selector
The universal selector lets you quickly select groups of elements and apply a style rule.The symbol for the universal selector is the asterisk (*). For example, to set a defaultcolor for all elements within a document, use the following rule:
*ƒ{color:ƒpurple;}
You can also use the universal selector to select all children of an element. For example,the following rule sets all elements within a <DIV> element to a sans-serif typeface:
DIVƒ*ƒ{font-family:ƒsans-serif;}
The universal selector is always overridden by more specific selectors. The followingstyle rules show a universal selector along with two other rules that have more specificselectors. In this example, the <H1> and <H2> rules override the universal selector forthe <H1> and <H2> elements.
*ƒ{color:ƒpurple;}H1ƒ{color:ƒred;}H2ƒ{color:ƒblack;}
Using the Advanced Selection TechniquesIn this set of steps, you have a chance to apply some advanced selection techniques youlearned about in this chapter. For this set of steps, assume that you have a collection of doc-uments that require style rules.To enforce style consistency across the collection, you willcreate class names that can be applied to document elements throughout the collection.Your
may be reproduced without prior permission in writing from Course Technology. Some of the product names and company names have beenused for identification purposes only and may be trademarks or registered trademarks of their respective manufactures and sellers.
Copyright © 2001 by Course Technology. All rights reserved.This publication is protected by federal copyright law. No part of this publication

Advanced Selection Techniques 43
2
test document is a chapter fragment from Lewis Carroll’s Alice’s Adventures in Wonderland.Asyou work through the steps, refer to Figure 2-13 to see the results you will achieve. Save yourfile and test your work in the browser as you complete each step.
1. Open the file alice.htm in your HTML editor, and save it in your workfolder as alice1.htm
2. In your browser, open the file alice1.htm.When you open the file, it lookslike Figure 2-12.
3. Examine the code. Notice that the file contains basic HTML code with nostyle information.The complete code for the page follows:
<HTML><HEAD><TITLE>Alice’sƒAdventuresƒinƒWonderlandƒbyƒLewisƒCarroll</TITLE></HEAD><BODY><H3>Alice’sƒAdventuresƒinƒWonderland</H3><H3>byƒLewisƒCarroll</H3><H2>Chapterƒ1</H2><H1>DownƒTheƒRabbit-Hole</H1><P>Aliceƒwasƒbeginningƒtoƒgetƒveryƒtiredƒofƒsittingƒbyƒherƒsisterƒonƒtheƒbank,ƒandƒofƒhavingƒnothingƒtoƒdo:ƒonceorƒtwiceƒsheƒhadƒpeepedƒintoƒtheƒbookƒherƒsisterƒwasƒ
<P> elements
Figure 2-12 The original HTML document
<H2> element
<H1> element
<H3> elements
may be reproduced without prior permission in writing from Course Technology. Some of the product names and company names have beenused for identification purposes only and may be trademarks or registered trademarks of their respective manufactures and sellers.
Copyright © 2001 by Course Technology. All rights reserved.This publication is protected by federal copyright law. No part of this publication

44 Chapter 2 Understanding CSS Selection Techniques
reading,ƒbutƒitƒhadƒnoƒpicturesƒorƒconversationsƒinƒit,ƒ"andƒwhatƒisƒtheƒuseƒofƒaƒbook,"ƒthoughtƒAlice,ƒ"withoutƒpicturesƒorƒconversations?"</P><P>Soƒsheƒwasƒconsideringƒinƒherƒownƒmindƒ(asƒwellƒasƒshecould,ƒforƒtheƒhotƒdayƒmadeƒherƒfeelƒveryƒsleepyƒandƒstupid)ƒwhetherƒtheƒpleasureƒofƒmakingƒaƒdaisy-chainƒwouldƒbeƒworthƒtheƒtroubleƒofƒgettingƒupƒandƒpickingƒthedaisies,ƒwhenƒsuddenlyƒaƒWhiteƒRabbitƒwithƒpinkƒeyesƒrancloseƒtoƒher.</P></BODY></HTML>
4. Add a <STYLE> element in the <HEAD> section to contain your stylerules, as shown in the following code. Leave a few lines of white spacebetween the <STYLE> tags to contain the style rules.
<HEAD><TITLE>Alice’sƒAdventuresƒinƒWonderlandƒbyƒLewisƒCarroll</TITLE><STYLEƒtype="text/css">ƒ</STYLE></HEAD>
5. Write a style rule for the <H3> element that contains the title of the book.The logical class name for this element is “.title.”The text will be center-aligned and 125% larger than the browser default font size, as shown in thefollowing style rule:
.titleƒ{text-align:ƒcenter;ƒfont-size:ƒ125%;}
6. Apply the style to the element that is the document title, currently an <H3>element. Change the <H3> element to a <DIV> element.This removes thedefault style characteristics that are built into the <H3> element. Add theCLASS attribute set to “title,” as shown in the following code fragment:
<DIVƒCLASS="title">Alice’sƒAdventuresƒinƒWonderland</DIV>
7. Write the style rule for the author information, which is also contained in an<H3> element.This rule uses a class selector called “.author.”This morecomplex style rule sets a variety of properties including element’s border,padding, and margins as shown below.You can set the properties on separatelines to make the rule easier to read:
.authorƒƒƒƒ{font-size:ƒ125%;ƒƒƒƒƒƒƒƒƒƒƒƒtext-align:ƒcenter;ƒƒƒƒƒƒƒƒƒƒƒborder-bottom:ƒ1pxƒsolidƒblack;ƒƒƒƒƒƒƒƒƒƒƒƒpadding-bottom:ƒ12pt;ƒƒƒƒƒƒƒƒƒƒƒmargin-left:ƒ30pt;ƒƒƒƒƒƒƒƒƒƒƒƒmargin-right:ƒ30pt;}
may be reproduced without prior permission in writing from Course Technology. Some of the product names and company names have beenused for identification purposes only and may be trademarks or registered trademarks of their respective manufactures and sellers.
Copyright © 2001 by Course Technology. All rights reserved.This publication is protected by federal copyright law. No part of this publication

Advanced Selection Techniques 45
2
8. Apply the style to the element that contains the author information, cur-rently an <H3> element. Change the <H3> element to a <DIV> element,and add the class attribute as shown in the following code fragment:
<DIVƒCLASS="author">byƒLewisƒCarroll</DIV>
9. Write style rules for the chapter number and title.The chapter number andchapter title are simple styles, with just the left margins set to 30 points.Youcan use the existing <H2> and <H1> elements that contain the content, butwrite a class name for each: “.chapternumber” and “.chaptertitle.”To makesure these are used correctly, restrict their use to their respective elements, asshown in the following style rule:
H2.chapternumberƒ{margin-left:ƒ30pt;}H1.chaptertitleƒ{margin-left:ƒ30pt;}
10. Apply the style rules with the CLASS attribute:
<H2ƒCLASS="chapternumber">Chapterƒ1</H2><H1ƒCLASS="chaptertitle">DownƒTheƒRabbit-Hole</H1>
11. Write a style rule to add a drop capital to the first paragraph of the document.This style uses the :first-letter pseudo-class, applied to a <P> element with theCLASS attribute set to “firstparagraph,” as shown in the following rule:
P.firstparagraph:first-letterƒƒƒƒƒƒ{font-size:ƒ200%;ƒƒƒƒƒƒfont-weight:ƒbold;ƒƒƒƒƒborder:ƒsolidƒthinƒblack;ƒƒƒƒƒƒpadding:ƒ4pt;ƒƒƒƒƒƒmargin:ƒ2pt;}
For this more complex rule, the selector and properties are on separate lines. Notice thatthe drop capital can have padding, margin, and border properties because it is treated likea block-level element.
12. Apply the style rules with the CLASS attribute to the first paragraph of thedocument:
<PƒCLASS="firstparagraph">Aliceƒwasƒbeginningƒtoƒgetƒverytiredƒofƒsittingƒbyƒherƒsisterƒonƒtheƒbank,ƒandƒofƒhavingƒnothingƒtoƒdo:ƒonceƒorƒtwiceƒsheƒhadƒpeepedƒintoƒtheƒbookƒherƒsisterƒwasƒreading,ƒbutƒitƒhadƒnoƒpicturesƒorƒconversationsƒinƒit,ƒ"andƒwhatƒisƒtheƒuseƒofƒaƒbook,"thoughtƒAlice,ƒ"withoutƒpicturesƒorƒconversations?"</P>
may be reproduced without prior permission in writing from Course Technology. Some of the product names and company names have beenused for identification purposes only and may be trademarks or registered trademarks of their respective manufactures and sellers.
Copyright © 2001 by Course Technology. All rights reserved.This publication is protected by federal copyright law. No part of this publication
46 Chapter 2 Understanding CSS Selection Techniques
13. Finally, write a style rule for the <P> elements that aligns the margins andsets the font-size:
Pƒ {margin-left:ƒ30pt;ƒƒƒƒƒƒƒmargin-right:ƒ30pt;ƒƒƒƒƒƒƒfont-size:ƒ125%;}
Because this rule selects standard paragraph elements, you do not need to add any addi-tional code to the <P> elements within the file.
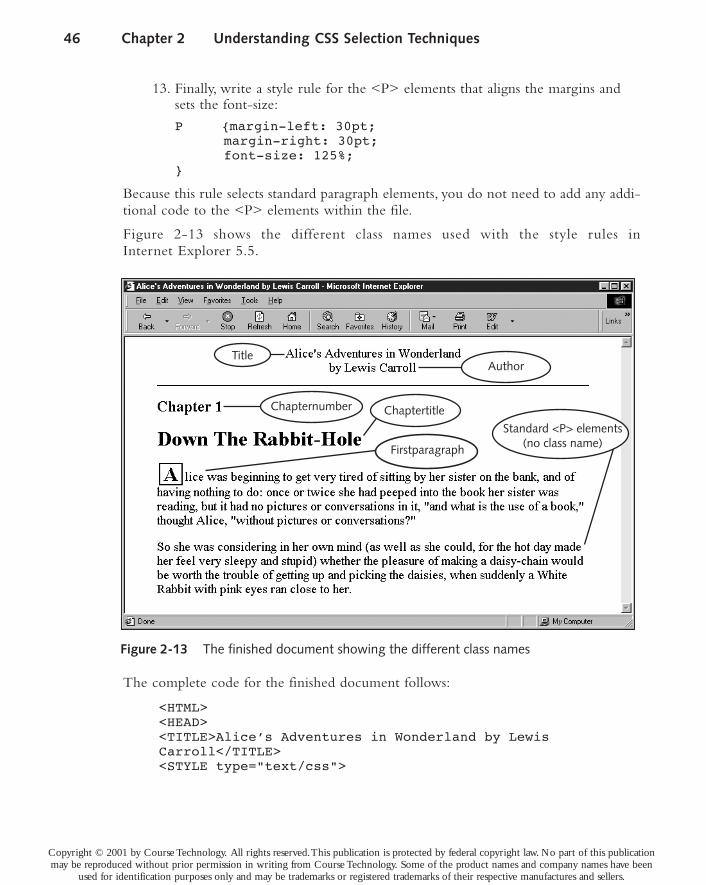
Figure 2-13 shows the different class names used with the style rules inInternet Explorer 5.5.
The complete code for the finished document follows:
<HTML><HEAD><TITLE>Alice’sƒAdventuresƒinƒWonderlandƒbyƒLewisƒCarroll</TITLE><STYLEƒtype="text/css">
Figure 2-13 The finished document showing the different class names
TitleAuthor
Chaptertitle
Firstparagraph
Chapternumber
Standard <P> elements(no class name)
may be reproduced without prior permission in writing from Course Technology. Some of the product names and company names have beenused for identification purposes only and may be trademarks or registered trademarks of their respective manufactures and sellers.
Copyright © 2001 by Course Technology. All rights reserved.This publication is protected by federal copyright law. No part of this publication

Advanced Selection Techniques 47
2
.titleƒƒƒƒ{text-align:ƒcenter;ƒƒƒƒfont-size:ƒ125%}
.authorƒƒƒ{font-size:ƒ125%;ƒƒƒƒƒƒtext-align:ƒcenter;ƒƒƒƒƒborder-bottom:ƒ1pxƒsolidƒblack;ƒƒƒƒƒƒpadding-bottom:ƒ12pt;ƒƒƒƒƒmargin-left:ƒ30pt;ƒƒƒƒƒƒmargin-right:ƒ30pt;}H2.chapternumberƒ{margin-left:ƒ30pt;}H1.chaptertitleƒ{margin-left:ƒ30pt;}P.firstparagraph:first-letterƒƒƒƒƒƒ{font-size:ƒ200%;ƒƒƒƒƒƒfont-weight:ƒbold;ƒƒƒƒƒborder:ƒsolidƒthinƒblack;ƒƒƒƒƒƒpadding:ƒ4pt;ƒƒƒƒƒƒmargin:ƒ2pt;}Pƒƒƒƒ{margin-left:ƒ30pt;ƒƒƒƒƒƒmargin-right:ƒ30pt;ƒƒƒƒƒƒfont-size:ƒ125%;}</STYLE></HEAD><BODY><DIVƒclass="title">Alice’sƒAdventuresƒinƒWonderland</DIV><DIVƒclass="author">byƒLewisƒCarroll</DIV><H2ƒclass="chapternumber">Chapterƒ1</H2><H1ƒclass="chaptertitle">DownƒTheƒRabbit-Hole</H1><PƒCLASS="firstparagraph">Aliceƒwasƒbeginningƒtoƒgetƒveryƒtiredƒofƒsittingƒbyƒherƒsisterƒonƒtheƒbank,ƒandƒofƒhavingƒnothingƒtoƒdo:ƒonceƒorƒtwiceƒsheƒhadƒpeepedƒintoƒtheƒbookherƒsisterƒwasƒreading,ƒbutƒitƒhadƒnoƒpicturesƒorconversationsƒinƒit,ƒ"andƒwhatƒisƒtheƒuseƒofƒaƒbook,"ƒthoughtAlice,ƒ"withoutƒpicturesƒorƒconversations?"</P><P>Soƒsheƒwasƒconsideringƒinƒherƒownƒmindƒ(asƒwellƒasƒsheƒcould,ƒforƒtheƒhotƒdayƒmadeƒherƒfeelƒveryƒsleepyƒandƒstupid)ƒwhetherƒtheƒpleasureƒofƒmakingƒaƒdaisy-chainƒwouldƒbeƒworthƒtheƒtroubleƒofƒgettingƒupƒandƒpickingƒtheƒdaisies,ƒwhenƒsuddenlyƒaƒWhiteƒRabbitƒwithƒpinkƒeyesƒranƒcloseƒtoƒher.</P></BODY></HTML>
may be reproduced without prior permission in writing from Course Technology. Some of the product names and company names have beenused for identification purposes only and may be trademarks or registered trademarks of their respective manufactures and sellers.
Copyright © 2001 by Course Technology. All rights reserved.This publication is protected by federal copyright law. No part of this publication
48 Chapter 2 Understanding CSS Selection Techniques
Testing Cross-Browser Compatibility
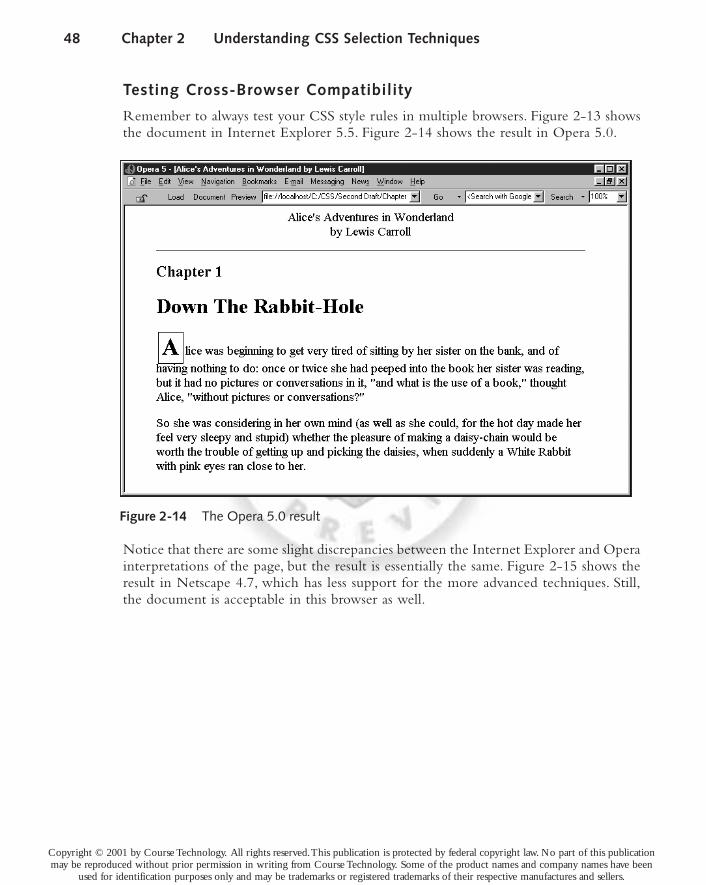
Remember to always test your CSS style rules in multiple browsers. Figure 2-13 showsthe document in Internet Explorer 5.5. Figure 2-14 shows the result in Opera 5.0.
Notice that there are some slight discrepancies between the Internet Explorer and Operainterpretations of the page, but the result is essentially the same. Figure 2-15 shows theresult in Netscape 4.7, which has less support for the more advanced techniques. Still,the document is acceptable in this browser as well.
Figure 2-14 The Opera 5.0 result
may be reproduced without prior permission in writing from Course Technology. Some of the product names and company names have beenused for identification purposes only and may be trademarks or registered trademarks of their respective manufactures and sellers.
Copyright © 2001 by Course Technology. All rights reserved.This publication is protected by federal copyright law. No part of this publication

Advanced Selection Techniques 49
2
Netscape 6.0 offers much improved support for CSS, as the result in Figure 2-16 shows.
Figure 2-15 The Netscape 4.7 result
may be reproduced without prior permission in writing from Course Technology. Some of the product names and company names have beenused for identification purposes only and may be trademarks or registered trademarks of their respective manufactures and sellers.
Copyright © 2001 by Course Technology. All rights reserved.This publication is protected by federal copyright law. No part of this publication

50 Chapter 2 Understanding CSS Selection Techniques
CSS2 SELECTORS
This section describes the newer CSS2 selection techniques.These techniques includeusing the following:
■ Child selectors
■ Adjacent siblings
■ :first-child, dynamic, and :lang pseudo-classes
■ :before and :after pseudo-elements
■ Attribute selectors
Although you may not be able to use these selection techniques immediately, they willbecome more widely supported as newer browsers are released.Table 2-1 shows browsersupport for the CSS2 selection techniques based on the author’s testing for this section.Your results can vary based on the exact browser version, so remember to test these newselection techniques in multiple browsers to see how they affect your finished work. Notealso that Netscape 4.0 supports none of these selectors, so it is not included in the table.
Figure 2-16 The Netscape 6.0 result
may be reproduced without prior permission in writing from Course Technology. Some of the product names and company names have beenused for identification purposes only and may be trademarks or registered trademarks of their respective manufactures and sellers.
Copyright © 2001 by Course Technology. All rights reserved.This publication is protected by federal copyright law. No part of this publication

CSS2 Selectors 51
2
Using the Child SelectorThe child selector lets you apply a style rule to the child elements of any parent element.Thefollowing style rule selects the child <BLOCKQUOTE> elements within a <DIV> ele-ment. Note the use of the greater-than symbol (>) to indicate the parent/child relationship.
DIVƒ>ƒBLOCKQUOTEƒ{font-weight:ƒbold;}
Figure 2-17 shows the result in Netscape 6.0.
Figure 2-17 The child selector
<DIV> parent element
<BLOCKQUOTE>child elements
Selector IE 5.5 PC IE 5 Macintosh Netscape 6 Opera 5.0
Child N Y Y Y
Adjacent sibling N Y Y Y
:first-child N Y Y N
Dynamic :hover and :hover and :hover and :hover and:active only :active only :active only :active only
.lang N N N N
Before and after N N N N
Attribute selectors N N N Y
Table 2-1 CSS2 selector compatibility cross-reference
may be reproduced without prior permission in writing from Course Technology. Some of the product names and company names have beenused for identification purposes only and may be trademarks or registered trademarks of their respective manufactures and sellers.
Copyright © 2001 by Course Technology. All rights reserved.This publication is protected by federal copyright law. No part of this publication

52 Chapter 2 Understanding CSS Selection Techniques
Using the Adjacent Sibling SelectorThe adjacent sibling selector lets you apply style rules to elements that share the sameparent and are adjacent in the code.The code fragment in Figure 2-18 shows adjacent<H3> and <H2> elements.
The <H3> is the preceding sibling, whereas the first <H2> is the following sibling.Adjacent sibling selectors always apply the style rule to the following sibling, in this casethe <H2>.The second <H2> element will not be affected because it is not an adjacentsibling to <H3>.The following code shows the style rule. Note the use of the plus sign(+) to indicate adjacent siblings.
H3ƒ+ƒH2ƒ{background-color:ƒgray;}
Figure 2-19 shows the result of the style rule in the document in Netscape 6.0.
Adjacent siblings
Figure 2-19 The adjacent sibling selector
<H3>An excerpt from the Wizard of OZ</H3>
<H2>Chapter 1</H2>
<H2>The Cyclone</H2>
Figure 2-18 Adjacent sibling elements
Adjacent siblings
Selectedelement
Not adjacent
may be reproduced without prior permission in writing from Course Technology. Some of the product names and company names have beenused for identification purposes only and may be trademarks or registered trademarks of their respective manufactures and sellers.
Copyright © 2001 by Course Technology. All rights reserved.This publication is protected by federal copyright law. No part of this publication

CSS2 Selectors 53
2
Using the :first-child SelectorThe :first-child selector lets you apply a style rule to the first child element of any par-ent element. For example, you can use :first-child to apply a first paragraph style to a<P> element. The following style rule selects the first child <P> element within a<DIV> element:
DIVƒ>ƒP:first-childƒ{font-weight:ƒbold;}
Figure 2-20 shows the result of the style rules in Netscape 6.0.
Using the Dynamic Pseudo-Class SelectorsThe dynamic selectors apply styles to an element based on the user’s actions. Thedynamic pseudo-classes include:
■ :hover - applies the style when the user designates an element; for example,by pointing to it with the mouse cursor
■ :active - applies the style when the user has activated the element; for exam-ple, holding down the mouse button on a hypertext link
■ :focus - applies the style when the element is accepting user input; such as inthe text area of a <FORM> element
The current browsers support both the :active and :hover pseudo-class. Because both:active and :hover are very much alike, only :hover is demonstrated here.
<DIV> element
Figure 2-20 The :first-child selector
First <P> childof <DIV>
may be reproduced without prior permission in writing from Course Technology. Some of the product names and company names have beenused for identification purposes only and may be trademarks or registered trademarks of their respective manufactures and sellers.
Copyright © 2001 by Course Technology. All rights reserved.This publication is protected by federal copyright law. No part of this publication
54 Chapter 2 Understanding CSS Selection Techniques
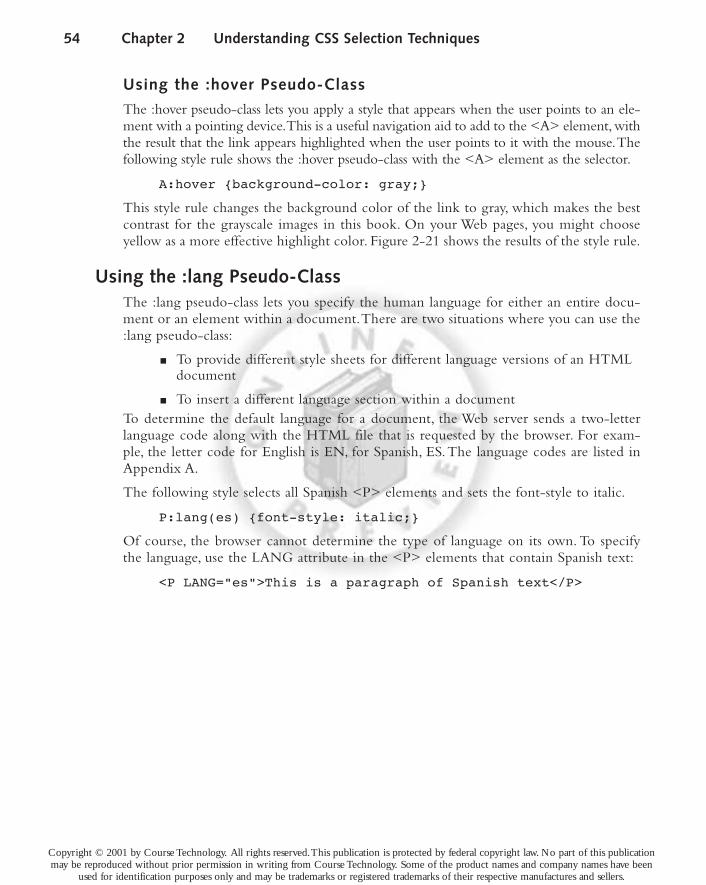
Using the :hover Pseudo-Class
The :hover pseudo-class lets you apply a style that appears when the user points to an ele-ment with a pointing device.This is a useful navigation aid to add to the <A> element,withthe result that the link appears highlighted when the user points to it with the mouse.Thefollowing style rule shows the :hover pseudo-class with the <A> element as the selector.
A:hoverƒ{background-color:ƒgray;}
This style rule changes the background color of the link to gray, which makes the bestcontrast for the grayscale images in this book. On your Web pages, you might chooseyellow as a more effective highlight color. Figure 2-21 shows the results of the style rule.
Using the :lang Pseudo-ClassThe :lang pseudo-class lets you specify the human language for either an entire docu-ment or an element within a document.There are two situations where you can use the:lang pseudo-class:
■ To provide different style sheets for different language versions of an HTMLdocument
■ To insert a different language section within a documentTo determine the default language for a document, the Web server sends a two-letterlanguage code along with the HTML file that is requested by the browser. For exam-ple, the letter code for English is EN, for Spanish, ES.The language codes are listed inAppendix A.
The following style selects all Spanish <P> elements and sets the font-style to italic.
P:lang(es)ƒ{font-style:ƒitalic;}
Of course, the browser cannot determine the type of language on its own. To specifythe language, use the LANG attribute in the <P> elements that contain Spanish text:
<PƒLANG="es">ThisƒisƒaƒparagraphƒofƒSpanishƒtext</P>
may be reproduced without prior permission in writing from Course Technology. Some of the product names and company names have beenused for identification purposes only and may be trademarks or registered trademarks of their respective manufactures and sellers.
Copyright © 2001 by Course Technology. All rights reserved.This publication is protected by federal copyright law. No part of this publication

CSS2 Selectors 55
2
Using the :before and :after Pseudo-ClassesThese two pseudo-class selectors let you insert content before or after an element.Youdefine the content that is inserted within the style rule itself. Although not currentlysupported by any browser, these pseudo-classes will provide a method for inserting“boilerplate” information into a document—standard language that does not vary fromone copy of the document to another. For example, assume that you have a documentthat is a series of questions and answers. You have designed <P> elements that haveCLASS values of “question” and “answer” as shown below:
<PƒCLASS="question">WhoƒsetsƒtheƒstandardsƒforƒHTML?</P><PƒCLASS="answer">TheƒWorldƒWideƒWebƒConsortium</P>
Suppose you want to include the words “Question” and “Answer” in bold type beforeeach respective paragraph.The following style rules accomplish this effect:
P.question:beforeƒ{content:"Question:";ƒfont-weight:ƒbold;}P.answer:beforeƒ{content:"Answer:";ƒfont-weight:ƒbold;}
Figure 2-22 shows the results of these style rules:
The :after pseudo-class works in the same way, inserting content after the element.
Question: Who sets the standards for HTML?
Answer: The World Wide Web Consortium
Figure 2-22 Using the :before pseudo-class
Pointing at link activates:hover pseudo-class
Figure 2-21 The :hover pseudo-class is activated by the mouse cursor
may be reproduced without prior permission in writing from Course Technology. Some of the product names and company names have beenused for identification purposes only and may be trademarks or registered trademarks of their respective manufactures and sellers.
Copyright © 2001 by Course Technology. All rights reserved.This publication is protected by federal copyright law. No part of this publication

56 Chapter 2 Understanding CSS Selection Techniques
Using the Attribute SelectorsThe attribute selectors let you apply styles based on the values of attributes in the HTMLelements.This can be useful if you need to add style rules to HTML documents in whichyou do not want to alter the existing code by adding new elements, such as <DIV>, ornew attributes, such as CLASS. If the attributes have been used consistently, you can applystyle rules consistently.You can use attribute selectors based on two methods:
■ The presence of the attribute
■ The value of the attribute
Selecting on Attribute Value
You can select elements depending on whether an attribute appears within an element.The value of the attribute does not matter.The following code selects all elements thathave the ALIGN attribute and sets the alignment to left.
[ALIGN]ƒ{text-align:ƒleft;}
Notice that the attribute name is enclosed within square brackets.To narrow down thisselection, you can add the element selector to the rule.The following rule selects only<H1> elements that have an ALIGN attribute:
H1[ALIGN]ƒ{text-align:ƒleft;}
Selecting Based on Attribute Value
You can also select elements depending on the specific value of an attribute. The fol-lowing rule selects <H1> elements that have the ALIGN attribute set to center:
H1[ALIGN="center"]ƒ{text-align:ƒleft;}
CHAPTER SUMMARY
In this chapter, you learned about the various methods of selecting elements and how toapply style rules in a variety of ways.You saw that the CSS basic selection techniques areoften powerful enough to handle most document styling. The advanced selection tech-niques let you apply style in ways previously not possible on the Web, even allowing theapplication of elements that are not defined in HTML elements, such as the :first-child or:first-line pseudo-elements.Also, you learned that the CLASS and ID attributes let you cre-ate naming conventions for styles that are meaningful to your organization or informationtype.As browsers continue to evolve, you will be able to take advantage of the newer CSS2selection techniques that allow even greater control over expression in document styling.
❒ Basic style rules let you apply style rules based on standard element selectors.You can combine the selectors and declarations to create more powerful styleexpressions.You can also select elements based on the contextual relationship ofelements in the document tree.
may be reproduced without prior permission in writing from Course Technology. Some of the product names and company names have beenused for identification purposes only and may be trademarks or registered trademarks of their respective manufactures and sellers.
Copyright © 2001 by Course Technology. All rights reserved.This publication is protected by federal copyright law. No part of this publication

Review Questions 57
2
❒ The advanced selection techniques allow you to use the CLASS and ID attributeselectors, which are often paired with the <DIV> and <SPAN> HTML elements.These elements have no style of their own but offer a convenient way of expressingstyle for any section of a document, whether block-level or inline.Additionally, CLASSand ID allow you to choose a meaningful naming convention for your style rules.
❒ The pseudo-class and pseudo-element selectors provide a method of styling charac-teristics of a document that are not expressed with standard HTML elements.Theseselection techniques offer advanced style effects that bring HTML documentscloser to the capabilities of print-based publishing.
❒ The newer CSS2 selectors, although not yet widely supported, offer even moreways to add style rules.
REVIEW QUESTIONS1. Write a basic style rule that selects <P> elements and sets the color property to red.
2. Add the <BLOCKQUOTE> element as an additional selector to the previous rule.
3. Add a font-size property to the rule, and set the size to 14 points.
4. Write a style rule that selects <UL> elements only when they appear within<P> elements, and set the color property to red.
5. Write the style rule for a CLASS selector named “note.” Set the font-weightproperty to bold.
6. Restrict the previous rule so it can be used only with <P> elements.
7. Write the style rule for an ID selector named “footer.” Set the font-size propertyto 10 points and the font-family property to sans-serif.
8. What characteristic makes ID different from CLASS?
9. What is the difference between <DIV> and <SPAN>?
10. Which pseudo-class selectors let you change the style for the <A> element?
11. Write a style rule that sets the default document text color to red.
12. What is the advantage of working with CLASS attribute?
13. What element does this selector choose? PƒULƒLI
14. What element does this selector choose? DIVƒPƒ*
15. What element does this selector choose? BLOCKQUOTE.warning
16. What element does this selector choose? :link
17. What element does this selector choose? P.custom:first-lineƒ
18. What are the three dynamic pseudo-classes?
19. How are the dynamic pseudo-classes activated?
20. What are the two methods of selecting by attribute?
may be reproduced without prior permission in writing from Course Technology. Some of the product names and company names have beenused for identification purposes only and may be trademarks or registered trademarks of their respective manufactures and sellers.
Copyright © 2001 by Course Technology. All rights reserved.This publication is protected by federal copyright law. No part of this publication

58 Chapter 2 Understanding CSS Selection Techniques
HANDS-ON PROJECTS1. Find an article from a magazine of your choice. Describe the style characteristics
of the page. Does it use multiple heading styles? A different first paragraph style?A special footer style? Devise CLASS names for the different elements. Indicatethe CLASS names on the magazine page.
2. Extend the project by listing the style properties that you want to state for each ele-ment on the page.You do not have to use the exact CSS style properties, but list thestyle characteristics in general terms, such as border, margin, font style, and so on.
3. Find a mainstream Web site, and discuss how you would standardize the look andfeel of the site by adding CSS style rules.Think about the different levels of infor-mation and how you will use CSS selectors to effectively select the different ele-ments within the pages of the site.
4. In this project, you will have a chance to test a few basic selection techniques ona standard HTML document and view the results in your browser. Save and viewthe file in your browser after completing each step.
a. Using your HTML editor, create a simple HTML file (or open an existing file)that contains <BODY> <H1> <P> elements and so on. Save the file in yourwork folder as csstest2.htm.
b. Add a <STYLE> element to the <HEAD> section, as shown in thefollowing code.
<HEAD><TITLE>CSSƒTestƒDocument</TITLE><STYLEƒTYPE="text/css"></STYLE></HEAD>
c. Write a style rule that uses BODY as a selector and sets the color property tothe color of your choice.
d. Find two elements on the page, such as <H1> and <H2>, that can share thesame characteristics.Write a single style rule that will apply to both elements.Set the color property to red and the margin property to 20px.
e. Find one element that contains another, such as a <B> or <I> element within a<P> element.Write a descendant selector rule that affects the contained elementand sets the color property to green.
5. In this project, you will have a chance to test a few advanced selection techniqueson a standard HTML document and view the results in your browser. Save andview the file in your browser after completing each step.
a. Using your HTML editor, create a simple HTML file (or open an existing file)that contains <BODY> <H1> <P> elements and so on. Save the file in yourwork folder as csstest3.htm.
b. Add a <STYLE> element to the <HEAD> section, as shown in Exercise #4.
Hands-onProject
may be reproduced without prior permission in writing from Course Technology. Some of the product names and company names have beenused for identification purposes only and may be trademarks or registered trademarks of their respective manufactures and sellers.
Copyright © 2001 by Course Technology. All rights reserved.This publication is protected by federal copyright law. No part of this publication

Case Study 59
2
c. Write a rule for a CLASS selector named “heading.” Set the color property tored and the font-size property to 36pt. Apply the heading class to an <H1> or<H2> element in the document.
d. Write a rule for a CLASS selector named “emphasis.” Set the color property toyellow. In the document, add a <SPAN> element to a span of words that youwant to highlight. Apply the emphasis class to the <SPAN> element.
e. Add a hypertext link in the document that points to www.yahoo.com, as shownin the following code:
<AƒHREF=http://www.yahoo.com>YahooƒWebƒSite</A>
f. Write a style rule that uses A:hover as the selector. Set the color property to yel-low.After you save the file, test the hover capability of your browser by pointingat the hypertext link.The background color of the link should turn yellow.
CASE STUDYRevisit your project proposal, and try to add as much detail to each category as possi-ble, concentrating on the content, goals, and style considerations. Carefully consider anyfeedback you have received from your instructor and fellow students. Decide where youcan make changes that help focus the content to match your user’s needs.
Start visualizing the page design for your site by sketching out mock layouts for differ-ent page designs and levels of information in your site.You do not have to determinethe exact look of the different page components. At this stage you are trying to build arough idea of the site’s look and feel.Think about your navigation choices and how youwill present these to the user. Consider the following questions:
■ Will navigation links be graphics, text, or both?
■ How many columns of text will there be on a page?
■ How many images will there be on a page?
■ How many different page designs are needed?
Start to organize your content by working on a site map. Create a visual diagram or flow-chart that includes the main page and other pages of the site. Indicate the links betweenthe pages and the file naming conventions for the site.Think about how your users willaccess your content—will they be able to quickly find the information they desire?
may be reproduced without prior permission in writing from Course Technology. Some of the product names and company names have beenused for identification purposes only and may be trademarks or registered trademarks of their respective manufactures and sellers.
Copyright © 2001 by Course Technology. All rights reserved.This publication is protected by federal copyright law. No part of this publication