ultimate frisbee - · pdf file18.03.2011 · change of possession: when the...
TRANSCRIPT

ULTIMATE FRISBEE Liz Buttimer & David Nugent
18 March 2011
ED4320
Sinead Luttrell

HISTORY OF THE GAME
In the late 1960’s, staff and students at Columbia High School, Maplewood, New
Jersey invented an entirely new sporting activity for their high school nights. It
was based around the game of American Football, in which participants used a
disc instead of a football. This modified game of Football, is now what we refer
to as Ultimate Frisbee.
In 1969, a competitive team was set up in Columbia High School, in which they
used to practise in a parking lot. There were no boundary lines, except for goal
lines, which were usually marked by piles of the players’ clothing. A year later,
Joel Silver, a teacher at Columbia High School, compiled the first set of official
rules for the game of Ultimate. Also during this year, Columbia High School
played the first ever interscholastic game of Ultimate Frisbee, defeating
Millburn High School. The original rules which were implemented, allowed for
20-30 players on each team, allowed players to run with the Frisbee, and also
included a line of scrimmages and a series of downs, similar to Football. These
rules were later changed, forming the rules for the game as we know it now.
During the 1970’s, the game grew in popularity, in which the first college
Ultimate game was held in the United States. In 1975, the first organised
tournament was arranged in Yale, which saw 8 teams contending for the National
Collegiate Championship title. Also during this year, the game was expanded to
an international level, where teams from all around the world competed in the
World Frisbee Championships. During the 1980’s, the first true World Ultimate
Championship was held in Sweden, and it was also shown as an exhibit game
during the World Games in Germany. This exposure helped to develop the game
on an international basis.
In 2001, the game was recognised as a medal Sport in the World Games in
Japan. 8 years later, the game had grown so much, that during the World Games
held in China in 2009, 50,000 enthusiasts turned up to support, the largest of
all sporting activities at the games. Ultimate is now played in over 50 different
countries around the world, with over 100,000 players.

RULES OF THE GAME
The field:
Rectangular shape (64m x 37m), endzones at each end.
Endzones are 18m in length.
Initiate play:
7 players on each team.
All players line up on their respective defensive goal line to begin each
point.
The defending team throws the Frisbee towards the offensive goal line –
called “pulling”.
Scoring:
Completing a pass in the defense’s endzone, results in the offensive team
scoring a point.
Play is initiated after each score.
Movement of the disc:
The disc may never be handed – it must always be thrown.
The disc may be thrown in any direction – forwards, backwards, sideways.
Players cannot run with the Frisbee in hand.
Player with the disc has 10 seconds to throw it.
Only 1 player can mark the person with the disc. They must stand at least
1m away from the thrower & count to 10 out loud – called “stall count”.
Once disc is passed to you, you must stop within 3 steps.

Change of possession:
When the Frisbee is dropped, thrown out of bounds, blocked or
intercepted, the defense gains possession immediately.
Substitutes:
Players can substitute after a score, or during an injury timeout.
Non-contact:
No physical contact permitted.
When contact is made, a foul occurs.
Fouls:
When a foul disrupts possession, the play resumes as if possession was
retained.
If the player committing the foul disagrees with the call, the play is
restarted.
Self-refereeing:
Players are responsible for their own foul and line calls.
Fair play and sportsmanship are integral to the principals of play.

CARD 1
AIM
To explain and identify the different grip techniques for Ultimate Frisbee.
EQUIPMENT
Paper plates, Frisbees
The backhand grip can be seen with the fingers curled under
the Frisbee’s rim and the thumb on top of the Frisbee.
The above diagram shows the forehand grip with the index &
middle fingers extended sitting under the Frisbee, the ring and
little finger outside the disk and the thumb on top.
Backhand grip Forehand grip

HOW TO PLAY TEACHING POINTS SAFETY POINTS
Each player has a paper plate.
Assign each grip and each dynamic
movement (relevant to the game) a
number:
1. Backhand grip
2. Forehand grip
3. High skips
4. Running backwards
5. Side stepping
Students move around area performing
action as called out by teacher for
numbers 1-5.
Backhand grip:
Finger’s curled under the Frisbee’s rim.
Thumb placed on top of Frisbee.
Forehand grip:
Index & middle fingers extended, and
sit under the Frisbee.
Ring & little finger are outside the
disc, supporting the outside of the
Frisbee.
Thumb is on top of the Frisbee.
Game:
Perform action as quickly as possible.
Keep head up to avoid bumping into
others.
Stay away from nearby obstructions.
No throwing of the paper plates – hold
them to perform grip only.
Remain within boundaries.
VARIATIONS/ADAPTATIONS
Introduce the use of a Frisbee rather than paper plates.
Introduce more movements – more numbers to increase players’ concentration.

CARD 2
AIM
To practise the backhand throw using the correct technique.
EQUIPMENT:
Frisbees
GAME: Keep it up
The above diagram shows 2 players passing to each other
using the backhand throw.
This diagram illustrates the technique of the backhand
throw and how players are to perform the throw.

HOW TO PLAY TEACHING POINTS SAFETY POINTS
Players work in pairs – 1 Frisbee
between each group.
Players start 10m apart.
Throw Frisbee back and forth, using
backhand throw.
If the Frisbee is caught both players
take a step back.
If the Frisbee is dropped, both players
take a step forward.
Frisbee is only to be thrown on the
whistle.
Count number of consecutive catches.
Hold Frisbee using backhand grip.
Back of hand facing the intended
target.
Stand side to target.
Keep Frisbee below belly button height.
Motion is like hitting a backhand in
tennis.
Release disc flat – pretend there is a
glass of water on it.
Only throw Frisbee on the whistle to
avoid them flying in different
directions.
Ensure sufficient space between each
group.
Stay away from nearby obstructions.
Call names to alert partner of incoming
Frisbee.
VARIATIONS/ADAPTATIONS
Start with a ball.
Start players 5m apart to simplify.
Start players further apart to extend exercise.
Set target number of consecutive catches for groups.
CARD 3
AIM
To develop the forehand throwing technique using target practise.
EQUIPMENT
Frisbees, tall cones or skittles
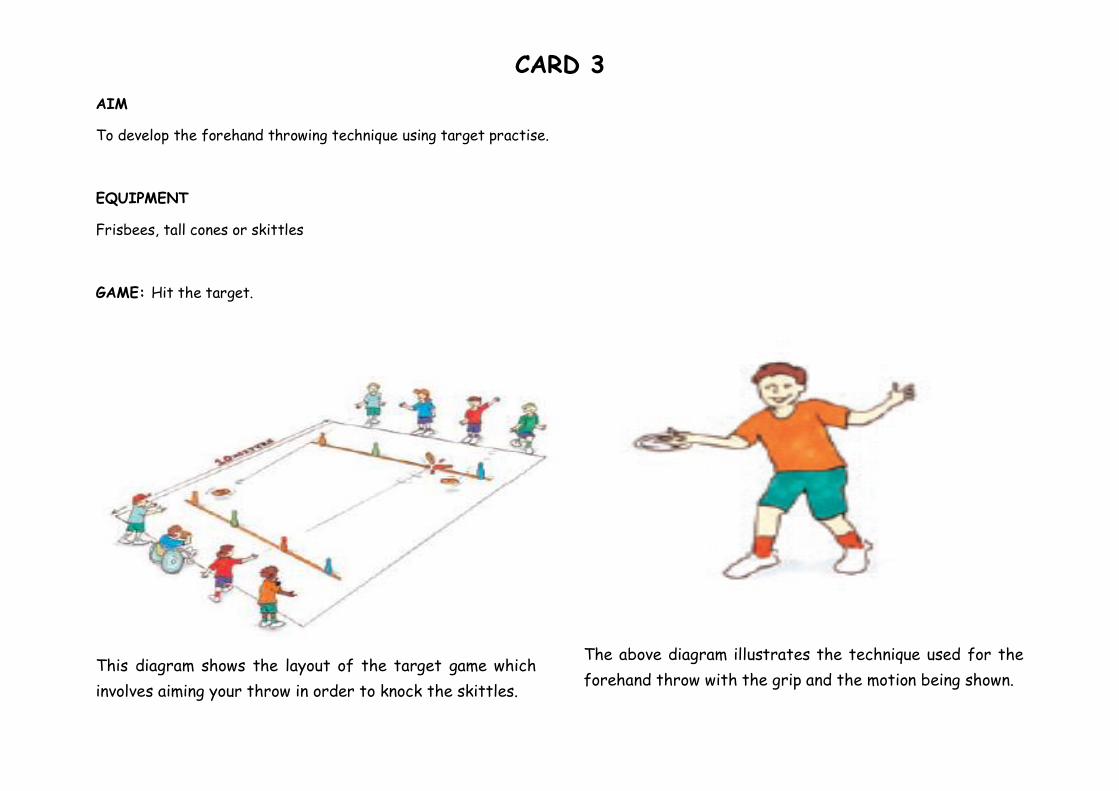
GAME: Hit the target.
This diagram shows the layout of the target game which
involves aiming your throw in order to knock the skittles.
The above diagram illustrates the technique used for the
forehand throw with the grip and the motion being shown.

HOW TO PLAY TEACHING POINTS SAFETY POINTS
Players work in pairs, 10m apart.
1 Frisbee per group.
Students take turns to attempt to
knock pins, which are placed 3m in
front of their partner.
Player scores a point if they hit the
pin. A bonus point is scored if the pin is
knocked over.
Partner retrieves Frisbee, picks up any
knocked pins & now takes their turn.
Count number of times you knock the
pin during the practise.
Use forehand grip to hold Frisbee.
Frisbee is thrown on same side of the
body as the throwing arm.
Throwing motion resembles forehand
serve in tennis – similar to shaking
something sticky off your fingers.
Keep palm faced up during whole
motion.
Release disc flat – pretend there is a
cup of water on it.
Encourage players to call names before
releasing Frisbee.
Ensure sufficient space between
groups.
Ensure each partner is at least 3m
away from pins in front of them to
avoid them being hit with the Frisbee.
Call names to alert partner of incoming
Frisbee.
Ensure no wild throwing – aim for
target only.
VARIATIONS/ADAPTATIONS
Move further away/closer to pins.
Increase the size of the target.

CARD 4
AIM
To introduce and apply the catching technique in a fun modified game.
EQUIPMENT
21 Frisbees, small cones, 4 baskets
GAME: Treasure chest
This diagram illustrates the treasure chest game, which
involves retrieving a Frisbee from a centre chest & passing
back to base for your partner to catch.
This diagram shows the technique for catching the Frisbee
using the crocodile catch, which involves vertically
clamping down on the disc.

HOW TO PLAY TEACHING POINTS SAFETY POINTS
Players work in groups of 2-3.
Square, with a team at each corner.
Chest at centre of square with all
Frisbees.
First player from each group runs to
centre zone and throws Frisbee back
to partner at base.
Next player at cone must catch
Frisbee using appropriate catch, and
place in basket.
Player at centre runs back to base.
Catcher now runs to centre to collect
another Frisbee & throw back to base
for next player to catch.
Sequence continues like this until all
Frisbees have been collected.
Crocodile catch:
Start hands apart one above the other,
similar to a crocodile’s mouth.
Keep eye on Frisbee.
Clamp down on Frisbee as it passes
through hands – vertical clap.
Ensure to get body behind Frisbee.
Move forward to attack the Frisbee.
Ensure hands close on top of each
other to avoid fumbling the Frisbee.
Treasure chest:
Only take 1 Frisbee at a time.
Players may only take Frisbees from
centre.
Players should only throw back to their
own base – do not throw across the
grid.
Call names to alert partner of incoming
Frisbee.
Keep head up to avoid bumping into
others, particularly at the centre.
VARIATIONS/ADAPTATIONS
Start with bean bags.
Increase/decrease distance of each corner from the centre.
CARD 5
AIM
To outline different aspects of footwork within ultimate Frisbee and perform these within a challenging game.
EQUIPMENT
Hurdles, ladders, cones, Frisbees.
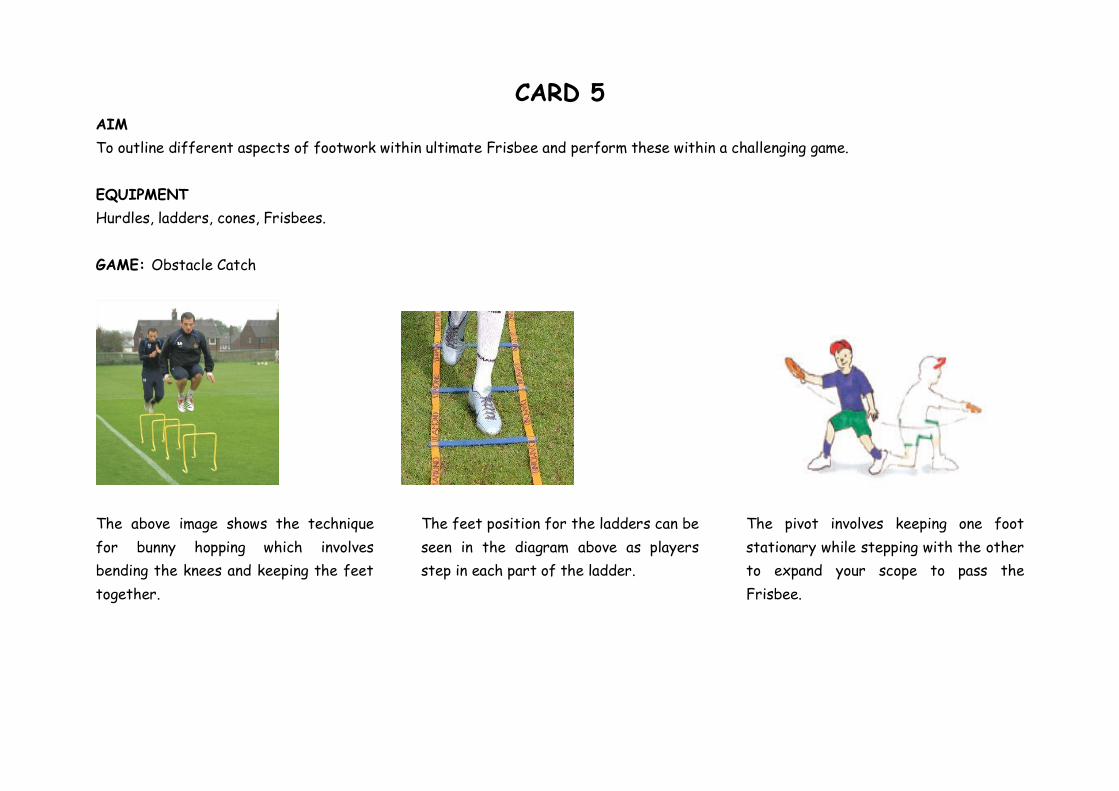
GAME: Obstacle Catch
The above image shows the technique
for bunny hopping which involves
bending the knees and keeping the feet
together.
The feet position for the ladders can be
seen in the diagram above as players
step in each part of the ladder.
The pivot involves keeping one foot
stationary while stepping with the other
to expand your scope to pass the
Frisbee.

HOW TO PLAY TEACHING POINTS SAFETY POINTS
GAME: Obstacle Course
Players perform an obstacle course
before receiving a pass of the Frisbee.
Players line up, on the whistle, the 1st
person runs out.
Action 1: bunny hop over 5 hurdles.
Action 2: Quick feet through ladders.
Action 3: Pivot in between cones using
the correct technique before receiving
a pass and joining the end of the group.
Bunny Hops: Keep the legs together
and bend the knees to bounce over the
hurdles.
Ladder Technique: Step each foot in
each part of the ladder and perform as
quick as possible.
Pivot: Keep one foot stationary at all
times (Pivot leg). Move the other leg to
widen your scope and target to evade
defender.
Throwing and Passing Technique: Use
the technique indicated in the previous
task cards.
Do not attempt to go through the
obstacle course too quick, as quality is
more important than speed.
Ensure there are no wild passes so that
players aren’t injured or hit by
Frisbees.
Be aware of the boundaries or any
obstacles that may cause injury.
Call the names of the intended receiver
so that they are alert and aware that a
pass is coming.
VARIATIONS/ADAPTATIONS
Start with just the hurdles, then just the ladders before including all the obstacles and the pass.
Begin with a ball instead of the Frisbee.

CARD 6
AIM
To outline and analyse different aspects and rules of defensive play before transferring this knowledge to a fun game.
EQUIPMENT
Balls, Frisbees.
GAME: Stop the Pass
The player in the orange above is demonstrating the guarding technique which involves blocking a pass or blocking the pathway for the
Frisbee so the player can’t pass. There is no contact allowed with the opposition player as it is a non-contact sport.

HOW TO PLAY TEACHING POINTS SAFETY POINTS
GAME: Stop the Pass
5 attackers with the Frisbee with tags
on each side of their shorts.
There are 3 defenders.
The 5 attackers must pass a ball to
each other. When they have the ball,
they cannot move their feet.
Defenders can only tag the attackers
when they have the ball, so passes
must be swift and accurate.
DEVELOPMENT
GAME: Pass Bomb
4 attackers start with a Frisbee.
1 defender tries to intercept.
After 4 successful passes, a new
defender joins the area.
The sequence continues until all
defenders are in the zone or there is
an intercept.
If the ball is intercepted, switch roles.
No Contact: There is no contact
permitted. The guarder must stand at
least a foot away from the player in
possession.
1 Guarder Only: There is only one
guarder allowed to mark each player. If
a second guarder marks a player, there
is a free pass from that spot.
Stall count (10 Second Count): Once a
guarder gets within 10 metres of the
thrower, they begin the stall count,
which is the 10 seconds that the
thrower has before they must pass.
Make Yourself Big: The guarder must
make themselves big so that they can
block the target passes for the player
in possession while maintaining low
hands. They should move their hands
and shuffle their feet to block the
targets.
Maintain a distance of 1 foot away from
the opposition player so that there is
no physical contact or collision.
Ensure there is no wild passes that may
hit or injure another player.
Ensure that you keep your head up to
be aware of the other players
positioning and the ball/Frisbee.
Ensure that there is adequate space
between each group.
VARIATIONS/ADAPTATIONS
Introduce a Frisbee instead of the ball to develop the game and make it harder for players.
Introduce a time aspect to Pass Bomb so the players are under pressure to pass.

CARD 7 AIM
To demonstrate the ability to throw and catch accurately and apply these skills to a competitive fun game.
EQUIPMENT
Frisbee
GAME: King of the Castle GAME: No Man’s Land
The diagram above shows the game of King of the Castle being
played where pupils line up at opposite sides of the court and
throw the Frisbee to the person on the opposite side, who must
catch and return a pass to the new player opposite them.
Above, the diagram shows the team game of No Man’s Land
where the pupils throw the Frisbee over a specific set area in
the middle of the court to an opposing team who must try to
catch the Frisbee and return a pass.

HOW TO PLAY TEACHING POINTS SAFETY POINTS
GAME: King of the Castle
Players line up behind each other at one side of the court.
Players pass the Frisbee to player directly opposite them
on the other side of the court.
After a while, it will become a competitive game and
players will be eliminated if they pass a bad pass or drop a
good pass.
These players must go to the side and practise their skills
in pairs.
The game is played until everyone is eliminated.
DEVELOPMENT
GAME: No Man’s Land
Players will split into 2 teams, with 3 members at either
side of the court.
A zone will be placed in the middle of the court and this
will be No Man’s Land.
Players must pass to a member of their team on the far
side.
The other team must try and intercept the pass.
A point is awarded for every successful pass.
Forehand and Backhand Technique:
Use the correct technique for the
forehand and backhand throws as
covered in previous task cards.
Catching Technique: Use the correct
technique for the catch and try and
bring each pass into your chest.
Pass to Chest: Aim the pass towards
the chest of your opponent to make
their catch easier.
Call the Name: Call the name of the
player you are passing to.
Keep your head up so
that you can see the
Frisbee and other
players.
Call names so all players
are aware of the
intended receiver.
Be aware of other
players so that you do
not run into them or
make contact.
Be aware of your
boundaries in case
there are walls or any
obstacles present.
VARIATIONS/ADAPTATIONS
Make the distance of the throws shorter or longer depending on the success of the players with the skills.
Challenge the players to use different throwing or catching techniques each time so that they are practising all skills.

CARD 8 AIM
To demonstrate the skills of Ultimate Frisbee in a fun competitive modified game before applying the skills to a regular game of
Ultimate Frisbee.
EQUIPMENT
2 benches, a Frisbee, 2 sets of 6 bibs
GAME: On the Bench GAME: Ultimate Frisbee
This diagram shows a similar form of the game being played with
a ball. The format is the same with members of the team trying
to accept passes from their teammates.
The diagram above shows the game in action as members of
each team pass the Frisbee to each other and attempt to make
a pass to a team member who is situated in the End Zone.

VARIATIONS/ADAPTATIONS
If too difficult, introduce a ball instead of the Frisbee.
HOW TO PLAY TEACHING POINTS SAFETY POINTS
GAME: Bench Ball
Players divided into teams of 6.
Players try to pass the Frisbee to
their teammates before throwing a
pass to a member of their team who is
standing on a bench at the end of the
court.
If a player passes successfully to their
teammate on the bench, they join the
bench.
First team with all members on the
bench wins.
DEVELOPMENT
GAME: Ultimate Frisbee
Players remain in their teams of 6.
Players attempt to make a pass to a
member of their team who is situated
in the end zone.
A score is awarded if a pass is
successful to the member in the end
zone.
If a pass of the Frisbee hits the
ground, the possession is turned over.
Communicate with each other: Call
names when looking for a pass or when
passing to a teammate.
Keep the Frisbee off the ground: Look
to pass to a teammate using the
backhand or forehand throw which
aims to keep the Frisbee in the air.
Use skill teaching points: Use the
teaching points for the skills covered
in the previous task cards for the
grips, throws and catches as
appropriate.
Ensure there is no wild throwing of the
Frisbee.
Call names of the intended receiver of
the pass.
Ensure that players take care when
standing on the bench – feet firmly on
bench.
Keep your head up and your eyes on the
Frisbee, particularly when expecting a
pass.
Beware of your boundaries in case
there are walls or any obstacles
present.

REFERENCES
Z a gor ia , A . ( 2 00 5 ) . H i s t or y o f t h e gam e . R etr i e ved fr om
h tt p : //ww w .w hat i su l t i ma t e . c om/h i s to r y/h i s t ory _ ga m e1 _ en .h tm l
Ac h i l l e s , A . ( 2 01 0 ) . U l t ima t e fr i sbee -h i s t ory . R etr i e ved fr om
h tt p : //ww w .k i dz w or l d . c om/ ar t ic l e / 44 0 5 -r u le s - of - p l a y i n g -
u l t i ma t e - fr i sb ee
W or l d F l y i n g D i sc F ed era t i o n . (2 0 1 1 ) . Hi s t or y o f u l t i ma te .
R etr i e ved f r om
h tt p : //ww w .w fd f . or g/ in d ex . php ?pa ge=h i s t or y/ u l t i mat e .h tm
R oger s , G , C or mac k , S , Kn i gh t s , B , & B ee , L . ( 2 0 0 7) . P l a y i n g for
l i fe : u l t im at e fr i sbee c ompa n i on book . Au str a i l i a : Au str a i l i a n
S p or t s C om mi s i o n .
Z a kra j sek , D . B . , Car n es , L . A. , & P e tt i gr ew , F . E . ( 2 0 0 3) .
Qu a l i ty l e sson p l a n s fo r sec on dar y p h y s i ca l edu cat i o n . I l l i n o i s ,
U S A: Huma n K i n e t i c s .