u guide% ru ink wireless!usb vga 3.5 a k
TRANSCRIPT

1
USER GUIDE TRULINK® WIRELESS USB TO VGA AND 3.5 MM AUDIO KIT
GUÍA DEL USUARIO
GUIDE D’UTILISATION
Model: 29354
®

1
TABLE OF CONTENTS
TABLE OF CONTENTS Introduction .......................................................................................................... 2 Features .................................................................................................................. 3 System Requirements....................................................................................... 4 Package Contents................................................................................................ 5 Device Overview ................................................................................................. 6 Device Installation.............................................................................................. 7 Device Operation ..............................................................................................10 Technical Specifications.................................................................................19 Cables To Go One Year Warranty ..............................................................20 Important Safety Information .....................................................................21
TABLE DES MATIERES Introduction...........................................................................................................2 Fonctions.................................................................................................................3 Configuration du système................................................................................4 Contenu du pack ..................................................................................................5 Vue générale du périphérique .......................................................................6 Installation du périphérique...........................................................................7 Fonctionnement du périphérique .............................................................10 Caractéristiques techniques ........................................................................19 Garantie d'un an Cables To Go ....................................................................20 Informations de sécurité importantes ....................................................21
ÍNDICE Introduzione ......................................................................................................... 2 Caratteristiche...................................................................................................... 3 Requisiti di Sistema ........................................................................................... 4 Contenuto della confezione............................................................................ 5 Panoramica del dispositivo ............................................................................ 6 Installazione del dispositivo .......................................................................... 7 Funcionamiento del dispositivo.................................................................10 Specifiche tecniche...........................................................................................19 Cables To Go One un anno di garanzia ....................................................20 Importanti informazioni sulla sicurezza ................................................21
2
INTRODUCTION Thank you for purchasing the TruLink® Wireless USB to VGA and 3.5 mm Audio Kit. The second generation of the TruLink® USB to VGA+ 3.5mm Kit provides a powerful solution to stream audio and video from a remote monitor, projector or television. Engineered to incorporate Ultra-‐Wide Band technology, this kit allows for in-‐room wireless connectivity up to 30 feet (line of sight) between the computer and display. Setup is simple and usage is seamless because all required video drivers are embedded in the host adapter, ensuring a quick, plug and play experience. Our new Quick Link feature allows additional users with host adapters to quickly connect to the device adapter with no additional steps required to “pair” the devices. This highly secure wireless connection is ideal for classrooms, conference rooms or to display audio/video content from your laptop to your home entertainment system. Two flexible device adapter mounting options are included, a desk mount and a wall mount. We recommend that you read this manual thoroughly and retain for future reference. INTRODUCCIÓN INTRODUCTION
INTRODUCTION

3
FEATURES
FEATURES Supports up to UXGA (1600 x 1200 pixels) and
WSXGA (1680 x 1050 pixels) video resolutions with 3.5mm stereo audio up to 30 feet (line of sight)
CD-‐less auto-‐install driver installation for PC Mac OS compatible (10.4 and higher. Video driver is
on the included CD) Video streaming up to 720p (720p only available at
resolution 1024 x 768 pixels or lower) WiMedia Data Rates: 53 to 480Mbps Ultra-‐Wide Band operates in the frequency of 6.3
GHz to 7.9GHz (WiMedia™ Band Group 3) New QuickLink feature allows additional host
adapters to connect to an existing device adapter with no pairing necessary
Warranty: 1 year CERTIFICATIONS FCC CFR 47 Part 15 subpart F CE compliant WiMedia compliant Wireless USB compliant RoHS compliant
FONCTIONS
CARACTERÍSTICAS
4
SYSTEM REQUIREMENTS
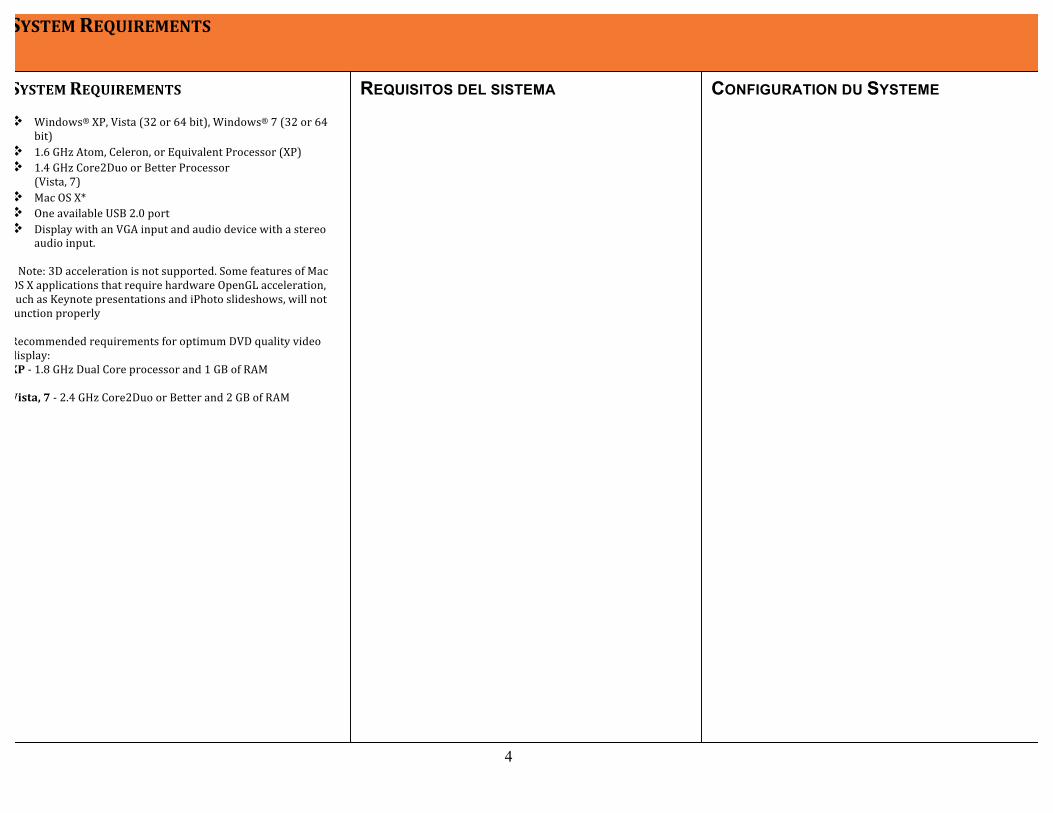
SYSTEM REQUIREMENTS Windows® XP, Vista (32 or 64 bit), Windows® 7 (32 or 64
bit) 1.6 GHz Atom, Celeron, or Equivalent Processor (XP) 1.4 GHz Core2Duo or Better Processor
(Vista, 7) Mac OS X* One available USB 2.0 port Display with an VGA input and audio device with a stereo
audio input. * Note: 3D acceleration is not supported. Some features of Mac OS X applications that require hardware OpenGL acceleration, such as Keynote presentations and iPhoto slideshows, will not function properly Recommended requirements for optimum DVD quality video display: XP -‐ 1.8 GHz Dual Core processor and 1 GB of RAM Vista, 7 -‐ 2.4 GHz Core2Duo or Better and 2 GB of RAM
REQUISITOS DEL SISTEMA
CONFIGURATION DU SYSTEME

5
PACKAGE CONTENTS
PACKAGE CONTENTS TruLink VGA and 3.5 mm Audio Device Adapter
(Receiver) TruLink USB Host Adapter (Transmitter) Desk Mount Stand Wall Mount Bracket 1 ft VGA Cable 3 ft 3.5 mm Audio Cable Power Adapter User Guide Quick Start Guide Driver CD (Mac Only)
CONTENIDO DEL PAQUETE
CONTENU DU PACK

6
DEVICE OVERVIEW / DESCRIPCIÓN GENERAL DEL DISPOSITIVO / VUE GENERALE DE L’APPAREIL /

7
DEVICE INSTALLATION
DEVICE INSTALLATION Windows Installation Step 1: Connect the USB transmitter to an available USB 2.0 port on your computer. Windows will automatically detect the new hardware and will open an AutoPlay window. Step 2: Click on the Open folder to view files within the AutoPlay window and then double click on the Setup file to install the drivers. Note: If AutoPlay is not enabled on your computer, then you will need to open Computer (Vista and 7) or My Computer (XP), and then open the driver labelled Alereon SCAH Wireless Host to access the Setup file that will install the drivers. Step 3: Follow the prompts “I accept” and “Next” on the Setup window to install the drivers Step 4: Leaving the USB transmitter connected to your computer, connect the wireless receiver to the VGA display with a VGA cable and to the audio device with a 3.5 mm cable. Be sure to notice which input you are using on the display so that you can easily select the correct port using your display’s remote control. Step 5: Connect the wireless receiver to its power supply, connect the power supply to an available AC outlet, power on the display, and select the input you used in Step 4. You will see a title screen until the dongle has wirelessly connected with the remote, at which time you will see your computers desktop background. Note: The Wireless USB to VGA and 3.5 mm Audio kit will default to “Extended Display Mode” where the display connected to the wireless receiver is a second display. This will only show the desktop background without any icons. You can move your cursor off the right side of your PC screen and it will move to the second display. Any programs that are open may be dragged to the right and will be shown on the second display.
INSTALLATION DU PÉRIPHÉRIQUE
INSTALACIÓN DEL DISPOSITIVO

8
DEVICE INSTALLATION
DEVICE INSTALLATION Mac Installation Step 1: Insert the CD ROM, double click on the application DisplayLink-‐OSX, and then Click on the DisplayLink Software installer. Step 2: Proceed through the installation screens to complete the driver installation and then click on the Restart button to restart the computer. Step 3: Connect the wireless receiver to the VGA display with a VGA cable and to the audio device with a 3.5 mm cable. Be sure to notice which input you are using on the display so that you can easily select the correct port using your display’s remote control. Step 4: Connect the wireless receiver to its power supply, connect the power supply to an available AC outlet, power on the display, and select the input you used in Step 4. You will see a title screen until the dongle has wirelessly connected with the remote, at which time you will see your computers desktop background. Step 5: Once the computer has fully restarted, connect the USB transmitter to an available USB 2.0 port on the computer. The USB transmitter will connect with the wireless receiver and the display will now show the desktop background. Note: The Wireless USB to VGA and 3.5 mm Audio kit will default to “Extended Display Mode” where the display connected to the wireless receiver is a second display. This will only show the desktop background without any icons. You can move your cursor off the right side of your PC screen and it will move to the second display. Any programs that are open may be dragged to the right and will be shown on the second display.
INSTALLATION DU PÉRIPHÉRIQUE
INSTALACIÓN DEL DISPOSITIVO
9
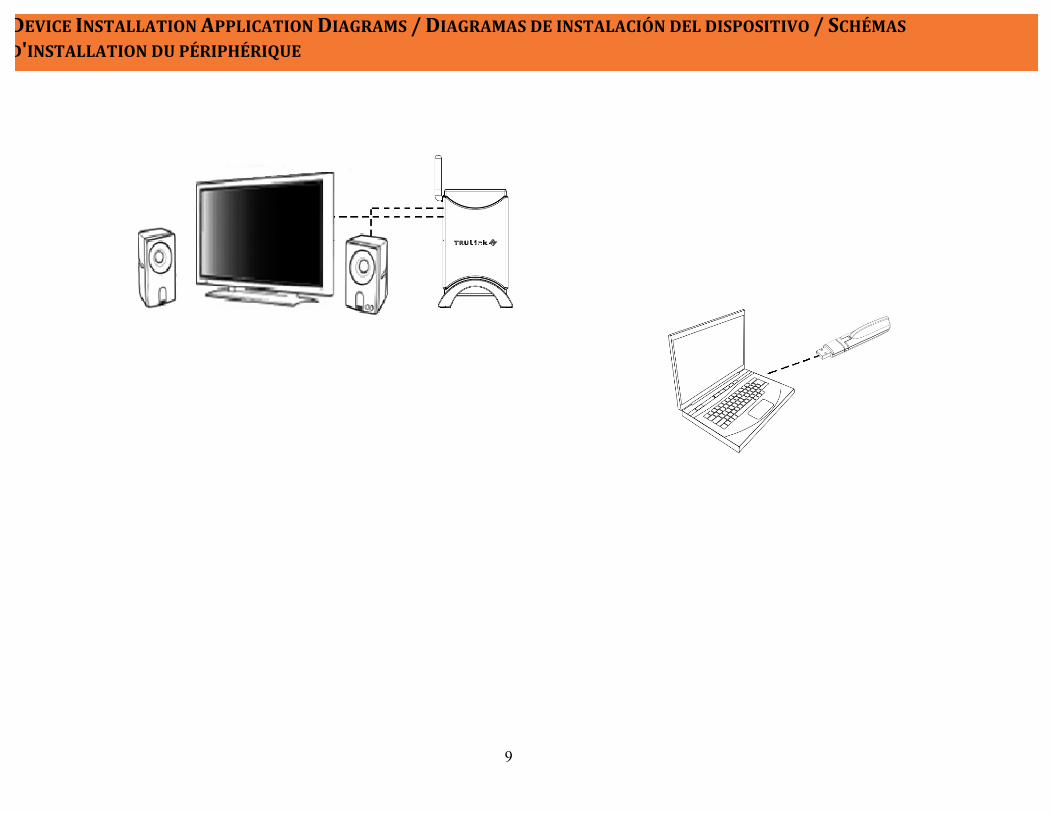
DEVICE INSTALLATION APPLICATION DIAGRAMS / DIAGRAMAS DE INSTALACIÓN DEL DISPOSITIVO / SCHÉMAS D'INSTALLATION DU PÉRIPHÉRIQUE
89012

10
DEVICE OPERATION
DEVICE OPERATION Windows 7 From the task bar, click the Show Hidden Icons arrow to show all available icons. Right click on the DisplayLink Icon in the Icon Tray to make the following adjustments. Check for Updates: This will allow the computer to connect to Windows Update to check for new versions of the software or drivers and download them if available. Optimize for Video: The option allow for better movie playback performance on the remote display(s). Only select this option when only video content is displayed on the remote monitor. Text may appear less clear when this option is selected. Advanced: This option will open the Windows Display Properties (WDP). The following adjustments may be made from WDP. Menu Sub-Menu Description
Display Use the drop down list to select a display to be configured.
Resolution* Use the slider to choose a resolution. Landscape Sets the display to landscape view Portrait Sets the display to portrait mode
Landscape (flipped) Sets the display to upside down landscape mode Orientation
Portrait (flipped) Sets the display to upside down portrait mode Duplicate these
displays Reproduces the main display on the second display
Extend these displays Extends the main display onto the secondary display
Show Desktop only on 1
The desktop appears on the display marked 1. The display marked 2 becomes blank
Multiple displays
Shows Desktop only on 2
The desktop appears on the display marked 2. The display marked 1 becomes blank
*Screen Resolution is only available when the software is set to Extend. Also, 720p is the recommended resolution is suggested for video playback
FONCTIONNEMENT DU PÉRIPHÉRIQUE
FUNCIONAMIENTO DEL DISPOSITIVO
11
DEVICE OPERATION
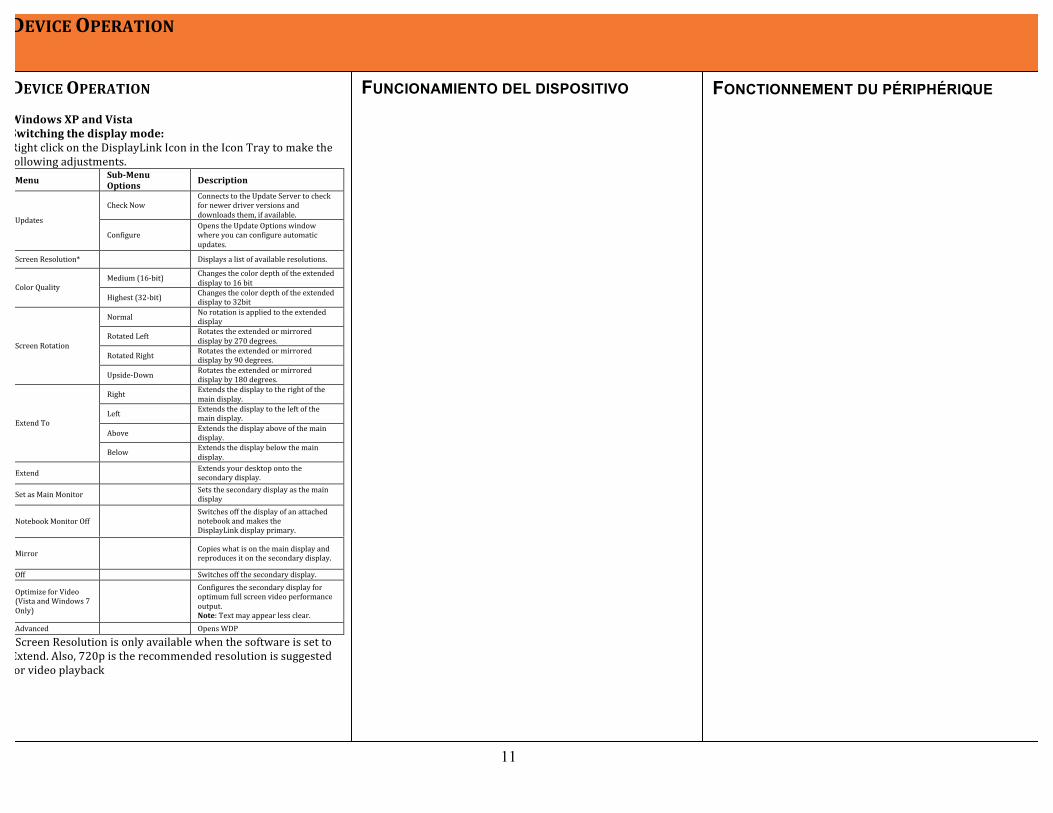
DEVICE OPERATION Windows XP and Vista Switching the display mode: Right click on the DisplayLink Icon in the Icon Tray to make the following adjustments. Menu
Sub-Menu Options
Description
Check Now Connects to the Update Server to check for newer driver versions and downloads them, if available.
Updates
Configure Opens the Update Options window where you can configure automatic updates.
Screen Resolution* Displays a list of available resolutions.
Medium (16-‐bit) Changes the color depth of the extended display to 16 bit Color Quality
Highest (32-‐bit) Changes the color depth of the extended display to 32bit
Normal No rotation is applied to the extended display
Rotated Left Rotates the extended or mirrored display by 270 degrees.
Rotated Right Rotates the extended or mirrored display by 90 degrees.
Screen Rotation
Upside-‐Down Rotates the extended or mirrored display by 180 degrees.
Right Extends the display to the right of the main display.
Left Extends the display to the left of the main display.
Above Extends the display above of the main display.
Extend To
Below Extends the display below the main display.
Extend Extends your desktop onto the secondary display.
Set as Main Monitor Sets the secondary display as the main display
Notebook Monitor Off Switches off the display of an attached notebook and makes the DisplayLink display primary.
Mirror Copies what is on the main display and reproduces it on the secondary display.
Off Switches off the secondary display.
Optimize for Video (Vista and Windows 7 Only)
Configures the secondary display for optimum full screen video performance output. Note: Text may appear less clear.
Advanced Opens WDP
*Screen Resolution is only available when the software is set to Extend. Also, 720p is the recommended resolution is suggested for video playback
FONCTIONNEMENT DU PÉRIPHÉRIQUE
FUNCIONAMIENTO DEL DISPOSITIVO

12
DEVICE OPERATION
DEVICE OPERATION Macintosh The first time any display is attached to the computer through the adapter the display will default to Extend mode and will be accessed by moving the mouse off the right side of the main display. Managing Multiple Displays: Select System Preferences from the Apple menu located in the top left corner of the main monitor in order to configure the settings for each of the connected displays. This will open a Display Preferences Window on each of the attached displays, allowing you to configure each display as required. To configure all displays from the main monitor, click Gather Windows. From the Display Preferences window the following adjustments can be made. Setting the Display Resolutions: To change a Display Resolution, simply select an available resolution from the Display Preferences Window. 720p is the recommended resolution is suggested for video playback Configuring Display from the Menu Bar: If you have checked the Show Displays in the Menu Bar from the Display Preferences Window, then you will be able to adjust the displays by clicking the Display Icon in the top right menu bar on the main display. The Display Icon will open a Menu which will allow you to perform the following tasks Detect all displays connected to the Mac Turn display mirroring on or off Set the resolution of both the primary display, and the
additional display(s), by selecting one of the recently used resolutions
Configure how many recent resolutions will be shown in the menu
Open the Display Preferences
FONCTIONNEMENT DU PÉRIPHÉRIQUE
FUNCIONAMIENTO DEL DISPOSITIVO

13
DEVICE OPERATION
DEVICE OPERATION Macintosh (continued) Setting the Sound Output: Select System Preferences from the Apple menu at the top left of your main monitor. Select the Sound option, click on the Output tab, and then select WUSB Audio/Video Device from the options. Please note this option will only be available once the USB transmitter has connected to the wireless receiver unit. Pairing and Auto-QuickLink™ Description: (All Operating Systems) Your TruLink Wireless USB to VGA and 3.5 mm Audio Kit supports both Pairing and Auto-‐QuickLink features. Pairing is a process whereby the USB transmitter and the wireless receiver unit are “Paired” or mated allowing them to immediately connect when they are within range. The ID of each device is stored inside the memory of its mated counterpart. This insures that the two devices “know” each other and enables them to always instantly wirelessly connect with each other. If you have purchased a TruLink kit that contains both the USB transmitter and the wireless receiver, the two units have already been pre-‐paired in the factory. There is no additional action required by the end user for these units to wirelessly connect with each other right out of the box. You can manually create pairings between additional units via the use of TruLink’s Pairing Application as described in the section below titled “Pairing Additional Units”. Auto-QuickLink™ is a feature whereby any USB transmitter will connect with any wireless receiver that is in range without the units being pre-‐paired. TruLink units ship with the Auto-‐QuickLink feature enabled. An example of this application is a conference room where a variety of laptops may need to connect to the receiver in the room and they have not been pre-‐paired, or there are a number of USB transmitters in the room and they need to share the wireless receiver.
FONCTIONNEMENT DU PÉRIPHÉRIQUE
FUNCIONAMIENTO DEL DISPOSITIVO

14
DEVICE OPERATION
DEVICE OPERATION Auto-QuickLink™(Continued) In this case, the first USB transmitter that wirelessly connects to the wireless receiver takes control of the receiver unit. The wireless connection must be terminated for another USB transmitter to take control of the wireless receiver. (This can be accomplished by simply unplugging the USB transmitter from the PC that is currently wirelessly connected to the wireless receiver). The time in which an Auto-QuickLink wireless connection is made between a USB transmitter and a wireless receiver is slightly longer as compared to paired units. The advantage however of Auto-QuickLink is that a formal pairing process is not required between a USB transmitter and a wireless receiver. If both a Paired USB transmitter and a non-paired USB transmitter are “seen” by a wireless receiver at the same time, the wireless receiver will always wirelessly connect with the paired USB transmitter first. If you have purchased the TruLink Wireless USB to VGA and 3.5 mm Audio Kit the two devices have been pre-‐paired in the factory. If you have purchased more than one kit or have purchased additional stand-‐alone USB transmitters, they can still wirelessly connect with each other via Auto-‐QuickLink. You can create formal pairings between additional USB transmitters and wireless receivers via the TruLink Pairing application provided on the CD. The CD also contains an Auto-‐QuickLink Configuration Application that allows you to disable or re-‐enable the Auto-‐QuickLink feature of a wireless receiver unit.
FONCTIONNEMENT DU PÉRIPHÉRIQUE
FUNCIONAMIENTO DEL DISPOSITIVO

15
DEVICE OPERATION
DEVICE OPERATION Pairing additional units: Paired USB transmitters and wireless receiver units do have the advantage that they will wirelessly connect faster (on a higher priority level) than making a wireless connection via Auto-‐QuickLink. If you wish, you can create formal pairings with additional USB transmitter and/or wireless receiver units. Pairings are created by running the TruLink Pairing Application provided on the CD that shipped with the Kit or stand-‐alone USB transmitter unit. Please note that a USB transmitter or wireless receiver can store pairing information for up to 8 counterpart units. If more than 8 pairings are made, prior pairing data will be overwritten (the first device pairing falls off the stack and the new one is added at the bottom). Once a pairing is completed between two devices, it is permanent and it will not be required to be paired again unless the pairing data is overwritten by exceeding the 8 unit pairing limit. NOTE: PRIOR TO BEGINING THIS PROCESS, PLEASE MAKE SURE THE WIRELESS RECIVER IS NOT CONNECT TO AC POWER AND THAT YOU HAVE LOCATED THE MAC ADDRESS NUMBER FOUND ON THE RECEIVER’S LABEL ON THE REAR OF THE UNIT. Step 1: To created a pairing between two devices insert the CD and run the “TruLink Pair” application. Once the title screen appears, click on Next to begin the pairing process. Step 2: Follow the instructions on the screen by inserting the USB transmitter into an available USB port on the PC. Place the wireless receiver unit with 3 feet of the USB transmitter. (It is best to ensure that there are no additional USB transmitters powered-‐up or within a 30 foot range). Apply power to the wireless receiver so that the blue power LED is illuminated. You will now have 60 seconds to complete the pairing process. Click Next to continue.
FONCTIONNEMENT DU PÉRIPHÉRIQUE
FUNCIONAMIENTO DEL DISPOSITIVO

16
DEVICE OPERATION
DEVICE OPERATION Step 3: Enter the MAC address number of the wireless receiver unit in the area provided. The MAC address number can be found on the wireless receiver’s label on the rear of the unit. Please note that the characters of the MAC address are case sensitive. Click the Next button to continue. Step 4: The Green LED on the wireless receiver unit should blink during the short pairing process. If the unit fails to pair, you may have exceeded the 60 second window allowed for the pairing process. Unplug the power cable to the wireless receiver unit, wait 5 seconds and then re-‐apply power by plugging the power cable into the wireless receiver unit. Select the “Retry” button and ensure that you have input the correct MAC address. Follow the prompts again by selecting the “Next” button until the pairing process is completed. A successful pairing is indicated by a screen stating that the pairing is complete. Click Close to exit the Pairing Application. Disabling the Auto-QuickLink Function As stated previously, the Auto-‐QuickLink function enables any USB transmitter to wirelessly connect to any wireless receiver. This is an ease-‐of-‐use feature to enable users to wirelessly connect to any unit that is within range. The Auto-‐QuickLink function is extremely useful in environments such as business conference rooms or class rooms where any user with a USB transmitter can wirelessly connect to the wireless receiver that is mounted in a given room. There may be some deployments of the TruLink Wireless USB to VGA and 3.5 mm Audio Kit where wireless connectivity may wish to be restricted to only one or two users. In this case, the Auto-‐QuickLink feature should be “turned-‐off” or disabled. Wirelessly connectivity will then be limited to only USB transmitters that are formally paired with the Wireless receiver unit. The paired unit could be the factory pre-‐paired set that was purchased together in a kit or additional units in which a manual pairing was created by the user via the use of the TruLink Pairing Application as described in the prior section.
FONCTIONNEMENT DU PÉRIPHÉRIQUE
FUNCIONAMIENTO DEL DISPOSITIVO

17
DEVICE OPERATION
DEVICE OPERATION The Auto-‐QuickLink function can be disabled in a USB receiver by running the TruLink Auto-‐QuickLink Configuration Application which is provided on the CD. This application can also be used to enable the Auto-‐QuickLink function on units that have been previously disabled in the past. Step 1: Insert the CD and run the “TruLink Auto-‐QuickLink Configuration” application. Once the title screen appears, click on Next to begin the configuration process. Step 2: Follow the instructions on the screen by inserting the USB transmitter into an available USB port on the PC. Place the wireless receiver unit with 3 feet of the USB transmitter. (It is best to ensure that there are no additional USB transmitters powered-‐up or within a 30 foot range). Apply power to the wireless receiver so that the blue power LED is illuminated. Verify that a wireless connection has been made between the USB transmitter and the Wireless receiver unit. This is indicated by the green wireless connect LED. Click the “Next” button to continue. Note: The USB transmitter must be wirelessly connected to the wireless receiver to allow the PC to read the current status of the Auto-‐QuickLink function and to either disable or enable this feature. Since the USB receiver is shipped from the factory with the Auto-‐QuickLink featured turned-‐on or “enabled”, the wireless receiver should wirelessly connect with any USB transmitter. If you are trying to read or modify this feature with a wireless receiver in which the Auto-‐QuickLink function has been previously disabled, you must use a USB transmitter that is formally paired with the receiver to establish a wireless connection. This can be accomplished by either using the original USB transmitter that was shipped with the wireless receiver since it was pre-‐paired with the wireless receiver in the factory, or you can manually create a formal pairing with any other USB transmitter by utilizing the TruLink Pair Application as described in the previous section.
FONCTIONNEMENT DU PÉRIPHÉRIQUE
FUNCIONAMIENTO DEL DISPOSITIVO

18
DEVICE OPERATION
DEVICE OPERATION Step 3: Once the Auto-‐QuickLink status has been read by the PC, a screen will appear which shows the current status of this feature. (Either Enabled or Disabled). If the reported status of the Auto-‐QuickLink feature is correctly set and you do not wish to modify it, simply select the “Cancel” button to exit the application. If you would like to change the status, select either the “Disable” button for units that are currently enabled or select the “Enable” button for units that are currently disabled. Step 4: Once the Auto-‐QuickLink feature has been changed, the final screen will report the new setting that has been programmed into the wireless receiver unit. Click the Close to exit the Configuration application.
FONCTIONNEMENT DU PÉRIPHÉRIQUE
FUNCIONAMIENTO DEL DISPOSITIVO

19
Product Number 29355
TECHNICAL SPECIFICATIONS / SPECIFICHE TECNICHE / CARACTERISTIQUES TECHNIQUES /

20
At Cables To Go, we want you to be totally confident in your purchase. That is why we offer a one year warranty on this device. If you experience problems due to workmanship or material defect for the duration of this warranty, we will repair or replace this device. To request a Return Merchandise Authorization (RMA) number, contact customer service at 800-‐506-‐9607 or www.cablestogo.com En Cables To Go queremos que confíe completamente en su compra. Esa es la razón por la que ofrecemos un año de garantía en este dispositivo. Si experimenta problemas debidos a mano de obra o defectos de material durante el periodo de validez de esta garantía, repararemos o sustituiremos este dispositivo. Para solicitar un número de autorización de devolución de mercancía, contacte con el servicio de atención al cliente en el número de teléfono 800-‐506-‐9608 o visite www.cablestogo.com. Chez Cables To Go, nous voulons que vous soyez complètement satisfait de votre achat. C'est pourquoi vous bénéficiez d'un an de garantie sur cet appareil. Si vous rencontrez des problèmes liés à des défauts matériels ou de fabrication pendant la durée de cette garantie, nous réparerons ou remplacerons cet appareil. Pour demander un numéro d'autorisation de retour de marchandise (ARM), contactez le service client au 800-‐506-‐9608 ou www.cablestogo.com.
CABLES TO GO® ONE YEAR WARRANTY / UN AÑO DE GARANTÍA CABLES TO GO® / GARANTIE D'UN AN DE CABLES TO GO®

21
IMPORTANT SAFETY INFORMATION Do not plug the unit in any outlet that does not have enough current to allow the device to function. Refer to the specifications in this manual for power level of the unit. Liquid: If this unit or its corresponding power adapter has had liquid spilled on or in it, do not attempt to use the unit. Do not attempt to use this product in an outdoor environment as elements such as rain, snow, hail, etc. can damage the product. In case of a storm, it is recommended that you unplug this device from the outlet. Avoid placing this product next to objects that produce heat such as portable heaters, space heaters, or heating ducts. THERE ARE NO USER SERVICEABLE PARTS. Do not attempt to open this product and expose the internal circuitry. If you feel that the product is defective, unplug the unit and refer to the warranty information section of this manual.
INFORMATIONS DE SÉCURITÉ IMPORTANTES Pour permettre à l'appareil de fonctionner, ne branchez pas l'unité sur une prise ne délivrant pas assez de courant. Reportez-‐vous aux spécifications de ce manuel pour connaître le niveau d'alimentation de l'unité. Liquide : Si du liquide s'est répandu sur ou à l'intérieur de cette unité ou son adaptateur d'alimentation correspondant, n'essayez pas d'utiliser cette unité. N'essayez pas d'utiliser ce produit dans un environnement extérieur car des éléments tels que la pluie, la neige, la grêle, etc. peuvent endommager ce produit. En cas de tempête, il est recommandé de débrancher cet appareil de la source de courant. Évitez de placer ce produit près d'objets produisant de la chaleur comme les appareils de chauffage portables ou non et les conduits de chauffage AUCUNE PIÈCE NE NÉCESSITE D'ÊTRE ENTRETENUE PAR L'UTILISATEUR. N'essayez pas d'ouvrir ce produit et d'exposer sa circuiterie interne. Si vous pensez que ce produit présente des défauts, débranchez l'unité et reportez-‐vous à la section de ce guide comportant des informations de garantie.
INFORMACIÓN DE SEGURIDAD IMPORTANTE No conecte la unidad en una salida que no disponga de suficiente corriente como para permitir que el dispositivo funcione. Consulte en este manual las especificaciones sobre nivel de potencia de la unidad. Líquidos: Si se han derramado líquidos sobre la unidad, en la unidad o en su correspondiente adaptador de potencia, no intente utilizar la unidad. No intente utilizar este producto en el exterior, ya que elementos como la lluvia, la nieve, el granizo, etc. pueden dañar el producto. En caso de tormenta, se recomienda que desconecte este dispositivo del enchufe. Evite situar este producto cerca de objetos que produzcan calor, como calefacciones portátiles, calefactores o conductos de calefacción. NO HAY PIEZAS QUE PUEDA REPARAR EL PROPIO USUARIO. No intente abrir este producto y exponer la circuitería interna. Si cree que el producto presenta algún defecto, desconecte la unidad y consulte la sección de garantía de este manual.
IMPORTANT SAFETY INFORMATION

22
For more information on this product or to check for updated drivers, manuals or frequently asked questions please visit our website.
Para obtener más información sobre este producto o para comprobar controladores actualizados, manuales o preguntas frecuentes, visite nuestro sitio web.
Pour plus d'informations concernant ce produit ou pour rechercher des pilotes actualisés, des manuels ou des questions souvent posées, veuillez visiter notre site web.
www.cablestogo.com
VER. 1.0.11.03.10