tutorial : overvieharald/proseminar02/guided_tour.pdf · tutorial 23 creating media in director you...
TRANSCRIPT

2
CHAPTER 2
. . . . . . . . . . . . . . . . . . . . . . . . . . . . . . . . . . . . . . . . . . . . . . . . . . . . . . . .. . . . . . . . . . . . . . . . . . . . . . . . . . . . . . . . . . . . . . . . . . . . . . . . . . . . .Tutorial
Tutorial: OverviewThis tutorial steps you through the creation of a simple banner for a web page and shows how to actually put the movie on the web. The tutorial explains how to import media, create sprites, work in the score, tween sprites, attach behaviors, and save the movie in Shockwave format. To better understand Director’s basic concepts before you follow this tutorial, you should view all parts of the Guided Tour before you begin. The Guided Tour provides an animated introduction to the most important concepts in Director. See the Guided Tour in Director Help.
To see a completed version of the movie you are going to create in this tutorial, open the file Completed Tutorial Example in the Learning folder in the Director application folder.
21

Setting up the movie
Before you start placing media in your movie, you should create a new movie to clear your work space and decide how large you want the movie to be. Because you are creating a web banner, you should define a small Stage and choose a color palette for the movie that works well in web browsers. The Stage is the visible area of a movie.
To create a new movie and set the screen size:
1 Make sure the Stage window is visible. If the Stage is not visible, choose Window > Stage.
2 Choose File > New > Movie.
If you’ve made changes to the current movie, Director prompts you to save them.
3 To change movie settings, choose Modify > Movie > Properties.
4 To specify a new Stage size, enter 464 in the Width box and 60 in the Height box.
This is a common size for web banners.
You also use the Movie Properties dialog box to change the default palette for the movie.
5 To choose the color palette for the movie, choose Web216 from the Default Palette pop-up menu.
Web216 is the palette used by most web browsers. Using this palette for your movie can prevent many color problems caused by mismatched color palettes.
6 Click OK.
The Stage should look like this:
To have your movie play through once without looping:
1 Choose Window > Control Panel.
The Control Panel lets you play, stop, and rewind the movie. The Loop Playback button in the upper right corner of the panel controls whether the movie loops.
2 Make sure the Loop Playback button is deselected.
When Loop Playback is deselected, the movie doesn’t loop.
Chapter 222

Creating media in Director
You can create media in Director or import it from other programs. Simple media such as text and backgrounds are often best created in Director. In this section you’ll learn about creating vector shapes and text.
A vector shape is a mathematical description of a shape filled with a color or gradient. It uses much less memory than a comparable bitmap and downloads faster from the Internet. You will create a vector shape filled with a gradient to serve as the background of the banner.
To create a vector shape:
1 Choose Window > Vector Shape.
The Vector Shape window provides basic drawing tools for creating and changing vector shapes.
2 Click the filled rectangle tool.
3 Draw a rectangle approximately the size of the stage.
You can resize the image later, so the exact size is not important.
4 Click the Gradient Fill button.
This fills the rectangle with a gradient using the current colors and settings. You need to change the gradient so it resembles a sunrise. The Gradient Colors control determines the colors used by the gradient.
5 Click the color box on the left side of the Gradient Colors control and choose a pale pink color from the Color menu.
6 Click the color box on the right side of the gradient color and choose a deep blue color from the Color menu.
Gradient Type pop-up menu
Filled rectangle tool
Gradient Fill button
Gradient Color control
Tutorial 23

7 From the Gradient Type pop-up menu at the top of the window, choose Radial.
8 In the Y Offset box, enter 30, and then press Return.
This offsets the center of the gradient by 30 pixels, moving the pink area downward. This placement is more effective for simulating a sunrise.
9 Enter Sky as the name for the cast member you’ve created in the field at the top of the window.
Entering a name for the cast member makes it easier to identify media in the Score.
10 Close the Vector Shapes window.
Now that you’ve created the background, you can create the text for the banner title.
Chapter 224
To create a text cast member:
1 Choose Window > Text.
The Text window offers standard text formatting controls in a window that looks like a word processor.
2 Use the formatting controls at the top of the Text window to choose Arial (Windows) or Helvetica (Macintosh) 24-point bold type.
3 Type “The Bean Factory.”
4 Name the cast member Title.
You also want a smaller text cast member that says the user can click to place an order.”
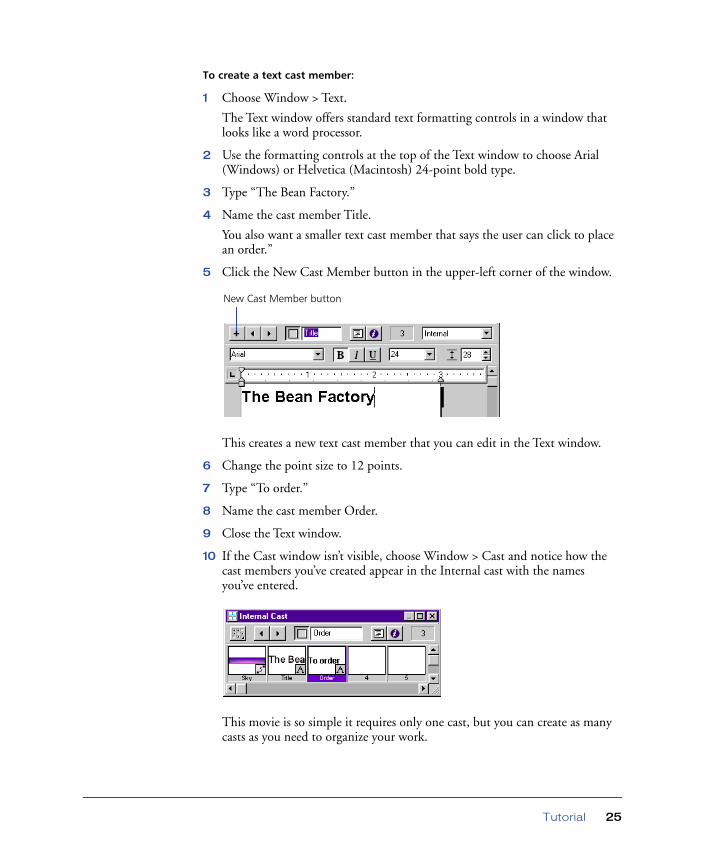
5 Click the New Cast Member button in the upper-left corner of the window.
This creates a new text cast member that you can edit in the Text window.
6 Change the point size to 12 points.
7 Type “To order.”
8 Name the cast member Order.
9 Close the Text window.
10 If the Cast window isn’t visible, choose Window > Cast and notice how the cast members you’ve created appear in the Internal cast with the names you’ve entered.
This movie is so simple it requires only one cast, but you can create as many casts as you need to organize your work.
New Cast Member button
Tutorial 25

Creating sprites and using inks
Now that you have some cast members, you’re ready to work with sprites. Sprites are objects that control when, where, and how cast member media appear in a movie. You move sprites on the Stage to determine where cast members appear. You move sprite bars in the Score to determine when cast members appear.
To create sprites:
1 Make sure the Cast window, Score, and Stage are visible, using any of the following methods:
� For the Cast window, choose Window > Cast or press Control-3 (Windows) or Command-3 (Macintosh).
� For the Score, choose Window > Score or press Control-4 (Windows) or Command-4 (Macintosh).
� For the Stage, choose Window > Stage or press Control-1 (Windows) or Command-1 (Macintosh).
Chapter 226

2 Drag the Sky cast member to the Stage as shown.
This creates a sprite that displays the Sky cast member. Notice the sprite bar in the Score that extends through 28 frames. The frames in the Score represent the passing of time. You define the number of frames per second in the Control Panel.
Director displays information about the selected sprite in a Sprite Overlay panel on the Stage. This information is usually helpful, but when the Stage is small, as when creating a banner, the information panel can make it difficult to work on the Stage. You can easily turn off this feature.
3 Choose View > Sprite Overlay > Show Info to turn off the display of the sprite information panels.
4 Resize the Sky sprite by dragging the handles on the sprite’s bounding rectangle so that the sprite fills the entire Stage.
Now you’re ready to add more sprites for the banner text.
Sprite on the Stage
Sprite in the Score
Tutorial 27

5 Drag the Title cast member to the lower part of the Stage as shown.
The title will rise out of the horizon, so you want it to start near the bottom of the Stage.
The new sprite appears as a white box with text inside. You can remove the box by applying the Background Transparent ink. Background Transparent and the other inks change the way colors appear within sprites. Changing the ink of a sprite has no effect on the cast member displayed by the sprite.
6 Make sure the Title sprite is selected. Then, in the Sprite toolbar at the top of the Score, choose Background Transparent from the Ink pop-up menu.
This removes the white box around the text.
Chapter 228

7 Drag the Order sprite from the Cast window to the right side of the Stage and apply Background Transparent again.
The Stage and Score of the movie should now look like this. If you need to move a sprite to a different frame, drag it in the Score.
8 Choose File > Save to save the movie.
9 Enter MyBanner for the movie’s name and then click OK.
Tutorial 29

Creating simple animation
To make the title rise out of the horizon, you will use a simple animation technique called tweening. To animate with tweening, you define settings for the starting and ending frames, and Director fills in all the frames in between.
To tween a sprite:
1 Select the Title sprite in the Score.
2 On the Stage, locate the large blue and red circle in the upper-left corner of the Title sprite.
This is a special handle for tweening the path of a sprite.
3 Hold down the Shift key and drag the handle up about half in inch.
As you drag, the handle separates into green and red circles. The green circle shows the starting location of the sprite, and the red circle represents the ending location. Holding down the Shift key constrains the movement to vertical or horizontal.
4 To see the animation, click Rewind and then click the Play button on the toolbar at the top of the screen. (You can click the buttons in the Control Panel or on the toolbar at the top of the Director window.)
The title moves between the starting and ending points you’ve defined.
Notice in the Score that there are now small circles at the beginning and end of the Title sprite. These circles represent keyframes. Keyframes are frames where the property of a sprite changes.
In addition to tweening the path of a sprite, Director can tween the blend, size, rotation, skew, and color of a sprite. In this example, you will tween the blend to make the title fade in as it rises.
5 Select the keyframe marker in the Score in frame 1 of the Title sprite.
Play
Rewind
Stop
Chapter 230

6 At the top of the Score, enter 0 in the Blend field and then press Return.
There is no 0 option on the Blend pop-up menu, but you can enter the number in the box.
This makes the sprite disappear in the first frame.
7 Click the Rewind button and then the Play button on the toolbar at the top of the screen.
The title fades in as it moves up.
8 Click the Rewind button to return the playback head to frame 1.
9 Choose File > Save to save your work.
Importing media
The cast members you’ve worked with so far are typical of media that you create within Director. For more complex media, you usually import from other applications. Director can import media from many popular media formats, including bitmaps. text, digital video, Flash movies, sounds, and so on. For this movie, you will import two bitmap cast members that were created in an image editing program, plus a Flash movie.
Importing media in Director involves choosing the files you want to import and then responding to prompts about how you want each one imported.
Selected keyframe
Blend field
Tutorial 31

To import media:
1 Choose File > Import.
2 Open the Learning folder within the Director application folder and then open the Tutorial Media folder.
You should see three files: Coffeman.swf, Cup.bmp, and Horizon.bmp.
3 Click Add All.
This adds all the files in the current folder to the list of files to be imported.
4 Click Import.
Director begins importing the files. Depending on the type of computer you have and how many colors your system is set to display, Director may prompt you to confirm the type of media you are importing or to change the color depth (number of colors) in the current image.
5 If the Image Options dialog box appears, choose Stage as the setting for Color Depth and click Same Settings for Remaining Images. If your system is set to 256 colors, choose Remap To from the Palette options, and Web216 from the pop-up menu to the right.
6 Click OK.
The files you have imported appear as cast members. The cast member names are set to the file names of the imported files. You can change the names if you wish.
Chapter 232

Creating more sprites
Now that you have more cast members, you can place them on the Stage to finish the design of the banner.
To place additional sprites:
1 Click frame 1 in channel 4 in the Score.
When you create sprites by dragging cast members to the Stage, Director always places them in the current frame, so it’s good practice to select the frame in the Score where you want the sprites to appear before dragging cast members to the Stage.
2 Drag the Flash movie, Coffeeman.swf, to the left edge of the stage.
3 Drag the bitmap cast member named Horizon into position at the bottom of the stage, as shown. Make sure the sprite bar appears in Score channel 5.
4 Making sure the Horizon sprite is still selected, choose Background Transparent from the Ink pop-up menu in the Sprite toolbar.
Notice that a fuzzy white border appears at the edge of the artwork. This occurs because the image was created to be anti-aliased against a white background. Anti-aliasing blends the borders of images by adding pixels of intermediate colors. If an anti-aliased image is placed over a different colored background, as in this example, a fuzzy halo may appear. You can fix this using the Darkest ink instead of Background Transparent. Darkest ink compares the colors in the foreground and background images and uses whichever color is darkest.
Tutorial 33
5 Choose Darkest ink from the Ink pop-up menu.
The fuzzy halo disappears.
6 Click Rewind and then Play to see the Flash movie animate while the banner movie plays.
Director imports Flash movies with all of their animation and interactivity.\
7 Click the Rewind button to return to the first frame of the movie.
Tweening rotation
Earlier you used tweening to make the title fade in as it rises. Now you’ll use tweening again to make a sprite spin as it moves across the stage.
To tween rotation:
1 Select frame 1 in channel 6.
2 Drag the Cup cast member onto the Stage and place it over the Flash movie.
This may not look right, but the cup will be over the Flash movie for only one frame.
3 With the Cup sprite still selected, choose Background Transparent ink.
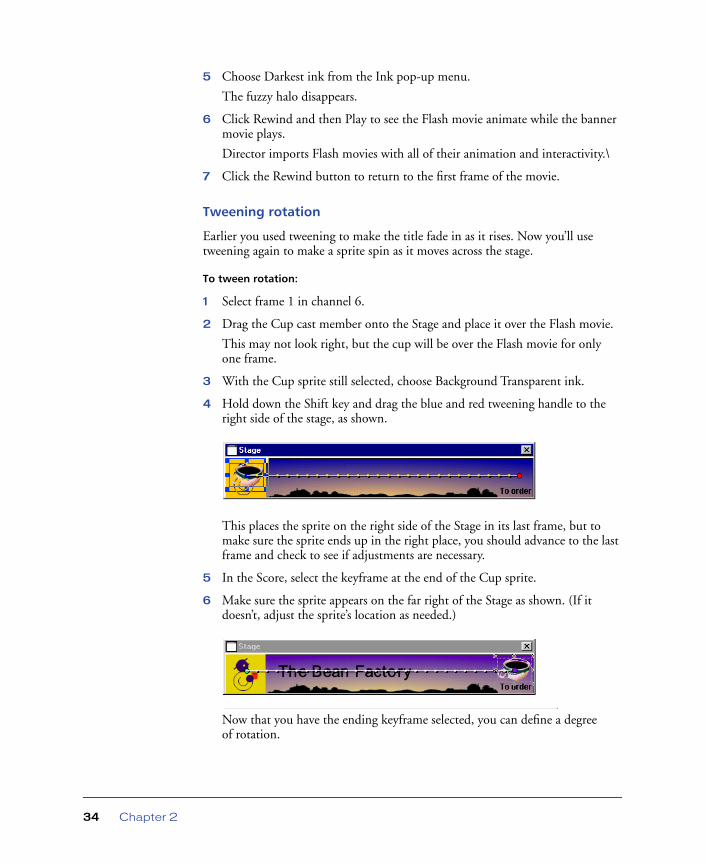
4 Hold down the Shift key and drag the blue and red tweening handle to the right side of the stage, as shown.
This places the sprite on the right side of the Stage in its last frame, but to make sure the sprite ends up in the right place, you should advance to the last frame and check to see if adjustments are necessary.
5 In the Score, select the keyframe at the end of the Cup sprite.
6 Make sure the sprite appears on the far right of the Stage as shown. (If it doesn’t, adjust the sprite’s location as needed.)
Now that you have the ending keyframe selected, you can define a degree of rotation.
Chapter 234

7 In the Sprite toolbar at the top of the Score, enter 720 in the Rotation field.
Since you have selected only the ending keyframe, Director will tween the rotation of the sprite from its starting rotation, 0 degrees, through two complete revolutions, 720 degrees.
8 Rewind and play the movie to see the sprite spin as it moves across the Stage.
9 Rewind and save the movie when you are done.
Ending keyframe selected
Rotation setting
Tutorial 35

Attaching behaviors
The animation and design of the banner is now complete, so you’re ready to add behaviors. Behaviors provide a level of control over the movie not available using only the Score. Behaviors are prewritten scripts in Director’s scripting language, Lingo. Attaching behaviors to sprites and frames lets you add Lingo’s interactivity without writing code yourself.
Behaviors add intelligence and flexibility to a movie. Instead of playing a series of frames exactly as the Score dictates, a behavior can control the movie in response to specific conditions and events. In this example, you use a behavior to open a new URL when the users clicks a sprite. This type of navigation is one of the most common uses of behaviors.
Director includes useful behaviors for common tasks. You can also create your own or get them from third-party developers.
To attach a behavior:
1 Choose Window > Library palette.
The Library palette displays all the behaviors included with Director. There are several libraries of behaviors included with Director. Use the Library List pop-up menu to specify which library is displayed in the palette.
2 Open the Library List pop-up menu and choose Navigation.
The Library palette displays the name of each behavior next to an icon indicating its type. You can scroll up or down through the list. You attach a behavior by dragging its icon to a sprite or frame.
Chapter 236

3 Drag the Go to URL behavior from the Library palette to the Cup sprite on the Stage or in the Score.
It makes no difference whether you attach a behavior to a sprite on the Stage or in the Score. After you drag the behavior, a Parameters dialog box appears. Many behaviors require additional information to perform their tasks.
4 In the Destination URL field in the Parameters dialog box, enter http://www.macromedia.com or any other URL.
If you were creating a real banner, you would enter the URL to the page containing an order form.
Tutorial 37
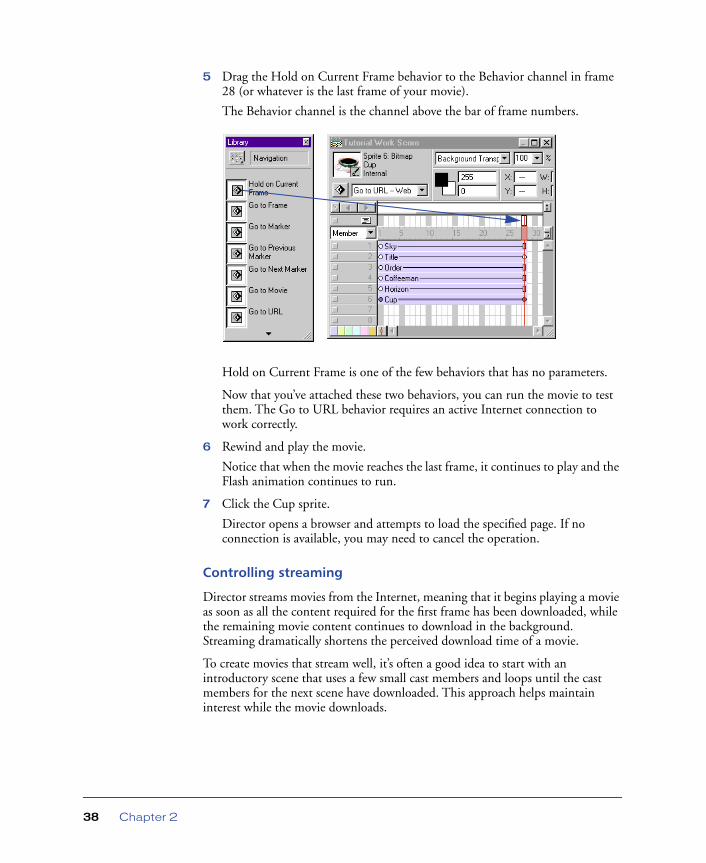
5 Drag the Hold on Current Frame behavior to the Behavior channel in frame 28 (or whatever is the last frame of your movie).
The Behavior channel is the channel above the bar of frame numbers.
Hold on Current Frame is one of the few behaviors that has no parameters.
Now that you’ve attached these two behaviors, you can run the movie to test them. The Go to URL behavior requires an active Internet connection to work correctly.
6 Rewind and play the movie.
Notice that when the movie reaches the last frame, it continues to play and the Flash animation continues to run.
7 Click the Cup sprite.
Director opens a browser and attempts to load the specified page. If no connection is available, you may need to cancel the operation.
Controlling streaming
Director streams movies from the Internet, meaning that it begins playing a movie as soon as all the content required for the first frame has been downloaded, while the remaining movie content continues to download in the background. Streaming dramatically shortens the perceived download time of a movie.
To create movies that stream well, it’s often a good idea to start with an introductory scene that uses a few small cast members and loops until the cast members for the next scene have downloaded. This approach helps maintain interest while the movie downloads.
Chapter 238

The banner you are working on is so small that streaming makes little difference, but its helpful to learn the technique so you can use it when you create larger movies.
To create a looping introduction for a streaming movie:
1 Drag the starting frames of the Title, Order, Cup, and Horizon sprites so that they begin in frame 2.
Make sure you drag only the starting frames and not the entire sprites.
This leaves only the Sky and Coffeman sprites in frame 1. These cast member work well for an introduction because Sky is a vector shape and Coffeman is a Flash movie. Both of these media types are small and download quickly. The Flash movie will also animate and attract interest while Director loops through frame 1.
2 In the Library palette, choose Internet > Streaming.
3 Drag the Loop Until Media in Frame is Available behavior to the Behavior channel in frame 1.
Tutorial 39

4 In the Parameters dialog box, enter 2 in the Wait for Media in Frame field, and then click OK. (The remaining parameters don’t need to be changed.)
This makes the behavior loop on frame 1 until all the cast members for frame 2 have downloaded. There’s no way to see this behavior working until you actually put the movie on a server.
Creating a Shockwave movie
The authoring work on the movie is now complete. All that remains is to save the banner as a Shockwave movie.
A Shockwave movie is a compressed version of a movie that is optimized for downloading. You cannot edit a Shockwave movie. You can only make changes to the original source file and save a new Shockwave movie.
A Director movie cannot be opened in a browser by itself. To make a Director movie appear in a browser, an HTML document must include certain tags (<OBJECT> and <EMBED>) along with parameters telling the browser where to find the movie file, the size of the movie, and so on.
To create a Shockwave movie:
1 Choose File > Save to save any changes.
Director cannot create a Shockwave movie unless you have saved all the changes in the open movie.
2 Choose File > Save as Shockwave Movie.
MyBanner.dcr appears as the default name.
Shockwave movies have a .dcr suffix. If you don’t enter the suffix, Director adds it automatically.
3 Choose a location for the Shockwave movie, and click OK.
Chapter 240

Finishing the project
If you were creating a banner for a real web page, at this stage you would probably create or edit an HTML document for the web page that contains the Shockwave movie.
After the HTML document is complete, you can use an FTP utility to transfer the HTML document and the Shockwave movie file to a web server location so the page and movie are accessible to the public.
While creating this simple banner, you’ve learned about some of Director’s most important features, including:
� Creating cast members
� Importing cast members
� Creating sprites
� Working in the Score
� Creating tweened animation
� Attaching behaviors
� Controlling streaming
� Creating a Shockwave movie
� Creating an HTML document to run a movie
To learn more, continue reading “Director basics: Overview” on page 43.
Tutorial 41