turtle art project guide.pdf - educator...
TRANSCRIPT

1
Turtle Art Grade: 5th & 6th
Turtle Art is free software that lets users design and draw using simple programming commands. Both an exercise in mathematical concepts and an outlet for creative expression, Turtle Art challenges students to think critically, while giving them room for play. At Lighthouse, we use Turtle Art to:
• Introduce students to basic programming.
• Explore geometric concepts like shapes, angles, and degrees.
• Discover the Cartesian coordinate system.
Download Turtle Art for free by visiting http://www.turtleart.org.
This guide offers a series of lessons for teaching basic programming and exploring mathematical concepts over a series of weeks using Turtle Art. While we invite you to customize the exercises to fit the needs of your class, the method for teaching these exercises is designed to give students ownership of their learning and help them with deep conceptualization, by giving minimal instruction. We encourage you to consider this method as you tailor the lessons to your needs.
For questions or comments, e-mail us at [email protected]

2
CLASS 1 & 2 I can use the basic keys of Turtle Art to draw a shape.
1. Establish class norms. (5 min) How should the computers be treated? When should students’
attentions be on their screens, and when should they be on the teacher?
2. Show students how they can drag and drop commands (called blocks) from the toolbar to the center of the screen in order to begin programming. They can also link blocks together to create a series (called a stack).
3. Limit students to five blocks: clear; forward; back; left; right. Challenge them to draw a square. Give students a chance to explore before giving them explicit instructions. (25 min)
4. Come back together as a group for discussion. What did everyone discover? Ask students what forward/back and right/left mean, and what the numbers associated with them determine. Have them demonstrate what they learned by physically walking out commands around the room. Students often make mistakes when using the right and left blocks, thinking they mean to move those directions, rather than merely turn those directions.
5. With this new guidance, give students another chance to draw a square. If students succeed with time to spare, challenge them to draw squares of different sizes.
6. If any students still struggle after one class period, continue with these basic exercises for the second class. Challenge students who are showing comprehension to draw triangles. Can they draw an equilateral triangle? How about an isosceles? Can they use what they have learned to draw a house?
TIPS • Give students limited directions. Come together to talk about what they have learned after they
have had a chance to discover on their own.
• We have students work in pairs, as an exercise in collaboration. One norm we set is for students to discuss problems and questions with their partners before asking for help from the teacher.
• Have students build a program with Turtle Art on the projector or white board.

3
CLASS 3 I can find shortcuts and be strategic in my programming.
1. Review the concepts learned in lessons one and two. Have students create definitions for the forward, back, left, right, and clear blocks. Ask them to explain what the numerical value associated with each block does, then ask for volunteers to walk out different paths at the front of the class.
2. Show students the question mark tool. This will help them learn on their own.
3. Tell students that today’s plan is to find a faster way to draw a square. Demonstrate how to use repeat to draw a shape. (Don’t use it to draw a square—otherwise students will simply copy you.)
4. Demonstrate my blocks (called subroutines), which allow users to define an entire stack as a new, single block (such as square).
5. Distribute computers. Let students practice using repeat and my blocks. Have them records the blocks they use, and what stacks and myblocks they are creating. If students are working in pairs, have one student record while the other programs, then switch halfway through.
6. Collect computers, then come together for discussion. Explain that what they are learning—repeating structures and subroutines—are the basics of programming.
TIPS • As students continue working
with Turtle Art, reward them with efficient programming. Designing a square with three commands shows better comprehension than designing the same square with fifteen commands.
4
CLASS 4 & 5 I can make shapes with exact areas and perimeters.
1. Without computers, give students perimeter and area problems to work on individually, then review these problems together. (15 min)
2. Challenge students to draw any polygon with an area of 100, using Turtle Art.
3. Challenge students to draw any polygon with an area of 200, using Turtle Art.
4. Challenge them to draw two polygons with the same perimeters, but different areas.
5. Challenge them to draw two polygons with the same areas, but different perimeters.
6. What is the biggest shape they can draw? What is the smallest?
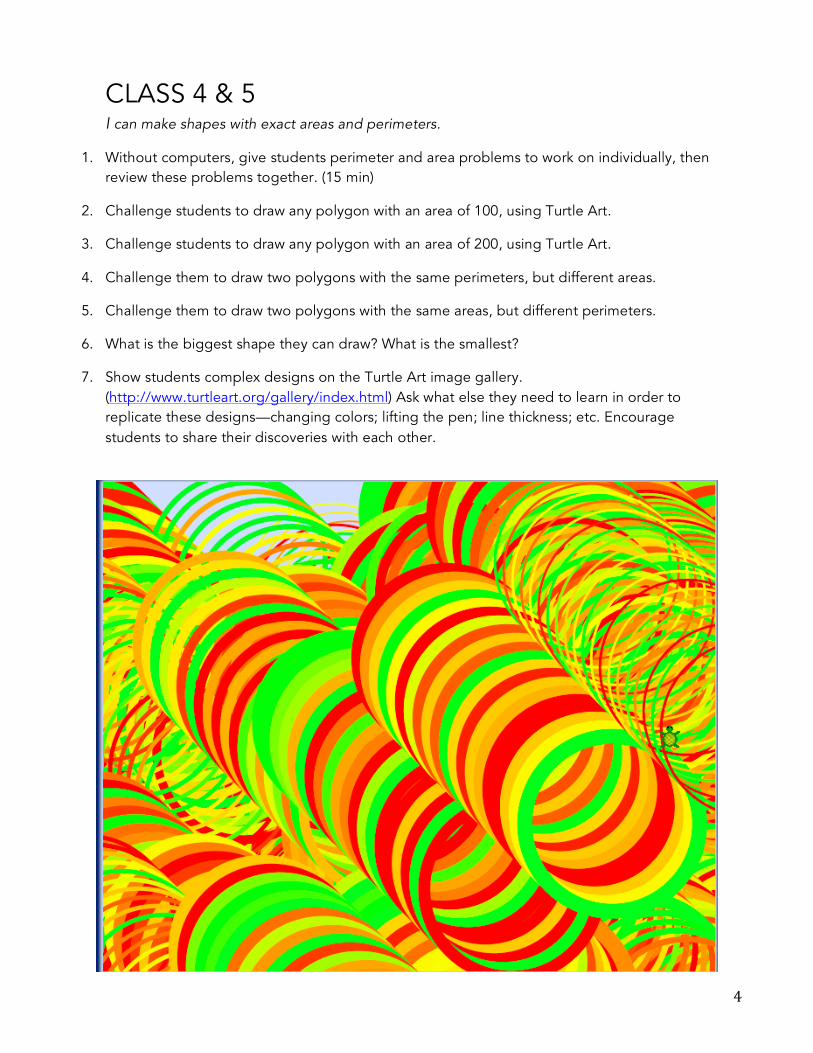
7. Show students complex designs on the Turtle Art image gallery. (http://www.turtleart.org/gallery/index.html) Ask what else they need to learn in order to replicate these designs—changing colors; lifting the pen; line thickness; etc. Encourage students to share their discoveries with each other.

5
CLASS 6 & 7 I can place shapes at different locations on the screen.
1. Use screenshots to review repeat with students.
2. Have students make a basic shape topped with a my block. (5 min)
3. Ask students how they could repeat their shape elsewhere on the screen. They often answer that you can click and drag the turtle to move it. Demonstrate this method, then ask them to explore the different Turtle Art tools to find alternatives. (15 min) Remind them of the question mark.
4. Come together as a group to discuss their discoveries. They will usually identify the setxy, seth, and pu/pd tools. Demonstrate of each of these, then explain that they will begin focusing on the setxy tool.
5. Challenge students to draw a shape in each corner of the screen; in a row/column.
6. Finish class discussion by asking what patterns students have started noticing. What happens when they change the turtle’s x and y-values?

6
CLASS 8 I can discover that the origin is x=0, y=0
1. Give students time to experiment moving the turtle by changing its x and y values. Challenge them to determine what values must be entered to “bring the turtle back to its starting place.” (10 min)
2. Project Turtle Art onto a white board. Challenge students to write a program that will have the turtle draw x and y-axes. Then ask them what values must be entered to bring the turtle back to center—0,0. Define the center as “the origin.”
3. Introduce students to their final project, so they can begin working on it:
FINAL PROJECT
Students choose one of the following:
• Design your ideal house, garden, or other space.
• Design a sports team logo.
• Draw an animal.
• Other teacher-approved ideas.
Have students turn in an outline of their intended program. If they don’t finish in class, assign it

7
CLASS 9 I can use the setxy block to repeat shapes at specific points.
1. As a warm-up, project Turtle Art onto a white board. Draw a point on the board, and ask students for input as to what they should change the x and y values to in order to move the turtle to that spot, revising their values as necessary. Label the x and y values.
2. On their own computers, have students draw shapes at:
a. X = 0, Y = 100
b. X = 0, Y = −100
c. X= 100, Y = 0
d. X= −100, Y=0
3. Challenge students to draw a shape in each of the four quadrants of the coordinate plane.
4. Introduce students to the + (plus) and – (minus) blocks. Show them how they can use these commands to change the turtle’s x and y values. Have them practice repeating shapes across their screen using these commands.
5. Pass back their outlines with feedback. Give remaining class time to work on their projects.

8
CLASS 10 Work on final project.
1. Have students experiment with the different color commands (set color; start fill; end fill…)
2. Dedicate the remainder of class to finishing their projects.
TIPS • Reward students for ambitious projects.
• Reward students for creativity.
• Reward students for efficient coding.