tractor-trailer - afstatic.e-publishing.af.mil/production/1/af_a4/publication/qtp24-3... ·...
TRANSCRIPT

DEPARTMENT OF THE AIR FORCE
Headquarters US Air Force
QTP24-3-B280
16 May 2017
Washington, D.C. 20330-1030
Tractor-Trailer
Vehicle Management Codes: 8199, B280, B313, B325, B327, B328, B352, B353,
B356, B360, B361, B363 – B365, B367 – B370, B375, B390, B401, B407, B409 –
B411, B415, B417, B418, B420, B421, B423, B426, B429, B442, B443, B447,
B458, C360, C366, C372, C379, C388, C395, C397, C410, C414, C415, C425,
C427, C437, D732, D740, D741, D742, E975, F353, F361, F380, F400, K363,
K365, K371, K376, K407, K411, K412, K429, K472 – K475, K477, K478, L363,
L370, L374, L376, L382, L385, L389, L390, L391, L398, L405, L410, L414,
L418 – L420, W204, W207, W212, W330, W400
QUALIFICATION TRAINING PACKAGE
Accessibility: Publications and forms are available on the e-publishing website at http://www.e-publishing.af.mil for downloading or ordering.
Realeasability: There are no releasability restrictions on this publication.

CONTENTS
SECTION 1—OVERVIEW ........................................................................................................................................ 3 1.1. Overview. ................................................................................................................................................................................................. 3
SECTION 2—RESPONSIBILITIES ......................................................................................................................... 4 2.1. Responsibilities. ....................................................................................................................................................................................... 4
SECTION 3—INTRODUCTION .............................................................................................................................. 5 3.1. Objectives. ............................................................................................................................................................................................... 5
3.2. Desired Learning Outcome. ................................................................................................................................................................... 5
3.3. Lesson Duration. ..................................................................................................................................................................................... 6
3.4. Instructional References. ........................................................................................................................................................................ 6
3.5. Instructional Training Aids and Equipment. ........................................................................................................................................ 7
SECTION 4—TRAINEE PREPARATION .............................................................................................................. 8 4.1. Licensing Requirements. ........................................................................................................................................................................ 8
4.2. Required Reading. .................................................................................................................................................................................. 8
SECTION 5—KNOWLEDGE LECTURE AND EVALUATION .......................................................................... 8 5.1. Knowledge Overview (Lecture).............................................................................................................................................................. 8
5.2. Overview of Training and Requirements. ............................................................................................................................................. 9
5.3. Tractor-Trailer Design Overview. ....................................................................................................................................................... 11
5.5. Vehicle Inspection. ................................................................................................................................................................................ 18
5.6. Combination Vehicle Inspection. ......................................................................................................................................................... 22
5.7. Coupling and Uncoupling. .................................................................................................................................................................... 23
5.8. Vehicle Safety and Equipment. ............................................................................................................................................................ 23
5.9. Driving Safety and Precautions. ........................................................................................................................................................... 24
5.10. Driving and Safety Precautions – Combination Vehicles. .................................................................................................................. 26
5.11. Miscellaneous Tractor-Trailer Vehicle Operations. ........................................................................................................................... 27
SECTION 6—TRAINER’S EXPLANATION AND DEMONSTRATION ......................................................... 29 6.1. Trainer’s Preparation. .......................................................................................................................................................................... 29
6.2. Safety Procedures and Equipment. ...................................................................................................................................................... 30
6.3. Trainer Operator Maintenance Demonstration. ................................................................................................................................ 31
6.4. Trainer Operation Demonstration. ...................................................................................................................................................... 31
SECTION 7—TRAINEE PERFORMANCE DEMONSTRATION AND PERFORMANCE TEST ................ 35 7.1. Trainee Performance Demonstration. ................................................................................................................................................. 35
7.2. Instructor’s Preparation. ...................................................................................................................................................................... 35
7.3. Safety Procedures and Equipment. ...................................................................................................................................................... 35
7.4. Trainee Vehicle (Pre-trip) Inspection. ................................................................................................................................................. 36
7.5. Trainee Operation Demonstration. ...................................................................................................................................................... 37
7.6. Performance Test Overview. ................................................................................................................................................................ 39
Attachment 1—GLOSSARY OF REFERENCES AND SUPPORTING INFORMATION 44
Attachment 2—VEHICLE INSPECTION GUIDE 46
Attachment 3—TRACTOR TRAILER PERFORMANCE TEST FRAMEWORK 47
Attachment 4—PERFORMANCE TEST GUIDE 54
Attachment 5—TRACTOR-TRAILER COUPLING/UNCOUPLING GUIDE 66
Attachment 6—SEVEN-STEP INSPECTION PROCESS 73

Section 1—OVERVIEW
1.1. Overview.
1.1.1. Send comments and suggested improvements on AF Form 847, Recommendation for
Change of Publication through Air Force Installation and Mission Support Center (AFIMSC)
functional managers via e-mail at [email protected].
1.1.2. How to use this plan:
1.1.2.1. Trainer.
1.1.2.1.1. Provide overview of training, Section 2 and Section 3.
1.1.2.1.2. Trainer’s lesson plan for trainee preparation, give classroom lecture,
Section 4.
1.1.2.1.3. Trainer’s lesson plan for knowledge lecture, Section 5 and the American
Association of Motor Vehicle Administrators (AAMVA) Commercial Driver’s
License (CDL) Manual.
1.1.2.1.4. Trainer’s lesson plan for air brakes, Section 5 and the AAMVA CDL
Manual.
1.1.2.1.5. Trainer’s lesson plan for demonstration, Section 6 and the AAMVA CDL
Manual.
1.1.2.1.6. Trainer’s lesson plan for performance and evaluation, Section 7.
1.1.2.2. Trainee.
1.1.2.2.1. Reads this entire lesson plan and the AAMVA CDL Manual prior to
starting lecture.
1.1.2.2.2. Follows along with lecture using this lesson plan, its attachments and the
AAMVA CDL Manual.
1.1.2.2.3. Trainees assigned to an installation identified by AF/A4LR that have
transitioned to the AAMVA model, will:
1.1.2.2.3.1. Complete written tests developed and administered in accordance with
(IAW) Air Force Instruction (AFI) 24-301, Vehicle Operations.

1.1.2.2.3.2. Take the Air Force Performance Test (following completion of
required written test(s)) consisting of three parts: Vehicle Inspection Test
(including air brakes system check and coupling/uncoupling demonstration), Basic
Control Skills Test and Road Test.
1.1.2.2.4. Trainees assigned to an installation that has not transitioned to the AAMVA
model, will:
1.1.2.2.4.1. Complete written tests developed and administered in accordance with
(IAW) Air Force Instruction (AFI) 24-301, Vehicle Operations.
1.1.2.2.4.2. Complete the performance test developed and administered by
Training, Validation and Operations (TVO) staff IAW AFI 24-301.
1.1.2.2.4.2.1. Attachment 3 provides the minimum requirements to be
evaluated during the performance test.
Section 2—RESPONSIBILITIES
2.1. Responsibilities.
2.1.1. The trainee shall:
2.1.1.1. Ensure the trainer explains the Air Force Qualification Training Package
(AFQTP) process and the trainee’s responsibilities.
2.1.1.2. Review the Tractor-Trailer Lesson Plan with the trainer.
2.1.1.3. Review the AAMVA CDL Manual with the trainer.
2.1.1.4. Ask questions if he/she does not understand the objectives for each unit.
2.1.1.5. Complete training hours recommended for the tractor-trailer.
2.1.1.6. Take the required written test(s) and performance test for the tractor-trailer.
2.1.2. Trainer shall:
2.1.2.1. Review this AFQTP and the AAMVA CDL Manual with the trainee.
2.1.2.2. Conduct knowledge training with the trainee using the Tractor-Trailer Lesson
Plan and the AAMVA CDL Manual.
2.1.2.3. Conduct performance task explanation and demonstration using the Tractor-
Trailer Lesson Plan and the AAMVA CDL Manual.

2.1.2.4. Answer questions for the trainee to ensure the required task knowledge has been
gained to complete the task.
2.1.2.5. Coordinate with the trainee and vehicle control officer/vehicle control non
commissioned officer (VCO/VCNCO) to schedule the required written test(s) and
performance test.
2.1.2.6. Document and sign-off the task(s) in Training Business Area (TBA) On-the-Job
Training (OJT) records for 2T1X1 personnel. For all installation personnel, this
information will be documented on a TVO log.
2.1.3. The Examiner shall:
2.1.3.1. Provide certification support IAW AFI 24-301 and AFQTP 24-3-200, TVO
Examiner’s Guide.
Note: Certification for the tractor-trailer will only be conducted by trained TVO Examiners.
Members with a valid Class A CDL and Hazardous Materials endorsement do not require further
TVO certification to be licensed on the tractor-trailer.
Section 3—INTRODUCTION
3.1. Objectives.
3.1.1. Given lectures, demonstrations, hands-on driving sessions, trainees will be able to:
3.1.1.1. Achieve an 80% or higher on all written test(s).
3.1.1.2. Complete all components of the performance test with zero instructor assists and
a passing score.
3.1.2. Ensure the trainee becomes qualified in the maintenance and operation of the air brake
system, an operator who has the knowledge and skills to operate the air brake system in a safe
and professional manner.
3.1.3. Ensure the trainee becomes trained and qualified as a tractor-trailer operator; an operator
who has the knowledge and skills for safe and professional tractor-trailer operation and
preventative maintenance of various tractor-trailers.
3.1.4. Ensure the trainee is able to safely uncouple/couple the tractor-trailer.
3.2. Desired Learning Outcome.
3.2.1. Understand the purpose of the tractor-trailer and its role in the mission.
3.2.2. Be able to safely and proficiently operate the air brake system.

3.2.3. Know the proper operator maintenance procedures of the tractor-trailer, IAW applicable
manufacturer’s operator’s manual, the seven-step inspection process and the vehicle inspection
guide.
3.2.4. Know, understand and safely demonstrate the steps for coupling/uncoupling the trailer.
3.2.5. Understand the safety precautions to be followed pre-, during-, and post-operation of
the tractor-trailer and the air brake system.
3.2.6. Be able to safely and proficiently operate the tractor-trailer.
3.3. Lesson Duration.
3.3.1. Recommended instructional and hands on training time is 89.25 hours:
Figure 3.1. Recommended Training Time for Training Activities.
Training Activity Training Time
Trainee’s Preparation 10 Hours
Instructor’s Lecture 20 Hours
Trainee’s Written Evaluation 5 Hours
Instructor’s Demonstration 10 Hours
Trainee’s Personal Experience (to build
confidence and proficiency)
Perform Operator Maintenance
Operate the Vehicle
40 Hours
Trainee’s Performance Evaluation 4.25 Hours
3.4. Instructional References.
3.4.1. AFI 24-301.
3.4.2. Air Force Manual (AFMAN) 24-306, Operation of Air Force Government Motor
Vehicles, Chapters 1-5 and 7-12.
3.4.3. Tractor-Trailer Lesson Plan.

3.4.4. AAMVA CDL Manual. Contact the TVO Section to obtain a copy.
Note: The material found in this lesson plan was written using resources developed by AAMVA,
including AAMVA’s CDL Manual, in order to provide all Air Force tractor-trailer operators with
content in-line with the standards of knowledge equivalent to national standards met by Class A
CDL holders. It has been expanded upon and modified to address the mission and standards
required by the Department of Defense (DoD) and the United States Air Force.
3.4.5. Risk Management (RM) and Safety Principles IAW Air Force Pamphlet 90-803, Risk
Management (RM) Guidelines and Tools.
3.4.6. Applicable Technical Orders (TOs) or manufacturer’s operator’s manual (see Vehicle
Management for TO number for vehicle being used in training).
3.4.7. Hazardous Materials Lesson Plan.
3.4.8. Pintle Hook Lesson Plan.
3.4.9. Code of Federal Regulations (CFR), Title 49—Transportation, Subtitle B—Other
Regulations Relating to Transportation (Continued), Chapter III—Federal Motor Carrier
Safety Administration (FMCSA), Department of Transportation (DOT), Parts 300-399; on-
line at http://www.access.gpo.gov/nara/cfr/cfr-table-search.html.
3.4.10. United States Department of Transportation, Federal Motor Carrier Safety
Administration; on-line at http://www.fmcsa.dot.gov/index.htm.
3.4.11. AAMVA website; on-line at http://www.aamva.org/.
3.5. Instructional Training Aids and Equipment.
3.5.1. Tractor-Trailer Lesson Plan.
3.5.2. Hazardous Materials Lesson Plan.
3.5.3. Pintle Hook Lesson Plan.
3.5.4. AAMVA CDL Manual.
3.5.5. Tractor-Trailer.
Note: If available, the trainee will train and be evaluated on a tractor-trailer equipped with manual
transmission.
3.5.6. Applicable TO or manufacturer’s operators manual.
3.5.7. Suitable training area.
3.5.8. Traffic cones.
Section 4—TRAINEE PREPARATION
4.1. Licensing Requirements.
4.1.1. Trainee must have in his/her possession a valid state driver’s license.
4.1.2. AF Form 171 IAW AFI 24-301.
4.1.3. Applicable local licensing jurisdiction requirements.
4.2. Required Reading.
4.2.1. Tractor-Trailer Lesson Plan.
4.2.2. AAMVA’s CDL Manual.
4.2.3. Hazardous Materials Lesson Plan.
4.2.4. Pintle Hook Lesson Plan.
4.2.5. AFMAN 24-306, Chapters 1-5 and 7-12.
4.2.6. Manufacturer’s operator’s manual and applicable TOs for the vehicle being trained on.
Section 5—KNOWLEDGE LECTURE AND EVALUATION
5.1. Knowledge Overview (Lecture).
5.1.1. Trainees will pass the required written test(s), with a minimum score of 80%, IAW AFI
24-301 prior to taking the performance test for the tractor-trailer.
5.1.1.1. Written tests will be developed using this vehicle lesson plan and the AAMVA
CDL Manual as source documents.
5.1.1.2. The trainer will schedule the trainee’s written test(s) through the VCO/VCNCO.
5.1.1.3. Trainees who fail the written test(s), will be rescheduled to accomplish the test(s)
following remedial training at the discretion and approval of the VCNCO and trainer.
Note: Refer to AFI 24-301 and local SOP for remediation and retake policy.

5.2. Overview of Training and Requirements.
5.2.1. Training objectives:
5.2.1.1. Given lectures, demonstrations, hands-on driving sessions, trainees will be able
to:
5.2.1.1.1. Achieve an 80% or higher on all written tests.
5.2.1.1.2. Complete all components of the performance test with zero instructor assists
and a passing score.
5.2.1.1.3. Ensure the trainee becomes trained and qualified as a tractor-trailer operator;
an operator who has the knowledge and skills for safe and professional tractor-trailer
operation and preventative maintenance of various tractor-trailers.
5.2.1.1.4. Ensure the trainee becomes qualified in the maintenance and operation of
the air brake system, an operator who has the knowledge and skills to operate the air
brake system in a safe and professional manner.
5.2.2. Desired learning outcome:
5.2.2.1. Understand the purpose of the tractor-trailer and its role in the mission.
5.2.2.2. Be able to safely and proficiently operate the air brake system.
5.2.2.3. Know the proper operator maintenance procedures of the tractor-trailer, IAW
applicable manufacturer’s operator’s manual, the seven-step inspection process and the
vehicle inspection guide.
5.2.2.4. Understand the safety precautions to be followed pre-, during-, and post-operation
of the tractor-trailer and the air brake system.
5.2.2.5. Know, understand and safely demonstrate the steps for coupling/uncoupling the
trailer.
5.2.2.6. Be able to safely and proficiently operate the tractor-trailer.
5.2.3. CDL Overview.
5.2.3.1. Military members are not required to obtain a CDL IAW 49 CFR Part 383.3.
“Each State must exempt from the requirements of this part individuals who operate commercial
motor vehicles (CMVs) for military purposes. This exception is applicable to active duty military
personnel; members of the military reserves; member of the national guard on active duty,
including personnel on full-time national guard duty, personnel on part-time national guard
training, and national guard military technicians (civilians who are required to wear military
uniforms); and active duty U.S. Coast Guard personnel. This exception is not applicable to U.S.
Reserve technicians.”
5.2.3.2. The Air Force is, however, required to develop and provide training meeting or
exceeding national requirements for CMV operation IAW Department of Defense Manual
(DoDM) 4500.36, Acquisition, Management, and Use of DoD Non-Tactical Vehicles,
Appendix 1 to Enclosure 5, paragraph 4a:
“The DoD Components will prescribe licensing requirements for its military and civilian drivers
that meet or exceed the minimum national requirements issued by the Secretary of Transportation”
5.2.3.3. Federal Motor Carrier Safety Administration (FMCSA), under the Department
of Transportation (DOT), serves as the administrator for CDL requirements.
5.2.3.3.1. AAMVA, on behalf of FMCSA, develops, provides and maintains the
minimum national standards through its CDL Test System model, standards and
resources IAW the Code of Federal Regulations (CFR) and the Commercial Motor
Vehicle Safety Act of 1986.
5.2.3.3.2. CDL knowledge requirements include:
5.2.3.3.2.1. Safe operations regulations. Motor vehicle inspection, repair, and
maintenance; safe vehicle operations procedures (proper visual search methods,
appropriate use of signals, speed control for weather and traffic conditions, safe
lane changing and turning); effects of fatigue, poor vision, hearing, and general
health, alcohol and drug use upon safe CMV operation; types of motor vehicles and
cargo subject to the requirements.
5.2.3.3.2.2. Basic vehicle control skills. Ability to start, to stop, and to move the
vehicle forward and backward in a safe manner.
5.2.3.3.2.3. Proper use of CMV safety control systems. Lights, horns, side and
rear-view mirrors, mirror adjustments, fire extinguishers, symptoms of improper
operation revealed through instruments, motor vehicle operation characteristics,
and diagnosing malfunctions. Knowledge on the correct procedures needed to use
these safety systems in an emergency situation, e.g., skids and loss of brakes.

5.2.3.3.2.4. Air brake equipped. IAW DoT standards and the AAMVA model
CDL program, the Air Force requires additional training and evaluation to operate
a CMV with air brakes (See Section 5).
5.2.3.3.2.5. Transportation of Hazardous Materials endorsement requires
additional knowledge and skill sets in accordance with AAMVA requirements.
Note: For information on the knowledge and skill sets required for the AF vehicle
operator transporting hazardous material, see AFMAN 24-306, the Hazardous
Materials Lesson Plan and the AAMVA CDL Manual.
5.3. Tractor-Trailer Design Overview.
5.3.1. Tractor-trailer design. A tractor-trailer, also referred to as an 18-wheeler, semi, semi-
trailer, or big rig, is a vehicle designed to carry cargo. Refer to the manufacturer’s operator’s
manual for additional information on the tractor-trailer being operated, and to the data plate
for safe load capacity guidance. The tractor-trailer normally can be identified by the following
characteristics:
5.3.1.1. Total of 5 axles/18 wheels.
5.3.1.1.1. Tractor (typically) 3 axles: One front (“steer” axle); 2 rear (“drive” axles)
with a pair of dual wheels on each side. Most tractor configurations have 10 wheels.
5.3.1.1.2. Trailer (typically) has 2 axles: 2 rear with a pair of dual wheels on each
side, or 8 wheels on the trailer.
5.3.1.2. Total length 50 to 70 feet.
5.3.1.3. Typical weight limit 80,000 lbs.
5.3.1.4. Common components.
5.3.1.4.1. Air brakes.
5.3.1.4.2. Coupling device “5th wheel” (allows easy hook up and release of semi-
trailer).
5.3.2. Common types of trailers.
5.3.2.1. 25- and 40-foot low-bed trailer (25 ton). This trailer is used primarily as a regular
flatbed trailer. The operator will need to know:

5.3.2.1.1. Tiedown points/ loops location on the side of the trailer (5) and how to attach
a chain to each side to increase tiedown locations and the location of the storage bins.
If the tiedown locations do not match up with the tiedown locations of the cargo, the
operator may also to run chains down the side of the trailer and secure the chain using
a binder.
5.3.2.1.2. Storage compartments location on the top of the gooseneck. They may be
used to store chains, binders and straps. Cargo should not be loaded on the gooseneck
for any reason.
5.3.2.1.3. The height of the cargo and how it relates to the maximum height allowed
in the area.
5.3.2.2. 32-foot van trailer. This trailer is primarily used for small non-palletized cargo,
sensitive equipment, mail, and cargo that is weather sensitive.
5.3.2.2.1. Rear doors.
5.3.2.2.1.1. Two securing rods that run the height of the doors.
5.3.2.2.1.2. Two door latches top and bottom of each door (securing rod locks into
latches). The securing rod must be inserted into both door latches before pushing
and lowering the door handle.
5.3.2.2.1.3. The driver side door must be closed before the passenger side door in
order to shut and lock the doors. They are closed when moving.
5.3.2.2.1.4. Open carefully, cargo may shift en route.
5.3.2.2.2. Height of trailer. While moving and loading cargo, watch for overhead and
side clearance. Never load cargo on the top of a trailer. While transporting cargo, be
alert for any object that protrudes from the side of the road or overhead (branches,
electrical lines, signal lights, etc.).
5.3.2.2.3. Stabilizing arms. Two stabilizing arms are mounted to stabilize the trailer
when being loaded without a tractor being attached to the trailer.
5.3.2.2.3.1. Lowering stabilizing arms. Remove the cotter pins and lower the arms.
When the arms reach the ground, place the cotter pins back into their original place.
Note: If stabilizing arms are not lowered and secured, the trailer could nose dive
and cause serious injury and damage.
5.3.2.2.4. Vent panels. Located on both the front side and each rear door of the trailer.
Open when transporting cargo over long distances or in hot weather.

5.3.2.2.5. Tie-down points inside the van trailer. Located every five feet on the floor,
or running up the side of each wall.
5.3.2.2.6. Clearance lights. Mounted at all four corners and midway down each side.
5.3.2.3. 40-foot tri-axle flatbed trailer. The major difference between this trailer and
regular flatbeds is that it is designed to haul heavier loads and ox carts.
5.3.2.3.1. Height of the trailer and cargo cannot exceed legal limits
5.3.2.3.2. May be equipped with side rails (raise side rails to carry small, loose loaded
items)
5.3.2.3.3. Three axles to accommodate heavy cargo that exceed that of a regular
tandem axle trailer.
5.3.2.3.4. The third axle affects the turning radius. When the trailer makes sharp turns
it wears on the tires. If the trailer is loaded, sharp turns could snap the axle or blow a
tire due to the skidding effect.
5.3.2.4. 32-foot Kentucky trailer. This trailer is used primarily as a regular flatbed trailer
but is mounted with side rails. The operator will need to know:
5.3.2.4.1. Side rails. May be removed by securing to the front wall with straps in order
to haul larger cargo item. To install the rails, place all of the stabilizing posts in the
slots, slide the rails between the posts from top to bottom, and ensure both sides of the
rails are inserted in the rail guides on each post.
5.3.2.4.2. Storage compartments. Mounted on the bottom of the bed and used to store
chains, binders and straps. The compartment must be secured to the trailer and the door
must be secured shut by shutting the latch and installing the safety pin.
5.3.2.4.3. Front wall. (Approximately 3-feet high mounted, non-removable.) Rails
will be secured to this wall, when not installed; small cargo can be loaded on the bed
and strapped against the wall.
5.3.2.4.4. Height of the trailer and cargo will not exceed legal limits
5.3.2.4.5. Blind spots are concerns due to the mounted rails on the front of the bed.
The largest blind spot is on the passenger side almost parallel with the fifth wheel, and
on the driver’s side just behind the cab.
5.3.2.5. 40-foot Rollerized Trailer. This trailer is used to transport 463L pallets ONLY.
5.3.2.5.1. Five 463L pallets may be loaded at a time. Ensure the rear-loading ramp is
in the raised position. This trailer can be loaded via forklift or K-loader ONLY.
5.3.2.5.2. Rollerized bed. There are three rows of rollers that run the entire length.
Ensure that rollers are secure, lubricated and all sections are flush. Between the rows
of rollers there are two paths for footing to push the pallets. Note: NEVER walk on
the rollers, ensure the trailer bed is clear prior to pushing a pallet down the roller
surface, and never load rolling stock onto the trailer.
5.3.2.5.3. Guide rails. Mounted on both sides of the trailer by “L” brackets. Used to
direct pallets in a straight line to the front of the trailers. Pallets may only be loaded
from the rear.
5.3.2.5.4. Lashing rings/small “D” rings. Mounted to the top of the guide rails and
held in place by two small bolts. These rings are used for securing tarpaulins over
cargo only. Note: Do not use these rings for securing cargo.
5.3.2.5.5. Lashing rings/large “D” rings. Mounted to the side of the frame running
under the bed, there are five large “D” rings that run the length of the trailer on each
side. These rings are the anchoring devices for securing cargo, rated at 10,000 lbs (data
plates give the maximum weight limitations on each section of the trailer). Each pallet
must be secured to large “D” ring on BOTH sides of the trailer. Married pallets must
have a minimum of 4 securing devices.
5.3.2.5.6. Securing cargo. In order to secure cargo on the 40-foot rollerized trailer:
5.3.2.5.6.1. Get a pallet count, and attach as many securing devices as possible to
the large D rings on each side of the trailer. (Load from the rear and push all the
way to the front of the trailer.).
5.3.2.5.6.2. Once the pallet is against the back of the gooseneck, quickly attach a
safety chain to hold it in place until securing devices can be attached properly.
5.3.2.5.6.3. Attach the securing device on the pallet, ratchet end of the strap to the
pallet. Pull the pallet toward the front of the trailer to where it is secured up against
the rear of the gooseneck. (Repeat on the other side of the pallet.).
5.3.2.5.6.4. If more than one pallet is being transported, push the second pallet all
the way up to the rear of the first pallet. Attach the safety chain fist and then use
the securing devices the same way as previously mentioned.
5.3.2.5.6.5. When unloading pallets: Leave one securing device attached to the
pallet; after forklift or K-loader is in place to receive the pallet at the end of the
trailer and the path of travel is clear; then unfasten.
Note: Cargo compartments are located on top of the gooseneck. The lids of the compartment are
extremely heavy. Safety awareness is key; be aware of hand and foot placement and wet surfaces.

5.3.2.5.7. Loading ramp. This is attached to the rear of the trailer and has a hydraulic
lift installed. Adjust the height of the ramp as needed to load or unload cargo. The
ramp can be raised by closing the release valve on the hydraulic unit located on the
driver side, near the rear of the guide rails. Remove the two safety pins in the support
arms and grab the handle of the hydraulic unit, located below the release valve, and
pump the system until the ramp lift is set to the desired height. Once the ramp is at the
desired height, install the pins back into the support arms.
5.3.2.6. Tilt trailer (22 tons). This trailer is primarily used to move vehicles and equipment
(i.e. forklifts, dozers, etc.) that are not designed for traveling over long stretches of
roadways.
5.3.2.6.1. Loading procedures.
5.3.2.6.1.1. Release latch(es) of tilt trailer located in the middle of the trailer.
5.3.2.6.1.2. Lower trailer ramps (if equipped).
5.3.2.6.1.3. With engine running, align equipment with the rear of the trailer.
5.3.2.6.1.4. Raise attachments high enough to clear rear of trailer.
5.3.2.6.1.5. Using a spotter (See AFMAN 24-306), slowly drive the vehicle or
equipment up onto the trailer, making sure it is centered.
5.3.2.6.1.6. Before reaching the back of the trailer, the bed will tilt back forward.
5.3.2.6.1.7. Lower attachments and set parking brake.
5.3.2.6.1.8. Stop engine.
5.3.2.6.1.9. Secure the piece of equipment to the trailer with chains and binders,
along with blocking and bracing the vehicle. Note: Be sure that the tilt latch is in
the secured position.

5.4. Air Brakes.
5.4.1. Safe operation of a tractor-trailer with an air brake system.
5.4.1.1. Safe operation of a CMV with an air brake system, requires knowledge of: Air
Brake System nomenclature; the dangers of contaminated air supply; implications of low
air pressure readings; procedures to conduct safe and accurate pre-trip inspections;
procedures for conducting en route and post-trip inspections of air actuated brake systems
(ability to detect defects, which may cause the system to fail).
Note: See the AAMVA CDL Manual for detailed, testable information on the Air Brake System
needed to operate the Air Brake System.
5.4.1.2. The operator will be required to inspect the Air Brake System as a part of the
performance test and as a part of the walk-around inspection, for daily operations, once
licensed on the vehicle. When inspecting air brakes, the following are added items to be
included in Step 2 “Engine Compartment Checks”, Step 5 “Walk-Around Inspecting”, and
Step 7 “Final Air Brake Check” of the Seven-Step Inspection Process. See Attachment 6.
Note: If any of the below tests fail, the trainee must report them to the VCO/VCNCO, the
supervisor and/or vehicle maintenance.
Figure 5.5. Air Brakes Inspection.
Additional Steps for Inspecting Air Brakes
Step Procedure
2. Engine Compartment Checks Check air compressor drive belt condition and
tightness (if compressor is belt driven).
5. Walk-Around Inspecting Check manual slack adjusters on S-cam
brakes. Note: Vehicles with automatic slack
adjustors still must be checked.
o Park on level ground and chock the wheels.
o Release the parking brakes in order to move
the slack adjusters.
o Use gloves and pull hard on each slack
adjuster that can be reached.
o Check slack adjuster, more than 1-inch
indicates adjustments required (vehicles with
too much brake slack can be very hard to stop).
Adjust it or have it adjusted.
Check brake drums (or discs), linings, and
hoses.
7. Final Air Brake Check Test low pressure warning signal.
o Shut the engine off when the vehicle has
enough air pressure so that the low pressure
warning signal is not on.

o Turn the electrical power on.
o Step on and off the brake pedal to reduce air
tank pressure.
o Low air pressure warning signal should come
on before the pressure drops to less than 60 psi
in the air tank with lowest pressure.
Check that the spring brakes come on
automatically.
o Chock the wheels.
o Release the parking brakes when enough air
pressure is built up.
o Shut the engine off.
o Step on and off the brake pedal to reduce the
air tank pressure.
o "Parking brake" knob should pop out when the
air pressure falls to the manufacturer's
specification.
Check rate of air pressure buildup
o Refer to manufacturer’s recommendation for
average buildup time.
o If not within recommended time, the air
pressure may drop too low during driving
operations.
Test air leakage rate.
o With a fully-charged air system (typically 125
psi).
o Turn-off the engine.
o Release the service brake and time the air
pressure drop.
o The loss rate should be less than 2 psi in one
minute for single vehicles.
o Not less than 3 psi in 1 minute for combination
vehicles.
Then apply 90 psi or more with the brake
pedal.
o After the initial pressure drop, if the air
pressure falls more than 3 psi in 1 minute for
single vehicles.
o Not more than 4 psi for combination vehicles.
Check air compressor governor cut-in and cut-
out pressures.
o Air compressor should start at about 100 psi
and stop at about 125 psi.
o Run the engine at a fast idle.
o Air governor should cut-out the air compressor
at about the manufacturer's specified pressure.

o Engine idling, step on and off brake to reduce
air tank pressure.
o Compressor should cut-in at manufacturer's
specified cut-in pressure.
o Test parking brake: Stop the vehicle; put the
parking brake on; gently pull against it in low
gear to determine if parking brake will hold.
Test service brakes.
Wait for normal air pressure.
Release the parking brake.
Move the vehicle forward slowly (about 5
mph).
Apply the brakes firmly using the brake pedal.
Note any vehicle "pulling" to one side, unusual
feel, or delayed stopping action.
5.5. Vehicle Inspection.
Note: If discrepancies are found the operator must report them to the VCO/VCNCO, the
supervisor, and/or vehicle maintenance.
5.5.1. The performance test will include an air brakes system check (See Section 5.4.), a
vehicle and air brakes component inspection, and a coupling/uncoupling test (See Section
5.6.).
5.5.2. Training tools and documentation.
5.5.2.1. Use Attachment 2, the Tractor-Trailer Vehicle Inspection Memory Aid, as a
walk-around guide.
Note: During the performance test, the trainee will be permitted to use Attachment 2.
5.5.2.2. A Seven-Step Inspection Method. The seven-step inspection method will help
ensure the inspection is the same each time it is conducted, and that nothing is left out. See
Attachment 6.
Note: The trainee will NOT be permitted to use the Seven-Step Inspection Method guide
(Attachment 6) during the performance test.
5.5.2.3. AF Form 1800. During inspection, fill out and sign the AF Form 1800,
Operator’s Inspection Guide and Trouble Report. If repairs are needed, follow the base
policy on repairs, and/or request a replacement tractor-trailer to accomplish the scheduled
run.

Note: The trainee will NOT fill out an AF Form 1800 during the AF Performance Test. The AF
Form 1800 will be used for the performance test at installations that have not transitioned to the
AAMVA model. It will also be used during daily operations.
5.5.2.4. SF 91 and DD Form 518. The operator should verify Standard Form (SF) 91,
Motor Vehicle Accident Report and Department of Defense (DD) Form 518, Accident
Identification Card are on-hand.
5.5.3. Pre-operation inspection (pre-trip inspection) – find items/problems that could cause
accident or breakdown.
Note: If discrepancies are found the operator must report them to the VCO/VCNCO, the
supervisor, and/or vehicle maintenance.
5.5.3.1. Locate and verbally identify air brake operating controls and monitoring devices.
5.5.3.2. Determine the motor vehicle’s brake system condition for proper adjustments and
that air system connections between motor vehicles have been properly made and secured.
5.5.3.3. Inspect the low pressure warning device(s) to ensure that they will activate in
emergency situations; ascertain, with the engine running, that the system maintains an
adequate supply of compressed air.
5.5.3.4. Determine that required minimum air pressure build up time is within acceptable
limits and that required alarms and emergency devices automatically deactivate at the
proper pressure level.
5.5.3.5. Operationally check the brake system for proper performance.
5.5.4. During-operation.
5.5.4.1. Brake and electrical connections to trailer.
5.5.4.2. Trailer coupling devices.
5.5.4.3. Cargo securement devices.
5.5.4.4. Cargo protection covers (tarps).
5.5.5. Post-trip inspection and report.
5.5.5.1. Ensure vehicle and components are cleaned.
5.5.5.2. Equipment is properly stowed.
5.5.5.3. Refueled.

5.5.5.4. Parked.
5.5.5.5. Apply brakes.
5.5.5.6. Place transmission in neutral (park for an automatic).
5.5.5.7. Drain air tanks.
Figure 5.1. What to Look for During an Inspection.
What to Look for During an Inspection
Inspection Location Problem
Tires
Too much or too little air pressure.
Bad wear (see TO 36-1-191 for proper tread
depth).
No fabric should show through the tread or
sidewall.
Cuts or other damage.
Tread separation.
Dual tires that come in contact with each other or
other parts of the vehicle.
Mismatched sizes.
Radial and bias-ply tires used together.
Cut or cracked valve stems.
Wheels and Rims
Damaged rims.
Rust around wheel nuts; may mean the nuts are
loose—check tightness.
Note: After a tire has been changed, stop a short
while later and re-check tightness of nuts.
Missing clamps, spacers, studs, or lugs; means
danger, mismatched, bent, or cracked lock rings
are dangerous.
Wheels or rims that have had welding repairs are
not safe.
Large rocks stuck between wheels.
Bad Brake Drums Cracked drums.
Shoes or pads with oil, grease, or brake fluid on
them.

Shoes worn dangerously thin, missing, or
broken.
Steering System Defects
Missing nuts, bolts, cotter keys, or other parts.
Bent, loose, or broken parts, such as steering
column.
Steering gear box, or tie rods.
(If power steering equipped) Hoses, pumps, and
fluid level.
Check for leaks.
Steering wheel play of more than 10 degrees
(approximately 2-inches movement at the rim of
a 20-inch steering wheel) can make it hard to
steer.
Suspension System Defects
Spring hangers.
Cracked or broken spring hangers.
Missing or broken leaves in any leaf spring,
Broken leaves that have shifted.
Leaking shock absorbers.
Torque rod or arm, u-bolts, spring hangers, or
other axle positioning parts.
Air suspension systems that are damaged and/or
leaking.
Any loose, cracked, broken, or missing frame
members.
Exhaust System Defects
Loose, broken, or missing exhaust pipes,
mufflers, tailpipes, or vertical stacks.
Loose, broken, or missing mounting brackets,
clamps, bolts, or nuts.
Exhaust system parts rubbing against fuel system
parts, tires, or other moving parts of vehicle.
Exhaust system parts that are leaking.
Emergency Equipment
Fire extinguishers. Note: Additional external
fire extinguishers will be required to transport
some hazardous materials.
Spare electrical fuses (unless equipped with
circuit breakers).
Warning devices for parked vehicles.
Spare tire, jack and lug wrench.

Cargo (Trucks)
Not overloaded.
Cargo is balanced and secured before each trip.
HAZMAT (Properly labeled and vehicle
placarded/Proper paperwork/Properly placarded,
if required).
5.6. Combination Vehicle Inspection.
5.6.1. In addition to the Seven-Step Inspection Method (See Attachment 6), the following
items need to be included in Step 5 “Walk-Around Inspecting.” See Figure 5.2.
Figure 5.2. Additional Steps for Inspecting Combination Vehicles.
Additional Steps for Inspecting Combination Vehicles
Step Procedure
5. Walk-Around Inspecting Coupling system areas:
Check fifth wheel (lower).
Securely mounted to frame.
No missing, damaged parts.
Enough grease.
No visible space between upper and lower fifth wheel.
Locking jaws around the shank, not the head of
kingpin.
Release arm properly seated and safety latch/lock
engaged.
Fifth wheel (upper).
o Glide plate securely mounted to trailer frame.
o Kingpin not damaged Air and electric lines to trailer.
o Electrical cord firmly plugged in and secured.
Air lines properly connected to glad hands, no air
leaks, properly secured with enough slack for turns.
o All lines free from damage.
Sliding fifth wheel.
o Slide not damaged or parts missing.
o Properly greased.
o All locking pins present and locked in place.
o If air powered -- no air leaks.
o Check that fifth wheel is not so far forward that tractor
frame will hit landing gear or the cab hit the trailer,
during turns.
Landing gear:
Fully raised, no missing parts, not bent or otherwise
damaged.
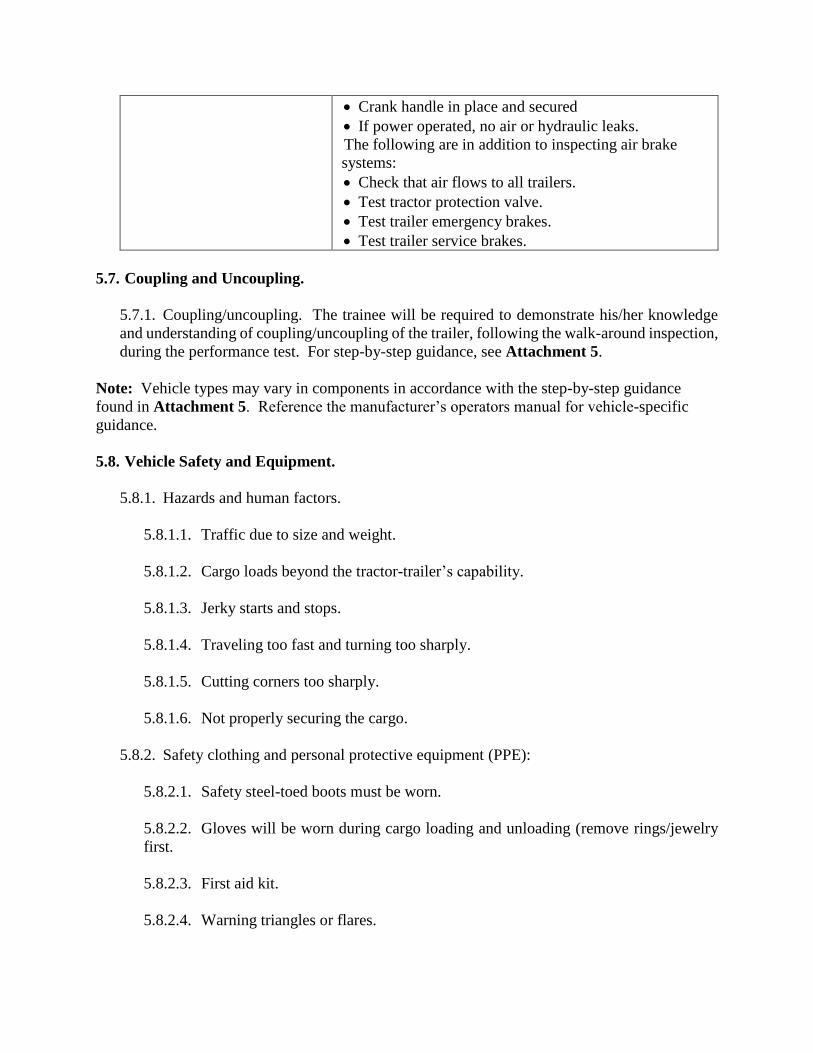
Crank handle in place and secured
If power operated, no air or hydraulic leaks.
The following are in addition to inspecting air brake
systems:
Check that air flows to all trailers.
Test tractor protection valve.
Test trailer emergency brakes.
Test trailer service brakes.
5.7. Coupling and Uncoupling.
5.7.1. Coupling/uncoupling. The trainee will be required to demonstrate his/her knowledge
and understanding of coupling/uncoupling of the trailer, following the walk-around inspection,
during the performance test. For step-by-step guidance, see Attachment 5.
Note: Vehicle types may vary in components in accordance with the step-by-step guidance
found in Attachment 5. Reference the manufacturer’s operators manual for vehicle-specific
guidance.
5.8. Vehicle Safety and Equipment.
5.8.1. Hazards and human factors.
5.8.1.1. Traffic due to size and weight.
5.8.1.2. Cargo loads beyond the tractor-trailer’s capability.
5.8.1.3. Jerky starts and stops.
5.8.1.4. Traveling too fast and turning too sharply.
5.8.1.5. Cutting corners too sharply.
5.8.1.6. Not properly securing the cargo.
5.8.2. Safety clothing and personal protective equipment (PPE):
5.8.2.1. Safety steel-toed boots must be worn.
5.8.2.2. Gloves will be worn during cargo loading and unloading (remove rings/jewelry
first.
5.8.2.3. First aid kit.
5.8.2.4. Warning triangles or flares.

5.8.2.5. Hearing protection, if required.
5.8.2.6. Coveralls.
5.8.2.7. Inclement weather gear, etc.
5.8.3. AF Form 1800. A separate AF Form 1800 will be used for the tractor and the trailer,
respectively.
Note: For day-to-day operations and normal use, the AF Form 1800 will be used to document any
discrepancies found during the vehicle pre-inspection, during-use inspection and post-operation
inspection.
5.9. Driving Safety and Precautions.
5.9.1. Right turns.
5.9.1.1. Turn slowly, gives the operator and others more time to avoid problems.
5.9.1.2. Make the right turn without swinging into another lane.
5.9.1.3. Prevents vehicles passing on the right.
5.9.1.4. If the trainee must cross into the oncoming lane to make a turn: Watch for vehicles
coming toward the vehicle; give them room to go by; stop; do not back up for them.
5.9.2. Left turns.
5.9.2.1. Ensure the vehicle has reached the center of intersection before starting the left
turn.
5.9.2.2. If two left turn lanes, take the right-hand lane.
5.9.3. Space needed to cross or enter traffic.
5.9.3.1. Slow acceleration and the space large vehicles require.
5.9.3.2. Acceleration varies with the load.
5.9.4. Mountain driving.
5.9.4.1. Select a "safe" speed, consider these items:
5.9.4.2. Total weight of vehicle and cargo.
5.9.4.3. Length of grade.

5.9.4.4. Steepness of grade.
5.9.4.5. Road conditions.
5.9.4.6. Weather.
5.9.4.7. Select proper gear before starting down grade.
5.9.4.7.1. Do not attempt to downshift after the vehicle’s speed has already increased.
5.9.4.7.2. Use lower gears going down a hill than would be required to go up the hill.
5.9.4.8. Brake fading or failure.
5.9.4.8.1. Excessive heat caused by overuse.
5.9.4.8.2. Brake adjustment must be checked frequently.
5.9.4.9. Proper braking technique.
5.9.4.9.1. Apply the brakes just hard enough to feel a definite slowdown.
5.9.4.9.2. When the vehicle’s speed has been reduced to approximately 5 MPH below
the "safe" speed, release the brakes.
5.9.4.9.3. When the vehicle’s speed has increased to the "safe" speed, repeat steps 1
and 2.
5.9.4.10. Escape ramps.
5.9.4.10.1. Know escape ramp locations on the route.
5.9.4.10.2. Use them if the vehicle’s brakes are lost.
5.9.5. A skid happens whenever the tires lose their grip on the road.
5.9.5.1. Over-braking.
5.9.5.2. Over-steering.
5.9.5.3. Over-acceleration.
5.9.5.4. Driving too fast.
5.9.5.5. Correcting a drive-wheel braking skid.

5.9.5.5.1. Stop braking.
5.9.5.5.2. Turn quickly.
5.9.5.5.3. Counter steer.
5.9.5.6. Front-wheel skids.
5.9.5.6.1. To stop the skid is to let the vehicle slow down.
5.9.5.6.2. Slow down as quickly as possible without skidding.
5.10. Driving and Safety Precautions – Combination Vehicles.
5.10.1. Rollover risks and prevention:
5.10.1.1. Keep the cargo as close to the ground as possible.
5.10.1.2. Drive slowly around turns, corners, and on-/off-ramps.
5.10.1.3. Avoid quick lane changes, especially when fully loaded.
5.10.1.4. Trucks with trailers can have a dangerous effect caused by rearward
amplification, where the trailer can swing out, then swing back. Steer gently and smoothly,
follow far enough behind other vehicles, look far enough down the road to avoid being
surprised, at night, drive slowly enough to see obstacles with the headlights, slow down to
a safe speed before going into a turn.
5.10.1.5. Brake early. Combination vehicles take longer to stop when empty. Allow lots
of following distance. Look ahead in order to brake early.
5.10.1.6. Prevent trailer skids. Recognize the skid, when braking, check trailer to ensure
it is going straight. Stop using the brake. Release the brakes to get traction back. Do not
use trailer hand brake to "straighten out the rig".
5.10.1.7. Turn wide. Off tracking, rear wheels follow a different path. Steer front end
wide enough around corners so rear will clear. Keep the rear of the vehicle close to curb.
Stops other drivers from passing the vehicle on the right. This may require a turn into
oncoming lane; watch for oncoming traffic. This may have to wait until oncoming lane is
clear.
5.10.2. Combination vehicle air brakes. See Section 5.4. and the AAMVA CDL Manual for
additional information on air brakes for single vehicles and combination vehicles.

5.11. Miscellaneous Tractor-Trailer Vehicle Operations.
5.11.1. Over-the-road operations.
5.11.1.1. When starting off in the tractor-trailer combination, ensure that the trailer brakes
are not locked up and that the tires are turning freely.
5.11.1.2. The added weight of the trailer and the equipment being hauled will affect the
power of the tractor and the distances required stopping.
5.11.1.3. Know the height of the trailer and equipment being hauled. Avoid low bridges
and underpasses.
5.11.2. Unloading procedures.
5.11.2.1. Remove chains, binders, and blocking and bracing from vehicle or equipment
being hauled.
5.11.2.2. Unlatch tilt trailer locking pin(s). Note: Failure to unlatch tilt trailer locking pin
will cause damage to trailer.
5.11.2.3. Lower trailer ramps (if equipped).
5.11.2.4. Start vehicle or equipment and release parking brake.
5.11.2.5. Raise any attachment(s) resting on the trailer deck.
5.11.2.6. Using a spotter, slowly start backing off the trailer. Moving backwards, the
vehicle will come to a pivot point where the trailer will start to tilt back. At that point apply
the brakes and let the trailer continue to tilt back until it rests on the ground.
5.11.2.7. Continue backing off, the operator may need raise attachments so they will clear
the trailer.
5.11.2.8. Once the vehicle or equipment is off the trailer, the bed will tilt back to its normal
position.
5.11.2.9. Ensure the tilt lock latches.
5.11.3. Winches (if equipped).
5.11.3.1. Winch cables (also called wire ropes). Immediately have damaged cables
replaced, failure to do so can result in cable backlash, which may cause injury or death.
The following are items to look for:
5.11.3.1.1. Properly lubricated.

5.11.3.1.2. No frays or cuts in cable (See Figure 5.3.).
5.11.3.1.3. Has not been crushed.
5.11.3.1.4. No kinks.
5.11.3.1.5. No bird caging. The twisting of the wire rope in an isolated area in the
opposite direction of the rope lay, causing it to take on a bird cage appearance.
5.11.3.1.6. Properly wound on the cable spool.
5.11.3.1.6.1. Cable fastening devices. Need to ensure they are properly installed
and securely fastened. Two most common types of fasteners are the U-bolt wire
clip and compression sleeve (see Figure 5.4.).
5.11.3.1.6.1.1. The U-bolt wire clips have a correct and incorrect way of being
fastened to the cable (see Figure 5.5.). The saddle of the clip rests against the
``live'' portion of the wire rope while the U-bolt rests on the short end of the
cable (also called the “dead” portion of the cable). Using clips improperly
severely weakens the connection, making it unsafe. A good way to remember
if fastened correctly is “never saddle a dead horse”.
Figure 5.3. Cable Frays and Cuts.

Figure 5.4. Cable U-bolt Wire Clip and Compression Sleeve.
Figure 5.5. Correct and Incorrect Methods for U-bolt Wire Clips.
5.11.4. Additional items.
5.11.4.1. Flightline rules and regulations (when applicable). Refer to AFMAN 24-306,
AFI 13-213 and local flightline procedures.
5.11.4.2. Fire extinguisher training. Tractor-trailers are equipped with fire extinguishers
and training is required annually. The supervisor or Squadron VCO will schedule training
according to local policy. The fire extinguisher itself must be inspected to ensure current
inspection date, ensure needle is positioned in the green and ensure it is securely mounted.
5.11.4.3. Workplace policies and procedures. Understand local policies and procedures
in regards to tractor-trailer operations. At a temporary duty location, take the time to learn
the specific policies and procedures for the location.
Section 6—TRAINER’S EXPLANATION AND DEMONSTRATION
6.1. Trainer’s Preparation.
6.1.1. Establish a training location.
6.1.2. Obtain appropriate vehicle operator’s manual.
6.1.3. Schedule/reserve a vehicle.

6.1.4. Ensure trainee completes AF Form 171.
6.2. Safety Procedures and Equipment.
6.2.1. The following safety items should be followed by both the instructor and trainee.
6.2.1.1. Chock wheel (if required) when tractor-trailer is parked.
6.2.1.2. Remove all jewelry and identification tags.
6.2.1.3. PPE and equipment items.
6.2.1.3.1. Safety steel-toed boots must be worn.
6.2.1.3.2. Gloves will be worn during cargo loading and unloading.
6.2.1.3.3. First aid kit.
6.2.1.3.4. Warning triangles.
6.2.1.3.5. Coveralls, if required.
6.2.1.3.6. Inclement weather gear, if required.
6.2.1.3.7. Reflective belt, if required.
6.2.1.3.8. Hearing protection, if required.
6.2.1.4. Walk-around vehicle to become familiar and to familiarize the trainee with all
warning labels and signs.
6.2.1.5. Ensure trainee wears seat belt.
6.2.1.6. Properly adjust driver’s seat and all mirrors.
6.2.1.7. Throughout demonstration, practice tractor-trailer safety.
6.2.1.8. Use three points-of-contact when entering/exiting the vehicle.
6.2.2. Practice basic AF Risk Management (RM) process during demonstration:
6.2.2.1. Identify hazards.
6.2.2.2. Assess hazards.
6.2.2.3. Develop controls and make decisions.

6.2.2.4. Implement controls.
6.2.2.5. Supervise and evaluate.
6.3. Trainer Operator Maintenance Demonstration.
6.3.1. With trainee, accomplish vehicle inspection. Document the inspection on an AF Form
1800. The vehicle inspection will follow the seven-step method as described in Attachment
6. An inspection guide/memory aid (Attachment 2) can be used to ensure all areas of the
tractor-trailer are covered. The trainee will be able to utilize Attachment 2 during the
performance test. If desired, the TVO examiner will provide the trainee with a clean copy at
the time of the performance test.
6.4. Trainer Operation Demonstration.
6.4.1. Demonstration overview. The trainer will spend time demonstrating the following
material to assist the trainee in becoming a proficient tractor-trailer operator. The trainee will
NOT be evaluated on the entirety of the material below during the performance test. See
Section 7, Attachment 3 and Attachment 4 for a description of testable performance test
components. Throughout demonstration:
6.4.1.1. Allow for questions.
6.4.1.2. Repeat demonstrations as needed.
6.4.2. For designated tractor-trailers, within the training area, demonstrate and explain the
following. Note: Use information contained on the data plate and/or the operator’s manual:
6.4.2.1. Tractor-trailer capacities.
6.4.2.2. Explain parking brake as they apply to tractor-trailer being used.
6.4.2.3. Tractor-trailer controls.
6.4.2.3.1. Shifting pattern.
6.4.2.3.2. Overdrive.
6.4.2.3.3. Mechanical fifth wheel controls.
6.4.2.4. Point out the items to be inspected during operations.
6.4.2.4.1. Instruments.
6.4.2.4.2. Air pressure gauge (if the vehicle has air brakes).

6.4.2.4.3. Temperature gauges.
6.4.2.4.4. Pressure gauges.
6.4.2.4.5. Ammeter/voltmeter.
6.4.2.4.6. Mirrors.
6.4.2.4.7. Tires.
6.4.2.4.8. Cargo, cargo covers.
6.4.3. Demonstrate tractor-trailer coupling/uncoupling. See Attachment 5.
6.4.4. Demonstrate the following tractor-trailer operations (See Attachment 4).
6.4.4.1. Forward stop (see following example for boundary setup).
6.4.4.1.1. Drive forward between the two rows.
6.4.4.1.2. Bring vehicles to a complete stop as close to the boundary.
Figure 6.1. Forward Stop.
6.4.4.2. Backing.
6.4.4.2.1. Straight line backing. Back vehicle in a straight line between two rows.
6.4.4.2.1.1. Bring vehicle to a complete stop as close to the boundary.

6.4.4.2.1.2. Always use a spotter when backing. The operator must maintain visual
contact with the spotter at all times. If visual contact is lost, the operator must
immediately stop the vehicle.
6.4.4.2.1.3. See AFMAN 24-306 for additional information on spotter safety and
standard AF spotter hand signals.
Figure 6.2. Straight Line Backing.
6.4.4.2.2. Offset back – Left.
6.4.4.2.3. Offset back – Right.
6.4.4.2.4. Sight Side parallel parking (operator’s side).
6.4.4.2.4.1. Drive past the parking space on the left.
6.4.4.2.4.2. Back rear of vehicle as close as possible to the rear of the space without
crossing side or rear boundaries.
6.4.4.2.5. Conventional parallel parking.
6.4.4.2.5.1. Drive past the parking space on the right.
6.4.4.2.5.2. Back rear of vehicle as close as possible to the rear of the space without
crossing side or rear boundaries.
6.4.4.2.6. Alley dock (see following example for boundary setup).
6.4.4.2.6.1. Sight-side back the vehicle into an alley.
6.4.4.2.6.2. Bring the rear of vehicle as close as possible to the rear of the alley
without going beyond the exercise boundary.

Figure 6.3. Alley Dock.
6.4.5. Demonstrate securing cargo. Note: While it is impossible to demonstrate all types of
cargo, it is important that the trainee has a basic understanding of how they might secure the
following types of cargo.
6.4.5.1. Rolling stock.
6.4.5.2. 463L pallets.
6.4.5.3. Lose cargo.
6.4.6. With tractor and trailer, demonstrate driving on a road course.
6.4.6.1. Turns (Left/Right).
6.4.6.2. Intersections.
6.4.6.3. Urban/rural straight.
6.4.6.4. Expressway.
6.4.6.5. Start/stop.
6.4.6.6. Curves (Left/Right).
6.4.6.7. Upgrades.
6.4.6.8. Downgrades.
6.4.6.9. Railroad crossing/simulated railroad crossing.
6.4.6.10. Bridge/overpass.
6.4.7. Show trainee the post-operation inspection and report. Fill out an AF Form 1800.

6.4.7.1. Ensure vehicle is cleaned.
6.4.7.2. Cargo straps and chains are properly stowed.
6.4.7.3. Refuel vehicle.
6.4.7.4. Park.
6.4.7.4.1. Apply brakes.
6.4.7.4.2. Place transmission in neutral (park on an automatic).
6.4.7.5. Follow manufacturer’s operator’s manual shutdown procedures.
6.4.7.6. Drain air tanks.
6.4.8. Conclude by allowing time for questions and any requested re-demonstrations.
Section 7—TRAINEE PERFORMANCE DEMONSTRATION AND PERFORMANCE
TEST
7.1. Trainee Performance Demonstration.
7.1.1. Following the trainer demonstration, the trainee will accomplish the required behind-
the-wheel time. The trainer will evaluate the proficiency of the trainee for the objectives found
in Section 7, and can use the tractor-trailer performance test framework checklist in
Attachment 3 as a guide for what to expect for the performance test.
7.2. Instructor’s Preparation.
7.2.1. Establish a training location.
7.2.2. Obtain appropriate manufacturer’s operator’s manual.
7.2.3. Schedule/reserve a vehicle.
7.2.3.1. If available, use a tractor-trailer equipped with manual transmission.
7.2.4. Ensure trainee completes AF Form 171.
7.3. Safety Procedures and Equipment.
7.3.1. The following safety items should be followed by the trainee and trainer:
7.3.1.1. Chock wheel (if required) when tractor-trailer is parked.

7.3.1.2. Remove all jewelry and identification tags.
7.3.1.3. PPE items.
7.3.1.3.1. Safety steel-toed boots must be worn.
7.3.1.3.2. Reflective belt, if required.
7.3.1.3.3. Hearing protection, if required.
7.3.1.3.4. First aid kit.
7.3.1.3.5. Warning triangles.
7.3.1.3.6. Inclement weather gear, if required.
7.3.1.4. Ensure operator and passenger wear seatbelt.
7.3.1.5. Properly adjust operator’s seat and all mirrors.
7.3.1.6. Throughout demonstration, practice tractor-trailer safety.
7.3.1.7. Keep loads and passenger capacity within the rated capacity of the tractor-trailer.
7.3.1.8. Practice basic AF RM process during demonstration:
7.3.1.8.1. Identify hazards.
7.3.1.8.2. Assess hazards.
7.3.1.8.3. Develop controls and make decisions.
7.3.1.8.4. Implement controls.
7.3.1.8.5. Supervise and evaluate.
7.4. Trainee Vehicle (Pre-trip) Inspection.
7.4.1. Have the trainee accomplish the vehicle inspection. The trainee will document the
inspection on an AF Form 1800. The vehicle inspection will follow the seven-step method
found in Attachment 6. An inspection guide/memory aid (Attachment 2) can be used to
ensure all areas of the tractor-trailer are covered.

7.4.1.1. The trainee will be able to utilize Attachment 2 during the performance test. If
desired, the TVO Examiner will provide the trainee with a clean copy at the time of the
performance test.
7.4.1.2. Before beginning the walk-around vehicle inspection, the trainee will demonstrate
an air brake system check. The steps to complete the air brake system check are identified
in Attachment 6.
7.4.2. Following the walk-around vehicle inspection, the trainee will demonstrate the ability
to couple/uncouple a tractor-trailer. He/she will follow the steps for coupling/uncoupling as
described in Attachment 5.
7.5. Trainee Operation Demonstration.
7.5.1. Demonstration overview. The trainee will demonstrate the following material to gain
experience in becoming a proficient tractor-trailer operator.
7.5.1.1. Allow for questions during trainee demonstration.
7.5.1.2. Have the trainee repeat objectives, as needed.
7.5.2. The trainee will demonstrate and explain the following for the tractor-trailer being
operated. Note: Use information contained on the vehicle data plate and/or the operator’s
manual:
7.5.2.1. Tractor-trailer capacities.
7.5.2.2. Explain parking brake as they apply to tractor-trailer being used.
7.5.2.3. Tractor-trailer controls.
7.5.3. The trainee will demonstrate the following tractor-trailer operations. See Attachment
4 for additional guidance:
7.5.3.1. Backing. (Use a spotter when backing).
7.5.3.1.1. Straight line backing.
7.5.3.1.2. Offset back – Left.
7.5.3.1.3. Offset back – Right.
7.5.3.2. Alley dock.
7.5.3.3. Sight Side parallel parking (operator’s side).

7.5.3.4. Conventional parallel parking.
7.5.4. With tractor-trailer, trainee will demonstrate driving on a road course:
7.5.4.1. Turns (Left/Right).
7.5.4.2. Intersections.
7.5.4.3. Urban/rural straight.
7.5.4.4. Expressway.
7.5.4.5. Start/stop.
7.5.4.6. Curves (Left/Right).
7.5.4.7. Upgrades.
7.5.4.8. Downgrades.
7.5.4.9. Railroad crossing/simulated railroad crossing.
7.5.4.10. Bridge/overpass.
7.5.5. Trainee will perform the post-operation inspection and report:
7.5.5.1. Walk-around inspection. Fill out AF Form 1800.
7.5.5.2. Ensure vehicle is clean.
7.5.5.3. Cargo straps and chains are properly stowed.
7.5.5.4. Ensure vehicle is refueled.
7.5.5.5. Park.
7.5.5.5.1. Apply brakes.
7.5.5.5.2. Place transmission in neutral (park on an automatic).
7.5.5.6. Follow manufacturer’s operator’s manual for shutdown procedures.
7.5.5.7. Drain air tanks (if applicable).
7.5.6. Conclude the trainee demonstration by allowing time for questions.

7.6. Performance Test Overview.
7.6.1. The examiner provided by the Vehicle Operations Element TVO activity will administer
the performance test for the tractor-trailer IAW AFI 24-301 and AFQTP 24-3-200.
7.6.1.1. The performance test, administered by the TVO Examiner, (in addition to the
required written test(s)) is the only official evaluation used to license the individual on the
tractor-trailer.
7.6.1.2. The trainer will ensure that the trainee is familiar with the components and
structure of the test, the items being evaluated and the minimum standards needed to pass
the exam.
7.6.1.3. The trainee must first pass required written test(s). See Section 5 for additional
information.
7.6.1.4. The trainee will accomplish the performance test using a tractor-trailer with
manual transmission. Note: In the event that the trainee is unable complete the
performance test using a tractor-trailer with manual transmission, he/she will receive a
license restriction notating a limitation to operate only automatic transmission-equipped
tractor-trailers.
7.6.2. In order to be licensed on the tractor-trailer:
7.6.2.1. Trainees assigned to an installation that has not transitioned to the AAMVA
model will successfully accomplish the performance test developed and administered by
TVO staff, IAW AFI 24-301. Note: The performance test will be developed, by the TVO
staff using this lesson plan and will include, at a minimum, evaluation of the checklist
found in Attachment 3.
7.6.2.2. Trainees assigned to an installation that has transitioned to the AAMVA model
will successfully accomplish the Air Force Performance Test administered by a TVO
Examiner IAW AFI 24-301 and AFQTP 24-3-200.
7.6.3. The Air Force Performance Test, for installations using the AAMVA model, consists of
three parts: The Vehicle Inspection Test, Basic Control Skills Test and the Road Test.
7.6.3.1. Vehicle Inspection Test. The trainee will be tested to see if he/she knows whether
the vehicle is safe to drive. The trainee will walk around the vehicle and point to or touch
each item and explain to the examiner what he/she is inspecting and why.
7.6.3.1.1. The Vehicle Inspection Test includes an air brakes system check, a walk-
around inspection, an in-cab inspection, and a coupling/uncoupling demonstration. See
Attachment 4 of this AFQTP and Section 11 of the AAMVA CDL Manual for
additional guidance.

7.6.3.1.2. The trainee is permitted to use the tractor-trailer vehicle inspection memory
aid (Attachment 2) during the Air Force Performance Test. The examiner will provide
a clean copy.
7.6.3.1.3. The trainee does not need to accomplish an AF Form 1800 during the Air
Force Performance Test.
7.6.3.1.4. Automatic failures. Automatic failures will result in the immediate
termination of the Performance Test. See Attachment 4 for a list of automatic
failures applicable to the Air Force Performance Test, Vehicle Inspection Test.
7.6.3.1.4.1. If the trainee fails the Vehicle Inspection Test, the remainder of the test
will be terminated. Retraining and re-examination will be conducted IAW AFI 24-
301 and AFQTP 24-3-200.
7.6.3.1.4.2. If a trainee fails any component of the Air Force Performance Test,
he/she will be required to retake the Air Force Performance Test, in its entirety.
7.6.3.2. Basic Control Skills Test. The trainee will be tested on his/her skill to control the
vehicle. The trainee will be asked to move the vehicle forward, backward, and turn it with
a defined area. These areas may be marked with traffic lanes, cones, barriers or something
similar. The examiner will explain how to complete each control test. See Attachment 4
of this AFQTP and Section 12 of the AAMVA CDL Manual for additional guidance and
for descriptions of the required maneuvers.
7.6.3.2.1. Required Basic Control Skills Test maneuvers:
7.6.3.2.1.1. Straight line backing.
7.6.3.2.1.2. Offset back/right or offset back left.
7.6.3.2.1.3. Parallel park (operator side), parallel park (conventional) or alley
dock.
7.6.3.2.2. Basic Control Skills Test Scoring.
7.6.3.2.2.1. Encroachments. The examiner will score the number of times that the
trainee touches or crosses over an exercise boundary line or cone with any portion
of the vehicle. Each encroachment will count as an error.
7.6.3.2.2.2. Pull-ups. When an operator stops and pulls forward to clear an
encroachment or to get a better position, it is scored as a pull-up. Stopping without
changing directions does not count as a pull-up. The trainee will not be penalized
for initial pull-ups. However, an excessive number of pull-ups, will count as errors.

7.6.3.2.2.3. Outside vehicle observations (Looks). The trainee may be permitted
to safely stop and exit the vehicle to check the external position of the vehicle
(look). When doing so, the trainee must place the vehicle in neutral and set the
parking brake(s). If exiting the vehicle, the trainee must do so safely by facing the
vehicle and maintaining three points of contact with the vehicle at all times. If the
trainee does not safely secure the vehicle or safely exit the vehicle may result in an
automatic failure of the basic control skills test.
7.6.3.2.2.3.1. The maximum number of times that the trainee may look to check
the position of the vehicle is two (2) except for the Straight Line Backing
exercise, which allows one look. Each time the operator opens the door, moves
from a seated position where in physical control of the vehicle, it is scored as a
“look”.
7.6.3.2.2.4. Final position/inside parallel. It is important that the trainee finish
each exercise exactly as the examiner has instructed. If the trainee does not
maneuver the vehicle into its final position as described by the examiner, the trainee
will be penalized and could fail the basic skills test.
7.6.3.2.3. Automatic failures. Automatic failures will result in the immediate
termination of the Air Force Performance Test. See Attachment 4 for a list of
automatic failures applicable to the Basic Control Skills Test. If a trainee fails any
component of the Air Force Performance Test, he/she will be required to retake the Air
Force Performance Test, in its entirety.
7.6.3.3. Road Test. The trainee will be tested on his/her skill to safely operate the vehicle
in a variety of traffic situations. The situations will include left and right turns,
intersections, railroad crossings, curves, up and down grades, single and multi-lane roads,
streets and highways. The examiner will tell the trainee where to drive.
7.6.3.3.1. The following maneuvers will be demonstrated on the on the road test (See
Section 13 of the AAMVA CDL Manual and Attachment 4 of this AFQTP for
additional guidance and detailed descriptions of each maneuver):
7.6.3.3.1.1. Turns (Left/Right).
7.6.3.3.1.2. Intersections.
7.6.3.3.1.3. Urban/rural straight.
7.6.3.3.1.4. Expressway.
7.6.3.3.1.5. Start/stop.
7.6.3.3.1.6. Curves (Left/Right).

7.6.3.3.1.7. Upgrades.
7.6.3.3.1.8. Downgrades.
7.6.3.3.1.9. Railroad crossing/simulated railroad crossing.
7.6.3.3.1.10. Bridge/overpass.
7.6.3.3.2. Road Test scoring. For detailed descriptions and scoring expectations of
each maneuver, see the Section 13 of the AAMVA CDL Manual and Attachment 4
of this lesson plan.
7.6.3.3.3. Automatic failures. Automatic failures will result in the immediate
termination of the Air Force Performance Test. See Attachment 4 for a list of
automatic failures applicable to the Road Test. If a trainee fails any component of the
Air Force Performance Test, he/she will be required to retake the Air Force
Performance Test, in its entirety.
7.6.4. During the performance test, the examiner will:
7.6.4.1. Ensure safety at all times. Note: Stop training when safety items are violated.
Proceed only when the trainee fully understands how to avoid repeating the safety
infraction(s).
7.6.4.1.1. Chock wheel (if required) when tractor-trailer is parked.
7.6.4.1.2. Remove all jewelry and identification tags.
7.6.4.1.3. Personal protective equipment and safety equipment.
7.6.4.1.4. First aid kit.
7.6.4.1.5. Warning triangles.
7.6.4.1.6. Inclement weather gear, etc.
7.6.4.2. Pay particular attention to the cautions and warnings listed in the operator's
manual.
7.6.4.3. Ensure trainee wears seat belt.
7.6.4.4. Ensure operator’s seat and all mirrors are properly adjusted.
7.6.4.5. Follow tractor-trailer safety items/procedures.
7.6.4.6. Ensure the operator is aware of driving situations he/she is to perform.

7.6.4.7. Conduct during/after-action reviews with the trainee (demonstration may need to
be re-accomplished).

Attachment 1
GLOSSARY OF REFERENCES AND SUPPORTING INFORMATION
References
AFI 24-301, Vehicle Operations, 5 May 2016
AFI 13-213, Airfield Driving, 1 June 2011
AFMAN 24-306, Operation of Air Force Government Motor Vehicles, 9 December 2016
AFPAM 90-803, Risk Management (RM) Guidelines and Tools, 11 February 2013
AFQTP 24-3-200, Training, Validation and Operations Examiner’s Manual, 1 April 2017
AAMVA, Commercial Driver’s License (CDL) Manual
Title 49 CFR Parts 300-399, Federal Motor Carriers, 23 August 2013
DoDM 4500.36, Acquisition, Management, and Use of DoD Non-Tactical Vehicles, 7 July 2015
Adopted Forms
AF Form 171, Request for Driver’s Training and Addition to U.S. Government Drivers, 15 March
2011
AF Form 847, Recommendation for Change of Publication, 22 September 2009
AF Form 1800, Operator’s Inspection Guide and Trouble Report, 1 April 2010
DD Form 518, Accident Identification Card, October 1978
SF 91, Motor Vehicle Accident Report, February 2004
Abbreviations and Acronyms
AAMVA—American Association of Motor Vehicle Administrators
ABS—Antilock Brake System
AFI—Air Force Instruction
AFIMSC—Air Force Installation Mission and Support Center
AFMAN—Air Force Manual
AFQTP—Air Force Qualification Training Plan
CDL—Commercial Driver’s License
CFR—Code of Federal Regulations
CMV—Commercial Motor Vehicle
DoD—Department of Defense
DoDM—Department of Defense Manual
DOT—Department of Transportation

FMSCA—Federal Motor Carrier Safety Administration
FMCSR—Federal Motor Carrier Safety Regulation
GMV—Government Motor Vehicle
GVWR—Gross Vehicle Weight Rating
HAZMAT—Hazardous Materials
IAW—In Accordance With
MPH—Miles per Hour
PSI—Pounds per Square Inch
RM—Risk Management
TBA—Training Business Area
TDY—Temporary Duty
TO—Technical Order
TVO—Training Validation and Operations
USAF—United States Air Force
VCNCO—Vehicle Control Non Commissioned Officer
VCO—Vehicle Control Officer
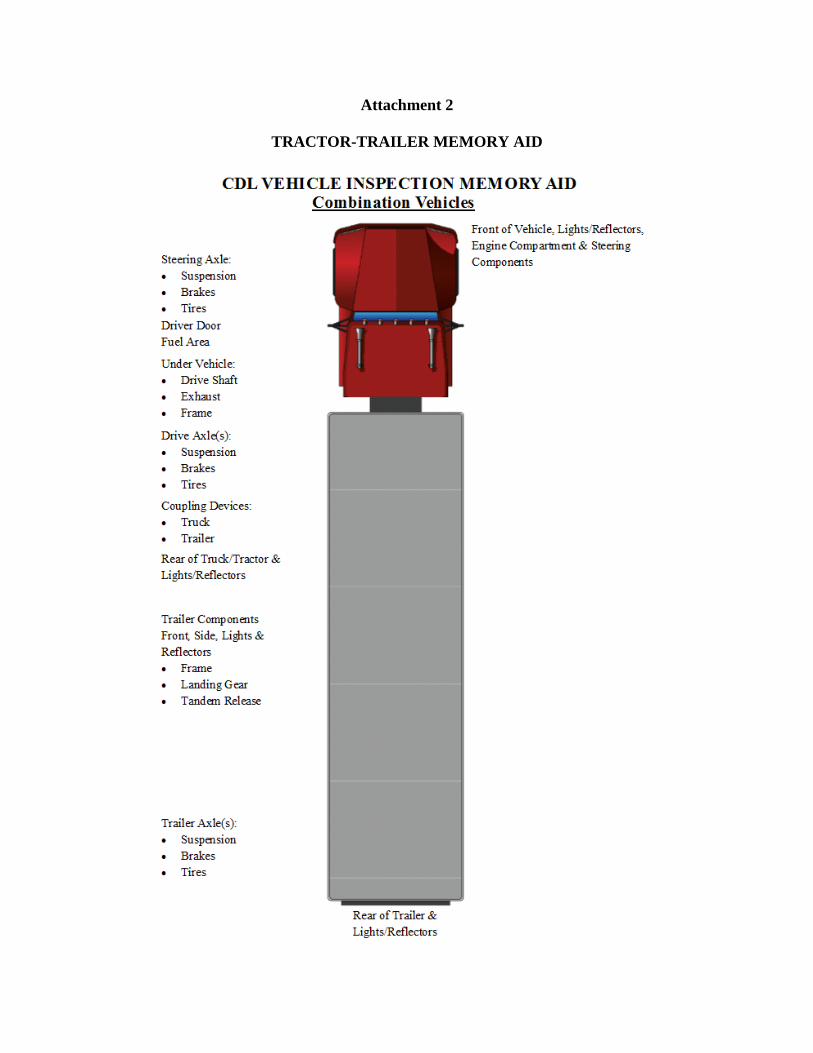
Attachment 2
TRACTOR-TRAILER MEMORY AID

Attachment 3
TRACTOR-TRAILER PERFORMANCE TEST FRAMEWORK
A3.1. Desired Learning Outcome.
A3.1.1. Understand the purpose of the tractor-trailer and its role in the mission.
A3.1.2. Be able to safely and proficiently operate the air brake system.
A3.1.3. Know the proper operator maintenance procedures of the tractor-trailer, IAW
applicable manufacturer’s operator’s manual, the seven-step inspection process and the
vehicle inspection guide.
A3.1.4. Understand the safety precautions to be followed pre-, during-, and post-operation
of the tractor-trailer and the air brake system.
A3.1.5. Know, understand and safely demonstrate the steps for coupling/uncoupling the
trailer.
A3.1.6. Be able to safely and proficiently operate the tractor-trailer.
Note: This checklist serves to provide the minimum requirements to TVO staff for developing
the required performance test for installations that have not transitioned to the AAMVA model.
The performance test, administered by the TVO Examiner, (in addition to the required written
test(s)) is the only official evaluation used to license the individual on the tractor-trailer. This
checklist also is a training tool intended to assist the trainer in preparing the trainee for being
evaluated and licensed to operate the tractor-trailer through the Air Force Performance Test
administered by the TVO Examiner.
A3.2. Instructions. Before beginning the tractor-trailer performance test, the examiner will brief
the trainee on the scenario that he/she will need to accomplish. The trainee will be given additional
directions and instructions as needed as he/she proceeds through the scenario.
A3.3. Scoring.
A3.3.1. The examiner will be scoring the trainee on tractor-trailer operations and also the
general safe driving practices. The examiner will give directions and instructions to the
trainee in sufficient time for him/her to execute a driving maneuver. The trainee will not be
asked to drive in an unsafe manner.
A3.3.2. The examiner will be making various marks on the tractor-trailer performance test
checklist. This does not necessarily mean the trainee has done anything wrong. It is in the
best interest of the trainee to concentrate on the operation of the tractor-trailer. The examiner
will explain the test results to the trainee at the conclusion of the tractor-trailer performance
test.

A3.3.3. Tasks being graded are listed on the following page; the trainee will be required to
successfully pass all items.
A3.3.4. The instructor will stop the performance test at any time safe tractor-trailer
operations are not being followed or as deemed necessary for safety concerns.

Figure A3.1. Tractor-Trailer Performance Test Framework (Non-AAMVA Model
Installations):
Note: For objectives that the trainee will not perform due to vehicle type restrictions (e.g. no
manual transmission, trainee will not perform Paragraph 3.2. Clutch and Transmission) annotate
“N/A” in each “Go” column to the right of the objective not performed.
TRACTOR-TRAILER PERFORMANCE TEST (Minimum Requirements)
Trainees Name: Date:
Event Go No Go Notes
1. PRE, DURING, AND POST- OPERATION
INSPECTION
1.1. Operator has required Personal
Protective Equipment.
1.2. Completes air brakes system
check.
1.3. Completes walk-around
inspection and accurately identifies all
components. (Can use Attachment
2).
1.4. Continues during operation
inspection checks, as needed.
1.5. Knows use of jacks, tools,
emergency devices, tire chains, fire
extinguishers, etc.
1.7. Performs post trip inspection and
reports malfunctions to Vehicle
Management.
Event: Go No Go Notes
2A. COUPLING TRACTOR-TRAILER:
Step 1. Inspect Fifth Wheel.
Step 2. Inspect Area and Chock
Wheels.
Step 3. Position Tractor.
Step 4. Secure Tractor.
Step 5. Check Trailer Height.
Step 6. Connect Air Lines to Trailer.
Step 7. Supply Air to Trailer.
Step 8. Lock Trailer Brakes - Pull out
the "air supply" knob.
Step 9. Back Under Trailer.
Step 10. Check Connection for
Security.
Step 11. Secure Vehicle.
Step 12. Inspect Coupling.

Step 13. Connect the Electrical Cord
and Check Air Lines.
Step 14. Raise Front Trailer Supports
(Landing Gear).
Step 15. Remove Trailer Wheel
Chocks – Remove and store in a safe
place.
Event: Go No Go Notes
2B. UNCOUPLING TRACTOR-TRAILER:
Step 1. Position Tractor.
Step 2. Ease Pressure on Locking
Jaws.
Step 3. Chock Trailer Wheels - Chock
the trailer wheels if the trailer doesn't
have spring brakes or if uncertain.
Step 4. Lower The Landing Gear.
Step 5. Disconnect Air Lines and
Electrical Cable.
Step 6. Unlock Fifth Wheel.
Step 7. Pull Tractor Partially Clear of
Trailer.
Step 8. Secure Tractor - Apply parking
brake and place transmission in
neutral.
Step 9. Inspect Trailer Supports.
Step 10. Pull Tractor Clear of Trailer.
Event Go No Go Notes
3. ON-ROAD DRIVING TEST
3.1. General - safety belt is used; obeys
all traffic signs, signals, and laws;
completes test without an accident or
moving violation.
3.2. Turns (2 Right/2 Left) - checks
traffic in all directions; uses turn
signals and safely get into the lane
needed for the turn; slows down
smoothly, changes gears as needed to
keep power; checks mirrors to ensure
proper clearance; vehicle should not
move into oncoming traffic.

3.3. Intersections (2 Stopped/2
Through) - checks traffic in all
directions; decelerate gently, brakes
smoothly and, if necessary, changes
gears; if necessary, comes to a
complete stop (no coasting) behind any
stop signs, signals, sidewalks, or stop
lines.
3.4. Urban/Rural Straight - makes
regular traffic checks and maintains a
safe following distance; makes
necessary traffic checks, uses proper
signals, safely and smoothly changes
lanes.
3.5. Expressway - checks traffic, uses
proper signals; merges smoothly into
the proper lane of traffic; maintains
proper lane positioning, vehicle
spacing, and vehicle speed; continue to
check traffic thoroughly in all
directions; exits using proper signals,
decelerates smoothly.
3.6. Stopping - decelerates smoothly,
brakes evenly, changes gears as
necessary; brings vehicle to a full stop
without coasting.
3.7. Starting - checks traffic, avoids
jerky starts.
3.8. Curves (Right/Left) - before
entering the curve, reduces speed and is
in proper gear; keeps vehicle in the
lane; continues checking traffic in all
directions.
3.9. Upgrade - selects proper gear to
maintain speed and does not lug the
engine; checks traffic in all directions
and moves to the right-most or curb
lane; if legal to do so, uses four-way
flashers if traveling too slowly for the
flow of traffic.
3.10. Downgrade - downshifts as
needed to help control engine speed
and test brakes; does not ride the
clutch, race the engine, change gears, or
coast.

3.11. Railroad Crossing/Simulated
Railroad Crossing - decelerates, brake
smoothly, and shift gears as necessary;
does not stop, changes gears, pass
another vehicle, or change lanes while
any part of the vehicle is in the
crossing.
3.12. Bridge/Overpass/Sign - can
identify the posted clearance or height,
the posted weight limit when going
over bridge and explains any traffic
sign which may appear on the route. 3.13. Roadside Stop/Start – See
Attachment 4.
Event Go No Go Notes
4. KNOWLEDGE OF VEHICLE AND USE OF
CONTROLS
4.1. Engine:
Uses proper starting procedures
Allows proper warm-up.
Understands all gauges.
Uses proper shutdown procedures.
Basic knowledge of engines.
4.2. Clutch and Transmission.
Understands proper clutching
techniques.
Uses clutch properly through all gears.
Shifts smoothly.
Time shifts properly.
Avoids riding the clutch.
Proper use of tachometer and shifting
range.
Avoids bumping the governor.
4.3. Brakes and Braking Techniques
Understands the principles of an air
brake system.
Knows proper use of the tractor
protection valve.
Knows proper use of the hand valve.
Understands the low air warning.
Uses proper techniques on downgrades.
Understands the principle of front
wheel limiting switch.
Proper use of parking brake.

Ensures air tank is at full tank pressure
prior to moving the vehicle.
Performs brake check (tractor and
trailer) before pulling out.
Event: Go No Go Notes
5. BACKING/PARKING:
5.1. Backing
Positions rig properly.
Inspects rig before backing.
Post guide before backing and uses
spotters properly.
Uses mirrors properly.
Avoids blind side backing.
Controls speed.
Takes more than three pull-ups on
jackknife backing.
Takes more than two pull-ups on
straight line backing.
5.2. Parking.
Checks traffic position before parking.
Secures rig properly.
Parks legally and safely.
Pulls completely off pavement when
possible.
Knows proper use of emergency
warning devices.
Uses emergency warning devices.
CERTIFIER COMMENTS:

Attachment 4
AIR FORCE PERFORMANCE TEST GUIDE
A4.1. Air Force Performance Test Overview. The trainee/trainee should be able to demonstrate
the following maneuvers (See Section 7). This guide should be used as a tool to prepare the trainee
for his/her Air Force Performance Test.
A4.2. Time Limit: Class A Vehicles: 4 Hours 30 Minutes.
VEHICLE INSPECTION TEST
A4.3. Vehicle Inspection Test Overview (Required). The Vehicle Inspection Test (including
Air Brakes test) must be successfully completed prior to being administered the remainder of the
Air Force Performance Test (Basic Control Skills Test/Road Test). The trainee is permitted to use
the Tractor-Trailer Inspection Memory Aid found in Attachment 2. Additional guidance for the
Vehicle Inspection Test requirements can be found in Section 7 and in the AAMVA CDL Manual
(Section 11). Failure of the Vehicle Inspection Test will terminate the test, requiring the trainee
to return at a later date approved by the trainer and examiner IAW AFI 24-301 and AFQTP 24-3-
200.
A4.4. Air Brake System Test. The operator will be required to inspect the Air Brake System as
a part of the performance test and as a part of the walk-around inspection, for daily operations,
once licensed on the vehicle. When inspecting air brakes, the following are added items to be
included in Step 2 “Engine Compartment Checks”, Step 5 “Walk-Around Inspecting”, and Step 7
“Final Air Brake Check” of the Seven-Step Inspection Process. See Attachment 6.
A4.5. Coupling/Uncoupling Demonstration. Coupling/uncoupling. The trainee will be
required to demonstrate his/her knowledge and understanding of coupling/uncoupling of the
trailer, following the walk-around inspection, during the performance test. For step-by-step
guidance, see Attachment 5.
A4.6. Time Limit: Class A Vehicles: 1 Hour 30 Minutes.

Table A4.1. Vehicle Inspection Test Automatic Failures. Note: The Vehicle Inspection Test
will be terminated and the trainee will receive an automatic failure for any of the items listed
below.
Automatic Failure Description
1 Air brakes test The operator must demonstrate and verbalize all
three air brake checks correctly to receive credit
in the scoring box. If the operator fails to do all
three parts of the check correctly, it is scored as
an automatic failure for the Vehicle Inspection
Test.
2 Violates law The operator has a moving traffic violation or
disobeys signs and signals.
3 Commits an unsafe act The operator commits any act that creates a
dangerous or unsafe traffic environment.
4 Failure to follow
instructions.
If the trainee fails to adhere to the instructions
given by the Examiner, he/she will be given one
warning. If the trainee again fails to adhere to the
instructions given by the Examiner, the Vehicle
Inspection Test will be terminated and the trainee
will receive an automatic failure.
BASIC CONTROL SKILLS TEST
A4.7. Basic Control Skills Test Overview (Required). The Basic Control Skills Test must be
successfully completed prior to being administered the Road Test component of the Air Force
Performance Test. Additional guidance for the Basic Control Skills Test requirements can be
found in Section 12 in the AAMVA CDL Manual. Failure of the Basic Control Skills Test will
terminate the test, requiring the trainee to return at a later date approved by the trainer and
examiner IAW AFI 24-301 and AFQTP 24-3-200.
Note: During the Basic Control Skills Test (ONLY), a spotter is not required during backing
exercises. The TVO Examiner will ensure safety during each maneuver. If, at any time during
the test, the TVO Examiner feels the operator or external factors could cause a safety mishap, he
or she will immediately direct the operator to stop the vehicle. The operator will not continue
until the TVO Examiner permits.
A4.8. Time Limit: Class A Vehicles: 1 Hour.

Table A4.2. Basic Control Skills Test Automatic Failures. Note: The Basic Control Skills
Test will be terminated and the trainee will receive an automatic failure for any item listed below.
Automatic Failure Description
1 Violates law The operator has a moving traffic violation or
disobeys signs and signals.
2 Fails to use seatbelt. The operator fails to use his/her seatbelt during
the Basic Controls Skills Test.
3 Fails to secure the
vehicle when not in the
operator’s seat.
During components when the operator is
permitted “Look(s)” to check the vehicle position,
the operator fails to safely secure the vehicle.
4 Commits an unsafe act The operator commits any act that creates a
dangerous or unsafe traffic environment (i.e. near
accident).
5 Failure to follow
instructions.
If the trainee fails to adhere to the instructions
given by the Examiner, he/she will be given one
warning. If the trainee fails to adhere to the
instructions given by the Examiner, he/she will be
given one warning. If the trainee again fails to
adhere to the instructions given by the Examiner,
the Basic Control Skills Test will be terminated
and the trainee will receive an automatic failure.
A4.9. Straight Line Backing. The trainee will be asked to back the vehicle in a straight line
between two rows of cones without touching or crossing over the exercise boundaries. See Figure
A4.1.
Figure A4.1. Straight Line Backing.
A4.10. Offset Backing (One of the following maneuvers required).
A4.10.1. Offset Backing – Right. The trainee will be asked to back the vehicle into a space
that is to the right rear of the vehicle. The trainee will drive straight forward the outer
boundary. From that position, the trainee must back the vehicle into the opposite lane until the
front of the vehicle has passed the first set of cones without striking boundary lines or cones.
See Figure A4.2.

A4.10.2. Offset Backing – Left. The trainee will be asked to back the vehicle into a space that
is to the left rear of the vehicle. The trainee will drive straight forward the outer boundary.
From that position, the trainee must back the vehicle into the opposite lane until the front of
the vehicle has passed the first set of cones without striking boundary lines or cones. See
Figure A4.2.
Figure A4.2. Offset Backing – Left/Right.
A4.11. Parallel Parking (One of the following maneuvers required).
A4.11.1. Parallel Parking – Operator Side. The trainee will be asked to park in a parallel
parking space that is on the left. The trainee will drive past the entrance to the parallel parking
space with the vehicle parallel to the parking area; and back into the space without crossing
front, side or rear boundaries marked by cones. The trainee is required to get the entire vehicle
completely into the space. See Figure A4.3.
A4.11.2. Parallel Parking – Conventional. The trainee will be asked to park in a parallel
parking space that is on the right. The trainee will drive past the entrance to the parallel parking
space with the vehicle parallel to the parking area; and back into the space without crossing
front, side or rear boundaries marked by cones. The trainee is required to get the entire vehicle
completely in the space. See Figure A4.3.
Figure A4.3. Parallel Parking.
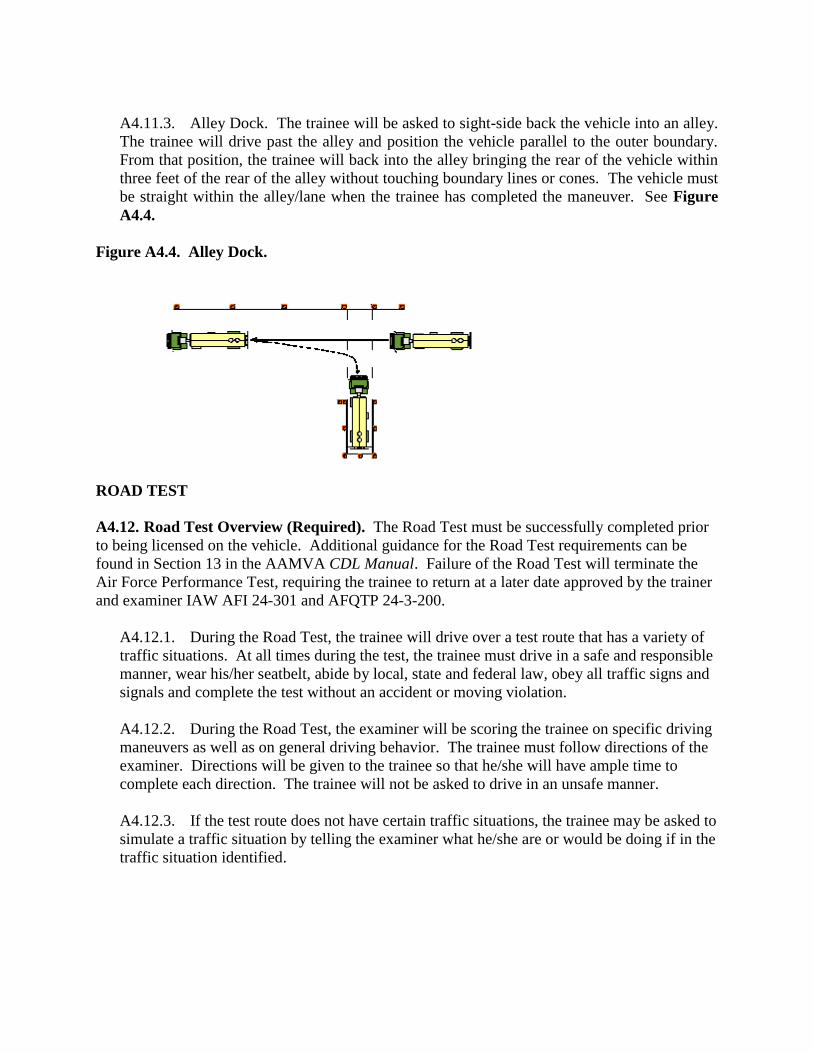
A4.11.3. Alley Dock. The trainee will be asked to sight-side back the vehicle into an alley.
The trainee will drive past the alley and position the vehicle parallel to the outer boundary.
From that position, the trainee will back into the alley bringing the rear of the vehicle within
three feet of the rear of the alley without touching boundary lines or cones. The vehicle must
be straight within the alley/lane when the trainee has completed the maneuver. See Figure
A4.4.
Figure A4.4. Alley Dock.
ROAD TEST
A4.12. Road Test Overview (Required). The Road Test must be successfully completed prior
to being licensed on the vehicle. Additional guidance for the Road Test requirements can be
found in Section 13 in the AAMVA CDL Manual. Failure of the Road Test will terminate the
Air Force Performance Test, requiring the trainee to return at a later date approved by the trainer
and examiner IAW AFI 24-301 and AFQTP 24-3-200.
A4.12.1. During the Road Test, the trainee will drive over a test route that has a variety of
traffic situations. At all times during the test, the trainee must drive in a safe and responsible
manner, wear his/her seatbelt, abide by local, state and federal law, obey all traffic signs and
signals and complete the test without an accident or moving violation.
A4.12.2. During the Road Test, the examiner will be scoring the trainee on specific driving
maneuvers as well as on general driving behavior. The trainee must follow directions of the
examiner. Directions will be given to the trainee so that he/she will have ample time to
complete each direction. The trainee will not be asked to drive in an unsafe manner.
A4.12.3. If the test route does not have certain traffic situations, the trainee may be asked to
simulate a traffic situation by telling the examiner what he/she are or would be doing if in the
traffic situation identified.

A4.13. Time Limit: Class A Vehicles: 2 Hours.
Table A4.3. Road Test Automatic Failures. Note: The Road Test will be terminated and the
trainee will receive an automatic failure for any item listed below.
Automatic Failure Description
1 Violates law The operator has a moving traffic violation or
disobeys signs and signals.
2 Fails to use seatbelt. The operator fails to use his/her seatbelt during
the Road Test.
3 Commits an unsafe act The operator commits any act that creates a
dangerous or unsafe traffic environment (i.e. near
accident).
4 Examiner takes control The operator forces the examiner to take verbal or
physical control of the vehicle.
5 Drives over curb The operator puts the vehicle over sidewalk/curb.
6 Does not yield to others The operator does not give right-of-way to
pedestrians or other vehicles during operator
maneuvers. The operator makes physical contact
with other vehicles, objects, pedestrians, etc.
Drivers of other vehicles or pedestrians were
forced to take evasive actions.
7 Failure to follow
instructions.
If the trainee fails to adhere to the instructions
given by the Examiner, he/she will be given one
warning. If the trainee fails to adhere to the
instructions given by the Examiner, he/she will be
given one warning. If the trainee again fails to
adhere to the instructions given by the Examiner,
the Road Test will be terminated and the trainee
will receive an automatic failure.
A4.14. General Driving Behaviors. The trainee will be scored on his/her overall performance
in the following general driving behavior categories:
A4.14.1. Clutch Usage (for Manual Transmission).
A4.14.1.1. Always use clutch to shift.
A4.14.1.2. Must double-clutch when shifting. Do not rev or lug the engine.
A4.14.1.3. Do not ride clutch to control speed, coast with the clutch depressed, or “pop”
the clutch.
A4.14.2. Gear Usage (for Manual Transmission).
A4.14.2.1. Do not grind or clash gears.

A4.14.2.2. Select gear that does not rev or lug engine.
A4.14.2.3. Do not shift in turns and intersections.
A4.14.3. Brake Usage.
A4.14.3.1. Do not ride or pump brake.
A4.14.3.2. Do not brake harshly. Brake smoothly using steady pressure.
A4.14.4. Lane Usage.
A4.14.4.1. Do not put vehicle over curbs, sidewalks, or lane markings.
A4.14.4.2. Stop behind stop lines, crosswalks, or stop signs.
A4.14.4.3. Complete a turn in the proper lane on a multiple lane road (vehicle should
finish a left turn in the lane directly to the right of the center line).
A4.14.4.4. Finish a right turn in the right-most (curb) lane.
A4.14.4.5. Move to or remain in right-most lane unless lane is blocked.
A4.14.5. Steering.
A4.14.5.1. Do not over or under steer the vehicle.
A4.14.5.2. Keep both hands on the steering wheel at all times unless shifting. Once the
trainee has completed shift, return both hands to the steering wheel.
A4.14.6. Regular Traffic Checks.
A4.14.6.1. Check traffic regularly.
A4.14.6.2. Check mirrors regularly.
A4.14.6.3. Check mirrors and traffic before, while in and after an intersection.
A4.14.6.4. Scan and check traffic in high volume areas and areas where pedestrians are
expected to be present.
A4.14.7. Use of Turn Signals.
A4.14.7.1. Use turn signals properly.

A4.14.7.2. Activate turn signals when required.
A4.14.7.3. Activate turn signals at appropriate times.
A4.14.7.4. Cancel turn signals upon completion of a turn or lane change.
A4.15. Left/Right Turn. Once the trainee has been asked to make a turn, he/she will do the
following:
A4.15.1. Check traffic in all directions.
A4.15.2. Use turn signals and safely get into the lane needed for the turn.
A4.15.3. As the trainee approaches the turn he/she will:
A4.15.3.1. Use turn signals to warn others of his/her turn.
A4.15.3.2. Slow down smoothly, change gears as needed to keep power, but will not
coast unsafely. Unsafe coasting occurs when the vehicle is out of gear (clutch depressed
or gearshift in neutral) for more than the length of the vehicle.
A4.15.4. If the trainee must stop before making the turn, he/she will:
A4.15.4.1. Come to a smooth stop without skidding.
A4.15.4.2. Come to a complete stop behind the stop line, crosswalk, or stop sign.
A4.15.4.3. If stopping behind another vehicle, the trainee will stop where he/she can see
the rear tires on the vehicle ahead. (safe gap).
A4.15.4.4. Not let the vehicle roll.
A4.15.4.5. Keep the front wheels aimed straight ahead.
A4.15.5. When ready to turn, the trainee will:
A4.15.5.1. Check traffic in all directions.
A4.15.5.2. Keep both hands on the steering wheel during the turn.
A4.15.5.3. Keep checking the mirror to make sure the vehicle does not hit anything on
the inside of the turn.
A4.15.5.4. Keep the vehicle from moving into oncoming traffic.
A4.15.5.5. Finish turn with the vehicle in the correct lane.

A4.15.6. After turn, the trainee will:
A4.15.6.1. Make sure turn signal is off.
A4.15.6.2. Get up to speed of traffic, use turn signal, and move into right-most lane when
safe to do so (if not already there).
A4.15.6.3. Check mirrors and traffic.
A4.16. Lane Change. During multiple lane portions of the test, the trainee will be asked to
change lanes to the left, and then back to the right. The trainee should make the necessary traffic
checks first, then use the proper signals and smoothly change lanes when it is safe to do so.
A4.17. Urban Highway. During this part of the test, the trainee is expected to make regular
traffic checks and maintain a safe following distance. The vehicle should be centered in the proper
lane (right-most lane) and the trainee should keep up with the flow of traffic but not exceed the
posted speed limit.
A4.18. Intersections. During this part of the test, the trainee should observe the following
criteria:
A4.18.1. As the trainee approaches an intersection, he/she will:
A4.18.1.1. Check traffic thoroughly in all directions.
A4.18.1.2. Decelerate gently.
A4.18.1.3. Brake smoothly and, if necessary, change gears.
A4.18.1.4. If necessary, come to a complete stop (no coasting) behind any stop signs,
signals, sidewalks, or stop lines maintaining a safe gap behind any other vehicle in front of
his/her vehicle.
A4.18.1.5. Not let the vehicle roll forward or backward.
A4.18.2. When driving through an intersection, the trainee will:
A4.18.2.1. Check traffic thoroughly in all directions.
A4.18.2.2. Decelerate and yield to any pedestrians and traffic in the intersection.
A4.18.2.3. No change lanes while proceeding through the intersection.
A4.18.2.4. Keep his/her hands on the wheel.

A4.18.3. Once the trainee is through the intersection, he/she will:
A4.18.3.1. Continue checking mirrors and traffic.
A4.18.3.2. Accelerate smoothly and change gears as necessary.
A4.19. Railroad Crossing. Not all driving road tests will have a railroad crossing. Instead, the
trainee may be asked to explain and demonstrate the proper railroad crossing procedures to the
examiner at a simulated location.
A4.19.1. Before reaching the crossing, all vehicle operators will:
A4.19.1.1. Decelerate, brake smoothly, and shift gears as necessary.
A4.19.1.2. Look and listen for the presence of trains.
A4.19.1.3. Check traffic in all directions.
A4.19.1.4. Not stop, change gears, pass another vehicle, or change lanes while any part
of the vehicle is in the crossing.
A4.19.2. If the trainee is driving a vehicle displaying placards, the trainee should be prepared
to observe the following procedures at every railroad crossing, unless the crossing is exempt:
A4.19.2.1. As the vehicle approaches a railroad crossing, activate the four-way flashers.
A4.19.2.2. Stop the vehicle within 50 feet but not less than 15 feet from the nearest rail.
A4.19.2.3. Listen and look in both directions along the track for an approaching train and
for signals indicating the approach of a train.
A4.19.2.4. Keep hands on the steering wheel as the vehicle crosses the tracks.
A4.19.2.5. Do not stop, change gears, or change lanes while any part of the vehicle is
proceeding across the tracks.
A4.19.2.6. Four-way flashers should be deactivated after the vehicle crosses the tracks.
A4.19.2.7. Continue to check mirrors and traffic.
A4.20. Curves. When the trainee approaches a curve, he/she should:
A4.20.1. Check traffic thoroughly in all directions.
A4.20.2. Before entering the curve, reduce speed so further braking or shifting is not required
in the curve.

A4.20.3. Keep the vehicle in the lane.
A4.20.4. Continue checking traffic in all directions.
A4.21. Expressway. For this section of the test the trainee should observe the following:
A4.21.1. Before entering the expressway:
A4.21.1.1. Check traffic.
A4.21.1.2. Use proper signals.
A4.21.1.3. Merge smoothly into the proper lane of traffic.
A4.21.2. Once on the expressway:
A4.21.2.1. Maintain proper lane positioning, vehicle spacing, and vehicle speed.
A4.21.2.2. Continue to check traffic thoroughly in all directions.
A4.21.3. When exiting the expressway:
A4.21.3.1. Make necessary traffic checks.
A4.21.3.2. Use proper signals.
A4.21.3.3. Decelerate smoothly in the exit lane.
A4.21.3.4. Once on the exit ramp, the trainee must continue to decelerate within the lane
markings and maintain adequate spacing between his/her vehicle and other vehicles.
A4.22. Roadside Stop/Start. For this maneuver, the trainee will be asked to pull the vehicle
over to the side of the road and stop as if the trainee were going to get out and check something on
the vehicle. The trainee must check traffic thoroughly in all directions and move to the right-most
lane or shoulder of the road.
A4.22.1. As the trainee prepares for the stop:
A4.22.1.1. Check traffic.
A4.22.1.2. Activate the right turn signal.
A4.22.1.3. Decelerate smoothly, brake evenly, change gears as necessary.
A4.22.1.4. Bring the vehicle to a full stop without coasting.

A4.22.2. Once stopped:
A4.22.2.1. Vehicle must be parallel to the curb or shoulder of the road and safely out of
the traffic flow.
A4.22.2.2. Vehicle should not be blocking driveways, fire hydrants, intersections, signs,
etc.
A4.22.2.3. Cancel the turn signal.
A4.22.2.4. Activate the four-way emergency flashers.
A4.22.2.5. Apply the parking brake.
A4.22.2.6. Move the gear shift to neutral or park.
A4.22.2.7. Remove feet from the brake and clutch pedals.
A4.22.3. When the trainee is told to resume, he/she should:
A4.22.3.1. Check traffic and mirrors thoroughly in all directions.
A4.22.3.2. Turn-off the four-way flashers.
A4.22.3.3. Activate the left turn signal.
A4.22.3.4. When traffic permits, the trainee should release the parking brake and pull
straight ahead.
A4.22.3.5. Not turn the wheel before the vehicle moves.
A4.22.3.6. Check traffic from all directions especially to the left.
A4.22.3.7. Steer and accelerate smoothly into the proper lane when safe to do so.
A4.22.3.8. Once the vehicle is back into the flow of traffic, cancel the left turn signal.
A4.23. Low Clearance, Weight Restriction, or Traffic Sign. After driving under an overpass,
the trainee may be asked to tell the examiner what the posted clearance or height was. After going
over a bridge, the trainee may be asked to tell the examiner what the posted weight limit was. If
the test route does not have a bridge or overpass, the trainee may be asked about another traffic
sign. When asked, the trainee should be prepared to identify and explain to the examiner any
traffic sign which may appear on the route.

Attachment 5
TRACTOR-TRAILER COUPLING/UNCOUPLING GUIDE
Figure A5.1. Coupling Tractor-Semitrailers.
Coupling Tractor-Semitrailers
Step Procedure
1. Inspect Fifth Wheel Check for damaged/missing parts.
Check to see that mounting to tractor
is secure, no cracks in frame, etc.
Be sure that the fifth wheel plate is
greased, if required. Note: Most Air
Force assets use a Teflon plate. Do
NOT grease the Teflon plate.
Check if fifth wheel is in proper
position for coupling:
o Wheel tilted down toward rear of
tractor.
o Jaws open.
o Safety unlocking handle in the
automatic lock position.
o If the vehicle has a sliding fifth wheel,
make sure it is locked.
o Make sure the trailer kingpin is not
bent or broken.
2. Inspect Area and Chock Wheels Make sure area around the vehicle is
clear.
Be sure trailer wheels are chocked or
spring brakes are on.
Check that cargo (if any) is secured
against movement due to tractor being
coupled to the trailer.
3. Position Tractor Put the tractor directly in front of the
trailer. (Never back under the trailer at
an angle because the trainee might
push the trailer sideways and break the
landing gear.)

Check position, using outside mirrors,
by looking down both sides of the
trailer.
4. Back Slowly Back until fifth wheel just touches the
trailer.
Don’t hit the trailer.
5. Secure Tractor Put on the parking brake.
Put transmission in neutral.
6. Check Trailer Height The trailer should be low enough that
it is raised slightly by the tractor when
the tractor is backed under it. Raise or
lower the trailer as needed. (If the
trailer is too low, the tractor may strike
and damage the trailer nose; if the
trailer is too high, it may not couple
correctly).
Check that the kingpin and fifth wheel
are aligned.
7. Connect Air-lines to Trailer Check glad hand seals and connect
tractor emergency air-line to trailer
emergency glad hand.
Check glad hand seals and connect
tractor service air-line to trailer service
glad hand.
Make sure air-lines are safely
supported where they won’t be
crushed or caught while tractor is
backing under the trailer.
8. Supply Air to Trailer Ensure trailer is chocked.
From cab, push in “air supply” knob or
move tractor protection valve control
from the “emergency” to the “normal”
position to supply air to the trailer
brake system.
Wait until the air pressure is normal.
Check brake system for crossed air-
lines.
Shut engine off so the operator can
hear the brakes.
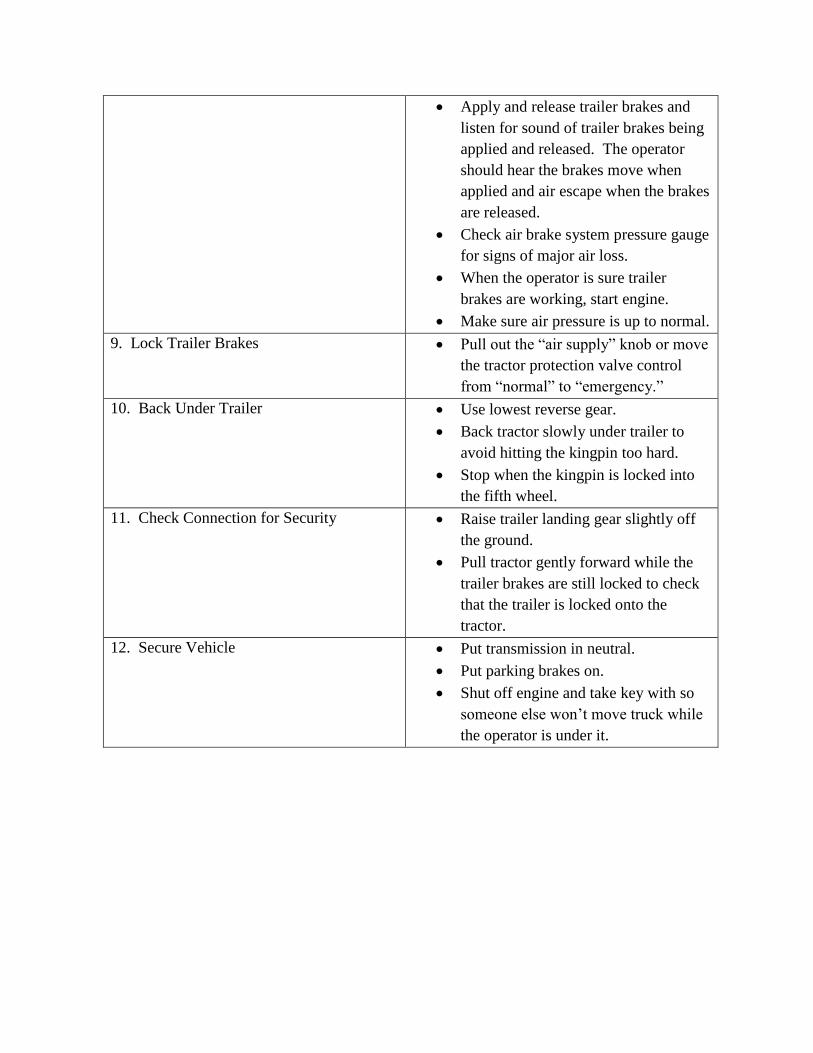
Apply and release trailer brakes and
listen for sound of trailer brakes being
applied and released. The operator
should hear the brakes move when
applied and air escape when the brakes
are released.
Check air brake system pressure gauge
for signs of major air loss.
When the operator is sure trailer
brakes are working, start engine.
Make sure air pressure is up to normal.
9. Lock Trailer Brakes Pull out the “air supply” knob or move
the tractor protection valve control
from “normal” to “emergency.”
10. Back Under Trailer Use lowest reverse gear.
Back tractor slowly under trailer to
avoid hitting the kingpin too hard.
Stop when the kingpin is locked into
the fifth wheel.
11. Check Connection for Security Raise trailer landing gear slightly off
the ground.
Pull tractor gently forward while the
trailer brakes are still locked to check
that the trailer is locked onto the
tractor.
12. Secure Vehicle Put transmission in neutral.
Put parking brakes on.
Shut off engine and take key with so
someone else won’t move truck while
the operator is under it.

13. Inspect Coupling Use a flashlight, if necessary.
Make sure there is no space between
upper and lower fifth wheel. If there
is a space between upper and lower
fifth wheel. If there is space,
something is wrong (kingpin may be
on top of the closed fifth wheel jaws,
and trailer would come lose very
easily).
Go under trailer and look into the back
of the fifth wheel. Make sure the fifth
wheel jaws have closed around the
shank of the kingpin.
Check that the locking lever is in the
“lock” position.
Check that the safety latch is in
position over locking lever. (On some
fifth wheels the catch must be put in
place by hand).
If the coupling isn’t right, don’t drive
the coupled unit; get it fixed.
14. Connect the Electrical Cord and Check
Air-Lines
Plug the electrical cord into the trailer
and fasten the safety catch.
Check both air-lines and electrical line
for signs of damage.
Make sure air and electrical lines will
not hit any moving parts of vehicle.
15. Raise Front Trailer Supports (Landing
Gear)
Use low gear range (if so equipped) to
begin raising the landing gear. Once
free of weight, switch to the high gear
range.
Raise the landing gear all the way up.
(Never drive with landing gear only
part way up as it may catch on railroad
tracks or other things.)
After raising landing gear, secure the
crank handle safely.
When full weight of trailer is resting
on tractor:

Check for enough clearance between
rear of tractor frame and landing gear.
(When tractor turns sharply, it must
not hit landing gear).
Check that there is enough clearance
between the top of the tractor tires and
the nose of the trailer.
16. Remove Trailer Wheel Chocks Remove and store wheel chocks in a
safe place.
Figure A5.2. Uncoupling Tractor-Semitrailers.
Uncoupling Tractor-Semitrailers
Step Procedure
1. Position Tractor-Trailer Make sure surface of parking area can
support weight of trailer.
Have tractor lined up with the trailer.
(Pulling out at an angle can damage
landing gear.)
2. Ease Pressure on Locking-Jaws Shut off trailer air supply to lock trailer
brakes.
Ease pressure on fifth wheel locking
jaws by backing up gently. (This will
help release the fifth wheel locking
lever.)
Put parking brakes on while tractor is
pushing against the kingpin. (This will
hold rig with pressure off the locking
jaws.)
3. Chock Trailer Wheels Chock the trailer wheels if the trailer
doesn't have spring brakes or if
uncertain. (The air could leak out of
the trailer air tank, releasing its
emergency brakes. Without chocks, the
trailer could move.)
4. Lower the Landing Gear If trailer is empty, lower the landing
gear until it makes firm contact with
the ground.

If trailer is loaded, after the landing
gear makes firm contact with the
ground, turn crank in low gear a few
extra turns. This will lift some weight
off the tractor. (Do not lift trailer off
the fifth wheel.)
This will:
o Make it easier to unlatch fifth wheel.
o Make it easier to couple next time.
5. Disconnect Air Lines and Electrical Cable Disconnect air-lines from trailer.
Connect air-line glad hands to dummy
couplers at back of cab or couple them
together.
Hang electrical cable with plug down
to prevent moisture from entering it.
Make sure lines are supported so they
won't be damaged while driving the
tractor.
6. Unlock Fifth Wheel Raise the release handle lock.
Pull the release handle to "open"
position.
Keep legs and feet clear of the rear
tractor wheels to avoid serious injury
in case the vehicle moves.
7. Pull Tractor Partially Clear of Trailer Pull tractor forward until fifth wheel
comes out from under the trailer.
Stop with tractor frame under trailer
(prevents trailer from falling to ground
if landing gear should collapse or
sink).
8. Secure Trailer Apply parking brake.
Place transmission in neutral.
9. Inspect Trailer Supports Make sure ground is supporting trailer.
Make sure landing gear is not
damaged.
10. Pull Tractor Clear of Trailer Release parking brakes.
Check the area and drive tractor
forward until it clears.

Attachment 6
SEVEN-STEP INSPECTION PROCESS
Figure A6.1. Seven-Step Inspection Process.
Seven-Step Inspection Process
Step Procedure
1. Vehicle Overview Review the AF Form 1800.
o Ensure any discrepancy has been
corrected.
o Vehicle Management annotated the
discrepancy was completed.
o Approaching the vehicle.
Damage or vehicle leaning to one
side.
Fresh leakage of fluids.
Hazards around vehicle.
2. Check Engine Compartment Note: Check that the parking brakes
are on and/or wheels chocked. The
operator may have to raise the hood,
tilt the cab (secure loose things so
they don't fall and break something),
or open the engine compartment
door.
Check the following:
o Engine oil level.
o Coolant level in radiator; condition of
hoses.
o Power steering fluid level; hose
condition (if so equipped).
o Windshield washer fluid level.
o Battery fluid level, connections and
tie-downs (battery may be located
elsewhere).
o Automatic transmission fluid level
(may require engine to be running).

o Check belts for tightness and
excessive wear (alternator, water
pump, air compressor)--learn how
much "give" the belts should have
when adjusted right.
o Leaks in the engine compartment
(fuel, coolant, oil, power steering
fluid, hydraulic fluid, battery fluid).
Cracked, worn electrical wiring
insulation.
3. Start Engine and Inspect Inside the Cab
(Get in and Start Engine)
Make sure parking brake is on.
Put gearshift in neutral (or park if
automatic). Start engine; listen for
unusual noises.
If equipped, check the Anti-lock
Braking System (ABS) indicator
lights. Light on dash should come on
and then turn-off. If it stays on the
ABS is not working properly.
Note: For trailers only, if the yellow
light on the left rear of the trailer
stays on, the ABS is not working
properly.
Look at the gauges.
o Oil pressure. Should come up to
normal within seconds after engine is
started.
o Air pressure. Pressure should build
from 50 to 90 psi within 3 minutes.
Build air pressure to governor cut-out
(usually around 120 – 140 psi. Know
the vehicle’s requirements.
o Ammeter and/or voltmeter. Should be
in normal range(s).
o Coolant temperature. Should begin
gradual rise to normal operating
range.
o Engine oil temperature. Should begin
gradual rise to normal operating
range.

o Warning lights and buzzers. Oil,
coolant, charging circuit warning,
and antilock brake system lights
should go out right away.
o Check Condition of Controls. Check
all of the following for looseness,
sticking, damage, or improper
setting:
Steering wheel.
Clutch.
Accelerator (gas pedal).
Brake controls.
Foot brake.
Trailer brake (if vehicle has one).
Parking brake.
Retarder controls (if vehicle has
them).
Transmission controls.
Interaxle differential lock (if vehicle
has one).
Horn(s).
Windshield wiper/washer.
Lights.
Headlights.
Dimmer switch.
Turn signal.
Four-way flashers.
Parking – clearance – identification –
marker switch (switches).
Check mirrors and windshield.
o Inspect mirrors and windshield for
cracks, dirt, illegal stickers, or other
obstructions to seeing clearly. Clean
and adjust as necessary.
Check emergency equipment.
o Check for safety equipment:
Spare electrical fuses (unless vehicle
has circuit breakers).
Three red reflective triangles, 6 fuses
or 3 liquid burning flares.

Properly charged and rated fire
extinguisher. Check for optional
items such as:
Chains (where winter conditions
require).
Tire changing equipment.
List of emergency phone numbers
Accident reporting kit (packet).
o Check safety belt. Check that the
safety belt is securely mounted,
adjusts; latches properly and is not
ripped or frayed.
4. Turn-off Engine Make sure the parking brake is set,
turn-off the engine, and take the key
with.
Turn-on headlights (low beams) and
four-way emergency flashers, and get
out of the vehicle.
5. Do Walk-Around Inspection General.
o Go to front of vehicle and check that
low beams are on and both of the
four-way flashers are working.
o Push dimmer switch and check that
high beams work.
o Turn-off headlights and four-way
emergency flashers.
o Turn-on parking, clearance, side-
marker, and identification lights.
o Turn-on right turn signal, and start
walk-around inspection.
o Walk around and inspect.
Clean all lights, reflectors, and glass
as while doing the walk-around
inspection.
Left front side.
o Driver's door glass should be clean.
o Door latches or locks should work
properly.

Left front wheel.
o Condition of wheel and rim--
missing, bent, broken studs, clamps,
lugs, or any signs of misalignment.
o Condition of tires--properly inflated,
valve stem and cap OK, no serious
cuts, bulges, or tread wear.
o Use wrench to test rust-streaked lug
nuts, indicating looseness.
o Hub oil level OK, no leaks. Left
front suspension.
o Condition of spring, spring hangers,
shackles,
o U-bolts.
o Shock absorber condition.
Left front brake.
o Condition of brake drum or disc.
o Condition of hoses.
Front.
o Condition of front axle. Condition of
steering system.
o No loose, worn, bent, damaged or
missing parts.
o Must grab steering mechanism to test
for looseness.
o Condition of windshield.
o Check for damage and clean if dirty.
o Check windshield wiper arms for
proper spring tension.
o Check wiper blades for damage,
"stiff" rubber, and securement.
o Lights and reflectors.
o Parking, clearance, and identification
lights clean, operating, and proper
color (amber at front).
o Reflectors clean and proper color
(amber at front).
o Right front turn signal light clean,
operating, and proper color (amber
or white on signals facing forward).

Right side
o Right front: check all items as done
on left front.
o Primary and secondary safety cab
locks engaged (if cab-over-engine
design).
o Right fuel tank(s).
o Securely mounted, not damaged, or
leaking. Fuel crossover line secure.
o Tank(s) contain enough fuel. Cap(s)
on and secure.
o Condition of visible parts. Rear of
engine--not leaking. Transmission--
not leaking.
o Exhaust system--secure, not leaking,
not touching wires, fuel, or air-lines.
o Frame and cross members--no bends
or cracks.
o Air-lines and electrical wiring--
secured against snagging, rubbing,
wearing.
o Spare tire carrier or rack not
damaged (if so equipped).
o Spare tire and/or wheel securely
mounted in rack.
o Spare tire and wheel adequate
(proper size, properly inflated).
o Cargo securement (trucks).
o Cargo properly blocked, braced, tied,
chained, etc. Header board adequate,
secure (if required).
o Side boards, stakes strong enough,
free of damage, properly set in place
(if so equipped).
o Canvas or tarp (if required) properly
secured to prevent tearing, billowing,
or blocking of mirrors.

o If oversize, all required signs (flags,
lamps, and reflectors) safely and
properly mounted and all required
permits in driver's possession.
o Curbside cargo compartment doors
in good condition, securely closed,
latched/locked and required security
seals in place.
Right rear.
o Condition of wheels and rims--no
missing, bent, or broken spacers,
studs, clamps, or lugs.
o Condition of tires--properly inflated,
valve stems and caps OK, no serious
cuts, bulges, tread wear, tires not
rubbing each other, and nothing
stuck between them.
o Tires same type, e.g., not mixed
radial and bias types.
o Tires evenly matched (same sizes).
Wheel bearing/seals not leaking.
o Suspension.
o Condition of spring(s), spring
hangers, shackles, and u-bolts.
o Axle secure.
o Powered axle(s) not leaking lube
(gear oil). Condition of torque rod
arms, bushings.
o Condition of shock absorber(s).
o If retractable axle equipped, check
condition of lift mechanism. If air
powered, check for leaks.
o Condition of air ride components.
o Brakes.
o Brake adjustment.
o Condition of brake drum(s) or discs.
o Condition of hoses--look for any
wear due to rubbing.
o Lights and reflectors.

o Side-marker lights clean, operating,
and proper color (red at rear, others
amber).
o Side-marker reflectors clean and
proper color (red at rear, others
amber).
Rear.
o Lights and reflectors.
o Rear clearance and identification
lights clean, operating, and proper
color (red at rear).
o Reflectors clean and proper color
(red at rear).
o Taillights clean, operating, and
proper color (red at rear).
o Right rear turn signal operating, and
proper color (red, yellow, or amber
at rear).
o License plate(s) present, clean, and
secured.
o Splash guards present, not damaged,
properly fastened, not dragging on
ground, or rubbing tires.
o Cargo secure (trucks).
o Cargo properly blocked, braced, tied,
chained, etc. Tailboards up and
properly secured.
o End gates free of damage, properly
secured in stake sockets.
o Canvas or tarp (if required) properly
secured to prevent tearing, billowing,
or blocking of either the rearview
mirrors or rear lights.
o If over-length, or over-width, make
sure all signs and/or additional
lights/flags are safely and properly
mounted and all required permits are
in driver's possession.
o Rear doors securely closed,
latched/locked.

Left side.
o Check all items as done on right side,
plus:
o Battery (batteries) (if not mounted in
engine compartment).
o Battery box (boxes) securely
mounted to vehicle. Box has secure
cover.
o Battery (batteries) secured against
movement. Battery (batteries) not
broken or leaking.
o Fluid in battery (batteries) at proper
level (except maintenance-free type).
o Cell caps present and securely
tightened (except maintenance-free
type).
o Vents in cell caps free of foreign
material (except maintenance-free
type).
6. Check Signal Lights Get in and turn-off all lights.
Turn-on stop lights (apply trailer
hand brake or have a helper put on
the brake pedal).
Turn-on left turn signal lights.
Get out and check lights.
Left front turn signal light clean,
operating and proper color (amber or
white on signals facing the front).
Left rear turn signal light and both
stop lights clean operating, and
proper color (red, yellow, or amber).
Get in vehicle.
o Turn-off lights not needed for
driving.
o Check for all required papers, trip
manifests, permits, etc.

o Secure all loose articles in cab (they
might interfere with operation of the
controls or hit the operator in a
crash).
o Start the engine.
7. Start the Engine and Check Test for
Hydraulic Leaks
Test for hydraulic leaks.
o If the vehicle has hydraulic brakes,
pump the brake pedal three times.
o Then apply firm pressure to the pedal
and hold for five seconds.
o The pedal should not move. If it
does, there may be a leak or other
problem.
Brake system.
Test parking brake.
o Fasten safety belt.
o Set parking brake (power unit only).
Release trailer parking brake (if
applicable). Place vehicle into a low
gear.
o Gently pull forward against parking
brake to make sure the parking brake
holds.
o Repeat the same steps for the trailer
with trailer parking brake set and
power unit parking brakes released
(if applicable).
o If it doesn't hold vehicle, it is faulty;
get it fixed.
Test service brake stopping action.
o Go about 5 miles per hour.
o Push brake pedal firmly.
o "Pulling" to one side or the other can
mean brake trouble.
o Any unusual brake pedal "feel" or
delayed stopping action can mean
trouble.

o If the trainee finds anything unsafe
during the Vehicle inspection, get it
fixed. Federal and state laws forbid
operating an unsafe vehicle.
Check vehicle operation regularly:
o Instruments.
o Air pressure gauge (if the vehicle has
air brakes). Temperature gauges.
o Pressure gauges.
Ammeter/voltmeter.
o Mirrors.
o Tires.
o Cargo, cargo covers. Lights, etc.
o If the trainee sees, hears, smells, or
feels anything that might mean
trouble, he/she should check it out.
Safety inspection.
o Drivers of trucks and truck tractors
when transporting cargo must inspect
the securement of the cargo within
the first 50 miles of a trip and every
150 miles or every 3 hours
(whichever comes first) after.
Document any discrepancy on AF
Form 1800. Sign-off AF Form 1800
to signify accomplishment of
inspection.

Figure A6.2. Additional Steps for Inspecting Air Brakes System.
Additional Steps for Inspecting Air Brakes
Step Procedure
2. Engine Compartment Checks Check air compressor drive belt condition and
tightness (if compressor is belt driven).
5. Walk-Around Inspecting Check manual slack adjusters on S-cam
brakes. Note: Vehicles with automatic slack
adjustors still must be checked.
o Park on level ground and chock the wheels.
o Release the parking brakes so the operator can
move the slack adjusters.
o Use gloves and pull hard on each slack
adjuster that it can be reached.
o Check slack adjuster, more than 1-inch
indicates adjustments required (vehicles with
too much brake slack can be very hard to
stop). Adjust it or have it adjusted.
Check brake drums (or discs), linings, and
hoses.
7. Final Air Brake Check Test low pressure warning signal.
o Shut the engine off when the vehicle has
enough air pressure so that the low pressure
warning signal is not on.
o Turn the electrical power on.
o Step on and off the brake pedal to reduce air
tank pressure.
o Low air pressure warning signal should come
on before the pressure drops to less than 60
psi in the air tank with lowest pressure.
Check that the spring brakes come on
automatically.
o Chock the wheels.
o Release the parking brakes when enough air
pressure is built up.
o Shut the engine off.
o Step on and off the brake pedal to reduce the
air tank pressure.
o "Parking brake" knob should pop out when
the air pressure falls to the manufacturer's
specification.
Check rate of air pressure buildup
o Refer to manufacturer’s recommendation for
average buildup time.

o If not within recommended time, the air
pressure may drop too low during driving
operations.
Test air leakage rate.
o With a fully-charged air system (typically 125
psi).
o Turn-off the engine.
o Release the service brake and time the air
pressure drop.
o The loss rate should be less than 2 psi in one
minute for single vehicles.
o Not less than 3 psi in 1 minute for
combination vehicles.
Then apply 90 psi or more with the brake
pedal.
o After the initial pressure drop, if the air
pressure falls more than 3 psi in 1 minute for
single vehicles.
o Not more than 4 psi for combination vehicles.
Check air compressor governor cut-in and
cut-out pressures.
o Air compressor should start at about 100 psi
and stop at about 125 psi.
o Run the engine at a fast idle.
o Air governor should cut-out the air
compressor at about the manufacturer's
specified pressure.
o Engine idling, step on and off brake to reduce
air tank pressure.
o Compressor should cut-in at manufacturer's
specified cut-in pressure.
o Test parking brake: Stop the vehicle; put the
parking brake on; gently pull against it in low
gear to determine if parking brake will hold.
Test service brakes.
Wait for normal air pressure.
Release the parking brake.
Move the vehicle forward slowly (about 5
mph).
Apply the brakes firmly using the brake pedal.
Note any vehicle "pulling" to one side,
unusual feel, or delayed stopping action.