topdesk v6 for operators - university of · pdf filetopdesk will also pre-populate location,...
TRANSCRIPT

Bath University
Computing Services
IT Training
TOPdesk v6 for Operators
Document Information
Author John Baker
Revised By
Date 27/09/2016 Version 2 Status Draft
Copyright © University of Bath
This document can be used by members of staff from the University of Bath provided this copyright statement is included and acknowledged.
Please contact the Information Officer, BUCS, University of Bath for further information.

Contents
Logging In ................................................................................................................................................. 3
Basic Layout: ............................................................................................................................................. 4
Working with Tabs ..................................................................................................................................... 6
Creating A New First or Second Line Incident .......................................... 7
VIP Process ............................................................................................................................................ 17
Using a Standard Solution to Resolve an Incident ................................................................................... 18
Creating a Standard Solution................................................................................................................... 18
Using the Knowledge Base to Resolve an Incident .................................................................................. 19
Finding an Incident - Using Quick Finder ................................................................................................. 21
Finding an Incident – Using Caller Card .................................................................................................. 22
Viewing & Opening Tickets Assigned To You Or Your Operator Group ................................................... 23
Resolving / Closing an incident ................................................................................................................ 25
Escalating an Incident to 2nd Line ............................................................................................................ 26
Sending Incidents to RT (1st and 2nd Line) ............................................................................................... 26
Creating Partial Incidents ........................................................................................................................ 27
Major Incidents ........................................................................................................................................ 28
Requesting a new / change to a knowledge base article ......................................................................... 31
Creating Default Text .............................................................................................................................. 32
Customising TOPdesk ............................................................................. 33
Your Workspace ...................................................................................................................................... 34
Moving and Deleting Widgets ............................................................................................................... 34
Adding Widgets .................................................................................................................................... 34
Tasks Block .......................................................................................................................................... 35
Customising Dashboard ....................................................................................................................... 35
Adjusting User Settings ........................................................................................................................ 36
Quick Launch Bar .................................................................................................................................... 36
Adding a new Shortcut ......................................................................................................................... 36
Selections, Reports and Shortcuts .......................................................................................................... 37
Appendix A 38
Quick Guides ........................................................................................................................................... 38
Logging In ............................................................................................................................................ 39
Working with Tabs ................................................................................................................................ 39
Creating new Incident using the Quick Launch Bar .............................................................................. 40
Using a Standard Solution to Resolve an Incident ................................................................................ 41
Using the Knowledge Base to Resolve an Incident .............................................................................. 41
Finding an Incident – Using Quick Finder ............................................................................................. 42
Finding an Incident – Using Caller Card ............................................................................................... 42

Viewing & Opening Tickets Assigned To You or Your Operator Group ................................................ 42
Closing / Resolving an incident ................................................................................................................ 43
Escalating an Incident to 2nd Line ......................................................................................................... 43
Requesting a new / change to a Knowledge Base Article ..................................................................... 43
Creating Default Text ........................................................................................................................... 43
TOPdesk Mobile Site ............................................................................................................................... 44
Attaching Files to an Email ...................................................................................................................... 45
Incident Priority Matrix ............................................................................................................................. 46
Priorities with Appropriate Timescales .................................................................................................. 46
Appendix B 47
Exercises................................................................................................................................................. 47
Appendix C 50
GIVING FEEDBACK ............................................................................................................................... 50
On-Line ................................................................................................................................................ 51
With your Team Leader ........................................................................................................................ 51

TOPdesk v6 Incident Management for Operators – Course Manual
Page 3 of 52 TOPdesk v6 IM for Operators.docx © University of Bath
Getting Started
Logging In
TOPdesk is an externally hosted ITSM solution and is accessed via a web link, it has two different options for logging in:
Operator Login: used by BUCS staff and other teams creating, monitoring and dealing with tickets.
Self Service Desk: used by all other University staff and students.
Open location: http://topdesk.bath.ac.uk to see a screen like this:
Click on “Operator Login” to see the standard Single Sign-on screen:
Enter your username & password and click on Log in.

TOPdesk v6 Incident Management for Operators – Course Manual
Page 4 of 52 TOPdesk v6 IM for Operators.docx © University of Bath
The opening screen is your personal TOPdesk workspace (which, because they’re easy to adapt to suit the way we work, could differ greatly to the one shown here):
Note: the live system has a blue button, and the test system has a red one – many pictures in these notes are from the test system.
Basic Layout:
The key parts of the standard TOPdesk workspace (you can make your own changes to the Quick Launch Bar) are as shown below:
The areas/items labelled in the picture (default layout) are:

TOPdesk v6 Incident Management for Operators – Course Manual
Page 5 of 52 TOPdesk v6 IM for Operators.docx © University of Bath
Tasks block (A): containing all of the tasks for which you are the operator. You can adjust both columns to display the tasks most important to you. By default the first column contains tasks assigned to you and the second column the tasks assigned to you, your groups and any unassigned tasks. You can choose how
you wish to filter these columns using .
Selections, Reports and Shortcuts (B): providing access to selections, reports and shortcuts that are most relevant to you. You can choose which selections, reports and shortcuts you wish to display here
using .
Quick Launch bar (C): containing icons for the features in TOPdesk you use most frequently, such as creating a new incident, reservation, change request as well as links to useful webpages. You can add
buttons to the quick launch bar using . The key standard buttons are:
- TOPdesk menu: in this window you can create new incidents and open the Plan Board, Task Board, Dashboard, the Modules and Help options. If the button is blue, you’re using the live system; if it’s red, you’re using the test system.
- Search: Choose the area of TOPdesk you wish to search, for example Incidents or changes and the search criteria you wish to use.
- Bookmarks: These can be used to bookmark cards, and create a mini To Do list but aren’t used that often.
- Caller Card – This can be used to look up all processes associated with a specific registered caller.
- New First Line Incident – Use to log a ticket as a new first line incident.
- New Second Line Incident – These can be created when an incident is close to its Target date and is unlikely to be resolved or when the incident is something which needs to be fixed by a third tier (Infrastructure or MIS team). Both IT Supporters and the Service desk can own either 1st line or second line incidents.
- New Request for Change – These notes look at this option in more detail. Note: if you can’t see this button, use the instructions within ‘Putting extra buttons onto the Quick Launch bar’ near the end of these notes to add it.
- Knowledge base start page – Used for looking up common solutions in the knowledge base.
Latest News (D): Information on current service status as well as upcoming maintenance and other useful
information, information is displayed with a coloured icon (e.g. ) depending on the type of news:
A Blue icon indicates the piece is for information only
An Amber icon indicates a notification for example details of planned maintenance
A Red icon indicates a warning for example a system or service is unexpectedly unavailable
“Home” button (E): taking you back to the start page at any time
“Logout” and “My Settings” buttons (F):
“Main Pages” (G): containing the following buttons:
Plan Board: This is used by Audio Visual for allocation of work.

TOPdesk v6 Incident Management for Operators – Course Manual
Page 6 of 52 TOPdesk v6 IM for Operators.docx © University of Bath
Task Board: This button opens the overview of all tasks assigned to you. You can use it to view tickets that you need to process, instead of the Task widget.
Dashboard: This displays KPIs and reports providing an overview of the current situation within your processes. You can also create new KPIs reports and selections through the dashboard, or the system administrator can add new reports for you to use.
Each new action will open a new tab across the top of your screen to help you easily navigate to the information you need. You can have many tabs open at the same time and easily switch from one to another.
Working with Tabs
In TOPdesk you work with tabs. Actions will open additional tabs across the top of your screen, these let you easily navigate to the information you need. You can open several tabs at once and easily switch between them:
Start Page: The start page tab is always open to the left of the open tabs (cards) and will take you back to your workspace
window.
Tabs: If you have many tabs open, you can view a list of all open tabs using the button, this also allows you to
close all open tabs in one go (except the start page tab), all other tabs except for the one you are currently working on (and the
start page tab) and also provides to access Recently viewed cards:
A
B

TOPdesk v6 Incident Management for Operators – Course Manual
Page 7 of 52 TOPdesk v6 IM for Operators.docx © University of Bath
A few useful points:
Tab Space: If the number of tabs open exceeds the space allowed by your browser, arrows will appear to allow you scroll through the tabs.
Opening Cards: If you open a card which is already open, the tab with that card will display at the front.
Maximum Number of Tabs: You can open up to ten tabs at one time, if you open an eleventh tab, the tab which has been unused for the longest will close to allow the new tab to open.
Recently Closed Cards: TOPdesk will remember the last 30 viewed card.
Creating A New First or Second Line Incident
New Incidents (cards) can be created from a variety of locations within TOPdesk. The Quick Launch Bar is probably the quickest.
Both first and second line incidents are created in the same way – the difference being:
A 1st Line Incident is most often dealt with by the Service Desk or IT Supporters
A 2nd Line Incident is one that is more complex so requires additional time and can be dealt with by either the Service desk or by IT Supporters. Alternatively, it is an incident which requires resolution by one of the IT Infrastructure or MIS teams.
Click on either the 1st Line ( ) or 2nd line ( ) Incident icon.
TOPdesk v6 Incident Management for Operators – Course Manual
Page 8 of 52 TOPdesk v6 IM for Operators.docx © University of Bath
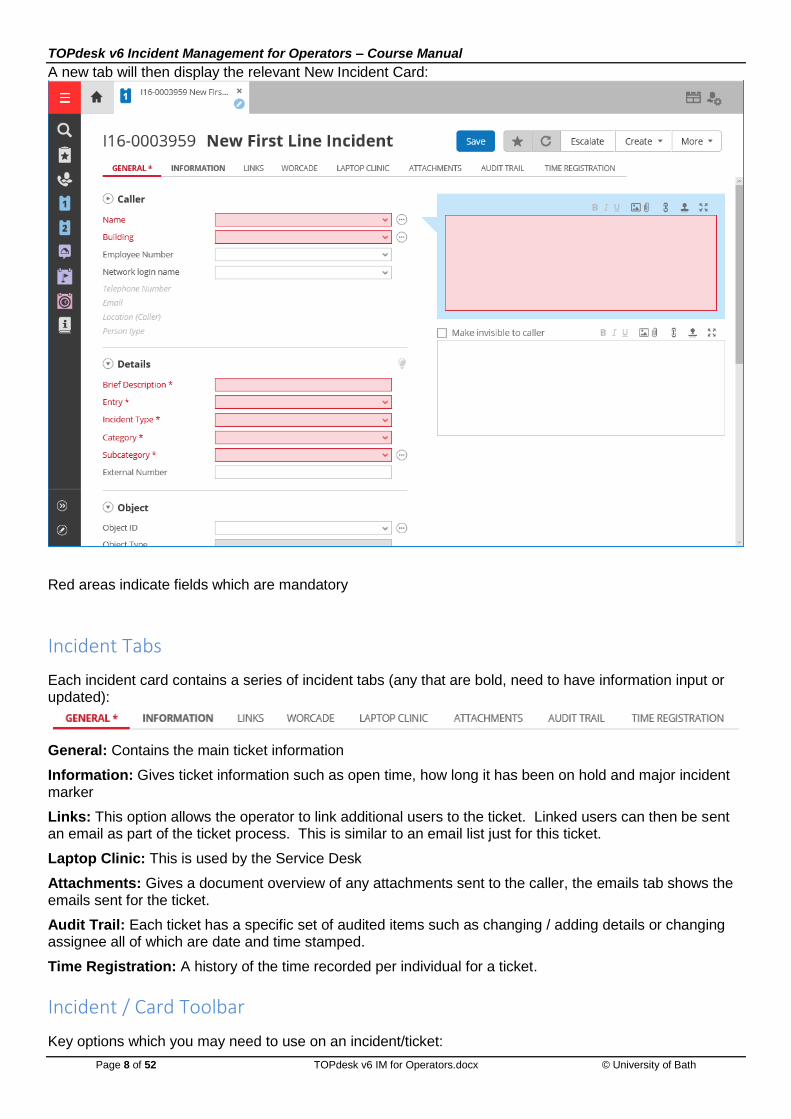
A new tab will then display the relevant New Incident Card:
Red areas indicate fields which are mandatory
Incident Tabs
Each incident card contains a series of incident tabs (any that are bold, need to have information input or updated):
General: Contains the main ticket information
Information: Gives ticket information such as open time, how long it has been on hold and major incident marker
Links: This option allows the operator to link additional users to the ticket. Linked users can then be sent an email as part of the ticket process. This is similar to an email list just for this ticket.
Laptop Clinic: This is used by the Service Desk
Attachments: Gives a document overview of any attachments sent to the caller, the emails tab shows the emails sent for the ticket.
Audit Trail: Each ticket has a specific set of audited items such as changing / adding details or changing assignee all of which are date and time stamped.
Time Registration: A history of the time recorded per individual for a ticket.
Incident / Card Toolbar
Key options which you may need to use on an incident/ticket:

TOPdesk v6 Incident Management for Operators – Course Manual
Page 9 of 52 TOPdesk v6 IM for Operators.docx © University of Bath
Save the ticket
***done to here***

TOPdesk v6 Incident Management for Operators – Course Manual
Page 10 of 52 TOPdesk v6 IM for Operators.docx © University of Bath
Undo Changes
Print the ticket
Add to Cart - Not in Use
Go to Next or Previous card
Reload data
Archive or Delete a incident – This option is only available to Team Leaders and Service Managers
Create a new incident using the current incident as a template
Escalate a ticket to 2nd Line
Create a new standard solution - This option is only available to Team Leaders and Service Managers
Copy incident data to Knowledge base - This option is not used.
Copy data from Knowledge base
4 Caller Area
Network Login Name: Simply type the user’s Computing Services username.
TOPdesk will also pre-populate location, user name and telephone number where available, because this information is taken from LDAP if it is incorrect users should contact their directory maintainer to make changes.
Name: This is entered as First Name, Last Name – This information in updated from LDAP every 3 hours, so if you begin typing the name TOPdesk will complete, if there are a number of people with similar names you can use the drop down to select the correct person.

TOPdesk v6 Incident Management for Operators – Course Manual
Page 11 of 52 TOPdesk v6 IM for Operators.docx © University of Bath
Alternative Method of Contact: If the caller requests contact by a different method (e.g. mobile phone), you should record this in the Request Field, as any changes made in the caller area will be over written the next time the data is imported from LDAP.
No LDAP Record: If the caller does not have an LDAP record the ticket can be created as an unregistered caller, click the right arrow and select Unregistered caller
In this case you will need to fill in the caller details / contact information manually.
Unregistered callers are not saved in the database so if the same caller needs to log further tickets the information will need to be re-entered.
Emails coming into TOPdesk from unregistered users will use the ‘name’ associated with their email account.
Please also refer to the VIP process, later in tis document for details of how to identify and deal with a VIP.

TOPdesk v6 Incident Management for Operators – Course Manual
Page 12 of 52 TOPdesk v6 IM for Operators.docx © University of Bath
5 Details Area
Brief Description: Summary of the incident
Incident Type: Choose from the following options
Interruption: Something is broken and not working
Degradation: Something is working but not as it should be (e.g. slow)
Failure: A piece of hardware has failed – this is usually identified by an Event Alert
Service Request: A request for some work to be done (e.g. increase quota, restart service, copy data from A to B)
Category: Choose the most appropriate category for the affected service.
Sub Category: Sub category is determined by the Category chosen, again choose the most appropriate for the affected service.
External Number: If a ticket has been logged in another system, record the relevant ticket ID here (e.g. RT Number, Canon reference number, Microsoft ticket number)
6 Planning
Impact: Who / What is affected Choose from the following options
Critical (All Users)
Very High (101+ users)
High (11 to 100 Users)
Medium (2 to 10 Users)
Low (~1 user)
Urgency: Choose from
Critical
High
Medium
Low
Project
Priority: This is automatically calculated by the Impact and Urgency selected.

TOPdesk v6 Incident Management for Operators – Course Manual
Page 13 of 52 TOPdesk v6 IM for Operators.docx © University of Bath
Duration: This is determined by the Priority but can be changed if agreed with your line manager and the customer.
Target Date: This is prepopulated based on Priority and Duration but can be changed if agreed with your line manager and the customer.
On Hold: This will auto populate when the options ‘Awaiting 3rd Party’ or ‘Awaiting Customer’ are selected in the Status field.
7 Processing Area
Operator Group: The group of people who are best suited to dealing with this ticket. For Example Service Desk, Datacentre and Ops, IT Literacy.
Operator: This should initially be set to the same value as the Operator Group to show that work has not yet started on the ticket within this Operator Group.
If you are creating the incident and will be working on it you should assign it to yourself TOPdesk will not do this automatically. If you have allocated a incident to yourself and are then unavailable this does not stop another operator picking up the incident and reassigning it to themselves.
Status: Status of the ticket, choose from
Open (work has not commenced on this ticket)
In Progress (the ticket is being dealt with – this is not automatic so you must select this when you create or pick up an incident)
Awaiting 3rd Party (this stops time being recorded against the incident for reporting purposes only)
Awaiting Customer (this stops time being recorded against the incident for reporting purposes only)
Resolved – The ticket is Resolved, email is sent to customer to confirm
Closed – The ticket is Closed, this happens automatically once a ticket has been resolved for 5 days. NB: If the user replies to the closure email, TOPdesk does NOT automatically re-open the ticket.
Time Spent: A mandatory field you should record the time you have spent on the ticket as accurately as possible.

TOPdesk v6 Incident Management for Operators – Course Manual
Page 14 of 52 TOPdesk v6 IM for Operators.docx © University of Bath
8 Request Area
Entry: Method of Incident being logged. Choose from In-Person, Telephone, Email. Tickets logged through the user self service portal will automatically be logged as Self Service.
Description: Add the Incident details here. If the caller has used the Help Forms on the CS website, this section will show the description that they have entered. Provide as much information as required, including if needed alternative contact information, note all information is subject to data protection laws and can be requested by the caller at any time.
9 Action Area
Use this area to record the actions you have taken to resolve the Incident.
The Add Default Text Button can be used to insert default text into your response. These can be created on a per user basis (see section on Creating Default Text). You can also attach a file in
this area using the attachment icon . Note: Files are attached to the ticket, NOT to an Action.
Make Invisible for caller: This can be used to make notes within the Incident for either yourself or another operator group – however note that anything entered is subject to data protection and can be requested by the caller.
TOPdesk v6 Incident Management for Operators – Course Manual
Page 15 of 52 TOPdesk v6 IM for Operators.docx © University of Bath
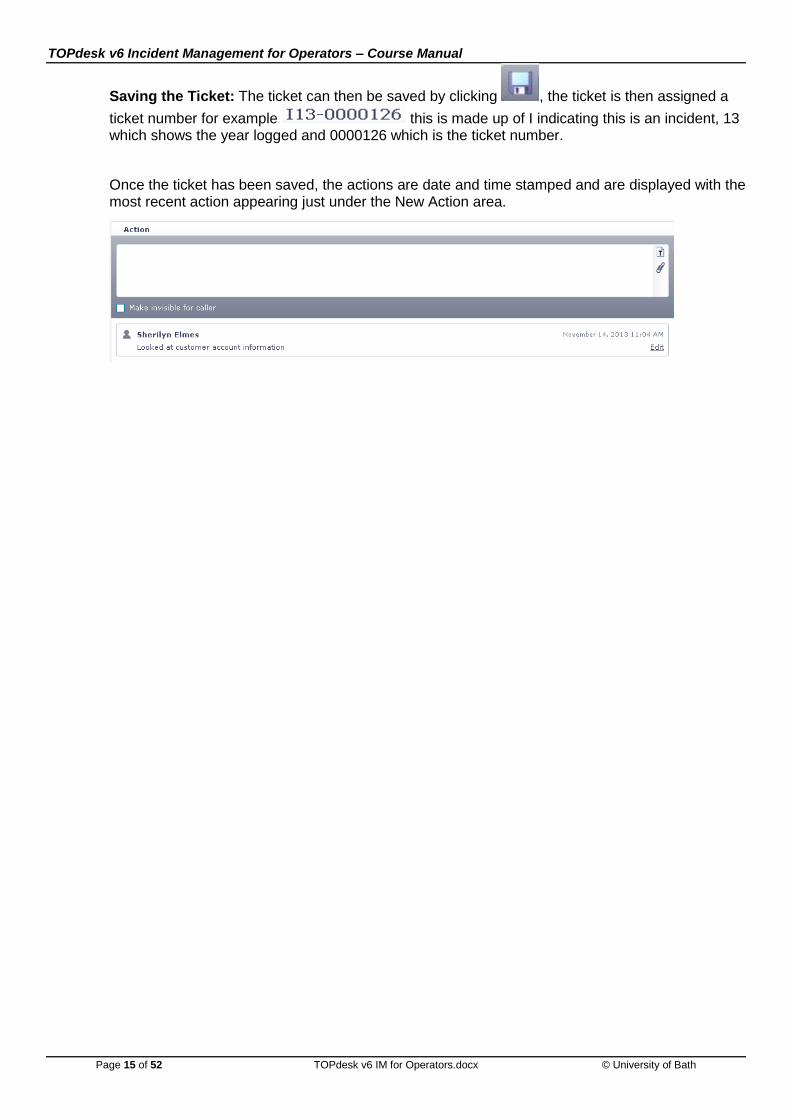
Saving the Ticket: The ticket can then be saved by clicking , the ticket is then assigned a
ticket number for example this is made up of I indicating this is an incident, 13 which shows the year logged and 0000126 which is the ticket number.
Once the ticket has been saved, the actions are date and time stamped and are displayed with the most recent action appearing just under the New Action area.

TOPdesk v6 Incident Management for Operators – Course Manual
Page 16 of 52 TOPdesk v6 IM for Operators.docx © University of Bath
10 TOPdesk will now automatically try to email the caller with details of the information you entered in the Action Area
The message can be edited and added to before sending if needed, and a preview of the message seen by clicking Show Message. The Extra tab will allow you to add cc and bcc information, the attachments tab can be used to attach files etc. to the message (see Attaching file to Emails, later in this document).
Once you are happy with the email click , if for any reason you do not wish to send the email
click .
NB: Even if you have checked the Make Invisible to caller box TOPdesk will still attempt to send the caller an email – however the email will contain the last Action Information which was visible to the caller rather than the invisible comment.
Handy Hints
Red Fields: Indicate mandatory fields.
Caller – Fast!: Enter the person’s user name in the Network login name field rather than entering their name.
Changing Caller Name: If you select the incorrect person simply click in the name field and start typing the correct name
Resetting the Incident (Card): If you need for any reason to reset the whole incident card, click
the button, a message will confirm that you wish to delete all information contained in the card.
Contact Information: Caller details should not be edited as they will be over written by the next import instead alternative contact information should be recorded in the Request Area
Unregistered Callers: Details will need to be entered each time as not recorded in the database
Make Invisible to Caller: Can be used to make notes within the incident and will not be visible to the caller but can be requested under data protection laws.
Emails: Can be edited before sending, Actions added using the Make Invisible feature will not be sent instead TOPdesk will try to send the last visible action.

TOPdesk v6 Incident Management for Operators – Course Manual
Page 17 of 52 TOPdesk v6 IM for Operators.docx © University of Bath
VIP Process
A VIP is identified as a person within the university who, often because of their position, will receive a higher level of service than other users.
1 When a VIP caller is selected in a ticket, a small green circle will appear next to their name:
2 If you log or triage a call for a VIP user, you must:
1. Increase the Urgency by 1 level.
2. Call the appropriate operator group to alert them to the ticket that you are about to send them.

TOPdesk v6 Incident Management for Operators – Course Manual
Page 18 of 52 TOPdesk v6 IM for Operators.docx © University of Bath
Using a Standard Solution to Resolve an Incident
A standard solution is a tried and tested method of resolving some of the most commonly seen incidents.
1 The standard solution light bulb will light up when a category is chosen which has a standard solution assigned to it. The icon can be found on the right hand side of the toolbar.
2 Clicking the light bulb will display a list of possible solutions in order of the most commonly used.
3 As you highlight each standard solution, the request details and actions that will be added to the open ticket are shown at the bottom of the window
4 To add this information to your current ticket, click OK
Creating a Standard Solution
The option to create standard solutions will be available to team leaders and service owners, if you have a request for a new standard solution please contact them in the first instance.

TOPdesk v6 Incident Management for Operators – Course Manual
Page 19 of 52 TOPdesk v6 IM for Operators.docx © University of Bath
Using the Knowledge Base to Resolve an Incident
In the same way as a standard solution can be used to resolve an incident, articles from the knowledge base (which are links to web pages) can be used to resolve an incident.
1 Click Copy Data from the Knowledge base button
2 A Knowledge Base search window appears,
The search box at the top of the screen allows you to shorten the list of available knowledge articles displayed, note that the list displayed will contain both knowledge articles and current news.
3 When an article is selected from the list you will see a description and any comments relating to the article
4 Click Next

TOPdesk v6 Incident Management for Operators – Course Manual
Page 20 of 52 TOPdesk v6 IM for Operators.docx © University of Bath
5 The following screen allows you to choose which parts of the knowledge article you would like to import into the ticket
Select the areas you wish to add and click Next, the information is then added to the relevant areas of the ticket.
6 Click Save to save the ticket and email the details to the caller.

TOPdesk v6 Incident Management for Operators – Course Manual
Page 21 of 52 TOPdesk v6 IM for Operators.docx © University of Bath
Finding an Incident - Using Quick Finder
There are a variety of ways to locate an incident in TOPdesk, the most common are Quick Finder and caller cards.
1 Quick finder is located at the top of the Quick Launch bar
2 In the Quick finder searchlist, select the process you would like to search on the most common is Incident
3 Common search criteria include, caller name, incident number, operator name but a variety of
criteria can be used. Press enter or click the search button to display your results
4 If you have searched using a full incident number the incident card will automatically be displayed.
If you have used other criteria the search results are then displayed,
Selecting the check box next to the incident will display a preview screen underneath.
5 To open the incident for editing select the check box next to the relevant line and click the Edit
button
6 Remember to Save any changes you have made to the incident and email the caller if appropriate.

TOPdesk v6 Incident Management for Operators – Course Manual
Page 22 of 52 TOPdesk v6 IM for Operators.docx © University of Bath
Finding an Incident – Using Caller Card
This method of searching will only work for callers who have LDAP accounts, you will be unable to search for unregistered callers in this way.
1 Click the Caller Card icon
2 Enter either the caller’s Network Login Name, or Name, in the caller card – this uses LDAP so will auto-fill with other caller details
3 Press Enter, a list of requests associated with the caller will be displayed below. Select the check box to see a summary of the information.
4 To open the incident for editing click
5 Make any changes necessary and click Save.

TOPdesk v6 Incident Management for Operators – Course Manual
Page 23 of 52 TOPdesk v6 IM for Operators.docx © University of Bath
Viewing & Opening Tickets Assigned To You Or Your Operator Group
Tickets that are assigned to you (or your operator group) either from self-service or from another operator will be displayed in your Tasks Overview on your main TOPdesk workspace.
1 The Tasks block displays the number of tasks that must be processed by you or your operator
group and the number of incidents which are unassigned. The left column displays the tasks assigned specifically to you.
The layout of the Tasks overview can be edited on a per operator basis using the Edit button
Important: TOPdesk does not automatically refresh your Tasks Block you must click the
Refresh button to see an up to date list of your tasks.
2 To access a list of the incidents click the number shown, the Tasks List is then displayed
The Task list can be edited, sorted and the columns adjusted to suit the individual operator, click the upper edge of the column to sort by that column, the arrow displayed will indicate whether the
information is sorted in ascending or descending order .
The layout is also controlled by any settings selected in your User Settings, for example colouring of tasks dependant on due date.
Selecting the check box at the end of an incident line will display an incident summary at the bottom of the screen.
3 The Task list can also be filtered to make it easier to find a particular item, click on the filter button
,

TOPdesk v6 Incident Management for Operators – Course Manual
Page 24 of 52 TOPdesk v6 IM for Operators.docx © University of Bath
Use the drop downs and radio buttons to create your filter and click OK.
4 To open and edit the incident card, check the box at the end of the line and click the edit button
, the incident card is then loaded in a new tab.
5 As with a new incident, you can now edit, update, escalate, assign the ticket to yourself, record time taken or resolve the incident.
6 Remember to save if you have made any changes.

TOPdesk v6 Incident Management for Operators – Course Manual
Page 25 of 52 TOPdesk v6 IM for Operators.docx © University of Bath
Resolving / Closing an incident
1 When an Incident has been dealt with, you will need to ensure the ticket is Resolved.
2 Open the Incident and select Resolved from the Status drop down, the incident will then automatically date and time stamp the end of the ticket.
3 Enter the final Action note, add remaining Time Spent, then Save the ticket.
4 An email will then be automatically sent to the caller confirming the Incident is closed, and asking them to complete a short survey. If the caller responds to this email it WILL NOT reopen the ticket automatically, if further work is required you will need to open the ticket and change the status to In Progress.
5 If the caller does not respond to the Resolved incident email the Incident status will automatically change to Closed after 5 days and cannot be reopened.
If the caller responds to the closed incident, a new incident will be raised in response to the reply to the closed incident.

TOPdesk v6 Incident Management for Operators – Course Manual
Page 26 of 52 TOPdesk v6 IM for Operators.docx © University of Bath
Escalating an Incident to 2nd Line
All tickets will have a target completion date / time depending on the Impact and Urgency assigned to it, when a ticket is nearing or has exceeded its target date you will receive an automatic email to warn you of this, and the ticket may need to be escalated to a 2nd line ticket. Tickets are also escalated when a functional escalation is needed.
1 If a ticket cannot be dealt with by 1st line or requires more time for resolution than a 1st line incident allows for it can be escalated to a 2nd Line Incident (second line incidents can be created and owned by Service Desk, IT Supporters or Infrastructure & MIS teams).
2 Open the ticket if not already open, alternatively click on the link in the auto generated email which you may have received due to the ticket breaching its target.
3 Click escalate
4 You may then need to reassign the ticket to another operator group and operator. You will only be able to escalate the ticket to Operator Groups who are included in 2nd Line support.
You should include information in the Action Section (Invisible to caller if appropriate) so that the group you are assigning the ticket to have all the information needed and know why you are escalating the ticket.
5 Click Save.
(Note that Second Line Operators also have the option to De-Escalate a ticket if required)
Sending Incidents to RT (1st and 2nd Line)
TOPdesk is for use with IT systems. Not everyone who currently uses RT will be moving over to TOPdesk
and so there may be a requirement to send an Incident to an RT Queue
1 Create the Incident as normal, adding any relevant details, or open an existing incident.
2 In the caller section, click the arrow to the right of the caller name and select Send Incident to RT
3 Amend the To: field to the RT queue email address, the Senders email should remain as the
original callers. Click Send

TOPdesk v6 Incident Management for Operators – Course Manual
Page 27 of 52 TOPdesk v6 IM for Operators.docx © University of Bath
Creating Partial Incidents
Partial incidents are requests for work from other operators or operator groups which will contribute towards resolving one of your incidents and which can work in parallel. For example, an interruption in SAMIS might require some database work, some authentication changes and some work from the SAMIS team, all of which can happen simultaneously. Partial incidents can only be created from 2ND line incidents (as first line incidents are one which can be quickly fixed).
Creating Partial Incidents
1 Log open a 2nd Line ticket (or escalate a 1st line ticket if appropriate).
2 Click the Partial Incidents tab:
3 Click the Create Partial Incident button:
4 A new 2nd line incident card is opened with much of the detail of the parent call pre-populated:
Note that the new incident has the same Incident ID as the parent ticket, but with an additional number at the end. In this case \03 indicates that this is the 3rd Partial incident related to this incident.

TOPdesk v6 Incident Management for Operators – Course Manual
Page 28 of 52 TOPdesk v6 IM for Operators.docx © University of Bath
***5
Complete the remaining details for this ticket and click the Save button.
6 You can quickly create another partial incident from this ticket by clicking the New Partial Incident
button: .
Handy Hints
The Parent ticket cannot be resolved until all of its related Partial Incident tickets have been resolved.
Partial Incident (child) tickets cannot have target date/time beyond the target of the Parent ticket.
Major Incidents
If a Major Incident is declared, a Major Incident ticket will be created. Tickets can be linked to the Major Incident ticket. This not only allows us to report impact more accurately in the future, but also allows all tickets related to the Major Incident to be Resolved or Closed simultaneously, with the same Resolution action, using a wizard.
Linking your ticket to a Major Incident Ticket
1 Once notified that a major incident is underway, you can link existing calls to the Major Incident ticket.
2 Open the ticket which you wish to link to the Major Incident.
3 Go to the Information Tab and select the Major Incident’s ticket ID from the Major Incident list at the bottom right of the screen.
4 If you do not know which Incident Number to select, click the right-facing arrow next to the list button and click Find. All Major Incidents will be listed. Simply select the appropriate Major Incident ticket and click OK.
Handy Hints
Once a Major Incident ticket has been resolved, it is possible (if appropriate) to Resolve (or Close) all related tickets with the same closure action using the Closure Wizard.

TOPdesk v6 Incident Management for Operators – Course Manual
Page 29 of 52 TOPdesk v6 IM for Operators.docx © University of Bath
Resolving or Closing all tickets related to a Major Incident
1 Once it had been confirmed that the Major Incident is over, you can, if appropriate, close all tickets which have been related to the Major Incident at once.
2 Open the Major Incident ticket.
3 Go to the Information Tab and select the related incidents that you wish to Resolve or Close by clicking the check box next to each (or then one in the row header to select all.
4 Click on the Closure Wizard icon in the icon bar immediately above the incidents list.
5 The Closure Wizard, step 1 dialogue box appears:
Select whether you want to affect all linked tickets or just the ones you have selected, then click Next.
6 The Closure Wizard, step 2 dialogue box appears.
Select whether you want to Resolve or Close the tickets, then click Next.

TOPdesk v6 Incident Management for Operators – Course Manual
Page 30 of 52 TOPdesk v6 IM for Operators.docx © University of Bath
7 The Closure Wizard, step 3 dialogue box appears.
Enter an appropriate Action note which will be added to each of the effected tickets. Click Next.
8 The Closure Wizard, step 4 dialogue appears.
Click Complete to finish the process and Resolve/Close all selected tickets.
TOPdesk v6 Incident Management for Operators – Course Manual
Page 31 of 52 TOPdesk v6 IM for Operators.docx © University of Bath
Requesting a new / change to a knowledge base article
We will be using the TOPdesk knowledge base to link to web sites, wiki pages, help guides and such like. Follow one of the procedures below to request a new knowledge base article or an amendment to an existing article.
1 If the information already exists on a web page, wiki page or similar, send the web address to:
2 If the information does not already exist, please create some content / copy / an article for the content, then email it to: [email protected]
The information management team will then work with you to setup the information in an appropriate location and create a knowledge base article to point to it.
3 If you wish a knowledge base article to be amended, please send the corrections to: [email protected]

TOPdesk v6 Incident Management for Operators – Course Manual
Page 32 of 52 TOPdesk v6 IM for Operators.docx © University of Bath
Creating Default Text
When working within TOPdesk you may find that there is text that you use within an Incident frequently, to save time you can save the text and use it again in future tickets, default text is different from a standard solution in that it is operator-specific so nobody else will be able to access the default text you create.
Team leaders will define up to 5 out of the 9 pieces of text available, leaving you to use the remaining 4.
1 Default text is created from within an Incident but will then be available to the operator for all other Incidents.
2 Click on the Add default text button in the action field , the default text window will appear allowing you to create up to 9 sets of default text.
3 Click the edit button on one of the empty boxes (you can also use this button to edit existing text)
4 In the default text box, enter the text you wish to use (up to 50,000 characters) and click Save.
5 To use the text click the box containing the default text and it will automatically be added to the action area of the Incident. The action box can still be edited and the default text added to if needed.

TOPdesk v6 Incident Management for Operators – Course Manual
Page 33 of 52 TOPdesk v6 IM for Operators.docx © University of Bath
Customising TOPdesk

TOPdesk v6 Incident Management for Operators – Course Manual
Page 34 of 52 TOPdesk v6 IM for Operators.docx © University of Bath
Your Workspace
The Main pages window can be customised on a per operator basis, you can drag and drop ‘widgets’ around, add new widgets, and change the way your tasks are displayed.
Moving and Deleting Widgets
1 Pick up the widget header by holding your left mouse button down, then drag into the desired position and release.
2 To Delete a widget click the button on the widget header.
Adding Widgets
1 Click on the Add icon in the Tasks widget.
2 A selection of available widgets will be displayed
3 Click Widget type to see further options or add directly to your main page / workspace.

TOPdesk v6 Incident Management for Operators – Course Manual
Page 35 of 52 TOPdesk v6 IM for Operators.docx © University of Bath
Tasks Block
1 Click on the Edit icon in the Tasks widget
2 The Tasks Widget Settings pop-up will open.
3 From the drop down search lists, under Column 1 and Column 2, select the tasks you wish to see in these columns.
4 Click Save, your start page will now display the tasks you have selected to view.
Customising Dashboard
1 Click the ‘dashboard’ icon on the main page
2 In the Navigator pane, click Overview to see a general overview or click on each module (eg Incident Management) to see a more detailed overview.
3 Additional Widgets and reports can be added to the dashboard by clicking the add icon

TOPdesk v6 Incident Management for Operators – Course Manual
Page 36 of 52 TOPdesk v6 IM for Operators.docx © University of Bath
Adjusting User Settings
1 Click on in the top right corner and select My Settings
2
Useful options to select here include
Bold Logged Today
Blue Target Date is today
Red: Elapsed (task is overdue)
Quick Launch Bar
You can add buttons to the Quick Launch bar to include links to internal or external web pages, it is also possible to add links to frequent activities but this is less likely to be required as the most common activities for operators are already listed.
Adding a new Shortcut
1 Click on the Edit icon at the bottom of the Quick Launch Bar.
2 To add a new Shortcut, click on the Add New Shortcut Icon, Complete the Title and URL fields.
3 Click Save, the shortcut will be created and displayed as – Shortcuts created can be edited at any time.

TOPdesk v6 Incident Management for Operators – Course Manual
Page 37 of 52 TOPdesk v6 IM for Operators.docx © University of Bath
Selections, Reports and Shortcuts
Selections, reports and shortcuts can be customised on a per operator basis allowing quick access to information required.
Customising
1 From the Selections, Reports and Shorcuts Widget
Click the edit button
2 To add a button
Use the drop downs and selection arrows to personalise the filters and click Save
3 To Add a Shortcut, use the same box as above but click the new shortcut button
Give your shortcut a Title and enter the URL, if you would like the webpage to open on a tab within TOPdesk select the Open within TOPdesk box, if not leave unchecked and the webpage will be displayed in your browser (either in a browser tab or another window depending on your browser settings).
4 Existing shortcuts and buttons can be edited and deleted using the Edit and delete buttons , to delete a TOPdesk button you need to move it from the display list by clicking the left facing arrow.
5 To access a selection simply click and the Task list will be opened with the relevant filters in place.

TOPdesk v6 Incident Management for Operators – Course Manual
Page 38 of 52 TOPdesk v6 IM for Operators.docx © University of Bath
Appendix A
Quick Guides

TOPdesk v6 Incident Management for Operators – Course Manual
Page 39 of 52 TOPdesk v6 IM for Operators.docx © University of Bath
Logging In
TOPdesk URL: https://topdesk.bath.ac.uk
Username and Password: TOPdesk uses single sign on.
Working with Tabs
Tabs: Use the button to view, jump to and close open tabs
Tab Space: If the number of tabs open exceeds the space allowed by your browser, arrows will appear to allow you scroll through the tabs.
Opening Incidents: If you open an incident card which is already open, the tab with that card will display at the front.
Maximum Number of Tabs: You can open up to ten tabs at one time, if you open an eleventh tab, the tab which has been unused for the longest will close to allow the new tab to open.
Recently Closed Cards: TOPdesk will remember the last 30 closed cards

TOPdesk v6 Incident Management for Operators – Course Manual
Page 40 of 52 TOPdesk v6 IM for Operators.docx © University of Bath
Creating new Incident using the Quick Launch Bar
1. Click either the 1st Line or 2nd Line Incident icon
2. Enter the following information (Red Fields are Mandatory)
a. Network Login Name: Enter the user’s network Login name. - Alternatively - Name - Uses LDAP to populate information, if the caller is not listed click the right arrow and choose unregistered caller (you will need to fill in name and contact information. Alternatively enter user name in the Network login name field.
b. Brief Description
c. Incident Type (Fault, Request, Knowledge Item)
d. Category
e. Sub Category
f. Impact (Campus, Building, Department, Team, User, AV)
g. Urgency (No Workaround, Has Workaround, Non Urgent Incident, Project)
h. Priority – Prepopulated based on impact and urgency but can be changed
i. Duration - Prepopulated based on impact and urgency but can be changed
j. Target – Prepopulated based on Priority and Duration
k. On Hold – Automatically selected when either of the ‘Awaiting’ statuses are selected.
l. Operator Group – The group the ticket is assigned to
m. Operator
n. Status - Open, In progress, Awaiting 3rd Party, Awaiting Customer, Resolved, Closed
o. Time Spent – Time you have spent on the ticket.
p. Entry – Telephone, In-person, Email, Self Service
q. Description – Details of the incident which can include alternative contact information.
r. Action – Use this area to record the actions you have taken to resolve (default text can also be created and inserted, files can also be attached to the incident)
3. Click Save
4. TOPdesk will now automatically try and send an email to the callers with details of the information you entered in the Action Area, The message can be edited and added to if needed.
5. Once you are happy with the email click , if for any reason you do not wish to send the email
click . It is worth noting that even if you have checked the Make Invisible to caller box TOPdesk will still attempt to send the caller an email – however the email will contain the last Action Information which was visible to the caller rather than the invisible comment.

TOPdesk v6 Incident Management for Operators – Course Manual
Page 41 of 52 TOPdesk v6 IM for Operators.docx © University of Bath
Using a Standard Solution to Resolve an Incident
A standard solution is a tried and tested method of resolving some of the most commonly seen incidents.
1. The standard solution lightbulb will light up when a category is chosen which has a standard solution assigned to it.
2. Clicking the lightbulb will display a list of possible solutions in order of the most commonly used.
3. As you highlight each standard solution, the request details and actions that will be added to the open ticket are shown at the bottom of the window
4. To add this information to your current ticket, click OK
5. Save and email the ticket.
Using the Knowledge Base to Resolve an Incident
In the same way as a standard solution can be used to resolve an incident, articles from the knowledge base, can be copied into the ticket and sent to the caller.
1. Click the Copy Data from the Knowledge base button
2. Use the Knowledge Base Search window to locate relevant articles (the results will include both knowledge base articles and news articles).
3. Selecting an item will display the description and comments for the article.
4. Click Next
5. Choose the parts of the knowledge article you wish to import into the ticket (Description, Comments, Files)
6. Save and email the ticket.

TOPdesk v6 Incident Management for Operators – Course Manual
Page 42 of 52 TOPdesk v6 IM for Operators.docx © University of Bath
Finding an Incident – Using Quick Finder
1. Click Quick Finder
2. From the searchlist select the process you wish to search for (Incident)
3. Enter Search Criteria (for example Name, Incident Number, Operator Name)
4. Press Enter or
5. Full Incident Number searches will bring up the Incident Card immediately, otherwise a list of possible matches will be displayed. (Select check box to see summary)
6. Open the Incident for editing
7. Edit Incident as required and Save.
Finding an Incident – Using Caller Card
1. Click Caller Card
2. Enter the caller’s name (will not work for unregistered callers) and press enter
3. A list of Incidents will be displayed (Select check box to see summary)
4. Open the Incident for editing
5. Edit Incident as required and Save.
Viewing & Opening Tickets Assigned To You or Your Operator Group
Tickets that are assigned to you (or your operator group will be displayed in your Tasks Overview (block) on your main TOPdesk page.
1. The Tasks block displays the number of tasks that must be processed by you or your operator
group . The left column displays the tasks assigned specifically to you.
2. To access a list of the incidents click the number displayed, the Tasks List is then displayed
3. The Task list can be filtered to make it easier to find a particular item.
4. To open and edit the incident card, check the box at the end of the line and click the edit button
5. You can now edit, update, escalate, reassign or resolve the incident.
6. Save
TOPdesk v6 Incident Management for Operators – Course Manual
Page 43 of 52 TOPdesk v6 IM for Operators.docx © University of Bath
Closing / Resolving an incident
1 When an Incident has been resolved, you will need to ensure the ticket is Resolved.
2 Open the Incident and select Resolved from the Status drop down, the incident will then automatically date and time stamp the end of the ticket.
3 An email will then be automatically sent to the caller confirming the Incident is closed, and asking them to complete a short survey. If the caller responds to this email it WILL NOT reopen the ticket automatically, if further work is required you will need to open the ticket and change the status to In Progress.
4 If the caller does not respond to the Resolved incident email the Incident status will automatically change to Closed after 5 working days and cannot be reopened.
If the caller responds to the closed incident, a new incident will be raised in response to the reply to the closed incident.
Escalating an Incident to 2nd Line
All tickets will have a Target date associated with it depending on the Impact and Urgency associated with it, when a ticket is nearing or has exceeded its target date you will receive an automatic email to warn you of this, if a ticket is nearing its Target date / time and you are unable to resolve it may be that it has to be escalated to 2nd Line support. Alternatively the incident may require resolution by a third tier team.
1. Open the ticket if not already open.
2. Click escalate
3. Reassign the ticket if needed to the new operator group and operator.
4. Click Save.
Requesting a new / change to a Knowledge Base Article
Please send an email to [email protected], including a link to the content that you wish to have added to the knowledge base (e.g. WIKI article).
Creating Default Text
1. Click on the Add default text button in the action field.
2. Click the edit button on one of the empty boxes (you can also use this button to edit existing text)
3. In the default text box, enter the text you wish to use and click Save.
4. To use the text click the box containing the default text and it will automatically be added to the action area of the Incident. The action box can still be edited and the default text added to if needed.

TOPdesk v6 Incident Management for Operators – Course Manual
Page 44 of 52 TOPdesk v6 IM for Operators.docx © University of Bath
TOPdesk Mobile Site
Although the main TOPdesk web based application will scale reasonably well on a variety of hand held devices, there is also the option to log into the TOPdesk mobile site, this provides a scaled down version of the system designed for use on mobiles devices.
From a Mobile or Tablet: https://topdesk.bath.ac.uk
From a PC or MAC: https://topdesk.bath.ac.uk/tas/secure/mobile
Clicking will allow you to perform a basic search for an Incident
Clicking on an incident will open the Incident details
To Update the incident click , enter details and click submit
To Record Time spent on the incident click
To Change Status of the incident click drop down
Once Incident has been updated send mail using to cancel email click
To return to List all incidents click
To Log Out click

TOPdesk v6 Incident Management for Operators – Course Manual
Page 45 of 52 TOPdesk v6 IM for Operators.docx © University of Bath
Attaching Files to an Email
You can attached files to a Ticket at any time, using the icon in the New Action area of a ticket. This will upload any file that can be browsed to and will attach it to the ticket.
If you wish to attach a file to an Email, you must choose to do so as you compose the email itself.
1. When composing an email (perhaps after you have saved an update), TOPdesk presents you with an email window.
2. Click on the Attachments tab to see the available attachments (those already uploaded).
3. Select the attachment you wish to use by clicking the check box next to it.
Send the email and the file will be attached to it.
If you wish to attach a file to this email only and NOT to the ticket, click the Choose Files button to attach a file. This file will NOT be attached to the ticket, but WILL be attached to the email.

TOPdesk v6 Incident Management for Operators – Course Manual
Page 46 of 52 TOPdesk v6 IM for Operators.docx © University of Bath
Incident Priority Matrix
The matrix below shows the priority matrix in use in TOPdesk and the timescales for ticket resolution based on these.
Figure 1 - Priotry 1 is the highes priority and 5 is the lowest
Priorities with Appropriate Timescales
Figure 2 - Example: A Priority 1 First Line Ticket should be resolved within 15 minutes

TOPdesk v6 Incident Management for Operators – Course Manual
Page 47 of 52 TOPdesk v6 IM for Operators.docx © University of Bath
Appendix B
Exercises
TOPdesk v6 Incident Management for Operators – Course Manual
Page 48 of 52 TOPdesk v6 IM for Operators.docx © University of Bath
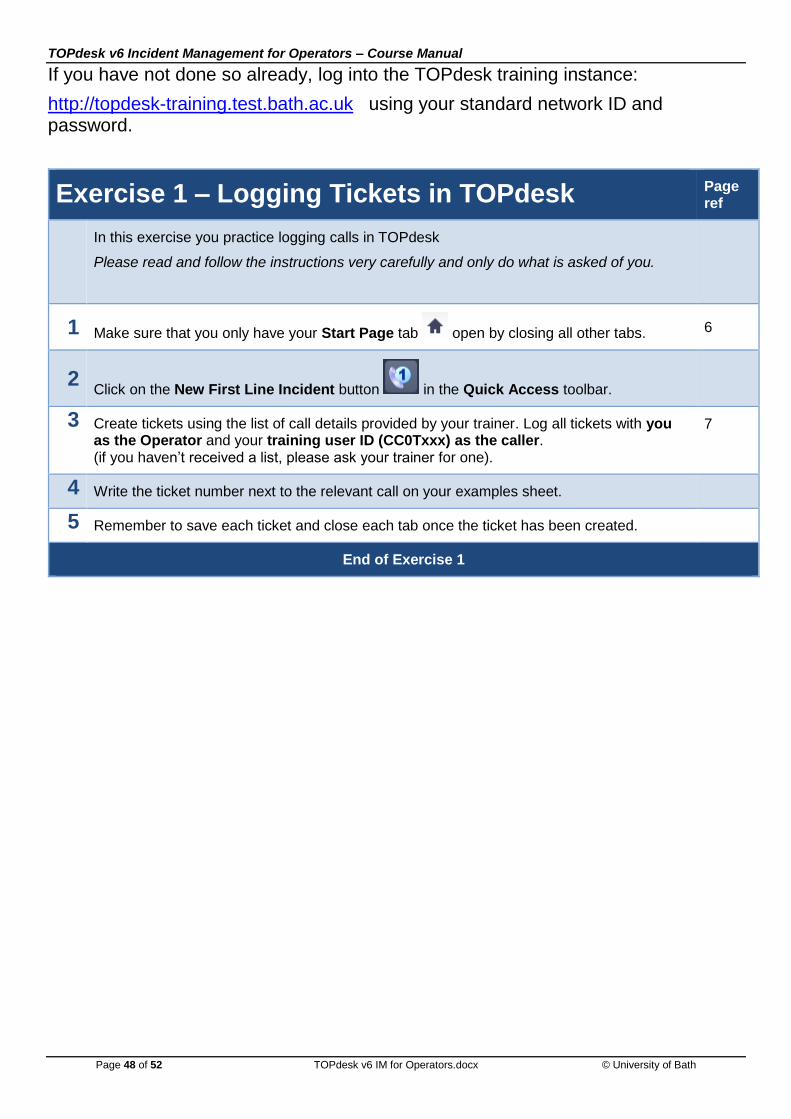
If you have not done so already, log into the TOPdesk training instance:
http://topdesk-training.test.bath.ac.uk using your standard network ID and password.
Exercise 1 – Logging Tickets in TOPdesk Page ref
In this exercise you practice logging calls in TOPdesk
Please read and follow the instructions very carefully and only do what is asked of you.
1 Make sure that you only have your Start Page tab open by closing all other tabs. 6
2 Click on the New First Line Incident button in the Quick Access toolbar.
3 Create tickets using the list of call details provided by your trainer. Log all tickets with you as the Operator and your training user ID (CC0Txxx) as the caller. (if you haven’t received a list, please ask your trainer for one).
7
4 Write the ticket number next to the relevant call on your examples sheet.
5 Remember to save each ticket and close each tab once the ticket has been created.
End of Exercise 1

TOPdesk v6 Incident Management for Operators – Course Manual
Page 49 of 52 TOPdesk v6 IM for Operators.docx © University of Bath
If you have not done so already, log into the TOPdesk training instance:
http://topdesk-training.test.bath.ac.uk using your standard network ID and password.
Exercise 2 – Updating and Transferring Tickets Page ref
In this exercise you practice Updating and Transferring tickets in TOPdesk
Please read and follow the instructions very carefully and only do what is asked of you.
1 Using the details provided by your trainer, update the tickets which you created in the previous exercise
End of Exercise 2

TOPdesk v6 Incident Management for Operators – Course Manual
Page 50 of 52 TOPdesk v6 IM for Operators.docx © University of Bath
Appendix C
GIVING FEEDBACK
TOPdesk v6 Incident Management for Operators – Course Manual
Page 51 of 52 TOPdesk v6 IM for Operators.docx © University of Bath
There are two methods for giving feedback on the TOPdesk tool:
On-Line
Use the following link to connect to Survey Monkey, where you can leave constructive criticism, observations and suggestions.
https://www.surveymonkey.com/s/PRX3GM8
The questions, comments and recommendations will be de-duplicated, and published and then answered on the WIKI:
https://wiki.bath.ac.uk/display/bucsuserservices/Feedback+from+Incident+Management+Workshops%2C+April+2014
With your Team Leader
All team leaders will be given an Issues Log to complete. Please discuss your feedback with your team leader who will then complete the Issues Log with