tipsheet 3 - kilnformed glass workshops and supplies · tipsheet will lead you through two versions...
TRANSCRIPT
September 2012
TipSheeTWORkING DEEPSTACk FIRING FOR ImBEDDED ImAGERY
3Published by Bullseye Glass Co.
This TipSheet will introduce you to ways to float imagery and color within thick blocks of clear glass. Historically, thick glass castings have resulted from pours of furnace glass or by kilncasting glass chunks or frit. The method we call “stack firing” results, instead, from the fusing of multiple layers of clear sheet glass on which are imbedded lines and fields of colored glass. This method is direct, simple, and allows greater control of line quality than is achievable with other techniques. The reader is assumed to have a basic knowledge of glass fusing methods.
The primary technical challenges involved in this working method are:
• Controlling trapped air (bubbles)• Restraining the glass flow at full fusing temperatures• Working with extended heating and cooling cycles• Minimizing coldworking to the finished project
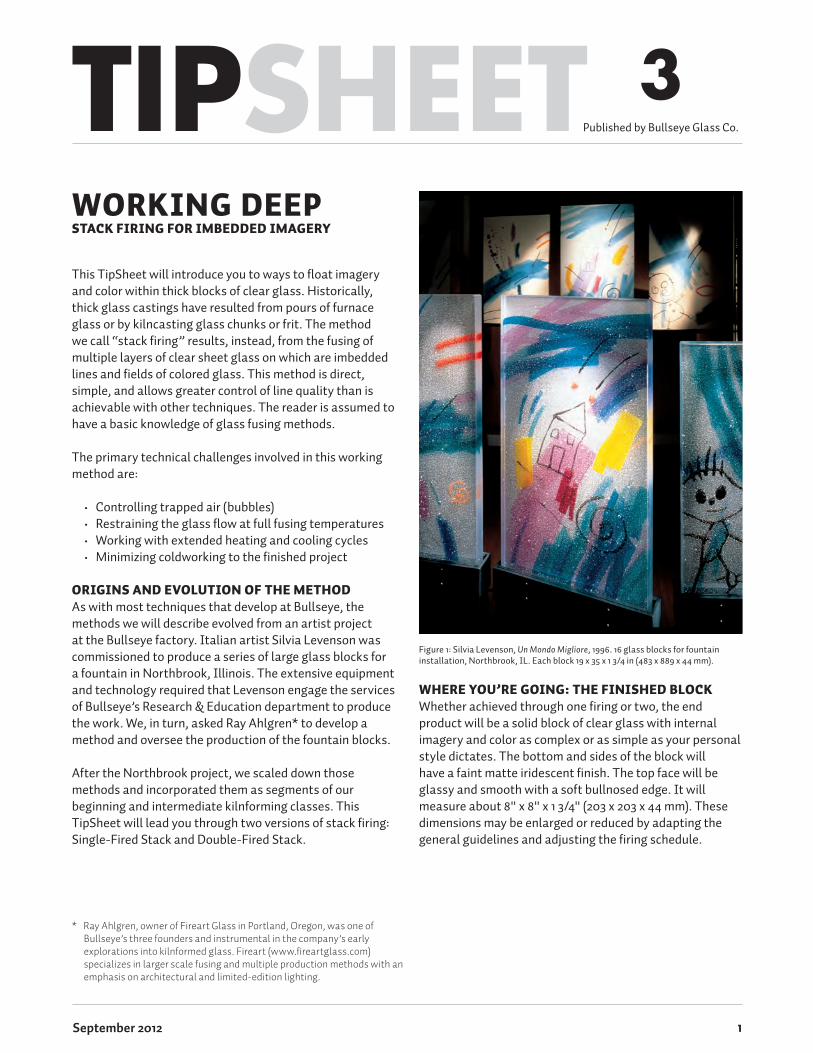
ORIGINS AND EVOLUTION OF THE mETHODAs with most techniques that develop at Bullseye, the methods we will describe evolved from an artist project at the Bullseye factory. Italian artist Silvia Levenson was commissioned to produce a series of large glass blocks for a fountain in Northbrook, Illinois. The extensive equipment and technology required that Levenson engage the services of Bullseye’s Research & Education department to produce the work. We, in turn, asked Ray Ahlgren* to develop a method and oversee the production of the fountain blocks.
After the Northbrook project, we scaled down those methods and incorporated them as segments of our beginning and intermediate kilnforming classes. This TipSheet will lead you through two versions of stack firing: Single-Fired Stack and Double-Fired Stack.
WHERE YOU’RE GOING: THE FINISHED BLOCkWhether achieved through one firing or two, the end product will be a solid block of clear glass with internal imagery and color as complex or as simple as your personal style dictates. The bottom and sides of the block will have a faint matte iridescent finish. The top face will be glassy and smooth with a soft bullnosed edge. It will measure about 8" x 8" x 1 3/4" (203 x 203 x 44 mm). These dimensions may be enlarged or reduced by adapting the general guidelines and adjusting the firing schedule.
* Ray Ahlgren, owner of Fireart Glass in Portland, Oregon, was one of Bullseye’s three founders and instrumental in the company’s early explorations into kilnformed glass. Fireart (www.fireartglass.com) specializes in larger scale fusing and multiple production methods with an emphasis on architectural and limited-edition lighting.
Figure 1: Silvia Levenson, Un Mondo Migliore, 1996. 16 glass blocks for fountain installation, Northbrook, IL. Each block 19 x 35 x 1 3/4 in (483 x 889 x 44 mm).
1

WHAT YOU NEED TO GET THERE: THE mATERIALSGlass: Because clarity is essential when working deep, we recommend using a very bright clear—one without a blue, green, or yellow tint. Bullseye’s Crystal Clear Transparent 3mm double-rolled sheet glass (001401-0030-F) will not muddy or mask your internal colors or lines.
For the bottom and four sidewalls, use Clear Transparent (001101-0037-F). Alternatively you may select colored irid sidepieces to create a contrasting frame around the block. The iridescent finish will give a cleaner release from the fiber paper or shelf separator than will the raw glass, which tends to pick up minute particles of fiber or separator.
The interior imagery will be created out of cut sheet, frit, powder, and/or stringers of colored glass.
Other Materials: During firing the glass stack will be restrained from flowing outwards by refractory dams. These may be made of mullite clay (sawn-up kiln shelves, for example), vermiculite board, or ceramic fiberboard. The stack will sit on a mullite clay shelf, which may be primed with shelf separator or covered with fiber paper or ThinFire. The upright dam walls will also require fiber paper strips to separate the glass from the refractory dams.
materials and Cut ListFor a block that will measure approximately 8" x 8" x 1 ¾" (203 x 203 x 44 mm) after firing, cut the following:
• Crystal Clear sheet (001401-0030-F): 13 @ 7 3/4" x 7 3/4" (197 x 197 mm)
• Clear sheet (001101-0037-F), or any colored glass with iridescent finish: 4 @ 7 7/8" x 1 7/16" (200 x 36 mm) 1 @ 7 3/4" x 7 3/4" (197 x 197 mm)
• 1/16" (1.5 mm) thick fiber paper: 4 pieces @ 8 3/16" x 1 3/4" (208 x 44 mm)*
• Mullite clay shelf material, ~5/8" (16 mm) thick or more, or rigidized ceramic fiberboard, ~3/4" (19 mm) thick or more: 4 dams @ 9" x 2" (229 x 51 mm) or more
• GlasTac
Consider Your DesignSketch out your design on tracing paper, using one sheet of paper for each layer of glass that will hold your imagery. Use these as a guide as you build your glass stack.
Remember that less is more in this process. Avoid large amounts of colored sheet glass, frit, or stringer within the interior. The clear block can quickly become muddy and chaotic.
If you use colored sheet glass for your imagery, plan to cut the forms into the clear glass just as you would create the parts for a stained glass window. Avoid laying a colored sheet glass form on top of the clear square. Instead, cut that same form out of the clear square and replace it with the colored form so that each layer is of uniform thickness.
You may include as many or as few layers of imagery in the block as you wish as long as you keep the bottom two (2) and top three (3) layers free of any cut pieces—which will help to control bubbles.
THE PROCESS: SINGLE-FIRED BLOCkGlass blocks may be created in a single firing, but because of the potential for air entrapment, this method is not recommended for blocks larger than 8" (203 mm) square.
Layering the Image: Avoiding BubblesOnce you have your design, begin to build the stack.
Place the square of clear irid glass irid side down onto a piece of thin cardboard (slightly larger than the sheet glass) on your worktable. Then place a single layer of clear on top of the irid square. When you later transport your stack to the kiln shelf, the cardboard will allow you to gently slide the stack onto the shelf with minimal jarring of the glass.
Depending on the complexity of your design, you may begin to compose directly on the second layer or stack up a few more squares of the clear glass. Keep the total amount of glass used for inclusions to no more than the equivalent of a single layer of sheet glass. If you add more than that, remove a layer of clear in order to keep the total volume of glass relatively constant at 14 layers – or 1 ¾" (44 mm) – thick.
Finish the stack with at least three full layers of clear. Using fewer layers of full sheets at the top of the stack can result in bubbles rising through and breaking on the surface. Keep these three layers free of cut sheet glass and frit to avoid trapping bubbles.
* Thicker fiber paper such as 1/8" (3 mm) may be used, but will compress more at the bottom of the block in response to the column pressure of the molten glass, resulting in a block that is wider at the shelf than at the top.
2
Irid strips, iridagainst fiber paper
Fiber paper
Mullite or rigidized ceramic fiber board dam approx. 1” (25mm) thick
As you design each layer, consider how the air will escape out the sides during firing. Avoid encircling areas with “barriers” of sheet glass, frit, or stringer. Plan for “escape routes” by which air can move laterally from the center of the block to the edges.
Any air that does not move out laterally during the first stages of firing will be trapped in the interior and rise up as bubbles during the later stages. These bubbles can break through the surface and eventually erupt as craters on the surface of the block.
Once all layers are composed, tack them in place with GlasTac to secure them for safe transport to the kiln.
Building the Side Walls and Dams: Restraining the FlowBecause glass that is higher than 1/4" (6 mm) will flow outward when fired to a full fuse, the glass stack must be surrounded by a dam of refractory material. At the same time, it must be prevented from sticking to that material.
For dams we use strips of 1" (25 mm) thick rigidized ceramic fiberboard on all four sides. Other refractory materials—strips cut from mullite clay shelves or vermiculite board, soft brick, Bullseye Bricks, or firebrick—may also be used to build your dams. Behind the dams you will need additional support in the form of heavy refractory materials such as Bullseye Bricks or firebricks. Without this additional support, the outward pressure of the melting glass will push out and/or topple the dams.
It is also necessary to put brick or refractory weights on top of the dams. Use one (1) pound per linear foot of dam per inch of thickness (454 grams per 305 linear mm of dam per 254 mm of thickness). Without extra weight, the glass can seep out at the base and side seams.
Use strips of 1/16" (1.5 mm) thick ceramic fiber paper to prevent the glass from sticking to the dam walls. The fiber paper must fit properly at all joints. Sloppy fiber paper joints will also result in glass seepage.
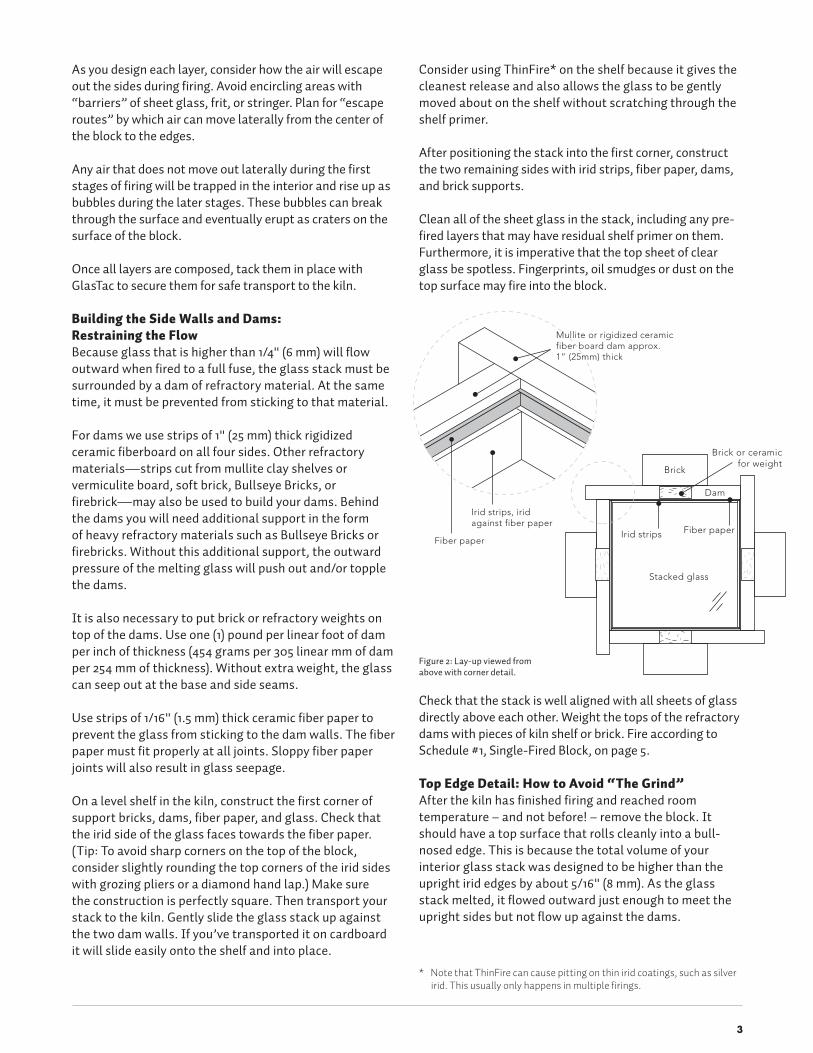
On a level shelf in the kiln, construct the first corner of support bricks, dams, fiber paper, and glass. Check that the irid side of the glass faces towards the fiber paper. (Tip: To avoid sharp corners on the top of the block, consider slightly rounding the top corners of the irid sides with grozing pliers or a diamond hand lap.) Make sure the construction is perfectly square. Then transport your stack to the kiln. Gently slide the glass stack up against the two dam walls. If you’ve transported it on cardboard it will slide easily onto the shelf and into place.
Consider using ThinFire* on the shelf because it gives the cleanest release and also allows the glass to be gently moved about on the shelf without scratching through the shelf primer.
After positioning the stack into the first corner, construct the two remaining sides with irid strips, fiber paper, dams, and brick supports.
Clean all of the sheet glass in the stack, including any pre-fired layers that may have residual shelf primer on them. Furthermore, it is imperative that the top sheet of clear glass be spotless. Fingerprints, oil smudges or dust on the top surface may fire into the block.
Brick
Brick or ceramicfor weight
Dam
Irid strips
Stacked glass
Fiber paper
Figure 2: Lay-up viewed from above with corner detail.
* Note that ThinFire can cause pitting on thin irid coatings, such as silver irid. This usually only happens in multiple firings.
Check that the stack is well aligned with all sheets of glass directly above each other. Weight the tops of the refractory dams with pieces of kiln shelf or brick. Fire according to Schedule #1, Single-Fired Block, on page 5.
Top Edge Detail: How to Avoid “The Grind”After the kiln has finished firing and reached room temperature – and not before! – remove the block. It should have a top surface that rolls cleanly into a bull-nosed edge. This is because the total volume of your interior glass stack was designed to be higher than the upright irid edges by about 5/16" (8 mm). As the glass stack melted, it flowed outward just enough to meet the upright sides but not flow up against the dams.
3
Trim
Are
a
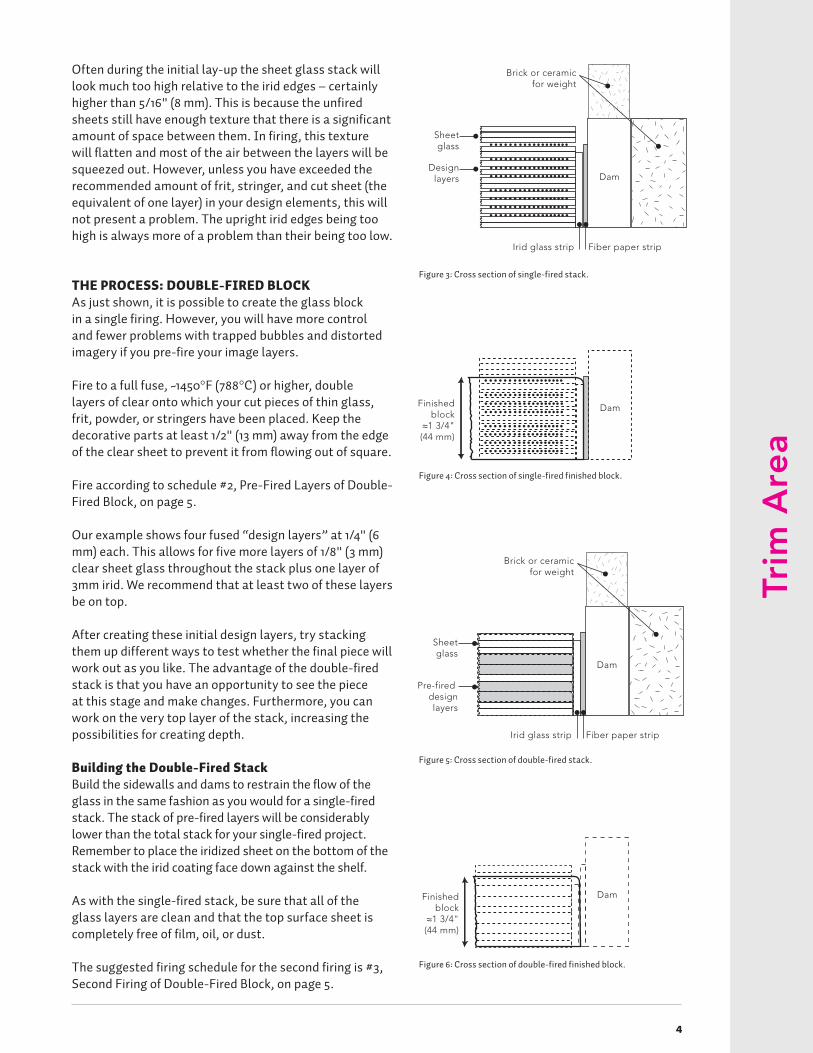
Designlayers
Sheetglass
Brick or ceramicfor weight
Dam
Dam
Irid glass strip Fiber paper strip
Finishedblock
≈1 3/4"(44 mm)
Designlayers
Sheetglass
Brick or ceramicfor weight
Dam
Dam
Irid glass strip Fiber paper strip
Finishedblock
≈1 3/4"(44 mm)
Often during the initial lay-up the sheet glass stack will look much too high relative to the irid edges – certainly higher than 5/16" (8 mm). This is because the unfired sheets still have enough texture that there is a significant amount of space between them. In firing, this texture will flatten and most of the air between the layers will be squeezed out. However, unless you have exceeded the recommended amount of frit, stringer, and cut sheet (the equivalent of one layer) in your design elements, this will not present a problem. The upright irid edges being too high is always more of a problem than their being too low.
THE PROCESS: DOUBLE-FIRED BLOCkAs just shown, it is possible to create the glass block in a single firing. However, you will have more control and fewer problems with trapped bubbles and distorted imagery if you pre-fire your image layers.
Fire to a full fuse, ~1450°F (788°C) or higher, double layers of clear onto which your cut pieces of thin glass, frit, powder, or stringers have been placed. Keep the decorative parts at least 1/2" (13 mm) away from the edge of the clear sheet to prevent it from flowing out of square.
Fire according to schedule #2, Pre-Fired Layers of Double-Fired Block, on page 5.
Our example shows four fused “design layers” at 1/4" (6 mm) each. This allows for five more layers of 1/8" (3 mm) clear sheet glass throughout the stack plus one layer of 3mm irid. We recommend that at least two of these layers be on top.
After creating these initial design layers, try stacking them up different ways to test whether the final piece will work out as you like. The advantage of the double-fired stack is that you have an opportunity to see the piece at this stage and make changes. Furthermore, you can work on the very top layer of the stack, increasing the possibilities for creating depth.
Building the Double-Fired StackBuild the sidewalls and dams to restrain the flow of the glass in the same fashion as you would for a single-fired stack. The stack of pre-fired layers will be considerably lower than the total stack for your single-fired project. Remember to place the iridized sheet on the bottom of the stack with the irid coating face down against the shelf.
As with the single-fired stack, be sure that all of the glass layers are clean and that the top surface sheet is completely free of film, oil, or dust.
The suggested firing schedule for the second firing is #3, Second Firing of Double-Fired Block, on page 5.
Pre-fired designlayers
Sheetglass
Brick or ceramicfor weight
Dam
Irid glass strip Fiber paper strip
Finishedblock
≈1 3/4"(44 mm)
Dam
Pre-fired designlayers
Sheetglass
Brick or ceramicfor weight
Dam
Irid glass strip Fiber paper strip
Finishedblock
≈1 3/4"(44 mm)
Dam
Figure 4: Cross section of single-fired finished block.
Figure 6: Cross section of double-fired finished block.
Figure 3: Cross section of single-fired stack.
Figure 5: Cross section of double-fired stack.
4

Figure 7: Jung-Hyun Yoon, distort, 2006. Kilnformed and kilncast glass, 8 3/4 x 11 7/8 x 1 7/8 in (222 x 302 x 48 mm).
FIRING SCHEDULES
Single Fired BlockSEGMENT RATE (DPH)* TEMPERATURE HOLD
1 400°F (222°C) 1250°F (677°C) 3:001
2 600°F (333°C) 1500°F (816°C)2 :20
3 AFAP** 960°F (516°C) 7:00
4 9°F (5°C) 800°F (427°C) :00
5 17°F (9°C) 700°F (371°C) :00
6 57°F (31°C) 75°F (24°C) :00
Pre-Fired Layers of Double-Fired BlockSEGMENT RATE (DPH)* TEMPERATURE HOLD
1 450°F (250°C) 1250°F (667°C) :45
2 600°F (333°C) 1480°F (804°C)2 :10
3 AFAP** 960°F (516°C) :30
4 210°F (116°C) 700°F (371°C) :00
5 400°F (222°C) 75°F (24°C) :00
Second Firing of Double-Fired BlockSEGMENT RATE (DPH)* TEMPERATURE HOLD
1 400°F (222°C) 1250°F (677°C) 1:151
2 600°F (333°C) 1480°F (804°C)3 :10
3 AFAP** 960°F (516°C) 7:00
4 9°F (5°C) 800°F (427°C) :00
5 17°F (9°C) 700°F (371°C) :00
6 57°F (31°C) 75°F (24°C) :00
* DPH = degrees per hour
** “As Fast As Possible” will be whatever cooling rate results from the kiln power being cut by the controller. We do not advocate crash cooling. Leave your kiln closed, allowing it to cool naturally to the anneal soak temperature.
1 A longer hold time is necessary for the Single-Fired Block than for the Double-Fired. More time is needed to “squeeze” any trapped air from the interior of the design layers in order to avoid bubbles.
2 Process temperatures and hold times will vary from kiln to kiln.
3 The slightly lower temperature and slightly shorter hold time on the Double-Fired Block compensates somewhat for the heatwork that has already gone into this glass in the pre-firings.
FINISHINGThe techniques outlined in this TipSheet will result in a finished block with clean, rolled edges and crisp corners. If the block has sharp edges and/or needlepoints, grinding may be necessary. There are many tools and methods available for grinding glass, and they range widely in cost and size. The most basic, a sickle stone, will knock off sharp edges, but will leave a rough, abraded look. A belt sander or lapping wheel will do the job quickly, right up to a polish, but both are large and fairly expensive tools. Diamond hand laps in grit sizes from 60 to 3500 do a wonderful job of everything from a rough grind to close to a polish.
DISPLAYYou may wish to work with a metalworker to fabricate a simple base like the one pictured here (see Figure 7). Smaller blocks can be used as paperweights. Larger blocks work well as tops for end tables. Really large blocks make can function as dividing walls, benches, countertops, and even stair treads!
See next page for project troubleshooting ›
5
www.bullseyeglass.com
©20
05
Bulls
eye
Gla
ss C
o. •
2012
1026
_KM
F
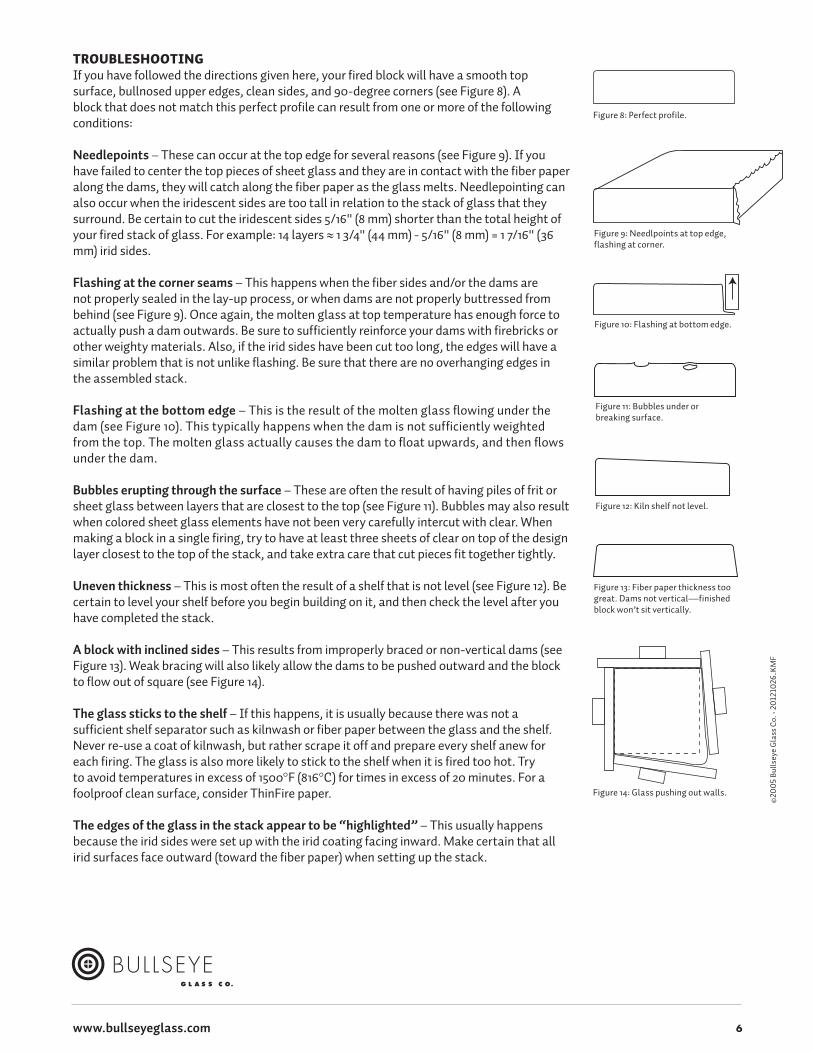
TROUBLESHOOTINGIf you have followed the directions given here, your fired block will have a smooth top surface, bullnosed upper edges, clean sides, and 90-degree corners (see Figure 8). A block that does not match this perfect profile can result from one or more of the following conditions:
Needlepoints – These can occur at the top edge for several reasons (see Figure 9). If you have failed to center the top pieces of sheet glass and they are in contact with the fiber paper along the dams, they will catch along the fiber paper as the glass melts. Needlepointing can also occur when the iridescent sides are too tall in relation to the stack of glass that they surround. Be certain to cut the iridescent sides 5/16" (8 mm) shorter than the total height of your fired stack of glass. For example: 14 layers ≈ 1 3/4" (44 mm) - 5/16" (8 mm) = 1 7/16" (36 mm) irid sides.
Flashing at the corner seams – This happens when the fiber sides and/or the dams are not properly sealed in the lay-up process, or when dams are not properly buttressed from behind (see Figure 9). Once again, the molten glass at top temperature has enough force to actually push a dam outwards. Be sure to sufficiently reinforce your dams with firebricks or other weighty materials. Also, if the irid sides have been cut too long, the edges will have a similar problem that is not unlike flashing. Be sure that there are no overhanging edges in the assembled stack.
Flashing at the bottom edge – This is the result of the molten glass flowing under the dam (see Figure 10). This typically happens when the dam is not sufficiently weighted from the top. The molten glass actually causes the dam to float upwards, and then flows under the dam.
Bubbles erupting through the surface – These are often the result of having piles of frit or sheet glass between layers that are closest to the top (see Figure 11). Bubbles may also result when colored sheet glass elements have not been very carefully intercut with clear. When making a block in a single firing, try to have at least three sheets of clear on top of the design layer closest to the top of the stack, and take extra care that cut pieces fit together tightly.
Uneven thickness – This is most often the result of a shelf that is not level (see Figure 12). Be certain to level your shelf before you begin building on it, and then check the level after you have completed the stack.
A block with inclined sides – This results from improperly braced or non-vertical dams (see Figure 13). Weak bracing will also likely allow the dams to be pushed outward and the block to flow out of square (see Figure 14).
The glass sticks to the shelf – If this happens, it is usually because there was not a sufficient shelf separator such as kilnwash or fiber paper between the glass and the shelf. Never re-use a coat of kilnwash, but rather scrape it off and prepare every shelf anew for each firing. The glass is also more likely to stick to the shelf when it is fired too hot. Try to avoid temperatures in excess of 1500°F (816°C) for times in excess of 20 minutes. For a foolproof clean surface, consider ThinFire paper.
The edges of the glass in the stack appear to be “highlighted” – This usually happens because the irid sides were set up with the irid coating facing inward. Make certain that all irid surfaces face outward (toward the fiber paper) when setting up the stack.
Figure 9: Needlpoints at top edge, flashing at corner.
Figure 14: Glass pushing out walls.
Figure 13: Fiber paper thickness too great. Dams not vertical—finished block won’t sit vertically.
Figure 12: Kiln shelf not level.
Figure 11: Bubbles under or breaking surface.
Figure 10: Flashing at bottom edge.
Figure 8: Perfect profile.
6