ti-series air/fan cooled laser & uc-2000 quick start guide start... · with in the introduction...
TRANSCRIPT

1 QSG ti-Series Air/Fan Cooled Laser & UC-2000 Ver 1.1
a Novanta company
ti-Series™ Air/Fan Cooled Laser & UC-2000 Quick Start Guide
1. Under your ti-Series laser at the bottom of the box you will find the mounting hardware/compo- nents kit. Don’t forget to save all shipping containment and plug covers and set them aside.
Unpacking:
1.1 Lifting the ti Series laser out of its packaging.
1.2 ti Series laser.
2. Upon arrival, inspect all shipping containers for signs of damage. If you discover shipping damage, document the damage (photographically if possible), then immediately notify the shipping carrier (responsible party for any transportation damage) and SYNRAD®. See the inventory section with in the Introduction chapter of the Operation Manual for packaging list(s).
Tip: UC-2000 controller ships separately if or-dered without additional accessories.
ImportantNote: Read all Danger, Warning, Caution terms, symbols, and instructions locat-
ed in the (Laser Safety Hazard information) sections in the ti-Series Laser Operation Manuals. A pdf version is available online at: http://www.synrad.com/Manuals/manu-als_laser.htm.
ImportantNote:
Keep All Foam and Packaging, you will need to re-use it when moving your laser to prevent damage that could void your warranty. Refer to this guide and the Technical Reference chapters in the laser’s Operation Manual when re-packaging for shipping and/or relocation. Remove all accessory items not originally attached to the laser prior to re-packaging for shipping.

2 QSG ti-Series Air/Fan Cooled Laser & UC-2000 Ver 1.1
a Novanta company
ti-Series™ Air/Fan Cooled Laser & UC-2000 Quick Start Guide
Readying your Laser for use:
Note: Remove the laser aperture self-adhesive film before mounting your laser into final posi-tion.
3. Failure to remove the aperture seal can damage your system!
(Fan-Cooled ti60 Shown)
AVOID EXPOSUREInvisible laser radiation
is emitted fromthis aperture.
Failure to remove
seal can damage the laser.
Mounting feet and/or rails are optional, for complete details, refer to the ti-Series Operator’s Manual. Remove the laser aperture self-adhesive film before mounting to the rail.
SYNRAD does not recommend mounting lasers in a vertical, (head and/or tail down) position. Please contact the factory for limitations as a vertical orientation increases the risk of damage to the lasers optics.
Consult the factory for further mounting angle guidance outside >20% from the horizontal. When mounting the laser to the baseplate, use only one metric or SAE fastener per mounting tab on the baseplate. Do not use any type of jackscrew arrangement as this will twist the baseplate and may distort the tube. The laser’s mount-ing feet are precisely aligned and shimmed at the factory to ensure alignment between the marking head and the Mounting Rail. Do not loosen or remove the mounting feet from the laser.
ImportantNote:
3 QSG ti-Series Air/Fan Cooled Laser & UC-2000 Ver 1.1
a Novanta company
ti-Series™ Air/Fan Cooled Laser & UC-2000 Quick Start Guide
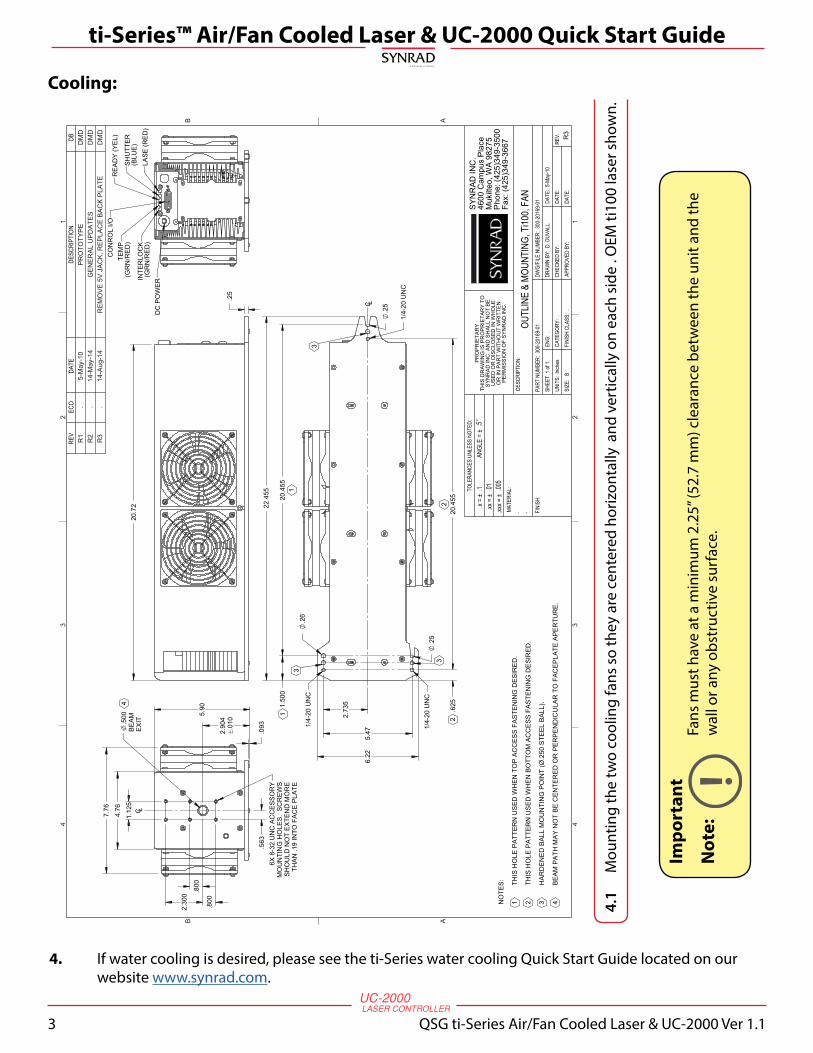
Cooling:
20.7
2
.25
7.76
4.76
.093
5.90
6X 8
-32
UN
C A
CC
ES
SO
RY
MO
UN
TIN
G H
OLE
S.
SC
RE
WS
SH
OU
LD N
OT
EX
TEN
D M
OR
ETH
AN
.19
INTO
FA
CE
PLA
TE
.500
BE
AM
EX
IT
2.3
00 .8
00
.800
.563
2.90
4.0
10
1.1
25
4
C L
DC
PO
WE
R
CO
NR
OL
I/O
INTE
RLO
CK
(GR
N/R
ED
)
TEM
P(G
RN
/RE
D)
RE
AD
Y (Y
EL)
SH
UTT
ER
(BLU
E)
LAS
E (R
ED
)
20.4
55.6
251.50
020
.455
22.4
55
.26
1/4-
20 U
NC
1/4-
20 U
NC
.25
1/4-
20 U
NC
.25
2.73
5
5.47
6.22
11
22
3
3
3
C L
NO
TES
: THIS
HO
LE P
ATT
ER
N U
SE
D W
HE
N T
OP
AC
CE
SS
FA
STE
NIN
G D
ES
IRE
D.
THIS
HO
LE P
ATT
ER
N U
SE
D W
HE
N B
OTT
OM
AC
CE
SS
FA
STE
NIN
G D
ES
IRE
D.
HA
RD
EN
ED
BA
LL M
OU
NTI
NG
PO
INT
(Ø.2
50 S
TEE
L B
ALL
).
BE
AM
PA
TH M
AY
NO
T B
E C
EN
TER
ED
OR
PE
RP
EN
DIC
ULA
R T
O F
AC
EP
LATE
AP
ER
TUR
E.
1 2 3 4
DESC
RIPT
ION:
FINI
SH:
MAT
ERIA
L:
REV
ECO
DATE
DESC
RIPT
ION
DB
TOLE
RANC
ES U
NLES
S NO
TED: .5
A
NGLE
= ±
.1 .
x = ±
.01 .x
x = ±
.005
.xxx =
±
PR
OP
RIE
TAR
YTH
IS D
RA
WIN
G IS
PR
OP
RIE
TAR
Y T
OS
YN
RA
D IN
C. A
ND
SH
ALL
NO
T B
EU
SE
D O
R D
ISC
LOS
ED
IN W
HO
LEO
R IN
PA
RT
WIT
HO
UT
WR
ITTE
NP
ER
MIS
SIO
N O
F S
YN
RA
D IN
C.
PART
NUM
BER:
300
-201
69-0
1DW
G/FI
LE N
UMBE
R: 3
00-2
0169
-01
SHEE
T 1
of 1
ENG:
.DR
AWN
BY:
D. D
UVAL
LDA
TE:
5-M
ay-1
0
UNIT
S: I
nche
sCA
TEGO
RY:
.CH
ECKE
D BY
:DA
TE:
SIZE
: B
FINI
SH C
LASS
: .
APPR
OVED
BY:
DATE
:
SY
NR
AD
INC
.46
00 C
ampu
s P
lace
Muk
ilteo
, WA
982
75P
hone
: (42
5)34
9-35
00Fa
x: (4
25)3
49-3
667
OUTL
INE
& M
OUNT
ING,
Ti10
0, F
AN..
DM
DP
RO
TOTY
PE
5-M
ay-1
0.
R1
GE
NE
RA
L U
PD
ATE
SR
2D
MD
14-M
ay-1
4.
RE
MO
VE
5V
JA
CK
, RE
PLA
CE
BA
CK
PLA
TER
3D
MD
14-A
ug-1
4.
AAB
B
1 122
3 344
REV. R3
4.1
M
ount
ing
the
two
cool
ing
fans
so
they
are
cen
tere
d ho
rizon
tally
and
ver
tical
ly o
n ea
ch s
ide
. OEM
ti10
0 la
ser s
how
n.
4. If water cooling is desired, please see the ti-Series water cooling Quick Start Guide located on our website www.synrad.com.
Impo
rtan
t
Not
e:Fa
ns m
ust h
ave
at a
min
imum
2.2
5” (5
2.7
mm
) cle
aran
ce b
etw
een
the
unit
and
the
wal
l or a
ny o
bstr
uctiv
e su
rfac
e.

4 QSG ti-Series Air/Fan Cooled Laser & UC-2000 Ver 1.1
a Novanta company
ti-Series™ Air/Fan Cooled Laser & UC-2000 Quick Start Guide
NO
TES: TH
IS H
OLE
PAT
TER
N U
SED
WH
EN T
OP
ACC
ESS
FAST
ENIN
G D
ESIR
ED.
THIS
HO
LE P
ATTE
RN
USE
D W
HEN
BO
TTO
M A
CC
ESS
FAST
ENIN
G D
ESIR
ED.
HAR
DEN
ED B
ALL
MO
UN
TIN
G P
OIN
T (Ø
.250
STE
EL B
ALL)
.
BEAM
PAT
H M
AY N
OT
BE C
ENTE
RED
OR
PER
PEN
DIC
ULA
R T
O F
ACEP
LATE
APE
RTU
RE.
C
C
DES
CR
IPTI
ON
:
FIN
ISH
:
MAT
ERIA
L:
REV
ECO
DAT
ED
ESC
RIP
TIO
ND
B
TOLE
RAN
CES
UN
LESS
NO
TED
:. °
A
NG
LE =
±.
.x
= ±
. .x
x =
±.
.xxx
= ±
.
PRO
PRIE
TAR
YTH
IS D
RAW
ING
IS P
RO
PRIE
TAR
Y TO
SYN
RAD
INC
. AN
D S
HAL
L N
OT
BEU
SED
OR
DIS
CLO
SED
IN W
HO
LEO
R IN
PAR
T W
ITH
OU
T W
RIT
TEN
PER
MIS
SIO
N O
F SY
NR
AD IN
C.
PAR
T N
UM
BER
:D
WG
/FIL
E N
UM
BER
:SH
EET
ENG
:D
RAW
N B
Y:D
ATE:
UN
ITS:
CAT
EGO
RY:
CH
ECKE
D B
Y:D
ATE:
SIZE
: B
FIN
ISH
CLA
SS:
APPR
OVE
D B
Y:D
ATE:
SYN
RAD
INC
.46
00 C
ampu
s Pl
ace
Muk
ilteo
, WA
9827
5Ph
one:
(425
)349
-350
0Fa
x: (4
25)3
49-3
667
OU
TLIN
E &
MO
UN
TIN
G, F
AN-C
OO
LED
, Ti6
0/Ti
80
10-M
ar-0
930
0-19
847-
021
. .
300-
1984
7-02
of1
D. D
UVA
LLIn
ches
.
DM
DR
ELEA
SE T
O P
RO
DU
CTI
ON
14-M
ay-0
940
45A
ADD
NO
TE 4
BD
MD
9-Se
p-09
4107
ADD
DIM
S FO
R F
ANS
AND
CU
T-O
UTS
CD
MD
28-S
ep-0
941
18
10.6
61.
38
3.18
.25
20.8
3
INTE
RLO
CK
(GR
N/R
ED)
TEM
P (G
RN
/RED
)
REA
DY
(YEL
)SH
UTT
ER(B
LUE)
LASE
(RED
)
DC
PO
WER
CO
NTR
OL
I/O
22.4
55
2.73
5
5.47
6.22
1.50
020
.455
.625
20.4
55
Ø.2
50
1/4-
20 U
NC
1/4-
20 U
NC
Ø.2
50
1/4-
20 U
NC
Ø.2
63
3
3
1
2
.094
.563
1.12
5
2.90
5±.
010
.800
.800
2.30
0
Ø.5
00BE
AMEX
IT
7.72
5.90
4.72
6X 8
-32
UN
C A
CC
ESSO
RY
MO
UN
TIN
G H
OLE
S. S
CR
EWS
SHO
ULD
NO
T EX
TEN
D M
OR
ETH
AN .1
9 IN
TO F
ACE
PLAT
E
5VD
CAC
CES
SOR
YPO
WER
4
1 2 3 4
C
1
2
4.2
M
ount
ing
cool
ing
fan
so th
at it
is c
ente
red
horiz
onta
lly a
nd v
ertic
ally
on
each
sid
e. O
EM ti
60/8
0 la
ser s
how
n.
Cooling (Continued):

5 QSG ti-Series Air/Fan Cooled Laser & UC-2000 Ver 1.1
a Novanta company
ti-Series™ Air/Fan Cooled Laser & UC-2000 Quick Start Guide
Power & Control Connections:
5. Connect the mini-Din to the power cord as shown below. The BNC from the UC-2000 controller to the laser’s port(s) shown in the figure below located on the rear of the laser.
5.1f Mini-DIN to power
A B C D E
A. ANV/ANC Connector- input BNC connector for applications using external analog voltage or current control signals.
B. Laser Connector- 4 pin mini-DIN connection for the Power/Control cable & tickle/PWM.
C. Serial Port Connector- DB9 connector allows a computer or programmable logic controller (PLC) to control the UC-2000 via an RS-232 serial port.
D. C/L Connector- 8-pin mini-DIN connector allows closed loop power control of lasers equipped with SYNRAD® closed loop kit.
E. Gate Connector- Input BNC connector for applications using external gating signals to gate the laser beam on and off.

6 QSG ti-Series Air/Fan Cooled Laser & UC-2000 Ver 1.1
a Novanta company
ti-Series™ Air/Fan Cooled Laser & UC-2000 Quick Start Guide
Important Note:
When performing the initial start-up sequence, check that the factory-installed DB-9 jumper plug is installed. If not, you must provide the required Remote Interlock and Remote Keyswitch signals to the DB-9 Connector. See the ti-Series Operation Manual for DB-9 connections, pinouts and signal descriptions.
Initial Start up (with a UC-2000 Controller):
6. Before starting your ti-Series laser, verify functionality by placing an appropriate beam block 61cm (24 in) from the laser aperture or a power meter to prevent the beam from traveling beyond the work area. If using water for cooling, see the Operation Manual for specifications.
7. Set the UC-2000 to MANUAL mode, utilizing the ‘SELECT’ button to scroll through the menu select- ions, and set the PWM Adj Knob to provide zero percent output (0.0%). The UC-2000’s Lase indicator will also be Off.
If you have not yet operated your UC-2000 Universal Laser Controller, refer to the UC-2000 Laser Con-troller Operator’s Manual for setup and operation instructions before continuing.
Ensure that all personnel in the area are wearing protective eye-wear!
Use the UC-2000 as a stand-alone controller; do not attempt to control the laser or UC-2000 externally.
Coarse ‘PWM’ adjustment knob
7.2 To adjust PWM to 00.0%, turn the “PWM’ coarse adjustment till 0 percent PWM output displays.
7.1 LASE indicator on the laser will be off too.
A
A. PWM Adj Knob- Rotate to change PWM duty cycle. When setting PWM duty cycle manually, rotate to change output in 0.5% increments OR press down and turn to increase/decrease laser PWM duty cycle in 5% increments.

7 QSG ti-Series Air/Fan Cooled Laser & UC-2000 Ver 1.1
a Novanta company
ti-Series™ Air/Fan Cooled Laser & UC-2000 Quick Start Guide
Initial Start up (with a UC-2000 Controller-continued):
8. If the laser has a Diode Pointer installed, remove its aperture dust cover.
9. Turn on the DC power supply to the laser.
10. Press the UC-2000’s Lase ‘ON/OFF’ button. The Lase indicator on the UC-2000 should illuminate. Use the “PWM” Adj Knob on the UC-2000 to slowly increase power. The intensity of the laser’s LASE indica- tor increases in brightness as the PWM duty cycle increases. The spot where the beam hits the beam block should also increase in brightness to indicate increased power output. The LASE indicator on the laser will grow bright.
Each time an OEM laser is powered up or a Keyswitch version is cycled OFF/ON, a five-second delay occurs between the time that the PWR LED illuminates and the laser is permitted to lase.
Note:
Decrease power before proceeding to the next step, otherwise damage to your unit could occur!
Important Note:
11. Reduce the PWM duty cycle to 0.0% and press the UC-2000’s Lase ‘On/Off’ button to toggle on or off lasing. The LASE indicator on the UC-2000 turns off and the laser’s LASE LED may go dim, flicker, or go out entirely.
12. Turn off the laser’s DC power supply if not utilizing the laser.
13. If your ti-Series laser fails to lase, refer to Troubleshooting in the Maintenance/Troubleshooting chapter for troubleshooting information.
10.2 Bright LASE LED. 10.3 Dim LASE LED.
10.1 LASE on/off button.

8 QSG ti-Series Air/Fan Cooled Laser & UC-2000 Ver 1.1
a Novanta company
ti-Series™ Air/Fan Cooled Laser & UC-2000 Quick Start Guide
Starting auxiliary equipment14. Ensure that all personnel in the area are wearing protective eyewear.
15. Assure the red self-adhesive aperture seal is removed from the laser faceplate.
16. Place a power meter, or appropriate beam block, 61 cm (24 in) from the laser aperture to prevent the beam from traveling beyond the work area.
17. Ensure that your PWM controller is set to zero percent output (0.0%).
18. If the laser has a Diode Pointer installed, remove its aperture dust cover.
19. Turn on the laser’s DC power supply.
Initial Start up (Without a UC-2000 Controller):
Caution
Possible equipment damage
ti-Series lasers MUST be provided with a pre-ionizing “tickle” signal during standby or laser “low” periods. This signal is automatically provided by SYNRAD®’s UC-2000 Universal Laser Controller.A tickle signal keeps the plasma ionized during laser ‘low’ periods and facilitates plasma breakdown and pulse-to-pulse fidelity. Damage to or malfunction of the laser may occur if this, or equivalent drive signals are not provided. If the laser has been “OFF” or the tickle has not been applied for any length of time apply the tickle signal for at least two seconds before apply-ing any PWM command signal.
Note: If you have chosen not to use a UC-2000 to control the laser, follow the procedure below to verify the laser’s functionality. You will need to provide a tickle signal and a pulse width modulated (PWM) Command signal to the laser’s CTRL input connector. Refer to Controlling laser power in the Technical Reference chapter for tickle and PWM Command signal descriptions.
In electrically-noisy environments, long lengths of unshielded wire act like an antenna and may generate enough voltage to trigger un-commanded lasing.
WarningSerious personal injury

9 QSG ti-Series Air/Fan Cooled Laser & UC-2000 Ver 1.1
a Novanta company
ti-Series™ Air/Fan Cooled Laser & UC-2000 Quick Start Guide
Initial Start up (Without a UC-2000 Controller):
20. Verify that the red LASE LED illuminates dimly after approximately five seconds. This indicates that tickle pulses are being applied to the laser and that it is safe to apply a PWM Command signal.
21. Apply a PWM Command signal (a +5 VDC, 5 kHz square wave of 1 µs to 3 µs duration) to the laser’s CTRL connector.
22. Slowly increase the duty cycle of the signal. The intensity of the laser’s LASE indicator increases in brightness as the PWM duty cycle increases. The spot where the beam hits the beam block should also increase in brightness to indicate an increasing power output.
Check your laser’s output power23. With your PWM signal source set for maximum power output, measure laser output using a laser power meter (such as SYNRAD®’s PW-250 Power Wizard®) to verify that output power is consistent with the power rating for your particular model. Refer to General specifications in the Technical Reference chapter for output power specifications.
24. Reduce the PWM duty cycle to 0.0%. The Lase indicator on the laser’s LASE LED turns dim, flickers, and can turn off entirely during tickle signal only.
25. Turn off the DC power supply to the laser when not in use.