thesis & dissertation · 2020-01-28 · d. in the “page setup” section of the “page...
TRANSCRIPT

Thesis & Dissertation:
Troubleshooting/How-To Resources for Microsoft Word

Page | 2
UTSA | The Graduate School
Table of Contents
Introduction ................................................................................................................................ 3
Using the Template .................................................................................................................... 4
Page Numbers ........................................................................................................................... 5
Landscape Pages .................................................................................................................... 10
General Tips and Tricks ........................................................................................................... 16

Page | 3
UTSA | The Graduate School
Introduction
This guide covers the most common questions that graduate students have while using Microsoft Word to
format their thesis/dissertation to meet The Graduate School’s requirements. This guide is meant to be
used as a troubleshooting supplement to the Microsoft Word templates available on The Graduate
School’s website (current templates can be found at: http://graduateschool.utsa.edu/current-
students/formatting-requirements/).
Instructions and screenshots in this guide cover settings found in Microsoft Word 2013. However, all
versions of Word contain the features we will cover. If application of the instructions in this guide to a
different version of Word is not immediately apparent, visit Microsoft’s support site at:
https://support.office.com/en-us/word.

Page | 4
UTSA | The Graduate School
Using the Template
There are two approaches you can take when using The Graduate School’s Microsoft Word template to
format your document:
Copy/paste your document’s text into the template file
or
Use the template as a guide to format your existing/in-progress document
The majority of this guide assumes that you are formatting your document using the template as a guide,
and therefore that all settings within the template file have not yet been set up in your document. In other
words, we’re creating the template from scratch using your document.
If you are formatting your document by copy/pasting or entering your work into the template file, you
might still find this guide helpful in the event that template settings need to be changed or replicated.

Page | 5
UTSA | The Graduate School
Page Numbers
The Graduate School’s template requires specific pagination of document sections. This section will
cover how to format your document within Word to meet these requirements.
Section Breaks for Required Pagination
In order to apply different page number styles to different portions of your document, you’ll need to break
your document into sections. This is accomplished by inserting section breaks at the end of the last
page of each section.
The table below provides an overview of where you will need to place section breaks within your
document to facilitate inserting page numbers.
Table 1. Section Breaks for Required Pagination
PAGE(S) PAGINATION
Title Page None (counted, not marked)
Copyright (optional) None (counted if present, not marked)
Dedication (optional) None (counted if present, not marked)
SECTION BREAK
Acknowledgements Roman Numeral (starts at ii, iii, or iv)
Abstract Roman Numeral
Table of Contents Roman Numeral
List of Tables Roman Numeral
List of Figures Roman Numeral
SECTION BREAK
Document Text Arabic Numeral (starts at 1)
Appendices (optional) Arabic Numeral
References Arabic Numeral
SECTION BREAK
Vita None (Listed in ToC, not counted)
The first page in your document with a page number will always be the Acknowledgements page.
Depending on whether or not you have included the optional Copyright and Dedication pages, it will be
numbered as ii, iii, or iv. This is because the previous pages are counted; they just will not have a
number printed on the page.
Page | 6
UTSA | The Graduate School
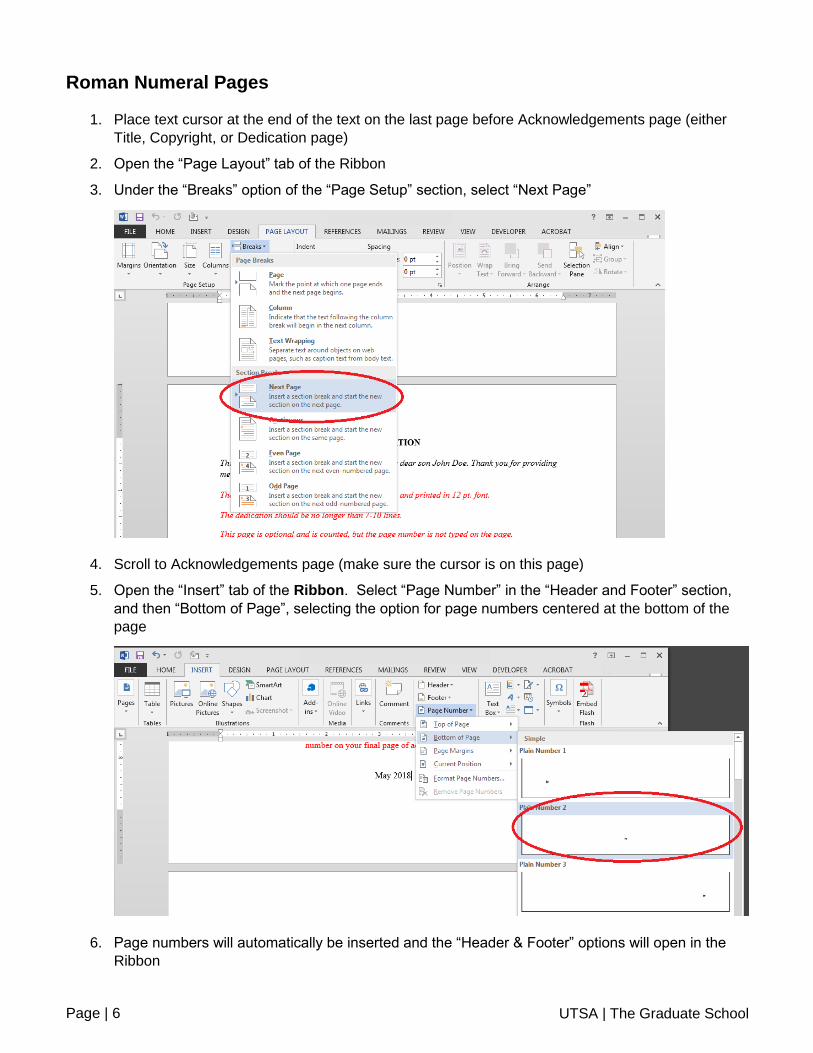
Roman Numeral Pages
1. Place text cursor at the end of the text on the last page before Acknowledgements page (either
Title, Copyright, or Dedication page)
2. Open the “Page Layout” tab of the Ribbon
3. Under the “Breaks” option of the “Page Setup” section, select “Next Page”
4. Scroll to Acknowledgements page (make sure the cursor is on this page)
5. Open the “Insert” tab of the Ribbon. Select “Page Number” in the “Header and Footer” section,
and then “Bottom of Page”, selecting the option for page numbers centered at the bottom of the
page
6. Page numbers will automatically be inserted and the “Header & Footer” options will open in the
Ribbon

Page | 7
UTSA | The Graduate School
7. Verify that “Link to Previous” is not selected
8. In the same tab as above, open the “Page Number” dropdown menu and select “Format Page
Numbers”
9. Select the Roman numerals (“i, ii, iii, …”) option in the “Number format” dropdown menu
10. Under “Page numbering” select “Start at:” and enter the Roman numeral to be displayed on the
Acknowledgements page (ii, iii, or iv, depending on inclusion of Copyright and Dedication pages)
11. Delete any page numbers that are on the pages in Section 1 (Title Page, Copyright, Dedication)—
as long as “Link to Previous” in Section 2’s footer is not selected, deleting the page numbers in
Section 1 will not affect the page numbers in Section 2
Arabic Numeral Pages
1. Place text cursor at the end of the text on the last page before first (or introductory) chapter of
document’s body text

Page | 8
UTSA | The Graduate School
2. Insert a section break at the end of this page (see steps 2-3 above)
3. Scroll to first page of first (or introductory) chapter of document (make sure the cursor is on this
page)
4. Insert page numbers (see steps 5-8 above)
5. Select the Arabic numerals (“1, 2, 3, …”) option in the “Number Format” dropdown menu
6. Under “Page Numbering” start at page 1
7. Verify that pagination on previous pages is still the same (Roman numbering on all pages
between Acknowledgements and Chapter 1)—as long as “Link to Previous” in Section 3’s footer
was not selected, changing to Arabic numbering should not have affected these pages
Vita Page
1. Place text cursor at the end of text on last page of References/Bibliography section
2. Insert a section break at the end of this page (see steps 2-3 under Roman Numeral Pages above)
3. Vita page should now be numbered “1”
4. Double-click in footer of Vita page (around the “1”) to open footer options
5. Click on the “Link to Previous” icon in Ribbon to de-activate it

Page | 9
UTSA | The Graduate School
6. Highlight page number and delete it
7. Verify that all previous page numbers in the document are still correctly formatted—as long as
“Link to Previous” in the Vita page’s footer was not selected, all other pages in the document
should not have been affected
Reminders and Tips
As a last resort, unwanted page numbers can be manually hidden by:
INSERTShapesRectangleFill: White; No Outline
o Verify that pagination in the rest of the document is accurate when using this method
Make sure that page numbers are formatted in Times New Roman 12 pt. font—the Word default
font (11 pt. Calibri) remains active in the footer and needs to be changed manually
You might find it helpful to insert page breaks at the end of each chapter within your document—
this will ensure that while you are working within the chapter, the following chapter will
automatically begin on a new page as required

Page | 10
UTSA | The Graduate School
Landscape Pages
The Graduate School’s template strictly requires 1” margins on all sides of every page in your document.
This includes all pages containing tables, figures, and images. For larger objects that do not legibly fit
within the margins, re-orienting the page from portrait to landscape layout might prove beneficial.
Landscape pages should appear within your document like this:
There are two ways to accomplish using landscape pages in your document:
1. Change the page’s orientation to landscape, or
2. Keep the page’s orientation as portrait, but rotate the material on the page
Option 1: Change the Page’s Orientation to Landscape
Pro: When scrolling through document in Word, it is easier to read landscape tables/figures at a glance
while working on material
Con: Lots of steps and inclusion of section breaks
Instructions:
1. Highlight the text and objects that you would like to appear on a separate, landscape page (likely
your table/figure and its title/caption)
Please Note:
Page number placement—
bottom short edge of page
Object orientation:
Top of object runs along left
long edge of page
Justification will match rest
of tables/figures in
document (example
shown is for centered
tables)

Page | 11
UTSA | The Graduate School
2. In the “Page Layout” section of the Ribbon, expand the “Page Setup” section to view advanced
page formatting options
3. In the advanced “Page Setup” options, select “Landscape” under “Orientation”
4. In the “Apply to:” dropdown menu under “Preview,” select “Selected text”
5. Section breaks are automatically created—the landscape portion should now be its own section

Page | 12
UTSA | The Graduate School
By default, Word will place the page number on the long edge of the page. The template requires the
page number to be placed on the left short edge of landscape pages (to match placement of portrait
pages within the document. Now, we must fix the page number placement:
6. Double-click near the page number to activate header/footer view
7. In the “Navigation” section of the Ribbon, unselect “Link to Previous”
8. Click “Go to Header” and unselect the “Link to Previous” option for the header as well
9. Scroll to the next page in document, activate header/footer view as above, unselect “Link to
Previous” for both header and footer
10. Scroll back to the landscape page. Double-click near the page number to activate header/footer
view. Delete the page number.
a. As long as the headers and footers of the landscape page and the first page of the next
section are not linked to previous, changes made to the new landscape page will not affect
the pages before and after it.

Page | 13
UTSA | The Graduate School
11. Insert a new page number in the “Page Margins” using the “Large, Left” option
a. At this time, Word does not have an option for a small, plain number in the left margin, so
we will have to insert a large number and change it to match the rest of the document
12. A large page number will appear in a text box on the left side of the page. Highlight this number
and change the font to Times New Roman 12 pt.
13. Rotate the page number by selecting the “Text Direction” in the “Drawing Tools” section of the
Ribbon. Choose “Rotate all text 90º”

Page | 14
UTSA | The Graduate School
14. Your page number should now match style and placement of all other page numbers in the
document. Scroll to the pages before and after the landscape page and verify that these pages
have not been affected by changes made to the landscape page.
a. If they have been affected, verify that “Link to Previous”/”Same as Previous” is not
selected for both the headers and footers of the landscape section and the section
following it
Option 2: Keep Protrait Orientation, Rotate Material on Page
Pro: Easy to achieve
Con: Pages will appear sideways when scrolling through document in Word, making it harder to read
tables/figures at a glance while working on material
1. Create section breaks before and after the table/figure (as well as its associated title/caption) that
you wish to be landscape:
a. Place cursor at end of last line of text before table/figure
b. In the “Page Setup” section of the “Page Layout” tab of the Ribbon, select “Breaks”
“Section Break” “Next Page”
c. Place cursor at end of table/end of last line of figure caption
d. In the “Page Setup” section of the “Page Layout” tab of the Ribbon, select “Breaks”
“Section Break” “Next Page”
2. Table/figure and its associated title/caption should now be on its own page.
3. Rotate the object on the page so that it is oriented as shown above on page 13 above

Page | 15
UTSA | The Graduate School
a. For tables, you might have to cut (ctrl+x) the table from the document and then insert it
back into the document as an image (right click”Paste Options””Picture”)
4. If the title/caption is not part of the table/figure image, you’ll need to insert a text box, rotate it 90
degrees, and place it above or below the table or figure as required
Reminders and Tips
When formatting new sections, select the “¶” button in the “Paragraph” section of the “Home” tab
of the Ribbon to show your document’s formatting. This will let you see where your section
breaks are, and also helps to prevent accidentally deleting them.
When using landscape pages for tables and figures, make sure that the table/figure placement on
the landscape page is the same as the placement for tables/figures in the rest of the document
(centered, left justified, etc.)
When inserting sideways page numbers in the page margins, make sure that the final, rotated
page number is placed in the same place as other page numbers in the document (centered, .5”
from edge of page)
If tables/figures are not cooperating with your text (for example, centering the figure centers all of
the text in the document; moving the figure moves entire paragraphs of text to the wrong place),
try playing with the “Layout Options” that appear when you select or right-click the table/fig
o Using “In Front of Text” or “Behind Text” will enable you to place the image/object
anywhere on the page you wish

Page | 16
UTSA | The Graduate School
General Tips and Tricks
Click the “¶” button (Ctrl + *) on the Home ribbon to show hidden formatting marks. This can alert
you to any unintentional formatting present in the document.
Save the task of perfecting the overall spacing within the main document text for last (after
content is ready to go)—otherwise, future content revisions could end up undoing your hard work
and/or causing new spacing issues.
Do NOT use Google Docs (or mobile Word applications) to format your document. All UTSA
students have access to full versions of Microsoft Word for free. Visit:
https://www.utsa.edu/oit/services/software-and-application-support/OfficeProPlus.html
If you are struggling with something, chances are excellent that somebody else is struggling with it
as well, and chances are also good that somebody has provided the answer online. Do a Google
search for your issue, and don’t discount YouTube tutorials—they can be very helpful! Tip: Include
the word “solved” in your search to increase chances of finding a solution.
The Graduate School will be evaluating your formatting in PDF format. A PDF is essentially a
digital printout/image of your document. What this means is, in the end, your document just
needs to look right. Any background formatting tricks you need to do to accomplish this will not
be seen! With that in mind:
o Text boxes are your friend—any time you need to insert text in a specific place in your
document and Word is giving you grief, you can always use a carefully placed text box
o You can hide anything you don’t want to be seen (page numbers, headings you have
inserted for the purpose of populating a Table of Contents, etc.) by covering the offending
material with a solid, unlined white box
o If you are having a hard time formatting something in Microsoft Word, you might have
better luck in a PDF editor. All campus computers have full versions of Adobe Acrobat
installed, enabling you to insert or delete content without using Word.