the saliba postural classification systemc.ymcdn.com/sites/ · • evaluation can include actual...
TRANSCRIPT

THE SALIBA POSTURALCLASSIFICATION SYSTEM:
A Valid and Reliable Approach to Improving Functional Alignment
Presented by
Vicky Saliba Johnson, PT, FFFMT, FAAOMPTPresident, Institute of Physical Art, Inc.
Director, IPA FMT ResidencyDirector, Funtional Manual Therapy Foundation
Saturday, September 23, 2017
Sponsored by: Tennessee Physical Therapy Association

2
© Copyright 1986 |The Institute of Physical Art, Inc.| All Rights Reserved – CFS ~ CoreFirst® Strategies
The Institute of Physical Art is a professional development organization committed to the advancement of optimum human performance through education and state of the art clinical services. Since 1978, Gregg and Vicky Johnson, co-founders and co-directors of the IPA, have strived to develop, teach, and implement a system of manual therapy which encompasses all aspects of patient care for those with pain, orthopedic, sports, and neurological dysfunctions. This system, developed by Gregg and Vicky and known as Functional Manual Therapy®, seamlessly integrates evaluation and treatment for mechanical capacity, neuromuscular function, and motor control.” (An MNM approach)
The Institute of Physical Art’s educational division is dedicated to the advancement of manual therapy through the offerings of multiple continuing education courses, an advanced FMT certification (CFMT), an IPA Skills Enhancing Residency, and an AAOMPT/APTA accredited Fellowship program. To learn more about the IPA courses and professional development offerings, visit theipa.co.
What sets the IPA apart from other Continuing Education Organizations?t Portney and Watkins (authors of Foundations of Clinical Research, 2009) state that, “Making clinical
decisions in the face of uncertainty and variability is part of the art of clinical practice.”t Sackett states that: “Without clinical experience, practice risks being tyrannized by evidence…”
The Institute of Physical Art promotes the “ART” of Physical Therapy as an integration of scientific evidence with intuition and a library of knowledge developed from a result driven clinical practice. The IPA’s integrated Functional Manual Therapy® curriculum prepares clinicians to methodically and systematically evaluate and treat individuals using advanced clinical reasoning. The comprehensive offerings of the IPA advance the therapist’s knowledge of mechanical treatment of joints, soft tissues, viscera, and neurovascular structures through the Functional Mobilization™ Course series. The PNF and CoreFirst® for Optimum Function seminars compliment this mechanical treatment with specific neuromuscular reeducation needed to promote efficient initiation, strength and endurance of the muscles required for optimum (CoreFirst®) functional strategies for posture and movement.
The dynamic Functional Manual Therapy® system trains the therapist to approach each patient from the perspective that all have existing potential and that potential is achieved by treating each person with a whole body approach. The IPA/FMT philosophy is founded on the recognition that all tissues of the body are intricately interconnected and that efficient function requires a dynamic interactive mechanical, neuromuscular and motor control system. Functional Manual Therapy® trains the therapist to seamlessly transition between the assessment and treatment of these systems while working toward the patient’s optimum potential.
Discover Your Potential® To Facilitate Your Patient’s Optimum Potential the IPA Way!
INSTITUTE OF PHYSICAL ART (IPA) | inspiring excellence since 1978

3
© Copyright 1986 |The Institute of Physical Art, Inc.| All Rights Reserved – CFS ~ CoreFirst® Strategies
Functional Manual Therapy is rooted in observational assessment of human kinesiology and individual outcomes secondary to manual therapy interventions.
All patients present with Mechanical Capacity, Neuromuscular Function, and Motor Control components to their dysfunction.
Evaluation and Treatment of the Mechanical Capacity:
• Evaluate the end feel and excursion of the joint, soft tissue, muscular, visceral, and neurovascular components which may impair motion or function.
• Treatment should include Functional Mobilization™ of the soft tissue, joints, neurovascular, and visceral structures, and PNF techniques; for increasing range of motion such as Combination of Isotonics, Hold Relax and Active Elongation.
Evaluation and Treatment of the Neuromuscular Function:
• Evaluate the patient’s muscular ability to efficiently initiate and demonstrate proper strength and endurance for any given contraction, as well as the ability to relax or lengthen with control.
• Evaluate the ability for each muscular contraction to effectively relax when not necessary for a function.
• Evaluation can include actual manual muscle resistance, as well as the Lumbar Protective Mechanism, Elbow Flexion Test, Impact Tests, and Regional Functional Tests.
• Treatment should include manual facilitation techniques such as PNF as well as a directed exercise program.
• Be sure to assess and treat both the core automatic muscular response, as well as the global initiation, strength and endurance.
Evaluation and Treatment of Motor Control:
• Motor control and motor learning refer to the individual’s ability to utilize efficient mechanical and neuromuscular components to effectively assume a balanced posture and perform efficient functional activities with necessary balancing reactions.
• Motor learning is trained through resistance and repetition, focusing on the patient’s kinesthetic and proprioceptive awareness and enhancement of central neuronal recruitment patterns.
• Effective motor control allows for an efficiently timed activation of the core and global muscles.
The IPA FMT™ Treatment Philosophy and Premise

4
© Copyright 1986 |The Institute of Physical Art, Inc.| All Rights Reserved – CFS ~ CoreFirst® Strategies
Many patients complain of increased pain or discomfort secondary to prolonged standing. This can often be related to the posture or mechanics of standing, especially if the patient presents with a load sensitive pathology. The mechanics of standing are critical to increasing the longevity of the activity. Standing training should be a continuation of what was trained in sitting, returning the patient to sitting often to continue to reinforce the patient’s proprioceptive and kinesthetic awareness of her alignment and state of balance.
A. Evaluation: SALIBA POSTURAL CLASSIFICATION SYSTEM (Collins, et all., JMMT, July 2016): A Function Based Classification System Observe for any segmental displacements or structural dysfunctions which appear to alter the
mechanics of weight transference. Specifically observe: F Classification System is a ratio of two components F The first component refers to the thoracic block position over the pelvis F The second component refers to the angulation of the thoracic block
EFFICIENT VERTICAL ALIGNMENT
Vertical/Vertical: The thoracic block is vertically aligned over the pelvic block and the angle of the thoracic block is vertical, allowing for the dome of the diaphragm to rest on top of the abdomen. In this alignment, the vector created by the angle of the xiphoid is perpendicular into the pelvic floor.
Efficient Vertical Alignment.
NOTE: This classification system provides direction for the CoreFirst® Strategies training. The purpose of this system is to address the primary trunk and pelvic dysfunctions. The IPA provides a full, in-depth, postural analysis cascade in
both FM I and Functional Gait, which incorporates the assessment of all joints and body regions.
SALIBA POSTURAL CLASSIFICATION SYSTEM: A Valid and Reliable System

5
© Copyright 1986 |The Institute of Physical Art, Inc.| All Rights Reserved – CFS ~ CoreFirst® Strategies
DYSFUNCTIONAL VERTICAL ALIGNMENTS.
1. Vertical/Posterior (fig. 1) l Thoracic block if vertically aligned over the
pelvic block l Thoracic block is posterior tipped l Confirmed by VCT when an accentuated
extension is felt in the T/L region and upper lumbar region
2. Posterior/Posterior (fig. 2) l Thoracic block is posterior to the pelvic block
in the sagittal plane l Thoracic block is posterior tipped l Confirmed by VCT when accentuated
extension is felt in the lower lumbar coupled with a forward shear of the pelvis
3. Posterior/Anterior (fig. 3) l Thoracic block is posterior to the pelvic block
in the sagittal plane l Thoracic block is anterior tipped l Confirmed by VCT when a slight flexion is felt
in the thoracic and upper lumbar coupled with a forward shear of the pelvis
4. Anterior/Posterior (fig. 4) l Thoracic block is anterior to the pelvic block in
the sagittal plane l Thoracic block is posterior tipped l Confirmed by VCT when extension occurs in
the upper/mid lumbar with a posterior shear of the pelvis
5. Anterior/Anterior (Not pictured). l Thoracic block is anterior to the pelvic block in
the sagittal plane l Thoracic block is anterior tipped l Confirmed by the VCT with an associated
overall flexion of the trunk
fig. 2: Posterior/Posteriorfig. 1: Vertical/Posterior
fig. 3: Posterior/Anterior fig. 4: Anterior/Posterior
SALIBA POSTURAL CLASSIFICATION SYSTEM: A Valid and Reliable System
Note: Shoulder girdle and head position is key to correction, but above classification must be established first.
6
© Copyright 1986 |The Institute of Physical Art, Inc.| All Rights Reserved – CFS ~ CoreFirst® Strategies
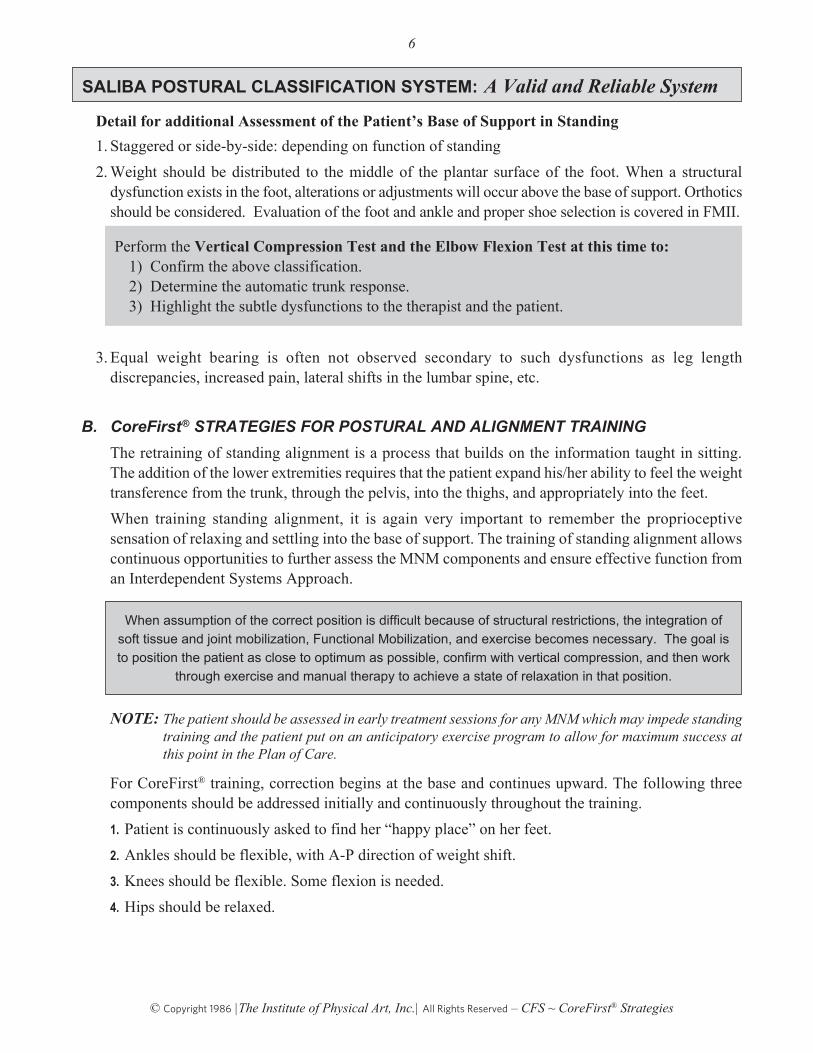
Detail for additional Assessment of the Patient’s Base of Support in Standing 1. Staggered or side-by-side: depending on function of standing 2. Weight should be distributed to the middle of the plantar surface of the foot. When a structural
dysfunction exists in the foot, alterations or adjustments will occur above the base of support. Orthotics should be considered. Evaluation of the foot and ankle and proper shoe selection is covered in FMII.
3. Equal weight bearing is often not observed secondary to such dysfunctions as leg length discrepancies, increased pain, lateral shifts in the lumbar spine, etc.
B. CoreFirst® STRATEGIES FOR POSTURAL AND ALIGNMENT TRAINING The retraining of standing alignment is a process that builds on the information taught in sitting.
The addition of the lower extremities requires that the patient expand his/her ability to feel the weight transference from the trunk, through the pelvis, into the thighs, and appropriately into the feet.
When training standing alignment, it is again very important to remember the proprioceptive sensation of relaxing and settling into the base of support. The training of standing alignment allows continuous opportunities to further assess the MNM components and ensure effective function from an Interdependent Systems Approach.
NOTE: The patient should be assessed in early treatment sessions for any MNM which may impede standing training and the patient put on an anticipatory exercise program to allow for maximum success at this point in the Plan of Care.
For CoreFirst® training, correction begins at the base and continues upward. The following three components should be addressed initially and continuously throughout the training.
1. Patient is continuously asked to find her “happy place” on her feet. 2. Ankles should be flexible, with A-P direction of weight shift. 3. Knees should be flexible. Some flexion is needed.
4. Hips should be relaxed.
Perform the Vertical Compression Test and the Elbow Flexion Test at this time to: 1) Confirm the above classification. 2) Determine the automatic trunk response. 3) Highlight the subtle dysfunctions to the therapist and the patient.
When assumption of the correct position is difficult because of structural restrictions, the integration of soft tissue and joint mobilization, Functional Mobilization, and exercise becomes necessary. The goal is to position the patient as close to optimum as possible, confirm with vertical compression, and then work
through exercise and manual therapy to achieve a state of relaxation in that position.
SALIBA POSTURAL CLASSIFICATION SYSTEM: A Valid and Reliable System

7
© Copyright 1986 |The Institute of Physical Art, Inc.| All Rights Reserved – CFS ~ CoreFirst® Strategies
VERTICAL COMPRESSION TEST (VCT) (Saliba and Johnson, 1983)PRE TEST: To demonstrate to the patient the effect of alignment/posture on force translation and allow the
PT to correlate the presenting posture to force translation.POST TEST: To correlate the corrected alignment to a change in force translation. PURPOSE: Use of vertical loading on the system to confirm the Saliba Postural Classification System and identify mechanical stress points.
PATIENT’S POSITION: This test can be performed on a patient in any weight bearing position. If standing, just ask the patient to stand in a natural position and relax everything but the knees (so as not to buckle and collapse when pressure is applied!)
THERAPIST’S POSITION AND MANUAL CONTACT: l A standing side by side or stride position l Standing testing, therapist may be positioned on a stool, chair, or table l Sitting testing, therapist is positioned behind the patient l Therapist positions forearms vertical then hovers l Therapist must ensure that all force is directed to patient and not allow movement
in his or her body unless patient buckles In standing, place your hands on the patient’s shoulders, between the acromion and the first rib insertion.In sitting, shoulder contact same as in standing or on top of pelvis to determine its positionNote: Do not lean on patient while positioning hands which will pre-activate a responsePHIT: Position, Hover, Instruct, TestTHERAPIST’S ACTION AND VERBAL COMMAND: After instruction, apply gentle, sustained pressure vertically through the patient’s trunk or pelvis. Gradually build the pressure from a grade of (1) which is at the point where the therapist feels the pressure of the patient’s bony surfaces through the soft tissue covering the carpal ridge, to a (2) which is double the pressure of (1), and then to a (3) which is triple the pressure of (1), and so on until full force is applied which would be a grade of (5). Note: If pain is not present, continue increasing the pressure past the grade as tolerated just to heighten the
patient’s proprioceptive awareness of the existing dysfunction.FINDINGS: Palpate the translation of force segment to segment. An efficient response is one in which the pressure applied by the therapist translates evenly to the base of support. In standing that would be to the arch of the foot, translating into the second ray, and in sitting that would be onto the pelvic floor. The end feel should be springy.An inefficient response (failure) is noted when the pressure applied by the therapist causes the spine to side bend, backward bend, shear or rotate. In addition, an inefficient response is a hard end feel, either at the segment of dysfunction or in the body as a whole (this total hard end feel usually indicates a holding pattern, which defeats the purpose of this test.) The test is graded 1-5: 1-4 at level a dysfunction is noted as indicated in above paragraph, and 5 being efficient force translation to base of support. If present, include with the grade level a description of the associated compensatory dysfunctions such as extension, shear, or rotation and at which segment.
Pressure is vertically applied through
patient’s shoulder.
CoreFirst® FUNCTIONAL TEST

8
© Copyright 1986 |The Institute of Physical Art, Inc.| All Rights Reserved – CFS ~ CoreFirst® Strategies
ELBOW FLEXION TEST (EFT) (Saliba and Johnson, 1983)
PURPOSE: To test the proper timing of core and global muscles in response to an external load through the forearms and confirm findings of the CoreFirst® Based Postural Classification System.COMPONENTS TO BE EVALUATED AND RECORDED: Activation Pattern, strength, endurance, and patient’s balance response. The therapist is specifically noting if the core fires first, then the scapula stabilizers, then the global arm muscles. In addition, the final assessment pertains to the patient’s balance response, specifically does the patient maintain a stable position, or tend to fall forward at the ankles.PATIENT’S POSITION: In the desired position:l Patient’s elbows bent to 90 degreesl Patient’s forearms supinated to loose pack positionl Patient’s humerus is perpendicular to the floor, not flexed or extendedl No substitution of shoulder adduction allowed to assist in stabilization
THERAPIST’S POSITION AND MANUAL CONTACT: l Therapist stands in front of patientl Therapist may be in squat position for resistance from belowl Therapist may also apply resistance from abovel Therapist positions forearms perpendicular to floor then hoversl Hand placement is over the distal end of the forearm,l If squat position, do not have one knee on the ground so as to better use body weight for testingl DO NOT APPLY PRESSURE UNTIL READY TO TESTThe therapist places his hands, palms down, on the distal end of patient’s forearms. Be sure the pressure is NOT on the wrist and that a lumbrical grip is used. The therapist’s forearms must be vertical.PHIT: Position, Hover, Instruct, Test
THERAPIST’S ACTION AND VERBAL COMMAND: Command: “Don’t let me straighten your arms”. Once the command is given, the therapist gradually increases the downward resistance, being cautious NOT to pull forward while pushing or pulling down. Grading is 1-5, with “1” defined as the amount of pressure requires to feel the bones of your hands on the bones of the patient’s forearms, and 2 = 2x1, 3 = 3x1, 4 = 4x1, and 5 – 5x1. When applying the resistance, the therapist asks the patient to note where the effort is and how hard it feels to maintain the position. Specifically, the patient should note if the effort is in the cervical, shoulder girdle, thoracic spine, lumbar spine, or forearms. The patient should also note the amount of force generated against the resistance and the patient’s balance reaction to the force. FINDINGS: Therapist should note activation pattern of patient’s stability response. An efficient state is one in which the patient can maintain the elbow position through automatic activation of the core, rotator cuff, shoulder girdle, and global shoulder and arm muscles. The spine should remain stable, and the patient should maintain his balance. In an inefficient state, the patient will attempt to maintain the position with global muscles and will often give in the arms, shoulder girdle, and spine. The patient will frequently fall forward as the force is applied or tilt the upper body back to compensate for the load. When an inefficient state is noted, the grade is the level of pressure at which the dysfunction is noted and a description of the dysfunction, such as: global spine muscles attempted to hold the patient in position and elbow position could not be maintained at level 3. The grade (1-5) is the level failure is noted.
CoreFirst® FUNCTIONAL TEST

9
© Copyright 1986 |The Institute of Physical Art, Inc.| All Rights Reserved – CFS ~ CoreFirst® Strategies
Efficient Motor Learning for Posture Begins in SittingTraining begins in sitting to allow the patient to proprioceptively focus on the segmental relationship of the thorax to the abdominal/pelvic region and learn the dissociative movements of the scapula and cervical spine.
Correlation of SPCS to sitting:
While the research was done in standing, because the classification is directed at the trunk, the principles of the classification system can be applied to sitting. In sitting, we typically see the following classifications:
• Vertical/Vertical • Posterior/Anterior • Anterior/Posterior • Anterior/Anteror
Gravity does not allow for a Posterior/Posterior
LAB I: Identification and practice of manual contacts and proprioceptive training necessary to facilitate the patient into a more appropriate and functional alignment.
• Identification and facilitation of proper BOS • Identification and facilitation of proper Thoroco-abdominal/pelvic alignment • Identification and facilitation of proper scapula-thoracic positioning • Identification and facilitation of proper cervical-thoracic positioning • Identification of typical mechanical and neuromuscular impairments to assuming an efficient
Vertical/Vertical
LAB II: Identification and practice of postural training exercises, addressing typical mechanical and neuromuscular impairments and preparing the patient for standing correction.
CoreFirst® FUNCTIONAL ALIGNMENT TRAINING

10
© Copyright 1986 |The Institute of Physical Art, Inc.| All Rights Reserved – CFS ~ CoreFirst® Strategies
1. CORRECTION OF VERTICAL/POSTERIOR a. In observation, the patient’s blocks appear to be vertical, but the angles are dysfunctional.
b. The therapist supports the patient’s rib cage while the patient finds a comfortable position on his feet: Command: Find a happy place on your feet. This command should be used frequently throughout the training.
c. The patient is instructed to relax the pelvis into a neutral position (drop the tailbone is a good command) and then relax the stomach into the pelvis and quads.
NOTE: The patient has been prepared for this proprioceptive and mechanical execution with the Wall Exercise and over the table pelvic drop exercise.
d. The patient should have the feeling of the weight of the abdomen filling up the pelvis, and actually notice the weight transferring through the pelvic floor into the quads. The weight of the abdomen should hold the pelvis vertical. Often it helps to encourage the patient to feel the weigh to the abdomen settle into the posterior aspect of the pelvis, opposite of what was taught in sitting.
e. Once the patient has relaxed the abdomen, facilitate the patient to relax the rib cage onto the abdomen and into the pelvic floor. Emphasize this feeling of the weight distributing through the abdomen, into the pelvic floor and into the quads. The patient can be instructed to proprioceptively imagine the sternum and the tailbone dropping over a ball to facilitate the vertical position of the pelvis and decrease the tendency to extend the lumbar spine.
A good proprioceptive tool is to have the patient feel his spine lengthen while relaxing the rib cage. The therapist can place the patient’s hand on the Therapist’s back and then demonstrate this lengthening for the patient.
f. Guide the patient through the correction of the shoulder girdles and head position.
g. Use weights for additional proprioceptive input to train patient in finding this position.
h. Re-test with VC and EFT.
CoreFirst® STRATEGIES FOR POSTURAL CORRECTION

11
© Copyright 1986 |The Institute of Physical Art, Inc.| All Rights Reserved – CFS ~ CoreFirst® Strategies
Once the patient has been manually facilitated, the patient is instructed to self correct by: a. Find a comfortable position on your feet. b. Take in a deep breath to hold the rib cage up (can use fist to assist). c. Relax the pelvis into a neutral position and then relax the stomach into the pelvis and quads. d. Relax the rib cage onto the stomach, feeling the sternum and tailbone arc over a ball and back
lengthening. e. Correct the shoulder girdle position with terminal pivot prone. f. Re-test with V/C and EFT.
2. CORRECTION OF POSTERIOR/POSTERIOR l In observation, the patient’s thoracic block appears posterior to the pelvic
block. The correction must involve a correction of the vertical alignment before correcting thoracic angle.
l Assist the patient by holding the rib cage up. Unload the thoracic spine from the lumbar region while (asking the patient to take in a deep breath) by lifting up the rib cage. Therapist should use his legs to lift and angle the rib cage.
l Ask the patient to bring the entire thoracic spine forward, as though he were looking at his feet. Patient is asked to note the back lengthening and tailbone relaxing down during this movement. NOTE: Again, the use of the wall exercise and over the table pelvic drop exercise prepares the patient to succeed with this task.
l Once the vertical alignment is correct, ask the patient to relax the stomach and then the rib cage as defined above in the first correction. Also remind patient to relax tailbone and feel sternum and tailbone gone over ball and meet under pelvic.
l NOTE: Patient will often relax into a Posterior/Anterior l Guide through the correction of the shoulder girdle and head and neck positions. l Re-test with V/C and EFT.
Once the therapist has facilitated the correction, the patient is instructed to self correct by: a. Take a deep breath and hold the rib cage up, using your fist under the sternum to assist. b. Bring the rib cage forward by looking down at the feet. c. Find a comfortable position on the feet. d. While still holding the rib cage up, e. Relax the pelvis into a neutral position (the pelvis often will go into an anterior tilt when the
patient looks down at the feet so this is a reminder of the pelvic position. Feel tailbone and sternum go over ball and meet under pelvis.
f. Relax the stomach and the drop the sternum down through the stomach into the quads, remembering the feeling of dropping the sternum and tailbone over a ball.
CoreFirst® STRATEGIES FOR POSTURAL CORRECTION

12
© Copyright 1986 |The Institute of Physical Art, Inc.| All Rights Reserved – CFS ~ CoreFirst® Strategies
3. CORRECTION OF POSTERIOR/ANTERIOR
As in the posterior positioned thoracic cage, the key correction is the alignment of the thoracic block over the lumbar and pelvic block. But in this case, the thoracic cage is dropped behind the lumbar block.
The emphasis of this correction is to get the thoracic cage vertical first, then up and over the lumbo pelvic region.
l Have the patient inhale and lift the thoracic cage upward. Be sure the patient lifts the sternum and backward bends the thoracic cage. Again the therapist should use legs to generate lift.
l Adjust the thoraco-lumbar position as done in sitting. Keep the thoracic cage unloaded off the abdomen and lumbar region. Therapist should note position of wrist.
l Correct the block alignment by having the patient look down and adjust the hip and pelvic position until the feet can be seen and the patient’s thoracic block is positioned over the pelvic block. Be sure to ask the patient to be centered over his feet and make whatever adjustment is necessary to feel balanced into the feet while you are holding the thoracic cage. Again emphasize lengthening of back.
l Do not loose elevated rib cage position during this block alignment correction. l Once the therapist can palpate that the thoracic block is over the pelvic block, redirect the patient to
relax the pelvis (by thinking relax ischial tuberosities down), then relax the abdomen, and finally, drop the ribs onto the abdomen and into the pelvic floor in a way that the weight of the ribs feels as though it prevents the pelvis from shearing forward The patient should feel the weight of the trunk pass through the pelvis and into the thighs (again use the ball analogy).
Once the therapist has facilitated a manual correction, the patient is instructed to: a. Take a deep breath and hold the rib cage up (can use the fist to assist) the key for this step is not just
getting the rib cage up, but correcting the angle, or even over exaggerating the backward bending to get the rib cage out of the downward angle.
b. Bring the rib cage UP and forward over the pelvis by looking for the feet. c. Relax the pelvis into a neutral position, then relax the stomach onto the pelvis. d. Drop the sternum down onto the stomach. e. Feel the sternum and tail bone drop over a ball and the weight go into the quads, not the tailbone. f. Correct the shoulder girdle and head and neck position g. Re-test with V/C and EFT.
In both corrections, the patient should feel the weight of the ribs drop through the stomach, to the pelvic floor, and to the quads. The primary mistake in correcting a posterior positioned thoracic block is not directly positioning the thoracic block over the pelvic block. In addition, the patient needs much kinesthetic training to learn what it feels like to relax the stomach into the pelvis and truly relax the sternum onto the abdomen.
CoreFirst® STRATEGIES FOR POSTURAL CORRECTION
13
© Copyright 1986 |The Institute of Physical Art, Inc.| All Rights Reserved – CFS ~ CoreFirst® Strategies
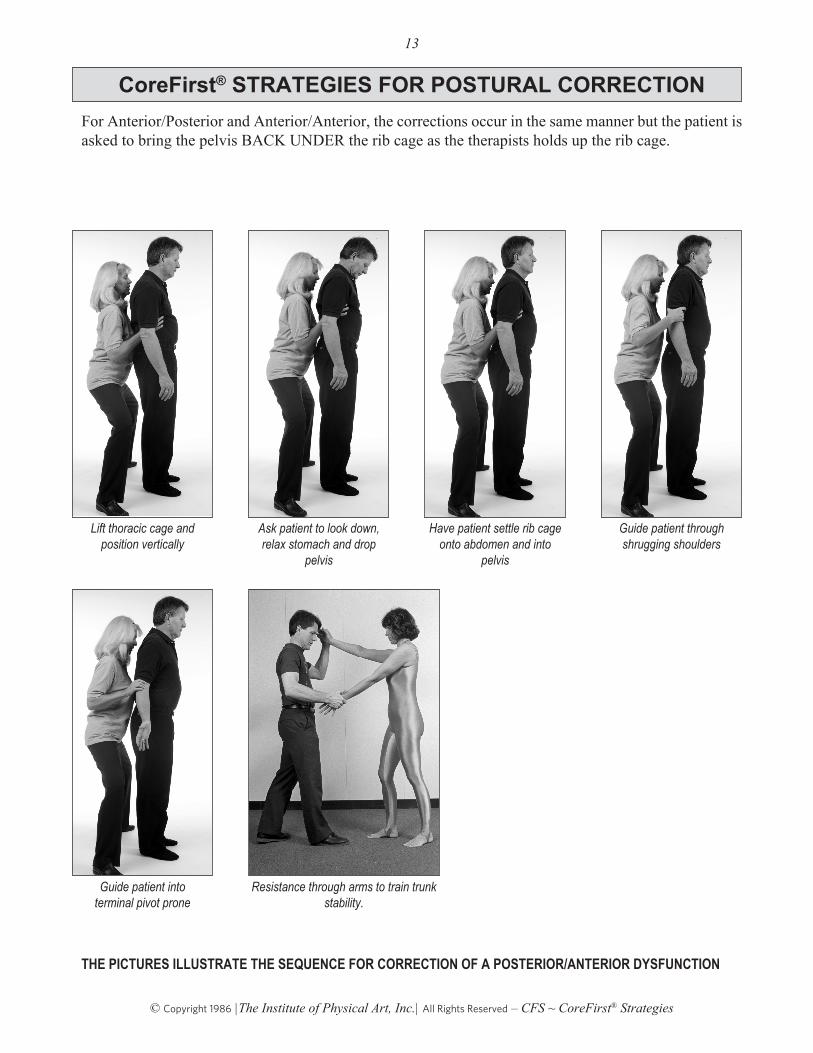
For Anterior/Posterior and Anterior/Anterior, the corrections occur in the same manner but the patient is asked to bring the pelvis BACK UNDER the rib cage as the therapists holds up the rib cage.
THE PICTURES ILLUSTRATE THE SEQUENCE FOR CORRECTION OF A POSTERIOR/ANTERIOR DYSFUNCTION
Resistance through arms to train trunk stability.
Lift thoracic cage and position vertically
Ask patient to look down, relax stomach and drop
pelvis
Have patient settle rib cage onto abdomen and into
pelvis
Guide patient through shrugging shoulders
Guide patient into terminal pivot prone
CoreFirst® STRATEGIES FOR POSTURAL CORRECTION

14
© Copyright 1986 |The Institute of Physical Art, Inc.| All Rights Reserved – CFS ~ CoreFirst® Strategies
Place hands on sternum region and lower abdomen
Feel the sternum relax OVER the abdomen, not behind
Place thumb on zyphoid and fingers on top of pubis with one hand while other hand is flat on back as shown. Feel the back lengthen as the zyphoid approximates the pubis.
Place a hand under the chin and support the weight of the head as the neck relaxes.
CoreFirst® STRATEGIES FOR POSTURAL CORRECTION