the pond masters guide to powersafe 2/3/4/5 … pdf/switchbox_inner_inst.pdf · congratulations on...
TRANSCRIPT

Congratulations on buying a Blagdon Powersafe Switchbox. The Powersafe
range of switchboxes has been specifically designed to protect your pond
equipment from failure. Each individual double pole switch gives total electrical
isolation when switched off. Each switch features the unique at-a-glance power
status indication system, which enables quick identification of power on, power on
standby and power failure due to a blown fuse. Each switch has an individual fuse
to provide overload protection ensuring that even if one or more items of
equipment fail, the other essential pond equipment is still able to function.
THE POND MASTERS GUIDE TO
POWERSAFE 2/3/4/5OUTLET SWITCHBOXES
1
Getting to knowyour Powersafe Switchbox ....................... 2Wiring diagram ................. inside front coverParts description ............... inside front coverSpares codes .............................................. 2Technical specification ............................... 2
Installation .......................................... 3 - 7Mounting the Switchbox ............................ 4Electrical installation ............................. 4 - 7
Maintenance ............................................ 7Replacing a fuse ......................................... 7Maintenance .............................................. 7
Faults problems procedure ...................... 8Consumer advice contact details ................ 8Returning a faulty Switchbox ...................... 8
IMPORTANTPlease attach proof of purchase to this manual and file in a safe place.
CONTENTS
SB_ISNT_INN_AW.qxd 23/3/06 10:00 am Page 1
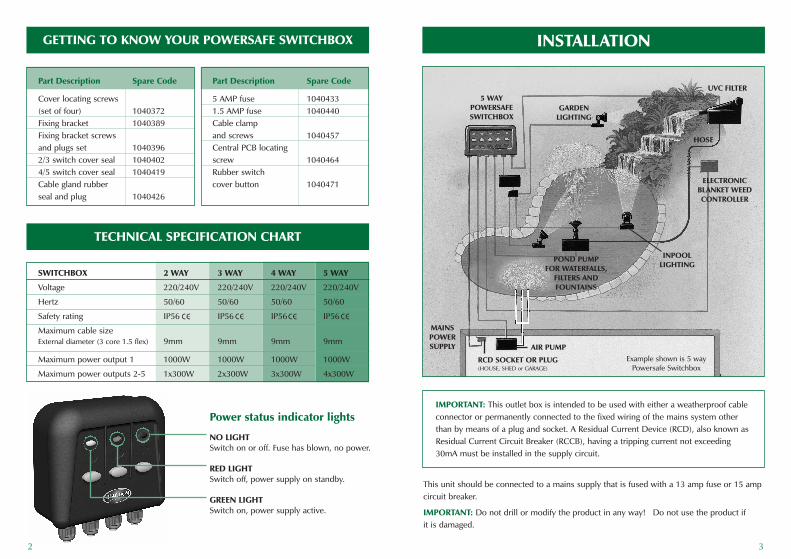
GETTING TO KNOW YOUR POWERSAFE SWITCHBOX INSTALLATION
TECHNICAL SPECIFICATION CHART
This unit should be connected to a mains supply that is fused with a 13 amp fuse or 15 ampcircuit breaker.
IMPORTANT: Do not drill or modify the product in any way! Do not use the product if it is damaged.
SWITCHBOX 2 WAY 3 WAY 4 WAY 5 WAY
Voltage 220/240V 220/240V 220/240V 220/240V
Hertz 50/60 50/60 50/60 50/60
Safety rating IP56 IP56 IP56 IP56
Maximum cable sizeExternal diameter (3 core 1.5 flex) 9mm 9mm 9mm 9mm
Maximum power output 1 1000W 1000W 1000W 1000W
Maximum power outputs 2-5 1x300W 2x300W 3x300W 4x300W
IMPORTANT: This outlet box is intended to be used with either a weatherproof cableconnector or permanently connected to the fixed wiring of the mains system otherthan by means of a plug and socket. A Residual Current Device (RCD), also known asResidual Current Circuit Breaker (RCCB), having a tripping current not exceeding 30mA must be installed in the supply circuit.
Part Description Spare Code
Cover locating screws(set of four) 1040372 Fixing bracket 1040389 Fixing bracket screwsand plugs set 10403962/3 switch cover seal 10404024/5 switch cover seal 1040419Cable gland rubberseal and plug 1040426
Part Description Spare Code
5 AMP fuse 1040433 1.5 AMP fuse 1040440Cable clampand screws 1040457Central PCB locatingscrew 1040464Rubber switchcover button 1040471
Power status indicator lights
NO LIGHTSwitch on or off. Fuse has blown, no power.
RED LIGHTSwitch off, power supply on standby.
GREEN LIGHTSwitch on, power supply active.
5 WAYPOWERSAFESWITCHBOX
GARDENLIGHTING
HOSE
INPOOLLIGHTING
AIR PUMP
MAINSPOWERSUPPLY
UVC FILTER
ELECTRONICBLANKET WEEDCONTROLLER
POND PUMPFOR WATERFALLS,
FILTERS ANDFOUNTAINS
RCD SOCKET OR PLUG(HOUSE, SHED or GARAGE)
Example shown is 5 wayPowersafe Switchbox
32
CC_ CC_ CC_ CC_
SB_ISNT_INN_AW.qxd 23/3/06 10:00 am Page 2

1. Prepare the cable (see cable preparation diagram - inside front cover).A maximum external cable diameter of 9mm is permitted.
IMPORTANT: Please note that the mains input must be connected to the green power input cable block only.
Switch one has a maximum loading of 1000w 1.0KW.
Switch two and subsequent switches are rated to a maximum wattage of 300w 0.3 KW.
These ratings must not be exceeded by the maximum wattage stated on the appliance to be fitted to each switch.
2. Remove the cable gland cover and thread it over the cable of the appliance to be fitted. (see gland detail diagram on colour Switchbox wiring diagram - inside front cover).
Note: The cable glands have a plug that should be retained if the gland is not being used fora application. This should be inserted to maintain a weatherproof seal.
INSTALLATION STEP BY STEP
IMPORTANT: Before removing the cover for wiring or adding additional appliances to the Switchbox always ensure that the mains power supply is off and isolated.
Remove the Switchbox from the mounting bracket.Unscrew the four screws at the back of the box to remove the Switchbox cover. Place in a safe location.
CIRCUIT BOARDREMOVAL
Remove the circuit board by
unscrewing the locating screws and
wire each appliance before replacing
and locating into the box.
INSTALLATION INSTALLATION
IMPORTANT: Please note all electrical work on garden lighting and power installationsmust comply with part P of the building regulations. Failure to comply is a criminaloffence. If the installation of this product is not carried out by a competent electricianwho is registered under the Part P self-certification scheme then you must notify the localbuilding control department before work begins. For further information and guidance onthis matter and other electrical installations in your home that might be covered by therelevant legislation, contact your local authorities building control department.
SWITCHBOX MOUNTING
The Switchbox shouldbe situated in a sitethat is protected from:
• Flooding
• Extreme heat
• Physical damage
• Tampering by adultschildren or pets
54
SB_ISNT_INN_AW.qxd 23/3/06 10:00 am Page 3

3. Remove the rubber seal from the cable gland and thread it over the cable of the appliance to be fitted. At this stage leave the gland cover and rubber seal loose on the cable.
4. Remove the central PCB locating screw that locates the printed circuit board and store in a safe place.
5. Unclip and remove the circuit board, placing it on a clean dry surface.
6. Undo (slacken) the two screws that locate the cable clamp and insert the cable through the cable clamp. At this stage leave the cable clamp loose.
7. Undo (slacken) the three screws on the cable block to be connected.
8. IMPORTANT: Please also see diagram cable preparation for correct identification of earth, neutral and live cables.
• Insert the Yellow/green (E) Earth cable and secure with the cable block screw. • Insert the Blue (N) Neutral cable and secure with the cable block screw. • Insert the Brown (L) Live cable and secure with the cable block screw. • Double insulated appliances do not have a earth cable.
Now repeat this process for all the appliances to be connected at this time.
9. When the mains input and ALL the appliances to be connected have been connected and are in place, replace the circuit board into the Switchbox (gently pulling the cables through the gland) and secure with the central PCB locating screw.
10. The cable clamps can now be secured with the two screws to ensure there is no wiring movement.
11. Insert the rubber seal that was previously threaded onto the cable into the seal grip on the cable gland. (see gland detail diagram)
12. Screw and hand tighten the cable gland cover that was previously threaded onto the cable to the cable gland.
Now repeat this process for all the appliances to be fitted at this time.
13. Ensuring that the recessed Switchbox cover seal is located, place the cover onto the box and secure with the four screws at the back of the box.
14. Identify the appliances installed with the labels provided in the recess above the relevant switch to enable clear identification when the box is in use.
15. The unit can now be placed on the fixing bracket provided by sliding the box vertically down onto the bracket.
See power status indicator lights diagram page 2 for status of the Switchbox when thepower is supplied to the unit.
FUSE REPLACEMENT See power status indicator lights diagram page 2 for status of the Switchbox fuses. If one of the fuses fails the power indicator will not light on the switch that has failed.
Please note that if the power supply to the switchbox has been switched off or interrupted due to the RCD circuit breaker or fuse from the mains supply isolating the box none of theindicator lights will illuminate.
Before replacing the fuse please check the manufacturer’s manual of the appliance that hascaused the fuse to blow. The product may be faulty and in need of replacement or servicing by the manufacturer
IMPORTANT: Always switch off the mains power and isolate the Switchbox beforeremoving the cover.
1. Remove the Switchbox from its mounting bracket by lifting in a vertical action.
2. Remove the four cover locating screws from the back of the box.
3. Having identified which switch fuse has blown (5 amp for switch 1 or 1.5 amp for subsequent switches), remove the blue fuse cover and gently remove the fuse with an electrical screwdriver.
4. Gently push the new fuse into place and replace the fuse cover (see page 2 for replacement fuse codes)
5. Replace the box cover ensuring that the cover seal is in place with the four screws at the back of the box.
6. Slide the Switchbox vertically down onto the locating bracket.
MAINTENANCEIt is recommended that once a season the cover seal and rubber buttons are checked forwear and damage to ensure that a safe weatherproof seal is maintained.
If signs of wear are shown, remove and replace the parts (spares codes and descriptions page 2). These should be readily available from your retailer.
INSTALLATION INSTALLATION
76
SB_ISNT_INN_AW.qxd 23/3/06 10:00 am Page 4
FAULTS - PROBLEMS PROCEDUREBefore returning your Powersafe Switchbox to your dealer or contacting our ConsumerAdvice Department, please carry out the following steps. This will solve most problemsquickly and easily.
1. Ensure electrical procedures have been followed fully. Check fuses and any cable connectors. Check mains fuse and mains RCD.
2. Return Switchbox to the point of purchase for inspection and advice (you will need proof of purchase).
CONSUMER ADVICE CONTACT DETAILSInterpet (Blagdon) Consumer Advice DepartmentVincent Lane, Dorking, Surrey RH4 3YX
Telephone: 0845 226 7437(Monday to Friday 10am to 4pm except Bank Holidays - Times may vary)
Fax: 01306 876712 E-mail: [email protected]
This product is guaranteed against defects in material and workmanship for 2 years from the date of purchase, under normal usage. The guarantee DOES NOT APPLY in case of improper use,negligence, lack of maintenance or accidental damage to the Switchbox. If the Switchbox fails dueto a manufacturing fault within this period it will be either repaired or replaced free of charge.Liability is limited to replacement of the faulty product only; no other costs will be reimbursed.
This guarantee is not transferable and does not affect your statutory rights. This guarantee does not confer any rights other than those expressly set out above. Excludes rubber buttons and fuses, which may require replacing annually. If any parts need replacing, spares are availablefrom your retailer.
IMPORTANT
GUARANTEE
8
SB_ISNT_INN_AW.qxd 23/3/06 10:00 am Page 5