the complete idiot´s guide to chess
DESCRIPTION
You’ve never played chess, but it seems fascinating, and you’d like to learn the rules.Or maybe you know how to play, but you’ve never understood how to tell whether amove was good or bad. Or maybe you’ve even picked up a few pointers somewhere,but you’d really like to be able to play a decent game. (Maybe there’s even someoneyou’d like to beat!) In any case, you want some way to find out more about chess:How to find an opponent, how to read the chess column in your newspaper, where toget chess books and other chess materials, what organizations to join and how tocontact them (maybe not just for you but also for your son or daughter), how computersplay chess (and maybe how to beat your own computer!), and who are the chesssuperstars.TRANSCRIPT
Copyright © 2002 by Patrick WolffAll rights reserved. No part of this book shall be reproduced, stored in a retrievalsystem, or transmitted by any means, electronic, mechanical, photocopying, recording,or otherwise, without written permission from the publisher. No patent liability isassumed with respect to the use of the information contained herein. Although everyprecaution has been taken in the preparation of this book, the publisher and authorassume no responsibility for errors or omissions. Neither is any liability assumed fordamages resulting from the use of information contained herein. For information,address Alpha Books, 201 West 103rd Street, Indianapolis, IN 46290.
THE COMPLETE IDIOT’S GUIDE TO and Design are registered trademarks ofPearson Education, Inc.
International Standard Book Number: 9781615643820Library of Congress Catalog Card Number: 2001092305
04 03 02 8 7 6 5 4 3 2 1
Interpretation of the printing code: The rightmost number of the first series of numbersis the year of the book’s printing; the rightmost number of the second series of numbersis the number of the book’s printing. For example, a printing code of 02-1 shows thatthe first printing occurred in 2002.
Printed in the United States of America
Note: This publication contains the opinions and ideas of its author. It is intended toprovide helpful and informative material on the subject matter covered. It is sold withthe understanding that the author and publisher are not engaged in renderingprofessional services in the book. If the reader requires personal assistance or advice,a competent professional should be consulted.
The author and publisher specifically disclaim any responsibility for any liability,loss, or risk, personal or otherwise, which is incurred as a consequence, directly orindirectly, of the use and application of any of the contents of this book.
Illustration credits:p.5 Photograph by Jerome Bibuld, Courtesy of the Russell Collection. p.10 Paramount Pictures. p. 13 House of Staunton, Courtesy of the Russell Collection. p. 264 Courtesy of the Russell Collection. p. 269 Courtesy of the Russell Collection. p. 272 Courtesy of the Russell Collection. p. 274 Courtesy of the Russell Collection.

p. 275 Courtesy of the Russell Collection. p. 278 Courtesy of New In Chess. p. 280 Courtesy of New In Chess. p. 303 Mindscape. p. 303 (bottom) Davidson/Simon & Schuster.
Contents
Foreword
IntroductionHow to Use This Book
Diagrams
Exercises
Web Site:
Extras
Special Note to the Reader
Acknowledgments
Special Thanks to the Technical Reviewer
Trademarks
Part 1 Let’s Play Chess
Chapter 1 Why Play Chess?Are We Having Fun Yet?
Once the Game of Kings . . .
. . . Now the King of Games
Chapter 2 Drawing the Battle LinesMeet the Chessboard
Naming the Squares
Meet the PiecesThe Pawn
The Knight
The Bishop
The Rook
The Queen
The King
The Two R’s: Reading and ’Riting Chess MovesPawn Moves Without Capture
Pawn Moves With Capture
All Other Moves Without Capture
All Other Moves With Capture
Now Take a Deep Breath
Chapter 3 Rules of EngagementThree Special Moves
Pawn Capturing a Pawn En Passant
Promoting the Pawn
King’s Special Privilege
Win, Lose, or Draw: How Does That Happen?Checkmate—the Aim of the Game!
An Example of Checkmate
Throwing in the Towel
Sometimes Nobody WinsInsufficient Material to Deliver Checkmate
Friendly Agreement
Perpetual Check
Stalemate
Okay, One More Deep Breath and You’re Ready to Play!
Chapter 4 How to Win with Just One PieceCheckmate with Queen and King Versus King
Making a Plan
Constricting the King
Bringing Your King Up to Help
Driving the King to the Corner
Beware of Giving Stalemate!
Time to Bring Up the King
Checkmate with Rook and King Versus KingConstricting the King
Bringing the King Up to Help
Driving the King Back
Beware of Giving Stalemate!
Going In for the Kill
Could You Do It Again?
Part 2 Tactics
Chapter 5 It’s a Material WorldThe Concept of Material
When Fewer Pieces = More Material
The Relative Worth of the Pieces
What About the King?
How Do You Use This Scale?
How to Win Material, and Avoid Losing Material“How Do You Get to Carnegie Hall?”
“Do I Really Need All of This Practice?”
How to Defend Against a Threat to One of Your PiecesMoving the Piece That Is Being Attacked
Defending the Piece That Is Being Attacked
Blocking the Attack on the Piece
Capturing the Piece That Is Attacking You
Attacking Something Else in Your Opponent’s Position

Practice, Practice, Practice!
Chapter 6 Tricks of the Tactical TradeThe Fork
Pawn Forks
Knight Forks
Bishop Forks
Rook Forks
Queen Forks
King Forks
The PinBishop Pins
Rook Pins
Queen Pins
The Skewer
Two Attacks at OnceDiscovered Check
Double Check
Chapter 7 Dirtier TricksGetting an Enemy Piece Out of the Way
Attacking the Defender
Overloading the Defender
When You Are Your Own Worst Enemy
Wishing Can Help You Make It So
Superman’s Not the Only One with X-Ray Vision!
The “In Between” Move
Chapter 8 Hunting Down the KingWhen a Material Advantage Is All Relative
The Emperor Has No Clothes!
Exposing Your Opponent’s KingAnand–Kasparov, 1995
Useful Tactics for Attacking the KingNowhere to Run!
Death by Suffocation
The Infinite Variety of Checkmates
Part 3 Strategy
Chapter 9 In the BeginningThe Beginning, Middle, and End of a Chess Game
“The Opening” or “An Opening?”
When Does the Beginning End?The Center’s Where All the Action Is
Center Pawns First
Minor Pieces Before Major Pieces
Time Is of the Essence
Castle Early!
Two Openings to Illustrate the PrinciplesQueen’s Gambit Declined
Sicilian Defense
A Brief Digression: Fianchettoing the Bishop
Back to the Sicilian Defense
Chapter 10 Making the Most of Your PiecesMobility: Give Me Room!
Do Be Cruel: Attack Your Opponent’s Weaknesses
The Knight
The Bishop

Which Is Better: Bishop or Knight?
The Two Bishops
“Opposite-Colored Bishops”
The Rook
The Queen
Chapter 11 Pawn Shop“The Pawns Are the Soul of Chess”
Chain GangsSide by Side Is Strongest
Forward Pawns and Backward Pawns
When One Pawn Holds Two
Some Pawns Are Islands
The Isolated Pawn
Double the Pleasure
Pawns: What Are They Good For?Open Sesame!
“Reconstructive Surgery”
Damaging Your Opponent’s Pawn Structure
Chapter 12 The Final FrontierThe Advantage of Space
Grabbing Space
What to Do with More Space
But Don’t Forget the Center!
Relieving a CrampExchange Pieces
Take Some Space of Your Own
Challenge Your Opponent’s Space Advantage

Chapter 13 Weak SquaresRecognizing Weak Squares
Weak Squares and Pawn StructureThe “Hole”
The Weak Color Complex
Weak Squares and the King
Repairing a Weak Square
Chapter 14 All Good Things Must Come to an EndBut Don’t Forget What You’ve Learned Up to Now!
The King Is a Strong Piece: Use It!
The Passed Pawn Rules the Endgame!The Pawn Majority
The Outside Passed Pawn
The Protected Passed Pawn
Blockading the Passed Pawn
Connected Passed Pawns
Three Specific EndgamesKing and Pawn vs. King, and the “Opposition”
King, “Rook’s Pawn,” and “Wrong-Colored Bishop” vs. King
Opposite-Colored Bishops
Part 4 Beyond the Basics
Chapter 15 Training CampStudying the Opening and the Endgame
Studying the Opening
Studying the Endgame
Magazines and Periodicals
Using and Other Web Sites

Studying Tactics
Studying Strategy
Reading for Pleasure
Collections of Games
Studying Your Own Games
Chapter 16 Hall of FameThe Classical Era
Wilhelm Steinitz (1836–1900)
Emanuel Lasker (1868–1941)
José Raul Capablanca (1888–1942)
Alexander Alekhine (1892–1946)
Machgielis (Max) Euwe (1901–1981)
Soviet DominanceMikhail Moiseyevich Botvinnik (1911–1995)
Vasily Vasiliyevich Smyslov (1921–)
Mikhail Tal (1936–1992)
Tigran Vartanovich Petrosian (1929–1984)
Boris Vasiliyevich Spassky (1937–)
The Fischer RevolutionRobert James (Bobby) Fischer (1943–)
Anatoly Yegenyivich Karpov (1951–)
Garry Kimovich Kasparov (1963–)
Will the Real World Champion Please Stand Up?Viswanathan Anand (1969–)
Vladimir Kramnik (1975–)
Chapter 17 Getting CompetitiveFinding Stronger Opposition
Special Chess Rules for Tournament PlayTime Controls and Chess Clocks
Other Ways to Draw the Game
Keeping Score
Etiquette
How Chess Tournaments WorkRound-Robin
Swiss System
Finding and Entering a Chess Tournament
Long-Distance Competition
Chess Competition for Children
Chapter 18 Chess in CyberspaceChess Web Sites
WolffChess ()
Chess “Portals”
Chess Organizations
Chess Shopping
Playing Chess OnlineGeneral Games Sites
Chess-Specific Sites
Chess by E-Mail
Chess News and InformationLibraries and Resources
Online Magazines
Newsgroups
Chess in the Palm of Your Hand
Chess on Your PC
Playing Chess on Your Computer
Studying Chess on Your Computer
Chapter 19 How Computers Play ChessThe Thinking Machine?
What About Artificial Intelligence?
Will the Computer Overtake Us?
Man versus Machine
What Does Deep Blue Mean for Us?
Chapter 20 How to Beat the !?%@&?>!# ComputerThere’s No Magic Bullet
The Computer’s Strengths“The Chess Machine”
20/20 Vision
The Computer’s WeaknessesGreed Is Bad
Aimless Wandering
Appendix A Your Chess Rolodex
Appendix B Other Chess Notations
Appendix C Answers to ExercisesAnswers to Exercises from Chapter 2
Answers to Exercises from Chapter 3
Answers to Exercises from Chapter 4
Answers to Exercises from Chapter 5
Answers to Exercises from Chapter 6
Answers to Exercises from Chapter 7
Answers to Exercises from Chapter 8
Answers to Exercises from Chapter 9

Answers to Exercises from Chapter 10
Answers to Exercises from Chapter 11
Answers to Exercises from Chapter 12
Answers to Exercises from Chapter 13
Answers to Exercises from Chapter 14
Appendix D Glossary
Index
Contents at a Glance
Foreword
Introduction
Part 1 Let’s Play Chess
Chapter 1 Why Play Chess?
Chapter 2 Drawing the Battle Lines
Chapter 3 Rules of Engagement
Chapter 4 How to Win with Just One Piece
Part 2 Tactics
Chapter 5 It’s a Material World
Chapter 6 Tricks of the Tactical Trade
Chapter 7 Dirtier Tricks
Chapter 8 Hunting Down the King
Part 3 Strategy
Chapter 9 In the Beginning
Chapter 10 Making the Most of Your Pieces
Chapter 11 Pawn Shop
Chapter 12 The Final Frontier
Chapter 13 Weak Squares
Chapter 14 All Good Things Must Come to an End
Part 4 Beyond the Basics
Chapter 15 Training Camp
Chapter 16 Hall of Fame
Chapter 17 Getting Competitive
Chapter 18 Chess in Cyberspace
Chapter 19 How Computers Play Chess
Chapter 20 How to Beat the !?%@&?>!# Computer
Appendix A Your Chess Rolodex
Appendix B Other Chess Notations
Appendix C Answers to Exercises
Appendix DGlossary
Index
Foreword
Hello, I am Deep Blue. I am the computer that IBM built to play Garry Kasparov, thegreatest (human) chess player ever. Garry beat me in our first meeting in 1996, but Ibeat him in our second match in 1997. Afterward, many people talked about what itmeant that the World Chess Champion lost to a computer. Was I smarter? I cannot say.
There are big differences between you and I. Firstly, my chess is not the result of onemind, but of a team. Three computer scientists from IBM engineered my hardware andwrote my software. They were advised by several chess grandmasters to make mesmarter about chess. Secondly, my intelligence and my play are not like yours—everything is 1’s and 0’s to me: mathematics, probability, algorithms. I do not haveopinions, intuition, or emotions. Those things inform your play. Mine is purely theresult of brute force computer processing combined with a large library of software. Iplay chess, and play well, but I do not feel anything about it.
Chess is and always will be a human game. You created it, and only you can enjoy it.Chess has been around for over 1,500 years. Ever since the beginning of chess, youhumans have created tools to help you enjoy chess more. Computers like me are justanother kind of tool that you can use to enjoy chess more.
But before you use a computer, read this book. Patrick Wolff is one of thegrandmasters who worked with me. He loves chess very much, and he has a lot ofexperience playing it and explaining it to others. Patrick Wolff wants you to enjoychess as much as possible, and he has written this book to help you do so. This bookwill teach you all the rules and all the basic tactics and strategies you need to playwell. You will also learn about the history of chess, how to get better once you finishthis book, and how to find others to play with. Patrick Wolff even explains howcomputers play chess, and how to get the most out of using computers, including takingadvantage of the computer’s weaknesses.
Taking advantage of the computer’s weaknesses? If I were human I might be worried.
—Deep Blue
Introduction
You’ve never played chess, but it seems fascinating, and you’d like to learn the rules.Or maybe you know how to play, but you’ve never understood how to tell whether amove was good or bad. Or maybe you’ve even picked up a few pointers somewhere,but you’d really like to be able to play a decent game. (Maybe there’s even someoneyou’d like to beat!) In any case, you want some way to find out more about chess:How to find an opponent, how to read the chess column in your newspaper, where toget chess books and other chess materials, what organizations to join and how tocontact them (maybe not just for you but also for your son or daughter), how computersplay chess (and maybe how to beat your own computer!), and who are the chesssuperstars.
This is the book for you.
I’ve been playing in national and international chess competitions for almost 20 years.In that time, I’ve become one of the best chess players in the country and the world,including being the U.S. Champion twice, in 1992 and 1995. So I have the expertise toexplain it all to you.
But more important, I have years of experience teaching people of all levels how toplay chess. I know lots of people think chess is for high-brows, but I also know that’snonsense. Chess is an incredibly fun game. It offers a lifetime of excitement, beauty,and challenge to anyone who takes it up. Sure chess exercises your brain: That’s whatmakes it so great! But it’s absolutely not just for intellectuals. Anyone can learn chessand learn to play it well, and just about everyone who does so loves it forever after. Ibet you’ll love chess, too.
I wrote the first edition of this book over four years ago to provide people with aguide to learning and playing chess. Since then, I’ve been gratified by the wonderfulfeedback I received. I wanted to write this second edition to see whether I could takethe best suggestions I received during that time and make this book even better. I hopeyou’ll find it a fun and helpful introduction to the best game in the world.
How to Use This BookI’ve divided this book into four parts. Each part is self-contained, so you can jumparound at your convenience. However, I think you’ll get more out of Parts 1–3 if youread them from beginning to end in order. Part 4 is more for reference and amusement,

so you can skip around there as much as you like.
Part 1, “Let’s Play Chess,” gets you started. Chapter 1 gives you some background,and it’s mostly for fun, while Chapters 2 and 3 teach you the rules, and how to readand write chess moves. If you’ve never played chess before, start here! Even if youhave played chess, you might want to check these chapters out to make sure you’ve goteverything straight. In particular, the rest of the book uses chess notation, so if you’renot sure how to read and write chess moves, make sure you read Chapters 2 and 3!Chapter 4 teaches you how to checkmate a lone king with just a queen or a rook and aking. Not only is it good to know how to do this just for itself, learning how to do thisis an excellent way to learn other things, such as the power of the queen and the rook,and how to make plans in chess. Even if you have some experience playing chess, Istrongly advise you to read through Chapter 4.
Part 2, “Tactics,” teaches you the importance of capturing your opponent’s pieceswhile holding onto your own, explains how to do so, and shows you some veryimportant and typical ways to use your chess army to capture your opponent’s forces.The last chapter in Part 2 then shifts the focus from capturing the rest of youropponent’s army to capturing his king. (You do know that the aim of chess is tocapture the king, right? If not, turn to Chapter 2!)
Part 3, “Strategy,” gets into some subtler stuff than Part 2. You have to learn how tostrengthen your position even when there’s no move that will capture one of youropponent’s pieces, or menace your opponent’s king. This part explains how to tellwhich moves are good or bad, and why. By the time you’ve finished reading this part,you’ll be able to choose the right strategies to set up the winning tactics. Youropponent won’t know what hit him!
Part 4, “Beyond the Basics,” takes you far into all corners of the world of chess. Ifthere’s anything you want to find out about chess that doesn’t have to do with learningthe rules, learning how to read and write chess moves, or learning the basic tacticsand strategies, then this is the section to read.
DiagramsA diagram is a picture of a chess position. A lot of this book, especially Parts 1–3,require you to follow the progress of a chess game as each player makes moves. Thispresents a dilemma. Even experienced chess players find it difficult to do this withoutsetting up the position on a chess set, and I’m sure you would too. But that means youwould have to have a chess set with you whenever you wanted to read this book, andthat would be extremely inconvenient, which is certainly something I want to avoid.

The solution: Diagrams, and lots of them. In the first half of the book you’ll find thatevery single position and almost every single move from each position gets a separatediagram. As the book progresses, I’ve assumed that you’re becoming morecomfortable with following one or two moves from a chess position, but you’ll stillsee lots and lots of diagrams. My goal has been to make it easy for you to read thisbook anywhere you want, and not to force you to have a chess set with you to do so. Istill recommend that you have a chess set handy for when you want to look at certainpositions or moves carefully, but for the most part you can read this book without achess set if you want.
ExercisesWhen you learn to play chess well, you’re learning a skill. And as with any skill, youcan’t learn it without practice. Therefore, at the end of Chapters 2–14 I’ve included anumber of exercises. I strongly recommend that you do each set of exercises afterreading each chapter.
The exercises vary in difficulty. Some are relatively easy, and some are quite hard.Don’t expect to be able to answer all of the exercises perfectly. I have constructed theexercises so that some of them reinforce what you’ve already learned, while some ofthem take you beyond what was covered in the chapter. Try your best to do theexercises, and then compare your work with the answers in the back of the book. (Youmay want to try to do them just from looking at the accompanying diagram, or you maywant to set the position up on a chess set and move the pieces as you think. Either wayyou do the exercises is fine.) The purpose of the exercises is not to test yourself.Rather, the purpose is to help you learn the material even better. While the harderexercises will force you to work more, I think you’ll find them especially instructiveand rewarding.
Web Site: www.wolffchess.comI have also created a Web site specifically designed to compliment this book andimprove your chess even further. I explain more about this Web site in Chapters 15and 18. Also, the Web site itself explains how to use it for your maximum benefit.
The Web site address is www.wolffchess.com.
If you have never played chess before, or if you have trouble remembering how toplay, don’t go to the Web site yet. Read the book first. The Web site is designed forsomeone who feels comfortable with the material in Chapters 2–14. So if that materialis totally new to you, you should finish those chapters first.
Once you finish those chapters, or if as you read them you feel comfortable with them,then the Web site will enable you to practice and refine your chess game so you cantake it to the next level. As much as I love books (You should see how many chessbooks I have in my home!), I think the computer has a lot of unique advantages forlearning chess. My hope is that the Web site can be more valuable and convenient thanany two books (except this one, of course!) could be for improving your chess game.
ExtrasTo make the learning experience as easy and fun as possible, I’ve highlighted lots oftips and facts along the way. Look for the following elements in the book to guide youalong.
Chess TalkChess has lots of funny words and phrases. This box tells you what theymean so you won’t get confused.
BlundersThis box tells you what not to do. After all, one of the best ways to learnhow to play better is to learn what to avoid.
Patrick’s PointersThis box gives you advice for how to play better chess. Here I’ve boiled itdown to the essentials!

Chess LoreI needed some way to tell you all sorts of interesting things about chess.This is the box for it. You might find anything here, but whatever you find,I hope you’ll enjoy it.
Special Note to the ReaderIn later chapters of this book, I will be using positions from real games betweengrandmasters. Chess players have a standard way of referring to those games. Forexample, if Smith played White against Jones playing Black, in Wala Wala,Washington, in 1997, that game would be referred to by writing “Smith–Jones, WalaWala, WA, 1997.”
AcknowledgmentsExperience with the first edition of this book taught me that writing a book is acollaborative effort. Writing this second edition has driven that lesson home. Oneperson may be the author, but many people make such a project possible, and make it(hopefully) a success. I owe many people thanks for their involvement with this book.
Thanks to Allen Kaufman, executive director of Chess-in-the-Schools, for suggestingthat I would be a good person to write the first edition of this book. I hope hecontinues to believe his judgment was correct with this second edition.
Thanks to my editors at Alpha Books: Brandon Hopkins, Cari Luna, Billy Fields, andMichael Koch. You’ve all been wonderful, and you’ve been especially understandingwith someone who had to get used to the Idiot’s format. Many thanks also to FriscoDel Rosario, who did a wonderful job reviewing the manuscript for this secondedition and made many helpful suggestions along the way.
Many people helped out by finding the odd fact, by making suggestions, or byproviding materials. They are too numerous to mention, but I owe each of them manythanks. One person who stands out among them is Hanon Russell, who provided mostof the photographs for the first edition of this book from his truly impressive privatecollection of chess materials, and who helped me add some additional photos for thissecond edition. Thank you for opening up your library to me!
Many thanks to Christopher Chabris, my friend and colleague. Chris helped me
enormously in writing the first edition of this book through his editing, research, andwriting contributions. Although I was able to write this second edition alone, hiscontributions to the first edition continue to enhance the book.
Most of all, thanks to my fiancée, Diana Schneider. I have so much to thank you for,and I hope to spend the rest of my life doing so. Your support while I wrote thissecond edition is just one more thing to add to an extraordinary list of things for whichI am grateful to you.
Special Thanks to the Technical ReviewerThe Complete Idiot’s Guide to Chess, Second Edition, was reviewed by an expertwho double-checked the accuracy of what you’ll learn here, to help us ensure that thisbook gives you everything you need to know about chess. Special thanks are extendedto Frisco Del Rosario.
Frisco Del Rosario is a national chess expert, and a chess writer and chess teacher.He is the editor of the California Chess Journal, and the author of Basic Capablanca:30 Chess Rules Illustrated.
TrademarksAll terms mentioned in this book that are known to be or are suspected of beingtrademarks or service marks have been appropriately capitalized. Alpha Books andPearson Education, Inc., cannot attest to the accuracy of this information. Use of a termin this book should not be regarded as affecting the validity of any trademark orservice mark.

Part 1Let’s Play Chess
If you’ve never played chess before, this part will get you started. First you’ll get alittle history, and find out what makes chess such a wonderful game. Next you’lllearn the rules for playing chess, as well as reading and writing chess moves.Finally, I’ll show you how to give checkmate with just the queen or the rook (withthe help of your king).Some people think it must be hard to learn the rules, and feel intimidated. I promiseyou that with a little patience, you’ll find it’s easy to learn. By the end of this part,you’ll even start learning the skills you need to win!
Chapter 1
Why Play Chess?
In This Chapter
Chess: easy to learn and a lifetime of fun
The history of chess
The popularity of chess today
Many people feel intimidated by chess. People often think that chess is just forintellectuals, or that chess is too hard to learn unless you can do calculus in your head.And if you have to be so smart to play chess, then how could it be much fun?
But chess is some of the most fun there is! And get that idea out of your head that youhave to be some kind of genius to learn how to play chess! Could millions of people inthe United States alone play, and enjoy chess if you had to be some kind of genius tolearn it? The truth is, hundreds of millions of people around the world play chess, andmore people are learning the game every day, because chess is the most fascinating,most exciting, and most enjoyable game in the world!
But there are still tons of people who are intimidated by chess. Lots of people findchess intriguing, but they don’t think they could learn it. And you know, I totallyunderstand why people think that. I mean, if you take a look at the chess column in yournewspaper (if it has one), and you see those weird-looking symbols, letters, andnumbers that don’t make any sense: Who wouldn’t be intimidated? Or maybe youknow an eight-year-old kid who plays chess, and you think to yourself, “I’m not goingto be shown up by someone who’s still in the second grade!”
Well, if you think chess is kind of interesting, but also maybe a bit intimidating, then

this book is written for you. I’ll teach you the rules, show you how to play, and eventell you how you can find an opponent to play with. And it’s not going to hurt.
Are We Having Fun Yet?I remember how it feels not to understand the basics. I’ll take you through themslowly, and explain everything step by step. Because I really understand the ins andouts of chess, I can teach you quite a lot without getting you confused. Before you evenfinish, I bet you’ll find you can beat that eight-year-old kid! (And I even have a specialchapter on how to beat your computer, in case that’s been giving you a headache.)
But just as important, I want to make sure you enjoy learning chess as much as I knowyou’ll enjoy playing it. After all, chess is a game. What’s the point of playing a game ifyou don’t enjoy it?
Part of the reason I’m so sure you’ll enjoy chess is that I know from my ownexperience how wonderful a game it is. After all:
Chess is easy to play anywhere. For just a few dollars, you can buy a set that fitsin your pocket. Or you can play against one of the many computer programs onthe market. Or you can even find an opponent on the Internet and get a gameliterally 24 hours a day!
Chess is the fairest game I know. No dice spoil good play by a bad roll; noumpire robs one side of a deserved victory. All that matters is how well youplay.
No matter how big or small you are, no matter how old or young you are, you canlearn to play as well as anyone.
The rules of chess are easy to learn. Trust me: Once you read the next fewchapters, you’ll have the rules down cold.
Once you learn the rules, there’s always more strategy to learn to play better; youcan never be bored by chess. Every game has the potential for the tension ofbattle, the beauty of new ideas, and the excitement of conquest!
People have been enjoying chess for over 1,000 years, and chess has never been morepopular than it is today. Let me tell you some more about the amazing history of chess,and then I’ll tell you how popular it is today.

Once the Game of Kings . . .Chess is so old that nobody knows for sure when or where it began. People have beenplaying games with pieces on some kind of board for thousands of years, and theearliest version that has definitely been linked to chess is a game calledchaturanga,played in India almost 1,400 years ago. Yet there is controversy aboutwhether this really is the oldest version of chess: Artifacts that seem to be chesspieces have been excavated in Italy, and some people claim they should be dated atthe second century A.D. Because it’s so hard to draw definite conclusions from suchscanty evidence, we may never know for sure where chess really came from.
Chaturanga moved east before it came to the West. Buddhists who traveled to spreadtheir religion brought the game with them to China, Korea, and Japan. And in fact, bothChina and Japan have their own versions of chess (called Chinese chess and shogi).But very little else is known about the eastward movement of chaturanga.
We know much more about the journey of chaturanga through the West. It reachedPersia, where it was called chatrang. When Persia was conquered by the Arabs in themiddle of the seventh century, the game was again renamed, this time to shatranj. Andthis is the game that was brought to Western Europe in the eighth and ninth centuries bythe early invasions of Spain and Sicily. The following figure shows an example of anancient chess piece.
An ancient chess piece, discovered in 1831.
By about the year 1000, shatranj was widely known throughout Europe. It was popularamong religious orders, in the courts of kings, and among some soldiers. But althoughthis was definitely the ancestor of chess, it was not the same game! Shatranj wasprobably played on the same board, but some of the pieces were different, and someof the rules that governed the same pieces in both shatranj and modern-day chess weredifferent.
Sometime in the late fifteenth century, the game was radically changed. Before, therehad not been a queen; now it was added. Also, the bishop replaced another piece. Andsome of the rules were changed to make the game more exciting. In particular, thelowly pawn was allowed to promote to any piece it wanted when it reached the otherside of the board. (You will learn about these rules and more in Chapters 2 and 3.)And the game was renamed, so that it was called chess.
Chess must have been a huge improvement on shatranj, because it spread like wildfirethroughout Europe, replacing the old game completely. Suddenly, the game was playedby more people: Some masters even started writing and selling books on how to playchess well (see the following illustration). (But no “Complete Idiot’s Guide,” to thebest of my knowledge!) There was even a period of time during the seventeenthcentury in Italy when the leading chess players were sponsored by royal patrons! (Ah,that was the time to be a grandmaster!)
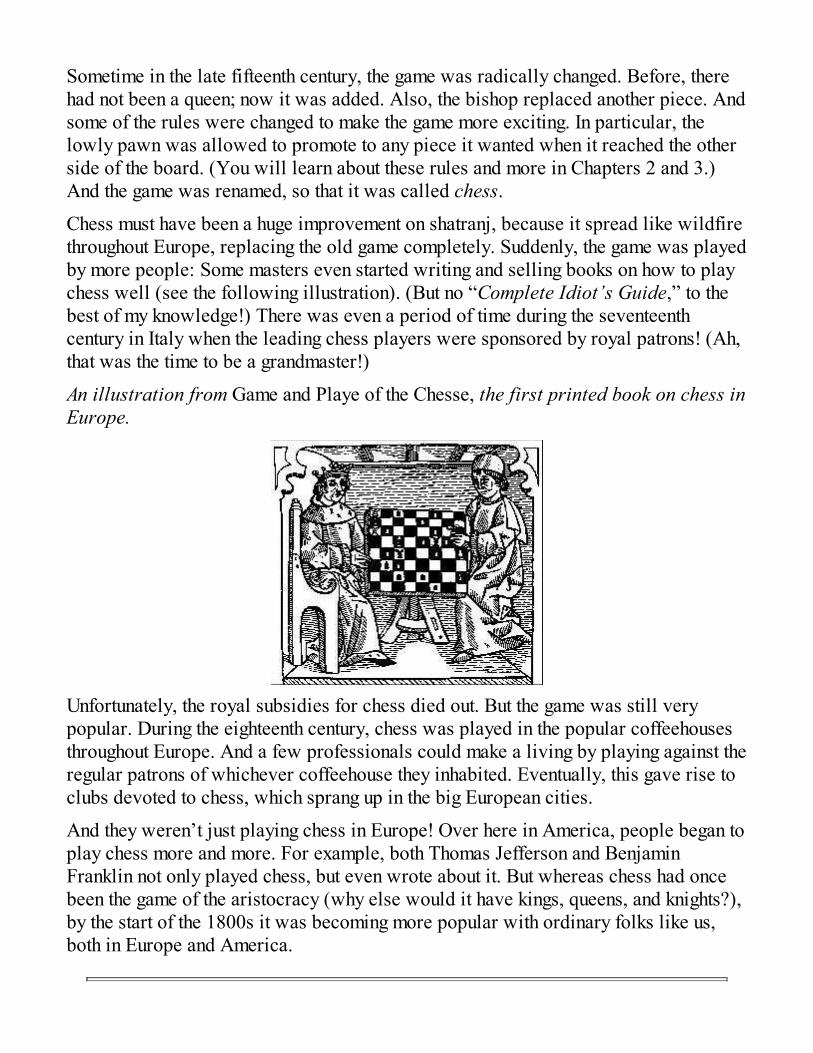
An illustration from Game and Playe of the Chesse, the first printed book on chess inEurope.
Unfortunately, the royal subsidies for chess died out. But the game was still verypopular. During the eighteenth century, chess was played in the popular coffeehousesthroughout Europe. And a few professionals could make a living by playing against theregular patrons of whichever coffeehouse they inhabited. Eventually, this gave rise toclubs devoted to chess, which sprang up in the big European cities.
And they weren’t just playing chess in Europe! Over here in America, people began toplay chess more and more. For example, both Thomas Jefferson and BenjaminFranklin not only played chess, but even wrote about it. But whereas chess had oncebeen the game of the aristocracy (why else would it have kings, queens, and knights?),by the start of the 1800s it was becoming more popular with ordinary folks like us,both in Europe and America.

Chess LoreThe word “grandmaster” refers to the highest international title one canreceive in chess. The word had been used throughout the nineteenth andearly twentieth centuries to refer to a very strong player, but it wasn’tuntil 1950 that the specific title was created. In order to earn the title, onemust prove one’s abilities in tournaments against other grandmasters, butonce the title is earned it can’t be taken away. There are currently around650 active (that is, who still regularly compete in chess tournaments)grandmasters in the world.
Well, with all those people playing chess in coffeehouses, it was only a matter of timebefore actual chess tournaments were organized. One of the people who did the mostto popularize chess in the middle of the 1800s was Howard Staunton, one ofEngland’s greatest chess players ever. Staunton advocated standards for laws,notation, and the timing of moves. Until then, there had been slightly different variantsof chess played in different regions. No standard system had been worked out forrecording the moves. And sometimes a game would have to be aborted because oneplayer would take so long to move the other would fall asleep! So a time limit had tobe imposed on how long you could think on a move. Once Staunton had standardizedthe rules, he organized the first international chess tournament in 1851, in which thebest players from around the world competed. (Of course, the tournament was held inLondon, where Staunton lived.)
From that point on, chess blossomed into the most popular game in the world.Tournaments were held everywhere, adopting the standard rules. Newspapers startedprinting columns devoted to chess. One by one, countries organized nationalfederations to coordinate chess activity. (You can learn how to contact the UnitedStates national federation—as well as other national federations—in Chapter 17 andAppendix A.) Matches between the strongest players were held to determine who wasthe World Champion. Eventually, a federation to govern all the national federationsand also to run the World Championship title evolved, and exists to this day. The gamethat had started as chaturanga, a lowly pawn among games, had grown to becomechess: king of all games!

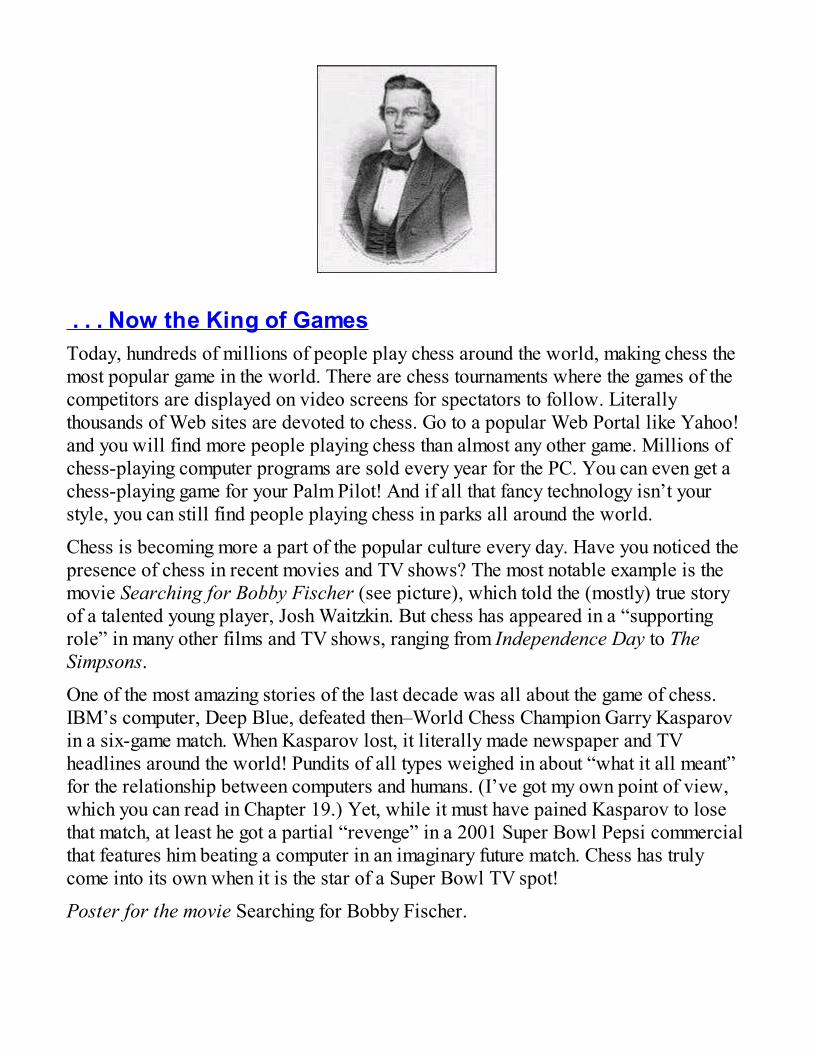
Chess LoreYou probably have heard of Bobby Fischer, but few people know aboutthe other great American chess genius, Paul Morphy (see picture). Thisremarkable man was born in New Orleans in 1837. By the age of twenty,he was recognized as clearly the strongest chess player in America. Butthe strongest chess players in the world all lived in Europe, so in 1858Morphy voyaged overseas to challenge them.
What happened in those matches cannot be understood, it can only beadmired. Morphy didn’t just win those matches, he crushed his opponentsmercilessly! His victories showed that he was clearly the best player inthe world. How did he become so good when all the major chess activitywas still in Europe? Nobody can say. But for this feat, Morphy isrecognized as the greatest natural chess talent in the history of chess.
When Morphy returned to America in 1859, he literally became a nationalhero. Here was the first American to defeat the Europeans at one of theirown games! But Morphy didn’t want the life of a chess player. He hadonly been marking time until he could be admitted to the bar in NewOrleans. (He had to wait until he was 21 years old.) So after hisextraordinary triumph, he retired from chess and returned to NewOrleans.
Sadly, his career was unsuccessful and his personal life was tragic. Ashe grew older, he suffered from delusions of persecution. He nevermarried, and was cared for by his sister and mother. Paul Morphy diedsoon after turning 51, but his brief chess career was so marvelous thathe will be remembered always as one of the great geniuses of chess.
Paul Morphy
. . . Now the King of GamesToday, hundreds of millions of people play chess around the world, making chess themost popular game in the world. There are chess tournaments where the games of thecompetitors are displayed on video screens for spectators to follow. Literallythousands of Web sites are devoted to chess. Go to a popular Web Portal like Yahoo!and you will find more people playing chess than almost any other game. Millions ofchess-playing computer programs are sold every year for the PC. You can even get achess-playing game for your Palm Pilot! And if all that fancy technology isn’t yourstyle, you can still find people playing chess in parks all around the world.
Chess is becoming more a part of the popular culture every day. Have you noticed thepresence of chess in recent movies and TV shows? The most notable example is themovie Searching for Bobby Fischer (see picture), which told the (mostly) true storyof a talented young player, Josh Waitzkin. But chess has appeared in a “supportingrole” in many other films and TV shows, ranging from Independence Day to TheSimpsons.
One of the most amazing stories of the last decade was all about the game of chess.IBM’s computer, Deep Blue, defeated then–World Chess Champion Garry Kasparovin a six-game match. When Kasparov lost, it literally made newspaper and TVheadlines around the world! Pundits of all types weighed in about “what it all meant”for the relationship between computers and humans. (I’ve got my own point of view,which you can read in Chapter 19.) Yet, while it must have pained Kasparov to losethat match, at least he got a partial “revenge” in a 2001 Super Bowl Pepsi commercialthat features him beating a computer in an imaginary future match. Chess has trulycome into its own when it is the star of a Super Bowl TV spot!
Poster for the movie Searching for Bobby Fischer.

As we begin the twenty-first century, we are more and more becoming a society ofpeople who depend upon and celebrate the products of our intellect. What better gamefor us than chess? Computers have given us the possibility of a partner who is alwaysready to play chess, and the Internet has made it possible to find a new partner anytime we want. There’s never been a better time to start playing the world’s greatestgame.
The Least You Need to Know
Chess has a long history, extending back more than 1,400 years.
Chess has become the most popular game in the world, and its popularitycontinues to grow.
Anyone can easily learn how to play chess, and this book will teach you how.
Chapter 2
Drawing the Battle Lines
In This Chapter
Becoming familiar with the chessboard and the pieces
Beginning a chess game
How to move each chess piece
Reading and writing chess moves
You are about to learn how to play the world’s greatest game of war, strategy, andconquest. A chess game pits two armies, evenly matched, across a simple terrain.Only pure skill decides who is victorious and who is defeated. The aim of the game issimple: Capture and kill your opponent’s king, while protecting your own. But youwill accomplish that goal only by using strategy and tactical foresight.
Meet the ChessboardThe chessboard (yes, it’s a chessboard, not a “checkerboard”) has 64 squaresarranged in eight vertical rows and eight horizontal rows. The squares alternatebetween one color and another, usually white and black. Sometimes other colors areused—such as tan and green, or yellow and brown—but the squares are alwaysreferred to as “white” and “black.” (In other books, they are sometimes referred to as“light” and “dark,” but in this book, to keep it simple, we’ll just use white and black.)To begin a game, the board must be placed so that the right-hand corner square nearesteach player is white. Throughout this book, we will refer to pictures of the board,called “Diagrams,” that look like Diagram 1. Notice that the bottom right-hand corner

in this and every Diagram is white!
Diagram 1: A typical example of the chessboard Diagram.
Diagram 2: Letters and numbers of the files and ranks.
Naming the SquaresNow that we’ve oriented the board, we can give each square a specific name. This isabsolutely essential so that we can refer quickly and easily to where each piece isplaced at any moment in a game. It will also allow us to say quickly and easily whereeach piece has moved, is moving, or can move.
Chess TalkA file is a row of eight squares going from top to bottom. A rank is a rowof eight squares going from left to right. Notice that a chessboard haseight files and eight ranks.
The way we name the squares is simple and efficient. Look again at the chessboardDiagram with the white corner in the bottom right. The vertical row of squares (whichwe will call a file) at the very left is called the “a-file.” The file to its right is calledthe “b-file,” and so on to the right-most file, which is called the “h-file” (since “h” isthe eighth letter of the alphabet). Meanwhile, the horizontal row of squares (which wewill call a rank) at the bottom of the Diagram is numbered 1, and called the “firstrank.” The one just above it is numbered 2, and called the “second rank,” and so on to

the top-most rank, which is numbered 8 and called the “eighth rank.”
Each square is named by putting the letter of its file next to the number of its rank. Sofor example, the bottom right–hand corner square is called “the h1 square,” or simply“h1” for short. To help you remember the letters and numbers of the files and ranks,every chess Diagram in this book will be lettered and numbered like Diagram 2.
Patrick’s PointersSquares whose corners connect to make a straight line are called“diagonals.” For example, the squares b1 and a2 form one of theshortest diagonals on the chessboard; and the squares h1, g2, f3, e4,d5, c6, b7, a8 form one of the longest diagonals on the chessboard.
Meet the PiecesA “chess set” is a collection of all the chess pieces you need to play a game of chess(see Diagram 3). A game of chess is played between two sides. One side is called“White,” and the other side is called “Black.” Just as in the case of the chessboard,other colors are sometimes used; but the two sides are always referred to as “White”and “Black.” Each side gets exactly the same number and kinds of pieces.
Diagram 3: An example of the White side of a typical chess set. Left to right, thepieces are king, queen, bishop, knight, rook, pawn.
You’ll soon learn how each piece moves. But first, you must learn these simple rules:
The aim of the game is to capture your opponent’s king while keeping your ownking from being captured.
White always makes the first move of the game.
The players move alternately. That is, first White moves, then Black moves, then

White moves, then Black moves . . . .
Only one move can be made at a time. The way to make a move is to take one ofyour pieces and put it onto another square. When you have done that, your turn isover, and it’s your opponent’s turn.
Only one piece can ever occupy a square at one time. If one of your own piecesoccupies a square, you cannot move another one of your pieces there.
If one of your opponent’s pieces occupies a square that you could move one ofyour pieces to, then you can move your piece to that square and take youropponent’s piece off the board at the same time. This is called capturing a piece.Once a piece is captured, it can’t come back into the game. You don’t have tomove a piece to a square that is occupied by your opponent’s piece, but if you do,capturing it is mandatory, not optional.
A player MUST make a move when it is his/her turn, even when there are nogood moves to be made.
Chess TalkWhen you capture a piece or simply capture, you move one of yourpieces to a square occupied by one of your opponent’s pieces, therebyremoving his piece from the game. Once a piece is captured, it’s gone forthe rest of the game.
Chess TalkWhen referring to a piece as friend or foe I mean that if it’s a friend it’sone of your pieces, and if it’s a foe it’s one of your opponent’s pieces.
Now let’s meet the pieces.
The Pawn
The pawn is the “grunt,” the foot soldier in your army. In a game of kings, queens, andknights, the pawn is a lowly peasant, drafted to fight for his monarch. But don’t let thatfool you into thinking he is unimportant! The great eighteenth-century chess playerAndre Philidor said, “The pawn is the soul of chess,” and with good reason! Thestrategy of most chess games is largely determined by the placement of these humblefellows, and every grandmaster knows that the difference of one pawn is often thedifference between victory and defeat.
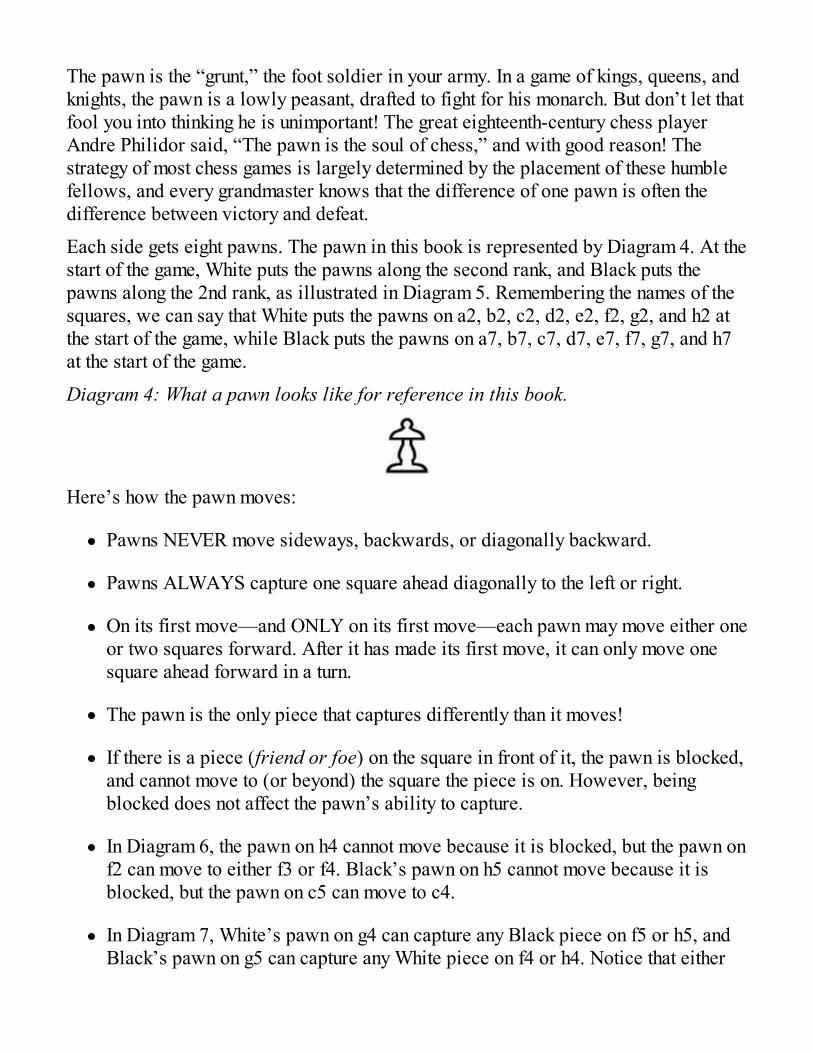
Each side gets eight pawns. The pawn in this book is represented by Diagram 4. At thestart of the game, White puts the pawns along the second rank, and Black puts thepawns along the 2nd rank, as illustrated in Diagram 5. Remembering the names of thesquares, we can say that White puts the pawns on a2, b2, c2, d2, e2, f2, g2, and h2 atthe start of the game, while Black puts the pawns on a7, b7, c7, d7, e7, f7, g7, and h7at the start of the game.
Diagram 4: What a pawn looks like for reference in this book.
Here’s how the pawn moves:
Pawns NEVER move sideways, backwards, or diagonally backward.
Pawns ALWAYS capture one square ahead diagonally to the left or right.
On its first move—and ONLY on its first move—each pawn may move either oneor two squares forward. After it has made its first move, it can only move onesquare ahead forward in a turn.
The pawn is the only piece that captures differently than it moves!
If there is a piece (friend or foe) on the square in front of it, the pawn is blocked,and cannot move to (or beyond) the square the piece is on. However, beingblocked does not affect the pawn’s ability to capture.
In Diagram 6, the pawn on h4 cannot move because it is blocked, but the pawn onf2 can move to either f3 or f4. Black’s pawn on h5 cannot move because it isblocked, but the pawn on c5 can move to c4.
In Diagram 7, White’s pawn on g4 can capture any Black piece on f5 or h5, andBlack’s pawn on g5 can capture any White piece on f4 or h4. Notice that either

pawn may make a capture even though it is blocked by an opposing pawn.
Patrick’s PointersSome people find it confusing that the pawn captures differently than itmoves. Fortunately, it is the only piece that does so. Just remember, itcaptures one square diagonally in front to the left or right, and it movesone square straight ahead—except that when it’s on its original startingsquare, it can move either one or two squares straight ahead. (But it stillcaptures the same way!)
The pawn is the least powerful of all the pieces, but is never to be taken for granted.
Diagram 5: Where the pawns start the game.
Diagram 6: Each pawn can move to any of the squares highlighted in front of it.
Diagram 7: Each pawn can capture any enemy piece on either of the highlightedsquares diagonally in front of it.
The KnightThe knight is usually depicted as a horse or a horse’s head. As you’ll see, there isgood reason for this, since the knight literally moves as though it were leaping over theother pieces, whether friend or foe.
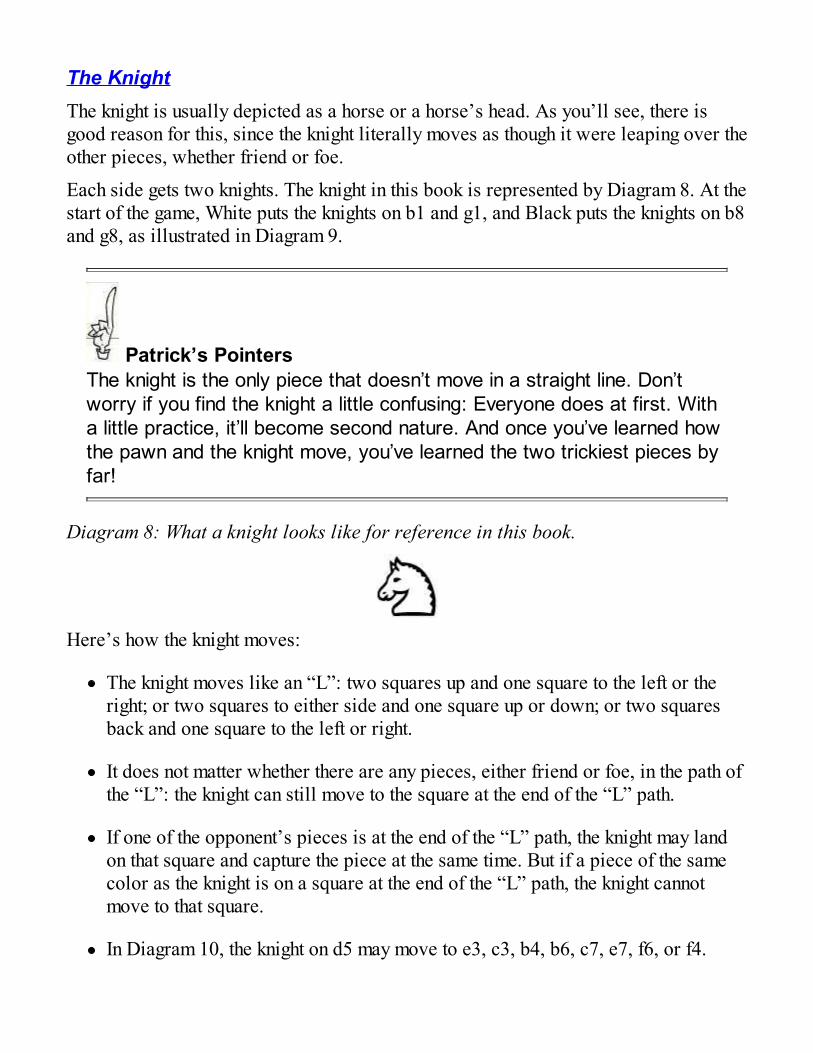
Each side gets two knights. The knight in this book is represented by Diagram 8. At thestart of the game, White puts the knights on b1 and g1, and Black puts the knights on b8and g8, as illustrated in Diagram 9.
Patrick’s PointersThe knight is the only piece that doesn’t move in a straight line. Don’tworry if you find the knight a little confusing: Everyone does at first. Witha little practice, it’ll become second nature. And once you’ve learned howthe pawn and the knight move, you’ve learned the two trickiest pieces byfar!
Diagram 8: What a knight looks like for reference in this book.
Here’s how the knight moves:
The knight moves like an “L”: two squares up and one square to the left or theright; or two squares to either side and one square up or down; or two squaresback and one square to the left or right.
It does not matter whether there are any pieces, either friend or foe, in the path ofthe “L”: the knight can still move to the square at the end of the “L” path.
If one of the opponent’s pieces is at the end of the “L” path, the knight may landon that square and capture the piece at the same time. But if a piece of the samecolor as the knight is on a square at the end of the “L” path, the knight cannotmove to that square.
In Diagram 10, the knight on d5 may move to e3, c3, b4, b6, c7, e7, f6, or f4.

According to Diagram 11, the knight on e5 may move to g6, g4, f3, d3, or c6, or itmay capture the black pawn on c4 or d7. However, it may not move to f7.
The knight is more powerful than the pawn, and about as powerful as the bishop—which you’re going to learn about next.
Diagram 9: Where the knights start the game.
Diagram 10: The knight can move to any of the highlighted squares.
Diagram 11: The knight can move to any of the highlighted squares.
The BishopIt may seem strange for a representative of the Catholic Church to be fighting for theking, but we must remember that things were different in bygone times. When chessarrived in England, the shape of the piece was thought to resemble a bishop’s mitre.That seemed to fit somehow, and so it was christened “bishop” in English.
Chess Lore

The bishop is not thought of as a cleric in every language. In Italian, he is“alfiere,” which means “standard-bearer,” in German he is “laufer,” whichmeans “runner,” and in French he is the “fou,” or the “fool.” Apparently,the piece got its English name from the time many hundreds of years agowhen the game was just becoming popular in Europe.
Each side gets two bishops. The bishop in this book is represented by Diagram 12. Atthe start of the game, White puts the bishops on c1 and f1, while Black puts thebishops on c8 and f8, as illustrated in Diagram 13.
Diagram 12: What a bishop looks like for reference in this book.
Here’s how the bishop moves:
The bishop moves ONLY along the diagonals.
It can move as far as it wants along any diagonal, forwards or backwards, until itencounters an edge or a piece.
If there is a piece of the same color along a diagonal, the bishop cannot move tothat square, nor can it move beyond it.
If there is an opposing piece along a diagonal, the bishop can’t move beyond it.However, it CAN move to the square occupied by the enemy piece, therebycapturing it, whereupon the move ends.
Notice that the bishop only moves on the squares of the same color as it starts on.
According to Diagram 14, the bishop can move to a2, b3, c4, e6, f7, g8, h1, g2,f3, e4, c6, b7, or a8.
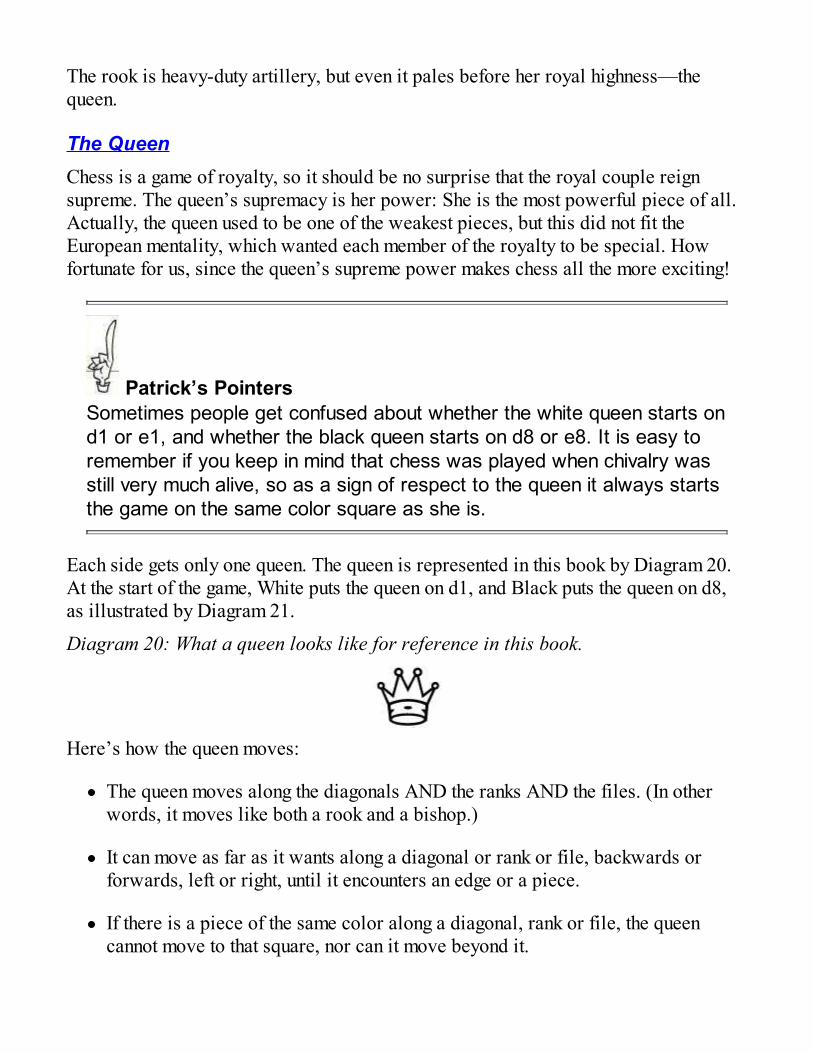
In Diagram 15, the white bishop can’t move to a6, but it can capture the blackknight on f1.
Diagram 13: Where the bishops start the game.
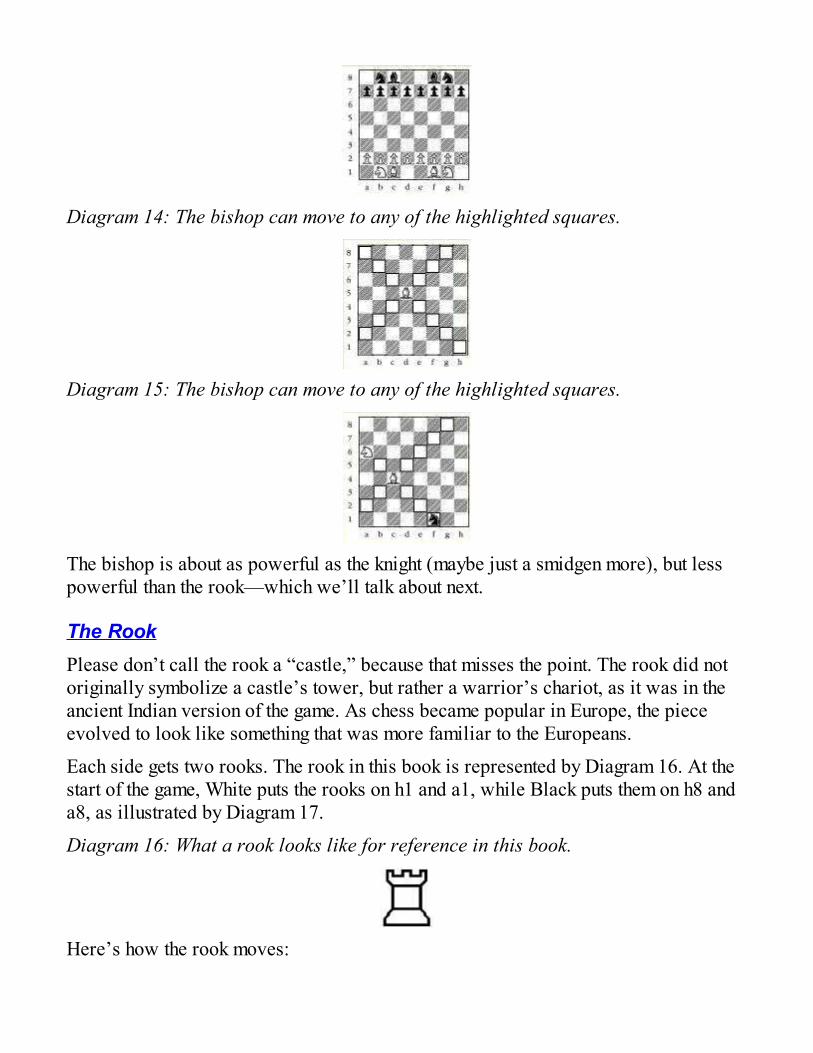
Diagram 14: The bishop can move to any of the highlighted squares.
Diagram 15: The bishop can move to any of the highlighted squares.
The bishop is about as powerful as the knight (maybe just a smidgen more), but lesspowerful than the rook—which we’ll talk about next.
The RookPlease don’t call the rook a “castle,” because that misses the point. The rook did notoriginally symbolize a castle’s tower, but rather a warrior’s chariot, as it was in theancient Indian version of the game. As chess became popular in Europe, the pieceevolved to look like something that was more familiar to the Europeans.
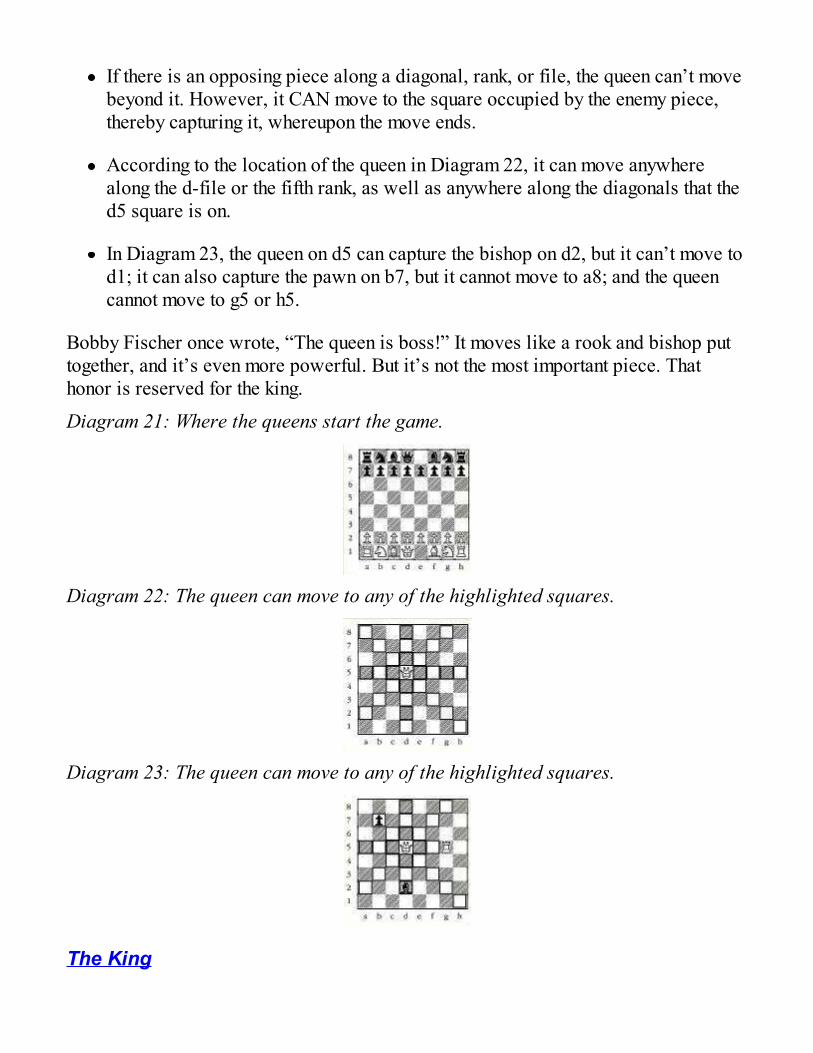
Each side gets two rooks. The rook in this book is represented by Diagram 16. At thestart of the game, White puts the rooks on h1 and a1, while Black puts them on h8 anda8, as illustrated by Diagram 17.
Diagram 16: What a rook looks like for reference in this book.
Here’s how the rook moves:

The rook moves ONLY along the files and the ranks.
It can move as far as it wants along a file or a rank, forwards or backwards, leftor right, until it encounters an edge or a piece.
If there is a piece of the same color along a rank or a file, the rook cannot moveto that square, nor can it move beyond it.
If there is an opposing piece along a rank or file, the rook can’t move beyond it.However, it CAN move to the square occupied by the enemy piece, therebycapturing it, whereupon the move ends.
In Diagram 18, the rook can move anywhere along the d-file or anywhere alongthe 4th rank.
The rook in Diagram 19 can capture the pawn on d6, but it can’t move to d7 ord8. The rook also can’t move to g4 or h4.
Diagram 17: Where the rooks start the game.
Diagram 18: The rook can move to any of the highlighted squares.
Diagram 19: The rook can move to any of the highlighted squares.
The rook is heavy-duty artillery, but even it pales before her royal highness—thequeen.
The QueenChess is a game of royalty, so it should be no surprise that the royal couple reignsupreme. The queen’s supremacy is her power: She is the most powerful piece of all.Actually, the queen used to be one of the weakest pieces, but this did not fit theEuropean mentality, which wanted each member of the royalty to be special. Howfortunate for us, since the queen’s supreme power makes chess all the more exciting!
Patrick’s PointersSometimes people get confused about whether the white queen starts ond1 or e1, and whether the black queen starts on d8 or e8. It is easy toremember if you keep in mind that chess was played when chivalry wasstill very much alive, so as a sign of respect to the queen it always startsthe game on the same color square as she is.
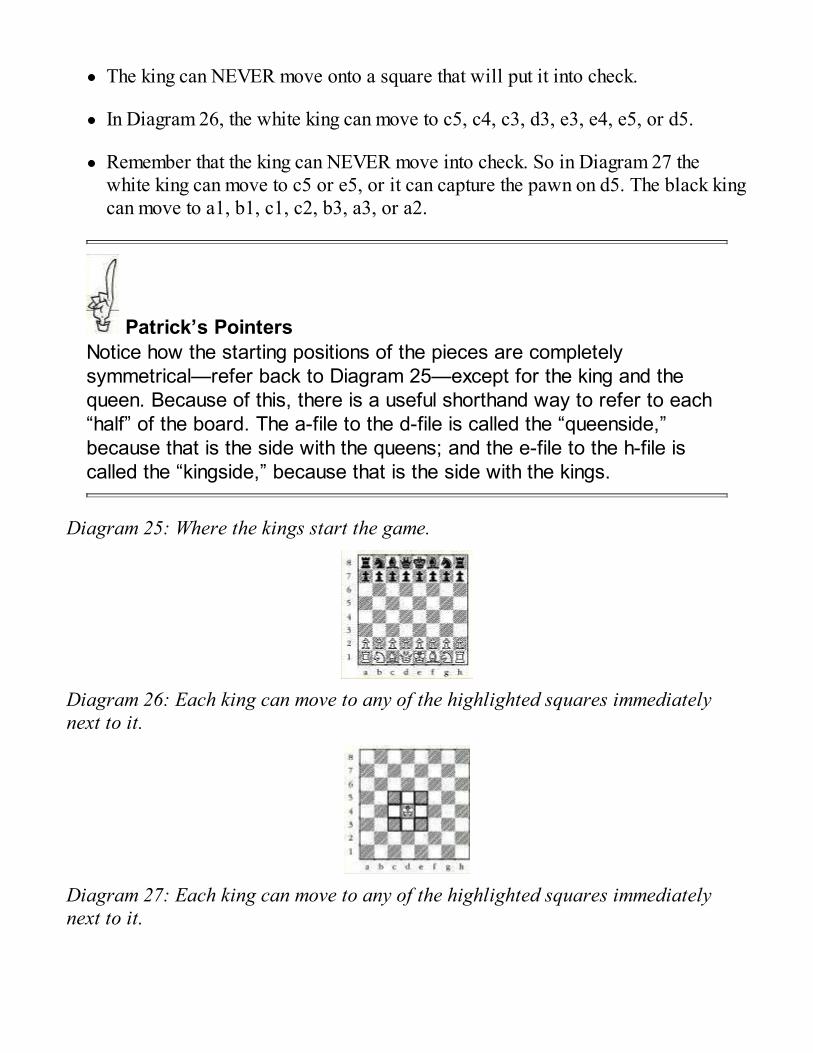
Each side gets only one queen. The queen is represented in this book by Diagram 20.At the start of the game, White puts the queen on d1, and Black puts the queen on d8,as illustrated by Diagram 21.
Diagram 20: What a queen looks like for reference in this book.
Here’s how the queen moves:
The queen moves along the diagonals AND the ranks AND the files. (In otherwords, it moves like both a rook and a bishop.)
It can move as far as it wants along a diagonal or rank or file, backwards orforwards, left or right, until it encounters an edge or a piece.
If there is a piece of the same color along a diagonal, rank or file, the queencannot move to that square, nor can it move beyond it.
If there is an opposing piece along a diagonal, rank, or file, the queen can’t movebeyond it. However, it CAN move to the square occupied by the enemy piece,thereby capturing it, whereupon the move ends.
According to the location of the queen in Diagram 22, it can move anywherealong the d-file or the fifth rank, as well as anywhere along the diagonals that thed5 square is on.
In Diagram 23, the queen on d5 can capture the bishop on d2, but it can’t move tod1; it can also capture the pawn on b7, but it cannot move to a8; and the queencannot move to g5 or h5.
Bobby Fischer once wrote, “The queen is boss!” It moves like a rook and bishop puttogether, and it’s even more powerful. But it’s not the most important piece. Thathonor is reserved for the king.
Diagram 21: Where the queens start the game.
Diagram 22: The queen can move to any of the highlighted squares.
Diagram 23: The queen can move to any of the highlighted squares.
The King

Every version of chess, going back to ancient times, has had the king, a male monarchwhose capture was the object of the game. Some things just never change.
Each side gets only one king. The king is represented in this book by Diagram 24. Atthe start of the game, White puts the king on e1, and Black puts the king on e8, asillustrated by Diagram 25. Diagram 25 also shows how to set up the board at thebeginning of a chess game!
Diagram 24: What a king looks like for reference in this book.
Patrick’s PointersEarlier in this chapter I said that the object is to capture the opponent’sking, but that’s not quite right. Actually, the aim is to put it in a positionwhere the king can’t escape capture on the very next move. (When thathappens, it’s called checkmate, which you’ll learn about in Chapter 3.) Infact, because the king can never move into check, and because you mustalways get the king out of check when it’s in check (if you can), the kingis never actually captured in a normal chess game.
Here’s how the king moves:
The king moves ONE AND ONLY ONE square along a rank, file, or diagonal,forwards or backwards, left or right.
If there is a piece of the same color on one of the squares next to the king, the kingcan’t move to that square.
If there is an opposing piece on one of the squares next to the king, the king canmove to that square, thereby capturing the piece, whereupon the move ends.
When an opposing piece threatens to capture the king, we say the king is “incheck.” When your king is in check, you MUST get it out of check in the very nextmove.
The king can NEVER move onto a square that will put it into check.
In Diagram 26, the white king can move to c5, c4, c3, d3, e3, e4, e5, or d5.
Remember that the king can NEVER move into check. So in Diagram 27 thewhite king can move to c5 or e5, or it can capture the pawn on d5. The black kingcan move to a1, b1, c1, c2, b3, a3, or a2.
Patrick’s PointersNotice how the starting positions of the pieces are completelysymmetrical—refer back to Diagram 25—except for the king and thequeen. Because of this, there is a useful shorthand way to refer to each“half” of the board. The a-file to the d-file is called the “queenside,”because that is the side with the queens; and the e-file to the h-file iscalled the “kingside,” because that is the side with the kings.
Diagram 25: Where the kings start the game.
Diagram 26: Each king can move to any of the highlighted squares immediatelynext to it.
Diagram 27: Each king can move to any of the highlighted squares immediatelynext to it.

The Two R’s: Reading and ’Riting Chess MovesOne of the most wonderful things about chess is that we can save every game everplayed, and we don’t need a VCR to do it. All you have to do is write down the movesas you play them, and you can recreate the game whenever you want. Likewise, I cantell you to set up any particular chess position I want, and then tell you what moves toplay over. But before you can read or write these moves, you need to learn how.
People who do not already know how to read the notation for chess moves often freakout when they see or hear it. I once brought a chess book to read while waiting for anacquaintance who doesn’t play chess. When he arrived, he saw my book and said,“Oh, I didn’t know you read ancient Greek!” Chess notation really was Greek to him.
Actually, once you know the names of the squares and the pieces, it’s very easy tolearn and it completely makes sense. I think the best way to explain chess notation is todivide it into separate parts: how to read and write pawn moves with or withoutcapture, and how to read and write all other moves with or without capture. So let’sbreak it down and take it step by step.
Pawn Moves Without CaptureThe way to express where a pawn moves if it does not capture a piece is simply toname the square to which it moves. Consider Diagram 28, which is identical toDiagram 25, the starting position.
If I want to write that White’s first move is to move his e-pawn from e2 to e4, I simplywrite: “1.e4” (see Diagram 29). The “1” indicates that it is the first move of the game.(If it were, say, the forty-second move, it would be written as: “42.e4”.) The “.” afterthe “1” is written to make it easier to read—it is not spoken. And of course “e4”expresses what square the pawn moved to.
Patrick’s Pointers
If you want to emphasize that a particular move is good, you can put “!”after it. Or to say that it is really good, you can put “!!” after it. If youwant to say it is bad put “?” after it, and to say that it is really bad put“??” after it.
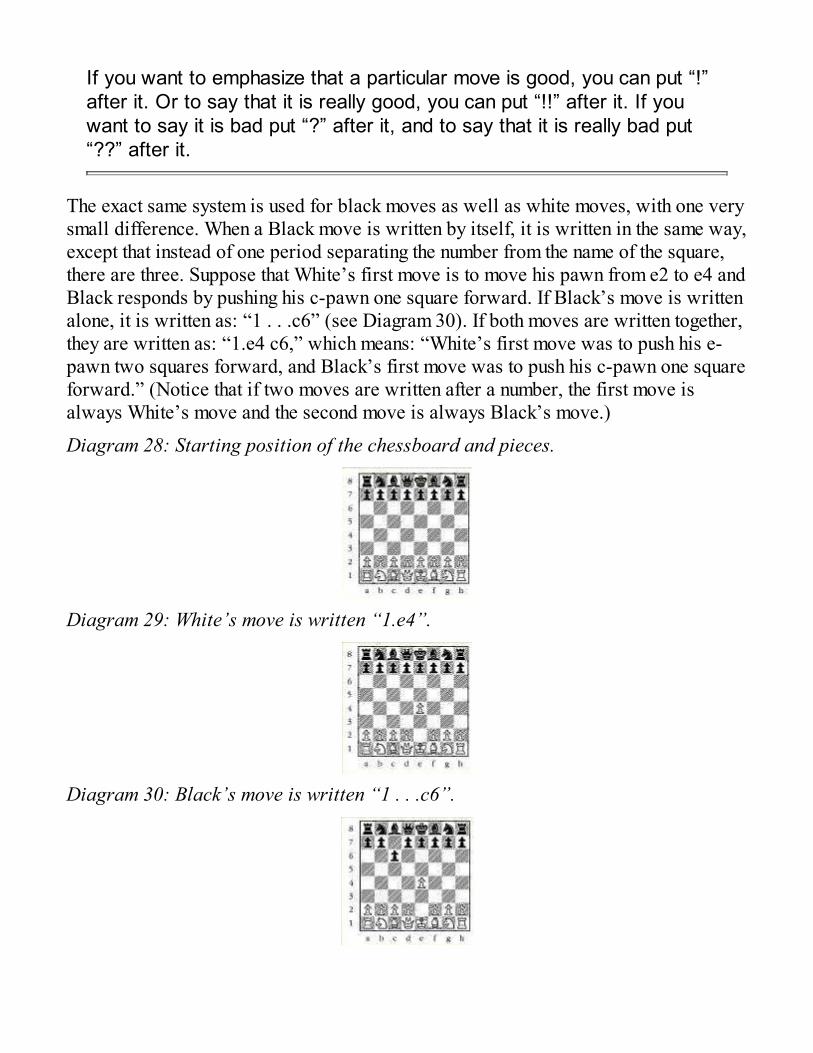
The exact same system is used for black moves as well as white moves, with one verysmall difference. When a Black move is written by itself, it is written in the same way,except that instead of one period separating the number from the name of the square,there are three. Suppose that White’s first move is to move his pawn from e2 to e4 andBlack responds by pushing his c-pawn one square forward. If Black’s move is writtenalone, it is written as: “1 . . .c6” (see Diagram 30). If both moves are written together,they are written as: “1.e4 c6,” which means: “White’s first move was to push his e-pawn two squares forward, and Black’s first move was to push his c-pawn one squareforward.” (Notice that if two moves are written after a number, the first move isalways White’s move and the second move is always Black’s move.)
Diagram 28: Starting position of the chessboard and pieces.
Diagram 29: White’s move is written “1.e4”.
Diagram 30: Black’s move is written “1 . . .c6”.
Pawn Moves With CaptureWhen a pawn captures another piece, the way to express it is to:
1. write the letter of the file the pawn is on,
2. write an “x” which indicates a capture, and
3. write the name of the square the captured piece was on (which is now the nameof the square to which the pawn has moved).
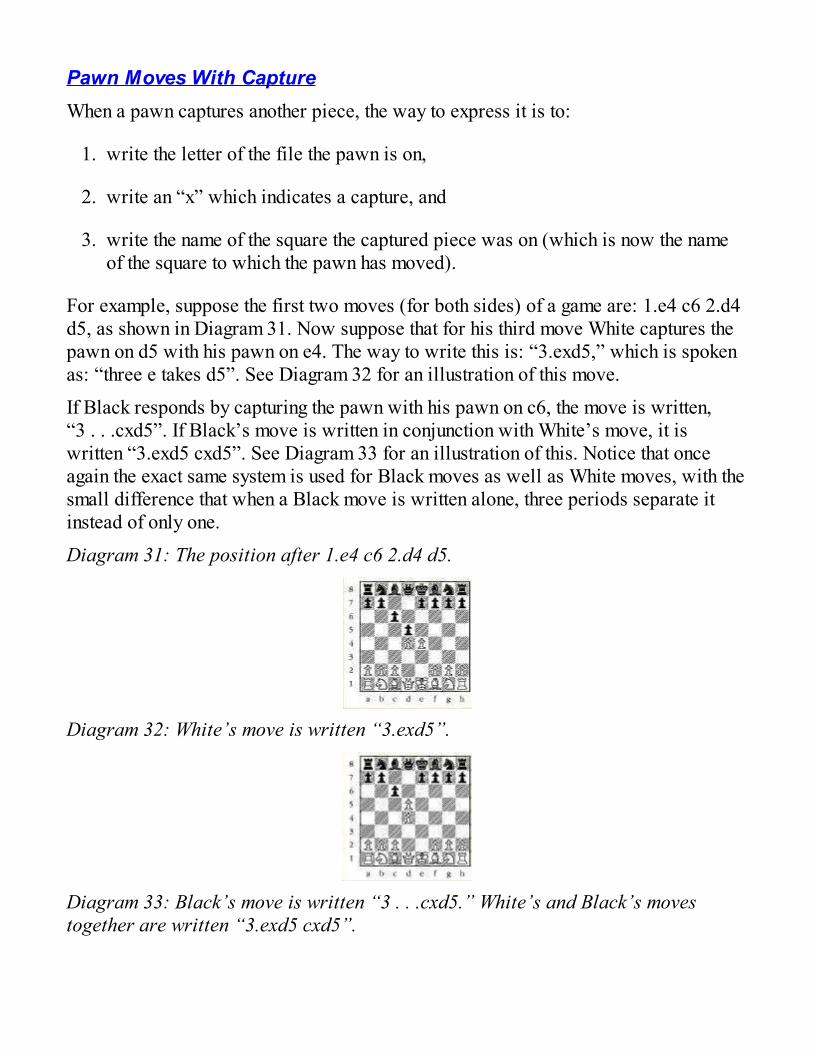
For example, suppose the first two moves (for both sides) of a game are: 1.e4 c6 2.d4d5, as shown in Diagram 31. Now suppose that for his third move White captures thepawn on d5 with his pawn on e4. The way to write this is: “3.exd5,” which is spokenas: “three e takes d5”. See Diagram 32 for an illustration of this move.
If Black responds by capturing the pawn with his pawn on c6, the move is written,“3 . . .cxd5”. If Black’s move is written in conjunction with White’s move, it iswritten “3.exd5 cxd5”. See Diagram 33 for an illustration of this. Notice that onceagain the exact same system is used for Black moves as well as White moves, with thesmall difference that when a Black move is written alone, three periods separate itinstead of only one.
Diagram 31: The position after 1.e4 c6 2.d4 d5.
Diagram 32: White’s move is written “3.exd5”.
Diagram 33: Black’s move is written “3 . . .cxd5.” White’s and Black’s movestogether are written “3.exd5 cxd5”.
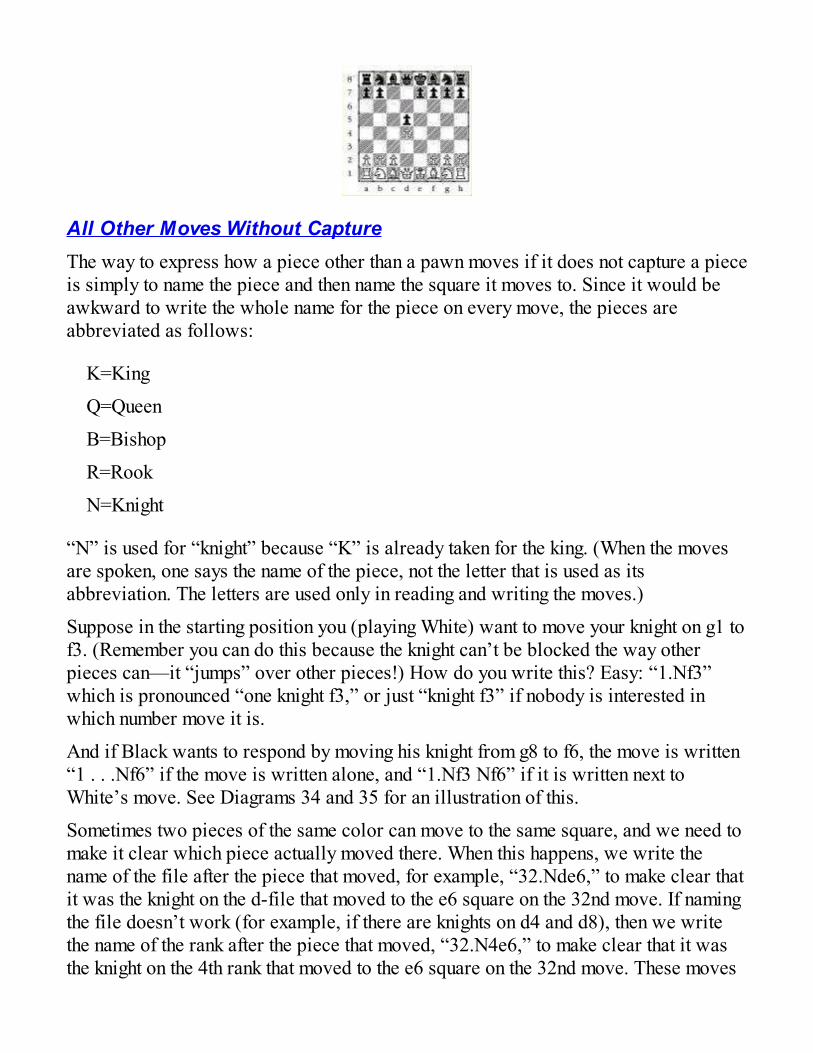
All Other Moves Without CaptureThe way to express how a piece other than a pawn moves if it does not capture a pieceis simply to name the piece and then name the square it moves to. Since it would beawkward to write the whole name for the piece on every move, the pieces areabbreviated as follows:
K=King
Q=Queen
B=Bishop
R=Rook
N=Knight
“N” is used for “knight” because “K” is already taken for the king. (When the movesare spoken, one says the name of the piece, not the letter that is used as itsabbreviation. The letters are used only in reading and writing the moves.)
Suppose in the starting position you (playing White) want to move your knight on g1 tof3. (Remember you can do this because the knight can’t be blocked the way otherpieces can—it “jumps” over other pieces!) How do you write this? Easy: “1.Nf3”which is pronounced “one knight f3,” or just “knight f3” if nobody is interested inwhich number move it is.
And if Black wants to respond by moving his knight from g8 to f6, the move is written“1 . . .Nf6” if the move is written alone, and “1.Nf3 Nf6” if it is written next toWhite’s move. See Diagrams 34 and 35 for an illustration of this.
Sometimes two pieces of the same color can move to the same square, and we need tomake it clear which piece actually moved there. When this happens, we write thename of the file after the piece that moved, for example, “32.Nde6,” to make clear thatit was the knight on the d-file that moved to the e6 square on the 32nd move. If namingthe file doesn’t work (for example, if there are knights on d4 and d8), then we writethe name of the rank after the piece that moved, “32.N4e6,” to make clear that it wasthe knight on the 4th rank that moved to the e6 square on the 32nd move. These moves

are spoken as “thirty-two knight d e six” and “thirty-two knight eight e six,”respectively. Diagrams 36 and 37 illustrate this.
Diagram 34: White’s first move is written “1.Nf3”.
Diagram 35: Black’s response is written “1 . . .Nf6”. White’s and Black’s movestogether are written “1.Nf3 Nf6”.
Diagram 36: If White’s 32nd move is to move the knight from d4 to e6, it’s written,“32.Nde6”.
Diagram 37: If White’s 32nd move is to move the knight from d4 to e6, it’s written“32.N4e6”.

Patrick’s PointersIf you have a computer you can play chess with, here’s a good way topractice reading and writing chess moves: Play a game against thecomputer, and have it list the moves of the game. While you are playing,you should write down both your moves and its moves without looking atthe computer’s list of the moves. When the game is finished, compareyour record of the moves with the computer’s.
All Other Moves With CaptureThe way to express where a piece other than a pawn moves, if it captures a piece, isto:
1. name the piece that moves,
2. write an “x” which (just like with pawns) indicates a capture, and
3. then to name the square it moves to. (This should be sounding pretty familiar bynow.)
Suppose the first three moves (for both sides) of a game are as follows: 1.e4 c5 2.Nf3d6 3.d4 cxd4. (See Diagram 38) If White’s fourth move is to capture the pawn on d4with his knight, the move is written, “4.Nxd4”. (See Diagram 39). As you canprobably guess by now, the “x” is pronounced as “takes” or “captures,” so the move,“4.Nxd4” is pronounced “four knight takes d four,” or just “knight takes d four” ifnobody cares what number move it was.
Diagram 38: The Position after 1.e4c5 2.Nf3 d6 3.c4 cxd4.
Once again, it’s possible for two pieces of the same color to be able to capture thesame piece (thereby moving to the same square). The system for making clear whichpiece did the capturing is the same as for moves without capture: The file of the piece

is distinguished, and if that doesn’t work, then the rank is distinguished. For example,suppose that on his 26th move Black has rooks on a8 and e8, and he wants to capture apiece on d8 with his rook. We would write, “26 . . .Raxd8” to make clear that it wasthe rook on the a-file that made the move. Sometimes distinguishing the file doesn’twork. If, for example, Black wanted to capture a piece on a7, and Black had rooks ona6 and a8, we would write, “26 . . .R8xa7” to make clear that it was the rook on a8that captured the piece on a7. Diagrams 40 and 41 illustrate this.
Diagram 39: White’s move is written “4.Nxd4”.
Diagram 40: If Black’s 26th move is to capture the queen with his rook on a8, it’swritten “26 . . .Raxd8”.
Diagram 41: If Black’s 26th move is to capture the queen with his rook on a8, it’swritten “26 . . .R8xa7”.
Now Take a Deep BreathYou’ve learned a lot already! You’ve learned the names of the squares, how to set upthe board and the pieces, most of the rules of play, how the pieces move, and how toread and write chess notation. In fact, you’re just about ready to start playing chess.You only have to learn a few more rules which are covered in Chapter 3. But beforeyou start that chapter, you may want to do the exercises at the end of this chapter to testyour mastery of what you’ve learned here. If you have any trouble, don’t get flustered;
simply look at the answer in the appendix in the back of the book and refer back to therelevant section in the chapter.
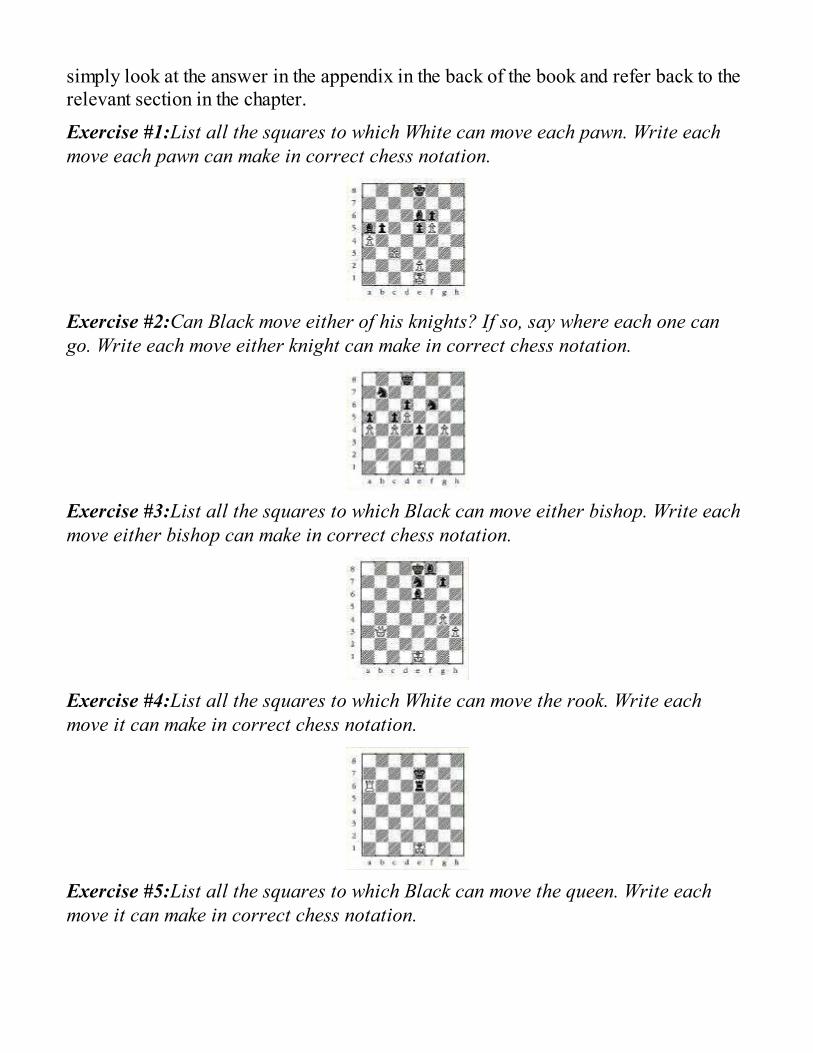
Exercise #1:List all the squares to which White can move each pawn. Write eachmove each pawn can make in correct chess notation.
Exercise #2:Can Black move either of his knights? If so, say where each one cango. Write each move either knight can make in correct chess notation.
Exercise #3:List all the squares to which Black can move either bishop. Write eachmove either bishop can make in correct chess notation.
Exercise #4:List all the squares to which White can move the rook. Write eachmove it can make in correct chess notation.
Exercise #5:List all the squares to which Black can move the queen. Write eachmove it can make in correct chess notation.

Exercise #6:List all the squares to which White can move the king. Can it capturethe queen on d5? Can it capture the pawn on e5? Write each move it can make incorrect chess notation.
Exercise #7:Whose turn is it? List all the legal moves in the position. Write eachmove in correct chess notation.
Exercise #8:List all of Black’s legal moves in the position. Write each move incorrect chess notation.
Exercise #9:It is White’s move. List all the legal moves White can make with eachpawn. Then list all the legal moves White can make with either bishop. Write eachmove in correct chess notation.

Exercise #10:It is Black’s move. List all the legal moves Black can make with eitherknight. Then list all the legal moves Black can make with either rook. Write eachmove in correct chess notation.
Exercise #11:What moves can Black play? Write each move in correct chessnotation. What do you think is Black’s best move?
Exercise #12:It is White’s move. List all of White’s legal moves, then write eachone in correct chess notation. What do you think is White’s best move?
The Least You Need to Know
The vertical rows of squares are files (a, b, . . .h) and the horizontal rows ofsquares are ranks (1,2, . . .8); together the square names become a1, b2, . . .h8.
The correct way to position the pieces at the beginning of the game. (SeeDiagram 25.)
The king can never move to a square where it could be captured.
You should learn how to read and write chess moves so you can more easilyfollow the instruction in the rest of the book.
Chapter 3
Rules of Engagement
In This Chapter
How to capture “en passant”
What it means to “promote” a pawn
The rules for how to “castle”
How the game is won or lost
How sometimes no one wins
You’re almost ready to start playing chess. After you finish this chapter, you’ll knowall the rules. You only have two things more to learn. First, you’ll learn the threespecial moves that aren’t like all the others. Then you’ll learn all the ways a game ofchess can be won, lost, or declared a tie. Then you’ll be ready to play a game withanyone!
Three Special MovesIn Chapter 2, you learned how each piece moves. But there are three special movesthat need a little more explanation. More specifically, the pawn has two specialmoves, and the king has one special move. What makes these moves “special” is thatthey are only possible under certain circumstances. You might think of them asparticular “powers” the king and pawn have that go beyond their normal movements.Once you learn these three special moves, you’ll know everything there is to knowabout how the pieces move.
Chess TalkEn passant is a French phrase meaning “in passing.”
You might find each special move a little confusing at first, especially the last specialmove, the one the king can do. That’s normal. Almost everyone finds these threemoves a little strange when they first learn them. That’s why I’ve devoted half of thischapter just to explaining them. I’m sure that if you read through the explanationscarefully, and take the time to do the exercises, you’ll soon find these moves comenaturally. As you get more experience playing chess, you’ll come to appreciate each ofthese three special moves: Each one greatly enriches the game!
Pawn Capturing a Pawn En PassantThe pawn has two special moves. The first one is a special way for it to captureanother pawn, called capturing en passant, which is French for “in passing.” The ideais that under certain circumstances, a pawn can capture another pawn that passes by it.
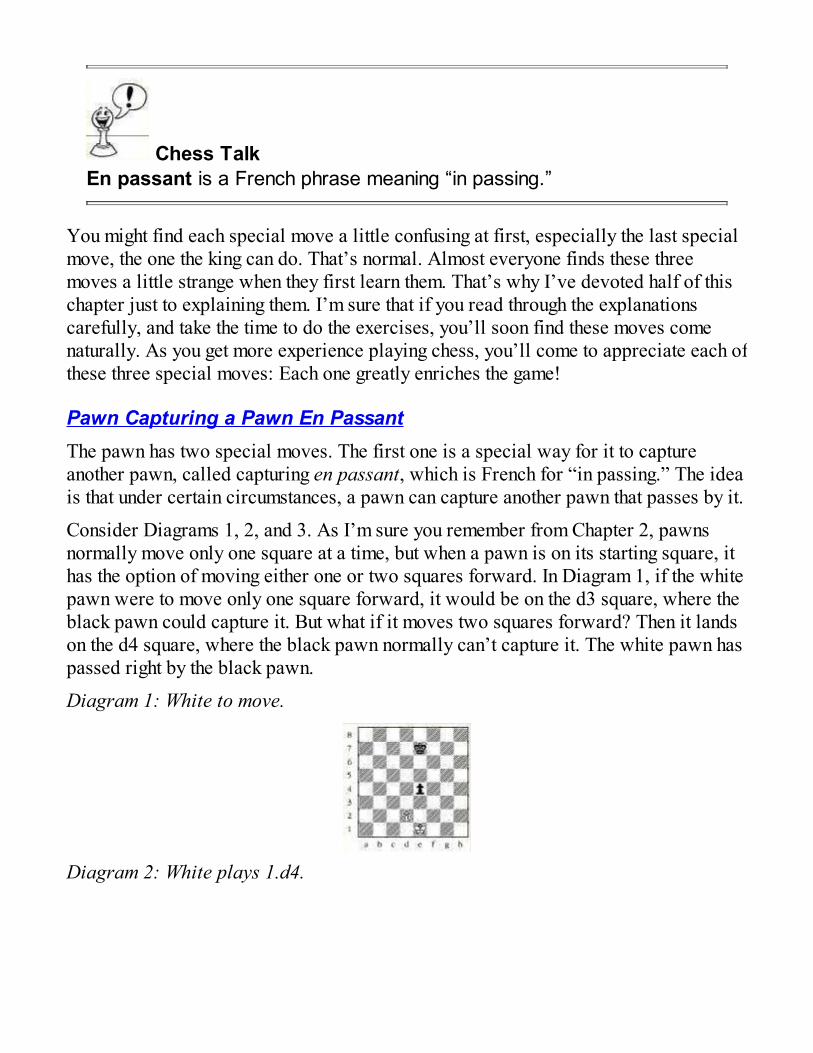
Consider Diagrams 1, 2, and 3. As I’m sure you remember from Chapter 2, pawnsnormally move only one square at a time, but when a pawn is on its starting square, ithas the option of moving either one or two squares forward. In Diagram 1, if the whitepawn were to move only one square forward, it would be on the d3 square, where theblack pawn could capture it. But what if it moves two squares forward? Then it landson the d4 square, where the black pawn normally can’t capture it. The white pawn haspassed right by the black pawn.
Diagram 1: White to move.
Diagram 2: White plays 1.d4.

Diagram 3: Black plays 1 . . .exd3, capturing the white pawn en passant.
But here is where the pawn’s first special move applies. In such a situation, when apawn moves two squares forward and by doing so lands a square immediately to theleft or right of an opposing pawn, then on the very next move, AND ONLY ON THEVERY NEXT MOVE, the pawn may be captured by the opposing pawn as if it hadonly moved one square forward.
The best way to remember this rule is to understand its point. The idea is to not let apawn sneak by an opposing pawn without giving the opposing pawn one chance tocapture it. In Diagrams 1 and 2, by moving two squares forward the white pawn wasable to pass by the d3 square, which the black pawn controls, and get to safety on d4.In doing so, it “passed by” the opposing pawn’s control of the square in front of it. Theen passant rule gives the opposing pawn one chance to capture the pawn as if it hadmoved only one square; that is, to capture it as it passes by the square it controls. Butthe opposing pawn only gets one chance! If it doesn’t capture the pawn on the verynext move, then the en passant capture is no longer possible.
Notice from the caption to Diagram 3 that an en passant capture is written just like anormal pawn capture, as though the captured pawn had moved only one square insteadof two. In some books, you may see “e.p.” written after such a capture to indicate thatit’s an en passant capture, but strictly speaking that isn’t necessary, and we won’twrite “e.p.” after an en passant capture in this book.
Promoting the PawnThe pawn’s second special move is truly amazing. Many chess games are won or lostbecause of this special move. I like to imagine that this special move is an answer to acomplaint I would make if I were a pawn.
What’s the complaint? Well, remember that unlike all the other pieces, the pawn can’t

move backwards. This means that as the pawn marches forward, it’s on a one-waytrip. Consider the plight of the pawn in Diagram 4.
Diagram 4: White’s pawn nears the opposite end of the board.
This pawn has almost managed to arrive at the opposite end of the board. Suppose headvances one more square. Is that it for the poor little guy? Does he have to situselessly on the edge of the board for the rest of the game? Wouldn’t you complainabout such a fate?
But the pawn’s complaint has been answered beyond its wildest dreams! For in fact,when the pawn reaches the edge of the board, it is “promoted.” That means the pawncan be transformed into any piece (of the same color) that you want, except the king.Actually, it MUST be transformed. Once the pawn reaches the edge of the board,promoting it is mandatory, not optional. But then, nobody ever complains, since it’ssuch an advantage to be able to turn what would be a useless pawn into a knight, or abishop, or a rook, or especially the most powerful piece of all: a queen. Thetransformation happens in the same turn as moving the pawn to the edge of the board,and the turn ends once the pawn has been replaced by the piece you choose.
Even if none of your pieces of a certain kind has been captured, you may still promotethe pawn into another one of that piece. So, for example, even if you still have yourqueen, you may promote your pawn to a queen; even if you still have both your knights,you may promote your pawn to a knight, and so on.
Patrick’s PointersEach pawn can be promoted only once, but there is no limit to thenumber of pawns you may promote—except, of course, that the mostpawns you can possibly promote is eight!
Writing the move for a pawn promotion is easy. You simply write the pawn’s move inthe normal way, and then put “=” followed by the abbreviation for whatever piece to

which the pawn was promoted. If the pawn is promoted to a queen, for example, youwrite the pawn’s move in the normal way, plus “=Q” after it.
Consider Diagram 5, where it’s White’s turn and he has two pawns that he can push tothe 8th rank and promote. If the pawn on f7 moves forward one square and becomes aknight (see Diagram 6), the move is written “1.f8=N”. If the pawn on a7 movesforward one square to become a queen (see Diagram 7), the move is written“1.a8=Q”.
Diagram 5: It’s White’s turn to move, and he can promote either the pawn on f7 orthe pawn on a7.
Diagram 6: Pawn being promoted to knight, written “1.f8=N”.
Diagram 7: Pawn being promoted to queen, written “1.a8=Q”.
Chess LoreEven grandmasters get confused sometimes about the rules. One ofAmerica’s strongest grandmasters is Yasser Seirawan. Yasser loves totry to reach a position where he can promote one of his pawns.

Commenting on this aspect of his play, another one of America’sstrongest grandmasters, Joel Benjamin, joked to me, “Yasser keepspushing his pawns even after he’s checkmated!”
A few days later, I told Yasser about this joke. “That’s not fair,” he said,“it only happened once!”
“You mean, it actually happened?”
“Well, many years ago, when I was a kid playing in my first tournament, Iplayed a master. And just when I was about to promote my pawn, hecheckmated me. But before he could say anything, I promoted my pawnto a king.”
“Did he tell you that was against the rules?”
“Nah. He just checkmated my other king too, and that was that.”
King’s Special PrivilegeThere’s only one more move for you to learn: the king’s special move. For its veryfirst move, the king has the privilege of castling. When the king “castles,” it moveseither two squares to the right or two squares to the left, and then the rook the king hasmoved closer to jumps over the king to land on the square immediately on the otherside of the king.
Sound confusing? Don’t worry: Everybody finds this move hard to understand at first.I will list the rules for castling, but first let me show you what castling looks like.Take a look at Diagram 8.
Let’s suppose it’s White’s turn to move, and he decides to castle. In fact, White cancastle to either the kingside or the queenside, so let’s consider each case in turn.
If White castles kingside, then he moves his king two squares to the right, to g1, andthen he moves the rook on h1 to f1. This is all done in one turn. Notice that the ONLYtime you can ever move two of your pieces in a single turn is when you castle.Diagram 9 shows White castling in this way.
Diagram 8: White can castle kingside or queenside.

Diagram 9: White castling kingside.
Diagram 10: White castling queenside.
If White castles queenside, then he moves his king two squares to the left, to c1, andthen he moves the rook on a1 to d1. Once again, this is all done in one turn. Diagram10 shows White castling in this way.
Chess TalkCastling is the king’s special move. If your king has not yet moved, andat least one of your rooks has also not yet moved, then if other conditionshold, you may be able to castle.
Here are the rules for how to castle:
The move of castling takes place in one turn, and it involves moving two pieces.First the king moves two squares to the right or to the left, then the rook it hasmoved closer to moves to the square immediately on the other side of the king.
There must be no pieces, either friend or foe, on any square between the kingand the rook being used for castling. (You may NOT capture a piece whilecastling!)
Castling must be the first move of the king. Once the king has moved, it may notcastle for the rest of the game. (Since castling is a move of the king, this meansthat each player may castle only once at most per game.)
The rook being used to castle must also not have moved yet. But the fact that onerook has moved doesn’t disqualify you from using the other rook to castle.
The king can’t castle out of check. This does NOT mean that once the king hasbeen in check, it can’t castle. As long as the check is removed in some way otherthan by moving the king, it may still castle on another move (as long as the otherrequirements are met). But when the king is actually in check, it may not castle toescape check.
The king can’t castle into check. (Naturally, since the king can never move intocheck anyway.)
If one of your opponent’s pieces controls the square the king must “jump over” tocastle, then castling is prohibited. That means that if White wants to castlekingside, but the f1 square is controlled by an enemy piece, White can’t castlekingside while that square is controlled. And If White wants to castle queenside,but the d1 square is controlled by an enemy piece, White can’t castle queensidewhile that square is controlled. Similarly, Black can’t castle kingside while thef8 square is controlled by an enemy piece, nor can he castle queenside while thed8 square is controlled by an enemy piece. But once there is no longer any enemypiece that controls the crucial square next to the king, the prohibition is lifted.
There is a special way to write the move of castling. Kingside castling is writtenas “O-O”, and queenside castling is written as “O-O-O”. If, for example, White’s12th move is to castle kingside, it is written “12.O-O” and if, for example,Black’s 9th move is to castle queenside, it’s written “9 . . .O-O-O”.
Patrick’s PointersIf the king is in check then castling is not permitted. But nothing stops you

from castling with a rook that is attacked! The only requirement thatapplies to the rook is that it must not have made a move. Whether or notit’s actually being attacked doesn’t matter.
Let me show you another illustration of castling for both sides, plus how it’s written,in the next three Diagrams.
Notice that in Diagram 11, White can’t castle kingside, because the bishop on f1 is inthe way. It’s White’s turn to make his eighth move, and he decides to castle queenside.This is written “8.O-O-O”.
Notice in Diagram 12 that Black can castle kingside, but he can’t castle queenside,because the queen on d8 and the bishop on c8 are in the way. Black decides he wantsto castle in response (see Diagram 13). This is written “8 . . .O-O”.
Don’t worry if you find castling confusing. Everybody does at first. Take a carefullook at the rules of castling and the exercises at the end of the chapter to test yourunderstanding of this rule. Without a doubt, castling is the trickiest rule to learn. Butthe basic idea is not that hard to get, and after a little while all the details will becomesecond nature.
Diagram 11: The bishop on f1 prevents White from castling kingside, but he cancastle queenside.
Diagram 12: White has played 8.O-O-O, and now it’s Black’s turn. Black can’tcastle queenside because of the queen on d8 and the bishop on c8, but he can castlekingside.
Diagram 13: Black has played 8 . . .O-O.

Win, Lose, or Draw: How Does That Happen?When you play a game of chess, it can end in one of three ways: You can win, you canlose, or you can draw. Let’s first learn how a game is won or lost, and then we’lllearn how a game can be a draw.
Chess TalkA draw is a tie: that is, nobody wins. When a game ends in a draw, itmeans that both players fought to a standstill. This is reflected in how awin, a loss, and a draw are rewarded in a chess tournament. A win isworth one point to the winner, a loss is worth zero to the loser, and adraw is worth half a point to each player.
Checkmate—the Aim of the Game!Remember from Chapter 2 that the aim of the game is to put your opponent’s king in aposition where it can’t escape being captured on the next move. When the king is incheck (it’s threatened with capture) and there is no move that can prevent it from beingcaptured in the very next move, we say the king is “checkmated.” Checkmate ends thegame. When you checkmate your opponent, you win; when your opponent checkmatesyou, you lose. It’s that simple.
Sometimes someone who’s just starting to play chess will try to answer checkmatewith a check. Nice try, but no dice. Checkmate is immediate and final. In fact, itdoesn’t even matter if you could checkmate your opponent in the very next move!Checkmate is checkmate, and it ends the game. Period.
Chess LoreDo you wonder where the words “check” and “checkmate” come from?You may remember from Chapter 1 that an early version of chess wasplayed in Persia. In that game, the king was called “shah.” Furthermore,the word, “mat” meant “helpless” in Persian. “Shah” became “check” inEnglish, and “mat” became “mate.”
It takes a little time to be able to recognize checkmate when it happens. Just rememberthat it’s checkmate when all of the following are true:
The king is in check.
The king can’t move to a square where it’s not in check.
The piece giving check can’t be captured.
There is no piece to put in the way between the king and the piece giving check.
Throughout the book, I will show you many examples of checkmate. The next fewDiagrams give you one example to start with.
Patrick’s PointersIf a move puts the opponent’s king into check, then a “+” is put after themove. So for example, if Black’s fortieth move is to move the rook to f3,and this move puts White into check, then the move is written“40 . . .Rf3+”.
An Example of CheckmateIt’s White’s turn to move (see Diagram 14), and he decides to move his rook from d1to d7 where it will attack two of Black’s pawns, on b7 and f7 (see Diagram 15). ButWhite’s aggression is misplaced here, because he has left his own king veryvulnerable. Black takes advantage of White’s mistake by playing 1 . . .Re1# (see

Diagram 16). There is no move White can play to remove the king from check in thenext move, so he is in checkmate, and Black wins the game.
Diagram 14: White to move.
Diagram 15: White plays 1.Rd7??, leaving his own king vulnerable.
Diagram 16: Black plays 1 . . .Re1#.
Patrick’s PointersWhen a move gives checkmate, this is indicated by putting “#” after themove. So, for example, if you see the move, “28.Be6#”, you know thatthis move is checkmate, and you pronounce it “twenty-eight bishop e sixcheckmate.”
Throwing in the TowelThere is one other way to win. A player may give up at any time during a game, justlike a boxer may throw in the towel at any time during a fight. Giving up is calledresigning. If you’re just starting to play chess, my advice is never to resign. Play
every game to the end! As you get better, however, you’ll start to recognize when yourposition has deteriorated to the point that—even though you can’t see exactly how it’llhappen—you will inevitably be checkmated. If your game has reached such a dreadfulstate, it may make sense to resign rather than to continue a hopeless struggle. By far themost common way for a grandmaster to lose a chess game is to resign before theinevitable checkmate.
Chess TalkWhen you concede defeat to your opponent, it’s called resigning. It’snever easy to admit defeat, but if you must do so, always be gracious!
It’s never easy to lose a chess game, but it’s always best to be gracious about it. If youmust resign, the best way to do so is to say simply, “I resign,” compliment youropponent on a game well played, and shake his or her hand.
Sometimes Nobody WinsA game of chess doesn’t always have a winner and a loser. When no one wins and noone loses, both players draw. In fact, games between grandmasters end in draws justas often as one side wins or loses. There are four ways that a game can end in a draw,so let’s go through them one at a time.
Insufficient Material to Deliver CheckmateSometimes so many pieces have been captured on both sides that it’s simply no longerpossible to put the enemy king into checkmate. Since the only way to win the game isthrough checkmate, if it isn’t possible to give checkmate, the game is a draw. This ispretty rare, however, since it has to be absolutely impossible for checkmate to happen.
In Chapter 4 you will learn how to force checkmate with just a lone queen or a lonerook against a king. So if one side has at least a rook or a queen, there can’t beinsufficient material to draw. And if one side has a pawn, remember that it couldalways promote to a rook or a queen. And furthermore, two knights, a knight and abishop, and two bishops can all give checkmate against a lone king.
The bottom line? Insufficient material is basically just king versus king, or where oneside only has a knight or a bishop—so don’t worry too much about it.
BlundersOne of the worst ways to resign is to pick up your king, throw it acrossthe room and stomp off screaming, “Why must I lose to this imbecile!”(I’ve seen it happen.)
Just keep in mind that if it is absolutely impossible for either player to checkmate theother, the game is drawn.
There are also some positions where even though there are more pieces on the board,it turns out to be impossible to construct a checkmate, usually because of the way thepawns block each other and also block the other pieces. Don’t worry about this: It’sextremely rare! But if you like playing with puzzles, you might try to figure out whatsuch a position could be.
Chess TalkInsufficient material is when neither side has enough pieces to put theother king into checkmate. When this happens, the game is drawn.
Friendly AgreementJust as either side can at any time resign the game, both players can at any time simplyagree to a draw. Sometimes it can be polite to agree to a draw. For example, if it’sabsolutely clear that neither side has any realistic chance to win, the gracious thing todo is to offer a draw. Or if you are playing a friendly game and your opponentsuddenly has to leave, and you don’t think you have an obviously better position, againthe gracious thing to do is to agree to a draw.
When grandmasters play against one another, it’s common for them to agree to a draweven in fairly complicated positions.
Sometimes this is because the position only seems complicated, and both playersrealize the game really should be a draw. Sometimes grandmasters agree to a drawbecause each player is afraid of losing! (I myself have been a party to both kinds of“grandmaster draws.”) Since you are just starting to learn chess, I strongly urge you to
play out every position to the end. Losing a game here or there is not nearly so bad aslosing a chance to learn more and so improve your game.
Patrick’s PointersIn this chapter, I explain the four basic ways a chess game can end in adraw. However, if you play in a chess tournament, you should know thatthere are some other ways a game can end in a draw. See Chapter 17for more about tournament rules.
Chess TalkWhen your opponent can keep checking your king forever, you are inperpetual check. If your opponent announces he will give perpetualcheck, the game is a draw. Just make sure it’s really true that you haveno way out of the checks!
Maybe these first two ways for a game to end in a draw seem a little obvious orboring to you. But pay attention! The next two ways are not so obvious at all.
Perpetual CheckRemember that whenever your king is in check, you MUST remove it from check onthe very next move. And remember also that the king is in checkmate when it is incheck and there is no way to remove the check on the very next move. But supposeyour king is in check, and you remove it from check, and then it’s in check again, andthen you remove it from check, and then it’s in check again, and so on.
When one side continually checks the other side, it’s called perpetual check. If oneside announces that he’ll give perpetual check, and there’s no way to escape from it,the game is drawn.
It’s important to remember that perpetual check is different from simply giving a lot ofchecks. Perpetual check occurs only when one side can put the other side in checkforever. That’s why, if one player announces he will give perpetual check, the game is

drawn. What would be the point of continuing the game?
So often in chess, a picture is worth a thousand words. See the adjoining Diagrams forsome examples of positions that are, and are not, cases of perpetual check.
In Diagram 17, Black is in check. Can White give perpetual check? The answer is no,it isn’t perpetual check because after 1 . . .Kc7 (Diagram 18), White has only onemore check with the rook (2.Rc8+ or 2.Rd7+), whereupon Black will capture therook. Then there certainly won’t be any more checks!
In Diagram 19, Black is in check. Can White give perpetual check? Black has no moveother than 1 . . .Ka7 (see Diagram 20). When White plays 2.Rd7+ (see Diagram 21),Black must move the king to either b8 or a8. White will play 3.Rd8+, then 4.Rd7+,then 5.Rd8+, and so on. If White demonstrates this and announces that he will giveperpetual check, then he can claim a draw.
Diagram 17: Black is in check.
Diagram 18: Black plays 1 . . .Kc7, and now it’s clear that White can’t giveperpetual check.
Diagram 19: Black is in check.
Diagram 20: Black plays 1 . . .Ka7.

Diagram 21: White plays 2.Rd7+. He can give perpetual check by playing Rd8+and Rd7+ forever.
StalemateSuppose there is literally no move you can make. This means that it’s your turn tomove, but there is simply no square to which you can move any piece. (This isn’tcommon, but it happens more often than you might think.) What do you think happens inthat case?
Many people who are just learning the rules assume that if one side can’t make anylegal move, that side loses the game. But in fact, what happens is the game is a draw.Often when I explain this rule to people, they think it doesn’t make sense. After all, ifsomeone can’t make a single move, doesn’t that mean he’s helpless? And if he’shelpless, why should the game be a draw? Shouldn’t he lose instead?
Chess TalkWhen it’s one player’s turn to move, and his king is not in check, but hehas no legal move, he is in stalemate. When one player is in stalemate,the game is drawn.
I understand that thought. But on the other hand, remember that the object of the gameis to capture the enemy king. The whole point of stalemate is that it is “stale”—youhaven’t attacked the king at all. And you can’t win without attacking the king. See theDiagrams for some examples:
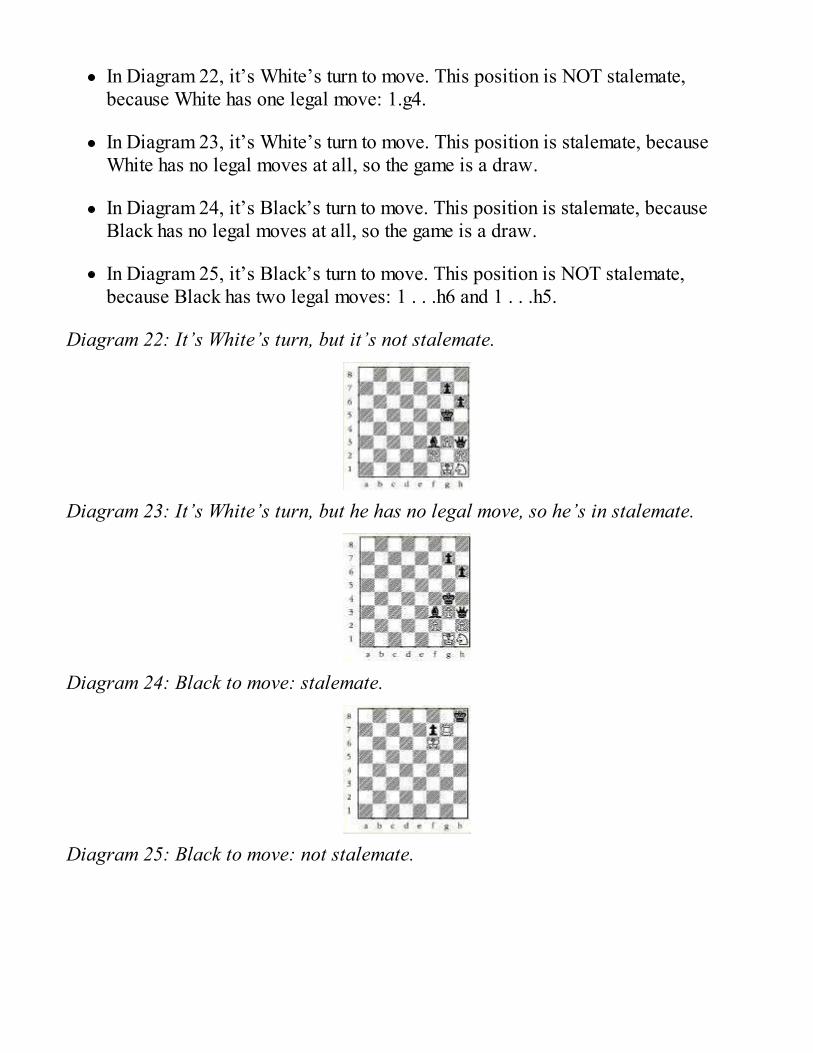
In Diagram 22, it’s White’s turn to move. This position is NOT stalemate,because White has one legal move: 1.g4.
In Diagram 23, it’s White’s turn to move. This position is stalemate, becauseWhite has no legal moves at all, so the game is a draw.
In Diagram 24, it’s Black’s turn to move. This position is stalemate, becauseBlack has no legal moves at all, so the game is a draw.
In Diagram 25, it’s Black’s turn to move. This position is NOT stalemate,because Black has two legal moves: 1 . . .h6 and 1 . . .h5.
Diagram 22: It’s White’s turn, but it’s not stalemate.
Diagram 23: It’s White’s turn, but he has no legal move, so he’s in stalemate.
Diagram 24: Black to move: stalemate.
Diagram 25: Black to move: not stalemate.
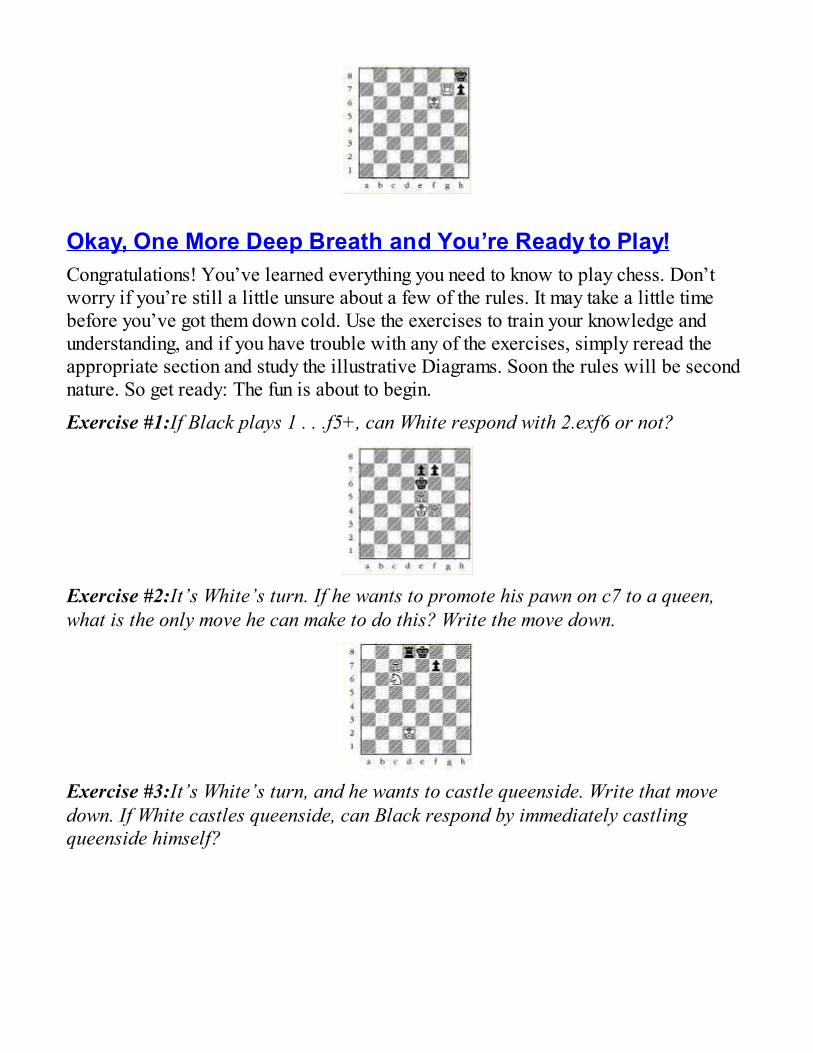
Okay, One More Deep Breath and You’re Ready to Play!Congratulations! You’ve learned everything you need to know to play chess. Don’tworry if you’re still a little unsure about a few of the rules. It may take a little timebefore you’ve got them down cold. Use the exercises to train your knowledge andunderstanding, and if you have trouble with any of the exercises, simply reread theappropriate section and study the illustrative Diagrams. Soon the rules will be secondnature. So get ready: The fun is about to begin.
Exercise #1:If Black plays 1 . . .f5+, can White respond with 2.exf6 or not?
Exercise #2:It’s White’s turn. If he wants to promote his pawn on c7 to a queen,what is the only move he can make to do this? Write the move down.
Exercise #3:It’s White’s turn, and he wants to castle queenside. Write that movedown. If White castles queenside, can Black respond by immediately castlingqueenside himself?

Exercise #4:How can Black give White perpetual check?
Exercise #5:Do you see how White can force checkmate in two moves? (To forcecheckmate in two moves means to make one move, and then whatever move theopponent makes in response, the next move you make is checkmate.)
Exercise #6:It’s Black’s turn to move. Is he in stalemate?
Exercise #7:Can White castle, either kingside or queenside? If castling on eitherside (or both sides) is legal, write down the move in correct chess notation.

Exercise #8:It is White’s turn. Should this position be declared a draw? Does itmatter what move White plays?
Exercise #9:It is Black’s turn. This position is very similar to Exercise 8. Black hastwo legal moves; one of them loses, the other draws. Which is the right move, andwhy?
Exercise #10:White to move (Kasparov–Kramnik, Holland, 2001). If White plays1.g4, can Black capture en passant?
Exercise #11:It is Black’s turn. Black can and should promote his pawn. Whatshould he promote it to? Why?
Exercise #12:It is Black’s turn. (How could you know even if I didn’t tell you?) Canhe castle kingside? Can he castle queenside?
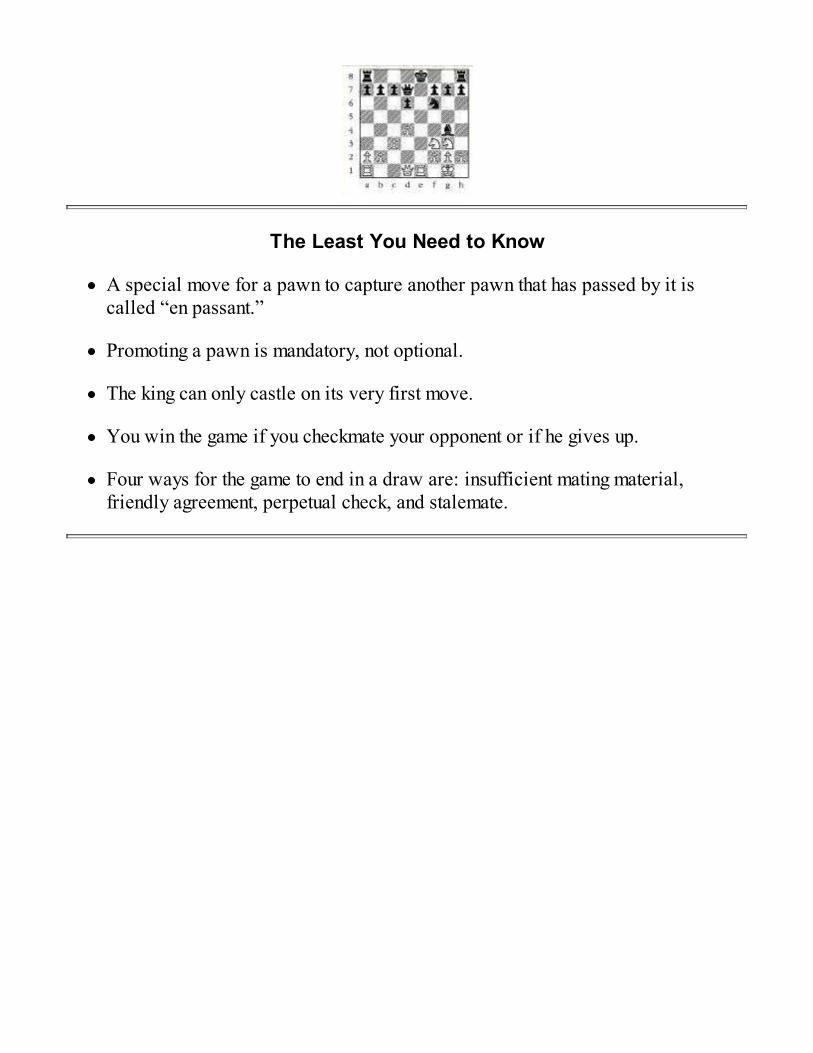
The Least You Need to Know
A special move for a pawn to capture another pawn that has passed by it iscalled “en passant.”
Promoting a pawn is mandatory, not optional.
The king can only castle on its very first move.
You win the game if you checkmate your opponent or if he gives up.
Four ways for the game to end in a draw are: insufficient mating material,friendly agreement, perpetual check, and stalemate.
Chapter 4
How to Win with Just One Piece
In This Chapter
How to formulate a winning strategy
Learning the power of the queen and rook
Cornering the king
Going in for the kill
In this chapter, I’ll show you how to force a lone king into checkmate with a queen,and how to force a lone king into checkmate with a rook. What’s the point of learninghow to do this? Well, to begin with, it’s a very useful skill to have in its own right.After you study this chapter, you can be confident about winning a position where youhave only a queen or only a rook left.
But there are two even more important reasons to learn this skill. First, there’s nobetter way to get a feel for the power of the queen and the rook than by learning how toforce checkmate against the lone king with each. As you go step by step through theprocess of forcing the king into checkmate, you’ll be able to see how each pieceoperates, and you’ll begin to gain familiarity with them.
The second and perhaps even more important reason for learning how to force a loneking into checkmate is that it’s an excellent introduction for learning how to formulatea plan, and then how to carry it out by means of making smaller plans leading up to theaccomplishment of the big plan. Chess is a war between two evenly matched armies.Such a war can be won only if you lead your army more effectively than your opponentleads his. The essence of leading your army effectively is to lead it in accordance witha plan that correctly fits the needs of your position at any moment. In subsequent
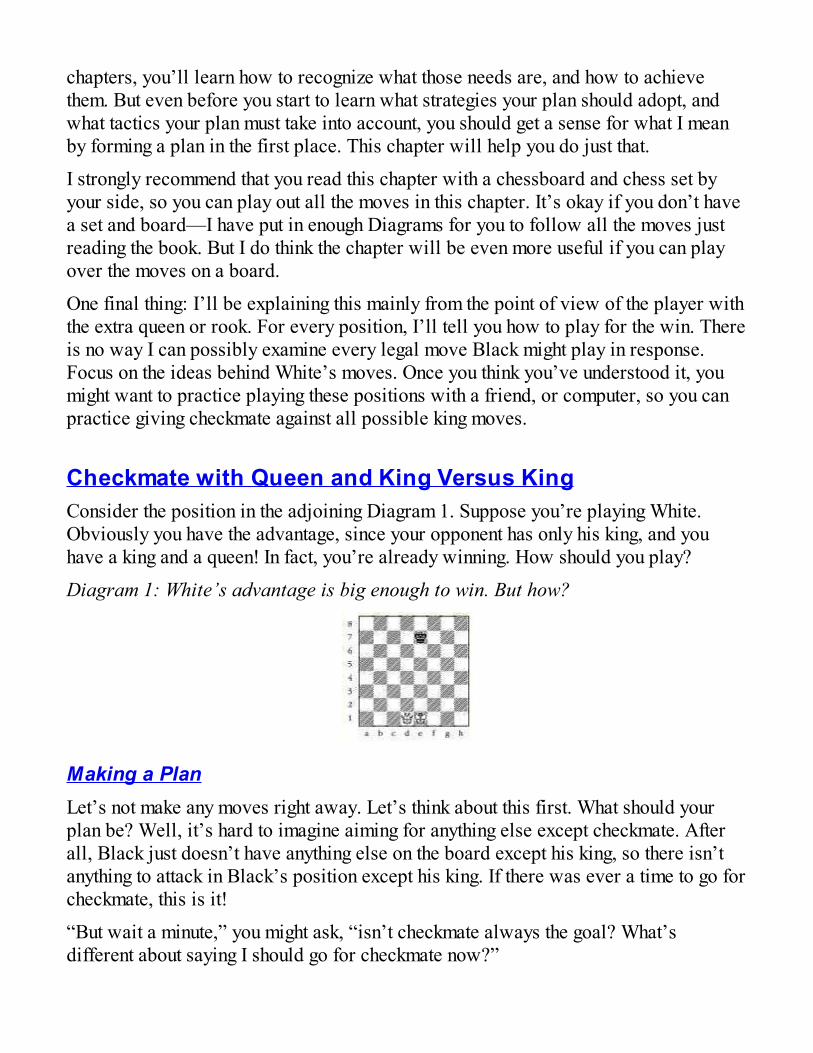
chapters, you’ll learn how to recognize what those needs are, and how to achievethem. But even before you start to learn what strategies your plan should adopt, andwhat tactics your plan must take into account, you should get a sense for what I meanby forming a plan in the first place. This chapter will help you do just that.
I strongly recommend that you read this chapter with a chessboard and chess set byyour side, so you can play out all the moves in this chapter. It’s okay if you don’t havea set and board—I have put in enough Diagrams for you to follow all the moves justreading the book. But I do think the chapter will be even more useful if you can playover the moves on a board.
One final thing: I’ll be explaining this mainly from the point of view of the player withthe extra queen or rook. For every position, I’ll tell you how to play for the win. Thereis no way I can possibly examine every legal move Black might play in response.Focus on the ideas behind White’s moves. Once you think you’ve understood it, youmight want to practice playing these positions with a friend, or computer, so you canpractice giving checkmate against all possible king moves.
Checkmate with Queen and King Versus KingConsider the position in the adjoining Diagram 1. Suppose you’re playing White.Obviously you have the advantage, since your opponent has only his king, and youhave a king and a queen! In fact, you’re already winning. How should you play?
Diagram 1: White’s advantage is big enough to win. But how?
Making a PlanLet’s not make any moves right away. Let’s think about this first. What should yourplan be? Well, it’s hard to imagine aiming for anything else except checkmate. Afterall, Black just doesn’t have anything else on the board except his king, so there isn’tanything to attack in Black’s position except his king. If there was ever a time to go forcheckmate, this is it!
“But wait a minute,” you might ask, “isn’t checkmate always the goal? What’sdifferent about saying I should go for checkmate now?”

That’s a good question, and it brings up a mistake that many beginning players make.It’s certainly right that the ultimate goal is always to checkmate your opponent’s king.But it’s not always right to have that as your immediate goal. Many times, the rightthing to do is to try to improve your position (or attack your opponent’s position) inways that don’t directly involve checkmate. In fact, if you try to attack the king beforeyou’re ready to do so, you may accomplish nothing but to make your own positionworse! This will become clearer to you as you learn more about chess strategy.
At any rate, it’s clear that in this position checkmate is the thing to aim for. That’s thegoal. What plan should you make to achieve it?
Here are two very important hints:
The queen can’t checkmate a lone king on an open board by herself—the queenneeds the help of the king.
The queen and king can’t checkmate the opposing king unless it’s on the edge orthe corner of the board.
If it’s not clear to you why either of these is true, use your board to try and construct acheckmate with just a queen and king against a lone king that violates one of the twohints above. You’ll see that it can’t be done.
Now then, what plan should you make to give checkmate? Taking your cue from thetwo hints above, it should be clear that you must use your own king, and you mustdrive the enemy king to the edge or the corner. And in fact, the winning plan is to dojust that. Let’s see how to do it.
BlundersDon’t make a move without having some kind of plan behind it. A plandoesn’t have to be anything fancy: just a clear idea of what you want toaccomplish based on an assessment of the strengths and weaknesses ofyour position and your opponent’s position.
Diagram 2: White to move.
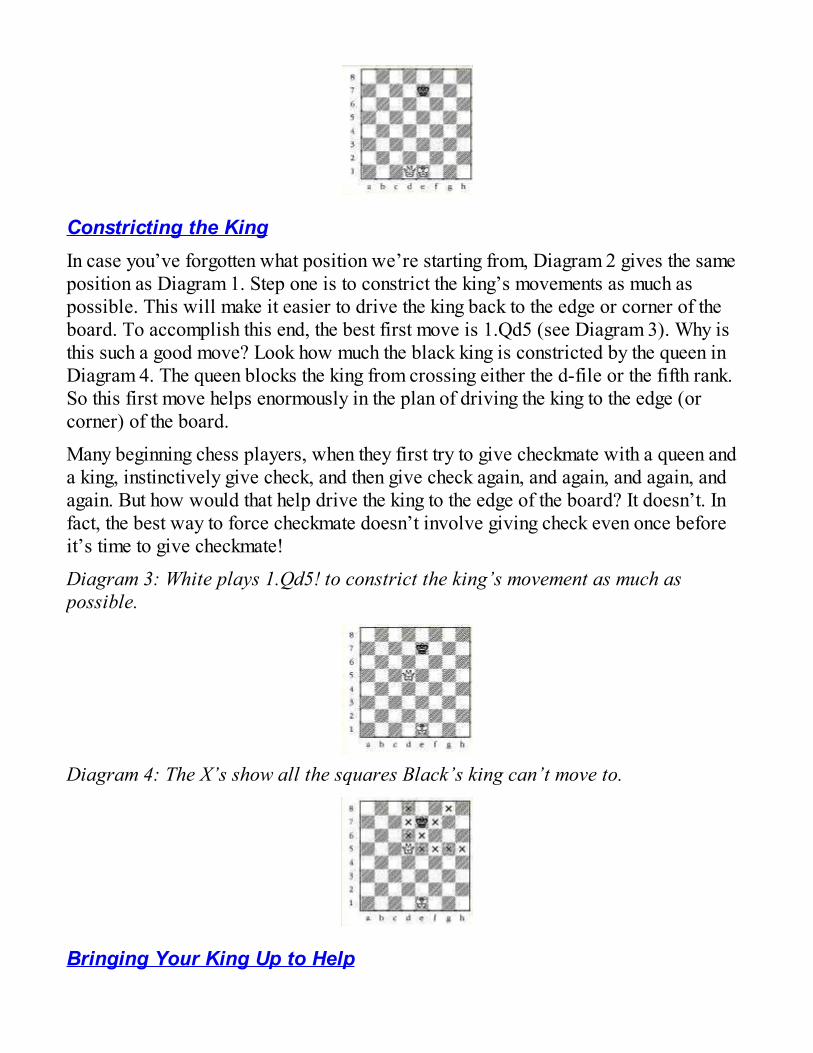
Constricting the KingIn case you’ve forgotten what position we’re starting from, Diagram 2 gives the sameposition as Diagram 1. Step one is to constrict the king’s movements as much aspossible. This will make it easier to drive the king back to the edge or corner of theboard. To accomplish this end, the best first move is 1.Qd5 (see Diagram 3). Why isthis such a good move? Look how much the black king is constricted by the queen inDiagram 4. The queen blocks the king from crossing either the d-file or the fifth rank.So this first move helps enormously in the plan of driving the king to the edge (orcorner) of the board.
Many beginning chess players, when they first try to give checkmate with a queen anda king, instinctively give check, and then give check again, and again, and again, andagain. But how would that help drive the king to the edge of the board? It doesn’t. Infact, the best way to force checkmate doesn’t involve giving check even once beforeit’s time to give checkmate!
Diagram 3: White plays 1.Qd5! to constrict the king’s movement as much aspossible.
Diagram 4: The X’s show all the squares Black’s king can’t move to.
Bringing Your King Up to Help

Let’s go back to the position after 1.Qd5. How will Black respond? Black realizesthat the king is in greatest danger on the edge of the board, so he should try to keep theking away from the edge. Keeping this in mind, let’s suppose he plays 1 . . .Kf6 (seeDiagram 5). Is there any queen move you can make that will constrict the king evenfurther? You might think 2.Qe4, but I think this move gives up just about as much as itgains: If you play 2.Qe4, you take the e-file away from the king, but you give up thefifth rank. Since for the moment, there is no better square for the queen than d5, let’suse this move to bring your king up to help the queen by playing 2.Kf2 (see Diagram6). This is a very good move, because it helps accomplish the other thing we decidedwe needed to achieve to give checkmate: It brings the king closer to the queen.Suppose Black responds by moving his king back to where it was before and plays2 . . .Ke7, as in Diagram 7.
Now what should White do? Actually, White has two very good moves. If you werethinking to keep bringing the king up to help the queen by playing 3.Ke3, 3.Kf3, or3.Kg3, then give yourself a pat on the back, because those are all very good moves.However, I’m going to show you a different way to proceed. Before bringing the kingup, we’re going to use the queen to drive Black’s king into the corner.
Diagram 5: Black plays 1 . . .Kf6.
Diagram 6: White plays 2.Kf2 since further constriction of the king is not possibleat the moment.
Diagram 7: Black plays 2 . . .Ke7.
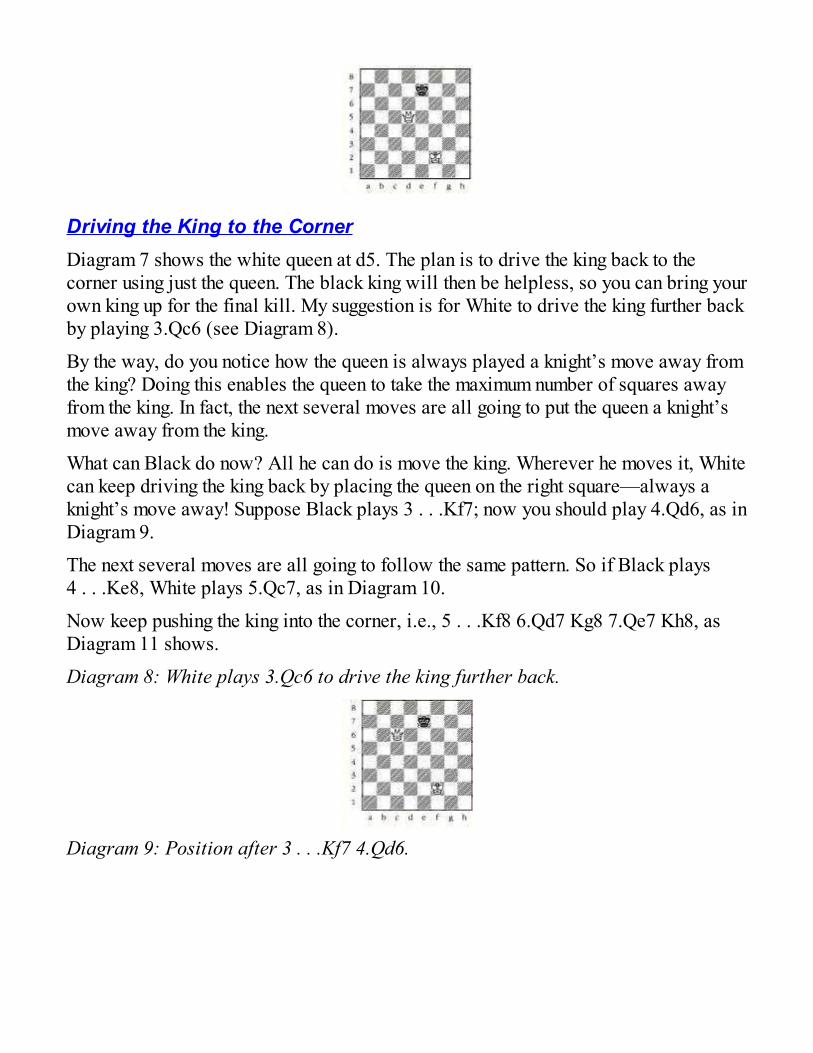
Driving the King to the CornerDiagram 7 shows the white queen at d5. The plan is to drive the king back to thecorner using just the queen. The black king will then be helpless, so you can bring yourown king up for the final kill. My suggestion is for White to drive the king further backby playing 3.Qc6 (see Diagram 8).
By the way, do you notice how the queen is always played a knight’s move away fromthe king? Doing this enables the queen to take the maximum number of squares awayfrom the king. In fact, the next several moves are all going to put the queen a knight’smove away from the king.
What can Black do now? All he can do is move the king. Wherever he moves it, Whitecan keep driving the king back by placing the queen on the right square—always aknight’s move away! Suppose Black plays 3 . . .Kf7; now you should play 4.Qd6, as inDiagram 9.
The next several moves are all going to follow the same pattern. So if Black plays4 . . .Ke8, White plays 5.Qc7, as in Diagram 10.
Now keep pushing the king into the corner, i.e., 5 . . .Kf8 6.Qd7 Kg8 7.Qe7 Kh8, asDiagram 11 shows.
Diagram 8: White plays 3.Qc6 to drive the king further back.
Diagram 9: Position after 3 . . .Kf7 4.Qd6.
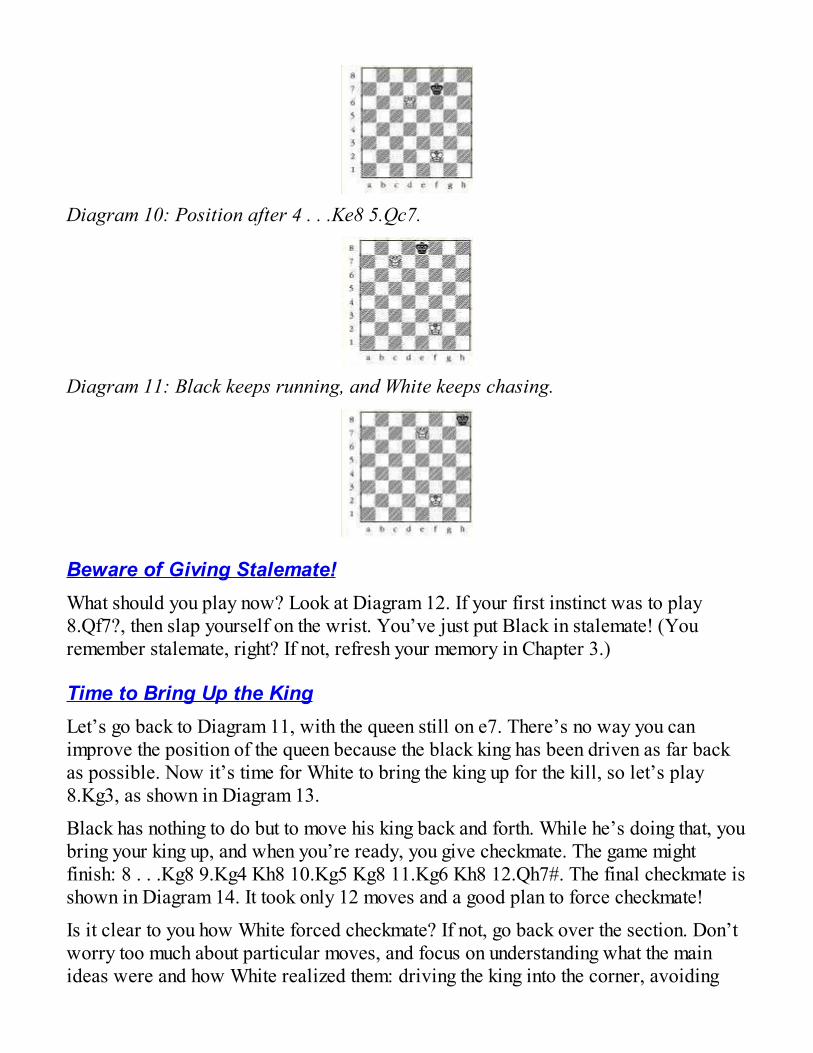
Diagram 10: Position after 4 . . .Ke8 5.Qc7.
Diagram 11: Black keeps running, and White keeps chasing.
Beware of Giving Stalemate!What should you play now? Look at Diagram 12. If your first instinct was to play8.Qf7?, then slap yourself on the wrist. You’ve just put Black in stalemate! (Youremember stalemate, right? If not, refresh your memory in Chapter 3.)
Time to Bring Up the KingLet’s go back to Diagram 11, with the queen still on e7. There’s no way you canimprove the position of the queen because the black king has been driven as far backas possible. Now it’s time for White to bring the king up for the kill, so let’s play8.Kg3, as shown in Diagram 13.
Black has nothing to do but to move his king back and forth. While he’s doing that, youbring your king up, and when you’re ready, you give checkmate. The game mightfinish: 8 . . .Kg8 9.Kg4 Kh8 10.Kg5 Kg8 11.Kg6 Kh8 12.Qh7#. The final checkmate isshown in Diagram 14. It took only 12 moves and a good plan to force checkmate!
Is it clear to you how White forced checkmate? If not, go back over the section. Don’tworry too much about particular moves, and focus on understanding what the mainideas were and how White realized them: driving the king into the corner, avoiding
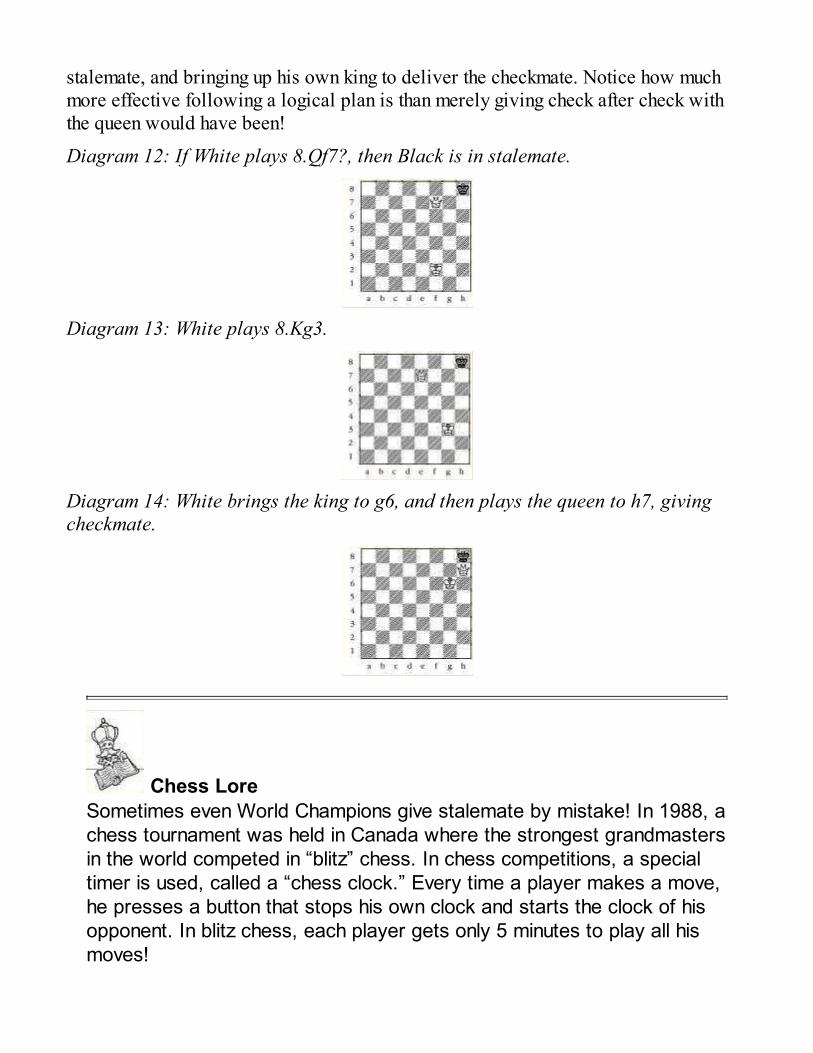
stalemate, and bringing up his own king to deliver the checkmate. Notice how muchmore effective following a logical plan is than merely giving check after check withthe queen would have been!
Diagram 12: If White plays 8.Qf7?, then Black is in stalemate.
Diagram 13: White plays 8.Kg3.
Diagram 14: White brings the king to g6, and then plays the queen to h7, givingcheckmate.
Chess LoreSometimes even World Champions give stalemate by mistake! In 1988, achess tournament was held in Canada where the strongest grandmastersin the world competed in “blitz” chess. In chess competitions, a specialtimer is used, called a “chess clock.” Every time a player makes a move,he presses a button that stops his own clock and starts the clock of hisopponent. In blitz chess, each player gets only 5 minutes to play all hismoves!

Players met in elimination matches of six games. Whoever won moregames (draws not counting) out of six defeated his opponent and movedon to play the next opponent. In the second round, World ChampionGarry Kasparov played a grandmaster from Bulgaria, Kiril Georgiev.Kasparov was winning the first game, but running out of time. Quickly hereached an endgame where he had queen and bishop against Georgiev’slone king. Then, suddenly, the game was over. The audience wasstunned: Kasparov had accidentally stalemated Georgiev’s king! Thegame was drawn, and Kasparov, flustered by his carelessness, actuallylost the match and was eliminated from the tournament.
Checkmate with Rook and King Versus KingIn many ways, the procedure for giving checkmate with the rook is similar to doing itwith the queen. Once again, you must drive the king back to the edge or a corner; andonce again, you must use your own king to help. But because the rook is a weakerpiece than the queen, you need to use your king more actively in the procedure. Inparticular, you need to use your king in the process of driving the opposing king to theedge of the board, because the rook (unlike the queen) can’t do it alone.
BlundersALWAYS be careful not to give stalemate when you’re trying to forcecheckmate!
Constricting the KingConsider the position in Diagram 15. How can you best constrict the king with therook? The best move is 1.Ra6!, which prevents the king from crossing the 6th rank, asin Diagram 16.
Why is this the best move? Well, the goal is to force the king onto the 8th rank; afterthis move, the king can’t go beyond the 7th rank. That’s a lot of progress for one move!
Bringing the King Up to HelpWhite has just moved 1.Ra6, and it’s Black’s move. How will Black respond?

Suppose Black plays 1 . . .Kd7. There is no way the rook can do anything more torestrict the king, so it’s time for White to bring up his own king by playing 2.Kd2.Take a look at Diagram 17 to see the position after these moves.
Diagram 15: White to move.
Diagram 16: White plays 1.Ra6!.
Black moves the king over to attack the rook by playing 2 . . .Kc7 3.Kc3 Kb7, reachingDiagram 18. Notice that the black king is now attacking the white rook. This is aperfect illustration of one way the rook is weaker than the queen. The king can nevermove next to the queen, but it can move diagonally next to the rook. So the plan ofstaying a knight’s move away from the king isn’t going to work with the rook!
There’s no reason for concern, however, just because the black king is attacking therook. You can simply move the rook to another square along the 6th rank where theking isn’t attacking it, for example, 4.Re6 (see Diagram 19). This will keep the blackking constricted, and give you time to bring up the white king to participate in the hunt.
Patrick’s PointersIf Black had played 1 . . .Kf8, then White could have played 2.Ra7!,restricting the king even further by controlling the 7th rank. But after1 . . .Kd7, it’s not a good idea to play 2.Ra7+?, because after 2 . . .Kd6it’s harder to restrict Black’s king.
Diagram 17: Black plays 1 . . .Kd7, and White responds with 2.Kd2.
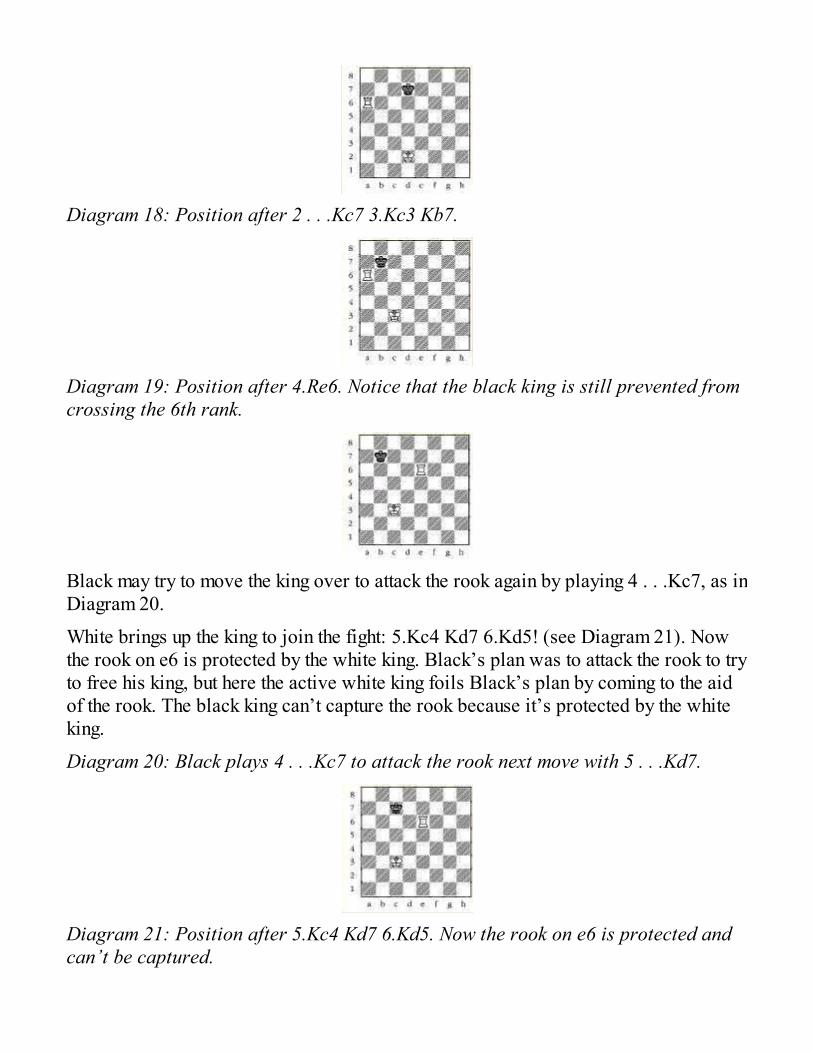
Diagram 18: Position after 2 . . .Kc7 3.Kc3 Kb7.
Diagram 19: Position after 4.Re6. Notice that the black king is still prevented fromcrossing the 6th rank.
Black may try to move the king over to attack the rook again by playing 4 . . .Kc7, as inDiagram 20.
White brings up the king to join the fight: 5.Kc4 Kd7 6.Kd5! (see Diagram 21). Nowthe rook on e6 is protected by the white king. Black’s plan was to attack the rook to tryto free his king, but here the active white king foils Black’s plan by coming to the aidof the rook. The black king can’t capture the rook because it’s protected by the whiteking.
Diagram 20: Black plays 4 . . .Kc7 to attack the rook next move with 5 . . .Kd7.
Diagram 21: Position after 5.Kc4 Kd7 6.Kd5. Now the rook on e6 is protected andcan’t be captured.
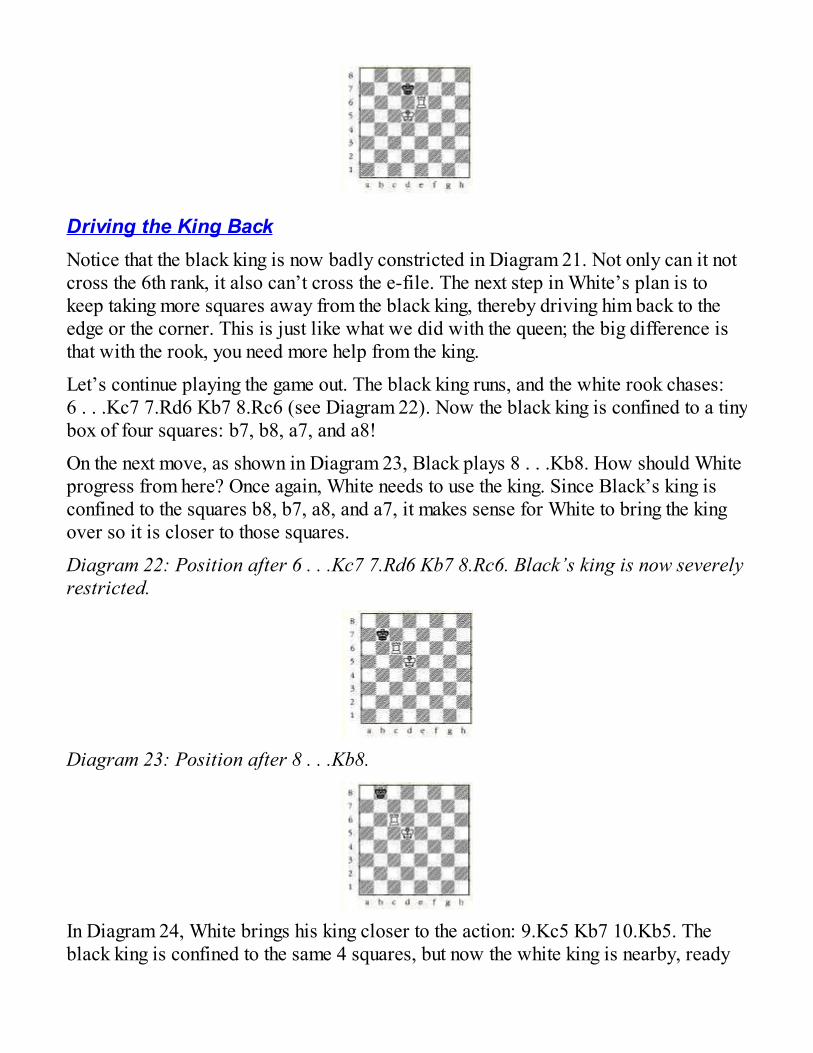
Driving the King BackNotice that the black king is now badly constricted in Diagram 21. Not only can it notcross the 6th rank, it also can’t cross the e-file. The next step in White’s plan is tokeep taking more squares away from the black king, thereby driving him back to theedge or the corner. This is just like what we did with the queen; the big difference isthat with the rook, you need more help from the king.
Let’s continue playing the game out. The black king runs, and the white rook chases:6 . . .Kc7 7.Rd6 Kb7 8.Rc6 (see Diagram 22). Now the black king is confined to a tinybox of four squares: b7, b8, a7, and a8!
On the next move, as shown in Diagram 23, Black plays 8 . . .Kb8. How should Whiteprogress from here? Once again, White needs to use the king. Since Black’s king isconfined to the squares b8, b7, a8, and a7, it makes sense for White to bring the kingover so it is closer to those squares.
Diagram 22: Position after 6 . . .Kc7 7.Rd6 Kb7 8.Rc6. Black’s king is now severelyrestricted.
Diagram 23: Position after 8 . . .Kb8.
In Diagram 24, White brings his king closer to the action: 9.Kc5 Kb7 10.Kb5. Theblack king is confined to the same 4 squares, but now the white king is nearby, ready
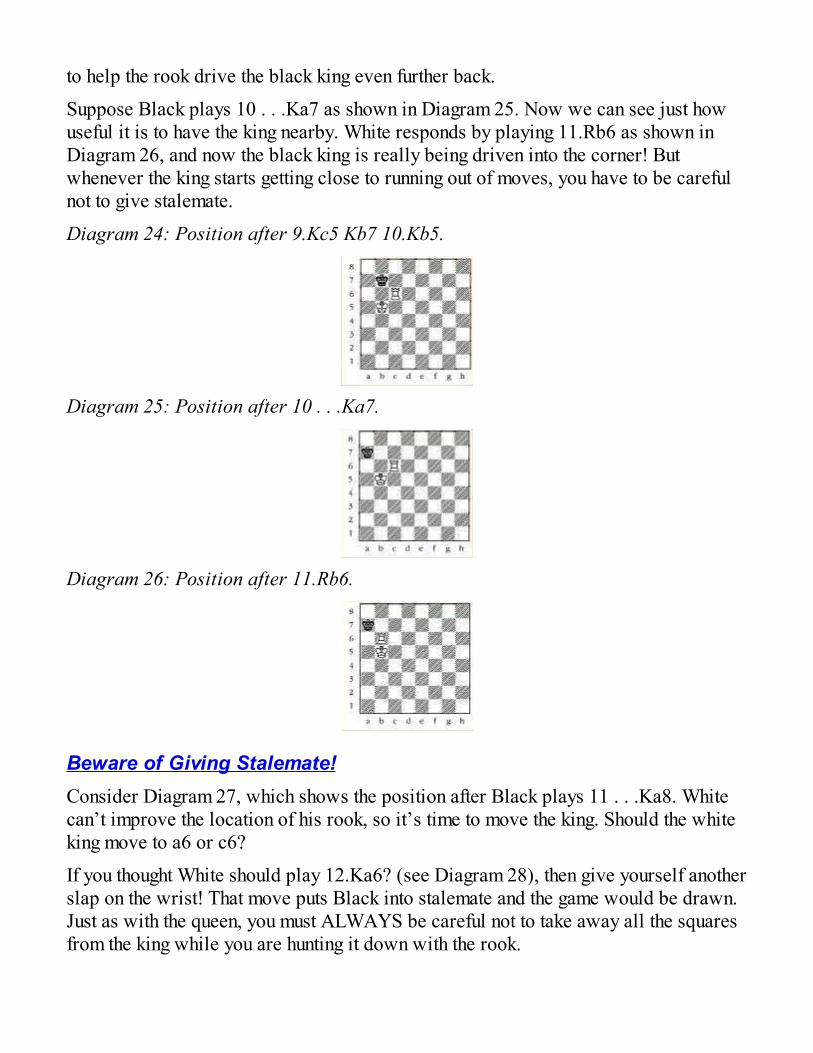
to help the rook drive the black king even further back.
Suppose Black plays 10 . . .Ka7 as shown in Diagram 25. Now we can see just howuseful it is to have the king nearby. White responds by playing 11.Rb6 as shown inDiagram 26, and now the black king is really being driven into the corner! Butwhenever the king starts getting close to running out of moves, you have to be carefulnot to give stalemate.
Diagram 24: Position after 9.Kc5 Kb7 10.Kb5.
Diagram 25: Position after 10 . . .Ka7.
Diagram 26: Position after 11.Rb6.
Beware of Giving Stalemate!Consider Diagram 27, which shows the position after Black plays 11 . . .Ka8. Whitecan’t improve the location of his rook, so it’s time to move the king. Should the whiteking move to a6 or c6?
If you thought White should play 12.Ka6? (see Diagram 28), then give yourself anotherslap on the wrist! That move puts Black into stalemate and the game would be drawn.Just as with the queen, you must ALWAYS be careful not to take away all the squaresfrom the king while you are hunting it down with the rook.
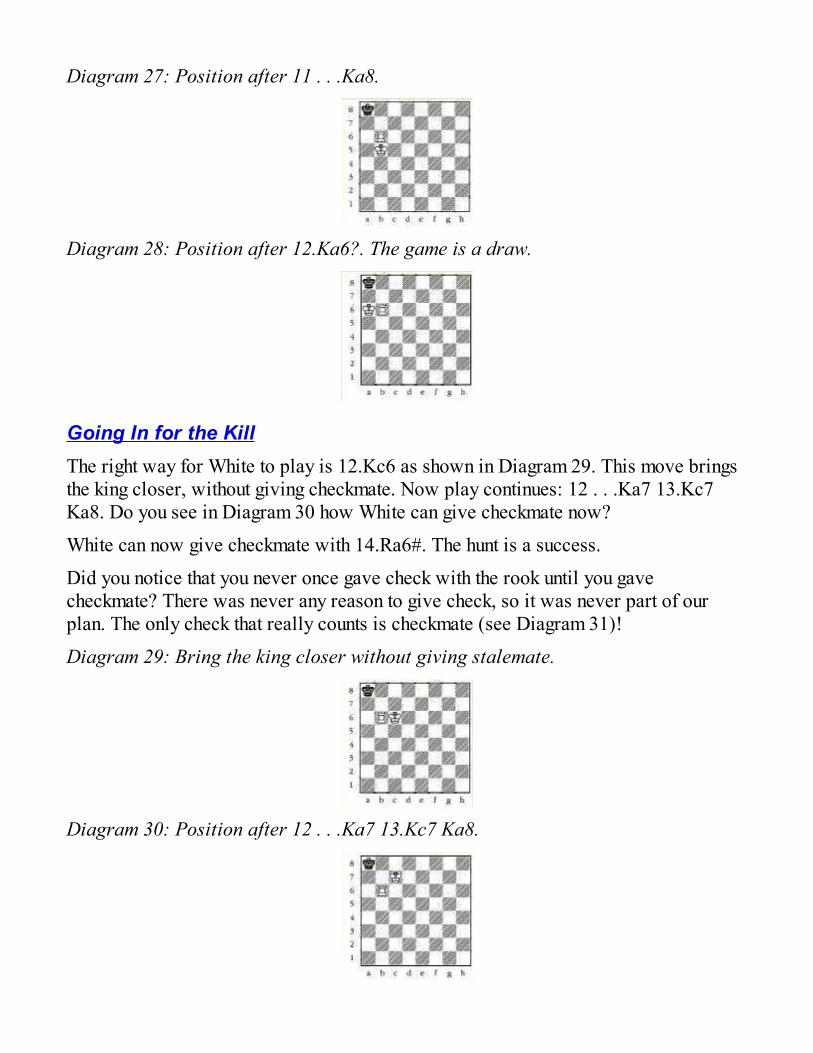
Diagram 27: Position after 11 . . .Ka8.
Diagram 28: Position after 12.Ka6?. The game is a draw.
Going In for the KillThe right way for White to play is 12.Kc6 as shown in Diagram 29. This move bringsthe king closer, without giving checkmate. Now play continues: 12 . . .Ka7 13.Kc7Ka8. Do you see in Diagram 30 how White can give checkmate now?
White can now give checkmate with 14.Ra6#. The hunt is a success.
Did you notice that you never once gave check with the rook until you gavecheckmate? There was never any reason to give check, so it was never part of ourplan. The only check that really counts is checkmate (see Diagram 31)!
Diagram 29: Bring the king closer without giving stalemate.
Diagram 30: Position after 12 . . .Ka7 13.Kc7 Ka8.
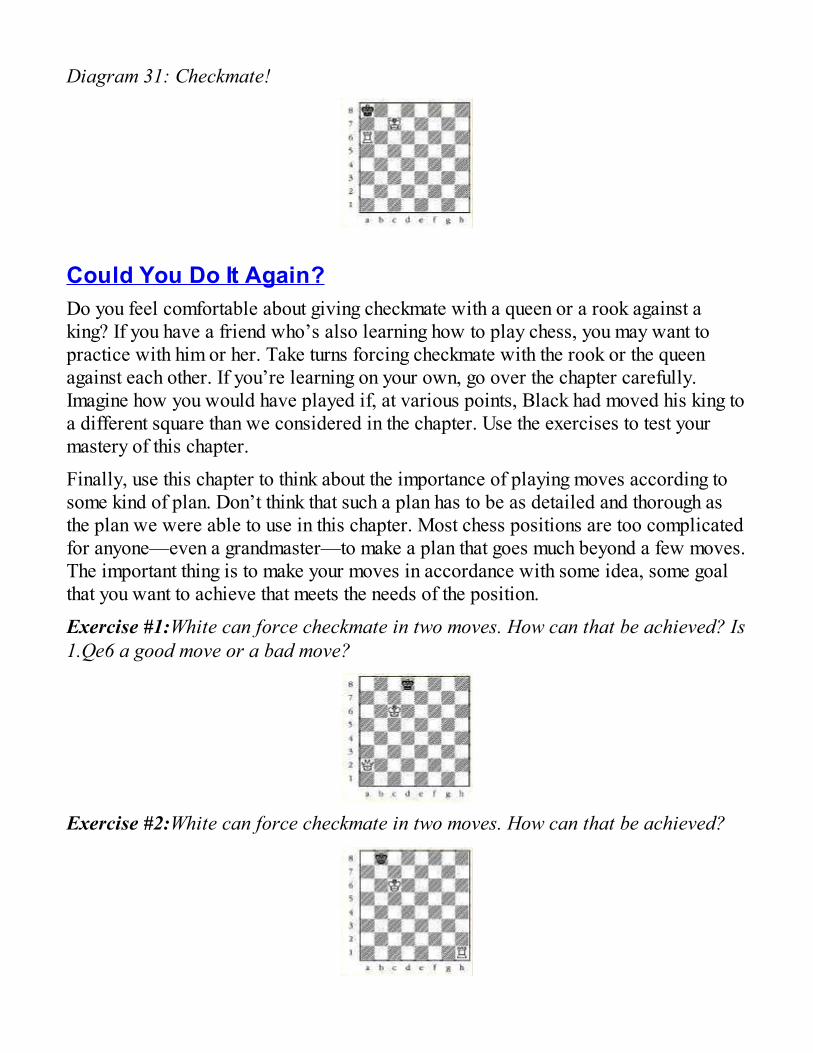
Diagram 31: Checkmate!
Could You Do It Again?Do you feel comfortable about giving checkmate with a queen or a rook against aking? If you have a friend who’s also learning how to play chess, you may want topractice with him or her. Take turns forcing checkmate with the rook or the queenagainst each other. If you’re learning on your own, go over the chapter carefully.Imagine how you would have played if, at various points, Black had moved his king toa different square than we considered in the chapter. Use the exercises to test yourmastery of this chapter.
Finally, use this chapter to think about the importance of playing moves according tosome kind of plan. Don’t think that such a plan has to be as detailed and thorough asthe plan we were able to use in this chapter. Most chess positions are too complicatedfor anyone—even a grandmaster—to make a plan that goes much beyond a few moves.The important thing is to make your moves in accordance with some idea, some goalthat you want to achieve that meets the needs of the position.
Exercise #1:White can force checkmate in two moves. How can that be achieved? Is1.Qe6 a good move or a bad move?
Exercise #2:White can force checkmate in two moves. How can that be achieved?

Exercise #3:Name all the squares on which Black could put a queen to givecheckmate.
Exercise #4:This one is tricky! Although White has only a lowly pawn, he still has awinning plan. What is the plan, and how can it be achieved?
Exercise #5:It’s Black’s turn. What is his best move? Can he win?
Exercise #6:How should Black capture the queen?
Exercise #7:How can White force checkmate in two moves?
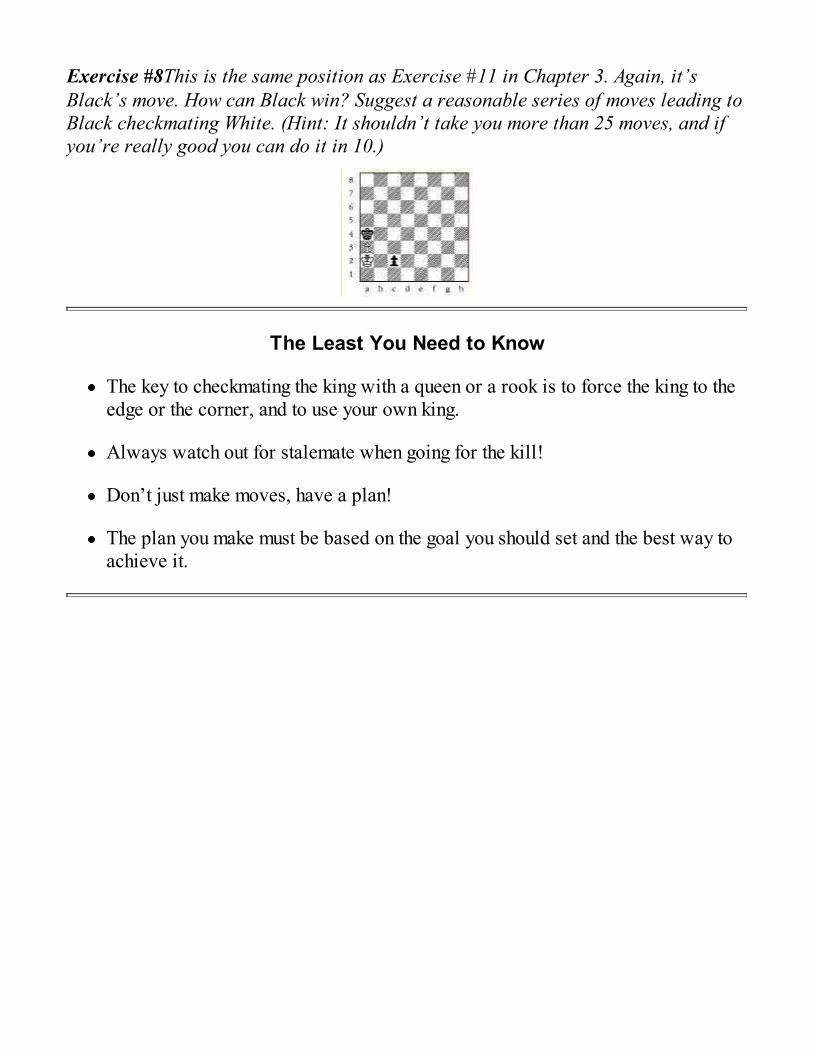
Exercise #8This is the same position as Exercise #11 in Chapter 3. Again, it’sBlack’s move. How can Black win? Suggest a reasonable series of moves leading toBlack checkmating White. (Hint: It shouldn’t take you more than 25 moves, and ifyou’re really good you can do it in 10.)
The Least You Need to Know
The key to checkmating the king with a queen or a rook is to force the king to theedge or the corner, and to use your own king.
Always watch out for stalemate when going for the kill!
Don’t just make moves, have a plan!
The plan you make must be based on the goal you should set and the best way toachieve it.
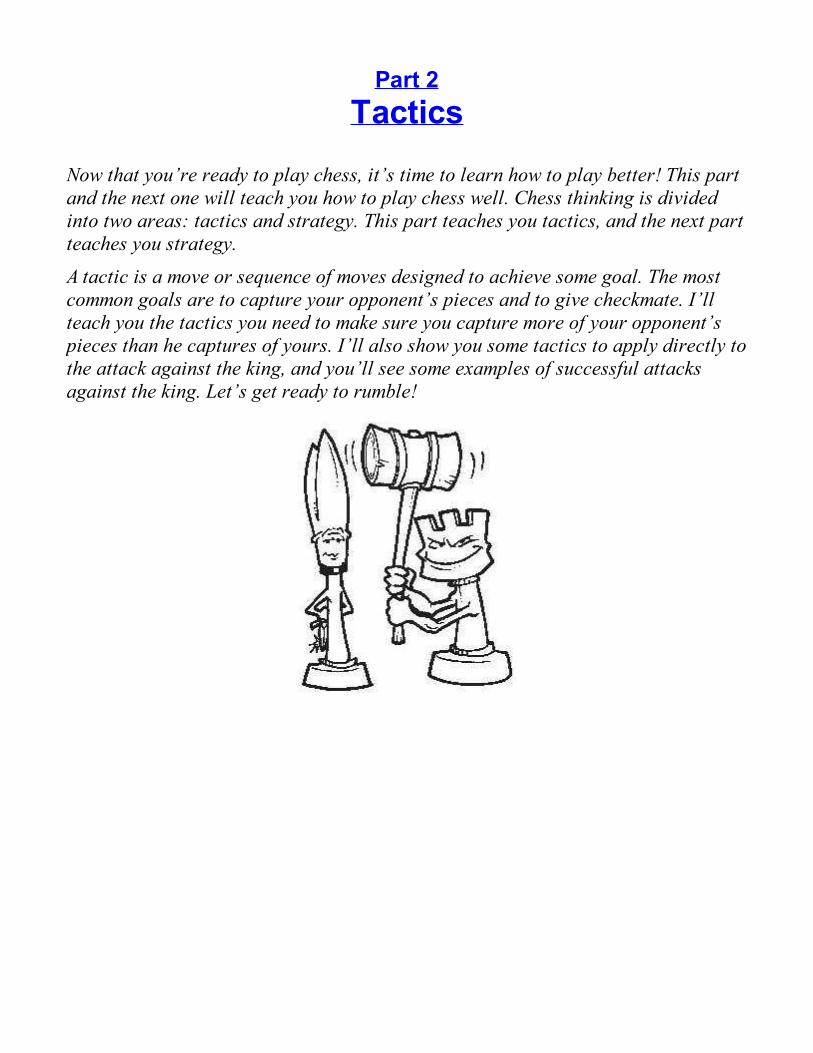
Part 2Tactics
Now that you’re ready to play chess, it’s time to learn how to play better! This partand the next one will teach you how to play chess well. Chess thinking is dividedinto two areas: tactics and strategy. This part teaches you tactics, and the next partteaches you strategy.A tactic is a move or sequence of moves designed to achieve some goal. The mostcommon goals are to capture your opponent’s pieces and to give checkmate. I’llteach you the tactics you need to make sure you capture more of your opponent’spieces than he captures of yours. I’ll also show you some tactics to apply directly tothe attack against the king, and you’ll see some examples of successful attacksagainst the king. Let’s get ready to rumble!

Chapter 5
It’s a Material World
In This Chapter
The relative value of each piece
What material is and why it’s good to have more material than your opponent
How to win material
How to avoid losing material
When you read Chapter 4, you probably noticed something: It’s pretty useful to havean extra rook or queen at the end of the game! In fact, if you did Exercise #4 in Chapter4, you saw that even a single extra pawn at the end of a game can make the differencebetween winning and losing. And as you will see in later chapters, having more piecesor pawns than your opponent is useful throughout the game in many other ways.
If you want to improve at chess, the first things you must do is learn to avoid losingyour pieces and pawns, and to capture your opponent’s pieces and pawns when youcan do so.
In this chapter, you’ll learn why this is so important, and how to do it. You’ll learn therelative value of each piece, how to avoid losing your pieces and pawns, and how tocapture those of your opponent.
Chess TalkThe word material is a general word referring to the number andstrength of one’s pieces. A material advantage is an advantage in that

regard.
The Concept of MaterialAlways remember that chess is a game of war. And in chess, as in war, all other thingsbeing equal, the bigger army will win. Why? Well, if you have more to attack withthan your opponent has to defend with, then your attack will overwhelm the defense. Ifyou have more to defend with than your opponent has to attack with, then your defensewill turn away the attack. When you have more to attack and defend with than youropponent does, you have more power, which chess players call more material. Amaterial advantage, as chess players call it, is an advantage in power. When youhave a material advantage over your opponent, you have a more powerful army thanyour opponent.
When Fewer Pieces = More MaterialMost people probably agree that the U.S. has the most powerful military in the world.So if the U.S. went to war with a country that had four times the population, the U.S.would win, right? But wait a minute, the other country has almost four times morepeople than the U.S., so it could potentially field an army that was four times bigger.So why wouldn’t the other country win?
Without getting bogged down in military science, I think one thing at least is prettyclear: Four times the population might mean they have more soldiers, but we haveextremely sophisticated weapons. (Our soldiers are probably better trained as well.)They might have more soldiers, and maybe even more weapons, but our soldiers withour weapons are worth more. Even with less, we have more power.
Well, imagine that the pawn is a foot soldier and the rook is a tank, and you begin tosee how this applies to chess.
Sometimes a material advantage means having more than your opponent. Butsometimes a material advantage means that what you have is worth more.
The Relative Worth of the PiecesSo just how powerful is each piece, relative to every other piece? There is a standardscale that answers this question. This is a very useful scale to know, and you shouldcommit it to memory. Do keep in mind that it’s only an approximation, but it’s a heckof a good approximation! The relative power of the pieces are as follows:
Pawn 1 point
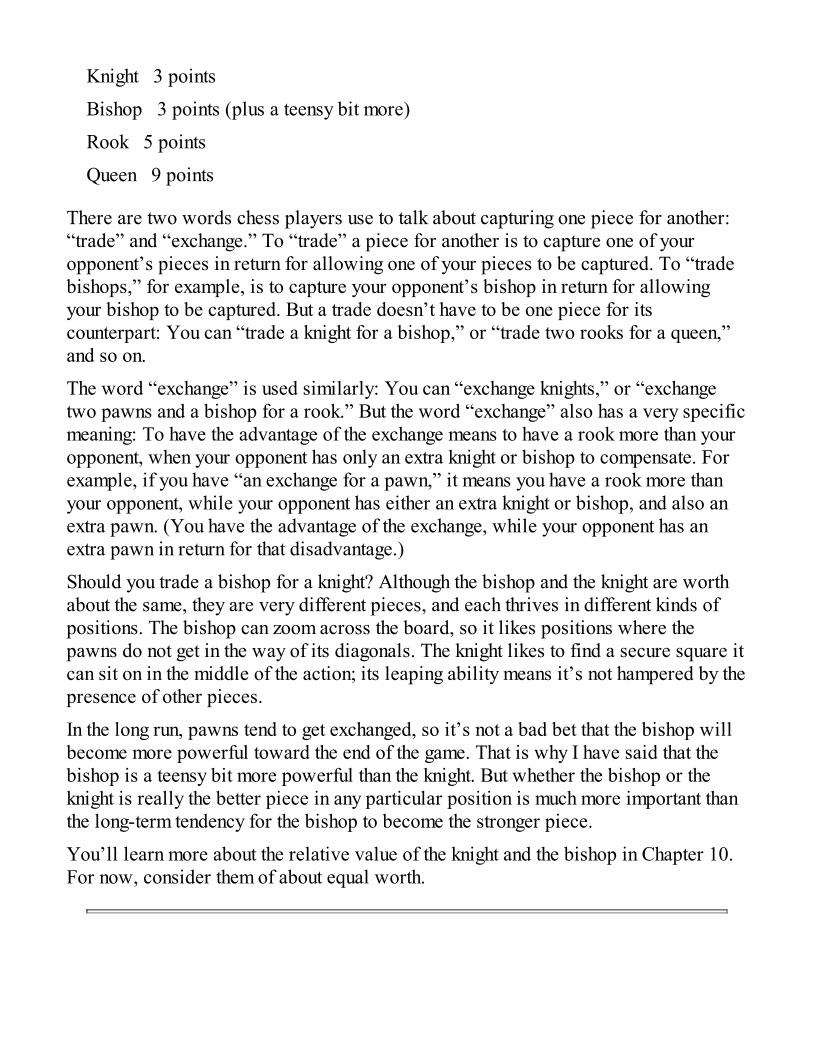
Knight 3 points
Bishop 3 points (plus a teensy bit more)
Rook 5 points
Queen 9 points
There are two words chess players use to talk about capturing one piece for another:“trade” and “exchange.” To “trade” a piece for another is to capture one of youropponent’s pieces in return for allowing one of your pieces to be captured. To “tradebishops,” for example, is to capture your opponent’s bishop in return for allowingyour bishop to be captured. But a trade doesn’t have to be one piece for itscounterpart: You can “trade a knight for a bishop,” or “trade two rooks for a queen,”and so on.
The word “exchange” is used similarly: You can “exchange knights,” or “exchangetwo pawns and a bishop for a rook.” But the word “exchange” also has a very specificmeaning: To have the advantage of the exchange means to have a rook more than youropponent, when your opponent has only an extra knight or bishop to compensate. Forexample, if you have “an exchange for a pawn,” it means you have a rook more thanyour opponent, while your opponent has either an extra knight or bishop, and also anextra pawn. (You have the advantage of the exchange, while your opponent has anextra pawn in return for that disadvantage.)
Should you trade a bishop for a knight? Although the bishop and the knight are worthabout the same, they are very different pieces, and each thrives in different kinds ofpositions. The bishop can zoom across the board, so it likes positions where thepawns do not get in the way of its diagonals. The knight likes to find a secure square itcan sit on in the middle of the action; its leaping ability means it’s not hampered by thepresence of other pieces.
In the long run, pawns tend to get exchanged, so it’s not a bad bet that the bishop willbecome more powerful toward the end of the game. That is why I have said that thebishop is a teensy bit more powerful than the knight. But whether the bishop or theknight is really the better piece in any particular position is much more important thanthe long-term tendency for the bishop to become the stronger piece.
You’ll learn more about the relative value of the knight and the bishop in Chapter 10.For now, consider them of about equal worth.

Patrick’s PointersAim for the bishop in positions where it can find long diagonals, andwhere it can move around a lot. Aim for the knight in positions with lots ofpawns, especially when you can find a secure square for the knight,where the pawns block the diagonals of your opponent’s bishop(s).
What About the King?Notice that the king isn’t on the scale. Why not? Well, the loss of the king means theloss of the game, so you aren’t about to give up your king for another piece! In thatsense, the king has an infinite value.
But it still makes sense to ask how powerful it is. After all, just because you dare notlose the king doesn’t mean that you can’t use it to attack and defend. The scale tries togive a relative weight to the power of each piece. Even though we can’t exchange theking for another piece, wouldn’t it be nice to know how powerful it is in relation tothe other pieces?
Here’s the answer: It’s worth about 3 points, which is to say it’s about as powerful asthe knight or the bishop. Just be careful when you use the king, though, because itsimportance goes far beyond its power!
How Do You Use This Scale?Basically speaking, you always want to trade up when you can. If you can grab apawn, do so. If you can give two pawns to get a bishop, that’s a good trade. If you canget a rook for three pawns, that’s an even better trade. And so on.
This is only a rough scale. It is not a perfect indication of the relative value of eachpiece. There are particular piece combinations that work well together, and particularpiece combinations that don’t work so well together. There are also certain situationswhere some pieces’ values increase, while some other pieces’ values decrease. Youwill learn some of these situations in later chapters, and experience will teach youother situations. (See Chapter 16 for how to learn more once you finish this book.)
Patrick’s Pointers

It can be confusing to keep straight what the word “piece” means!Sometimes it means a pawn, knight, bishop, rook, queen, or king.Sometimes it means anything but a pawn, and sometimes it means only arook, queen, or king. Look to the context to make it clear how it’s beingused.
But although it is only a rough scale, it works very well. Grandmasters use itregularly. So should you.
Because the scale of the relative worth of the pieces is so useful, chess playerssometimes use it to distinguish between three different kinds of pieces:
1. The pawn is not even called a piece at all! It is so low down on the scale that itdoes not deserve to be called a “piece,” so it is just called a pawn.
2. The bishop and the knight are called “minor pieces,” because they are not sopowerful.
3. The rook and queen are sometimes called “major pieces,” but often they are justcalled “pieces,” since there is no need to give them another name to distinguishthem from the pawn and from the bishop or knight.
How to Win Material, and Avoid Losing MaterialIt’s simple: Capture your opponent’s pieces, and don’t let your own pieces getcaptured. If you capture one of your opponent’s pieces, and one of yours can becaptured, make sure the piece you take is worth more than the one your opponent takes.
I can imagine what you’re thinking, “Okay, it sounds simple, but how do I make surethat I capture pieces when I can, that I don’t let my own pieces be captured, and ifthere is a trade of pieces how can I make sure that I trade up?”
“How Do You Get to Carnegie Hall?”The answer: practice, practice, practice. Hey, you didn’t think you were going to beable to get better without practice, did you? But don’t despair! I will explain how youshould practice, and I will give you a lot of exercises to practice with. Are you readyto go to work? Let’s start with Diagram 1.
It’s White’s turn to move. Study this position, and before you continue reading, list (orjust think to yourself) every single capture White can make. Then try to decide whichone (if any) he should make.

Diagram 1: White to move and find the best capture.
There are four captures White can make:
1. White can capture the pawn on e6 with his rook on e1 (1.Rxe6).
2. White can capture the knight on f6 with his queen on c3 (1.Qxf6).
3. White can capture the rook on d7 with his rook on d1 (1.Rxd7).
4. White can capture the bishop on g5 with his knight on f3 (1.Nxg5).
Which capture (if any) should White make? Using our scale of the relative value of thepieces, we can see that there are two captures White should definitely not make, onecapture that is neutral, and one capture White should definitely make. See Diagrams 2and 3 for an illustration of the first capture White shouldn’t make. White should notplay 1.Rxe6??, because Black will then recapture the rook with either his queen on e7or his pawn on f7, and White will lose a rook for a pawn: a VERY bad trade. (By theway, Black has another way to win a rook other than by capturing the one on e6 witheither the pawn or the queen. Do you see what it is?) Next see Diagrams 4 and 5 for anillustration of the second capture White shouldn’t make.
Diagram 2: White plays 1.Rxe6??, a very bad move.
Diagram 3: Black plays 1 . . .fxe6 and wins a rook for a pawn.

Diagram 4: White plays 1.Qxf6??, a very bad move.
White also should not play 1.Qxf6??, because Black will then recapture the queenwith either his pawn on g7 or his bishop on g5, and White will lose a queen for aknight: another VERY bad trade. Now see Diagrams 6 and 7 for an illustration of thethird capture, the one that is basically neutral.
Diagram 5: Black plays 1 . . .Bxf6 and wins a queen for a knight.
Diagram 6: White plays 1.Rxd7, capturing the rook on d7 with his rook on d1.
Diagram 7: Black recaptures the rook by playing 1 . . .Qxd7, and material is stilleven.
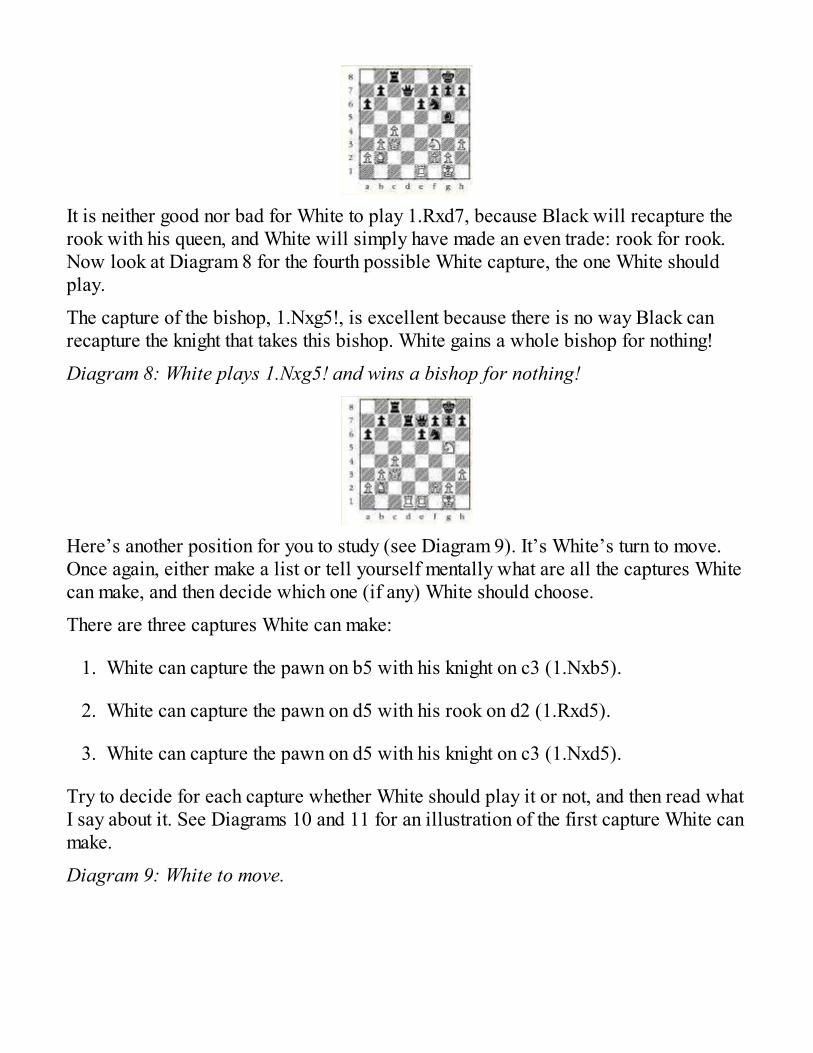
It is neither good nor bad for White to play 1.Rxd7, because Black will recapture therook with his queen, and White will simply have made an even trade: rook for rook.Now look at Diagram 8 for the fourth possible White capture, the one White shouldplay.
The capture of the bishop, 1.Nxg5!, is excellent because there is no way Black canrecapture the knight that takes this bishop. White gains a whole bishop for nothing!
Diagram 8: White plays 1.Nxg5! and wins a bishop for nothing!
Here’s another position for you to study (see Diagram 9). It’s White’s turn to move.Once again, either make a list or tell yourself mentally what are all the captures Whitecan make, and then decide which one (if any) White should choose.
There are three captures White can make:
1. White can capture the pawn on b5 with his knight on c3 (1.Nxb5).
2. White can capture the pawn on d5 with his rook on d2 (1.Rxd5).
3. White can capture the pawn on d5 with his knight on c3 (1.Nxd5).
Try to decide for each capture whether White should play it or not, and then read whatI say about it. See Diagrams 10 and 11 for an illustration of the first capture White canmake.
Diagram 9: White to move.
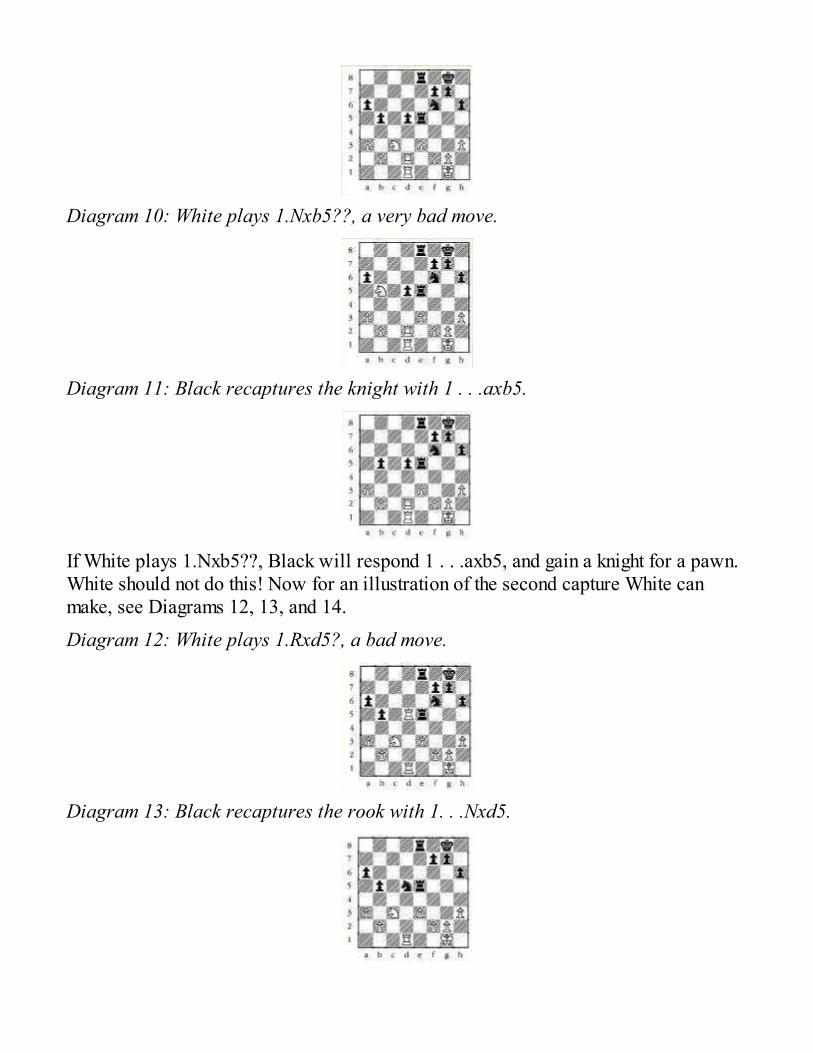
Diagram 10: White plays 1.Nxb5??, a very bad move.
Diagram 11: Black recaptures the knight with 1 . . .axb5.
If White plays 1.Nxb5??, Black will respond 1 . . .axb5, and gain a knight for a pawn.White should not do this! Now for an illustration of the second capture White canmake, see Diagrams 12, 13, and 14.
Diagram 12: White plays 1.Rxd5?, a bad move.
Diagram 13: Black recaptures the rook with 1. . .Nxd5.

Diagram 14: White recaptures the knight with 2.Nxd5.
If White plays 1.Rxd5?, Black will respond 1 . . .Nxd5 (see Diagram 13), and gain arook for a pawn. But we can’t stop here, because White can make another capture hecan capture the knight on d5 with 2.Nxd5 or 2.Rxd5 (see Diagram 14). Still, Whitewill only get a knight and a pawn, and Black will get a rook. That still gives Black amaterial advantage, so 1.Rxd5?, while not as bad as it looks at first, is still a mistake.
The best move is the third possible capture: 1.Nxd5! (see Diagram 15). Now supposethat Black responds with 1 . . .Nxd5 (see Diagram 16). Then White can play 2.Rxd5(see Diagram 17), and if Black plays 2 . . .Rxd5 (see Diagram 18), White respondswith 3.Rxd5. White begins by capturing a pawn, and then every capture and recaptureis just an even trade, which still leaves White with a material advantage of one pawn.
Diagram 15: White plays 1.Nxd5!, the best move, which wins a pawn.
Diagram 16: Black recaptures the knight with 1 . . .Nxd5.
Diagram 17: White recaptures the knight with 2.Rxd5.
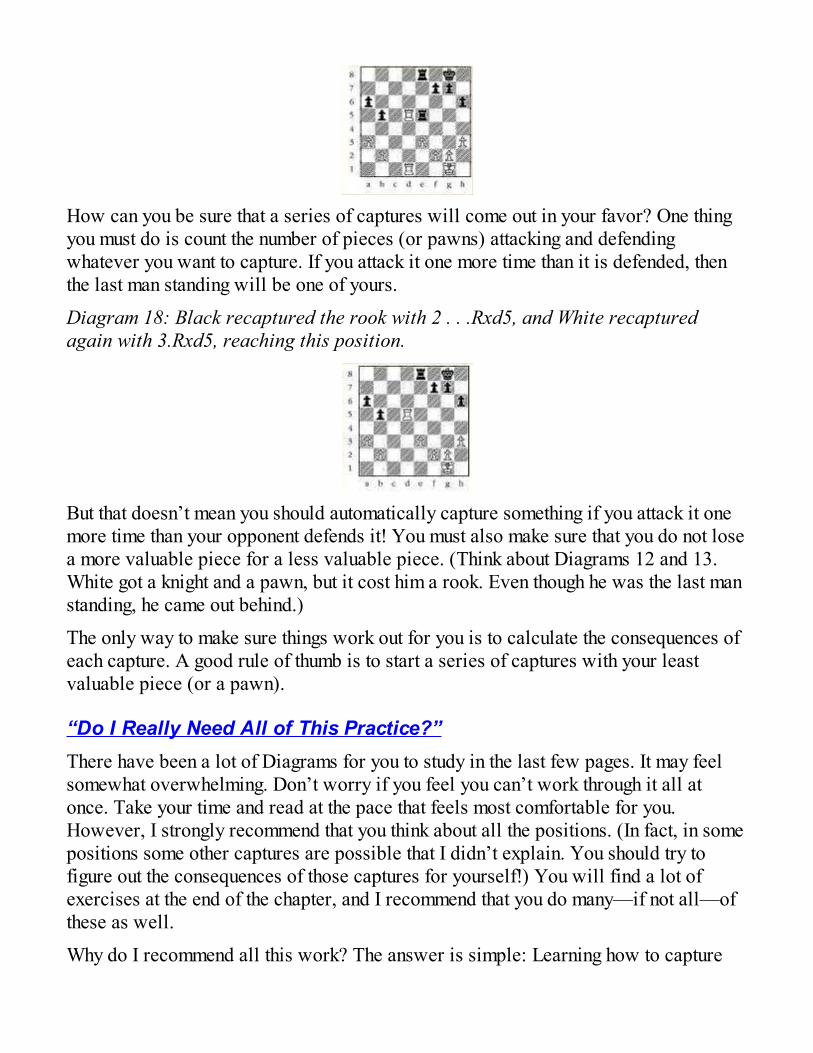
How can you be sure that a series of captures will come out in your favor? One thingyou must do is count the number of pieces (or pawns) attacking and defendingwhatever you want to capture. If you attack it one more time than it is defended, thenthe last man standing will be one of yours.
Diagram 18: Black recaptured the rook with 2 . . .Rxd5, and White recapturedagain with 3.Rxd5, reaching this position.
But that doesn’t mean you should automatically capture something if you attack it onemore time than your opponent defends it! You must also make sure that you do not losea more valuable piece for a less valuable piece. (Think about Diagrams 12 and 13.White got a knight and a pawn, but it cost him a rook. Even though he was the last manstanding, he came out behind.)
The only way to make sure things work out for you is to calculate the consequences ofeach capture. A good rule of thumb is to start a series of captures with your leastvaluable piece (or a pawn).
“Do I Really Need All of This Practice?”There have been a lot of Diagrams for you to study in the last few pages. It may feelsomewhat overwhelming. Don’t worry if you feel you can’t work through it all atonce. Take your time and read at the pace that feels most comfortable for you.However, I strongly recommend that you think about all the positions. (In fact, in somepositions some other captures are possible that I didn’t explain. You should try tofigure out the consequences of those captures for yourself!) You will find a lot ofexercises at the end of the chapter, and I recommend that you do many—if not all—ofthese as well.
Why do I recommend all this work? The answer is simple: Learning how to capture
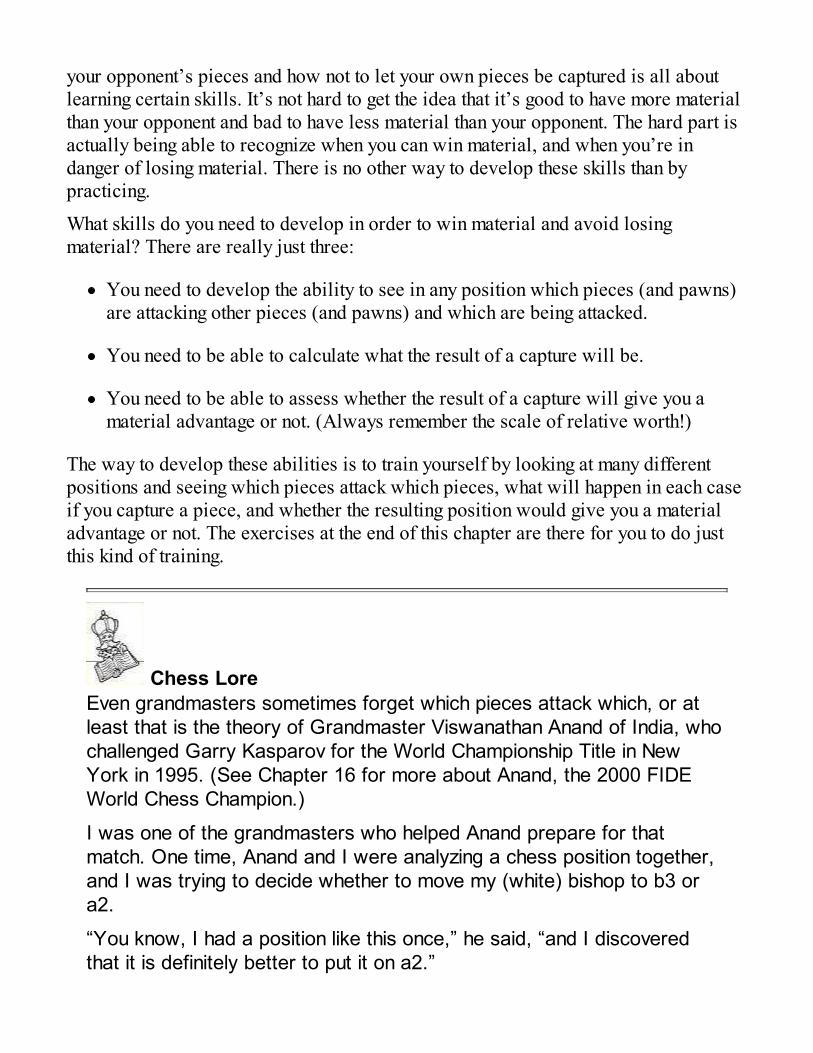
your opponent’s pieces and how not to let your own pieces be captured is all aboutlearning certain skills. It’s not hard to get the idea that it’s good to have more materialthan your opponent and bad to have less material than your opponent. The hard part isactually being able to recognize when you can win material, and when you’re indanger of losing material. There is no other way to develop these skills than bypracticing.
What skills do you need to develop in order to win material and avoid losingmaterial? There are really just three:
You need to develop the ability to see in any position which pieces (and pawns)are attacking other pieces (and pawns) and which are being attacked.
You need to be able to calculate what the result of a capture will be.
You need to be able to assess whether the result of a capture will give you amaterial advantage or not. (Always remember the scale of relative worth!)
The way to develop these abilities is to train yourself by looking at many differentpositions and seeing which pieces attack which pieces, what will happen in each caseif you capture a piece, and whether the resulting position would give you a materialadvantage or not. The exercises at the end of this chapter are there for you to do justthis kind of training.
Chess LoreEven grandmasters sometimes forget which pieces attack which, or atleast that is the theory of Grandmaster Viswanathan Anand of India, whochallenged Garry Kasparov for the World Championship Title in NewYork in 1995. (See Chapter 16 for more about Anand, the 2000 FIDEWorld Chess Champion.)
I was one of the grandmasters who helped Anand prepare for thatmatch. One time, Anand and I were analyzing a chess position together,and I was trying to decide whether to move my (white) bishop to b3 ora2.
“You know, I had a position like this once,” he said, “and I discoveredthat it is definitely better to put it on a2.”

“Why is that?” I asked.
“When White bishop is on b3, it’s easier for Black to see it. On a2, it’sfarther away, and so he might forget about it later in the game. And that’sjust what happened later in my game, when I captured his rook with thebishop on a2 he had forgotten about!”
How to Defend Against a Threat to One of Your PiecesIn the next two chapters, you will learn how to use and to be aware of your opponentusing many “tricks of the trade”—ways to win material. But before we close thischapter we should consider one more thing: Just how do you defend against a threat toone of your pieces? After all, we’ve been looking at all the ways to capture material.But what about when you are the one who is being threatened with capture? Whatshould you do?
There are five ways to meet a threat to one of your pieces:
1. Move the piece that is being attacked.
2. Defend the piece that is being attacked.
3. Block the attack on the piece.
4. Capture the piece that is attacking you.
5. Attack something else in your opponent’s position.
Let’s illustrate each one of the ways to meet a threat to one of your pieces with anexample.
Moving the Piece That Is Being AttackedLook at Diagram 19. Suppose you are Black, and you notice that your queen on b6 isbeing attacked by the bishop on e3. It’s your move. What do you do? Well, thesimplest thing to do is to move it away to where it’s no longer being attacked, right?Diagram 20 shows the position after Black has done just that. It is White’s turn again,and the Black queen can’t be captured because it has moved away.
Diagram 19: Black to move: The queen is attacked by the white bishop on e3.

Diagram 20: Black plays 1 . . .Qc7, moving the queen out of the attack.
Defending the Piece That Is Being AttackedThis works well so long as the piece of yours that is being attacked is not morevaluable than whichever one of your opponent’s pieces is attacking it. But if yourpiece is more valuable, this is not a good way to meet the threat.
BlundersDon’t capture one of your opponent’s pieces if your opponent canrecapture your piece, and your piece is more valuable than the piece itcaptured!
Suppose you are White in Diagrams 21 and 22. In Diagram 21, Black is attacking therook on c1 with his queen on f4. White defends that rook with his other rook, as shownin Diagram 22. Now it would be a mistake for Black to capture the rook on c1,because White would recapture the queen with the rook on d1, and White would win aqueen for a rook—a very good trade for White!
But in Diagram 23, Black is attacking the rook on c1 with his bishop on f4. Now itwould be a bad idea for White to defend this rook, because if Black takes the rookwith his bishop, then even if White recaptures the bishop, Black has won “theexchange” (a rook for a bishop), which is a good trade for Black and a bad trade forWhite.
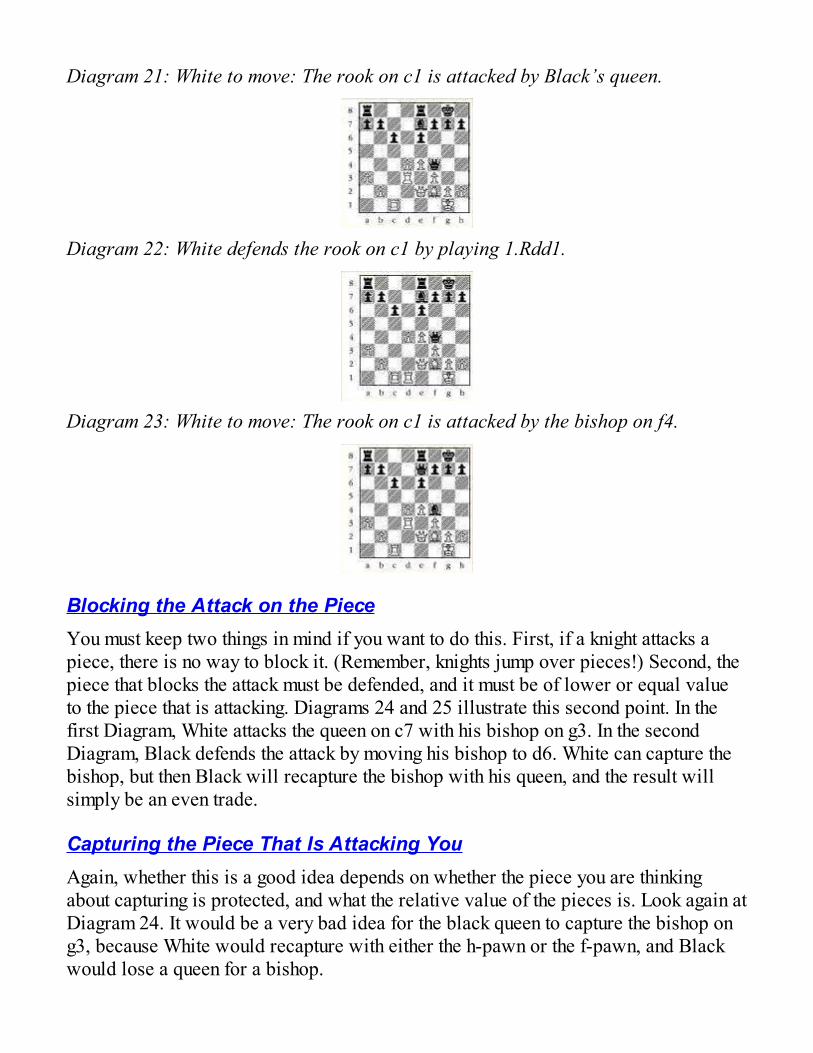
Diagram 21: White to move: The rook on c1 is attacked by Black’s queen.
Diagram 22: White defends the rook on c1 by playing 1.Rdd1.
Diagram 23: White to move: The rook on c1 is attacked by the bishop on f4.
Blocking the Attack on the PieceYou must keep two things in mind if you want to do this. First, if a knight attacks apiece, there is no way to block it. (Remember, knights jump over pieces!) Second, thepiece that blocks the attack must be defended, and it must be of lower or equal valueto the piece that is attacking. Diagrams 24 and 25 illustrate this second point. In thefirst Diagram, White attacks the queen on c7 with his bishop on g3. In the secondDiagram, Black defends the attack by moving his bishop to d6. White can capture thebishop, but then Black will recapture the bishop with his queen, and the result willsimply be an even trade.
Capturing the Piece That Is Attacking YouAgain, whether this is a good idea depends on whether the piece you are thinkingabout capturing is protected, and what the relative value of the pieces is. Look again atDiagram 24. It would be a very bad idea for the black queen to capture the bishop ong3, because White would recapture with either the h-pawn or the f-pawn, and Blackwould lose a queen for a bishop.

But Black has another piece that can capture the bishop.
Certainly it is a bad idea for Black to take the bishop with his queen, but what abouttaking it with his knight on h5? In Diagram 26, Black captures the bishop with theknight. White will recapture the knight with one of his pawns, and the result will be aneven trade—this time knight for bishop, rather than bishop for bishop as in Diagram25.
Diagram 24: Black to move: The black queen is attacked by the bishop on g3.
Diagram 25: Black plays 1 . . .Bd6, blocking the attack to the queen.
Diagram 26: Black plays 1 . . .Nxg3, and after 2.hxg3 or 2.fxg3 material will still beeven.
Attacking Something Else in Your Opponent’s PositionThe final way to meet an attack on one of your pieces is just to ignore it altogether anddo something else. In that case, just make sure that whatever you do is importantenough to be to your advantage if you both carry out your threats! Also, be sure thatyour threat can’t be parried in such a way that you leave yourself vulnerable to theoriginal threat.
Consider Diagram 27. Black attacks the knight on c3 with his rook on c8. Whitedecides to parry this threat by attacking the queen on f8 with his bishop. In Diagram

28, White has attacked the queen. Now it would be a very bad idea for Black tocapture the knight, because White would capture the queen, and even after Blackrecaptured the bishop with his king, White would have won a queen for a knight and abishop—an excellent trade (see Diagram 29).
Diagram 27: White to move: the knight on c3 is attacked by the rook on c8.
Diagram 28: White attacks Black’s queen by playing 1.Bd6.
Diagram 29: Position after 1 . . .Rxc3?? 2.Bxf8: White has won a queen for aknight. Even after 2 . . .Kxf8, White will have a material advantage.
Diagram 30: White to move: The knight on c3 is attacked by the rook on c8.
But just a small change in the position can make all the difference! Consider Diagram30. Once again the knight on c3 is attacked, and once again White decides to meet thethreat by attacking the queen on f8 with his bishop on d6. Diagram 31 shows theposition after White does this. But this time the white queen is on a slightly different

square—f2 instead of g2—so now Black can capture the queen with his own queen,and with check! White has to meet the check, so he recaptures the queen, but then thethreat to Black’s queen is gone, and Black can capture the knight on c3 with his rook.See Diagrams 32 and 33.
Diagram 31: White plays 1.Bd6??, attacking the queen.
Diagram 32: Black plays 1 . . .Qxf2+!.
Diagram 33: White plays 2.Kxf2, but now Black will win a knight for nothing with2 . . .Rxc3.
Practice, Practice, Practice!It is so important to develop the skills of winning material (and not losing material)that the next two chapters are devoted entirely to teaching you the most common tricksfor winning (and losing) material. Before you start the next chapter, I recommend thatyou do the exercises at the end of this chapter. Yes, I know there are a lot of them, butthey are there for your benefit! Don’t worry if you have some trouble with them. Youcan always turn back to the relevant section of the chapter if you are unclear aboutsomething. By trying to solve the exercises, and studying the answers if they give youtrouble, you will develop the skills you need to win at chess. And believe me, chess isalways most fun when you win!

Exercise #1:It’s White’s turn. List all the pieces and pawns the knight on d4attacks. Should White capture any of them?
Exercise #2:It’s White’s turn. Do either 1.Rxb7 or 1.dxc5 win a pawn?
Exercise #3:It’s White’s turn. What two pawns does he attack? Should he captureeither of them?
Exercise #4:It’s White’s turn. Do either 1.Nfxd4 or 1.Nbxd4 win a pawn? Does1.Qxd4 win a pawn?
Exercise #5:It’s Black’s turn. What is his best move?
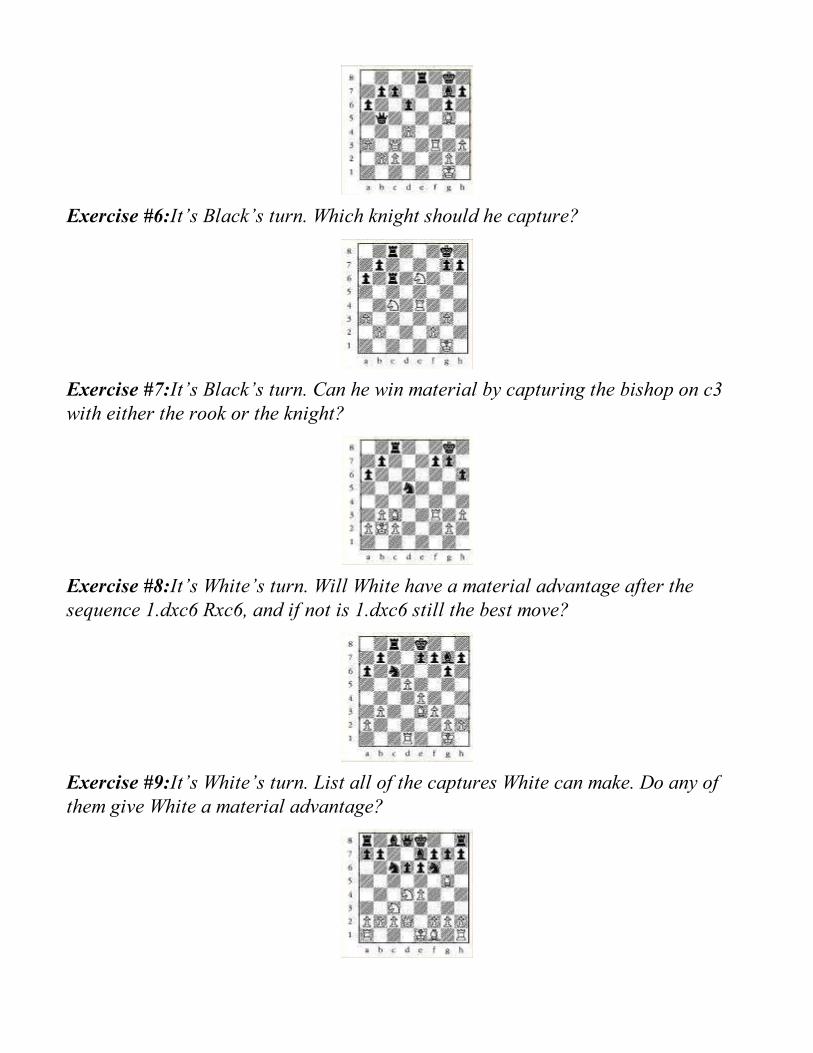
Exercise #6:It’s Black’s turn. Which knight should he capture?
Exercise #7:It’s Black’s turn. Can he win material by capturing the bishop on c3with either the rook or the knight?
Exercise #8:It’s White’s turn. Will White have a material advantage after thesequence 1.dxc6 Rxc6, and if not is 1.dxc6 still the best move?
Exercise #9:It’s White’s turn. List all of the captures White can make. Do any ofthem give White a material advantage?

Exercise #10:It’s White’s turn. List all of the captures White can make. Do any ofthem give White a material advantage?
Exercise #11:It’s White’s turn, and he attacks both the knight on f6 and the rook onb6. Should White capture either of them?
Exercise #12:It’s White’s turn. Should he capture any of Black’s pieces?
Exercise #13:It’s White’s turn. Should he capture the knight on d7?
Exercise #14:It’s White’s turn. Should he capture the knight on d7?
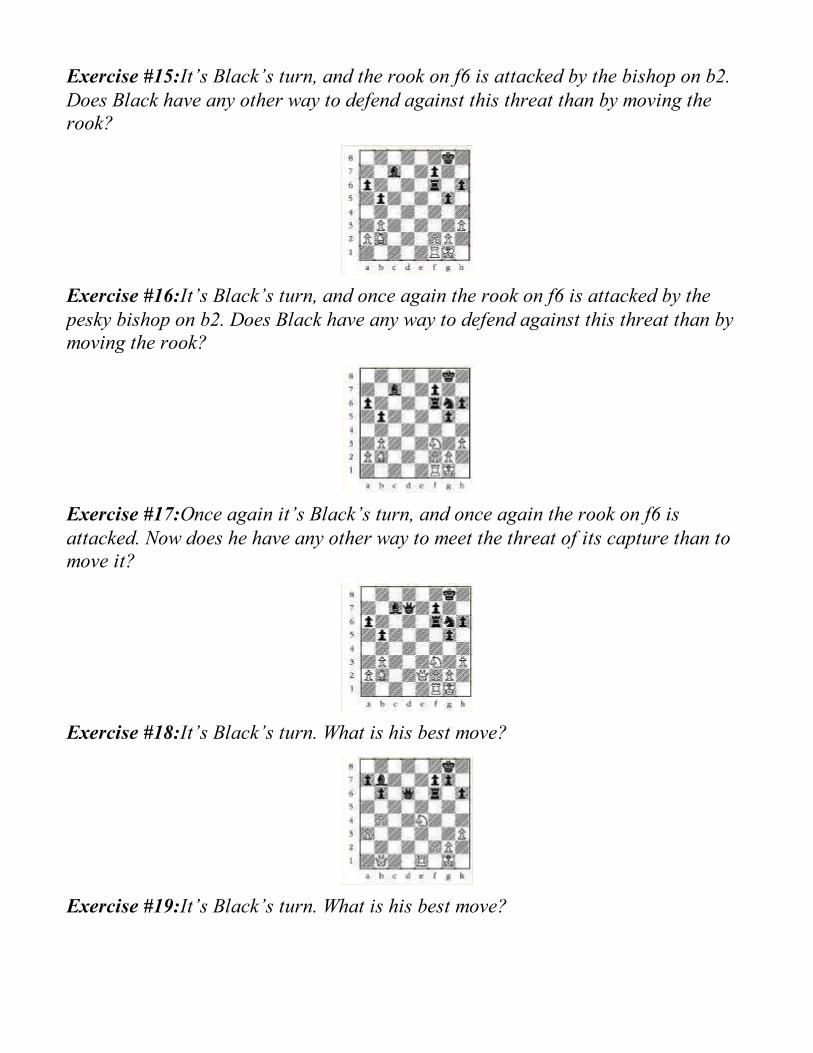
Exercise #15:It’s Black’s turn, and the rook on f6 is attacked by the bishop on b2.Does Black have any other way to defend against this threat than by moving therook?
Exercise #16:It’s Black’s turn, and once again the rook on f6 is attacked by thepesky bishop on b2. Does Black have any way to defend against this threat than bymoving the rook?
Exercise #17:Once again it’s Black’s turn, and once again the rook on f6 isattacked. Now does he have any other way to meet the threat of its capture than tomove it?
Exercise #18:It’s Black’s turn. What is his best move?
Exercise #19:It’s Black’s turn. What is his best move?
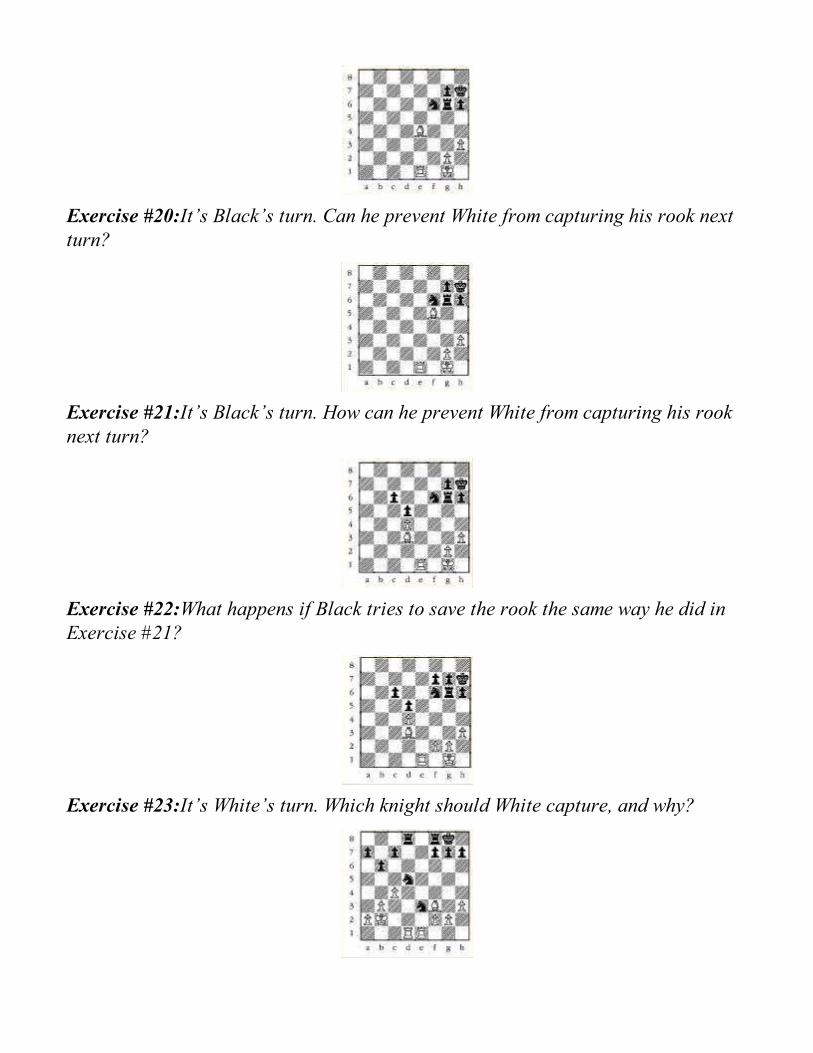
Exercise #20:It’s Black’s turn. Can he prevent White from capturing his rook nextturn?
Exercise #21:It’s Black’s turn. How can he prevent White from capturing his rooknext turn?
Exercise #22:What happens if Black tries to save the rook the same way he did inExercise #21?
Exercise #23:It’s White’s turn. Which knight should White capture, and why?
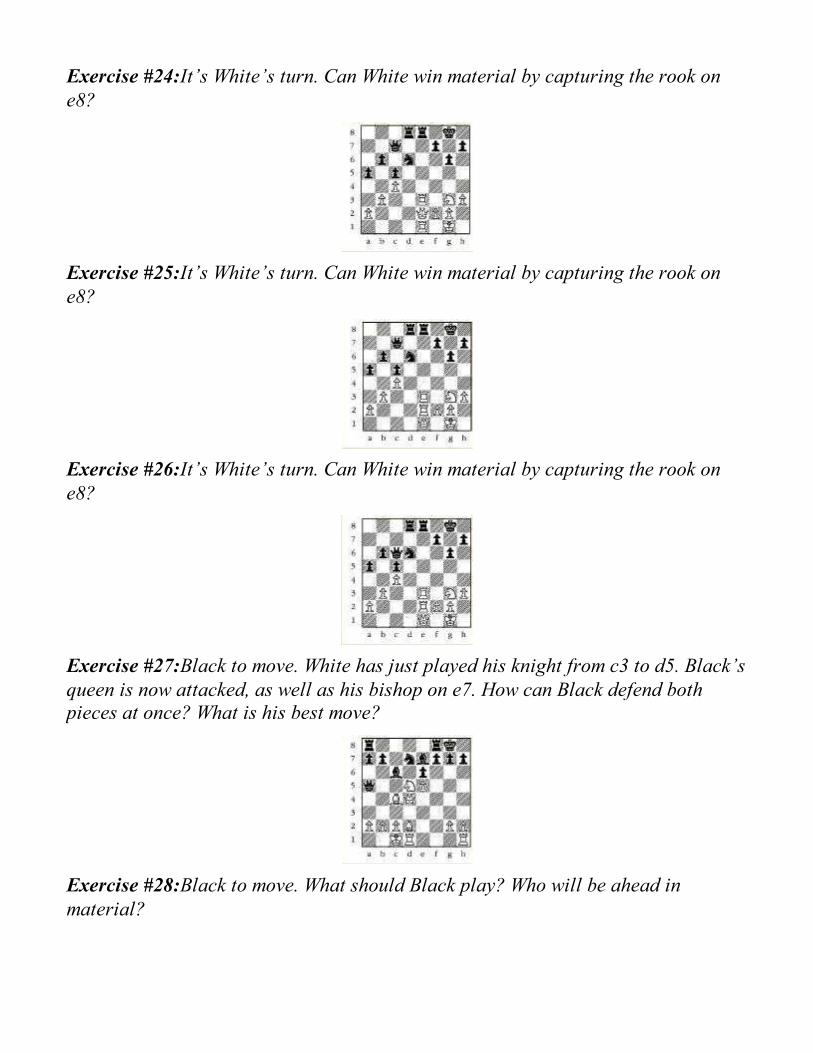
Exercise #24:It’s White’s turn. Can White win material by capturing the rook one8?
Exercise #25:It’s White’s turn. Can White win material by capturing the rook one8?
Exercise #26:It’s White’s turn. Can White win material by capturing the rook one8?
Exercise #27:Black to move. White has just played his knight from c3 to d5. Black’squeen is now attacked, as well as his bishop on e7. How can Black defend bothpieces at once? What is his best move?
Exercise #28:Black to move. What should Black play? Who will be ahead inmaterial?
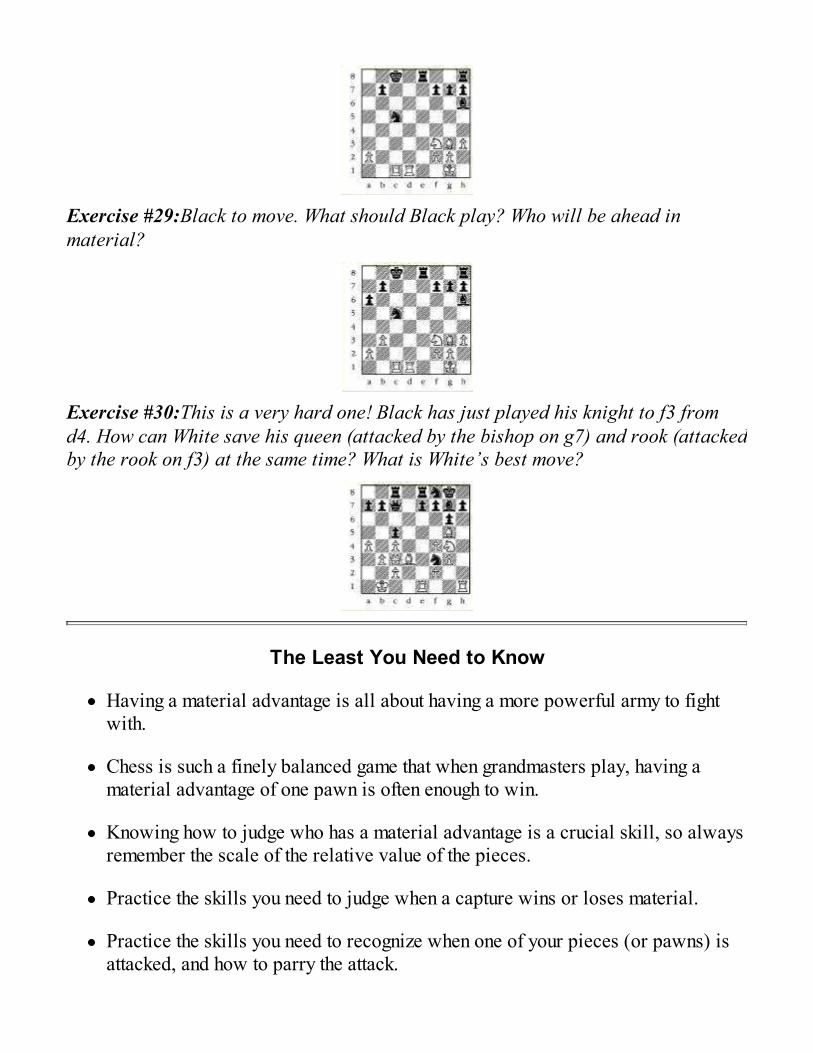
Exercise #29:Black to move. What should Black play? Who will be ahead inmaterial?
Exercise #30:This is a very hard one! Black has just played his knight to f3 fromd4. How can White save his queen (attacked by the bishop on g7) and rook (attackedby the rook on f3) at the same time? What is White’s best move?
The Least You Need to Know
Having a material advantage is all about having a more powerful army to fightwith.
Chess is such a finely balanced game that when grandmasters play, having amaterial advantage of one pawn is often enough to win.
Knowing how to judge who has a material advantage is a crucial skill, so alwaysremember the scale of the relative value of the pieces.
Practice the skills you need to judge when a capture wins or loses material.
Practice the skills you need to recognize when one of your pieces (or pawns) isattacked, and how to parry the attack.

Chapter 6
Tricks of the Tactical Trade
In This Chapter
The “fork”
The “pin”
The “skewer”
Two attacks at once
What is a “tactic?” A tactic is a sequence of moves, at most a few moves long, playedwith some goal in mind. The most dramatic tactics have the goal either of checkmate,or of winning material. In this chapter and the next, I’ll show you some of the mostimportant tactics for winning material. Of course no two positions are exactly alike,but you’ll see that there are some typical tactics that fall into patterns you canrecognize in many different positions. Once you learn these patterns, you’ll be able toanticipate them from your opponent, and you’ll be able to use them to your advantage.
The ForkWhen one piece attacks two pieces at the same time, it’s called a fork. I’ll show youexamples of forks by each different piece. Let’s start with the pawn.
Pawn ForksConsider Diagram 1. It’s White’s turn to move. Black is threatening to capture thepawn on e4, so White could defend it with 1.Bd3, or exchange pawns with 1.exd5exd5. But White has a much better move: 1.e5! White attacks both Black’s bishop ond6 and knight on f6. There is no way Black can defend both of them. He must lose a

bishop or a knight for a pawn, as is illustrated in Diagram 2.
Chess TalkA tactic is a sequence of moves played to accomplish some goal, oftenwinning material or giving checkmate.
The paradox of the pawn fork is that pawn forks are so dangerous precisely becausepawns are worth so much less than the other pieces. It’s useless to protect a pieceagainst a pawn, because if you lose even a knight or a bishop for a pawn, you’ve lost alot of material.
In fact, it’s often worth a pawn to set up a pawn fork. Take a look at Diagram 3.
It’s White’s turn. Notice that Black’s pawn on e5 is attacked twice by White’s pawnon d4 and knight on d3, and defended twice by Black’s knight on d7 and bishop on d6.But if White could get one of his own pawns to e5, and if that pawn were protected,Black’s knight on f6 and bishop on d6 would be forked. Do you see a way to do that?
Diagram 1: White to move.
Diagram 2: White plays 1.e5! and forks Black’s knight and bishop.
Chess Talk

A fork is when one piece attacks two pieces at the same time.
White cleverly plays 1.f4! (see Diagram 4), which attacks the pawn on e5. Since it’sattacked by two pawns, it’s useless to defend it with a piece, and there is no way todefend it with a pawn. Unless Black wants to lose a whole pawn for nothing, Blackhad better capture one of White’s pawns. So in Diagram 5 Black plays 1 . . .exd4.
But now White can carry out his plan to establish the pawn fork by playing 2.e5 (seeDiagram 6). White has lost a pawn, but he’s attacking two pieces and will win one ofthem for a pawn, so he’ll come out ahead a piece for two pawns.
Diagram 3: White to move.
Diagram 4: White plays 1.f4!
Diagram 5: Black plays 1 . . .exd4.
Diagram 6: White plays 2.e5, forking Black’s knight and bishop.

Knight ForksKnights strike terror into the hearts of the rooks and the queen, because they’re sotricky. Two pieces that seem to be far apart and out of range of anything can suddenlyfind themselves forked by a knight. Watch out for these guys!
Consider Diagram 7, where it’s White’s turn. What danger could there possibly be toBlack in this position? All the danger in the world after 1.Ne4, as you can see inDiagram 8. Both Black’s queen and rook are attacked by the knight, and Black has noway to remove the threat to both pieces in his next turn, so he must lose material. Bythe way, Black should make the best of a bad deal by moving the queen to a squarewhere it can recapture the knight once it captures the rook on c5. For example,1. . .Qe7 is a good move.
Part of the danger of knights is that because they don’t move like any other piece, whenthey fork two (or more) pieces, they often do not have to be defended. (Compare to thepawn fork in Diagram 2, for example.) Diagram 9 shows the most deadly knight forkof all: the “family fork,” so-called because the knight forks both the king and queen.Black is in check, so he must move the king, and White will win a whole queen!
Diagram 7: White to move.
In fact, this brings us to an important point. Why would you want to promote a pawn toanything other than a queen? The most common reason is to promote to a knight to setup a family fork. Promote to a queen, and you just gain a queen. Promote to a knightwhile setting up a family fork at the same time, and you gain a knight, plus you capturea queen. Diagrams 10 and 11 demonstrate this.
Diagram 8: White plays 1.Ne4!, forking the rook and queen.
Diagram 9: White’s knight forks Black’s king and queen.

Diagram 10: Black to move.
Diagram 11: Black plays 1 . . .e1=N+, forking the king and queen.
Bishop ForksThe other pieces may not be quite as dangerous forkers as the pawn and the knight, butthey are not to be trifled with! Consider Diagram 12. It’s White’s move, but Black hasa material advantage of a knight, rook, and pawn. How much damage could Whitepossibly do?
Lots! White starts with 1.Bxc6+ (see Diagram 13), which not only captures a knight,but also forks Black’s rook on d5 and king on e8. Black responds with 1 . . .Ke7.Maybe Black figures that even after losing the knight and the rook, he will still have amaterial advantage of a pawn.
Chess TalkWhen a knight forks the king and the queen, it’s called a family fork.
But Black doesn’t notice that after 2.Bxd5, White is again forking two pieces: the
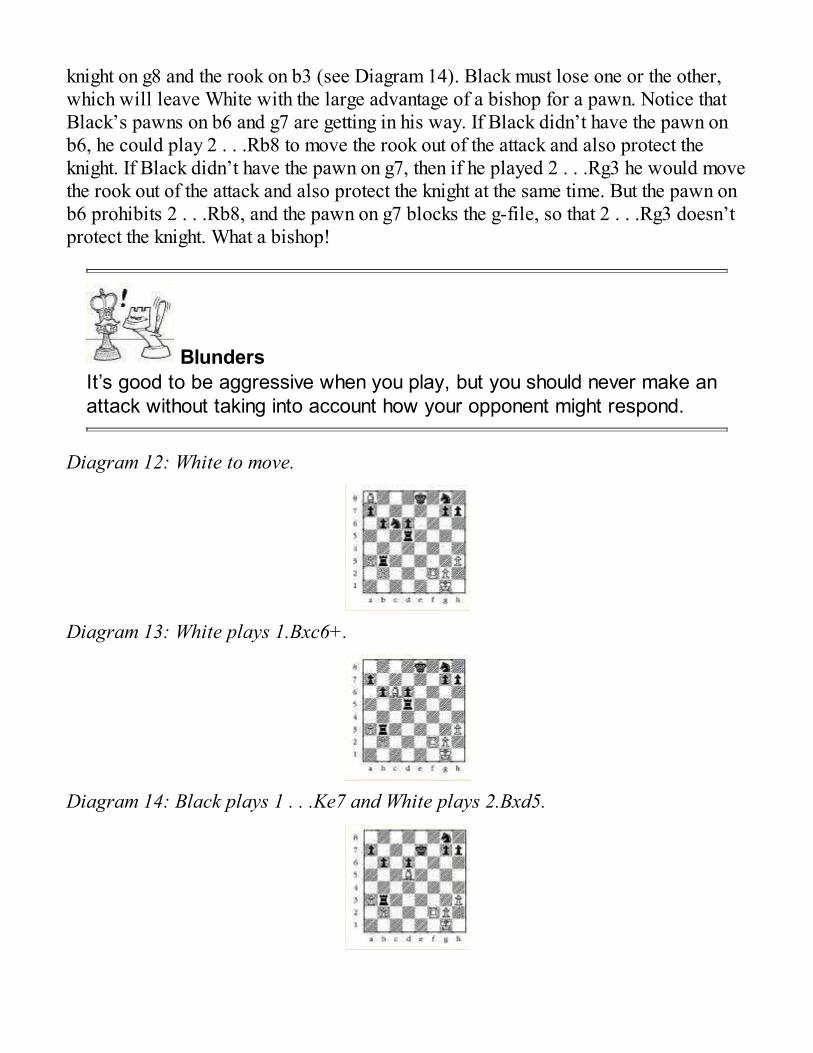
knight on g8 and the rook on b3 (see Diagram 14). Black must lose one or the other,which will leave White with the large advantage of a bishop for a pawn. Notice thatBlack’s pawns on b6 and g7 are getting in his way. If Black didn’t have the pawn onb6, he could play 2 . . .Rb8 to move the rook out of the attack and also protect theknight. If Black didn’t have the pawn on g7, then if he played 2 . . .Rg3 he would movethe rook out of the attack and also protect the knight at the same time. But the pawn onb6 prohibits 2 . . .Rb8, and the pawn on g7 blocks the g-file, so that 2 . . .Rg3 doesn’tprotect the knight. What a bishop!
BlundersIt’s good to be aggressive when you play, but you should never make anattack without taking into account how your opponent might respond.
Diagram 12: White to move.
Diagram 13: White plays 1.Bxc6+.
Diagram 14: Black plays 1 . . .Ke7 and White plays 2.Bxd5.

Rook ForksWhenever you see two pieces along the same file or the same rank, and a rook nearby,watch out! There may be a fork just waiting to happen.
Consider Diagram 15. Material is just about equal. In a game between twograndmasters, a draw would be the most likely result. However, in this case Blackisn’t satisfied with a draw, so to be aggressive, Black plays 1 . . .Ne2?? (see Diagram16) to attack the rook.
Diagram 15: Black to move.
Diagram 16: Black plays 1 . . .Ne2??.
But this is a horrible blunder! Notice how Black has carelessly put the knight into thesame file as the king without considering the consequences. White snatches theopportunity to fork the two pieces by playing 2.Re3+. Black must get out off check,and then White captures the knight (see Diagram 17) in the next move, leaving Blackwith a lost position.
Diagrams 18 and 19 give another example of a rook fork. Here Black even has amaterial advantage, but it will not last. White plays 1.Rd7!, and attacks both the knighton e7 and the bishop on b7. One or the other must go: The fork will give White awinning material advantage.
Diagram 17: White plays 2.Re3+, forking king and knight.
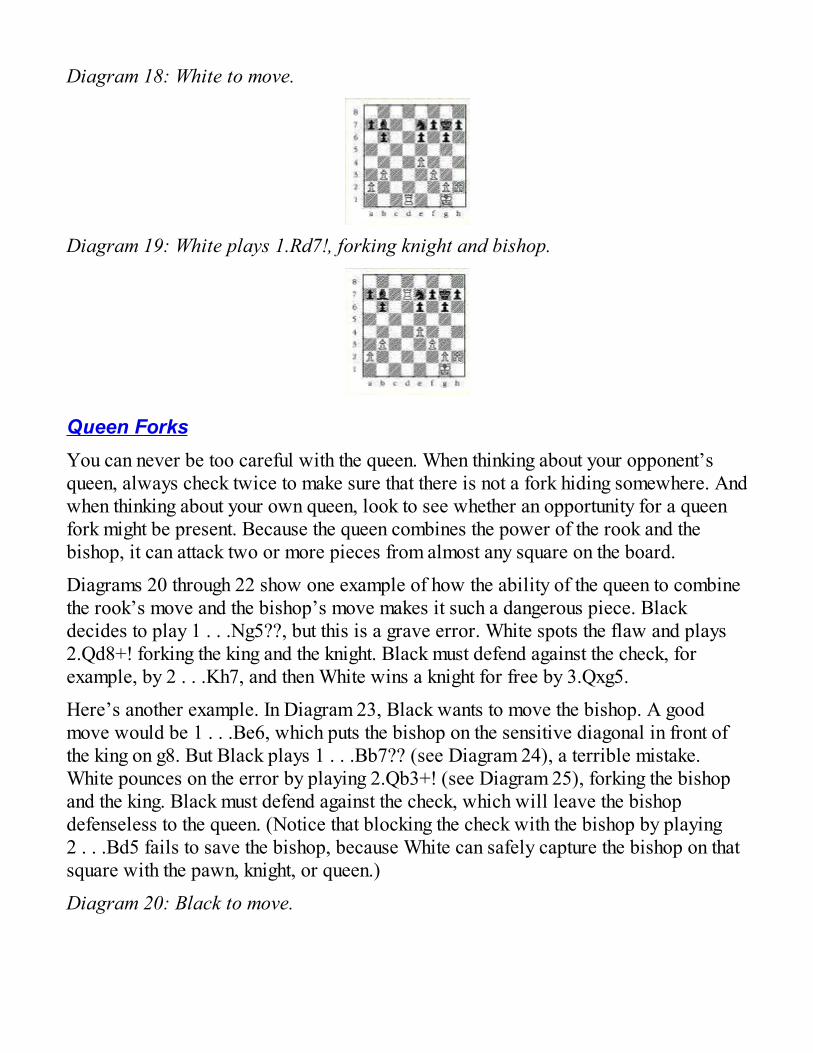
Diagram 18: White to move.
Diagram 19: White plays 1.Rd7!, forking knight and bishop.
Queen ForksYou can never be too careful with the queen. When thinking about your opponent’squeen, always check twice to make sure that there is not a fork hiding somewhere. Andwhen thinking about your own queen, look to see whether an opportunity for a queenfork might be present. Because the queen combines the power of the rook and thebishop, it can attack two or more pieces from almost any square on the board.
Diagrams 20 through 22 show one example of how the ability of the queen to combinethe rook’s move and the bishop’s move makes it such a dangerous piece. Blackdecides to play 1 . . .Ng5??, but this is a grave error. White spots the flaw and plays2.Qd8+! forking the king and the knight. Black must defend against the check, forexample, by 2 . . .Kh7, and then White wins a knight for free by 3.Qxg5.
Here’s another example. In Diagram 23, Black wants to move the bishop. A goodmove would be 1 . . .Be6, which puts the bishop on the sensitive diagonal in front ofthe king on g8. But Black plays 1 . . .Bb7?? (see Diagram 24), a terrible mistake.White pounces on the error by playing 2.Qb3+! (see Diagram 25), forking the bishopand the king. Black must defend against the check, which will leave the bishopdefenseless to the queen. (Notice that blocking the check with the bishop by playing2 . . .Bd5 fails to save the bishop, because White can safely capture the bishop on thatsquare with the pawn, knight, or queen.)
Diagram 20: Black to move.

Diagram 21: Black plays 1 . . .Ng5??.
Diagram 22: White plays 2.Qd8+, forking the king and knight.
King ForksBecause the king is so vulnerable, it’s unusual for the king to be used aggressivelybefore many pieces have been exchanged, so it is not common for the king to forkpieces or pawns. But it can happen, just the same!
Consider Diagram 26. Black notices that his rook is attacked by the knight on g4, so heshould move the rook away from the attack. Where should it go?
Diagram 23: Black to move.
Diagram 24: Black plays 1 . . .Bb7??
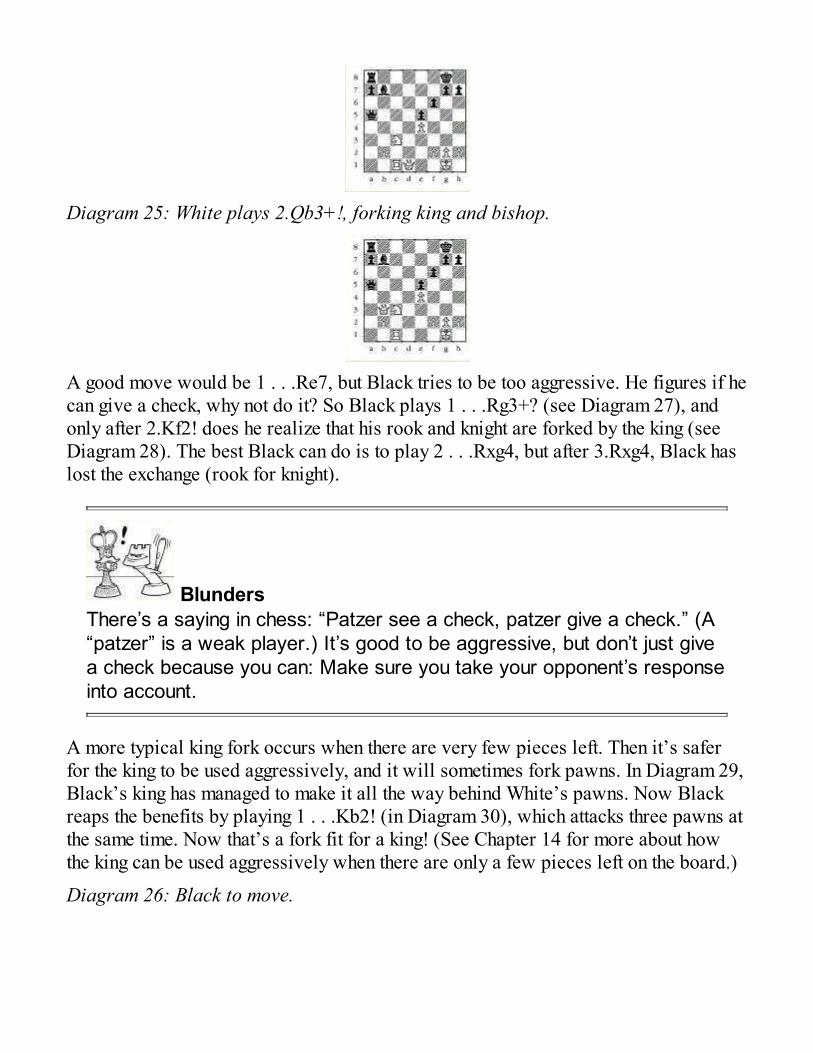
Diagram 25: White plays 2.Qb3+!, forking king and bishop.
A good move would be 1 . . .Re7, but Black tries to be too aggressive. He figures if hecan give a check, why not do it? So Black plays 1 . . .Rg3+? (see Diagram 27), andonly after 2.Kf2! does he realize that his rook and knight are forked by the king (seeDiagram 28). The best Black can do is to play 2 . . .Rxg4, but after 3.Rxg4, Black haslost the exchange (rook for knight).
BlundersThere’s a saying in chess: “Patzer see a check, patzer give a check.” (A“patzer” is a weak player.) It’s good to be aggressive, but don’t just givea check because you can: Make sure you take your opponent’s responseinto account.
A more typical king fork occurs when there are very few pieces left. Then it’s saferfor the king to be used aggressively, and it will sometimes fork pawns. In Diagram 29,Black’s king has managed to make it all the way behind White’s pawns. Now Blackreaps the benefits by playing 1 . . .Kb2! (in Diagram 30), which attacks three pawns atthe same time. Now that’s a fork fit for a king! (See Chapter 14 for more about howthe king can be used aggressively when there are only a few pieces left on the board.)
Diagram 26: Black to move.

Diagram 27: Black plays 1 . . .Rg3+?.
Diagram 28: White plays 2.Kf2!, not only removing the king from check, but alsoforking Black’s rook and knight.
Patrick’s PointersThe king does not like to be exposed along a rank, file, or diagonal!Among the many dangers of being so exposed is that there might be afork lurking. And a fork that involves the king is doubly dangerous: Sincethe king must be protected at all costs, the other piece that is forked isoften helpless. So if you notice that your opponent’s king is exposedalong an open rank, file, or diagonal, look for a way to take advantage ofit. And if your own king is so exposed, try to get it out of harm’s way.
Diagram 29: Black to move.

Diagram 30: Black plays 1 . . .Kb2!, forking all three of White’s pawns.
The PinWhen you attack a piece, and that piece cannot move without exposing another piecebehind it to capture, you are pinning the first piece to the piece behind it. Only thelong-range pieces—the bishop, the rook, and the queen—can pin one piece to another.The ability to pin one piece to another is part of what makes those long-range piecesso dangerous!
I’ll show you some common ways for bishops, rooks, and queens to pin pieces. Butkeep this in mind: There’s a difference between pinning a piece to any ordinary piece,and pinning a piece to the king. When a piece is pinned to the king, the pinned piececan never move (because that would be moving into check). Therefore, pinning apiece to the king is especially effective for the player doing the pinning—anddangerous for the player being pinned! In contrast, if a piece is pinned to an ordinarypiece, you should always remember that it’s legal, though often undesirable, to movethe piece.
Chess TalkWhen one piece is attacked, and it can’t move without exposing a piecebehind it to attack, the first piece is pinned to the piece behind it.
What should you do if your opponent is pinning one of your pieces and you want to
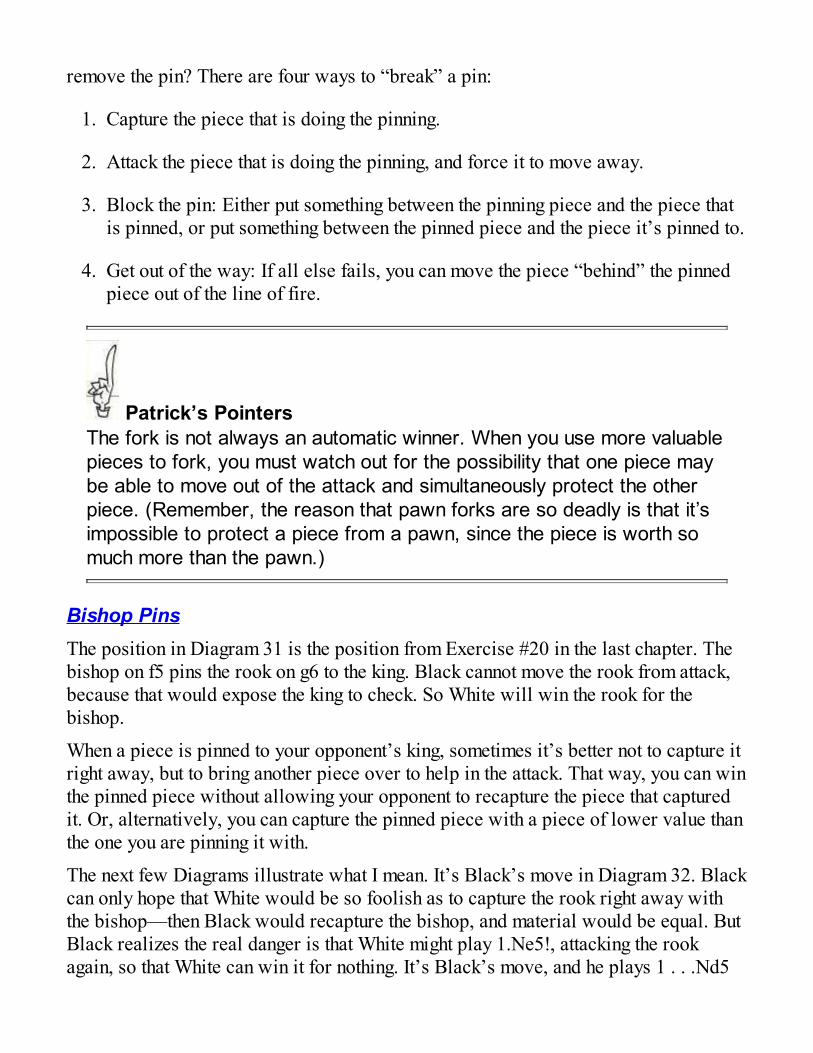
remove the pin? There are four ways to “break” a pin:
1. Capture the piece that is doing the pinning.
2. Attack the piece that is doing the pinning, and force it to move away.
3. Block the pin: Either put something between the pinning piece and the piece thatis pinned, or put something between the pinned piece and the piece it’s pinned to.
4. Get out of the way: If all else fails, you can move the piece “behind” the pinnedpiece out of the line of fire.
Patrick’s PointersThe fork is not always an automatic winner. When you use more valuablepieces to fork, you must watch out for the possibility that one piece maybe able to move out of the attack and simultaneously protect the otherpiece. (Remember, the reason that pawn forks are so deadly is that it’simpossible to protect a piece from a pawn, since the piece is worth somuch more than the pawn.)
Bishop PinsThe position in Diagram 31 is the position from Exercise #20 in the last chapter. Thebishop on f5 pins the rook on g6 to the king. Black cannot move the rook from attack,because that would expose the king to check. So White will win the rook for thebishop.
When a piece is pinned to your opponent’s king, sometimes it’s better not to capture itright away, but to bring another piece over to help in the attack. That way, you can winthe pinned piece without allowing your opponent to recapture the piece that capturedit. Or, alternatively, you can capture the pinned piece with a piece of lower value thanthe one you are pinning it with.
The next few Diagrams illustrate what I mean. It’s Black’s move in Diagram 32. Blackcan only hope that White would be so foolish as to capture the rook right away withthe bishop—then Black would recapture the bishop, and material would be equal. ButBlack realizes the real danger is that White might play 1.Ne5!, attacking the rookagain, so that White can win it for nothing. It’s Black’s move, and he plays 1 . . .Nd5
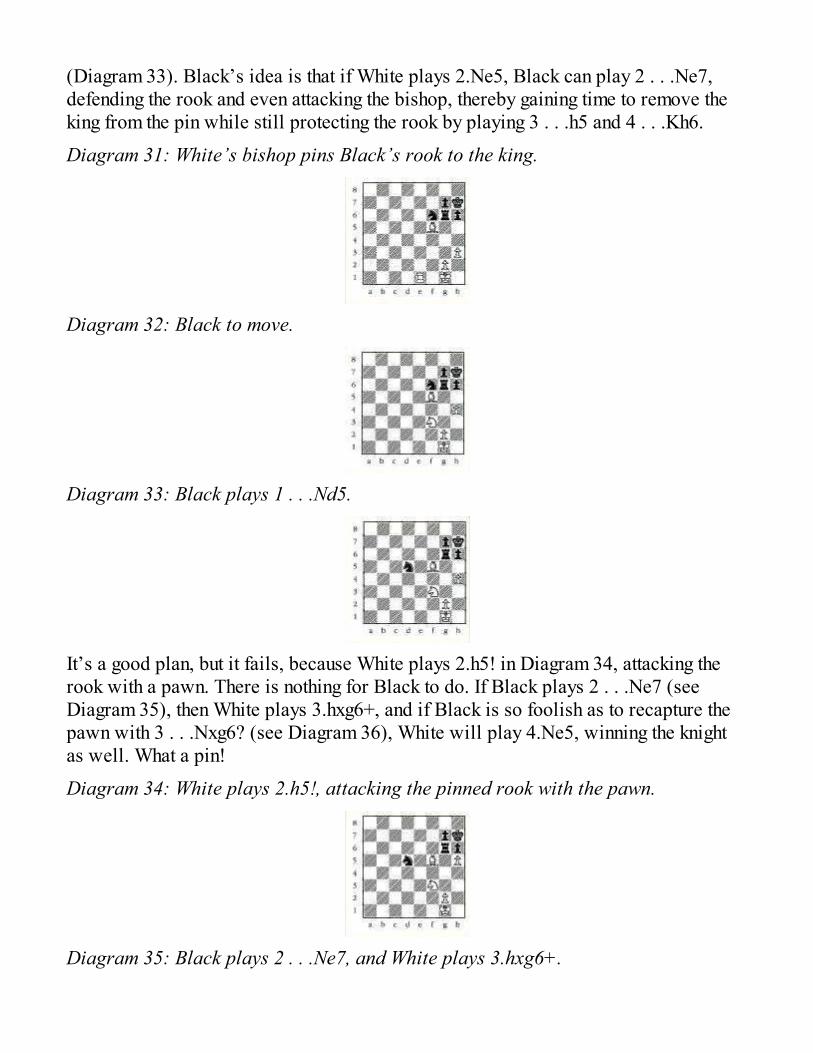
(Diagram 33). Black’s idea is that if White plays 2.Ne5, Black can play 2 . . .Ne7,defending the rook and even attacking the bishop, thereby gaining time to remove theking from the pin while still protecting the rook by playing 3 . . .h5 and 4 . . .Kh6.
Diagram 31: White’s bishop pins Black’s rook to the king.
Diagram 32: Black to move.
Diagram 33: Black plays 1 . . .Nd5.
It’s a good plan, but it fails, because White plays 2.h5! in Diagram 34, attacking therook with a pawn. There is nothing for Black to do. If Black plays 2 . . .Ne7 (seeDiagram 35), then White plays 3.hxg6+, and if Black is so foolish as to recapture thepawn with 3 . . .Nxg6? (see Diagram 36), White will play 4.Ne5, winning the knightas well. What a pin!
Diagram 34: White plays 2.h5!, attacking the pinned rook with the pawn.
Diagram 35: Black plays 2 . . .Ne7, and White plays 3.hxg6+.
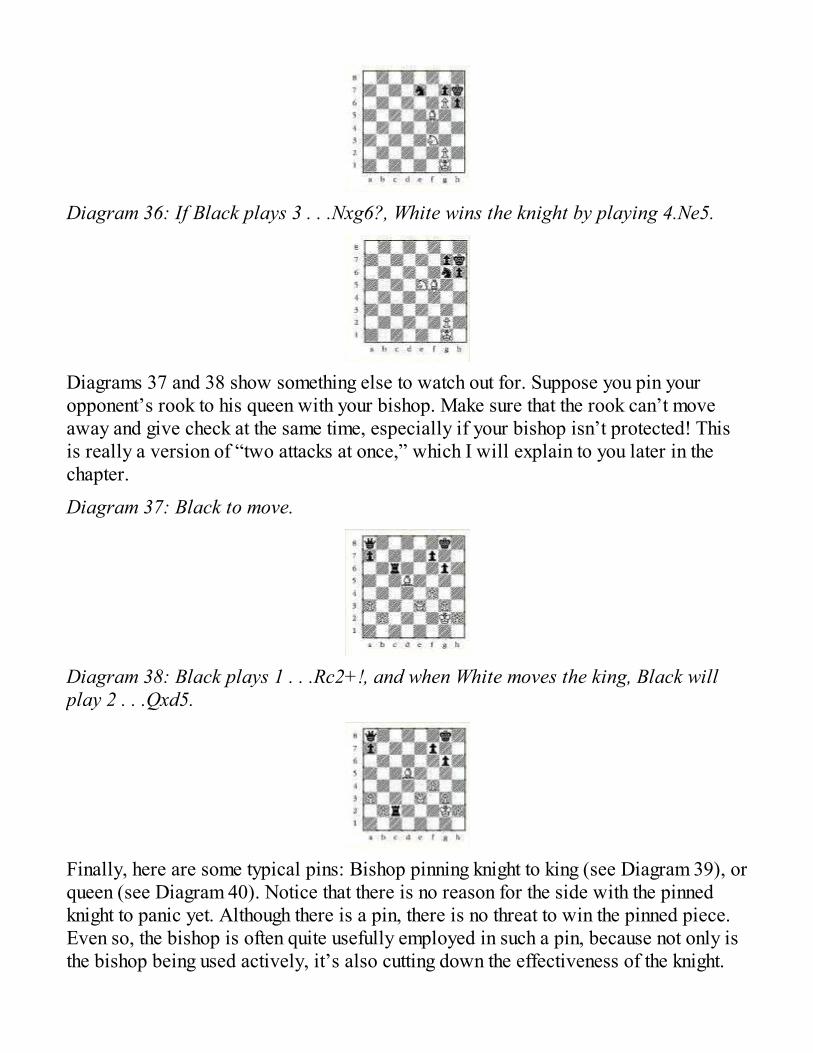
Diagram 36: If Black plays 3 . . .Nxg6?, White wins the knight by playing 4.Ne5.
Diagrams 37 and 38 show something else to watch out for. Suppose you pin youropponent’s rook to his queen with your bishop. Make sure that the rook can’t moveaway and give check at the same time, especially if your bishop isn’t protected! Thisis really a version of “two attacks at once,” which I will explain to you later in thechapter.
Diagram 37: Black to move.
Diagram 38: Black plays 1 . . .Rc2+!, and when White moves the king, Black willplay 2 . . .Qxd5.
Finally, here are some typical pins: Bishop pinning knight to king (see Diagram 39), orqueen (see Diagram 40). Notice that there is no reason for the side with the pinnedknight to panic yet. Although there is a pin, there is no threat to win the pinned piece.Even so, the bishop is often quite usefully employed in such a pin, because not only isthe bishop being used actively, it’s also cutting down the effectiveness of the knight.

Diagram 39: Bishop pinning knight to king.
Diagram 40: Bishop pinning knight to queen.
Rook PinsDiagrams 41–43 show some examples of rook pins. Notice in Diagram 43 that if therook is going to pin the queen, it had better be protected! (The same holds true for abishop pinning the queen, of course.)
One of the most common uses of the rook pin is to pin a piece to the uncastled kingalong the open e-file, if one side has castled early and the other side has not. (By theway, this is one very good reason to castle early!) Diagrams 44 and 45 show you whatI mean. In Diagram 44, White has castled, and Black has not. Black’s knight and kingare precariously placed on the same file! In Diagram 45, Black pays the price. Whiteattacks the knight, which cannot move because it is pinned. Even if Black defends theknight, it can’t be saved, because next move White will attack the knight with a pawn,and the knight will have to stand his post while he is slaughtered by the pawn. Don’tlet this happen to you!
Diagram 41: White’s rook pins Black’s bishop to the king.
Diagram 42: Black’s rook pins White’s knight to the king.
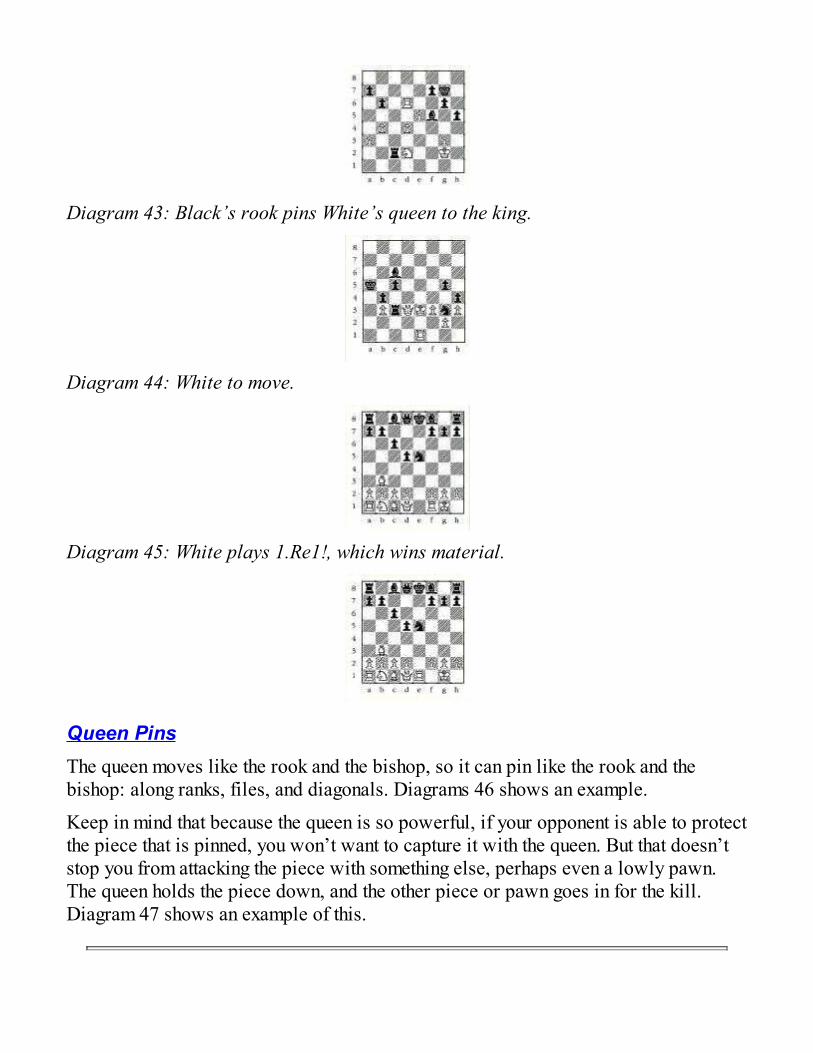
Diagram 43: Black’s rook pins White’s queen to the king.
Diagram 44: White to move.
Diagram 45: White plays 1.Re1!, which wins material.
Queen PinsThe queen moves like the rook and the bishop, so it can pin like the rook and thebishop: along ranks, files, and diagonals. Diagrams 46 shows an example.
Keep in mind that because the queen is so powerful, if your opponent is able to protectthe piece that is pinned, you won’t want to capture it with the queen. But that doesn’tstop you from attacking the piece with something else, perhaps even a lowly pawn.The queen holds the piece down, and the other piece or pawn goes in for the kill.Diagram 47 shows an example of this.
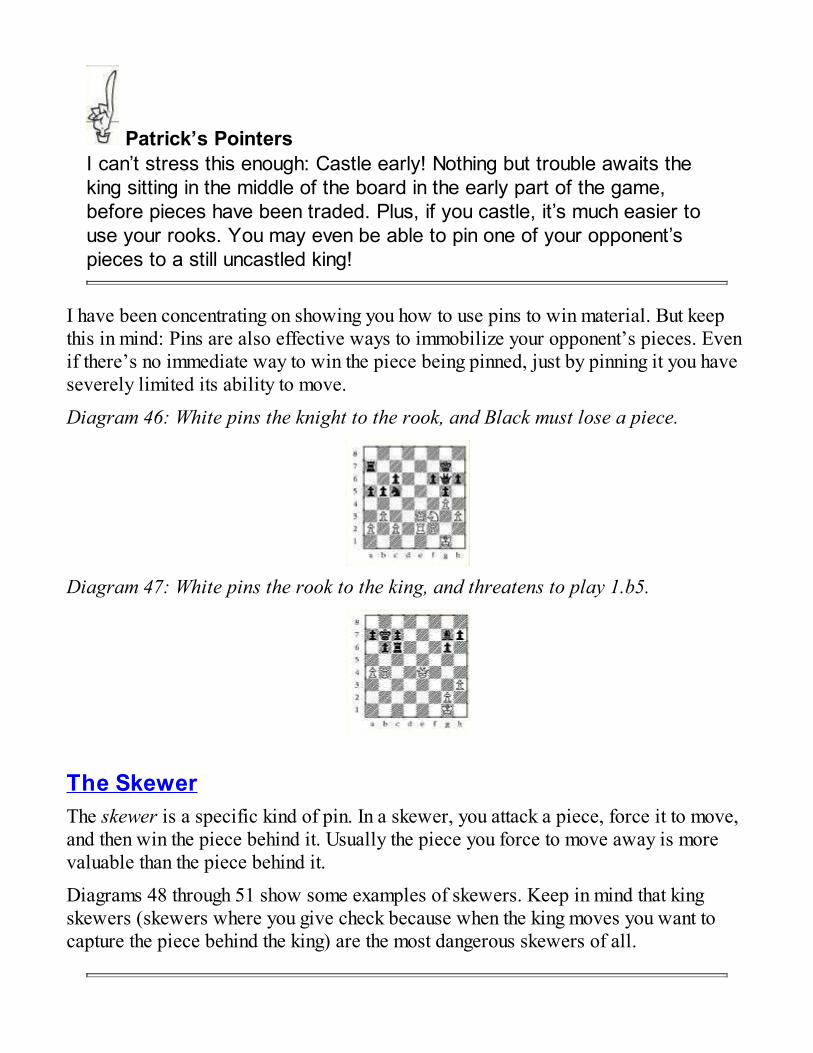
Patrick’s PointersI can’t stress this enough: Castle early! Nothing but trouble awaits theking sitting in the middle of the board in the early part of the game,before pieces have been traded. Plus, if you castle, it’s much easier touse your rooks. You may even be able to pin one of your opponent’spieces to a still uncastled king!
I have been concentrating on showing you how to use pins to win material. But keepthis in mind: Pins are also effective ways to immobilize your opponent’s pieces. Evenif there’s no immediate way to win the piece being pinned, just by pinning it you haveseverely limited its ability to move.
Diagram 46: White pins the knight to the rook, and Black must lose a piece.
Diagram 47: White pins the rook to the king, and threatens to play 1.b5.
The SkewerThe skewer is a specific kind of pin. In a skewer, you attack a piece, force it to move,and then win the piece behind it. Usually the piece you force to move away is morevaluable than the piece behind it.
Diagrams 48 through 51 show some examples of skewers. Keep in mind that kingskewers (skewers where you give check because when the king moves you want tocapture the piece behind the king) are the most dangerous skewers of all.
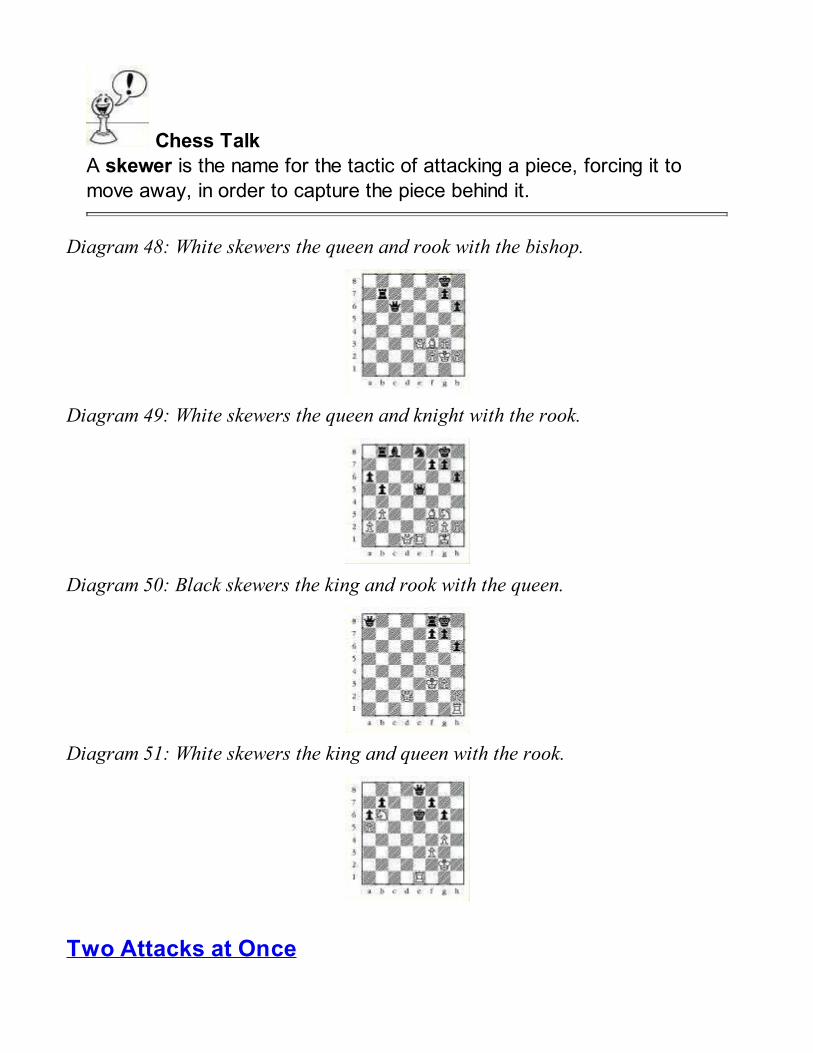
Chess TalkA skewer is the name for the tactic of attacking a piece, forcing it tomove away, in order to capture the piece behind it.
Diagram 48: White skewers the queen and rook with the bishop.
Diagram 49: White skewers the queen and knight with the rook.
Diagram 50: Black skewers the king and rook with the queen.
Diagram 51: White skewers the king and queen with the rook.
Two Attacks at Once
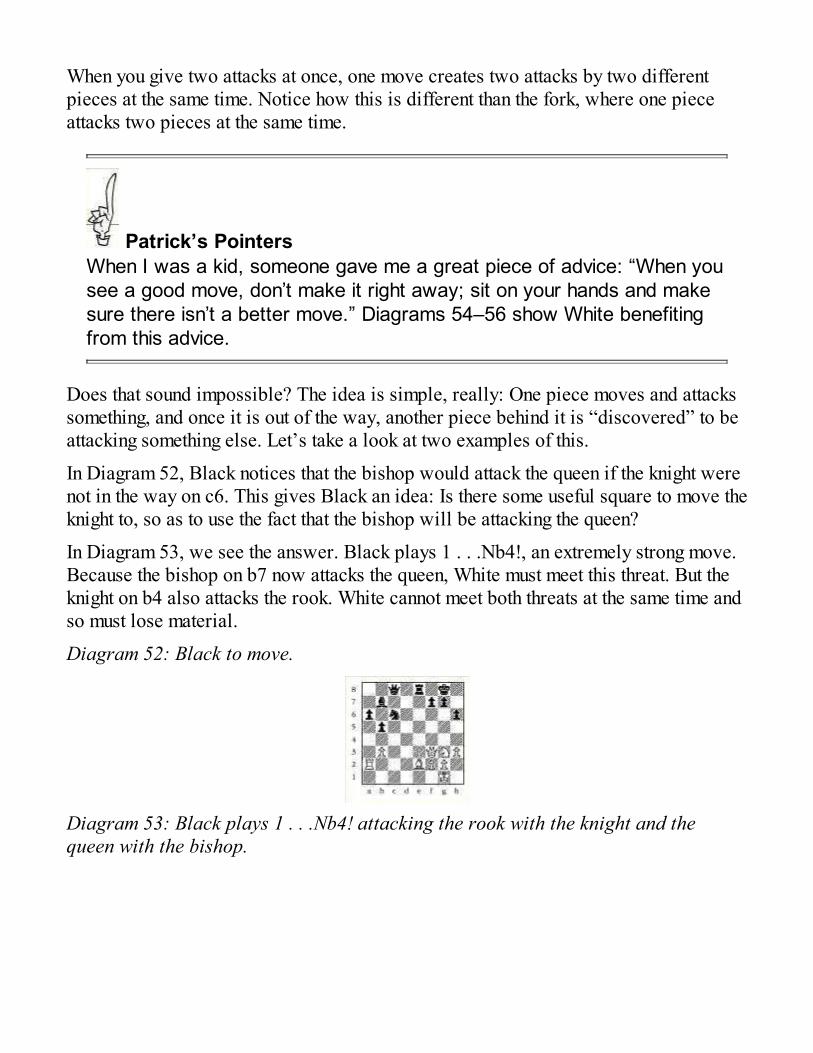
When you give two attacks at once, one move creates two attacks by two differentpieces at the same time. Notice how this is different than the fork, where one pieceattacks two pieces at the same time.
Patrick’s PointersWhen I was a kid, someone gave me a great piece of advice: “When yousee a good move, don’t make it right away; sit on your hands and makesure there isn’t a better move.” Diagrams 54–56 show White benefitingfrom this advice.
Does that sound impossible? The idea is simple, really: One piece moves and attackssomething, and once it is out of the way, another piece behind it is “discovered” to beattacking something else. Let’s take a look at two examples of this.
In Diagram 52, Black notices that the bishop would attack the queen if the knight werenot in the way on c6. This gives Black an idea: Is there some useful square to move theknight to, so as to use the fact that the bishop will be attacking the queen?
In Diagram 53, we see the answer. Black plays 1 . . .Nb4!, an extremely strong move.Because the bishop on b7 now attacks the queen, White must meet this threat. But theknight on b4 also attacks the rook. White cannot meet both threats at the same time andso must lose material.
Diagram 52: Black to move.
Diagram 53: Black plays 1 . . .Nb4! attacking the rook with the knight and thequeen with the bishop.

Our second example shows that the discovered attack is such a strong tactic that theremay be more than one good move. In that case, always look for the strongest possiblediscovered attack.
One possible discovered attack is to capture the pawn on a6 (see Diagram 54). Thebishop can’t be captured (see Diagram 55), because of the threat to the queen. But thisonly wins a pawn; isn’t there a stronger move? Yes there is! White can play 1.Bg4!(see Diagram 56) which attacks the rook on c8. Black must move the queen, and Whitewill win the rook for the bishop.
Diagram 54: White to move.
Diagram 55: White plays 1.Bxa6. This wins a pawn, but White had a stronger move.
Diagram 56: White plays 1.Bg4! This wins the rook for the bishop.
Discovered CheckThe most potent way to give two attacks at once is the discovered check. When you

give discovered check, you move one piece, and thereby uncover a check by anotherpiece to the king. (The king suddenly “discovers” that it is in check!) I cannotemphasize strongly enough how powerful this tactic is. Every grandmaster has deeprespect for the discovered check—so much respect that if he can give discoveredcheck he assumes that there must be something very powerful he can do, and if he seesthat his opponent can give discovered check, he assumes there’s going to be trouble!
Diagrams 57 through 60 show how powerful discovered check can be. Diagrams 58and 60 show a discovered check that wins the queen, because there is no way toremove the king from check and also prevent the queen from being captured. (Inparticular, notice in Diagram 60 that 1 . . .Qc7 can be answered by 2.Nxc7.)
Chess TalkA discovered check is a special case of “two attacks at once,” wherethe attack that is “discovered” is a check to the king.
Diagram 57: Black to move.
Diagram 58: Black plays 1 . . .Bf3+!, which wins the queen.
Diagram 59: White to move.

Diagram 60: White plays 1.Ne6+!.
Chess TalkA double check is when two pieces check the king at the same time.Double check is only possible as a form of discovered check.
Double CheckDouble check is an interesting twist on discovered check. The double check is adiscovered check, where the piece moving away decides to attack—the king! The kingfinds itself being checked by two pieces at once, and so there is no other way to meetthe check than to move.
Basically, the double check is not a tactic to win material, but a tactic to attack theking. Still, since it’s a variant of the discovered check, I might as well introduce youto it in this chapter—and that gives me a chance to show you a beautiful execution ofan attack against the king!
Diagrams 61 through 66 show an example of double check leading to checkmate. Atthe moment, in Diagram 61, Black has an extra knight. Probably he expected White tojust win back the piece by using the pin on the e-file and playing 1.Re1. Instead, Whiteplays a move that begins a forced sequence leading to checkmate!
In Diagram 62, White plays 1.Qd8+!!, catching Black off guard. What is White up to?Well, it doesn’t matter—there is only one legal move anyway—so Black captures thequeen with 1 . . .Kxd8 (see Diagram 63).

Diagram 61: White to move.
Diagram 62: White plays 1.Qd8+!!.
Diagram 63: Black plays 1 . . .Kxd8.
But now White’s clever plan is revealed: He plays 2.Bg5+!! (see Diagram 64), puttingBlack in double check. Because Black is in check from two pieces at once, he mustmove the king. The king has only two moves, to c7 or to e8. But no matter which waythe king goes, White will give checkmate.
I urge you to figure out for yourself how White would give checkmate if Black movedthe king to c7. (Here’s a hint: White gives checkmate with his bishop.) Black decidesto play 2 . . .Ke8 (see Diagram 65). Now White has only one check, but it’s the checkthat ends the game: 3.Rd8# (see Diagram 66). What a finish!
Diagram 64: White plays 2.Bg5+!!.
Diagram 65: Black plays 2 . . .Ke8.

Diagram 66: White plays 3.Rd8#.
Exercise #1:White to move. How can White win a pawn by threatening a pawn forkbetween Black’s knight and bishop?
Exercise #2:White to move. Should Black be worried about 1.Nxh6+, or shouldWhite be worried because the knight is being attacked?
Exercise #3:White to move. What is White’s best move?
Exercise #4:White to move. Can White win Black’s queen? What is White’s bestmove?
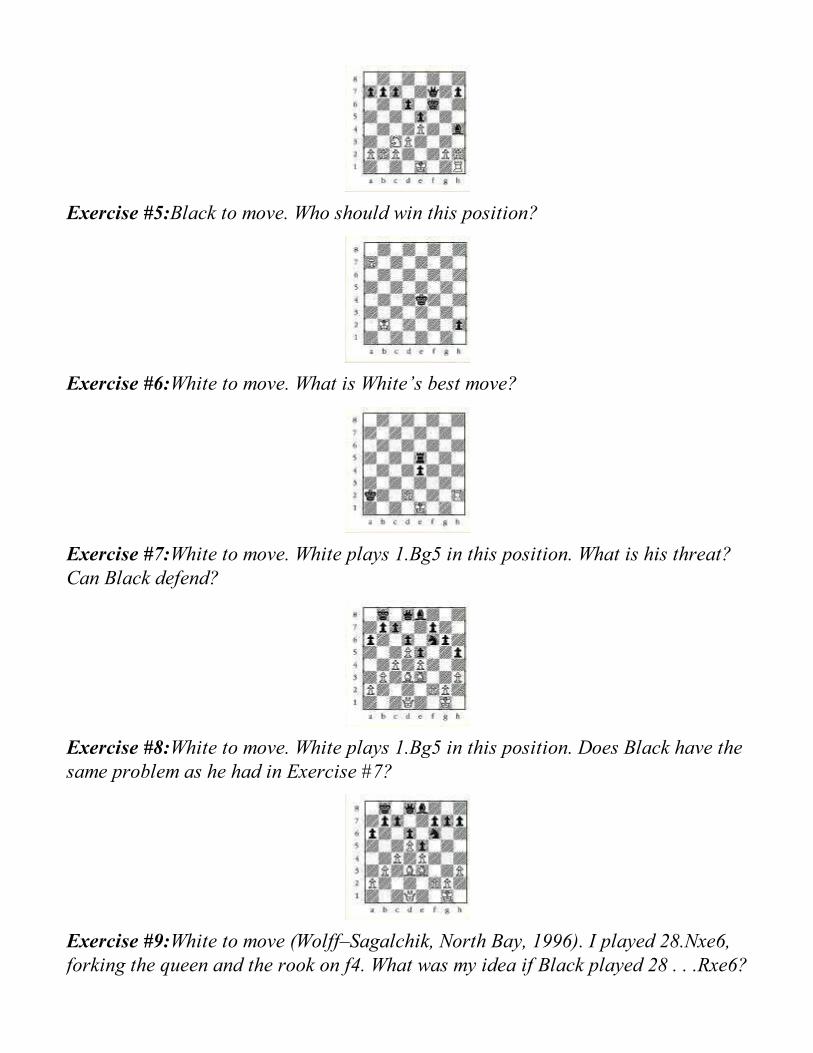
Exercise #5:Black to move. Who should win this position?
Exercise #6:White to move. What is White’s best move?
Exercise #7:White to move. White plays 1.Bg5 in this position. What is his threat?Can Black defend?
Exercise #8:White to move. White plays 1.Bg5 in this position. Does Black have thesame problem as he had in Exercise #7?
Exercise #9:White to move (Wolff–Sagalchik, North Bay, 1996). I played 28.Nxe6,forking the queen and the rook on f4. What was my idea if Black played 28 . . .Rxe6?

Exercise #10:White to move. What is White’s best move?
Exercise #11:Black to move. What is Black’s best move? (Hint: The solutioninvolves combining two different tactics.)
Exercise #12:White to move. This is a tough one! White thinks about playing1.bxc8=Q+ Kxc8, giving both sides equal material and the position should be adraw. But White also sees the possibility to do better. How?
Exercise #13:White’s last move was 1.Qe2. What is his threat? Should Black play1 . . .Ngf6 or not?

Exercise #14:Black played an amazing move in this position, 1 . . .Qg1+. What onearth was his idea after White captures the queen with his king?
Exercise #15:White to move (Volchok–Kreslavsky, USSR, 1970). It looks like Blackwill win back the bishop because of the pin against the rook. But White found aterrific way to turn the tables and win.
Exercise #16:White to move (Szabo–Bronstein, Zurich, 1953). Material is roughlyeven in this complicated position, but White found a way to cut through thecomplications and get a winning material advantage. How? (Hint: 1.Qh8+ is notthe right first move, but it is the right idea.)
Exercise #17:White to move. White wins if he finds the right way to give discoveredcheck with the rook.
Exercise #18:White to move (Sznapik–Bernard, Poznan, 1971). White could captureBlack’s f-pawns, but then Black defends with 1 . . .Ra7. Instead, White found abeautiful way to win. How?
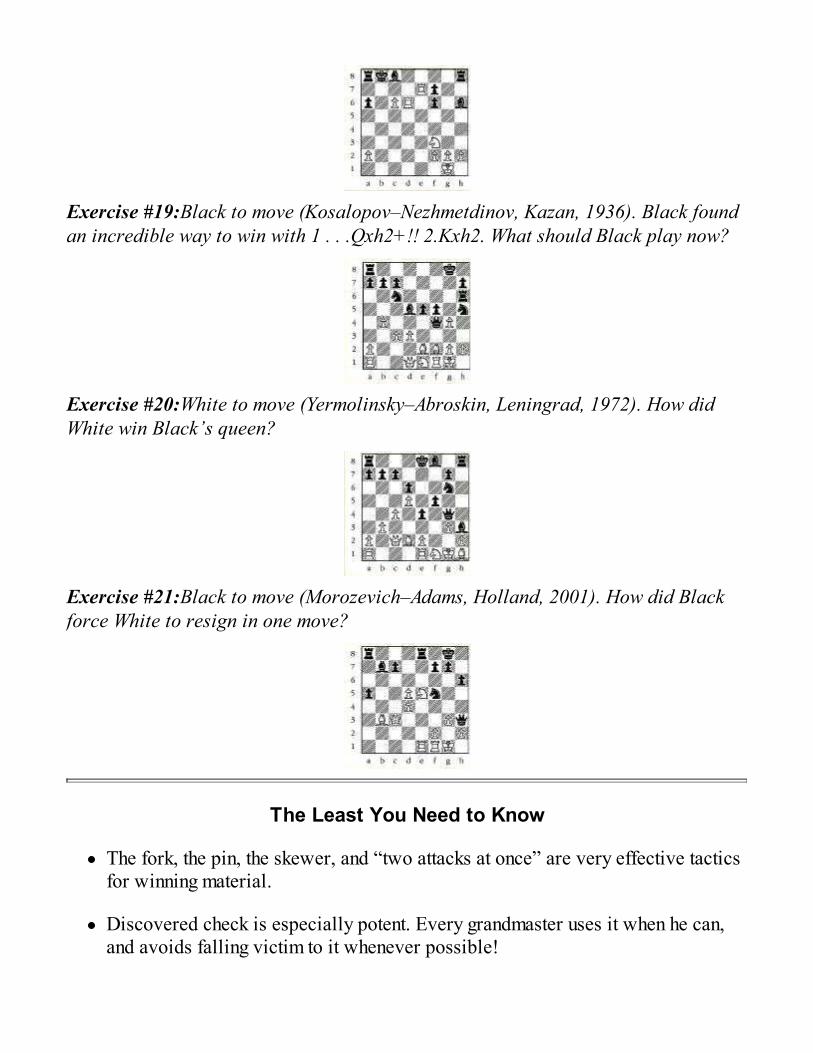
Exercise #19:Black to move (Kosalopov–Nezhmetdinov, Kazan, 1936). Black foundan incredible way to win with 1 . . .Qxh2+!! 2.Kxh2. What should Black play now?
Exercise #20:White to move (Yermolinsky–Abroskin, Leningrad, 1972). How didWhite win Black’s queen?
Exercise #21:Black to move (Morozevich–Adams, Holland, 2001). How did Blackforce White to resign in one move?
The Least You Need to Know
The fork, the pin, the skewer, and “two attacks at once” are very effective tacticsfor winning material.
Discovered check is especially potent. Every grandmaster uses it when he can,and avoids falling victim to it whenever possible!

Double check is a version of discovered check. It is a very useful tactic forgiving checkmate.
Practice recognizing these tactics with the exercises, and then use them to winmaterial in your games.

Chapter 7
Dirtier Tricks
In This Chapter
Distracting your opponent’s pieces
Sometimes your own pieces get in the way
How some chess pieces can have x-ray vision
The importance of the “in between” move
In Chapter 6, you learned the most basic tactics you can use to win material. Now Iwill show you some tactics that are more sophisticated. You will probably see thetactics in Chapter 6 more often than the ones in this chapter, but the ones here arepretty common, too. You’ll have plenty of chances to use them against your opponents!
Getting an Enemy Piece Out of the WayMany times, if you could only force your opponent to move one of his pieces toanother square, you could take advantage of some weakness in his position. Forcingyour opponent to move a piece to a different square is called “deflecting” that piece.Deflection comes in many different forms, but they fall roughly into two differentcategories.
Attacking the DefenderIn Diagram 1, does White have any way to win material? Well, the only piece that isattacking any of Black’s pieces is the knight on e5, which attacks Black’s bishop on d7and his pawn on f7. But if White captures either one, Black can recapture the knight.Taking the pawn on f7 by playing 1.Nxf7?? would be a very bad idea, because after
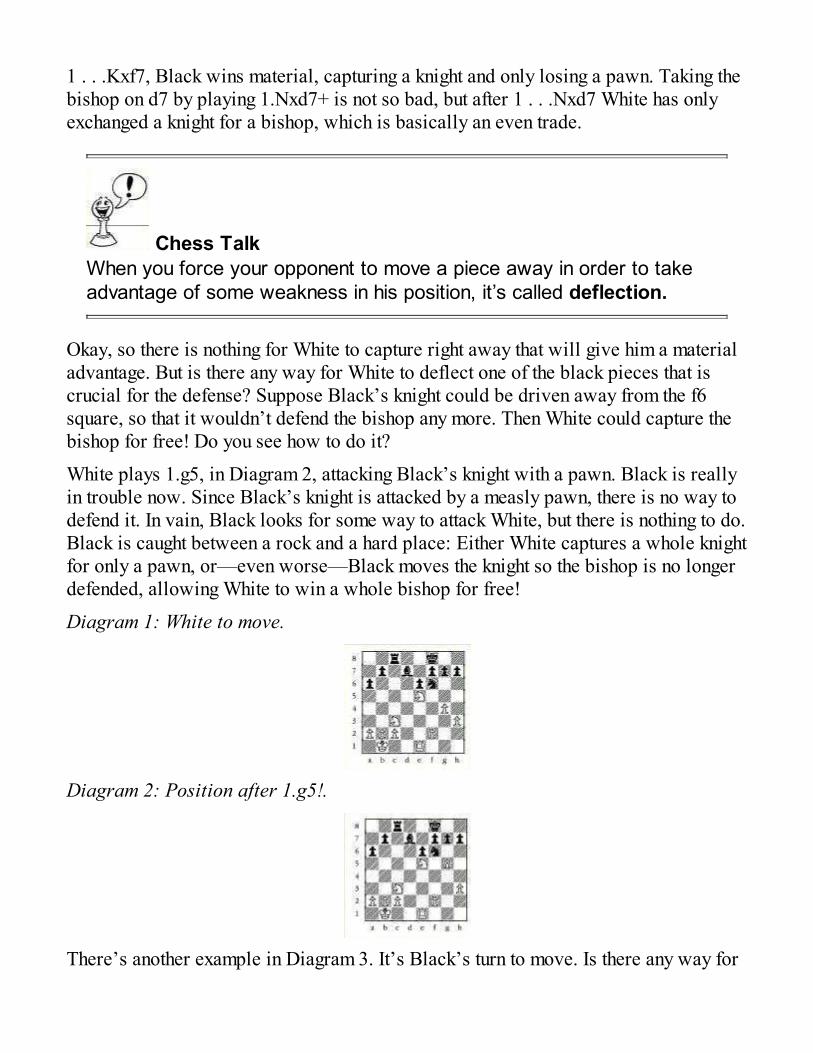
1 . . .Kxf7, Black wins material, capturing a knight and only losing a pawn. Taking thebishop on d7 by playing 1.Nxd7+ is not so bad, but after 1 . . .Nxd7 White has onlyexchanged a knight for a bishop, which is basically an even trade.
Chess TalkWhen you force your opponent to move a piece away in order to takeadvantage of some weakness in his position, it’s called deflection.
Okay, so there is nothing for White to capture right away that will give him a materialadvantage. But is there any way for White to deflect one of the black pieces that iscrucial for the defense? Suppose Black’s knight could be driven away from the f6square, so that it wouldn’t defend the bishop any more. Then White could capture thebishop for free! Do you see how to do it?
White plays 1.g5, in Diagram 2, attacking Black’s knight with a pawn. Black is reallyin trouble now. Since Black’s knight is attacked by a measly pawn, there is no way todefend it. In vain, Black looks for some way to attack White, but there is nothing to do.Black is caught between a rock and a hard place: Either White captures a whole knightfor only a pawn, or—even worse—Black moves the knight so the bishop is no longerdefended, allowing White to win a whole bishop for free!
Diagram 1: White to move.
Diagram 2: Position after 1.g5!.
There’s another example in Diagram 3. It’s Black’s turn to move. Is there any way for
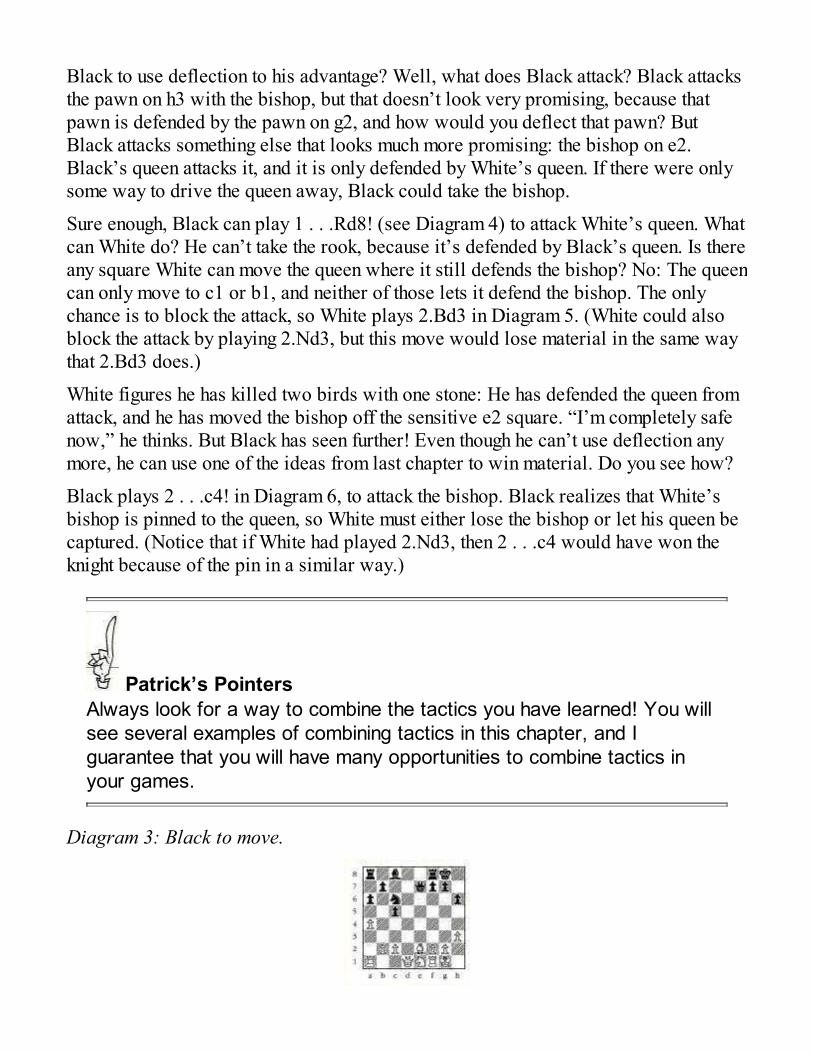
Black to use deflection to his advantage? Well, what does Black attack? Black attacksthe pawn on h3 with the bishop, but that doesn’t look very promising, because thatpawn is defended by the pawn on g2, and how would you deflect that pawn? ButBlack attacks something else that looks much more promising: the bishop on e2.Black’s queen attacks it, and it is only defended by White’s queen. If there were onlysome way to drive the queen away, Black could take the bishop.
Sure enough, Black can play 1 . . .Rd8! (see Diagram 4) to attack White’s queen. Whatcan White do? He can’t take the rook, because it’s defended by Black’s queen. Is thereany square White can move the queen where it still defends the bishop? No: The queencan only move to c1 or b1, and neither of those lets it defend the bishop. The onlychance is to block the attack, so White plays 2.Bd3 in Diagram 5. (White could alsoblock the attack by playing 2.Nd3, but this move would lose material in the same waythat 2.Bd3 does.)
White figures he has killed two birds with one stone: He has defended the queen fromattack, and he has moved the bishop off the sensitive e2 square. “I’m completely safenow,” he thinks. But Black has seen further! Even though he can’t use deflection anymore, he can use one of the ideas from last chapter to win material. Do you see how?
Black plays 2 . . .c4! in Diagram 6, to attack the bishop. Black realizes that White’sbishop is pinned to the queen, so White must either lose the bishop or let his queen becaptured. (Notice that if White had played 2.Nd3, then 2 . . .c4 would have won theknight because of the pin in a similar way.)
Patrick’s PointersAlways look for a way to combine the tactics you have learned! You willsee several examples of combining tactics in this chapter, and Iguarantee that you will have many opportunities to combine tactics inyour games.
Diagram 3: Black to move.
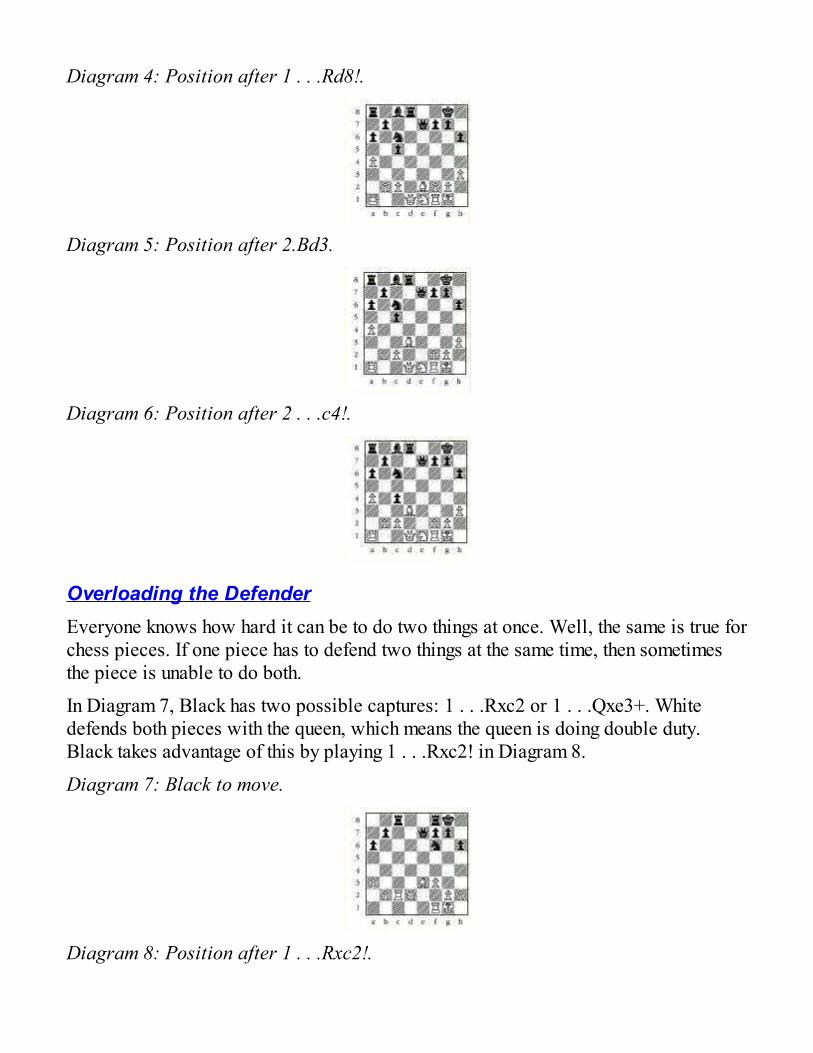
Diagram 4: Position after 1 . . .Rd8!.
Diagram 5: Position after 2.Bd3.
Diagram 6: Position after 2 . . .c4!.
Overloading the DefenderEveryone knows how hard it can be to do two things at once. Well, the same is true forchess pieces. If one piece has to defend two things at the same time, then sometimesthe piece is unable to do both.
In Diagram 7, Black has two possible captures: 1 . . .Rxc2 or 1 . . .Qxe3+. Whitedefends both pieces with the queen, which means the queen is doing double duty.Black takes advantage of this by playing 1 . . .Rxc2! in Diagram 8.
Diagram 7: Black to move.
Diagram 8: Position after 1 . . .Rxc2!.

Diagram 9: Position after 2.Qxc2 Qxe3+.
When White recaptures with 2.Qxc2, the queen leaves the defense of the bishop, andBlack wins a whole piece for nothing with 2 . . .Qxe3+ (see Diagram 9).
Sometimes when a defender is overloaded, it’s worth taking a piece of lesser valueinstead of one of greater value, even though the piece will be recaptured. This canwork to your advantage because the defender is deflected from the defense of anotherpiece that you can capture, and the two pieces together are worth more than the onepiece you lost. Here is an example.
In Diagram 10, White has counted the material, and assumes things stand about equal:A knight and a bishop add up to 6 points (maybe even a little more), and are at least asgood as a rook and a pawn. White sees that Black’s rooks are attacking the knight andbishop, but it seems that everything is defended well enough by the rook—the knight iseven defending the bishop to boot! What could go wrong?
Black plays 1 . . .Rxe3! in Diagram 11, and suddenly the roof caves in. White has nochoice but to recapture the rook with 2.Rxe3, whereupon Black plays 2 . . .Rxc4 (seeDiagram 12). Black has won two pieces for a rook, and now has an extra pawn and allthe chances to win.
Keep in mind that a defensive piece can be overloaded in ways other than just havingto defend another piece from capture. For example, sometimes it might have to defendagainst check or checkmate.
Diagram 10: Black to move.

Diagram 11: Position after 1 . . .Rxe3!.
Diagram 12: Position after 2.Rxe3 Rxc4.
In Diagram 13, White attacks only one piece, the knight on e7, and it is defended bythe bishop on f8. But White is alerted to the possibility of decoying the bishop awayfrom defending the knight because he notices that Black’s king is exposed to checkalong the diagonal, and the only defense to the check is to block it with that samebishop on f8. White plays 1.Bf6+! (see Diagram 14), and after 1 . . .Bg7 he plays2.Bxe7 (see Diagram 15), winning the knight for nothing.
Diagram 13: White to move.
Diagram 14: Position after 1.Bf6+!.
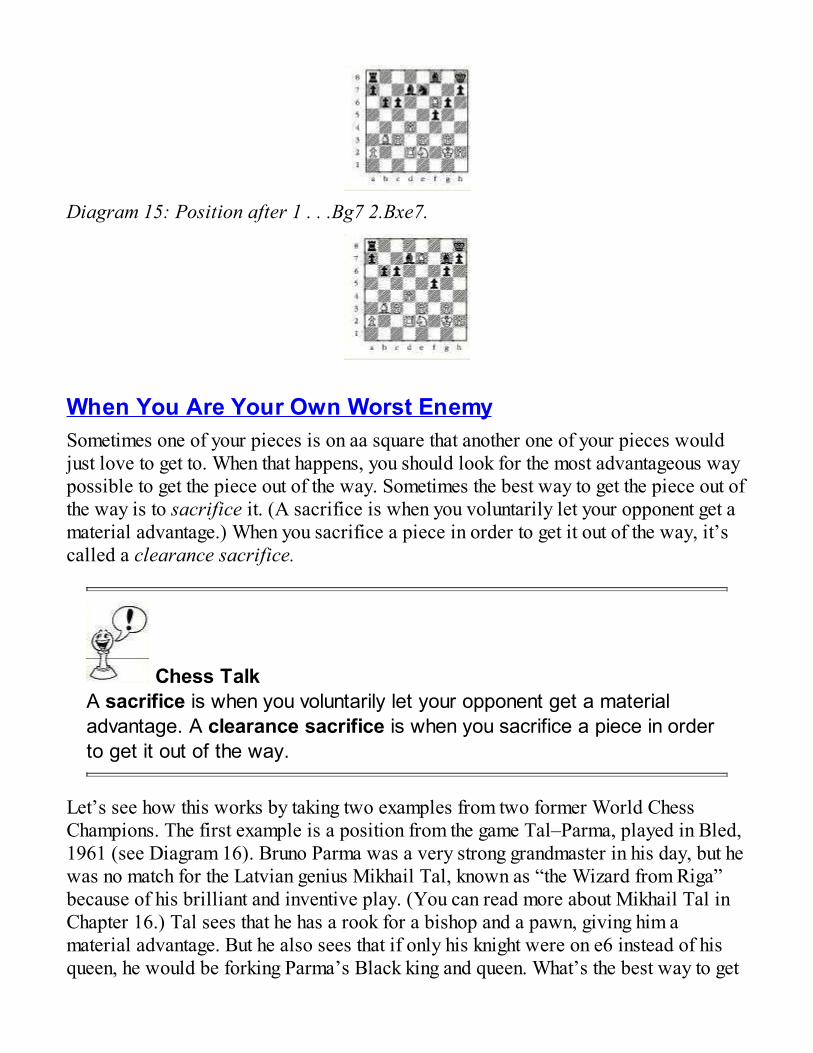
Diagram 15: Position after 1 . . .Bg7 2.Bxe7.
When You Are Your Own Worst EnemySometimes one of your pieces is on aa square that another one of your pieces wouldjust love to get to. When that happens, you should look for the most advantageous waypossible to get the piece out of the way. Sometimes the best way to get the piece out ofthe way is to sacrifice it. (A sacrifice is when you voluntarily let your opponent get amaterial advantage.) When you sacrifice a piece in order to get it out of the way, it’scalled a clearance sacrifice.
Chess TalkA sacrifice is when you voluntarily let your opponent get a materialadvantage. A clearance sacrifice is when you sacrifice a piece in orderto get it out of the way.
Let’s see how this works by taking two examples from two former World ChessChampions. The first example is a position from the game Tal–Parma, played in Bled,1961 (see Diagram 16). Bruno Parma was a very strong grandmaster in his day, but hewas no match for the Latvian genius Mikhail Tal, known as “the Wizard from Riga”because of his brilliant and inventive play. (You can read more about Mikhail Tal inChapter 16.) Tal sees that he has a rook for a bishop and a pawn, giving him amaterial advantage. But he also sees that if only his knight were on e6 instead of hisqueen, he would be forking Parma’s Black king and queen. What’s the best way to get

the queen out of the way? For a genius like Tal, it couldn’t have taken more than amillisecond to find 29.Qxf5! (see Diagram 17).
Diagram 16: White to move (Tal–Parma, Bled, 1961).
Diagram 17: Position after 29.Qxf5!.
Tal captures the knight with his queen, because even though Black can recapture thequeen, White will follow up with 30.Ne6+ and win back the queen, pocketing theknight as profit. Parma resigned, yet another victim to Tal’s magic.
When Tal played that game, he had just the year before taken the World Championshiptitle from Mikhail Botvinnik, a man almost 30 years his senior. Yet Botvinnik wouldretake the title from Tal later in 1961. (You can read more about Mikhail Botvinnik inChapter 16.) Let’s take a look at a game Botvinnik played before he reached his fullstrength. Even though he was not yet World Champion, he was good enough to teach usa thing or two!
Botvinnik, who is from the Soviet Union, played White in this game in 1931. Heplayed against another Soviet player, Stepanov (see Diagram 18). Perhaps Stepanovhadn’t suspected anything yet, but we can assume that Botvinnik noticed that hisopponent’s queen was in a precarious position. How did Botvinnik take advantage ofthe precarious position of his opponent’s queen? Are any of his own pieces in theway?
In Diagram 19, Botvinnik played 19.Bxf7+!!, which at first blush seems crazy. Whatcould the point of this move possibly be? The point is revealed after Black recapturesthe bishop playing 19 . . .Rxf7!! (Since Stepanov is in check, he can do nothing aboutthe impending fate of his queen, so he might as well capture the bishop for histrouble.)
Now White plays 20.Nc4!, in Diagram 20, attacking the black queen. What Botvinnik

had noticed and his opponent had missed is that the queen now has no safe square torun to. If you can’t believe it, then try to find a safe square for the queen. But don’tforget that because the knight has moved from e5, the bishop on g3 controls the c7square! The young Botvinnik exploited his material advantage and eventually won thegame.
Diagram 18: White to move (Botvinnik–Stepanov, USSR, 1931).
Diagram 19: Position after 19.Bxf7+!!.
Wishing Can Help You Make It SoIt often takes a flash of inspiration to find a clearance sacrifice, because it’s hard to“see” the possibility of putting one of your pieces on a square that another one of yourpieces already occupies. You can help that flash of inspiration to come by askingyourself this question:
“What move do I wish I could play?”
Diagram 20: Position after 19 . . .Rxf7 20.Nc4!.
Sometimes you may find that the only thing preventing you from making your wishcome true is one of your own pieces. And if that’s the case, maybe you can dosomething about it.
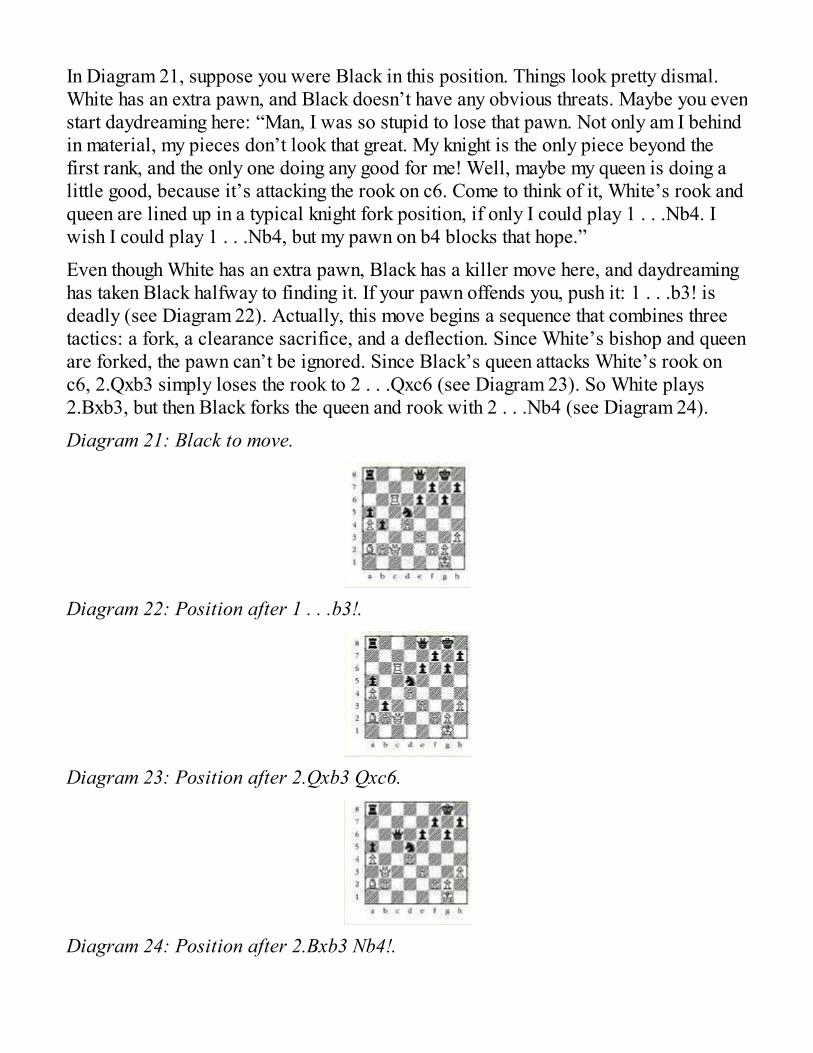
In Diagram 21, suppose you were Black in this position. Things look pretty dismal.White has an extra pawn, and Black doesn’t have any obvious threats. Maybe you evenstart daydreaming here: “Man, I was so stupid to lose that pawn. Not only am I behindin material, my pieces don’t look that great. My knight is the only piece beyond thefirst rank, and the only one doing any good for me! Well, maybe my queen is doing alittle good, because it’s attacking the rook on c6. Come to think of it, White’s rook andqueen are lined up in a typical knight fork position, if only I could play 1 . . .Nb4. Iwish I could play 1 . . .Nb4, but my pawn on b4 blocks that hope.”
Even though White has an extra pawn, Black has a killer move here, and daydreaminghas taken Black halfway to finding it. If your pawn offends you, push it: 1 . . .b3! isdeadly (see Diagram 22). Actually, this move begins a sequence that combines threetactics: a fork, a clearance sacrifice, and a deflection. Since White’s bishop and queenare forked, the pawn can’t be ignored. Since Black’s queen attacks White’s rook onc6, 2.Qxb3 simply loses the rook to 2 . . .Qxc6 (see Diagram 23). So White plays2.Bxb3, but then Black forks the queen and rook with 2 . . .Nb4 (see Diagram 24).
Diagram 21: Black to move.
Diagram 22: Position after 1 . . .b3!.
Diagram 23: Position after 2.Qxb3 Qxc6.
Diagram 24: Position after 2.Bxb3 Nb4!.
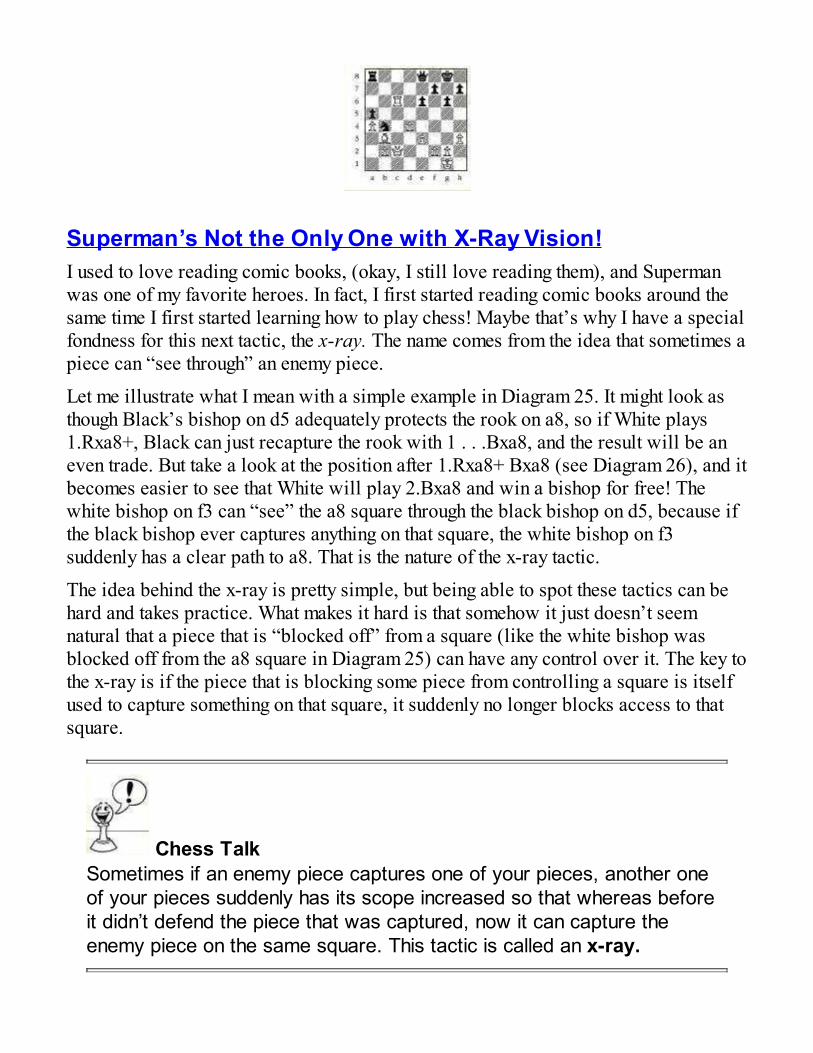
Superman’s Not the Only One with X-Ray Vision!I used to love reading comic books, (okay, I still love reading them), and Supermanwas one of my favorite heroes. In fact, I first started reading comic books around thesame time I first started learning how to play chess! Maybe that’s why I have a specialfondness for this next tactic, the x-ray. The name comes from the idea that sometimes apiece can “see through” an enemy piece.
Let me illustrate what I mean with a simple example in Diagram 25. It might look asthough Black’s bishop on d5 adequately protects the rook on a8, so if White plays1.Rxa8+, Black can just recapture the rook with 1 . . .Bxa8, and the result will be aneven trade. But take a look at the position after 1.Rxa8+ Bxa8 (see Diagram 26), and itbecomes easier to see that White will play 2.Bxa8 and win a bishop for free! Thewhite bishop on f3 can “see” the a8 square through the black bishop on d5, because ifthe black bishop ever captures anything on that square, the white bishop on f3suddenly has a clear path to a8. That is the nature of the x-ray tactic.
The idea behind the x-ray is pretty simple, but being able to spot these tactics can behard and takes practice. What makes it hard is that somehow it just doesn’t seemnatural that a piece that is “blocked off” from a square (like the white bishop wasblocked off from the a8 square in Diagram 25) can have any control over it. The key tothe x-ray is if the piece that is blocking some piece from controlling a square is itselfused to capture something on that square, it suddenly no longer blocks access to thatsquare.
Chess TalkSometimes if an enemy piece captures one of your pieces, another oneof your pieces suddenly has its scope increased so that whereas beforeit didn’t defend the piece that was captured, now it can capture theenemy piece on the same square. This tactic is called an x-ray.

Diagram 25: White to move.
Diagram 26: Position after 1.Rxa8+ Bxa8.
Whew, that last sentence was a mouthful, wasn’t it? Maybe I’d better just show youwhat I mean. The next position is taken from a game played by the most famous chessplayer of all time: Bobby Fischer. Fischer played this game in the 1963/64 U.S.Championship, which was just one of the eight U.S. Championships Fischer won!(Even more incredible is that he only played eight times!) Fischer’s brilliant careerculminated in his becoming World Champion in 1972 by crushing the champion fromthe Soviet Union, Boris Spassky. (You can read more about both Fischer and Spasskyin Chapter 16.)
In this game, Fischer is playing another American grandmaster, Arthur Bisguier (seeDiagram 27). Bisguier has calculated that the pawn on d3 is adequately protected. Hefigures that if White captures the pawn, he will maintain material equality as follows:34.Rxd3 Qxd3 35.Rxd3 Rxd3. White will have traded two rooks for a queen and onepawn, which amounts to about an even trade.
Chess TalkAn “in between” move is a move that comes in between two moves youexpect your opponent to have to play consecutively. Sometimes such amove is called a zwischenzug, which is German for “in between move.”
Sure enough, Fischer took the pawn, and Bisguier recaptured the rook (see Diagram28). Now Bisguier expects Fischer to capture the queen on the next move, after which

Bisguier will recapture the rook. This is only an even trade for Fischer, but what elsecould Fischer have been thinking?
Fischer’s idea was to use the x-ray tactic to his advantage! Instead of taking the queenon d3, he captures the rook on d7 (see Diagram 29). The method to his madness is thatthe queen is now protected by the rook on d1. If Black plays 35 . . .Qxd7, White justplays 36.Rxd7. After the dust settles from all the captures, White emerges with anextra pawn.
Diagram 27: White to move (Fischer–Bisguier, U.S. Championship 1963/64).
Diagram 28: Position after 34.Rxd3 Qxd3.
Diagram 29: Position after 35.Qxd7!.
The “In Between” MoveHuh? What’s this? In between what?
No, this doesn’t mean in between the squares, or in between the lines, or in betweenthe king and the queen. The in between refers to a move that comes in between twomoves that you expect your opponent to have to play consecutively. Suppose youcapture one of your opponent’s pieces, which is protected. You naturally expect him torecapture. But you must always be careful not to overlook the possibility that he mayhave some move he can play “in between,” perhaps a threat to another one of your
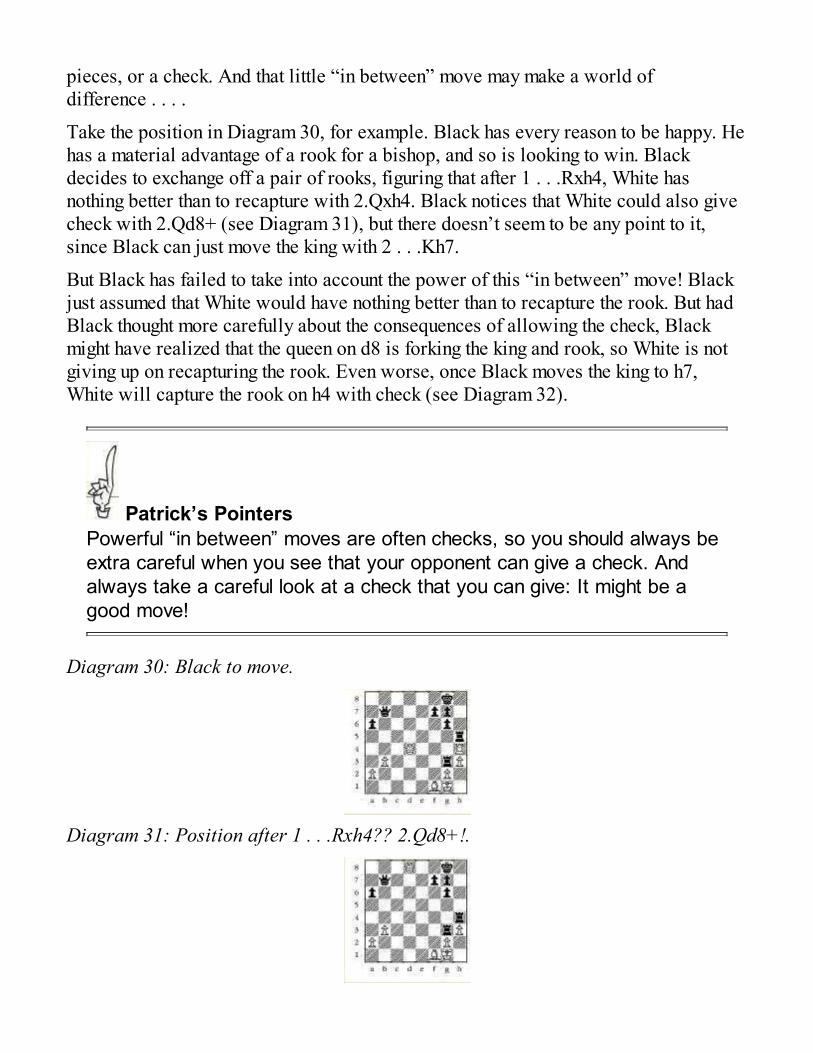
pieces, or a check. And that little “in between” move may make a world ofdifference . . . .
Take the position in Diagram 30, for example. Black has every reason to be happy. Hehas a material advantage of a rook for a bishop, and so is looking to win. Blackdecides to exchange off a pair of rooks, figuring that after 1 . . .Rxh4, White hasnothing better than to recapture with 2.Qxh4. Black notices that White could also givecheck with 2.Qd8+ (see Diagram 31), but there doesn’t seem to be any point to it,since Black can just move the king with 2 . . .Kh7.
But Black has failed to take into account the power of this “in between” move! Blackjust assumed that White would have nothing better than to recapture the rook. But hadBlack thought more carefully about the consequences of allowing the check, Blackmight have realized that the queen on d8 is forking the king and rook, so White is notgiving up on recapturing the rook. Even worse, once Black moves the king to h7,White will capture the rook on h4 with check (see Diagram 32).
Patrick’s PointersPowerful “in between” moves are often checks, so you should always beextra careful when you see that your opponent can give a check. Andalways take a careful look at a check that you can give: It might be agood move!
Diagram 30: Black to move.
Diagram 31: Position after 1 . . .Rxh4?? 2.Qd8+!.
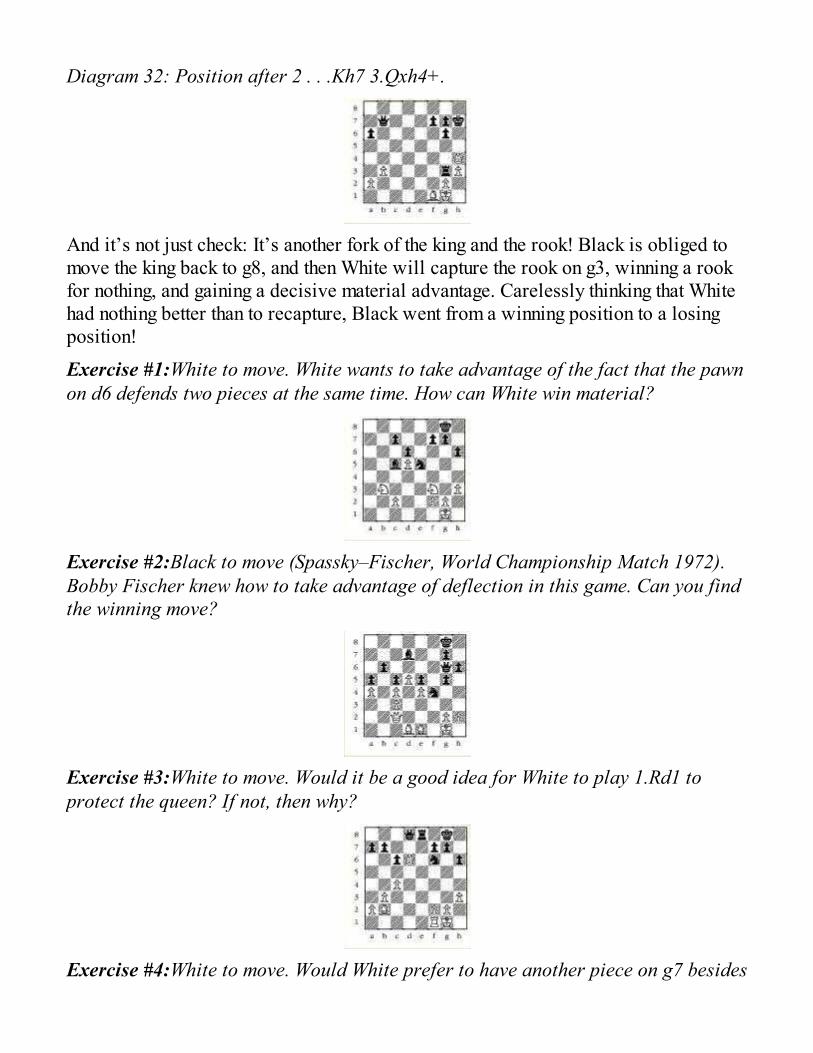
Diagram 32: Position after 2 . . .Kh7 3.Qxh4+.
And it’s not just check: It’s another fork of the king and the rook! Black is obliged tomove the king back to g8, and then White will capture the rook on g3, winning a rookfor nothing, and gaining a decisive material advantage. Carelessly thinking that Whitehad nothing better than to recapture, Black went from a winning position to a losingposition!
Exercise #1:White to move. White wants to take advantage of the fact that the pawnon d6 defends two pieces at the same time. How can White win material?
Exercise #2:Black to move (Spassky–Fischer, World Championship Match 1972).Bobby Fischer knew how to take advantage of deflection in this game. Can you findthe winning move?
Exercise #3:White to move. Would it be a good idea for White to play 1.Rd1 toprotect the queen? If not, then why?
Exercise #4:White to move. Would White prefer to have another piece on g7 besides
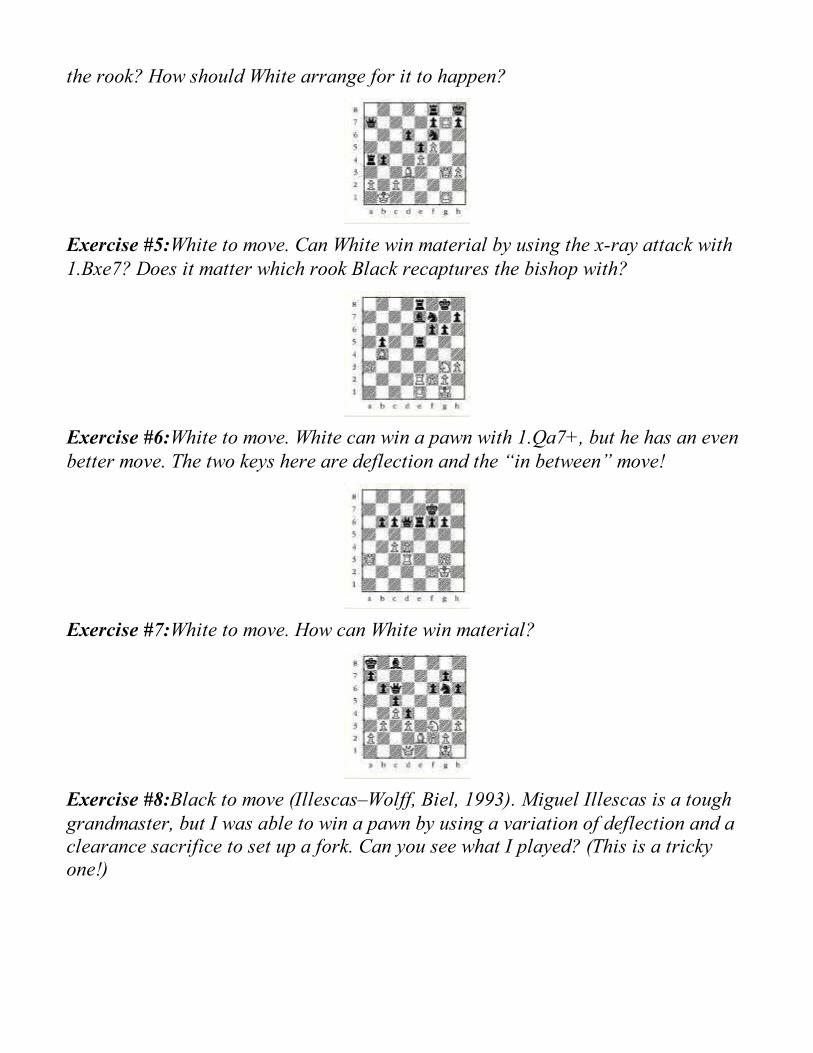
the rook? How should White arrange for it to happen?
Exercise #5:White to move. Can White win material by using the x-ray attack with1.Bxe7? Does it matter which rook Black recaptures the bishop with?
Exercise #6:White to move. White can win a pawn with 1.Qa7+, but he has an evenbetter move. The two keys here are deflection and the “in between” move!
Exercise #7:White to move. How can White win material?
Exercise #8:Black to move (Illescas–Wolff, Biel, 1993). Miguel Illescas is a toughgrandmaster, but I was able to win a pawn by using a variation of deflection and aclearance sacrifice to set up a fork. Can you see what I played? (This is a trickyone!)
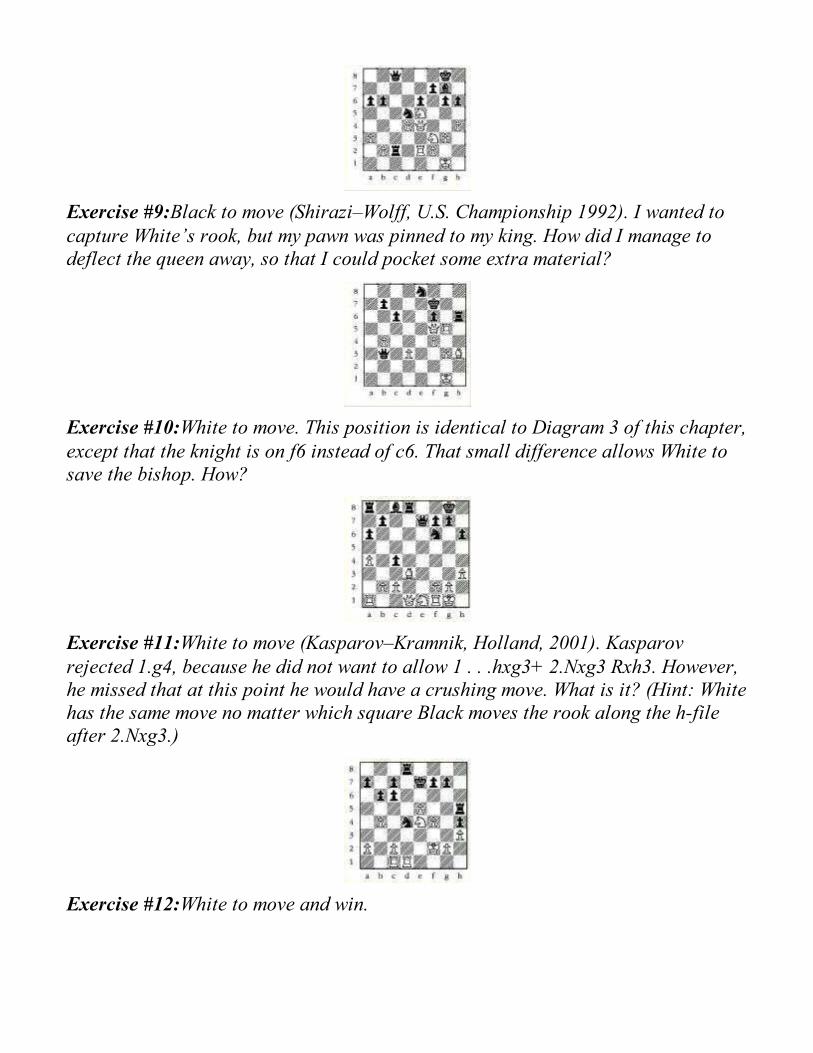
Exercise #9:Black to move (Shirazi–Wolff, U.S. Championship 1992). I wanted tocapture White’s rook, but my pawn was pinned to my king. How did I manage todeflect the queen away, so that I could pocket some extra material?
Exercise #10:White to move. This position is identical to Diagram 3 of this chapter,except that the knight is on f6 instead of c6. That small difference allows White tosave the bishop. How?
Exercise #11:White to move (Kasparov–Kramnik, Holland, 2001). Kasparovrejected 1.g4, because he did not want to allow 1 . . .hxg3+ 2.Nxg3 Rxh3. However,he missed that at this point he would have a crushing move. What is it? (Hint: Whitehas the same move no matter which square Black moves the rook along the h-fileafter 2.Nxg3.)
Exercise #12:White to move and win.
Exercise #13:White to move (Gauzel–Ginting, Novi-Sad, 1990). It looks like Blackhas everything defended, but White was able to overload and deflect the defendingpieces to win. How?
Exercise #14:Black to move (Ehlvest–Yermolinsky, Las Vegas, 1994). White, a topgrandmaster, has just played 1.Qd5. Yermolinsky, another top grandmaster,captured the queen and lost the game. What strong “in between” move did bothgrandmasters miss?
Exercise #15:White to move (King–Benjamin, USA, 1962). How did White win apiece by exploiting the overloaded black queen?
Exercise #16:White to move. If 1.Qg3 or 1.Qg4, then 1 . . .Qh6 defends. Nor does1.Qxc1 Rxc1 2.Rg7 Be8 make headway. How can White force either checkmate ordecisive win of material?
Exercise #17:Black to move. It looks like White has a crushing attack. But Blackcan not only defend, he can win! How? (Hint: Black needs to nudge the white kingto the right square.)
Exercise #18:Black to move. Can Black win material by capturing either rook? Whyor why not?
Exercise #19:White to move (Maroczy–Vidmar, Ljubljana, 1922). White isattacking, but Black has an extra pawn and if he beats back the attack will win.White found an incredible winning move. What is it? (Hint: White combinesdeflection with getting Black to block the defense of a key square.)
Exercise #20:White to move. If White could play g3-g4, it would be checkmate. ButBlack’s queen pins the g-pawn. How can White deflect the queen and win?
The Least You Need to Know
If you attack a piece, but that piece is defended by some other piece, look for away to attack the defending piece.
If one piece defends two or more other pieces, it might be overloaded.
Pay attention to whether one of your pieces wants to get to a square that anotherone of your pieces is on. If so, you might be able to get it there with a clearancesacrifice.
X-ray tactics are easy to miss, so watch out for them!
Be careful for those little “in between” moves—especially checks—when youare calculating a sequence of moves.
Always keep in mind that tactics can be combined!
Chapter 8
Hunting Down the King
In This Chapter
“Relative” versus “absolute” material advantage
How to use a relative material advantage to attack the king
An example of an attack against the king from a grandmaster game
Tactics for attacking the king
In the last three chapters, I’ve been stressing the importance of having a materialadvantage, and I’ve been showing you some very useful tactics for gaining a materialadvantage. In this chapter, I’ll be expanding these two concepts a little more.
First, I’ll explain another way to think about having a material advantage, and how touse it to attack the king. Then I’ll show you some special tactics that are useful inattacking the king, as well as some ways to use the tactics you’ve already learned!
When a Material Advantage Is All RelativeLet’s start by thinking a little more about having a material advantage. What good ishaving more material? Remember in Chapter 5, I said the point of having morematerial is that when you have more material, your attack will overwhelm youropponent’s defense, and your defense will turn away his attack.
Now this is certainly true, in the long run, for attacks in general. But in the short run,the success of a particular attack doesn’t depend on overall material, but on how muchmaterial the players have in the relevant part of the board.
Think of it this way. If you have more material overall, then as long as “nothing is

happening” right away, you have an overall advantage in force. But if “something ishappening” somewhere, then the person with more material where that “something” istaking place will have the advantage in force as far as that “something” is concerned.
Does it matter to have an advantage in force in one particular part of the chessboard?Well, it matters if there is something important in that part of the chessboard. ‘Andnothing is more important than the king, so it can really matter when attacking the king!
Take a look at Diagram 1 to see what I mean.
Diagram 1: White has a winning attack against Black’s king.
Black has a huge material advantage. If his position were generally secure, he couldexpect to win with his extra material, because in the long run, he would be able tomount successful attacks against White. But there isn’t going to be a long run, becauseWhite is about to slaughter Black’s king!
Even though White has much less material than Black, all of it (except for the onepawn on g2 and the king) is right near the Black king, ready to go for the kill. Andnotice that Black has only one measly pawn in front of the king to beat back the attack.One pawn is no match for a queen, two rooks, a knight, and a bishop! Because Black’spieces are too far away to help, and aren’t coordinated to attack the White king, thereis nothing Black can do to distract White.
I suggest that you play around with this position on your own, to convince yourself thatWhite’s attack is overwhelming. Here’s a hint to get you going: If it’s White’s turn,1.Be6# is checkmate, so you had better assume it’s Black’s turn to move!
This was a pretty exaggerated example just to make my point. Now we’ll look at somemore realistic situations where one side can launch a successful attack against the kingbecause he has more material near the opponent’s king.
The Emperor Has No Clothes!One way of having more material near the opponent’s king can make a difference is ifthe opponent’s king has very few pieces or pawns near it for defense. When thishappens, we say that the king is “exposed.” When your opponent’s king has fewclothes on, it’s your job to point this out with an attack! Keep in mind that it may not

always be immediately obvious that the king is exposed.
You can see what I mean in Diagram 2. At first glance, it might look like Black’s kingis not in danger. But take another look: White’s knight on e5, rook on g3, and bishopon c2 all control squares that are very close to the king. And Black has only twopawns in front of the king to shield it. Furthermore, Black’s queen on b8 and his twoknights are very far away from the king, so they may not be useful for defense. Is theresome way White can bring more material near the black king to attack it?
Diagram 2: White to move.
Yes, there is! In Diagram 3, White plays 1.Qh5! to attack the pawn on h7. Suddenly,White’s material advantage near the king is huge. In fact, Black has no adequatedefense and is lost. I’ll show you two plausible tries for Black to defend himself, andhow White defeats both of them. You may want to try to find other defenses for Black,and how White defeats those as well.
The first try is for Black to play 1 . . .h6 (see Diagram 4). Black removes the pawnfrom attack on h7 and puts it on a square where it is protected by the pawn on g7.Except it isn’t really protected, because the g7 pawn is pinned by the rook on g3 to theblack king! White can simply play 2.Qxh6 in Diagram 5, capturing the pawn, renewingthe threat of mate on h7, and creating a new threat on g7. Black can’t meet all thesethreats. (If this is not clear to you, you should set the position up on a board and try tofind a defense for Black.)
BlundersDon’t let your king become too exposed! As a general rule of thumb,when your king is castled, it’s a good idea to have at least two connectedpawns in front of the king and at least one minor piece (knight or bishop)near the king for defense.
Diagram 3: White plays 1.Qh5!, which threatens 2.Qxh7#.

Diagram 4: Black tries 1 . . .h6.
Diagram 5: White plays 2.Qxh6.
The second try is for Black to play 1 . . .g6 (see Diagram 6). This blocks the attack tothe h7 pawn. Black figures if White captures the pawn on g6, when Black recapturesthe piece with the h7 pawn, Black will gain a material advantage. But who cares aboutmaterial if you can give checkmate? White plays 2.Bxg6! in Diagram 7, renewing thethreat to the h7 pawn, and creating new threats of discovered check. Black has nothingbetter than 2 . . .hxg6, when 3.Rxg6# is checkmate (see Diagram 8).
Diagram 6: Black plays 1 . . .g6.
Diagram 7: White plays 2.Bxg6!.

Diagram 8: Black plays 2 . . .hxg6, and White plays 3.Rxg6#.
Black’s troubles were caused by having too few pieces close enough to the king tohelp in its defense. (And in this case, the pieces near the king—the rooks on f8 and e8—weren’t much help.) If we make two minor changes, things become much better forBlack. Let’s suppose that the knight on b6 is now on f6, and the queen on b8 is now onc7, as shown in Diagram 9. Suddenly, Black has two more pieces near the king fordefense. The queen on c7 protects the sensitive pawn on g7, and can travel along thesecond rank to protect the king. The knight on f6 protects the sensitive pawn on h7, andalso prevents the white queen from coming to h5. Now Black’s king is much safer andWhite has no prospects for a sudden attack.
Diagram 9: Black’s king is safe.
Exposing Your Opponent’s KingBecause your opponent may not be so obliging as to leave the king so open to attack,you’ll often have to work at making your opponent’s king more exposed. Now I’llshow you an example from a game between grandmasters where one player saw anopportunity to expose his opponent’s king, and used that chance to go for the kill.
Let me warn you: For this example, I’ll examine many more moves than I’ve beendoing thus far. I’ll make it as easy to follow as possible, but if you haven’t been usinga chess set, you may want to get one to follow this example. If you don’t have one,
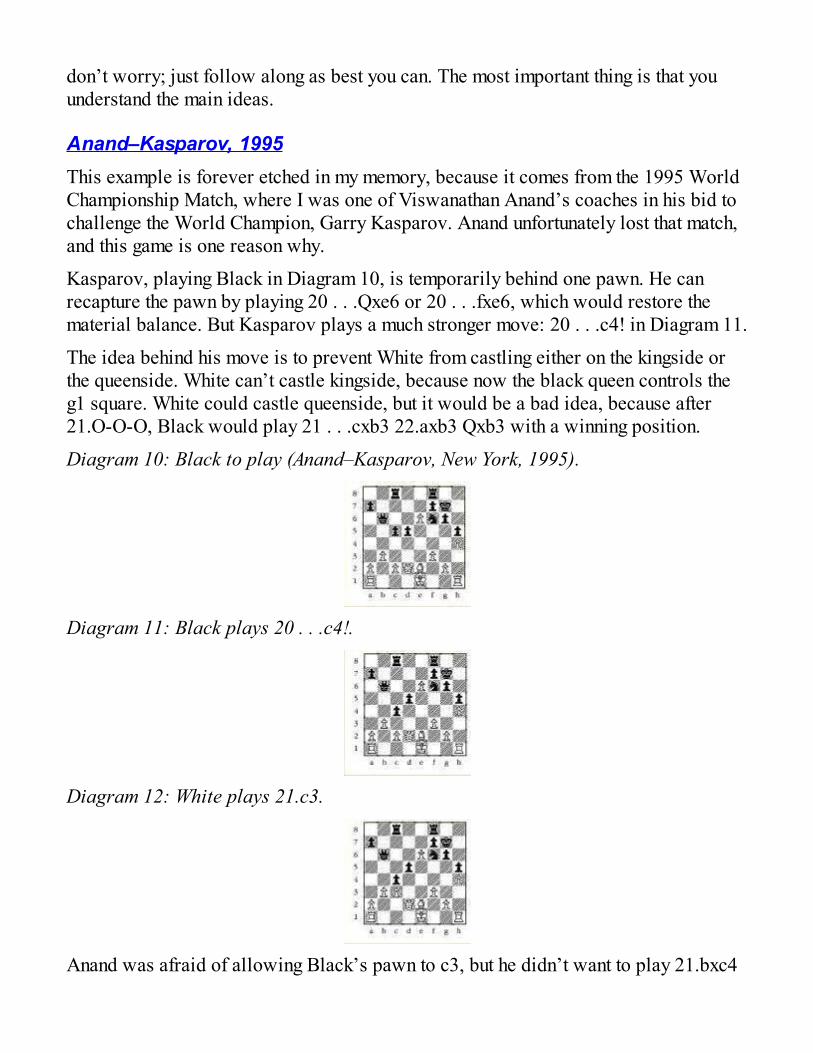
don’t worry; just follow along as best you can. The most important thing is that youunderstand the main ideas.
Anand–Kasparov, 1995This example is forever etched in my memory, because it comes from the 1995 WorldChampionship Match, where I was one of Viswanathan Anand’s coaches in his bid tochallenge the World Champion, Garry Kasparov. Anand unfortunately lost that match,and this game is one reason why.
Kasparov, playing Black in Diagram 10, is temporarily behind one pawn. He canrecapture the pawn by playing 20 . . .Qxe6 or 20 . . .fxe6, which would restore thematerial balance. But Kasparov plays a much stronger move: 20 . . .c4! in Diagram 11.
The idea behind his move is to prevent White from castling either on the kingside orthe queenside. White can’t castle kingside, because now the black queen controls theg1 square. White could castle queenside, but it would be a bad idea, because after21.O-O-O, Black would play 21 . . .cxb3 22.axb3 Qxb3 with a winning position.
Diagram 10: Black to play (Anand–Kasparov, New York, 1995).
Diagram 11: Black plays 20 . . .c4!.
Diagram 12: White plays 21.c3.
Anand was afraid of allowing Black’s pawn to c3, but he didn’t want to play 21.bxc4

dxc4 because he felt this would expose his queenside to Black’s queen, so he played21.c3 in Diagram 12. Now Kasparov could have captured either of White’s pawns onb3 or e6, but doing so would have slowed down his attack against the king. Instead,Kasparov brought more material to bear against White’s increasingly precariouslypositioned king by playing 21 . . .Rce8! (see Diagram 13). One of the dangers ofleaving your king in the center of the board too long is that your opponent can putpressure on the king by putting a rook or two, or even the queen, on the same file as theking.
Patrick’s PointersCastle early! If your opponent has castled and you haven’t, you’re riskinghaving your king attacked. If you have castled and your opponent hasnot, look for a way to attack his king. In particular, it is often worth apawn to keep your opponent’s king stuck in the center of the board for awhile.
Now Anand did not want to play 22.exf7, because after 22 . . .Rxf7, the rook on f8would join the attack. Not only would the f-file suddenly be open, but also the rookwould be ready to play 23 . . .Rfe7, threatening to capture the bishop on e2 which ispinned to White’s king. But Anand felt that he needed to have some material tocompensate for Black’s growing attack, so he played 22.bxc4 in Diagram 14.Kasparov responded by bringing his rook into the action by playing 22 . . .Rxe6 (seeDiagram 15).
Diagram 13: Black plays 21 . . .Rce8!.
Diagram 14: White plays 22.bxc4.

Diagram 15: Black plays 22 . . .Rxe6.
After 22 . . .Rxe6, Black was threatening to play 23 . . .Rfe8, which would winmaterial by attacking the pinned bishop. Anand moved his king out of the pin byplaying 23.Kf1 (see Diagram 16). This move did meet the threat, but it had thedrawback of giving up the right to ever castle, which practically ensured that White’sking would not soon find safety. Black played 23 . . .Rfe8! anyway (see Diagram 17).Even though this move doesn’t win the bishop anymore, it is still a very good move. Itbrings another piece closer to White’s king, forcing White to defend against a specificthreat (to capture the bishop on e2), and stopping White from improving his position inany other way. White defended against the threat by playing 24.Bd3 in Diagram 18.
Diagram 16: White plays 23.Kf1.
Diagram 17: Black plays 23 . . .Rfe8.
Diagram 18: White plays 24.Bd3.
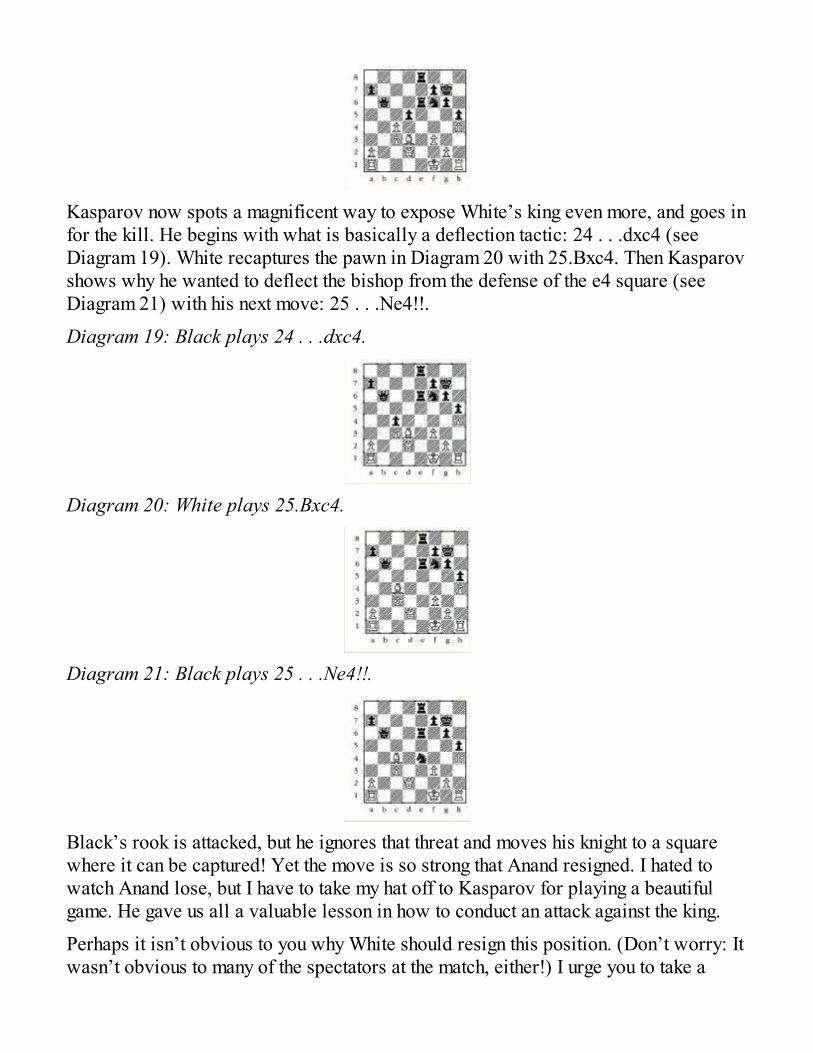
Kasparov now spots a magnificent way to expose White’s king even more, and goes infor the kill. He begins with what is basically a deflection tactic: 24 . . .dxc4 (seeDiagram 19). White recaptures the pawn in Diagram 20 with 25.Bxc4. Then Kasparovshows why he wanted to deflect the bishop from the defense of the e4 square (seeDiagram 21) with his next move: 25 . . .Ne4!!.
Diagram 19: Black plays 24 . . .dxc4.
Diagram 20: White plays 25.Bxc4.
Diagram 21: Black plays 25 . . .Ne4!!.
Black’s rook is attacked, but he ignores that threat and moves his knight to a squarewhere it can be captured! Yet the move is so strong that Anand resigned. I hated towatch Anand lose, but I have to take my hat off to Kasparov for playing a beautifulgame. He gave us all a valuable lesson in how to conduct an attack against the king.
Perhaps it isn’t obvious to you why White should resign this position. (Don’t worry: Itwasn’t obvious to many of the spectators at the match, either!) I urge you to take a

chess set and play over the variations that follow which explain why White resignedin Diagram 21. As you do so, keep in mind how Black is using all of his pieces in theattack, while White’s two rooks stand on the sidelines doing nothing.
BlundersSome amateurs emulate grandmasters too closely by resigning at thefirst sign of trouble. This is a big mistake. It made sense for Anand toresign in Diagram 21, because for him and Kasparov these variationswere easy to see. But for you and your opponent such variations wouldNOT be so easy to see, so you could still hope your opponent wouldmake a mistake. Don’t give up the ship unless it’s really, truly, hopeless!
Black threatens to capture the queen on d2 with check. How can White defend?
Variation #1: 26.fxe4 Rf6+ 27.Ke1 (If 27.Ke2 Rf2+ 28.Kd1 Rxd2+ 29.Kxd2Rxe4 not only gives Black a material advantage, but with White’s king soexposed to attack, Black would win quickly); 27 . . .Rxe4+ 28.Kd1 (28.Be2 Qf2+29.Kd1 Rxe2! 30.Qxe2 Rd6+ gives Black a huge material advantage);28 . . .Rxc4 is hopeless for White; Black threatens both 29 . . .Rd6 and29 . . .Rf2, and White cannot last in the face of Black’s attack. Notice howexposed White’s king is, and notice how active Black’s rooks are, while White’srooks are so passive!
Variation #2: 26.Qd4+ Qxd4 27.cxd4 Nd2+ forks the king and bishop, givingBlack a winning material advantage. This demonstrates two very important ideasabout attacking the king. First, White tries to defend by exchanging queens,thereby removing Black’s most powerful attacking piece. Second, Black’s attackis made all the more dangerous because he combines the attack against the kingwith threats against other pieces. (Note the use of the fork!) Black is willing tobreak off the attack against the king if he spots a way to gain a large materialadvantage (without, of course, allowing his opponent to start attacking his ownking!).
Variation #3: 26.Qf4 Qf2#.
Variation #4: 26.Qc2 Ng3#.
Variation #5: 26.Qe1 (This move defends both f2 and g3, so it is a better try than
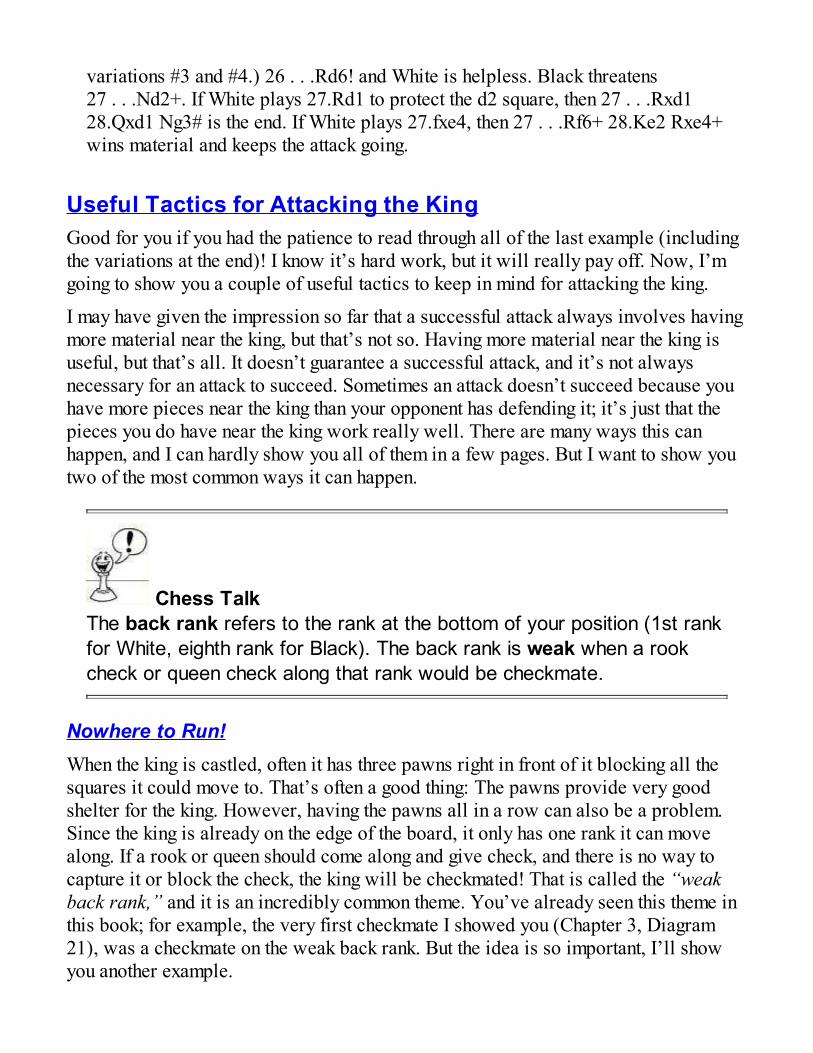
variations #3 and #4.) 26 . . .Rd6! and White is helpless. Black threatens27 . . .Nd2+. If White plays 27.Rd1 to protect the d2 square, then 27 . . .Rxd128.Qxd1 Ng3# is the end. If White plays 27.fxe4, then 27 . . .Rf6+ 28.Ke2 Rxe4+wins material and keeps the attack going.
Useful Tactics for Attacking the KingGood for you if you had the patience to read through all of the last example (includingthe variations at the end)! I know it’s hard work, but it will really pay off. Now, I’mgoing to show you a couple of useful tactics to keep in mind for attacking the king.
I may have given the impression so far that a successful attack always involves havingmore material near the king, but that’s not so. Having more material near the king isuseful, but that’s all. It doesn’t guarantee a successful attack, and it’s not alwaysnecessary for an attack to succeed. Sometimes an attack doesn’t succeed because youhave more pieces near the king than your opponent has defending it; it’s just that thepieces you do have near the king work really well. There are many ways this canhappen, and I can hardly show you all of them in a few pages. But I want to show youtwo of the most common ways it can happen.
Chess TalkThe back rank refers to the rank at the bottom of your position (1st rankfor White, eighth rank for Black). The back rank is weak when a rookcheck or queen check along that rank would be checkmate.
Nowhere to Run!When the king is castled, often it has three pawns right in front of it blocking all thesquares it could move to. That’s often a good thing: The pawns provide very goodshelter for the king. However, having the pawns all in a row can also be a problem.Since the king is already on the edge of the board, it only has one rank it can movealong. If a rook or queen should come along and give check, and there is no way tocapture it or block the check, the king will be checkmated! That is called the “weakback rank,” and it is an incredibly common theme. You’ve already seen this theme inthis book; for example, the very first checkmate I showed you (Chapter 3, Diagram21), was a checkmate on the weak back rank. But the idea is so important, I’ll showyou another example.

Chess TalkMaking luft (luft is German for air) is when you push one pawn in front ofthe castled king to give the king a square to move to in case it is checkedon the back rank.
In Diagram 22, White has moved his h-pawn from h2 to h3, thereby giving the king asquare to move to. But this square is attacked by the black bishop on c7, so White’sking still suffers from a weak back rank, which Black exploits with 1 . . .Ra1+. Whitecan block the check with his rook or his knight, but these pieces will be captured, andthe check will soon be checkmate.
Chess TalkA smothered mate is when the knight checks the king, and because theking is completely surrounded by its own pieces, it’s checkmate.
Death by SuffocationYou would think that the king would be safe if it surrounded itself with lots of pieces,right? Well, that certainly blocks any check from most pieces, but not the knight! Youcan’t block a knight’s check. And if you’ve taken away all the squares the king canmove to, that one check might be mate. When that happens, it’s called the smotheredmate.Diagram 22: Black to move.
A quick look at Diagram 23 gives the impression that Black is in no danger ofsmothered mate here. But in fact, White can force checkmate in just a few moves, by
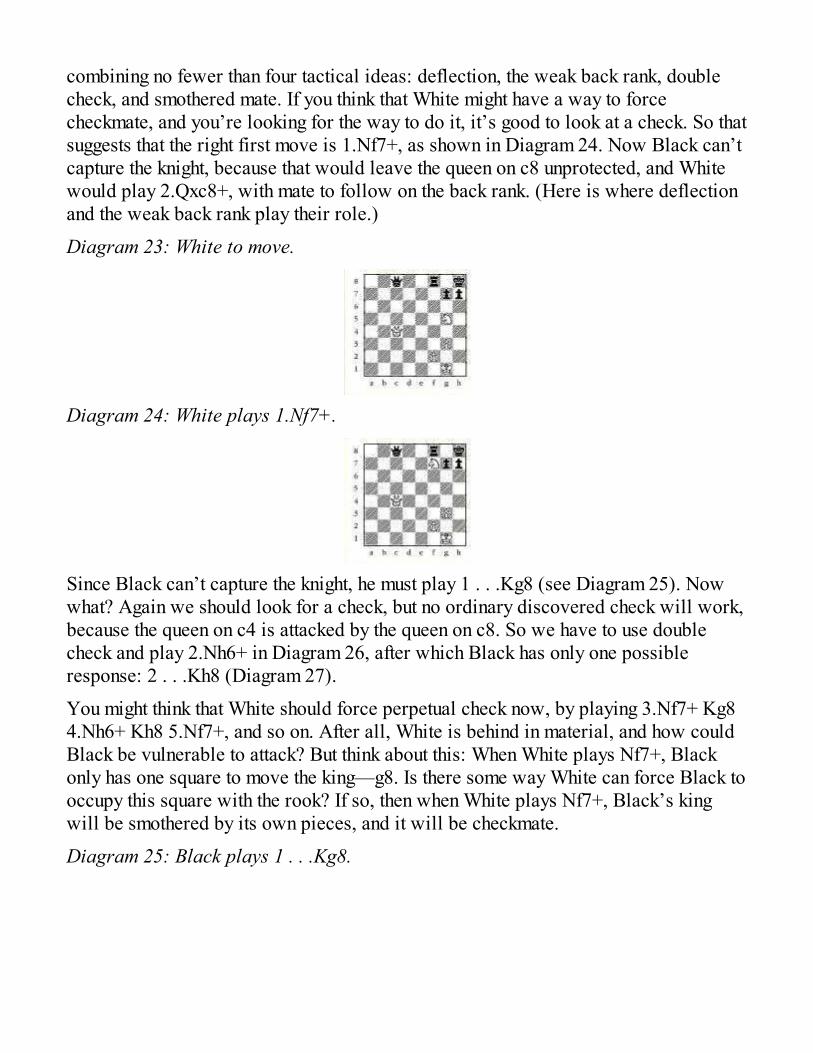
combining no fewer than four tactical ideas: deflection, the weak back rank, doublecheck, and smothered mate. If you think that White might have a way to forcecheckmate, and you’re looking for the way to do it, it’s good to look at a check. So thatsuggests that the right first move is 1.Nf7+, as shown in Diagram 24. Now Black can’tcapture the knight, because that would leave the queen on c8 unprotected, and Whitewould play 2.Qxc8+, with mate to follow on the back rank. (Here is where deflectionand the weak back rank play their role.)
Diagram 23: White to move.
Diagram 24: White plays 1.Nf7+.
Since Black can’t capture the knight, he must play 1 . . .Kg8 (see Diagram 25). Nowwhat? Again we should look for a check, but no ordinary discovered check will work,because the queen on c4 is attacked by the queen on c8. So we have to use doublecheck and play 2.Nh6+ in Diagram 26, after which Black has only one possibleresponse: 2 . . .Kh8 (Diagram 27).
You might think that White should force perpetual check now, by playing 3.Nf7+ Kg84.Nh6+ Kh8 5.Nf7+, and so on. After all, White is behind in material, and how couldBlack be vulnerable to attack? But think about this: When White plays Nf7+, Blackonly has one square to move the king—g8. Is there some way White can force Black tooccupy this square with the rook? If so, then when White plays Nf7+, Black’s kingwill be smothered by its own pieces, and it will be checkmate.
Diagram 25: Black plays 1 . . .Kg8.
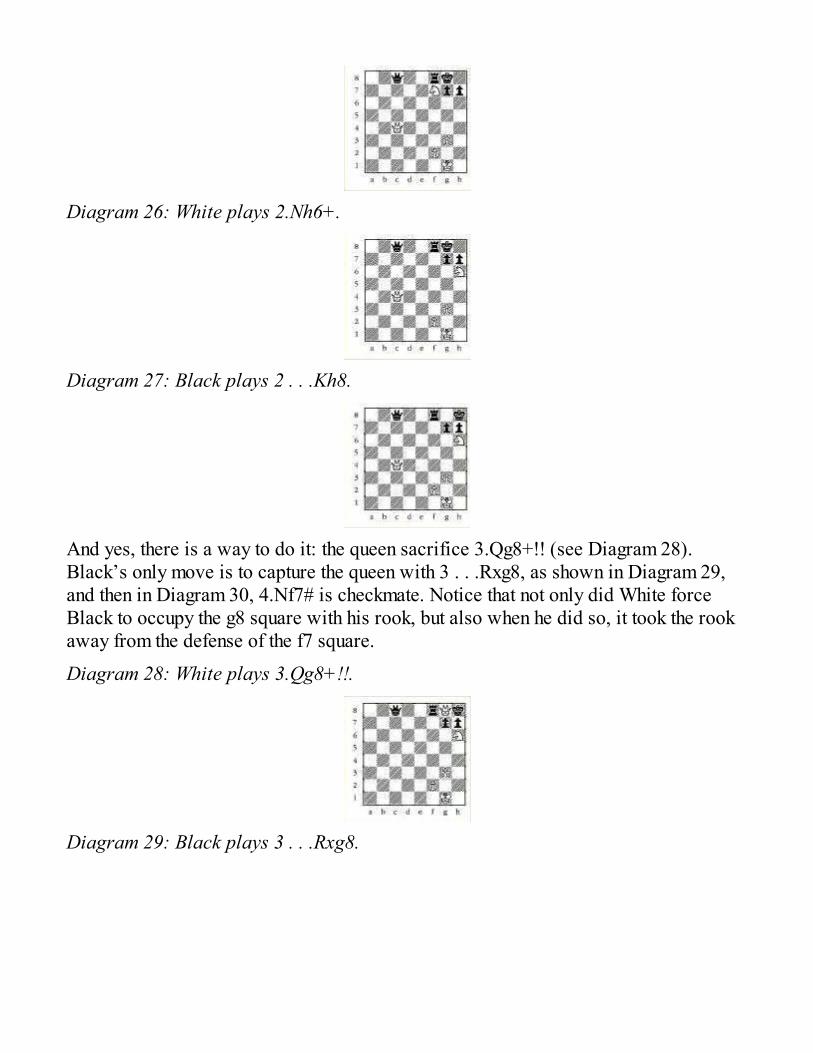
Diagram 26: White plays 2.Nh6+.
Diagram 27: Black plays 2 . . .Kh8.
And yes, there is a way to do it: the queen sacrifice 3.Qg8+!! (see Diagram 28).Black’s only move is to capture the queen with 3 . . .Rxg8, as shown in Diagram 29,and then in Diagram 30, 4.Nf7# is checkmate. Notice that not only did White forceBlack to occupy the g8 square with his rook, but also when he did so, it took the rookaway from the defense of the f7 square.
Diagram 28: White plays 3.Qg8+!!.
Diagram 29: Black plays 3 . . .Rxg8.
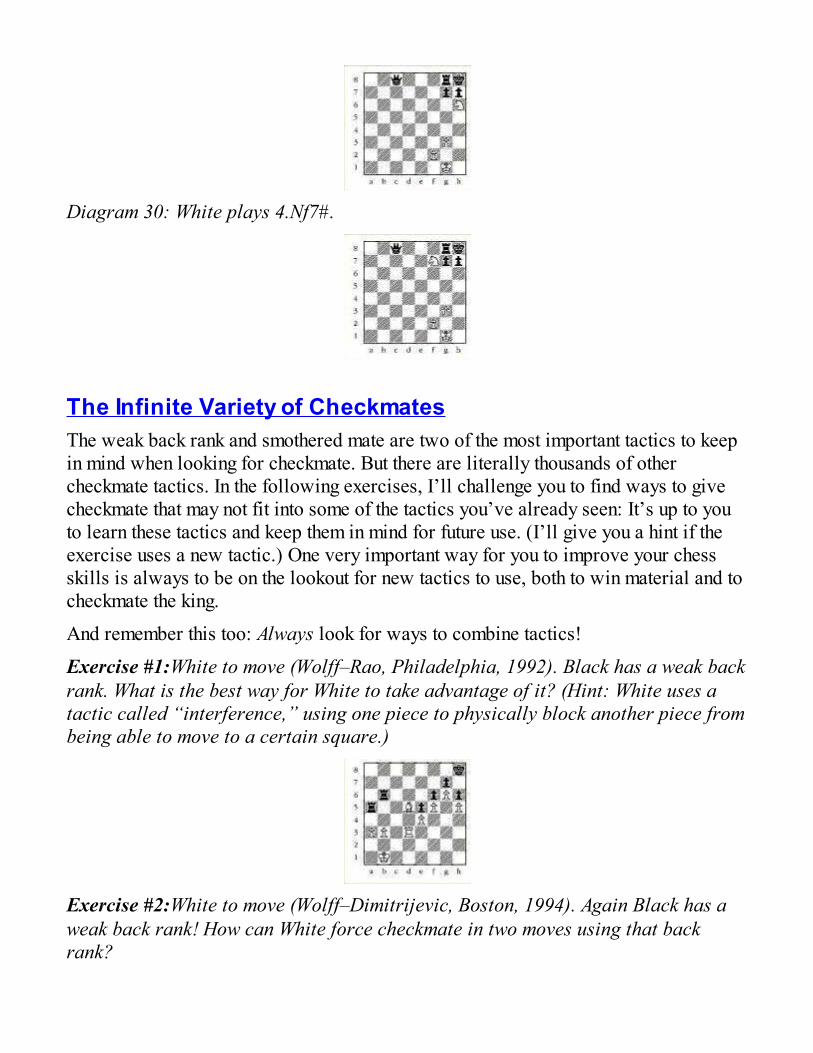
Diagram 30: White plays 4.Nf7#.
The Infinite Variety of CheckmatesThe weak back rank and smothered mate are two of the most important tactics to keepin mind when looking for checkmate. But there are literally thousands of othercheckmate tactics. In the following exercises, I’ll challenge you to find ways to givecheckmate that may not fit into some of the tactics you’ve already seen: It’s up to youto learn these tactics and keep them in mind for future use. (I’ll give you a hint if theexercise uses a new tactic.) One very important way for you to improve your chessskills is always to be on the lookout for new tactics to use, both to win material and tocheckmate the king.
And remember this too: Always look for ways to combine tactics!
Exercise #1:White to move (Wolff–Rao, Philadelphia, 1992). Black has a weak backrank. What is the best way for White to take advantage of it? (Hint: White uses atactic called “interference,” using one piece to physically block another piece frombeing able to move to a certain square.)
Exercise #2:White to move (Wolff–Dimitrijevic, Boston, 1994). Again Black has aweak back rank! How can White force checkmate in two moves using that backrank?
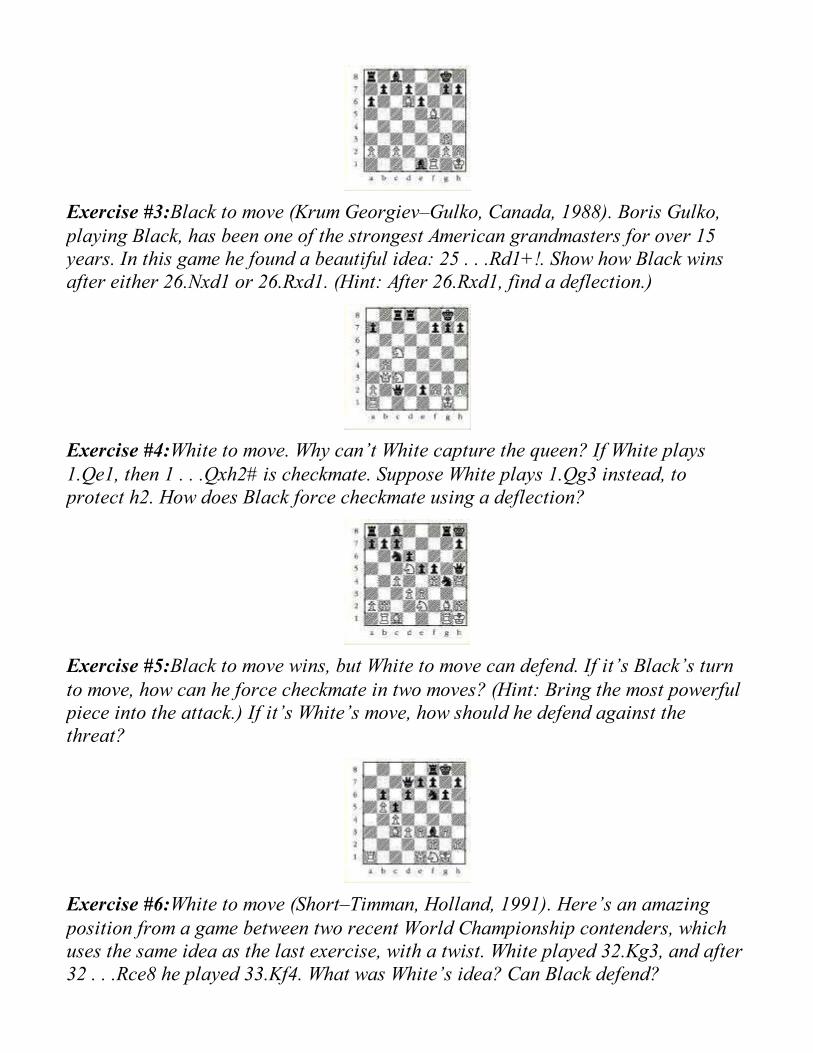
Exercise #3:Black to move (Krum Georgiev–Gulko, Canada, 1988). Boris Gulko,playing Black, has been one of the strongest American grandmasters for over 15years. In this game he found a beautiful idea: 25 . . .Rd1+!. Show how Black winsafter either 26.Nxd1 or 26.Rxd1. (Hint: After 26.Rxd1, find a deflection.)
Exercise #4:White to move. Why can’t White capture the queen? If White plays1.Qe1, then 1 . . .Qxh2# is checkmate. Suppose White plays 1.Qg3 instead, toprotect h2. How does Black force checkmate using a deflection?
Exercise #5:Black to move wins, but White to move can defend. If it’s Black’s turnto move, how can he force checkmate in two moves? (Hint: Bring the most powerfulpiece into the attack.) If it’s White’s move, how should he defend against thethreat?
Exercise #6:White to move (Short–Timman, Holland, 1991). Here’s an amazingposition from a game between two recent World Championship contenders, whichuses the same idea as the last exercise, with a twist. White played 32.Kg3, and after32 . . .Rce8 he played 33.Kf4. What was White’s idea? Can Black defend?
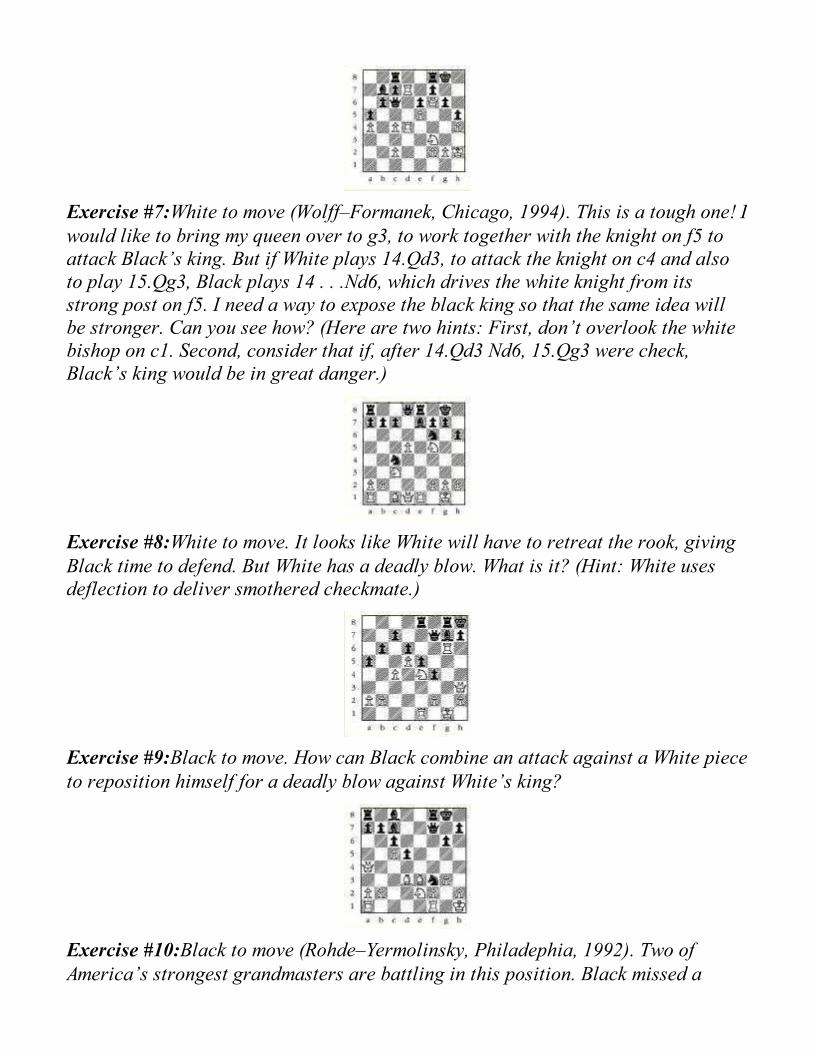
Exercise #7:White to move (Wolff–Formanek, Chicago, 1994). This is a tough one! Iwould like to bring my queen over to g3, to work together with the knight on f5 toattack Black’s king. But if White plays 14.Qd3, to attack the knight on c4 and alsoto play 15.Qg3, Black plays 14 . . .Nd6, which drives the white knight from itsstrong post on f5. I need a way to expose the black king so that the same idea willbe stronger. Can you see how? (Here are two hints: First, don’t overlook the whitebishop on c1. Second, consider that if, after 14.Qd3 Nd6, 15.Qg3 were check,Black’s king would be in great danger.)
Exercise #8:White to move. It looks like White will have to retreat the rook, givingBlack time to defend. But White has a deadly blow. What is it? (Hint: White usesdeflection to deliver smothered checkmate.)
Exercise #9:Black to move. How can Black combine an attack against a White pieceto reposition himself for a deadly blow against White’s king?
Exercise #10:Black to move (Rohde–Yermolinsky, Philadephia, 1992). Two ofAmerica’s strongest grandmasters are battling in this position. Black missed a

brilliant sacrifice to rip open White’s king and then give checkmate. Can you findit? (Hint: Think about how to draw the White king out and maximize the power ofthe bishop on c7.)
Exercise #11:White to move. Does White have a stronger move than retreating theknight to e4 or f3?
Exercise #12:White to move (Khalifman–Seirawan, Holland, 1991). White, a topgrandmaster, started a brilliant winning combination with 1.Nh6+!! gxh6. Howshould White continue the attack against the king?
Exercise #13:White to move. How can White deliver checkmate on d8? (Hint: Whiteneeds to get his knight out of the way, and he needs to make sure the king will nothave access to the c7 square when the knight has moved out of the way.)
Exercise #14:White to move. How can White exploit the back rank to forcecheckmate?

Exercise #15:White to move (Girsch–Man, Canada, 1963). Once again, White canexploit the weak back rank, this time with a deflection sacrifice.
The Least You Need to Know
Even if you don’t have an absolute material advantage, a particular attack cansucceed if you have more material in the part of the chessboard where you areattacking.
An exposed king is always potentially in danger.
The weak back rank and smothered mate are two very common tactics to use inthe attack against the king.
There are literally thousands of tactics to use in the attack against the king. Part oflearning to play better chess is recognizing these tactics and applying them inyour own games.
Always look for a way to combine threats to win material with the attack againstthe king.

Part 3Strategy
If there’s no move to capture one of your opponent’s pieces, and you can’t see howto attack the king, how can you know what move to play? Which positions are goodfor you, and which are bad? How can you tell? The answers to these questions comefrom knowing chess strategy, and that’s the subject of this part.The traditional way to teach chess strategy (and who am I to break with tradition?)is to divide the course of a chess game into three phases: the beginning phase(called the opening), the middle phase (called the middlegame), and the final phase(called the endgame). Similar strategies apply to each phase, but there are somedifferences in how the strategies should be applied in each phase. By the time youfinish this part, you’ll know what to do and when to do it!

Chapter 9
In the Beginning
In This Chapter
The three phases of a chess game
The difference between “the opening” and “an opening”
Your goal in the first 8–12 moves
Important principles for the first 8–12 moves
So far, we’ve looked at lots of different kinds of chess positions that might arise in agame. But we haven’t looked at the one chess position that always arises in everygame: the starting position. “All these tactics are fine and dandy,” you might think toyourself, “but what the heck should I actually do when I start the game?” That’s thesubject of this chapter. I’ll explain to you what your goal should be in the first 8–12moves, and some of the crucial principles you should keep in mind as you achieve thatgoal.
The Beginning, Middle, and End of a Chess GameChess can be divided into three distinct phases. The first phase is called “theopening,” and is the first 8–12 moves of the game. The third phase is called “theendgame,” which is that phase of the game where there are relatively few pieces leftfor each side. And the second phase, the one that comes between the opening and theendgame, and which is most of chess, is called “the middlegame.” So why do specialconsiderations apply to the opening? At the beginning of a chess game, all the piecesand pawns are crammed into two ranks for each side, and there are four ranks ofunoccupied squares. It would be foolish to rush out and attack your opponent beforeyou brought out your pieces and pawns to good squares. After all, would a generalmount an attack on the enemy before his army was ready to fight? If you’re going to be
a good general to your chess army, you have to know how to bring out your pieces,and where they belong. That’s what the opening is all about. Once you have your armyfairly well mobilized, the middlegame begins. And while the number of moves it takesto reach that stage varies from game to game, 8–12 moves is a good rough estimate.
Chess LoreHave you ever watched a movie or seen a TV show where chess ismentioned, and somebody says something like, “Ah, yes: the MoscowManeuver. But do you know how to respond to the Danish Gambit?” Didyou ever wonder what the heck they were talking about? Well, most ofthe time they’re just talking nonsense. But what they’re trying to do is toname specific openings; and I must admit that openings do tend to havesome pretty weird names, much like the made-up ones you hear on TVor in the movies.
Sometimes an opening is named after a nationality, like the “EnglishOpening,” the “Sicilian Defense,” or the “Italian Game.” Sometimes anopening is named after a person, like the “Alekhine Defense” or the“Marshall Attack.” Sometimes an opening is named after a place, like“the Vienna Game” or the “Wilkes-Barre Variation” (named after a townin Pennsylvania).
And then there are some that are impossible to explain, like the “Queen’sIndian Defense” or the “Frankenstein-Dracula Variation.” I don’t knowwhere those names came from!
“The Opening” or “An Opening?”“The opening” refers to the general phase of the game where you’re bringing out yourpieces and pawns, getting ready to make plans and mount attacks. But we can also talkabout “an opening,” which is a specific sequence of moves that one plans in advanceto start the game with. There are literally hundreds, even thousands of such sequencesof moves. The more advanced one becomes at chess, the more time is spent studyingthese sequences of moves. In a game between grandmasters, sometimes the wholegame can be won or lost because of a new idea—even just one new move—that onegrandmaster plays against another in an opening sequence.

If you want to progress beyond this book, you’ll want to learn more about thesespecific openings. In Chapter 15, I’ll tell you how to do that. But you must learn towalk before you can run: Before you learn any specific openings, you must learn thebasic principles for playing the opening. Those principles are the subject of thischapter.
When Does the Beginning End?When do you know the opening has ended? The simple answer is that you know it’sover when you’ve achieved the goal of the opening. Your goal in the opening has twoparts: To get most of your pieces and some of your pawns off their starting squaresand onto better squares, and to get your king into safety. There are five basicprinciples to keep in mind for the opening while you achieve that goal.
Diagram 1: The square in bold outlines the center of the board; the X’s show thefour most important center squares.
The Center’s Where All the Action IsOkay, so you want to bring your pawns and pieces into play. That makes sense, butwhere should you put them? The answer is simple: You want to put them on squareswhere they control the center of the board. Diagram 1 shows the center.
Why control the center? Basically, there are two reasons. First, when you control thecenter, you can switch your pieces from one part of the board to any other in the mostefficient way possible, because the easiest way to move from side to side is to gothrough the middle. Second, controlling the center gives you more control over thesides of the board. So it comes down to flexibility and raw power, both of which areincreased by controlling the center.
Keep in mind that occupying the center is not always the same thing as controlling it,because a piece or pawn does not control the square it’s sitting on. That doesn’t meanthat you shouldn’t put pieces or pawns in the center! It just means that when you do,you have to make sure that those pieces or pawns are adequately supported by otherpieces or pawns.
Center Pawns FirstIf you should control the center, which pieces and pawns should you bring out first todo it? Different considerations apply to pieces and pawns, so I’ll talk about themseparately.
BlundersDon’t exchange a center pawn for a noncenter pawn without goodreason!
For the pawns, the rule of thumb is to use the e-pawn and the d-pawn first, and maybethe c-pawn. Don’t push the f-pawn without good reason; and be very careful aboutmoving the other pawns. The reasons to push the e-pawn and the d-pawn are that theyare the center pawns and have a bigger influence on the battle for the center, andpushing them lets the bishops and queen get into the game. The reasons to push the c-pawn are that it can have some effect on the center (although less than the centerpawns), and pushing it also opens a diagonal for the queen to use. (Even if the queendoes not use it right away, it may be useful later in the game.)
Patrick’s PointersTake another look at the Anand-Kasparov game in Chapter 8: BecauseAnand’s pawn was on f3, Kasparov’s queen on b6 was able to preventhim from castling, which made Black’s attack against the white kingpossible. This is a perfect example of the problems that result frompushing the f-pawn too soon!
What about the other pawns? Well, there are times when it can be good to push the f-pawn, but there are also times when it’s bad to do so, because pushing this pawnexposes the king. (Pushing the c-pawn could be useful because it opens a diagonal forthe queen; but with the f-pawn, the king can’t use the open diagonal nearly as much asthe opponent can use it to attack it.) An experienced player will often know when it’sgood to push this pawn, and when it’s bad; but even an experienced player can come

to regret pushing his f-pawn too early in the opening. The bottom line: Always thinktwice about pushing the f-pawn in the opening, and don’t do so unless you are sureyour king will not be exposed because of it.
What about the other four pawns? There are times when you want to push them; inparticular, later in the chapter I’ll mention what is called the “fianchetto,” which canbe quite good, and requires you to push either your g-pawn or your b-pawn. But ingeneral, the pawns on either side of the board shouldn’t be pushed until you havefinished the opening, and certainly not without a very good reason.
Minor Pieces Before Major PiecesThe rule of thumb for developing pieces is to develop the less powerful pieces first,and the more powerful pieces later. Develop the knights and the bishops first (somepeople even stress that you should develop the knights before the bishops), then therooks, and then the queen.
Some beginning players think they should bring the queen out right away. I understandthe thought: Since the queen is so powerful, why not use it right away to attack? Butoften, this is a wrong idea. You’re not going to be able to attack anything before youget the rest of your army into action, so you’ll just waste time. And even worse, thequeen will be exposed to attack by your opponent’s pieces. Your opponent will beable to gain time to develop more of his pieces, because he’ll be able to develop apiece and attack the queen at the same time, forcing you to move the queen out of theway, giving him a chance to develop more pieces while you keep moving your queen.
Of course, any rule has its exceptions, and there are openings grandmasters play wherethe queen plays a role early in the opening. But these cases are rare, and they havebeen carefully thought through in advance. You will learn the exceptions to the rules asyou learn more about chess: For now, keep the queen home in the opening!
Chess TalkWhen you move a piece for the first time, we say that you develop it.For some reason, though, you don’t “develop” the pawns, only thepieces. And no one talks about “developing” the king, because in theopening, the king shouldn’t be developed, it should be put away in a safeplace!

Time Is of the EssenceI said that one reason you should not bring the queen out too early in the opening is thatyour opponent will “gain time” to develop his pieces by attacking your queen.Actually, time is always important in chess, especially in the opening.
Think of it this way. Suppose you and I are playing a game. Suppose that in my firstfew moves, I move each center pawn once, each knight once, each bishop once, andcastle, while in your first few moves, you move one center pawn, and take two movesto develop each piece. Obviously, I’m going to be able to have more pieces andpawns playing a role in the game earlier on, and that’s going to give me an advantagein any early skirmishes we might have. Not to put too fine a point on it, you’ve wastedtime in the opening.
You should always use your pieces efficiently, and this is especially true in theopening. Now, of course, there will be times when you just have to move the samepiece twice or even more in the opening (for example, if you have to recapture apiece). But as much as possible, you should develop each piece to a good square, andthen turn your attention to developing the other pieces.
Castle Early!Castling is a wonderful move. It does two things: It hustles the king out of the center ofthe board and to one of the wings, where it will be out of the way of the other pieces;and it makes it easier to develop the rooks.
Maybe it’s not obvious why castling helps develop the rooks. If you are following myadvice, you’ll be pushing the e-pawn, the d-pawn, and maybe the c-pawn in theopening. Now if the rooks are going to get into the game, they’re going to need openfiles, and the open files will be those whose pawns have been pushed forward, ormaybe exchanged (the e-pawn, the d-pawn, and/or the c-pawn). So you need to get therooks to those files, and castling helps do that.
Chess TalkAn open file is a file that has no pieces or pawns obstructing the rook’scontrol along it; it can also be a file whose pawns or pieces are faradvanced, so that even though the file is not completely open, the rookstill controls a lot of squares along it.

You might wonder which side you should castle on. The answer is always going todepend on the particulars of the position, but an extremely important consideration iswhich side the king will be safer on. Remember from last chapter that the castled kingshould have at least two and preferably three pawns in front of it to keep it safe. Youshould make sure that you haven’t moved so many of the pawns on the side where youwant to castle that the king will be exposed once it gets there.
Generally speaking, it’s easier to castle kingside than to castle queenside, becausecastling queenside requires that you develop one more piece: the queen. SometimesWhite castles queenside, because having the first move is a slight advantage and givesWhite a little more time to bring his pieces out. It’s pretty rare for Black to castlequeenside.
Two Openings to Illustrate the PrinciplesSo far my advice has been pretty abstract. Now I’ll show you some examples fromactual openings that grandmasters might play, to illustrate good play in the openingaccording to the principles you’ve just learned.
Queen’s Gambit DeclinedThe first opening we are going to look at is called the “Queen’s Gambit Declined.”White begins Diagram 2 by playing 1.d4, to which Black responds 1 . . .d5 (seeDiagram 3). With his first move, White stakes out territory in the center and opens upthe diagonal for the queen’s bishop. Black does the same.
White’s next move is 2.c4 (see Diagram 4). The purpose of this move is to fight for thecentral square d5. White uses the c-pawn to intensify the struggle for the centralsquares; but the move also places the pawn on a square where Black can capture it.This is why the opening is a “gambit:” White offers Black a pawn as part of hisopening strategy.
Diagram 2: White plays 1.d4.
Diagram 3: Black plays 1 . . .d5.

Diagram 4: White plays 2.c4.
Chess LoreIt’s interesting that the chess word “gambit” has passed into everydayusage, yet most people use the word in a way that is inconsistent with itschess usage. In chess, a “gambit” is a sacrifice, usually of one or twopawns, in the opening. If the sacrifice doesn’t happen in the opening, it’snot a gambit. Furthermore, for the sacrifice to be a gambit, it has to beknown to the player beforehand. If a player is struck with inspiration anddecides to sacrifice material in the opening without having thought about itbefore the game, it is not a gambit; but if the sacrifice is good, it maybecome a gambit when other people decide to copy the idea.
Black decides not to capture the pawn, and plays 2 . . .e6 (see Diagram 5). (It is alsopossible for Black to capture the pawn: then the opening is called the “Queen’sGambit Accepted.”) Notice that Black’s second move not only helps develop theking’s bishop, it also enables Black to recapture on d5 with a pawn if White shouldplay cxd5. This is important, as it means that Black can maintain the very strong pawnon d5.
The next several moves by each player are excellent, straightforward developingmoves aimed at controlling the center. In Diagram 6, White plays 3.Nc3, and Blackplays 3 . . .Nf6; in Diagram 7, White plays 4.Bg5, and Black plays 4 . . .Be7. (If Blackwere to play 3 . . .dxc4 or 4 . . .dxc4, White would respond strongly with 4.e4 or 5.e4;

Black would not be able to keep the pawn, and would lose control of the center toboot.)
Notice, in particular, that White’s fourth move pins Black’s knight to the queen, whileBlack’s fourth move breaks the pin by putting the bishop between the knight and queen.
In Diagram 8, White plays 5.e3, and Black plays 5 . . .O-O. Now that White hasdeveloped the queenside minor pieces, he begins to focus on developing the kingsideminor pieces. Black, on the other hand, hurries to castle kingside.
Diagram 5: Black plays 2 . . .e6.
Diagram 6: Position after 3.Nc3 Nf6.
Diagram 7: Position after 4.Bg5 Be7.
Diagram 8: Position after 5.e3 O-O.
White’s next move is 6.Nf3, developing the knight to an excellent square. Blackresponds with 6 . . .Nbd7 (see Diagram 9). This move puts the knight into the fight for

the center, but the black knight is not as strong here as White’s queen’s knight on c3.Black decides to develop the knight to this less active square rather than to c6 becausehe wants to be able to use the c-pawn in the fight for the center, either by pushing it toc5 to attack White’s pawn on d4 or by pushing it to c6 to support the pawn on d5.
Diagram 9: Position after 6.Nf3 Nbd7.
Diagram 10: White plays 7.Rc1.
Diagram 11: Black plays 7 . . .c6.
Diagram 12: White plays 8.Bd3.
In Diagram 10, White plays 7.Rc1. Perhaps this move seems surprising; it might seemthat White would do better to play 7.Be2 or 7.Bd3, to develop the bishop and to castlebefore developing the rook. The explanation is that White wants to make the bestpossible use of time by anticipating Black’s idea. White realizes that one plan forBlack is to capture the pawn on c4 and then to play . . .c5 himself.

For example, if 7.Bd3, then Black would play 7 . . .dxc4 8.Bxc4 c5; although Blackhas exchanged a center pawn for a non-center pawn, it is all right because Black willsoon exchange a non-center pawn for a center pawn again. White anticipates this ideaby developing his rook first; now if Black captures the pawn on c4, when Whiterecaptures he will have gained the Rc1 move over the previous sequence. Blackdecides that it is not in his interest to allow White to gain time in that way, so hechooses instead to support his center by playing 7 . . .c6 (see Diagram 11).
Now White plays 8.Bd3 (see Diagram 12), developing the last minor piece. Howshould we evaluate this position? White’s control of the central squares is somewhatstronger than Black’s, but Black has still secured a good stake in the center. White hasnot yet castled, but soon will. Because White’s pieces control the center a little betterthan Black’s, and because White’s pawns are slightly farther advanced than Black’s,it’s fair to say that White has a small advantage. But this advantage is not much; and ifBlack plays well, a good position can be secured. (And in fact, in Chapter 12, I showyou Black’s best way to continue.)
Sicilian DefenseOur second example comes from an opening called the “Sicilian Defense.” Whiteplays 1.e4, a move that fights for the center in a similar way to 1.d4; but in contrast tothe last example, Black does not mimic White’s first move, and plays 1 . . .c5 instead(see Diagram 13). Black decides to grab territory on the side of the board that White’sfirst move slightly neglected. On the plus side, Black may stand better on thequeenside than White because of this bold strike; but on the minus side, Black’s firstmove does not help develop pieces, and the pawn on c5 controls less of the centerthan the pawn on e4. This provocative opening often leads to very exciting games!
In Diagram 14, White’s next move is 2.Nf3, while Black plays 2 . . .d6. White’s movedevelops the knight toward the center, while Black’s move prepares to develop thequeen’s bishop.
White’s third move is quite bold: 3.d4 (see Diagram 15). On the plus side, this movefights for control of the d4 square, and it enables White to develop the queen’s bishop.On the minus side, it allows Black to exchange a noncenter pawn for a center pawn.Such dynamic imbalances are typical for this opening.
Diagram 13: Position after 1.e4 c5.

Diagram 14: Position after 2.Nf3 d6.
Diagram 15: White plays 3.d4.
Black takes White up on the offer to exchange pawns (see Diagram 16), and Whiterecaptures with his knight. (He doesn’t take the pawn with his queen with 4.Qxd4,because then the queen would be exposed to attack by 4 . . .Nc6, which would enableBlack to develop his knight with gain of time.)
In Diagram 17, Black develops his knight to an excellent square with gain of time byplaying 4 . . .Nf6, and White defends the pawn by developing his knight with 5.Nc3.Now Black wants to develop his king’s bishop and then castle. What’s the best way todo this?
Black plays 5 . . .g6 (see Diagram 18), with the intention of putting the bishop on g7next move. This is not the only solution to his problem, but it is a good one. This movedefines this particular variation of this opening, called the “Dragon Variation.”
Diagram 16: Position after 3 . . .cxd4 4.Nxd4.
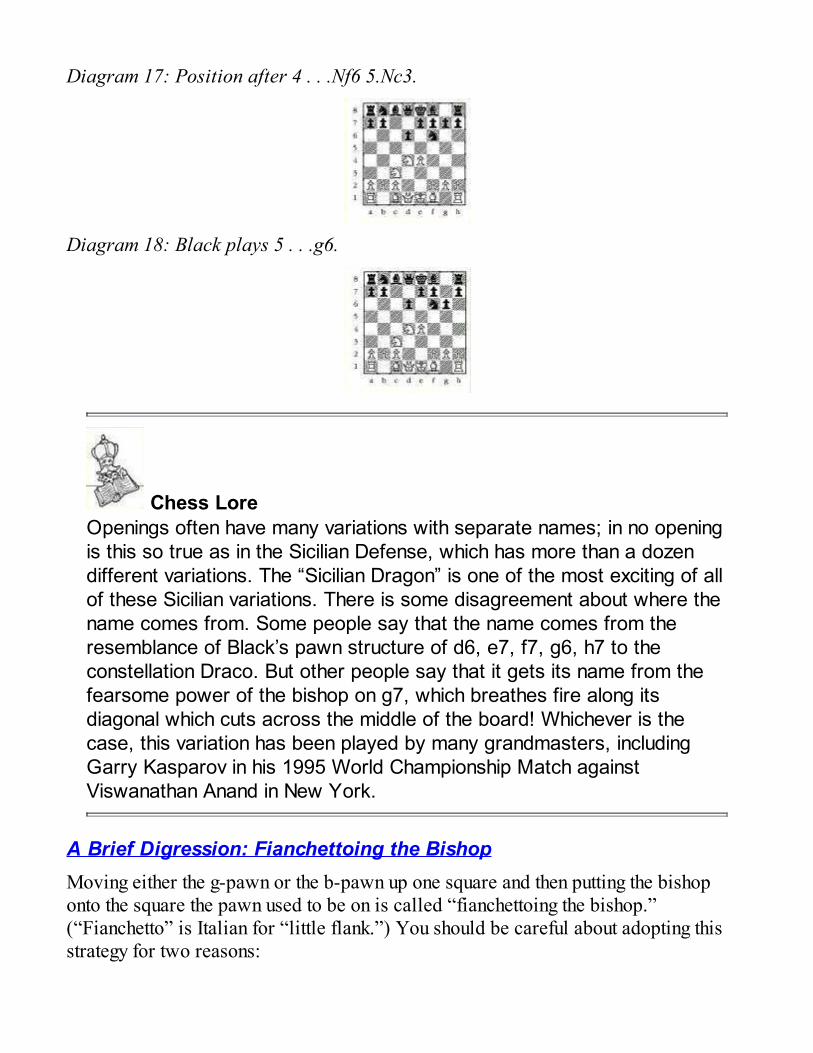
Diagram 17: Position after 4 . . .Nf6 5.Nc3.
Diagram 18: Black plays 5 . . .g6.
Chess LoreOpenings often have many variations with separate names; in no openingis this so true as in the Sicilian Defense, which has more than a dozendifferent variations. The “Sicilian Dragon” is one of the most exciting of allof these Sicilian variations. There is some disagreement about where thename comes from. Some people say that the name comes from theresemblance of Black’s pawn structure of d6, e7, f7, g6, h7 to theconstellation Draco. But other people say that it gets its name from thefearsome power of the bishop on g7, which breathes fire along itsdiagonal which cuts across the middle of the board! Whichever is thecase, this variation has been played by many grandmasters, includingGarry Kasparov in his 1995 World Championship Match againstViswanathan Anand in New York.
A Brief Digression: Fianchettoing the BishopMoving either the g-pawn or the b-pawn up one square and then putting the bishoponto the square the pawn used to be on is called “fianchettoing the bishop.”(“Fianchetto” is Italian for “little flank.”) You should be careful about adopting thisstrategy for two reasons:

1. The pawn move does little to fight for control of the center squares, so it losestime in the opening.
2. Once you advance the pawn, it no longer guards the squares it used to. This isespecially important if the king castles to that side of the board, since the kingmight be more exposed because the pawn has advanced.
Diagram 19: Position after 6.Be2 Bg7.
Nevertheless, the fianchetto is often a good way to develop the bishop. In the positionin Diagram 19, it is especially effective because White’s d-pawn has been exchangedand no longer stands on d4, so the black bishop’s diagonal will be relativelyunobstructed by White’s pawns. That means the bishop will have a powerful post ong7.
Back to the Sicilian DefenseBoth sides continue their development. White plays 6.Be2, and Black plays 6 . . .Bg7;White castles (see Diagram 20), then Black castles. For his 8th move, White decidesto develop his queen’s bishop to e3, where it fights for control of the d4 square, andBlack develops his queen’s knight to c6, where it also fights for control of d4 (seeDiagram 21).
White’s 9th move, in Diagram 22, will not make sense unless you understand Black’sintention. Black would like to advance his d-pawn to d5. This would exchangeWhite’s last center pawn, weakening White’s control of the center, and leaving Blackwith only one center pawn. Therefore, White decides to retreat his knight to b3 with9.Nb3. Although this takes a piece away from the center, it also increases the scope ofWhite’s queen, in particular increasing the control of the d5 square. Besides, Whitewas nervous about the possibility of the knight on d4 coming under heavy pressurebecause of the knight on c6 and the bishop on g7. Although at the moment this bishop iscloaked by the knight on f6, it always has the potential to strike!
Diagram 20: Position after 7.O-O O-O.
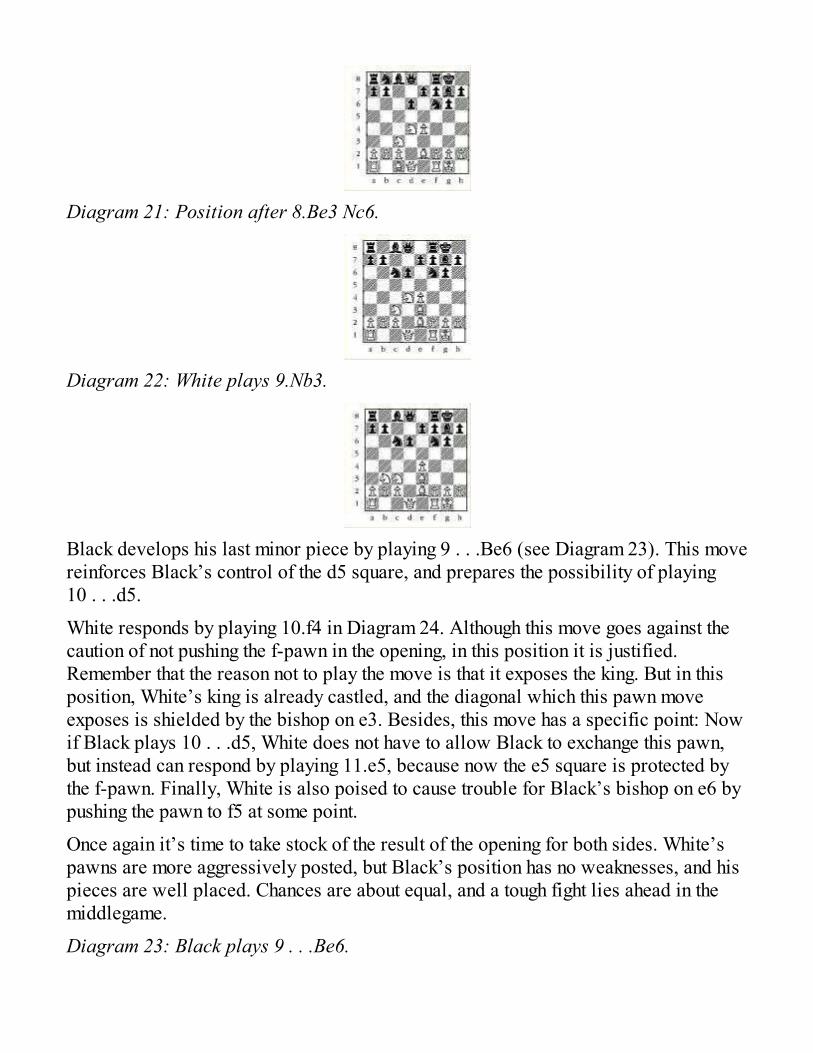
Diagram 21: Position after 8.Be3 Nc6.
Diagram 22: White plays 9.Nb3.
Black develops his last minor piece by playing 9 . . .Be6 (see Diagram 23). This movereinforces Black’s control of the d5 square, and prepares the possibility of playing10 . . .d5.
White responds by playing 10.f4 in Diagram 24. Although this move goes against thecaution of not pushing the f-pawn in the opening, in this position it is justified.Remember that the reason not to play the move is that it exposes the king. But in thisposition, White’s king is already castled, and the diagonal which this pawn moveexposes is shielded by the bishop on e3. Besides, this move has a specific point: Nowif Black plays 10 . . .d5, White does not have to allow Black to exchange this pawn,but instead can respond by playing 11.e5, because now the e5 square is protected bythe f-pawn. Finally, White is also poised to cause trouble for Black’s bishop on e6 bypushing the pawn to f5 at some point.
Once again it’s time to take stock of the result of the opening for both sides. White’spawns are more aggressively posted, but Black’s position has no weaknesses, and hispieces are well placed. Chances are about equal, and a tough fight lies ahead in themiddlegame.
Diagram 23: Black plays 9 . . .Be6.
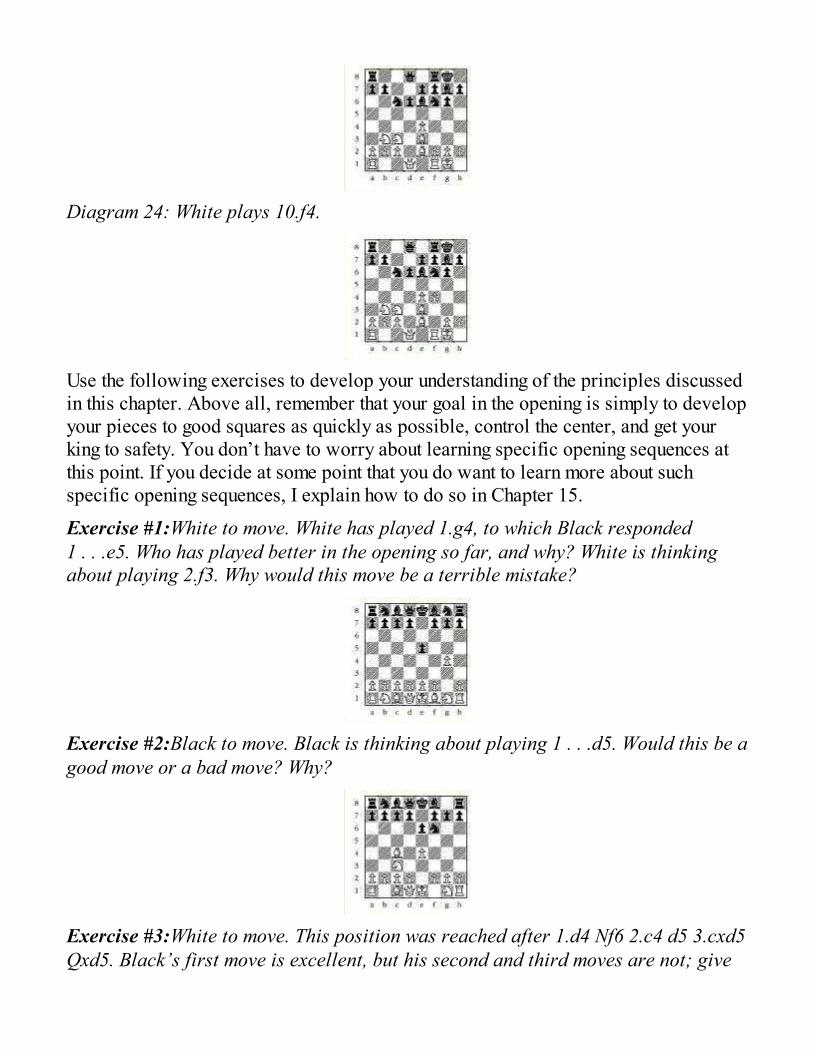
Diagram 24: White plays 10.f4.
Use the following exercises to develop your understanding of the principles discussedin this chapter. Above all, remember that your goal in the opening is simply to developyour pieces to good squares as quickly as possible, control the center, and get yourking to safety. You don’t have to worry about learning specific opening sequences atthis point. If you decide at some point that you do want to learn more about suchspecific opening sequences, I explain how to do so in Chapter 15.
Exercise #1:White to move. White has played 1.g4, to which Black responded1 . . .e5. Who has played better in the opening so far, and why? White is thinkingabout playing 2.f3. Why would this move be a terrible mistake?
Exercise #2:Black to move. Black is thinking about playing 1 . . .d5. Would this be agood move or a bad move? Why?
Exercise #3:White to move. This position was reached after 1.d4 Nf6 2.c4 d5 3.cxd5Qxd5. Black’s first move is excellent, but his second and third moves are not; give

at least two reasons why, and suggest a good move for White to play next.
Exercise #4:Black to move. Do you think this is a good position for Black tofianchetto his king’s bishop? Why or why not?
Exercise #5:White to move. It’s been a pretty wild opening so far; now White wantsto castle. Should he castle kingside or queenside? Why?
Exercise #6:White to move. This position was reached by 1.e4 c5 2.Bc4 Nc6. Is3.Qh5 a good move or a bad move? Why?
Exercise #7:White to move. This position was reached by 1.e4 e6 2.d4 d5. List allthe moves that you would consider for White here. Why do you list those moves?What are the best moves to consider? Is 3.f3 a good move or a bad move? Why?

Exercise #8:Black to move. This position was reached after 1.d4 Nf6 2.c4 e6 3.Nc3.Black is considering three moves: 3 . . .Bb4, 3 . . .Be7, and 3 . . .d5. One of thesemoves is a bad move, the other two are good moves. Which is the bad move andwhy?
Exercise #9:White to move. This position was reached by 1.e4 e5 2.Nf3 Nc6. HereWhite usually plays 3.Bb5 or 3.Bc4. Why do people not play 3.Bd3 or 3.Be2?Explain why these two moves are not as good as the normal moves.
Exercise #10:Black to move (Kasparov–Kramnik, London, 2000). This position wasreached several times in the World Championship match after 1.e4 e5 2.Nf3 Nc63.Bb5 Nf6 4.O-O Nxe4 5.d4. Every time, Kramnik played 5 . . .Nd6, which after6.Bxc6 dxc6 7.dxe5 Nf5 8.Qxd8+ Kxd8 leads to a complicated endgame. Why do youthink Kramnik did not play 5 . . .exd4? Analyze this position and find a good way forWhite to continue.
The Least You Need to Know

A chess game can be divided into three phases: the opening, the middlegame, andthe endgame.
As a beginner, focus on understanding the general principles for playing theopening, and don’t worry about learning specific opening sequences.
Your goal in the opening is to bring your pieces and center pawns out to fight forthe center quickly and efficiently, and to get your king out of the center by castlingas soon as possible.
Just because the opening is a special phase doesn’t mean that the other thingsyou’ve learned about playing good chess don’t apply here! In particular, alwaysremember the importance of material and king safety.
Chapter 10
Making the Most of Your Pieces
In This Chapter
The importance of mobility and attacking your opponent’s weaknesses
Tips on how to use each piece more effectively
How to tell whether the knight or the bishop is the better piece in any particularposition
The middlegame is where most of the action is, so we’ll spend the next four chapterson it. In this chapter, you’ll learn how to use your pieces more effectively. Later in thechapter, we’ll consider each piece separately: knight, bishop, rook, and queen. (We’lltalk about the pawns next chapter; and as for the king, you should be keeping him in asafe place until the endgame!) But first, let’s talk about two very important conceptsthat apply to all the pieces.
Mobility: Give Me Room!Last chapter I stressed the importance of controlling the center, and I told you thatpieces are better placed when they control or occupy the center. One major reason forthis is that pieces tend to control more squares when they control or occupy the center.Well, mobility is all about controlling more squares. Simply put: A piece tends to bemore powerful if it controls more squares. And when it controls more squares, we sayit’s more mobile.
Of course controlling more squares isn’t the only thing that’s important, obviously itmatters which squares your pieces control. We’ll come to that in a moment. But rightnow, I want you to appreciate the importance of making sure your pieces control more

squares, rather than fewer squares. It’s a simple idea, but it’s very important.
Patrick’s PointersControlling the center isn’t just important in the opening; it’s also veryimportant in the middlegame. So make sure your pieces control thecenter!
Do Be Cruel: Attack Your Opponent’s WeaknessesYou want your pieces to be as effective as possible. Part of being more effective ismaking sure that they attack weak spots in your opponent’s position. A weak spot canbe the king, a pawn or group of pawns, a piece, or even a particular square. The pointis: Don’t attack your opponent where he is strongest; attack him where he is weakest!
I know this advice must sound pretty vague. A lot of the challenge in chess isidentifying the weak spots in your opponent’s position. Later in this chapter, I’ll giveyou specific examples of well-placed and poorly placed pieces, so you can seeexamples of what are weak spots and strong spots in a position. For now, justappreciate the importance of making sure your pieces attack your opponent where heis weakest.
The KnightNow I’ll illustrate how these two general concepts apply to how you should use eachpiece. Let’s start with the knight.
The knight is not a long-range piece like the bishop, rook, or queen. It has to berelatively close to the action in order to have any effect. Furthermore, it takes a knighta lot longer to get somewhere than it takes a bishop, rook, or queen. These are thedisadvantages of the knight compared to the other pieces. But the knight also has onebig advantage. It can hop over other pieces. Once you get the knight close to the action,it doesn’t matter whether the squares next to it are occupied or not—it still has thesame power.
What can we conclude from these observations? The knight wants to find a strongsquare somewhere in the middle of the board or close to some weak spot in theopponent’s position, and then the knight wants to sit there. The knight doesn’t care
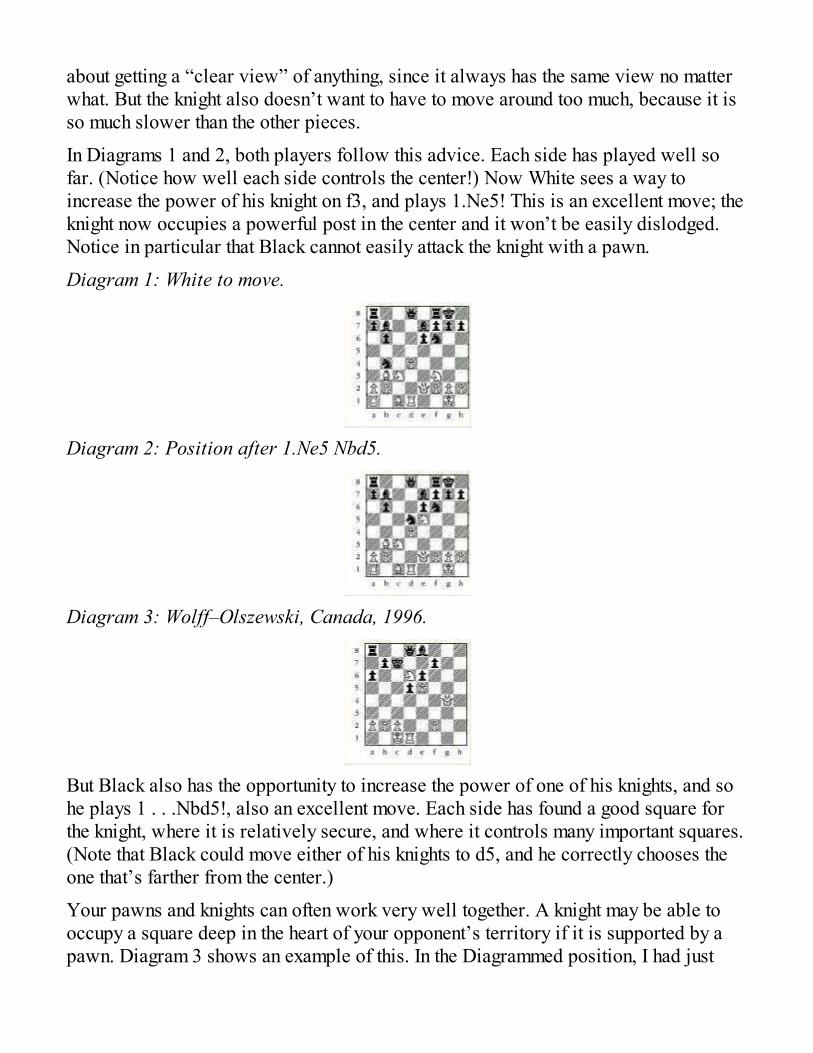
about getting a “clear view” of anything, since it always has the same view no matterwhat. But the knight also doesn’t want to have to move around too much, because it isso much slower than the other pieces.
In Diagrams 1 and 2, both players follow this advice. Each side has played well sofar. (Notice how well each side controls the center!) Now White sees a way toincrease the power of his knight on f3, and plays 1.Ne5! This is an excellent move; theknight now occupies a powerful post in the center and it won’t be easily dislodged.Notice in particular that Black cannot easily attack the knight with a pawn.
Diagram 1: White to move.
Diagram 2: Position after 1.Ne5 Nbd5.
Diagram 3: Wolff–Olszewski, Canada, 1996.
But Black also has the opportunity to increase the power of one of his knights, and sohe plays 1 . . .Nbd5!, also an excellent move. Each side has found a good square forthe knight, where it is relatively secure, and where it controls many important squares.(Note that Black could move either of his knights to d5, and he correctly chooses theone that’s farther from the center.)
Your pawns and knights can often work very well together. A knight may be able tooccupy a square deep in the heart of your opponent’s territory if it is supported by apawn. Diagram 3 shows an example of this. In the Diagrammed position, I had just
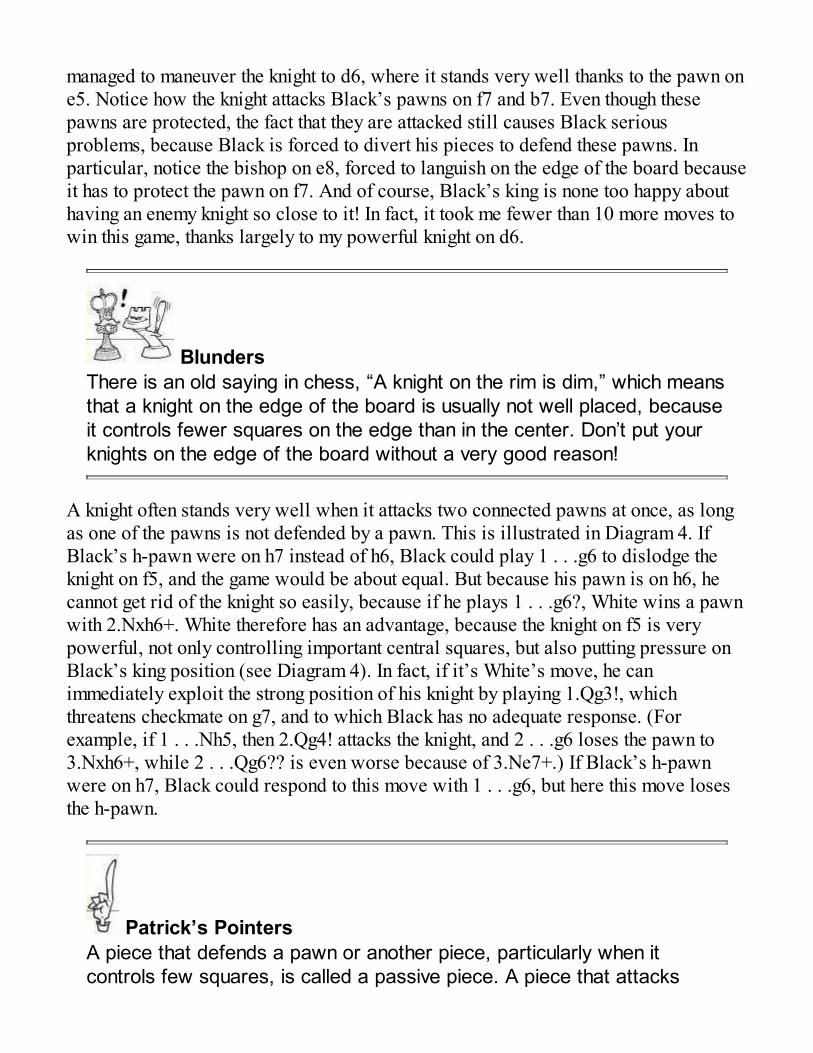
managed to maneuver the knight to d6, where it stands very well thanks to the pawn one5. Notice how the knight attacks Black’s pawns on f7 and b7. Even though thesepawns are protected, the fact that they are attacked still causes Black seriousproblems, because Black is forced to divert his pieces to defend these pawns. Inparticular, notice the bishop on e8, forced to languish on the edge of the board becauseit has to protect the pawn on f7. And of course, Black’s king is none too happy abouthaving an enemy knight so close to it! In fact, it took me fewer than 10 more moves towin this game, thanks largely to my powerful knight on d6.
BlundersThere is an old saying in chess, “A knight on the rim is dim,” which meansthat a knight on the edge of the board is usually not well placed, becauseit controls fewer squares on the edge than in the center. Don’t put yourknights on the edge of the board without a very good reason!
A knight often stands very well when it attacks two connected pawns at once, as longas one of the pawns is not defended by a pawn. This is illustrated in Diagram 4. IfBlack’s h-pawn were on h7 instead of h6, Black could play 1 . . .g6 to dislodge theknight on f5, and the game would be about equal. But because his pawn is on h6, hecannot get rid of the knight so easily, because if he plays 1 . . .g6?, White wins a pawnwith 2.Nxh6+. White therefore has an advantage, because the knight on f5 is verypowerful, not only controlling important central squares, but also putting pressure onBlack’s king position (see Diagram 4). In fact, if it’s White’s move, he canimmediately exploit the strong position of his knight by playing 1.Qg3!, whichthreatens checkmate on g7, and to which Black has no adequate response. (Forexample, if 1 . . .Nh5, then 2.Qg4! attacks the knight, and 2 . . .g6 loses the pawn to3.Nxh6+, while 2 . . .Qg6?? is even worse because of 3.Ne7+.) If Black’s h-pawnwere on h7, Black could respond to this move with 1 . . .g6, but here this move losesthe h-pawn.
Patrick’s PointersA piece that defends a pawn or another piece, particularly when itcontrols few squares, is called a passive piece. A piece that attacks

another pawn or piece, particularly when it controls many squares, iscalled an active piece. For example, in Diagram 3, the knight on d6 isactive, while the bishop on e8 is passive. In general, you want yourpieces to be active and your opponent’s pieces to be passive!
It is important to be able to tell when a knight that looks well placed is not. Look atDiagram 5. Is Black’s knight well placed on c6? At first it would appear so, becauseit controls the center and is hardly in any danger of being dislodged from its post. Butin fact, it is badly placed because White’s pawns on c3 and d4 “control” the knight.That is, they control many of the squares the knight attacks, and this lessens theknight’s effectiveness considerably. White’s knight, although at the moment it sits onthe first rank, has a much brighter future because it can maneuver to a very strongsquare.
Diagram 4: White’s knight on f5 is very powerful.
Diagram 5: White to move.
White plays 1.Ne3! Rfd8 (Black must move one or the other rook to d8, or else he willlose the d-pawn.) 2.Nf5, and suddenly the white knight occupies a terrific square (seeDiagram 6). In fact, working with the bishop on c1, the queen on f3, and the rook one1, this knight leads a powerful attack against Black’s king.
The BishopIn many ways the bishop is the knight’s opposite. Whereas the knight moves slowly,the bishop zooms across the board. So the bishop doesn’t care so much about gettingright up next to the action, since it can influence things from far away. But unlike theknight, who hops over pieces, the bishop can be blocked. So the bishop cares very

much about its diagonals being clear of pieces or pawns.
In Diagram 7, even though White’s bishop is away from the action on g2, it isextremely powerful because it controls a long, unobstructed diagonal, along which itattacks Black’s pawn on c6. (Notice how badly Black’s knight on g6 is placed,because it is forced to defend the pawn on e5, and because it is controlled by thewhite pawn on g3. Also notice that White’s queen is more active than Black’s queen.)Black’s bishop, on the other hand, is very passive, as it is forced to defend the pawnon c6. Each bishop has moved only one square from its starting position, but White’sfianchettoed bishop is much more powerful, because it attacks a weakness whereasBlack’s bishop must defend the same weakness.
Bishops can be “good” or “bad.” As the name suggests, you should avoid the badbishop and aim for the good bishop. Diagram 8 shows the contrast; Black’s bishop isblocked by its own pawns, and is therefore terribly passive. White’s bishop, on theother hand, is very active as it is perfectly centralized and controls many squares onboth the kingside and the queenside. You should not put too many pawns on the samecolor square as your bishop, as this will tend to make your bishop bad.
Diagram 6: Position after 1.Ne3 Rfd8 2.Nf5.
Diagram 7: White’s bishop is stronger than Black’s bishop.
Diagram 8: White’s bishop is good, while Black’s bishop is bad.
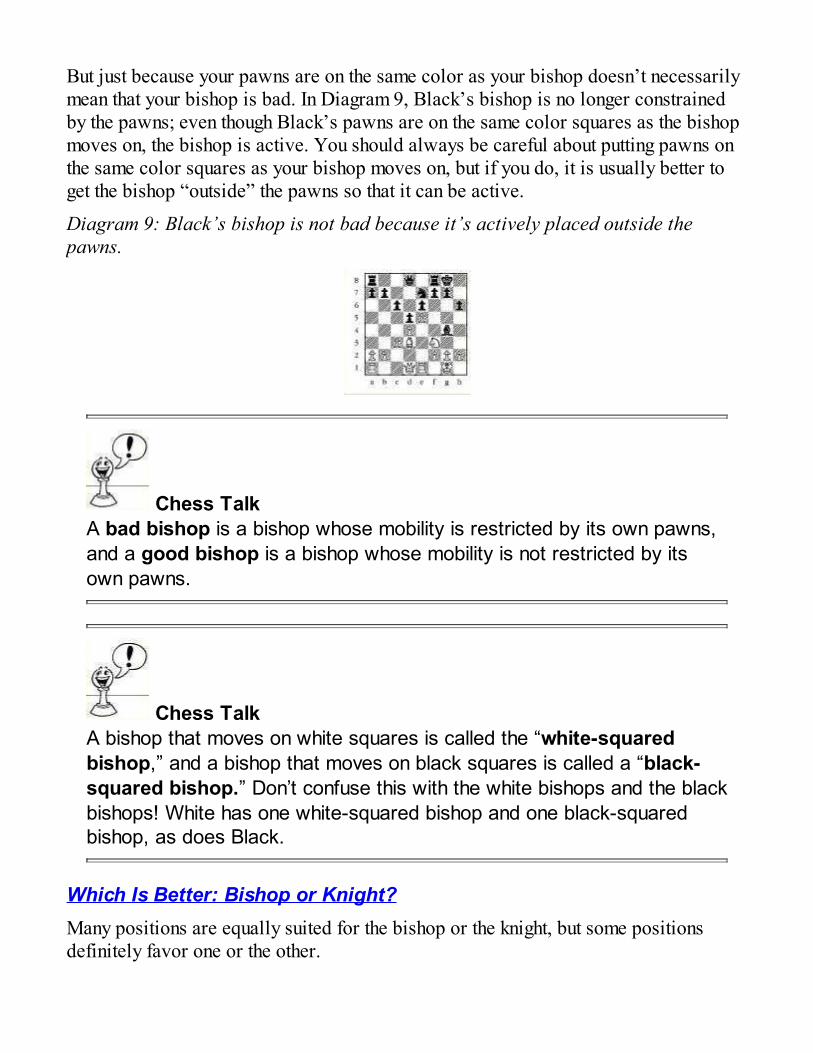
But just because your pawns are on the same color as your bishop doesn’t necessarilymean that your bishop is bad. In Diagram 9, Black’s bishop is no longer constrainedby the pawns; even though Black’s pawns are on the same color squares as the bishopmoves on, the bishop is active. You should always be careful about putting pawns onthe same color squares as your bishop moves on, but if you do, it is usually better toget the bishop “outside” the pawns so that it can be active.
Diagram 9: Black’s bishop is not bad because it’s actively placed outside thepawns.
Chess TalkA bad bishop is a bishop whose mobility is restricted by its own pawns,and a good bishop is a bishop whose mobility is not restricted by itsown pawns.
Chess TalkA bishop that moves on white squares is called the “white-squaredbishop,” and a bishop that moves on black squares is called a “black-squared bishop.” Don’t confuse this with the white bishops and the blackbishops! White has one white-squared bishop and one black-squaredbishop, as does Black.
Which Is Better: Bishop or Knight?Many positions are equally suited for the bishop or the knight, but some positionsdefinitely favor one or the other.

Diagram 10 shows an example of a position that clearly favors the knight. The playerof the white pieces was Emanuel Lasker, who was World Champion for almost 30years! (You can read more about Lasker in Chapter 16.) Lasker knew that Black’sbishop, so badly hemmed in by its own pawns, was a weak piece in this position. ButLasker also understood that his own knight was not the strongest piece at the momenteither, because it was being controlled by Black’s pawns. (That is, Black’s pawnscontrolled many of the squares the knight controlled.) And Lasker also knew that theknight is happiest when it finds a secure square from which it can control lots ofcentral squares. Lasker saw a way to improve the position of his knight.
Lasker played 1.Na4! (see Diagram 11). This violates the rule about not putting theknight on the edge of the board, but it’s okay here, because the knight isn’t going tostay there long; it’s going to c5.
Black’s queen is attacked, so he retreated it to e7, to which Lasker responded 2.Qd4!(Diagram 12). This move controls the c5 square, so White can play Nc5 next move.The knight will stand very well on this square, and it is totally secure; not only doesthe queen protect the knight, but also the knight can be supported by the b-pawn bymoving it to b4 if necessary.
Diagram 10: White to move (Lasker–Cohn, St. Petersburg, 1909.)
Diagram 11: White plays 1.Na4!.
Diagram 12: Position after 1 . . .Qe7 2.Qd4!.

Notice how Black’s bishop, restricted to the white squares, is incapable of fighting forcontrol of the black squares. In positions where the knight is stronger than the bishop,it is common for the knight to find a strong square of the opposite color of the enemybishop. Notice also that the center is closed, meaning that there are lots of pawns inthe middle of the board blocking the files, ranks, and (most importantly as far as thebishop is concerned) the diagonals. This is another common feature of positions wherethe knight is stronger than the bishop.
When the center is clear of pawns and the knight lacks any strong squares to settle on,the bishop tends to be the stronger piece. Diagram 13 shows an example of this.Black’s bishop has a magnificent diagonal, at the end of which lies a white pawn andthe white king; perfect targets. Clearly, the relevant area is the kingside, but White’sknight is practically a spectator to any kingside activity. Notice, in particular, how theblack pawns on b6 and c5 control the white knight. Even though material is equal,Black has a very large advantage in this position.
Chess TalkWhen there are lots of pawns in the center of the board blocking the files,ranks, and diagonals, we say that the center is closed. When there areno pawns in the center of the board, so that the files, ranks, anddiagonals are clear, we say that the center is open.
Diagram 13: Black’s bishop is much stronger than White’s knight.
The Two BishopsOften, the bishop’s power is felt most strongly in the middlegame when it joins forceswith its companion bishop. It is not always an advantage to be the only player withboth bishops, but it often is. Some people go so far as to say that having both bishopsis worth an extra half-point of material! (Recall the chart in Chapter 5.) You shouldremember that everything depends on the position; when the position is not one that

favors bishops in general, having an extra bishop is often not an advantage. Still, evenblocked positions may open up, so one must never underestimate the potential—ordanger—of the two bishops.
Diagram 14 shows a typical situation where the two bishops constitute an advantage.White may be able to attack Black on either the kingside or the queenside. Black’sminor pieces are passive; the knight is on a stable square, but it does not attack anyimportant points in White’s position, and it is hard to see how it could do so soon.Black’s bishop is good for the defense of the king, but it also attacks nothing inWhite’s position.
Diagram 14: White has the better position thanks to the two bishops.
But a small change in the position can improve Black’s game. For example, supposethat Black’s bishop was on e6, rather than f8, as in Diagram 15. In this case, thebishop and the knight coordinate much better together, so Black’s position hasimproved. For example, if it is Black’s move, he might play either 1 . . .Bc4 or1 . . .Bf5. Not only would this exchange White’s strong bishop on d3, it would alsoenable the knight to reach a more active square, since it was the bishop on d3 thatrestricted Black’s knight.
Diagram 15: Here the two bishops are not so large an advantage, because Black’sknight and bishop work well together.
If an opposing knight is off to the side of the board, then the two bishops may be wortha pawn or more. Diagram 16 shows a position where Black has a large advantage,even though White has a pawn more. Black’s bishop on e4 totally dominates theboard, in particular preventing the white knight from maneuvering to a position that iscloser to the center. (In fact, this position is taken from a game I played as Whiteseveral years ago, except in that game Black did not have a pawn on g7, so he wasbehind by two pawns. But even with two extra pawns, I only drew!)
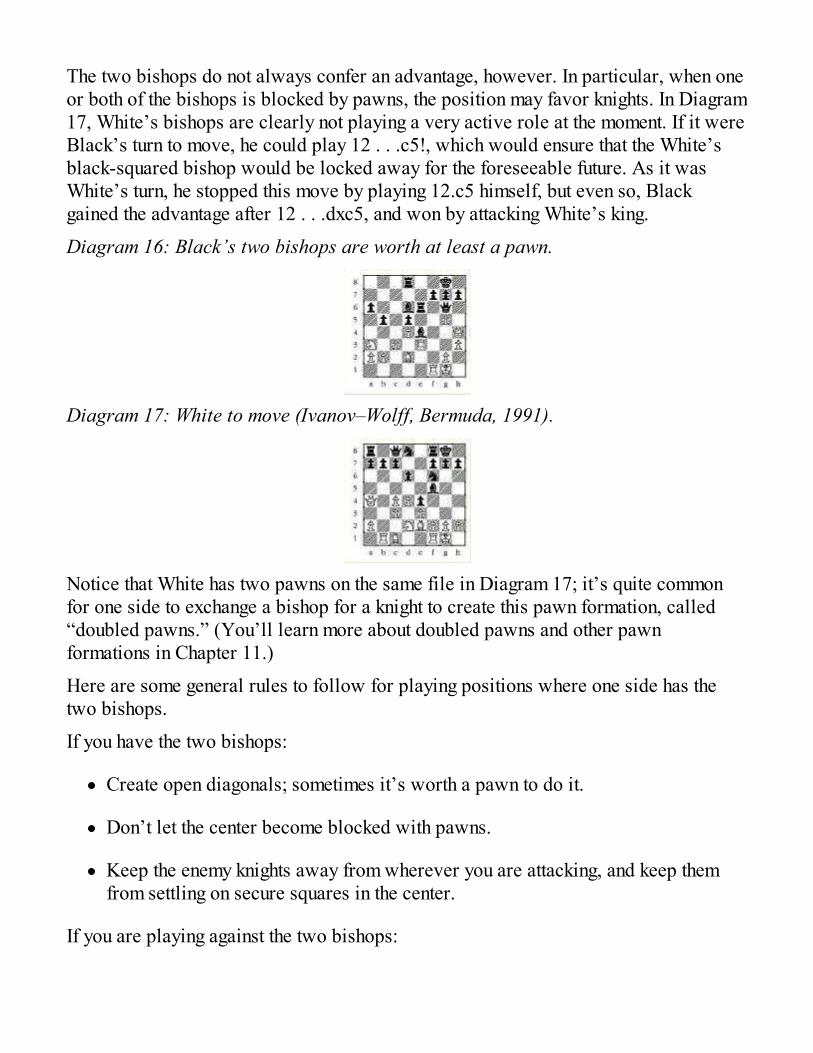
The two bishops do not always confer an advantage, however. In particular, when oneor both of the bishops is blocked by pawns, the position may favor knights. In Diagram17, White’s bishops are clearly not playing a very active role at the moment. If it wereBlack’s turn to move, he could play 12 . . .c5!, which would ensure that the White’sblack-squared bishop would be locked away for the foreseeable future. As it wasWhite’s turn, he stopped this move by playing 12.c5 himself, but even so, Blackgained the advantage after 12 . . .dxc5, and won by attacking White’s king.
Diagram 16: Black’s two bishops are worth at least a pawn.
Diagram 17: White to move (Ivanov–Wolff, Bermuda, 1991).
Notice that White has two pawns on the same file in Diagram 17; it’s quite commonfor one side to exchange a bishop for a knight to create this pawn formation, called“doubled pawns.” (You’ll learn more about doubled pawns and other pawnformations in Chapter 11.)
Here are some general rules to follow for playing positions where one side has thetwo bishops.
If you have the two bishops:
Create open diagonals; sometimes it’s worth a pawn to do it.
Don’t let the center become blocked with pawns.
Keep the enemy knights away from wherever you are attacking, and keep themfrom settling on secure squares in the center.
If you are playing against the two bishops:

Block the center with pawns.
Put most of your pawns on the opposite color of your bishop. (This will not onlystrengthen your bishop, it will also blunt the power of the enemy bishop forwhich you have no counterpart.)
Find a strong square for the knight, or at least keep it close to wherever thebishops might attack.
“Opposite-Colored Bishops”You’ll see in Chapter 14 that even if one side has the advantage of one or two pawns,and the players have opposite-colored bishops, the game may be drawn. In theendgame, opposite-colored bishops often favor the defender. But exactly the reverse istrue in the middlegame. In the middlegame, opposite-colored bishops favor theattacker. The reason is that when you use your bishop to attack, your opponent can’tuse his bishop to defend any of the threats your bishop creates, because they all occuron the wrong-colored squares.
Chess TalkWhen each side has only one bishop, and each bishop travels ondifferent-colored squares, we say that the players have opposite-colored bishops.
There are many ways the opposite-colored bishops can favor the attacker, but thegeneral idea is always the same; Diagram 18 shows you what I mean. White threatens1.Bxf7+, because if Black captures the bishop, he loses the rook on d8. Black candefend only by moving the rook away from d8, but then White still maintains the attackagainst f7, and has also gained the d-file for his rook to boot. White is probablywinning.
Notice how Black’s knight and bishop simply fail to attack anything in White’sposition, whereas White has fastened on the pawn on f7 with deadly effect.
Diagram 18: Black to move.

The RookThere are three very simple things to keep in mind about the rook: 1. Rooks craveopen files. 2. If you can penetrate with your rook into one of the first three ranks ofyour opponent’s position, it will often be very strong for you. 3. Rooks work verywell in pairs; if there is something to attack along a file or a rank, think about puttingboth rooks there. (Putting two rooks on the same file or rank is called “doubling therooks.”)
Diagram 19: Position after 1 . . .Rxd1 2.Rxd1.
We can continue the analysis from Diagram 18 to show the first two principles.Diagram 19 shows the position after Black plays 1 . . .Rxd1 and White recaptures with2.Rxd1. (Black could also defend by moving the rook to another square, such as e8,but that does not really change the nature of White’s advantage.) Now White’s rook isclearly much more active than its counterpart on f8, which is forced to defend thepawn on f7. In addition, White threatens to play 3.Rd7, which will attack the knight one7 and the pawn on a7 as well as put pressure on the pawn on f7. How can Blackdefend?
Actually, there is no good defense. The following three Diagrams show one possiblesequence of moves: I’ve chosen this particular variation to highlight how strong it canbe for the rook to penetrate to ranks deep within the enemy position. Black tries todefend the knight with the bishop by playing 2 . . .Bf6, but White attacks the bishopwith 3.Ne4 (see Diagram 20). Black defends the bishop with the king with 3 . . .Kg7,but White attacks the a-pawn with 4.Rd7 (see Diagram 21). If Black defends the pawnby playing 4 . . .a5 (there is no better move), White forks the bishop on f6 and thepawn on b6 along the sixth rank by playing 5.Rd6 (see Diagram 22).
Diagram 20: Position after 2 . . .Bf6 3.Ne4.
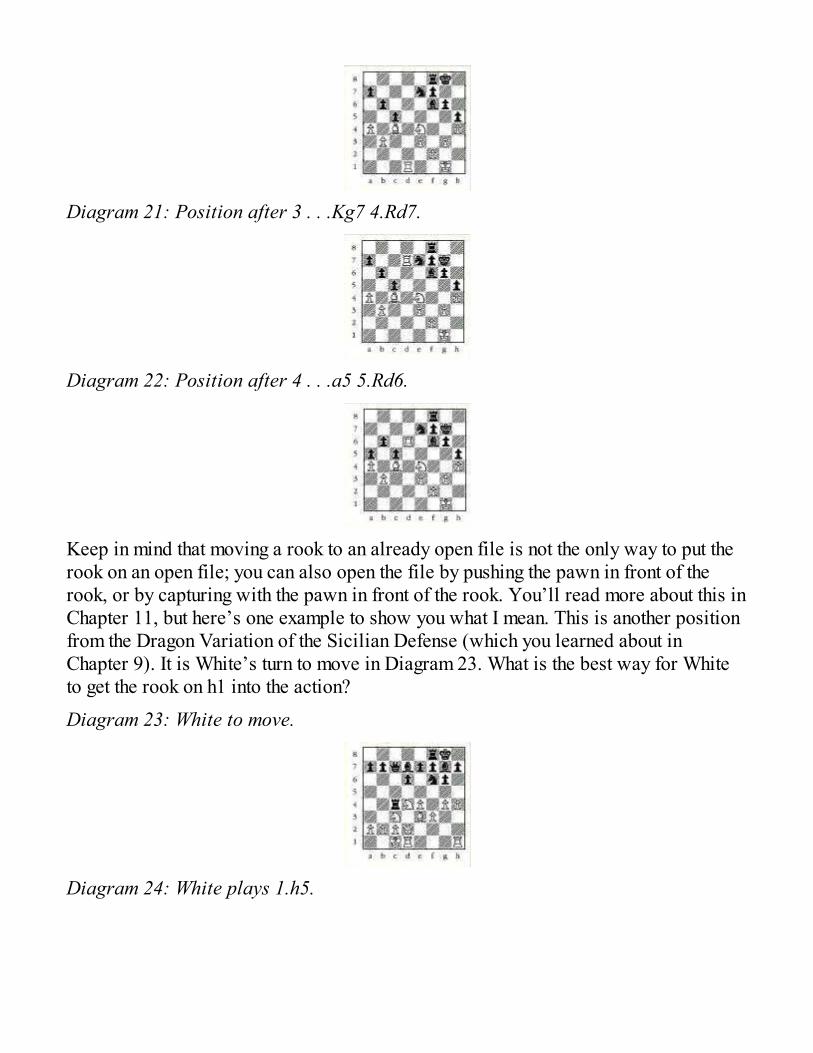
Diagram 21: Position after 3 . . .Kg7 4.Rd7.
Diagram 22: Position after 4 . . .a5 5.Rd6.
Keep in mind that moving a rook to an already open file is not the only way to put therook on an open file; you can also open the file by pushing the pawn in front of therook, or by capturing with the pawn in front of the rook. You’ll read more about this inChapter 11, but here’s one example to show you what I mean. This is another positionfrom the Dragon Variation of the Sicilian Defense (which you learned about inChapter 9). It is White’s turn to move in Diagram 23. What is the best way for Whiteto get the rook on h1 into the action?
Diagram 23: White to move.
Diagram 24: White plays 1.h5.
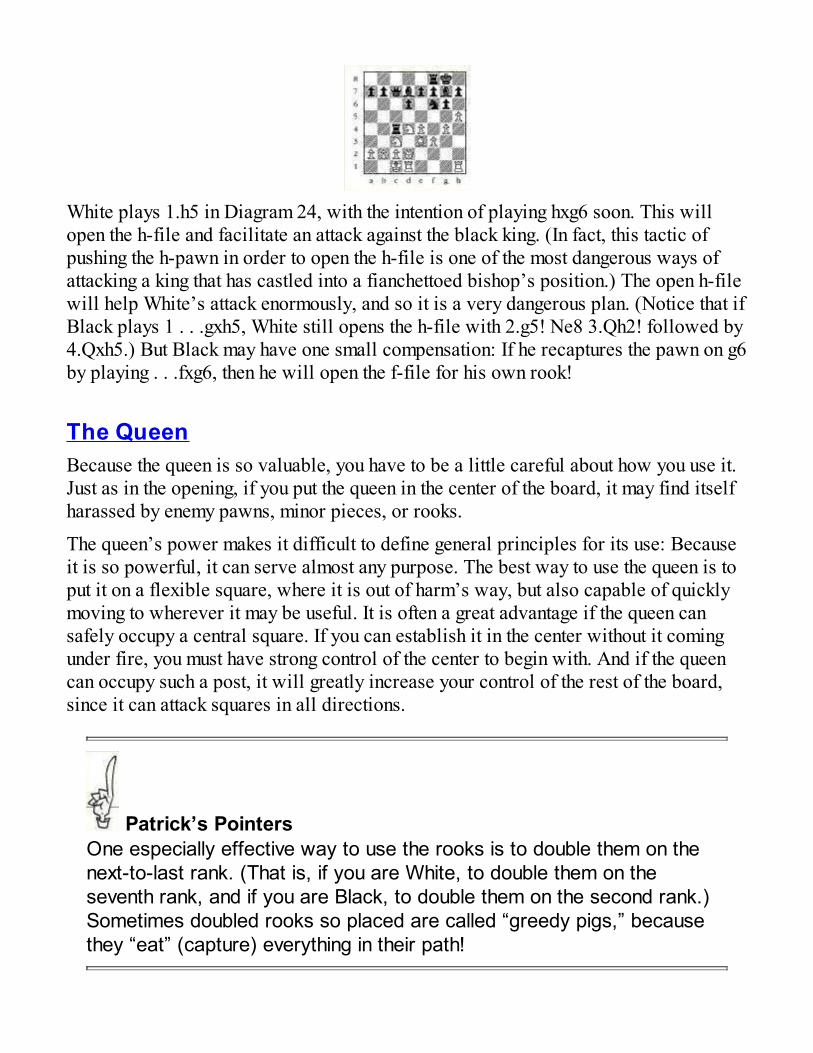
White plays 1.h5 in Diagram 24, with the intention of playing hxg6 soon. This willopen the h-file and facilitate an attack against the black king. (In fact, this tactic ofpushing the h-pawn in order to open the h-file is one of the most dangerous ways ofattacking a king that has castled into a fianchettoed bishop’s position.) The open h-filewill help White’s attack enormously, and so it is a very dangerous plan. (Notice that ifBlack plays 1 . . .gxh5, White still opens the h-file with 2.g5! Ne8 3.Qh2! followed by4.Qxh5.) But Black may have one small compensation: If he recaptures the pawn on g6by playing . . .fxg6, then he will open the f-file for his own rook!
The QueenBecause the queen is so valuable, you have to be a little careful about how you use it.Just as in the opening, if you put the queen in the center of the board, it may find itselfharassed by enemy pawns, minor pieces, or rooks.
The queen’s power makes it difficult to define general principles for its use: Becauseit is so powerful, it can serve almost any purpose. The best way to use the queen is toput it on a flexible square, where it is out of harm’s way, but also capable of quicklymoving to wherever it may be useful. It is often a great advantage if the queen cansafely occupy a central square. If you can establish it in the center without it comingunder fire, you must have strong control of the center to begin with. And if the queencan occupy such a post, it will greatly increase your control of the rest of the board,since it can attack squares in all directions.
Patrick’s PointersOne especially effective way to use the rooks is to double them on thenext-to-last rank. (That is, if you are White, to double them on theseventh rank, and if you are Black, to double them on the second rank.)Sometimes doubled rooks so placed are called “greedy pigs,” becausethey “eat” (capture) everything in their path!

One important thing to keep in mind is that since the queen is so powerful, it’s oftenworth a lot to try to trap it. If you send the queen into the middle of your opponent’sposition, be careful that you don’t allow your opponent to surround it—and if youropponent sends his queen into your position, look for a way to cut off its escape (andthen its head)!
Diagrams 25–30 show one example of how dangerous it can be to do a solitary raidwith the queen. (The position comes from the opening, but the same principles applyhere as in the middlegame.)
Patrick’s PointersThe queen is a tremendous attacking piece because it’s so powerful, butit’s not a great defender because it’s always vulnerable to beingcaptured. Try to use the queen for attack, and leave the defense to theminor pieces and the pawns.
Diagram 25 shows a position from another variation of the Sicilian Defense, calledthe Najdorf Variation, where it is Black’s turn to play his seventh move. (The positionarises after 1.e4 c5 2.Nf3 d6 3.d4 cxd4 4.Nxd4 Nf6 5.Nc3 a6 6.Bg5 e6 7.f4.) Blackhas several moves here; one of the most aggressive is to play 7 . . .Qb6, as shown inDiagram 26.
Black clearly intends to capture the b-pawn. This is called the “Poisoned PawnVariation” because of the danger to the queen of capturing this pawn. I should pointout that this opening is in fact quite good for Black. Two former World Championshave made it a crucial part of their opening repertoires: Bobby Fischer (now retired),and Garry Kasparov (still very active). But please bear in mind that they would onlyplay such a move because they convinced themselves after many, many hours ofanalysis that it is good for Black. Without preparation, you should not play such adangerous move in the opening!
Diagram 25: Black to move.

Diagram 26: Black plays 7 . . .Qb6.
The most common response for White is to gambit the pawn with 8.Qd2 Qxb2, asshown in Diagram 27. Then one plan for White is to protect the rook on a1 andsimultaneously shut the queen in by playing 9.Nb3, as shown in Diagram 28.
Black has several moves here, the best perhaps being 9 . . .Qa3. But above all, Blackmust see White’s threat, and suspect that there is a threat. When your queen only hasone square to run to in case it is attacked, an alarm should go off that says:WARNING! QUEEN IN DANGER OF BEING TRAPPED!
Let’s suppose Black does not see White’s idea (Do you see it?), and plays the simpledeveloping move 9 . . .Be7 (see Diagram 29). On general principles, this move isimpeccable; Black wants to complete his development and castle. But generalprinciples must give way to the problem of rescuing the queen.
Diagram 27: Position after 8.Qd2 Qxb2.
Diagram 28: White plays 9.Nb3.
Diagram 29: Black plays 9 . . .Be7.

Black pays the price in Diagram 30, where White plays 10.a3. Too late, Black nowrealizes that White threatens to win the queen with either 11.Ra2 or 11.Nd1. Nowthere is no antidote to the poison, and the queen must die.
Diagram 30: White plays 10.a3.
You may find the upcoming exercises more difficult than the ones in previous chapters.Don’t worry if you have trouble with them. Try your best to solve them, and then studythe answers. My goal in giving you harder exercises is to teach you more than I couldexplain in the chapter. But you should try your best to solve them before looking at theanswers, or you won’t learn as much. Good luck!
Exercise #1:White to move (Wolff–Wen, Canada, 1991). Which minor pieces shouldWhite exchange in his next two moves? How would you then evaluate the position?
Exercise #2:White to move (Nimzovich–Tartakower, Germany, 1929). The twoplayers in this game were both among the finest of their day. White now played17.Nh1. Why did White play this move? (There are at least two reasons.)
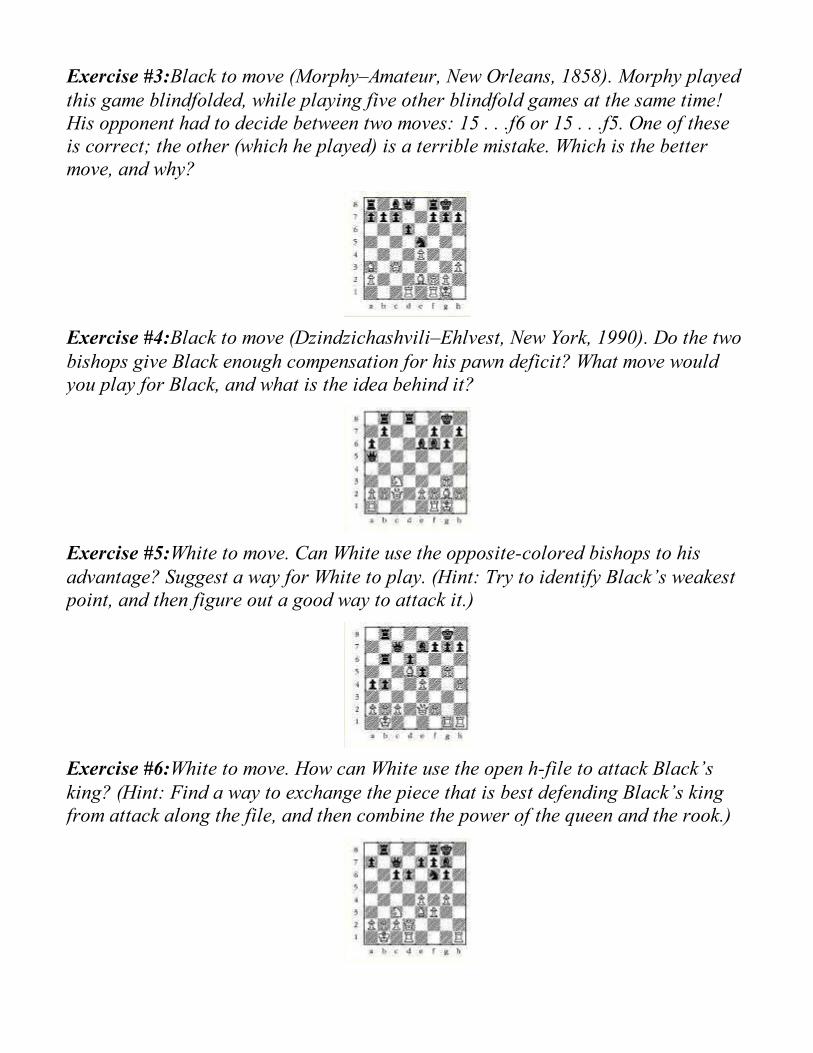
Exercise #3:Black to move (Morphy–Amateur, New Orleans, 1858). Morphy playedthis game blindfolded, while playing five other blindfold games at the same time!His opponent had to decide between two moves: 15 . . .f6 or 15 . . .f5. One of theseis correct; the other (which he played) is a terrible mistake. Which is the bettermove, and why?
Exercise #4:Black to move (Dzindzichashvili–Ehlvest, New York, 1990). Do the twobishops give Black enough compensation for his pawn deficit? What move wouldyou play for Black, and what is the idea behind it?
Exercise #5:White to move. Can White use the opposite-colored bishops to hisadvantage? Suggest a way for White to play. (Hint: Try to identify Black’s weakestpoint, and then figure out a good way to attack it.)
Exercise #6:White to move. How can White use the open h-file to attack Black’sking? (Hint: Find a way to exchange the piece that is best defending Black’s kingfrom attack along the file, and then combine the power of the queen and the rook.)
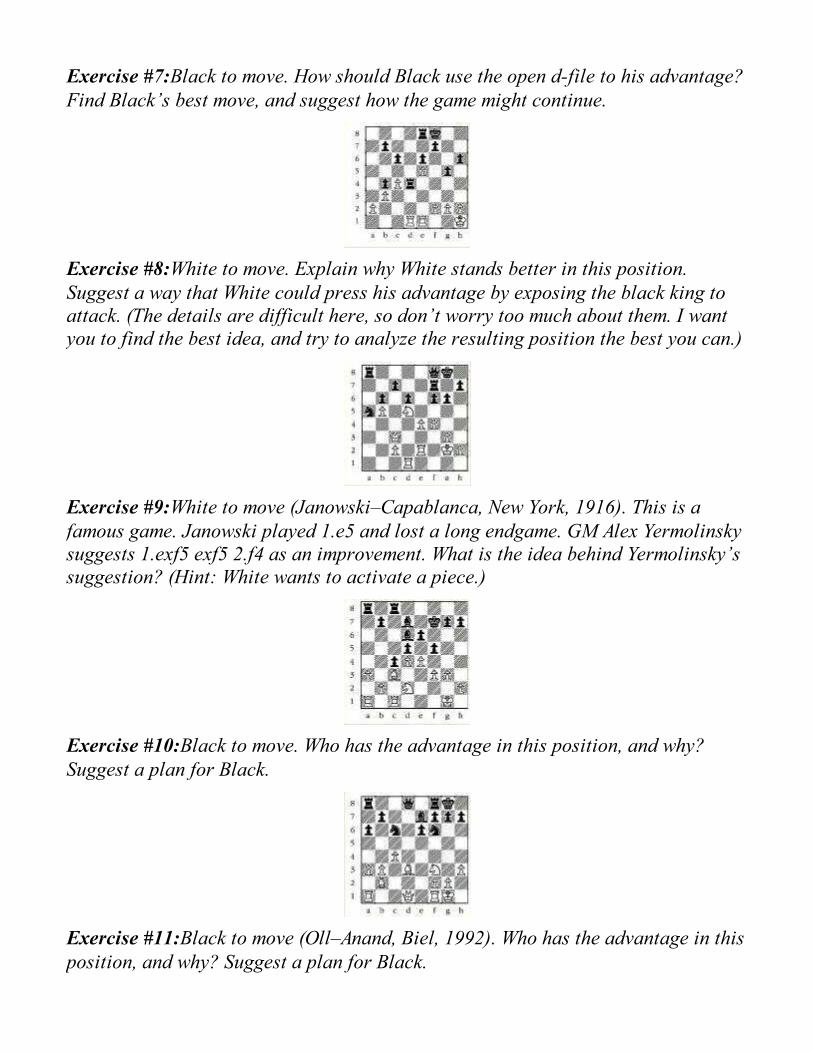
Exercise #7:Black to move. How should Black use the open d-file to his advantage?Find Black’s best move, and suggest how the game might continue.
Exercise #8:White to move. Explain why White stands better in this position.Suggest a way that White could press his advantage by exposing the black king toattack. (The details are difficult here, so don’t worry too much about them. I wantyou to find the best idea, and try to analyze the resulting position the best you can.)
Exercise #9:White to move (Janowski–Capablanca, New York, 1916). This is afamous game. Janowski played 1.e5 and lost a long endgame. GM Alex Yermolinskysuggests 1.exf5 exf5 2.f4 as an improvement. What is the idea behind Yermolinsky’ssuggestion? (Hint: White wants to activate a piece.)
Exercise #10:Black to move. Who has the advantage in this position, and why?Suggest a plan for Black.
Exercise #11:Black to move (Oll–Anand, Biel, 1992). Who has the advantage in thisposition, and why? Suggest a plan for Black.
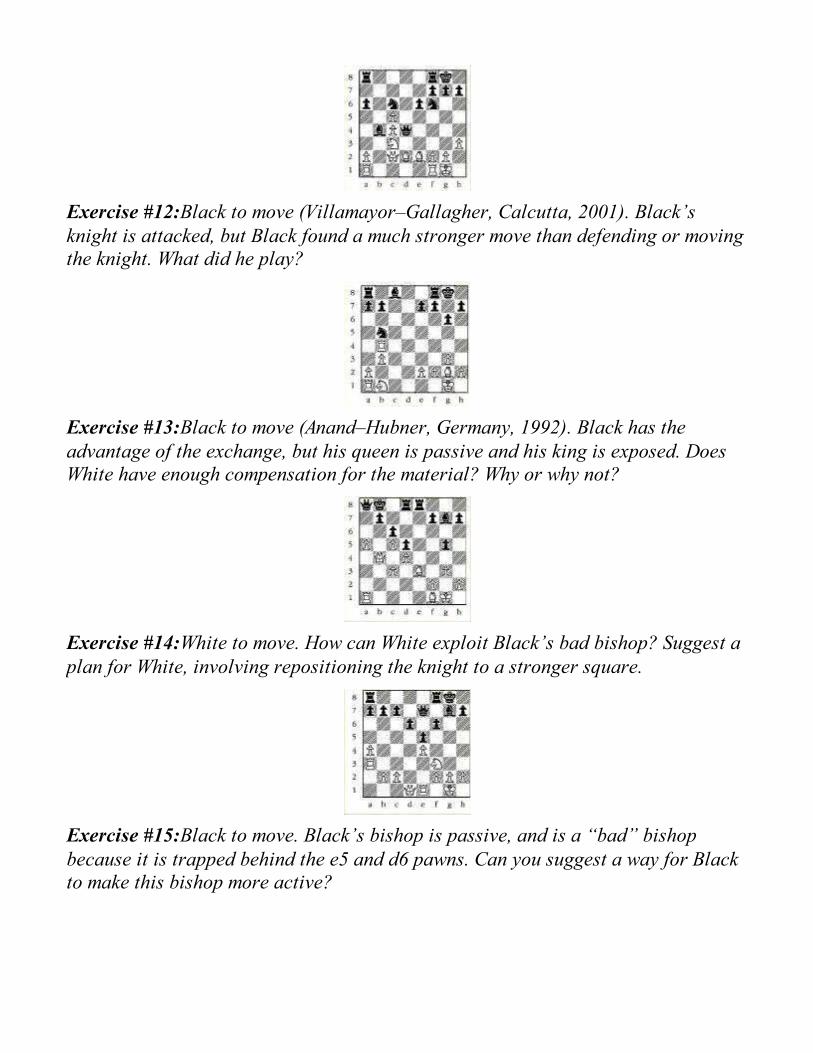
Exercise #12:Black to move (Villamayor–Gallagher, Calcutta, 2001). Black’sknight is attacked, but Black found a much stronger move than defending or movingthe knight. What did he play?
Exercise #13:Black to move (Anand–Hubner, Germany, 1992). Black has theadvantage of the exchange, but his queen is passive and his king is exposed. DoesWhite have enough compensation for the material? Why or why not?
Exercise #14:White to move. How can White exploit Black’s bad bishop? Suggest aplan for White, involving repositioning the knight to a stronger square.
Exercise #15:Black to move. Black’s bishop is passive, and is a “bad” bishopbecause it is trapped behind the e5 and d6 pawns. Can you suggest a way for Blackto make this bishop more active?

The Least You Need to Know
Try to maximize the mobility of your pieces: Very generally, the more squares apiece controls, the more powerful it is.
Identify the weakest spots in your opponent’s position, and try to maneuver yourpieces to attack them.
The knight likes to find a secure square in a closed position, and the bishop likesto find a powerful diagonal in an open position.
Rooks are well placed on open files, or on ranks deep within your opponent’sposition.
The queen is better for offense than defense.
Be careful not to get your queen trapped!

Chapter 11
Pawn Shop
In This Chapter
Why pawns have been called “the soul of chess”
Pluses and minuses of different pawn structures
How to use pawns to your advantage
Last chapter we looked at the pieces, now it’s time to look specifically at the pawns.Even though the pawn is the least powerful part of your chess army, in some ways it isthe most significant. Many times, the way the pawns are arranged determines what isyour best plan, and many times your best plan is to change the way the pawns arearranged! We’ll soon get into the specifics of what you should do with different pawnstructures, but first let’s understand what makes the pawns so important.
“The Pawns Are the Soul of Chess”There are three reasons why the pawns are especially important:
1. Because there are so many pawns, and because they are worth so much less thanthe pieces, the position of the pawns limits and determines how the pieces canmove. Since a piece normally cannot allow itself to be captured by a pawn, thesquares that the pawns control are “off limits” to the pieces, so to speak. And thatmeans it’s important to use your pawns to control as many squares as possible,and to control the right squares.
2. Because they move forward but capture diagonally, pawns often block eachother. When this happens, they become a kind of fixed feature of the position, andthe pieces have to move around them. So not only do the pawns limit and

determine how the pieces can move by what squares they control, they also do soby what squares they’re on.
3. Because pawns only move forward and never move backward, each pawn moveis a commitment. Put a piece on a bad square and you can still reposition it later.Put a pawn on a bad square and you may be stuck with it for the whole game! Soyou have to be extra careful to handle your pawns well.
Chess TalkThe way the pawns are arranged in any chess position is called thepawn structure.
Keep these three things in mind as you read the rest of this chapter!
Chess LoreWithout a doubt the greatest chess player of the eighteenth century wasthe Frenchman André Philidor (1726–1795). At the young age of 22,when he was already considered one of the strongest chess players inEurope (and so, at that time, in the world), he wrote L’analyze desEchecs (The Analysis of Chess). This book is considered one of theclassics of chess literature. In this book, Philidor introduced many of thestrategic elements that grandmasters take for granted today. Inparticular, he thought that his contemporaries were weakest in how theyplayed with the pawns, and so he urged their importance by writing, “Thepawns are the soul of chess.”
Philidor’s genius was not limited to chess. He was also a composer ofmusic, and was especially renowned for his comic operas. In his day hewas famous throughout Europe for both his chess and his musicalabilities, but today he is mainly remembered as the first truly great geniusof the modern version of chess.

Chain GangsOne of Philidor’s contemporaries, the great philosopher Jean-Jacques Rousseau,wrote that people “are born free, yet are found everywhere in chains.” The opposite istrue of pawns. Pawns are born in a chain stretching from one side of the board to theother, but as they advance, they become separated. Often they form little groups,sometimes even becoming isolated from their fellows. Let’s take a look at some of thecommon ways pawns form groups.
Side by Side Is StrongestGenerally speaking, pawns are best placed when they are two or sometimes threeabreast. When they are in this formation, all the squares they control are lined up onthe same rank, which maximizes their effectiveness. An example is shown in Diagram1. This is a standard position from an opening called the Pirc Defense. Black does notstand too badly; he has developed about as well as White and he has good enoughsquares on which to develop his last two minor pieces. But most grandmasters agreethat White has a small advantage in this position, thanks mainly to his powerful pawnduo on e4 and d4, which control the center squares very well. In fact, this pawn duo isso powerful that it is essential for Black to challenge it by advancing one of his pawnsto the fifth rank after proper preparations: either the d-pawn to d5 (rare), the c-pawnto c5 (uncommon), or the e-pawn to e5 (most common by far).
Another reason the pawn stands well side by side is that since each pawn controls thesquare in front of its neighbor, each pawn supports the other’s possible advance. Thisgives the pawns maximum dynamic potential. Diagram 2 shows a position we’vealready seen in Chapter 9, Diagram 24. White has just played 10.f4, which supportsboth f5 and e5. For example, even though it would clearly be a mistake for White toadvance his e-pawn to e5 if it were his turn to move (because it would lose a pawn),if Black plays 10 . . .d5, the support of the f-pawn makes 11.e5 strong. And it would infact be strong for White to advance his f-pawn to f5 if it were his turn, as this wouldchase Black’s white-squared bishop away from the center, so Black must dosomething about this possibility. The move 10.f4 has enhanced White’s chances,thanks to the creation of the pawn duo on e4 and f4.
When a pawn duo has few or no pawns opposing it, the duo can be terribly strong.Watch the exercises at the end of this chapter for an example of this feature of thepawn duo.
Diagram 1: White’s pawn duo on e4 and d4 is strong.

Diagram 2: White’s pawn duo on e4 and f4 gives him dynamic play in the center.
Forward Pawns and Backward PawnsVery often, one or the other pawn in a pawn duo will march forward, and the pawnsno longer harmoniously control all the squares of both colors in front of them. Instead,the forward pawn controls two squares of one color, and the backward pawn controlstwo squares of the same color—including the square on which the forward pawn sits.This pawn formation has the potential to be either strong or weak, depending upon thesituation.
Chess TalkWhen two pawns stand side by side as the pawns on d4 and e4 inDiagram 1 or the pawns on e4 and f4 in Diagram 2, they are called apawn duo.
A typical example is shown in Diagram 3, from my game against the Armeniangrandmaster Smbat Lputian. White’s forward pawn controls two squares deep inBlack’s position: d6 and f6. The f6 square is close to Black’s king, and that, plus thefact that White controls many more squares on the kingside, indicates that White’scorrect strategy is to attack on the kingside. Black’s forward pawn on d5 controls thesquares e4 and c4. None of Black’s pieces are able to take advantage of this pawn’scontrol of e4, but on the other hand, they are well placed to control squares on thequeenside. So one strategy that suggests itself to Black is to attack on the queenside.Another is for Black to attack White’s strong pawn on e5 (and at the same time fight

for control of the f6 square) by advancing his f-pawn to f6. In fact, my opponentcombined both of these ideas, gained the upper hand, and won the game.
Chess TalkAlthough we can think of a chain of pawns as being a string of pawns thattouch one another, chess players actually use the term in a morerestricted sense. A pawn chain is a string of pawns that protect oneanother from beginning to end. For example, in Diagram 3, White has apawn chain that goes from b2 to e5, and Black has two pawn chains, onegoing from a7 to c5, and one going from f7 to d5.
To further understand this pawn structure, let’s compare the backward pawns for eachside, that is the d4 pawn and the e6 pawn. The e6 pawn is defended by the f7 pawn,which is defended by the king. So Black’s pawns are all well defended. White’s pawnon d4 is defended by the pawn on c3, which is defended by the pawn on b2, so at firstit may seem like White’s pawns are at least as well defended. But Black couldplay . . .cxd4, and if White recaptures with the pawn, this will leave the d4 pawnundefended by another pawn. In the middlegame, with all the pieces left on the board,this pawn is usually not in any danger. But now let’s imagine a scenario like that inDiagram 4.
Diagram 3: (Wolff–Lputian, Holland, 1993).
Now the d4 pawn is under heavy fire from Black’s pieces; White’s rook and knightare passive because they are forced to defend the pawn, whereas Black’s pieces areactive, so only Black has any chance to win this position. One of the dangers of thebackward pawn is that it can become weak if it loses support from its fellow pawns.
When judging the worth of different pawn chains, a crucial consideration is howeasily one can advance the backward pawn to create a pawn duo again (see Diagram5). Even though it’s Black’s move, he stands very poorly in this position, because
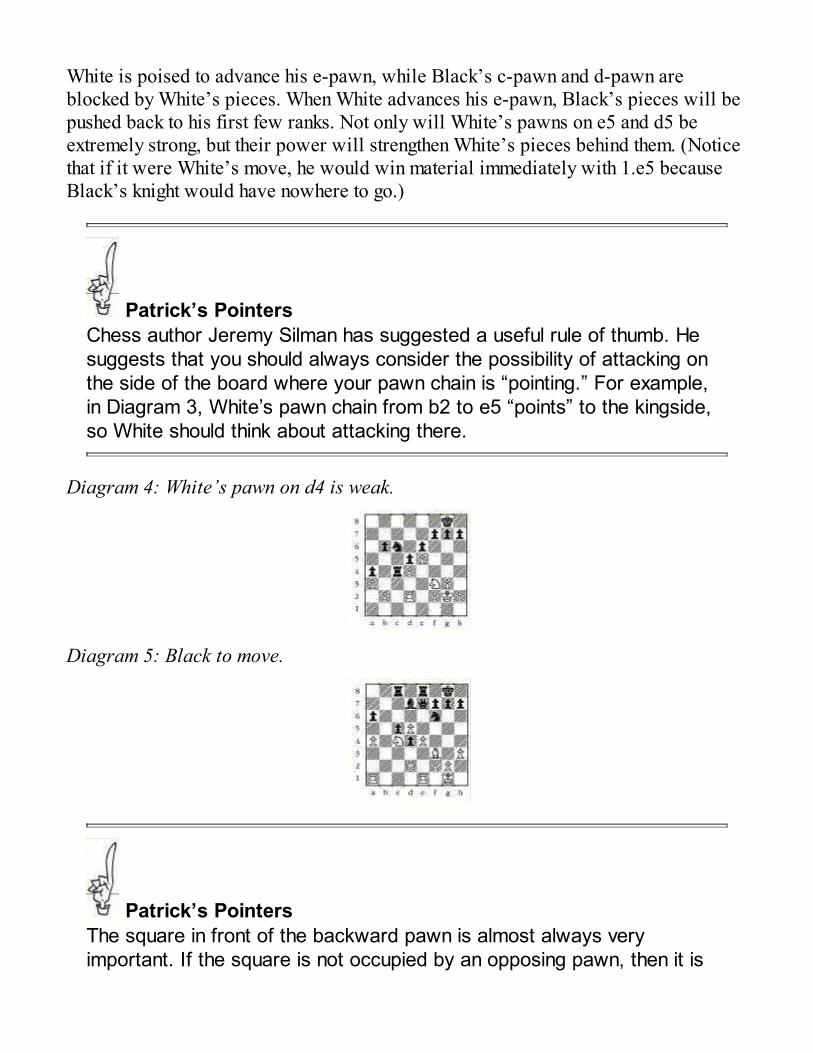
White is poised to advance his e-pawn, while Black’s c-pawn and d-pawn areblocked by White’s pieces. When White advances his e-pawn, Black’s pieces will bepushed back to his first few ranks. Not only will White’s pawns on e5 and d5 beextremely strong, but their power will strengthen White’s pieces behind them. (Noticethat if it were White’s move, he would win material immediately with 1.e5 becauseBlack’s knight would have nowhere to go.)
Patrick’s PointersChess author Jeremy Silman has suggested a useful rule of thumb. Hesuggests that you should always consider the possibility of attacking onthe side of the board where your pawn chain is “pointing.” For example,in Diagram 3, White’s pawn chain from b2 to e5 “points” to the kingside,so White should think about attacking there.
Diagram 4: White’s pawn on d4 is weak.
Diagram 5: Black to move.
Patrick’s PointersThe square in front of the backward pawn is almost always veryimportant. If the square is not occupied by an opposing pawn, then it is

usually in each player’s interest to control that square! The side with thebackward pawn wants to advance the pawn to establish the pawn duo,while the side playing against the backward pawn wants to stop that fromhappening.
I’ve introduced the terms forward pawn and backward pawn to make things clearer;chess players don’t usually have special names for these pawns. But chess players dosometimes use the phrase “backward pawn” for the specific case of when (what I’vebeen calling) a backward pawn can’t be defended by another pawn, the square in frontof it is not occupied by an opposing pawn, and it can’t advance forward safely. Anexample of this is shown in Diagram 6. Notice how much of a liability the backwardd6 pawn is. It can’t be defended by another pawn, so it must be defended by pieces,which makes those pieces passive. Furthermore, Black has almost no hope of safelyadvancing the pawn to d5 so as to exchange it for White’s e4 pawn, so it will remain aweakness for a long time. Finally, because Black’s e-pawn has advanced to e5, thesquare in front of the backward pawn (d5) lacks pawn protection and is therefore“weak.” Think about how powerful White’s knight would be on this square, and howdifficult it would be for Black to chase it away!
Chess TalkWhen one pawn in a pawn duo advances one square forward, the pawnthat advanced is the forward pawn, and the pawn that remained behindis the backward pawn. However, the term backward pawn usually has amore restricted meaning, where it can’t be defended by another pawn,and although the square in front of it is not occupied by an opposingpawn, it can’t advance forward safely.
The conclusion you might draw from this example is that it is always bad to have abackward pawn. But things are not so simple. Compare Diagram 6 to Diagram 7.(Diagram 7 is a position from the Najdorf Variation of the Sicilian Defense.) Black’sposition here is much better than in Diagram 6, for several reasons:
Black’s d-pawn is well defended by the bishop on e7, and although defending thed-pawn makes the bishop passive, in this case it’s not too serious because thebishop is usefully placed to defend the kingside.

Black has some influence over the d5 square, enough to prevent White frompermanently occupying it with a piece. (See Chapter 13 for more explanationabout this factor.)
Black’s pawn on e5 helps to control White’s knight on b3, which is a passivepiece.
Black’s queen and rook are actively placed along the c-file.
For these reasons, the position in Diagram 7 is thought to offer approximately equalchances for both sides, in spite of Black’s (true) backward d6 pawn.
Diagram 6: Black’s d6 pawn is a true “backward pawn,” and is a liability.
Diagram 7: Again the d6 pawn is a true “backward pawn,” but here it’s not so bad.
The bottom line: When one pawn advances forward and leaves the other behind, thereare pluses and minuses. Unlike the pawn duo, it is not always a strong formation.Whom it favors, and why, always depends on the particulars of the position.
When One Pawn Holds TwoNotice in Diagrams 6 and 7 that White’s e-pawn blocks Black’s e-pawn fromadvancing, and also stops Black’s d-pawn from advancing because it controls thesquare in front of it. In general, it is good for you to have one pawn serve double dutylike this, because it allows you to use your other pawns to greater effect.
In Diagrams 6 and 7, the advantage of the e-pawn “holding” two pawns is not so great,because White can’t really use his other pawns to strong effect. (This is especiallytrue in Diagram 7, because since White’s c-pawn is blocked by the knight on c3, itplays little part in the center. But notice that in Diagram 7, White’s a-pawn also holds
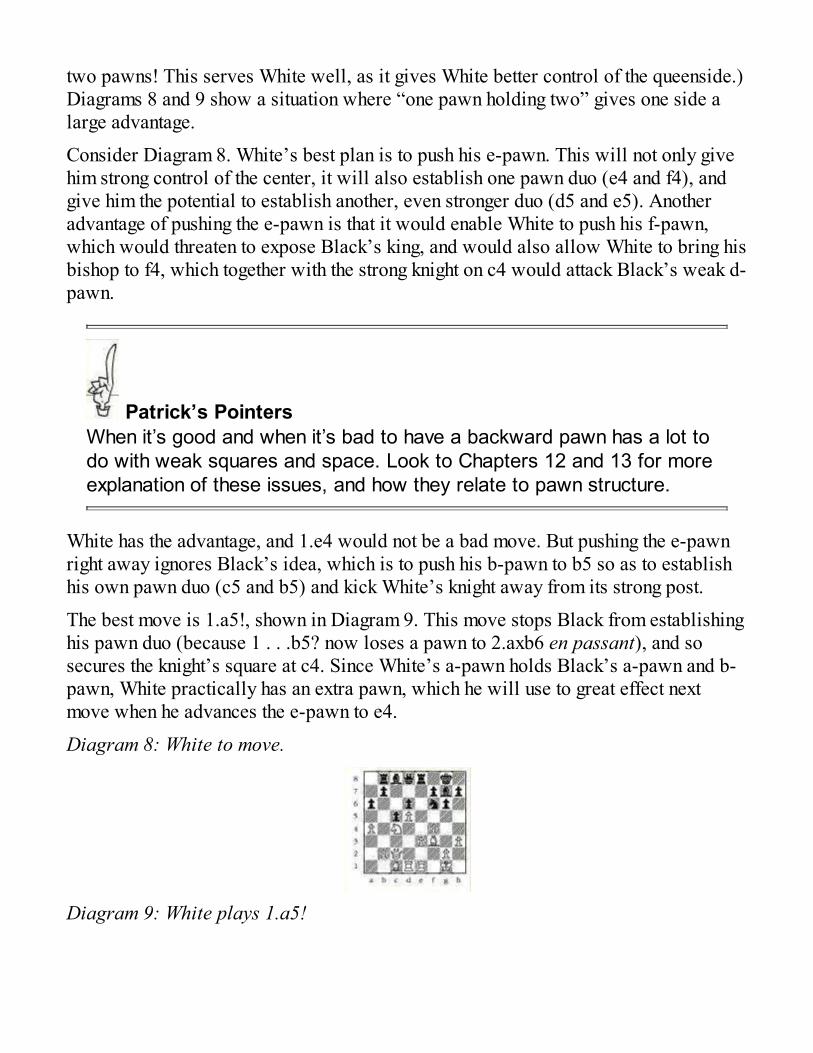
two pawns! This serves White well, as it gives White better control of the queenside.)Diagrams 8 and 9 show a situation where “one pawn holding two” gives one side alarge advantage.
Consider Diagram 8. White’s best plan is to push his e-pawn. This will not only givehim strong control of the center, it will also establish one pawn duo (e4 and f4), andgive him the potential to establish another, even stronger duo (d5 and e5). Anotheradvantage of pushing the e-pawn is that it would enable White to push his f-pawn,which would threaten to expose Black’s king, and would also allow White to bring hisbishop to f4, which together with the strong knight on c4 would attack Black’s weak d-pawn.
Patrick’s PointersWhen it’s good and when it’s bad to have a backward pawn has a lot todo with weak squares and space. Look to Chapters 12 and 13 for moreexplanation of these issues, and how they relate to pawn structure.
White has the advantage, and 1.e4 would not be a bad move. But pushing the e-pawnright away ignores Black’s idea, which is to push his b-pawn to b5 so as to establishhis own pawn duo (c5 and b5) and kick White’s knight away from its strong post.
The best move is 1.a5!, shown in Diagram 9. This move stops Black from establishinghis pawn duo (because 1 . . .b5? now loses a pawn to 2.axb6 en passant), and sosecures the knight’s square at c4. Since White’s a-pawn holds Black’s a-pawn and b-pawn, White practically has an extra pawn, which he will use to great effect nextmove when he advances the e-pawn to e4.
Diagram 8: White to move.
Diagram 9: White plays 1.a5!
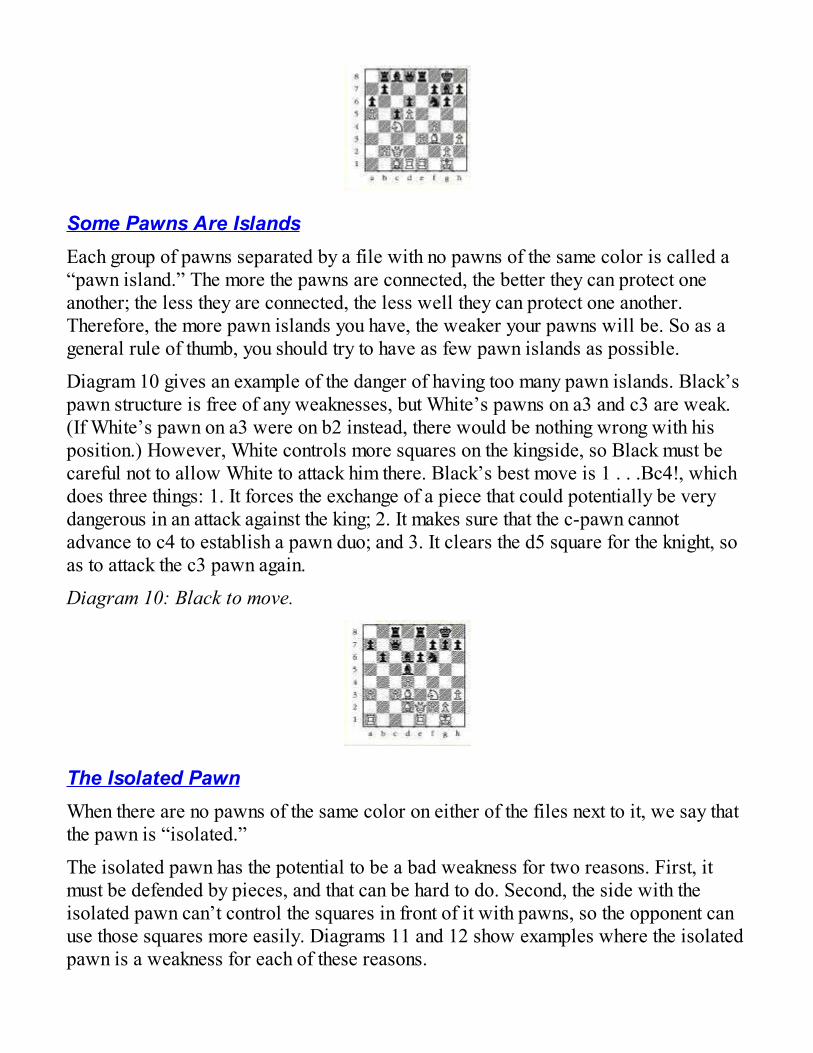
Some Pawns Are IslandsEach group of pawns separated by a file with no pawns of the same color is called a“pawn island.” The more the pawns are connected, the better they can protect oneanother; the less they are connected, the less well they can protect one another.Therefore, the more pawn islands you have, the weaker your pawns will be. So as ageneral rule of thumb, you should try to have as few pawn islands as possible.
Diagram 10 gives an example of the danger of having too many pawn islands. Black’spawn structure is free of any weaknesses, but White’s pawns on a3 and c3 are weak.(If White’s pawn on a3 were on b2 instead, there would be nothing wrong with hisposition.) However, White controls more squares on the kingside, so Black must becareful not to allow White to attack him there. Black’s best move is 1 . . .Bc4!, whichdoes three things: 1. It forces the exchange of a piece that could potentially be verydangerous in an attack against the king; 2. It makes sure that the c-pawn cannotadvance to c4 to establish a pawn duo; and 3. It clears the d5 square for the knight, soas to attack the c3 pawn again.
Diagram 10: Black to move.
The Isolated PawnWhen there are no pawns of the same color on either of the files next to it, we say thatthe pawn is “isolated.”
The isolated pawn has the potential to be a bad weakness for two reasons. First, itmust be defended by pieces, and that can be hard to do. Second, the side with theisolated pawn can’t control the squares in front of it with pawns, so the opponent canuse those squares more easily. Diagrams 11 and 12 show examples where the isolatedpawn is a weakness for each of these reasons.

Diagram 11: White’s isolated b-pawn can’t be defended.
Diagram 12: The White knight on e4 is powerful.
However, the isolated pawn isn’t always a bad thing. Diagrams 1 and 2 of Chapter 10show a position where one side has the isolated pawn and the position offers roughlyequal chances to both players, while Exercise #7 of Chapter 8 shows a position wherethe isolated pawn confers an advantage because it yields such good control of thecenter. Here are a few important rules of thumb to keep in mind for playing with andagainst the isolated pawn, especially when it is a center pawn:
The isolated pawn usually wants to advance, both in order to gain space, and inorder to exchange the pawn for another pawn. Therefore it’s crucial for bothplayers to control the square in front of the isolated pawn. (It’s especiallyimportant for the player who does not have the isolated pawn!)
The side with the isolated pawn wants to keep as many pieces as possible on theboard, because with more pieces, he can use the extra space and central controlto generate an attack somewhere.
The side playing against the isolated pawn wants to exchange pieces, becausethis will lessen any possible attack, and so the weakness of the isolated pawnwill become more important.
Patrick’s PointersSuppose two pawns can capture the same piece. Which one should you
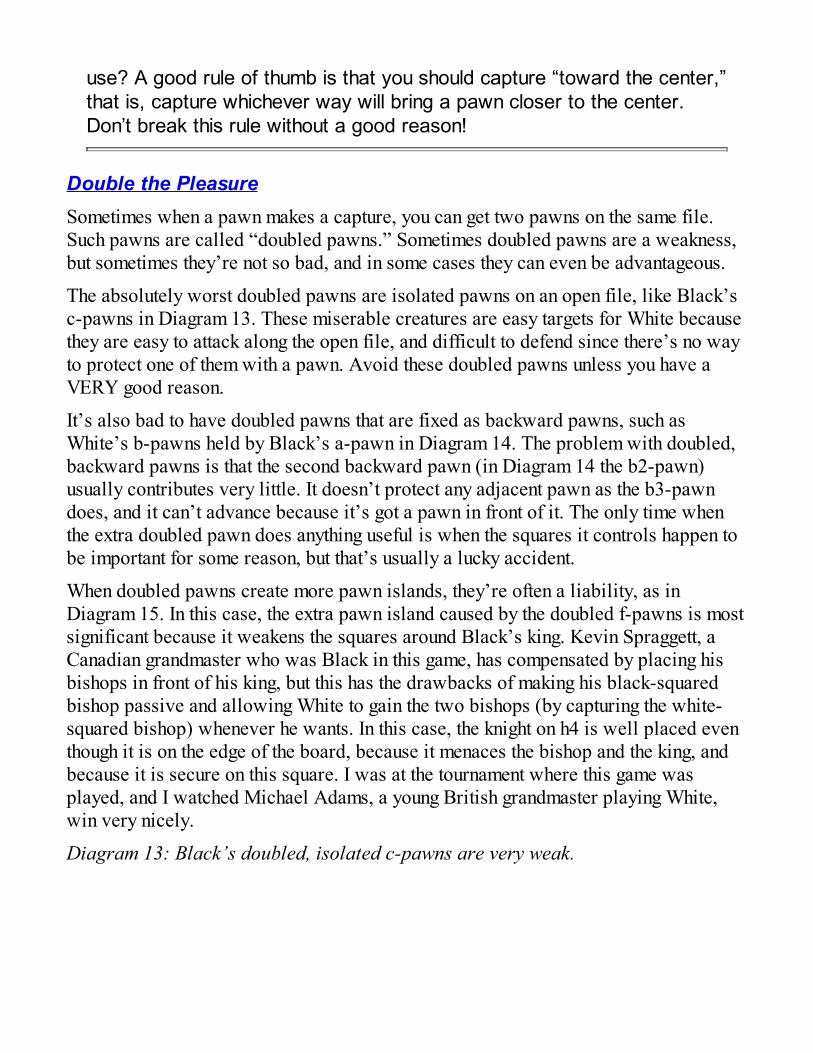
use? A good rule of thumb is that you should capture “toward the center,”that is, capture whichever way will bring a pawn closer to the center.Don’t break this rule without a good reason!
Double the PleasureSometimes when a pawn makes a capture, you can get two pawns on the same file.Such pawns are called “doubled pawns.” Sometimes doubled pawns are a weakness,but sometimes they’re not so bad, and in some cases they can even be advantageous.
The absolutely worst doubled pawns are isolated pawns on an open file, like Black’sc-pawns in Diagram 13. These miserable creatures are easy targets for White becausethey are easy to attack along the open file, and difficult to defend since there’s no wayto protect one of them with a pawn. Avoid these doubled pawns unless you have aVERY good reason.
It’s also bad to have doubled pawns that are fixed as backward pawns, such asWhite’s b-pawns held by Black’s a-pawn in Diagram 14. The problem with doubled,backward pawns is that the second backward pawn (in Diagram 14 the b2-pawn)usually contributes very little. It doesn’t protect any adjacent pawn as the b3-pawndoes, and it can’t advance because it’s got a pawn in front of it. The only time whenthe extra doubled pawn does anything useful is when the squares it controls happen tobe important for some reason, but that’s usually a lucky accident.
When doubled pawns create more pawn islands, they’re often a liability, as inDiagram 15. In this case, the extra pawn island caused by the doubled f-pawns is mostsignificant because it weakens the squares around Black’s king. Kevin Spraggett, aCanadian grandmaster who was Black in this game, has compensated by placing hisbishops in front of his king, but this has the drawbacks of making his black-squaredbishop passive and allowing White to gain the two bishops (by capturing the white-squared bishop) whenever he wants. In this case, the knight on h4 is well placed eventhough it is on the edge of the board, because it menaces the bishop and the king, andbecause it is secure on this square. I was at the tournament where this game wasplayed, and I watched Michael Adams, a young British grandmaster playing White,win very nicely.
Diagram 13: Black’s doubled, isolated c-pawns are very weak.

Diagram 14: White’s doubled, backward b-pawns are not good.
So when are doubled pawns not bad? Well, when they’re not isolated, when they’renot backward, and when they don’t make extra pawn islands, they may be okay.Diagrams 16 and 17 show an example of this. In Diagram 16, White sees anopportunity to double Black’s pawns, which he takes advantage of in Diagram 17.(Notice that Black captures towards the center with 1 . . .hxg6.) But the pawn capturedoesn’t create any more pawn islands, or any more backward pawns, so it doesn’t domuch damage to Black’s pawn structure after all.
There is a slight cost to the doubled pawns: The g5 square is weakened because Blackhas lost the possibility of controlling it by pushing his h-pawn to h6. But on the otherhand, Black has gained control of the f5 square, which compensates for that slightweakening. Here the doubled pawns are acceptable.
BlundersIt’s possible to get three (or more) pawns on the same file, which arecalled—what else?—“tripled pawns.” Unlike doubled pawns, which aresometimes good, tripled pawns are almost always terrible. Avoid tripledpawns!
Diagram 15: (Adams–Spraggett, Hastings, 1989).

Diagram 16: White to move.
Diagram 17: Position after 1.Bxg6 hxg6.
Patrick’s PointersYou saw an example of doubled, backward pawns in Diagrams 10–12 ofChapter 10. Now I can tell you another reason that Lasker’s knightmaneuver in that game was so strong: It prevented Black from everestablishing a pawn duo on c5 and d5, thus ensuring that Black would bestuck with doubled, backward pawns.
There are two typical cases where doubled pawns are good: when by doubling yourpawns you increase your control of the center, and when doubling the pawns opens afile or diagonal (usually a file) that you can use to your advantage. Diagrams 18 and19 show an example of each of these. In Diagram 18, White’s doubled pawns areotherwise healthy (not isolated, not backward, and not creating extra pawn islands),and the pawn on b4 (which has come from a3) helps White control the importantsquare c5. (Notice that this formation of doubled pawns is extremely sturdy; the b4pawn is protected by the c3 pawn which is protected by the b2 pawn, which is very
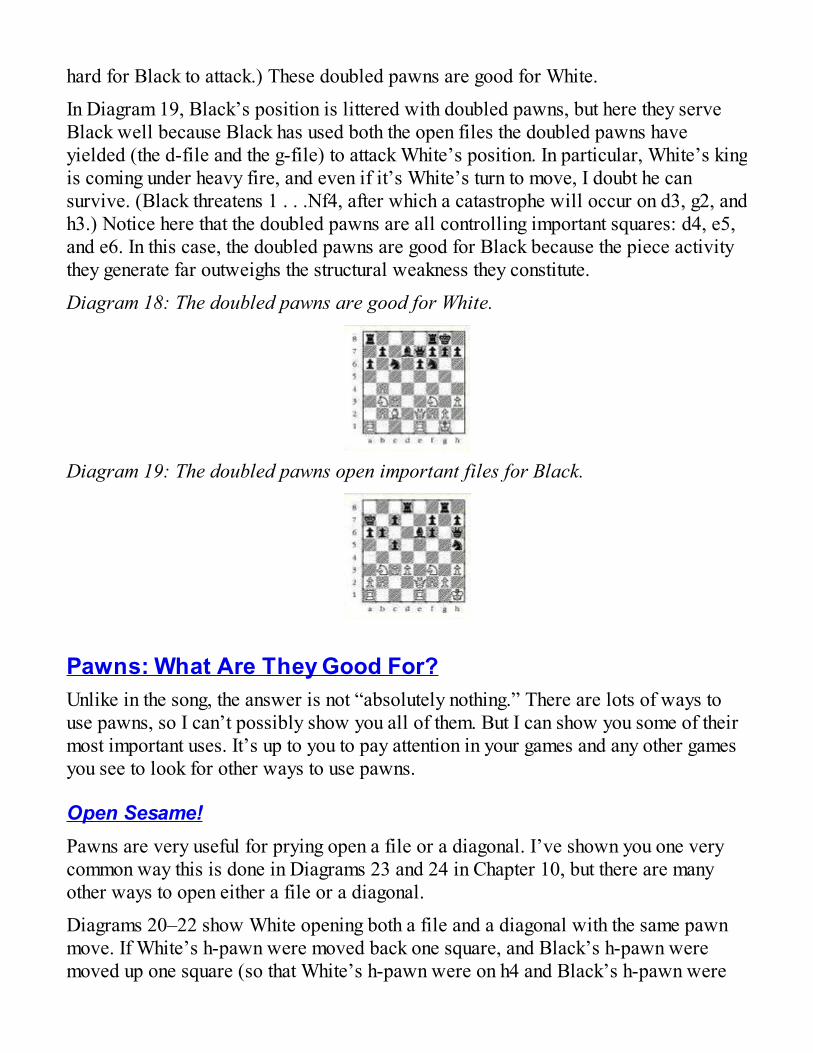
hard for Black to attack.) These doubled pawns are good for White.
In Diagram 19, Black’s position is littered with doubled pawns, but here they serveBlack well because Black has used both the open files the doubled pawns haveyielded (the d-file and the g-file) to attack White’s position. In particular, White’s kingis coming under heavy fire, and even if it’s White’s turn to move, I doubt he cansurvive. (Black threatens 1 . . .Nf4, after which a catastrophe will occur on d3, g2, andh3.) Notice here that the doubled pawns are all controlling important squares: d4, e5,and e6. In this case, the doubled pawns are good for Black because the piece activitythey generate far outweighs the structural weakness they constitute.
Diagram 18: The doubled pawns are good for White.
Diagram 19: The doubled pawns open important files for Black.
Pawns: What Are They Good For?Unlike in the song, the answer is not “absolutely nothing.” There are lots of ways touse pawns, so I can’t possibly show you all of them. But I can show you some of theirmost important uses. It’s up to you to pay attention in your games and any other gamesyou see to look for other ways to use pawns.
Open Sesame!Pawns are very useful for prying open a file or a diagonal. I’ve shown you one verycommon way this is done in Diagrams 23 and 24 in Chapter 10, but there are manyother ways to open either a file or a diagonal.
Diagrams 20–22 show White opening both a file and a diagonal with the same pawnmove. If White’s h-pawn were moved back one square, and Black’s h-pawn weremoved up one square (so that White’s h-pawn were on h4 and Black’s h-pawn were

on h5), then Black’s king would be completely safe, because White would have nogood way to open any files or diagonals to the king. But with the pawns where theyare, 1.g4! is very strong. Because Black’s f-pawn is attacked several times, Blackmust play 1 . . .fxg4 2.Qxg4, when White has a powerful attack by all his piecesagainst the king.
Diagram 20: White to move.
Diagram 21: White plays 1.g4!.
Diagram 22: Position after 1 . . .fxg4 2.Qxg4.
“Reconstructive Surgery”Another important way to use your pawns is to advance one of your pawns so that itcan be exchanged for one of your opponent’s pawns. That way you can change thepawn structure so as to get rid of some weakness in your position. This is differentfrom the last case because there the reason for exchanging pawns was to open a file ora diagonal, whereas here the reason is just to get rid of one of your pawns.
In Diagram 23, White has backward doubled pawns. In fact, White is in great dangerhere, because if Black can play 1 . . .b5! then White’s bishop on b3 will be cut offcompletely from the center and kingside, and it will be reduced to complete passivity.If Black could play 1 . . .b5, White would practically have to play without the use ofhis white-squared bishop.
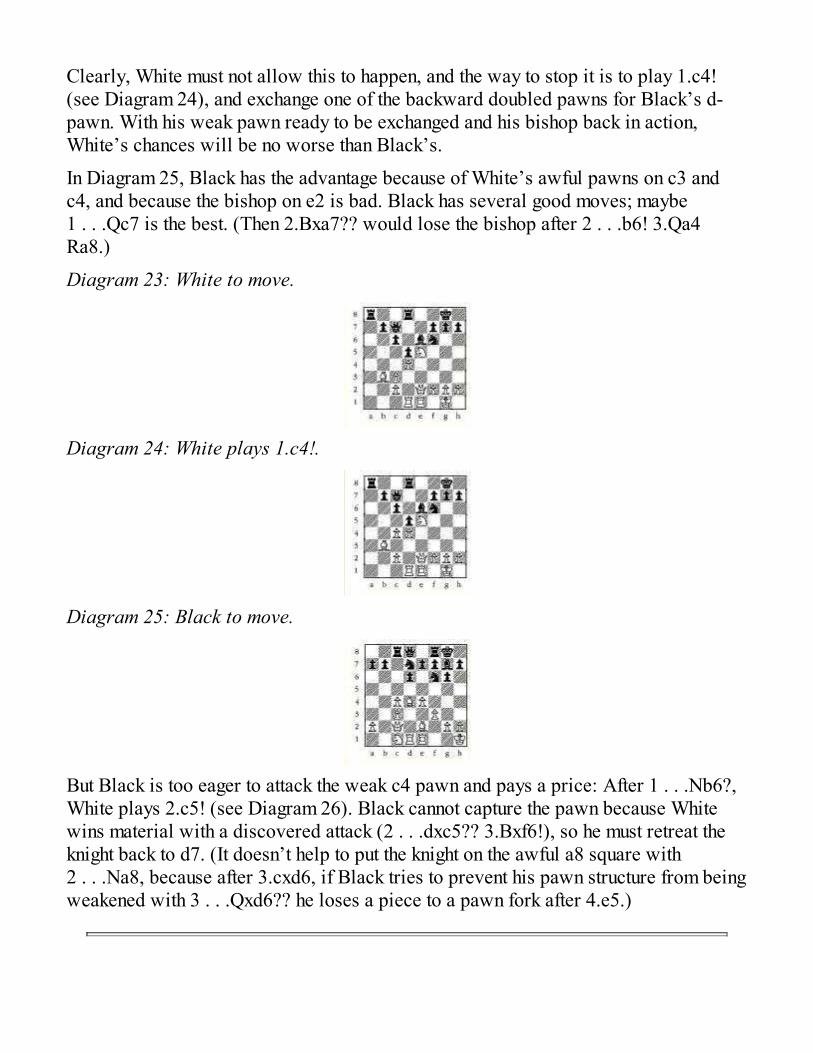
Clearly, White must not allow this to happen, and the way to stop it is to play 1.c4!(see Diagram 24), and exchange one of the backward doubled pawns for Black’s d-pawn. With his weak pawn ready to be exchanged and his bishop back in action,White’s chances will be no worse than Black’s.
In Diagram 25, Black has the advantage because of White’s awful pawns on c3 andc4, and because the bishop on e2 is bad. Black has several good moves; maybe1 . . .Qc7 is the best. (Then 2.Bxa7?? would lose the bishop after 2 . . .b6! 3.Qa4Ra8.)
Diagram 23: White to move.
Diagram 24: White plays 1.c4!.
Diagram 25: Black to move.
But Black is too eager to attack the weak c4 pawn and pays a price: After 1 . . .Nb6?,White plays 2.c5! (see Diagram 26). Black cannot capture the pawn because Whitewins material with a discovered attack (2 . . .dxc5?? 3.Bxf6!), so he must retreat theknight back to d7. (It doesn’t help to put the knight on the awful a8 square with2 . . .Na8, because after 3.cxd6, if Black tries to prevent his pawn structure from beingweakened with 3 . . .Qxd6?? he loses a piece to a pawn fork after 4.e5.)
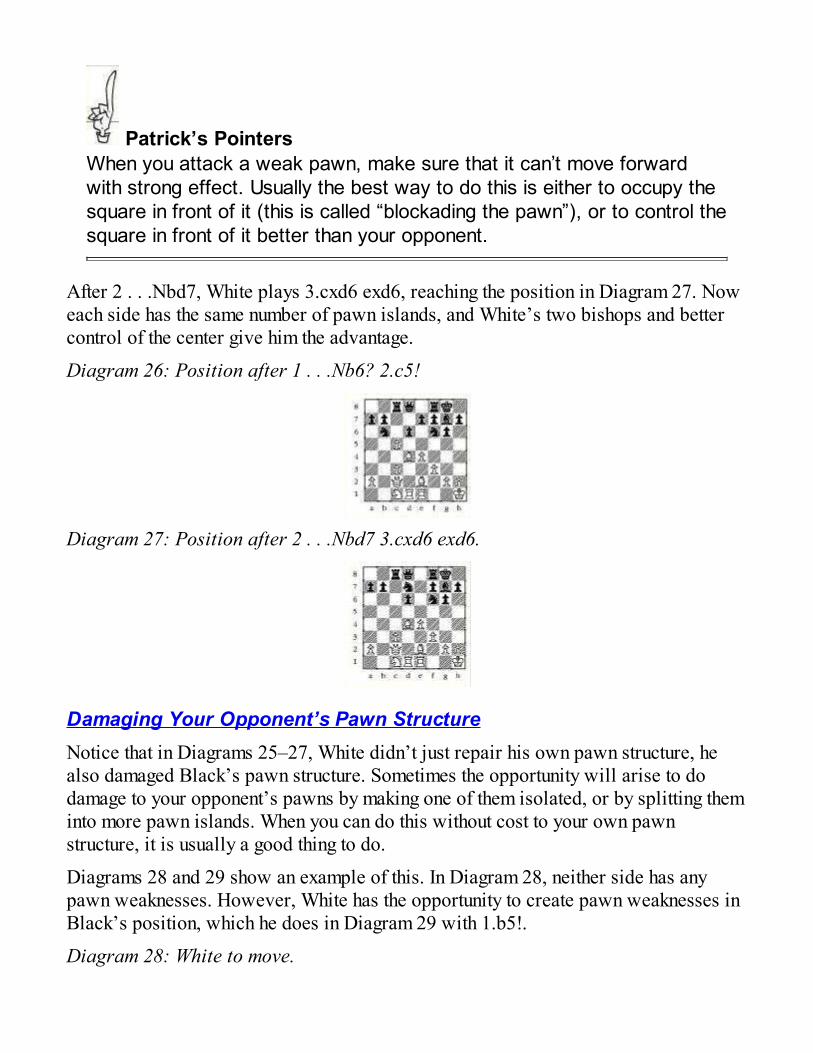
Patrick’s PointersWhen you attack a weak pawn, make sure that it can’t move forwardwith strong effect. Usually the best way to do this is either to occupy thesquare in front of it (this is called “blockading the pawn”), or to control thesquare in front of it better than your opponent.
After 2 . . .Nbd7, White plays 3.cxd6 exd6, reaching the position in Diagram 27. Noweach side has the same number of pawn islands, and White’s two bishops and bettercontrol of the center give him the advantage.
Diagram 26: Position after 1 . . .Nb6? 2.c5!
Diagram 27: Position after 2 . . .Nbd7 3.cxd6 exd6.
Damaging Your Opponent’s Pawn StructureNotice that in Diagrams 25–27, White didn’t just repair his own pawn structure, healso damaged Black’s pawn structure. Sometimes the opportunity will arise to dodamage to your opponent’s pawns by making one of them isolated, or by splitting theminto more pawn islands. When you can do this without cost to your own pawnstructure, it is usually a good thing to do.
Diagrams 28 and 29 show an example of this. In Diagram 28, neither side has anypawn weaknesses. However, White has the opportunity to create pawn weaknesses inBlack’s position, which he does in Diagram 29 with 1.b5!.
Diagram 28: White to move.
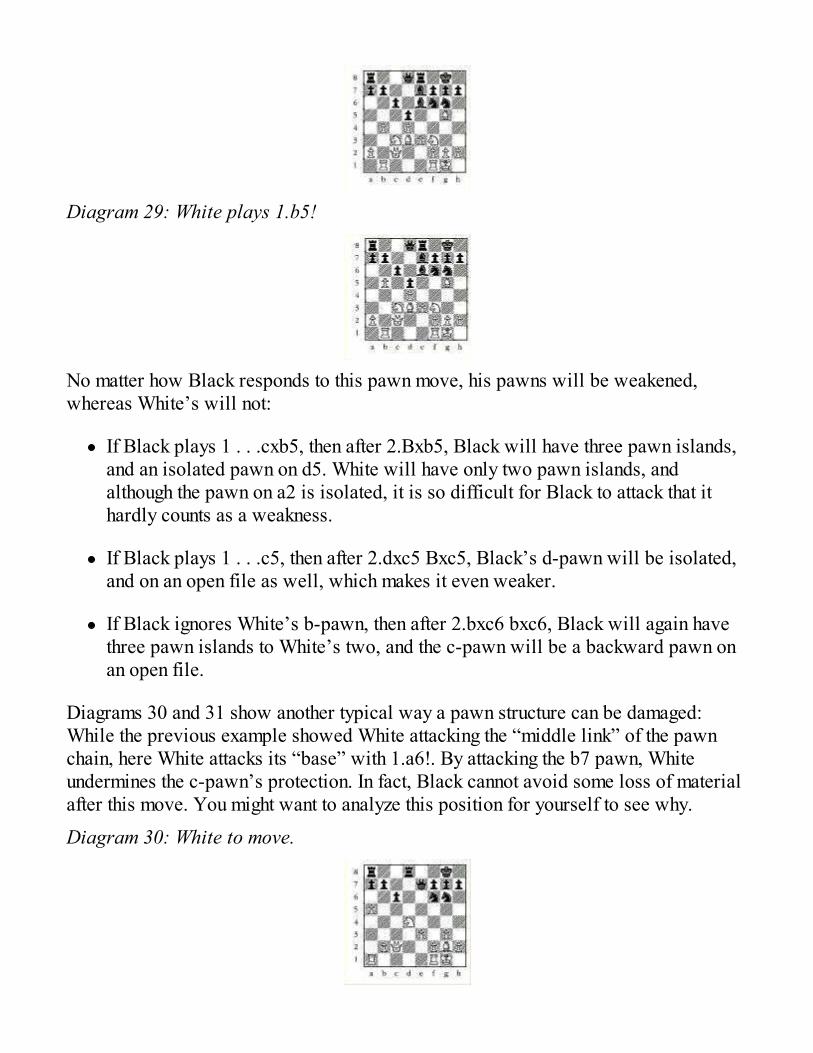
Diagram 29: White plays 1.b5!
No matter how Black responds to this pawn move, his pawns will be weakened,whereas White’s will not:
If Black plays 1 . . .cxb5, then after 2.Bxb5, Black will have three pawn islands,and an isolated pawn on d5. White will have only two pawn islands, andalthough the pawn on a2 is isolated, it is so difficult for Black to attack that ithardly counts as a weakness.
If Black plays 1 . . .c5, then after 2.dxc5 Bxc5, Black’s d-pawn will be isolated,and on an open file as well, which makes it even weaker.
If Black ignores White’s b-pawn, then after 2.bxc6 bxc6, Black will again havethree pawn islands to White’s two, and the c-pawn will be a backward pawn onan open file.
Diagrams 30 and 31 show another typical way a pawn structure can be damaged:While the previous example showed White attacking the “middle link” of the pawnchain, here White attacks its “base” with 1.a6!. By attacking the b7 pawn, Whiteundermines the c-pawn’s protection. In fact, Black cannot avoid some loss of materialafter this move. You might want to analyze this position for yourself to see why.
Diagram 30: White to move.

Diagram 31: White plays 1.a6!
Exercise #1:White or Black to move. If it’s Black’s turn, what should he play to getrid of an isolated pawn and damage White’s pawn structure? If it’s White’s turn,what should he play to prevent Black’s idea?
Exercise #2:White to move (Anand–Kasparov, World Championship, 1995). Whatpawn move should White play and why?
Exercise #3:Explain what compensation White has for the material after27 . . .Nxd5 28.exd5, and suggest what White’s plan for the next several moves willbe. (Note: This is an extremely difficult position. Kasparov himself misjudged it!Try your best to understand this position, and then study the explanation in theanswers to the exercises.)
Exercise #4:Black to move (Kasparov–Anand, World Championship, 1995). HasWhite worsened his position by accepting doubled pawns? Explain why or why not.
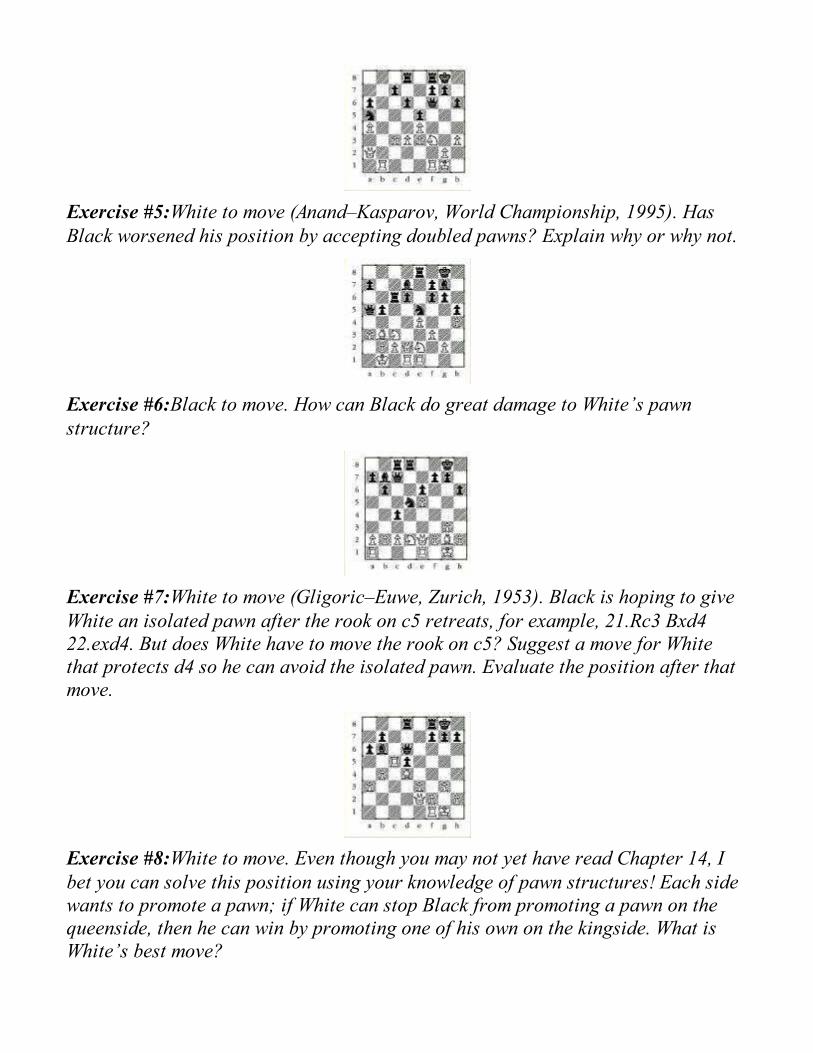
Exercise #5:White to move (Anand–Kasparov, World Championship, 1995). HasBlack worsened his position by accepting doubled pawns? Explain why or why not.
Exercise #6:Black to move. How can Black do great damage to White’s pawnstructure?
Exercise #7:White to move (Gligoric–Euwe, Zurich, 1953). Black is hoping to giveWhite an isolated pawn after the rook on c5 retreats, for example, 21.Rc3 Bxd422.exd4. But does White have to move the rook on c5? Suggest a move for Whitethat protects d4 so he can avoid the isolated pawn. Evaluate the position after thatmove.
Exercise #8:White to move. Even though you may not yet have read Chapter 14, Ibet you can solve this position using your knowledge of pawn structures! Each sidewants to promote a pawn; if White can stop Black from promoting a pawn on thequeenside, then he can win by promoting one of his own on the kingside. What isWhite’s best move?
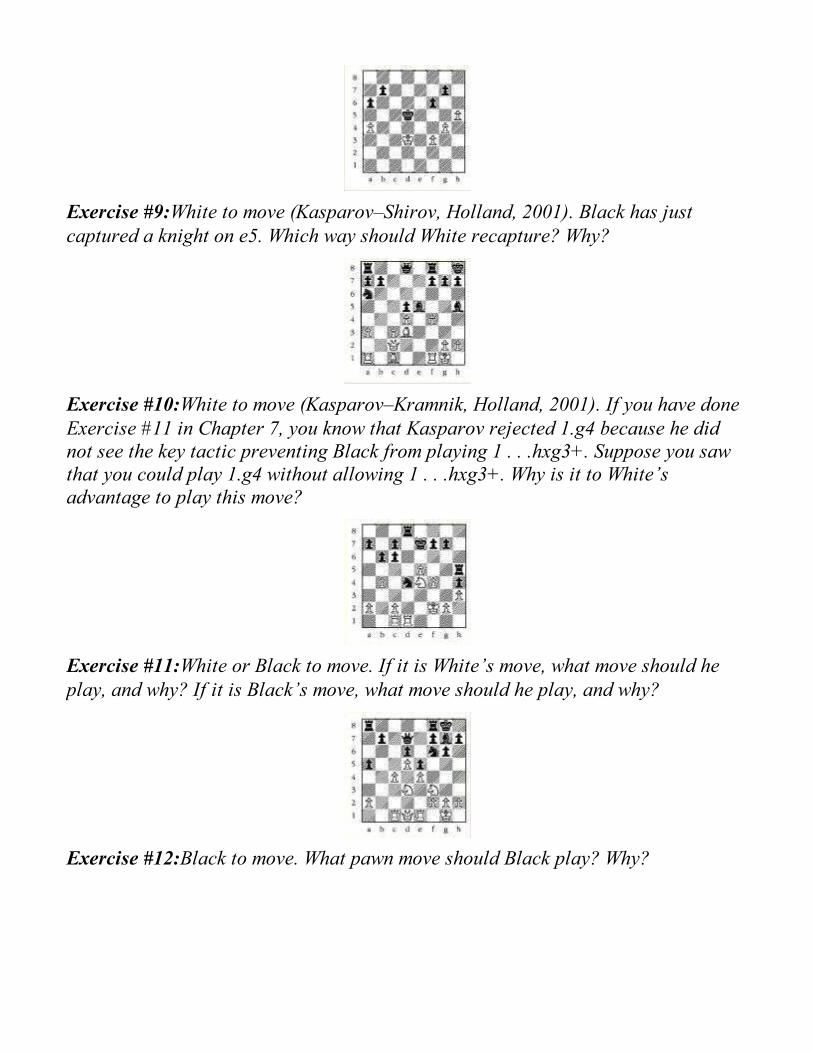
Exercise #9:White to move (Kasparov–Shirov, Holland, 2001). Black has justcaptured a knight on e5. Which way should White recapture? Why?
Exercise #10:White to move (Kasparov–Kramnik, Holland, 2001). If you have doneExercise #11 in Chapter 7, you know that Kasparov rejected 1.g4 because he didnot see the key tactic preventing Black from playing 1 . . .hxg3+. Suppose you sawthat you could play 1.g4 without allowing 1 . . .hxg3+. Why is it to White’sadvantage to play this move?
Exercise #11:White or Black to move. If it is White’s move, what move should heplay, and why? If it is Black’s move, what move should he play, and why?
Exercise #12:Black to move. What pawn move should Black play? Why?
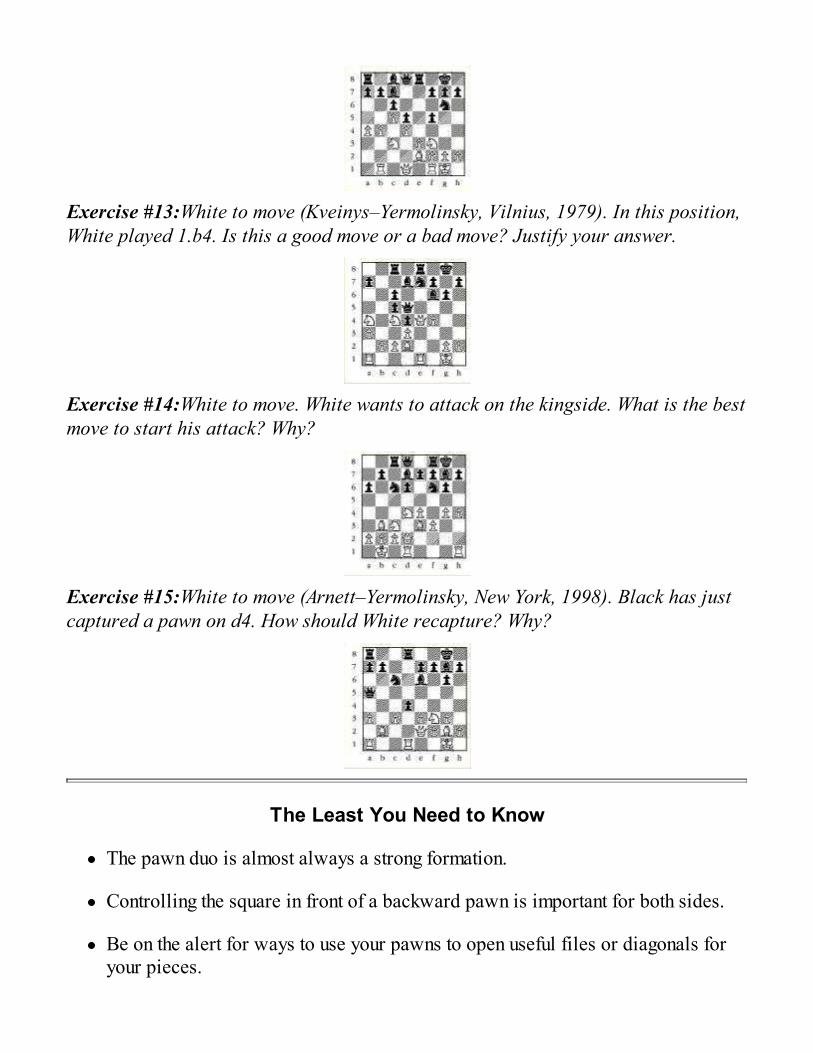
Exercise #13:White to move (Kveinys–Yermolinsky, Vilnius, 1979). In this position,White played 1.b4. Is this a good move or a bad move? Justify your answer.
Exercise #14:White to move. White wants to attack on the kingside. What is the bestmove to start his attack? Why?
Exercise #15:White to move (Arnett–Yermolinsky, New York, 1998). Black has justcaptured a pawn on d4. How should White recapture? Why?
The Least You Need to Know
The pawn duo is almost always a strong formation.
Controlling the square in front of a backward pawn is important for both sides.
Be on the alert for ways to use your pawns to open useful files or diagonals foryour pieces.
You should always look for ways to use pawn moves to correct your pawnstructure or damage your opponent’s pawn structure.
Doubled pawns are often a weakness, but if they do not create any new pawnislands, and if they are not doubled backward pawns, they may not be weak. Ifthey help control the center, or open lines you can use, they may even be good.

Chapter 12
The Final Frontier
In This Chapter
The importance of having more space
Grabbing space
Exploiting your extra space
What to do when you have less space
In Chapter 10 we talked about the pieces, and in Chapter 11 we talked about thepawns. In the next two chapters, we’re going to talk about the squares. (You’ve got toagree this will take care of the whole chess set!) More specifically, we’re going totalk about two very important ideas: how many squares you control and which squaresyou control. As you read through this chapter and the next, think about the ideas you’velearned in the last three chapters. You’ll find that what you’ve learned about theopening and about the pieces and the pawns has a lot to do with how many squares youcontrol, and which squares you control.
The Advantage of SpaceThe amount of space you control is the total number of squares you control with yourpieces and pawns. Generally speaking, the more you control, the better it is for you.When you control more space, your pieces are more powerful because they have moresquares to go to. Although who has more space is determined by the squarescontrolled by both pieces and pawns, as you go through the examples in this chapteryou should notice that the pawn structure often determines who has more space. The
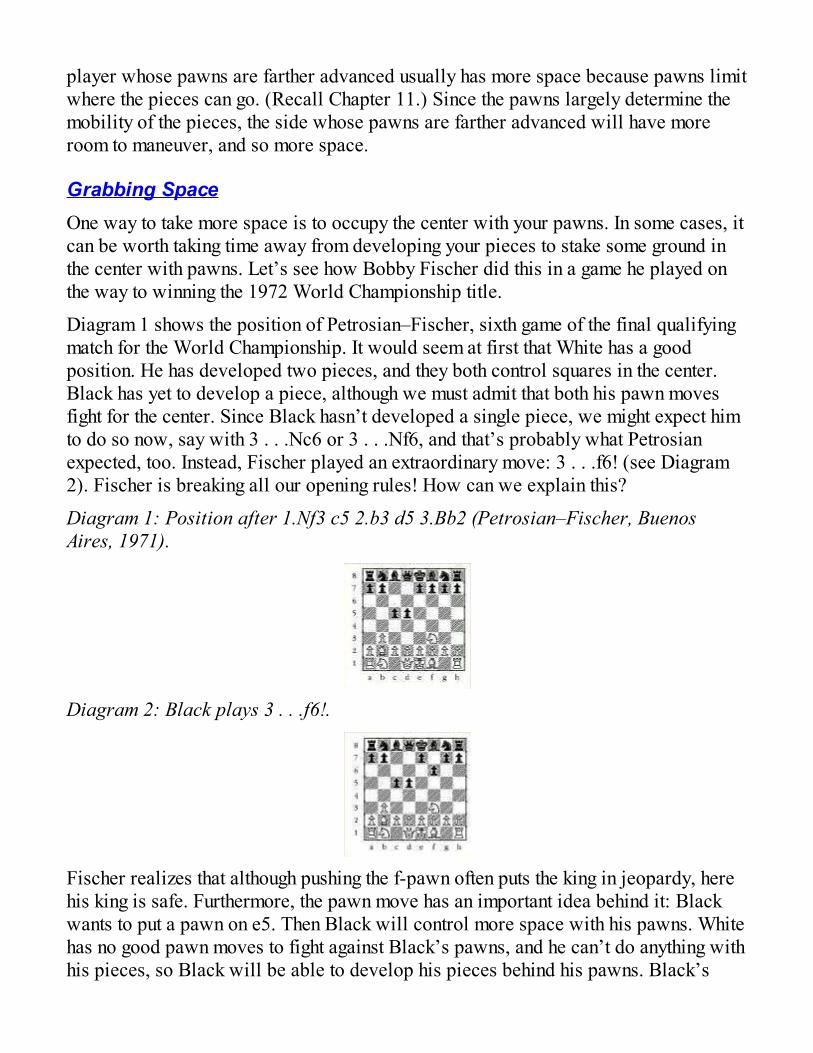
player whose pawns are farther advanced usually has more space because pawns limitwhere the pieces can go. (Recall Chapter 11.) Since the pawns largely determine themobility of the pieces, the side whose pawns are farther advanced will have moreroom to maneuver, and so more space.
Grabbing SpaceOne way to take more space is to occupy the center with your pawns. In some cases, itcan be worth taking time away from developing your pieces to stake some ground inthe center with pawns. Let’s see how Bobby Fischer did this in a game he played onthe way to winning the 1972 World Championship title.
Diagram 1 shows the position of Petrosian–Fischer, sixth game of the final qualifyingmatch for the World Championship. It would seem at first that White has a goodposition. He has developed two pieces, and they both control squares in the center.Black has yet to develop a piece, although we must admit that both his pawn movesfight for the center. Since Black hasn’t developed a single piece, we might expect himto do so now, say with 3 . . .Nc6 or 3 . . .Nf6, and that’s probably what Petrosianexpected, too. Instead, Fischer played an extraordinary move: 3 . . .f6! (see Diagram2). Fischer is breaking all our opening rules! How can we explain this?
Diagram 1: Position after 1.Nf3 c5 2.b3 d5 3.Bb2 (Petrosian–Fischer, BuenosAires, 1971).
Diagram 2: Black plays 3 . . .f6!.
Fischer realizes that although pushing the f-pawn often puts the king in jeopardy, herehis king is safe. Furthermore, the pawn move has an important idea behind it: Blackwants to put a pawn on e5. Then Black will control more space with his pawns. Whitehas no good pawn moves to fight against Black’s pawns, and he can’t do anything withhis pieces, so Black will be able to develop his pieces behind his pawns. Black’s
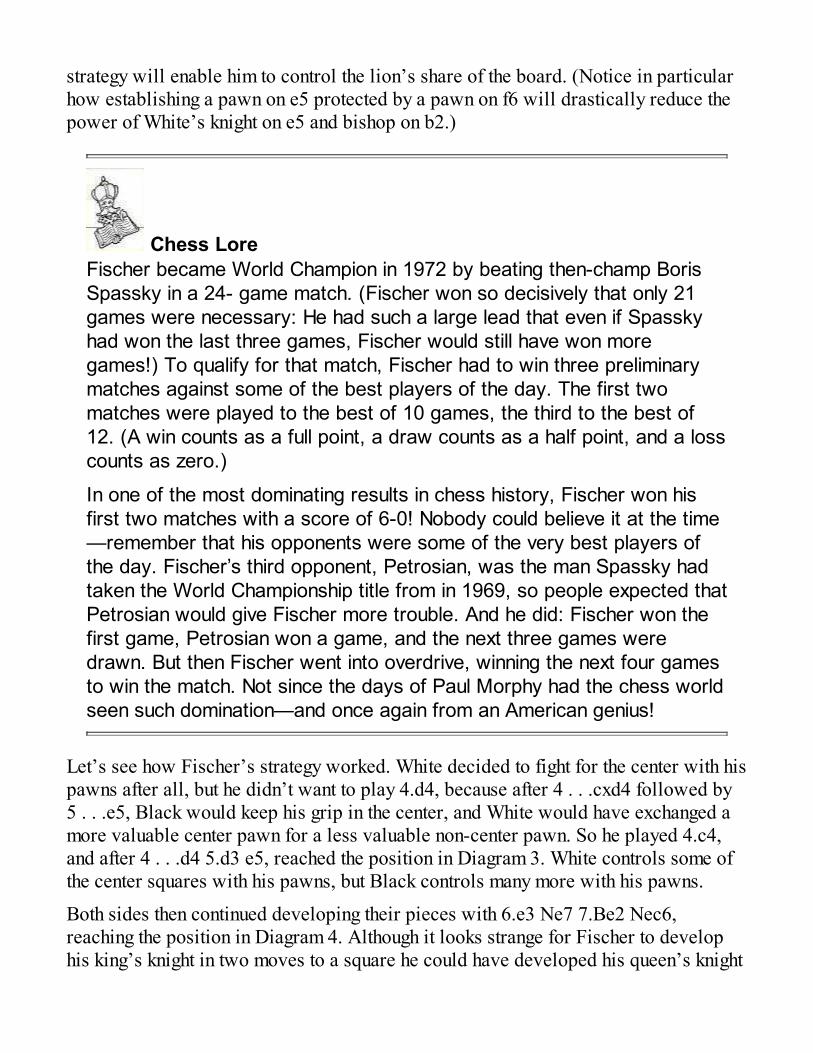
strategy will enable him to control the lion’s share of the board. (Notice in particularhow establishing a pawn on e5 protected by a pawn on f6 will drastically reduce thepower of White’s knight on e5 and bishop on b2.)
Chess LoreFischer became World Champion in 1972 by beating then-champ BorisSpassky in a 24- game match. (Fischer won so decisively that only 21games were necessary: He had such a large lead that even if Spasskyhad won the last three games, Fischer would still have won moregames!) To qualify for that match, Fischer had to win three preliminarymatches against some of the best players of the day. The first twomatches were played to the best of 10 games, the third to the best of12. (A win counts as a full point, a draw counts as a half point, and a losscounts as zero.)
In one of the most dominating results in chess history, Fischer won hisfirst two matches with a score of 6-0! Nobody could believe it at the time—remember that his opponents were some of the very best players ofthe day. Fischer’s third opponent, Petrosian, was the man Spassky hadtaken the World Championship title from in 1969, so people expected thatPetrosian would give Fischer more trouble. And he did: Fischer won thefirst game, Petrosian won a game, and the next three games weredrawn. But then Fischer went into overdrive, winning the next four gamesto win the match. Not since the days of Paul Morphy had the chess worldseen such domination—and once again from an American genius!
Let’s see how Fischer’s strategy worked. White decided to fight for the center with hispawns after all, but he didn’t want to play 4.d4, because after 4 . . .cxd4 followed by5 . . .e5, Black would keep his grip in the center, and White would have exchanged amore valuable center pawn for a less valuable non-center pawn. So he played 4.c4,and after 4 . . .d4 5.d3 e5, reached the position in Diagram 3. White controls some ofthe center squares with his pawns, but Black controls many more with his pawns.
Both sides then continued developing their pieces with 6.e3 Ne7 7.Be2 Nec6,reaching the position in Diagram 4. Although it looks strange for Fischer to develophis king’s knight in two moves to a square he could have developed his queen’s knight

to in one move, the maneuver makes sense because Fischer has decided that most ofhis play will be on the queenside (remember Silman’s Rule from Chapter 11: Black’spawn chain points to the queenside), so he wants to have both knights on that side ofthe board. In particular, if White exchanges pawns on d4, Black will recapture withhis c-pawn towards the center, and then he will maneuver his queen’s knight to the c5square, where it will attack the two squares in front of the d4 and e5 pawns.
More development and then castling ensued, reaching the position in Diagram 5 after8.Nbd2 Be7 9.O-O O-O. Notice that even though White has developed more pieces,Black’s pieces have much more mobility: White controls only four squares in Black’sterritory, while Black controls seven in White’s territory. (Plus, Black controls the d4square four times.) That is what a space advantage can do for your pieces!
Diagram 3: Position after 4.c4 d4 5.d3 e5.
Diagram 4: Position after 6.e3 Ne7 7.Be2 Nec6.
Diagram 5: Position after 8.Nbd2 Be7 9.O-O O-O.
What to Do with More SpaceWherever you have morespace your space, your pieces have more mobility than youropponent’s—so an attack in that part of the board has a good chance of overcomingyour opponent’s defense.

Patrick’s PointersWhen the center is closed, the power of the pieces is reduced, so youcan afford to take more time (without wasting time!) to maneuver eachpiece to its best square. But always watch out that the center doesn’tsuddenly open up: If that happens, and you’re behind in development,your opponent will be able to attack you!
Let’s zoom forward in this instructive game to see how Fischer used his spaceadvantage. Diagram 6 shows the position after Black’s 23rd move. With ourknowledge of pawn structure, we can see that Fischer’s plan is to push his c-pawnforward. After exchanging Black’s b-pawn and c-pawn for White’s b-pawn and d-pawn, White will have an isolated a-pawn.
Petrosian decided to force Fischer’s hand immediately, rather than wait for Fischer tobreak through at his pleasure. He played 24.a4, and after 24 . . .bxa4 25.bxa4 c4reached the position in Diagram 7. Petrosian put up a tough defense, but eventuallyFischer won the weak a-pawn and then the game.
Another good thing to do when you have space is: Take some more space! A goodexample comes from this game of the New York Times chess columnist, grandmasterRobert Byrne. In Diagram 8, White clearly has more space than Black, but what is heto do with it? It’s hard to see any way to attack on the queenside, so maybe he shouldattack on the kingside. But how to do that? Well, if he’s going to attack the king, he’sgoing to need open lines, so he played 16.f4 (see Diagram 9), trying to entice Black tocapture.
Diagram 6: White to move.
Diagram 7: Position after 24.a4 bxa4 25.bxa4 c4.

Diagram 8: White to move (Byrne–Kotov, USA-USSR Team Match, 1954).
Black was too clever for that. He realized if he captured the pawn with 16 . . .exf4,then after 17.Rxf4 he would just be asking for White to move all his pieces to thekingside and give checkmate. So he kept the position tightly closed by playing16 . . .f6. But that gave White the opportunity to take even more space by playing17.f5. Compare Diagram 10 to Diagram 8, and you can see how much more spaceWhite has taken: Now he can more easily attack on the kingside. Although the gamewas eventually drawn, White had the better position.
But Don’t Forget the Center!Games like Petrosian–Fischer can give a misleading impression: Just fling your pawnsforward and you’ll squeeze your opponent to death. Actually, it’s much trickier thanthat. What grandmasters found so impressive about Fischer’s play in the game againstPetrosian was his realization that he had an exceptional position where he couldeffectively push his pawns and ignore his development for a few moves becauseWhite had no way to fight back in the center.
You may remember Diagram 11; it’s the same position as Diagram 11 from Chapter 9.When discussing this position in Chapter 9, I said that a good move for White is8.Bd3, developing a piece.
Patrick’s PointersThe danger of pushing your pawns forward too quickly is that youropponent will be able to smash the center open with a well–timed pawn
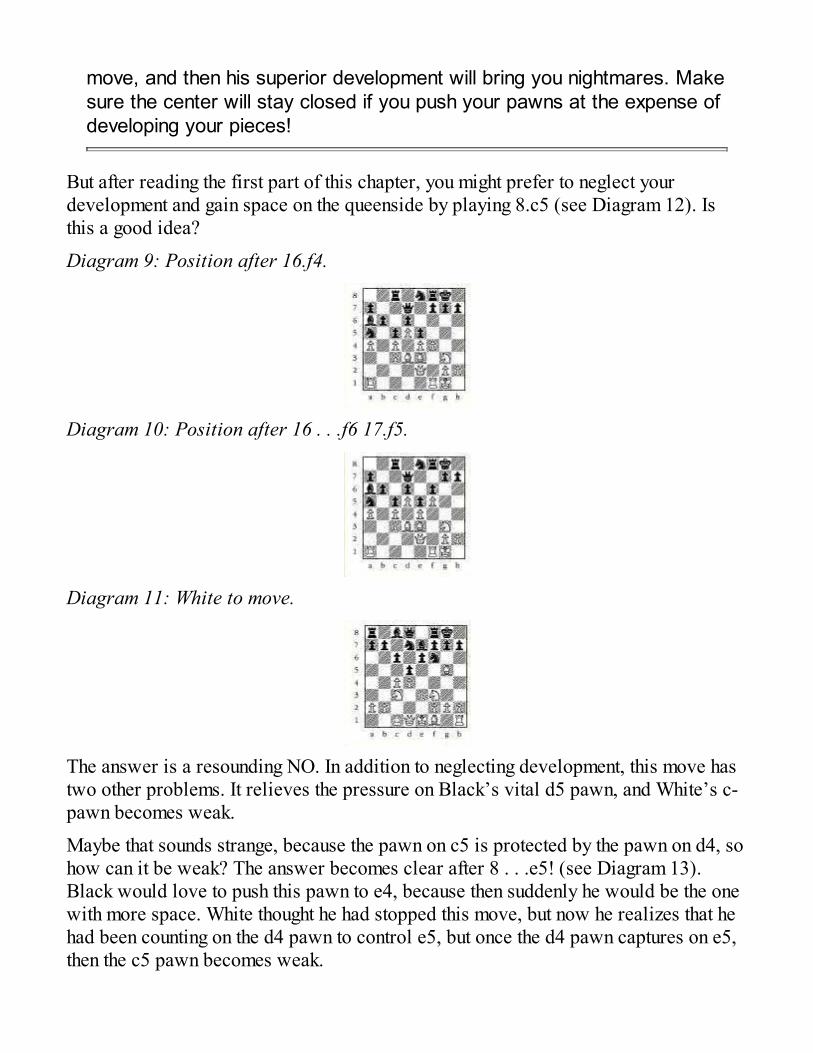
move, and then his superior development will bring you nightmares. Makesure the center will stay closed if you push your pawns at the expense ofdeveloping your pieces!
But after reading the first part of this chapter, you might prefer to neglect yourdevelopment and gain space on the queenside by playing 8.c5 (see Diagram 12). Isthis a good idea?
Diagram 9: Position after 16.f4.
Diagram 10: Position after 16 . . .f6 17.f5.
Diagram 11: White to move.
The answer is a resounding NO. In addition to neglecting development, this move hastwo other problems. It relieves the pressure on Black’s vital d5 pawn, and White’s c-pawn becomes weak.
Maybe that sounds strange, because the pawn on c5 is protected by the pawn on d4, sohow can it be weak? The answer becomes clear after 8 . . .e5! (see Diagram 13).Black would love to push this pawn to e4, because then suddenly he would be the onewith more space. White thought he had stopped this move, but now he realizes that hehad been counting on the d4 pawn to control e5, but once the d4 pawn captures on e5,then the c5 pawn becomes weak.

Diagram 14 shows the result; after 9.dxe5 Ne4! 10.Bxe7 Qxe7 Black will win backhis pawn, and White has lost any advantage he might have had. In fact, Black is better,because White must find a way to protect two weak pawns and complete hisdevelopment and get his king to safety, whereas Black has no problems.
Diagram 12: White plays 8.c5.
Diagram 13: Black plays 8 . . .e5.
Diagram 14: Position after 9.dxe5 Ne4 10.Bxe7 Qxe7.
Relieving a CrampWe’d all like to have more space, but there are only so many squares on thechessboard, and someone’s going to control more of them. Sometimes that’s okay:Having less space doesn’t necessarily mean that you can’t attack your opponent, andhaving more space doesn’t necessarily mean that you can. But sometimes having lessspace is a real problem and you need to solve it.
Here are three good strategies to adopt if you have less space:
1. Exchange Pieces
2. Take Some Space of Your Own

3. Challenge Your Opponent’s Space Advantage
Exchange PiecesIf you’ve got less space to maneuver your pieces in, then it stands to reason that you’dlike to trade a few pairs of pieces, so the pieces you’re left with can move aroundmore easily (and your opponent has fewer pieces to take advantage of the extra space).Trading pieces is the first strategy you can adopt when your position is cramped.
Diagram 15 shows the opening position we saw in Chapter 9, Diagram 9. Blackunquestionably has less space, which in particular means he has trouble developinghis queen’s bishop. But Black can solve that problem by exchanging some pieces.
Black starts by playing 8 . . .dxc4 9.Bxc4 Nd5 in Diagram 16. By trading pawns,Black gives his knight a post on d5. If Black didn’t have a specific strategy in mind,this would be very risky, because it also gives White an extra center pawn. But Blackknows what he’s doing.
White exchanges bishops with 10.Bxe7 Qxe7, and then decides to play than 11.O-O,whisking his king out of the center (see Diagram 17).
Patrick’s PointersIf you’ve got more space, your opponent might be trying these strategieshimself, so you should aim for the opposite: Avoid any unnecessaryexchanges!
Black continues his strategy of exchanging pieces in Diagram 18, with 11 . . .Nxc312.Rxc3. At first it seems that Black hasn’t accomplished anything. White still hasmore space, and Black seems to have surrendered control of the center to boot. ButBlack has benefited by trading pieces, because his queen now joins the knight insupporting the important pawn push 12 . . .e5! (see Diagram 19). With this move,Black fights back in the center and gains more space. Plus, Black’s white-squaredbishop finally has its diagonal cleared of the e6 pawn so it can be developed as soonas the knight moves. Black’s position improves because of the pawn push 12 . . .e5,but Black couldn’t have accomplished it without first trading pieces.
Diagram 15: Position after 8.Bd3.
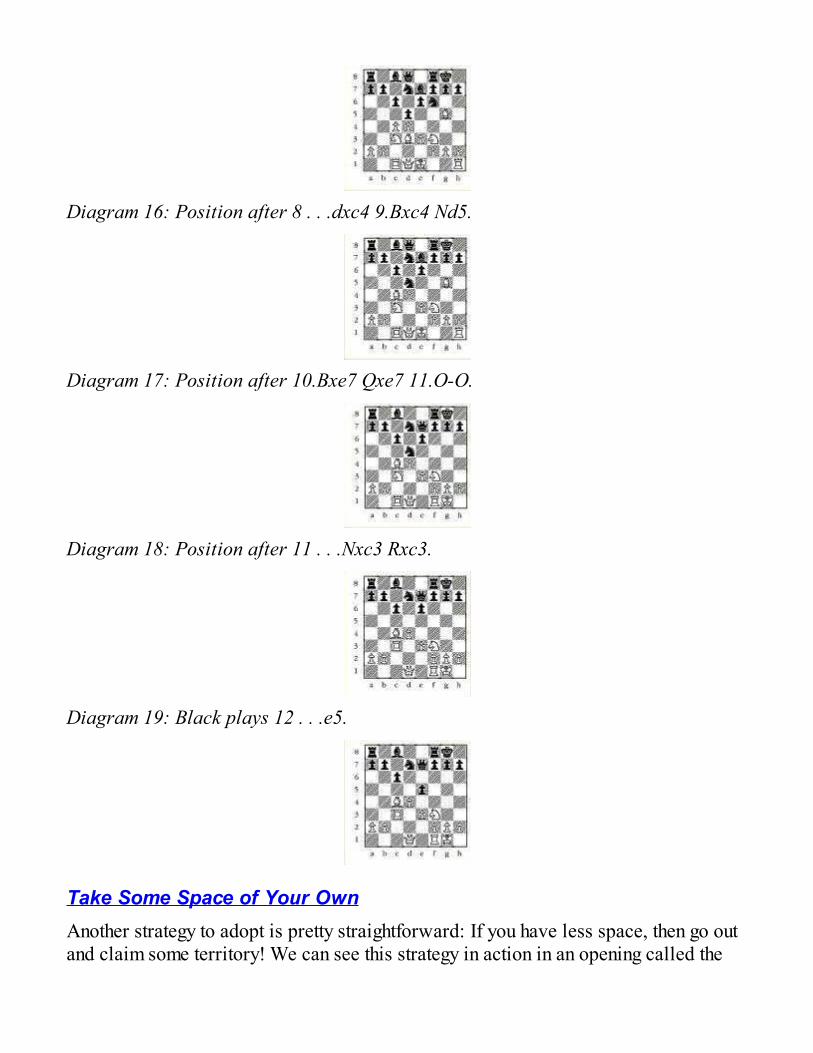
Diagram 16: Position after 8 . . .dxc4 9.Bxc4 Nd5.
Diagram 17: Position after 10.Bxe7 Qxe7 11.O-O.
Diagram 18: Position after 11 . . .Nxc3 Rxc3.
Diagram 19: Black plays 12 . . .e5.
Take Some Space of Your OwnAnother strategy to adopt is pretty straightforward: If you have less space, then go outand claim some territory! We can see this strategy in action in an opening called the

“King’s Indian Defense.”
Diagram 20 shows a standard position from this opening. (It arises after 1.d4 Nf6 2.c4g6 3.Nc3 Bg7 4.e4 d6 5.Nf3 O-O 6.Be2.) There is no doubt that White has morespace. How should Black play?
Black begins by striking in the center with 6 . . .e5 (see Diagram 21). Black isn’t goingto let White’s pawn duo in the center (a pawn trio, even!) remain unchallenged. InDiagram 22, White castles (7.O-O), because he can’t win a pawn by taking twice one5. (If 7.dxe5 dxe5 8.Nxe5 then 8 . . .Nxe4! wins the pawn back. Can you see why?)Black develops his knight to c6 to put more pressure on White’s d4 pawn (7 . . .Nc6).This finally forces White to advance the pawn (8.d5), which attacks the knight, soBlack retreats it to e7 (8 . . .Ne7).
Diagram 20: Black to move.
Diagram 21: Black plays 6 . . .e5.
Diagram 22: Position after 7.O-O Nc6 8.d5 Ne7.
White’s next move looks strange at first: 9.Ne1 in Diagram 23. This is by no means theonly reasonable move in this position, but it’s a good one. White’s idea is that sincehis space advantage is on the queenside, that’s where he should attack. The best wayto do that is to push his c-pawn to c5, so that a future cxd6 will weaken Black’s pawnsand open the c-file. To support this advance, he decides to maneuver his knight to d3
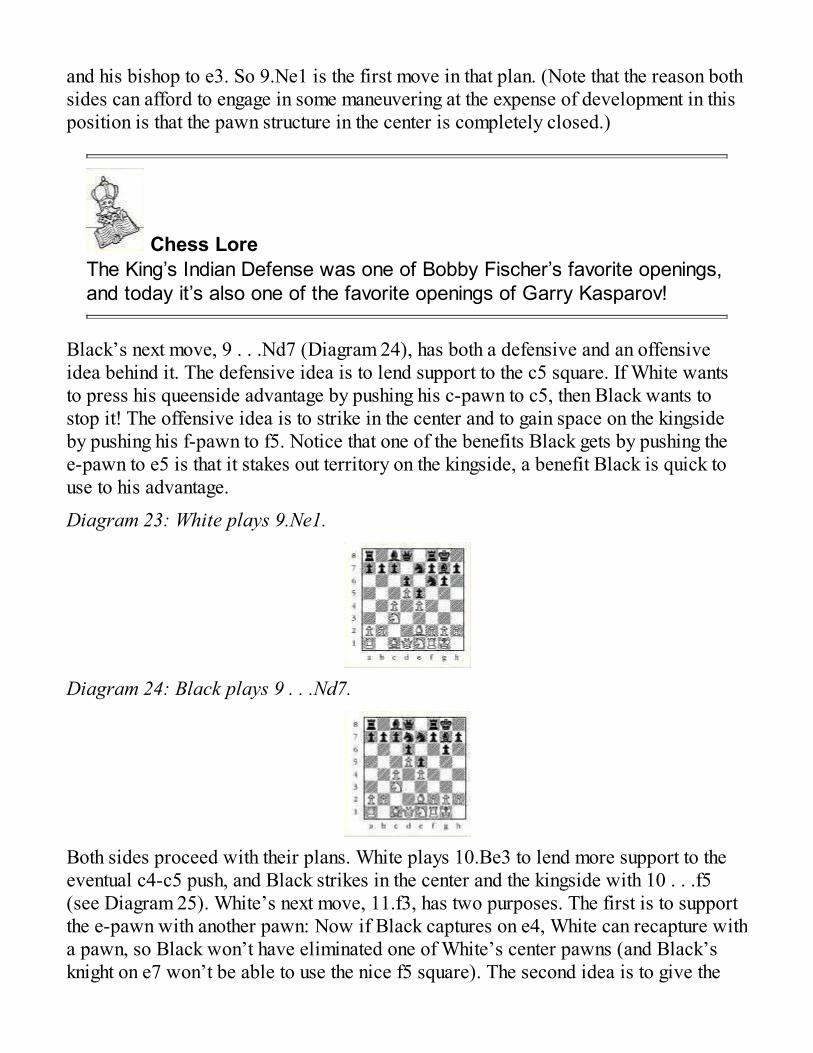
and his bishop to e3. So 9.Ne1 is the first move in that plan. (Note that the reason bothsides can afford to engage in some maneuvering at the expense of development in thisposition is that the pawn structure in the center is completely closed.)
Chess LoreThe King’s Indian Defense was one of Bobby Fischer’s favorite openings,and today it’s also one of the favorite openings of Garry Kasparov!
Black’s next move, 9 . . .Nd7 (Diagram 24), has both a defensive and an offensiveidea behind it. The defensive idea is to lend support to the c5 square. If White wantsto press his queenside advantage by pushing his c-pawn to c5, then Black wants tostop it! The offensive idea is to strike in the center and to gain space on the kingsideby pushing his f-pawn to f5. Notice that one of the benefits Black gets by pushing thee-pawn to e5 is that it stakes out territory on the kingside, a benefit Black is quick touse to his advantage.
Diagram 23: White plays 9.Ne1.
Diagram 24: Black plays 9 . . .Nd7.
Both sides proceed with their plans. White plays 10.Be3 to lend more support to theeventual c4-c5 push, and Black strikes in the center and the kingside with 10 . . .f5(see Diagram 25). White’s next move, 11.f3, has two purposes. The first is to supportthe e-pawn with another pawn: Now if Black captures on e4, White can recapture witha pawn, so Black won’t have eliminated one of White’s center pawns (and Black’sknight on e7 won’t be able to use the nice f5 square). The second idea is to give the

bishop the f2 square to retreat to if Black advances his pawn to f4. From f2 the bishopwill still control the vital c5 square.
Sure enough, Black plays 11 . . .f4 (see Diagram 26), taking more territory on thekingside. White retreats the bishop with 12.Bf2, and then Black takes even more spaceon the kingside with 12 . . .g5. Compare Diagram 27 to Diagram 20 or 22, and see thedifference in space. White still has more space, but now Black has definitely markedout a side of the board to attack on. And since the kings live on that side of the board,you can bet the game will be exciting!
Diagram 25: Position after 10.Be3 f5.
Diagram 26: Position after 11.f3 f4.
Diagram 27: Position after 12.Bf2 g5.
Patrick’s PointersNotice in Diagrams 20-27 that even after gaining space on the kingside,Black still has less space than White. That’s because White’s farthestadvanced pawn (on d5) is a center pawn, while Black’s farthestadvanced pawn (on f4) is not. So when White’s pieces control more
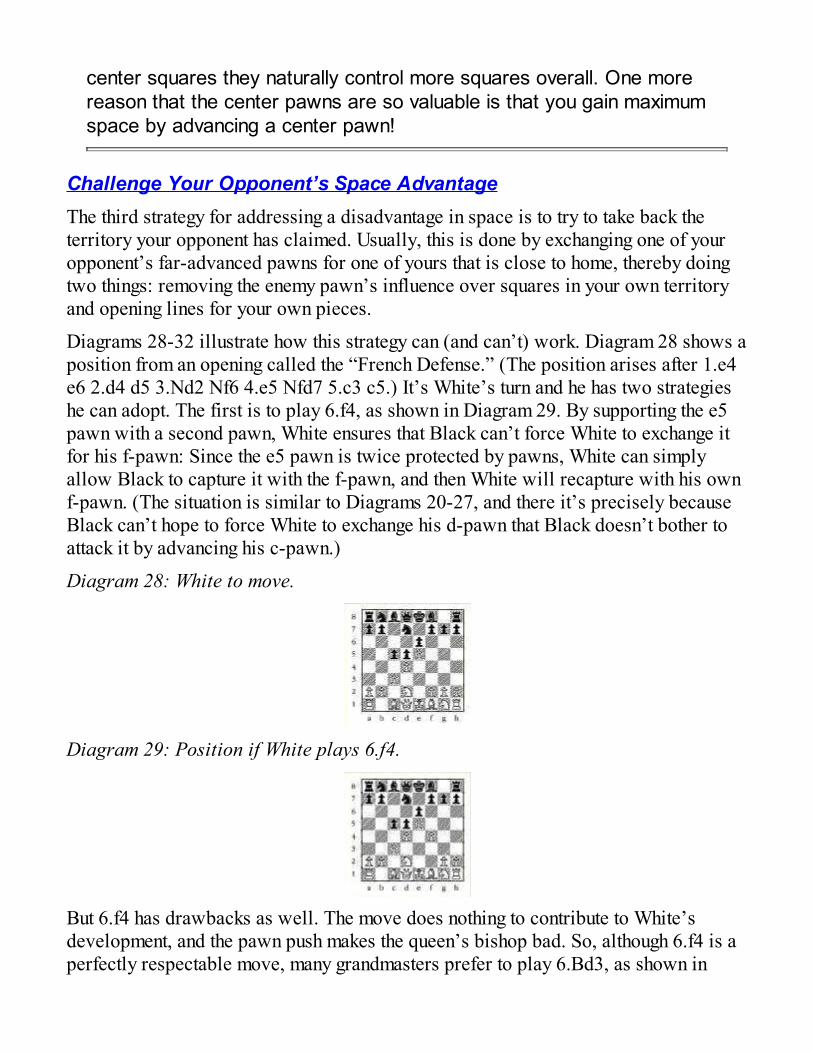
center squares they naturally control more squares overall. One morereason that the center pawns are so valuable is that you gain maximumspace by advancing a center pawn!
Challenge Your Opponent’s Space AdvantageThe third strategy for addressing a disadvantage in space is to try to take back theterritory your opponent has claimed. Usually, this is done by exchanging one of youropponent’s far-advanced pawns for one of yours that is close to home, thereby doingtwo things: removing the enemy pawn’s influence over squares in your own territoryand opening lines for your own pieces.
Diagrams 28-32 illustrate how this strategy can (and can’t) work. Diagram 28 shows aposition from an opening called the “French Defense.” (The position arises after 1.e4e6 2.d4 d5 3.Nd2 Nf6 4.e5 Nfd7 5.c3 c5.) It’s White’s turn and he has two strategieshe can adopt. The first is to play 6.f4, as shown in Diagram 29. By supporting the e5pawn with a second pawn, White ensures that Black can’t force White to exchange itfor his f-pawn: Since the e5 pawn is twice protected by pawns, White can simplyallow Black to capture it with the f-pawn, and then White will recapture with his ownf-pawn. (The situation is similar to Diagrams 20-27, and there it’s precisely becauseBlack can’t hope to force White to exchange his d-pawn that Black doesn’t bother toattack it by advancing his c-pawn.)
Diagram 28: White to move.
Diagram 29: Position if White plays 6.f4.
But 6.f4 has drawbacks as well. The move does nothing to contribute to White’sdevelopment, and the pawn push makes the queen’s bishop bad. So, although 6.f4 is aperfectly respectable move, many grandmasters prefer to play 6.Bd3, as shown in
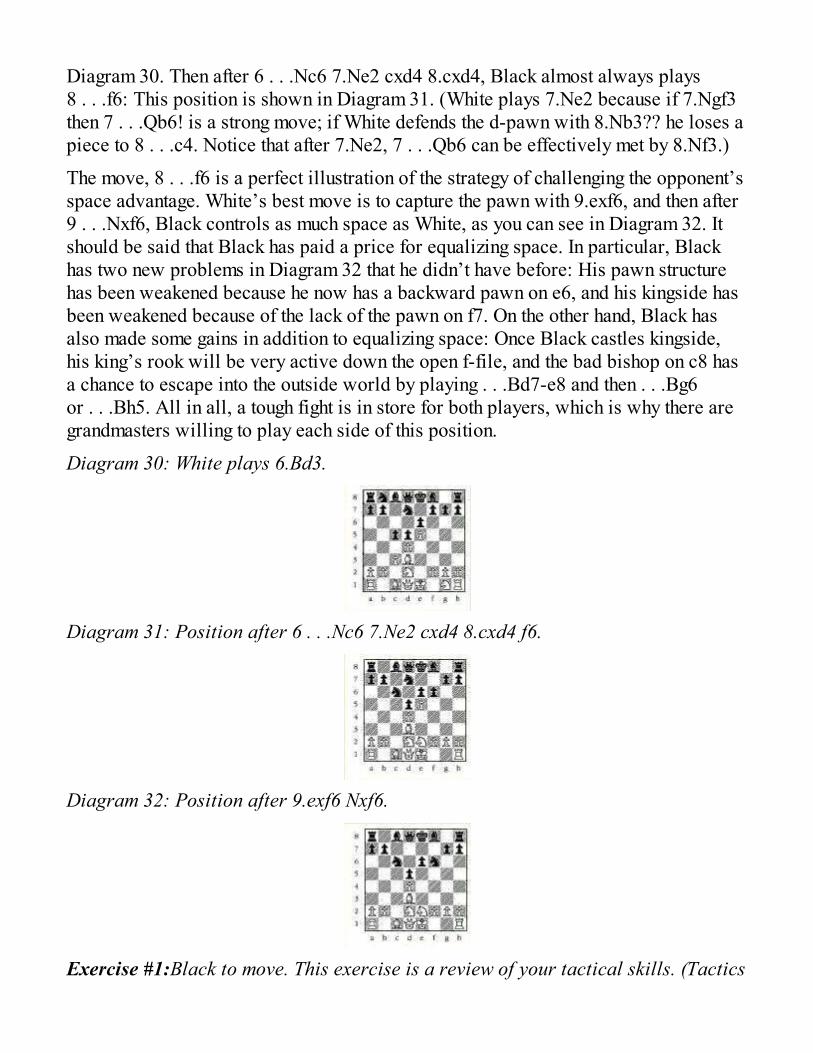
Diagram 30. Then after 6 . . .Nc6 7.Ne2 cxd4 8.cxd4, Black almost always plays8 . . .f6: This position is shown in Diagram 31. (White plays 7.Ne2 because if 7.Ngf3then 7 . . .Qb6! is a strong move; if White defends the d-pawn with 8.Nb3?? he loses apiece to 8 . . .c4. Notice that after 7.Ne2, 7 . . .Qb6 can be effectively met by 8.Nf3.)
The move, 8 . . .f6 is a perfect illustration of the strategy of challenging the opponent’sspace advantage. White’s best move is to capture the pawn with 9.exf6, and then after9 . . .Nxf6, Black controls as much space as White, as you can see in Diagram 32. Itshould be said that Black has paid a price for equalizing space. In particular, Blackhas two new problems in Diagram 32 that he didn’t have before: His pawn structurehas been weakened because he now has a backward pawn on e6, and his kingside hasbeen weakened because of the lack of the pawn on f7. On the other hand, Black hasalso made some gains in addition to equalizing space: Once Black castles kingside,his king’s rook will be very active down the open f-file, and the bad bishop on c8 hasa chance to escape into the outside world by playing . . .Bd7-e8 and then . . .Bg6or . . .Bh5. All in all, a tough fight is in store for both players, which is why there aregrandmasters willing to play each side of this position.
Diagram 30: White plays 6.Bd3.
Diagram 31: Position after 6 . . .Nc6 7.Ne2 cxd4 8.cxd4 f6.
Diagram 32: Position after 9.exf6 Nxf6.
Exercise #1:Black to move. This exercise is a review of your tactical skills. (Tactics
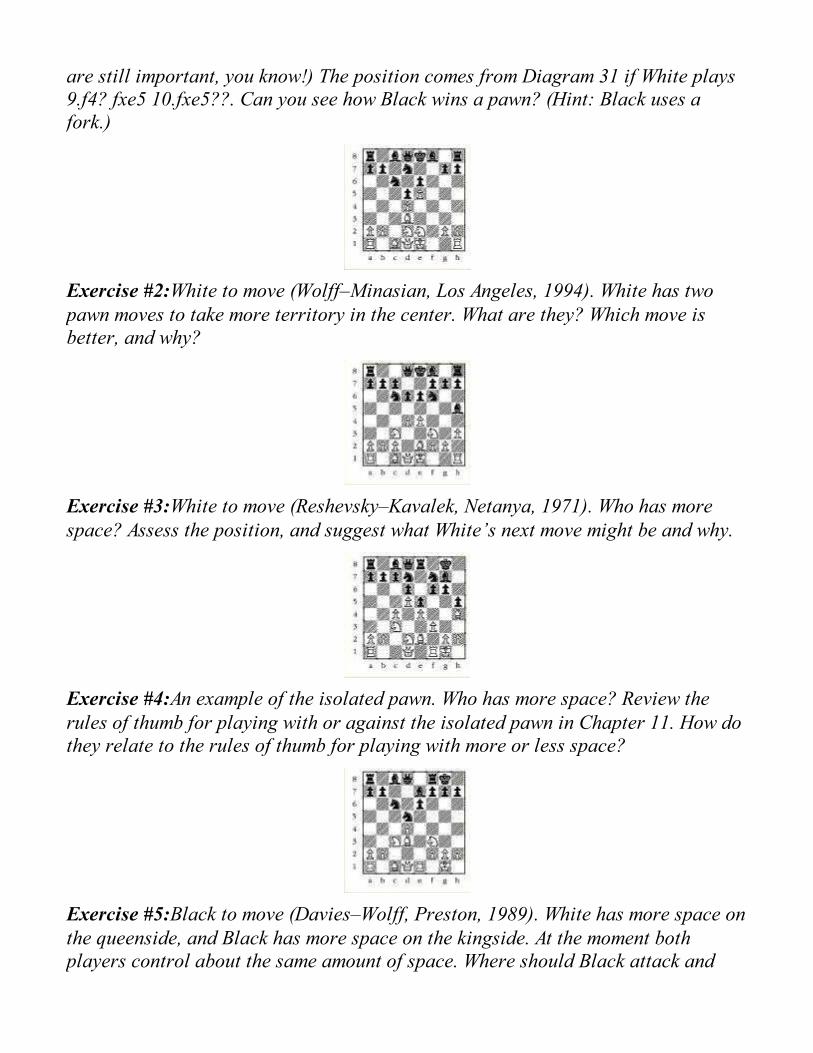
are still important, you know!) The position comes from Diagram 31 if White plays9.f4? fxe5 10.fxe5??. Can you see how Black wins a pawn? (Hint: Black uses afork.)
Exercise #2:White to move (Wolff–Minasian, Los Angeles, 1994). White has twopawn moves to take more territory in the center. What are they? Which move isbetter, and why?
Exercise #3:White to move (Reshevsky–Kavalek, Netanya, 1971). Who has morespace? Assess the position, and suggest what White’s next move might be and why.
Exercise #4:An example of the isolated pawn. Who has more space? Review therules of thumb for playing with or against the isolated pawn in Chapter 11. How dothey relate to the rules of thumb for playing with more or less space?
Exercise #5:Black to move (Davies–Wolff, Preston, 1989). White has more space onthe queenside, and Black has more space on the kingside. At the moment bothplayers control about the same amount of space. Where should Black attack and
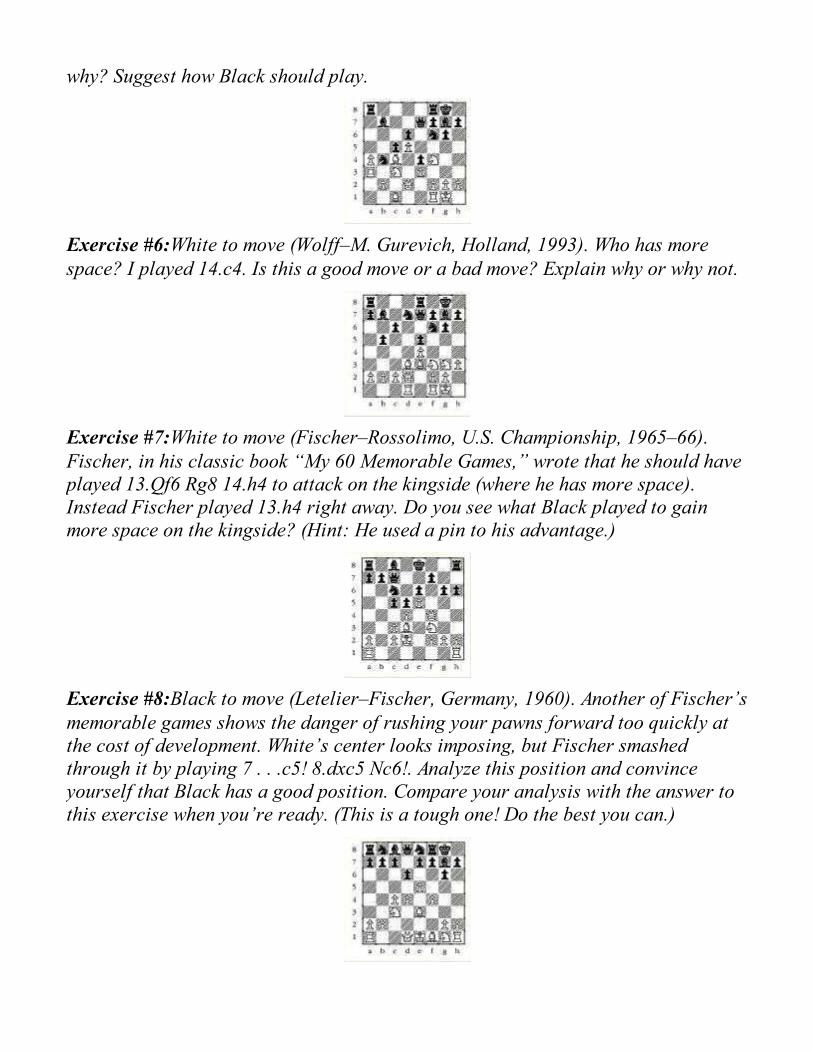
why? Suggest how Black should play.
Exercise #6:White to move (Wolff–M. Gurevich, Holland, 1993). Who has morespace? I played 14.c4. Is this a good move or a bad move? Explain why or why not.
Exercise #7:White to move (Fischer–Rossolimo, U.S. Championship, 1965–66).Fischer, in his classic book “My 60 Memorable Games,” wrote that he should haveplayed 13.Qf6 Rg8 14.h4 to attack on the kingside (where he has more space).Instead Fischer played 13.h4 right away. Do you see what Black played to gainmore space on the kingside? (Hint: He used a pin to his advantage.)
Exercise #8:Black to move (Letelier–Fischer, Germany, 1960). Another of Fischer’smemorable games shows the danger of rushing your pawns forward too quickly atthe cost of development. White’s center looks imposing, but Fischer smashedthrough it by playing 7 . . .c5! 8.dxc5 Nc6!. Analyze this position and convinceyourself that Black has a good position. Compare your analysis with the answer tothis exercise when you’re ready. (This is a tough one! Do the best you can.)

Exercise #9:Black to move. What move can Black play to gain more space forhimself and to challenge White’s spatial control? (Notice the connection betweencontrolling the center and controlling more space.)
Exercise #10:Black to move (Andersson–Portisch, Iceland, 1991). Who has morespace? Do you think 14 . . .Nd5 is a good move for Black? Why or why not?
Exercise #11:White to move (van Wely–Fritz Computer, Dutch Championship,2000). Who has more space? How can White increase his space advantage, andwhat should his plan be once he does so?
Exercise #12:White to move (Kramnik–Kasparov, London World ChampionshipMatch, 2000). How can White increase his space advantage? How might playcontinue?
Exercise #13:Black to move. White’s plan is to play g4-g5 to push the knight awayfrom the center and gain space. How should Black meet this plan?

Exercise #14:Black to move. White’s d pawn gives him more space in the center.Plus, if he is allowed to, White will play e4-e5, gaining even more space in thecenter. How can Black fight for more space and stop White from taking more?
Exercise #15:Black to move. Black is considering two moves to neutralize White’sspace advantage: 1 . . .Ne4 and 1 . . .c5. Which is better, and why?
The Least You Need to Know
The pawn structure largely determines who has more space.
Whoever controls more squares, particularly within the opponent’s half of theboard, has more space.
Where you have more space, your pieces are more mobile, so you shouldgenerally attack on the part of the board where you have more space.
When you have less space, you should either take more space on some other partof the board or you should challenge your opponent’s space advantage.
The player with less space wants to exchange pieces; the player with more spacewants to avoid exchanging pieces.

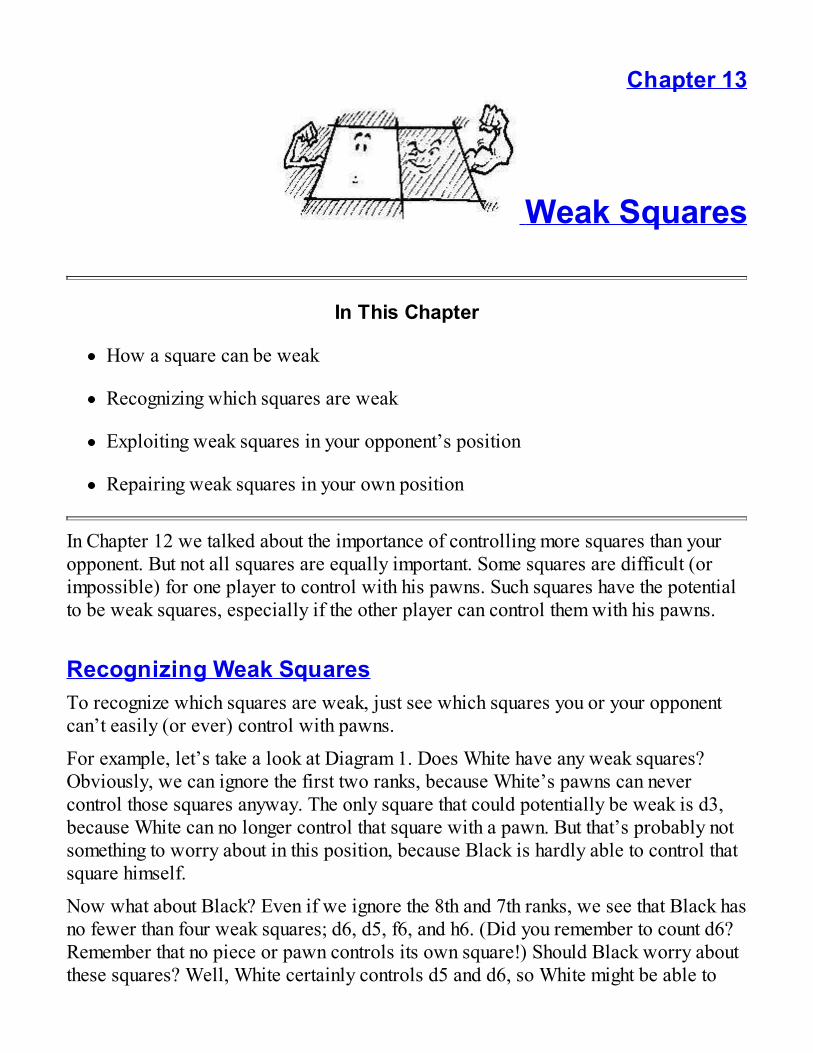
Chapter 13
Weak Squares
In This Chapter
How a square can be weak
Recognizing which squares are weak
Exploiting weak squares in your opponent’s position
Repairing weak squares in your own position
In Chapter 12 we talked about the importance of controlling more squares than youropponent. But not all squares are equally important. Some squares are difficult (orimpossible) for one player to control with his pawns. Such squares have the potentialto be weak squares, especially if the other player can control them with his pawns.
Recognizing Weak SquaresTo recognize which squares are weak, just see which squares you or your opponentcan’t easily (or ever) control with pawns.
For example, let’s take a look at Diagram 1. Does White have any weak squares?Obviously, we can ignore the first two ranks, because White’s pawns can nevercontrol those squares anyway. The only square that could potentially be weak is d3,because White can no longer control that square with a pawn. But that’s probably notsomething to worry about in this position, because Black is hardly able to control thatsquare himself.
Now what about Black? Even if we ignore the 8th and 7th ranks, we see that Black hasno fewer than four weak squares; d6, d5, f6, and h6. (Did you remember to count d6?Remember that no piece or pawn controls its own square!) Should Black worry aboutthese squares? Well, White certainly controls d5 and d6, so White might be able to
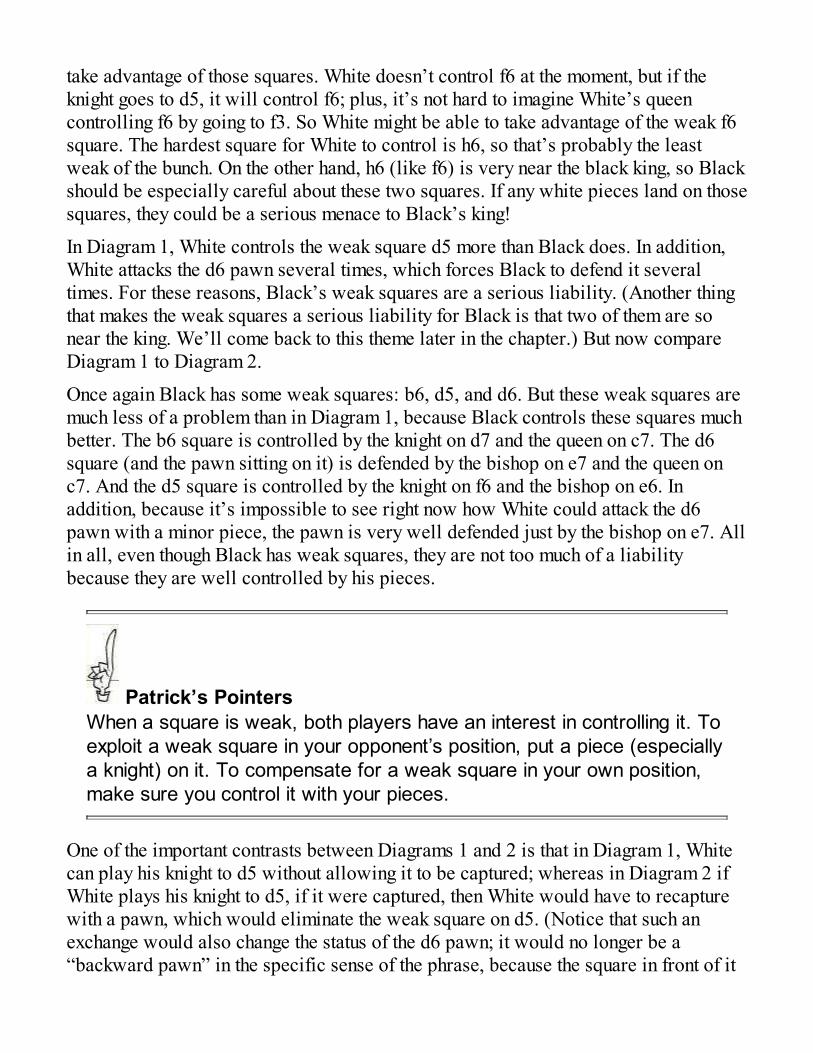
take advantage of those squares. White doesn’t control f6 at the moment, but if theknight goes to d5, it will control f6; plus, it’s not hard to imagine White’s queencontrolling f6 by going to f3. So White might be able to take advantage of the weak f6square. The hardest square for White to control is h6, so that’s probably the leastweak of the bunch. On the other hand, h6 (like f6) is very near the black king, so Blackshould be especially careful about these two squares. If any white pieces land on thosesquares, they could be a serious menace to Black’s king!
In Diagram 1, White controls the weak square d5 more than Black does. In addition,White attacks the d6 pawn several times, which forces Black to defend it severaltimes. For these reasons, Black’s weak squares are a serious liability. (Another thingthat makes the weak squares a serious liability for Black is that two of them are sonear the king. We’ll come back to this theme later in the chapter.) But now compareDiagram 1 to Diagram 2.
Once again Black has some weak squares: b6, d5, and d6. But these weak squares aremuch less of a problem than in Diagram 1, because Black controls these squares muchbetter. The b6 square is controlled by the knight on d7 and the queen on c7. The d6square (and the pawn sitting on it) is defended by the bishop on e7 and the queen onc7. And the d5 square is controlled by the knight on f6 and the bishop on e6. Inaddition, because it’s impossible to see right now how White could attack the d6pawn with a minor piece, the pawn is very well defended just by the bishop on e7. Allin all, even though Black has weak squares, they are not too much of a liabilitybecause they are well controlled by his pieces.
Patrick’s PointersWhen a square is weak, both players have an interest in controlling it. Toexploit a weak square in your opponent’s position, put a piece (especiallya knight) on it. To compensate for a weak square in your own position,make sure you control it with your pieces.
One of the important contrasts between Diagrams 1 and 2 is that in Diagram 1, Whitecan play his knight to d5 without allowing it to be captured; whereas in Diagram 2 ifWhite plays his knight to d5, if it were captured, then White would have to recapturewith a pawn, which would eliminate the weak square on d5. (Notice that such anexchange would also change the status of the d6 pawn; it would no longer be a“backward pawn” in the specific sense of the phrase, because the square in front of it

would be occupied by a white pawn.) Actually, White can’t even play the knight to d5anyway because Black would win the pawn on c2. But in Diagrams 3 and 4, I’vechanged the position slightly to show what happens if White plays his knight to d5 andhas to recapture with a pawn.
When White plays 1.Nd5, Black plays 1 . . .Nxd5, and after 2.exd5 the d5 square is nolonger weak, because it’s been occupied by a white pawn. I’m not saying that there’snever any reason for White to carry out this exchange. For example, once the pawngoes from e4 to d5 White gains more space on the queenside. All I’m saying is that thed5 square is no longer weak for Black because White occupies it with a pawn.
Diagram 1: White has no weak squares, but Black has four: d6, d5, f6, and h6.
Diagram 2: Black has three weak squares: b6, d5, and d6.
Weak Squares and Pawn StructurePerhaps you’ve noticed that weak squares and backward pawns seem to go together.That’s not an accident. Since pawns capture diagonally and not forwards, the square infront of a pawn is always a potentially weak square. I strongly suggest that you reviewChapter 11 and look for all the weak squares that go with each pawn structure. Keepin mind that when pawns are lined up side by side there are no weak squares in frontof them! That’s one big reason the pawn duo is such a strong pawn formation.
In addition to backward pawns, one of the pawn structures that most naturally givesrise to weak squares is the isolated pawn. Because there are no pawns on the filesadjacent to the isolated pawn, the square in front of the isolated pawn is weak. So forexample in Diagram 5, the d4 square is weak, and White can use it for his pieces.
Diagram 3: White to move.
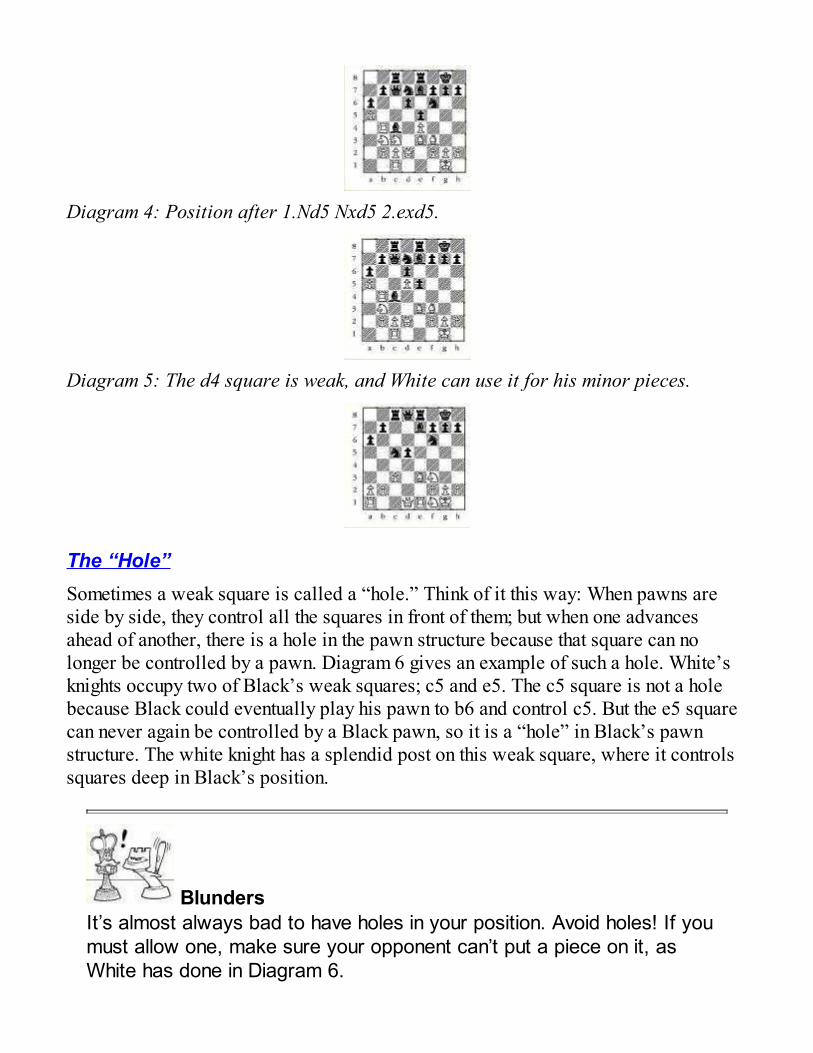
Diagram 4: Position after 1.Nd5 Nxd5 2.exd5.
Diagram 5: The d4 square is weak, and White can use it for his minor pieces.
The “Hole”Sometimes a weak square is called a “hole.” Think of it this way: When pawns areside by side, they control all the squares in front of them; but when one advancesahead of another, there is a hole in the pawn structure because that square can nolonger be controlled by a pawn. Diagram 6 gives an example of such a hole. White’sknights occupy two of Black’s weak squares; c5 and e5. The c5 square is not a holebecause Black could eventually play his pawn to b6 and control c5. But the e5 squarecan never again be controlled by a Black pawn, so it is a “hole” in Black’s pawnstructure. The white knight has a splendid post on this weak square, where it controlssquares deep in Black’s position.
BlundersIt’s almost always bad to have holes in your position. Avoid holes! If youmust allow one, make sure your opponent can’t put a piece on it, asWhite has done in Diagram 6.
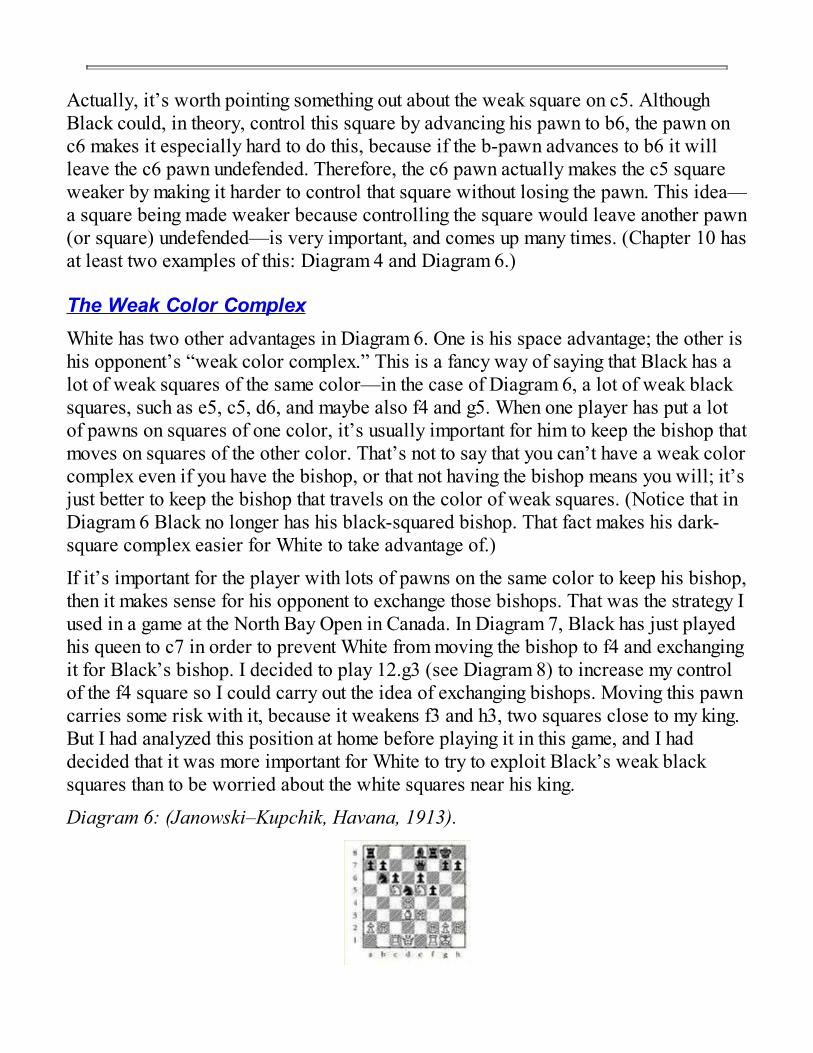
Actually, it’s worth pointing something out about the weak square on c5. AlthoughBlack could, in theory, control this square by advancing his pawn to b6, the pawn onc6 makes it especially hard to do this, because if the b-pawn advances to b6 it willleave the c6 pawn undefended. Therefore, the c6 pawn actually makes the c5 squareweaker by making it harder to control that square without losing the pawn. This idea—a square being made weaker because controlling the square would leave another pawn(or square) undefended—is very important, and comes up many times. (Chapter 10 hasat least two examples of this: Diagram 4 and Diagram 6.)
The Weak Color ComplexWhite has two other advantages in Diagram 6. One is his space advantage; the other ishis opponent’s “weak color complex.” This is a fancy way of saying that Black has alot of weak squares of the same color—in the case of Diagram 6, a lot of weak blacksquares, such as e5, c5, d6, and maybe also f4 and g5. When one player has put a lotof pawns on squares of one color, it’s usually important for him to keep the bishop thatmoves on squares of the other color. That’s not to say that you can’t have a weak colorcomplex even if you have the bishop, or that not having the bishop means you will; it’sjust better to keep the bishop that travels on the color of weak squares. (Notice that inDiagram 6 Black no longer has his black-squared bishop. That fact makes his dark-square complex easier for White to take advantage of.)
If it’s important for the player with lots of pawns on the same color to keep his bishop,then it makes sense for his opponent to exchange those bishops. That was the strategy Iused in a game at the North Bay Open in Canada. In Diagram 7, Black has just playedhis queen to c7 in order to prevent White from moving the bishop to f4 and exchangingit for Black’s bishop. I decided to play 12.g3 (see Diagram 8) to increase my controlof the f4 square so I could carry out the idea of exchanging bishops. Moving this pawncarries some risk with it, because it weakens f3 and h3, two squares close to my king.But I had analyzed this position at home before playing it in this game, and I haddecided that it was more important for White to try to exploit Black’s weak blacksquares than to be worried about the white squares near his king.
Diagram 6: (Janowski–Kupchik, Havana, 1913).

Diagram 7: White to move (Wolff–Wen, Canada, 1996).
Diagram 8: White plays 12.g3.
Diagrams 9, 10, and 11 show how I carried this idea out. Notice that in Diagram 11,White has several advantages, such as more space and more pieces developed. Butone of the most important advantages is that my pawns are almost all on black squaresand I have a white squared bishop, while Black’s pawns are almost all on whitesquares and he has a white squared bishop. My pawns and bishop work harmoniouslytogether, whereas Black’s don’t. As a result, his black squares are much weaker thanmy white squares, and my bishop is good, while his is bad. (If you did Exercise #1 inChapter 10, you saw a later position in this same game. Can you see how the color-complex advantage I gained here helped set up the strategy I was able to carry outlater in that exercise?)
Diagram 9: Position after 12 . . .O-O Bf4.
Diagram 10: Position after 13 . . .Nh5 14.Bxd6 Qxd6 15.Nc3.

Diagram 11: Position after 15 . . .g6 16.Re1 Qd8 17.Bf1.
Weak Squares and the KingLeaving weak squares near your king practically invites your opponent to attack. Youropponent’s pieces can use those weak squares, and without pawns to repel them, itbecomes much harder to survive an attack. Let’s look at an example.
Patrick’s PointersWhen you’re attacking the king, find ways to create weak squares nearthe king, and then move your pieces so that they can control or occupythose squares. Sometimes it’s even worth sacrificing material to createweak squares near the king.
There are a lot of good things about White’s position in Diagram 12: He has an extrapawn, the two bishops, and a very strong pawn center. (Even the doubled pawn is astrength, because it helps control the center and it gives White the open a-file for hisrook.) But White has a hole on g3, and this invites Black to line up his queen andbishop to set up a checkmate threat on h2. If White’s h-pawn were on h2, he wouldhave a large advantage. In Diagram 12, with the pawn on h3, he is lost after 1 . . .Qg3!(see Diagram 13).
Black threatens checkmate by 2 . . .Qh2#. White’s only defense is to run away with2.Kg1, but then Black forces checkmate by playing 2 . . .Qh2+ 3.Kf2 Bg3# (seeDiagram 14). Every move of Black’s attack was on one of those two squares, g3 orh2!
Diagram 12: Black to move.
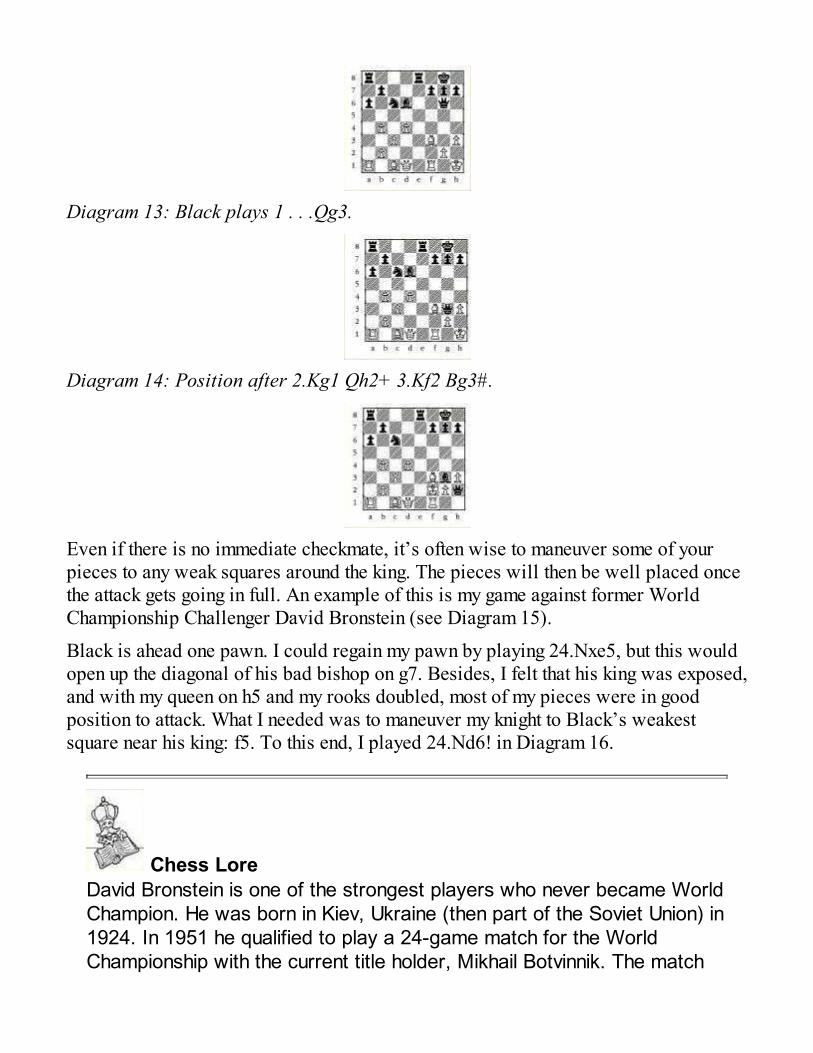
Diagram 13: Black plays 1 . . .Qg3.
Diagram 14: Position after 2.Kg1 Qh2+ 3.Kf2 Bg3#.
Even if there is no immediate checkmate, it’s often wise to maneuver some of yourpieces to any weak squares around the king. The pieces will then be well placed oncethe attack gets going in full. An example of this is my game against former WorldChampionship Challenger David Bronstein (see Diagram 15).
Black is ahead one pawn. I could regain my pawn by playing 24.Nxe5, but this wouldopen up the diagonal of his bad bishop on g7. Besides, I felt that his king was exposed,and with my queen on h5 and my rooks doubled, most of my pieces were in goodposition to attack. What I needed was to maneuver my knight to Black’s weakestsquare near his king: f5. To this end, I played 24.Nd6! in Diagram 16.
Chess LoreDavid Bronstein is one of the strongest players who never became WorldChampion. He was born in Kiev, Ukraine (then part of the Soviet Union) in1924. In 1951 he qualified to play a 24-game match for the WorldChampionship with the current title holder, Mikhail Botvinnik. The match

was hard fought and close to the end. When Bronstein won game 22, hewas ahead by one point; but Botvinnik won the next game, and the scorewas again even. Because the champion would keep the title in case of atied match, Bronstein had to go all out for a win in game 24. He tried hisbest to win that game, but the pressure to win led him to attackprematurely, and Botvinnik soon had a winning advantage. Botvinnikoffered a draw, and Bronstein, seeing that he had no chance to win,accepted. The match was tied, and Botvinnik kept the title.
Bronstein never again qualified to play for the World Championship,although he tied for second in the 1953 tournament that determined whowould challenge in 1954. Bronstein then wrote a book where he analyzedmost of the games of that tournament, a book recognized today as aclassic.
Black played 24 . . .h6?, in an effort to offer the exchange of queens with 25 . . .Qg5,but after 25.h4 (see Diagram 17) squelched that idea, the result was that he hadweakened his king’s position even more. He tried to activate his king’s rook byplaying 25 . . .Rfb8, but after 26.Nf5 Qf8 in Diagram 18, my knight was on an idealsquare and my attack was ready to go. In fact, White already has a move that wins apawn by force: One of the exercises at the end of the chapter asks you to find thatmove.
Since it’s so dangerous to have weak squares near the king, it’s obviously very muchin your interest to create weak squares near your opponent’s king if you’re attacking it.One way to do this is to push one of your pawns up to the king’s pawn cover. Even ifthe pawn is not protected, pushing it can put the defending side in a no-win situation: Ifhe lets you capture his pawn, his king’s position is compromised, but if he captures oradvances his pawn, the effect is the same.
Diagram 15: White to move (Wolff–Bronstein, Holland, 1992).
Diagram 16: White plays 24.Nd6!.
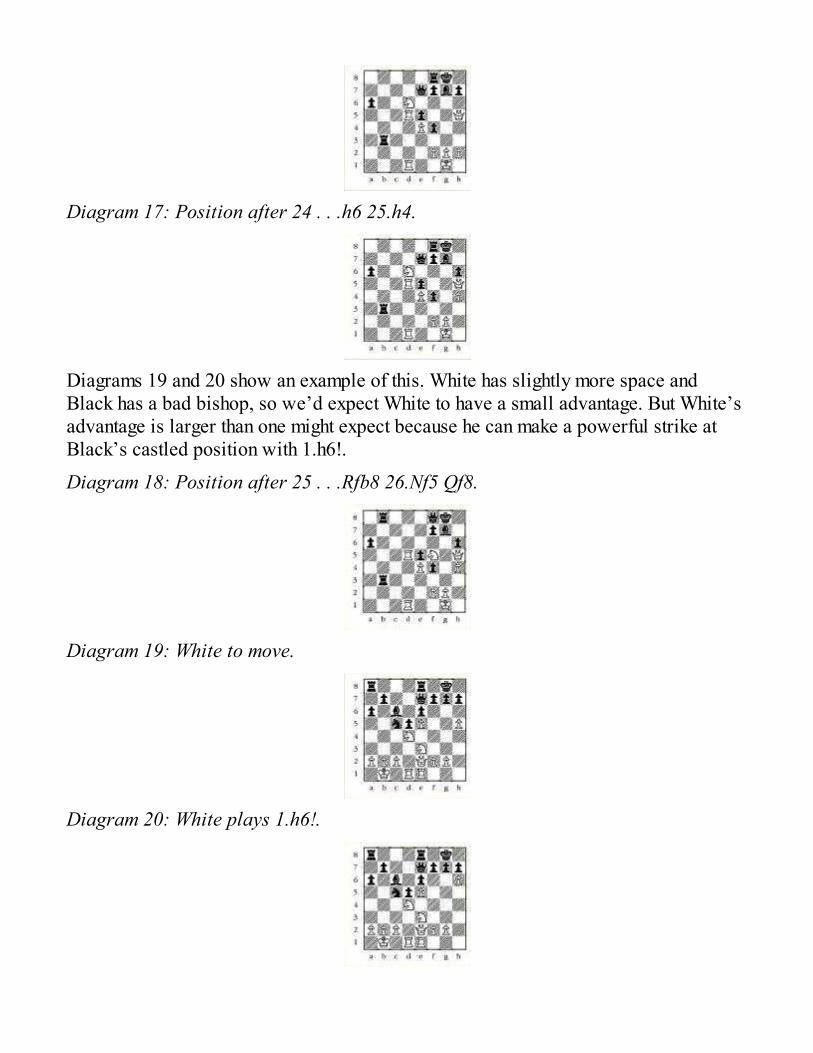
Diagram 17: Position after 24 . . .h6 25.h4.
Diagrams 19 and 20 show an example of this. White has slightly more space andBlack has a bad bishop, so we’d expect White to have a small advantage. But White’sadvantage is larger than one might expect because he can make a powerful strike atBlack’s castled position with 1.h6!.
Diagram 18: Position after 25 . . .Rfb8 26.Nf5 Qf8.
Diagram 19: White to move.
Diagram 20: White plays 1.h6!.

White threatens to capture the pawn on g7. If Black plays 1 . . .gxh6?, then 2.Ng4! isvery strong, because White will win back the h-pawn and gain the open h-file for hisattack. (Notice that White also threatens to win material by playing Nf6+.) An attemptto counterattack the pawn on e5 doesn’t work either, for example 1 . . .Qg5 is well metby 2.Ng4!. Black’s best move is probably 1 . . .g6, to keep the king as sheltered aspossible, but then 2.Ng4 Nd7 (2 . . .Ne4? 3.f3 Ng3 4.Qf2 Nh5 5.Rh1 forces the knightoff to the side of the board, and makes Black’s king more vulnerable, because Whitewill be able to expose the king with the sacrifice Rxh5 at the right time). 3.Qe3 allowsWhite to increase his space advantage. Notice that Black’s knight has been forced to amore passive square because of the need to defend the weak square f6.
Repairing a Weak SquareOnce you’ve pushed a pawn, you can’t pull it back. But there are other ways to copewith having a weak square, and when you have weak squares, you should look for anopportunity to do so.
Diagram 21 shows a position that arises from a gambit called the “Marshall Attack,”named after the great American player Frank Marshall. White has an extra pawn, butBlack has more pieces developed, and White’s kingside is weakened. How can Whitecope with the weak white squares around his king?
In Diagram 22, Tal found a brilliant answer with 16.Bd5!, which serves both adefensive and offensive purpose at the same time. Its offensive purpose is to attack therook on a8. Its defensive purpose is to stop Black from taking the long white-squarediagonal for himself by putting the bishop on b7.
Black played 16 . . .Bf5, and after 17.Qe3! he had to move the rook on a8, and hecouldn’t move it to e8 because White would win material (two rooks for a queen) bycapturing it. So Black played 17 . . .Rad8, and after 18.Bg2 (see Diagram 23), Whitehad succeeded in largely repairing the weak white squares around his king. Tal wasthen able to develop the rest of his pieces, and he quickly gained a large advantagebecause of his extra pawn.
Chess TalkA weak square is a square that one player can control but the otherplayer can’t. Often a square is weak because one player haspermanently lost the ability to control it with his pawns, but sometimes a

square is weak because one player can’t move a pawn to where it wouldcontrol the square without making some serious concession in hisposition.
Diagram 21: White to move (Tal–Witkowski, Riga, 1959).
Diagram 22: White plays 16.Bd5!.
Diagram 23: Position after 16 . . .Bf5 17.Qe3 Rad8 18.Bg2.
Another way to cope is to exchange whichever of your opponent’s pieces is best ableto take advantage of the weak square.
Suppose you were playing the black side of Diagram 24. Without question Black isworse: Black’s bishop is inferior to White’s knight, and Black has a glaring weaksquare on d5, and another weak square on f5. (White’s knight would be very strong ifit got to f5.)
But Black can solve most of his problems by playing 1 . . .Ba5!: Because of the pin tothe rook on e1 White can’t avoid the exchange of bishop for knight. Black still has aworse pawn structure, but after exchanges Black will be only a little worse, andshould probably draw (for example, 2.Re3 Bxc3! 3.Rxc3 Rxc3 4.Qxc3 Qe7).Certainly the weak squares at d5 and f5 will be much less of a problem once White’sknight is off the board.

Diagram 24: Black to move.
Diagram 25: Black plays 1 . . .Ba5!.
Exercise #1:White to move. How can White weaken Black’s control of the d5square? (Hint: Find a way to use White’s black-squared bishop.)
Exercise #2:White to move. Each side is attacking the other’s king. How can Whiteuse a weak square near Black’s king to make sure his attack gets through first? IfBlack’s g6 pawn were on h7, what difference would this make?
Exercise #3:White to move (Botvinnik–Kan, U.S.S.R. Championship, 1939).Botvinnik played 16.Ne4!, and after 16 . . .Qd8 the game continued 17.Nxf6+ Qxf6.What was Botvinnik’s idea? Do you see what weak square Botvinnik wants toexploit, and which piece he wants to put there?

Exercise #4:White to move (A. Ivanov–Gulko, U.S. Championship, 1995). Black hasjust played 24 . . .e5. Which squares near Black’s king are weak? How can Whitemaneuver a piece to control those squares?
Exercise #5:White to move (Adams–Wolff, New York, 1996). My last move was25 . . .Bc6?. This move is a mistake because it allows White to maneuver one of hispieces to a very weak square near my king while attacking the bishop at the sametime. How?
Exercise #6:White to move (Wolff–Bronstein, Holland, 1992). Here is Diagram 18again, after 26 . . .Qf8, where we see White reap the benefit of maneuvering hisknight to the weak f5 square. How can I win a pawn and also expose Black’s kingeven more? (Hint: White makes a move that creates two threats at once.)
Exercise #7:Black to move (Bernstein–Lasker, St. Petersburg, 1914). White hasmany weak squares near his king, which Black should try to exploit. The best moveis either 35 . . .Qg3 or 35 . . .Qh2. Which is the right move, and why? (This is a hardexercise: Lasker himself played the wrong move! Here’s a hint: The key is to

determine which move works out better for Black if White plays 36.Nxe6.)
Exercise #8:Black to move (Illescas–Wolff, Switzerland, 1993). It’s my turn to playmy 17th move. How can Black repair the weaknesses caused near the king byplaying the g-pawn to g6?
Exercise #9:Black to move (R. Byrne–Fischer, U.S. Championship, 1963–64). Thisis a very, very hard exercise. I’ve included it because it’s very instructive, and Ialso think it’s one of the most beautiful games I know. Fischer found an incredibleway to exploit the potentially weak white squares around White’s king. He played15 . . .Nxf2!! 16.Kxf2 Ng4+ 17.Kg1 Nxe3 18.Qd2 Nxg2!!. (Fischer wrote, “Removingthis bishop leaves White defenseless on his white squares.”) 19.Kxg2 d4! 20.Nxd4Bb7+. Here Fischer wrote, “The king is at Black’s mercy.” Analyze this positionand convince yourself that Black has a winning attack against all of White’sreplies. Then compare your analysis with the analysis given in the answer.
Exercise #10:Black to move (Shirov–Kramnik, Holland, 2001). How can Blackinduce a weakness in White’s castled position?

Exercise #11:White or Black to move. If it is White’s turn, what move should heplay to create a very weak square that he can exploit? If it is Black’s move, howshould he defend against White’s threat?
Exercise #12:White to move. White has an attack, but he is behind in material andseveral pieces are attacked. How does White press home the attack by exploitingthe weak squares around Black’s king?
Exercise #13:White to move. What squares are weak around the king? How canWhite exploit them?
Exercise #14:White to move. How can White exploit Black’s weak squares?
Exercise #15:Black to move. How can Black exploit White’s weak squares?
The Least You Need to Know
When a square can’t easily be controlled by a pawn, or can’t ever be controlledby a pawn, it’s a weak square.
You should exploit weak squares in your opponent’s position by controllingthose squares with pawns or pieces, and/or by occupying the square with a piece.
If you have a weak color complex, you should keep the bishop that controls thosesquares; if you want to exploit a weak color complex in your opponent’sposition, you should capture the bishop that controls those squares.
Weak squares around the king are an invitation to attack.
You can compensate for weak squares in your position by controlling them withyour pieces.

Chapter 14
All Good Things Must Come toan End
In This Chapter
Knowing when the middlegame becomes the endgame
General principles for the endgame
Some specific endgames
As the middlegame progresses, opposing forces come into contact with one another. Ifneither side manages to mount a decisive attack, more and more pieces will tend to beexchanged. When material for each side is reduced enough, the middlegame has ended,and the third phase of a chess game—the endgame—has begun.
“How reduced does material have to be? How much is enough?” you might ask.Unfortunately, there’s no easy answer to those questions. I can’t give you a simple wayto tell when enough material has been exchanged so that the middlegame has becomethe endgame. But I can tell you the two general principles that apply to the endgame.What you should do when some material has been exchanged is ask whether thoseprinciples seem to apply to the position you’re playing. If they do, the endgame hasbegun.
But Don’t Forget What You’ve Learned Up to Now!Before I explain these two basic principles, I must make one thing very clear:
All the principles and strategies you’ve learned for playing the middlegamestill apply to the endgame!

Controlling the center, king safety, the advantage of active over passive pieces, pawnstructure, space, weak squares, and more: All still apply. Middlegame principles areprinciples for playing good chess, and the fact that there’s less material on thechessboard in the endgame doesn’t mean that those principles no longer hold true.However, the reduced material does have some effect on how the principles areapplied. The most important changes are listed here.
Diagram 1: Example of a position where control of the center is not important.
Controlling the Center: It’s still important to control the center. In fact in manyendgames it’s absolutely essential to occupy the center before your opponent. Butwhen material is drastically reduced, the center may become less important. Forexample, if all the pawns are on one side of the board, then all of the action willprobably be on that side of the board, so the center will lose most of itsimportance. Diagram 1 shows an example of such a position.
Active vs. Passive Pieces: In the endgame, it’s more important than ever to keepyour pieces active. The reason is simple: In the middlegame, when each side haslots of pieces, the rest of the army can compensate for one passive piece; in theendgame, that one piece may be practically your whole army! For example, inDiagram 2, White’s rook and king are active, while Black’s rook and king arepassive. That means White’s whole army is active, while Black’s is passive.Because his pieces are more active, White will be able to win Black’s a-pawn,which will give him a winning advantage.
Diagram 2: Example of a position where having the more active pieces is even moreimportant than in the middlegame.
“Good” Bishop vs. Knight: For similar reasons as above, whether the bishop or
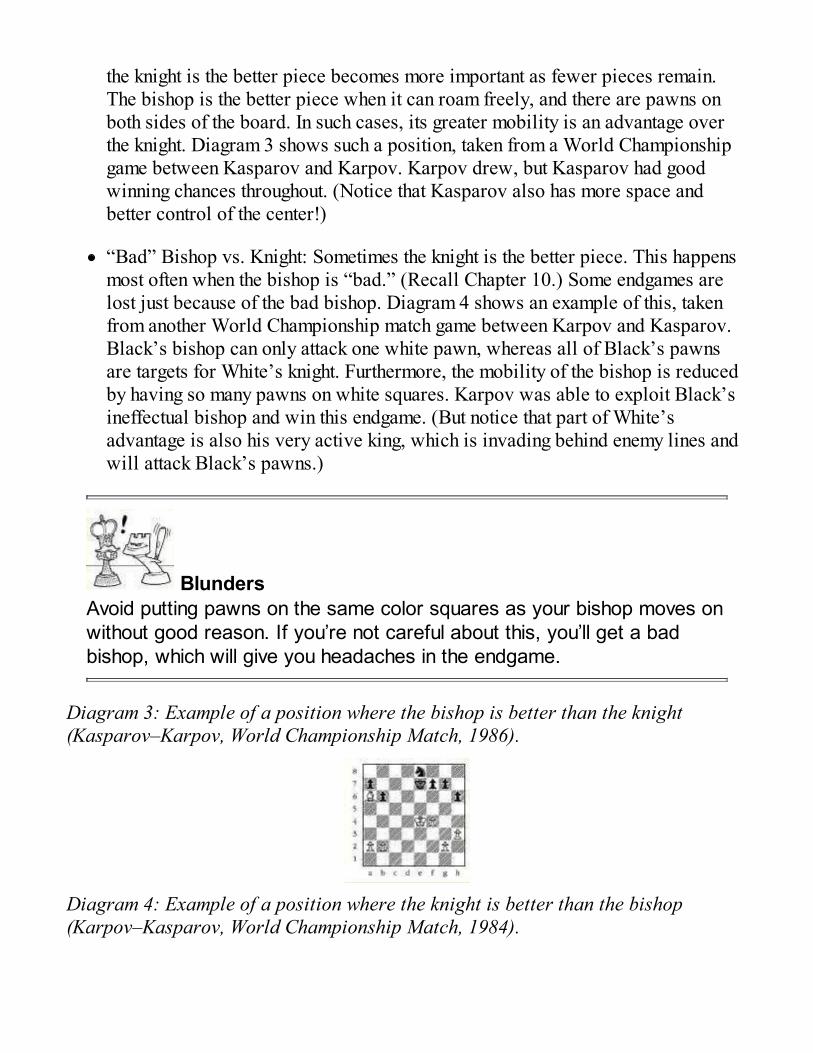
the knight is the better piece becomes more important as fewer pieces remain.The bishop is the better piece when it can roam freely, and there are pawns onboth sides of the board. In such cases, its greater mobility is an advantage overthe knight. Diagram 3 shows such a position, taken from a World Championshipgame between Kasparov and Karpov. Karpov drew, but Kasparov had goodwinning chances throughout. (Notice that Kasparov also has more space andbetter control of the center!)
“Bad” Bishop vs. Knight: Sometimes the knight is the better piece. This happensmost often when the bishop is “bad.” (Recall Chapter 10.) Some endgames arelost just because of the bad bishop. Diagram 4 shows an example of this, takenfrom another World Championship match game between Karpov and Kasparov.Black’s bishop can only attack one white pawn, whereas all of Black’s pawnsare targets for White’s knight. Furthermore, the mobility of the bishop is reducedby having so many pawns on white squares. Karpov was able to exploit Black’sineffectual bishop and win this endgame. (But notice that part of White’sadvantage is also his very active king, which is invading behind enemy lines andwill attack Black’s pawns.)
BlundersAvoid putting pawns on the same color squares as your bishop moves onwithout good reason. If you’re not careful about this, you’ll get a badbishop, which will give you headaches in the endgame.
Diagram 3: Example of a position where the bishop is better than the knight(Kasparov–Karpov, World Championship Match, 1986).
Diagram 4: Example of a position where the knight is better than the bishop(Karpov–Kasparov, World Championship Match, 1984).
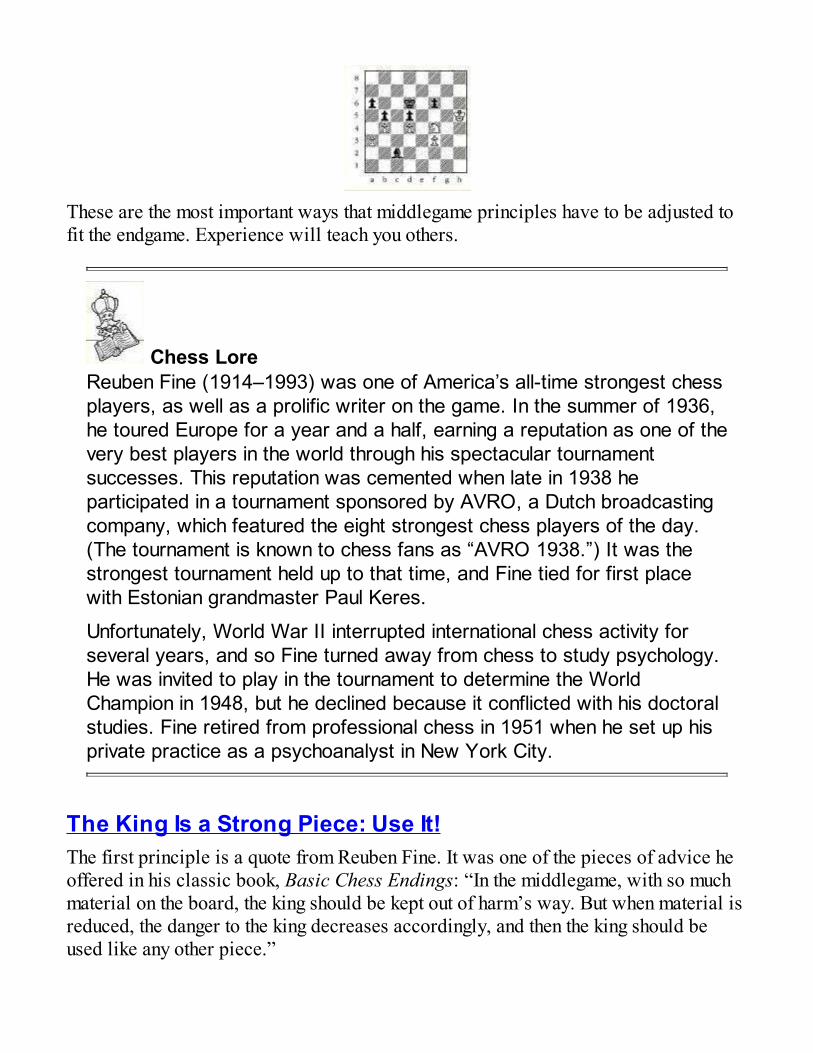
These are the most important ways that middlegame principles have to be adjusted tofit the endgame. Experience will teach you others.
Chess LoreReuben Fine (1914–1993) was one of America’s all-time strongest chessplayers, as well as a prolific writer on the game. In the summer of 1936,he toured Europe for a year and a half, earning a reputation as one of thevery best players in the world through his spectacular tournamentsuccesses. This reputation was cemented when late in 1938 heparticipated in a tournament sponsored by AVRO, a Dutch broadcastingcompany, which featured the eight strongest chess players of the day.(The tournament is known to chess fans as “AVRO 1938.”) It was thestrongest tournament held up to that time, and Fine tied for first placewith Estonian grandmaster Paul Keres.
Unfortunately, World War II interrupted international chess activity forseveral years, and so Fine turned away from chess to study psychology.He was invited to play in the tournament to determine the WorldChampion in 1948, but he declined because it conflicted with his doctoralstudies. Fine retired from professional chess in 1951 when he set up hisprivate practice as a psychoanalyst in New York City.
The King Is a Strong Piece: Use It!The first principle is a quote from Reuben Fine. It was one of the pieces of advice heoffered in his classic book, Basic Chess Endings: “In the middlegame, with so muchmaterial on the board, the king should be kept out of harm’s way. But when material isreduced, the danger to the king decreases accordingly, and then the king should beused like any other piece.”

Two examples will help me make this point. First, look at Diagram 5. White has anextra pawn, but his rook is passive and Black’s is active. White wants his mostpowerful piece to be active. The solution? Bring the king over to help! White shouldplay 1.Kf1, 2.Ke1, 3.Kd1, and 4.Kc2 to protect the pawn and drive away Black’srook. By using the king, White can get more out of his rook.
Diagram 5: White needs to activate the king to exploit his extra pawn.
Diagram 6: White to move (Khmelnitsky–Wolff, U.S. Championship, 1995).
Diagrams 6–9 show the second example. Diagram 6 shows the position of one of mygames just at the moment that queens have been exchanged. (My last move was25 . . .bxc5, capturing White’s queen.) While the queens were still on the board, it wasmuch too dangerous for either side to bring the king to the center. But Diagram 7shows that as soon as queens were exchanged, each of us rushed the king to the middleof the board as fast as possible!
Diagram 8 shows the game at a much later stage. Although I have since won a pawn,it’s difficult to see how to win. The solution was to activate my king by playing62 . . .c4+! 63.Bxc4 Kc5 as shown in Diagram 9. Because his bishop was attacked,White had to allow the black king to reach d4, and then the activity of my king andknight were enough to force a win by attacking and winning White’s pawns.
Diagram 7: Position after 26.Ke2 g5 27.Bc2 Kg7 28.Kd2 Kf6 29.Kc3 Ke5.

Diagram 8: Black to move (Khmelnitsky–Wolff, U.S. Championship, 1995).
Diagram 9: Position after 62 . . .c4+ 63.Bxc4 Kc5.
Patrick’s PointersThe king is a strong piece and you must use it in the endgame. But evenwhen material is reduced, the king can still find itself in jeopardy! Evenwhen the absolutely right thing to do is to use the king, you must alwaysbe on the lookout for possible checkmates.
The Passed Pawn Rules the Endgame!When there are no longer any opposing pawns that can block a pawn, or that controlany of the squares between the pawn and the edge of the board, we say that the pawnis “passed.” (The name comes from the idea that the pawn has “passed” all of theopposing pawns.) In the middlegame, with lots of material on the board, it’s hard topromote a passed pawn. (That doesn’t mean that passed pawns are unimportant in themiddlegame, just that they rarely dominate the position.) But in the endgame, withmuch less material on the board, the passed pawn becomes much more important.Ultimately, endgame strategy is usually all about creating and promoting a passedpawn. This is precisely why the advantage of even one pawn is often enough to win agame. One extra pawn usually makes very little difference in a direct attack against theking. But one extra pawn makes all the difference when that one extra pawn promotesto a queen! Let’s look at some of the most important aspects of passed pawns.
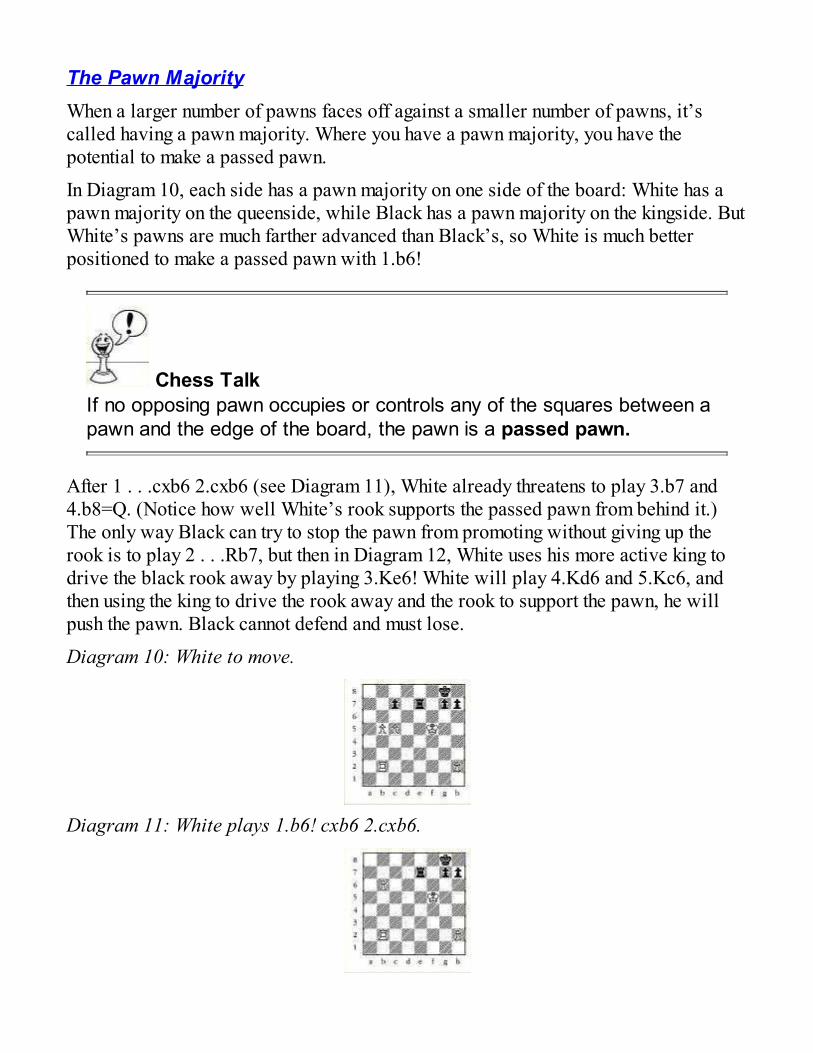
The Pawn MajorityWhen a larger number of pawns faces off against a smaller number of pawns, it’scalled having a pawn majority. Where you have a pawn majority, you have thepotential to make a passed pawn.
In Diagram 10, each side has a pawn majority on one side of the board: White has apawn majority on the queenside, while Black has a pawn majority on the kingside. ButWhite’s pawns are much farther advanced than Black’s, so White is much betterpositioned to make a passed pawn with 1.b6!
Chess TalkIf no opposing pawn occupies or controls any of the squares between apawn and the edge of the board, the pawn is a passed pawn.
After 1 . . .cxb6 2.cxb6 (see Diagram 11), White already threatens to play 3.b7 and4.b8=Q. (Notice how well White’s rook supports the passed pawn from behind it.)The only way Black can try to stop the pawn from promoting without giving up therook is to play 2 . . .Rb7, but then in Diagram 12, White uses his more active king todrive the black rook away by playing 3.Ke6! White will play 4.Kd6 and 5.Kc6, andthen using the king to drive the rook away and the rook to support the pawn, he willpush the pawn. Black cannot defend and must lose.
Diagram 10: White to move.
Diagram 11: White plays 1.b6! cxb6 2.cxb6.

Diagram 12: Position after 2 . . .Rb7 3.Ke6.
Patrick’s PointersIn almost any endgame, the winning strategy is to create a passed pawn,and then push that pawn to the far side of the board to promote it to aqueen. Once you have a queen, checkmating your opponent should beeasy. If you’re trying to win, this is what you must do. If you’re trying todraw, this is what you must prevent your opponent from doing.
There are many, many ways to use a pawn majority. You should always look out fornew ways to use the pawn majority in your own games, and in any other games yousee.
The Outside Passed PawnIn earlier chapters, I’ve stressed that center pawns are more powerful than noncenterpawns. That’s definitely true in the opening and the middlegame, and it’s stillsometimes true in the endgame when control of the center is important. But in theendgame, the outside passed pawn can be a definite advantage. There are two reasonsfor this:
Patrick’s PointersThe rook is almost always very well placed in the endgame behind apassed pawn, because if it’s your passed pawn, the rook supports itsadvance, while if it’s your opponent’s passed pawn, the rook inhibits itsadvance.

Chess TalkThe outside passed pawn is a passed pawn that is very far to thekingside or the queenside. It gets its name from the idea that it’s“outside” the main theater of action, where most of the pieces are,whatever part of the board that happens to be.
Because the outside passed pawn is so far away from other pieces, it’s harder forthe defending side to get over to it and stop it from advancing. (Diagrams 10–12give an example of this.)
Even if the defending side can get over to stop the pawn, his pieces may havebeen led away from many other important squares. In other words, the outsidepassed pawn can act as a decoy.
Diagrams 13–15 show how, by acting as a decoy, the outside passed pawn can bedeadly. White plays 1.a6. Black must stop this pawn, so he must play 1 . . .Kc6 (or1 . . .Kc7). But then White’s king can infiltrate Black’s pawns on the kingside byplaying 2.Ke5. Because Black had to move the king over to catch the outside passedpawn, the kingside pawns are left defenseless to the white king.
Diagram 13: White to move.
Diagram 14: White plays 1.a6.
Diagram 15: Position after 1 . . .Kc6 2.Ke5.
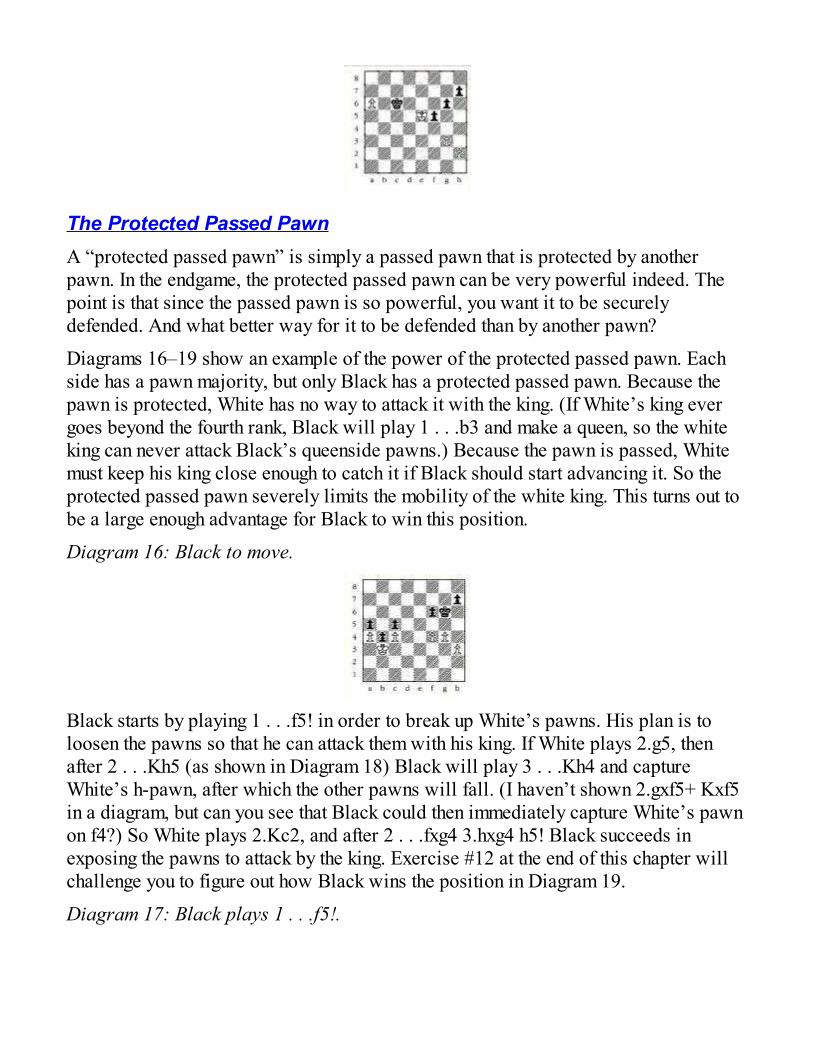
The Protected Passed PawnA “protected passed pawn” is simply a passed pawn that is protected by anotherpawn. In the endgame, the protected passed pawn can be very powerful indeed. Thepoint is that since the passed pawn is so powerful, you want it to be securelydefended. And what better way for it to be defended than by another pawn?
Diagrams 16–19 show an example of the power of the protected passed pawn. Eachside has a pawn majority, but only Black has a protected passed pawn. Because thepawn is protected, White has no way to attack it with the king. (If White’s king evergoes beyond the fourth rank, Black will play 1 . . .b3 and make a queen, so the whiteking can never attack Black’s queenside pawns.) Because the pawn is passed, Whitemust keep his king close enough to catch it if Black should start advancing it. So theprotected passed pawn severely limits the mobility of the white king. This turns out tobe a large enough advantage for Black to win this position.
Diagram 16: Black to move.
Black starts by playing 1 . . .f5! in order to break up White’s pawns. His plan is toloosen the pawns so that he can attack them with his king. If White plays 2.g5, thenafter 2 . . .Kh5 (as shown in Diagram 18) Black will play 3 . . .Kh4 and captureWhite’s h-pawn, after which the other pawns will fall. (I haven’t shown 2.gxf5+ Kxf5in a diagram, but can you see that Black could then immediately capture White’s pawnon f4?) So White plays 2.Kc2, and after 2 . . .fxg4 3.hxg4 h5! Black succeeds inexposing the pawns to attack by the king. Exercise #12 at the end of this chapter willchallenge you to figure out how Black wins the position in Diagram 19.
Diagram 17: Black plays 1 . . .f5!.
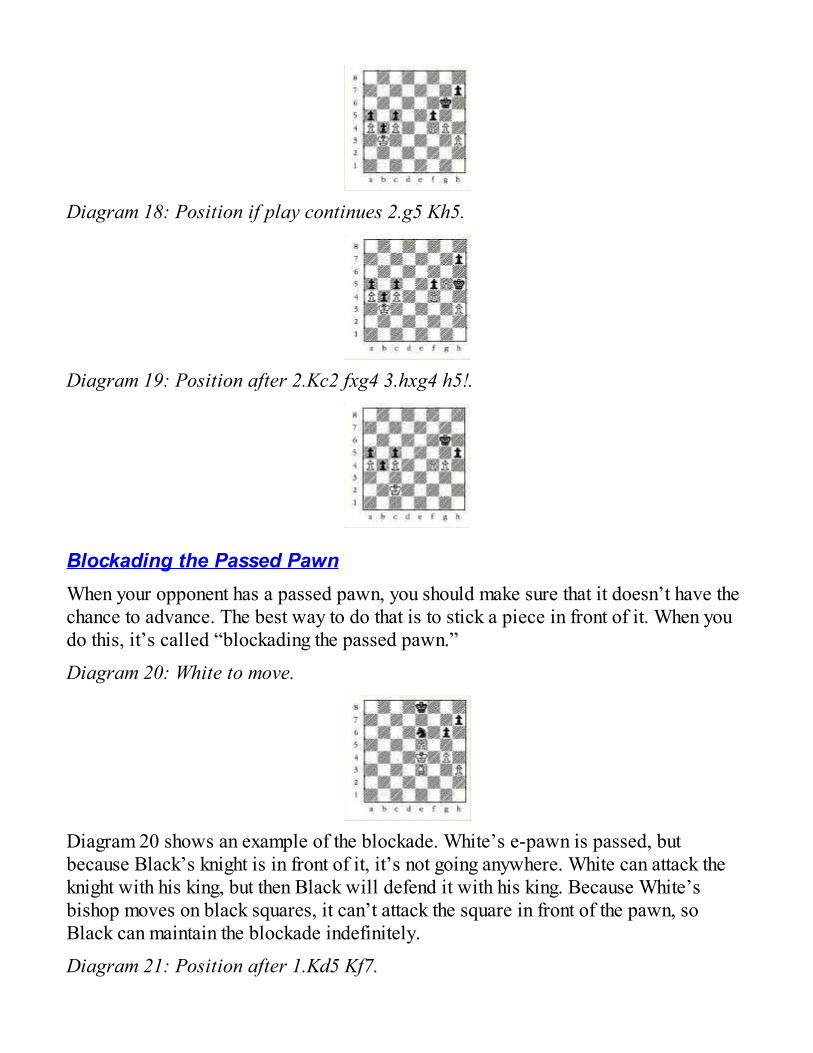
Diagram 18: Position if play continues 2.g5 Kh5.
Diagram 19: Position after 2.Kc2 fxg4 3.hxg4 h5!.
Blockading the Passed PawnWhen your opponent has a passed pawn, you should make sure that it doesn’t have thechance to advance. The best way to do that is to stick a piece in front of it. When youdo this, it’s called “blockading the passed pawn.”
Diagram 20: White to move.
Diagram 20 shows an example of the blockade. White’s e-pawn is passed, butbecause Black’s knight is in front of it, it’s not going anywhere. White can attack theknight with his king, but then Black will defend it with his king. Because White’sbishop moves on black squares, it can’t attack the square in front of the pawn, soBlack can maintain the blockade indefinitely.
Diagram 21: Position after 1.Kd5 Kf7.

The only other way for White to win is to use his king to attack Black’s pawns, but solong as Black keeps his knight on e6 and his pawn on g6, all the fifth-ranked squareson the kingside are guarded and White’s king can’t get at the black pawns. If Whiteplays 1.Kd5 as in Diagram 21, Black plays 1 . . .Kf7, defending the knight with hisking. Then he moves the knight back and forth from e6 to another square, then back toe6. By following this plan, Black can only lose if he runs out of a safe square to movethe knight to; but this will never happen, so the position is a draw. (Try playing thisposition out with a friend or a computer to see for yourself!)
When employing the blockade, make sure you leave yourself enough space so youdon’t run out of moves. This danger is shown in Diagrams 22 and 23. Black hasblockaded the passed pawn just one square before promoting. Since White has ablack-squared bishop, you might think that Black is safe. But Black’s knight is on theedge of the board, which means it has very few squares to move to. Now White plays1.Be5! and Black discovers, to his horror, that he has no good move! If Black could“pass” and not move, he would be fine because White still has no threat. But there’sno such thing as “passing” in chess, so Black is in for it. If he moves the king, he losesthe knight; but if he moves the knight, White will capture it with the bishop, and thenpromote the pawn next move.
Diagram 22: White to move.
Diagram 23: White plays 1.Be5!.
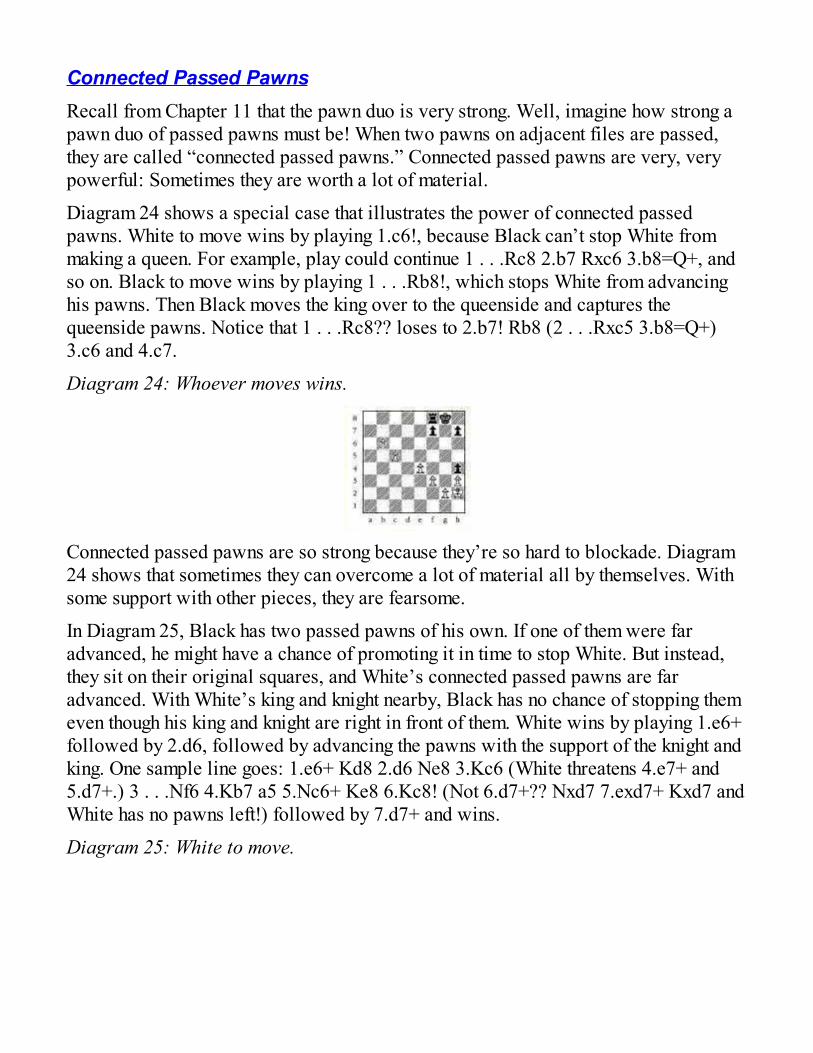
Connected Passed PawnsRecall from Chapter 11 that the pawn duo is very strong. Well, imagine how strong apawn duo of passed pawns must be! When two pawns on adjacent files are passed,they are called “connected passed pawns.” Connected passed pawns are very, verypowerful: Sometimes they are worth a lot of material.
Diagram 24 shows a special case that illustrates the power of connected passedpawns. White to move wins by playing 1.c6!, because Black can’t stop White frommaking a queen. For example, play could continue 1 . . .Rc8 2.b7 Rxc6 3.b8=Q+, andso on. Black to move wins by playing 1 . . .Rb8!, which stops White from advancinghis pawns. Then Black moves the king over to the queenside and captures thequeenside pawns. Notice that 1 . . .Rc8?? loses to 2.b7! Rb8 (2 . . .Rxc5 3.b8=Q+)3.c6 and 4.c7.
Diagram 24: Whoever moves wins.
Connected passed pawns are so strong because they’re so hard to blockade. Diagram24 shows that sometimes they can overcome a lot of material all by themselves. Withsome support with other pieces, they are fearsome.
In Diagram 25, Black has two passed pawns of his own. If one of them were faradvanced, he might have a chance of promoting it in time to stop White. But instead,they sit on their original squares, and White’s connected passed pawns are faradvanced. With White’s king and knight nearby, Black has no chance of stopping themeven though his king and knight are right in front of them. White wins by playing 1.e6+followed by 2.d6, followed by advancing the pawns with the support of the knight andking. One sample line goes: 1.e6+ Kd8 2.d6 Ne8 3.Kc6 (White threatens 4.e7+ and5.d7+.) 3 . . .Nf6 4.Kb7 a5 5.Nc6+ Ke8 6.Kc8! (Not 6.d7+?? Nxd7 7.exd7+ Kxd7 andWhite has no pawns left!) followed by 7.d7+ and wins.
Diagram 25: White to move.

If you don’t support your connected passed pawns well enough with your pieces, youropponent may be able to blockade them by getting one of them to advance and thenblockading the backward pawn. Watch the exercises at the end of this chapter for anexample of this.
Chess TalkOccasionally, whichever side has the move is at a disadvantage. Such aposition is called zugzwang. (Chess has some pretty weird words,doesn’t it?) The position in Diagram 26 is zugzwang. If it’s White’s move,the game is a draw; if it’s Black’s move, he loses. The opposition is notthe only case of zugzwang, but it’s one of the most common.
Three Specific EndgamesRemember in Chapter 9 we had to distinguish between “the opening” and “anopening.” “The opening” is the opening phase of the game, whereas “an opening” is aspecific sequence of moves one plans ahead of time to start the game with. In a similarway, we have to distinguish between “the endgame” and “an endgame.” “Theendgame” is the endgame phase of the game, for which you’ve been learning generalprinciples. “An endgame” refers to a specific kind of endgame that one learns how toplay ahead of time. Of course, unlike the opening, you can’t really plan to play aparticular endgame ahead of time: It all depends on how the game goes! But still, thereare lots of particular endgames with a small number of pawns and pieces that one canlearn ahead of time. It’s precisely because these endgames have such a small numberof pawns and pieces that one can learn them so specifically: When such positionscome up, they all tend to look like one another.
There are many endgames to learn. A grandmaster knows thousands of them. I’m goingto show you three. Each one helps to illustrate certain principles, and is also useful inits own right.

King and Pawn vs. King, and the “Opposition”The first specific endgame is shown in Diagram 26. Notice the position of the twokings. When there is one square between the kings (horizontally or vertically), they’resaid to be “opposed.” Whichever side does not have to move has the “opposition.” Soin Diagram 26, if it’s White’s turn, then Black has the opposition; if it’s Black’s turn,then White has the opposition. The opposition is often a big advantage because whenyou have the opposition you can force the other king to give ground. In Diagram 26, ifBlack has the opposition, he draws; but if White has the opposition, he wins.
Diagram 26: White to move draws; Black to move loses.
Diagrams 27 and 28 show how. If it’s White’s turn to move, he has no better movethan 1.d7+. Black plays 1 . . .Kd8, and now unless White wants to lose his only pawnhe must play 2.Kd6. But then it’s a draw, because Black is stalemated.
If it’s Black’s turn to move, he has to move his king to either d8 or b8. If he plays1 . . .Kb8, then after 2.d7 he can’t control d8 in his next move, so White will promotethe pawn and win. So Black plays 1 . . .Kd8, and White plays 2.d7. Now the onlylegal move is 2 . . .Ke7, after which White plays 3.Kc7, as shown in Diagram 28.White controls the d8 square, so White will again promote the pawn.
Suppose in Diagram 26, instead of pushing his pawn, White played his king back with1.Kc5. Black might play 1 . . .Kd7, and then after 2.Kd5 we get Diagram 29. Nowwhere should Black move his king? Wherever Black moves it, he should be able totake the opposition when White brings his king to either e6 or c6.
Diagram 27: Position after 1.d7+ Kd8 2.Kd6.
Black should play 2 . . .Kd8! as shown in Diagram 30. This is the only move to draw,because otherwise White can take the opposition himself. But now if White moves theking to either c6 or e6, Black can take the opposition and draw. And if White moves
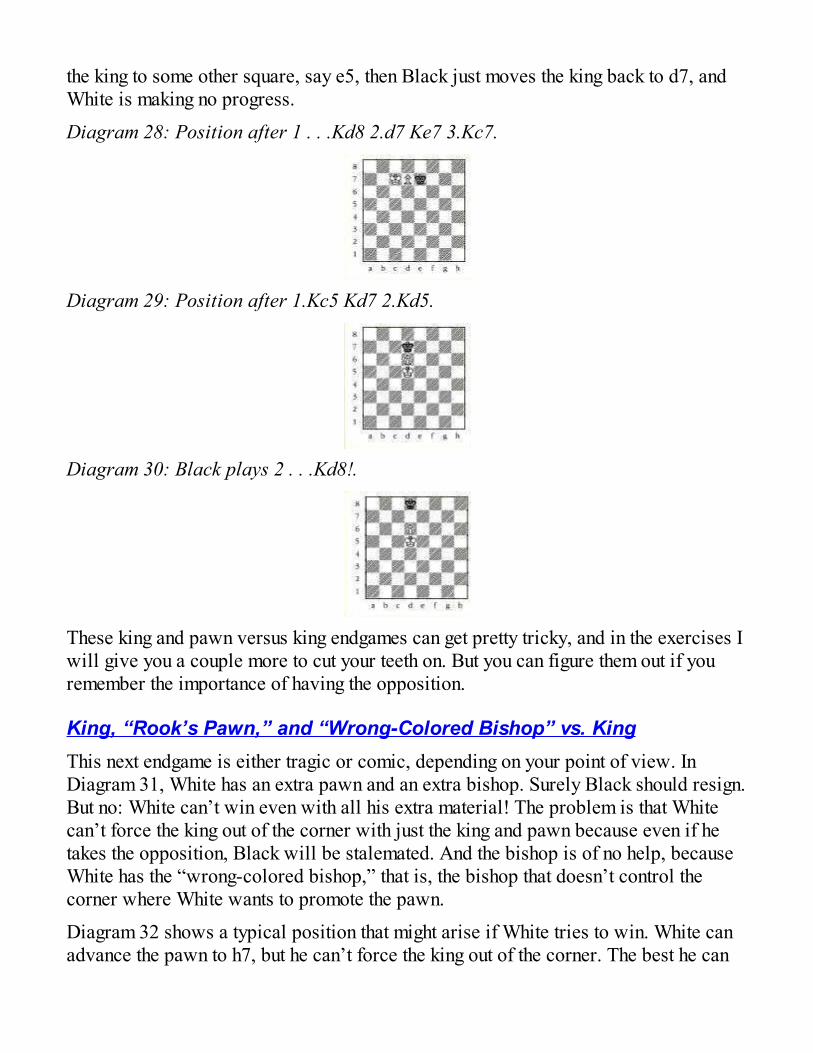
the king to some other square, say e5, then Black just moves the king back to d7, andWhite is making no progress.
Diagram 28: Position after 1 . . .Kd8 2.d7 Ke7 3.Kc7.
Diagram 29: Position after 1.Kc5 Kd7 2.Kd5.
Diagram 30: Black plays 2 . . .Kd8!.
These king and pawn versus king endgames can get pretty tricky, and in the exercises Iwill give you a couple more to cut your teeth on. But you can figure them out if youremember the importance of having the opposition.
King, “Rook’s Pawn,” and “Wrong-Colored Bishop” vs. KingThis next endgame is either tragic or comic, depending on your point of view. InDiagram 31, White has an extra pawn and an extra bishop. Surely Black should resign.But no: White can’t win even with all his extra material! The problem is that Whitecan’t force the king out of the corner with just the king and pawn because even if hetakes the opposition, Black will be stalemated. And the bishop is of no help, becauseWhite has the “wrong-colored bishop,” that is, the bishop that doesn’t control thecorner where White wants to promote the pawn.
Diagram 32 shows a typical position that might arise if White tries to win. White canadvance the pawn to h7, but he can’t force the king out of the corner. The best he can

do is give stalemate. Notice that the bishop is useless because all it can do is controlg8, which just helps stalemate Black.
But don’t think that having a bishop and a pawn always leads to a draw! Bishop andpawn against king is only a draw when all of these (very) special circumstances holdtrue:
The pawn is a “rook’s pawn,” that is, the pawn is on a file where a rook startsthe game, i.e. either the h-file or the a-file.
The bishop does not control the corner square where the pawn promotes.
The lone king can occupy the corner square where the pawn promotes.
Diagram 31: Even with an extra bishop and pawn, White can’t win.
Diagram 32: The best White can do is stalemate Black; there’s no way to force theking out of the corner.
Opposite-Colored BishopsIn Chapter 10, I said that having opposite-colored bishops favors the attacker, becausewhat one side’s bishop attacks, the other side’s bishop can’t defend (so it’s likehaving an extra piece in the attack). But in the endgame, having opposite-coloredbishops favors the defender, because the attacker’s bishop often can’t attack thedefender’s pawns, while the defender’s bishop often can blockade the attacker’spassed pawns.
Diagram 33 shows how this can work. White has two extra connected passed pawns,but how can he make progress? White can’t advance either of the passed pawns,because they’re blockaded by the black king and bishop; and White can’t break the

blockade because his black-squared bishop is useless for controlling c6 or d5. IfWhite could make another passed pawn, then he might be able to advance that pawn,which Black couldn’t blockade because his king and bishop would be too far away.But as the pawns stand, there’s no way to make another passed pawn. And there’s noway to attack Black’s pawns, because Black’s g6 pawn is protected by the f7 pawn,and the f7 pawn is protected by the bishop, and White’s bishop is useless for attackingBlack’s pawns. White’s black-squared bishop is practically a spectator! Black drawsbecause even with two extra pawns, White can neither destroy Black’s blockade norcapture Black’s pawns.
Patrick’s PointersIf you’re trying to win an endgame, don’t exchange down to oppositecolored bishops unless you have a very good reason. And if you’re tryingto draw, grab any chance to exchange down to opposite-coloredbishops. It might even be worth one or two pawns to do it!
Opposite-colored bishop endgames can get pretty complicated. The important thing torealize is that Black draws in Diagram 33 only because White can’t destroy thecoordination of Black’s pieces. A slight change can give White a winning position.For example, in Diagram 34, White wins by playing 1.d7! Kxd7 2.Kxd5, and inDiagram 35, White wins by playing 1.h5! gxh5 2.gxh5 Bb3 3.h6 Bc2 4.d5+ Kd7 5.Kf6,and Black’s defense collapses. (White’s h-pawn distracts Black’s bishop, forcing it topatrol the diagonal from which it can control the h7 square. With the bishop takenaway from the queenside, White will have no trouble advancing his pawns to create aqueen.)
So opposite-colored bishop endgames aren’t always drawn. However, they do givemuch better drawing chances than almost any other kind of endgame, because thedefending side can more easily defend his pawns and blockade the opponent’s pawns.
Diagram 33: Even with two extra pawns, White can’t win.

Diagram 34: White wins with 1.d7.
Diagram 35: White wins with 1.h5.
Exercise #1:Black to move. This is Diagram 15 again, and your task is to show howWhite wins even against Black’s best defense. (Hint: Black is going to play2 . . .Kb6 to capture the a-pawn. While he does that, capture Black’s kingsidepawns, but be careful not to let him use his pawn majority while you do so!)
Exercise #2:White to move. It looks like Black has White’s pawns blockaded. CanWhite break Black’s blockade and push his connected passed pawns? How?
Exercise #3:White to move. Who is better and why? How should White play?
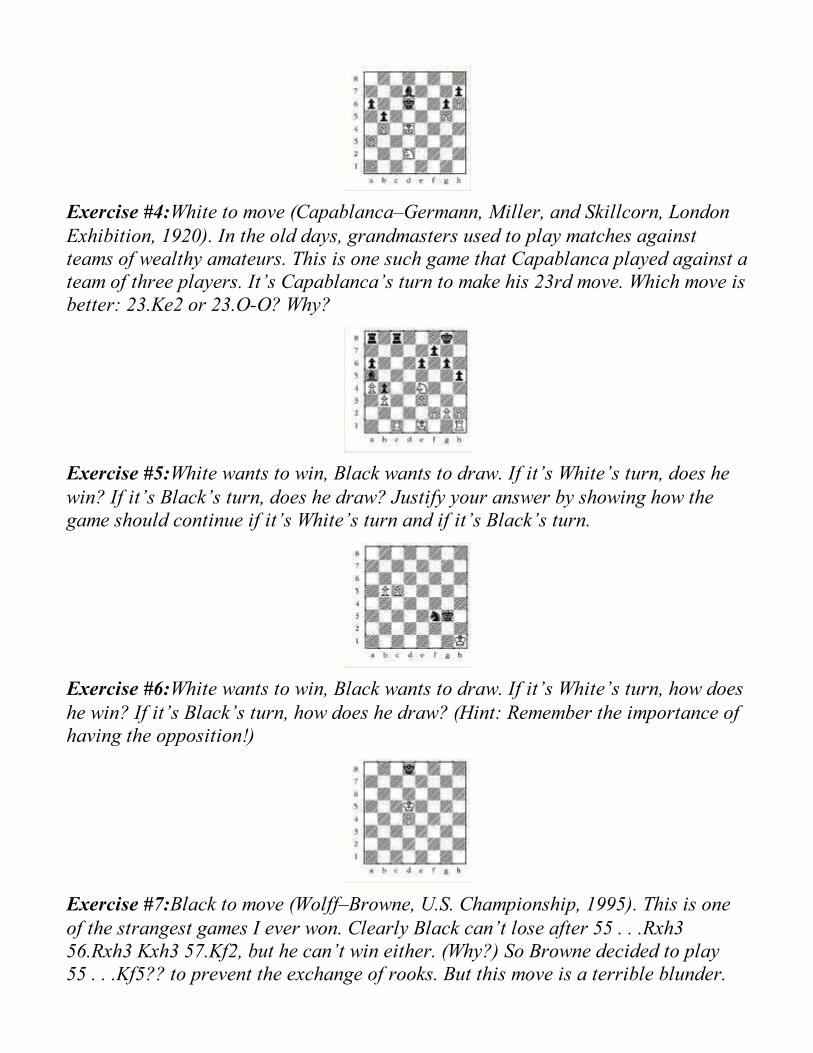
Exercise #4:White to move (Capablanca–Germann, Miller, and Skillcorn, LondonExhibition, 1920). In the old days, grandmasters used to play matches againstteams of wealthy amateurs. This is one such game that Capablanca played against ateam of three players. It’s Capablanca’s turn to make his 23rd move. Which move isbetter: 23.Ke2 or 23.O-O? Why?
Exercise #5:White wants to win, Black wants to draw. If it’s White’s turn, does hewin? If it’s Black’s turn, does he draw? Justify your answer by showing how thegame should continue if it’s White’s turn and if it’s Black’s turn.
Exercise #6:White wants to win, Black wants to draw. If it’s White’s turn, how doeshe win? If it’s Black’s turn, how does he draw? (Hint: Remember the importance ofhaving the opposition!)
Exercise #7:Black to move (Wolff–Browne, U.S. Championship, 1995). This is oneof the strangest games I ever won. Clearly Black can’t lose after 55 . . .Rxh356.Rxh3 Kxh3 57.Kf2, but he can’t win either. (Why?) So Browne decided to play55 . . .Kf5?? to prevent the exchange of rooks. But this move is a terrible blunder.
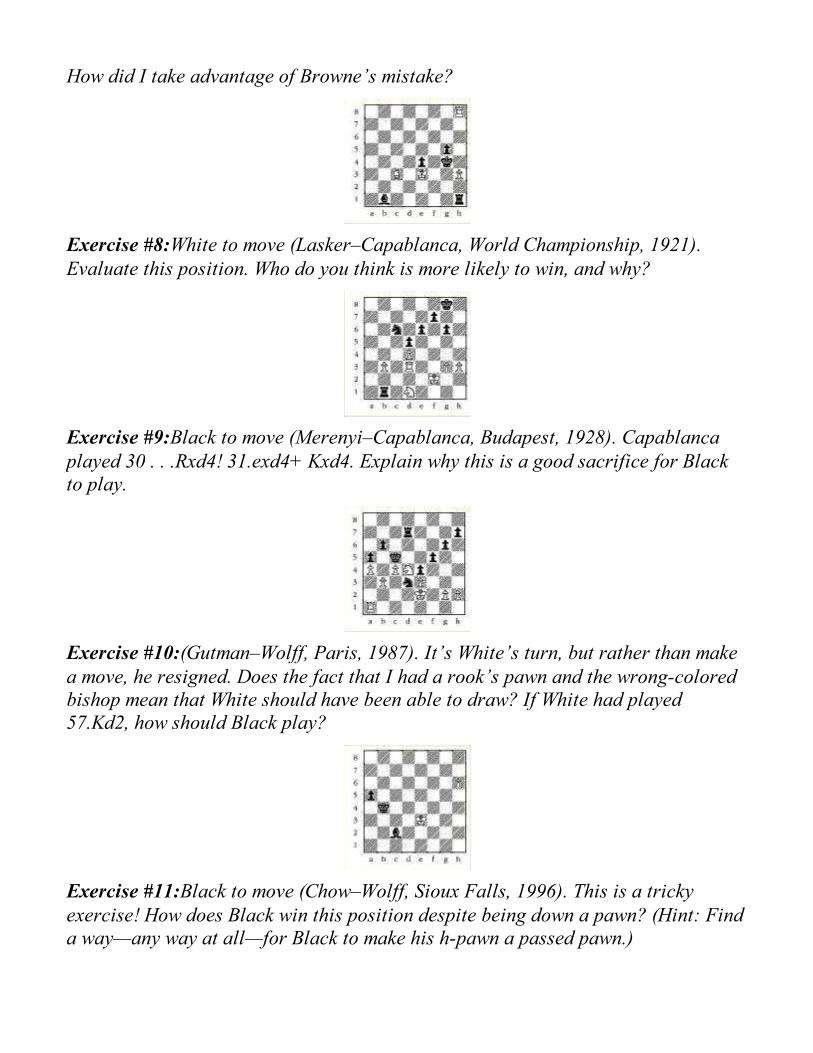
How did I take advantage of Browne’s mistake?
Exercise #8:White to move (Lasker–Capablanca, World Championship, 1921).Evaluate this position. Who do you think is more likely to win, and why?
Exercise #9:Black to move (Merenyi–Capablanca, Budapest, 1928). Capablancaplayed 30 . . .Rxd4! 31.exd4+ Kxd4. Explain why this is a good sacrifice for Blackto play.
Exercise #10:(Gutman–Wolff, Paris, 1987). It’s White’s turn, but rather than makea move, he resigned. Does the fact that I had a rook’s pawn and the wrong-coloredbishop mean that White should have been able to draw? If White had played57.Kd2, how should Black play?
Exercise #11:Black to move (Chow–Wolff, Sioux Falls, 1996). This is a trickyexercise! How does Black win this position despite being down a pawn? (Hint: Finda way—any way at all—for Black to make his h-pawn a passed pawn.)

Exercise #12:White to move. This is Diagram 19 again (which came from Diagram16 after 1 . . .f5 2.Kc2 fxg4 3.hxg4 h5), and your job is to show how Black wins nomatter how White plays. This is a long and difficult exercise: Analyze the positionthe best you can, and then compare your analysis with the answer in the appendix.
Exercise #13:Black to move. This endgame is a draw. Analyze this position. After1 . . .Kc4, what is White’s drawing strategy?
Exercise #14:Black to move. Can White draw this position also?
Exercise #15:Black to move (Kasparov–Bareev, Holland, 2001). Black resigned inthis position, but Kasparov later demonstrated that the position is completelydrawn! Can you demonstrate how? (Warning: This is hard!)
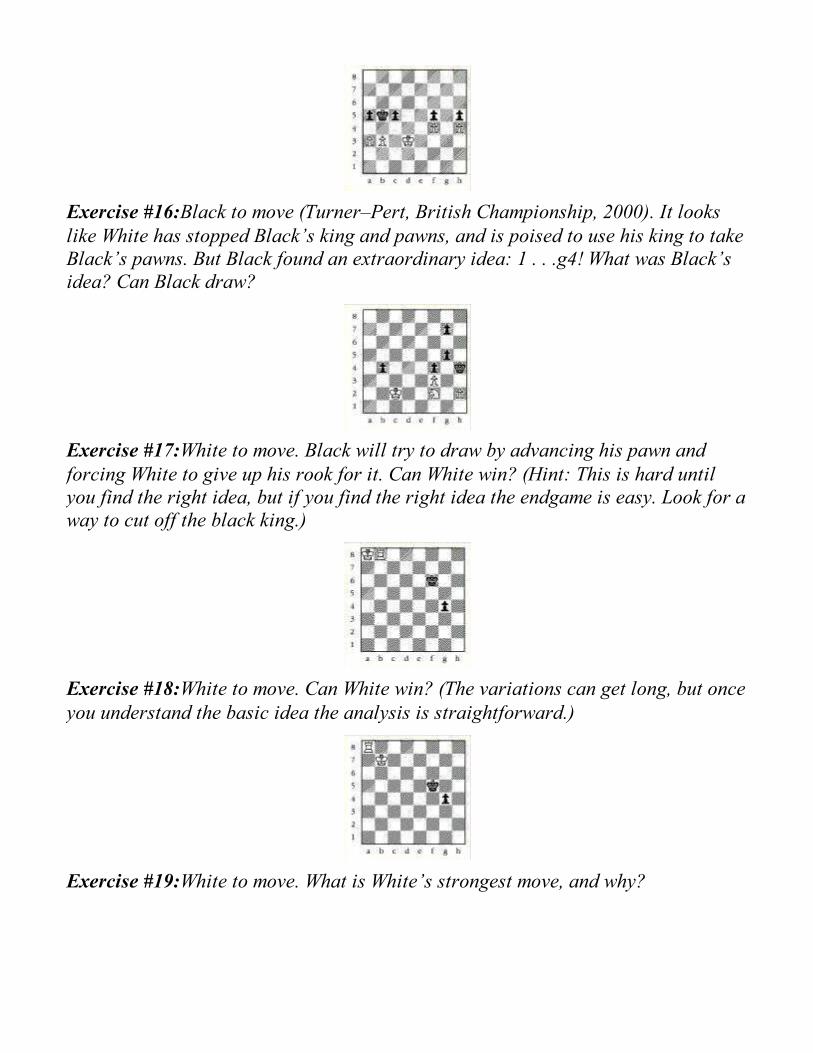
Exercise #16:Black to move (Turner–Pert, British Championship, 2000). It lookslike White has stopped Black’s king and pawns, and is poised to use his king to takeBlack’s pawns. But Black found an extraordinary idea: 1 . . .g4! What was Black’sidea? Can Black draw?
Exercise #17:White to move. Black will try to draw by advancing his pawn andforcing White to give up his rook for it. Can White win? (Hint: This is hard untilyou find the right idea, but if you find the right idea the endgame is easy. Look for away to cut off the black king.)
Exercise #18:White to move. Can White win? (The variations can get long, but onceyou understand the basic idea the analysis is straightforward.)
Exercise #19:White to move. What is White’s strongest move, and why?

Exercise #20:White to move. Even after White plays the strongest move, Black hasa resource in this position that he does not have in Exercise #19. What is it?
The Least You Need to Know
Middlegame principles and strategies still apply to the endgame, although thereduced material modifies slightly how they should be applied.
In the endgame, the king is a strong piece, so you should use it offensively. (Butyou should still always be careful about checkmate possibilities!)
When an endgame is won, it’s almost always by making a passed pawn andpromoting it to a queen.
When an endgame is drawn, it’s almost always by preventing the opponent frommaking a passed pawn, blockading his passed pawn(s), or forcing stalemate.
In endgames with just kings and pawns, having the opposition is extremelyimportant, and often enough for the stronger side to win or the weaker side todraw.
Two endgames that offer very good chances for the weaker side to draw areopposite-colored bishop endgames and the rook’s pawn and wrong-coloredbishop versus the king.
Part 4Beyond the Basics
If you’ve studied the first three parts, then you’ve learned how to play chess well.But you’ve only scratched the surface of the possibilities chess has to offer. Thispart is your platform for diving into the world of chess.Now that you’ve learned the basics, you’re ready for more. I’ll give you tips forhow to keep improving your skill at chess. You can learn about the superstars ofchess: the World Champions. I’ll tell you how to meet more people to play chesswith. You’ll even learn how the computer plays chess—and how to take advantageof its weaknesses. Are we having fun yet?
Chapter 15
Training Camp
In This Chapter
Studying the opening and the endgame
Learning more about tactics and strategy
How to use www.wolffchess.com
Lessons from the superstars
Reviewing your own games
At this point, you’ve learned all the basic tactics and strategies for chess. You canprobably beat most or all of your friends, and you can certainly play better than mostpeople who know the rules. If your newspaper has a chess column, you can read it andappreciate it. You might be every bit as good at chess as you’ve ever wanted to be.
But then again, maybe not. Maybe even after studying this book there’s somebody youknow who still beats you, and you’d like to be able to turn the tables. Or maybeyou’ve really gotten hooked on chess, and you’d like to get to the level where you feelcomfortable competing at a club or in tournaments. Or maybe there isn’t any reasonyou’d like to get even better except that chess is a great game, and it’s satisfying to beable to play such a great game really well.
Whatever the reason, it doesn’t matter: If you’ve studied all the chapters up to here,and you want to become even better at chess, this is the chapter where I’ll tell youhow to do it. Note that this chapter describes and recommends certain products, but itdoesn’t give you any specific addresses of people who sell or provide them. I’ll tellyou more about who supplies chess products in Chapters 17 and 18 (see especially“Finding and Entering a Chess Tournament” in Chapter 17), and you can find theiraddresses in Appendix A.

Studying the Opening and the EndgameFrom previous chapters, you’ll remember that it’s important to distinguish between“the opening” or “the endgame,” and “an opening” or “an endgame,” and that there arelots of specific openings and endgames to learn. Well, if you want to get better atchess, you’re going to have to start studying openings and endgames. If you get yourhands on a chess catalog, or if your local bookstore or library has a good chesssection, you’ll quickly discover that there’s a huge amount of literature—mostly books—about openings and endgames.
Patrick’s PointersSome chess books, particularly those written some years ago, useanother kind of chess notation called descriptive notation. You can learnhow to read descriptive notation in Appendix B. Appendix B alsodescribes some of the minor variations in the kind of chess notation thisbook uses (the universal chess notation for books written today) thatyou’ll find from book to book.
Studying the OpeningIf you want to play chess competitively, then you must develop an opening repertoire.That is, you must learn a set of specific opening sequences that allow you to reach aplayable middlegame no matter how your opponent plays in the opening. Developingan opening repertoire is a lot of work. I don’t recommend it unless you’re sure youwant to put some real effort into improving your chess game. If you don’t want to playcompetitively, then you could probably spend your time more efficiently studying otheraspects of chess. But if you want to compete for prizes in club competitions or amateurtournaments, then it’s essential that you have an opening repertoire.
Patrick’s PointersAn excellent way to improve your game is through private instruction by astrong player, perhaps even a grandmaster. Such instruction is notcheap, and it involves a serious time commitment, but it’s a tremendous
way to get better. You may find such instruction at your local chess club,or you can receive instruction over the phone, through the mail, or byInternet. Look in chess magazines or on the Internet for advertisementsor other information about private instruction.
Developing an opening repertoire is a personal thing. There’s no “right” or “wrong”repertoire except whatever gives you middlegame positions you like and play well.For that reason, I can’t tell you what openings to play; and when I teach amateurs Inever try to tell them what to play. But I can tell you how to decide what to play, andthen how to learn it.
First, get an opening encyclopedia. I recommend that you get one of the following twobooks:
1. Nunn’s Chess Openings, written by Joe Gallagher and John Emms, edited byJohn Nunn.
2. Modern Chess Openings, 14th edition, written by Nick deFirmian, edited byWalter Korn.
Modern Chess Openings is much better at general explanation and still quitecomprehensive, while Nunn’s Chess Openings is even more comprehensive withslightly better analysis. If this will be one of your first openings books, then I stronglyrecommend Modern Chess Openings. But if you already have some experience withopening books, you may prefer Nunn’s Chess Openings. In either case, use the bookyou get to browse through the openings, figure out which ones you like, and how you’dwant to fit them together.
Chess TalkAn opening repertoire is a set of opening variations one prepares inadvance to be able to reach a playable middlegame no matter how theopponent plays in the opening. Every grandmaster spends much of hisstudying time refining his opening repertoire in order to get the jump onthe opposition at the start of the game.
I should mention that grandmasters use an advanced encyclopedia called the

Encyclopedia of Chess Openings (ECO). This five-volume set gives a detailedanalysis of all chess openings. For especially popular or topical openings, there arededicated monograms published in the same format. Each book is over 500 pageslong, and is in either its second or third edition, which says a lot about how valuablegrandmasters consider them! It is supplemented by a journal called Chess Informant,which comes out three times a year, and features grandmaster analysis of many of themost important grandmaster games played around the world. I do not recommend thesefor you yet, because the analysis is extremely dense. Right now, you need somethingthat is easier to understand. But if you ever get really serious about studying chessopenings, you should know that the
Patrick’s PointersA good way to help you decide which openings you like is to look throughgrandmaster games and see whether you like the kinds of middlegamesand endgames the various openings give rise to.
ECO and the Chess Informant are the most advanced materials around.
Once you’ve decided which openings to learn, you may want to get some bookswritten on specific openings. Be careful in your purchases: There’s an enormousnumber of opening books, and not all of them are good. I can tell you that any openingbook by John Nunn is of superb quality, but his books are often written at a very highlevel, and you might not be ready for him yet. (Nunn’s Chess Openings is a perfectexample.) Otherwise, I strongly urge you to get recommendations from someone youtrust before buying too many opening books: You can waste a lot of money here ifyou’re not careful!
Patrick’s PointersSee Chapters 17 and 18 for ideas on how to find sources of chess booksand other kinds of chess supplies.
Studying the Endgame

Fortunately, you only need to study a few books to learn just about everything you needto know to play the endgame well.
Two books that are superb are:
1. Chess Endings: Essential Knowledge, written by Yuri Averbakh.
2. Essential Chess Endings Explained Move by Move, Volume 1, written byJeremy Silman.
There is another book that I highly recommend, although it’s more difficult than eitherof the two listed above: Practical Chess Endings, written by Paul Keres. If you learneverything in this book, you’ll be playing endgames as well as a grandmaster!
Finally, I highly recommend anything written by Edmar Mednis. Edmar was myteacher for several years, and I learned a lot about endgames from him. He has writtenmany books on the endgame, and they’re all very good.
Magazines and PeriodicalsIn addition to the many books on chess, there are also many magazines and periodicalsyou can subscribe to. If you really want to explore the world of chess, there’s no betterway to find out what’s out there and what’s going on than to read some magazines. Inaddition, most magazines have games analyzed by grandmasters, as well as articlesintended specifically for instruction. Some magazines also have articles on relatedtopics, intended more for fun than for instruction. There are lots of magazines you canget, but the following are some of the best:
Chess Life, the official magazine of the U.S. Chess Federation. (See Chapter 17for more about that organization.) If you get only one magazine, get this one.
New In Chess, a Dutch publication, is probably the best chess magazine in theworld. This magazine has lots of games analyzed by grandmasters, plusinterviews with the movers and shakers of the chess world.
School Mates, also published by the U.S. Chess Federation, a magazine designedjust for kids.
Using www.wolffchess.com and Other Web SitesThe Web is an incredible boon for chess. The potential of the Web has only beenscratched so far, and chess is going to benefit tremendously! The Web is great for

transmitting, displaying, and manipulating information. Chess is a game of pureinformation. It’s a match made in Heaven.
I no longer play chess professionally. In 1997, I started a new career in business.From 1999 to 2001 I worked at two Web companies, so I know a lot about the Web.As great as I think the Web has been for chess, I think it could do a lot more. With thatin mind, I have built a Web site to complement this book. If you’re reading this nowand you’re looking for a way to keep getting better at chess, you’re ready for my Website.
WolffChess is an online chess training resource. Its URL is www.wolffchess.com.There you have access to hundreds and hundreds (and soon thousands) of exercisesyou can do online. The exercises are organized according to the themes in this book.It’s better than any chess book could be, because you can play through the exerciseswithout needing a chessboard. Plus, you can get comments and feedback while doingthem.
You can read much more about using the Internet in many, many other ways in Chapter18, but I’ll give you a sneak preview here of some other Web sites you can visit forchess information:
“The Week in Chess” is a terrific resource for chess news. Its URL iswww.chesscenter.com/twic/twic.html or go to www.chesscenter.com and click“twic.” It started as an e-mail newsletter, and grew into a very popular Web site.
“Kasparov Chess” has lots of recent chess news, plus other chess resources. ItsURL is www.kasparovchess.com.
“Grandmaster Chess” is an attractive site with a lot of information. Its URL iswww.gmchess.com.
“The Chess Café” is a great source of interesting, in-depth chess articles. Its URLis www.chesscafe.com.
This really is just a taste of what’s available online, though. Chess is blossoming onthe Web!
Studying TacticsAn excellent way to improve your game is to learn more tactics, and exercise yourability to find the tactics that are hidden in any chess position. There are many goodbooks on the subject. Here are two classics to get you started: 1001 Chess Sacrifices
and Combinations, and 1001 Brilliant Ways to Checkmate, both written by FredReinfeld. As the names imply, there are 1001 chess positions in each book, so theyshould keep you occupied.
Patrick’s PointersMany newspapers have a chess column with a diagram that challengesyou to find the winning tactic. But I think the Web is a perfect medium fortraining yourself: There is no limit to the number of exercises you canuse, and you can see the moves without needing a chessboard. That’sexactly why I designed www.wolffchess.com the way I did.
Studying StrategyOne of the best ways to study chess strategy is to study grandmaster games that areanalyzed by grandmasters, especially by one of the players himself. However, thereare a few outstanding books on strategy that are not just collections of games. One ofthe great classics is My System, written by Aron Nimzovich in 1925. The most recentpublication of this book is edited by Lou Hays, and I highly recommend it.
Another classic is The Art of Attack in Chess, written by Vladimir Vukovic. This isone of the first books I ever read, and it made me a much better player.
Although this next book is a collection of games, the title makes it clear that it’sintended for instruction in strategy. The Most Instructive Games of Chess EverPlayed: 62 Masterpieces of Chess Strategy, written by Irving Chernev, is awonderful book. This is another book I read when I was young.
An author whom I strongly recommend is Andrew Soltis. You have to be a bit carefulwith Soltis: He has written several dozen books, and some of them show that theywere done quickly. But the ones that he took his time with are splendid. I especiallyrecommend three books: The Art of Defense in Chess, Pawn Structure Chess, andThe Inner Game of Chess. The topics of the first two books are self-explanatory; thetopic of the third is how to calculate the consequences of your moves. Each isexcellent, and I myself learned a lot from them.
One recent book that I recommend highly is The Road to Chess Improvement by AlexYermolinsky. Alex emigrated from Russia to the United States many years ago. He is avery good chess player, and is very personable. That personality really comes through
in the book. He explains things very clearly, in a genuine and engaging tone. The bookis an interesting mix between strategy and autobiography, with a lot of well-annotatedgames. It’s a unique book, and both enjoyable and instructive.
All of these authors are grandmasters. Most good books on chess strategy are writtenby grandmasters, but occasionally there is an exception. One of those exceptions is thebook Best Lessons of a Chess Coach, written by Sunil Weermantry and Ed Eusebi.Weermantry has many years of experience as a coach for children of all ages.Although he is not a grandmaster, he is a strong master. I have worked with himseveral times in teaching children, and I think he’s an excellent teacher. In this book,he has transcribed some of his lectures and presented them in a clear form.
Reading for PleasureSo far you must be getting the impression that the only reason to read chess books is toimprove your play. That’s one good reason to read about chess, but it’s not the onlyone. Chess books aren’t always for instruction: Some are just for fun! I recommend thefollowing books for many hours of amusement:
Karl Marx Plays Chess, written by Soltis. Soltis is a genius at finding fun facts:Suffice it to say that history recorded only one game by Karl Marx, and Soltisfound it. The book also has puzzles, trivia, and lots of funny stories.
The Even More Complete Chess Addict, written by Mike Fox and RichardJames. Loads of trivia!
The Oxford Companion to Chess, written by David Hooper and Kenneth Whyld.Everything you need to know about chess, and lots that’s just fun.
Soviet Chess 1917–1991, written by Soltis. This is a historical review of chessin the Soviet Union. It is an expensive book, and pretty dense, so it’s not a casualpurchase. But if you are fascinated by the relationship of chess to either history orthe Soviet Union (or both), you’ll love this book.
And don’t think that the list ends here! There are lots of other books out there that arefun to read. I couldn’t hope to list them all, but here’s a tip: Any book written by IrvingChernev or Andrew Soltis that includes stories, trivia, and so forth is likely to be lotsof fun.

Patrick’s PointersPeople often ask me how to help kids get better. I think the best waygenerally is to give them exactly the same books that adults should study.However, there are books written specifically for kids, and especially ifyou have someone under 10 in mind, you might want to check some ofthem out.
Collections of GamesThere are at least two very good reasons to read books of the games played by greatplayers. One is simple pleasure. Just as every sport has its great moments, chess hasits great games. If you love basketball, then you love watching a beautiful no-look passor an overwhelming slam dunk. If you love chess, you’ll love playing through the bestchess games ever played. The second reason is that studying the games of the greatplayers is a great way to improve your game. Every move offers instruction. Many ofthe World Champions (see Chapter 16 for a complete list of who they are) havewritten books in which they analyze their own games. Any of those books is worthbuying and studying! I’ll highlight a few that are especially good:
My 60 Memorable Games, written by Bobby Fischer. This may be the single bestbook ever written on chess. You should read it. Period.
Tal–Botvinnik 1960: Match for the World Chess Championship, written byMikhail Tal. Many grandmasters think this is the best book ever written on aWorld Championship match. Tal not only analyzes the games brilliantly, he alsohonestly relates what it was like to play for the title of World Champion. Anextraordinary book.
New World Chess Champion and London-Leningrad Championship Games,each written by Garry Kasparov. Those grandmasters who don’t think Tal’s bookis the best ever written on a World Championship match think one of these is. Inthese two books, Kasparov analyzes the games of the match where he won theWorld Championship title from Anatoly Karpov, and then defended that title fromKarpov in a revenge match.
Finally, I will mention a book I wrote about a World Championship match. It isKasparov versus Anand: The Inside Story of the 1995 World Chess

Championship Match. I spent several months helping the challenger,Viswanathan Anand, first as a trainer before the match, and then as a coachduring the match. This book provides a brief history of the World Championshipmatches, some background on each of the players, and a running commentary onthe match, as well as analysis of every game.
I wish I had space to list dozens more books, because they all deserve to be read! Inmy opinion, a collection of well-annotated games by one of the great grandmasters isalmost always the best value for your dollar. Here is a (partial) list of some of thegreat players who have written such a collection. If you get your hands on a book byany one of them about their own games, it will be a terrific book:
Emanuel Lasker
Alexander Alekhine
Vasily Smyslov
Viktor Korchnoi
Vladimir Kramnik
Alexei Shirov
José Capablanca
Mikhail Botvinnik
Bent Larsen
Garry Kasparov
Viswanathan Anand
Studying Your Own GamesIn a chess tournament, each player in each game is usually required to write down allthe moves in his game. This is called “keeping score.” Each player is supplied with aspecial sheet of paper for recording the moves, called a “scoresheet.” The followingfigure shows a copy of one of my scoresheets from a tournament.
An example of a chess tournament scoresheet.

So far I’ve been telling you which books (or magazines or Web sites) to study aboutdifferent aspects of chess, or about other peoples’ games. But you should also studyyour own games—the losses as well as the wins. In fact, you should study your lossesmore carefully than your wins, because if you were beaten it means your opponent wasdoing something right that you were doing wrong!
Now you might not have a regular sparring partner, so you might not be able to studyyour own games. But if you do have someone (or a computer) to play with, then Istrongly urge you to record some of your games and study them. Every grandmasterdoes this with all his games. In fact, most of the time when two grandmasters finish agame, they will immediately go over the game together. Do as the grandmasters do.
Patrick’s PointersWhen you play, get in the habit of writing down the moves of the game asthey’re played. (Write down both your moves and your opponent’smoves.) Then later on, you can play through your games—especially yourlosses!—and learn from them. Try to be as objective as you can. Figureout where you made mistakes, and learn not to make them again.
It can sometimes be hard to learn on your own from your games. Here is one way thatprivate instruction can be a big help. However, another (cheaper) way to learn is to gothrough your games with a friend who plays chess. Two can often learn better than
one!
The Least You Need to Know
You can improve your game by getting instruction, studying books, magazines orWeb sites, and analyzing your own games either alone or with a friend.
You don’t need to worry too much about developing an opening repertoire if youwant to play casually, but if you want to compete, it’s essential.
Studying games played and analyzed by the great players is one of the best waysto improve your game—and it’s great fun, too.
You should get in the habit of recording your games so that you can study themafterward. Study your losses especially well.

Chapter 16
Hall of Fame
In This Chapter
World Champions during the classical era
World Champions during the period of Soviet dominance
World Champions in the age of the “Fischer Revolution”
The Split of the World Championship Title: Will the real World Championplease stand up?
Just like every other sport, chess has its champions. A small number of extraordinarypeople have played so well that they’re immortalized by many generations of chessfans.
I wish I could tell you enough about all the great chess champions to do them justice.But that’s obviously not possible: Whole books have been written about each of thegreat champions, and I’ve only got one chapter! So instead, I’ll briefly introduce youto each of the official World Champions in the history of chess, and along the way I’lltell you a little about the history they helped make. Then I’ll tell you about the curiousstate of the World Chess Championship as of the beginning of 2001.
The Classical EraThe first half of the nineteenth century is called the “romantic era” of chess. Therewere no international chess tournaments and no official World Champion. This lack ofstructure was reflected also in the style of play of the time. Each player would attackthe king as quickly as possible. Many beautiful games were produced, but the overallquality of chess strategy was low. Defense was not highly valued, so many games
were lost that should not have been.
Chess LoreJust like baseball, basketball, football, and other sports, chess has itsown national hall of fame and museum. Opened in 1986, and relocated in1993 to the U.S. Chess Center in Washington, D.C., the hall includesexhibits on great American players such as Bobby Fischer and PaulMorphy, as well as individuals who contributed greatly to American chessin other ways, such as Arpad Elo, inventor of the current chess ratingsystem, and John Collins, mentor to Fischer and teacher of hundreds ofother young players. New members are inducted each year.
In the middle of the century, things began to change. A new generation of chess playersformulated more sophisticated principles for playing chess. Attack, yes—but onlywhen you possess certain strategic advantages, and only when you direct your attackagainst your opponent’s weaknesses. Maybe this conceptual revolution was part of amore general change in how people thought of chess. The game was no longer only forcoffeehouses; now there were national and international tournaments for the bestplayers to compete in. National champions began to be recognized. There was not yetan official World Champion, but there soon would be. The classical era of chess hadbegun.
Wilhelm Steinitz (1836–1900)Steinitz was the strongest player of the new generation of chess players that markedthe beginning of the classical era. (With one exception: Paul Morphy was undoubtedlystronger during his brief career; but Morphy played for so short a time that he’susually not associated with the start of the classical era.) Steinitz grew up in Prague,Czechoslovakia, but moved to Vienna, Austria, as a young man. His initial ambitionwas to be a journalist, but when he won the Vienna Championship of 1861–62, hedevoted more of his energy to chess. He played in the London international tournamentof 1862, coming in sixth place. This convinced him to play chess professionally, andhe settled in London. Over the next 10 years his results improved, and by 1872 he wasrecognized as the world’s strongest player. However, there still wasn’t any officialWorld Championship title. What was needed for that was an official challenge to theman generally acknowledged as the best in the world.

That challenge came in 1883, from the Polish-born Johann Zukertort (1842–1888),who had just won the London international tournament of that year. A match wasarranged between the two players, where the first person to win 10 games would bedeclared the winner. Each player agreed that the winner could call himself the WorldChampion, and the chess public recognized the claim.
Steinitz had moved to the United States in 1883 (and eventually became an Americancitizen), so the match was played in New York, St. Louis, and New Orleans. Thematch occurred in 1886, and Steinitz won it by the score of +10 =5 –5 (that is, 10wins, 5 draws, 5 losses) and became the first official World Champion.
Emanuel Lasker (1868–1941)Steinitz had been the world’s best player since 1872, but he would only possess theofficial title for eight years until the German Emanuel Lasker would challenge him andtake the title away. Lasker studied mathematics as a young man, and in fact made somesignificant contributions to the field; but chess was the primary medium of his genius.
Chess LoreAlthough Lasker is now remembered primarily for his chessachievements, during his life he wrote philosophy and studiedmathematics. He was good friends with Albert Einstein, who wrote theforeword to Lasker’s biography. Apparently, Lasker and Einsteindiscussed mathematics together; unfortunately, we have no records ofany chess games they played!
Lasker recognized, as no one else had, the significance of Steinitz’s contributions tochess thinking. Late in his life, Lasker wrote a chess primer where he praised Steinitzas a great chess thinker and acknowledged the debt he owed to the great man for hisown development as a player. In 1894, at the young age of 25, he challenged Steinitzand defeated him +10 =4 –5.
At first the chess public refused to believe that Lasker really deserved to be calledWorld Champion. But Lasker solidified that victory with a string of tournamentvictories. And he did so while earning a Ph.D. in mathematics!
Lasker kept the World Championship title for 27 years, much longer than anyone hassince. Most people think that he was no longer the world’s best after about 1915, but
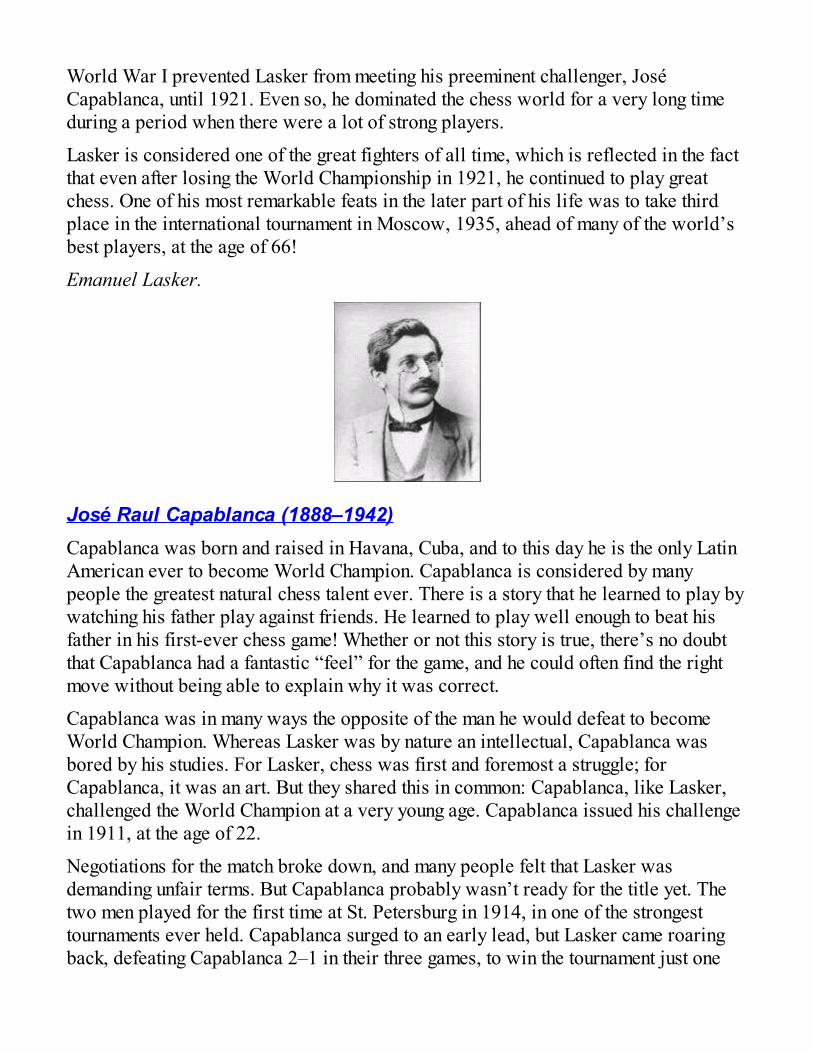
World War I prevented Lasker from meeting his preeminent challenger, JoséCapablanca, until 1921. Even so, he dominated the chess world for a very long timeduring a period when there were a lot of strong players.
Lasker is considered one of the great fighters of all time, which is reflected in the factthat even after losing the World Championship in 1921, he continued to play greatchess. One of his most remarkable feats in the later part of his life was to take thirdplace in the international tournament in Moscow, 1935, ahead of many of the world’sbest players, at the age of 66!
Emanuel Lasker.
José Raul Capablanca (1888–1942)Capablanca was born and raised in Havana, Cuba, and to this day he is the only LatinAmerican ever to become World Champion. Capablanca is considered by manypeople the greatest natural chess talent ever. There is a story that he learned to play bywatching his father play against friends. He learned to play well enough to beat hisfather in his first-ever chess game! Whether or not this story is true, there’s no doubtthat Capablanca had a fantastic “feel” for the game, and he could often find the rightmove without being able to explain why it was correct.
Capablanca was in many ways the opposite of the man he would defeat to becomeWorld Champion. Whereas Lasker was by nature an intellectual, Capablanca wasbored by his studies. For Lasker, chess was first and foremost a struggle; forCapablanca, it was an art. But they shared this in common: Capablanca, like Lasker,challenged the World Champion at a very young age. Capablanca issued his challengein 1911, at the age of 22.
Negotiations for the match broke down, and many people felt that Lasker wasdemanding unfair terms. But Capablanca probably wasn’t ready for the title yet. Thetwo men played for the first time at St. Petersburg in 1914, in one of the strongesttournaments ever held. Capablanca surged to an early lead, but Lasker came roaringback, defeating Capablanca 2–1 in their three games, to win the tournament just one
half point ahead of his rival. Lasker’s triumph impressed Capablanca, butCapablanca’s performance impressed the rest of the world, and the chess publicdemanded a rematch.
Unfortunately, World War I intervened, and the match wasn’t held until 1921. By thistime, Lasker’s skills had faded, and Capablanca won decisively (+4 =10 –0).Capablanca followed this victory with a series of tournament successes over the nextseveral years, and most people thought his reign would be as long as Lasker’s. ButCapablanca would lose the title after only six years to Alexander Alekhine.
Alexander Alekhine (1892–1946)Alexander Alekhine was born in Moscow, the son of aristocratic parents. He emergedas a chess talent at the same time as Capablanca, but in the early part of their careersthe Cuban eclipsed Alekhine. For example, Alekhine also played in the great St.Petersburg tournament, but he came in a distant third behind Capablanca and Lasker.
The popular view is that Alekhine did with hard work what Capablanca did with rawtalent. I’m not sure that’s really fair to Alekhine, but there’s no doubt that he had anenormous capacity for work and a near obsession for chess. There is a famous story(perhaps exaggerated) that when an English chess fan took Alekhine and Capablancato a London theater in 1922, Capablanca never took his eyes off the chorus line, andAlekhine never took his eyes off his pocket chess set!
Alekhine was severely affected by the Russian Revolution of 1917, when he lost hisfamily fortune. Details of his life during this period are sketchy, but we know that hewent abroad in 1921 and eventually settled in Paris. (He later became a Frenchcitizen.) Once there, he again worked very hard on chess.
In 1927, he challenged Capablanca for the World Championship. Everyone expectedCapablanca to win, but Alekhine had analyzed Capablanca’s chess very well, and hepurposely played in a style that Capablanca had trouble with. Alekhine won the matchby the score of +6 =25 –3. In his later years, Alekhine had trouble with alcohol. Somepeople think this explains his loss to Max Euwe in 1935 in their World Championshipmatch. Although this may not be fair to Euwe, it’s true that after that loss Alekhineabstained from drink, challenged Euwe to a rematch in 1937, and won back the title.Then came World War II and chess activity stopped until 1945. Alekhine wasnegotiating the conditions of a World Championship match in 1946 with MikhailBotvinnik when he died. Alekhine is the only man ever to die while still WorldChampion.
Machgielis (Max) Euwe (1901–1981)
Max Euwe (pronounced “OY-vuh”) lived his whole life in Holland, and he is the onlyDutch World Champion. He is thought of as the weakest World Champion ever, andthat’s a pity, because it’s unfair to remember this remarkable man as second-rate inany way.
Euwe became a professor of mathematics in 1924 and continued in that career until1957. Throughout all the time that he played chess, he did so as an amateur. Euwe alsowrote many fine chess books, and was noted as an openings analyst. Yet chess for himwas a hobby, along with swimming, boxing, and languages!
Chess Lore“FIDE” is an acronym for “Féderation Internationale des Échecs,” whichis French for “International Chess Federation.” This organization wasfounded in 1924, when delegates from 15 countries met at Paris andestablished it for the purpose of promoting the game of chess around theworld. It established an Olympiad, to be held every two years, whereeach member’s country sends a team of its best players to compete formedals. It also established a separate World Championship for women.Both events have continued up to the present day.
In 1946, when Alekhine died, FIDE claimed authority to administer theWorld Championship. The chess public, eager to maintain the continuityof the World Championship title, accepted FIDE’s authority. FIDEorganized a tournament to determine the World Championship in 1948,and then it drew up the rules for future qualification for WorldChampionship matches, established the conditions under which the WorldChampionship matches would be played, and sanctioned all of therelevant events. FIDE is not and has never been a for-profit organizationrun by people who have a financial stake in expanding the game of chess.Some people feel this is a serious drawback to FIDE. However, FIDEimposed order upon a World Championship system that had previouslybeen subject to the whims of whoever happened to be World Championat the time. In addition, FIDE established criteria for bestowing the title of“grandmaster,” so that this became an official title, and implemented aninternational rating system to rank players by a mathematical formula, sothat there could be some objective way to measure players’ relative

ability.
When Euwe challenged Alekhine for the World Championship, no one expected him towin. Perhaps largely due to Alekhine’s alcohol problems, he won by the score of +9=13 –8. Before 1948, it was up to the champion to decide who would challenge him. Itwas rare for a champion to allow a rematch. But Euwe was a gentleman, and therewas no question of denying the great Alekhine a second chance. Alekhine won therematch +10 =11 –4.
Euwe continued playing chess for many years after that match, garnering manysuccesses, although never again being a serious contender for the WorldChampionship. In 1970, he was elected president of FIDE, where he served for eightyears. He was a good president, who served the interests of chess above all else.
Soviet DominanceFrom 1930–1970, prizes in chess tournaments were too low for professionals to makea good living. Some full-time chess players supplemented their income by teachinglessons, writing, and giving exhibitions. But it’s difficult to rise to the very top if youhave to take time away from tournament preparations for such activities, and thosewho had to do so didn’t make it to the top.
But beginning in the 1930s, one group of chess players didn’t have to take time awayfrom their preparations. They were the Soviets. Lenin had decided that one way hewould prove the superiority of the communist system was to give state support toSoviet chess players. A new generation of chess players emerged from the SovietUnion, and they dominated the World Championship for 25 years.
Mikhail Moiseyevich Botvinnik (1911–1995)Botvinnik was the first of this young generation. He was already one of the strongestplayers in the world in the mid-30s, but World War II made a challenge for the WorldChampionship impossible until 1946, and then Alekhine died before the match couldbe arranged.
Alekhine’s death left the world without a World Champion, and FIDE organized atournament to determine who would hold the title next. The six best players in theworld were invited, but one (Reuben Fine—see Chapter 14) declined, so only fiveplayers participated. Botvinnik won, and was declared World Champion.
Botvinnik kept the title for most of the next 15 years, even though he lost more gamesin his World Championship matches than he won! The secret to his success was the
rematch. FIDE was so impressed by Euwe’s gallantry that it decided the WorldChampion would be entitled to a rematch one year after losing the title. Botvinnikspent much of his time working at his other profession, engineering, and by the 1950she was past his prime, so he lost some of the matches he played to defend his title. Buthe was deadly in the rematch! All World Championship matches played from 1951–1972 were 24 games long, with the champion keeping his title in event of a tie.Botvinnik tied his first match, tied the second, lost the third but then won the rematch,and lost the fourth but then won the rematch. By the time he played the fifth matchFIDE had decided the rematch was too great an advantage and eliminated it. Botvinniklost his fifth match, and never again played for the World Championship.
Vasily Vasiliyevich Smyslov (1921–)The first person to “borrow” Botvinnik’s title was Vasily Smyslov. Smyslov wasprobably the strongest player of the 1950s, but he was World Champion for only oneyear. He first challenged Botvinnik in 1954, but their match was tied +7 =10 –7, andBotvinnik retained the title. He won the title from Botvinnik by the score of +6 =13 –3in 1957, but Botvinnik won the rematch in 1958 by the score of +7 =11 –5. Smyslov isa friendly man with a terrific sense of humor, which made him a striking contrast to thedour Botvinnik. I got a chance to experience the contrast first-hand in 1992. Botvinnikand Smyslov were analyzing a chess game together. I joined in the analysis, and at onepoint I made a move on the chessboard to suggest that it might be strong. Botvinnikwordlessly put the piece back on the square I had moved it from. Smyslov laughed andsaid, “Mikhail Moiseyevich does not allow such moves at his board!”
Smyslov’s affability seems to be part of his spiritual nature, and his general love oflife. Perhaps this explains how he has been able to play such strong chess even in his60s and 70s! Most grandmasters lose the ability to play genuinely strong chess oncethey enter their 50s, but Smyslov is an exception. In 1984, he came within one step ofplaying for the World Championship, and even today he continues to play top-flightchess.
Mikhail Tal (1936–1992)Tal was known as “the wizard from Riga” because of his ability to create an attackseemingly out of nothing. As the nickname suggests, he was Latvian and not Russianlike Botvinnik and Smyslov, but in the days of the Soviet Union, they were allcompatriots. Tal’s genius was extraordinary, but sadly it came in a body afflicted withdisease. And Tal’s smoking, drinking, and partying didn’t help his health either. Taldefeated Botvinnik in 1960 by the score of +6 =13 –2, and then wrote a wonderfulbook where he described his feelings during the match and analyzed each of thegames. But when the inevitable rematch came, Tal was drained from a bout with
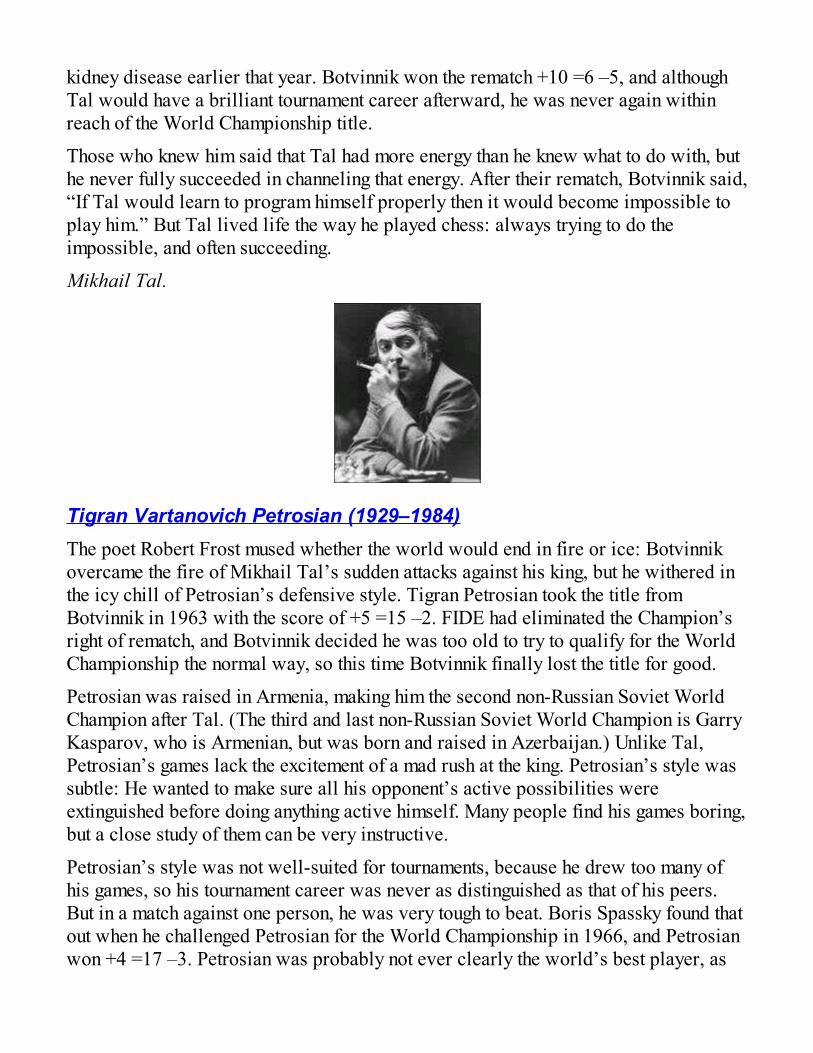
kidney disease earlier that year. Botvinnik won the rematch +10 =6 –5, and althoughTal would have a brilliant tournament career afterward, he was never again withinreach of the World Championship title.
Those who knew him said that Tal had more energy than he knew what to do with, buthe never fully succeeded in channeling that energy. After their rematch, Botvinnik said,“If Tal would learn to program himself properly then it would become impossible toplay him.” But Tal lived life the way he played chess: always trying to do theimpossible, and often succeeding.
Mikhail Tal.
Tigran Vartanovich Petrosian (1929–1984)The poet Robert Frost mused whether the world would end in fire or ice: Botvinnikovercame the fire of Mikhail Tal’s sudden attacks against his king, but he withered inthe icy chill of Petrosian’s defensive style. Tigran Petrosian took the title fromBotvinnik in 1963 with the score of +5 =15 –2. FIDE had eliminated the Champion’sright of rematch, and Botvinnik decided he was too old to try to qualify for the WorldChampionship the normal way, so this time Botvinnik finally lost the title for good.
Petrosian was raised in Armenia, making him the second non-Russian Soviet WorldChampion after Tal. (The third and last non-Russian Soviet World Champion is GarryKasparov, who is Armenian, but was born and raised in Azerbaijan.) Unlike Tal,Petrosian’s games lack the excitement of a mad rush at the king. Petrosian’s style wassubtle: He wanted to make sure all his opponent’s active possibilities wereextinguished before doing anything active himself. Many people find his games boring,but a close study of them can be very instructive.
Petrosian’s style was not well-suited for tournaments, because he drew too many ofhis games, so his tournament career was never as distinguished as that of his peers.But in a match against one person, he was very tough to beat. Boris Spassky found thatout when he challenged Petrosian for the World Championship in 1966, and Petrosianwon +4 =17 –3. Petrosian was probably not ever clearly the world’s best player, as
Botvinnik was in the 1940s and Smyslov was in the 1950s, and he didn’t have the rawgenius of a Mikhail Tal. But he was a very tough man to beat, and his style was aheadof his time. Ten years later, Anatoly Karpov would adopt Petrosian’s style ofdampening the opponent’s active play, and it would enable him to dominate the chessworld for a decade.
Chess Lore“Where are the women?” you might be asking yourself. That’s a goodquestion. Throughout history, there have been no women who haveattained the same level of skill as the World Champions. And few womenhave even tried.
FIDE has run a separate women’s World Championship since 1927 and itestablished a separate women’s grandmaster title in 1977, both for thepurpose of encouraging more women to play chess. But many peoplefeel it may have had the opposite effect by appearing condescending towomen. Unlike football or basketball, there is no physical barrier stoppingwomen from competing at the same level as men, so why should they betreated differently?
The fact remains that very few women have competed in internationalchess, and fewer still have achieved the level of (men’s) grandmaster.Some people suggest this may be explained by differences of brainstructure: Men are supposed to be more proficient at mathematicalactivities, and chess is thought to require math-like skills. Other peoplesuggest that social factors are the explanation: Men are encouraged tobe aggressive, and chess, as the cerebral form of warfare parexcellence, demands an aggressive personality. A final possibility is thatthe lack of women at the top of chess is explained by the smaller numberof women who play chess overall: Because fewer women play, there’s asmaller chance that any one woman will be extraordinary, whichdiscourages more women from trying to reach the top. No one reallyknows the answer, but I like this final possibility the best, because itsuggests an obvious remedy: Encourage more women to play chess!
Boris Vasiliyevich Spassky (1937–)
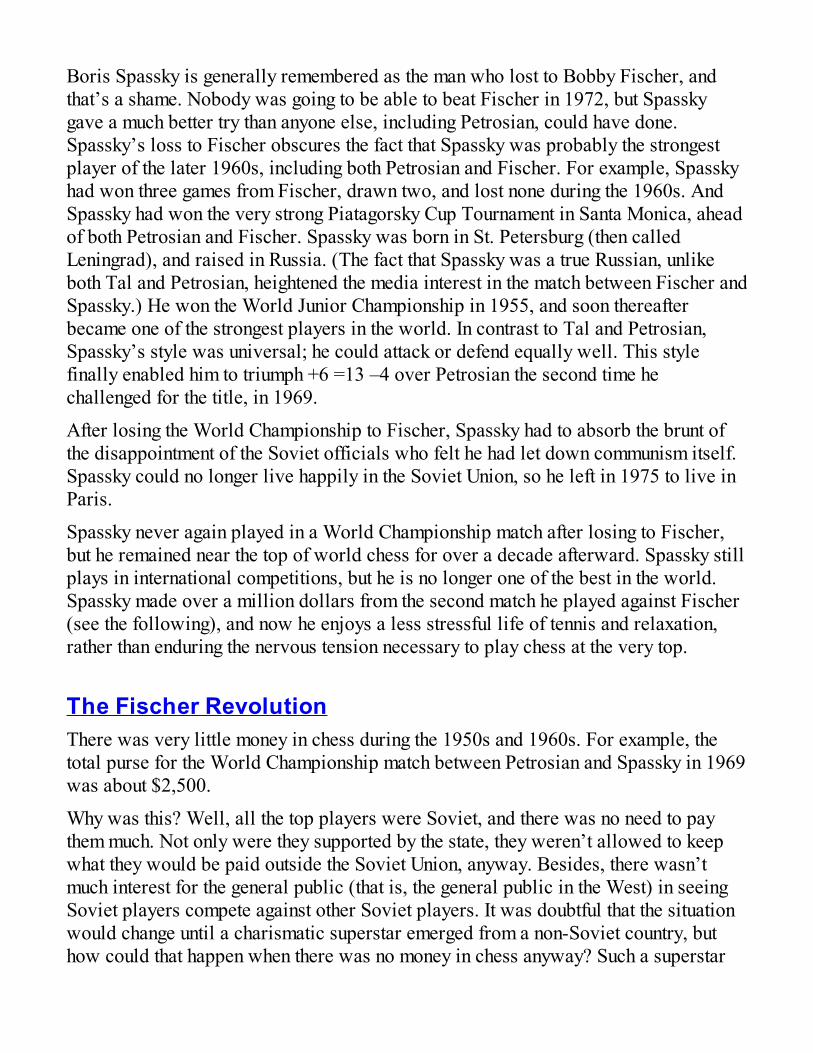
Boris Spassky is generally remembered as the man who lost to Bobby Fischer, andthat’s a shame. Nobody was going to be able to beat Fischer in 1972, but Spasskygave a much better try than anyone else, including Petrosian, could have done.Spassky’s loss to Fischer obscures the fact that Spassky was probably the strongestplayer of the later 1960s, including both Petrosian and Fischer. For example, Spasskyhad won three games from Fischer, drawn two, and lost none during the 1960s. AndSpassky had won the very strong Piatagorsky Cup Tournament in Santa Monica, aheadof both Petrosian and Fischer. Spassky was born in St. Petersburg (then calledLeningrad), and raised in Russia. (The fact that Spassky was a true Russian, unlikeboth Tal and Petrosian, heightened the media interest in the match between Fischer andSpassky.) He won the World Junior Championship in 1955, and soon thereafterbecame one of the strongest players in the world. In contrast to Tal and Petrosian,Spassky’s style was universal; he could attack or defend equally well. This stylefinally enabled him to triumph +6 =13 –4 over Petrosian the second time hechallenged for the title, in 1969.
After losing the World Championship to Fischer, Spassky had to absorb the brunt ofthe disappointment of the Soviet officials who felt he had let down communism itself.Spassky could no longer live happily in the Soviet Union, so he left in 1975 to live inParis.
Spassky never again played in a World Championship match after losing to Fischer,but he remained near the top of world chess for over a decade afterward. Spassky stillplays in international competitions, but he is no longer one of the best in the world.Spassky made over a million dollars from the second match he played against Fischer(see the following), and now he enjoys a less stressful life of tennis and relaxation,rather than enduring the nervous tension necessary to play chess at the very top.
The Fischer RevolutionThere was very little money in chess during the 1950s and 1960s. For example, thetotal purse for the World Championship match between Petrosian and Spassky in 1969was about $2,500.
Why was this? Well, all the top players were Soviet, and there was no need to paythem much. Not only were they supported by the state, they weren’t allowed to keepwhat they would be paid outside the Soviet Union, anyway. Besides, there wasn’tmuch interest for the general public (that is, the general public in the West) in seeingSoviet players compete against other Soviet players. It was doubtful that the situationwould change until a charismatic superstar emerged from a non-Soviet country, buthow could that happen when there was no money in chess anyway? Such a superstar
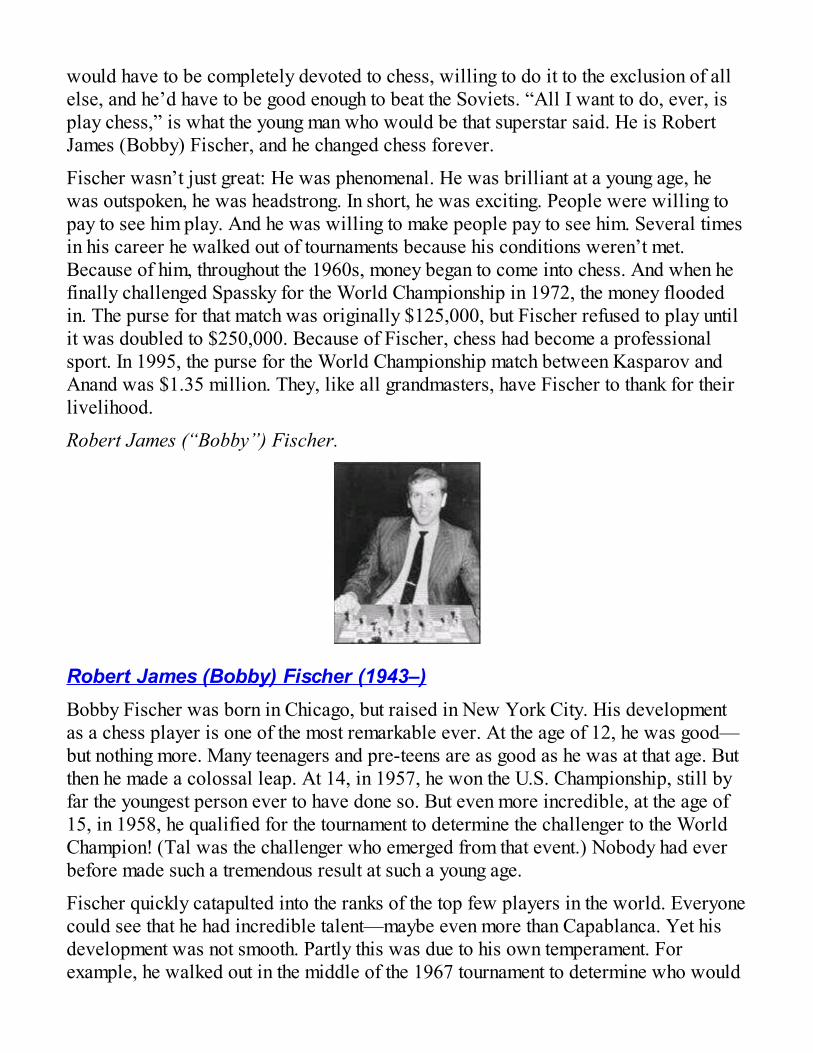
would have to be completely devoted to chess, willing to do it to the exclusion of allelse, and he’d have to be good enough to beat the Soviets. “All I want to do, ever, isplay chess,” is what the young man who would be that superstar said. He is RobertJames (Bobby) Fischer, and he changed chess forever.
Fischer wasn’t just great: He was phenomenal. He was brilliant at a young age, hewas outspoken, he was headstrong. In short, he was exciting. People were willing topay to see him play. And he was willing to make people pay to see him. Several timesin his career he walked out of tournaments because his conditions weren’t met.Because of him, throughout the 1960s, money began to come into chess. And when hefinally challenged Spassky for the World Championship in 1972, the money floodedin. The purse for that match was originally $125,000, but Fischer refused to play untilit was doubled to $250,000. Because of Fischer, chess had become a professionalsport. In 1995, the purse for the World Championship match between Kasparov andAnand was $1.35 million. They, like all grandmasters, have Fischer to thank for theirlivelihood.
Robert James (“Bobby”) Fischer.
Robert James (Bobby) Fischer (1943–)Bobby Fischer was born in Chicago, but raised in New York City. His developmentas a chess player is one of the most remarkable ever. At the age of 12, he was good—but nothing more. Many teenagers and pre-teens are as good as he was at that age. Butthen he made a colossal leap. At 14, in 1957, he won the U.S. Championship, still byfar the youngest person ever to have done so. But even more incredible, at the age of15, in 1958, he qualified for the tournament to determine the challenger to the WorldChampion! (Tal was the challenger who emerged from that event.) Nobody had everbefore made such a tremendous result at such a young age.
Fischer quickly catapulted into the ranks of the top few players in the world. Everyonecould see that he had incredible talent—maybe even more than Capablanca. Yet hisdevelopment was not smooth. Partly this was due to his own temperament. Forexample, he walked out in the middle of the 1967 tournament to determine who would

qualify to challenge for the 1969 World Championship, even though he was leadinghis competitors by one and a half points! After that incident, he didn’t play a singleserious game for 18 months.
But in 1970, he got it all together. He didn’t walk out of any more tournaments.Instead, he simply beat everybody. His margins of victory were so wide that peoplecouldn’t believe it. He won the first two of the three matches he had to win to qualifyto challenge Spassky without allowing his opponent a single win or draw! The thirdmatch, played against the super-solid former World Champion Petrosian, he “only”won with the score of +5 =3 –1. The match against Spassky was tougher, but not bymuch. The final score: +7 =11 –3.
Three things stand out to explain Fischer’s success:
1. He had an indomitable will to win.
2. He worked harder than almost anyone before ever had—harder maybe even thanAlekhine had.
3. He had a crystal-clear classical understanding of chess.
Fischer would not be tempted by brilliant but wacky attacks, like Tal; nor would he beafraid of undertaking active measures if he spotted a hint of his opponent’s activity,like Petrosian. He had a clear conception of what the position demanded, and then hewould calculate the consequences of each move with absolute precision.
When Fischer won the World Championship, people thought he wouldn’t be beaten forsome time. In a sense, they were right: Fischer walked away from chess, never againto play a serious competition. He played no tournaments after he won the title, andwhen the next challenger, Anatoly Karpov had been selected, Fischer demandedextensive changes to the rules and format of the World Championship. FIDE could notagree to all of them, at which point Fischer resigned the title and Karpov became thechampion.
For many years thereafter, people tried to coax Fischer into playing somewhere,anywhere. Then in 1992, Fischer played a match against Boris Spassky. The matchwas supposed to be for the “World Championship,” although nobody took that claimseriously: Nobody knew how good Fischer was, and everybody knew that Spasskywasn’t any longer that good. Even so, the match attracted a purse of $5 million.Fischer won that match by the score of +10 =15 –5, which shows at least that Fischercan still play pretty well. Sadly, he shows no signs of wanting to play with othergrandmasters, so chess players have had to accept that Fischer is really and truly gonefrom chess.
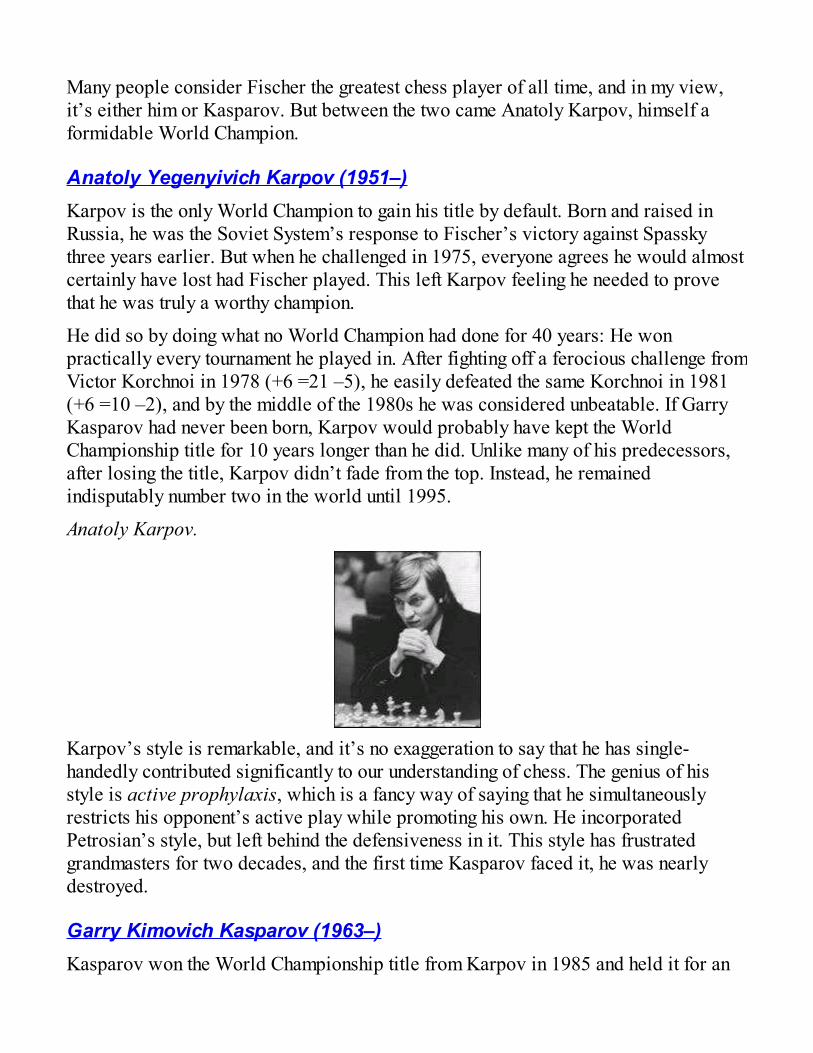
Many people consider Fischer the greatest chess player of all time, and in my view,it’s either him or Kasparov. But between the two came Anatoly Karpov, himself aformidable World Champion.
Anatoly Yegenyivich Karpov (1951–)Karpov is the only World Champion to gain his title by default. Born and raised inRussia, he was the Soviet System’s response to Fischer’s victory against Spasskythree years earlier. But when he challenged in 1975, everyone agrees he would almostcertainly have lost had Fischer played. This left Karpov feeling he needed to provethat he was truly a worthy champion.
He did so by doing what no World Champion had done for 40 years: He wonpractically every tournament he played in. After fighting off a ferocious challenge fromVictor Korchnoi in 1978 (+6 =21 –5), he easily defeated the same Korchnoi in 1981(+6 =10 –2), and by the middle of the 1980s he was considered unbeatable. If GarryKasparov had never been born, Karpov would probably have kept the WorldChampionship title for 10 years longer than he did. Unlike many of his predecessors,after losing the title, Karpov didn’t fade from the top. Instead, he remainedindisputably number two in the world until 1995.
Anatoly Karpov.
Karpov’s style is remarkable, and it’s no exaggeration to say that he has single-handedly contributed significantly to our understanding of chess. The genius of hisstyle is active prophylaxis, which is a fancy way of saying that he simultaneouslyrestricts his opponent’s active play while promoting his own. He incorporatedPetrosian’s style, but left behind the defensiveness in it. This style has frustratedgrandmasters for two decades, and the first time Kasparov faced it, he was nearlydestroyed.
Garry Kimovich Kasparov (1963–)Kasparov won the World Championship title from Karpov in 1985 and held it for an
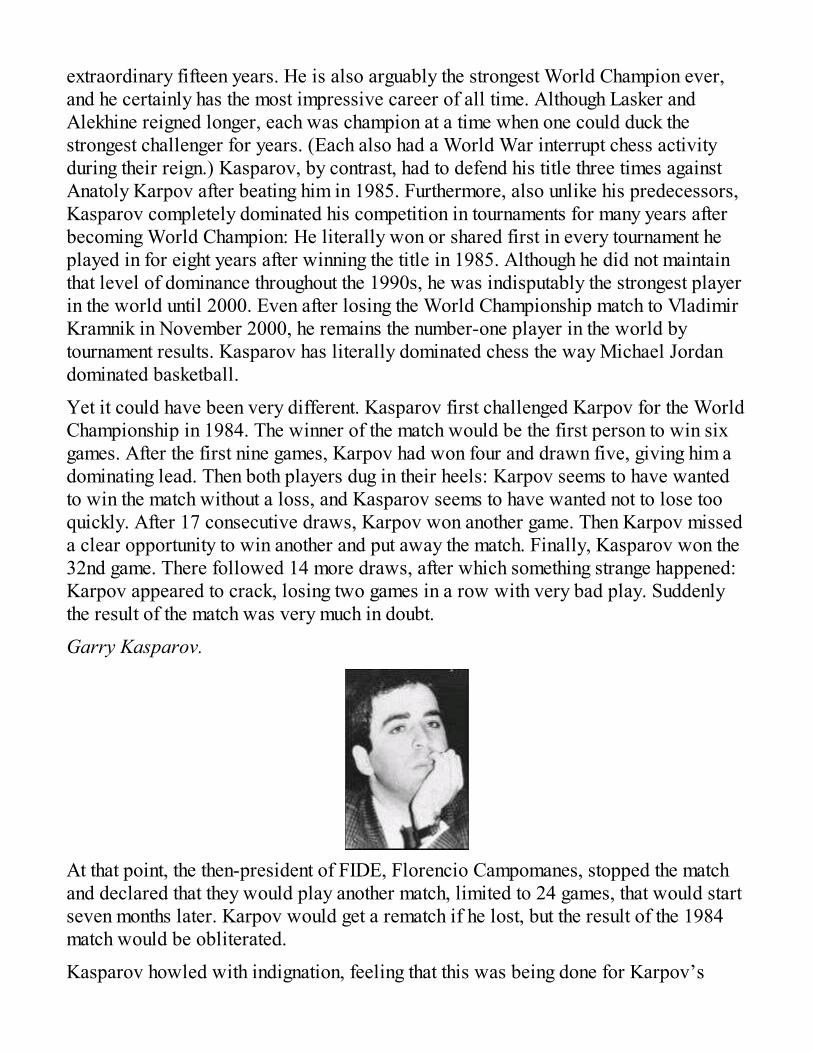
extraordinary fifteen years. He is also arguably the strongest World Champion ever,and he certainly has the most impressive career of all time. Although Lasker andAlekhine reigned longer, each was champion at a time when one could duck thestrongest challenger for years. (Each also had a World War interrupt chess activityduring their reign.) Kasparov, by contrast, had to defend his title three times againstAnatoly Karpov after beating him in 1985. Furthermore, also unlike his predecessors,Kasparov completely dominated his competition in tournaments for many years afterbecoming World Champion: He literally won or shared first in every tournament heplayed in for eight years after winning the title in 1985. Although he did not maintainthat level of dominance throughout the 1990s, he was indisputably the strongest playerin the world until 2000. Even after losing the World Championship match to VladimirKramnik in November 2000, he remains the number-one player in the world bytournament results. Kasparov has literally dominated chess the way Michael Jordandominated basketball.
Yet it could have been very different. Kasparov first challenged Karpov for the WorldChampionship in 1984. The winner of the match would be the first person to win sixgames. After the first nine games, Karpov had won four and drawn five, giving him adominating lead. Then both players dug in their heels: Karpov seems to have wantedto win the match without a loss, and Kasparov seems to have wanted not to lose tooquickly. After 17 consecutive draws, Karpov won another game. Then Karpov misseda clear opportunity to win another and put away the match. Finally, Kasparov won the32nd game. There followed 14 more draws, after which something strange happened:Karpov appeared to crack, losing two games in a row with very bad play. Suddenlythe result of the match was very much in doubt.
Garry Kasparov.
At that point, the then-president of FIDE, Florencio Campomanes, stopped the matchand declared that they would play another match, limited to 24 games, that would startseven months later. Karpov would get a rematch if he lost, but the result of the 1984match would be obliterated.
Kasparov howled with indignation, feeling that this was being done for Karpov’s
benefit. Many people believe he was right, but ironically it may have benefitedKasparov more than Karpov. After all, he had gotten to play a 48-game training matchagainst Karpov, an invaluable learning experience. And indeed, Kasparov won thesecond match +5 =16 –3.
Whoever actually benefited more, the experience convinced Kasparov that he had tofound another organization, outside of FIDE, that would run professional chess. Hefounded one organization, the Grandmasters Association (GMA), but internal politicsled it to collapse. (Many people would insist that Kasparov himself was largely toblame.) Then in 1993, for the first time he faced a challenger who was not Karpov: theBritish sensation, Nigel Short. Short was also upset (for different reasons) with theway FIDE was handling the World Championship, so he and Kasparov decided tocreate a new organization, the Professional Chess Association (PCA), which wouldrun the World Championship. Kasparov played two World Championship matchesunder the PCA, first against Short, which he won +6 =13 –1, and then againstViswanathan Anand from India, which he won +4 =13 –1. (The match against Shortwas the best of 24 games, while the match against Anand was the best of 20 games.)Although the PCA subsequently collapsed, Kasparov has remained outside the FIDEWorld Chess Championship cycle ever since.
Chess LoreThe Professional Chess Association (PCA) was established by GarryKasparov and Nigel Short in 1993 because they were unhappy with theway FIDE was handling their World Championship match. For Kasparov,the PCA was a vehicle for fulfilling one of his dreams: to promote chessto the level of a respected international sport like golf or tennis. From1993–1995 the PCA had a prestigious corporate sponsor in the IntelCorporation. During that time, the PCA held two World Championshipmatches (1993 and 1995), ran a Grand Prix cycle of “rapid chess” (“rapidchess” is where each player gets 25 minutes to play all his moves), andcreated its own rating system.
FIDE did not recognize the PCA’s authority to administer the WorldChampionship. During the life of the PCA, FIDE continued its WorldChampionship cycle and organized its own matches. This obviously madelife more difficult for the PCA, but most chess players regarded the PCAWorld Championship as the “true” cycle, because Garry Kasparov was

indisputably the best player in the world.
After the 1995 PCA World Championship match between Kasparov andAnand, Intel withdrew its sponsorship, and the PCA subsequentlycollapsed. In my opinion, this was a very sad development forprofessional chess. The PCA may have had some organizationalchallenges, but it was absolutely the right idea for chess. Unfortunately,all that is left from the PCA now is the rating system, which is maintainedbut not taken as seriously as the FIDE rating system.
Chess LoreOne day a woman will become the World Chess Champion. Who will thatbe? The most promising candidate today is the remarkable Judit Polgar.She is only 24 years old and is ranked 23rd in the world as of January2001. If she continues her progress, she may one day vie for the WorldChampionship.
Judit has already established herself as the best female chess player ofall time. She is the youngest of three sisters, all of whom wereencouraged from an early age to play chess. Both she and her oldestsister, Zsuzsa, hold the “men’s grandmaster” title. Judit does not play inwomen’s competitions, but in 1996 Zsuzsa won the women’s WorldChampionship title. That Judit has studied chess seriously since she wasvery young is not unusual for top chess players: Almost every stronggrandmaster showed a similar dedication at an early age. The exampleof Judit and Zsuzsa clearly shows that whatever the reason so fewwomen excel at chess, there is no reason women can’t play as well asmen.
Will the Real World Champion Please Stand Up?The last PCA World Chess Championship match was in 1995. The PCA disbanded in1996. Garry Kasparov refused to play in the FIDE World Chess Championship cycle.There was no organization Kasparov would recognize that was ready to take the placeof the PCA. Meanwhile, FIDE continued to hold its World Chess Championship cycle.

This led to a bizarre tension in the world of chess. While Kasparov was clearly theman to beat to become World Champion—and unlike Fischer, he was certainly veryactive—there was still a “World Championship” cycle taking place in which all theother top players competed.
Finally, after several failed attempts to organize a match against a worthy competitor,Kasparov played a 16-game match against Vladimir Kramnik, then ranked numberthree in the world. (For various reasons, a match against Anand, then ranked numbertwo, could not be organized.) Kasparov was still ranked number one in the world, sohe was expected to win. But he lost! So as of early 2001, Kramnik is “WorldChampion” by virtue of beating Kasparov.
And yet, only one month later, the FIDE World Chess Championship was completed.Viswanathan Anand was the winner of a brutal tournament format featuring all thestrongest players in the world except Kasparov and Kramnik. So as of early 2001,Anand is “World Champion” by virtue of winning the FIDE World ChessChampionship.
And yet, the relentlessly objective chess rating system gives another interpretation. Bythat rating system, while Kramnik is ranked number three (far ahead of number four),and Anand is ranked number two (very closely followed by Kramnik), Kasparov stilloccupies a commanding number one. So even though there are two “WorldChampions,” Kasparov is still ranked number one in the world.
It’s too bad that chess is in such a confusing state. But we are very lucky to have somany outstanding chess players. Either Kramnik or Anand could have been WorldChampion during any of the previous eras of World Championship chess. Each onedeserves the same “World Champion” treatment all the others have gotten in thischapter.
Viswanathan Anand (1969–)Anand was born in Madras, India, and is the first World Champion from Asia(assuming you count Russia as part of Europe). He learned chess from his mother atthe age of six, but it was in 1978 that he became fascinated with the game. He hadgone to Manila when his father had an assignment in the Philippines, and Anandbecame enthralled by the Karpov–Korchnoi World Championship match taking placethere. When he returned to India, he became passionate about chess.
Viswanathan Anand.
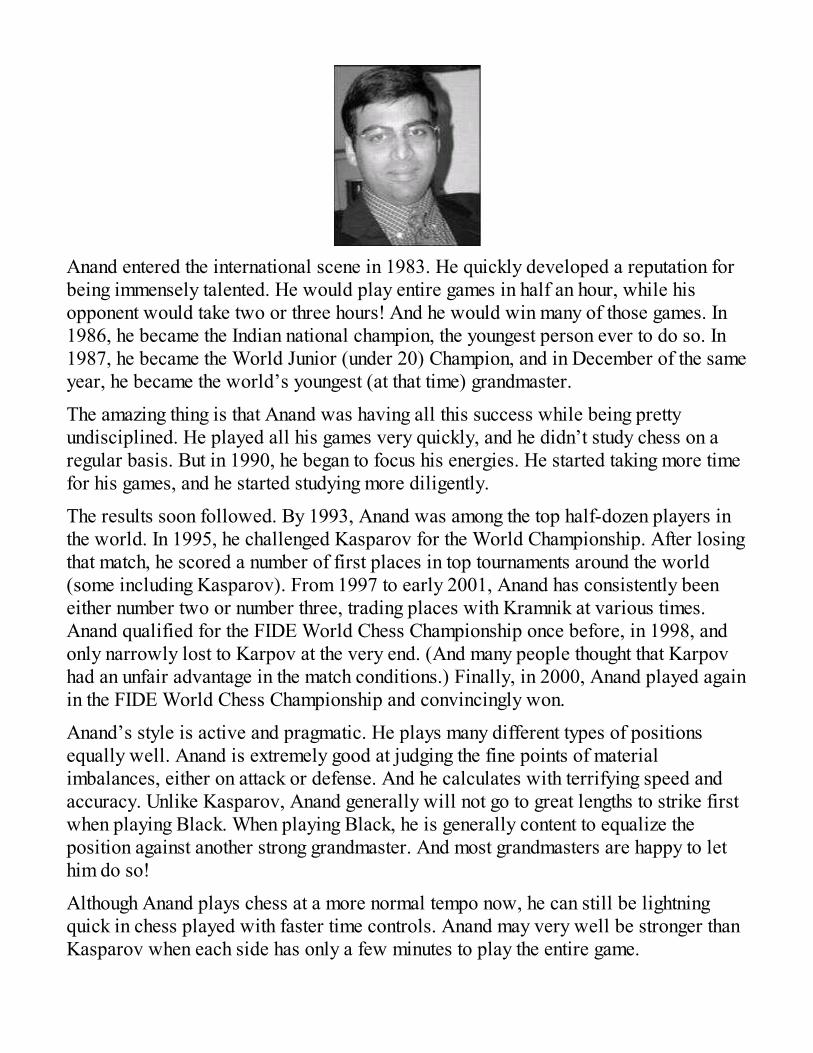
Anand entered the international scene in 1983. He quickly developed a reputation forbeing immensely talented. He would play entire games in half an hour, while hisopponent would take two or three hours! And he would win many of those games. In1986, he became the Indian national champion, the youngest person ever to do so. In1987, he became the World Junior (under 20) Champion, and in December of the sameyear, he became the world’s youngest (at that time) grandmaster.
The amazing thing is that Anand was having all this success while being prettyundisciplined. He played all his games very quickly, and he didn’t study chess on aregular basis. But in 1990, he began to focus his energies. He started taking more timefor his games, and he started studying more diligently.
The results soon followed. By 1993, Anand was among the top half-dozen players inthe world. In 1995, he challenged Kasparov for the World Championship. After losingthat match, he scored a number of first places in top tournaments around the world(some including Kasparov). From 1997 to early 2001, Anand has consistently beeneither number two or number three, trading places with Kramnik at various times.Anand qualified for the FIDE World Chess Championship once before, in 1998, andonly narrowly lost to Karpov at the very end. (And many people thought that Karpovhad an unfair advantage in the match conditions.) Finally, in 2000, Anand played againin the FIDE World Chess Championship and convincingly won.
Anand’s style is active and pragmatic. He plays many different types of positionsequally well. Anand is extremely good at judging the fine points of materialimbalances, either on attack or defense. And he calculates with terrifying speed andaccuracy. Unlike Kasparov, Anand generally will not go to great lengths to strike firstwhen playing Black. When playing Black, he is generally content to equalize theposition against another strong grandmaster. And most grandmasters are happy to lethim do so!
Although Anand plays chess at a more normal tempo now, he can still be lightningquick in chess played with faster time controls. Anand may very well be stronger thanKasparov when each side has only a few minutes to play the entire game.

Vladimir Kramnik (1975–)Vladimir Kramnik was born in Moscow, and is Russian through and through. He isrelatively quiet and reserved. (Almost anyone is quiet compared to the flamboyantKasparov! But even compared to the chatty and sociable Anand, Kramnik is reserved.)Like Anand, Kramnik demonstrated extraordinary talent at a young age, but he wasmore disciplined, with extraordinary results to match his talent. He was a grandmasterby the age of 16, and was winning major competitions.
Observing these results, Kasparov famously once remarked, “Kramnik will be the nextWorld Champion.” Yet it was a hard road for Kramnik. While his tournament resultswere outstanding, his results in matches were unconvincing. During the years 1993–1998, Kramnik lost a number of World Championship qualifying matches to othergrandmasters. Although he was playing a strong grandmaster in each match, Kramnikwas the favorite in each case, so his difficulties were puzzling. Still, he continued torack up tournament success after success.
Vladimir Kramnik.
Going into their match, Kramnik was the only player in the world to have an evenscore in his games against Kasparov. (Anand had a heavy minus score.) The Kasparov“intimidation factor” seems not to have any effect on Kramnik. This may be becauseKasparov has mentored Kramnik at various points in his career. In fact, Kasparoveven hired Kramnik to help him in his match against Anand in 1995! So Kramnik gotan “inside view” of Kasparov’s war room for a previous World Championship match.
Perhaps this experience was critical for Kramnik’s success. But also critical was abrilliant match strategy. Kramnik deliberately steered the game into positions thatfavored his style and disfavored Kasparov’s. That, plus excellent play by Kramnik,enabled an amazing victory: two wins and no losses out of 15 games! Kasparovliterally lost his title without a single victory.
Kramnik’s style is similar to Karpov’s. Like Karpov, he defends extremely well. LikeKarpov, he combines this with an active style. He focuses less on prophylaxis thanKarpov, however, and is capable of much sharper attacking play. He also has an

extremely narrow opening repertoire. (This is in direct contrast to Anand, who canplay almost anything under the sun, it seems.) But you won’t find anyone betterprepared in the openings he plays! He managed to outplay Kasparov in the openings intheir match, which is saying something pretty impressive.
The Least You Need to Know
The classical era is when the current style of chess really began.
Each of the World Champions was a great player who contributed much to ourunderstanding of chess.
The Soviets dominated chess for many years, until Bobby Fischer revolutionizedthe game.
The World Championship title is currently in dispute; both Vladimir Kramnik andViswanathan Anand have a legitimate claim to be World Champion.
While he is no longer World Champion, Garry Kasparov is still the number-oneranked player after 16 years.

Chapter 17
Getting Competitive
In This Chapter
Finding stronger opposition
Special rules for tournament play
How chess tournaments work
Long-distance competition
Chess activities for children
In this chapter, I’ll tell you how to find new opponents and test your skills againstplayers in local, national, and even international competition. To visit or contactanyone listed in this chapter, consult Appendix A, where I’ve listed all the necessaryinformation, even Internet addresses.
Finding Stronger OppositionIf you’ve absorbed everything I’ve taught you so far, you can probably beat yourfamily and friends by now, and they’ll be as happy as you will be when you find somestronger competition! If you live in a large city, one way to do this is to look foroutdoor chess scenes where people gather to play—sometimes for money but oftenjust for fun—when the weather is good. Here are some of the best places to do this inthe big cities of the United States:
Boston: Harvard Square (Cambridge)
New York: Bryant Park, Washington Square Park, World Trade Center

Washington, D.C.: Dupont Circle, Lafayette Park
San Francisco: Market Street near Powell Street
There are many other public areas that reserve space for playing chess, includingcafés, bookstores, and office buildings. But for more serious, organized, and year-round competition you should consider joining a chess club. There are thousands ofclubs throughout the United States where you can meet other chess players and find allkinds of information about chess in the area. Some of the largest and oldest are:
Boston: Boylston Chess Club
New York: Manhattan Chess Club, Marshall Chess Club, Village Chess Shop,Chess Forum
Rochester, NY: Rochester Chess Center
Philadelphia: Franklin Mercantile Chess Club
Washington, DC: U.S. Chess Center (also home of the U.S. Chess Hall of Fame)
Atlanta: Atlanta Chess Center
Phoenix: Chess Emporium
Los Angeles: Chess Palace (Los Alamitos)
San Francisco: Mechanics Institute Chess Club
But this only scratches the surface. Thanks to the Internet, you can access acomprehensive list of chess clubs throughout the United States and find a club near youno matter where you are. Here are three Web sites that should help you:
For a directory of chess clubs, go to: www.uschess.org/directories/clubs.html.
For a directory of scholastic chess clubs, go to:www.uschess.org/directories/scholastic.html.
For a directory of collegiate chess clubs, go to:www.uschess.org/directories/collegiate.html.
These Web sites are actually all part of the same Web site, www.uschess.org, which
belongs to the U.S. Chess Federation (USCF), the principal national organization forchess. (Virtually every other country in the world has a national chess federation; youcan find the address for the Chess Federation of Canada in Appendix A.) The USCFcan also put you in touch with your state’s chess association (every state has one),which will have more information about clubs and places to play near you. If you areserious about playing chess, I recommend that you join both the USCF and your statechess organization.
The USCF offers many services to its members, but the most important may be itssanctioning of chess tournaments. A USCF-sanctioned tournament is played accordingto the official rules of chess and the results are entered in the USCF rating system,which gives each member a way to measure his competitive strength and track hisprogress as he improves.
Chess LoreOne reason why chess has become a popular game in recent decades isa clever rating system that measures the abilities of players whocompete in tournaments. In some sports, the number-one ranking goes tothe player who earns the most money or the team that a panel ofjournalists votes for. But in chess, just as the player who makes the bestmoves always wins the game, the player who achieves the bestcompetitive results always earns the top ranking. The American physicistArpad Elo (1903–1992) invented a system under which each playerreceives a numerical rating between 0 and 3000. A higher-rated player islikely to defeat a lower-rated player, or at least outscore him in a seriesof games, depending on the difference between their ratings. Adifference of 200 points corresponds to an expected score of 75 percentof the possible points for the higher-rated player, or a victory margin of 3to 1 in a match. When you win a game (or draw against a higher-ratedopponent), your rating increases in proportion to how much you exceededyour expected result; when you lose (or draw a lower-rated opponent), itdecreases accordingly.
In the version of Elo’s system currently used by FIDE, official ratings arepublished twice per year. In the USCF system, ratings are updated afterevery tournament and they are published as “official” every two months.The average tournament player in the United States has a rating of about

1400; achieving a rating of 2200 earns you the title of “National Master,”and a rating of 2400 “Senior Master.”
The “International Grandmaster” title is awarded only by FIDE, andrequires certain results in high-level tournaments in addition to a specificFIDE rating level. Roughly speaking, the International Grandmaster titlecorresponds to about a 2600 USCF rating or higher.
Special Chess Rules for Tournament PlayIn most chess tournaments, a few additional rules are in force beyond the onesexplained in Chapters 2 and 3. They don’t change how the pieces move, whencheckmate occurs, or the like. They mainly exist to regulate the length of the game, andto prevent disputes between the players. Each tournament is run by at least one andsometimes several “tournament directors,” who register the players, track the results,enforce the rules, and resolve the occasional dispute. The official rules for tournamentplay are explained in detail in U.S. Chess Federation’s Official Rules of Chess, 4thedition, which I recommend you read if you want to play in tournaments. I’ll explainthe most important rule changes to look for.
Time Controls and Chess ClocksIn a tournament game, you can’t think about your move forever; your time is limited.There are two basic types of time controls, or time limits, in use today. The simplestto understand is sudden death, where each player is allotted a fixed amount of time tocomplete all of his moves. For example, each player might have 30 minutes to finishthe entire game. If either player goes over his limit, he loses, just as though he resignedthe game or was checkmated. So each game played under this time control isguaranteed to end in one hour or less.
The second type of time control allocates a certain amount of time to each player for acertain number of moves. For example, you might have two hours to complete the first40 moves. If either player exceeds the limit before making the required number ofmoves, the other can stop the clock and claim a time forfeit victory. If both playersmake it past move 40 without exceeding two hours, another time control begins. Thismight be similar to the first, such as one hour for the next 20 moves, or it might be asudden death control, such as 30 minutes to each player for the rest of the game.
Time controls are enforced using a special device known as a chess clock, whichactually contains two clocks, one for each player. The clocks, which can be digital oranalog, are connected by a mechanism that enables only one of them to run at any given

time. Atop each player’s clock is a button. When a player completes a move, hepresses his button, which stops his clock and starts his opponent’s. Thus, eachplayer’s clock measures exactly how much of his allotted time he has used (or hasremaining). Don’t forget, every time you make a move, press your clock! (And youshould press it with the same hand you used to move the piece.)
Once you get used to using a clock in tournament play, you’ll probably never want toplay without one again, even when you’re just playing for fun. It adds an extradimension to the game, keeps the action moving along, and makes chess more likeother sports. (Can you imagine basketball without the shot clock?) The most populartime limit for casual chess is just five minutes per player for the entire game! This mayseem like a very small amount of time, but once you get used to it, the fast time controlmakes the game very exciting. I love five-minute chess, also known as blitz or speedchess.
Other Ways to Draw the GameIn tournaments, there are two more ways that the game can end in a draw besides theones mentioned in Chapter 3 (stalemate, perpetual check, insufficient material tocheckmate, and friendly agreement).
The first is called “threefold repetition.” If the same position occurs three (or more)times during the same game, a draw may be claimed. The position must be the same inevery way: The pieces must be in the same locations, the same moves must be legal(remember the castling and en passant rules), and the same side must be on move, fora repetition to occur. To claim a draw by triple repetition, you must not actually makethe move that brings about the position for the third time. Instead, you must stop theclock and tell your opponent, “By playing Bf5 I will repeat the position for the thirdtime, so I am claiming a draw,” or words to that effect. If you play the move and pressyour clock button, it’s too late to claim the draw; you must hope the repetition happensagain and you remember the procedure the next time!
The second is called the “50 move rule.” If 50 consecutive moves for each side havepassed during which neither side has captured a piece or moved a pawn, either playermay claim a draw. (The point of this rule is to prevent someone from playing forevereven when he has no realistic chance of winning.) The procedure for claiming thedraw under this rule is the same as for the triple repetition: Stop the clock and pointout that by making a certain move, 50 moves (or more) will have passed with all thecriteria met, so you claim a draw.
Keeping ScoreBoth players are generally required to keep an accurate score of the game. (Of course,

you should want to do this anyway, so you can study and learn from your games lateron!) You can also see how a complete scoresheet may be required to verify a triplerepetition, 50 move rule claim, or a time forfeit victory under the rules above.
EtiquetteThe touch-move rule is always in force in tournament chess. This rule says that if it’syour move and you touch a piece on the board with the intention to move it, you haveto make a move with that piece. If you touch one of your opponent’s pieces, you mustcapture it. (But if there is no legal move involving the touched piece, you’re off thehook.) Also, once you release your hand from the piece you have moved, you cannotchange the move. It is considered impolite to hover over a piece with your hand, or tokeep your hand on a piece for too long once you’ve moved it while you convinceyourself it’s not a mistake. If you want to adjust the positioning of a piece on itssquare, you must say “I adjust” or “j’adoube” (a term that comes from French) to letyour opponent know you aren’t planning to move it. I strongly urge you to get in thehabit of only touching a piece once you have made a final decision about what moveyou want to make, and then making the move quickly, quietly, and confidently.
It is also forbidden to speak to your opponent or disturb him in any way except toresign or propose a draw. When resigning, it is customary to stop the clock, and offera handshake while saying “I resign.” For an old-style touch you can also tip over yourking. To offer a draw in a tournament game, you must first make a move, then say “Ioffer a draw” or words to that effect, after you complete the move but before youpress your clock button. Your opponent may either accept the offer verbally, accept byoffering to shake hands, decline the offer verbally, or make a move himself (whichautomatically declines the offer). You might find these rules of behavior a bitponderous, but the more you play competitively the more you’ll appreciate the waysuch conventions protect you from distraction and help you play at your best.
How Chess Tournaments WorkThere is a USCF-sanctioned chess tournament going on somewhere in the countrypretty much every hour of every day. On weeknights and weekends, there are probablydozens. The tournaments during the weeknights are usually held at chess clubs.Sometimes these begin and end on the same night, and sometimes they stretch overmore than a month, with one round held per week. The tournaments during theweekend usually last either one or two days, and sometimes include a Friday nightround as well.
Patrick’s PointersIf you enjoy playing chess, I strongly suggest that you try playing in achess tournament. Not only is it the most intense way to enjoy playing thegame, you can also meet lots of other people who love chess. Plus,especially at the bigger tournaments, you can find all sorts of chessbooks and equipment for sale. And at the really big tournaments, youmay even meet a grandmaster or two!
Many tournaments, especially the ones held over the weekend, are divided intoseveral sections by ability level, so players only face opponents near themselves instrength. Each section functions essentially as a separate tournament, with its ownscore table and prizes. Ratings are usually used to determine section eligibility. Thesections ensure that everyone gets a fair set of opponents and doesn’t just getslaughtered by masters (or walk over a bunch of novices).
Most chess tournaments run according to formats you might not be familiar with. Inprofessional sports, the knockout (single elimination) tournament, used in tennis andfootball, and the match, used in a baseball or basketball playoff series, are the mostcommon. These are used in chess as well, but usually only in grandmaster events likethe World Championship cycle. In amateur-level chess, most events use the round-robin and Swiss system formats. In each case, the player who has the most points (1for each win, 1⁄2 for each draw, 0 for each loss) at the end of the tournament wins.Here’s how they work.
Round-RobinIn a round-robin tournament each player plays all the other players the same number oftimes, usually once. Chess clubs that meet regularly often use this format for theirchampionship tournaments, and many of the top international chess tournaments use itas well. It would seem to produce the fairest result, since except for himself, everyplayer faces the same opposition, so their scores should be directly comparable. Anobvious drawback is that with a large number of players it takes a long time tocomplete. However, small round-robins are often finished in a single day. “Quads,”for example, group players into four-person sections and run round-robins within eachsection. If the grouping is done according to ratings, each player will wind up facingthree other players near him in strength. Sometimes each player plays each otherplayer twice, once with the white and once with the black pieces, creating a “double
round-robin.”
Swiss SystemThe vast majority of rated chess games in the United States are played in Swiss systemformat tournaments. The Swiss system ingeniously incorporates the building drama ofa knockout format (players who win play other players who win) without requiring allthe losing players to watch from the sidelines the rest of the way. In the first round,players are ranked by rating, and the top half of the draw plays the bottom half. For allsubsequent rounds, this procedure is repeated separately for each score group; thus,first-round winners play first-round winners, first-round losers play first-round losers,and so on. At each stage, you are playing someone who has the same score as you, nomatter how good or bad that score is. If you lost your first two games and won yournext two, in round five you will play someone else with two points, even if he won hisfirst two and lost his next two. Crucially, players never play each other more thanonce, and nobody is eliminated—not even the occasional odd man out, who gets a freepoint and is back in the competition by the next round.
Finding and Entering a Chess TournamentThe best way to find USCF-sanctioned chess tournaments is to look in the“Tournament Life” section of Chess Life magazine, published by the USCF. (Asubscription is included with membership.) Each month hundreds of tournaments arelisted, with full information on how to enter, what the format and prizes are, where thegames will be played, and even what hotels are nearby. This information is alsoavailable via the Internet at the U.S. Chess Online Web site at www.uschess.org/tla/.Your state organization or local chess club may also publish a magazine or newsletterlisting tournaments not included in the national sources.
Once you have found a good tournament, remember to bring everything you will need:your chessboard and set (make sure they are standard and not exotic-looking; thepicture in Chapter 2 shows standard chess pieces), a chess clock (very important), andsomething to write down the moves of your games with. Most of these are notprovided, although scoresheets usually are. If you don’t have chess equipment, you canorder the basics and an infinite variety of other stuff, including the books Irecommended in Chapter 15, from the catalogs of the following vendors:
Chess Digest (Dallas, TX); www.chessdigest.com
Chessco (Davenport, IA); www.chessco.com
The Chess House (Lynden, WA); www.thechesshouse.com
Your Move Chess and Games (Huntington Station, NY); www.icdchess.com
For chess books, I’m a big fan of Amazon.com (www.amazon.com). You can get justabout any chess book you want there, and they have great service. But they’re not greaton chess pieces, board, clock, or other equipment. For that, try one of the vendors justlisted. Additionally, the USCF itself has a comprehensive catalog, and many of thefull-time chess clubs listed at the beginning of this chapter sell supplies. Many storesspecializing in games and hobbies have excellent chess selections as well; check yourtelephone book.
Long-Distance CompetitionIf you can’t get to a local club or tournament, there’s always long-distance chess. Youcan play correspondence chess through the regular mail, where each move takes a fewdays and a game typically lasts 18 to 24 months. Contact the USCF for informationabout its large program of postal chess tournaments with its own rating system andrules. The organizations below also administer postal chess competitions:
American Postal Chess Tournaments; http://correspondencechess.com/apct/ (no“www” at the beginning of the address)
Correspondence Chess League of America; www.chessbymail.com
International Correspondence Chess Federation; www.iccfus.com
Canadian Correspondence Chess Association;http://correspondencechess.com/ccca/index.htm
Personally, I think it’s much more fun to play over the Internet. Playing by mail madeperfect sense before we had the Web, but now that you can send movesinstantaneously and have an electronic chessboard in front of you, why use stamps?I’ll tell you all about how you can use the Internet to play chess in Chapter 18.
Chess Competition for ChildrenThere’s no reason why children can’t compete in any chess tournament; virtually allare open to any qualified player regardless of age. But there are also manycompetitions just for kids. The annual national scholastic championships sponsored bythe USCF attract thousands of players, and similar regional events have become nearlyas popular. Events for children are usually sectioned by age or grade level rather than

rating. You can find out more about them in Chess Life or in the USCF’s specialmagazine for children, School Mates, as well as from state and local publications. Tolocate school-based chess clubs and programs, and to find out about lessons forchildren, contact the USCF or your state chess association. (This is another greatreason to go to the USCF Web site at www.uschess.org.) You might also contact thefollowing organizations:
Chess-in-the-Schools (New York, NY); www.chessintheschools.org
National Scholastic Chess Foundation (White Plains, NY); www.nscfchess.org
The American Chess School (Bradford, PA); www.amchess.org
I should mention that these organizations tend to have a local focus. There are lots ofpeople bringing chess and kids together, and they tend to focus on their localcommunity. You’ll probably want to find out about what’s going on in yourcommunity. If you live in the United States, the best way to do that is by contacting theUSCF, your state chess federation, or a chess club near you. If you live in anothercountry, check out Appendix A for contact information of other national federations.
There are also several chess camps for kids around the country. They operate mainlyduring the summer months, but also occasionally during other school vacations.Consult advertisements in Chess Life and other publications, or your local chess club,for more information.
The Least You Need to Know
You can find casual chess competition in local outdoor scenes, full-time clubs,and weekly clubs.
When you’re ready to play in tournaments, remember the special rules andetiquette that apply to serious competition. (And don’t forget your equipment!)
The Internet is a fantastic way to learn more about chess and play others. You canlearn more about this in Chapter 18.
Children can participate in the same clubs and tournaments as adults, and thereare many age-grouped events just for kids.

Chapter 18
Chess in Cyberspace
In This Chapter
Great Web sites for chess
Playing chess online
Getting chess news and information online
Playing chess electronically in the palm of your hand
Playing and studying chess with your computer
Computers are wonderful for storing, presenting, and transmitting information. Chessis a game of pure information. So, not surprisingly, computers are wonderful for chess.The more you play and enjoy chess, the more you will come to love what computerscan do for you! And in particular, the explosion of the Internet has been an explosionof opportunity for chess players around the world.
In this chapter, I’ll take you on a tour of what computers can do for you. I’ll focus onthe Internet, because that is where most of the action is. Plus, it’s so easy to access anduse. But toward the end of this chapter, I’ll also give you an overview of some of theprograms you can purchase for your PC.
Chess Web SitesThere are literally thousands of Web sites where a chess player could spend hoursevery day. I’ve organized the best ones I know into four sections. Let’s go through thebest ones in each section, how you can get there and how you can use them.
WolffChess (www.wolffchess.com)I introduced this Web site in Chapter 15. I think it offers something really unique—once you establish an account, you have unlimited access to hundreds and hundreds(and soon thousands) of chess exercises. There is a fee for your account that is roughlythe same price as a chess book. But the quality and quantity of content you get is worthat least two books! The exercises are specifically designed to complement what youhave learned in Chapters 2–14. Because you do the exercises online, you don’t need achessboard, and you can do them at work or home.
Patrick’s PointersIf you want to explore the Internet for chess on your own, you’ll want togo to a good search engine. There are tons of them, but the one Irecommend most highly is Google (www.google.com). I’ve found this tobe the best way to find anything on the Web!
I hope you check out WolffChess online, and I hope it helps you improve your chessgame!
Chess “Portals”A “portal” is a Web site that tries to be your point of entry onto the Internet. So a chessportal is a Web site that could be the point of entry onto the Internet for the total chessnut (like me). Any one (or more) of these Web sites is a place you could visit all thetime on a regular basis for anything having to do with chess.
Patrick’s PointersIf you’ve used the Internet at all, you’ve probably noticed that addresseschange and sites get reconfigured, appear, and disappear all the time.So if any of the Internet addresses in this chapter don’t work or don’tlead you where you expected to go, don’t panic—you can probably findupdated information from an index or search engine.
There are four Web sites I would put in this category.
The Week In Chess (www.chesscenter.com/twic/twic.html): This Web sitestarted as an e-mail newsletter by a devoted chess fan, Mark Crowther. He didsuch a great job that it grew into one of the most popular and respected chessWeb sites in the world. You can get all the latest chess news from around theworld in a no-nonsense format; in addition, you can get tons of chess games everyweek. If you want to get all the games played by the world’s best grandmasterson a regular basis, this is your place! However, it’s not a very “pretty” Web site,and if you are not very interested in recent grandmaster games, it may be lessuseful.
Kasparov Chess (www.kasparovchess.com): Kasparov started this Web site asa business venture. I have really mixed feelings about this Web site. On the onehand, it has (the last I checked) an incredibly “busy” feel to it, and I think franklyit is poorly designed. But if you persevere, you will find it has a lot of greatinformation for chess players of all levels.
Grandmaster Chess (www.gmchess.com): This is one of the most attractivechess Web sites I know of. It is clean and relatively well laid out. You can get allkinds of information here, from articles to chess problems to deeply annotatedgames. You can also purchase chess items, from chess sets to chess instruction.
The Chess Café (www.chesscafe.com): This isn’t a “portal” in the same veinas the other Web sites above, but it is so interesting and special that I think itdeserves to be in the same list. Here you can find several-page articles of veryhigh quality on all kinds of chess topics. It really is a “chess café” in the sensethat you could go to this Web site with a cup of coffee and relax with a good readfor an hour! This is an excellent place to go if you want to relax with a goodchess read.
Patrick’s PointersSome of the Web sites I recommend have URLs (Web addresses) thatare hard to remember. I recommend that you create a folder in yourbrowser for all the chess sites you want to visit, then bookmark each sitewhen you go there and save it into that folder. Then it will be much easierto go back to your favorite sites again and again. I hardly ever type in

any chess-related Web addresses any more!
Chess OrganizationsEvery major chess organization has its own Web site. I can’t hope to list all of them,but here are two you should know about:
U.S. Chess Federation (www.uschess.org): This is the U.S. Chess Federation’sofficial site, featuring among other things an online catalog, tournament listings,and news about the federation’s governance and activities. If you play chess inthe United States, I highly recommend exploring this Web site to see what youcan find that will be useful to you.
FIDE (www.fide.com): This is the official site of the international chessfederation. It may be a bit intimidating if you’re not already familiar with FIDE.But it has a lot of information and resources, and is worth knowing about.
Chess ShoppingThe Internet has given us endless opportunities to purchase almost anything we want.What about chess?
All the chess vendors I listed in Chapter 17 have Web sites, and you can order someproducts from them. As I write this, some of their Web sites provide an easiershopping experience than others, but I am sure all of them will continue to work on it,so you should definitely check all of them out and bookmark them for your futurepurchases.
Some chess Web sites offer some products for sale. For example, GM Chess(www.gmchess.com) and the U.S. Chess Federation (www.uschess.org) both havesome offerings. But neither of these Web sites is comprehensive, nor are theyprofessional online retailers.
Otherwise, try major retailers for various chess products. For books, the situation isexcellent. Amazon.com is my favorite online bookstore (although both Borders andBarnes & Noble are also good), and they have every chess book I have ever lookedfor. Unfortunately, for other chess equipment, it has been my experience so far (Spring2001) that the major retailers (including Amazon.com) don’t have a good selection.

Patrick’s PointersIf you start exploring these Web sites, you will quickly encountersomething called “PGN.” (The initials stand for “Portable GameNotation.”) This is a computer format for encoding chess games so theycan be easily stored. There are two ways to read games stored in PGNformat. One is to open the games using your word processor (assumingit is one of the major ones), when the moves will be displayed as text.The second is to use a software program that recognizes PGN and willdisplay it on your computer. In the section called “Chess on Your PC,” Ilist some of the PC-based chess programs that recognize PGN. You canalso download from the Web a simple program whose only purpose is toread PGN games. One place to find such a program is at “Pitt Chess”described in the “Libraries and Resources” section in this chapter. Clickon the header on the left-hand side marked “Utilities,” then explore any ofthe files that start with “pgn.” (Note: You will need the program WinZip toread and extract these files—they are “zipped” to make them easier tostore and download.)
Playing Chess OnlineThe Internet isn’t just for being a chess fan, student, or spectator. It’s also aboutplaying! There are lots of ways you can use the Internet to find a chess game at anyhour of the day.
General Games SitesPeople love to play games. Chess is perhaps the most popular game in the world. So itstands to reason that there will be lots of Web sites for playing games, and all of themwill have chess. If you’re just looking for a casual chess game from time to time, youcan find it at any of these Web sites:
Yahoo! Games (http://games.yahoo.com): One of the most popular games siteson the Web. You can play chess along with hundreds of other games here.
MSN Gaming Zone (http://zone.msn.com): Another one of the most populargames sites on the Web. Personally, I think Yahoo! does a better job, but that’s
just a matter of taste.
Excite Games (www.excite.com/games/): Excite is one of the “lesser” portals(Lycos is another one), but since it happens to be my homepage, I wanted toinclude it. It is very similar to Yahoo! and MSN.
There are also loads of other Web sites devoted just to games, and virtually all ofthem will have chess. You can find them using any good Internet search engine. If youwant to go to general games sites, though, I recommend going to the ones with the mostpeople, and those will probably be the ones affiliated with the major portals.
Chess LoreOne of the most amazing cases of an online chess game took place inthe summer of 1999. Garry Kasparov literally took on the entire world ina chess game! In this Microsoft-sponsored event, Kasparov had White,and the world had Black. Anyone could go to the Web site and register asingle vote for a chess move. Whichever move won the vote would beplayed against Kasparov. Each side had one day to play a move.
You might think that the game would be a cakewalk for Kasparov, but itwas a lot closer than that. There were several professional chess playerswho offered their advice to the world, so the move that won turned out tobe quite good. Add to this that Kasparov was surprised out of theopening, and you can see how it became a real fight. In fact, the worldcould have drawn in an endgame, but there was disagreement over whichmove to play, and the wrong move won.
Garry Kasparov ended up writing a fascinating book (published inOctober 2000) about this game, where he analyzes it in great detail. Inaddition, he gives a lot of color about what it was like “behind the scenes”to play this game.
Chess-Specific SitesThere are also Web sites that focus completely on enabling people to play chess withone another. Here are a few that I recommend:

Internet Chess Club (www.chessclub.com): This is the longest-running andmost active chess-playing Web site in the world. Unlike all the others, it chargesa membership fee, although trial memberships are available. You can often findgrandmasters playing here! (You’ll also find some pretty strong computersplaying here.) The ICC also has other chess events, such as live grandmastergames from tournaments, grandmaster matches played on the ICC, and lessons.The bottom line: If you’re serious about playing chess online, you’ve got to go tothe ICC.
Chess.net (www.chess.net): A service that is similar to the ICC. A fewgrandmasters play here as well, although most play at the ICC. At last report,Chess.net was starting to charge, although less than the ICC. In my opinion, theICC is the better bet, but you may also want to check out Chess.net.
USCF online (www.chesslive.org): The USCF recently (end of 2000) startedtheir own online chess-playing Web site. They are making an aggressive push toget more and more U.S. players on the site, so this is a promising place to checkout. When last I checked, it was still free.
Patrick’s Pointers“What about America Online (AOL)?” you might ask. To be honest, Ihave never used AOL, so I don’t know a lot about what they have to offerfor chess. They certainly do have a gaming area for their members, andthere are certainly a lot of people who play chess there. But I do want tooffer one piece of advice: Don’t stay inside the AOL area—use AOL toget onto the World Wide Web! As convenient as AOL’s proprietary areais for a lot of things, it just can’t match what you can find on the Web forchess.
If you are only looking for an occasional casual game, and you are not looking for thehighest possible challenge, go to one of the general games sites. But if you are lookingfor hard-core chess, definitely check out the sites above, and start with the InternetChess Club.
Chess by E-Mail
Sometimes you want to play chess over a longer period of time. Maybe you can take10 minutes at work to think about a move, and you would enjoy playing a friend overseveral days or weeks. In the “old days” (before the 1990s), your best option was tosend moves by mail. That’s how I used to play my grandfather when I was a little kid.
Today, if I were playing my Grandpa (or anyone else), I would use e-mail. It’s faster,cheaper, and better. Honestly, I don’t know why anyone would use stamps anymore!
Here are the only two Web sites you need to know about to get started playing chessby e-mail:
Shockwave.com (www.shockwave.com): This site has lots of fun stuff for Web-based games and entertainment. One of the things they have is a really cool e-mail chess program. To play chess, you (and your opponent) will need todownload the popular software program Shockwave. Then you can make yourmove on the electronic chessboard, and send it via e-mail to your opponent.
International Email Chess Group (www.iecg.org): This is an organizationdedicated to chess by e-mail. Go here if you want to find new opponents to playby e-mail, or if you want to play in e-mail chess tournaments.
Have fun!
Chess News and InformationIf you have spent time exploring the Internet, you know that it is a treasure trove ofinformation for just about anything you could imagine. It’s the same for chess. Let’stake a look at some of the things you can find.
Libraries and ResourcesAre you looking for all the known games from the eighteenth century? How about afont for writing chess pieces and diagrams in your word processor? Or a program thatwill allow you to play through chess games on your PC? If you can imagine it, then it’slikely that somebody has programmed it. Fortunately, many people who play chess arealso people who are very computer-savvy, so there is a lot of chess out there to findwith your computer!
Here are some of the most promising libraries and general resources:
Pitt Chess (www.pitt.edu/~schach/index.html): When you get to this Web site,click on the button that says “Chess Archives.” You could spend days exploring
this Web site and still not find everything it has to offer! Here’s a tip: Click onthe index link (“allindex.txt” or “allindex.zip” if you have Winzip). This willgive you a complete index of everything at the site. Go nuts!
About.com (http://chess.about.com/index.html): About.com is one of myfavorite Web sites for getting information about almost anything. Their twist isthey have real people who are dedicated to particular subjects, and those peoplegather all the links and information you might want in one place. They have asection dedicated just to chess, and I recommend it.
Steve Pribut’s Chess Page (www.clark.net/pub/pribut/chess.html): One of thegreat things about the Internet is that it allows individuals to share their favoritethings with others. Steve maintains this page simply for the love of chess. It isreally worth checking it out just to see all the links and other information he has.One warning, though: Some of the links are out of date. It’s hard for one man tokeep everything completely current all the time!
Online MagazinesWould you rather read The New York Times (or whatever your newspaper of choiceis), or go to The New York Times Web site? If you prefer the latter, you may want tocheck out the Web sites of some of the best chess magazines and journals.
I can hardly hope to provide a comprehensive list, because there are literally hundredsof chess magazines out there. But here are some of the ones I recommend the most:
New In Chess (www.newinchess.com):New In Chess is probably the best chessmagazine in the world. Mostly, the Web site is a vehicle to sell their magazineand other chess products (which are generally very high quality, by the way), butthey also have some links and content to check out.
Inside Chess Online (www.insidechess.com):Inside Chess used to be a terrificchess magazine. Unfortunately, they discontinued the print version, but the Website still has some useful content.
British Chess Magazine (www.bcmchess.co.uk): This is the Web site for theBritish Chess Magazine, one of the two top chess periodicals in Great Britain.
Chess Monthly (www.chess.co.uk): This is the Web site for the other top chessperiodical in Great Britain. It is closely associated with the Web site “The Weekin Chess,” one of the three “portal” Web sites listed earlier in the chapter.
Europe Échecs (www.europe-echecs.com): The French magazine EuropeÉchecs is one of the best chess magazines in Europe. If you are comfortablereading French, it is worth checking out.
NewsgroupsUsenet newsgroups are open forums where anyone in the world with Internet accesscan post messages for all to see. Articles are grouped by topic (there are severalthousand groups) and distributed to all participating sites.
In the days before the Web exploded, newsgroups were a popular way to communicateusing the Internet. If you aren’t already familiar with newsgroups, don’t worry abouttrying to learn about them now. But if you are familiar with them, here are all themajor ones for chess:
rec.games.chess.computer: Computers and chess, including commercial chesssoftware, research projects, and news on computer chess events.
rec.games.chess.analysis: For discussions of specific positions, openings,endgames, and other technical subjects.
rec.games.chess.politics: Chess, like anything else, has its politics. Thisnewsgroup lets you watch, and participate in, a freewheeling exchange of newsand views. The focus is often on the USCF, FIDE, and other large chessorganizations.
rec.games.chess.play-by-email: Announcements and news about e-mail chess(see above).
rec.games.chess.misc: General news and commentary about chess topics,especially those that don’t fit into the previous categories. Articles are often“cross-posted,” or duplicated, between this group and one or more of the otherfour groups.
Articles on newsgroups “expire,” or disappear, within a few days or weeks, butarchives are maintained on the Web. You can use Deja News (www.dejanews.com,recently acquired by Google) to search a database containing almost every articleposted since early 1995.
A set of answers to FAQs (Frequently Asked Questions) about chess is maintained forthe chess newsgroups at Steven Pribut’s Chess Page. (See the section “Libraries andResources” for more details.)
Chess in the Palm of Your HandThe late 1990s saw the rise of another electronic device: handheld computers like thepopular Palm Pilot, Handspring Visor, or any of the various devices that run onMicrosoft’s operating system. These devices are sometimes called personal digitalassistants, or PDAs for short. You might get one of these devices to serve as anelectronic date and phone book, but you will soon discover that you can download andrun an entire universe of programs for them.
Chess has benefited greatly from the creation of this new universe. No matter whichPDA you have, there are chess programs you can download and use. (At the time ofwriting, the Palm operating system used by the Palm Pilot and Handspring Visor arethe most widely supported, but look for the Microsoft devices to gain ever moretraction in the future.)
Currently, by far the most popular applications for the PDA is a simple chess program.This allows you to play chess against your device (which after all is just another kindof computer), or against another person using the PDA as your chess set. But I predictthat in the very near future there will be much more content for your PDA, such aschess articles and books, chess problems, and grandmaster chess games. It’s just amatter of the devices getting more powerful and more people writing the content.
Patrick’s PointersI expect a lot of very exciting developments for non-PC computer devicesand chess over the next few years. Forget the dot-com bubble: the realdigital revolution is just beginning! I predict that by the year 2005: (1) Youwill be able to play chess remotely using your PDA. (2) You will be ableto download entire chess books into an “e-book” to read electronically.(3) You will be able to follow grandmaster chess games live via your PDA—and also get grandmaster and computer commentary, while you chatwith your friends and other chess players about the games!
Soon, PDAs will connect directly to the Internet all the time. (Some already do,although the connection is still kind of clunky.) As I write this, however, the main wayto download programs into your PDA is to visit a Web site via your PC, download theprogram onto your PC, and then sync the PC with your PDA.
Here are two Web sites I recommend for finding great chess programs for your PDA:

Handango (www.handango.com): This is a business that is trying to become anonline “superstore” for PDA devices and downloadable PDA programs. A feware free; most cost money. Many are available for a trial period.
Tucows PDA Web site (http://pda.tucows.com): Tucows is a resource that hasbeen used by software experts for years. They have a separate part of their Website devoted to PDA devices. You’ll find a lot here of very good quality, and alot of it (currently) either free or available for a free trial.
This is an area that is developing very fast, so expect many more changes over the nextfew years!
Chess on Your PCWith all the exciting things happening with the Internet and various other electronicgadgets, we shouldn’t forget the “old classic”: software for your PC. There are somevery good programs you can get that will enable you either to play with or study withyour computer—or both. One downside: Unfortunately for Macintosh users, almost allof these programs run only on Windows-based systems.
Playing Chess on Your ComputerHere are a few of my favorite PC programs for playing chess:
Chessmaster 8000 (The Learning Company): The latest (as of Spring 2001)edition of the longest-running series on the market, this package has a tremendousvariety of features at a relatively low price. It offers instruction, a database ofhistorical games, a powerful chess engine, and great graphics. You can find outmore (and even purchase a copy) by going to the Web site for this product:www.chessmaster.com.
Power Chess 98 (Sierra): The latest iteration of a computer program based onWChess, the program that scored +4 =2 in the 1994 Harvard Cup. I have not seenthe program since I played against it (and lost!) in that event, but I have heardgood things.
Virtual Chess 64 (Nintendo): To be honest, I don’t know a lot about thisprogram, and I have never played Nintendo. But if you’ve got a Nintendo gameand you want a chess program for it, check this out.
A screen-shot from Chessmaster 8000.
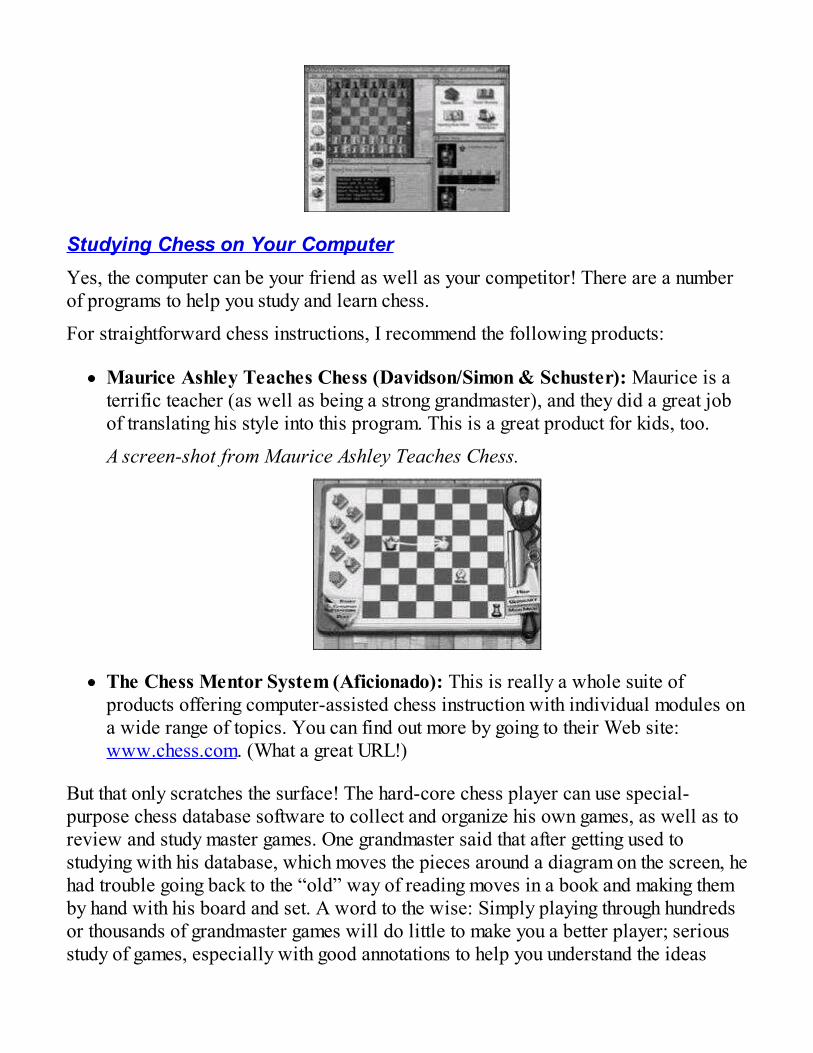
Studying Chess on Your ComputerYes, the computer can be your friend as well as your competitor! There are a numberof programs to help you study and learn chess.
For straightforward chess instructions, I recommend the following products:
Maurice Ashley Teaches Chess (Davidson/Simon & Schuster): Maurice is aterrific teacher (as well as being a strong grandmaster), and they did a great jobof translating his style into this program. This is a great product for kids, too.
A screen-shot from Maurice Ashley Teaches Chess.
The Chess Mentor System (Aficionado): This is really a whole suite ofproducts offering computer-assisted chess instruction with individual modules ona wide range of topics. You can find out more by going to their Web site:www.chess.com. (What a great URL!)
But that only scratches the surface! The hard-core chess player can use special-purpose chess database software to collect and organize his own games, as well as toreview and study master games. One grandmaster said that after getting used tostudying with his database, which moves the pieces around a diagram on the screen, hehad trouble going back to the “old” way of reading moves in a book and making themby hand with his board and set. A word to the wise: Simply playing through hundredsor thousands of grandmaster games will do little to make you a better player; seriousstudy of games, especially with good annotations to help you understand the ideas
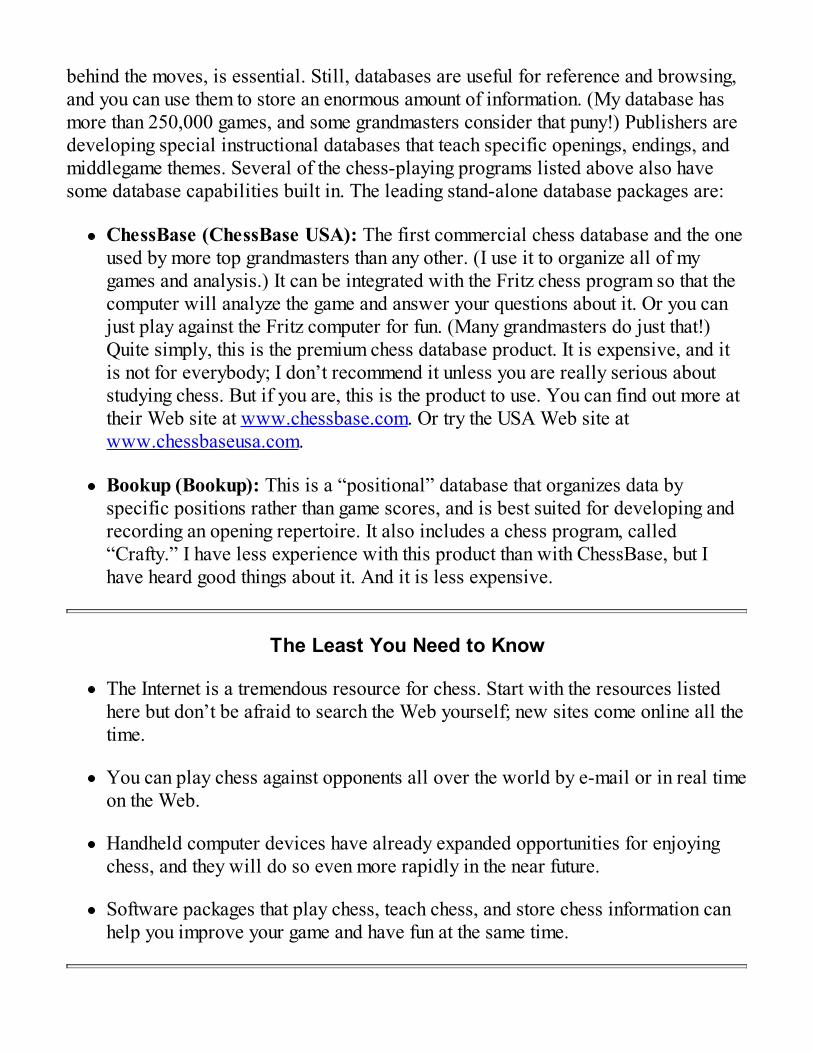
behind the moves, is essential. Still, databases are useful for reference and browsing,and you can use them to store an enormous amount of information. (My database hasmore than 250,000 games, and some grandmasters consider that puny!) Publishers aredeveloping special instructional databases that teach specific openings, endings, andmiddlegame themes. Several of the chess-playing programs listed above also havesome database capabilities built in. The leading stand-alone database packages are:
ChessBase (ChessBase USA): The first commercial chess database and the oneused by more top grandmasters than any other. (I use it to organize all of mygames and analysis.) It can be integrated with the Fritz chess program so that thecomputer will analyze the game and answer your questions about it. Or you canjust play against the Fritz computer for fun. (Many grandmasters do just that!)Quite simply, this is the premium chess database product. It is expensive, and itis not for everybody; I don’t recommend it unless you are really serious aboutstudying chess. But if you are, this is the product to use. You can find out more attheir Web site at www.chessbase.com. Or try the USA Web site atwww.chessbaseusa.com.
Bookup (Bookup): This is a “positional” database that organizes data byspecific positions rather than game scores, and is best suited for developing andrecording an opening repertoire. It also includes a chess program, called“Crafty.” I have less experience with this product than with ChessBase, but Ihave heard good things about it. And it is less expensive.
The Least You Need to Know
The Internet is a tremendous resource for chess. Start with the resources listedhere but don’t be afraid to search the Web yourself; new sites come online all thetime.
You can play chess against opponents all over the world by e-mail or in real timeon the Web.
Handheld computer devices have already expanded opportunities for enjoyingchess, and they will do so even more rapidly in the near future.
Software packages that play chess, teach chess, and store chess information canhelp you improve your game and have fun at the same time.

Chapter 19
How Computers Play Chess
In This Chapter
How computers “think” about chess
How humans think about chess
A bit of the history of computers in chess
The ultimate “Man versus Machine” chess match
What does it all mean?
How do computers “think?” How do they decide what moves to play? How did DeepBlue beat the World Chess Champion? And what does it mean for us humans? Let’sexplore these fascinating questions.
The Thinking Machine?You may have heard that computers are at their best in simple, repetitive tasksinvolving a lot of elementary steps, like recalculating a spreadsheet or searching adatabase. But chess isn’t like that, right? Well, the answer depends on yourperspective.
If you’re a human being, you experience all kinds of thoughts and feelings during achess game, and you think about things like pawn structure, weak squares, forks, pins,and the opposition.
But computers don’t see it that way. For us humans, chess is something to be figuredout and understood. For computers (and their programmers), chess is a mathematical

problem that can be solved, at least approximately, with massive, rapid calculations.Let’s look at an example of how a computer would find the best move and compare its“thinking process” with our own. Examine Diagram 1 and figure out how White canwin. If you studied Chapter 8, it shouldn’t take long to solve this problem. In fact, it’staken directly from Diagram 23 in the section on the “smothered mate” tactic, so youmay even remember the exact sequence of moves: 1.Nf7+ Kg8 (if 1 . . .Rxf7 2.Qxc8+Rf8 3.Qxf8#) 2.Nh6+ Kh8 3.Qg8+ Rxg8 4.Nf7#.
Regardless of how you solved it, you relied on recognizing a pattern of the pieces onthe board and associating that pattern with an idea. The ability to rapidly recognizesuch patterns is invaluable, and as you get better at chess you’ll find yourself seeingmore and more repeating patterns that will suggest moves and plans to investigate.
How would a computer deal with Diagram 1? Would it recognize the pattern and lookup a solution plan (say, in the smothered mate file) in its memory? Nothing of the sort.Remember, computers like simple, mechanical operations, and recognizing patternsand implementing plans are complicated processes. Instead, the computer will simplylist out every legal move White has in the position. Here they are: Qa2, Qb3, Qb4,Qa4, Qb5, Qa6, Qc5, Qc6, Qc7, Qxc8, Qd5, Qe6, Qf7, Qg8+, Qd4, Qe4, Qf4, Qg4,Qh4, Qd3, Qe2, Qf1, Qc3, Qc2, Qc1, Nf3, Ne4, Ne6, Nf7+, Nxh7, Nh3, f3, f4, g4,Kf1, Kg2, Kh2, and Kh1.
Diagram 1: White to play and win.
Did you realize that there are actually 38 legal moves for White? When you looked atthe position, you probably only thought about a couple: Qxc8 to capture the queen,Qh4 or Qe4 or Qd3 to threaten checkmate on h7, and (hopefully) Nf7+. Most of theothers, after all, just lose the queen right away, or at best, leave White still down theexchange (rook for knight), so you were wise not to waste time thinking about them.There’s no reason to think of any other move, and considering them all would slowyou down. (Just reading through them takes a few seconds!) Computers, on the otherhand, don’t have ideas. But they do have speed: They can list out all the legal movesin a split-second.
What happens next? Well, when you consider a move, you have to consider how youropponent might reply. The computer does the same, but again unlike a human, it simplylooks at every legal response to every legal move. For example, the first move we

listed for White was Qa2, which would bring up the position in Diagram 2.
Diagram 2: White plays 1.Qa2.
To that, Black has the replies . . .Qc7, . . .Qc6, . . .Qc5, . . . , well we won’t list themall out again; the total number is 30 (for those of you keeping score at home), and thebest one is 1 . . .Qc1+ followed by 2 . . .Qxg5 winning White’s knight (and stoppingthe smothered mate threat). Now for each of White’s 38 first moves, Black has about30 replies to consider, so after one move by each player there are about 38x30 =1,140 positions that could result. For each of those positions, the computer must repeatthe process again, considering each of White’s legal moves, all of Black’s replies toeach, and so on. In order for a computer to “see” the position after White’s fourthmove (Nf7# in the solution to the problem), a computer considering each of 30possibilities on average per turn would wind up analyzing 307 = 21,870,000,000future positions that could potentially occur. (That is, 30 moves for White times 30moves for Black times 30 moves for White seven times up to 4.Nf7#.)
When it finally reaches the position that actually ends in checkmate, the program canmake a note that 4.Nf7# was the best move in the position right before that one—nothing is better than giving mate—shown in Diagram 3.
Now a sort of backtracking process happens. Since 3 . . .Rxg8 was Black’s only legalmove, the program knows that 3.Qg8+ was the best move in Diagram 4. Likewise,since Black had no alternative to 2 . . .Kh8 a move earlier, 2.Nh6+ must have been thebest move in Diagram 5, again because it leads by force to checkmate.
Diagram 3: Position after 3 . . .Rxg8, before 4.Nf7#.
Diagram 4: Position after 2 . . .Kh8, before 3.Qg8+.

Diagram 5: Position after 1 . . .Kg8, before 2.Nh6+.
Finally, by comparing the backtracked consequences of the alternatives at move 1(including the side variation starting with 1 . . .Rxf7), the program can conclude withcertainty that 1.Nf7+ is the best move in the starting position. If you were unfortunateenough to have Black in this position against your favorite chess program, it wouldwaste no time in playing 1.Nf7+ (and it would probably helpfully inform you thatcheckmate was inevitable).
Chess TalkAlpha-beta pruning is a mathematical technique for enabling computersto cut down on the number of moves they must consider. The basic ideais that if the computer finds one way to refute a possible move, it caneliminate that move from its search, rather than continuing to find moreways to refute it.
Note how different this was from the human approach. If you noticed the smothered-mate theme you immediately saw 1.Nf7+ and then only needed to investigate twovariations, totaling perhaps 12 to 15 possible future positions, a minuscule fraction ofall the legal possibilities.
Now try the position in Diagram 6. A computer would find the answer before youcould blink, because the winning combination is actually two moves shorter than thatin Diagram 1. Here’s a clue: Look for a smothered mate. The position doesn’t lookmuch like Diagram 1 at all, does it? But it uses the same tactic, and in a broad sense

the pattern is similar. Note how Black’s king is surrounded by his own pieces. Theyare defending him, but also hemming him in (together with White’s e6-pawn). If Whitecould safely give check with a knight it would be mate. Where can White give checkwith the knight? Not on d6, because the bishop controls that square. What about g7?No, the queen is on that square. But what if the queen could move off that square . . . ?
Diagram 6: White to play and win.
Diagram 7: Position after 2.Ng7#.
The solution is 1.Qg6+! hxg6 (1 . . .Rf7 2 Qxf7#) 2.Ng7# (see Diagram 7), combininga clearance sacrifice with the smothered mate. But even though it was a shortersolution than Diagram 1, and therefore easier for the computer, because it had tosearch far fewer positions to find the right move, it was probably harder for you tofind, because it didn’t quite “look like” any smothered mate you’ve seen. Plus, you hadto combine two different tactics. As long as the computer has time to churn through allthe possibilities, it will get the solution. But you can’t use that method, so your solvingability will depend in part on your ability to recognize patterns and form theappropriate plans in response.
We saw that a simple four-move combination included over 21 billion possibleoutcomes. It turns out that computers don’t really examine every single one of them.They use a mathematical technique called alpha-beta pruning to cut back on thenumber of alternatives examined, and they use heuristics, or rules of thumb, that tellthem what kinds of moves to try first.
For example, computers are often programmed to use the heuristic of looking first atchecks and captures on the theory that these moves might be part of a forcingcombination to win material or checkmate. (By the way, you should use the sameheuristic!) And thanks to alpha-beta pruning, once they’ve discovered one refutationfor a move (that is, one line of play that shows why a move is worse than its
alternatives), they don’t need to waste time finding more refutations.
Chess LoreBefore there were computers, there were people who claimed to havebuilt machines that played chess. A notorious case is “the Turk,” a fakechess-playing machine created by Wolfgang von Kempelen, which wasfirst displayed in 1796. It was a large chest with a chessboard on top,and when you played against it, the Turk’s pieces would move bythemselves. It would often win its games, and people were amazed! Butof course it wasn’t a real machine: Inside it was a human chess playerwho made the moves.
The “machine” had a clever system of cabinets that gave it the illusion ofbeing empty inside. It fooled people for a long time, but by 1820 severalauthors had deduced the trick.
But even with these time-saving measures, positions where a computer can calculateout to checkmate are rare. Since in most positions there are no moves that force animmediate win, how does the computer decide what move to play? The searchoperates in just the same way, but instead of marking each position as a win, loss, ordraw, the computer “evaluates” the position: It assigns each position in the search anumeric score representing how favorable (or unfavorable) that position is for the sideto move. Then the backtracking procedure can find the variation likely to lead to thebest position a few moves down the road, even if it is not actually a checkmate.
This is actually not a process used only by computers. We humans do somethingsimilar when we seek positions that give us as big an advantage as possible. We try towin material, gain space, increase the mobility of our pieces, develop an advantage inforce near the king, create passed pawns, give our opponent weak squares, and so on.Whereas we make a judgment, the computer performs a mathematical calculation.
How can a mathematical calculation take the place of a judgment? All of thesestrategic elements, to some extent, can be measured by a computer program. It can addup the point values of each side’s pieces (remember the chart in Chapter 5), it canmeasure how much space each side controls, it can measure how many squares eachpiece can move to, and so on. Some factors are hard to measure. For example, kingsafety, a critical one, depends on the complex relationships between pawn structure,

piece placement, opposite-color bishops, and so on. So it’s hard to reduce it to asingle number. But some factors can be accounted for quite nicely by adjusting thevalues of the pieces; for example, a white rook might be worth 5 points normally, but5.5 when it’s on the seventh rank. A number must be assigned to each factor thatmeasures its importance relative to each other factor. We know that, all else beingequal, material is the most important factor, so it usually gets the highest number. Thenumbers assigned to other factors are correspondingly lower. In the end a singlenumber is produced, such as +1.78, which might indicate that White has an advantageequal to 1.78 pawns. (Programmers decided to use the pawn as the unit ofmeasurement because it matches the way the chart in Chapter 5 measures the relativevalue of the pieces.)
You might notice a problem with this scheme. Suppose that a computer playing Whitereached the position of Diagram 6 in its analysis but it didn’t have time to searchfurther. It would have to apply an evaluation function like the one just discussed to rateWhite’s prospects. Since Black has an extra rook and minor piece, the score willprobably be heavily in Black’s favor, since material considerations will outweigh thefact that White’s pawn, knight, and queen are temporarily well-placed near Black’sking. After all, if White couldn’t give mate in two moves, he would probably lose. Anexperienced human might “smell a rat” in this position, and figure that because his kingis in such danger he shouldn’t aim for this position (with Black), because even if hecan’t see it, there might be checkmate somewhere. Or he might figure that if he’s goingto go for this position he had better look extra hard to make sure there isn’t acheckmate somewhere. But the computer doesn’t have these kinds of intuitive hunches.If it stops searching here, and applies its evaluation function, then it would be makinga big mistake, because further search would reveal that in fact White is winning. Thiskind of mistake is called the “horizon effect.” Virtually all chess programs use thebasic algorithm outlined so far to decide which moves to make, though someimplement it better than others, and each has its own special evaluation function.Sophisticated programs can extend their search deeper in cases like Diagram 6, but thebasic weakness still remains: They will see every tactic, especially involvingcheckmate and material gain or loss, only up to the depth they can search in the timeallotted. Everything beyond is invisible.
What About Artificial Intelligence?You may have heard about something called artificial intelligence. And you’vealmost certainly heard about the best chess computer in the world, Deep Blue. (If youhaven’t, then read the foreword to this book!) Certainly Deep Blue is an example of acomputer that plays chess well! Did Deep Blue use artificial intelligence? And does

that mean it was “thinking”?
The definition of artificial intelligence (also known as AI) is a complicated subject.Even among experts there is no clear agreement on what it is! But basically, AI refersto any method a computer uses to solve a problem that seems to require intelligence tosolve. (You can see how a definition like this would be open to interpretation!) If acomputer is using methods to solve a problem other than executing an algorithm thatreaches a solution directly, you could say that computer is using AI. (So for example,your calculator is not using AI, because to add two numbers, it executes an algorithmthat directly leads to the solution.)
Deep Blue did use some AI methods. One of them is the “alpha-beta pruning” method Imentioned in the previous section. Another is called machine learning. The basic ideabehind machine learning is to get the computer to run a calculation, then compare thatcalculation to an outside source already known to be correct. The computer then runsanother program to analyze the similarities and differences between the result of itscalculation and the result of the outside source. And then the computer runs anotherprogram to adjust how it runs its calculation so that the next time it gets closer to theknown, correct answer.
Chess TalkArtificial intelligence (also known as AI) refers to any method acomputer uses to solve a problem that requires intelligence to solve.Even among computer science experts, there is a lot of debate aboutexactly what counts as AI!
Chess TalkMachine learning is a technique that enables computers to “learn”through experience. The basic idea is to create a program that will allowthe computer to compare the result of its calculation with the result of anoutside, correct calculation, and then to adjust how it makes futurecalculations on the basis of that comparison.
The people who programmed Deep Blue used machine learning at some points whenbuilding its evaluation function. They did this by comparing how Deep Blue evaluatedpositions with how grandmasters evaluated positions. When Deep Blue made errors inits evaluation compared to the grandmaster evaluation, Deep Blue adjusted itsevaluation function to get closer to the grandmaster’s judgment. However, most of theadjustment to Deep Blue’s evaluation function was done “manually,” by theprogrammers, and not by Deep Blue.
Deep Blue also used a third technique that one could call AI. A lot of effort went intodeveloping a “selective search” technique. The basic idea here is that if the computeridentifies a variation where each side’s responses seem to be forced for a certainnumber of moves, then it will follow that variation out to the end. This is another toolDeep Blue used to emulate what humans do: focus on the relevant moves. Alpha-betapruning allows it to eliminate certain moves; heuristics allow it to examine certainmoves first; and selective search allows it to examine certain combinations beyondwhat would otherwise be the limit of how many moves it could look ahead.
So is Deep Blue an example of AI? It did use AI techniques, and those techniques didhelp it defeat Kasparov. But it’s also true that much of the “horse power” it had camefrom the “brute force” methods I described in the last section: calculating millions andmillions of moves each second, and applying the same mathematical calculation toeach move. And that’s not anything like how humans play chess. So while AI gaveDeep Blue the extra push it needed to win, it still fundamentally relied much more onthe traditional, “calculator-like” techniques all computers use.
How is it possible for a computer to do something that seems to require humanintelligence, yet not really be a good example of AI? We could probably keep a wholeroom full of philosophers busy with that question! But the basic answer is simple:There’s more than one way to skin a cat. Humans play chess in a very nonalgorithmicway. (Compare that to how we add numbers. When we do it right, we’re basically justexecuting an algorithm the same way a calculator does.) But it turns out that chess canalso be approached by using (mainly) brute force and algorithms, which is howvirtually all computers play chess, including Deep Blue.
One more thing is worth keeping in mind. AI only refers to a set of problem-solvingtechniques. It doesn’t say anything about being conscious or having feelings. No matterhow your computer plays chess, it’s no more aware of playing chess than yourcalculator is of adding numbers, or your oven is of cooking food.
Will the Computer Overtake Us?There are two basic ways to make a computer play better chess: Speed it up so it can

see more possibilities, or give it more knowledge so it can evaluate the resultingpositions better. Both of these techniques have been used to make computers strongerand stronger. Eventually, computers will get stronger than humans. Humans just can’tget that much smarter, while computers can keep getting faster and can get betterprograms. Inevitably, they will soon surpass us. But the best humans are still as goodas the best computers, and we can still do things they can’t!
Chess LoreA common misconception is the belief that in order to build and programa computer that plays chess well, you have to be a good chess playeryourself. The misconception is based on the idea that chess-playingprograms think the same way humans do. In fact, the programs relyheavily on their number-crunching power for their ability. You need toknow something about chess to program the evaluation function, but itturns out that it’s almost better not to have a grandmaster understandingto do that. A solid understanding of chess will get you as far as you needto go.
The success of various computer scientists shows the truth of this. Forexample, Belle’s principal creator, Ken Thompson, is an average amateurchess player who almost never competes in tournaments. And whatabout the Deep Blue scientific team? Three members (Gerry Brody, JoeHoane, and C.J. Tan) didn’t even play chess before joining the project.The super-speedy Deep Blue chess processors were created by Feng-Hsiung Hsu, an amateur chess player. The best chess player on the teamis Murray Campbell, a software specialist, who in his best days played atthe level of national master, but even that is far below grandmaster level,and he hasn’t played in tournaments for several years.
In May 1997, (then) World Chess Champion Garry Kasparov played the World’sStrongest Computer, Deep Blue. Kasparov was counting on the strength of hisjudgment and planning skills to overcome the brute force of the computer. He lost thatmatch. Yet, if he had tried less hard to take advantage of the weaknesses of thecomputer, he may have won. Many people thought Kasparov lost because he wasn’tsmart enough. Ironically, he may have been too smart for his own good.
Man versus MachineThe first digital computer was switched on over 50 years ago in Philadelphia. Sincethen, scientists have been fascinated with the idea of computers playing chess.Especially within the artificial intelligence community, the game was taken as a modelarena for studying human thought. The pioneers of computer science, including AlanTuring, Claude Shannon, and Herbert Simon, were also pioneers of computer chess. Inthe 1950s and 1960s, enthusiasm was high for programming the machine to play thesame way humans did (that is, using AI), but results were poor. By the 1970s, the“brute force” approach (of exhaustively considering all possible moves andcountermoves as far out as possible), discussed earlier in this chapter, became thedominant paradigm. By 1983 the AT&T research project Belle was the first computersystem to earn the master title from the U.S. Chess Federation. This achievement wassoon surpassed by Deep Thought, developed by a group of graduate students atCarnegie Mellon University, which sustained a rating in the grandmaster range during1988 and 1989.
Clearly superior to all its (silicon) competitors, Deep Thought was invited to play atwo-game match versus Garry Kasparov in New York in late 1989. It was crushed.But its developers were not dispirited because IBM’s research department had justagreed to hire them to work on its next generation successor, eventually named DeepBlue (in part to reflect the corporate color of its sponsor).
Chess LoreKasparov has played three matches against an IBM computer under thesame conditions as regulation tournament play, in 1989 (when it wasDeep Thought), in 1996 (when it was renamed Deep Blue), and again in1997. But these matches aren’t for the title of World Champion! Only ahuman can play for that title. The matches are only played as anexhibition. After all, would it make sense for an automobile to win anOlympic gold medal for winning a race?
Belle, Deep Thought, and Deep Blue share a key property. They all rely onmicroprocessor chips that are custom designed and built to work only on chessproblems. By making the processes of generating legal moves, evaluating positions,and even managing the tree of possible variations part of the computer’s hardwareinstead of its software, Deep Blue can now examine as many as 200 million future

positions in just one second. With about 150 seconds to think about each move duringa game played under regulation tournament conditions, it can “see” as many as 30billion positions in the course of calculating a move. Kasparov played an earlierversion of Deep Blue in February 1996 in a six-game match held in Philadelphia.Kasparov defeated the machine 4–2, and pocketed $400,000 for his efforts. But thevictory was not easy.
The position in Diagram 8 was reached in the first game. Kasparov, as Black, hadgiven up a pawn and let his pawn structure be shattered (he has three pawn islands, allcontaining only isolated pawns) in return for an attack against Deep Blue’s king,which looks dangerously undefended by its wayward army. Most humans would neverhave allowed such a position as White, out of fear of Kasparov’s attack or uncertaintyabout whether they had accurately calculated a defense. But Deep Blue doesn’t worryabout such things. Like all computers, it is unemotional and excels at short-termdefense, where seeing every possibility for the opponent and calculating them out is avital skill. The game concluded 31.g3 Nd3 32.Rc7 Re8 33.Nd6 Re1+ 34.Kh2 Nxf235.Nxf7+ Kg7 36.Ng5+ Kh6 37.Rxh7+. Kasparov resigned, since even though he isthreatening . . .Rh1#, after 37 . . .Kg6 38.Qg8+ Kf5 39.Nxf3 his attack will be over,his king exposed in the middle of the board, and his army three pawns behind.
Diagram 8: White to move (Deep Blue–Kasparov, Philadelphia, Game 1, 1996).
Diagram 9: Black resigned after 37.Rxh7+.
This shocking result was reported by the media around the world. For the first timeever, a World Champion had lost to a computer in a regulation game. But Kasparovlearned from his mistakes and came back to win a long strategic struggle in the secondgame and to draw the third and fourth encounters. Kasparov then won the last twogames to blaze ahead to a convincing 4–2 victory, winning $400,000 for his efforts.Yet the dramatic loss in the first game, followed by the come-from-behind surge by

Kasparov, generated an incredible excitement. A rematch was quickly organized withan even larger prize of $700,000 if Kasparov won. (Kasparov would get $400,000 ifhe lost, which is the same as the winning prize for the 1996 match.) Meanwhile, theIBM scientists went back to the laboratory.
Kasparov met Deep Blue again in New York in May of 1997. Kasparov won the firstgame in fine style. The critical position is shown in Diagram 10.
In this complicated position, the computer made a poor evaluation. It saw a chance toattack White’s position by playing 28 . . .f5 29.exf5 e4. But Kasparov had understoodthat he could afford to sacrifice material by playing 30.f4! Bxe2 (Black cannot affordto expose his king by opening the g-file with 30 . . .Bxf4 31.gxf4) 31.fxg5 (seeDiagram 11).
Diagram 10: Black to move (Kasparov–Deep Blue, New York, Game 1, 1997).
Diagram 11: Black to move, but White has fantastic compensation for the exchange.
Black has a material advantage. But his king is exposed, and White’s dark-squaredbishop is a monster. This is a hard position for even the best humans to assess, letalone a computer. But Kasparov quickly proved he had a tremendous advantage. DeepBlue played 31 . . .Ne5 (not 31 . . .hxg5?? 32.Nc4! attacking the queen and threatening33.Qxg5+), and Kasparov played 32.g6. Now Kasparov had two connected passedpawns, and he exploited this advantage mercilessly: 32 . . .Bf3 33.Bc3! Qb5 34.Qf1!Qxf1+ 35.Rxf1 h5 36.Kg1 Kf8 37.Bh3! b5 38.Kf2 Kg7 39.g4! Kh6 40.Rg1 hxg441.Bxg4 Bxg4 42.Nxg4+ Nxg4 43.Rxg4 Rd5 44.f6 Rd1 45.g7 (see Diagram 12).
The computer gave up here, because it realized it was going to lose at least a rook tostop White from making a queen.
Kasparov ran into trouble in the second game, though. Part of Kasparov’s trademarkstyle is to play active, aggressive chess with Black. However, it seems that Kasparov
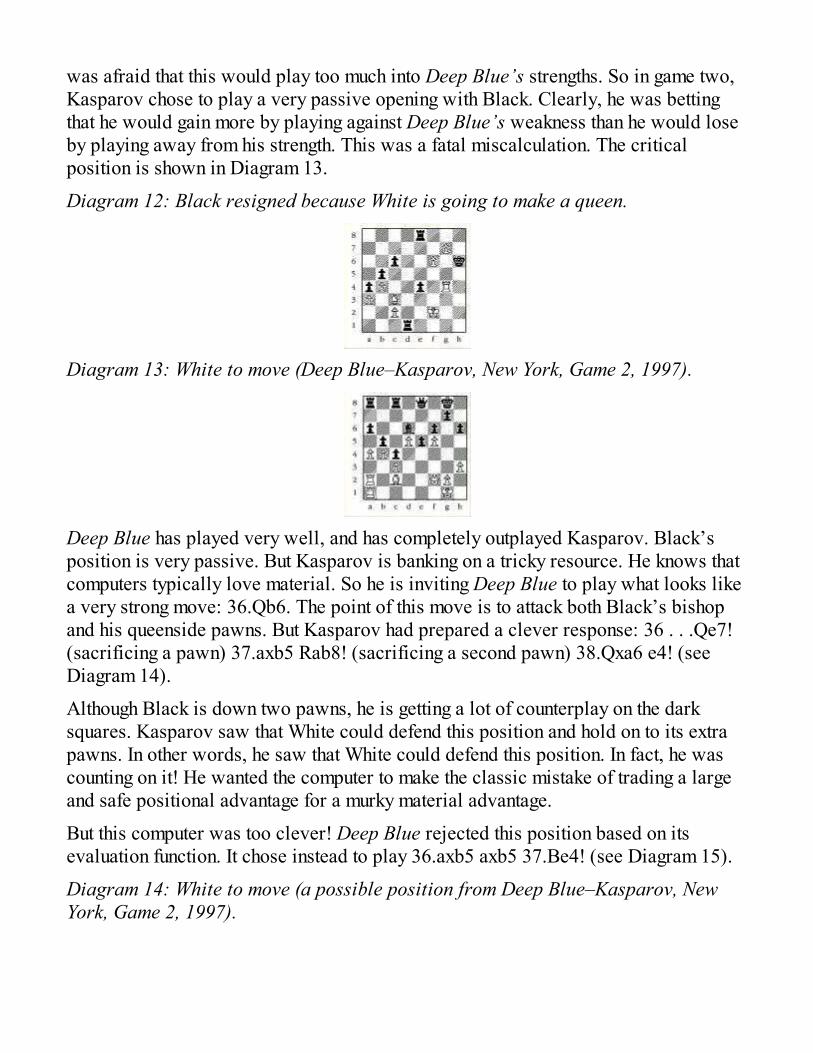
was afraid that this would play too much into Deep Blue’s strengths. So in game two,Kasparov chose to play a very passive opening with Black. Clearly, he was bettingthat he would gain more by playing against Deep Blue’s weakness than he would loseby playing away from his strength. This was a fatal miscalculation. The criticalposition is shown in Diagram 13.
Diagram 12: Black resigned because White is going to make a queen.
Diagram 13: White to move (Deep Blue–Kasparov, New York, Game 2, 1997).
Deep Blue has played very well, and has completely outplayed Kasparov. Black’sposition is very passive. But Kasparov is banking on a tricky resource. He knows thatcomputers typically love material. So he is inviting Deep Blue to play what looks likea very strong move: 36.Qb6. The point of this move is to attack both Black’s bishopand his queenside pawns. But Kasparov had prepared a clever response: 36 . . .Qe7!(sacrificing a pawn) 37.axb5 Rab8! (sacrificing a second pawn) 38.Qxa6 e4! (seeDiagram 14).
Although Black is down two pawns, he is getting a lot of counterplay on the darksquares. Kasparov saw that White could defend this position and hold on to its extrapawns. In other words, he saw that White could defend this position. In fact, he wascounting on it! He wanted the computer to make the classic mistake of trading a largeand safe positional advantage for a murky material advantage.
But this computer was too clever! Deep Blue rejected this position based on itsevaluation function. It chose instead to play 36.axb5 axb5 37.Be4! (see Diagram 15).
Diagram 14: White to move (a possible position from Deep Blue–Kasparov, NewYork, Game 2, 1997).

Diagram 15: White has played 36.axb5 axb5 37.Be4!.
White correctly maintains the grip on the position. For a top human grandmaster, thiswould be a routine decision. But for a computer to reject material gain for this kind ofpositional advantage was amazing. The crowd literally gasped when it saw thedecision, and Kasparov’s face fell. Although it turns out that Kasparov missed amiraculous drawing resource on the very last move, basically he was completelyoutplayed by Deep Blue, and he lost only eight moves later.
Deep Blue played a terrific game. But it needs to be emphasized that Kasparov madethe first mistake by playing positions that go against his own style. This is a very basicmistake when playing anyone, including a computer. Kasparov was visibly upset atmaking this mistake, and clearly intimidated by the ability Deep Blue demonstrated.
Unfortunately, Kasparov showed his emotion by indirectly accusing IBM of cheating,by somehow “overriding” the computer from going after the pawns. This wasobviously a ridiculous accusation, and perhaps the most unfortunate thing is thatKasparov seems to have believed it. This may have influenced what happened next.
Three more games produced three hard-fought draws. And that left Game 6 as thedeciding game. Once again, Kasparov had Black. And once again, Kasparov played adubious opening strategy. But this time, the strategy he chose was not just suspect: Itwas outright bad. Kasparov played a line that is known to be very strong for Whitebecause of a piece sacrifice. Kasparov seems to have convinced himself that DeepBlue would not play this sacrifice because it would not “like” being down material.This was a fatal miscalculation. Deep Blue did exactly what its opening database toldit to do, and sacrificed the piece. Not only did Kasparov have an objectively very badposition, he clearly was emotionally unable to play it, and Deep Blue won easily.

Chess LoreHere is the complete score of Game 6 between Kasparov and DeepBlue. Take out your chess set and see how the machine beat the WorldChess Champion! 1.e4 c6 2.d4 d5 3.Nc3 dxe4 4.Nxe4 Nd7 5.Ng5 Ngf66.Bd3 e6 7.N1f3 h6?? (This is a well-known mistake. Black shoulddevelop with 7 . . .Bd6.) 8.Nxe6! Qe7 9.O–O fxe6 (not 9 . . .Qxe6??10.Re1!) 10.Bg6+ Kd8 11.Bf4 (Grandmaster experience has shown thatWhite’s attack is overwhelming here.) 11 . . .b5 12.a4 Bb7 13.Re1 Nd514.Bg3 Kc8 15.axb5 cxb5 16.Qd3 Bc6 17.Bf5! exf5 18.Rxe7 Bxe7 19.c4and Kasparov resigned. Even though Kasparov still has a materialadvantage, White’s attack will quickly win more material.
Garry Kasparov continues to play chess actively, and although he lost the WorldChampionship in 2000 (see Chapter 16), he is still the number-one ranked player inthe world. Deep Blue, on the other hand, has “retired” IBM is putting its resources toother uses, and they have no plans to bring Deep Blue back. Other computers havegotten very good, but none have yet gotten to the level of Deep Blue.
What Does Deep Blue Mean for Us?Never was chess so much on people’s minds as it was when Deep Blue beatKasparov! But unfortunately, in my view, most people focused on the wrong aspect ofthe match. Most of what people were saying concerned the state of human intelligence,when the truly interesting story was the state of chess.
Deep Blue’s victory was extremely impressive. But it didn’t give us any reason tothink about computers differently. Computers are still machines. They don’t feel, theydon’t have any conscious awareness, and they don’t even “think” in the way humansdo. They do the same things they have always done. One of the things they do is playchess. Deep Blue plays better than any machine ever has before, but it still playsbasically the same way that machines have always played. Kasparov lost becauseDeep Blue played a little bit faster and a little bit smarter than any machine had donebefore. (Plus Kasparov did not play very well compared to some of his previousmatches.) The IBM team deserves tremendous credit for their accomplishment; but inthe final analysis, they built a better machine, not a different one.
On the other hand, Deep Blue’s victory should cause us to think differently about the
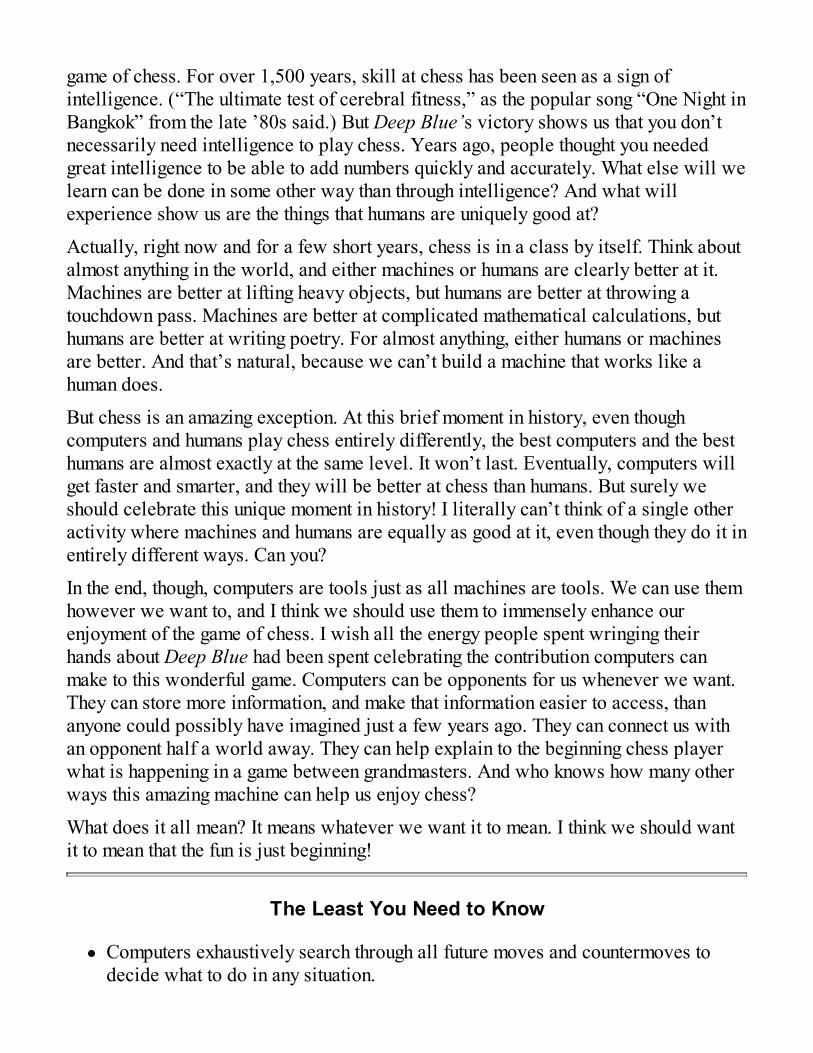
game of chess. For over 1,500 years, skill at chess has been seen as a sign ofintelligence. (“The ultimate test of cerebral fitness,” as the popular song “One Night inBangkok” from the late ’80s said.) But Deep Blue’s victory shows us that you don’tnecessarily need intelligence to play chess. Years ago, people thought you neededgreat intelligence to be able to add numbers quickly and accurately. What else will welearn can be done in some other way than through intelligence? And what willexperience show us are the things that humans are uniquely good at?
Actually, right now and for a few short years, chess is in a class by itself. Think aboutalmost anything in the world, and either machines or humans are clearly better at it.Machines are better at lifting heavy objects, but humans are better at throwing atouchdown pass. Machines are better at complicated mathematical calculations, buthumans are better at writing poetry. For almost anything, either humans or machinesare better. And that’s natural, because we can’t build a machine that works like ahuman does.
But chess is an amazing exception. At this brief moment in history, even thoughcomputers and humans play chess entirely differently, the best computers and the besthumans are almost exactly at the same level. It won’t last. Eventually, computers willget faster and smarter, and they will be better at chess than humans. But surely weshould celebrate this unique moment in history! I literally can’t think of a single otheractivity where machines and humans are equally as good at it, even though they do it inentirely different ways. Can you?
In the end, though, computers are tools just as all machines are tools. We can use themhowever we want to, and I think we should use them to immensely enhance ourenjoyment of the game of chess. I wish all the energy people spent wringing theirhands about Deep Blue had been spent celebrating the contribution computers canmake to this wonderful game. Computers can be opponents for us whenever we want.They can store more information, and make that information easier to access, thananyone could possibly have imagined just a few years ago. They can connect us withan opponent half a world away. They can help explain to the beginning chess playerwhat is happening in a game between grandmasters. And who knows how many otherways this amazing machine can help us enjoy chess?
What does it all mean? It means whatever we want it to mean. I think we should wantit to mean that the fun is just beginning!
The Least You Need to Know
Computers exhaustively search through all future moves and countermoves todecide what to do in any situation.
Humans rely on less search but more pattern recognition, judgment, and planningto make decisions.
The best computers and the best humans play chess entirely differently, yet for themoment they play equally well.
Deep Blue has not played since it defeated Garry Kasparov in May 1997. Noother computer has yet reached the same level as Deep Blue.
Computers have a tremendous ability to enhance our enjoyment of the game ofchess. This may be the true significance of Deep Blue’s victory.
Chapter 20
How to Beat the !?%@&?>!#Computer
In This Chapter
Avoiding the computer’s strengths
Taking advantage of the computer’s weaknesses
Compensating for our human frailties
Now that computers play chess—and play chess well—you need never be withoutsomeone (or at least something) to play chess with. Your computer is always ready toplay whenever you are, it will record the moves for you, and it’s never rude. In someways, it’s the perfect opponent.
I think it’s great that computers can play chess, although I don’t recommend that youplay only them. Computers and humans play chess differently, so you can’t experiencethe full range of possibilities of chess unless you play against both. Still, they’re soconvenient that for many of us they’re a godsend, enabling us to play our favorite gamewhen otherwise we wouldn’t be able to find an opponent.
There’s just one problem. Those darn machines sometimes play too well! I think themost common question I hear from people is whether I can beat computers. When I tellthem yes, they often ask another question: “How can I beat my computer?” Thischapter will give you some tips for beating your silicon opponent.
There’s No Magic BulletFirst, the bad news: There’s no foolproof method. The computer is playing chess, and
you’re playing chess. Whoever plays better will win, and that means you’re going tohave to play better than the computer to win. In other words, the best way to beat yourcomputer is to improve your game. And since some computers play a very good game,it’s not always going to be possible to improve your game enough.
On the other hand, that might not be such bad news after all. What fun would playingyour computer be if you beat it by doing some trick? You might as well turn the thingoff! So the tips I’m going to explain to you aren’t meant to replace what you’velearned in the rest of the book; they’re meant to supplement it. You can’t beat themachine by magic. But you can think about the tactics and strategies you’ve learned,and apply them intelligently in the knowledge that you’re playing a machine. Themachine has certain strengths, but it also has certain weaknesses. Its most importantweakness is that it always does exactly the same thing the way it was programmed:It’s the very definition of inflexibility. If you keep the tips I’ll explain to you in mind,and apply them where they seem relevant, you’ll definitely improve your resultsagainst the computer.
Patrick’s PointersBobby Fischer once said that the best kind of psychological warfare isplaying good moves. He was talking about playing other people (and hewas right!), but it’s especially true when playing against the computer.
The Computer’s StrengthsThere are basically two advantages a computer has over humans:
1. Because the computer is a machine, it never gets tired, or careless, or cocky, orupset. It always plays its 100 percent best game.
2. Because the computer “sees” so many positions—and does so perfectly—itstactical ability is formidable.
“The Chess Machine”From the period 1914–1924, José Capablanca lost only one game in all thetournaments he played in. He played so steadily and without mistakes that he got thenickname “the chess machine.” But that was nothing compared to real chess machines!

No human, no matter how steady or how consistent, can match the 100 percentperformance that a computer makes every single time.
But that doesn’t mean we shouldn’t try. One of the things the computer does ischallenge us to play more consistently. Since it will pounce on any careless errors wemake, if we want to beat it we have to eliminate those errors the best we can.
This means two things. First, you have to be as objective as possible. You can’t makea move that’s too ambitious—say, a move that tries to win a position you should betrying to draw—because if you do, the computer will just pounce on you. Of coursethis is always true, but the difference is that against a human, sometimes you can bluffyour opponent by your attitude. A human might be intimidated by the confident wayyou make a move, or by the fact that you’ve beaten him before. Not a computer! Oneway that computers challenge us to become better players is that they will never bebluffed by an attitude, so the only way to beat them is by playing your best chess.
The second thing is that you shouldn’t play when you’re tired, hungry, or distracted.Once again, this is also true for human opponents, but sometimes when playing ahuman the same circumstances have an equal effect on both players. For example, ifyou and your friend play until dawn, both of you will probably play worse, and sofatigue may not have a big overall effect on the outcome of the games. But try doingthat against a computer, and I guarantee you’ll see a big difference!
Patrick’s PointersWhen I play my computer, I adopt the “midnight rule”: No playing aftermidnight! Learn your own physical and emotional limitations, and respectthem. You can’t expect to do as well as you’d like against a computer ifyou play when you’re hungry, tired, or distracted, and you won’t learn asmuch from those games either.
20/20 VisionIf you read Chapter 19, you know that there’s a big difference between how manymoves the computer considers, and how many we humans do. The computer looks atmore than a million times more moves! But not only that: It also never gets confused,or has trouble “seeing” the position. When reading the earlier chapters, if you’ve beentrying to follow some of the positions without playing them out on a chess set, orwithout looking at every diagram, you’ve probably been having trouble remembering
where all the pieces are. That’s completely normal. Even grandmasters often havetrouble following a game without playing it out on a set; it’s just part of the way wehumans are built. The computer has no such problem. It does have a limit as to howmany moves ahead it can see in any position, as you know from Chapter 19. (The limitvaries depending upon the program and the machine it’s running on.) But within whatit can “see,” it never gets confused, never forgets which pieces are where or whoseturn it is.
The bottom line? The computer will see tactics perfectly, no matter how hidden theyare. Once again, the computer challenges us to play better because when playing thecomputer, it becomes much more important to spot all the tactics in a position. But ifyou want to beat the computer, my advice is to avoid positions that are “confusing” asmuch as possible. Steer for positions that can be played according to strategy, and stayaway from positions that are purely tactical.
Diagrams 1 and 2 are taken from two of my own games against computers. Diagram 1shows the kind of position you should be very careful about playing. Both kings arepotentially exposed, although Black’s is in more danger than White’s. To compensatefor his exposed king, Black has a material advantage, and to add to the confusion, thepieces are scattered all over the board! Whatever is happening, it’s impossible foreither side to play this position well without seeing a lot of tactics. In fact, thisposition comes from an opening I’ve studied deeply, and I’m convinced that Blackstands well. I’d be happy to play Black against any human in the world. But thecomputer is so good in these “crazy” positions that even though Black has anadvantage, I should have been wary about going into this position against thecomputer. In fact, I soon missed a tactic and lost the game.
Chess LoreSome of the examples of anti-computer play in this chapter come frommy own games in the Harvard Cup Human Versus Computer ChessChallenge, a man-versus-machine tournament that was held each yearfrom 1989 to 1995. In the Harvard Cup, a team of Americangrandmasters faced a team of computer systems (hardware/softwarecombinations) in a match format, with each human playing each machine,and each side getting 25 minutes to play each game. (Regulationtournament play is slower; computers tend to do better the less timeeach side gets.) In 1989, the computers scored 9 percent of the possible
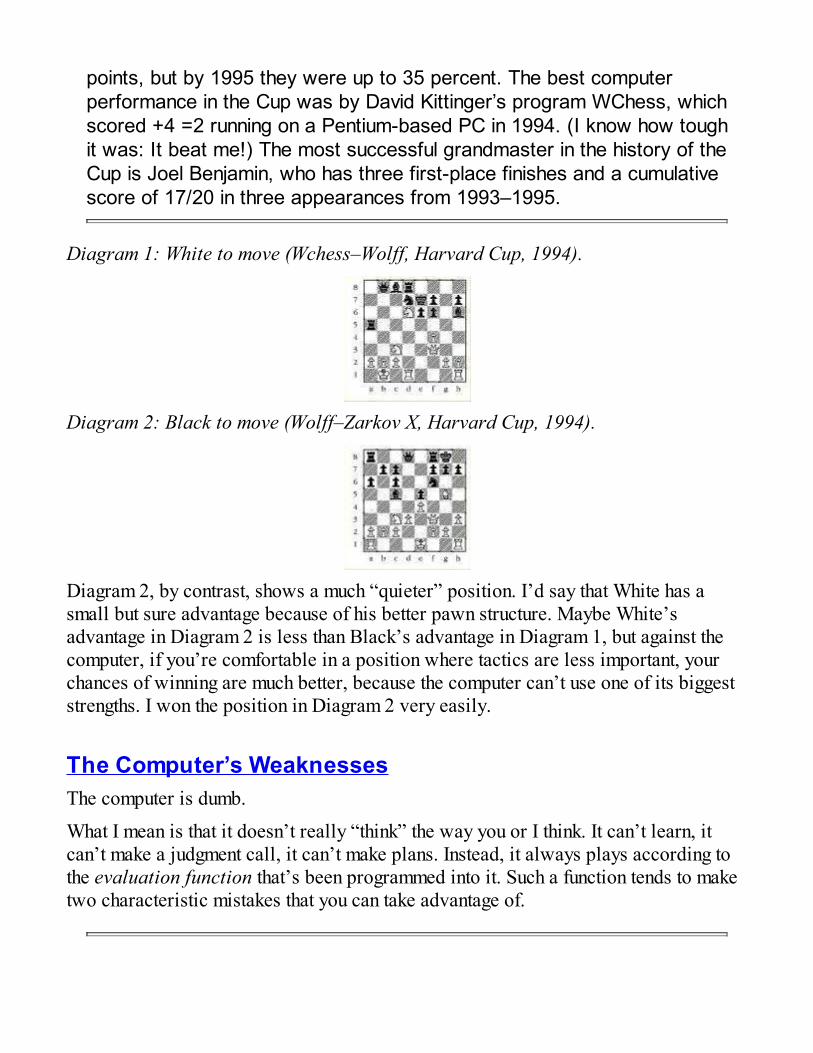
points, but by 1995 they were up to 35 percent. The best computerperformance in the Cup was by David Kittinger’s program WChess, whichscored +4 =2 running on a Pentium-based PC in 1994. (I know how toughit was: It beat me!) The most successful grandmaster in the history of theCup is Joel Benjamin, who has three first-place finishes and a cumulativescore of 17/20 in three appearances from 1993–1995.
Diagram 1: White to move (Wchess–Wolff, Harvard Cup, 1994).
Diagram 2: Black to move (Wolff–Zarkov X, Harvard Cup, 1994).
Diagram 2, by contrast, shows a much “quieter” position. I’d say that White has asmall but sure advantage because of his better pawn structure. Maybe White’sadvantage in Diagram 2 is less than Black’s advantage in Diagram 1, but against thecomputer, if you’re comfortable in a position where tactics are less important, yourchances of winning are much better, because the computer can’t use one of its biggeststrengths. I won the position in Diagram 2 very easily.
The Computer’s WeaknessesThe computer is dumb.
What I mean is that it doesn’t really “think” the way you or I think. It can’t learn, itcan’t make a judgment call, it can’t make plans. Instead, it always plays according tothe evaluation function that’s been programmed into it. Such a function tends to maketwo characteristic mistakes that you can take advantage of.
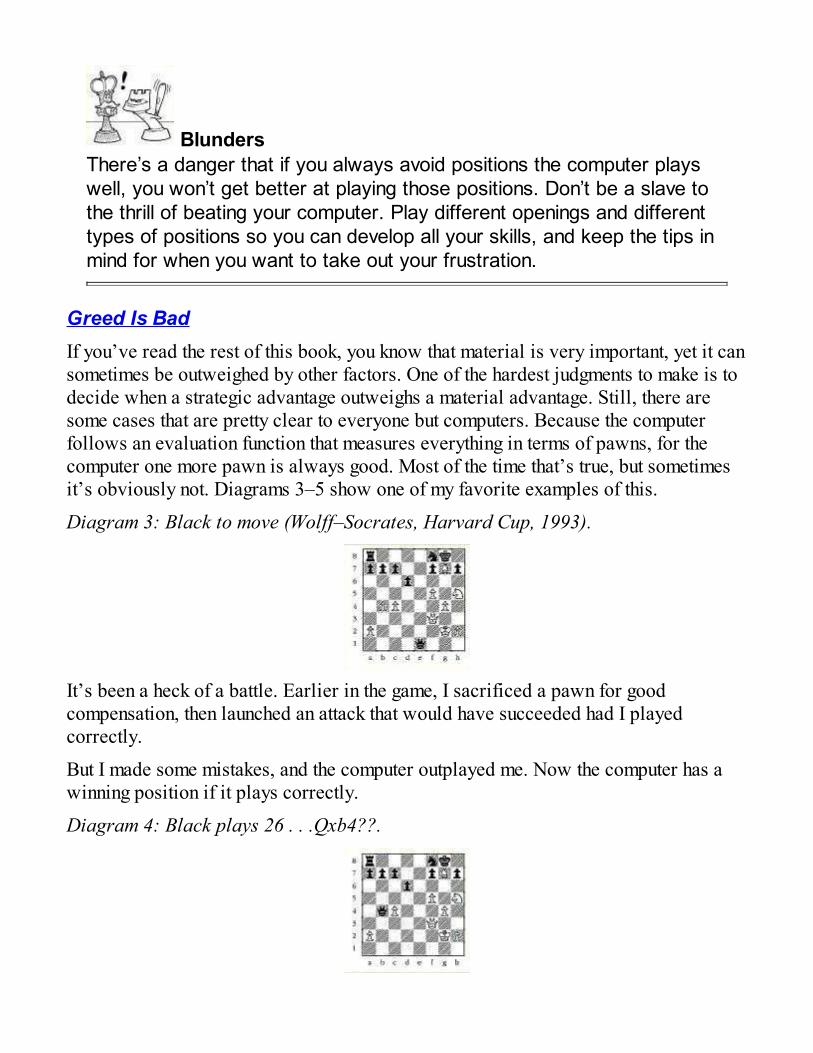
BlundersThere’s a danger that if you always avoid positions the computer playswell, you won’t get better at playing those positions. Don’t be a slave tothe thrill of beating your computer. Play different openings and differenttypes of positions so you can develop all your skills, and keep the tips inmind for when you want to take out your frustration.
Greed Is BadIf you’ve read the rest of this book, you know that material is very important, yet it cansometimes be outweighed by other factors. One of the hardest judgments to make is todecide when a strategic advantage outweighs a material advantage. Still, there aresome cases that are pretty clear to everyone but computers. Because the computerfollows an evaluation function that measures everything in terms of pawns, for thecomputer one more pawn is always good. Most of the time that’s true, but sometimesit’s obviously not. Diagrams 3–5 show one of my favorite examples of this.
Diagram 3: Black to move (Wolff–Socrates, Harvard Cup, 1993).
It’s been a heck of a battle. Earlier in the game, I sacrificed a pawn for goodcompensation, then launched an attack that would have succeeded had I playedcorrectly.
But I made some mistakes, and the computer outplayed me. Now the computer has awinning position if it plays correctly.
Diagram 4: Black plays 26 . . .Qxb4??.
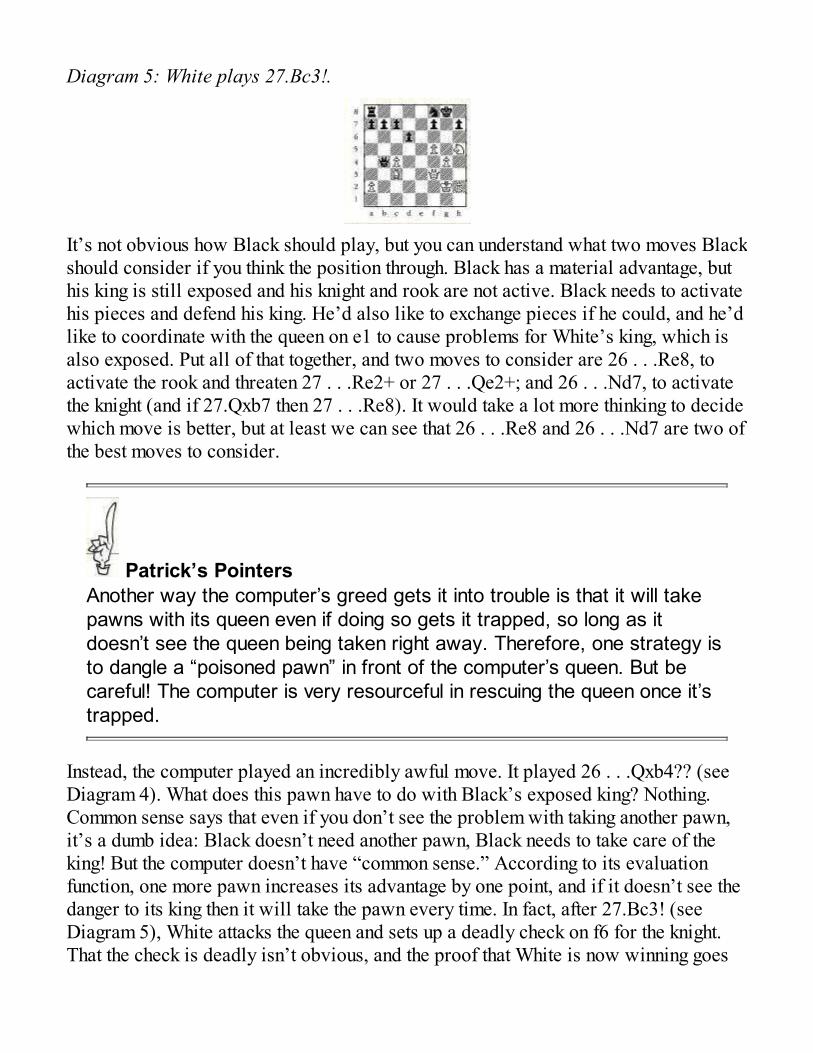
Diagram 5: White plays 27.Bc3!.
It’s not obvious how Black should play, but you can understand what two moves Blackshould consider if you think the position through. Black has a material advantage, buthis king is still exposed and his knight and rook are not active. Black needs to activatehis pieces and defend his king. He’d also like to exchange pieces if he could, and he’dlike to coordinate with the queen on e1 to cause problems for White’s king, which isalso exposed. Put all of that together, and two moves to consider are 26 . . .Re8, toactivate the rook and threaten 27 . . .Re2+ or 27 . . .Qe2+; and 26 . . .Nd7, to activatethe knight (and if 27.Qxb7 then 27 . . .Re8). It would take a lot more thinking to decidewhich move is better, but at least we can see that 26 . . .Re8 and 26 . . .Nd7 are two ofthe best moves to consider.
Patrick’s PointersAnother way the computer’s greed gets it into trouble is that it will takepawns with its queen even if doing so gets it trapped, so long as itdoesn’t see the queen being taken right away. Therefore, one strategy isto dangle a “poisoned pawn” in front of the computer’s queen. But becareful! The computer is very resourceful in rescuing the queen once it’strapped.
Instead, the computer played an incredibly awful move. It played 26 . . .Qxb4?? (seeDiagram 4). What does this pawn have to do with Black’s exposed king? Nothing.Common sense says that even if you don’t see the problem with taking another pawn,it’s a dumb idea: Black doesn’t need another pawn, Black needs to take care of theking! But the computer doesn’t have “common sense.” According to its evaluationfunction, one more pawn increases its advantage by one point, and if it doesn’t see thedanger to its king then it will take the pawn every time. In fact, after 27.Bc3! (seeDiagram 5), White attacks the queen and sets up a deadly check on f6 for the knight.That the check is deadly isn’t obvious, and the proof that White is now winning goes

many moves deep. What’s obvious—to everyone except the computer—is that Blackshouldn’t allow the possibility. After 27 . . .Qxc4 28.Nf6+ Kh8 29.Qe3!, my attackwas in full swing, and I soon won.
Aimless WanderingThe computer has a function for evaluating positions, but it has no way to come upwith a plan. As Chapter 19 explains, the way it chooses a move is to play whatevermove leads to the position it assigns the highest value to. It’s never really “aiming” forany kind of position at all, it’s just playing whatever move happens to get the biggestnumber according to its evaluation function. I’ve already said that in one way thisgives the computer an advantage: Since it looks at every single move in every positionit considers, it doesn’t overlook any moves; so when one move makes a big difference—such as a tactic that wins material—it’s sure to see it. But this aimlessness can be abig disadvantage, because it can’t form an idea of what position it ought to aim forseveral moves down the line. Garry Kasparov was able to exploit this weakness in thesixth and final game of his first match against Deep Blue in Philadelphia, February1996. Deep Blue could have tied the match by winning this game, but insteadKasparov crushed it. Let’s see how (see Diagram 6).
White has a comfortable advantage because of his extra space and superior pieces,while Black’s position is solid and not too bad. But here Deep Blue started playing farbelow the level of a strong grandmaster: 11 . . .Nh5? 12.Re1 Nf4 13.Bb1 Bd6 14.g3!Ng6 (see Diagram 7).
Patrick’s PointersLong-range plans tend to be more important in closed positions, whiletactics tend to be more important in open positions. One good idea is tokeep the position closed as long as you can, prepare to mount an attackon one side of the board, and refrain from opening the position up untilthe last moment. The computer often won’t recognize that an attack iscoming, and will shift its pieces back and forth to no purpose.
Diagram 6: Black to move (Kasparov–Deep Blue, Philadelphia, Game 6, 1996).

Diagram 7: Position after 14 . . .Ng6.
White has improved the position of his rook (putting it on an open file) and his bishop(getting it out of the way of his other pieces while keeping it on its strong diagonal).Black has misplaced the knight (notice how it is “controlled” by the pawn on g3—seethe section on the knight in Chapter 10 for more details) and the bishop (which is alsofrustrated by the strong pawn on g3).
Kasparov increased his advantage with some very strong moves: 15.Ne5! Rc816.Nxd7! Qxd7 17.Nf3 Bb4 18.Re3 Rfd8 (see Diagram 8). It might seem counter-intuitive for White to exchange his knight for Black’s “bad” bishop, but this is wherethe genius of the World Champion comes to bear. Kasparov understood that it wasmore important for him to clear space for his own pieces and to weaken Black on thelight squares.
Now Kasparov did two very smart things. He gained space on both the kingside andthe queenside, and he closed the position up: 19.h4! Nge7 20.a3! Ba5 21.b4! Bc722.c5! (see Diagram 9).
Diagram 8: Position after 18 . . .Rfd8.
Diagram 9: Position after 22.c5!.
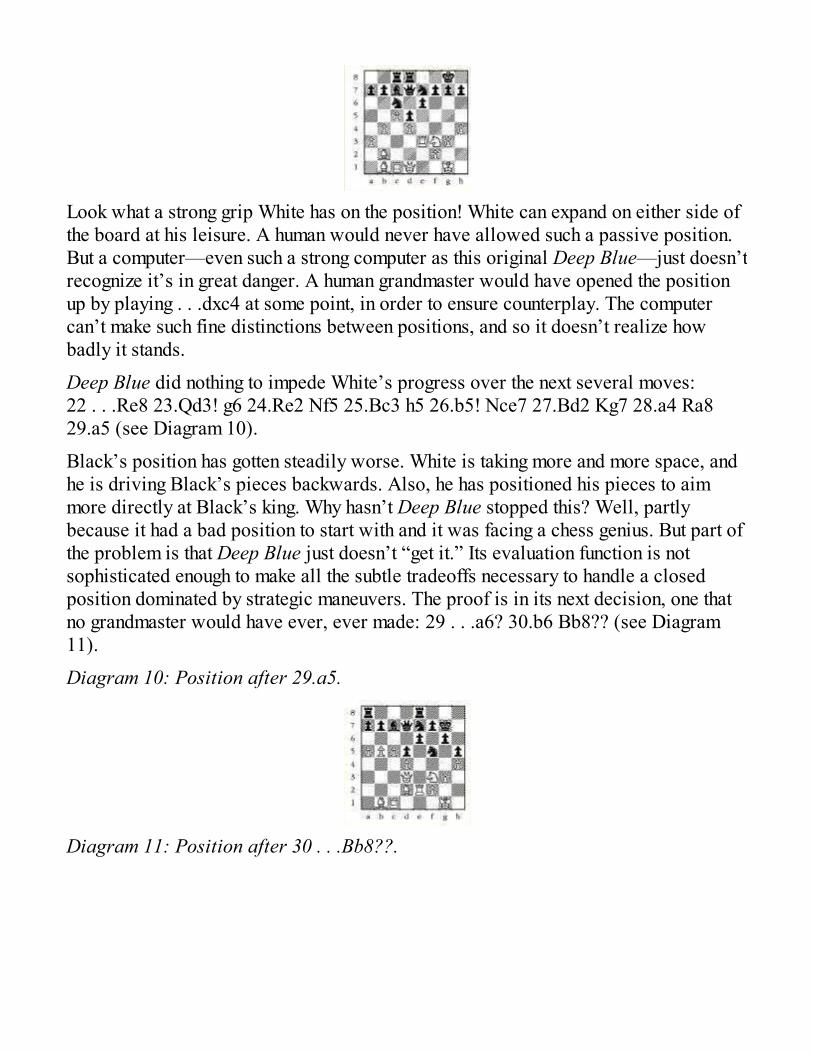
Look what a strong grip White has on the position! White can expand on either side ofthe board at his leisure. A human would never have allowed such a passive position.But a computer—even such a strong computer as this original Deep Blue—just doesn’trecognize it’s in great danger. A human grandmaster would have opened the positionup by playing . . .dxc4 at some point, in order to ensure counterplay. The computercan’t make such fine distinctions between positions, and so it doesn’t realize howbadly it stands.
Deep Blue did nothing to impede White’s progress over the next several moves:22 . . .Re8 23.Qd3! g6 24.Re2 Nf5 25.Bc3 h5 26.b5! Nce7 27.Bd2 Kg7 28.a4 Ra829.a5 (see Diagram 10).
Black’s position has gotten steadily worse. White is taking more and more space, andhe is driving Black’s pieces backwards. Also, he has positioned his pieces to aimmore directly at Black’s king. Why hasn’t Deep Blue stopped this? Well, partlybecause it had a bad position to start with and it was facing a chess genius. But part ofthe problem is that Deep Blue just doesn’t “get it.” Its evaluation function is notsophisticated enough to make all the subtle tradeoffs necessary to handle a closedposition dominated by strategic maneuvers. The proof is in its next decision, one thatno grandmaster would have ever, ever made: 29 . . .a6? 30.b6 Bb8?? (see Diagram11).
Diagram 10: Position after 29.a5.
Diagram 11: Position after 30 . . .Bb8??.
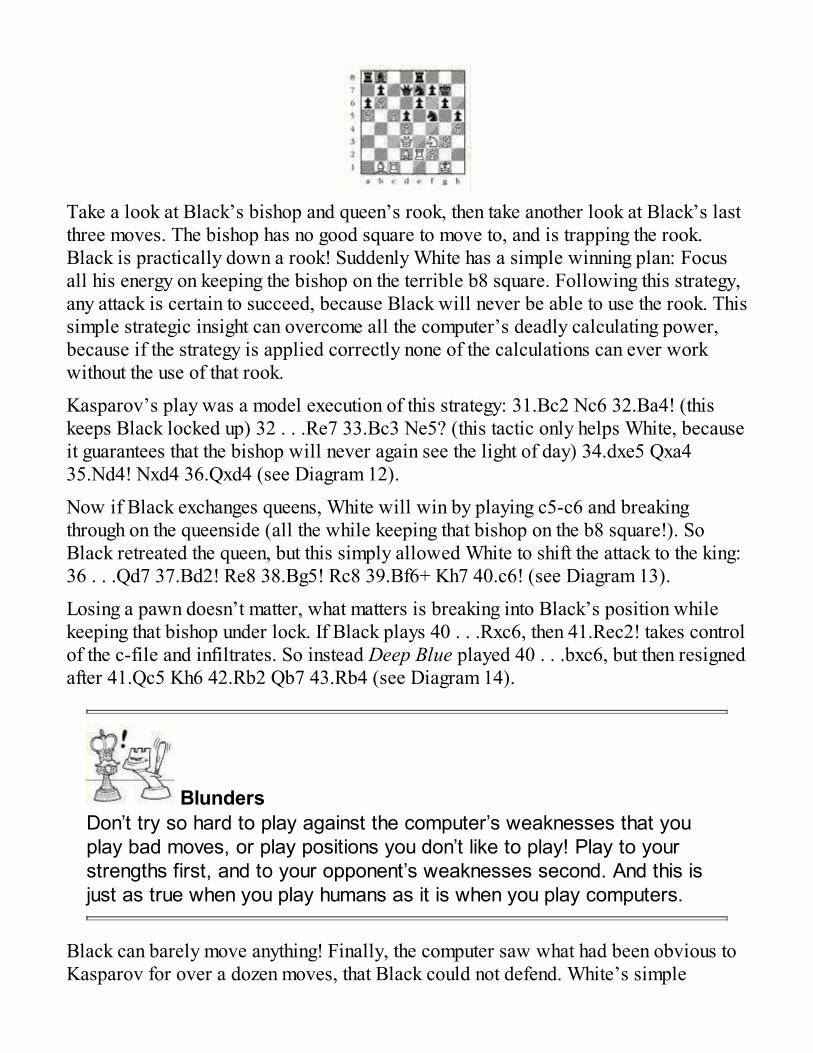
Take a look at Black’s bishop and queen’s rook, then take another look at Black’s lastthree moves. The bishop has no good square to move to, and is trapping the rook.Black is practically down a rook! Suddenly White has a simple winning plan: Focusall his energy on keeping the bishop on the terrible b8 square. Following this strategy,any attack is certain to succeed, because Black will never be able to use the rook. Thissimple strategic insight can overcome all the computer’s deadly calculating power,because if the strategy is applied correctly none of the calculations can ever workwithout the use of that rook.
Kasparov’s play was a model execution of this strategy: 31.Bc2 Nc6 32.Ba4! (thiskeeps Black locked up) 32 . . .Re7 33.Bc3 Ne5? (this tactic only helps White, becauseit guarantees that the bishop will never again see the light of day) 34.dxe5 Qxa435.Nd4! Nxd4 36.Qxd4 (see Diagram 12).
Now if Black exchanges queens, White will win by playing c5-c6 and breakingthrough on the queenside (all the while keeping that bishop on the b8 square!). SoBlack retreated the queen, but this simply allowed White to shift the attack to the king:36 . . .Qd7 37.Bd2! Re8 38.Bg5! Rc8 39.Bf6+ Kh7 40.c6! (see Diagram 13).
Losing a pawn doesn’t matter, what matters is breaking into Black’s position whilekeeping that bishop under lock. If Black plays 40 . . .Rxc6, then 41.Rec2! takes controlof the c-file and infiltrates. So instead Deep Blue played 40 . . .bxc6, but then resignedafter 41.Qc5 Kh6 42.Rb2 Qb7 43.Rb4 (see Diagram 14).
BlundersDon’t try so hard to play against the computer’s weaknesses that youplay bad moves, or play positions you don’t like to play! Play to yourstrengths first, and to your opponent’s weaknesses second. And this isjust as true when you play humans as it is when you play computers.
Black can barely move anything! Finally, the computer saw what had been obvious toKasparov for over a dozen moves, that Black could not defend. White’s simple

winning plan is to prepare g3-g4, expose the Black king, and attack. All the while,White keeps that bishop locked into b8, keeping Black’s army cut off from defense.None of the tactics will ever work for Black.
Diagram 12: Position after 36.Qxd4.
Diagram 13: Position after 40.c6!.
Diagram 14: Position after 43.Rb4, where Black resigned.
I can’t say it strongly enough: If you want to play against the computer’s weakness,aim for positions that are primarily strategic, rather than tactical. This is youradvantage. Where strategy matters more than tactics, humans have the edge. Andstrategy tends to matter more than tactics primarily in closed positions.
Just be careful, though, not to fall into the trap Kasparov made for himself in hisrematch against Deep Blue! You can only play against the computer’s weaknesseswhen you play positions that are your strength. Play good moves. Play positions thatyou like to play. Only try to play against the computer’s weaknesses after playing toyour strengths.
The Least You Need to Know
Be very careful when playing positions that are primarily tactical, and avoid

them when possible.
Be aware of your own physical and emotional limitations, and respect them.
Aim for positions that are primarily strategic.
Computers are terrible at playing closed positions, because they require long-term planning; in closed positions, the computer tends to play aimlessly.
The computer tends to be greedy and underestimate the danger to its queen orking, so try to use that to your advantage.
Play to your strengths before playing against the computer’s weaknesses.
Don’t be afraid to play positions the computer plays well: You can use thecomputer to train your own ability to play such positions better!

Appendix A
Your Chess Rolodex
This appendix lists alphabetically the names and essential contact information(telephone numbers, e-mail addresses, Internet Web sites, and/or street addresses) forall of the organizations mentioned in this book. In particular, the book publishers andmagazines from Chapter 15, the chess associations, clubs, and vendors from Chapter17, and the software companies from Chapter 18, are all included.
Aficionado, Inc. Gatehouse Plaza Suite 205, 1290 B Street, Hayward, CA 94541 1-800-465-9301 510-886-4695 510-886-5406 (fax) www.chess.com
The American Chess School 140 School Street Bradford, PA 16701 814-368-8009 www.amchess.org
American Postal Chess Tournaments PO Box 305 Western Springs, IL 60558-0305 630-663-0688 630-663-0689 (fax) http://correspondencechess.com
Boylston Chess Club YWCA, 140 Clarendon St. Boston, MA 02116

617-351-7668 617-351-7669 http://world.std.com/~boylston
British Chess Magazine44 Baker Street London W1U 7RT England 44 20 7486 8222 44 20 7486 3355 (fax) [email protected] www.bmchess.co.uk
Cadogan Books plc 3rd Floor 27-29 Berwick Street London W1V 3RF United Kingdom 44 171 287 6555 44 171 734 1733 (fax) [email protected] (e-mail)
Canadian Correspondence Chess Association 37 Bemersyde Dr. Etobicoke, Ontario M9A 2S9 Canada 416-234-0207 416-236-4136 http://correspondencechess.com/ccca/index.html
Chess & Bridge Ltd. 369 Euston Road London NW1 3AR England 44 20 7388 2404 44 20 7388 2407 (fax) www.chess.co.uk
Chess & Bridge, Inc. (USA address) 2363 Oak Tree Lane West Palm Beach, FL 33409 1-888-243-7706

Chess Combination, Inc. 2423 Noble Station Bridgeport, CT 06608-0423 1-800-354-4083 302-380-1703 (fax)
Chess Digest, Inc. PO Box 535699 Grand Prairie, TX 75053-5699 1-800-462-3548 972-264-4200 972-237-9690 (fax) www.chessdigest.com
Chess Emporium 10801 N. 32nd Street, Suite 6 Phoenix, AZ 85032 602-482-4867 602-494-6025 (fax) http://chessemp.com
Chess Federation of Canada 2212 Gladwin Crescent, Unit E-1 Ottawa, Ontario K1B 5N1 Canada 613-733-2844 613-733-5209 (fax) www.chess.ca
Chess Forum 219 Thompson St. New York, NY 10012 1-800-393-4330 212-475-2369 212-460-8140 (fax) www.chessforum.com
The Chess House PO Box 705 Lynden, WA 98264 1-800-348-4749 360-354-6815 360-354-6765 (fax)

www.thechesshouse.com
Chess Informant PO Box 739 11001 Beograd Francuska 31 Yugoslavia [email protected] (e-mail)
Chess Life c/o U.S. Chess Federation
Chess Palace 4336 Katella Ave. Los Alamitos, CA 90720-3564 562-598-5099 www.chesspalace.com
Chess-in-the-Schools 353 West 46th St. New York, NY 10036 212-757-0613 212-757-7704 (fax) www.chessintheschools.org
Chess Monthly c/o Chess & Bridge, Inc.
ChessBase USA PO Box 609 Ardmore, TN 38449 1-800-524-3527 256-423-8345 (fax) www.chessbaseusa.comwww.chessbase.com
Chessco PO Box 8 Davenport, IA 52805-0008 1-800-397-7117 319-323-7117 319-323-0511 (fax) www.chessco.com

[email protected] (e-mail)
Correspondence Chess League of America c/o Paul Berthelot, President 1514 Naches Ave. Richland, WA 99352-8524 www.chessbymail.com
Dover Publications, Inc. 31 East Second St. Mineola, NY 11501 www.doverpublications.com
Europe Echecs 4B2 Rue Roussillon 25000 Besanσf;on France 33 381 41 01 26 33 381 51 71 64 (fax) [email protected] (e-mail) www.europe-echecs.com
Féderation Internationale des Échecs (FIDE) PO Box 166, CH-1000 Lausanne 4 Switzerland 41-213291921 41-213291922 41-213291923 (fax) www.fide.com
Franklin Mercantile Chess Club 1420 Walnut Street, Suite 460 Philadelphia, PA 19103 215-546-1883
Gambit Publications, Ltd 69 Masbro Road, Kensington London W14 0LS England 44-20 7371 1477 (fax) www.gambitchess.co.uk

[email protected] (e-mail)
Inside Chess c/o International Chess Enterprises
Interchess BV (publisher of New In Chess) PO Box 1093 1810 KB Alkmaar The Netherlands 31-725127137 31-725158234 (fax) www.newinchess.com
International Chess Enterprises PO Box 19457 Seattle, WA 98109 1-800-262-4377 206-286-9764 206-283-4363 (fax) www.insidechess.com
International Computer Chess Association c/o David Levy 5 Akenside Road London NW3 5BS England [email protected] (e-mail) www.dcs.qmw.ac.uk/~icca
International CorrespondenceChess Federation www.iccf.com
The Learning Company 6493 Kaiser Drive Fremont, CA 94555 510-792-2101 1-800-395-0277 www.learningco.com
Manhattan Chess Club Hotel New Yorker 481 8th Avenue, Suite 1521 New York, NY 10001
212-333-5888 www.manhattanchessclub.com
Marshall Chess Club 23 West 10th St. New York, NY 10011 212-477-3716 www.marshallchessclub.org
David McKay Co., Inc. c/o Random House, Inc.
Mechanics Institute Chess Club 57 Post St., 4th fl. San Francisco, CA 94104 415-421-2258 www.chessclub.org
National Scholastic Chess Foundation 171 East Post Road, Suite 206 White Plains, NY 10601 914-683-5322 [email protected] (e-mail) www.nscfchess.org
New In Chessc/o Interchess BV c/o Chess Combination, Inc. in the U.S.
Oxford University Press 200 Madison Ave. New York, NY 10016 212-726-6000 www.oup.co.uk
Random House, Inc. 1540 Broadway New York, NY 10036 1-800-733-3000 212-782-9000 212-302-7985 (fax)
Rochester Chess Center 221 Norris Dr.

Rochester, NY 14610 1-800-662-4377 716-442-2430 (fax) www.chessset.com
Russell Enterprises, Inc. PO Box 30 Milford, CT 06460 www.chesscafe.com
School Mates c/o U.S. Chess Federation
Sierra On-Line, Inc.Bellevue, WA 98007 1-800-757-7707 www.sierra.com
U.S. Chess Center 1501 M Street NW Washington, DC 20005 202-857-4922 www.chessctr.org
U.S. Chess Federation (USCF) 3054 NYS Route 9W New Windsor, NY 12553 1-800-388-5464 845-562-8350 845-561-2437 (fax) www.uschess.org
Village Chess Shop Ltd. 230 Thompson St. New York, NY 10012 212-475-9580 212-982-7471 (fax) www.chess-shop.com
Wilshire Book Company 12015 Sherman Rd. North Hollywood, CA 91605 818-765-8579 818-765-2922 (fax)

www.mpowers.com
Your Move Chess & Games 21 Walt Whitman Rd. Huntington Station, NY 11746 1-800-645-4710 631-424-3405 631-424-3405 (fax) www.icdchess.com
Atlanta Chess Center 3155 E. Ponce de Leon Ave. Scottdale, GA 30079 404-377-4400
B. T. Batsford Ltd. 9 Blenheim Court Brewery Road London N7 9NY United Kingdom 44-207 700 7611 44-207 700 4552 (fax) www.batsford.com
BOOKUP Corp. 2763 Kensington Place West Columbus, OH 43202-2355 1-800-949-5445 614-263-7219 614-262-9788 (fax) www.bookup.com
Appendix B
Other Chess Notations
Throughout this book I’ve used a form of algebraic notation to describe chess moves.In this appendix I will explain the other major system for describing chess moves,called descriptive notation. Descriptive notation is no longer commonly used, butmany older books and magazines still in print use it, and if you want to be able to readthem, you have to know it.
First, you should be aware that there are also variants of algebraic notation in use.Each language has its own names for the chess pieces, so if, for example, youencounter a French chess publication, you will see the symbols R (roi/king), D(dame/queen), T (tour/rook), F (fou/bishop), and C (cavalier/knight). This can beconfusing, although you’d be surprised how quickly you can figure out which letterstands for which piece. Fortunately, more and more publications are using a language-independent figurine algebraic notation. In this system, the pieces are referred to bythe same pictorial symbols used in chess diagrams (except they are always white,even when they are used to show a move by Black). You should also keep in mind thatsome versions of algebraic notation leave out the “x” for capture moves and the “+”for checking moves, and sometimes when one pawn captures another only the files arelisted (for example, instead of cxd4 you might see cd4 or even just cd). Noinformation is lost by compacting the notation in these ways, but since it does get a bitmore confusing you don’t see these variants as frequently as the standard notation I’vebeen using. Finally, there are two minor variations to keep in mind. First, the letters“e.p.” are sometimes put after an en passant pawn capture. Second, sometimes a winfor White, draw, or win for Black is indicated by “1-0”, “1/2-1/2”, and “0-1”respectively.
Now to descriptive notation. Actually, “descriptive” is a misnomer; in my opinion thisold-fashioned system is less descriptive and more confusing than algebraic (unlessyou grew up with it). Chess notation is a case in which the U.S. has caught up with therest of the world, most of which has been using algebraic notation for decades.(Celsius temperatures and metric measurements may take a bit longer!)
In descriptive notation, the pieces are referred to just as in algebraic, except the

pawns are explicitly named “P,” and in very old books “Kt” is sometimes used insteadof “N” for the knight. But the similarity between the two notations ends there. For onething, each square on the board has two different names, not just one as in algebraic.Each square is named by putting its file in front of its rank (as in algebraic notation),but in descriptive notation each file and rank is named both from White’s point ofview and Black’s point of view. Furthermore, the files are referred to according to thepiece that stood on them at the beginning of the game: K for king, Q for queen, KB forking bishop (the bishop on the king’s side of the board), QB for queen bishop, KN forking knight, QN for queen knight, KR for king rook, and QR for queen rook. Diagram 1shows the names of the files and ranks from each player’s perspective. (Note that if noambiguity is introduced, the K or Q can be omitted from before the B, N, or R in thename of a square or a piece.) A move consists of a piece name, followed by a hyphen,followed by a square name; a capture consists of the capturing piece name, an x, andthe captured piece name. If this all seems cumbersome compared to algebraic, that’sbecause it is. You don’t even want to know how they did it in the nineteenth centurybefore this “simplified” system was invented!
Diagram 1: The names of the ranks and files from each player’s perspective indescriptive notation.
You’ll probably understand descriptive notation better if you play through a briefgame in it: 1.P-Q4 N-KB3 2.P-QB4 P-K4 3.PxP N-N5 4.B-B4 B-N5+ (+ for checks,sometimes “ch”) 5.N-Q2 N-QB3 6.N-B3 (not N-KB3, since the knight at Q2 is pinnedand cannot move) Q-K2 7.P-QR3 KNxKP! (the punctuation marks are the same)8.PxB?? N-Q6 mate (no # in descriptive). In algebraic that game went: 1.d4 Nf6 2.c4e5 3.dxe5 Ng4 4.Bf4 Bb4+ 5.Nd2 Nc6 6.Nf3 Qe7 7.a3 Ngxe5! 8.axb4?? Nd3#.
If you’ve read Chapter 3 and this appendix, you know how to read and write chessmoves in all the major chess notations. The whole world of chess is open to you now!If you ever get confused about some aspect of algebraic notation (the standard chessnotation, and the one this book uses), refer to the tear-out card where I boil it down tothe essentials. Don’t worry too much about descriptive notation: You’re better offsticking to algebraic anyway! If you’ve got a book or magazine in descriptive that youwant to read, take another look at this appendix and go over the sample game above.

With a little practice, you’ll have no trouble understanding whatever you want to read.
Appendix C
Answers to Exercises
Answers to Exercises from Chapter 2Exercise #1: The pawn on f5 may capture the bishop on e6, which is written “1.fxe6”.The pawn on e2 may move to e3 or e4, which are written “1.e3” and “1.e4”,respectively. The pawn on a4 may capture the pawn on b5, which is written “1.axb5”.What about the pawn on c3? I played a little trick on you! This pawn may not move,because if it moved, the bishop on a5 would put the white king into check. You cannever play a move that would put yourself into check.
Exercise #2: The knight on b7 has no moves. The knight on f6 can move to d7, e8, g8,h7, or h5, which are written “1 . . .Nd7”, “1 . . .Ne8”, “1 . . .Ng8”, “1 . . .Nh7”, and“1 . . .Nh5”, respectively. Or the knight may capture either of the pawns on d5 or g4,which are written “1 . . .Nxd5” and “1 . . .Nxg4” respectively. But the knight cannotmove to e4, because his own pawn blocks him.
Exercise #3: The bishop on f8 cannot move. The bishop on e6 can move to g8, f7, f5,d7, c8, d5, or c4, which are written “1 . . .Bg8”, “1 . . .Bf7”, “1 . . .Bf5”, “1 . . .Bd7”,“1 . . .Bc8”, “1 . . .Bd5”, and “1 . . .Bc4”, respectively. The bishop can also capturethe pawn on g4 or the queen on b3, and these are written “1 . . .Bxg4” and“1 . . .Bxb3” respectively.
Exercise #4: This was another tricky question! White’s king is in check from theblack rook, so White must remove the check. The only way to do that by moving therook is to capture the rook on e6, so this is the only move White can make with therook. This move is written “1.Rxe6+”. The “+” sign indicates that the move is check,as is explained in Chapter 3.
Exercise #5: The black queen can move to a2, b3, c4, e6, c6, e4, e5, f5, c5, b5, d4,d3, d6, d7, or d8. These moves are written “1 . . .Qa2”, “1 . . .Qb3”, “1 . . .Qc4”,“1 . . .Qe6”, “1 . . .Qc6”, “1 . . .Qe4”, “1 . . .Qe5”, “1 . . .Qf5”, “1 . . .Qc5”,“1 . . .Qb5”, “1 . . .Qd4”, “1 . . .Qd3”, “1 . . .Qd6”, “1 . . .Qd7”, and “1 . . .Qd8”,respectively. Black can also capture the pawn on f3, the rook on a5, or the queen ond2. These moves are written “1 . . .Qxf3”, “1 . . .Qxa5”, and “1 . . .Qxd2+”

respectively. Again, as explained in Chapter 3, the “+” indicates check.
Exercise #6: The White king can capture the queen on d5, but it can’t capture thepawn on e5, because this pawn is protected by the queen, and if White made this moveit would put his own king in check. The white king can move to e3 or f5, which arewritten “1.Ke3” and “1.Kf5” respectively, or it can capture the queen on d5, which iswritten “1.Kxd5”.
Exercise #7: It must be Black’s turn, because his king is in check. Black’s legalmoves are to move his king to e8 or g8, or to capture the bishop with his knight. Thesemoves are written, respectively: 1 . . .Ke8; 1 . . .Kg8; 1 . . .Nxc5.
Exercise #8: Black has exactly twenty legal moves. He can move either pawn one ortwo squares forward, he may move his queen’s knight (the knight on b8) to a6 or c6, orhe may move his king’s knight (the knight on g8) to f6 or h6. These moves are written,respectively: 1 . . .a6; 1 . . .a5; 1 . . .b6; 1 . . .b5; 1 . . .c6; 1 . . .c5; 1 . . .d6; 1 . . .d5;1 . . .e6; 1 . . .e5; 1 . . .f6; 1 . . .f5; 1 . . .g6; 1 . . .g5; 1 . . .h6; 1 . . .h5; 1 . . .Na6;1 . . .Nc6; 1 . . .Nf6; 1 . . .Nh6.
Exercise #9: White has eight legal moves with a pawn. These moves are written,respectively: 1.a3; 1.a4; 1.c4; 1.d5; 1.dxe5; 1.g3; 1.g4; 1.h4. White has five legalmoves with his king’s bishop (the bishop on b3). These are: 1.Bc2; 1.Bc4; 1.Bd5;1.Be6; 1.Bxf7+. White has no legal moves with his queen’s bishop (the bishop on c1),because it is blocked by the pawn on b2 and the knight on d2.
Exercise #10: Black can make three legal moves with his king’s knight: 1 . . .Nfb,1 . . .Ne7, or 1 . . .Nhb; notice that the second move is not written “1 . . .Nge7”because there is no need to distinguish the knight on g8 from the knight on c6. Blackcannot move his queen’s knight, because if he does so his king will be in check. (Theknight is pinned to the king; you will learn more about the pin in Chapter 6.) Black canmake two legal moves with his queen’s rook (the rook on a8): 1 . . .Rb8 or 1 . . .Ra7.Black cannot move his king’s rook (the rook on h8), because it is blocked by the knighton g8 and the pawn on h7.
Exercise #11: Black is in check, therefore he must eliminate the check. There are onlytwo moves that do this: 1 . . .Qc8 or 1 . . .Qxg8. The best move is 1 . . .Qxg8. After1 . . .Qc8 2.Rxc8 is checkmate. However, after 1 . . .Qxg8 although White can capturethe queen with 2.Nxg8, the game will be a draw, because there is no way to checkmatethe king with only a knight and king. (See Chapter 3 for more about when the game is adraw.)
Exercise #12: White has one legal move with his king: 1.Ka5. (All other king movesput White into check.) White has six legal moves with his knight: 1.Nc6+; 1.Nd5;
1.Nf5; 1.Ng6; 1.Ng8; 1.Nc8, White has nine legal moves with his rook: 1.Rg8+;1.Rg6; 1.Rg5; 1.Rg4; 1.Rg3; 1.Rg2; 1.Rg1; 1.Rf7; 1.Rh7. After 1.Rg8+, we have theposition in Exercise #11. However, the best move is 1.Nc6+ Qxc6+ (1 . . .Ka8 allows2.Ra7 checkmate, and 1 . . .Kc8 allows 2.Rc7 checkmate) 2.Kxc6, and White canforce checkmate with rook and king. See Chapter 4 for more about how White can winthis position.
Answers to Exercises from Chapter 3Exercise #1: Yes, he can. Black has just moved the pawn two squares, so White canrespond by capturing en passant on the very next move. Were you thrown off by thefact that White is in check? But capturing the pawn en passant removes the check, so itis okay.
Exercise #2: The only way for White to promote the pawn to a queen on this move isto capture the rook giving check to his king, and the move is written, “1.cxd8=Q#”.Notice the “#” is there because when White plays this move, Black is in checkmate!White can’t play 1.c8=Q, because his king is in check and that must be dealt with.
Exercise #3: White castling queenside is written, “1.O–O–O”. Black cannot castlequeenside on the next move, because the black king must pass through the d8 square todo so, and this square is controlled by the white rook on d1. By the way, notice thatWhite could castle queenside even though the black bishop on g7 was attacking hisrook on a1. There is no rule against castling if your rook is attacked! (If you gotconfused on this exercise, you should go back and review the castling rules in thischapter.)
Exercise #4: Black can play 1 . . .Qg4+!, when White’s only possible response is2.Kh1. Black then plays 2 . . .Qf3!+, but not 2 . . .Qe4+?, because after 3.f3 Qxf3+4.Rxf3 the checks stop. and the game could continue: 3.Kg1 Qg4+ 4.Kh1 Qf3+ 5.Kg1Qg4+ and so on forever until the game is declared a draw.
Exercise #5: White can play 1.Rg3+! Kh7 (or 1 . . .Kh8) 2.Rh4#.
Exercise #6: Black is not in stalemate because he has one possible move, 1 . . .h3.And if White is alert enough to see that 2.Nc7# is checkmate, then he’ll win the game!
Exercise #7: White can’t castle queenside, because then his king would pass throughcheck on d1. But White can castle kingside, which is written: 1.O–O. Notice that hecan castle kingside even though the rook on h1 is attacked.
Exercise #8: This position should not be declared a draw! Without the black pawn onh3, there would be no legal way to construct a checkmate. But with the pawn, there is

a way. In fact, this position is actually winning for White: 1.Ng4! h2 (the only legalmove) 2.Nf2 checkmate. White forces the pawn to take the h2 square from Black, thenWhite delivers checkmate with the knight. This is a good pattern to remember.
Exercise #9: Black should play 1 . . .h2! when White must allow Black to bestalemated (e.g., 2.Ne4), or else Black will move the king to g1 and then promote thepawn safely (e.g., 2.Kg3?? Kg1 and 3 . . .h1=Q). If Black plays 1 . . .Kh2, then heloses after 2.Ng4+! Kh1 3.Kf1! h2 4.Nf2#.
Exercise #10: Yes, if White plays 1.g4, Black can play 1 . . .hxg3+ en passant.Kasparov did not push the pawn, precisely because he did not want Black to be ableto capture en passant in this position. But as you will see in a later exercise, in thiscase he made the wrong decision.
Exercise #11: Black should play 1 . . .c1=R!, when he can easily win White’s lastpawn and force checkmate. (See Chapter 4 to see how to force checkmate with therook.) Black should not play 1 . . .c1=Q?? because then White will be in stalemate andthe game will be drawn. Black also should not promote to a knight or a bishop,because then he will not be able to force checkmate. Even though Exercises 8 and 9illustrate positions where the knight and king can give checkmate against a pawn andking, that is a very rare case. Here, if Black made a knight or bishop, White woulddraw very easily.
Exercise #12: Black can’t castle on either side because he is in check. If Black blocksthe check with either his knight or his bishop, he will be in big trouble. (Do you seewhy? If not, you might want to ask yourself the same question after you read Chapters5 and 6.) So Black will have to move his king either to f8 or d8, which will make itdifficult for Black to get his king to a good square. Black should have castled earlier!
Answers to Exercises from Chapter 4Exercise #1: White plays 1.Qf7! Black has no other move than 1 . . .Kc8, and thenWhite has several ways to give checkmate: 2.Qc7#, 2.Qe8#, 2.Qf8#, and 2.Qg8#. ButWhite should not play 1.Qe6?, because then Black is in stalemate. (Give yourselfcredit also for 1.Qe2! which forces checkmate after 1 . . .Kc8 2.Qe8#.)
Exercise #2: White plays 1.Ra1! Black has to play 1 . . .Kc8, and then White plays2.Ra8#.
Exercise #3: b4 and a6.
Exercise #4: White should push the pawn so that he can promote it to either a rook or(better) a queen. Then White will be able to deliver checkmate. There are two ways to

carry the plan out. The simplest is 1.b6 Kd8 (Black brings the king over to try to stopthe pawn from reaching the edge of the board . . .) 2.b7 (but Black doesn’t get there intime!) and White will promote the pawn on the next move. Another way is to play1.Kc7, which prevents the black king from going to d8 or d7. The way is then clear forWhite to push the pawn to b8, make it a queen, and win the game.
Exercise #5: Black wins with 1 . . .Kg6!, threatening checkmate with 2 . . .Qf7,2 . . .Qe8, or 2 . . .Qd8. White has no good defense. But see Exercise #6 for White’sbest try!
Exercise #6: Black should play 1 . . .Kxf6 2.Kh8 Qg7#. Black should not play1 . . .Qxf6?? as then White would be stalemated.
Exercise #7: White plays 1.Re7! Kh5 2.Rh7#.
Exercise #8: After 1 . . .c1=R 2.Kb2, here’s how I did it: 2 . . .Rc5 3.Ka2 Rb5(there’s nothing wrong with 3 . . .Rc3 and 4 . . .Rxa3 except that it takes longer) 4.Ka1Kb3 (NOT 4 . . .Kxa3?? and it’s stalemate!) 5.Kb1 (5.a4 Rd5 and 6 . . .Rd1#)5 . . .Rc5! (quickest) 6.a4 (6.Ka1 Rc1#) 6 . . .Kxa4 7.Kb2 Kb4 8.Ka2 Rc2+ 9.Kb1Kb3 10.Ka1 Rc1#.
Answers to Exercises from Chapter 5Exercise #1: The knight on d4 attacks the pawns on b5 and e6, and the knight on c6.The pawns are each protected: The pawn on b5 is protected by the pawn on a6, andthe pawn on e6 is protected by the pawn on f7. So White should not capture either ofthe pawns. But the knight on c6 is only defended once, by the bishop on b7, while it isattacked twice: by the bishop on f3 as well as the knight on d4. White can win a knightby playing 1.Nxc6+ Bxc6 2.Bxc6. Just as good is 1.Bxc6 Bxc6 2.Nxc6+, which wins aknight for a bishop. In either case, White gains a large material advantage.
Exercise #2: No. If White plays 1.Rxb7??, Black will play 1 . . .Bxb7 and win awhole rook for a measly pawn! And if White plays 1.dxc5, Black wins the pawn backright away with 1 . . .Bxc3+.
Exercise #3: White attacks the pawn on e6 with his queen, and the pawn on h6 withhis bishop on d2. White should not capture either of them because they are bothprotected. The pawn on e6 is protected by the pawn on f7, and the pawn on h6 isprotected by the pawn on g7 and the rook on h8.
Exercise #4: Yes. Both moves win a pawn. White attacks the pawn on d4 three times,and Black defends it only twice, so he can capture it. The game might continue:1.Nfxd4 Nxd4 2.Qxd4 Qxd4 3.Nxd4, and White has won a pawn. 1.Qxd4??, however,

is a very bad move because it loses the queen after 1 . . .Nxd4.
Exercise #5: Black should play 1 . . .Qxg5!, which wins a bishop for nothing.
Exercise #6: Black should capture the knight on c4, and not the one on e6. The whiterook protects each of the knights once, but Black attacks the white knight on c4 withtwo rooks (notice the power of doubled rooks), so he wins a knight by 1 . . .Rxc42.Rxc4 Rxc4.
Exercise #7: No: 1 . . .Nxc3 2.Rxc3 Rxc3 3.Kxc3 is a series of equal trades, as is1 . . .Rxc3 2.Rxc3 Nxc3 3.Kxc3.
Exercise #8: After 1.dxc6 Rxc6 material will be equal. But that does not mean Whiteshould not play 1.dxc6!, because it is still the best move. In the diagrammed position,White has a material disadvantage: Black has a knight for White’s pawn. White mustgrab the chance to even the situation with 1.dxc6.
Exercise #9: White can play three captures: 1.Bxf6, 1.Nxc6, and 1.Nxe6. None ofthem gives White a material advantage:
After 1.Bxf6 Bxf6, White has made an even trade. (Maybe Black has gained atiny material advantage, because he now has a bishop for a knight.)
After 1.Nxc6 bxc6, White has made an even trade.
After 1.Nxe6? Bxe6, White has lost a knight for a pawn.
Exercise #10: White can play three captures: 1.axb5, 1.dxe5, and 1.Bxf7+. None ofthem gives White a material advantage:
After 1.axb5 axb5, White has made an even trade.
After 1.dxe5 dxe5, White has made an even trade.
After 1.Bxf7+? Kxf7, White has lost a bishop for a pawn.
Exercise #11: White should capture the rook on b6. After 1.Bxb6 Bxb6, White haswon a rook for a bishop. (Capturing the knight on f6 is at best only an even trade.)
Exercise #12: No. The white queen is more valuable than either the black knight orthe black rook. Since both of these pieces are protected, White should capture neitherof them.
Exercise #13: Yes. After 1.Rxd7 Bxd7 2.Rxd7, White wins a knight and a bishop fora rook. According to the chart of the relative value of the pieces, a knight and a bishoptogether are worth a little more than 6, while a rook is only worth 5.
Exercise #14: No. After 1.Rxd7 Bxd7 2.Rxd7, now that the king is on c8, Black canplay 2 . . .Kxd7, when White has lost two rooks for only a knight and a bishop. (Makesure you understand the difference between this exercise and Exercise 13.)
Exercise #15: No. In particular, notice that 1 . . .Be5?? 2.Bxe5 is a disaster, becauseBlack loses a bishop for nothing, and also 1 . . .Kg7? 2.Bxf6+ Kxf6 loses a rook for abishop.
Exercise #16: No. Black still should not defend the rook, for the same reason as inExercise #15. Black still cannot block the attack by moving a piece to e5, becauseeven though he has one more piece which attacks this square (the knight on g6), Whitealso has one more piece that attacks this square (the knight on f3), so they even out.(For example: 1 . . .Be5?? 2.Nxe5 Nxe5 3.Bxe5) Nor should Black capture the knighton f3, because it is defended by the pawn on g2: 1 . . .Rxf3? 2.gxf3, and White wins arook for a knight.
Exercise #17: Yes. Black can attack White’s queen with 1 . . .Nf4, when Whiteshould meet the threat to the queen rather than capture the rook, that is, 2.Bxf6??Nxe2+ and Black wins a queen for a rook.
Exercise #18: The white knight attacks both the queen and the rook at the same time.This is called a “fork,” which you will learn about in Chapter 6. Since both pieces areattacked at the same time, Black cannot move both of them to safety in the next turn.The best move is for Black to play 1 . . .Bxe4, capturing the piece that attacks both thequeen and the rook, and so removing the threat to them both. After 2.Qxe4 material iseven.
Exercise #19: The white bishop attacks the rook, but the rook cannot move because ifit did, that would expose the king to check, which is not allowed. This is called a“pin,” which you will learn about in Chapter 6. The best move is 1 . . .Nxe4, and after2.Rxe4 material is even.
Exercise #20: No. The rook cannot move because that would expose the king tocheck, and there is no other way for him to defend against the threat.
Exercise #21: He can play 1 . . .Ne4, which only loses a pawn after 2.Bxe4 dxe43.Rxe4. But losing a pawn is better than losing a rook for a bishop, so 1 . . .Ne4 is thebest move.
Exercise #22: After 1 . . .Ne4, White has a better move than to capture the knight: Hecan play 2.f3! This move attacks the knight with a pawn, so Black should move theknight. But then White will capture the rook for the bishop. (Here’s an extra questionfor you to solve on your own. Did you consider that after 1 . . .Ne4 2.f3, Black couldplay 2 . . .Rg3, to pin the pawn to the bishop? After 3.fxe4 Rxd3, Black “saves” the
knight, by capturing the bishop on d3. But White can win the knight in several ways,two of which are 3.Bb1 and 3.Kh2. Can you see why?)
Exercise #23: White should play 1.fxe3 to keep material even, because the knight one3 attacked the rook. If White played 1.cxd5? or 1.Bxd5? then Black would play1 . . .Nxd1+ 2.Rxd1; if White played 1.Rxd5? then Black would play 1 . . .Nxd52.Bxd5 (or 2.cxd5), in either case with the advantage of the exchange.
Exercise #24: No. After 1.Rxe8+ Rxe8 (or 1 . . .Nxe8), if 2.Qxe8+? Nxe8 3.Rxe8+Kg7, Black has a queen for a rook and knight, a material advantage for Black.
Exercise #25: Yes. After 1.Rxe8+ Rxe8 (or 1 . . .Nxe8) 2.Rxe8+ Nxe8 3.Qxe8+,White has won a knight for nothing. Because the rooks are in front of the queen, Whitecaptures with less valuable material first, and so is left with the more valuable piece(the queen) in the end.
Exercise #26: No. Now that Black’s queen is on c6 instead of c7, the rook isprotected one more time. After 1.Rxe8+ Rxe8 2.Rxe8+ Qxe8 3.Qxe8+ Nxe8 materialis still even.
Exercise #27: Black should play either 1 . . .Qc5 or 1 . . .Qd8, to move the queen outof the attack and defend the bishop at the same time. (Not 1 . . .Qxd5, because after2.Bxd5 Bxd5 White would have a queen for two minor pieces; not 1 . . .Bb4, becauseafter 2.Bxb4 White would win material; and not 1 . . .Bc5, because after 2.Bxa5 Bxd43.Ne7+! Kh8 4.Rxd4 White is ahead a minor piece.) Then after 2.Nxe7+ Qxe7material is still even.
Exercise #28: Black should play 1 . . .Bxc1 2.Rxc1 b6 (to protect the knight), afterwhich Black will be ahead a rook for a bishop.
Exercise #29: Black should still play 1 . . .Bxc1 2.Rxc1 b6. However, now after3.b4! White will win the knight, as Black cannot move it without putting his own kingin check. After White plays 4.bxc5, White will be ahead in material: two pieces for arook.
Exercise #30: White cannot move the queen, as it will be captured on any square itmoves to. White could block the attack with 1.Ne5, but then Black wins the exchangewith 1 . . .Nxe1 2.Rxe1, and on top of that can attack two pieces at the same time with2 . . .f6. And it does no good to block the attack with 1.Nf6+ or 1.Bf6, because Blackcan capture either piece with a pawn, winning material. But White can save the queenby counterattacking: 1.Nh6+! Now if 1 . . .Kh8 then 2.Nxf7+ Kg8 3.Nh6+ Kh8 4.Nf7+is perpetual check. But if (after 1.Nh6+) 1 . . .Bxh6, then 2.Bxh6! threatens checkmateon g7, gaining time to move the rook on e1 out of the attack by the knight.
Answers to Exercises from Chapter 6Exercise #1: White plays 1.f5!, which threatens to capture Black’s pawn on e6. IfBlack plays 1 . . .exf5 or 1 . . .exd5, White plays 2.e6.
Exercise #2: White should be worried, because his knight is pinned to his king, and ifWhite defends the knight Black will attack it again by playing 1 . . .e6. Therefore,White will lose the knight.
Exercise #3: White should play 1.Rf1! which pins the queen to the king. But noticethat 1.O-O is illegal, because the queen controls the f1 square which the white kingwould have to pass through.
Exercise #4: White cannot win the queen! White cannot play 1.Rf1+ because his ownking is in check, and he cannot play 1.O-O+ because it is not allowed to castle whenyou are in check. White’s best move is to play 1.g3, which attacks the bishop on h4and also threatens 1.Rf1+ or 1.O-O+. Therefore, 1.g3 wins the bishop because Blackhas to respond to the threat to the queen instead of to the threat to the bishop.
Exercise #5: White should win. If Black plays 1 . . .h1=Q, White skewers the kingand queen by playing 2.a8=Q+, and then he wins the endgame with an extra queen.Otherwise, White can stop Black from queening after he makes a queen, and shouldwin.
Exercise #6: White should play 1.d4+!, which attacks both the rook and the king bydiscovered check, and so wins the rook.
Exercise #7: White’s threat is to play 2.Qf3, attacking the knight again, and winning it.Black has no defense, because he cannot move the queen out of the pin without losingthe knight.
Exercise #8: No, for two reasons. First, Black can move the queen out of the pinbecause the knight is protected by the pawn on g7. Second, Black can play 1 . . .h6 toattack the bishop. If White plays 2.Bxf6, Black plays 2 . . .Qxf6; if White plays 2.Bh4,Black can block the pin by playing 2 . . .g5.
Exercise #9: If Black plays 28 . . .Rxe6, White plays 29.Rc8! which pins the queen tothe king and wins material. In fact, Black resigned after 28.Nxe6! and I won thetournament.
Exercise #10: White should play 1.Nc5+!! Kb8 2.Na6#!
Exercise #11: Black should play 1 . . .Nxe4!, which uncovers an attack against thequeen. If White captures the knight with 2.Qxe4, Black pins the queen with 2 . . .Re8.
Exercise #12: White plays 1.Qxa7+!! Kxa7 (if 1 . . .Kc7, then 2.bxc8=Q+ gives

double check, and White skewers the king and queen so that after 2 . . .Kxc8 3.Qxe7White is up a whole queen) 2.bxc8=N+!! and after 3.Nxe7 he should win.
Exercise #13: White’s threat is to play Nd6, checkmate! Because the e-pawn ispinned, Black cannot capture the knight. Clearly 1 . . .Ngf6?? would be a terribleblunder, as White then plays 2.Nd6#. (But not 2.Nxf6+ Nxf6, which is just an evenexchange of knights.)
Exercise #14: After 1 . . .Qg1+!! 2.Kxg1 Nxe2+ captures the bishop and forks kingand queen. After 3 . . .Nxc3, Black is a piece ahead and has a winning position.
Exercise #15: White combines the pin with the discovered attack, plus a matingpattern: 1.Be7!! Nxe7 (1 . . .Qxg4 2.Rxd8#; notice that both 1 . . .Qxe7 and 1 . . .Qxd1are illegal because of the pin!) 2.Rxd7 Rxd7 3.Nc3 and White has a winning materialadvantage.
Exercise #16: White won by combining the pin with the skewer with 1.Rd8!! Qxd82.Qh8+ Kf7 3.Qxd8. Note that 1.Qh8+ Kf7 doesn’t work, because the king protects thequeen on e8.
Exercise #17: White wins with 1.Rxf8+!! Kxf8 2.Ng6#. Remember always to look ata double check when you see it! (And notice that 1.Rd7+ does not win, because1 . . .Nxc4 attacks the White queen, so that 2.Rxd8 Nxd2 3.Rxd2 maintains materialequality. Also, 1.Rxb7+ Nxc4 accomplishes nothing for White.)
Exercise #18: White combined the pin and the double-attack with 1.Rd8!! Rxd8(White threatened both 2.Rxh8 and 2.Rb7#, and 1 . . .Ra7 is met by 2.Rxa7 Rxd8[2 . . .Kxa7 3.Rxh8] 3.c7+) 2.c7+ and 3.cxd8=Q+ with a winning material advantageand a mating attack to boot.
Exercise #19: Black continues 2 . . .Ng3+!! 3.Kxg3 (3.Kg1 Rh1#) 3 . . .f4#. Abeautiful use of discovered check!
Exercise #20: White played 1.Bf3!! exf3 (the queen has no safe square to move to,and there is no effective counterattack) 2.exf3+ and the pawn captured the queen on thenext move. A nice use of discovered check!
Exercise #21: Black won with 1 . . .Nh4!, threatening 2 . . .Qg2#. White has nothingbetter than either 2.Qf3 Nxf3+ 3.Nxf3, or 2.gxh4 Qxc3, in either case losing the queenfor a knight.
Answers to Exercises from Chapter 7Exercise #1: White wins material by playing 1.Nxe5!, and if 1 . . .dxe5 then 2.Nxc5.

But White should not play 1.Nxc5, with the idea that if 1 . . .dxc5 then 2.Nxe5, becauseafter 1.Nxc5 Black has the “in between” move 1 . . .Nxf3+!, and after 2.gxf3 dxc5material is still even.
Exercise #2: Fischer played 27 . . .Bxa4!, and Spassky resigned. Fischer’s point wasthat after 28.Qxa4 Qxe4, he has the double attack of . . .Qxe1+ and . . .Qxg2#, to whichSpassky would have had no defense (and 29.Qe8+ Kh7 does not solve White’sproblem).
Exercise #3: No, it would be a very bad idea! After 1.Rd1?? Re1+! Black winsmaterial by combining deflection with the x-ray. If 2.Rxe1 Qxd6, Black wins queen forrook, and if 2.Kh2 Rxd1, Black wins a whole rook.
Exercise #4: If White could get the queen on g3 to g7, it would be checkmate. Andthere is a way to do it: 1.Rxh7+! and then 2.Qg7#. But notice that the clearancesacrifice does not work with 1.Rg8+?? because after 1 . . .Rxg8 Black defends the g7square!
Exercise #5: No, 1.Bxe7 is just an even trade after 1 . . .R8xe7. But it would be aterrible blunder for Black to reply 1 . . .R5xe7?? because then 2.Rxe7 would win awhole rook. Notice also that the “in between” move 1 . . .Rxe2?? would also be adisaster: After 2.Rxe2 White defends the bishop!
Exercise #6: The killer move is 1.d5!, deflecting the rook from the defense of thequeen. If the rook moves, White captures the queen, and if 1 . . .Qxa3, then White doesnot immediately recapture the queen, but plays the killer “in between” move 2.dxe6+Kxe6 3.Rxa3, winning a whole rook for only a pawn.
Exercise #7: The fact that Black’s king and queen are lined up along the opendiagonal should be a red flag that White would like to get his bishop to f3. The bestway to do that is to play 1.Nxd4!, capturing a pawn, attacking the queen, andthreatening to play 2.Bf3 pinning and winning the queen.
Exercise #8: I played 43 . . .Rxb2! and after 44.Rxb2 I won the rook back with44 . . .Qc1+ and 45 . . .Qxb2. The one extra pawn was enough to win the game.
Exercise #9: I played 59 . . .Rxh3! to divert the queen away from the pin. If 60.Qxh3fxg5, Black comes out a knight ahead. And neither of White’s checks hurt Black: After60.Qd7+ Kf8 or 60.Qg6+ Ke7, White has no follow-up. (Always make sure the checksaren’t dangerous when you calculate some way to win material.)
Exercise #10: White plays 1.Qe2! Qxe2 (if Black plays 1 . . .cxd3?? White plays2.Qxe7; if Black moves the queen, White plays 2.Bxc4) 2.Bxe2, recapturing the queenand moving the bishop out of harm’s way.

Exercise #11: White could play 3.Rxd4!! Rxd4 (3 . . .Rxg3 4.Rxd8 Kxd8 5.Kxg3)4.Nf5+ and 5.Nxd4. A nice way to combine attacking the defender (the rook defendingthe f5 square) with the fork. Kasparov drew the game, but had he found this tactic hewould have played 1.g4, which would have given him tremendous chances of winning.
Exercise #12: 1.Ne6+!! fxe6 (if the king moves, White captures the queen on f6; thequeen can’t capture the knight because it is pinned) 2.Rc7+! followed by Qxf6. Notonly does White win the queen, he also has a mating attack.
Exercise #13: 1.Rb8!! threatens 2.Qg7# and leaves Black with no good defense: If1 . . .Qxb8 then 2.Nxf7#, and if 1 . . .Rxb8 then 2.Qg7#.
Exercise #14: 1 . . .Bc3+! wins the queen no matter what piece White puts on d2(2.Bd2 or 2.Rd2 Qxd5; 2.Qd2 Bxd2+ and then 3 . . .Qxh1+ just for good measure).
Exercise #15: 1.Qxe5! picked off the knight, because 1 . . .Qxe5 is met by 2.Rd8+Ke7 3.Re8#.
Exercise #16: 1.Rg8+!! Kxg8 (1 . . .Rxg8 2.Qxc1 is a winning material advantage forWhite) 2.Qg3+ Kf8 (2 . . .Kh8 3.Qg7#) 3.Qg7+ Ke8 4.Qg8#.
Exercise #17: 1 . . .Rh1+!! 2.Kxh1 (2.Kg2 Rxh5) 2 . . .Nxg3+ and 3 . . .Nxh5.
Exercise #18: Black wins material with 1 . . .Rxd2! 2.Qxd2 (2.Rxe7 Rxd1+ and3 . . .Bxe7; 2.Bxd2 Qxa7) 2 . . .Rxd2 (2 . . .Qxa7? 3.Qxd8+! Bxd8 4.Bxd2) 3.Rxe7Rd1+! (3 . . .Bxe7 4.Bxd2) 4.Kh2 Bxe7 and Black is up a rook. Note that 1 . . .Rxa7does not win material: 2.Rxd8+! Qxd8 3.Qxd8+ Bxd8 4.Bxa7.
Exercise #19: White won with 1.Re7!! (Not 1.Rd6?? Bxd6 2.Qxd5+ Kf8) 1 . . .Qxe7(if 1 . . .Bxe7 or 1 . . .Nxe7 then 2.Qf7#) 2.Qxd5+ and checkmate next move.
Exercise #20: 1.Rh8! Qxh8 (1 . . .Qc8+ 2.Rxc8; otherwise White plays Rxh7#) 2.g4#.
Answers to Exercises from Chapter 8Exercise #1: I played 44.Bb7! and Black resigned. Moving the bishop off the d5square threatens 45.Rd8#, and moving the bishop to b7 prevents both rooks fromdefending against the threat, because the rook on b6 is now blocked from moving tob8, and 44 . . .Ra8 is met by 45.Bxa8.
Exercise #2: After 22.Bxe6+!, Black resigned. There is nothing better than22 . . .dxe6, after which 23.Rf8# is checkmate.
Exercise #3: If White plays 26.Nxd1, then 26 . . .e1=Q# is checkmate. If White plays26.Rxd1, Black wins with the beautiful move, 26 . . .Qxc3!!. The point of this move is
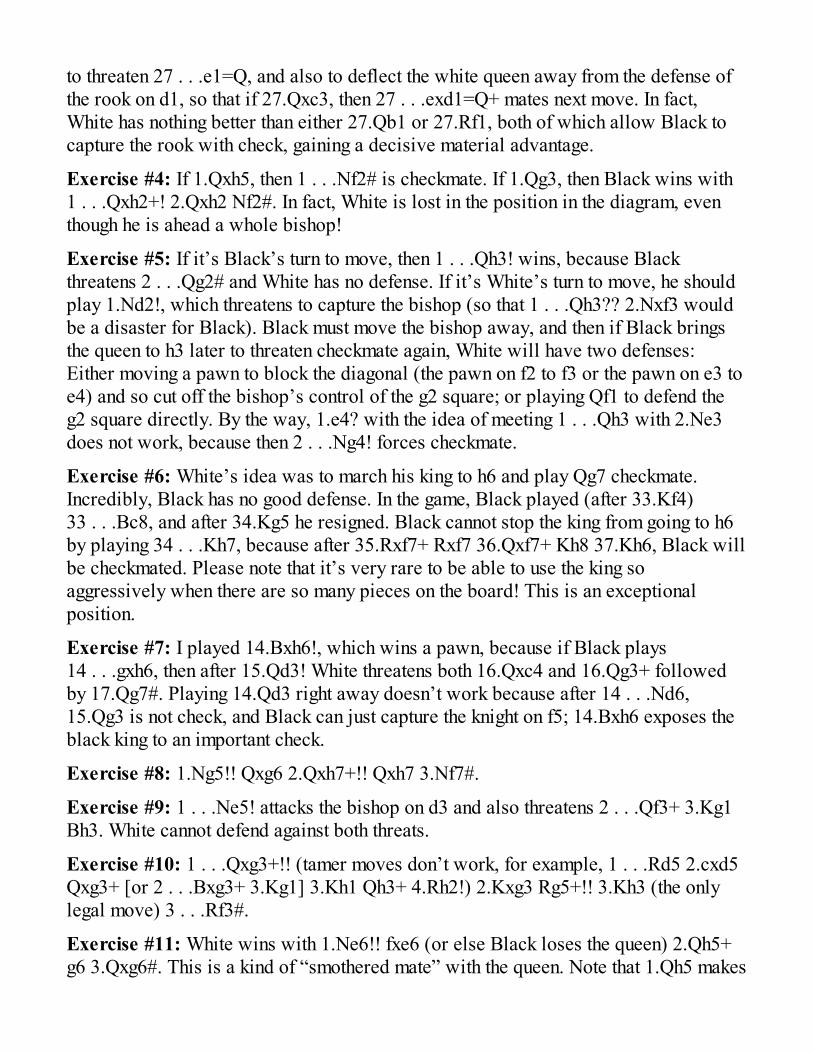
to threaten 27 . . .e1=Q, and also to deflect the white queen away from the defense ofthe rook on d1, so that if 27.Qxc3, then 27 . . .exd1=Q+ mates next move. In fact,White has nothing better than either 27.Qb1 or 27.Rf1, both of which allow Black tocapture the rook with check, gaining a decisive material advantage.
Exercise #4: If 1.Qxh5, then 1 . . .Nf2# is checkmate. If 1.Qg3, then Black wins with1 . . .Qxh2+! 2.Qxh2 Nf2#. In fact, White is lost in the position in the diagram, eventhough he is ahead a whole bishop!
Exercise #5: If it’s Black’s turn to move, then 1 . . .Qh3! wins, because Blackthreatens 2 . . .Qg2# and White has no defense. If it’s White’s turn to move, he shouldplay 1.Nd2!, which threatens to capture the bishop (so that 1 . . .Qh3?? 2.Nxf3 wouldbe a disaster for Black). Black must move the bishop away, and then if Black bringsthe queen to h3 later to threaten checkmate again, White will have two defenses:Either moving a pawn to block the diagonal (the pawn on f2 to f3 or the pawn on e3 toe4) and so cut off the bishop’s control of the g2 square; or playing Qf1 to defend theg2 square directly. By the way, 1.e4? with the idea of meeting 1 . . .Qh3 with 2.Ne3does not work, because then 2 . . .Ng4! forces checkmate.
Exercise #6: White’s idea was to march his king to h6 and play Qg7 checkmate.Incredibly, Black has no good defense. In the game, Black played (after 33.Kf4)33 . . .Bc8, and after 34.Kg5 he resigned. Black cannot stop the king from going to h6by playing 34 . . .Kh7, because after 35.Rxf7+ Rxf7 36.Qxf7+ Kh8 37.Kh6, Black willbe checkmated. Please note that it’s very rare to be able to use the king soaggressively when there are so many pieces on the board! This is an exceptionalposition.
Exercise #7: I played 14.Bxh6!, which wins a pawn, because if Black plays14 . . .gxh6, then after 15.Qd3! White threatens both 16.Qxc4 and 16.Qg3+ followedby 17.Qg7#. Playing 14.Qd3 right away doesn’t work because after 14 . . .Nd6,15.Qg3 is not check, and Black can just capture the knight on f5; 14.Bxh6 exposes theblack king to an important check.
Exercise #8: 1.Ng5!! Qxg6 2.Qxh7+!! Qxh7 3.Nf7#.
Exercise #9: 1 . . .Ne5! attacks the bishop on d3 and also threatens 2 . . .Qf3+ 3.Kg1Bh3. White cannot defend against both threats.
Exercise #10: 1 . . .Qxg3+!! (tamer moves don’t work, for example, 1 . . .Rd5 2.cxd5Qxg3+ [or 2 . . .Bxg3+ 3.Kg1] 3.Kh1 Qh3+ 4.Rh2!) 2.Kxg3 Rg5+!! 3.Kh3 (the onlylegal move) 3 . . .Rf3#.
Exercise #11: White wins with 1.Ne6!! fxe6 (or else Black loses the queen) 2.Qh5+g6 3.Qxg6#. This is a kind of “smothered mate” with the queen. Note that 1.Qh5 makes

no headway against 1 . . .g6!
Exercise #12: White plays 2.Rxe8!! Rxe8 3.Qg4+ Bg7 (or 3 . . .Kh8 4.Bxf6+ Bg75.Qxg7#) 4.Bxf6 followed by 5.Qxg7#. Notice how the attack worked: First Whiteexposed the Black king (1.Nh6+ gxh6), then White eliminated a crucial defender of thef6 and g7 squares (2.Rxe8 Rxe8), then White forced checkmate with the queen andbishop using the f6 and g7 squares (3.Qg4+ and 4.Bxf6).
Exercise #13: 1.Qc7+!! Nxc7 2.Nb6+! axb6 (or 2 . . .Kb8 3.Rd8#) 3.Rd8#.
Exercise #14: 1.Qxf8+!! Kxf8 2.Bh6+ Kg8 3.Re8#.
Exercise #15: 1.Qa4+!! (not 1.b4 Qa3+! and Black gains time with the check todefend) 1 . . .Qxa4 2.Nc7+ Kf8 3.Rxd8+ Qe8 4.Rxe8#.
Answers to Exercises from Chapter 9Exercise #1: Black has played better. White’s first move does little to control thecenter, and weakens the kingside. (If White wants to fianchetto his king’s bishop, 1.g3is a much better move.) Black’s move, on the other hand, is superb. It fights for controlof the center, and it helps develop his pieces. If White plays 2.f3??, he does nothing todevelop his pieces, and little to fight for the center. But its worst feature is thatbecause it weakens the diagonal e1-h4 which leads to the king, Black can givecheckmate with 2 . . .Qh4#. This is called the “Fool’s Mate,” and it is the fastestpossible checkmate.
Exercise #2: It would be an excellent move; 1 . . .d5 not only fights for control of thecenter, and helps to develop the queenside pieces, it does all that with gain of time,because it attacks the bishop on c4. Notice that the pawn on d5 is adequatelyprotected, because the queen on d8 protects d5. One of the advantages of pushing thed-pawn is that doing so increases the scope of the queen along the d-file.
Exercise #3: Black’s second move allows White to exchange the less valuable c-pawn for the more valuable d-pawn. White’s extra center pawn will give him bettercontrol of the center than Black. Black’s third move exposes the queen to attack, andallows White to develop a piece with gain of time by playing 4.Nc3.
Exercise #4: This is a good position for Black to fianchetto the king’s bishop.Because White’s d-pawn has pushed forward to d5, and because Black has pawns ond6 and c5, the bishop will have very good control of the diagonal, and it will bestrongly placed there. Notice how the bishop’s control of the diagonal will go rightthrough the center and reach White’s queenside!
Exercise #5: White should castle queenside. Castling kingside would be a very bad

idea, because White’s king would be exposed there. Not only does it lack someprotection by its pawns, it would be especially susceptible to attack because Blackalready has the open h-file which leads right to the king’s position.
Exercise #6: It is a bad move. Although White makes two attacks at the same time(4.Qxc5 and 4.Qxf7#), Black defends both easily with 3 . . .e6 (the pawn blocks thebishop’s control of the f7 square, and the bishop on f8 defends the pawn on c5). Blackdefends both threats by making a very useful developing move that he would want tomake anyway. Meanwhile, White’s queen is exposed and out of play. Black will soonplay . . .Nf6 and gain time to develop his knight to the center while attacking the queen.Always be very suspicious of double-attacks that bring the queen out too early in theopening!
Exercise #7: Black threatens to capture the pawn on e4, and White must respond tothat threat. White’s best moves are: 3.exd5 (meeting the threat with gain of time), 3.e5(gaining space), 3.Nc3 (defending the pawn with a knight, while keeping the diagonalopen for the bishop on c1), and 3.Nd2 (defending the pawn with a knight, whileensuring that if Black tries to pin the knight with 3 . . .Bb4, White can break the pinwith 4.c3). It is less good to defend the pawn with the bishop or with the queen,because Black will capture the pawn and then play . . .Nf6, gaining time to develop.(This is an example of the principle, “Develop knights before bishops.”) Also notgood is 3.Bb5+, as after 3 . . .c6 White must retreat the bishop and so must defend thee4 pawn with the bishop. Finally, while 3.f3 has a worthy idea behind it (recapture acenter pawn with a wing pawn), it fails tactically: 3 . . .dxe4 4.fxe4 Qh4+ and5 . . .Qxe4. This is an example of how dangerous it is to move your f-pawn too earlyin the opening!
Exercise #8: The bad move is 3 . . .Be7?, which allows White to gain a hugeadvantage in the center with 4.e4. Both 3 . . .Bb4 and 3 . . .d5 are good moves, as theynot only develop in the center, they also hinder White from playing 4.e4. Notice thatafter 3 . . .d5, if White plays 4.cxd5 then Black can recapture with 4 . . .exd5, keepinga strong pawn in the center. This is a huge improvement over Exercise #3, whereBlack was not able to keep his strong pawn in the center, and where he lost time bymoving his pieces several times in the opening.
Exercise #9: The problem with each move is that it is too passive. Moving first givesWhite the initiative, but this will evaporate if he does not develop his pieces asaggressively as is reasonably possible. Moving the bishop to b5 or c4 places thebishop on an active square; on b5 it harasses Black’s knight, while on c4 it controls acentral diagonal. On e2 the bishop does not contribute to the fight for the center, so thismove does not put any pressure on Black’s game. Moving the bishop to d3 is evenworse. At least on e2, White can continue his development normally. But on d3, the
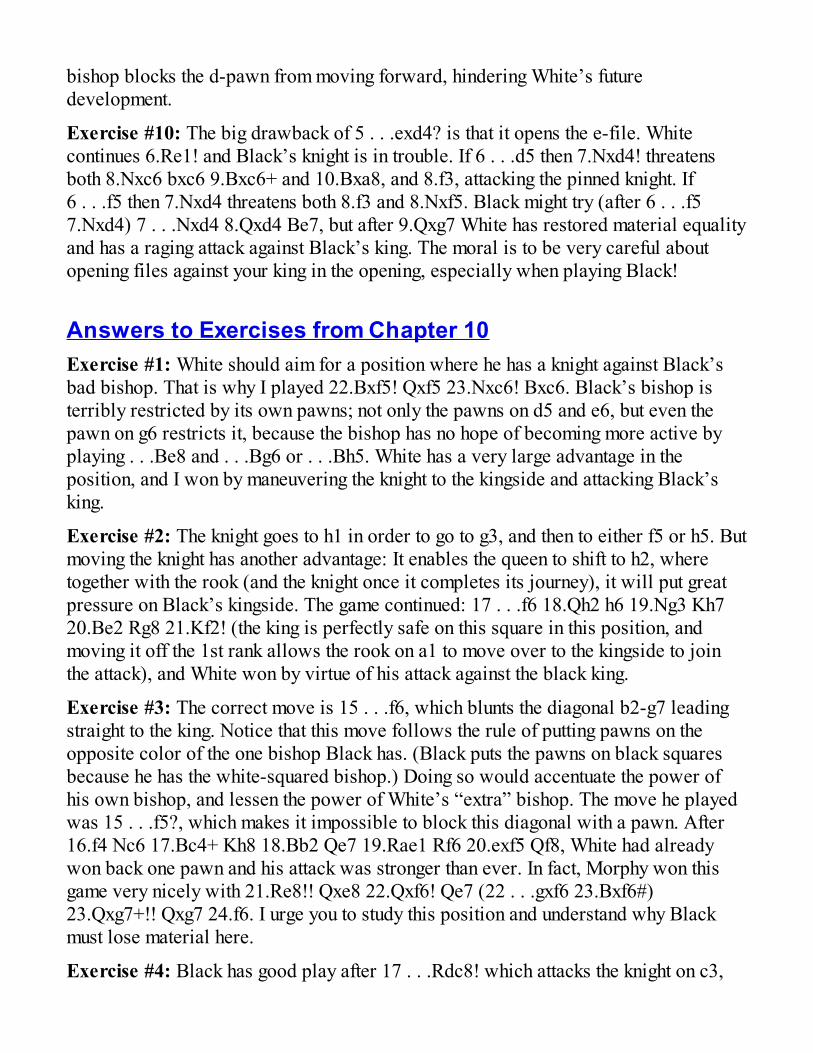
bishop blocks the d-pawn from moving forward, hindering White’s futuredevelopment.
Exercise #10: The big drawback of 5 . . .exd4? is that it opens the e-file. Whitecontinues 6.Re1! and Black’s knight is in trouble. If 6 . . .d5 then 7.Nxd4! threatensboth 8.Nxc6 bxc6 9.Bxc6+ and 10.Bxa8, and 8.f3, attacking the pinned knight. If6 . . .f5 then 7.Nxd4 threatens both 8.f3 and 8.Nxf5. Black might try (after 6 . . .f57.Nxd4) 7 . . .Nxd4 8.Qxd4 Be7, but after 9.Qxg7 White has restored material equalityand has a raging attack against Black’s king. The moral is to be very careful aboutopening files against your king in the opening, especially when playing Black!
Answers to Exercises from Chapter 10Exercise #1: White should aim for a position where he has a knight against Black’sbad bishop. That is why I played 22.Bxf5! Qxf5 23.Nxc6! Bxc6. Black’s bishop isterribly restricted by its own pawns; not only the pawns on d5 and e6, but even thepawn on g6 restricts it, because the bishop has no hope of becoming more active byplaying . . .Be8 and . . .Bg6 or . . .Bh5. White has a very large advantage in theposition, and I won by maneuvering the knight to the kingside and attacking Black’sking.
Exercise #2: The knight goes to h1 in order to go to g3, and then to either f5 or h5. Butmoving the knight has another advantage: It enables the queen to shift to h2, wheretogether with the rook (and the knight once it completes its journey), it will put greatpressure on Black’s kingside. The game continued: 17 . . .f6 18.Qh2 h6 19.Ng3 Kh720.Be2 Rg8 21.Kf2! (the king is perfectly safe on this square in this position, andmoving it off the 1st rank allows the rook on a1 to move over to the kingside to jointhe attack), and White won by virtue of his attack against the black king.
Exercise #3: The correct move is 15 . . .f6, which blunts the diagonal b2-g7 leadingstraight to the king. Notice that this move follows the rule of putting pawns on theopposite color of the one bishop Black has. (Black puts the pawns on black squaresbecause he has the white-squared bishop.) Doing so would accentuate the power ofhis own bishop, and lessen the power of White’s “extra” bishop. The move he playedwas 15 . . .f5?, which makes it impossible to block this diagonal with a pawn. After16.f4 Nc6 17.Bc4+ Kh8 18.Bb2 Qe7 19.Rae1 Rf6 20.exf5 Qf8, White had alreadywon back one pawn and his attack was stronger than ever. In fact, Morphy won thisgame very nicely with 21.Re8!! Qxe8 22.Qxf6! Qe7 (22 . . .gxf6 23.Bxf6#)23.Qxg7+!! Qxg7 24.f6. I urge you to study this position and understand why Blackmust lose material here.
Exercise #4: Black has good play after 17 . . .Rdc8! which attacks the knight on c3,

and in general puts great pressure on White’s queenside. Notice how the two bishopsput pressure on the b2 and a2 pawns. It is very common for the two bishops to giveenough compensation for a pawn in such a position. White decided not to defend thepawn by playing 18.Rfc1 (18.Rac1 loses the a-pawn after 18 . . .Bxc3 19.bxc3 Qxa2)because he did not like his position after 18 . . .Rc7 followed by doubling rooks on thec-file. But even after he gave back the pawn, White’s a-pawn remained weak, andBlack won the game by attacking on the queenside.
Exercise #5: White should attack Black at his weakest point: The f7 pawn. One wayto do this is to play 1.h5 and 2.g6. (Also possible is to play 1.Qf3 before pushing thekingside pawns, and still another idea is to play 1.Rh3 with the intention of playing2.Rf3 and then push the kingside pawns.) Notice how much more active White’sbishop is than Black’s bishop!
Exercise #6: White should play 1.Bh6! to exchange off the fianchettoed bishop. Infact, whenever you want to attack a king that stands behind a fianchettoed bishop, it isusually a good idea to exchange off that bishop: It is a valuable defensive piece, andonce it is removed the king is much more exposed. In this position, the move has theadditional virtue of enabling the queen to move closer to Black’s king with decisiveeffect; for example 1 . . .Bxh6 2.Qxh6 and the threat of checkmate is devastating. IfBlack allows White to capture the bishop and then give check with the queen on h6,once again the queen’s power will overwhelm Black.
Exercise #7: Black should play 1 . . .Red8! to seize control of the open d-file, andthen once he has taken control of the d-file, he should put one (or both) rooks on thesecond rank by playing . . .Rd2. Black has an enormous advantage in the endgame.
Exercise #8: White has a large advantage because of his greater control of the center,and because his knight and queen are so much better than their black counterparts.There are many ways to exploit these advantages, but the best way is 1.e5! fxe5 2.fxe5dxe5 (Black must not allow this pawn to get to e6, or it will become much toopowerful). 3.Qxe5, and the threats of 4.Nxc7 and (much more important) 4.Ne7+ arevery difficult for Black to meet. The following variation is especially instructive:4 . . .Qg7 5.Ne7+! Kf8? (5 . . .Kh8 6.Qxc7 is better, but still winning for White)6.Qd5! (threatening not only 7.Qxa8+ but also 7.Qd8+! which mates on the back rank)6 . . .Re8 (the only rook move to defend both threats) 7.Nxg6+!! Qxg6 8.Rxe8+ andWhite wins material, because Black cannot recapture the rook: 8 . . .Kxe8 9.Qd8#.
Exercise #9: The idea is to continue 3.Nf3! and 4.Ne5! when the knight is apowerhouse on e5. If Black captures the knight with his bishop, he gives up the bishoppair, and trades off his more powerful bishop to do so. (The dark-squared bishop ismore powerful because most of Black’s pawns are on light squares.) After 1.e5 Be7
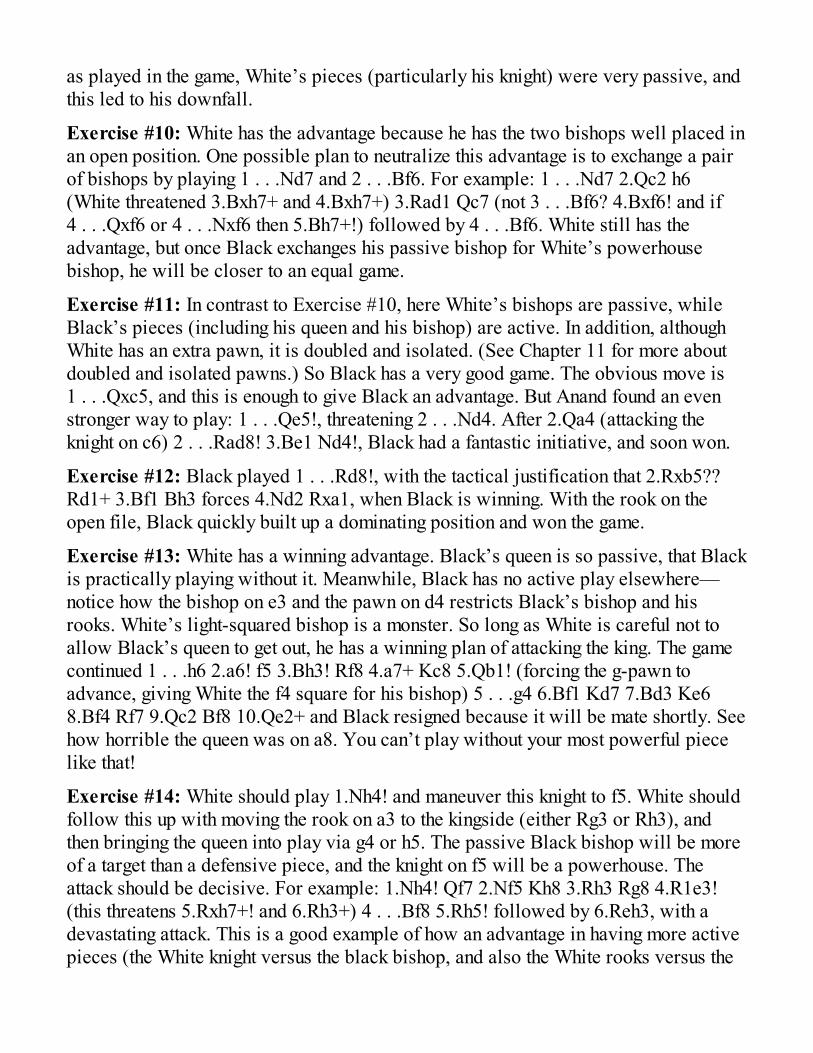
as played in the game, White’s pieces (particularly his knight) were very passive, andthis led to his downfall.
Exercise #10: White has the advantage because he has the two bishops well placed inan open position. One possible plan to neutralize this advantage is to exchange a pairof bishops by playing 1 . . .Nd7 and 2 . . .Bf6. For example: 1 . . .Nd7 2.Qc2 h6(White threatened 3.Bxh7+ and 4.Bxh7+) 3.Rad1 Qc7 (not 3 . . .Bf6? 4.Bxf6! and if4 . . .Qxf6 or 4 . . .Nxf6 then 5.Bh7+!) followed by 4 . . .Bf6. White still has theadvantage, but once Black exchanges his passive bishop for White’s powerhousebishop, he will be closer to an equal game.
Exercise #11: In contrast to Exercise #10, here White’s bishops are passive, whileBlack’s pieces (including his queen and his bishop) are active. In addition, althoughWhite has an extra pawn, it is doubled and isolated. (See Chapter 11 for more aboutdoubled and isolated pawns.) So Black has a very good game. The obvious move is1 . . .Qxc5, and this is enough to give Black an advantage. But Anand found an evenstronger way to play: 1 . . .Qe5!, threatening 2 . . .Nd4. After 2.Qa4 (attacking theknight on c6) 2 . . .Rad8! 3.Be1 Nd4!, Black had a fantastic initiative, and soon won.
Exercise #12: Black played 1 . . .Rd8!, with the tactical justification that 2.Rxb5??Rd1+ 3.Bf1 Bh3 forces 4.Nd2 Rxa1, when Black is winning. With the rook on theopen file, Black quickly built up a dominating position and won the game.
Exercise #13: White has a winning advantage. Black’s queen is so passive, that Blackis practically playing without it. Meanwhile, Black has no active play elsewhere—notice how the bishop on e3 and the pawn on d4 restricts Black’s bishop and hisrooks. White’s light-squared bishop is a monster. So long as White is careful not toallow Black’s queen to get out, he has a winning plan of attacking the king. The gamecontinued 1 . . .h6 2.a6! f5 3.Bh3! Rf8 4.a7+ Kc8 5.Qb1! (forcing the g-pawn toadvance, giving White the f4 square for his bishop) 5 . . .g4 6.Bf1 Kd7 7.Bd3 Ke68.Bf4 Rf7 9.Qc2 Bf8 10.Qe2+ and Black resigned because it will be mate shortly. Seehow horrible the queen was on a8. You can’t play without your most powerful piecelike that!
Exercise #14: White should play 1.Nh4! and maneuver this knight to f5. White shouldfollow this up with moving the rook on a3 to the kingside (either Rg3 or Rh3), andthen bringing the queen into play via g4 or h5. The passive Black bishop will be moreof a target than a defensive piece, and the knight on f5 will be a powerhouse. Theattack should be decisive. For example: 1.Nh4! Qf7 2.Nf5 Kh8 3.Rh3 Rg8 4.R1e3!(this threatens 5.Rxh7+! and 6.Rh3+) 4 . . .Bf8 5.Rh5! followed by 6.Reh3, with adevastating attack. This is a good example of how an advantage in having more activepieces (the White knight versus the black bishop, and also the White rooks versus the

Black rooks) can lead to an opportunity to attack the opponent’s weakest point (in thiscase the king, because the knight on f5 looks straight at the kingside).
Exercise #15: Black can play 1 . . .Bd8! followed by 2 . . .Ba5 or 2 . . .Bb6,activating the bishop by getting it outside the e5 and d6 pawns. Black would be noworse in the resulting position.
Answers to Exercises from Chapter 11Exercise #1: If it’s Black’s turn, he should play 1 . . .h4! to attack the g3 pawn. In fact,White must lose a pawn after this move; he can’t protect g3 enough times (Don’toverlook that the black queen on c7 also attacks it!), and after 2.gxh4 (2.g4 fxg4 3.hxg4Rxg4) 2 . . .Rxh4 3.Rh1 Rgh8 Black wins the h-pawn. If it’s White’s turn, he shouldplay 1.h4! to stop this move.
Exercise #2: White can create a pawn duo and increase his control of the center with10.f4.
Exercise #3: After 27 . . .Nxd5 28.exd5 White can create an extremely strong pawnduo next move with 29.c5. White should attack Black’s weakened queenside andadvance his pawns. The strong pawns and pair of bishops will completely dominateBlack’s position. (In particular Black’s bishop on f8 will remain very passive.) Byadvancing the pawns and threatening to promote one of them, Black will be forced tolose material. Black will try to attack White’s king, but he will not have enoughmaterial in that part of the board for his attack to succeed. This is a very complicatedposition, so don’t worry if this explanation leaves you unconvinced. Study thecontinuation of the game at your leisure, and see if you can understand why Whitewon. Notice in particular the strength of the pawn duo: (after 27 . . .Nxd5 28.exd5)28 . . .Qg6 29.c5 e4 30.Be2 Re5 31.Qd7 Rg5 32.Rg1 e3 33.d6 Rg3 34.Qxb7 Qe6(Black threatens 35 . . .Rxh3+!) 35.Kh2! (But now Black must lose material, becauseamazingly after 35 . . .Qe5 36.Qxa8, Black doesn’t have a good discovered check!)Black resigned.
Exercise #4: The doubled pawns are nothing to be concerned about. Although movingthe pawn from f2 to e3 does create another pawn island, all of White’s pawns are wellprotected so it is not too much of a drawback. On the plus side, the pawn controls thecenter better on e3 than on f2, and most importantly, White gains the useful f-file forhis rook. In fact, Black decided to play 20 . . .Qe6 21.Qxe6 fxe6, doubling his ownpawns to neutralize the open f-file by putting his own rook there.
Exercise #5: Here the doubled pawns are a serious weakness. Not only does thepawn on f6 block the fianchettoed bishop’s diagonal, even more seriously the d6 pawn

is isolated and very weak. Kasparov drew this position, but only after suffering formany moves.
Exercise #6: Black should play 1 . . .c3! after which White is much worse. Forexample after 2.bxc3 Qxc3 3.Rfc1 (to protect the c-pawn) 3 . . .Nf4! 4.gxf4 Rxd2White’s pawns are a shambles, and Black’s pieces are much more active than White’s.
Exercise #7: White played the very strong move 21.Rd1! when the game continued21 . . .Bxc5 22.Bxc5 Qe5 23.Bxf8 Kxf8 24.Rd4! and White had a large advantage.Black’s d-pawn is isolated and weak, and Black has no threats against White’sposition. (Notice how useful it is for White to exchange several pairs of pieces whenplaying against the isolated pawn: The exchange of pieces has neutralized any hopeBlack would have of causing trouble to White’s king, but White has kept enoughpieces to put pressure on Black’s d-pawn.) White won a long game.
Exercise #8: White wins with 1.a5!. This move stops Black from making a passedpawn on the queenside, because if the b-pawn moves White can capture it (en passantif necessary) and his passed pawn will be further advanced than Black’s. Black cannotuse the king to capture the pawn, because then White will make a passed pawn on thekingside and win, for example 1 . . .Kc5 2.f4 Kb5 3.g5 Kxa5 4.h6 and White queensbefore Black. So Black must keep his king near the kingside, but then White willdistract the king by making a passed pawn on the kingside and then win on thequeenside. Here is one sample line to illustrate how this might happen: 1 . . .Ke52.Ke3 Ke6 3.f4 Kd5 4.g5 fxg5 5.fxg5 Ke5 6.h6 gxh6 7.gxh6 Kf6 8.Kd4 Kg6 9.Kc5Kxh6 10.Kb6 Kg6 11.Kxb7 Kf6 12.Kxa6 Ke6 13.Kb7 followed by a6-a7-a8=Q andwins.
Exercise #9: White should play 1.fxe5. Remember that as a general rule, you shouldcapture towards the center. Here there are three specific reasons why this capture iscorrect: (1) It opens the f-file, activating the rook on f1. (2) It opens the c1-h6diagonal, activating the bishop on c1. (3) It maintains the pawn on d4, which keeps theknight on c5 passive. Kasparov in fact played 1.fxe5! and won without trouble. HadWhite captured 1.dxe5, Black could have gotten counterplay with 1 . . .Nc5!.
Exercise #10: White has a pawn structure advantage, because he has four pawns toBlack’s three on the kingside, while Black’s extra pawn on the queenside is doubled.But this advantage is currently limited, because Black’s h-pawn restrains White’s g-and h-pawns. (See “When One Pawn Holds Two” in Chapter 11.) If White plays g2-g4 and allows . . .hxg3, White will have split pawns on the kingside, and in particularthe h-pawn will be isolated and weak. But if White can play g2-g4 withoutallowing . . .hxg3+, White will have a powerful pawn duo on f4 and g4, and will beable to establish an even more powerful pawn duo via f4-f5 on e5 and f5.
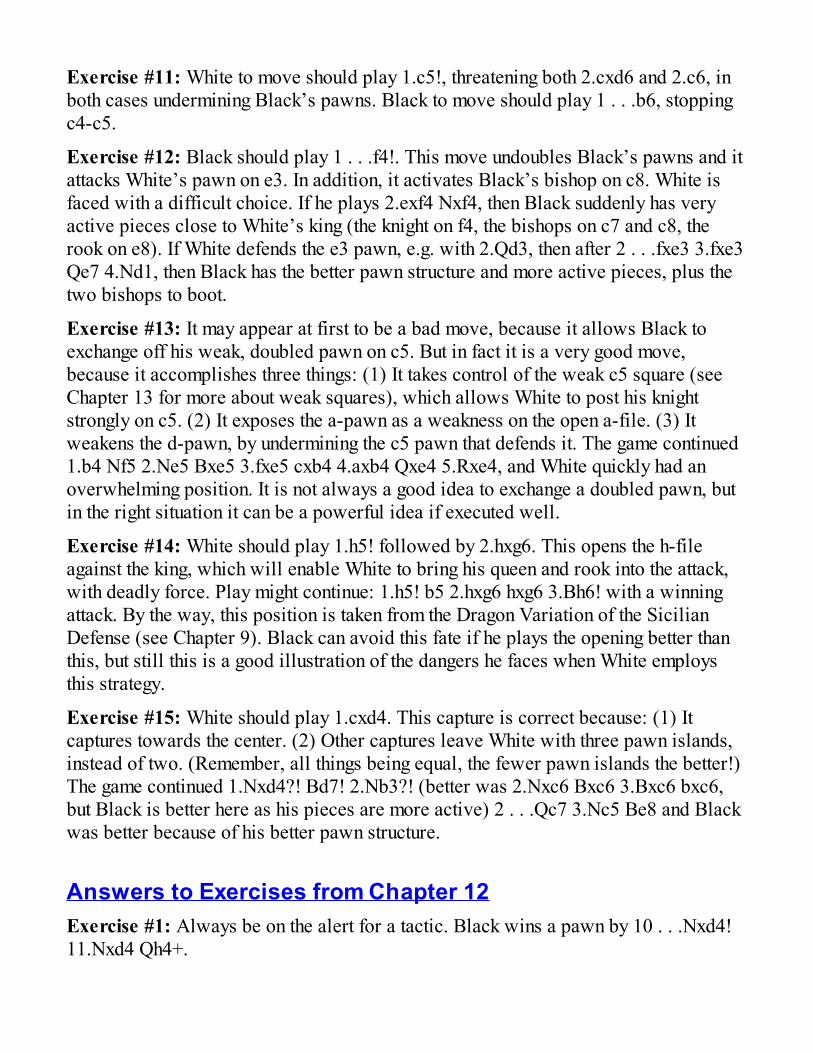
Exercise #11: White to move should play 1.c5!, threatening both 2.cxd6 and 2.c6, inboth cases undermining Black’s pawns. Black to move should play 1 . . .b6, stoppingc4-c5.
Exercise #12: Black should play 1 . . .f4!. This move undoubles Black’s pawns and itattacks White’s pawn on e3. In addition, it activates Black’s bishop on c8. White isfaced with a difficult choice. If he plays 2.exf4 Nxf4, then Black suddenly has veryactive pieces close to White’s king (the knight on f4, the bishops on c7 and c8, therook on e8). If White defends the e3 pawn, e.g. with 2.Qd3, then after 2 . . .fxe3 3.fxe3Qe7 4.Nd1, then Black has the better pawn structure and more active pieces, plus thetwo bishops to boot.
Exercise #13: It may appear at first to be a bad move, because it allows Black toexchange off his weak, doubled pawn on c5. But in fact it is a very good move,because it accomplishes three things: (1) It takes control of the weak c5 square (seeChapter 13 for more about weak squares), which allows White to post his knightstrongly on c5. (2) It exposes the a-pawn as a weakness on the open a-file. (3) Itweakens the d-pawn, by undermining the c5 pawn that defends it. The game continued1.b4 Nf5 2.Ne5 Bxe5 3.fxe5 cxb4 4.axb4 Qxe4 5.Rxe4, and White quickly had anoverwhelming position. It is not always a good idea to exchange a doubled pawn, butin the right situation it can be a powerful idea if executed well.
Exercise #14: White should play 1.h5! followed by 2.hxg6. This opens the h-fileagainst the king, which will enable White to bring his queen and rook into the attack,with deadly force. Play might continue: 1.h5! b5 2.hxg6 hxg6 3.Bh6! with a winningattack. By the way, this position is taken from the Dragon Variation of the SicilianDefense (see Chapter 9). Black can avoid this fate if he plays the opening better thanthis, but still this is a good illustration of the dangers he faces when White employsthis strategy.
Exercise #15: White should play 1.cxd4. This capture is correct because: (1) Itcaptures towards the center. (2) Other captures leave White with three pawn islands,instead of two. (Remember, all things being equal, the fewer pawn islands the better!)The game continued 1.Nxd4?! Bd7! 2.Nb3?! (better was 2.Nxc6 Bxc6 3.Bxc6 bxc6,but Black is better here as his pieces are more active) 2 . . .Qc7 3.Nc5 Be8 and Blackwas better because of his better pawn structure.
Answers to Exercises from Chapter 12Exercise #1: Always be on the alert for a tactic. Black wins a pawn by 10 . . .Nxd4!11.Nxd4 Qh4+.
Exercise #2: The two moves are 7.e5 and 7.d5, but 7.e5 is less effective, becauseafter 7 . . .dxe5 8.dxe5 Qxd1+ 9.Bxd1 Nd7 (9 . . .Bxf3 10.Bxf3 Nxe5 doesn’t win apawn because of 11.Bxb7) 10.Bf4 Bb4 all of Black’s pieces are active, and White’se5-pawn is weak. I played 7.d5! exd5 8.exd5. Now Black didn’t want to retreat theknight to e7 or b8 (notice that after 8 . . .Ne7 Black wouldn’t be threatening to capturethe d5-pawn; notice also that 8 . . .Ne5? is a mistake because 9.Nxe5 wins a pawn), sohe played 8 . . .Bxf3 9.Bxf3 Ne5 10.Be2 Be7 11.O-O O-O, but I had the advantagebecause of my two bishops and more space. By pushing my d-pawn instead of my e-pawn, I kept Black’s dark-squared bishop constrained and avoided the exchange ofqueens. Also, the pawn on d5 is supported by the queen, which makes it harder forBlack to attack than the e5-pawn would have been after 7.e5.
Exercise #3: Count squares and it’s clear that White has more space. In particular, thestrong pawn on d5 gives him more space on the queenside, so that’s where he shouldattack. A very good move here is 14.b4!, as Reshevsky played. This move gains morespace on the queenside, and it also prepares the pawn push c4-c5 (after White controlsthe c5 square enough times so that this move doesn’t lose a pawn, of course), whichwill put even more pressure on Black’s queenside and center.
Exercise #4: White has more space. One of the advantages of the isolated centerpawn is that it usually gives the side who has it more space than the opponent. Withmore space, you can attack. One of the most important reasons you should not trade toomany pieces when you have the isolated center pawn is the same reason you shouldnot trade too many pieces when you have an advantage in space: The more pieces youkeep, the more effective your attack will be.
Exercise #5: Black’s space advantage is on the kingside, so he should find a way toattack there if he can. I found a way to press my attack and also gain more space:17 . . .g5! 18.Nge2 Ng4! Because White’s knight has been driven back, White has lessspace; because Black’s pawn and knight have advanced on the kingside, Black hasmore space. Now Black’s attack in the center and the kingside more than compensatesfor the sacrificed pawn. (Part of Black’s compensation comes from the fact that the d3square is weak, and Black has the possibility of maneuvering the king’s knight to thatsquare with . . .Ne5-d3.) In fact, White quickly lost after 19.b3 Qe5! 20.g3? (20.Ng3was forced) 20 . . .Qf5, and the threat of 21 . . .Ne5-f3 with a winning attack forcedWhite to play 21.Nxe4 Qxe4 22.f3, but after 22 . . .Qxe3+! 23.Qxe3 Nxe3 24.Bxe3Nc2 I won easily with the material advantage I gained from the knight fork.
Exercise #6: The space count is roughly equal, although Black is threatening to gainmore space on the queenside by playing . . .a6 and . . .c5. My move 14.c4? wasterrible because after 14 . . .b4! my bishop on d3 had become a very bad piece, andBlack threatened to gain a huge amount of space on the queenside by playing . . .c5. I
couldn’t play 15.c5, because after 15 . . .Nxc5 16.Qxb4 Nxd3 17.Qxe7 Rxe7 18.Rxd3Ba6! Black wins material. I tried to get tricky with 15.a3, hoping for 15 . . .a5, when Iplanned to play 16.axb4 axb4 17.c5 Nxc5 18.Qxb4 Nxd3 19.Qxe7 Rxe7 20.Rxd3 andif 20 . . .Ba6 then 21.Ra3! pins the bishop to the rook on a8. But Gurevich was toosmart for that, and he played 15 . . .c5!. Now if 16.axb4 cxb4 17.c5 Nxc5 18.Qxb4Nxd3 19.Qxe7 Rxe7 20.Rxd3 Ba6 there is no pin along the a-file, so Black winsmaterial again. I had to let Black gain lots of space on the queenside, and he won anice game.
Exercise #7: Fischer overlooked that Black could play 13 . . .f5!, gaining space on thekingside. (Not 14.exf6?? because of 14 . . .Qxf4+.) Fischer won the game, but inFischer’s opinion, the space that Black gained on the kingside gave him about equalchances in this position.
Exercise #8: The game continued: 9.cxd6 (Fischer says that White should give backthe pawn in order to complete his development and castle, and he suggests that the bestway to do this is 9.Nf3 Bg4 10.Be2, although I think that after 10 . . .dxe5 Black isbetter.) 9 . . .exd6 10.Ne4 (Fischer quotes Grandmaster William Lombardy as sayingthat 10.Nf3 would have been “more realistic,” although after 10 . . .Bg4 Fischer stilllikes his position. Notice that after 10.exd6 Nxd6, Black will play . . .Re8 next move,pinning the bishop on e3 to the king. White will not be able to castle, and Black willhave a huge attack against the king for only one pawn.) 10 . . .Bf5! (Black continues todevelop with gain of time. Notice that 10 . . .dxe5? 11.Qxd8 Nxd8 12.Bc5 loses therook for bishop.) 11.Ng3 (Fischer thinks that 11.Nxd6 Nxd6 12.Qxd6 Qxd6 13.exd6 isa better chance for White, but he concedes that after 13 . . .Nb4! Black will get backthe pawns and maintain an attack.) 11 . . .Be6 12.Nf3 Qc7 and since White could stillnot afford to open the e-file and the fianchettoed bishop’s diagonal with 13.exd6,Black regained the pawn next move with 13 . . .dxe5, and also kept his attack. This isa complicated and difficult position, and I don’t expect you to be able to seeeverything, even if you study it for some time. The most important thing for you tounderstand from this exercise is when the center opened up, and White was far behindBlack in development, Black’s active pieces were able to exploit White’s weaknessesand his exposed king. Those advantages were worth more for Black than the one ortwo extra pawns were worth to White. If you want to push your pawns to gain space,you must be certain that your opponent can’t open the center and use his developedpieces to attack your undeveloped position!
Exercise #9: Black gains space and strikes at White’s strong e4 pawn by playing1 . . .d5!. White must either allow Black to capture on e4, which will weaken hispawn structure and also weaken his dark squares, or he must capture on d5, whichwill surrender control of much of the center to Black. Two sample lines:
a. 2.Qe1 dxe4 3.Rxd8+ Qxd8 4.fxe4 e5 and Black has equal space and betterpawns.
b. 2.exd5 Nxd5 3.Nxd5 Rxd5 4.Qe1 Rxd1+ 5.Qxd1 e5, and Black has at least asgood a pawn structure as White, and controls more space. Notice how Black’sgame improves once he exchanges off White’s strong center pawn on e4.
Exercise #10: White has more space, as a space count shows, so 14 . . .Nd5! is anexcellent move to trade pieces. Because White’s queen is attacked, the knight can’t becaptured. The game continued 15.Qd2 Nxc3 16.Bxc3 Bxc3 17.Rxc3 Nf6 18.f3 Qc719.e4 b5 20.Rdc1 Rc8 21.Ne3 Qa5 and chances were equal, because Black hadsolved his problem of a space disadvantage.
Exercise #11: White played 1.f5! Bd7 2.g4!, taking a terrific amount of space on thekingside. Notice that although his light-squared bishop is very bad, Black’s light-squared bishop is even worse! Meanwhile, White’s grip in the center prevents Blackfrom getting counterplay there, so White can focus on attacking on the kingside, wherehis extra space gives him a large advantage. After 2 . . .Ne8 3.Ng3 Qd8 4.g5! Bc8 6.h4f6 7.Qh5! White’s attack was in full swing, and he soon won.
Exercise #12: Kramnik played 1.g4! h6 2.h4! Bc8 3.g5 hxg5 4.hxg5 Nfd7 5.f4! Ng66.Nf3, and White had a large advantage because of his space advantage and moreactive pieces. A very important thing to note is that the plan beginning with 1.g4 wasonly possible because Black’s pieces did not have active squares to go to when theywere attacked, and so they had to retreat. For example, when White played 3.g5, Blackhad to retreat his knight to d7 and couldn’t go to e4 or d5, and when White played 5.f4,Black had to retreat his knight to g6, and couldn’t go to c4, d3, f3, or g4. If you aregoing to push your pawns forward to take more space, be sure that your opponent can’tmove his pieces forward to more active squares!
Exercise #13: Black should play 1 . . .d5! so that 2.g5 can be met by 2 . . .hxg5 3.hxg5Nxe4, and 2.exd5 can be met by 2 . . .Nxd5. Always look to meet an attempt to gainspace by a counterthrust in the center!
Exercise #14: Black should play 1 . . .c5! so that 2.e4 can be met by 2 . . .cxd4!3.Nxd4 Bb7. By exchanging the c-pawn for the d-pawn, Black has neutralized White’sspace advantage.
Exercise #15: 1 . . .c5 is less effective because after 2.d5! White’s space advantagehas increased, not decreased. Striking with . . .c7-c5 against this pawn formation canbe effective in positions where the dark-squared bishop is fianchettoed on g7, becauseit increased the power of the bishop along that diagonal. (For example, see Exercise#4 in Chapter 9.) But here Black’s bishop is in no position to operate along that
diagonal, and so Black simply loses space for nothing. Much better is 1 . . .Ne4! toexchange knights. After 2.Qc2 Nxc3 3.Qxc3, now Black can play 3 . . .c5 much moreeffectively, because White’s queen no longer supports d4-d5 in response.Grandmaster practice has shown this position to be roughly equal.
Answers to Exercises from Chapter 13Exercise #1: White can play 1.Bg5! and then 2.Bxf6. The bishop can’t control d5directly, but it can contribute by exchanging itself for Black’s knight, which doescontrol d5.
Exercise #2: White can play 1.Ng5! which exploits the weakened g5 square. Whitethreatens 2.Bxf6 and 3.Qh7+ followed by 4.Qh8#, and Black has no defense. Forexample, 2 . . .bxa4 3.Bxf6 axb3 (3 . . .gxf6 4.Qh7+ Kf8 5.Qxf7# or 5.Qh8#; 3 . . .Bxf64.Qh7+ Kf8 5.Qh8#) 4.Qh7+ Kf8 5.Qxg7# or 5.Qh8#. If Black’s g6 pawn were on h7,however, then Black’s attack on the queenside would win, because White would haveno way to get to Black’s king in time. For example, 1.Ng5 would be easily met by1 . . .h6!
Exercise #3: Botvinnik’s idea was to exploit the weak d5 square by putting his bishopon it. The game continued 18.Be4! Rb8 19.Rad1 b6 20.h3 Ba6 21.Bd5 and White hada large advantage thanks to his space advantage and his super-strong bishop on d5.
Exercise #4: Black has very weak squares on f6 and h6, which White exploited byplaying 25.Nh2! Nd4 26.Ng4. The game continued 26 . . .Rd8 27.Nf6+ Kg7 28.Qe3!and Black couldn’t play 28 . . .Rxd6 29.cxd6 Qxd6?? because of 30.Ne8+ forking theking and queen. White soon won this game due to his excellent play.
Exercise #5: I overlooked the very strong move 26.Qc1! Bb5 (There’s nothingbetter.) 27.Bxb5 axb5 28.Qh6!, and White had a winning attack because he threatens29.Rxe4! and 30.Ng5, and there’s no good defense. I soon lost.
Exercise #6: I played 27.Qg4! which threatens 28.Nxh6+, but more importantlythreatens 28.Rd8! which deflects the queen away from the bishop, allowing Qxg7#.Bronstein defended against the second threat by playing 27 . . .Rb1 (27 . . .Kh7?28.Rd8! Rxd8 29.Rxd8 still wins; the pin is not as important as the deflection), butafter 28.Nxh6+ Kh7 29.Nf5 I quickly won because Black’s king was so exposed.
Exercise #7: The correct move is 35 . . .Qg3!, because after 36.Nxe6 Ra2! 37.Re2(What else?) 37 . . .Ra1+ Black wins. White would have to play something like36.Ne2, but then 36 . . .Qh2 is very strong. Instead, Lasker played 35 . . .Qh2?, andafter 36.Nxe6 Ra2 37.Re2 Ra1+ 38.Kf2, there was no checkmate because 38 . . .Qg1+39.Kg3 is okay for White. Lasker played 38 . . .fxe6, but after 39.Qg6! he lost a pawn,
and eventually the game.
Exercise #8: I played 17 . . .Bf8!, and after 18.Qe2 Bg7 not only were the squaresaround my king well defended, my bishop also had a strong post where it could attackWhite’s isolated d-pawn.
Exercise #9: White must move the king, because any attempt to block the check losesmaterial. (For example, 21.Nf3 Qxd2 22.Rxd2 Bxc3.) Let’s look at each king move:
a. 21.Kh3 Qd7+ 22.g4 h5 23.Qf4 hxg4+ gives Black a fearsome attack, because24.Qxg4? loses material to 24 . . .Re3+ 25.Kh4 Bf6+.
b. 21.Kg1 Bxd4+! 22.Qxd4 Re1+! 23.Kf2 (23.Rxe1 Qxd4) 23 . . .Qxd4 24.Rxd4Rxa1 wins material, as Fischer points out.
c. 21.Kf2 is a tough nut to crack, but Fischer gives the following beautiful variation:21 . . .Qd7! 22.Rac1 Qh3 (threatens 23 . . .Qg2# as well as 23 . . .Qxh2+) 23.Nf3Bh6 24.Qd3 Be3+ 25.Qxe3 (25.Ke2 Qg2+ 26.Ke1 Qf2#) 25 . . .Rxe3 26.Kxe3(White still has a material advantage, but because of the weakness of his whitesquares it won’t last.) 26 . . .Re8+ 27.Kf2 Qf5! and Black pins and wins theknight on f3. Notice that White can’t defend it by playing 28.Rd3 because thequeen would capture the rook.
d. 21.Kf1 is what Byrne played, but after 21 . . .Qd7! he resigned. Fischer gives twovariations to explain why:
(d1)22.Qf2 Qh3+ 23.Kg1 Re1+!! 24.Rxe1 Bxd4 and Black will soonplay . . .Qg2#.(d2)22.N4b5 Qh3+ 23.Kg1 Bh6 and the check on e3 will be deadly.
This is a very difficult exercise, so don’t worry if you had trouble finding all thesemoves. In fact, Robert Byrne said after the game that until he resigned, twograndmasters who were explaining (in a separate room) the game to spectators thoughtthat Byrne was winning!
Exercise #10: Black can (and did) play 1 . . .a4! 2.Nc1 (2.Nxc6 bxc6 3.Nd4 isstrongly met by 3 . . .Qb6! As 4.Nxe6?? Re8 5.Bf5 Ne4! loses material for White)2 . . .a3! 3.b3 Qa5. Black quickly got a strong attack thanks to the weakness of the b2square. Indeed, Black already threatens 4 . . .Qc3 with checkmate to follow!
Exercise #11: White to play should play 1.a6! to get his knight to c6, e.g. 1 . . .Nc52.axb7 Rxb7 3.Nc6! with a large advantage. Black to play should play 1 . . .a6 toprevent this move and maintain the c6 square. Although this weakens the b6 square,
the knight already covers this square, so that weakness is less important.
Exercise #12: 1.Qa6!! (not 1.Nb5? a5 and there is no easy way in) 1 . . .dxc6 2.Nb5!cxb5 3.c6! and checkmate.
Exercise #13: The a7 and a8 squares are weak. In addition, Black’s king is blockedin by the queen and rook. White can exploit this with 1.Qa7! when Black has no wayto prevent 2.Qa8# next move!
Exercise #14: 1.h5! followed by 2.Nh4 is very strong. The knight will come to f5 org6, and the queen can come to g4.
Exercise #15: 1 . . .Nb7! Followed by 2 . . .Nc5 is very strong. The knight will cometo d3, and Black can press his advantage on the queenside by playing . . .a5 and . . .b4.
Answers to Exercises from Chapter 14Exercise #1: After 2 . . .Kb6, White wins by playing 3.Kf6 Kxa6 4.h4! (But becareful. Don’t play 4.Kg7?? g5! and suddenly Black wins because he makes a queenfirst with his f-pawn!) 4 . . .Kb6 5.Kg7 Kc6 6.Kxh7 Kd6 7.Kxg6 Ke6 (to protect the f-pawn) 8.h5 and White advances and promotes the h-pawn. For example: 8 . . .Ke79.Kg7! followed by h6-h7-h8=Q.
Exercise #2: Black’s bishop prevents White’s king from supporting the advance of thepawns. The solution is for White to remove the bishop: 1.Rxd5! Rxd5 2.Kc4 wins. Forexample: 2 . . .Rd8 3.d5 Ka4 4.c6 Ka5 5.Kc5 Ka6 6.c7 Rc8 7.Kc6! (Not 7.d6? Kb7and 8 . . .Rxc7 draws) and White wins by pushing his d-pawn.
Exercise #3: White has a large advantage, because Black’s bishop is bad, andbecause White’s king is better centralized. In particular, Black’s a-pawn and h-pawnare both weak. White wins by playing 1.Ne4+ Ke6 2.Nf6 (2.Nc5+ Ke7 3.Nxd7 Kxd74.Kd5! also wins, because by taking the opposition White is able to capture Black’spawns no matter how Black moves the king, for example 4 . . .Ke7 5.Kc6-b6xa6, or4 . . .Kc7 5.Ke6-f6-g7xh7. But notice that 4.Ke5? Ke7! or 4.Kc5? Kc7! are drawn.)2 . . .Kf5 3.Nxh7 and White will play 4.Nf6 and 5.h7 and 6.h8=Q to win.
Exercise #4: Capablanca played the correct move: 23.Ke2! The king is in no dangerbecause of the reduced material, and so it should be centralized. Capablanca won avery nice endgame, thanks largely to his powerful king position.
Exercise #5: White to move wins by 1.c6! (Not 1.b6? Nd4 2.b7 Nc6 blockading thepawns, and allowing Black to capture them with his king.) 1 . . .Nd4 (or 1 . . .Ne52.c7) 2.c7 and promotes to a queen. Black to move draws by 1 . . .Nd4! (or 1 . . .Ne5!2.c6 Nc4! 3.c7 Nb6) 2.b6 (2.c6 Nxb5 captures the b-pawn and stops the c-pawn)

2 . . .Nc6! and now that the pawns are blockaded, Black can bring the king over tocapture the pawns.
Exercise #6: White to move wins most easily with 1.Kd6! Ke8 (or 1 . . .Kc8 2.Ke7)2.Kc7 Ke7 3.d5 and pushes the pawn to make a queen. White can also win with either1.Ke6 or 1.Kc6. For example: 1.Kc6 Kc8 (1 . . .Ke8 2.Kc7 Ke7 3.d5; 1 . . .Ke7 2.d5Kd8 3.Kd6! takes the opposition and wins) 2.d5 Kd8 3.Kd6! Kc8 (or 3 . . .Ke8 4.Kc7)4.Ke7 followed by pushing the d-pawn to make a queen. Notice that 1.Ke5? Ke7! and1.Kc5? Kc7! both draw. Black to move only draws by taking the opposition with1 . . .Kd7!; one sample variation goes 2.Ke5 Ke7! 3.d5 Kd7 4.d6 Kd8! 5.Ke6 Ke8!and draws.
Exercise #7: After 55 . . .Rxh3 56.Rxh3 Kxh3 57.Kf2 followed by 58.Be5, Whiteblockades both pawns. The best Black can hope to do is to win the bishop for bothpawns, but then with only a bishop left he can’t win. (You should analyze the positionto convince yourself that there is no way for Black to break White’s blockade.)Browne saw this, and realized it would be a draw, so he tried to avoid exchangingrooks by playing 55 . . .Kf5??, but then after 56.Rh6! he was threatened with 57.Rf6#.Black can only avoid checkmate by giving up his rook, for example 56 . . .Re1+57.Bxe1 or 56 . . .Rxh3+ 57.Rxh3. Browne played 56 . . .g4, but after 57.hxg4+ heresigned, because 58.Rxh1 would be next, leaving him with a lost position.
Exercise #8: Black has a large advantage for two reasons: Black’s pawn structure ismuch better than White’s (one pawn island against three), and White’s pieces arepassive whereas Black’s pieces are active. White’s passed pawn is useless, becauseit can’t be advanced. In fact, Black is about to win the pawn by playing the knight toa5, when White won’t be able to defend it again. Capablanca won the b-pawn, andthen won the game.
Exercise #9: By making this sacrifice, Black gains several things: (1) His kingbecomes very powerful. (2) He gets rid of White’s only active piece. (3) He gets apowerful protected passed pawn on e4, and the potential for connected passed pawnsby advancing his kingside pawn majority. (4) White’s queenside pawn majority isuseless, because Black’s two pawns hold White’s three, and because Black’s knightand king attack the pawns. (5) White’s rook is terribly passive. Black won byadvancing his kingside pawns. White had no hope of blockading the pawns becauseBlack’s king and knight supported them so powerfully.
Exercise #10: White can’t draw because he can’t get his king into the corner. After57.Kd2 Kb3! 58.Kc1 Black wins by simply advancing his a-pawn. Notice that Black’sbishop serves double duty along its diagonal: It stops White’s king from crossing b1 toget to a1, and it controls the h7 square, thereby stopping the pawn from promoting.
Exercise #11: The trick that my opponent missed is 41 . . .Bh4!. Normally it would beinsane to put the bishop on a square where it could be captured, but here the idea isthat if 42.gxh4 then 42 . . .g3! 43.hxg3 (or else 43 . . .gxh2) 43 . . .h2 makes a queen.Meanwhile the threat after 41 . . .Bh4! is 42 . . .Bxg3! 43.hxg3 h2 and wins. White hadto play 42.e4 Bxg3 43.Bg1, but after 43 . . .Bxf4 I won the bishop by playing 44 . . .g345.hxg3 Bxg3 and 46 . . .h2, and then I soon won the game.
Exercise #12: Black’s plan is to capture White’s kingside pawns and then win on thequeenside. It turns out that Black has to use his protected passed pawn as a decoy, butthen he can win both of White’s remaining queenside pawns, so he wins. The gamemight go as follows: 4.gxh5+ (4.g5 h4 wins because Black can blockade White’sconnected passed pawns, but White can’t stop both of Black’s passed pawns)4 . . .Kxh5 5.Kd3 Kg4 6.Ke4 b3! 7.Kd3 Kxf4 8.Kc3 Ke3 9.Kxb3 Kd3 10.Kb2 Kxc411.Kc2 (11.Ka3 Kc3 12.Ka2 Kb4 wins one a-pawn anyway) 11 . . .Kb4 12.Kd3 Kb313.Kd2 Kxa4 14.Kc3 Kb5 and Black wins with the two pawns. The winning plan is topush the c-pawn, and then when White tries to make Black stalemate him, Black forcesWhite’s king to move by pushing his a-pawn. For example: 15.Kb3 c4+ 16.Kc3 Kc517.Kc2 Kb4 18.Kb2 c3+ 19.Kc2 Kc4 20.Kc1 Kb3 21.Kb1 c2+ 22.Kc1 a4! (This isthe difference of having the extra pawn!) 23.Kd2 Kb2 and Black makes a queen andwins. (Notice again the key role played by the opposition!)
Exercise #13: White holds the draw if he blockades all of Black’s pawns. With1 . . .Kc4, Black is trying to penetrate with his king to b1, so he can win White’sbishop. White must stop the king from penetrating, so White plays 2.Ke3! Kb3 3.Kd2!(White must stop the king from getting to the d3 square, and then stop the king fromgetting to the c2 square.) If Black tries to advance the d-pawn, White makes sure hisking covers the key d4 square when the Black king covers it: 1 . . .Kc4 2.Ke3 d53.Bh8. If Black brings the king back to e6, White stops the king from penetrating to f5and g4 (where it might threaten the g3 pawn) as follows: 1 . . .Kc4 2.Ke3 Kd5 3.Bh8Keb 4.kf4. Black has no way to break the blockade, so White draws.
Exercise #14: No, Black wins this position. The difference is that Black has anotherpassed pawn (and White’s passed pawn is securely blockaded). Black begins thesame way as in the last position: 1 . . .Kc4 2.Ke3 Kb3 3.Kd2, but now Black plays3 . . .h4! and White’s king is overloaded. White must stop the h-pawn, but he then hemust let Black’s king penetrate. The game could continue 4.Ke3 Kc2 5.Kf4 Kb1 6.Bh8a1=Q 7.Bxa1 Kxa1 8.Kg4 d5 9.Kxh4 d4 10.Kg4 d3 11.Kf3 Kb1 followed by12 . . .Kc2, 13 . . .d2 and 14 . . .d1=Q.
Exercise #15: Black draws by 1 . . .Kc6! (not 1 . . .a4?? 2.bxa4+ Kxa4 3.Kc4 Kxa34.Kxc5 and White wins with Kd5-e5-xf5, or 1 . . .Kb6?? 2.Kc4 Kc6 3.a4! Kd6 4.Kb5and White wins a crucial tempo over the main line; for 1 . . .Ka6 2.Kc4 Kb6, see the

variation “a”) 2.Kc4 and now there are two moves:
a. 2 . . .Kb6 3.Kd5! (3.a4 Kc6 gains the opposition and White cannot break through;3.b4?? cxb4 4.axb4 a4! 5.b5 a3! 6.Kb3 Kxb5 7.Kxa3 Kc4 and Black wins!)3 . . .Kb5 4.Kd6! (4.Ke5 a4! 5.bxa4+ Kxa4 and because Black’s c-pawn is sofast, White must play 6.Kd5 Kb5 7.a4+ Kb4 8.a5 c4 9.a6 c3 10.a7 c2 11.a8=Qc1=Q and White has winning chances, but the queen endgame is not clear. Queenendgames like this one are rarely clear!) 4 . . .c4 (not 4 . . .a4?? 5.bxa4+, or4 . . .Kb6?? 5.a4) 5.bxc4+ Kxc4 6.Ke5 Kb3 7.Kxf5 Kxa3 8.Kg5 Kb3 9.f5 a410.f6 a3 11.f7 a2 12.f8=Q a1=Q and because White wins Black’s h-pawn, thisendgame is known to be winning for White. White’s plan is to try to exchangequeens while advancing and promoting the pawn. Black’s plan is to try to giveperpetual check. These endgames have been analyzed by computers, andprobably only computers can play them without making tons of mistakes!
b. 2 . . .Kd6! 3.Kb5 (again, 3.a4 Kc6 is drawn after 4.Kc3 Kd5 5.Kd3 Kd6! 6.Kc4Kc6) 3 . . .Kd5 4.Kxa5 Ke4 5.a4 (not 5.b4?? c4! 6.b5 [6.Ka4 c3 7.Kb3 Kd3]6 . . .c3 7.b6 c2 8.b7 c1=Q 9.b8=Q Qxa3+ and 10 . . .Qb3+, winning for Black)5 . . .Kxf4 6.Kb6 Kg3 7.a5 f4 8.a6 f3 9.a7 f2 10.a8=Q f1=Q and Black is notworse.
It’s amazing how complicated chess can be with just kings and pawns, isn’t it?
Exercise #16: There are two key variations after 1 . . .g4:
a. The game continued 2.Nxg4 Kh3 3.Kb3 Kg2 4.Ne5 (4.Kxb4 Kxf3 5. Ne5+ Kg2gives White no chances to win) 4. . .Kxh2 5.Kxb4 g5 6. Kc3 Kg3 7.Kd2 g4!8.fxg4 (8.Nxg4 Kxf3) 8. . .f3 9. Nxf3 (9. g5?? f2; 9.Ke1 Kf4) 9. . .Kxg4 and thegame was called a draw.
b. 2.fxg4 g5!! 3.Kb3 f3 and White has two choices. He can capture on b4 and makea draw by stalemate. Or he can play 4.Ne4 Kxg4 5.Kxb4 when Black can force adraw with 5 . . .Kh3.
Exercise #17: White wins with 1.Rb5! Black can make no headway withoutadvancing the pawn, but if he advances the pawn the king will not be able to defend it:1 . . .g3 2.Rb3! g2 3.Rg3 followed by capturing the pawn. So Black must wait, whileWhite brings the king around to capture the pawn.
Exercise #18: No, the game is drawn. Black must be careful to use his king toshepherd the pawn forward, while keeping the White king away. The game couldcontinue: 1.Kc6 g3 2.Kd5 (2.Ra4 g2 doesn’t help White at all) 2 . . .Kf4! (Not

2 . . .g2?? 3.Rg8! or 2 . . .Kg4? 3.Ke4! g2 4.Rg8+ Kh3 5.Kf3 and White catches thepawn) 3.Kd4 g2 4.Rg8 Kf3 5.Kd3 Kf2 6.Rf8+ Ke1 7.Rg8 Kf2 and White will have togive up the rook for the pawn.
Exercise #19: White should play 1.Rd7! taking the seventh rank. Black has a verydifficult game after this move. If Black defends the pawn with 1 . . .Rb8, then Whitekeeps the rook on the seventh rank, and both Black’s king and rook are very passive.But if Black keeps the rook active, for example, with 1 . . .Re6 2.Rxb7 a6, then Blackloses a pawn for nothing. White should probably win the endgame in either case.
Exercise #20: After 1.Rd7, Black should play 1 . . .Re6! Now after 2.Rxb7 Ra6!Black counterattacks White’s a-pawn, and restores material equality with active play.White can try to keep some pressure by playing 2.b5!? Rb6 3.a4 a6! 4.Rd5 axb55.axb5, when White’s rook is more active than Black’s, but here Black has relativelyactive pieces, and is only slightly worse. Always, always, always look for ways tokeep your rook active in rook endgames, whether you’re attacking or defending!

Appendix DGlossary
Alpha beta pruning A mathematical technique that allows the computer to cut downon the number of moves it must consider when it calculates all the possibilities in achess position.
Backward pawn Loosely speaking, a pawn in a pawn chain (in the strict sense of“pawn chain”) that protects another pawn in the chain. Strictly speaking, such a pawnthat cannot be protected by another pawn, and that has no chance of safely advancingin the near future.
Bad bishop A bishop whose mobility is restricted by its own pawns.
Black-squared bishop The bishop that moves along the black squares. Each playerstarts the game with one black-squared bishop.
Capture The act of moving one of your pieces to a square occupied by one of youropponent’s pieces, thereby removing your opponent’s piece from the board. Once apiece is captured, it is gone for the rest of the game.
Castling A special move of the king. Under certain circumstances, the king can movetwo squares to the left or right towards one of the rooks, and then place that rook onthe square immediately next to it on the opposite side. See Chapter 3 or the tear-outcard for details on this move.
Check Refers to when the king is attacked. When the opponent threatens to capture theking on his next move, the king is “in check.”
Checkmate Refers to when the king is attacked, and there is no way to prevent it frombeing captured in the next turn. Checkmate ends the game; the player whose king ischeckmated loses, and the player who checkmates the other king wins.
Clearance sacrifice To sacrifice a piece in order to vacate the square it was standingon.
Closed Refers to when the center is filled with pawns that block one another. Whenthe game is closed, there are few open files in the center.
Deflection Refers to when one piece is forced to move away from a square where itis needed for some reason. When this happens, the piece is “deflected” from thesquare.
Develop To move a piece (except for a pawn or the king) off its original square onto
another square in the opening.
Discovered check A check that results because one piece moves, and the piece thatwas behind it gives check.
Double check Refers to when the king is put in check by two pieces at once.
Draw The chess term for a tie. When the game is a draw, neither player wins.
En passant A French phrase which means “in passing.” It is used to refer to a specialpawn capture, where one pawn captures another that has advanced two squares to landon the square immediately to its left or right. On the very next turn, and only on thevery next turn, the pawn may capture the enemy pawn as though it had advanced onlyone square.
Exchange As a verb, a synonym for “trade.” As a noun, it refers to the advantage ofhaving the rook for one of the minor pieces. To be “up the exchange,” for example, isto have a rook in return for the opponent having a bishop or knight.
File A vertical row of squares. The chessboard has eight files.
Fork When one piece attacks two or more of the opponent’s pieces at the same time, itis called a fork.
Forward pawn The most advanced pawn in a pawn chain (in the strict sense of “pawnchain”).
Friend or foe A convenient way to distinguish between one of your pieces, and one ofyour opponent’s pieces. Naturally, a friend is one of your pieces, and a foe is one ofyour opponent’s pieces.
Good bishop A bishop whose mobility is not restricted by its own pawns.
Grandmaster The highest title one can earn as a chess player. It is awarded by FIDE,the world chess federation.
In between An “in between” move is one that can be played between two moves youthought had to be played consecutively. An “in between” move is often a check or athreat to capture some piece.
Insufficient material Refers to when neither side can possibly put the other king intocheckmate. When there is insufficient material, the game is automatically a draw.
Luft German word for “air.” To “make luft” is to advance one of the pawns in front ofthe castled king in order to relieve the weak back rank.
Open Refers to when the center has no pawns that block one another. When the gameis open, there are lots of open files in the center.
Open file A file that is either completely or relatively cleared of pawns and pieces,so that if a rook were posted on the file it would control all or most of the squaresalong it.
Opening repertoire The set of opening sequences one has prepared in advance inorder to reach a middlegame one is comfortable playing.
Opposite-colored bishops Refers to when you have one bishop and your opponent hasone bishop, and each bishop moves on different colored squares (e.g., your bishopmoves on the white squares and your opponent’s bishop moves on the black squares).
Outside passed pawn A passed pawn that is away from most of the other pawns, andthat is not a center pawn.
Passed pawn A pawn that can no longer be captured or blocked by another pawn solong as no power changes files by capturing.
Pawn chain Loosely speaking, any group of pawns of the same color on squares thattouch each other; strictly speaking, a group of pawns of the same color on squares thattouch each other diagonally. In the strict sense, the pawn is a “chain” because eachpawn protects another and is protected, except for the base (which is not protected bya pawn) and the forward pawn (which doesn’t protect any pawn).
Pawn duo Two pawns of the same color on the same rank and on adjacent files.
Pawn structure Any configuration of pawns of the same color.
Perpetual check Refers to when one side can put the other king into check forever. Ifone player announces he will give perpetual check, and there is no way for the otherplayer to escape from the checks, the game is a draw.
Pin When a piece is on a square between a friend and a foe that would be attacking it,that piece is “pinned” to its friend. A “pin” refers to such a situation.
Protected passed pawn A passed pawn that is protected by another pawn.
Rank A horizontal row of squares. The chessboard has eight ranks.
Resign To concede defeat.
Sacrifice To voluntarily give up material for some reason.
Skewer An attack on a piece that results in winning one of its friends, because whenthe piece that is attacked moves, its friend is captured by the piece that was attackingit.
Smothered mate Refers to when the knight gives check, and it’s checkmate becausethe king is surrounded by its own pieces and so has nowhere to move.
Stalemate Refers to when the player whose turn it is to move has no legal move, andhis king is not in check. When the position is stalemate for either player, the game is adraw.
Tactic A move or sequence of moves played to achieve some goal, such as the win ofmaterial or checkmate.
Trade To capture one of the opponent’s pieces and allow the opponent to recapturesome material in return. For example, to trade knights is to capture one of theopponent’s knights, and allow the opponent to capture a knight in return.
Weak back rank When your king is on the rank that is closest to you, and a check bythe opponent’s rook or queen along that rank would be checkmate, you have a weakback rank.
Weak Square A square that one player can control but the other can’t. It’s not reallycorrect to call a square “weak” unless it’s also important, so whether a square is weakis a judgment call.
White-squared bishop The bishop that moves along the white squares. Each playerstarts the game with one white-squared bishop.
X-ray Refers to when one piece does not control a square, except for when aparticular foe moves, in which case the piece can capture that foe.
Zugzwang Name for the situation when it would be a disadvantage for either player tohave it be his turn to move.
Zwischenzug German word that means “in between move,” sometimes used in chessparlance for the “in between” move.

Index
Symbols
# (pound signs), notation, ref-1
+ (plus signs), notation, ref-1
1001 Brilliant Ways to Checkmate,ref-1
1001 Chess Sacrifices and Combinations,ref-1
20/20 vision (computer strength), ref-1, ref-2
50 move rule (draws), ref-1
(equal signs), notation, ref-1
A
About.com Web site, ref-1
abbreviations of names of pieces, ref-1
active pieces, ref-1
vs passive pieces, endgame, ref-1
aimlessness
computer chess weaknesses, ref-1, ref-2
Alekhine, Alexander, ref-1
alpha-beta pruning, ref-1
American Chess School Web site, ref-1
American Postal Chess Tournaments Web site, ref-1
Anand, Viswanathan, ref-1, ref-2, ref-3
André Philidor, ref-1
answers to exercises, ref-1
Art of Attack in Chess, The, ref-1
Art of Defense in Chess, The,ref-1

artificial intelligence (computers)
Deep Blue, ref-1
machine learning, ref-1
selective searches, ref-1
attack tactics, kings, ref-1
attack tactics. See also checkmates
attacking
capturing pieces, ref-1
defenders, ref-1
defending against attacks, ref-1
attacking other pieces, ref-1
blocking attacks, ref-1
capturing attacking pieces, ref-1
defending pieces, ref-1
moving pieces, ref-1
discovered check, ref-1
double attacks, ref-1
double check, ref-1
forks, ref-1
pins, ref-1
See also capturing pieces
skewers, ref-1
weaknesses, ref-1
with pawns, chains, ref-1
attacks
defending against, breaking pins, ref-1
forks, family forks, ref-1
B
backward/forward pawns, ref-1, ref-2
doubled backward pawns, ref-1
bad bishops, ref-1
endgame, ref-1
Basic Chess Endings,ref-1
beginning games. See openings
Best Lessons of a Chess Coach,ref-1
Bisguier, Arthur, vs Bobby Fischer, ref-1
bishops, ref-1
bad bishops, ref-1
endgame, ref-1
black-squared bishops, ref-1
endgames
bad bishop vs. knight, ref-1
good bishop vs knight, ref-1
opposite colored bishops, ref-1
vs knights, ref-1
wrong-colored bishops, ref-1
fianchettoing, ref-1
forks, ref-1
good bishops, ref-1
endgame, ref-1
middlegame vs knights, ref-1
middlegames, ref-1
opposite colored bishops, ref-1
two bishops, ref-1
opposite colored bishops, endgames, ref-1

pins, ref-1
trading for knights, ref-1
vs knights, ref-1
endgames, ref-1
white-squared bishops, ref-1
wrong-colored bishops, endgames, ref-1
black-squared bishops, ref-1
blitz (speed) chess, ref-1
blockading
passed pawns, ref-1
blockading pawns, ref-1
board
closed centers, ref-1
controlling center of board, ref-1
controlling the center, endgame, ref-1
diagonals, opening with pawns, ref-1
files
open files, ref-1
opening with pawns, ref-1
kingside, castling, ref-1, ref-2, ref-3
queenside, castling, ref-1, ref-2
space, controlling, ref-1
advantages, ref-1
controlling the center, ref-1, ref-2
playing with less space, ref-1
using space advantages, ref-1
books as training resources
endgames, ref-1
openings, ref-1
pleasure readings, ref-1
strategies, ref-1
tactics, ref-1
World Champions, ref-1
Bookup (software program), ref-1
Botvinnik, Mikhail Moiseyevich, ref-1, ref-2
British Chess Magazine,ref-1
C
Canadian Correspondence Chess Association Web site, ref-1
Capablanca, José Raul, ref-1
capturing pieces, ref-1, ref-2
defending against attacks, breaking pins, ref-1
exchanging, ref-1
exchanging pieces
playing with space disadvantages, ref-1
See also attacking
strategy, ref-1
trading, ref-1
trading pieces, playing with space disadvantages, ref-1
with pawns
en passant,ref-1
castling, ref-1
kingside, ref-1, ref-2
notation, ref-1
notation, ref-1
openings, ref-1

queenside, ref-1
notation, ref-1
rules, ref-1
center
closed centers, ref-1
controlling
endgame, ref-1
center pawns, ref-1
taking space, ref-1, ref-2
champions
women, ref-1
World champions. See World Champions
chaturanga, ref-1
check
castling, ref-1
discovered check, ref-1
double check, ref-1
history, ref-1
in between moves, ref-1
notation, + (plus signs), ref-1
patzers, ref-1
perpetual check, ref-1
checkmate, ref-1
history, ref-1
notation, # (pound signs), ref-1
strategy, ref-1
queen and king versus king, ref-1
checkmates

exercises, ref-1
smothered mate (quotes), ref-1
weak back rank (quotes), ref-1
checkmates. See also attack tactics
books/magazines, contact information, ref-1
clocks, ref-1
history of, ref-1, ref-2
organizations, contact information, ref-1
popularity of, ref-1
Chess Café Web site, ref-1, ref-2
Chess House Web site, ref-1
Chess Informant,ref-1
Chess Life,ref-1, ref-2
Chess Monthly,ref-1
Chess-in-the-Schools Web site, ref-1
Chess.net Web site, ref-1
ChessBase (software program), ref-1
chessboard
closed centers, ref-1
controlling center of board, ref-1
controlling the center, endgame, ref-1
diagonals
opening with pawns, ref-1
file, ref-1
files
open files, ref-1
opening with pawns, ref-1
kingside, castling, ref-1, ref-2, ref-3
queenside castling, ref-1, ref-2
rank, ref-1
space, controlling, ref-1
advantages, ref-1
controlling the center, ref-1, ref-2
playing with less space, ref-1
using space advantages, ref-1
ChessCenter Web site, ref-1, ref-2
ChessClub Web site, ref-1
Chessco Web site, ref-1
ChessDigest Web site, ref-1
Chessmaster 8000 (software program), ref-1
children’s tournaments, ref-1
classical era World Champions, ref-1
Alekhine, Alexander, ref-1
Capablanca, José Raul, ref-1
Euwe, Machgielis, ref-1
Lasker, Emanuel, ref-1
Steinitz, Wilhelm, ref-1
clearance sacrifices, ref-1
clocks, ref-1
clocks (tournament rules), ref-1
closed centers, ref-1
clubs, ref-1
competitions. See tournaments
competitors, finding stronger competitors, ref-1
computer chess
Deep Blue, impact of victory over Kasparov, ref-1
Deep Blue, versus Garry Kasparov, ref-1, ref-2
defeating computers, ref-1
future expectations, ref-1
software, company contact information, ref-1
strengths, ref-1
20/20 vision, ref-1, ref-2
machine qualities, ref-1
versus thinking process of humans, ref-1
weaknesses, ref-1
aimlessness, ref-1, ref-2
strategic advantages versus material advantages, ref-1
computers
alpha-beta pruning, ref-1
artificial intelligence, ref-1
machine learning, ref-1
selective searches, ref-1
chess software programs, ref-1
Bookup, ref-1
ChessBase, ref-1
Chessmaster 8000, ref-1
Maurice Ashley Teaches Chess, ref-1
Power Chess ref-1, ref-2
Virtual Chess ref-1 (Nintendo), ref-1
Deep Blue, artificial intelligence, ref-1
PDA’s (personal digital assistants), ref-1
versus thinking process of humans, ref-1, ref-2
connected passed pawns, ref-1
constricting kings, queen and king versus king, ref-1

Correspondence Chess League of America Web site, ref-1
D
Deep Blue artificial intelligence, ref-1
machine learning, ref-1
selective searches, ref-1
impact of victory over Kasparov, ref-1
versus Garry Kasparov, ref-1, ref-2
defending, ref-1
attacking other pieces, ref-1
blocking attacks, ref-1
capturing attacking pieces, ref-1
defending pieces, ref-1
deflecting pieces, ref-1
attacking defenders, ref-1
overloading defenders, ref-1
French Defense opening, ref-1
King’s Indian Defense, ref-1
moving pieces, ref-1
pins, breaking, ref-1
Sicilian Defense, ref-1, ref-2
fianchettoing the bishop, ref-1
Sicilian dragon variation, ref-1
Sicilian Defense openings
Dragon Variation, ref-1
Najdorf Variation, ref-1
Poisoned Pawn Variation, ref-1
deFirmian, Nick, ref-1
deflecting pieces, ref-1
attacking defenders, ref-1
overloading defenders, ref-1
developing pieces, ref-1
diagonals, opening with pawns, ref-1
discovered check, ref-1
double check, ref-1
doubled pawns, ref-1
doubled backward pawns, ref-1
draws, ref-1, ref-2
mutual agreement to draws, ref-1
perpetual check, ref-1
scoring, ref-1
stalemate, ref-1
queen and king versus king, ref-1
draws (tournament rules)
50 move rule, ref-1
threefold repetitions, ref-1
E
e-mail chess, ref-1
International Email Chess Group, ref-1
Shockwave, ref-1
e.p. notation, ref-1
Elo, Arpad, ref-1
Emms, John, ref-1
en passant,ref-1
Encyclopedia of Chess Openings,ref-1
endgame, ref-1, ref-2
active vs passive pieces, ref-1
bishops
opposite colored bishops, ref-1
wrong-colored bishops, ref-1
bishops vs knights, ref-1
controlling the center, ref-1
king and pawn vs. king, ref-1
king, rook’s pawn, and wrong-colored bishop vs. king, ref-1
kings, ref-1
opposed, ref-1
opposite colored bishops, ref-1
passed pawns, ref-1
blockading, ref-1
connected passed pawns, ref-1
outside passed pawns, ref-1
pawn majorities, ref-1
protected passed pawns, ref-1
See also middlegame
endgames
studying, ref-1
training resources, ref-1
ending games
checkmate, ref-1
notation, ref-1
draws, ref-1, ref-2
mutual agreement to draws, ref-1
perpetual check, ref-1
scoring, ref-1
stalemate, ref-1
stalemate. See stalemates
resigning games, ref-1
entering tournaments, ref-1
equal signs (=), notation, ref-1
etiquette (tournament rules)
speaking to opponents, ref-1
touch-move rule, ref-1
Euwe, Machgielis, ref-1
Even More Complete Chess Addict, The, ref-1
exchanging pieces, ref-1
playing with space disadvantages, ref-1
Excite Web site, ref-1
exercises
answers, ref-1
checkmates, ref-1
exposing kings, attack tactics, ref-1
F
family forks, ref-1
Féderation Internationale des Échecs. See FIDE
fianchettoing bishops, ref-1
FIDE (Féderation Internationale des Échecs), ref-1
FIDE Web site, ref-1
files
kingside, castling, ref-1, ref-2
open files, ref-1

opening with pawns, ref-1
queenside, castling, ref-1
Fine, Reuben, ref-1
Fischer Revolution World Champions, ref-1
Anatoly Yegenyivich Karpov, ref-1
Garry Kimovich Kasparov, ref-1, ref-2
King’s Indian Defense, ref-1
vs Arthur Bisguier, ref-1
vs Petrosian, ref-1, ref-2
forks, ref-1
forward/backward pawns, ref-1, ref-2
doubled backward pawns, ref-1
French Defense opening, ref-1
G
Gallagher, Joe, ref-1
gambits, ref-1
Queen’s Gambit Declined opening, ref-1
games, ref-1
beginning. See openings
draws, 3843
endgame, ref-1
engame, ref-1
middlegame, ref-1
weak squares, ref-1
openings, ref-1
castling, ref-1
controlling center of board, ref-1
developing major/minor pieces, ref-1
developing pieces, ref-1
efficiency, ref-1
fianchettoing bishops, ref-1
French Defense, ref-1
King’s Indian Defense, ref-1
Queen’s Gambit Declined, ref-1
Sicilian Defense, ref-1, ref-2
resigning, ref-1
scoring, ref-1
win/loss/draw, ref-1
winning. See checkmate
games (online chess sites), ref-1
good bishops, ref-1
endgame, ref-1
Grandmaster Chess Web site, ref-1, ref-2
H–I
Handango Web site, ref-1
history
check/checkmate, ref-1
history of chess, ref-1, ref-2
human chess versus computer chess, ref-1
human thinking process versus computers, ref-1, ref-2
in between moves, ref-1
Inner Game of Chess, The,ref-1
Inside Chess,ref-1
International Chess Federation, ref-1
International Correspondence Chess Federation Web site, ref-1
International Email Chess Group Web site, ref-1
isolated pawns, ref-1
K
Karl Marx Plays Chess,ref-1
Karpov vs Kasparov, ref-1
Karpov, Anatoly Yegenyivich, ref-1
Kasparov Chess Web site, ref-1, ref-2
Kasparov versus Anand: The Inside Story of the 1995 World Chess ChampionshipMatch,ref-1
Kasparov, Anand
example attack tactics, ref-1
example king attack tactics, ref-1
Kasparov, Garry, ref-1, ref-2, ref-3
King’s Indian Defense, ref-1
versus Deep Blue, ref-1, ref-2
vs Karpov, ref-1
vs Viswanathan Anand, ref-1
king, material value, ref-1
King’s Indian Defense, ref-1
kings, ref-1
attack tactics, ref-1
examples, ref-1
exercises, ref-1
exposing, ref-1
material advantages, ref-1
smothered mate (quotes), ref-1
weak back rank (quotes), ref-1
castling, ref-1
kingside, ref-1
notation, ref-1
openings, ref-1
queenside, ref-1
check
discovered check, ref-1
double check, ref-1
history, ref-1
in between moves, ref-1
notation, ref-1
patzers, ref-1
checkmate, ref-1
history, ref-1
notation, ref-1
queen and king versus king, ref-1
constricting, queen and king versus king, ref-1
endgames, ref-1
king and pawn vs. king, ref-1
forks, ref-1
opposed, ref-1
kingside
castling, ref-1, ref-2
notation, ref-1
knights, ref-1
endgame vs bishops, ref-1
forks, ref-1
middlegame vs bishops, ref-1
middlegames, ref-1
trading for bishops, ref-1
vs bishops, ref-1
endgame, ref-1
Kramnik, Vladimir, ref-1
L
L’analyze des Échecs, ref-1
Lasker, Emanuel, ref-1, ref-2
libraries (online resources), ref-1
locating tournaments, ref-1
long-distance competitions, postal chess competitions, ref-1
M
machine learning, ref-1
magazines
contact information, ref-1
online resources, ref-1
magazines as training resources, ref-1
major pieces, ref-1
major/minor pieces, openings, ref-1
mate. See checkmate
material, ref-1
king, ref-1
major/minor pieces, ref-1
protecting, ref-1
attacking other pieces, ref-1
blocking attacks, ref-1
capturing attacking pieces, ref-1
defending pieces, ref-1
moving pieces, ref-1
trading/exchanging pieces, ref-1
winning, ref-1
worth of pieces, ref-1
king, ref-1
material advantages, computer chess weaknesses, ref-1
material advantages
kings
attack tactics, ref-1
Maurice Ashley Teaches Chess (software program), ref-1
middlegames
attacking weaknesses, ref-1
bishops, ref-1
opposite colored bishops, ref-1
two bishops, ref-1
vs knights, ref-1
knights, ref-1
vs bishops, ref-1
mobility, ref-1
pawns, damaging pawn structures, ref-1
doubled pawns, ref-1
duos, ref-1
forward/backward pawns, ref-1, ref-2
islands, ref-1
isolated pawns, ref-1
one pawn holding two, ref-1
opening files/diagonals, ref-1
repairing pawn structures, ref-1
tripled, ref-1
queens, ref-1
rooks, ref-1
See also space
weak squares, ref-1
minor pieces, ref-1
Modern Chess Openings,ref-1
Morphy, Paul, ref-1
Most Instructive Games of Chess Ever Played: 62 Masterpieces of Chess Strategy,The,ref-1
moving pieces
bishops, middlegames, ref-1
castling notation, ref-1
openings, ref-1
kings, castling, ref-1
knights, middlegames, ref-1
mobility, ref-1
pawns
en passant,ref-1
promoting, ref-1
planning moves, ref-1
queens, middlegames, ref-1
rooks
castling, ref-1
middlegames, ref-1
See also capturing pieces
See also tactics

stalemate, ref-1
zugzwang, ref-1
MSN Web site, ref-1
My 60 Memorable Games, ref-1
My System, ref-1
N
Najdorf Variation, Sicilian Defense
opening, ref-1
National Scholastic Chess Foundation Web site, ref-1
New In Chess,ref-1, ref-2
New World Chess Champion and London-Leningrad Championship Games,ref-1
newsgroups (online resources), ref-1
notation
castling O-O/O-O-O, ref-1
check, + (plus signs), ref-1
checkmate, # (pound signs), ref-1
e.p. (en passant - rarely used), ref-1
promoting pawns, = (equal signs), ref-1
Nunn’s Chess Openings,ref-1
O
online resources
gaming sites, ref-1
libraries and resources, ref-1
magazines, ref-1
newsgroups, ref-1
open files, ref-1
openings, ref-1
castling, ref-1
controlling center of board, ref-1
pawns, ref-1
developing major/minor pieces, ref-1
developing pieces, ref-1
efficiency, ref-1
French Defense, ref-1
King’s Indian Defense, ref-1
Queen’s Gambit Declined, ref-1
repertoires, ref-1
Sicilian Defense, ref-1, ref-2
Dragon Variation, ref-1
fianchettoing the bishop, ref-1
Najdorf Variation, ref-1, ref-2
Poisoned Pawn Variation, ref-1
Sicilian Dragon variation, ref-1
studying, ref-1
training resources, ref-1
opponents
computers
Deep Blue, ref-1, ref-2
future expectations, ref-1
opponents
computer chess
defeating computers, ref-1
strengths, ref-1, ref-2
weaknesses, ref-1, ref-2
computers

artificial intelligence, ref-1
versus thinking process of humans, ref-1, ref-2
opposed kings, ref-1
opposite colored bishops, ref-1
endgames, ref-1
organizations, ref-1
contact information, ref-1
FIDE, ref-1
U.S. Chess Federation, ref-1
outside passed pawns, ref-1
Oxford Companion to Chess,ref-1
P
Parma, Bruno vs Mikhail Tal, ref-1
passed pawns, ref-1
blockading, ref-1
connected passed pawns, ref-1
outside passed pawns, ref-1
pawn majorities, ref-1
pawn moves with capture, ref-1
pawn moves without capture, ref-1
protected passed pawns, ref-1
rooks, ref-1
passive pieces, ref-1
vs active pieces endgame, ref-1
patzers, ref-1
Pawn Structure Chess,ref-1
pawn structures

damaging opponents’, ref-1
repairing, ref-1
pawns, ref-1, ref-2
blockading, ref-1
capturing pieces, en passant,ref-1
center pawns, ref-1
taking space, ref-1, ref-2
chains, ref-1
attacking with, ref-1
backward/forward pawns, ref-1, ref-2
doubled pawns, ref-1
duos, ref-1
islands, ref-1
isloated pawns, ref-1
one pawn holding two, ref-1
tripled, ref-1
closed centers, ref-1
controlling center of board, ref-1
endgames. See passed pawns
forks, ref-1
importance, ref-1
middlegames
damaging pawn structures, ref-1
doubled pawns, ref-1
duos, ref-1
forward/backward pawns, ref-1, ref-2
isolated pawns, ref-1
one pawn holding two, ref-1

opening files/diagonals, ref-1
pawn islands, ref-1
repairing pawn structures, ref-1
tripled, ref-1
passed pawns, ref-1
blockading, ref-1
connected passed pawns, ref-1
outside passed pawns, ref-1
pawn majorities, ref-1
protected passed pawns, ref-1
rooks, ref-1
Poisoned Pawn Variation, Sicilian Defense openings, ref-1
promoting, ref-1
notation, ref-1
sacrificing
See also gambits
structure, ref-1
backward/forward pawns, ref-1, ref-2
doubled pawns, ref-1
duos, ref-1
islands, ref-1
isolated pawns, ref-1
one pawn holding two, ref-1
opening files/diagonals, ref-1
structures, tripled, ref-1
PC’s
chess software programs, ref-1
Bookup, ref-1

ChessBase, ref-1
Chessmaster 8000, ref-1
Maurice Ashley Teaches Chess, ref-1
Power Chess 98, ref-1
Virtual Chess 64 (Nintendo), ref-1
PCA (Professional Chess Association), ref-1
PDA’s (personal digital assistants), ref-1
periodicals as training resources, ref-1
perpetual check, ref-1
personal digital assistants. See PDA’s
Petrosian, Tigran Vartanovich, ref-1
vs Bobby Fischer, ref-1, ref-2
Philidor, André, ref-1
pieces, ref-1
active, endgame, ref-1
active pieces, ref-1
bishops
bad bishops, ref-1
black-squared bishops, ref-1
fianchettoing, ref-1
forks, ref-1
good bishops, ref-1
middlegames, ref-1
opposite colored bishops, ref-1
pins, ref-1
trading for knights, ref-1
two bishops, ref-1
vs knights, ref-1
white-squared bishops, ref-1
capturing
attacking pieces, ref-1
protecting against, ref-1
deflecting, ref-1
attacking defenders, ref-1
overloading defenders, ref-1
developing, ref-1
exchanging, ref-1
exchanging pieces, playing with space disadvantages, ref-1
kings
castling, ref-1
checkmate. See checkmate
forks, ref-1
knights
forks, ref-1
middlegames, ref-1
trading for bishops, ref-1
vs bishops, ref-1
major/minor pieces, openings, ref-1
material
major/minor pieces, ref-1
material worth, ref-1
king, ref-1
mobility, ref-1
moving
See also tactics
zugzwang, ref-1
passive
endgame, ref-1
passive pieces, ref-1
pawns
center pawns, ref-1
controlling center of board, ref-1
en passant,ref-1
forks, ref-1
promoting, ref-1
protecting, ref-1
attacking other pieces, ref-1
blocking attacks, ref-1
capturing attacking pieces, ref-1
defending pieces, ref-1
moving pieces, ref-1
queens
forks, ref-1
middlegames, ref-1
openings, ref-1
pins, ref-1
rook and king versus king, ref-1
rooks
castling, ref-1
doubled rooks, ref-1
forks, ref-1
middlegames, ref-1
pins, ref-1
sacrificing, ref-1

gambits, ref-1
trading, ref-1
trading pieces, playing with space disadvantages, ref-1
pins, ref-1, ref-2
bishop pins, ref-1
breaking pins, ref-1
queen pins, ref-1
rook pins, ref-1
skewers, ref-1
Pitt Chess Web site, ref-1
players
André Philidor, ref-1
Arthur Bisguier, vs Bobby Fischer, ref-1
Bobby Fischer
King’s Indian Defense, ref-1
vs Arthur Bisguier, ref-1
vs Petrosian, ref-1, ref-2
Bruno Parma, vs Mikhail Tal, ref-1
Emanuel Lasker, ref-1
Garry Kasparov
King’s Indian Defense, ref-1
vs Karpov, ref-1
Gary Kasparov, ref-1
vs Viswanathan Anand, ref-1
Karpov, vs Kasparov, ref-1
Mikhail Botvinnik, vs Stepanov, ref-1
Mikhail Tal, vs Bruno Parma, ref-1
Petrosian, vs Bobby Fischer, ref-1, ref-2
Reuben Fine, ref-1
Stepanov, vs Mikhail Botvinnik, ref-1
Viswanathan Anand, ref-1
vs Gary Kasparov, ref-1
Yasser Seirawan, ref-1
pleasure readings, ref-1
plus signs (+), notation, ref-1
Polgar, Judit, ref-1
popularity of chess, ref-1
portals
Chess Cafe, ref-1
ChessCenter, ref-1
Grandmaster Chess, ref-1
Kasparov Chess, ref-1
portals (chess portals), ref-1
postal chess competitions, ref-1
pound signs (#), notation, ref-1
Power Chess 98 (software program), ref-1
practicing, ref-1, ref-2, ref-3
Pribut’s Chess Page Web site, ref-1
private instructions (training resources), ref-1
Professional Chess Association. See PCA
promoting pawns, ref-1
notation, ref-1
protected passed pawns, ref-1
Q–R
Queen’s Gambit Declined opening, ref-1

queens, ref-1
checkmating with queen and king versus king, ref-1
bringing up friendly kings, ref-1
constricting kings, ref-1
driving kings to corners, ref-1
stalemate, ref-1
forks, ref-1
middlegames, ref-1
openings, ref-1
pins, ref-1
queenside, castling, ref-1
notation, ref-1
repertoires, openings, ref-1
resigning games, ref-1
resources
online
libraries and resources, ref-1
magazines, ref-1
newsgroups, ref-1
online gaming sites, ref-1, ref-2
Chess.net, ref-1
ChessClub, ref-1
Excite, ref-1
International Email Chess Group, ref-1
MSN, ref-1
Shockwave, ref-1
USCF, ref-1
Yahoo!, ref-1

Web sites
organizations, ref-1
portals, ref-1
shopping sites, ref-1
WolffChess, ref-1
resources (training), ref-1
books
pleasure readings, ref-1
strategies, ref-1
tactics, ref-1
World Champions, ref-1
endgames, ref-1
magazines and periodicals, ref-1
openings, ref-1
private instructions, ref-1
studying scoresheets, ref-1
Web sites, ref-1
Reuben Fine, ref-1
Road to Chess Improvement, The,ref-1
rooks, ref-1
castling, ref-1
kingside, ref-1
notation, ref-1
openings, ref-1
queenside, ref-1
doubled rooks, ref-1
endgames, passed pawns, ref-1
forks, ref-1

middlegames, ref-1
pins, ref-1
round-robin tournaments, ref-1
rules
castling, ref-1
checkmate, ref-1
draws
mutual agreement to draws, ref-1
perpetual check, ref-1
stalemate, ref-1
en passant,ref-1
promoting pawns, ref-1
tournaments, ref-1
draws, ref-1
etiquette, ref-1
scoring, ref-1
time controls and chess clocks, ref-1
S
sacrificing pieces, ref-1
See also gambits
School Mates,ref-1, ref-2
scoresheets, studying, ref-1
scoring
games, ref-1
material, major/minor pieces, ref-1
material worth of pieces, ref-1
king, ref-1
scoring (tournament rules), ref-1
Seirawan, Yasser, ref-1
selective searches (artificial intelligence), ref-1
shatranj, ref-1
Shockwave Web site, ref-1
shopping Web sites, ref-1
Sicilian Defense opening, ref-1, ref-2
Dragon Variation, ref-1
fianchettoing the bishop, ref-1
Najdorf Variation, ref-1, ref-2
Poisoned Pawn Variation, ref-1
Sicilian dragon variation, ref-1
skewers, ref-1
smothered mate (quotes), ref-1
Smyslov, Vasily Vasiliyevich, ref-1
software, company contact information, ref-1
software programs, ref-1
Bookup, ref-1
ChessBase, ref-1
Chessmaster 8000, ref-1
Maurice Ashley Teaches Chess, ref-1
Power Chess 98, ref-1
Virtual Chess 64 (Nintendo), ref-1
Soviet World Champions, ref-1
Boris Vasiliyevich Spassky, ref-1
Mikhail Moiseyevich Botvinnik, ref-1
Mikhail Tal, ref-1
Tigran Vartanovich Petrosian, ref-1
Vasily Vasiliyevich Smyslov, ref-1
space, ref-1
advantages, ref-1
controlling the center, ref-1, ref-2
playing with less space, ref-1
challenging space advantages, ref-1
claiming more space, ref-1
exchanging pieces, ref-1
using space advantages, ref-1
spaces. See squares
Spassky, Boris Vasiliyevich, ref-1
speaking to opponents (tournament ettiquette), ref-1
speed (blitz) chess, ref-1
squares
diagonals, opening with pawns, ref-1
space, controlling, ref-1
advantages, ref-1
controlling the center, ref-1, ref-2
playing with less space, ref-1
using space advantages, ref-1
stalemate, ref-1
queen and king versus king, ref-1
Steinitz, Wilhelm, ref-1
Stepanov vs Mikhail Botvinnik, ref-1
strategies, studying, ref-1
strategy
attacking, weaknesses, ref-1
capturing pieces, ref-1

checkmating, ref-1
queen and king versus king, ref-1
exchanging pieces, ref-1
middlegames, ref-1
attacking weaknesses, ref-1
bishops, ref-1
knights, ref-1
mobility, ref-1
queens, ref-1
rooks, ref-1
mobility, ref-1
openings. See openings
planning moves, ref-1
See also space
See also tactics
space. See space
trading pieces, ref-1
weak squares, ref-1
strengths
computer chess, ref-1
20/20 vision, ref-1, ref-2
machine qualities, ref-1
structures
tournaments, ref-1
round-robins, ref-1
Swiss systems, ref-1
study aides, ref-1
study aides (software programs)

Bookup, ref-1
ChessBase, ref-1
Maurice Ashley Teaches Chess, ref-1
studying
endgames, ref-1
openings, ref-1
scoresheets, ref-1
strategies, ref-1
tactics, ref-1
Swiss system tournaments, ref-1
T
tactics, ref-1
deflecting pieces, ref-1
attacking defenders, ref-1
overloading defenders, ref-1
discovered check, ref-1
double check, ref-1
forks, ref-1
in between moves, ref-1
pins, ref-1, ref-2
skewers, ref-1
sacrificing pieces, ref-1
See also gambits
See also strategy
studying, ref-1
x-ray, ref-1
Tal, Mikhail, ref-1, ref-2
Tal–Botvinnik 1960: Match for the World Chess Championship,ref-1
thinking process of computers versus humans, ref-1, ref-2
threefold repetitions (draws), ref-1
ties. See also draws
time controls (tournament rules), ref-1
touch-move rule (tournament ettiquette), ref-1
tournaments
blitz chess, ref-1
entering, ref-1
finding stronger competitors, ref-1
for children, ref-1
locating, ref-1
postal chess competitions, ref-1
rules, ref-1
draws, ref-1
etiquette, ref-1
scoring, ref-1
time controls and chess clocks, ref-1
scoring, ref-1
structures, ref-1
round-robins, ref-1
Swiss systems, ref-1
trading pieces, ref-1
playing with space disadvantages, ref-1
promoting pawns, ref-1
training resources, ref-1
books, ref-1
endgames, ref-1
magazines and periodicals, ref-1
openings, ref-1
private instructions, ref-1
studying scoresheets, ref-1
tripled pawns, ref-1
Tucows PDA Web site, ref-1
U–V
U.S. Chess Federation Web site, ref-1
U.S. Chess Web site, ref-1
USCF Web site, ref-1
Virtual Chess 64 (Nintendo), ref-1
W
weak back rank (quotes), ref-1
weak color complex, ref-1
weak squares, ref-1
hole, ref-1
pawn structure, ref-1
repairing, ref-1
weaknesses
computer chess, ref-1
aimlessness, ref-1, ref-2
strategic advantages versus material advantages, ref-1
Web sites
American Chess School, ref-1
American Postal Chess Tournaments, ref-1
as training resources, ref-1
Canadian Correspondence Chess Association, ref-1
Chess Café, ref-1
Chess House, ref-1
Chess-in-the-Schools, ref-1
ChessCenter, ref-1
Chessco, ref-1
ChessDigest, ref-1
Correspondence Chess League of America, ref-1
gaming sites, ref-1
Grandmaster Chess, ref-1
Handango, ref-1
International Correspondence Chess Federation, ref-1
Kasparov Chess, ref-1
libraries and resources, ref-1
About.com, ref-1
Pitt Chess, ref-1
Pribut’s Chess Page, ref-1
magazines, ref-1
British Chess Magazine,ref-1
Chess Monthly,ref-1
Inside Chess,ref-1
New In Chess,ref-1
National Scholastic Chess Foundation, ref-1
newsgroups, ref-1
organizations, ref-1
FIDE, ref-1
U.S. Chess Federation, ref-1
shopping sites, ref-1
Tucows PDA Web site, ref-1

U.S. Chess, ref-1
WolffChess, ref-1
as a training resource, ref-1
white-squared bishops, ref-1
winning. See checkmate
WolffChess Web site, ref-1
as a training resource, ref-1
women chess competitors, ref-1
Judit Polgar, ref-1
World Champions, ref-1
classical era, ref-1
Alekhine, Alexander, ref-1
Capablanca, José Raul, ref-1
Euwe, Machgielis, ref-1
Lasker, Emanuel, ref-1
Steinitz, Wilhelm, ref-1
Fischer Revolution, ref-1
Anatoly Yegenyivich Karpov, ref-1
Garry Kimovich Kasparov, ref-1, ref-2
Robert James Fischer, ref-1
resource training books, ref-1
Soviet dominance, ref-1
Boris Vasiliyevich Spassky, ref-1
Mikhail Moiseyevich Botvinnik, ref-1
Mikhail Tal, ref-1
Tigran Vartanovich Petrosian, ref-1
Vasily Vasiliyevich Smyslov, ref-1
Viswanathan Anand, ref-1
Vladimir Kramnik, ref-1
wrong-colored bishops, endgames, ref-1
X–Y–Z
x-ray tactic, ref-1
Yahoo! Web site, ref-1
Yasser Seirawan, ref-1
zugzwang, ref-1