the balanced body trapeze table (cadillac)s3.pilates.com/resources/instructions/ce manual trap...the...
TRANSCRIPT

Contact Us1-800-PILATES | +1-916-388-2838
pilates.com | [email protected] | 12.16.13
The Balanced Body Trapeze Table (Cadillac)
Balanced Body, IncSacramento, CA001-916-388-2838
ECEMERGO EUROPE
Molenstraat 15
2513 BH, The Hague
The Netherlands
REP Balanced Body, IncSacramento, CA001-916-388-2838
ECEMERGO EUROPE
Molenstraat 15
2513 BH, The Hague
The Netherlands
REP

2
IMPORTANT:
This manual is intended for medical and fitness professionals, or persons with experience in the use of this equipment. If there is a question regarding appropriateness of a particular movement, please consult a licensed health professional.
Safety Note: Warning – The Trapeze Table contains flammable materials, please keep away from direct heat.
INTRODUCTION
The Balanced Body Trapeze Table (Cadillac) consists of a padded table surrounded by a frame made of metal poles. Eyebolts in the frame provide attachment points for the springs. Loops, handles or a wooden Roll-down Bar can be attached to the springs creating a wide variety of exercises. The Trapeze Table has two moving cross bars or sliders: one between the uprights on one end of the table (vertical slider), and the other between the overhead bars (horizontal slider). The end of the Trapeze Table without the vertical slider (“Tower End”) holds a hinged wooden or aluminum frame called the Push-through Bar (PTB).
Please see the attached diagram for a listing of the various parts of the Trapeze Table.
FEATURES OF THE TRAPEZE TABLE (CADILLAC)
1. SPRING ATTACHMENT POINTS
Low: Springs are attached from eyebolts in the wood frame at the PTB end of the table. These springs are used for bottom sprung exercises using the PTB.
Middle: Springs are attached to the vertical slider.
High: Springs are attached to eyebolts in the upper corners of the canopy.
Overhead: Springs are attached to the horizontal slider between the overhead bars.
2. TRAPEZE TABLE SPRINGS
The Trapeze Table has the widest variety of springs and the greatest number of possible attachment points of any Pilates equipment. Suggested spring weights and attachment points are included for each exercise.
3. SPRING CODING
The Trapeze Table has two different lengths of springs – long springs and short springs. Each length of spring comes in different resistances. The standard Balanced Body spring coding is as follows:
Short springs
» Yellow – Light
» Blue – Medium
» Red – Heavy
» Black – Very heavy, usually used on the Trapeze Bar
Long springs
» Yellow – Light
» Purple – Medium
4. SAFETY
It is very important that that the instructor is present and spotting the client whenever the Push-through Bar is in use. The Push-through Bar should never be adjusted low enough to hit a client who is lying under it. The safety strap must always be used. The safety strap must be adjusted so that the angle of the Push-through Bar, when viewed from the side, is no lower than either the four or eight o’clock position. There are three height positions for the Push-through Bar pivot point. If a client is positioned below the bar, raise the pivot point to avoid the client.
5. UPHOLSTERY CLEANING AND DISINFECTING.
You can extend the life of your upholstery by keeping it clean and free of dirt, oil and perspiration. After each use, wipe down the upholstery with a solution of mild soap and water. Then wipe it down with clean water and dry with a rag.

3
How to Assemble the Trapeze Table (Cadillac)
Top Rectangular Section
Top Slider Corner Connectors
Safety Strap
Vertical Tubes
Pull-Out Shelf (optional)
Flange Connectors
Not Shown:Velcro Ankle CuffsVelcro Thigh CuffRoll Down BarBelly StrapVinyl Flap
Base
Quick Release Pins (T-Pins)
Push Through Bar
Trapeze Bar
Cotton Web and Fuzzy
Cotton Loops
Leg Springs
Vertical Slider

4
TRAP INSTRUCTIONS PARTS LIST
Description Part Number Qty. Ankle Velcro (pair) 101-001 1 Cotton Loop (pair) 101-005 1 Long Web (pair) 101-026 1 Thigh Velcro (pair) 101-020 1 Wool Fuzzy (pair) 101-022 1 Roll down bar 710-010 1 Belly Strap 210-034 1 T-Pin GEN9892 2 Red Trapeze Spring SPR9001 2 Yellow Trapeze Spring SPR9002 2 Blue Trapeze Spring SPR9004 2 Long Yellow Trapeze Spring SPR9006 2 Long Purple Trapese Spring SPR9461 2 Safety Strap 210-021 1 Push Thru Bar Conn TRP0021 1 Push Thru Bar TRP0047 1 Trap Bar w/Springs and Sling 950-059 1 Vertical Slider TRP6002 1 Horizontal Slider TRP6003 1
ASSEMBLE THE TRAPEZE CANOPY
1. Using the provided allen wrench, loosen the set screws in each of the eight flange connectors mounted to the outside of the Reformer frame. Insert the provided cotter pins into the 1/8 holes near the bottom ends of each vertical tube. Pick up the vertical tube assemblies and place the tube ends into the flanges. The cotter pins will automatically set the tubing height. Be careful that the cotter pin doesn’t scratch the vinyl or wooden frame. The tubeset with the push-through bar goes at the head end of the machine (the end with the vinyl flaps). The eyebolts on each tubeset should face the other end.
2. Now set the canopy top onto the four vertical tubes. You will need help with this. The end of the canopy frame with the black safety strap goes over the push-through bar. Be certain all four corner fittings fit securely over the tubes.
3. Using the allen wrench, tighten the set screws in the corner fittings and in the flanges around the reformer frame. Supporting the push-through bar, remove the T-pins one at a time and re-insert them so that they enter from the outside of the tubes. If either pin binds, some adjustment of the vertical tubes is needed. Simply loosen the set screws and rotate the tubes until both pins slide in and out freely. Be sure to re-tighten all set screws. Remove the cotter pins from the tubes and save for future use.
WEEKLY MAINTENANCE
Inspect springs for separations, and replace if needed. Inspect snaps on springs and make sure the retractors operate smoothly. Replace them if worn or do not operate freely. Make sure that there are no indentations on the inside of the hooks.
Inspect all nuts, eyebolts and setscrews for tightness. Tighten or replace if necessary.
Check to see if quick release T-pins operate correctly. Does the ball at the end of the pin protrude? Does the ball retract when the button is pressed? If not, replace the pin.
WARNING: This machine is potentially dangerous, and Balanced Body Inc. assumes no liability towards use or misuse. If you are not fully aware of the safety issues and use of this machine, do not use it.
Use only with qualified instructor supervision.
QUESTIONS?
Call Balanced Body at 1-800-PILATES (1-800-745-2837) or 916-388-2828.
ASSEMBLY PODCAST
You can also see the Trapeze Table assembly podcast located on the FAQ & Safety page of our Web site, pilates.com.

5
Safety First: A guide to proper maintenance and safe use of your Pilates equipment.For over 35 years, Balanced Body has been introducing safety-related innovations to Pilates equipment. Many of our improvements are now industry standards, resulting in Pilates equipment that’s safer today than ever before.
Safety depends on proper maintenance and safe use, in addition to the quality of the equipment. This guide was created to help you use and maintain your equipment for optimum safety. Please read it through carefully and keep for future reference. If you have any questions, give us a call. Failure to follow these instructions may result in serious injury.
ALL EQUIPMENT
Springs and SnapsSpring inspections are critical for maintaining your equipment in safe operating condition. Springs should be inspected weekly or monthly, depending upon frequency of use. Springs should be replaced after 3,000 hours of use. If, for example, your Reformer is used 30 hours a week, you should replace the springs every two years. Worn or old springs lose resilience, and may break during use. Injury may result if a spring breaks during use.
Inspect springs for gaps and kinks (weekly or monthly, depending upon frequency of use). Look for gaps and kinks between the coils when the spring is at rest. It’s okay for the spring to have a gap on the tapered end (a gap is sometimes created when the hook is inserted during the manufacturing process). There should be no gaps in the body of the spring. If you see gaps or kinks in the body of the spring, discontinue using the spring immediately. Figure 1.
Kink
Figure 1
Inspect snaps for wear (monthly). First, verify that the snap hook is working properly. If the snap hook does not retract and return properly, discontinue using the spring immediately and replace the snap. Eyebolts can cause excessive wear on snap hooks. If the hook shows a lot of wear, discontinue using the spring immediately and call Balanced Body to replace spring or snap. Figure 2.
Figure 2: Good snap: no wear on hook. Bad snap: excessive wear on hook.
.
EYEBOLTS, NUTS AND BOLTS
Tighten all equipment bolts and screws (monthly). Verify that all eyebolts, nuts and bolts are tight. See the section titled “How to inspect and tighten nuts and bolts.”
REFORMERS
Springbar hooks or eyebolts (quarterly). Balanced Body makes two different springbar systems:
1. Revo Springbar. Make sure springbar hooks and handle are tight.
2. Standard Springbar. Verify that the nuts securing the springbar hooks are tight. See section titled “How to inspect and tighten nuts and bolts.”
Rope wear (quarterly). Ropes should be replaced if you can see the core of the rope through the outer lining, or if the ropes are flattened. Be sure to check the sections of rope that attach to the clips and run through the pulleys.

6
Spring rotation (quarterly). You can prolong Reformer spring life by rotating springs of the same weight each quarter. Unhook and move to another position on the springbar. Rotating springs helps them wear more evenly.
Risers on the outside. Wood risers must be installed on the outside of the frame. Risers can loosen over time, so always make sure they are tight.
Springs hooked downward under carriage. Make sure springs are hooked in a downward position. Figure 3.
Secure the carriage. When your Reformer is not in use, be sure that at least two springs secure the carriage to the springbar.
Default settings. Many users have a “default setting” for Reformers. At the end of a session, the user connects a prescribed number of springs in neutral tension, sets the footbar at a pre-determined height, and sets the ropes at a specified length. This ensures that the equipment is ready for the next use, and that the carriage is secured by the springs.
Footstrap under tension in box work. When using the box and footstrap, be sure the footstrap is under tension (with snaps pulling from the top of the eyebolt) before beginning the exercise. Figure 4.
REFORMER WHEEL AND TRACK MAINTENANCE
Clean the tracks and wheels (weekly). For smooth carriage travel and to maintain the longevity of the wheels, we recommend that you wipe down the tracks once a week.
Disconnect the springs and clean the entire length of the tracks with a soft cloth and a mild commercial cleaner such as Simple Green®, Fantastik® or 409®. Do not use abrasive cleansers or pads, as they can damage the anodizing on the rails. To clean the wheels, hold the cloth against the wheels while you move the carriage. If you feel a bump in the ride, dirt has adhered to the surface of the rails or wheels. Clean hair and debris out of the rails. Hair can wrap around the wheel axles and eventually build up and cause wheel failure. Use tweezers to remove hair from the wheels.
Lubrication. Reformers rarely need lubrication. Occasionally, a sidewheel may squeak. If this happens, lightly spray a small amount of dry silicone on a cloth and wipe the aluminum tracking rail where the sidewheel makes contact. “Dry” silicone does not have an oil base. Oil-based (“wet”) silicone and WD40 should not be used as they attract dirt. Never spray silicone near
or inside the wheels – this can wash the lubricant out of the bearings and ruin the bearings. You can purchase dry silicone at most hardware and auto parts stores. Pulleys sometimes require lubrication to stop a squeak. Direct a very quick spray of dry silicone or Teflon spray into the pulley. Be careful not to over spray. You may want to remove ropes to avoid getting silicone on them.
Footbar supports (quarterly). For all Balanced Body footbars with footbar support brackets, verify that the pivot screw attaching the footbar support bracket to footbar is tight, but not so tight that it prevents the support from rotating freely. For Legacy Reformers, tighten the pivot bolt to secure footbar support.
Headrest (monthly). Make sure the hinge screws and bolts on your headrest are tight.
Under the Reformer (monthly). Move Reformers and make sure you clean the floor space underneath.
Standing Platform Footbar Bumpers (wood Reformers only). If your standing platform footbar bumpers (the small plastic pieces that protect the standing platform from the footbar) are broken or damaged, please call Balanced Body to replace.
TRAPEZE TABLE (CADILLAC)
Cotter pins removed. These pins are located in the vertical tubes that align the canopy to the frame and should be removed as soon as installation is complete. Unremoved cotter pins can tear clothing and lacerate the skin. Use pliers to remove the pins.
Save the pins in case you need to disassemble and reassemble the table for transportation purposes. Figure 5.
Push-Through Bar (PTB) control. Make sure you have enough room around the trap table to safely use the PTB without fear of hitting other people. The PTB can be dangerous if not properly used. Only trained, experienced users should use the PTB. A spotter should always maintain control of the bar with one hand. If the user should lose control of the bar, the spotter can maintain control of it.
T-pins. Balanced Body PTBs move vertically to accommodate different users and exercises. The T-pins within the bar allow for this vertical movement. Make sure these T-pins are clean and that they are easy to remove. If the T-pin is binding, make sure the frame tubes are properly aligned with the PTB holes. If you notice wear on the T-pins, please call Balanced Body to replace. If the T-pin is squeaking, remove the T-pin by depressing the button on the head of the T-pin and place a drop of 3-in-1 oil on the section of the pin that passes through the tube and PTB.
Figure 3: Springs hooked downward
Figure 4: Foot strap under tension
Figure 5: Cotter pin before and after removal from Trap Table.

7
Then re-insert the T-pin. Make sure the bushings on the PTB (where the T-pins are inserted in to the PTB) are clean.
Push-Through Bar (PTB) T-pin setting. For bottom-sprung exercises, if your client’s head is below the PTB, use the T-pin setting in addition to the safety strap or chain. Spotting your client is highly recommended. This is important for safety.
Correct safety strap attachment. For bottom-sprung exercises, the safety strap or chain should always secure the bar.
The safety strap or chain should wrap around the PTB and the canopy frame, not the eyebolts. The strap or chain is only as strong as the weakest link, and the frame and bar are a great deal stronger than eyebolts. Figure 6.
Seting the PTB for bottom-sprung exercises. For bottom-sprung exercises, the safety strap should be attached so that the angle of the push-through bar is at no lower than the 4 o’clock position. This limits the range of the bar and prevents it from potentially coming into contact with the user.
CHAIRS
Dismount with control. When dismounting the chair, release the pedals slowly, with control. Don’t let the pedal snap back.
Spot users. When a user is standing, sitting or lying on top of the chair, there is increased risk of falling. Standing exercises, in particular, can be unstable. Spotting users will make these exercises safer.
Hourglass spring mounts. If your chair has hourglass spring mounts and the mounts do not successfully retain the springs, replace the fiber washers (they are reddish-brown in color). Figure 7. If your chair is a Balanced Body Split-step Pedal Chair (Combo Chair), please consider upgrading to the Cactus Springtree).
UPHOLSTERY CLEANING & MAINTENANCE
Cleaning. You can extend the life of upholstery by keeping it clean and free of dirt, oil and perspiration. After each use, wipe down the upholstery with a solution of mild soap and water. Then wipe it down with clean water and dry with a soft towel.
Disinfecting. Equipment upholstery is coated with BeautyGard®, which offers antibacterial protection. If you want additional disinfection, use any off-the-shelf disinfectant spray or solution, such as Pine Sol® or Lysol®. Since disinfectants will leave a fragrance residue buildup with repeated use, we recommend wiping down the disinfected area with clean water using a sponge or soft towel.
HOW TO INSPECT AND TIGHTEN NUTS AND BOLTS.
Use your fingers to check nuts and bolts for tightness. If you can turn the nut or bolt with your fingers, it’s too loose and should be tightened. To tighten, first tighten using your fingers. Rotate nuts and bolts clockwise to tighten. Then use a small wrench to tighten further. Insert a screwdriver through eyebolts to hold them steady while you tighten the nuts. Use your forefinger and middle finger on the handle of the wrench to tighten, (as opposed to using your entire hand).
This technique will help prevent over tightening, which can damage metal parts. Figure 8.
EQUIPMENT INSPECTION AND MAINTENANCE LOG
We suggest that you keep a maintenance log for each piece of equipment. The log should include:
1. A description of the machine including the serial number, the date and place of purchase, and the manufacturer. All of this information should appear on the invoice.
2. Date and description of all required maintenance and inspections performed.
3. Date and description of each repair, including name and contact information for person or company performing the repair.
Figure 6: Safety strap holding the push-through bar at 4 o’clock. The strap is secured to the PTB and canopy frame, not the eyebolts.
Figure 7: Fiber washer
Figure 8: Use two fingers to tighten bolts

8
MAINTENANCE SCHEDULE
All Equipment Day Wk. Mo. Qtr.
Inspect springs for gaps & kinks ✓ ✓
Inspect snaps for wear ✓
Inspect nuts & bolts for tightness ✓
Reformers
Clean wheels and tracks ✓
Inspect springbar hooks/eyebolts ✓
Rotate springs ✓
Inspect ropes ✓
Inspect footbar supports ✓
Inspect One-Step springbars ✓
REPLACEMENT PARTS
To order replacement parts, or if you have any questions, please call:
From U.S. and Canada: 1-800-PILATES (1-800-745-2837) From United Kingdom and South Africa: 00 800 7220 0008 From Israel: + 800 7220 0008 From other locations: +1 916-388-2838 Email: [email protected]

9
Trapeze Table (Cadillac) Exercises DEFINITION OF EXERCISE SET-UP TERMS
Level: The level of expertise needed to undertake exercise.
Reps: How many times the exercise is performed.
Springs: Number and location of springs on the trapeze table.
Loops: Which loops should be used during exercise.*
Focus: What should be emphasized during exercise.
Precautions: Physical conditions that may limit or exclude a participant. Exercises may need to be modified for people with these conditions.
Prerequisites: Specific exercises that must be mastered before undertaking a new exercise.
Starting Position: Where to begin the exercise on the Reformer.
*If applicable
ROLL BACKS, LEVEL 1
6-10 RepsSprings: 2 long or 2 short springs from high positionRoll-down Bar or handles Focus » Breathing – exhale roll down, inhale at the bottom, exhale to
roll up
» Balance between abdominals and lumbar extensors
» Soft neck and shoulders
» Maintain C-curve
» Soft hip flexors
Precautions Shoulder and neck problems, some low back problems, osteoporosis
Starting position Sit facing open end of Cadillac, holding on to bar or handles, knees soft, feet on metal bars.
Standard Exercise Hold bar with arms straight, roll down, curving back and staying lifted, roll back up maintaining slight flexion in spine
Oblique Variations » Wooden bar (Water skiing)
» Sit diagonally on table, place left foot against pole, cross right foot over ankle, place left hand on bar and reach right arm open while rotating torso to the right.
» Roll down and up maintaining rotation, then switch sides.
Rodar hacia atrás
Walking (muelles en posición superior)

10
BREATHING, LEVEL 2
6 repsSprings: 2 long, light springs from high position on wooden bar for Joe’s Breathing, 1 – 2 short springs from high position on aluminum bar for Carola’s Breathing.Feet in Trapeze Focus » Breathing – Inhale push bar, exhale return, inhale press legs
down, exhale return, inhale roll-up, exhale return
» Abdominal strength, balance between abdominals and back extensors
» Shoulders down
» Pelvic stability
» Back, Gluteal and Hamstring strength
» Coordination
Precautions » Shoulder and neck problems, some low back injuries
Starting position » Lie supine with head at tower end of Trapeze Table, hands
holding Push-through Bar or Roll-down Bar, palms facing down, feet in trapeze, legs slightly turned out. Adjust Trapeze with the horizontal slider to be directly over the knees when lying supine.
Joe’s Breathing » Holding on to Roll-down Bar, press bar down to hips as legs
press down into the trapeze and torso and hips rise off the table, return to the starting position.
Carola’s Breathing » Hold on to Push-through Bar, inhale and pull bar down to
chest by bending elbows wide
» Press bar overhead and bring arms down and back to starting position on the exhale
» Inhale and press the Trapeze down lifting the hips off table with a flat back
» Roll the back down and return to starting position on exhale.
» Press bar up and roll torso off table into Teaser position
» Exhale and return to starting position.
Joes Atmung
Caminando (muelles en posición

11
FEET IN STRAPS, LEVEL 1
6-10 repsSprings: Long springs from middle, high or overhead positionLoops or Velcro around ankle or arches
Focus » Breath - exhale out/inhale in or inhale out/exhale in
» Neutral spine
» Hollow abdominals
» Pelvic stability
» Hamstring, adductor and gluteal strength
» Hamstring and adductor flexibility
» Leg alignment
Precautions » Back injuries, some knee injuries and hamstring strains
Starting Position » Lie supine on Trapeze Table with head at open end, Velcro
straps on ankles (with springs at overhead bar) or loops around arches (with springs in middle or high position).
Leg Lowers » Both legs in Velcro straps or loops and inner thighs together,
lower legs toward the table and maintain pelvic stability.
» Variations: Parallel, turned-out, turned-in, holding a ball or magic circle between the legs
Circles » With both legs in the Velcro straps or loops circle the legs in
both directions, maintaining pelvic stability.
» parallel, turned-out, turned-in
Scissors » With both legs in Velcro straps or loops, lower legs toward
table then open and close legs and maintain pelvic stability.
» Variations: parallel, turned-out, turned-in
Walking » With both legs in Velcro
straps or loops alternately bring one leg down toward the table and then the other, while maintaining pelvic stability.
» Variations: parallel, turned-out, turned-in
Leg Lowers
Cinghia di sicurezza
Contact Us
Connecteurs d’angle
12
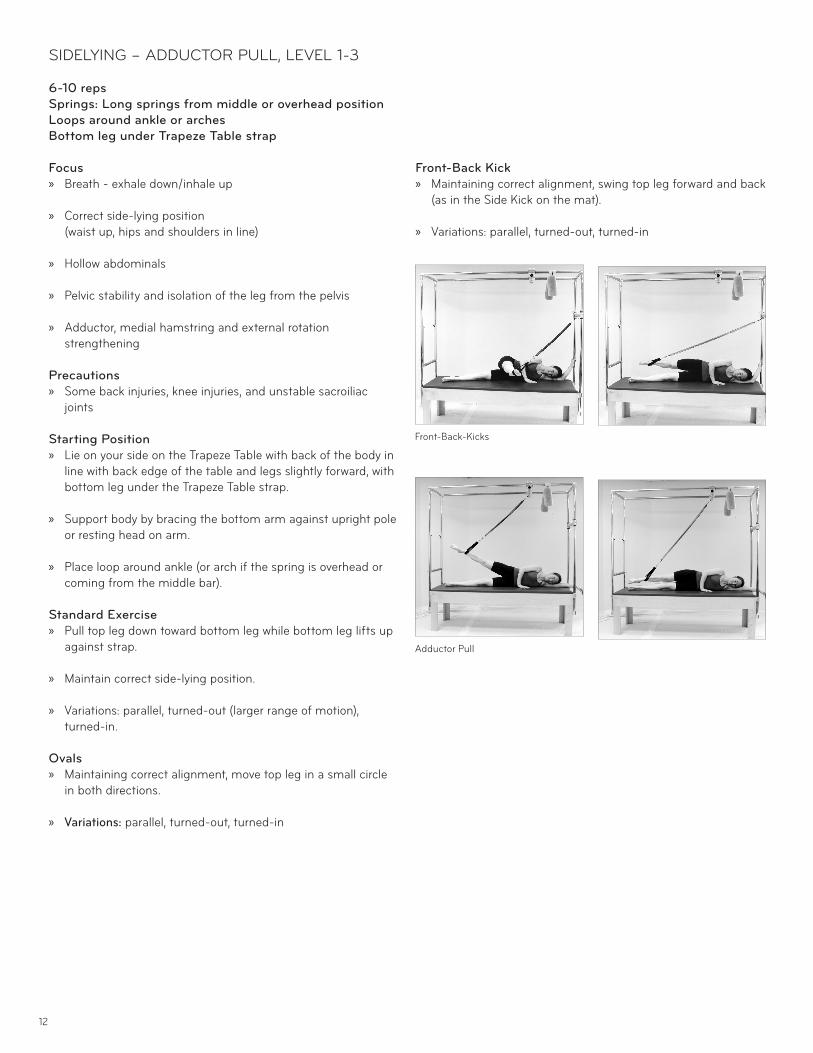
SIDELYING – ADDUCTOR PULL, LEVEL 1-3
6-10 repsSprings: Long springs from middle or overhead positionLoops around ankle or archesBottom leg under Trapeze Table strap
Focus » Breath - exhale down/inhale up
» Correct side-lying position (waist up, hips and shoulders in line)
» Hollow abdominals
» Pelvic stability and isolation of the leg from the pelvis
» Adductor, medial hamstring and external rotation strengthening
Precautions » Some back injuries, knee injuries, and unstable sacroiliac
joints
Starting Position » Lie on your side on the Trapeze Table with back of the body in
line with back edge of the table and legs slightly forward, with bottom leg under the Trapeze Table strap.
» Support body by bracing the bottom arm against upright pole or resting head on arm.
» Place loop around ankle (or arch if the spring is overhead or coming from the middle bar).
Standard Exercise » Pull top leg down toward bottom leg while bottom leg lifts up
against strap.
» Maintain correct side-lying position.
» Variations: parallel, turned-out (larger range of motion), turned-in.
Ovals » Maintaining correct alignment, move top leg in a small circle
in both directions.
» Variations: parallel, turned-out, turned-in
Front-Back Kick » Maintaining correct alignment, swing top leg forward and back
(as in the Side Kick on the mat).
» Variations: parallel, turned-out, turned-in
Front-Back-Kicks
Adductor Pull
13
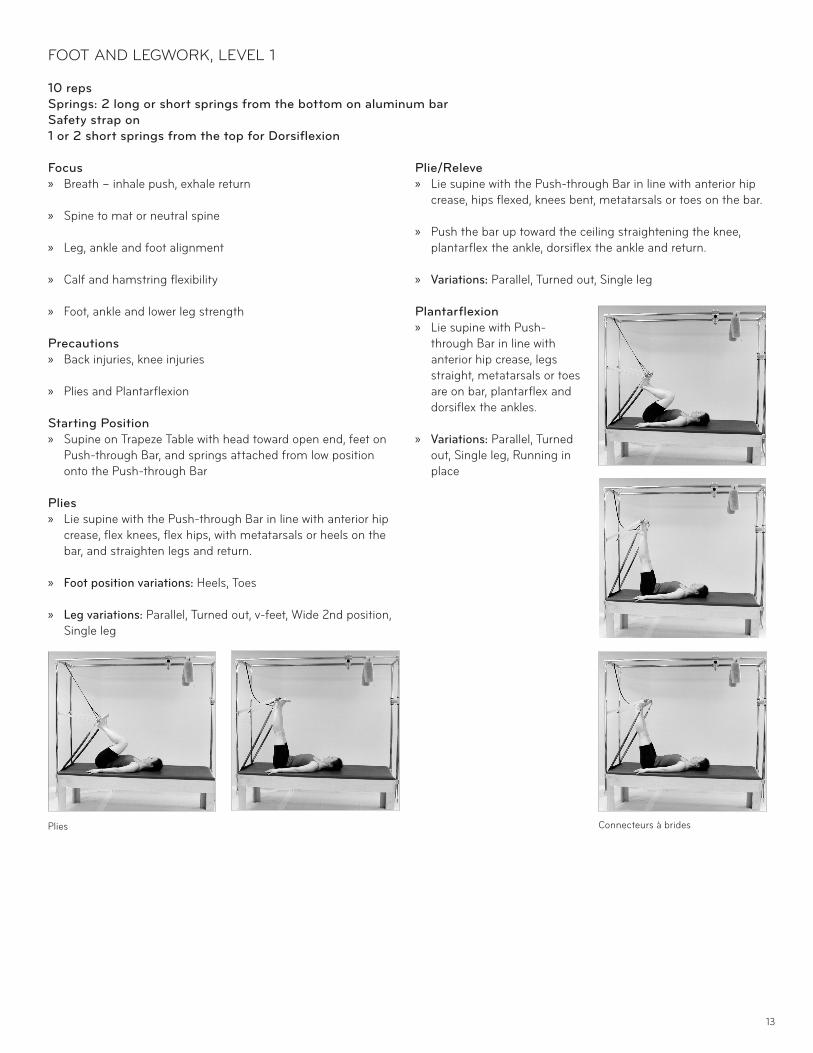
FOOT AND LEGWORK, LEVEL 1
10 repsSprings: 2 long or short springs from the bottom on aluminum barSafety strap on1 or 2 short springs from the top for Dorsiflexion
Focus » Breath – inhale push, exhale return
» Spine to mat or neutral spine
» Leg, ankle and foot alignment
» Calf and hamstring flexibility
» Foot, ankle and lower leg strength
Precautions » Back injuries, knee injuries
» Plies and Plantarflexion
Starting Position » Supine on Trapeze Table with head toward open end, feet on
Push-through Bar, and springs attached from low position onto the Push-through Bar
Plies » Lie supine with the Push-through Bar in line with anterior hip
crease, flex knees, flex hips, with metatarsals or heels on the bar, and straighten legs and return.
» Foot position variations: Heels, Toes
» Leg variations: Parallel, Turned out, v-feet, Wide 2nd position, Single leg
Plie/Releve » Lie supine with the Push-through Bar in line with anterior hip
crease, hips flexed, knees bent, metatarsals or toes on the bar.
» Push the bar up toward the ceiling straightening the knee, plantarflex the ankle, dorsiflex the ankle and return.
» Variations: Parallel, Turned out, Single leg
Plantarflexion » Lie supine with Push-
through Bar in line with anterior hip crease, legs straight, metatarsals or toes are on bar, plantarflex and dorsiflex the ankles.
» Variations: Parallel, Turned out, Single leg, Running in place
Plies Connecteurs à brides

14
SEATED PUSH THROUGH, LEVEL 1
6 reps Springs: 1 short spring from above on Push-through BarFocus » Breath – exhale stretch forward, inhale stretch up or reverse
» Spinal flexion and extension
» Hamstring flexibility
» Scapula stability/mobility
» Abdominal hollowing and lift
» Coordination of breath with spinal mobility
Precautions » Some back injuries,
shoulder injuries
Prerequisites » Mat – Spine Stretch
Starting Position » Sit on table facing tower end, with feet against upright bars,
and both hands on the Push-through Bar (knees can be bent or straight depending on flexibility).
Standard Exercise » Push bar down, curve spine forward beginning with top of
head, reach the bar forward and stretch.
» Return by hollowing out abdominals and stacking one vertebra on top of another until sitting up on the sit bones.
» Press bar up and lean forward from hips with a flat back before beginning again
15
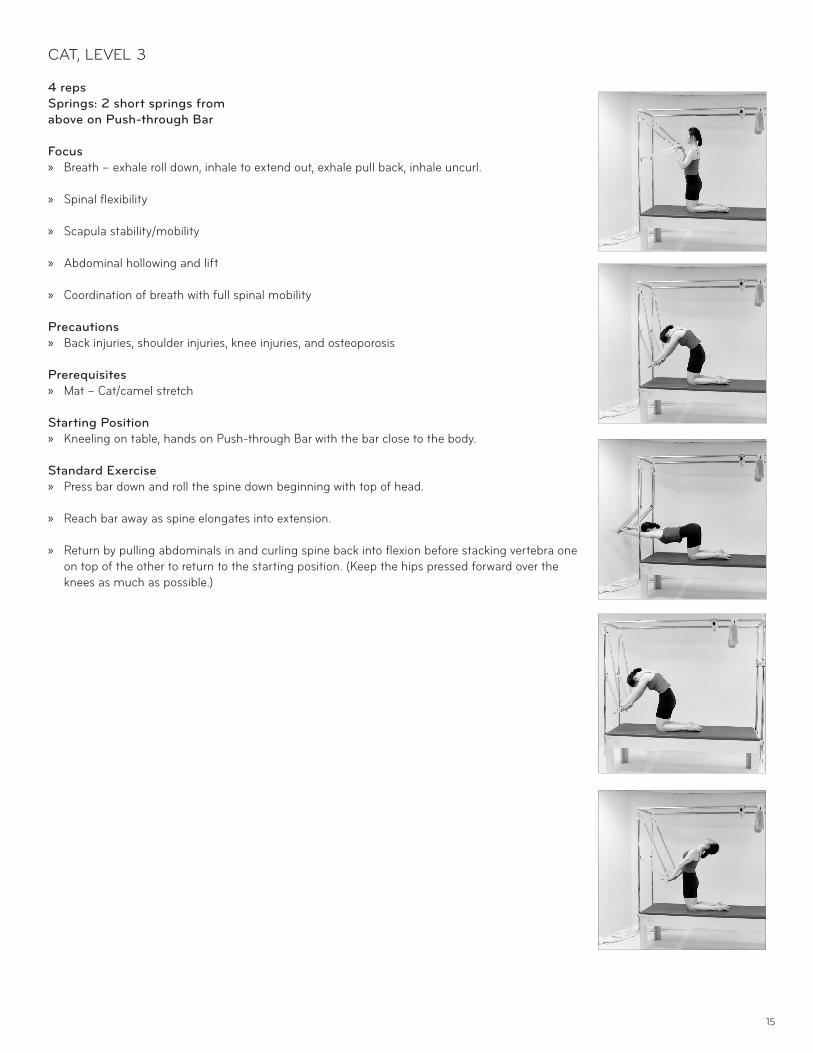
CAT, LEVEL 3
4 reps Springs: 2 short springs from above on Push-through Bar
Focus » Breath – exhale roll down, inhale to extend out, exhale pull back, inhale uncurl.
» Spinal flexibility
» Scapula stability/mobility
» Abdominal hollowing and lift
» Coordination of breath with full spinal mobility
Precautions » Back injuries, shoulder injuries, knee injuries, and osteoporosis
Prerequisites » Mat – Cat/camel stretch
Starting Position » Kneeling on table, hands on Push-through Bar with the bar close to the body.
Standard Exercise » Press bar down and roll the spine down beginning with top of head.
» Reach bar away as spine elongates into extension.
» Return by pulling abdominals in and curling spine back into flexion before stacking vertebra one on top of the other to return to the starting position. (Keep the hips pressed forward over the knees as much as possible.)

16
CIRCLE SAW, LEVEL 2
4 reps Springs: 2 short springs from above on Push-through Bar
Focus » Breath – exhale stretch, inhale to circle out, exhale reach,
inhale circle back
» Spinal flexibility in rotation
» Scapula stability/mobility
» Abdominal hollowing and lift
» Coordination of breath with full spinal mobility
Precautions » Some back injuries,
shoulder injuries
Prerequisites » Mat - Saw
Starting Position » Sit on table facing Tower
end, with feet against upright bars, right hand pushing up on the Push-through Bar, left hand reaching toward right foot.
Standard Exercise » Sweep left hand toward
left foot and continue to circle arm out and around, allowing torso to lean back while maintaining abdominal lift and torso integrity until the left hand reaches over the right arm toward the right foot.
Reverse the circle » Do four repetitions using
each arm, keep both sit bones anchored for pelvic stability (or release one slightly to increase stretch).
SEATED DOUBLE ARMS, LEVEL 1-2
4-10 repsSprings: 1 - 2 springs from above on Push-through BarDowel or padded stick
Focus » Breath – exhale pull, inhale release or inhale pull, exhale
release
» Scapular stability and mobility
» Shoulders down
» Abdominal hollowing
» Balance on sit bones
Precautions » Shoulder injuries, modify for tight adductors
Starting Position » Straddle table; face
Push-through Bar, hands on bar, sit cross-legged inside frame of Push-through Bar. Can also stand on outside of table facing Tower end or inside frame facing away from the table.
Pull downs with stick » Hold the dowel or padded
stick as wide as possible with palms facing you.
» Pull bar down, focusing on soft neck and upper shoulders.
» Return bar to starting position without raising the shoulders.
Push-Through Stange

17
PARAKEET, LEVEL 4
4-6 reps Springs: 2 short springs from high outside eyes on to the Push-through Bar
Focus » Breath – varies
» Pelvic stability
» Hamstring and gluteal strengthening
» Abdominal hollowing
» Spinal articulation in flexion
» Leg and torso alignment
Precautions » Some back problems, neck injuries, and weak torsos
Starting Position » Lie supine with head toward open end of table and toes
gripping aluminum bar. When bar is pulled down, tailbone should not come off table.
Standard Exercise » Bend knees and press the bar out until legs are straight,
keeping a firm grip on the bar with toes or arch of foot.
» Pull bar back by bending knees and press bar up toward ceiling rolling the spine off the table into a shoulder stand.
» Lift one foot off bar and return it maintaining pelvic placement.
» Lift other foot off and return it.
» Bend and straighten knees, maintaining torso height, roll down and repeat.
» Variation: When legs have pressed bar out and back is on the mat, roll up into a sitting position, reach forward toward the bar and stretch, then roll back down to begin again.
